Archive for the ‘Java’ Category
SQL Developer & PostgreSQL
I had a request from one of the adjunct professors to connect SQL Developer to the PostgreSQL database. This is in support of our database programming class that teaches students how to write PL/SQL against the Oracle database and pgPL/SQL against the PostgreSQL database. We also demonstrate transactional management through Node.js, Python and Java.
Naturally, this is also a frequent step taken by those required to migrate PostgreSQL data models to an Oracle database. While my final solution requires mimicking Oracle’s database user to schema, it does work for migration purposes. I’ll update this post when I determine how to populate the database drop-down list.
The first step was figuring out where to put the PostgreSQL JDBC Java ARchive (.jar) file on a Linux distribution. You navigate to the end-user student account in a Terminal and change to the .sqldeveloper directory. Then, create a jdbc subdirectory as the student user with the following command:
mkdir /home/student/.sqldeveloper/jdbc |
Then, download the most current PostgreSQL JDBC Java ARchive (.jar) file and copy it into the /home/student/.sqldeveloper/jdbc, which you can see afterward with the following command:
ll /home/student/.sqldeveloper/jdbc |
It should display:
-rw-r--r--. 1 student student 1041081 Aug 9 13:46 postgresql-42.3.7.jar |
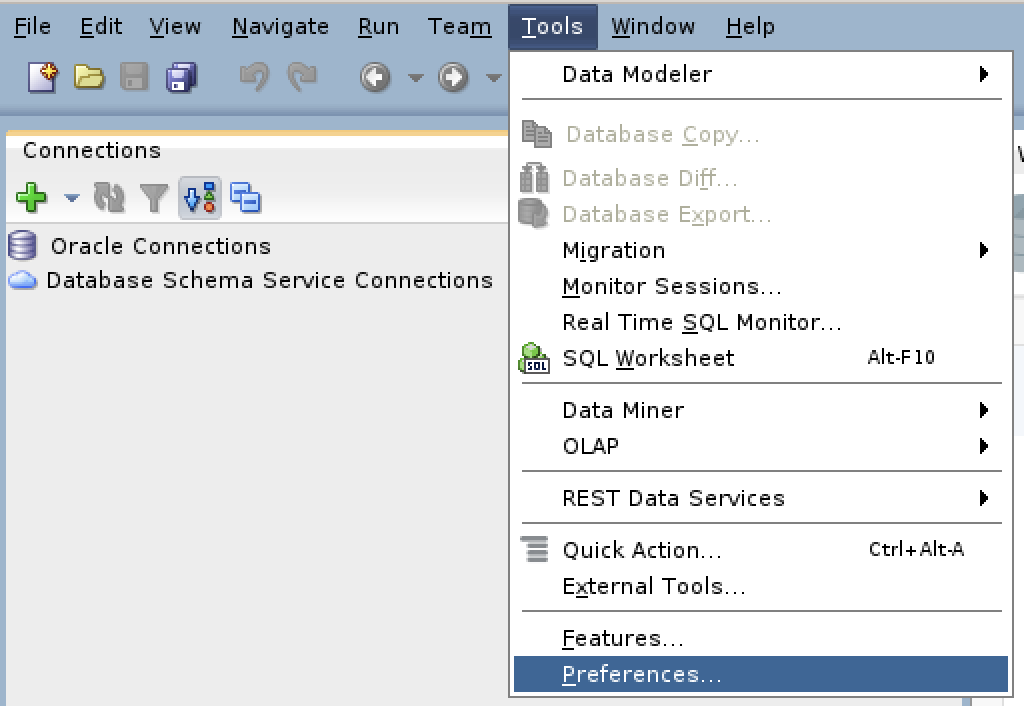
The next series of steps are done within SQL Developer. Launch SQL Developer and navigate to Tools and Preferences, like this:
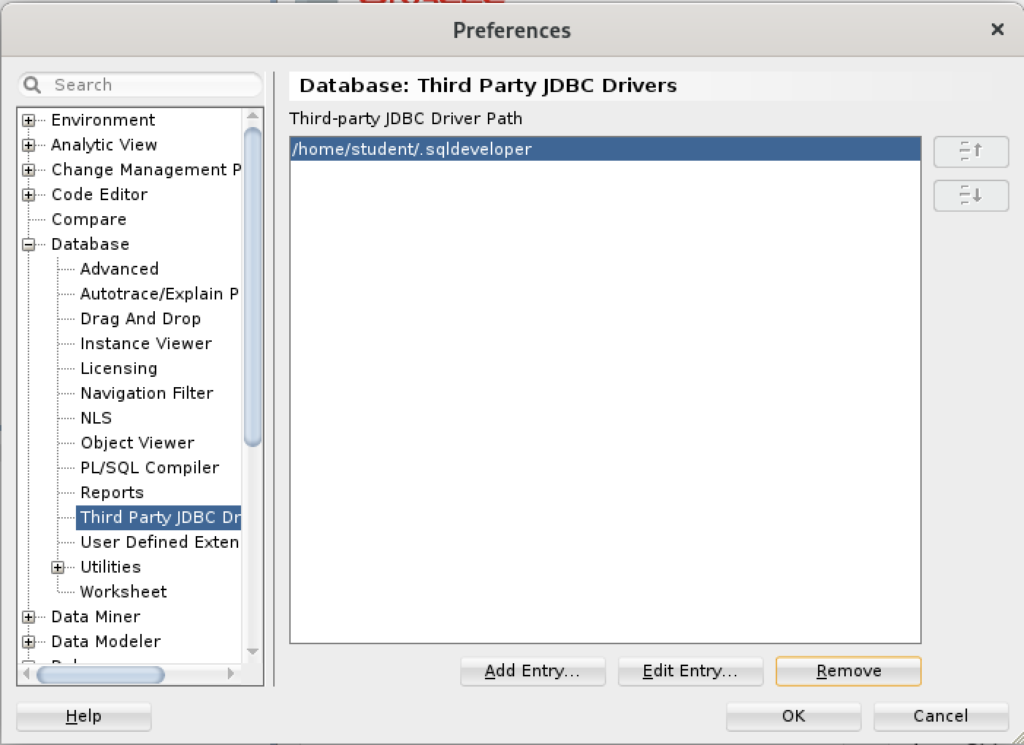
Inside the Preferences dialog, navigate to Database and Third Party JDBC Drivers like shown and click the Add Entry button to proceed:
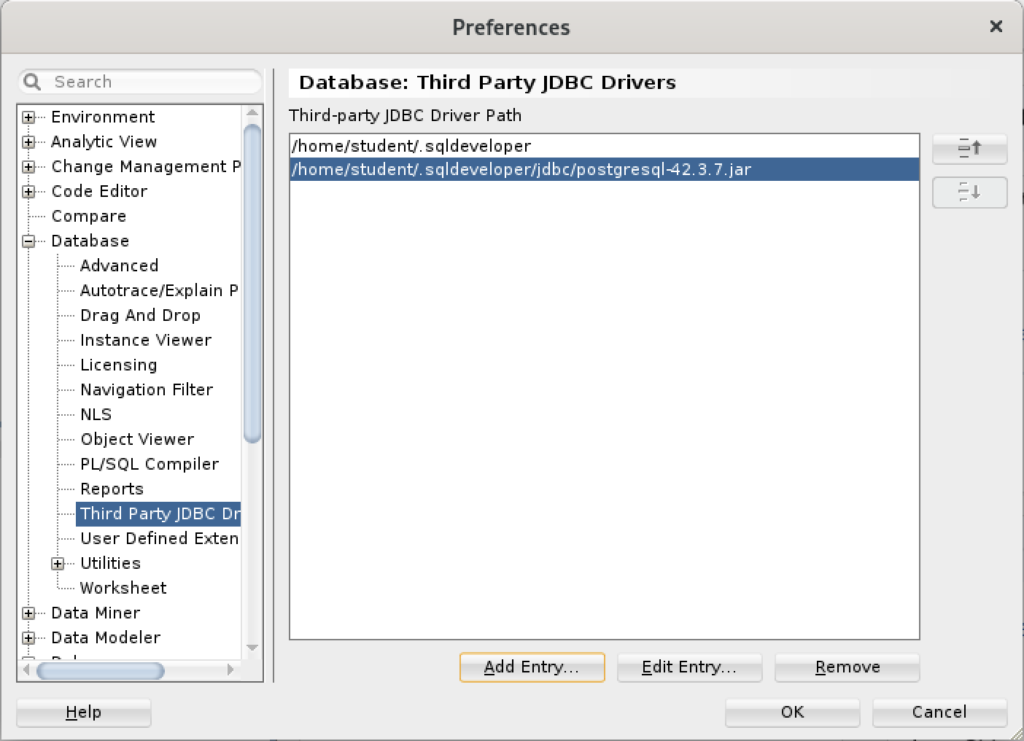
Inside the Select Path Entry dialog, select the current PostgreSQL JDBC Java ARchive (.jar) file, which is postgresql-42-3.7.jar in this example. Then, click the Select button.

You are returned to the Preferences dialog as shown below. Click the OK button to continue.
After completing the 3rd Party Java Driver setup, you attempt to create a new connection to the PostgreSQL database. You should see that you now have two available Database Type values: Oracle and PostgreSQL, as shown below:
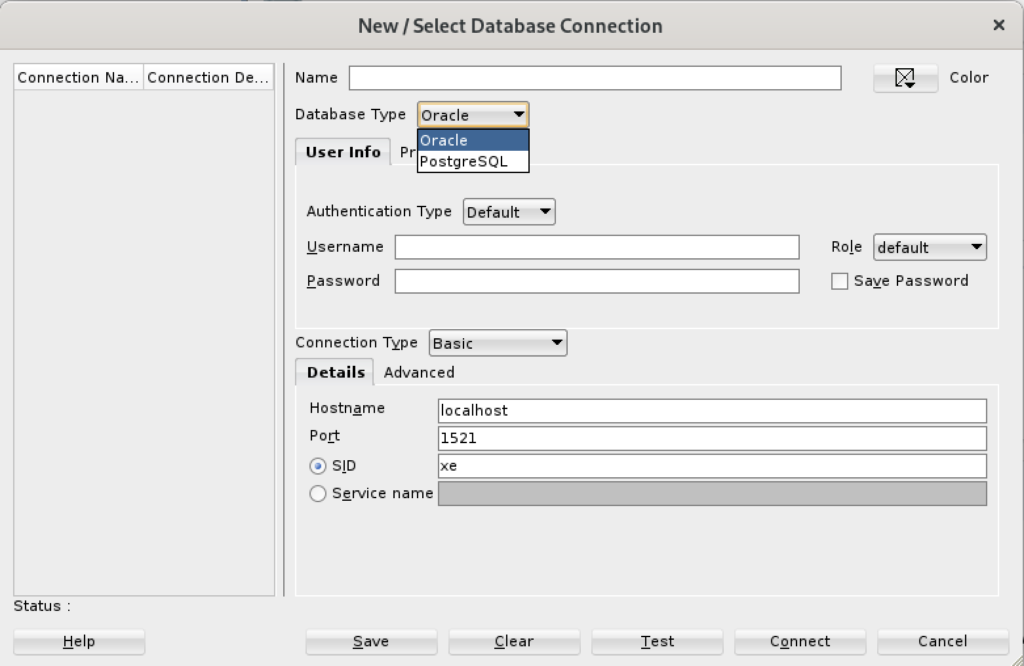
When you click on the PostgreSQL Database Type, the dialog updates to the following view. Unfortunately, I couldn’t discover how to set the values in the list for the Choose Database drop down. Naturally, a sandboxed user can’t connect to the PostgreSQL database without qualifying the database name.
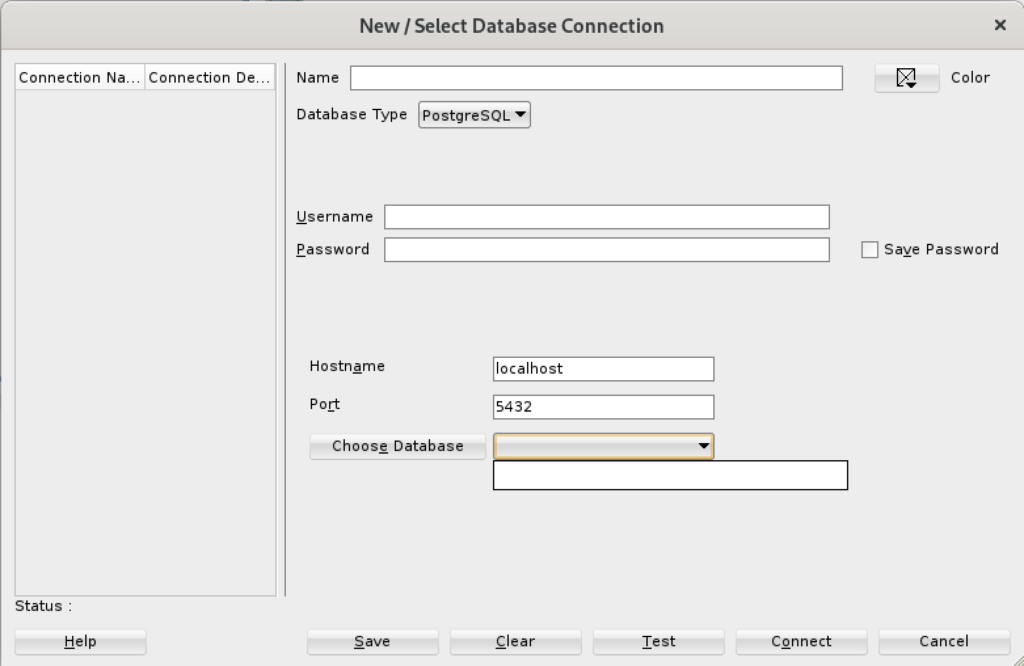
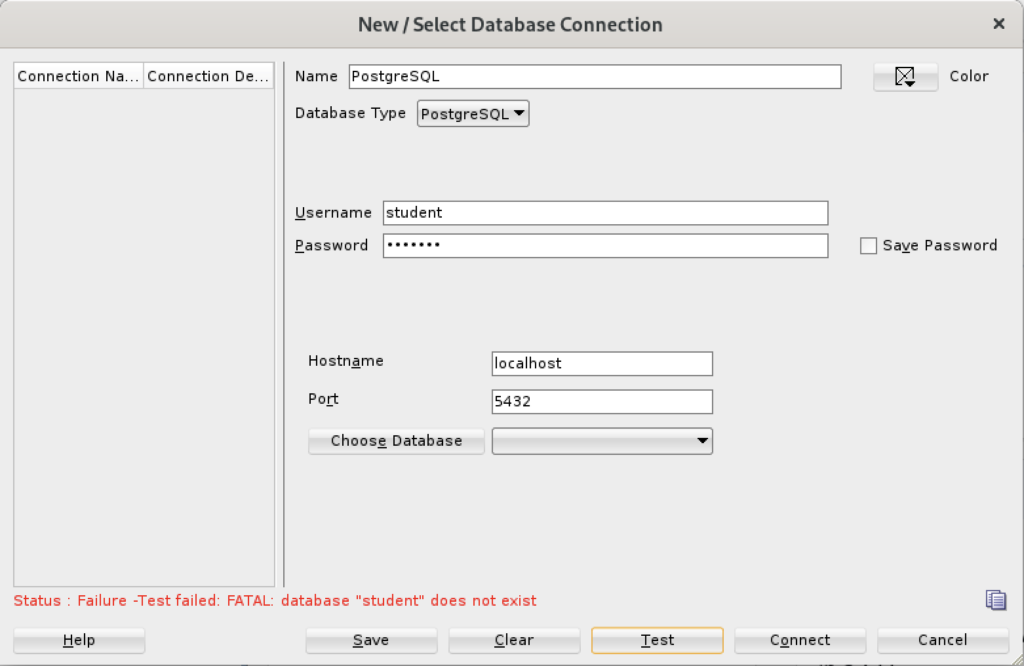
Unless you qualify the PostgreSQL database or connect as the postgres user with a privileged password, SQL Developer translates the absence of a database selection to a database name equivalent to the user’s name. That’s the default behavior for the Oracle database but differs from the behavior for MySQL, PostgreSQL, and Microsoft SQL Server. It returns the following
Status: Failure - Test failed: FATAL: database "student" does not exist |
As seen in the diaglog’s result when testing the connection:
Based on my hunch and not knowing how to populate the database field for the connection, I did the following:
- Created a Linux OS videodb user.
- Copied the .bashrc file with all the standard Oracle environment variables.
- Created the /home/videodb/.sqldeveloper/jdbc directory.
- Copied the postgresql-42.3.7.jar into the new jdbc directory.
- Connected as the postgres super user and created the PostgreSQL videodb user with this syntax:
CREATE USER videodb
  WITH ROLE dba
       ENCRYPTED PASSWORD 'cangetin';
- As the postgres super user, granted the following privileges:
-- Grant privileges on videodb database videodb user.
GRANT ALL ON DATABASE "videodb" TO "videodb";

-- Connect to the videodb database.
\c

-- Grant privileges.
GRANT ALL PRIVILEGES ON ALL TABLES IN SCHEMA public TO videodb;
GRANT ALL PRIVILEGES ON ALL SEQUENCES IN SCHEMA public TO videodb;
- Added the following line to the pg_hba.conf file in the /var/lib/pgsql/15/data directory as the postgres user:
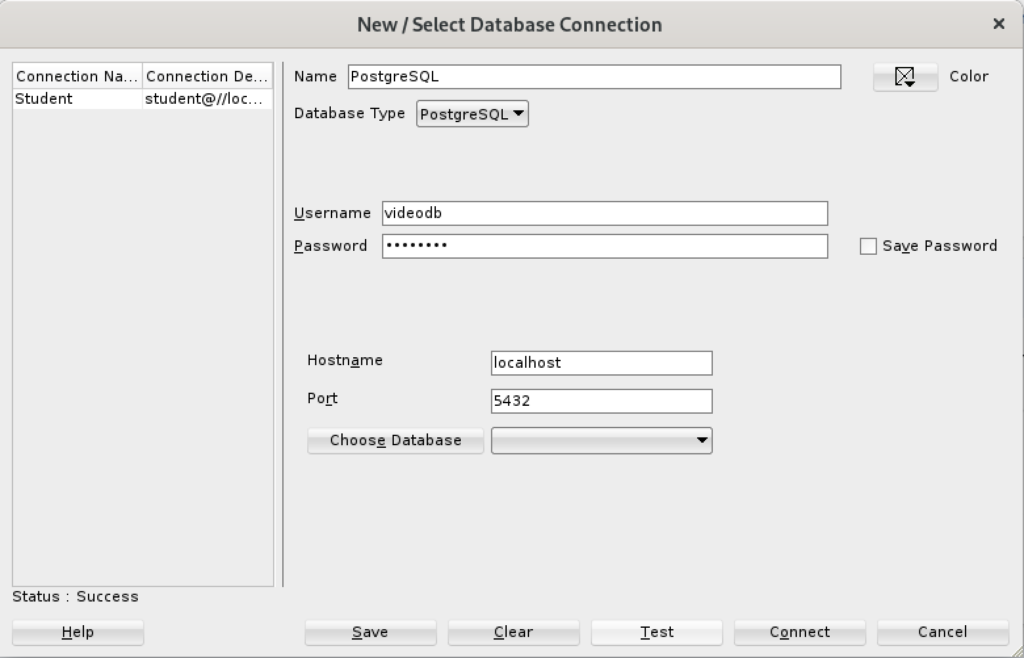
local all videodb peer - Connected as the switched from the student to videodb Linux user, and launched SQL Developer. Then, I used the Tools menu to create the 3rd party PostgreSQL JDBC Java ARchive (.jar) file in context of the SQL Developer program. Everything completed correctly.
- Created a new PostgreSQL connection in SQL Developer and tested it with success as shown:
- Saving the new PostgreSQL connection, I opened the connection and could run SQL statements and display the catalog information, as shown:
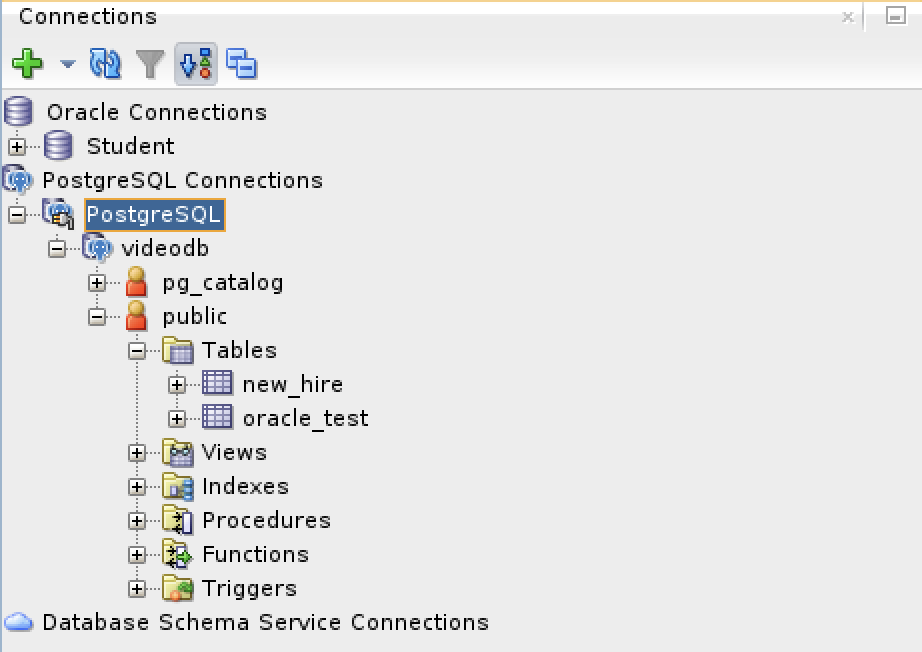
Connected as the videodb user to the videodb database I can display tables owned by student and videodb users:
-- List tables.
\d

                   List of relations
 Schema |           Name           |   Type   |  Owner
--------+--------------------------+----------+---------
 public | new_hire                 | table    | student
 public | new_hire_new_hire_id_seq | sequence | student
 public | oracle_test              | table    | videodb
(3 rows)
In SQL Developer, you can also inspect the tables, as shown:

At this point, I’m working on trying to figure out how to populate the database drop-down table. However, I’ve either missed a key document or it’s unfortunate that SQL Developer isn’t as friendly as MySQL Workbench in working with 3rd Party drivers.
PostgreSQL Java
The majority of information to write this post comes form knowing how Java works and where to find the PostgreSQL JDBC Java archive (.jar) file and the standard documentation. Here are the URLs:
The rest of the example is simply demonstrating how to create a fully working program to return one or more rows from a static query. After you download the latest PostgreSQL JDBC archive, with a command like:
wget https://jdbc.postgresql.org/download/postgresql-42.3.7.jar |
Assuming you put it in test directory, like /home/student/java, you would add it to your Java $CLASSPATH environment variable, like this:
export set CLASSPATH="/home/student/Code/java/postgresql-42.3.7.jar:." |
If you’re new to Java and Linux, the . (dot) represents the present working directory and is required in the Java $CLASSPATH to avoid raising a java.lang.ClassNotFoundException when you test your code. For example, the sample program name is PostgreSQLDriver.java and if you failed to include the present working directory in the $CLASSPATH it would raise the following error message when you try to run the compiled class file:
Error: Could not find or load main class PSQL Caused by: java.lang.ClassNotFoundException: PSQL |
Now that you’ve set your Java $CLASSPATH correctly, you can copy or type this PostgreSQLDriver.java Java program into a file.
1 2 3 4 5 6 7 8 9 10 11 12 13 14 15 16 17 18 19 20 21 22 23 24 25 26 27 28 29 30 31 32 33 34 35 36 37 38 39 40 41 42 43 44 45 46 47 48 49 50 51 52 53 54 55 56 57 58 59 60 61 62 63 64 65 66 67 68 69 | // Import classes. import java.sql.Connection; import java.sql.DriverManager; import java.sql.ResultSet; import java.sql.SQLException; import java.sql.Statement; import java.util.Properties; /* You can't include the following on Linux without raising an exception. */ // import com.mysql.jdbc.Driver; public class PostgreSQLDriver { public PostgreSQLDriver() { /* Declare variables that require explicit assignments because they're addressed in the finally block. */ Connection conn = null; Statement stmt = null; ResultSet rset = null; /* Declare other variables. */ String url; String username = "student"; String password = "student"; String database = "videodb"; String hostname = "[::1]"; String port = "5432"; String sql; /* Attempt a connection. */ try { // Set URL. url = "jdbc:postgresql://" + hostname + ":" + port + "/" + database; // Create instance of MySQLDriver. conn = DriverManager.getConnection (url, username, password); // Query the version of the database. sql = "SELECT version()"; stmt = conn.createStatement(); rset = stmt.executeQuery(sql); System.out.println ("Database connection established"); // Read row returns for one column. while (rset.next()) { System.out.println("PostgreSQL Connected to the [" + rset.getString(1) + "] database."); } } catch (SQLException e) { System.err.println ("Cannot connect to database server:"); System.out.println(e.getMessage()); } finally { if (conn != null) { try { rset.close(); stmt.close(); conn.close(); System.out.println ("Database connection terminated"); } catch (Exception e) { /* ignore close errors */ } } } } /* Unit test. */ public static void main(String args[]) { new PostgreSQLDriver(); } } |
Now, you compile the program from the present working directory with this syntax:
javac PostgreSQLDriver.java |
It creates a PostgreSQLDriver.class file, which you can run with this syntax:
java PostgreSQLDriver |
It will return the following, which verifies you’ve connected to a valid database in the PostgreSQL instance. You should note that the IPV6 syntax is used in the example on line #25 but you could substitute localhost, an assigned host name, or an IP address.
AlmaLinxu + javac
I neglected to show how to install and configure the Java SDK on my earlier post without relying on including the $JAVA_HOME in the $PATH. This post shows how to install the Java and Java SDK on Alma Linux without layering it with the $JAVA_HOME environment variable.
You install the Java runtime and development kit with the following command:
sudo dnf install -y java-17-openjdk java-17-openjdk-devel |
Then, you need to add it to the $PATH environment variable with the following syntax in your .bashrc file or environment file of your choice.
export set PATH=$PATH:/usr/lib/jvm/java-17-openjdk-17.0.8.0.7-2.el9.x86_64/bin/ |
After you source the new $PATH environment value, you can then write a file like this Hello.java file to test it.
// Define the Java program. public class HelloWorld { public static void main(String[] args) { System.out.println("Hello World!"); } } |
You compile the Hello.java file with this syntax:
javac Hello.java |
Then, you run the compiled program with the following syntax:
java Hello |
It’ll print:
Hello World! |
AlmaLinux Install & Configuration

This is a collection of blog posts for installing and configuring AlmaLinux with the Oracle, PostgreSQL, MySQL databases and several programming languages. Sample programs show how to connect PHP and Python to the MySQL database.
- Installing AlmaLinux operating system
- Installing and configuring MySQL
- Installing Python-MySQL connector and provide sample programs
- Configuring Flask for Python on AlmaLinux with a complete software router instruction set.
- Installing Rust programming language and writing a sample program
- Installing and configuring LAMP stack with PHP and MySQL and a self-signed security key
- MySQL PNG Images in LAMP with PHP Programming
- Demonstration of how to write Perl that connects to MySQL
- Installing and configuring MySQL Workbench
- Installing and configuring PostgreSQL and pgAdmin4
- Identifying the required libnsl2-devel packages for SQL*Plus
- Writing and deploying a sqlplus function to use a read line wrapper
- Installing and configuring Visual Studio Code Editor
- Installing and configuring Java with connectivity to MySQL
- Installing and configuring Oracle SQL Developer
I used Oracle Database 11g XE in this instance to keep the footprint as small as possible. It required a few tricks and discovering the missing library that caused folks grief eleven years ago. I build another with a current Oracle Database XE after the new year.
If you see something that I missed or you’d like me to add, let me know. As time allows, I’ll try to do that. Naturally, the post will get updates as things are added later.
AlmaLinux+Java+MySQL
AlmaLinux generally has Java installed. You can check whether java is installed with this command:
which -a java |
It should return:
/usr/bin/java |
Then, you can check the Java version with this command:
java -version |
For AlmaLinux 9, it should return:
openjdk version "11.0.17" 2022-10-18 LTS OpenJDK Runtime Environment (Red_Hat-11.0.17.0.8-2.el9_0) (build 11.0.17+8-LTS) OpenJDK 64-Bit Server VM (Red_Hat-11.0.17.0.8-2.el9_0) (build 11.0.17+8-LTS, mixed mode, sharing) |
Next, you check whether javac is installed. You can use the which command to determine whether it is installed. Generally, its not installed and you use this command to
sudo dnf search jdk | egrep -- '-17' |
It should return:
Last metadata expiration check: 0:11:17 ago on Mon 19 Dec 2022 11:32:48 PM EST. java-17-openjdk.x86_64 : OpenJDK 17 Runtime Environment java-17-openjdk-demo.x86_64 : OpenJDK 17 Demos java-17-openjdk-devel.x86_64 : OpenJDK 17 Development Environment java-17-openjdk-headless.x86_64 : OpenJDK 17 Headless Runtime Environment java-17-openjdk-javadoc.x86_64 : OpenJDK 17 API documentation java-17-openjdk-javadoc-zip.x86_64 : OpenJDK 17 API documentation compressed in a single archive java-17-openjdk-jmods.x86_64 : JMods for OpenJDK 17 java-17-openjdk-src.x86_64 : OpenJDK 17 Source Bundle java-17-openjdk-static-libs.x86_64 : OpenJDK 17 libraries for static linking |
Now, you can install the Java JDK with the following dnf command:
sudo dnf install java-17-openjdk java-17-openjdk-devel |
The log file for this is:
Display detailed console log →
Last metadata expiration check: 0:28:26 ago on Mon 19 Dec 2022 11:32:48 PM EST. Dependencies resolved. ================================================================================ Package Arch Version Repository Size ================================================================================ Installing: java-17-openjdk x86_64 1:17.0.5.0.8-2.el9_0 appstream 237 k java-17-openjdk-devel x86_64 1:17.0.5.0.8-2.el9_0 appstream 4.7 M Installing dependencies: java-17-openjdk-headless x86_64 1:17.0.5.0.8-2.el9_0 appstream 40 M ttmkfdir x86_64 3.0.9-65.el9 appstream 52 k xorg-x11-fonts-Type1 noarch 7.5-33.el9 appstream 499 k Transaction Summary ================================================================================ Install 5 Packages Total download size: 45 M Installed size: 199 M Is this ok [y/N]: y Downloading Packages: (1/5): java-17-openjdk-17.0.5.0.8-2.el9_0.x86_6 342 kB/s | 237 kB 00:00 (2/5): ttmkfdir-3.0.9-65.el9.x86_64.rpm 520 kB/s | 52 kB 00:00 (3/5): xorg-x11-fonts-Type1-7.5-33.el9.noarch.r 849 kB/s | 499 kB 00:00 (4/5): java-17-openjdk-devel-17.0.5.0.8-2.el9_0 1.7 MB/s | 4.7 MB 00:02 (5/5): java-17-openjdk-headless-17.0.5.0.8-2.el 6.1 MB/s | 40 MB 00:06 -------------------------------------------------------------------------------- Total 6.3 MB/s | 45 MB 00:07 Running transaction check Transaction check succeeded. Running transaction test Transaction test succeeded. Running transaction Regex version mismatch, expected: 10.40 2022-04-14 actual: 10.37 2021-05-26 Regex version mismatch, expected: 10.40 2022-04-14 actual: 10.37 2021-05-26 Running scriptlet: java-17-openjdk-headless-1:17.0.5.0.8-2.el9_0.x86_64 1/1 Preparing : 1/1 Installing : java-17-openjdk-headless-1:17.0.5.0.8-2.el9_0.x86_64 1/5 Running scriptlet: java-17-openjdk-headless-1:17.0.5.0.8-2.el9_0.x86_64 1/5 Installing : ttmkfdir-3.0.9-65.el9.x86_64 2/5 Installing : xorg-x11-fonts-Type1-7.5-33.el9.noarch 3/5 Running scriptlet: xorg-x11-fonts-Type1-7.5-33.el9.noarch 3/5 Installing : java-17-openjdk-1:17.0.5.0.8-2.el9_0.x86_64 4/5 Running scriptlet: java-17-openjdk-1:17.0.5.0.8-2.el9_0.x86_64 4/5 Installing : java-17-openjdk-devel-1:17.0.5.0.8-2.el9_0.x86_64 5/5 Running scriptlet: java-17-openjdk-devel-1:17.0.5.0.8-2.el9_0.x86_64 5/5 Running scriptlet: java-17-openjdk-headless-1:17.0.5.0.8-2.el9_0.x86_64 5/5 Running scriptlet: java-17-openjdk-1:17.0.5.0.8-2.el9_0.x86_64 5/5 Running scriptlet: java-17-openjdk-devel-1:17.0.5.0.8-2.el9_0.x86_64 5/5 Verifying : java-17-openjdk-1:17.0.5.0.8-2.el9_0.x86_64 1/5 Verifying : java-17-openjdk-devel-1:17.0.5.0.8-2.el9_0.x86_64 2/5 Verifying : java-17-openjdk-headless-1:17.0.5.0.8-2.el9_0.x86_64 3/5 Verifying : ttmkfdir-3.0.9-65.el9.x86_64 4/5 Verifying : xorg-x11-fonts-Type1-7.5-33.el9.noarch 5/5 Installed: java-17-openjdk-1:17.0.5.0.8-2.el9_0.x86_64 java-17-openjdk-devel-1:17.0.5.0.8-2.el9_0.x86_64 java-17-openjdk-headless-1:17.0.5.0.8-2.el9_0.x86_64 ttmkfdir-3.0.9-65.el9.x86_64 xorg-x11-fonts-Type1-7.5-33.el9.noarch Complete! |
After installing javac, you can verify it with the which command, and check the version with the javac utility.
which -a javac |
It should return:
/usr/bin/javac |
Then, you can check the Java version with this command:
java -version |
For AlmaLinux 9, it should return:
javac 17.0.5 |
Now, you need to download and install the jdk with the dnf utility. You download the jdk package with the wget utility.
wget https://download.oracle.com/java/17/latest/jdk-17_linux-x64_bin.rpm |
It will generate the following console output:
--2022-12-20 00:12:34-- https://download.oracle.com/java/17/latest/jdk-17_linux-x64_bin.rpm Resolving download.oracle.com (download.oracle.com)... 23.192.208.88 Connecting to download.oracle.com (download.oracle.com)|23.192.208.88|:443... connected. HTTP request sent, awaiting response... 200 OK Length: 163101336 (156M) [application/x-redhat-package-manager] Saving to: ‘jdk-17_linux-x64_bin.rpm’ jdk-17_linux-x64_bi 100%[===================>] 155.54M 11.1MB/s in 17s 2022-12-20 00:12:51 (9.01 MB/s) - ‘jdk-17_linux-x64_bin.rpm’ saved [163101336/163101336] |
You install the jdk package with the dnf utility.
sudo rpm -Uvh jdk-17_linux-x64_bin.rpm |
The log file for this is:
Display detailed console log →
warning: jdk-17_linux-x64_bin.rpm: Header V3 RSA/SHA256 Signature, key ID ec551f03: NOKEY Verifying... ################################# [100%] Regex version mismatch, expected: 10.40 2022-04-14 actual: 10.37 2021-05-26 Regex version mismatch, expected: 10.40 2022-04-14 actual: 10.37 2021-05-26 Preparing... ################################# [100%] Updating / installing... 1:jdk-17-2000:17.0.5-ga ################################# [100%] |
After installing everything, you need to set the default Java. You can discover the available Java versions with the following command:
sudo alternatives --config java |
It should return a list and the ability to select one by using the “Selection” number. I recommend you chose #2.
There are 3 programs which provide 'java'. Selection Command ----------------------------------------------- 1 java-11-openjdk.x86_64 (/usr/lib/jvm/java-11-openjdk-11.0.17.0.8-2.el9_0.x86_64/bin/java) 2 java-17-openjdk.x86_64 (/usr/lib/jvm/java-17-openjdk-17.0.5.0.8-2.el9_0.x86_64/bin/java) *+ 3 /usr/java/jdk-17.0.5/bin/java Enter to keep the current selection[+], or type selection number: 2 |
Then, you can check the Java version with this command:
java -version |
Now, it should return:
openjdk version "17.0.5" 2022-10-18 LTS OpenJDK Runtime Environment (Red_Hat-17.0.5.0.8-2.el9_0) (build 17.0.5+8-LTS) OpenJDK 64-Bit Server VM (Red_Hat-17.0.5.0.8-2.el9_0) (build 17.0.5+8-LTS, mixed mode, sharing) |
You should define the $JAVA_HOME environment variable in the /etc/profile file. Sometimes, it is also appropriate to include it in your .bashrc file.
export set JAVA_HOME="/usr/lib/jvm/java-17-openjdk-17.0.5.0.8-2.el9_0.x86_64/bin" |
You should also add it to your $PATH variable in your .bashrc file, like:
export set PATH=$PATH:$JAVA_HOME |
Now, let’s write the basic “Hello World” program in Java:
// Define the Java program. public class HelloWorld { public static void main(String[] args) { System.out.println("Hello World!"); } } |
Compile it with:
javac HelloWorld.java |
Run it with the java command:
java HelloWorld |
It prints:
Hello World! |
Let’s download the MySQL/J Connector from the MySQL website, where we con select the operating system and its version, as shown in the image.
![]()
After you download the mysql-connector-j RPM package, you can install it with the following dnf command:
sudo dnf install -y mysql-connector-j-8.0.31-1.el9.noarch.rpm |
The log file for this is:
Display detailed console log →
Last metadata expiration check: 2:02:56 ago on Mon 19 Dec 2022 11:32:48 PM EST. Dependencies resolved. ================================================================================ Package Arch Version Repository Size ================================================================================ Installing: mysql-connector-j noarch 1:8.0.31-1.el9 @commandline 2.3 M Transaction Summary ================================================================================ Install 1 Package Total size: 2.3 M Installed size: 2.7 M Downloading Packages: Running transaction check Transaction check succeeded. Running transaction test Transaction test succeeded. Running transaction Regex version mismatch, expected: 10.40 2022-04-14 actual: 10.37 2021-05-26 Regex version mismatch, expected: 10.40 2022-04-14 actual: 10.37 2021-05-26 Preparing : 1/1 Installing : mysql-connector-j-1:8.0.31-1.el9.noarch 1/1 Verifying : mysql-connector-j-1:8.0.31-1.el9.noarch 1/1 Installed: mysql-connector-j-1:8.0.31-1.el9.noarch Complete! |
You should add the $CLASSPATH to your .bashrc file. Add the following line to your .bashrc file and resource your .bashrc file to test the JDBC driver.
export set CLASSPATH="/usr/share/java/mysql-connector-j.jar:." |
Let’s write a slightly larger Java program that tests connectivity to the MySQL database, like:
// Import classes. import java.sql.*; /* You can't include the following on Linux without raising an exception. */ // import com.mysql.jdbc.Driver; public class MySQLConnector { public MySQLConnector() { /* Declare variables that require explicit assignments because they're addressed in the finally block. */ Connection conn = null; Statement stmt = null; ResultSet rset = null; /* Declare other variables. */ String url; String username = "student"; String password = "student"; String database = "studentdb"; String hostname = "localhost"; String port = "3306"; String sql; /* Attempt a connection. */ try { // Set URL. url = "jdbc:mysql://" + hostname + ":" + port + "/" + database; // Create instance of MySQLDriver. Class.forName ("com.mysql.cj.jdbc.Driver").newInstance(); conn = DriverManager.getConnection (url, username, password); // Query the version of the database. sql = "SELECT version()"; stmt = conn.createStatement(); rset = stmt.executeQuery(sql); System.out.println ("Database connection established"); // Read row returns for one column. while (rset.next()) { System.out.println("MySQLDriver Version [" + rset.getString(1) + "]"); } } catch (SQLException e) { System.err.println ("Cannot connect to database server:"); System.out.println(e.getMessage()); } catch (ClassNotFoundException e) { System.err.println ("Cannot find MySQL driver class:"); System.out.println(e.getMessage()); } catch (InstantiationException e) { System.err.println ("Cannot instantiate class:"); System.out.println(e.getMessage()); } catch (IllegalAccessException e) { System.err.println ("Illegal access exception:"); System.out.println(e.getMessage()); } finally { if (conn != null) { try { rset.close(); stmt.close(); conn.close(); System.out.println ("Database connection terminated"); } catch (Exception e) { /* ignore close errors */ } } } } /* Unit test. */ public static void main(String args[]) { new MySQLDriver(); } } |
Just a note, there’s a deprecated behavior introduced in MySQL 8.0.24, which produces the following error message when compiled looking for deprecation:
javac -Xlint:deprecation MySQLDriver.java |
It produces the following error message, which I hope to sort and update later in the week:
MySQLDriver.java:30: warning: [deprecation] newInstance() in Class has been deprecated
      Class.forName ("com.mysql.cj.jdbc.Driver").newInstance();
                                                ^
  where T is a type-variable:
    T extends Object declared in class Class
1 warning |
The code does compile because the deprecation is only a warning. When you run the program, like:
java MySQLDriver |
It returns, confirming a connection to the MySQL database:
Database connection established MySQLDriver Version [8.0.30] Database connection terminated |
As always, I hope this helps those trying to sort out new behaviors.
Java Gregorian Date
One of my students asked for an example of how to work with a Gregorian date and timezones in Java. I dug out an old example file from when I taught Java at Regis University.
The code follows:
/* || Program name: MyGregorian.java || Created by: Michael McLaughlin || Creation date: 10/07/02 || History: || ---------------------------------------------------------------------- || Date Author Purpose || -------- ---------------------- --------------------------------- || dd/mm/yy {Name} {Brief statement of change.} || ---------------------------------------------------------------------- || Execution method: Static class demonstrating timezone setting. || Program purpose: Designed as a stand alone program. */ // Class imports. import java.util.Calendar; import java.util.GregorianCalendar; import java.util.TimeZone; // Define MyGregorian class. public class MyGregorian { // Testing static main() method. public static void main(String args[]) { // Set an initial variable. String initial = ""; System.out.println("======================================================"); System.out.println("Value of [user.timezone]: [" + (initial = (null != System.getProperty("user.timezone")) ? "Unset" : System.getProperty("user.timezone")) + "]"); System.out.println("======================================================"); GregorianCalendar gc = (GregorianCalendar) Calendar.getInstance(); System.out.println("Calendar Date: [" + gc.getTime() + "]"); gc.add(GregorianCalendar.MONTH,1); System.out.println("Calendar Date: [" + gc.getTime() + "]"); System.out.println("======================================================"); System.out.println("Value of [user.timezone]: [" + System.getProperty("user.timezone") + "]"); System.out.println("Value of [user.timezone]: [" + System.setProperty("user.timezone","") + "]"); gc.add(GregorianCalendar.MONTH,1); System.out.println("Calendar Date: [" + gc.getTime() + "]"); System.out.println("======================================================"); Calendar c = Calendar.getInstance(); System.out.println("Calendar Date: [" + c.getTime() + "]"); // Move the date ahead one month, hour and minute. c.add(Calendar.MONTH,1); System.out.println("Calendar Date: [" + c.getTime() + "]"); System.out.println("======================================================"); } // End of testing static main() method. } // End of MyGregorian class. |
It prints to console:
====================================================== Value of [user.timezone]: [Unset] ====================================================== Calendar Date: [Thu May 05 23:43:42 MDT 2022] Calendar Date: [Sun Jun 05 23:43:42 MDT 2022] ====================================================== Value of [user.timezone]: [America/Denver] Value of [user.timezone]: [America/Denver] Calendar Date: [Tue Jul 05 23:43:42 MDT 2022] ====================================================== Calendar Date: [Thu May 05 23:43:42 MDT 2022] Calendar Date: [Sun Jun 05 23:43:42 MDT 2022] ====================================================== |
As always, I hope this helps those who need to see and example to work with Gregorian dates.
PL/SQL Inheritance Failure
PL/SQL is a great programming language as far as it goes but it lacks true type inheritance for its collections. While you can create an object type and subtype, you can’t work with collections of those types the same way. PL/SQL object type inheritance, unlike the Java class hierarchy and parallel array class hierarchy, only supports a class hierarchy. Effectively, that means:
- You can pass a subtype as a call parameter, or argument, to a parent data type in a function, procedure, or method signature, but
- You can’t pass a collection of a subtype as a call parameter, or argument, to a collection of parent type in a function, procedure, or method signature.
The limitation occurs because collections have their own data type, which is fixed when you create them. Worse yet, because Oracle has never seen fit to fix their two underlying code trees (23 years and counting since Oracle 8i), you have two types of collections using two distinct C/C++ libraries. You define collections of Attribute Data Types (ATDs) when you create a collection of a standard scalar data type, like NUMBER, VARCHAR2, or DATE. You define collection of User-Defined Data Types (UTDs) when you create a collection of a SQL UDT or PL/SQL-only RECORD data type. The former uses one C/C++ library and the latter another.
Now, Oracle even make the differences between Java and PL/SQL more complex because it treats collections known as tables, really lists in most programming languages, differently than varrays, or arrays. You create a TABLE collection, or list, when you create a table of a scalar or UDT data type. There are two options when you create these object types, and they are:
- You create an empty collection with a no element constructor, which means you’ll need to allocate memory before assigning element values later in your program.
- You create a populated collection with a comma-delimited list of elements.
Both approaches give you a list of elements with a densely populated index. A “densely populated index” is Oracle’s jargon for how they characterize a 1-based sequence of integers without any gaps (e.g., 1, 2, 3, …). The initial construction works the same way whether you create a TABLE or VARRAY collection type. Unfortunately, after you’ve built the collection behaviors change. If you use Oracle’s Collection API to delete one or more items from a TABLE collection type, you create gaps in the index’s sequence of values. That means you must use special logic to navigate across a TABLE collection type to ensure it doesn’t fail when encountering a gap in the numeric sequence.
For example, here’s a FOR-LOOP without the logic to vouchsafe a uninterrupted set of sequence values incrementing by a counter of 1 element at a time:
1 2 3 4 5 6 7 8 9 10 11 12 13 14 15 16 17 18 19 | DECLARE /* Create a local table collection. */ TYPE list IS TABLE OF VARCHAR2(10); /* Statically allocate memory and assign values to for elements. */ lv_list LIST := list('Moe','Shemp','Larry','Curly'); BEGIN /* Remove the second element, Shemp, from the collection of variable length strings. */ lv_list.DELETE(2); /* Loop through the target with a for loop, which depends on densely populated index values. */ FOR i IN 1..lv_list.COUNT LOOP dbms_output.put_line('['||lv_list(i)||']'); END LOOP; END; / |
The program fails when it tries to read the second element of the table collection, which was previously removed. It raises the following error message after print the first element of the table collection:
[Moe] DECLARE * ERROR at line 1: ORA-01403: no data found ORA-06512: at line 16 |
Conveniently, Oracle’s Collection API provides an EXISTS method that we can use to check for the presence of an index’s value. Modifying line 16 by wrapping it in an IF-statement fixes one problem but identifies another:
15 16 17 18 19 | FOR i IN 1..lv_list.COUNT LOOP IF lv_list.EXISTS(i) THEN dbms_output.put_line('['||lv_list(i)||']'); END IF; END LOOP; |
The program no longer fails on a missing index value, or index gap, but it returns fewer lines of output than you might expect.
That’s because the Oracle Collection API’s COUNT method returns the number of elements currently allocated in memory not the number of original elements. We learn that when we deleted the second element, Oracle deleted the memory allocated for it as well. This is the type of behavior you might expect for a singly linked list. It prints:
[Moe] [Larry] |
One more change is required to count past and to the highest index value. One line 15, change the COUNT method call to the LAST method call, which returns the highest index value.
15 16 17 18 19 | FOR i IN 1..lv_list.LAST LOOP IF lv_list.EXISTS(i) THEN dbms_output.put_line('['||lv_list(i)||']'); END IF; END LOOP; |
It now prints the three stooges we would expect to see:
[Moe] [Larry] [Curly] |
Realistically, a FOR-LOOP is not the best control structure for a collection. You should use a WHILE-LOOP and treat the incrementing value as an iterator rather than sequence index value. An iterator doesn’t worry about gaps in the sequence, it simply moves to the next element in the singly linked list. Here’s an example that uses the iterator approach with a WHILE-LOOP:
1 2 3 4 5 6 7 8 9 10 11 12 13 14 15 16 17 18 19 20 21 22 23 24 25 26 | DECLARE /* Create a local table collection. */ TYPE list IS TABLE OF VARCHAR2(10); /* Statically allocate memory and assign values to for elements. */ lv_list LIST := list('Moe','Shemp','Larry','Curly'); /* Declare a current index variable. */ CURRENT NUMBER; BEGIN /* Remove the second element, Shemp, from the collection of variable length strings. */ lv_list.DELETE(2); /* Loop through the target with a while loop, which doesn't depend on densely populated index values by setting the starting index value and increment as if with an iterator. */ CURRENT := lv_list.FIRST; WHILE NOT (CURRENT > lv_list.LAST) LOOP dbms_output.put_line('['||lv_list(CURRENT)||']'); CURRENT := lv_list.NEXT(CURRENT); END LOOP; END; / |
The iterator approach prints the elements as:
[Moe] [Larry] [Curly] |
You can reverse the process with the following changes to lines 20-24:
20 21 22 23 24 | CURRENT := lv_list.LAST; WHILE NOT (CURRENT < lv_list.FIRST) LOOP dbms_output.put_line('['||lv_list(CURRENT)||']'); CURRENT := lv_list.PRIOR(CURRENT); END LOOP; |
It prints the list backwards:
[Curly] [Larry] [Moe] |
After covering the issues with sparsely populated, those with gaps in the sequence of indexes values, table collections, let’s examine how you must work around PL/SQL’s lack of a parallel array class hierarchy. The solution lies in combining two programming concepts:
- A function to pack the sparsely populated table collection into a densely populated one, and
- A package with overloaded functions that pack different table collections.
To develop the test case, let’s use an ADT collection because it’s the simplest to work with. The following creates a table collection of a thirty character long scalar string:
1 2 3 | CREATE OR REPLACE TYPE list IS TABLE OF VARCHAR2(30); / |
The following pack function takes a table collection of the thirty character long scalar string, evaluates the string for missing elements, and packs the existing elements into a densely populated list:
1 2 3 4 5 6 7 8 9 10 11 12 13 14 15 16 17 | CREATE OR REPLACE FUNCTION pack ( pv_list LIST ) RETURN list IS /* Declare a new list. */ lv_new LIST := list(); BEGIN /* Read, check, and pack an old list into a new one. */ FOR i IN 1..pv_list.LAST LOOP IF pv_list.EXISTS(i) THEN lv_new.EXTEND; lv_new(lv_new.COUNT) := pv_list(i); END IF; END LOOP; RETURN lv_new; END; / |
This anonymous block tests the pack function:
1 2 3 4 5 6 7 8 9 10 11 12 13 14 15 16 | DECLARE /* Declare a list value. */ lv_test LIST := list('Moe','Shemp','Larry','Curly'); BEGIN /* Remove one element in the middle. */ lv_test.DELETE(2); /* Pack the list of elements into a sequence of values. */ lv_test := pack(lv_test); /* Print the list of elements from the packed list. */ FOR i IN 1..lv_test.COUNT LOOP dbms_output.put_line('['||lv_test(i)||']'); END LOOP; END; / |
It prints the expected three string values:
[Moe] [Larry] [Curly] |
Now, let’s expand the example to build an overloaded package. The first step requires building a base_t object type and a table collection of the object type, like:
1 2 3 4 5 6 7 8 9 | CREATE OR REPLACE TYPE base_t IS OBJECT ( oid NUMBER ) INSTANTIABLE NOT FINAL; / CREATE OR REPLACE TYPE base_list IS TABLE OF base_t; / |
Next, you create a book_t subtype of the base_t object type and a book_list table collection of the book_t subtype, like:
1 2 3 4 5 6 7 8 9 | CREATE OR REPLACE TYPE book_t UNDER base_t ( title VARCHAR2(30) , COST NUMBER); / CREATE OR REPLACE TYPE book_list IS TABLE OF book_t; / |
We can test the base_t and book_t default constructors with the following SQL*Plus formatting and SQL query:
COL oid FORMAT 999 COL title FORMAT A20 COL COST FORMAT 99.99 SELECT * FROM TABLE(book_list(book_t(1,'Neuromancer',15.30) ,book_t(2,'Count Zero',7.99) ,book_t(3,'Mona Lisa Overdrive',7.99) ,book_t(4,'Burning Chrome',8.89))); |
It prints the following output:
OID TITLE COST ---- -------------------- ------ 1 Neuromancer 15.30 2 Count Zero 7.99 3 Mona Lisa Overdrive 7.99 4 Burning Chrome 8.89 |
The following is an overloaded package specification:
1 2 3 4 5 6 7 8 9 10 11 12 13 14 15 16 17 | CREATE OR REPLACE PACKAGE packer IS /* A simple ADT list of strings. */ FUNCTION pack ( pv_list LIST ) RETURN list; /* A UDT list of base objects. */ FUNCTION pack ( pv_list BASE_LIST ) RETURN base_list; /* A UDT list of subtype objects. */ FUNCTION pack ( pv_list BOOK_LIST ) RETURN book_list; END; / |
After you create the package specification, you need to provide the implementation. This is typical in any programming language that supports Interface Description Language (IDL). A package body provides the implementation for the package specification. The package body follows:
1 2 3 4 5 6 7 8 9 10 11 12 13 14 15 16 17 18 19 20 21 22 23 24 25 26 27 28 29 30 31 32 33 34 35 36 37 38 39 40 41 42 43 44 45 46 47 48 49 50 51 52 53 54 55 56 | CREATE OR REPLACE PACKAGE BODY packer IS /* A simple ADT list of strings. */ FUNCTION pack ( pv_list LIST ) RETURN list IS /* Declare a new list. */ lv_new LIST := list(); BEGIN /* Read, check, and pack an old list into a new one. */ FOR i IN 1..pv_list.LAST LOOP IF pv_list.EXISTS(i) THEN lv_new.EXTEND; lv_new(lv_new.COUNT) := pv_list(i); END IF; END LOOP; RETURN lv_new; END pack; /* A simple ADT list of strings. */ FUNCTION pack ( pv_list BASE_LIST ) RETURN base_list IS /* Declare a new list. */ lv_new BASE_LIST := base_list(); BEGIN /* Read, check, and pack an old list into a new one. */ FOR i IN 1..pv_list.LAST LOOP IF pv_list.EXISTS(i) THEN lv_new.EXTEND; lv_new(lv_new.COUNT) := pv_list(i); END IF; END LOOP; RETURN lv_new; END pack; /* A simple ADT list of strings. */ FUNCTION pack ( pv_list BOOK_LIST ) RETURN book_list IS /* Declare a new list. */ lv_new BOOK_LIST := book_list(); BEGIN /* Read, check, and pack an old list into a new one. */ FOR i IN 1..pv_list.LAST LOOP IF pv_list.EXISTS(i) THEN lv_new.EXTEND; lv_new(lv_new.COUNT) := pv_list(i); END IF; END LOOP; RETURN lv_new; END pack; END packer; / |
The test case for the base_list object type is:
1 2 3 4 5 6 7 8 9 10 11 12 13 14 15 16 17 | DECLARE lv_test BASE_LIST := base_list(base_t(1),base_t(2) ,base_t(3),base_t(4)); BEGIN /* Remove one element in the middle. */ lv_test.DELETE(2); /* Pack the list of elements into a sequence of values. */ lv_test := packer.pack(lv_test); /* Print the list of elements from the packed list. */ FOR i IN 1..lv_test.LAST LOOP dbms_output.put_line('['||lv_test(i).oid||']'); END LOOP; END; / |
It prints the following output:
[1] [3] [4] |
The test case for the book_list object type is:
1 2 3 4 5 6 7 8 9 10 11 12 13 14 15 16 17 18 19 20 21 | DECLARE lv_test BOOK_LIST := book_list(book_t(1,'Neuromancer',15.30) ,book_t(2,'Count Zero',7.99) ,book_t(3,'Mona Lisa Overdrive',7.99) ,book_t(4,'Burning Chrome',8.89)); BEGIN /* Remove one element in the middle. */ lv_test.DELETE(2); /* Pack the list of elements into a sequence of values. */ lv_test := packer.pack(lv_test); /* Print the list of elements from the packed list. */ FOR i IN 1..lv_test.LAST LOOP dbms_output.put_line( '['||lv_test(i).oid||']' ||'['||lv_test(i).title||']' ||'['||lv_test(i).COST||']'); END LOOP; END; / |
It prints the following output:
[1][Neuromancer][15.3] [3][Mona Lisa Overdrive][7.99] [4][Burning Chrome][8.89] |
In conclusion, you would not have to write overloaded methods for every list if PL/SQL supported class hierarchy and parallel array class hierarchy like Java. Unfortunately, it doesn’t and likely won’t in the future. You can pack table collections as a safety measure when they’re passed as parameters to other functions, procedures, or methods with the code above.
As always, I hope this helps those looking for a solution.
SQL Developer JDK
In my classes, we use a VMware Linux install with SQL Developer. One of my students called me in a panic after an upgrade of packages when SQL Developer failed to launch. The student was astute enough to try running it from the command line where it generates an error like:
Oracle SQL Developer Copyright (c) 2005, 2018, Oracle and/or its affiliates. All rights reserved. /opt/sqldeveloper/sqldeveloper/bin/../../ide/bin/launcher.sh: line 954: [: : integer expression expected The JDK (/usr/lib/jvm/java-1.8.0-openjdk-1.8.0.222.b10-0.fc30.x86_64/) is not a valid JDK. The JDK was specified by a SetJavaHome directive in a .conf file or by a --setjavahome option. Type the full pathname of a JDK installation (or Ctrl-C to quit), the path will be stored in /home/student/.sqldeveloper/19.2.0/product.conf Error: Unable to get APP_JAVA_HOME input from stdin after 10 tries |
The error is simple, the SQL Developer package update wipe clean the configuration of the SetJavaHome variable in the user’s ~/.sqldeveloper/19.2.0/product.conf file. The fix is three steps because its very likely that the Java packages were also updated. Here’s how to fix it:
- Navigate to the directory where you’ve installed the Java Virtual Machine (JVM) and find the current version of the JVM installed:
cd /usr/lib/jvm
ls java*
It will return a set of files, like:
java
java-1.8.0
java-1.8.0-openjdk
java-1.8.0-openjdk-1.8.0.252.b09-0.fc30.x86_64
java-openjdk
jre
jre-1.8.0
jre-1.8.0-openjdk
jre-1.8.0-openjdk-1.8.0.252.b09-0.fc30.x86_64
jre-openjdk
- Navigate to your user’s product configuration file with this command:
cd ~/.sqldeveloper/19.2.0
- Add the following line to the
product.conffile:# SetJavaHome /path/jdk SetJavaHome /usr/lib/jvm/java-1.8.0-openjdk-1.8.0.252.b09-0.fc30.x86_64/
Now, you should be able to run it from the command line. The shortcut icon should also work if one was installed. Also, don’t forget to update your $JAVA_HOME variable in the master Bash resource file, or your local user’s .bashrc files.
As always, I hope this helps those looking for a quick solution.
MySQL 8.0.20 JDBC
In April, when I updated from MySQL 8.0.17 to MySQL 8.0.19, I found that my Java connection example failed. That’s because of a change in the JDBC driver, which I blogged about then. Starting yesterday, I began updating a base Fedora 30 configuration again to MySQL 8.0.20. I wrote a testing program for the Java JDBC file last time, and when I ran it this time it told me that I didn’t have the JDBC driver installed, or in the $CLASSPATH. My Java diagnostic script, MySQLDriver.java, returned the following error message:
Error: Could not find or load main class MySQLDriver |
The Java JDBC test program code is in the prior post. It simply loads the user, password, database, host, and port statically for my student image, which you can update for your MySQL deployment.
You can find the MySQL 8.0 Connector/J installation in Chapter 4 of the MySQL Connector/J 8.0 Developer Guide. The link to page where you can download the Connector/J driver is in Chapter 4, but to save time you can click on the following download link. You’ll find Ubuntu, Debian, SUSE Enterprise Linux Server, Red Hat Enterprise Linux/Oracle Linux, Fedora, Platform Independent, and Source Code at that download link.
I downloaded Fedora 30, 31, and 32 because eventually they get deprecated and sometimes I need the deprecated versions. Since Python 2.7 is deprecated, keeping an old Fedora 30 with both Python 2.7 and 3.7 is very attractive as a developer, keeping these Java libraries is also a potential convenience. On the Fedora 30 platform, you should download:
mysql-connector-java-8.0.20-1.fc30.noarch.rpm |
You install the RPM package with the following syntax:
rpm -ivh mysql-connector-java-8.0.20-1.fc30.noarch.rpm |
It installs a single mysql-connector-java.jar file in the /usr/share/java directory. Then, you need to export the Java Archive file like so in your .bashrc file:
# Set the Java CLASSPATH path. export CLASSPATH=/usr/share/java/mysql-connector-java.jar:. |
Now, my MySQLDriver Java program returned:
Cannot connect to database server: The server time zone value 'MDT' is unrecognized or represents more than one time zone. You must configure either the server or JDBC driver (via the 'serverTimezone' configuration property) to use a more specifc time zone value if you want to utilize time zone support. |
As qualified in the prior post, it required me to add the following line to my /etc/my.cnf configuration file, which synchronizes the database’s timezone with the operating system.
# Synchronize the MySQL clock with the computer system clock. default-time-zone='+00:00' |
You need to restart the MySQL Daemon to apply the change, like:
sudo systemctl restart mysqld.service |
Then, running my MySQL Driver connection test program worked like a charm. It returns the following:
Database connection established MySQLDriver Version [8.0.20] Database connection terminated |
As always, I hope this helps those looking for a quick solution.
SQL Developer Error
It’s been a couple releases trying to fix the following error thrown by SQL Developer on Fedora 30 and shown as the following dialog:

When you click the Detail button it shows the following error stack:
java.lang.NoClassDefFoundError: javafx/embed/swing/JFXPanel at oracle.dbtools.raptor.javafx.ui.JFXPanelFactory.createJFXPanelImpl(JFXPanelFactory.java:58) at oracle.dbtools.raptor.javafx.ui.JFXPanelFactory.createJFXPanel(JFXPanelFactory.java:34) at oracle.dbtools.raptor.startpage.StartPageViewer.createGUIComponent(StartPageViewer.java:179) at oracle.dbtools.raptor.startpage.StartPageViewer.getEditorContent(StartPageViewer.java:136) at oracle.ide.editor.AsynchronousEditor$2.run(AsynchronousEditor.java:345) at oracle.ide.editor.AsynchronousEditor$5.run(AsynchronousEditor.java:555) at org.openide.util.RequestProcessor$Task.run(RequestProcessor.java:1443) at org.netbeans.modules.openide.util.GlobalLookup.execute(GlobalLookup.java:68) at org.openide.util.lookup.Lookups.executeWith(Lookups.java:303) at org.openide.util.RequestProcessor$Processor.run(RequestProcessor.java:2058) Caused by: java.lang.ClassNotFoundException: javafx.embed.swing.JFXPanel cannot be found by oracle.sqldeveloper_19.2.0 at org.eclipse.osgi.internal.loader.BundleLoader.findClassInternal(BundleLoader.java:501) at org.eclipse.osgi.internal.loader.BundleLoader.findClass(BundleLoader.java:421) at org.eclipse.osgi.internal.loader.BundleLoader.findClass(BundleLoader.java:412) at org.eclipse.osgi.internal.baseadaptor.DefaultClassLoader.loadClass(DefaultClassLoader.java:107) at org.netbeans.modules.netbinox.NetbinoxLoader.loadClass(NetbinoxLoader.java:81) at java.lang.ClassLoader.loadClass(ClassLoader.java:352) ... 10 more |
I thought applying the Open Java FX package might fix the problem. I installed the package like the following:
yum install -y openjfx |
The installation log:
Last metadata expiration check: 4:03:29 ago on Tue 21 Apr 2020 06:42:26 PM MDT. Dependencies resolved. ============================================================================================= Package Architecture Version Repository Size ============================================================================================= Installing: openjfx x86_64 8.0.202-8.b07.fc30 updates 8.8 M Transaction Summary ============================================================================================= Install 1 Package Total download size: 8.8 M Installed size: 11 M Downloading Packages: openjfx-8.0.202-8.b07.fc30.x86_64.rpm 2.5 MB/s | 8.8 MB 00:03 --------------------------------------------------------------------------------------------- Total 2.1 MB/s | 8.8 MB 00:04 Running transaction check Transaction check succeeded. Running transaction test Transaction test succeeded. Running transaction Preparing : 1/1 Installing : openjfx-8.0.202-8.b07.fc30.x86_64 1/1 Running scriptlet: openjfx-8.0.202-8.b07.fc30.x86_64 1/1 Verifying : openjfx-8.0.202-8.b07.fc30.x86_64 1/1 Installed: openjfx-8.0.202-8.b07.fc30.x86_64 Complete! |
After installing the software, I determined the new JAR files. Then, I added them to my $CLASSPATH environment variable, like:
export CLASSPATH=/usr/share/java/mysql-connector-java.jar:/usr/lib/jvm/openjfx/rt/lib/ext/fxrt.jar:/usr/lib/jvm/openjfx/rt/lib/jfxswt.jar:. |
While it appears to load faster with these JAR files, it still raises the same Dialog error. I simply have to continue to look for a complete fix.
