Archive for the ‘MySQL Connect’ Category
MySQL on Ubuntu
Working with my students to create an Ubuntu virtual environment for Python development with the MySQL database. After completing the general provisioning covered in this older post, I’d recommend you create a python symbolic link before installing the MySQL-Python driver.
sudo ln -s /usr/bin/python3 /usr/bin/python |
You install the Python development driver with the following:
sudo apt-get -y install python3-mysql.connector |
Create a python_connect.py file to test your Python deployment’s ability to connect to the MySQL database:
#!/usr/bin/python # Import the library. import mysql.connector from mysql.connector import errorcode try: # Open connection. cnx = mysql.connector.connect(user='student', password='student', host='localhost', database='sakila') # Print the value. print("Database connection resolved.") # Handle exception and close connection. except mysql.connector.Error as e: if e.errno == errorcode.ER_ACCESS_DENIED_ERROR: print("Something is wrong with your user name or password") elif e.errno == errorcode.ER_BAD_DB_ERROR: print("Database does not exist") else: print(e) # Close the connection when the try block completes. else: cnx.close() |
You should change the file permissions of the python_connect.py to read-write-execute as owner, and read-execute as group and other with the following command:
chmod 755 python_connect.py |
Then, you can test your python_connect.py program from the local directory with the following command:
./python_connect.py |
You see the following output if it works:
Database connection resolved. |
As alway, I hope those looking for a code complete solutionk
Setting SQL_MODE
In MySQL, the @@sql_mode parameter should generally use ONLY_FULL_GROUP_BY. If it doesn’t include it and you don’t have the ability to change the database parameters, you can use a MySQL PSM (Persistent Stored Module), like:
Create the set_full_group_by procedure:
1 2 3 4 5 6 7 8 9 10 11 12 13 14 15 16 17 18 19 20 21 22 23 24 25 26 27 | -- Drop procedure conditionally on whether it exists already. DROP PROCEDURE IF EXISTS set_full_group_by; -- Reset delimter to allow semicolons to terminate statements. DELIMITER $$ -- Create a procedure to verify and set connection parameter. CREATE PROCEDURE set_full_group_by() LANGUAGE SQL NOT DETERMINISTIC SQL SECURITY DEFINER COMMENT 'Set connection parameter when not set.' BEGIN /* Check whether full group by is set in the connection and if unset, set it in the scope of the connection. */ IF NOT EXISTS (SELECT NULL WHERE REGEXP_LIKE(@@SQL_MODE,'ONLY_FULL_GROUP_BY')) THEN SET SQL_MODE=(SELECT CONCAT(@@sql_mode,',ONLY_FULL_GROUP_BY')); END IF; END; $$ -- Reset the default delimiter. DELIMITER ; |
Run the following SQL command before you attempt the exercises in the same session scope:
CALL set_full_group_by(); |
As always, I hope this helps those looking for a solution. Naturally, you can simply use the SET command on line #21 above.
MySQL INSERT-SET
I found myself explaining the nuances of INSERT statements and whether you should use named or positional notation. While the class was on Zoom, I could imagine the blank stares in the silence of my headphones. Then, I had to remind them about mandatory (NOT NULL constrained) and optional (nullable) columns in tables and how an INSERT statement requires an explicit NULL value for optional columns when the INSERT statement isn’t inserting a value into that column.
Then, I asked if somebody could qualify the different types of INSERT statements; and what would happen if a table with a first_name and last_name column order evolves when a new DBA decides to restructure the table and uses a last_name and first_name column order in the new table structure. Only a couple of the students recalled using a column-list between the table name and VALUES clause but none could remember how to write an INSERT-SET statement.
Below is a quick example of inserting data with column-lists and the SET clause. It builds an actor table with an actor_id column as a surrogate key and primary key column and a unique natural key composed of the first and last name columns (not a real world solution for uniqueness).
CREATE TABLE actor ( actor_id int unsigned primary key auto_increment , first_name varchar(30) not null , last_name varchar(30) not null , CONSTRAINT actor_uq UNIQUE (first_name, last_name)); |
Next, let’s insert a couple rows with a column-list approach. The column-list is a comma-delimited list of column values that must contain all mandatory columns and may contain optional columns.
INSERT INTO actor ( first_name , last_name ) VALUES ('Harrison','Ford') ,('Carrie','Fisher') ,('Mark','Hamill') ,('Alec','Guinness'); |
Now, let’s validate the unique constraint on the composite value of first and last name by trying to insert a second Harrison Ford into the actor table.
INSERT INTO actor (first_name, last_name) VALUES ('Harrison','Ford'); |
it fails and raises the following error:
ERROR 1062 (23000): Duplicate entry 'Harrison-Ford' for key 'actor.actor_uq' |
The following uses the INSERT-SET statement to add Tom Hanks to the actor table:
INSERT INTO actor SET first_name = 'Tom' , last_name = 'Hanks'; |
I believe the INSERT-SET is the best approach to a name-value model for INSERT statements. It’s a shame that only MySQL supports it. Query the actor table with the following:
SELECT * FROM actor ORDER BY actor_id; |
it returns:
+----------+------------+-----------+ | actor_id | first_name | last_name | +----------+------------+-----------+ | 1 | Harrison | Ford | | 2 | Carrie | Fisher | | 3 | Mark | Hamill | | 4 | Alec | Guinness | | 6 | Tom | Hanks | +----------+------------+-----------+ 5 rows in set (0.01 sec) |
There’s now a gap when you query the data because the second attempt at adding Harrison Ford consumed a sequence value from the internally managed list. That list is a property of the table when you create or alter a table to include an autoincrementing column, like actor_id. Anytime you attempt to insert a row that violates the table constraints, you consume a value from the internally managed sequence. While you can restore it and eliminate the gaps, I strongly recommend against it.
As always, I hope this helps those trying to learn and experiment with syntax.
MySQL Connect Dialog
About a month ago, I published how you can connect to MySQL with a small form. One suggestion, or lets promote it to a request, from that post was: “Nice, but how do you create a reusable library for the MySQL Connection Dialog box?”
That was a good question but I couldn’t get back until now to write a new blog post. This reusable MySQL connection dialog lets you remove MySQL connection data from the command-line history. This post also shows you how to create and test a Powershell Module.

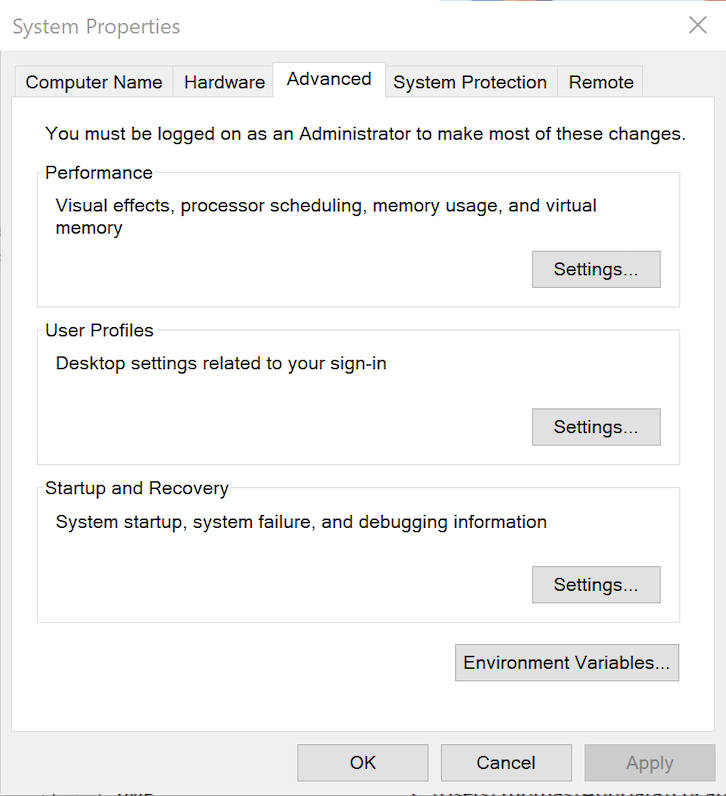
The first step to create a module requires that you set the proper %PSModulePath% environment variable. If you fail to do that, you can put it into a default PowerShell module location but that’s not too effective for testing. You launch the System Properties dialog and click the Environment Variables button:
Then, you edit the PSModulePath environment variable in the bottom list of environment variables and add a new path to the PSModulePath. My development path in this example is:
C:\Data\cit225\mysql\ps\mod |
I named the file the same as the function Get-Credentials.psm1 consistent with the Microsoft instructions for creating a PowerShell module and their instructions for Pascal case name with an approved verb and singular noun.
Below is the code for the Get-Credentials.psm1 file:
function Get-Credentials { # Add libraries for form components. Add-Type -AssemblyName System.Windows.Forms Add-Type -AssemblyName System.Drawing # Define a user credential form. $form = New-Object System.Windows.Forms.Form $form.Text = 'User Credential Form' $form.Size = New-Object System.Drawing.Size(300,240) $form.StartPosition = 'CenterScreen' # Define a button and assign it and its controls to a form. $loginButton = New-Object System.Windows.Forms.Button $loginButton.Location = New-Object System.Drawing.Point(60,160) $loginButton.Size = New-Object System.Drawing.Size(75,23) $loginButton.Text = 'Login' $loginButton.DialogResult = [System.Windows.Forms.DialogResult]::OK $form.AcceptButton = $loginButton $form.Controls.Add($loginButton) # Define a button and assign it and its controls to a form. $cancelButton = New-Object System.Windows.Forms.Button $cancelButton.Location = New-Object System.Drawing.Point(155,160) $cancelButton.Size = New-Object System.Drawing.Size(75,23) $cancelButton.Text = 'Cancel' $cancelButton.DialogResult = [System.Windows.Forms.DialogResult]::Cancel $form.CancelButton = $cancelButton $form.Controls.Add($cancelButton) # Define a label and assign it and its controls to a form. $userLabel = New-Object System.Windows.Forms.Label $userLabel.Location = New-Object System.Drawing.Point(30,15) $userLabel.Size = New-Object System.Drawing.Size(100,20) $userLabel.Text = 'Enter User Name:' $form.Controls.Add($userLabel) # Define a TextBox and assign it and its controls to a form. $userTextBox = New-Object System.Windows.Forms.TextBox $userTextBox.Location = New-Object System.Drawing.Point(140,15) $userTextBox.Size = New-Object System.Drawing.Size(100,20) $form.Controls.Add($userTextBox) # Define a label and assign it and its controls to a form. $pwdLabel = New-Object System.Windows.Forms.Label $pwdLabel.Location = New-Object System.Drawing.Point(30,40) $pwdLabel.Size = New-Object System.Drawing.Size(100,20) $pwdLabel.Text = 'Enter Password:' $form.Controls.Add($pwdLabel) # Define a TextBox and assign it and its controls to a form. $pwdTextBox = New-Object System.Windows.Forms.TextBox $pwdTextBox.Location = New-Object System.Drawing.Point(140,40) $pwdTextBox.Size = New-Object System.Drawing.Size(100,20) $pwdTextBox.PasswordChar = "*" $form.Controls.Add($pwdTextBox) # Define a label and assign it and its controls to a form. $hostLabel = New-Object System.Windows.Forms.Label $hostLabel.Location = New-Object System.Drawing.Point(30,65) $hostLabel.Size = New-Object System.Drawing.Size(100,20) $hostLabel.Text = 'Enter Hostname:' $form.Controls.Add($hostLabel) # Define a TextBox and assign it and its controls to a form. $hostTextBox = New-Object System.Windows.Forms.TextBox $hostTextBox.Location = New-Object System.Drawing.Point(140,65) $hostTextBox.Size = New-Object System.Drawing.Size(100,20) $form.Controls.Add($hostTextBox) # Define a label and assign it and its controls to a form. $portLabel = New-Object System.Windows.Forms.Label $portLabel.Location = New-Object System.Drawing.Point(30,90) $portLabel.Size = New-Object System.Drawing.Size(100,20) $portLabel.Text = 'Enter Port #:' $form.Controls.Add($portLabel) # Define a TextBox and assign it and its controls to a form. $portTextBox = New-Object System.Windows.Forms.TextBox $portTextBox.Location = New-Object System.Drawing.Point(140,90) $portTextBox.Size = New-Object System.Drawing.Size(100,20) $form.Controls.Add($portTextBox) # Define a label and assign it and its controls to a form. $dbLabel = New-Object System.Windows.Forms.Label $dbLabel.Location = New-Object System.Drawing.Point(30,115) $dbLabel.Size = New-Object System.Drawing.Size(100,20) $dbLabel.Text = 'Enter DB Name:' $form.Controls.Add($dbLabel) # Define a TextBox and assign it and its controls to a form. $dbTextBox = New-Object System.Windows.Forms.TextBox $dbTextBox.Location = New-Object System.Drawing.Point(140,115) $dbTextBox.Size = New-Object System.Drawing.Size(100,20) $form.Controls.Add($dbTextBox) $form.Topmost = $true $form.Add_Shown({$userTextBox.Select()}) $result = $form.ShowDialog() if ($result -eq [System.Windows.Forms.DialogResult]::OK) { # Assign inputs to connection variables. $uid = $userTextBox.Text $pwd = $pwdTextBox.Text $server = $hostTextBox.Text $port= $portTextBox.Text $dbName = $dbTextBox.Text # Declare connection string. $credentials = 'server=' + $server + ';port=' + $port + ';uid=' + $uid + ';pwd=' + $pwd + ';database=' + $dbName } else { $credentials = $null } return $credentials } |
You must create a Get-Connection directory in your C:\Data\cit225\mysql\ps\mod directory that you added to the PSModulePath. Then, you must put your module code in the Get-Connection subdirectory as the Get-Connection.psm1 module file.
The test.ps1 script imports the Get-Credentials.psm1 PowerShell module, launches the MySQL Connection Dialog form and returns the connection string. The test.ps1 code is:
# Import your custom module. Import-Module Get-Credentials # Test the Get-Credentials function. if (($credentials = Get-Credentials) -ne $undefinedVariable) { Write-Host($credentials) } |
You can test it from the local any directory with the following command-line:
powershell .\test.ps1 |
It should print something like this to the console:
server=localhost;port=3306;uid=student;pwd=student;database=studentdb |
If you got this far, that’s great! You’re ready to test a connection to the MySQL database. Before you do that, you should create the same avenger table I used in the initial post and insert the same or some additional data. Connect to the any of your test databases and rung the following code to create the avenger table and nine rows of data.
-- Create the avenger table. CREATE TABLE db_connect ( db_connect_id INT UNSIGNED PRIMARY KEY AUTO_INCREMENT , version VARCHAR(10) , user VARCHAR(24) , db_name VARCHAR(10)); -- Seed the avenger table with data. INSERT INTO avenger ( first_name, last_name, avenger ) VALUES ('Anthony', 'Stark', 'Iron Man') ,('Thor', 'Odinson', 'God of Thunder') ,('Steven', 'Rogers', 'Captain America') ,('Bruce', 'Banner', 'Hulk') ,('Clinton', 'Barton', 'Hawkeye') ,('Natasha', 'Romanoff', 'Black Widow') ,('Peter', 'Parker', 'Spiderman') ,('Steven', 'Strange', 'Dr. Strange') ,('Scott', 'Lange', 'Ant-man'); |
Now, let’s promote our use-case test.ps1 script to a testQuery.ps1 script, like:
# Import your custom module. Import-Module Get-Credentials # Test the Get-Credentials function. if (($credentials = Get-Credentials) -ne $undefinedVariable) { # Connect to the libaray MySQL.Data.dll Add-Type -Path 'C:\Program Files (x86)\MySQL\Connector NET 8.0\Assemblies\v4.5.2\MySql.Data.dll' # Create a MySQL Database connection variable that qualifies: # [Driver]@ConnectionString # ============================================================ # You can assign the connection string before using it or # while using it, which is what we do below by assigning # literal values for the following names: # - server=<ip_address> or 127.0.0.1 for localhost # - uid=<user_name> # - pwd=<password> # - port=<port#> or 3306 for default port # - database=<database_name> # ============================================================ $Connection = [MySql.Data.MySqlClient.MySqlConnection]@{ConnectionString=$credentials} $Connection.Open() # Define a MySQL Command Object for a non-query. $sqlCommand = New-Object MySql.Data.MySqlClient.MySqlCommand $sqlDataAdapter = New-Object MySql.Data.MySqlClient.MySqlDataAdapter $sqlDataSet = New-Object System.Data.DataSet # Assign the connection and command text to the MySQL command object. $sqlCommand.Connection = $Connection $sqlCommand.CommandText = 'SELECT CONCAT(first_name," ",last_name) AS full_name ' + ', avenger ' + 'FROM avenger' # Assign the connection and command text to the query method of # the data adapter object. $sqlDataAdapter.SelectCommand=$sqlCommand # Assign the tuples of data to a data set and return the number of rows fetched. $rowsFetched=$sqlDataAdapter.Fill($sqlDataSet, "data") # Print to console the data returned from the query. foreach($row in $sqlDataSet.tables[0]) { write-host "Avenger:" $row.avenger "is" $row.full_name } # Close the MySQL connection. $Connection.Close() } |
It should give you the MySQL Connection Dialog and with the correct credentials print the following to your console:
Avenger: Iron Man is Anthony Stark Avenger: God of Thunder is Thor Odinson Avenger: Captain America is Steven Rogers Avenger: Hulk is Bruce Banner Avenger: Hawkeye is Clinton Barton Avenger: Black Widow is Natasha Romanoff Avenger: Spiderman is Peter Parker Avenger: Dr. Strange is Steven Strange Avenger: Ant-man is Scott Lange |
As always, I hope this helps those looking to exploit technology.
MySQL+Credentials
The first tutorial supplementing the MySQL Connector/NET Developer Guide showed you how to connect and run static INSERT statement. It was a barebones PowerShell script with the MySQL Connector. This post shows you how to run a PowerShell script that uses a dynamic form to gather the MySQL credentials and then run a static query. Below is the MySQL Credentials form.

You enter the correct user name, password, hostname (or IP address), port, and database, like this:

Here’s the complete code for this staticQuery.ps1 PowerShell script:
# Add libraries for form components. Add-Type -AssemblyName System.Windows.Forms Add-Type -AssemblyName System.Drawing # Define a user credential form. $form = New-Object System.Windows.Forms.Form $form.Text = 'User Credential Form' $form.Size = New-Object System.Drawing.Size(300,240) $form.StartPosition = 'CenterScreen' # Define a button and assign it and its controls to a form. $loginButton = New-Object System.Windows.Forms.Button $loginButton.Location = New-Object System.Drawing.Point(60,160) $loginButton.Size = New-Object System.Drawing.Size(75,23) $loginButton.Text = 'Login' $loginButton.DialogResult = [System.Windows.Forms.DialogResult]::OK $form.AcceptButton = $loginButton $form.Controls.Add($loginButton) # Define a button and assign it and its controls to a form. $cancelButton = New-Object System.Windows.Forms.Button $cancelButton.Location = New-Object System.Drawing.Point(155,160) $cancelButton.Size = New-Object System.Drawing.Size(75,23) $cancelButton.Text = 'Cancel' $cancelButton.DialogResult = [System.Windows.Forms.DialogResult]::Cancel $form.CancelButton = $cancelButton $form.Controls.Add($cancelButton) # Define a label and assign it and its controls to a form. $userLabel = New-Object System.Windows.Forms.Label $userLabel.Location = New-Object System.Drawing.Point(30,15) $userLabel.Size = New-Object System.Drawing.Size(100,20) $userLabel.Text = 'Enter User Name:' $form.Controls.Add($userLabel) # Define a TextBox and assign it and its controls to a form. $userTextBox = New-Object System.Windows.Forms.TextBox $userTextBox.Location = New-Object System.Drawing.Point(140,15) $userTextBox.Size = New-Object System.Drawing.Size(100,20) $form.Controls.Add($userTextBox) # Define a label and assign it and its controls to a form. $pwdLabel = New-Object System.Windows.Forms.Label $pwdLabel.Location = New-Object System.Drawing.Point(30,40) $pwdLabel.Size = New-Object System.Drawing.Size(100,20) $pwdLabel.Text = 'Enter Password:' $form.Controls.Add($pwdLabel) # Define a TextBox and assign it and its controls to a form. $pwdTextBox = New-Object System.Windows.Forms.TextBox $pwdTextBox.Location = New-Object System.Drawing.Point(140,40) $pwdTextBox.Size = New-Object System.Drawing.Size(100,20) $pwdTextBox.PasswordChar = "*" $form.Controls.Add($pwdTextBox) # Define a label and assign it and its controls to a form. $hostLabel = New-Object System.Windows.Forms.Label $hostLabel.Location = New-Object System.Drawing.Point(30,65) $hostLabel.Size = New-Object System.Drawing.Size(100,20) $hostLabel.Text = 'Enter Hostname:' $form.Controls.Add($hostLabel) # Define a TextBox and assign it and its controls to a form. $hostTextBox = New-Object System.Windows.Forms.TextBox $hostTextBox.Location = New-Object System.Drawing.Point(140,65) $hostTextBox.Size = New-Object System.Drawing.Size(100,20) $form.Controls.Add($hostTextBox) # Define a label and assign it and its controls to a form. $portLabel = New-Object System.Windows.Forms.Label $portLabel.Location = New-Object System.Drawing.Point(30,90) $portLabel.Size = New-Object System.Drawing.Size(100,20) $portLabel.Text = 'Enter Port #:' $form.Controls.Add($portLabel) # Define a TextBox and assign it and its controls to a form. $portTextBox = New-Object System.Windows.Forms.TextBox $portTextBox.Location = New-Object System.Drawing.Point(140,90) $portTextBox.Size = New-Object System.Drawing.Size(100,20) $form.Controls.Add($portTextBox) # Define a label and assign it and its controls to a form. $dbLabel = New-Object System.Windows.Forms.Label $dbLabel.Location = New-Object System.Drawing.Point(30,115) $dbLabel.Size = New-Object System.Drawing.Size(100,20) $dbLabel.Text = 'Enter DB Name:' $form.Controls.Add($dbLabel) # Define a TextBox and assign it and its controls to a form. $dbTextBox = New-Object System.Windows.Forms.TextBox $dbTextBox.Location = New-Object System.Drawing.Point(140,115) $dbTextBox.Size = New-Object System.Drawing.Size(100,20) $form.Controls.Add($dbTextBox) $form.Topmost = $true $form.Add_Shown({$userTextBox.Select()}) $result = $form.ShowDialog() if ($result -eq [System.Windows.Forms.DialogResult]::OK) { # Assign inputs to connection variables. $uid = $userTextBox.Text $pwd = $pwdTextBox.Text $server = $hostTextBox.Text $port= $portTextBox.Text $dbName = $dbTextBox.Text # Declare connection string. $credentials = 'server=' + $server + ';port=' + $port + ';uid=' + $uid + ';pwd=' + $pwd + ';database=' + $dbName # Connect to the libaray MySQL.Data.dll Add-Type -Path 'C:\Program Files (x86)\MySQL\Connector NET 8.0\Assemblies\v4.5.2\MySql.Data.dll' # Create a MySQL Database connection variable that qualifies: # [Driver]@ConnectionString # ============================================================ # You can assign the connection string before using it or # while using it, which is what we do below by assigning # literal values for the following names: # - server=<ip_address> or 127.0.0.1 for localhost # - port=<port #> # - uid=<user_name> # - pwd=<password> # - database=<database_name> # ============================================================ $Connection = [MySql.Data.MySqlClient.MySqlConnection]@{ConnectionString=$credentials} $Connection.Open() # Define a MySQL Command Object for a non-query. $sqlCommand = New-Object MySql.Data.MySqlClient.MySqlCommand $sqlDataAdapter = New-Object MySql.Data.MySqlClient.MySqlDataAdapter $sqlDataSet = New-Object System.Data.DataSet # Assign the connection and command text to the MySQL command object. $sqlCommand.Connection = $Connection $sqlCommand.CommandText = 'SELECT CONCAT(first_name," ",last_name) AS full_name ' + ', avenger ' + 'FROM avenger' # Assign the connection and command text to the query method of # the data adapter object. $sqlDataAdapter.SelectCommand=$sqlCommand # Assign the tuples of data to a data set and return the number of rows fetched. $rowsFetched=$sqlDataAdapter.Fill($sqlDataSet, "data") # Print to console the data returned from the query. foreach($row in $sqlDataSet.tables[0]) { write-host "Avenger:" $row.avenger "is" $row.full_name } # Close the MySQL connection. $Connection.Close() } |
I created an avenger table and populated it with six rows of data:
-- Create the avenger table. CREATE TABLE db_connect ( db_connect_id INT UNSIGNED PRIMARY KEY AUTO_INCREMENT , version VARCHAR(10) , user VARCHAR(24) , db_name VARCHAR(10)); -- Seed the avenger table with data. INSERT INTO avenger ( first_name, last_name, avenger ) VALUES ('Anthony', 'Stark', 'Iron Man') ,('Thor', 'Odinson', 'God of Thunder') ,('Steven', 'Rogers', 'Captain America') ,('Bruce', 'Banner', 'Hulk') ,('Clinton', 'Barton', 'Hawkeye') ,('Natasha', 'Romanoff', 'Black Widow'); |
You run the staticQuery.ps1 PowerShell script from the Windows command shell with the following syntax:
powershell .\staticQuery.ps1 |
After running the staticQuery.ps1 PowerShell script, it writes the following to the local console but with minimal effort you can redirect it to a file:
Avenger: Iron Man is Anthony Stark Avenger: God of Thunder is Thor Odinson Avenger: Captain America is Steven Rogers Avenger: Hulk is Bruce Banner Avenger: Hawkeye is Clinton Barton Avenger: Black Widow is Natasha Romanoff |
As always, I hope this helps those looking to use this technology. My guess is the principal uses will be DevOps and Data Engineers.
MySQL 8.0 Install
MySQL will be used for our online sections because the VMware instance and Docker configurations where too large to effectively download this term.
MySQL 8.0.21 Installation Steps
After you download the MySQL 8 MSI file, you will perform the following 24 steps to install MySQL on Windows 10. If you want a full developer install you must install Microsoft Excel and Visual Studio first.
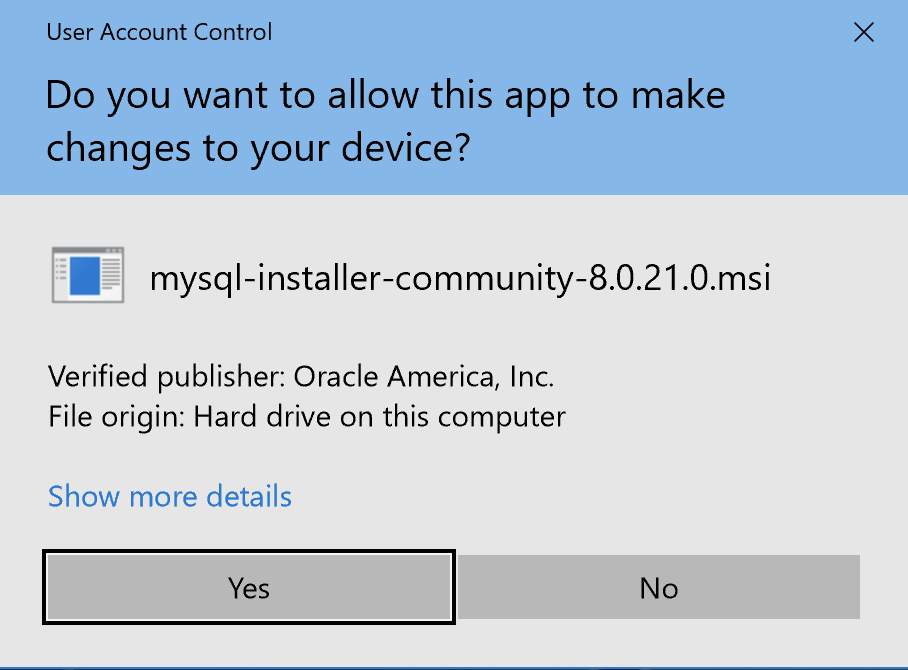
- The first thing you need to do is grant privileges to allow the MySQL Installer application to work in Windows 10. Click the Yes button to authorize the MySQL Installer to run.
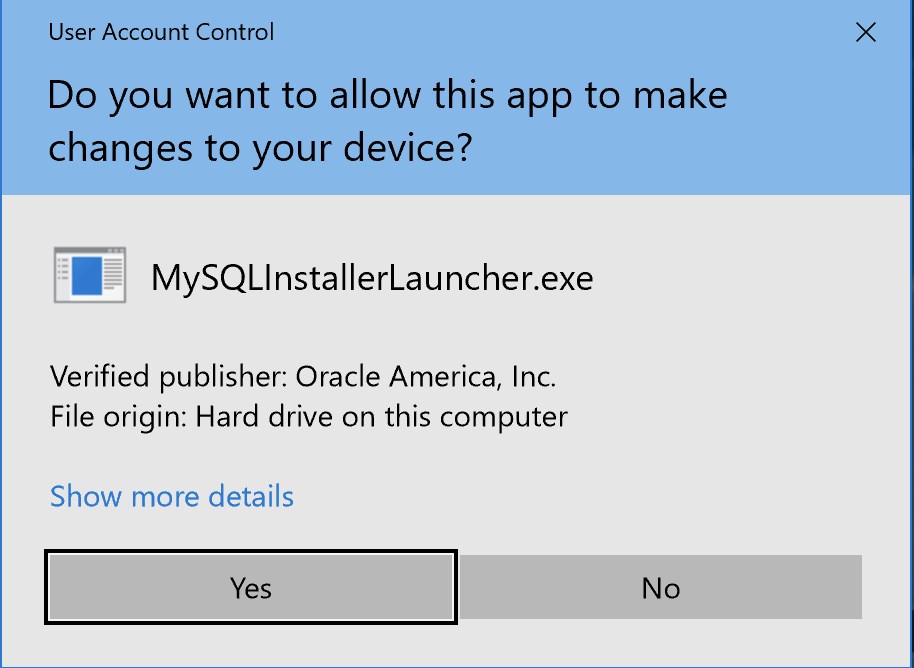
- The next thing you need to do is grant privileges to allow the MySQL Installer Launcher application to work in Windows 10. Click the Yes button to authorize the MySQL Installer to run.

- Now you start the install by choosing a setup type. As a rule, I recommend you install the Developer Default. It is the default selection and preselected for you. Click the Next button to verify that you can install what you’ve selected.
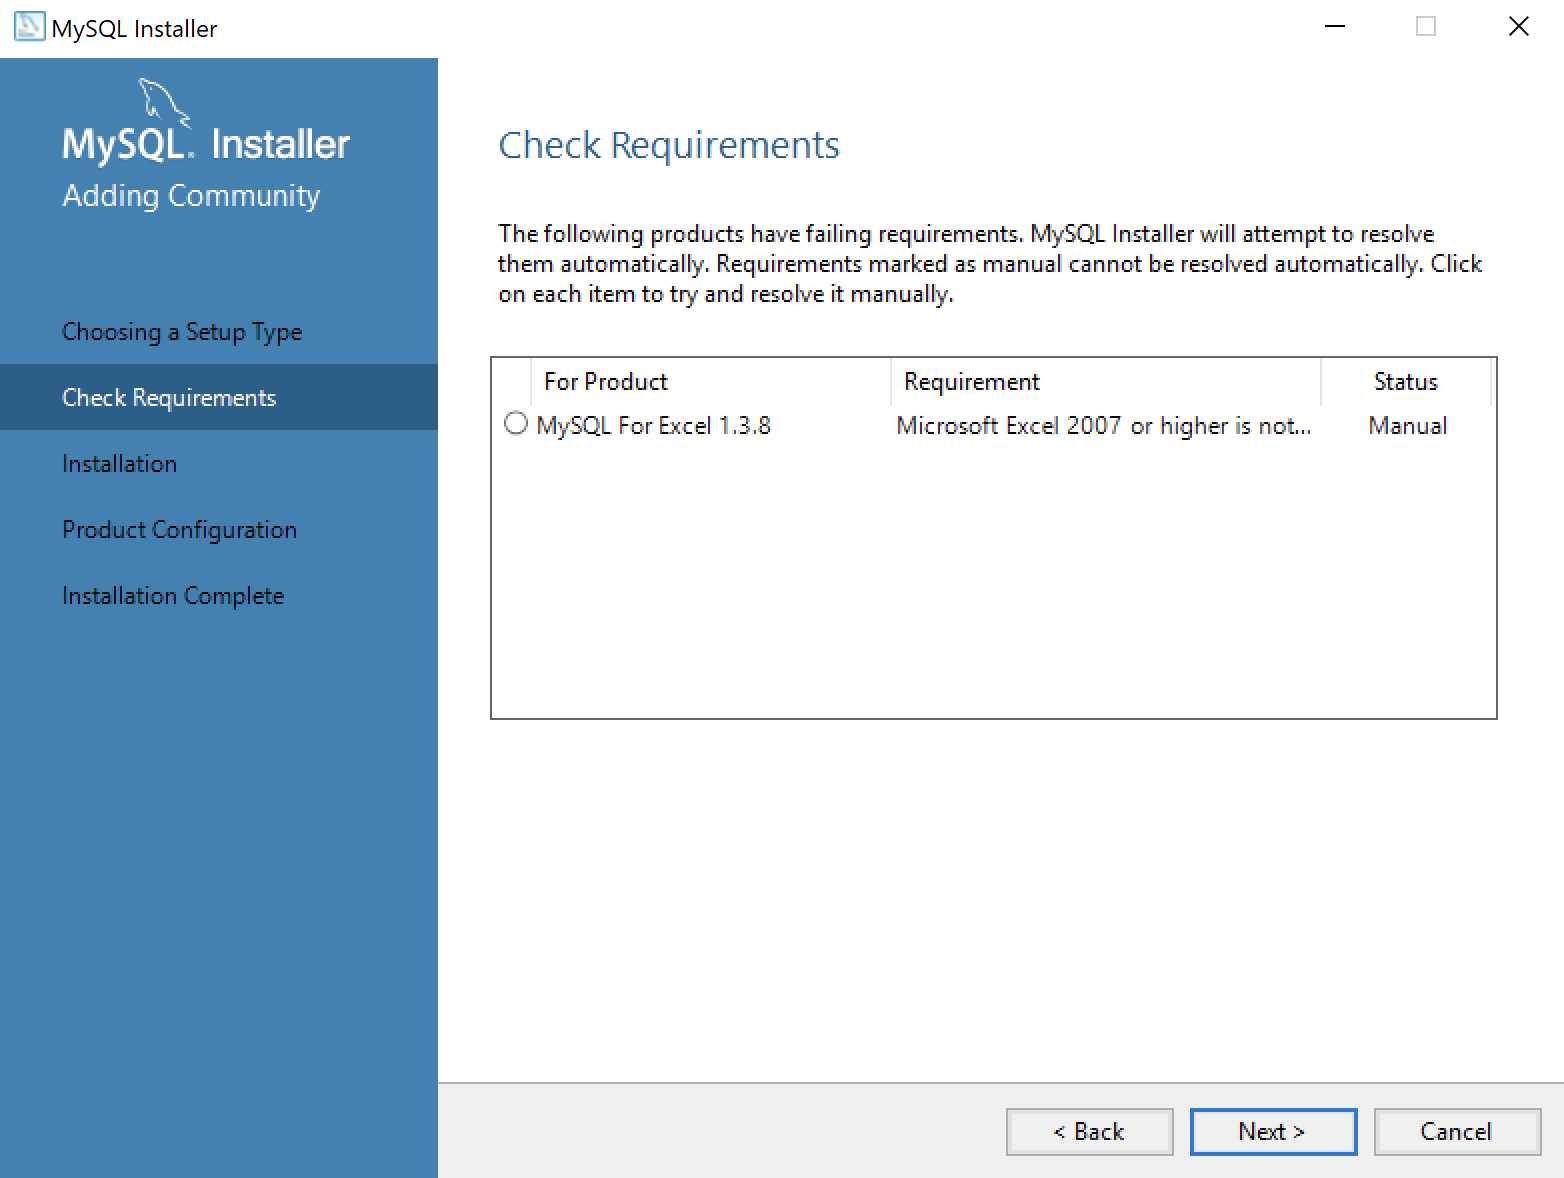
- The next workflow step checks requirements and lists any unmet requirements. The workflow lists the requirements for MySQL for Excel 1.3.8 as unmet because Microsoft Excel is not installed. Click the Next button when there are no unmet requirements in the list. Click the Back button to remove MySQL for Excel 1.3.8 from the setup selection.

- Returning to the setup type workflow, you should select the Custom radio button. Click the Next button to view the list of selected types.
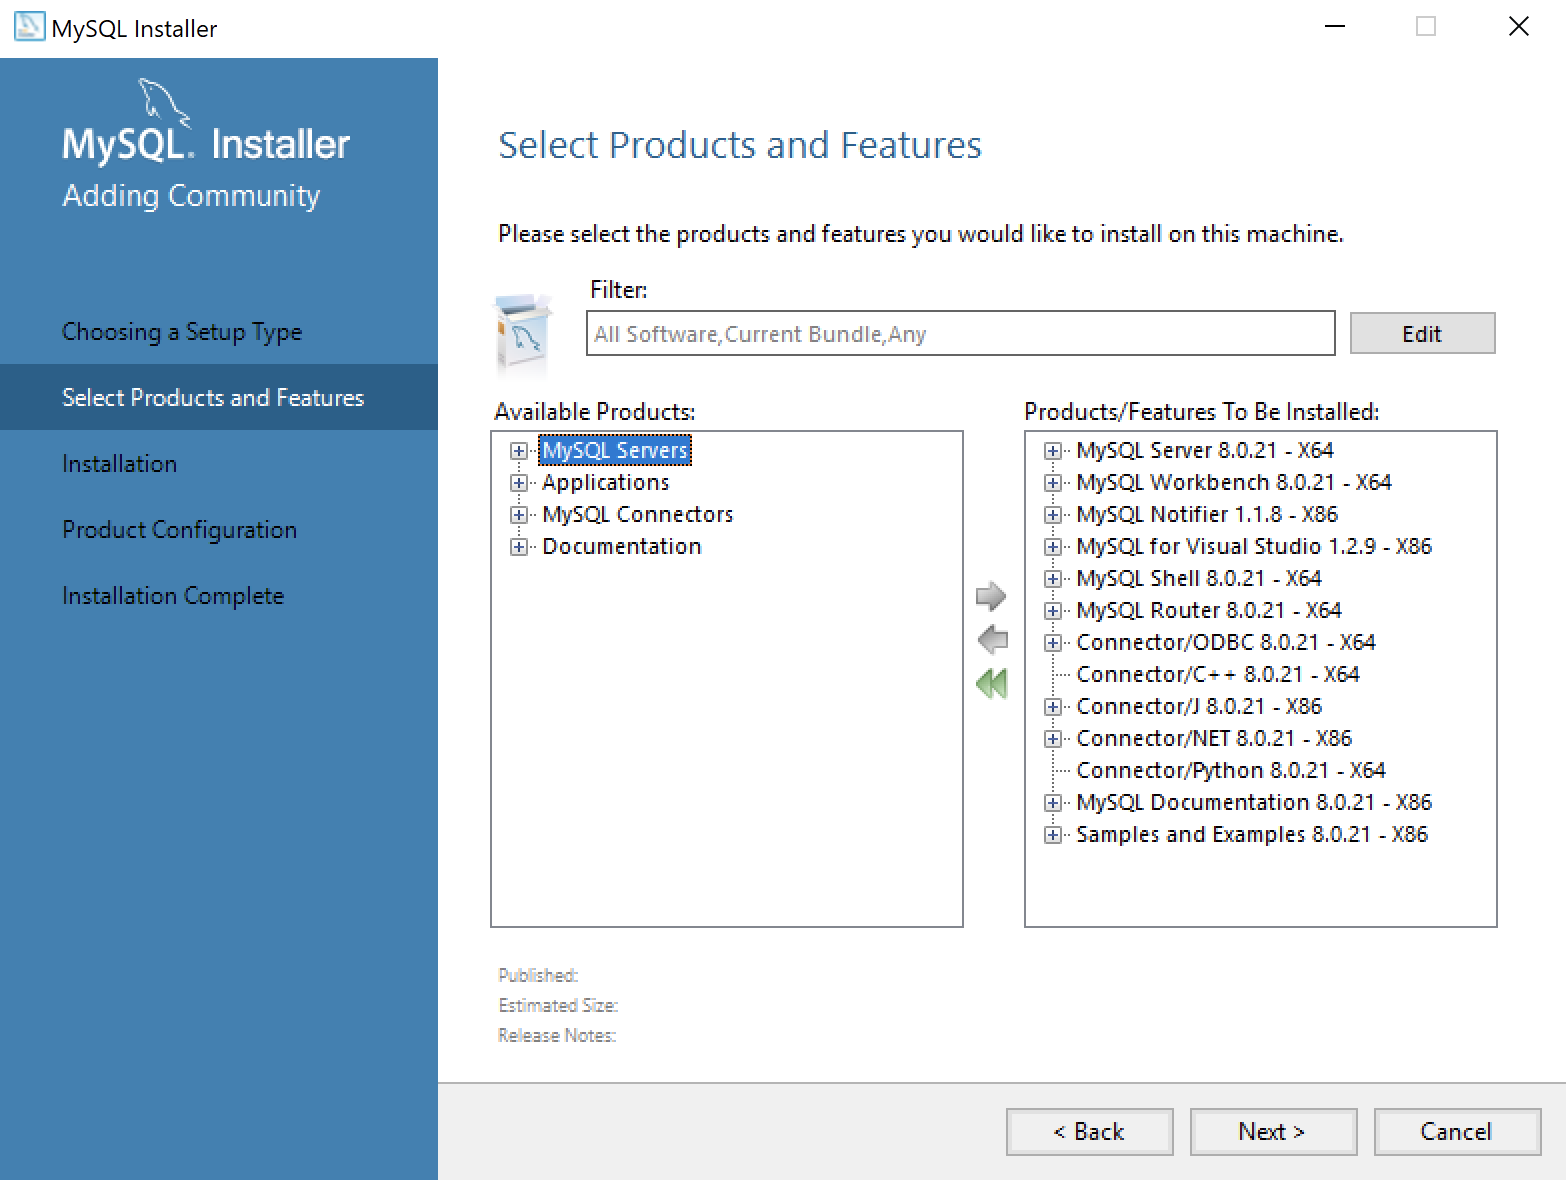
- Use the green arrow pointing to the left to remove MySQL for Excel 1.3.8 from the list. Click the Next button to continue the MySQL Installer to install the selected MySQL libraries.
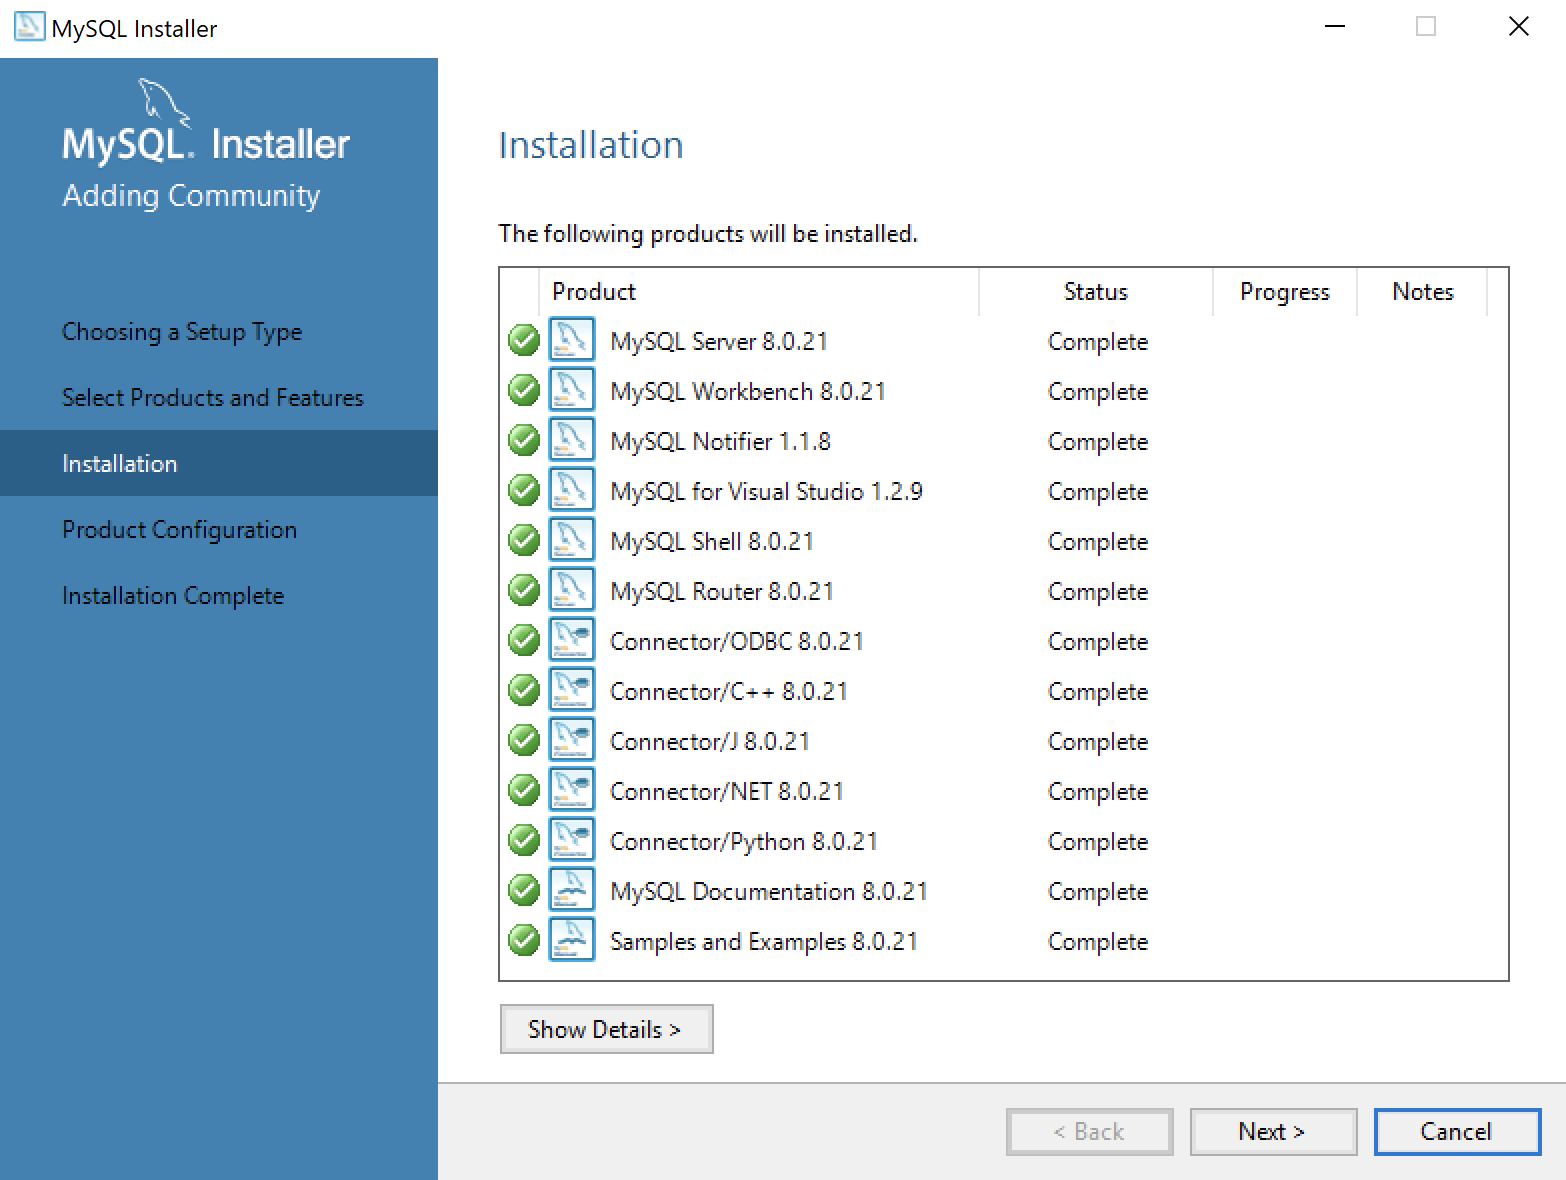
- This dialog will display for several minutes as each of the MySQL Installer modules is. Click the Next button to move forward in the MySQL Installer workflow.
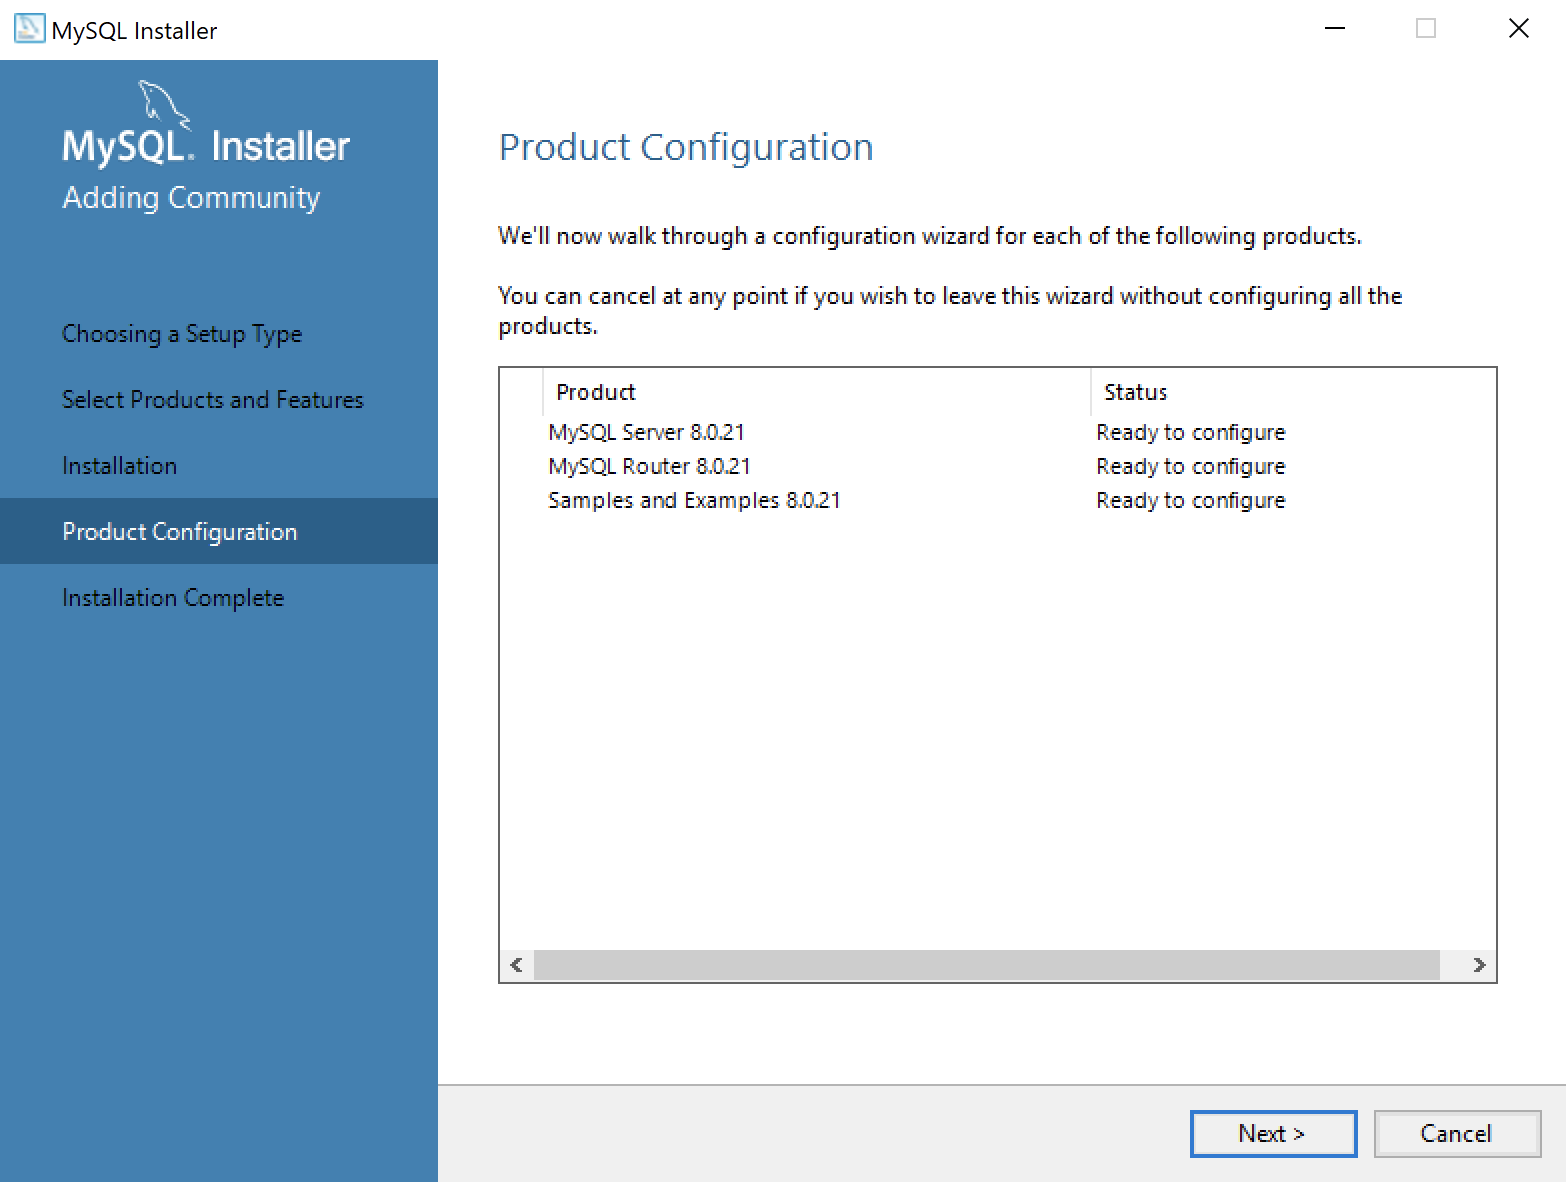
- This dialog qualifies that there are three products to configure. Click the Next button to begin configuration of these products.
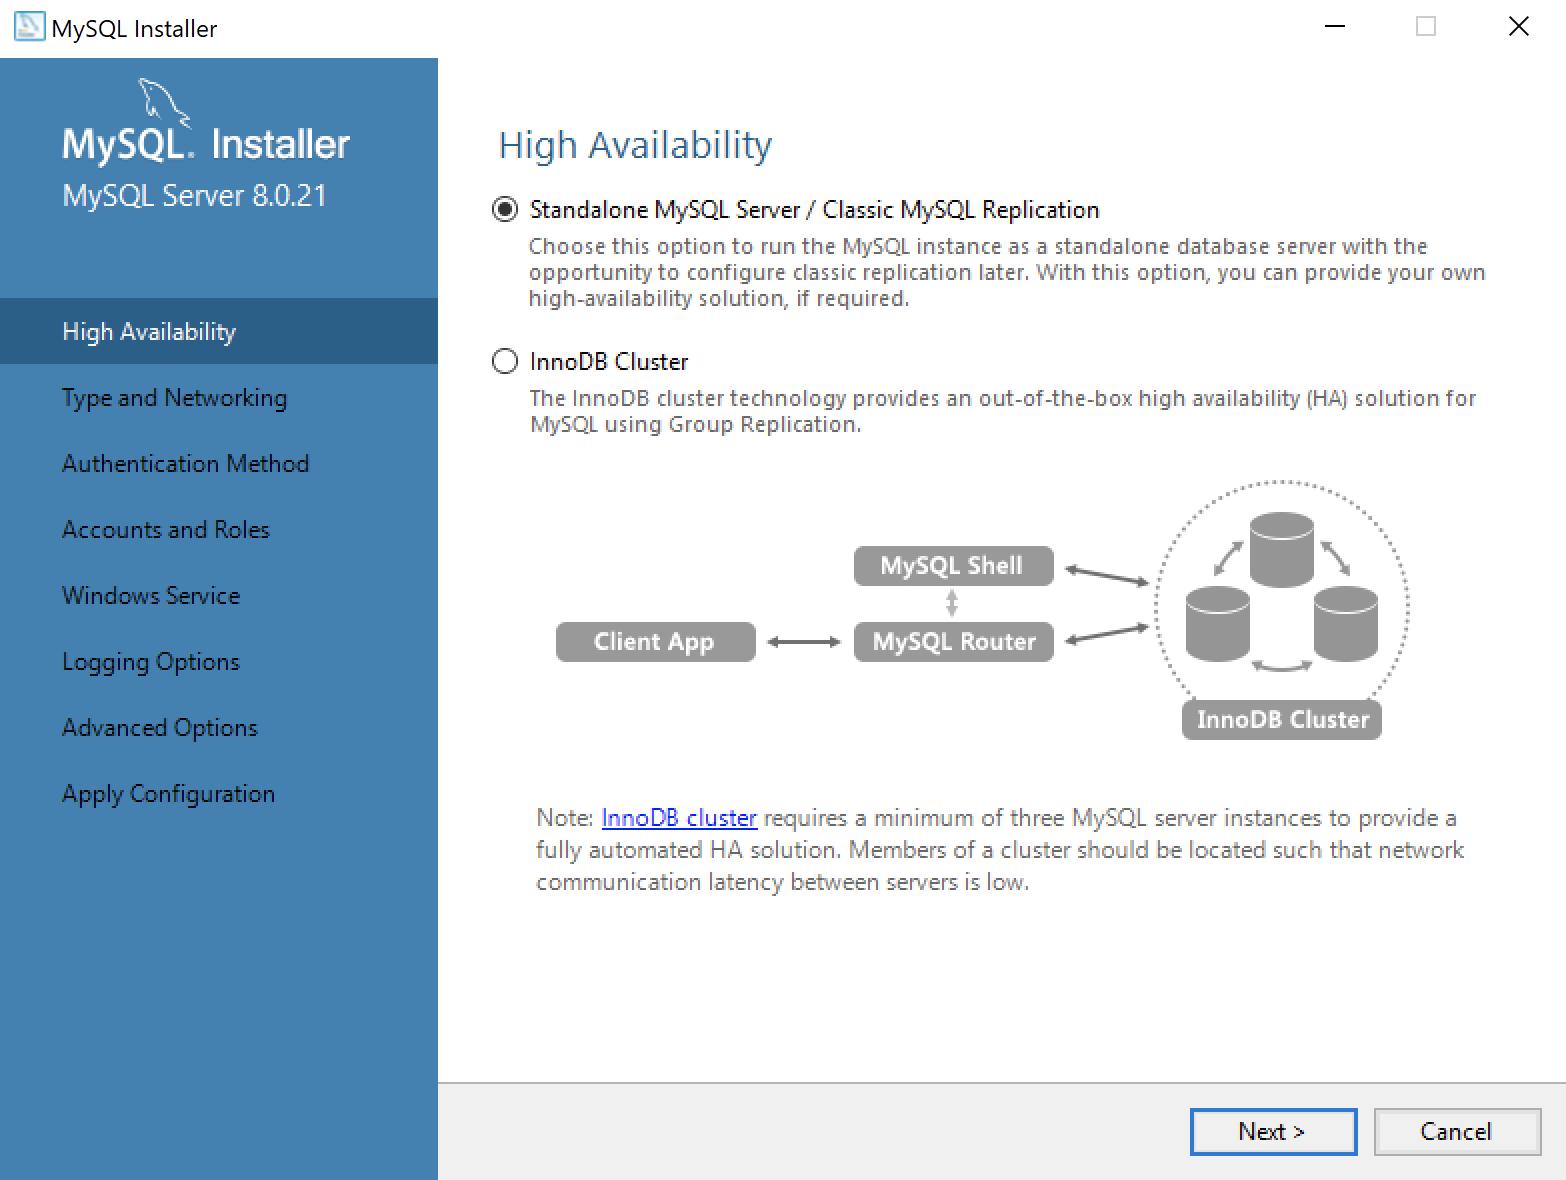
- This dialog lets you choose between a Standalone MySQL Server / Classic MySQL Replication and InnoDB Cluster. You should choose the Standalone MySQL Server for a developer installation on a laptop or desktop. Click the Next button to continue the MySQL Installer configuration.
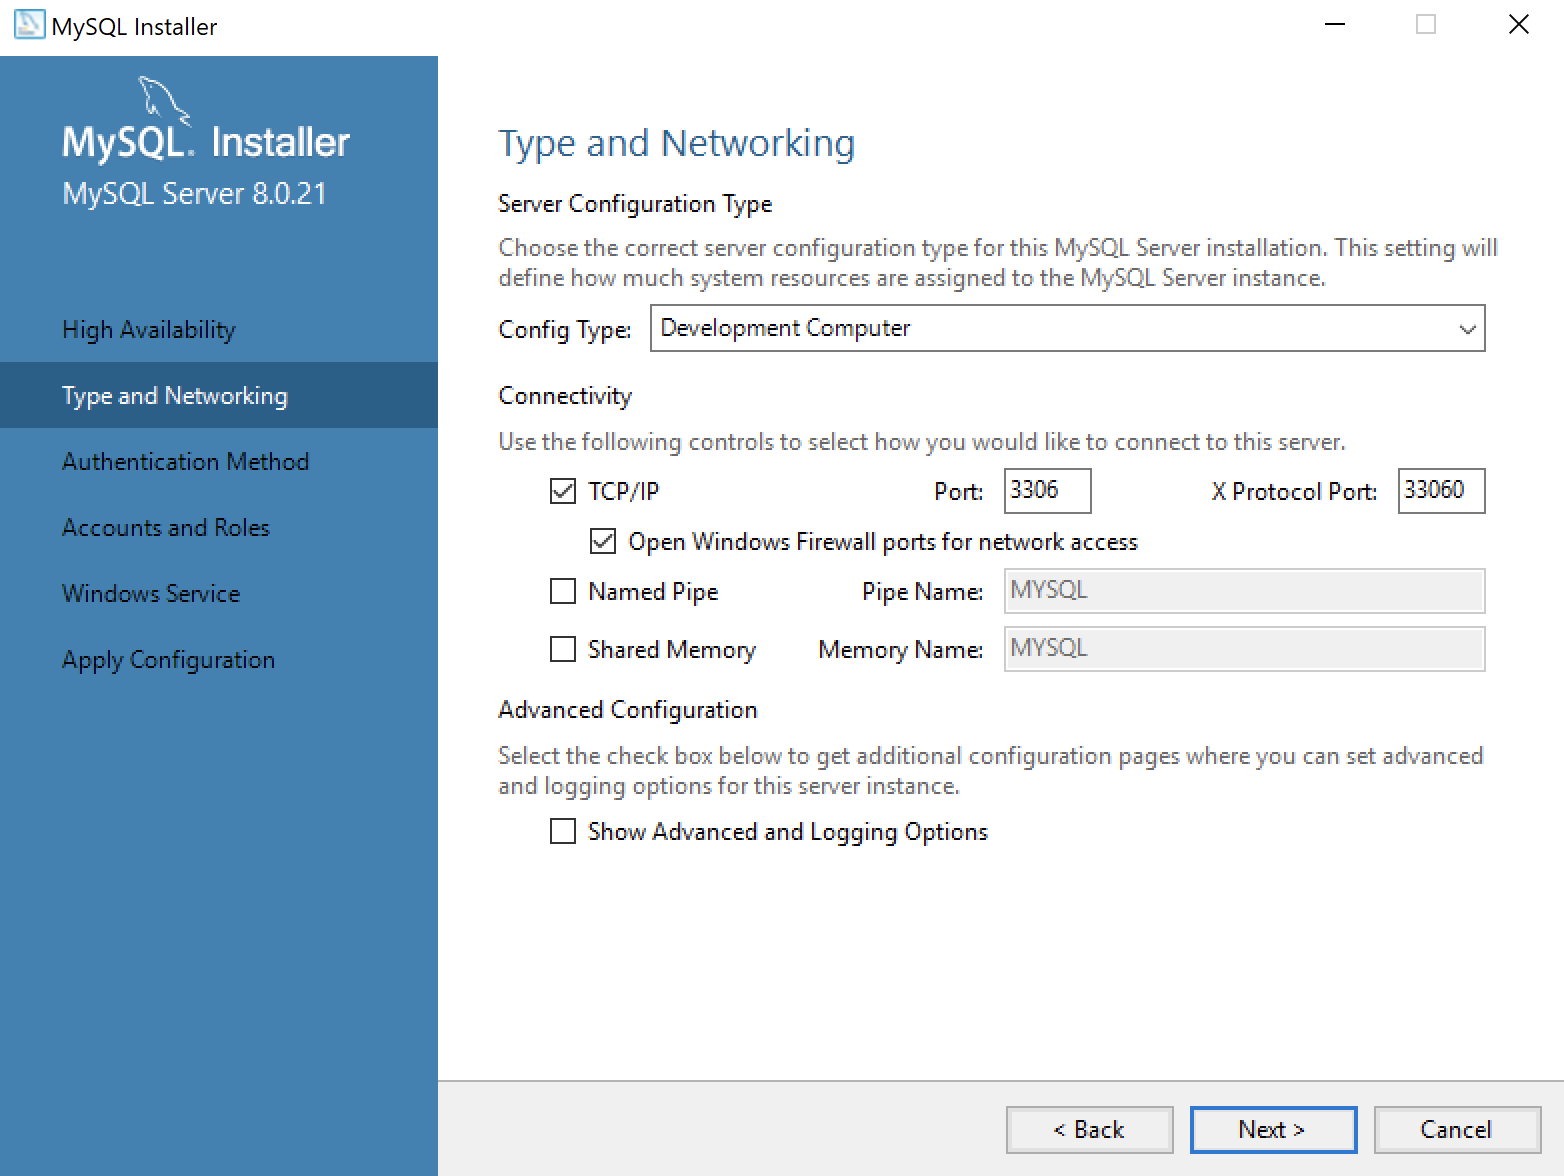
- This dialog lets you choose set the type and networking values. They should be preselected as they are in the screen image. Click the Next button to continue the MySQL Installer configuration.
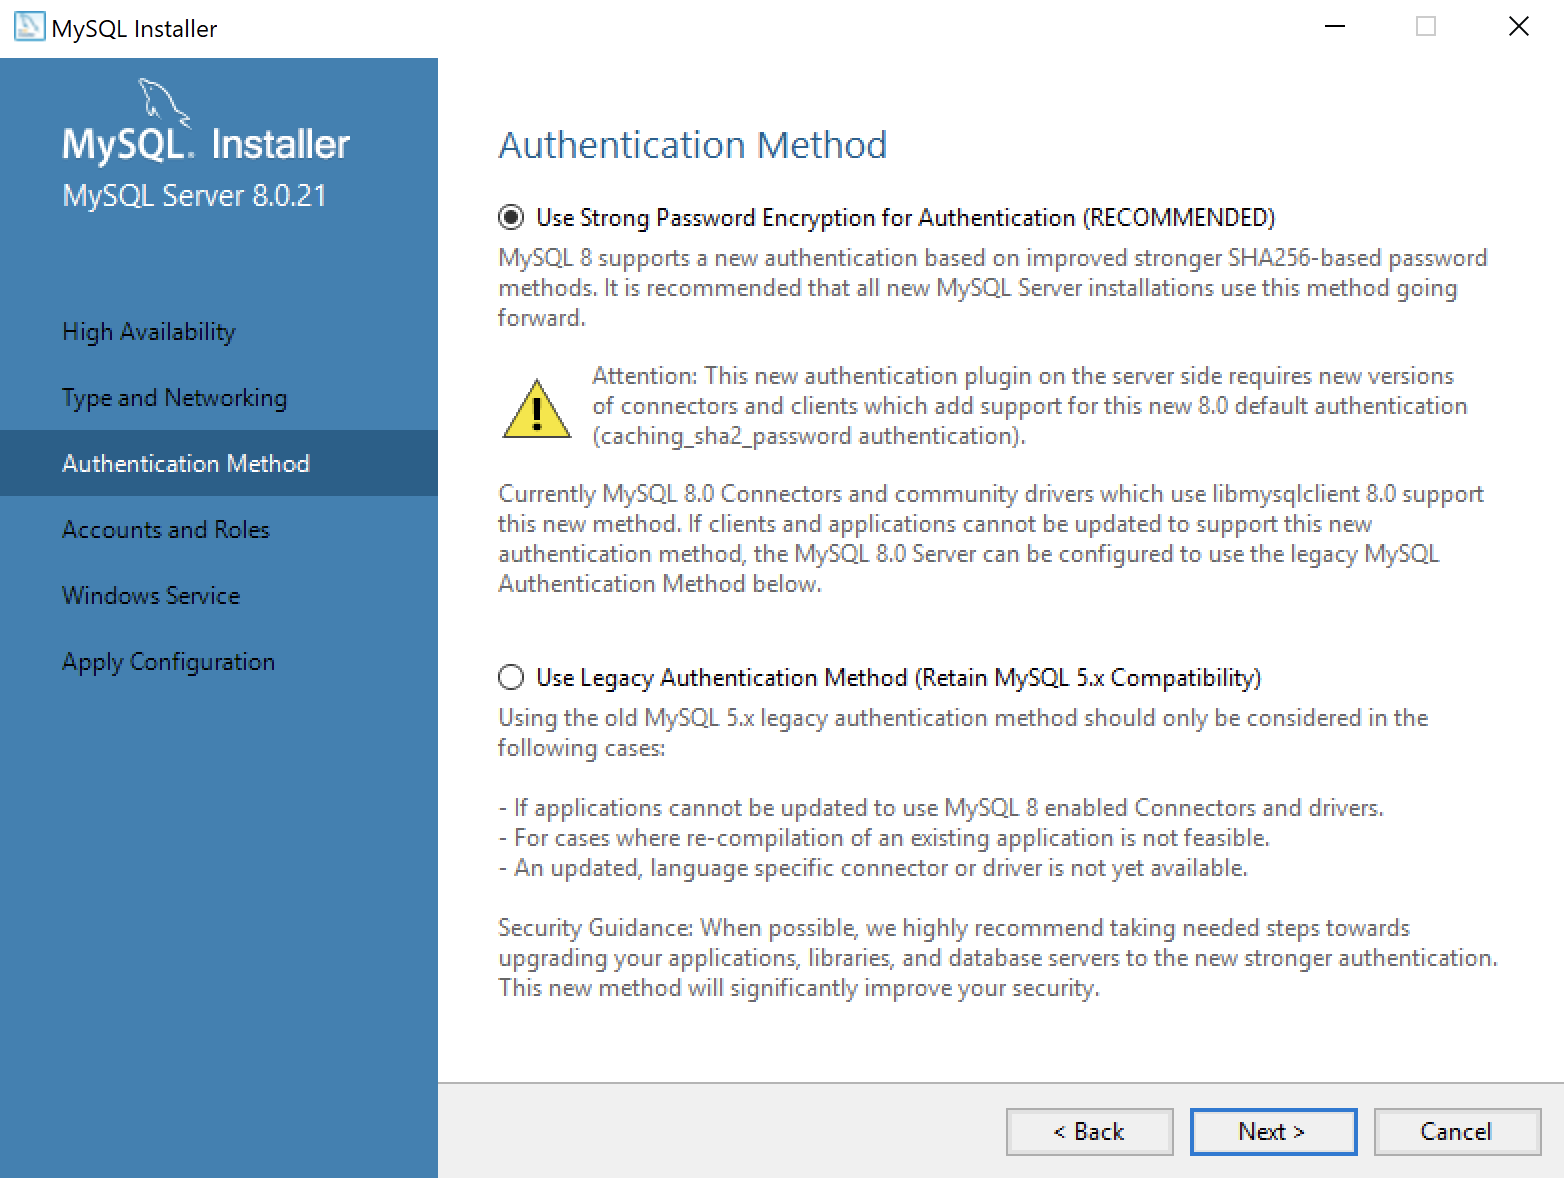
- This dialog lets you choose between SHA256-based and the older MD5 encryption. Click Use Strong Password Encryption for Authentication (RECOMMENDED) radio button. Click the Next button to continue the MySQL Installer configuration.
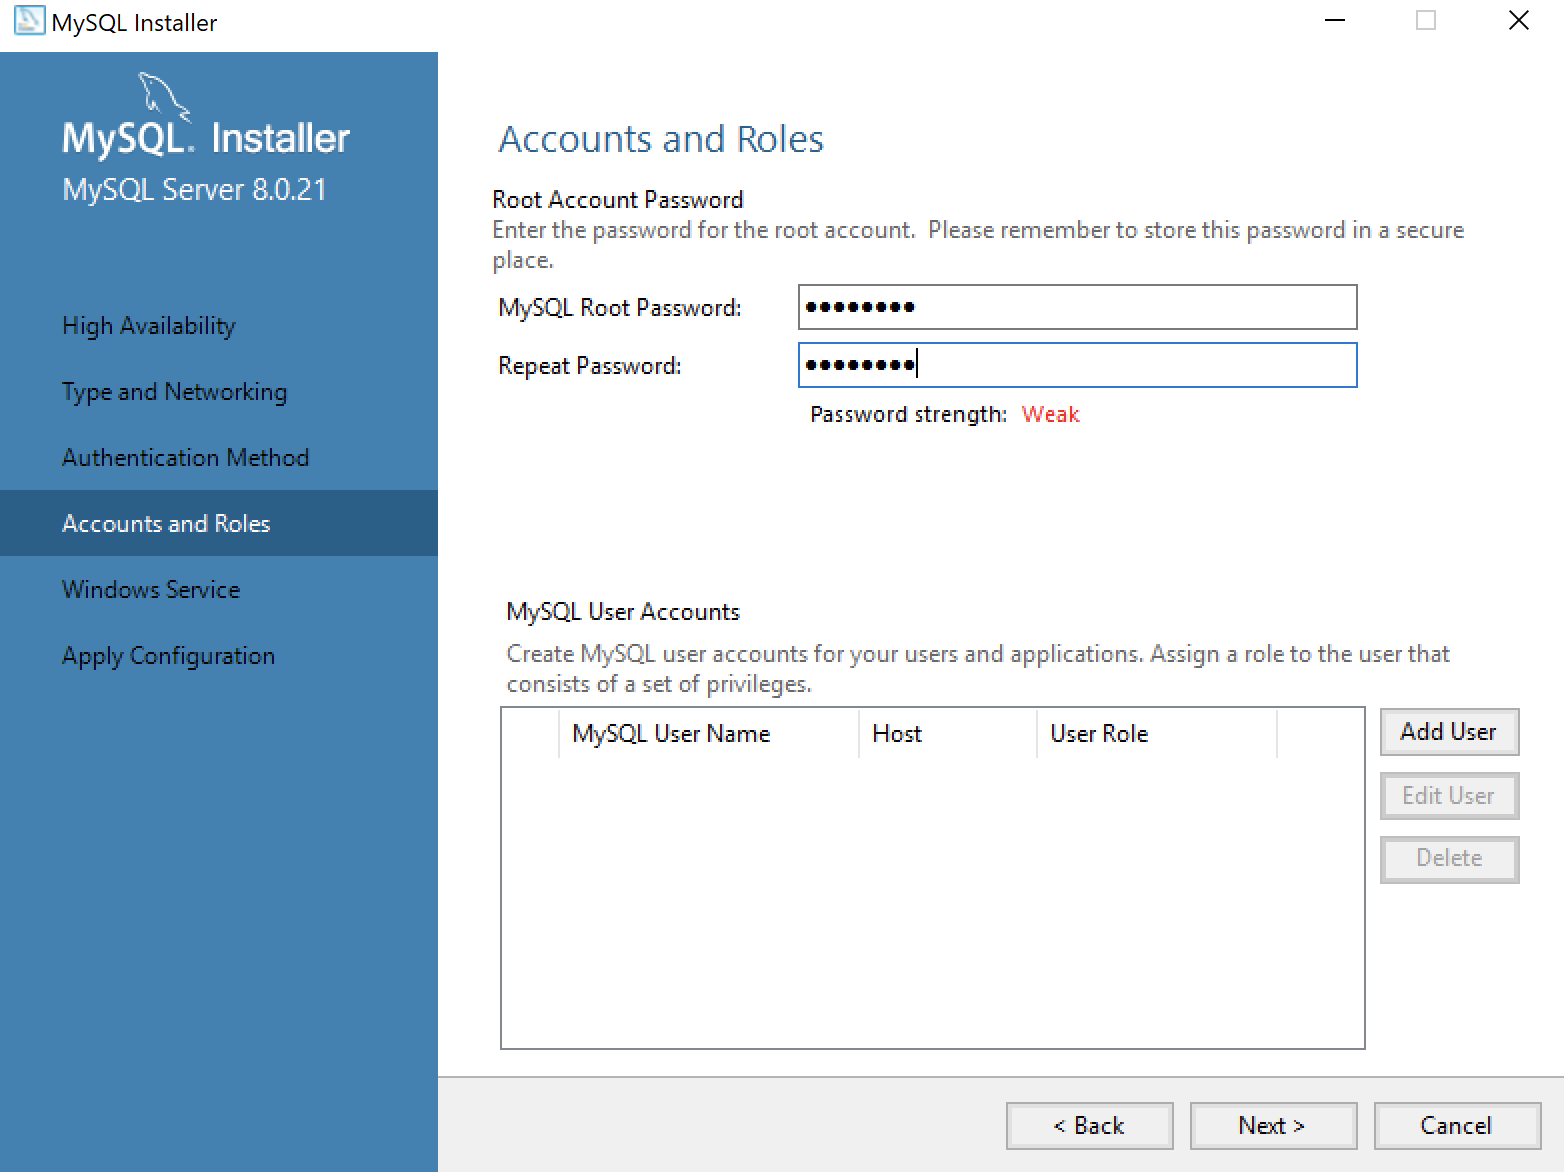
- This dialog lets you enter the MySQL Root Password. Click the Next button to continue the MySQL Installer configuration.
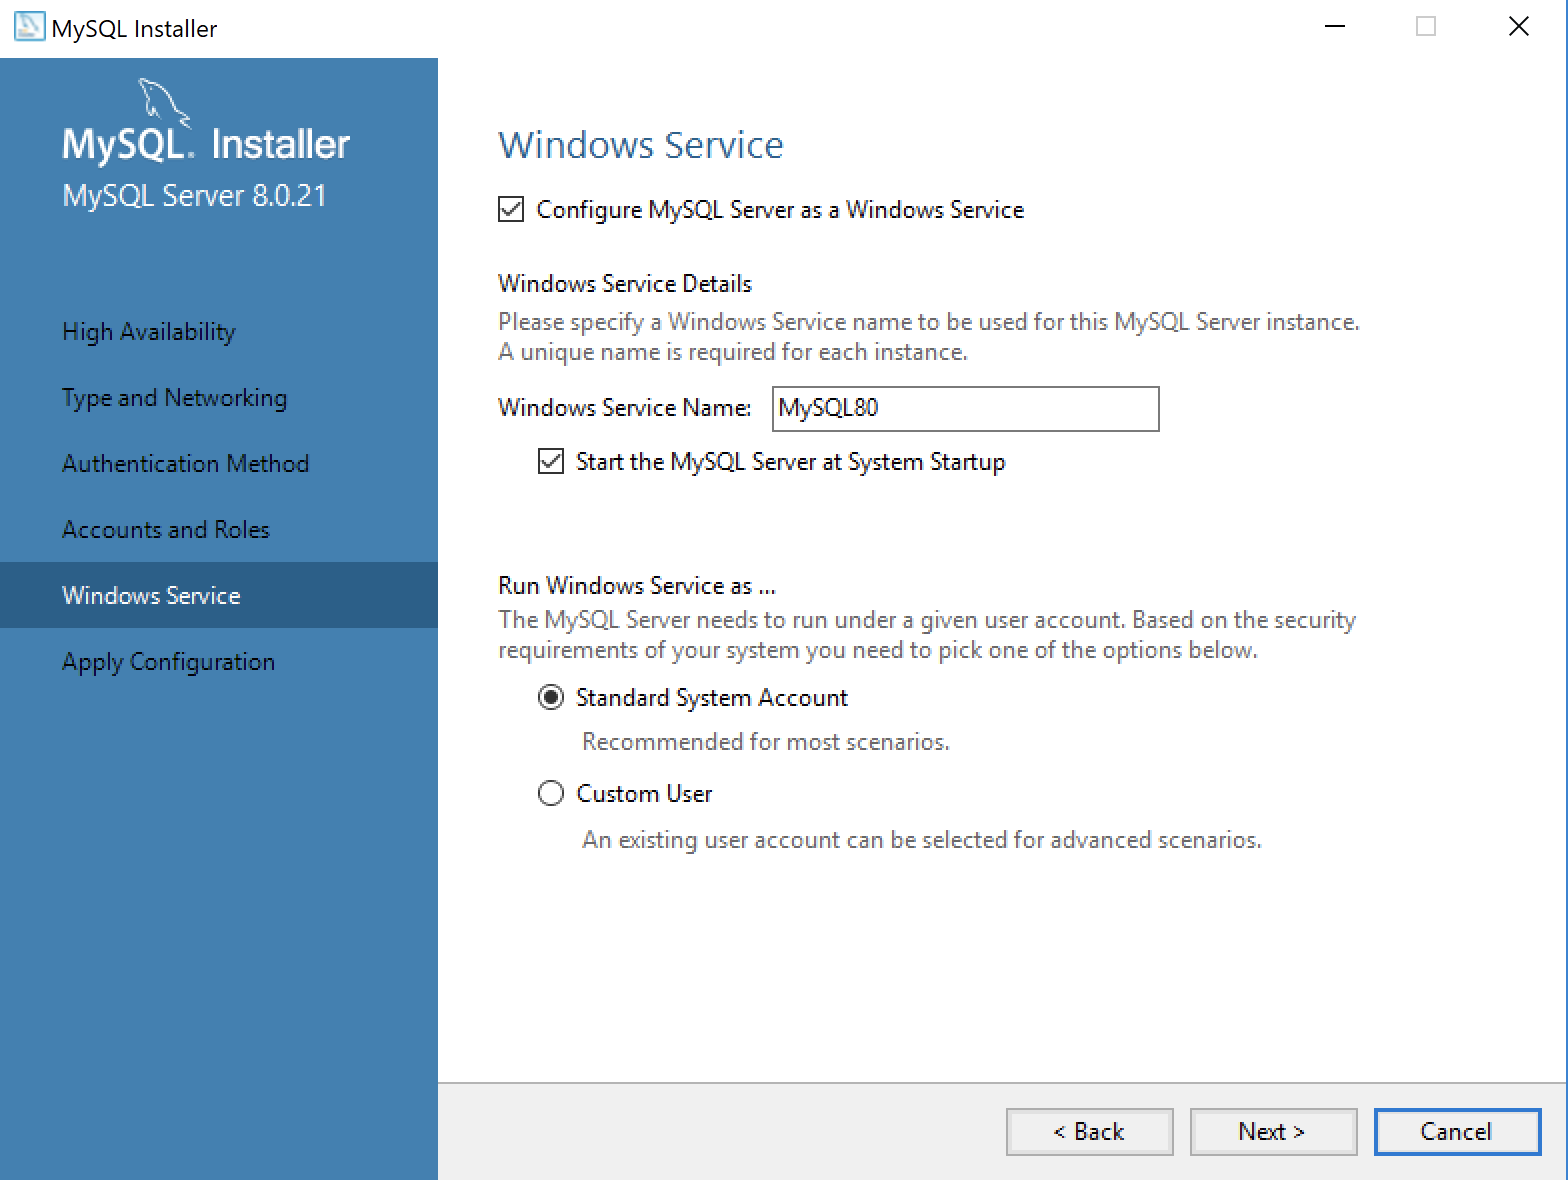
- This dialog lets you enter a Windows Service Name and install a Standard System Account or Custom User account. Click the Next button to continue the MySQL Installer configuration.
- This dialog lets you apply the configuration of the MySQL Server or Custom User product. Click the Next button to continue the MySQL Server configuration.
- This dialog lets you watch the progress of the MySQL Server or Custom User configuration. Click the Finish button to complete the MySQL Server configuration.
- This dialog lets you choose the next MySQL Router product for configuration. Click the Next button to begin the MySQL Router configuration.
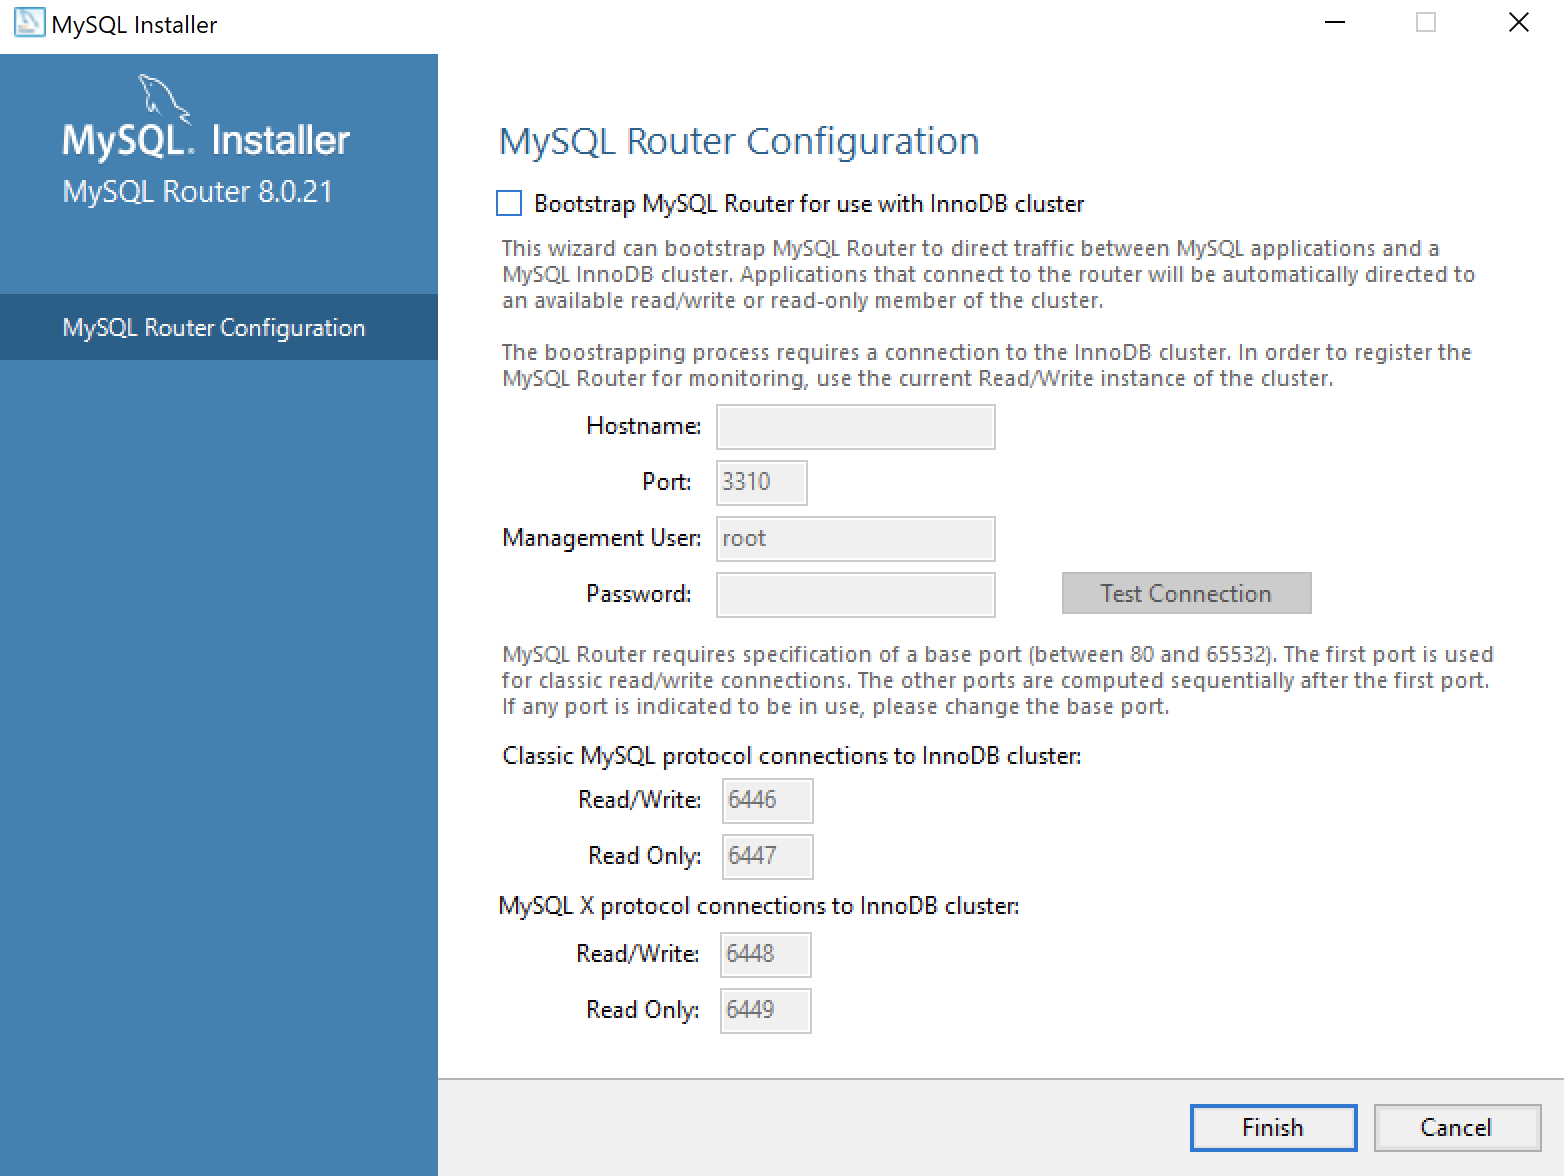
- This dialog allows you to configure the MySQL Router Configuration product. Leave the
HostnameandPasswordfields blank when you do not want to configure the MySQL Router Configuration product. Click the Finish button to complete the MySQL Router workflow.

- This dialog lets you choose the next Samples and Examples product for configuration. Click the Next button to begin the Samples and Examples configuration.

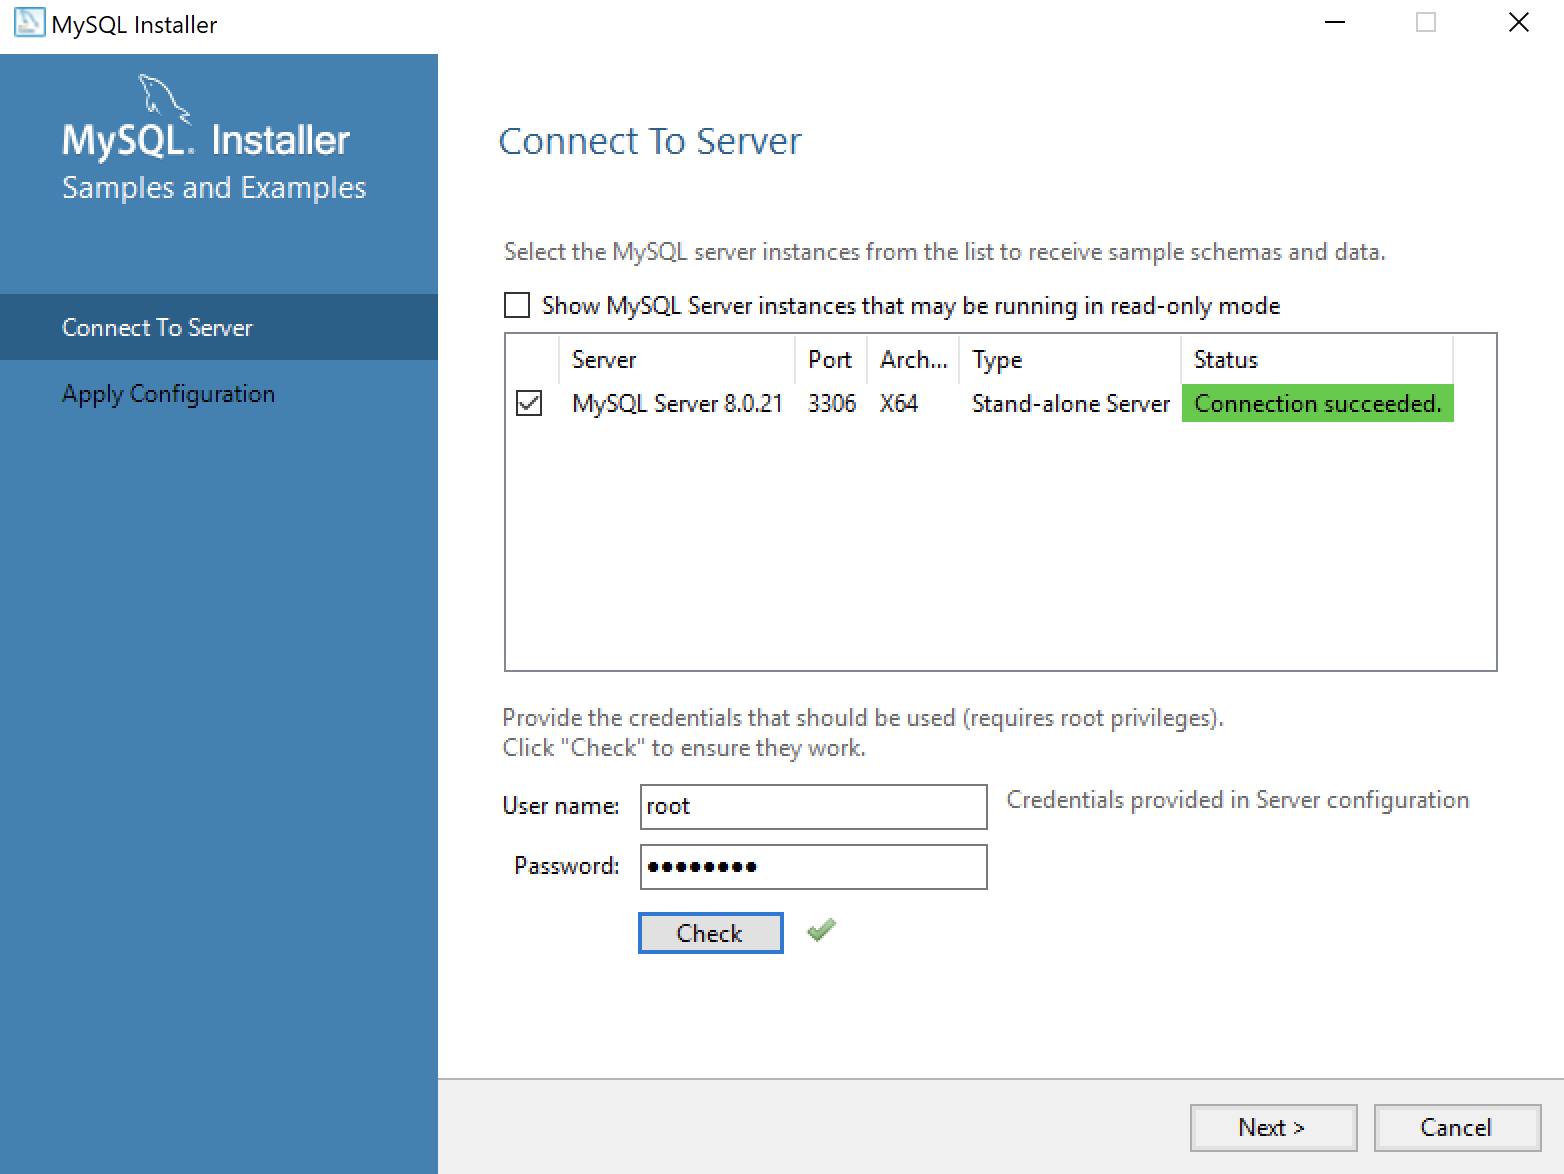
- This dialog lets you create a Windows 10 MySQL Service. You enter the
rootpassword that you entered in Step #12. After you enterrootpassword, click the Check button to verify therootpassword. The Check button enables the Next button when therootaccount’s password is validated. Click the now enabled Next button to create the MySQL Service.
- This dialog lets you create a Windows 10 MySQL Service. Click the now enabled Next button to create the MySQL Service.
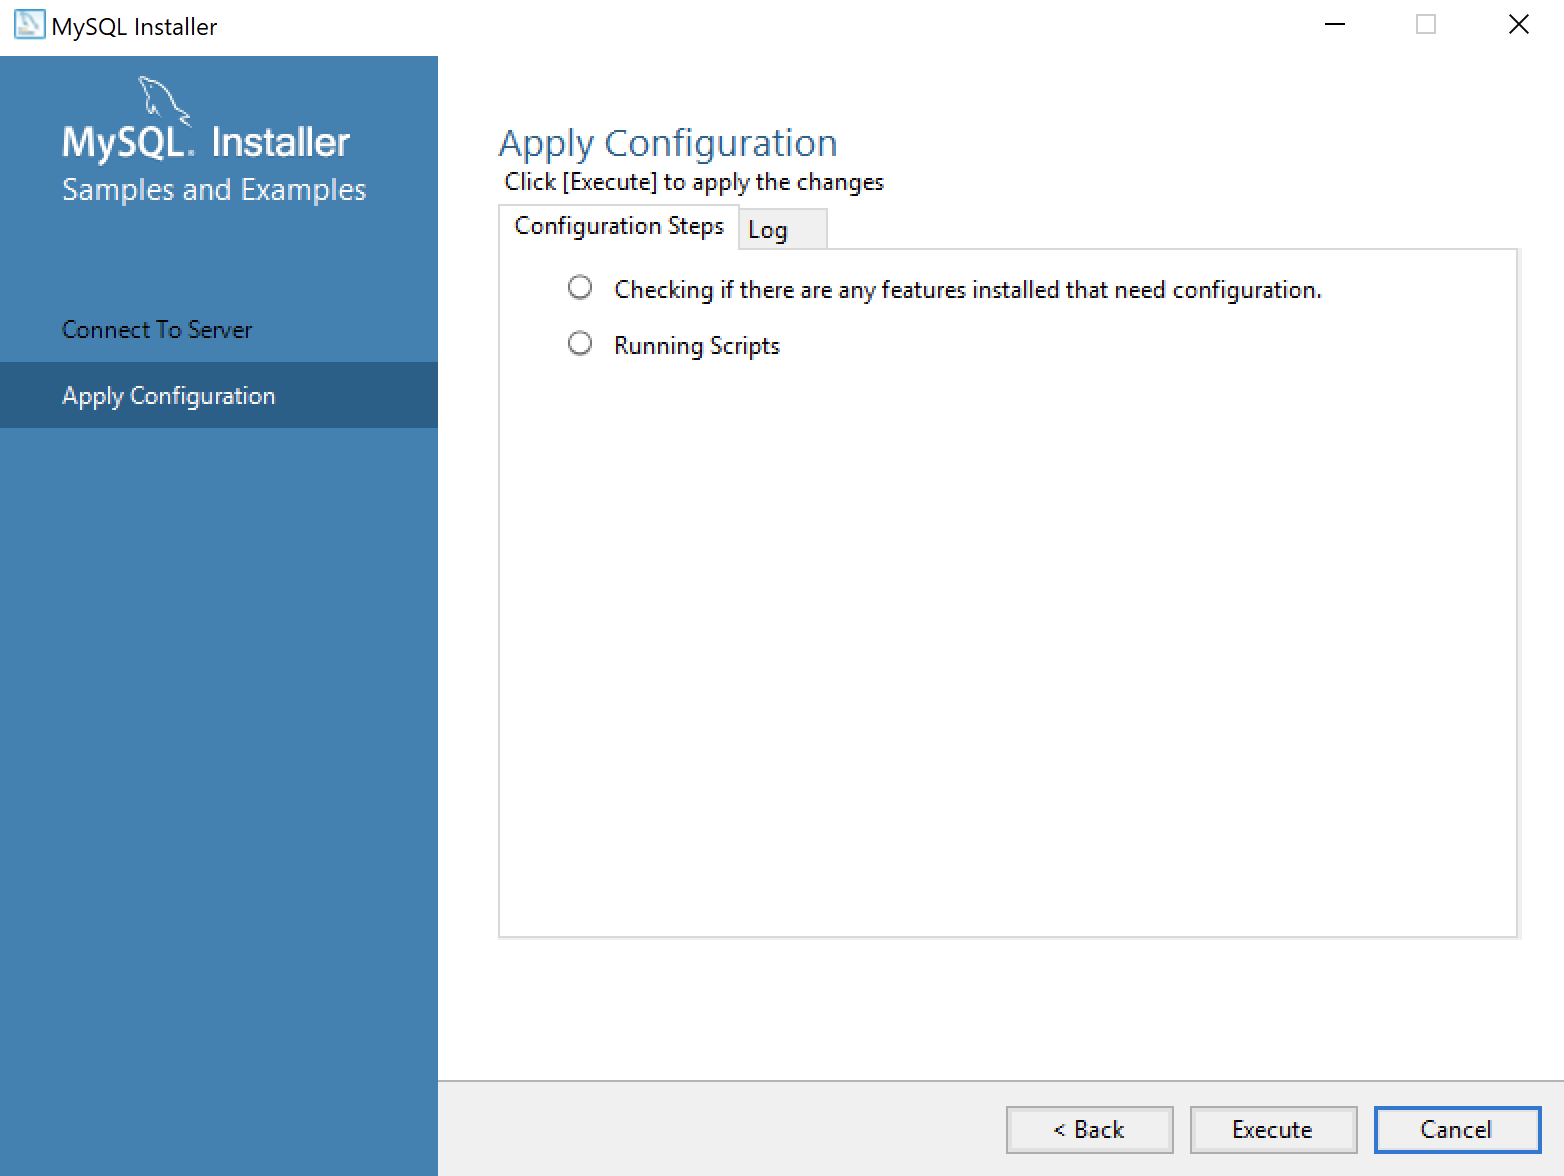
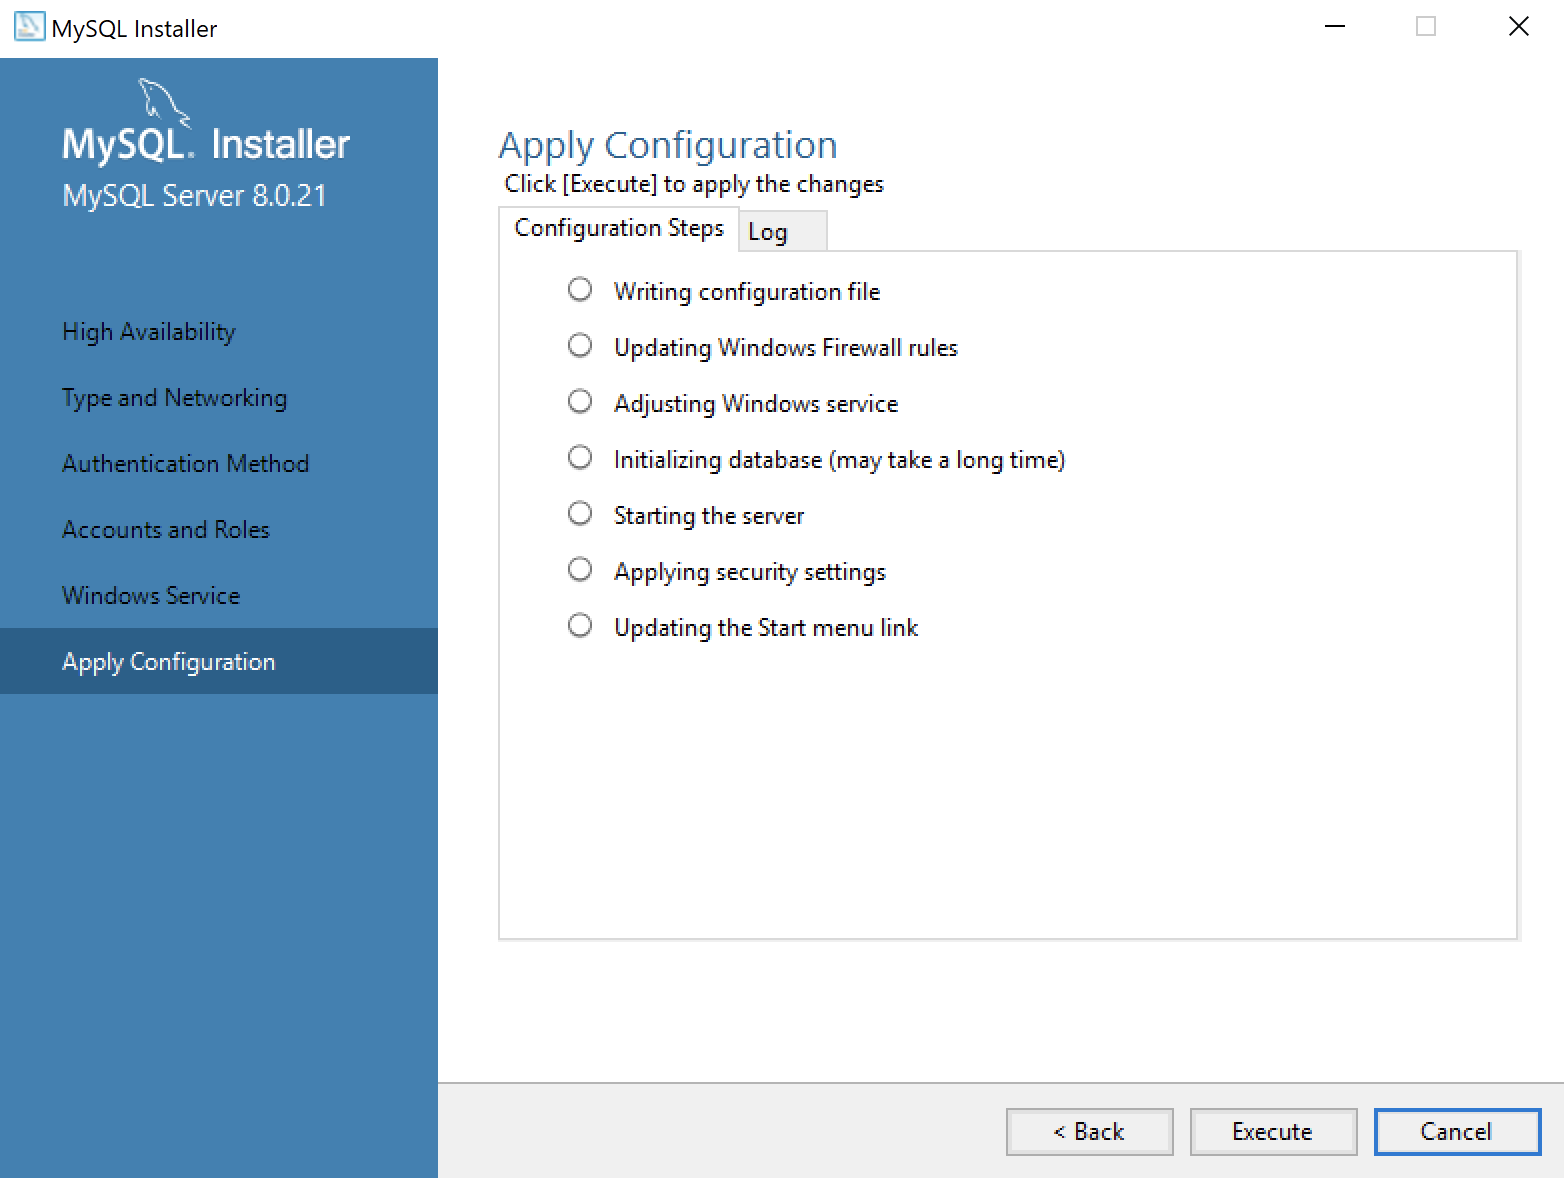
- This dialog applies all the configurations selected. Click the Execute button to proceed with the configuration.
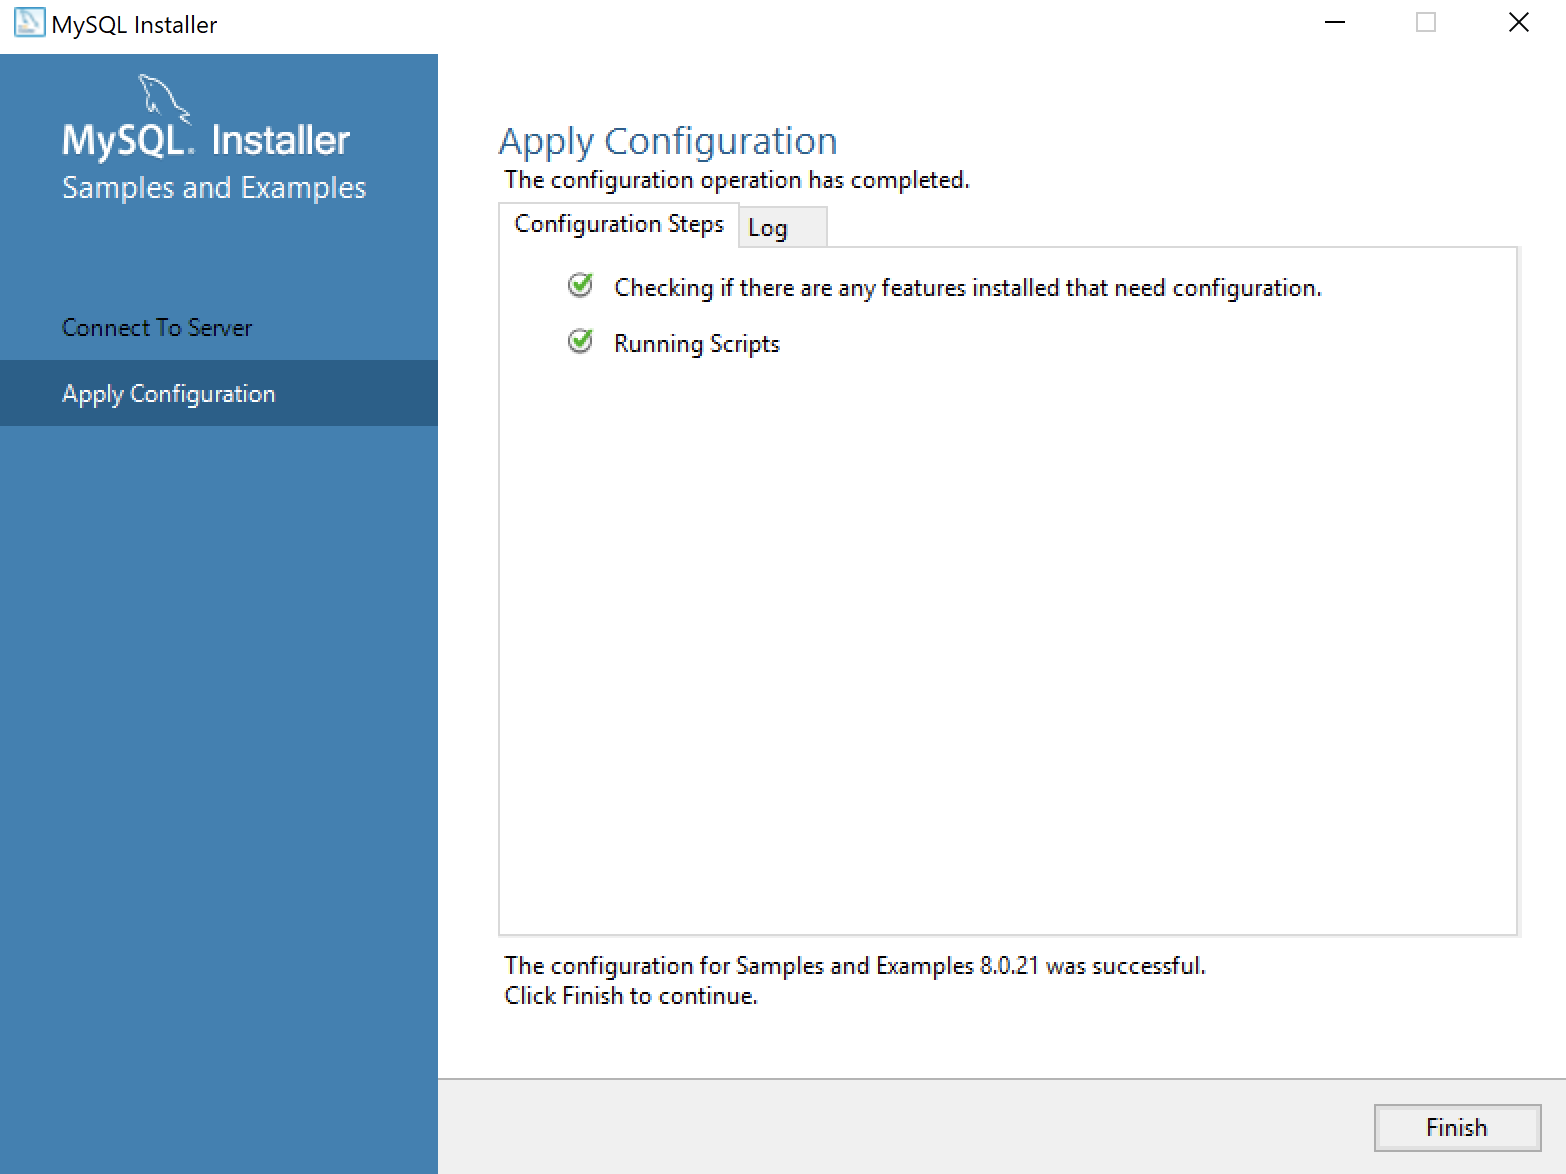
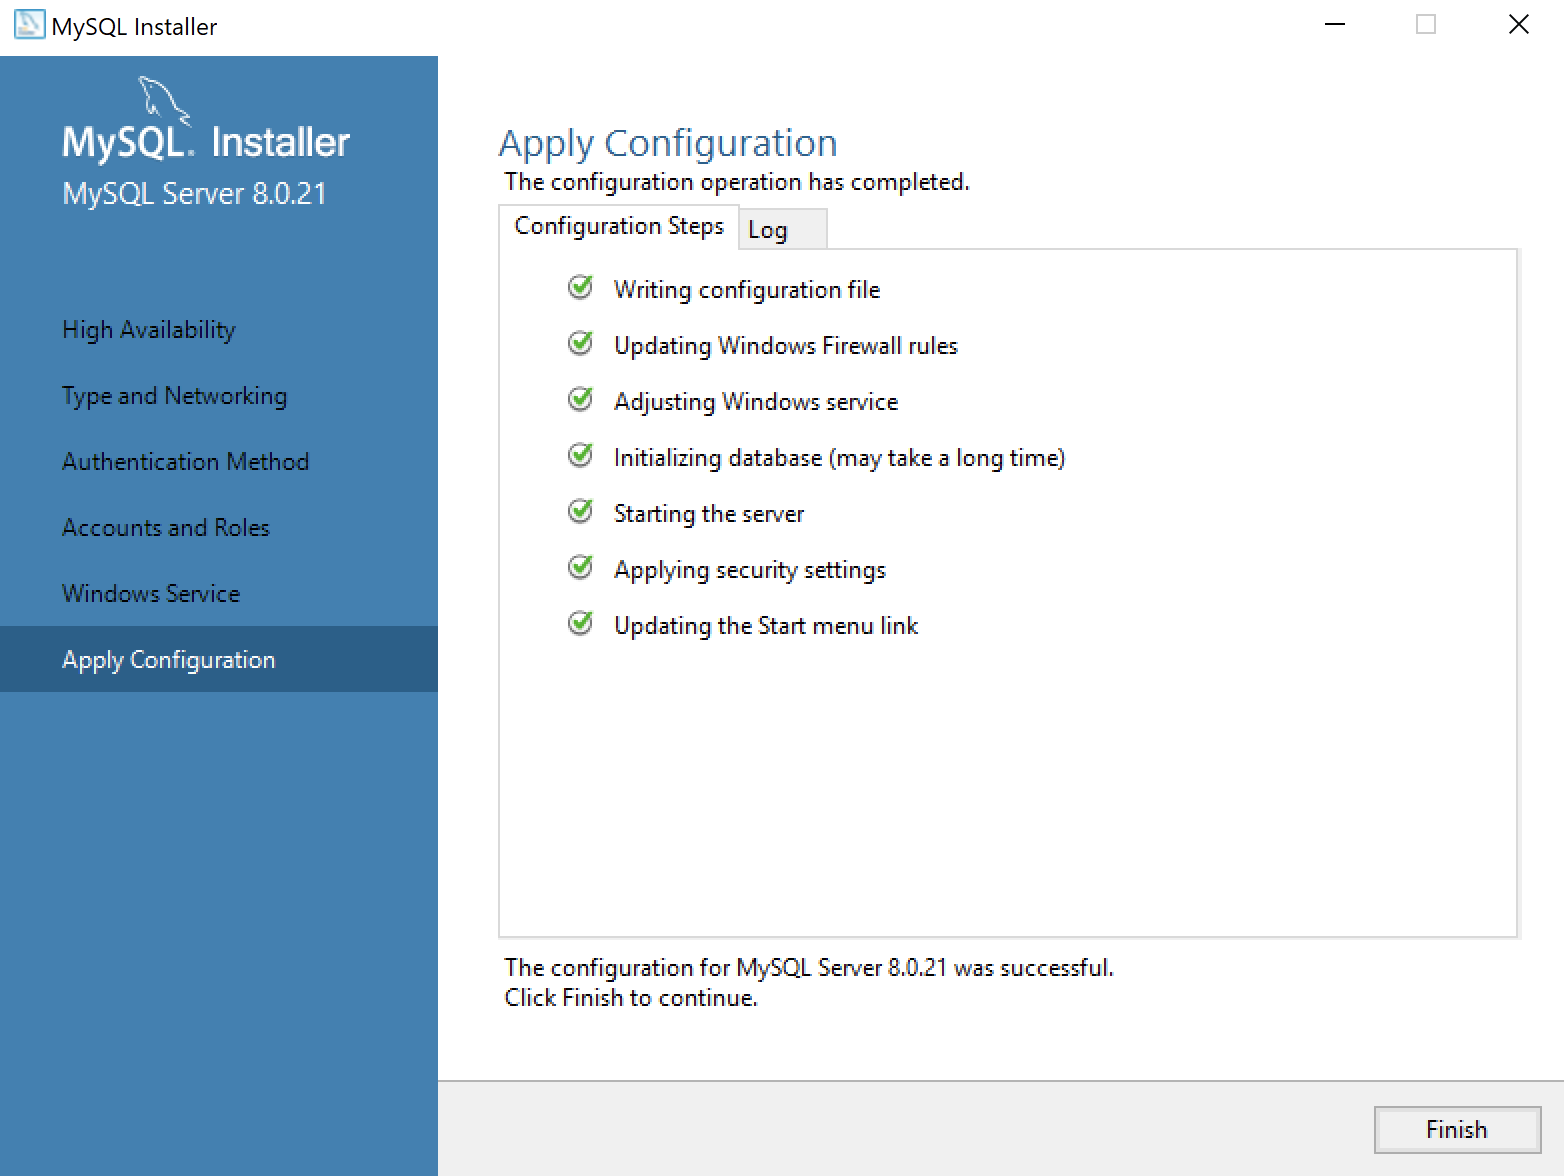
- This dialog lets you watch the progress of the configuration. Click the Finish button to complete the product configurations.

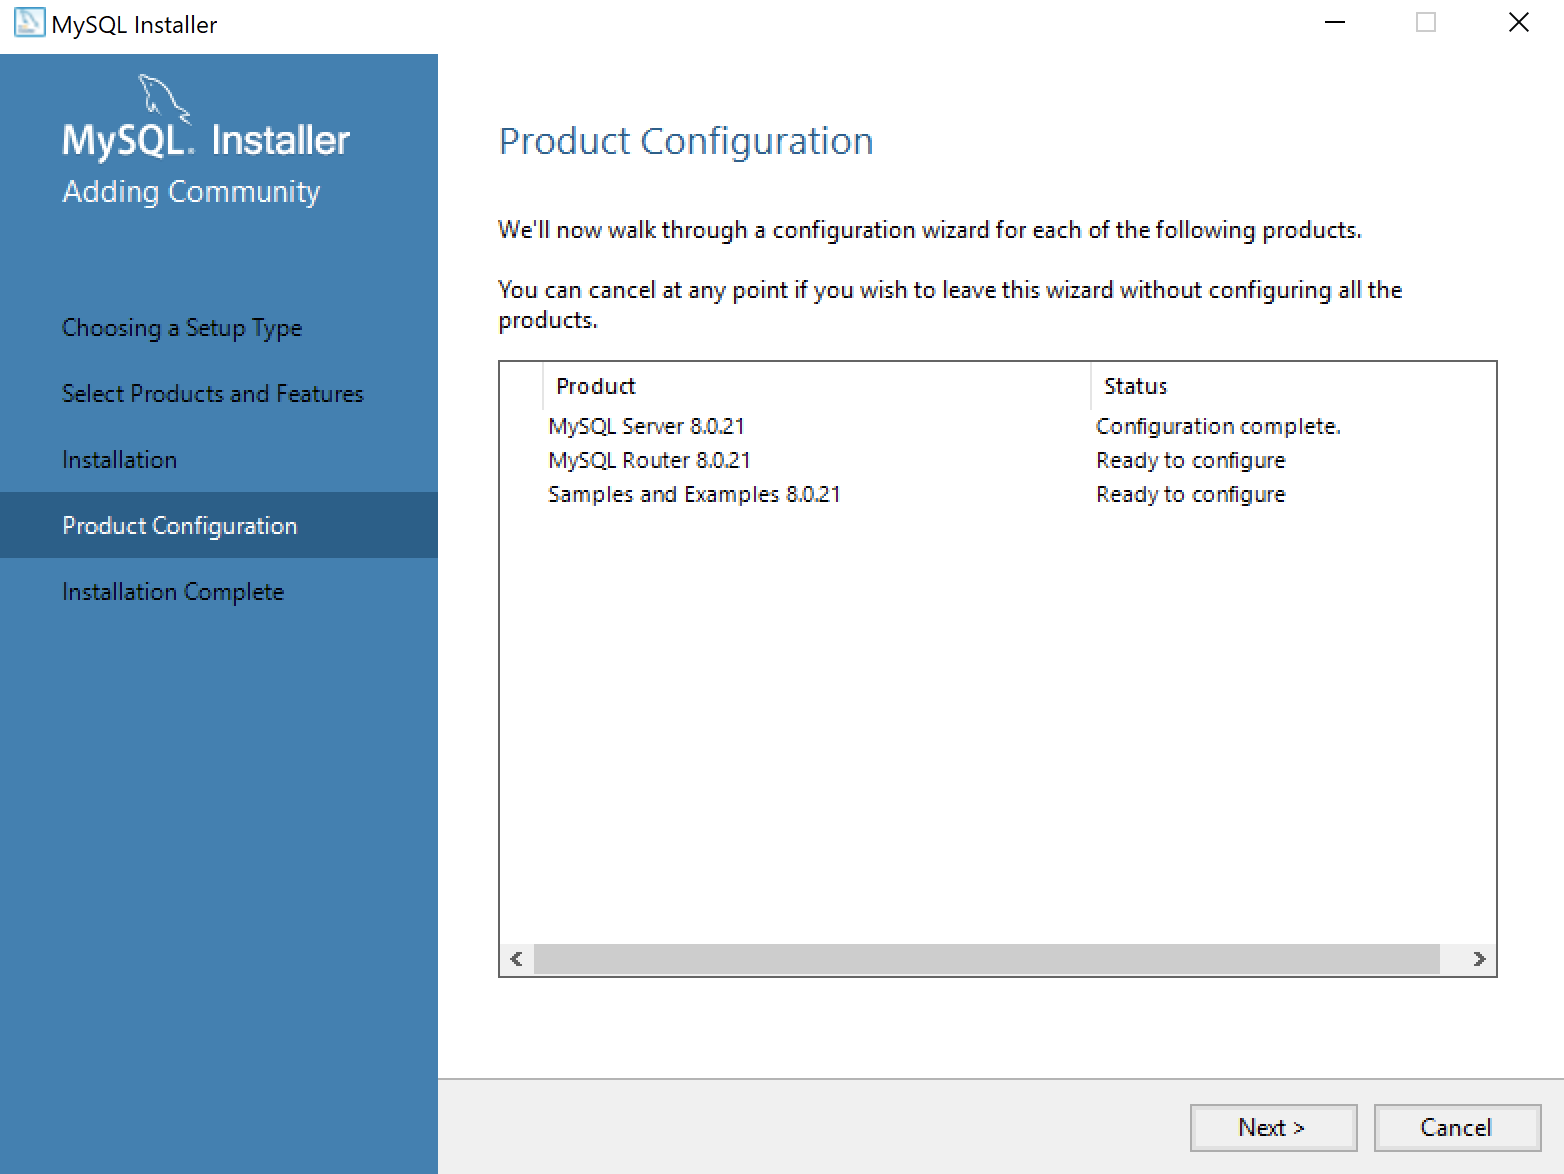
- This dialog the product configurations. You should note that the MySQL Router was not configured or needed. Click the Next button to complete the installation.
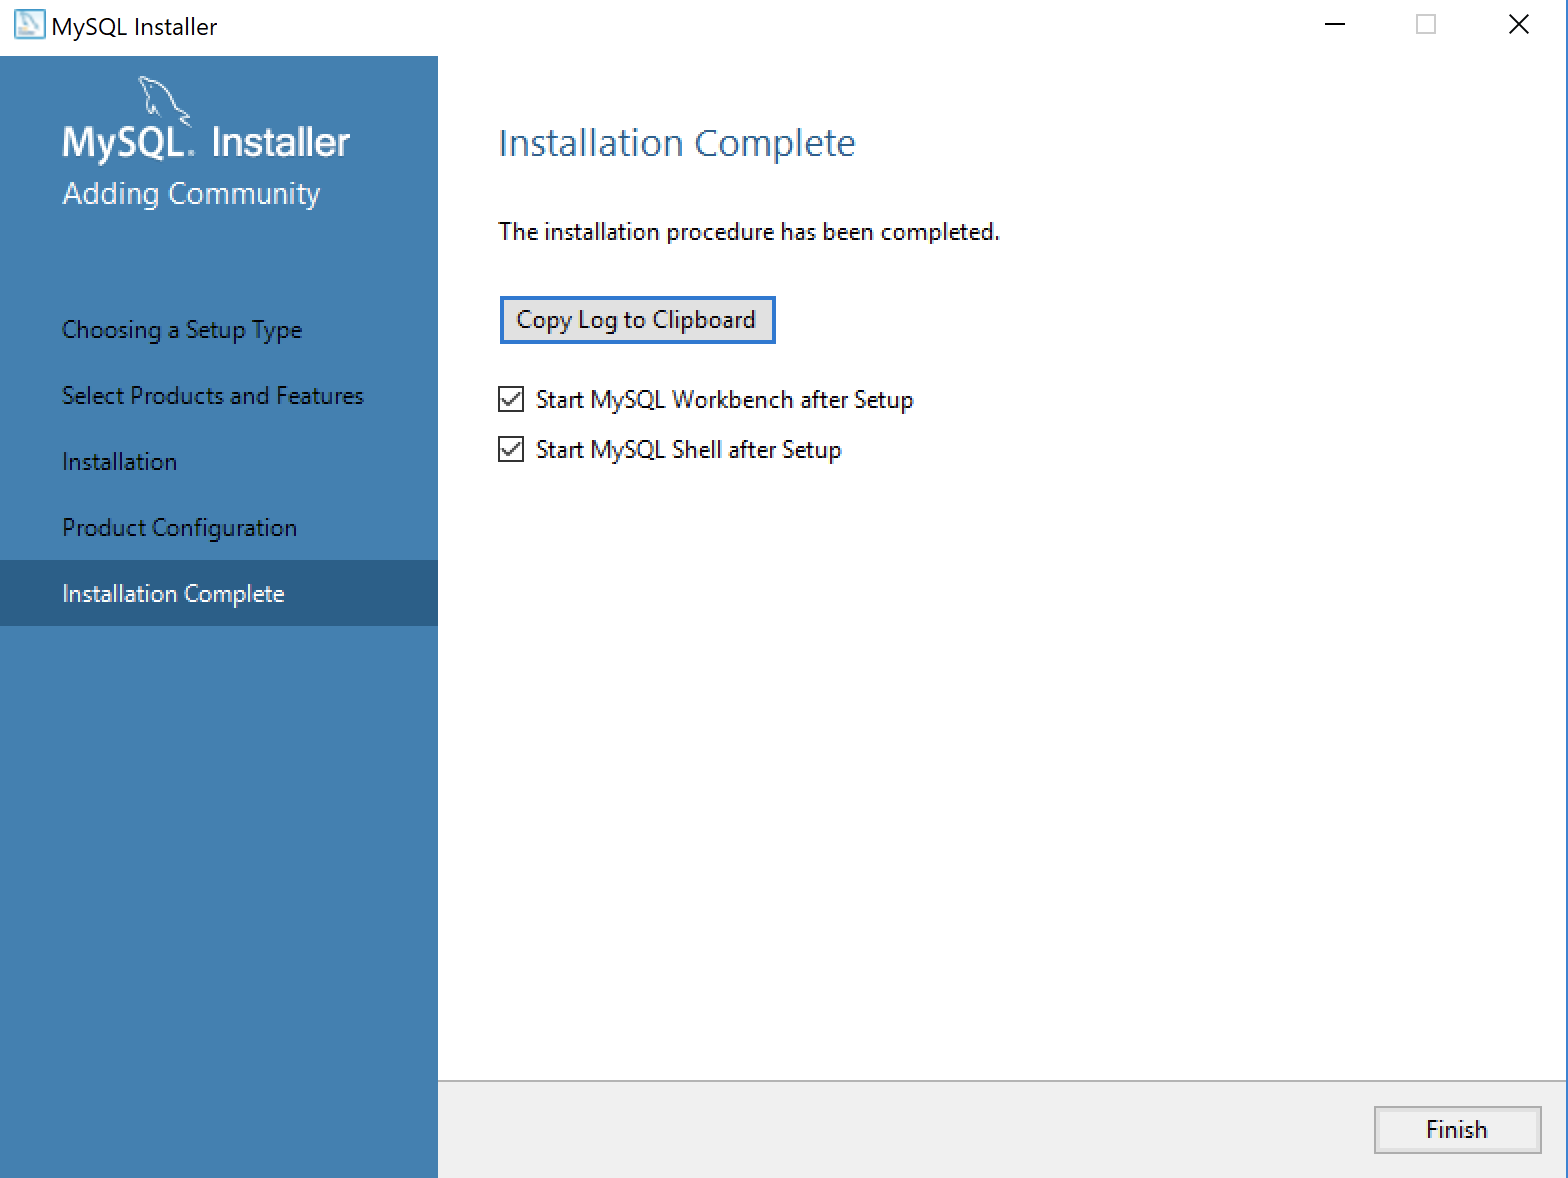
- This dialog completes the workflow and launches MySQL Workbench and Shell. Click the Finish button to complete the installation and configuration processes.
After you install MySQL, the following shows you how to provision a studentdb database. It also shows you how to enable the global file privilege and how to read data from an external comma-separated values (CSV) file.
Java & MySQL 8.0.19
It’s the in-between term time and we’re all stuck at home. I decided to update the image for my Fedora 30 virtual machine. I had a work around to the update issue that I had encountered last October in Bug #96969 but it was not required with the current version. However, after updating from MySQL 8.0.17 to MySQL 8.0.19, I found that my Java connection example failed.
The $CLASSPATH value was correct:
/usr/share/java/mysql-connector-java.jar:. |
The first error that I got was the my reference to MySQL JDBC driver was incorrect. The error message is quite clear:
Loading class `com.mysql.jdbc.Driver'. This is deprecated. The new driver class is `com.mysql.cj.jdbc.Driver'. The driver is automatically registered via the SPI and manual loading of the driver class is generally unnecessary. Cannot connect to database server: The server time zone value 'MDT' is unrecognized or represents more than one time zone. You must configure either the server or JDBC driver (via the 'serverTimezone' configuration property) to use a more specifc time zone value if you want to utilize time zone support. |
I changed the MySQL Driver reference as instructed by the error message:
29 30 31 | // Create instance of MySQLDriver. Class.forName ("com.mysql.cj.jdbc.Driver").newInstance(); conn = DriverManager.getConnection (url, username, password); |
After the change, I got the following error while retesting my little MySQL Java driver connection test program. Initially, I thought this required a change in the Java environment but that wasn’t it.
Cannot connect to database server: The server time zone value 'MDT' is unrecognized or represents more than one time zone. You must configure either the server or JDBC driver (via the 'serverTimezone' configuration property) to use a more specifc time zone value if you want to utilize time zone support. |
It required me to add the following line to my /etc/my.cnf configuration file, which synchronizes the database’s timezone with the operating system.
# Synchronize the MySQL clock with the computer system clock. default-time-zone='+00:00' |
Then, running my MySQL Driver connection test program worked like a charm. It returns the following:
Database connection established MySQLDriver Version [8.0.19] Database connection terminated |
Here’s the MySQL Connector Java code if you’d like to use the MySQLDriver.java file:
1 2 3 4 5 6 7 8 9 10 11 12 13 14 15 16 17 18 19 20 21 22 23 24 25 26 27 28 29 30 31 32 33 34 35 36 37 38 39 40 41 42 43 44 45 46 47 48 49 50 51 52 53 54 55 56 57 58 59 60 61 62 63 64 65 66 67 68 69 70 71 72 73 74 75 76 77 | // Import classes. import java.sql.*; /* You can't include the following on Linux without raising an exception. */ // import com.mysql.jdbc.Driver; public class MySQLDriver { public MySQLDriver() { /* Declare variables that require explicit assignments because they're addressed in the finally block. */ Connection conn = null; Statement stmt = null; ResultSet rset = null; /* Declare other variables. */ String url; String username = "student"; String password = "student"; String database = "studentdb"; String hostname = "localhost"; String port = "3306"; String sql; /* Attempt a connection. */ try { // Set URL. url = "jdbc:mysql://" + hostname + ":" + port + "/" + database; // Create instance of MySQLDriver. Class.forName ("com.mysql.cj.jdbc.Driver").newInstance(); conn = DriverManager.getConnection (url, username, password); // Query the version of the database. sql = "SELECT version()"; stmt = conn.createStatement(); rset = stmt.executeQuery(sql); System.out.println ("Database connection established"); // Read row returns for one column. while (rset.next()) { System.out.println("MySQLDriver Version [" + rset.getString(1) + "]"); } } catch (SQLException e) { System.err.println ("Cannot connect to database server:"); System.out.println(e.getMessage()); } catch (ClassNotFoundException e) { System.err.println ("Cannot find MySQL driver class:"); System.out.println(e.getMessage()); } catch (InstantiationException e) { System.err.println ("Cannot instantiate class:"); System.out.println(e.getMessage()); } catch (IllegalAccessException e) { System.err.println ("Illegal access exception:"); System.out.println(e.getMessage()); } finally { if (conn != null) { try { rset.close(); stmt.close(); conn.close(); System.out.println ("Database connection terminated"); } catch (Exception e) { /* ignore close errors */ } } } } /* Unit test. */ public static void main(String args[]) { new MySQLDriver(); } } |
As always, I hope this helps those who encounter similar problems.
MySQL Python Connector
While building my student image on Fedora 30, I installed the MySQL PHP Connector (php-mysqlndrp) but neglected to install the Python Connector. This adds the installation and basic test of the Python Connector to the original blog post.
You use the following command with a wildcard as a privileged user. The wildcard is necessary because you need to load two libraries to support Python 2.7 and 3.7, which are installed on Fedora 30. You also need to be the root user or a user that is found in the sudoer’s list:
yum install -y mysql-connector-python* |
Display detailed console log →
Last metadata expiration check: 0:35:46 ago on Tue 20 Aug 2019 05:36:29 PM MDT. Dependencies resolved. ===================================================================================================================================== Package Architecture Version Repository Size ===================================================================================================================================== Installing: mysql-connector-python x86_64 8.0.17-1.fc30 mysql-connectors-community 435 k mysql-connector-python-cext x86_64 8.0.17-1.fc30 mysql-connectors-community 7.7 M mysql-connector-python3 x86_64 8.0.17-1.fc30 mysql-connectors-community 429 k mysql-connector-python3-cext x86_64 8.0.17-1.fc30 mysql-connectors-community 7.7 M Installing dependencies: python2-protobuf noarch 3.6.1-3.fc30 fedora 563 k python3-protobuf noarch 3.6.1-3.fc30 fedora 568 k Transaction Summary ===================================================================================================================================== Install 6 Packages Total download size: 17 M Installed size: 89 M Downloading Packages: (1/6): python3-protobuf-3.6.1-3.fc30.noarch.rpm 1.0 MB/s | 568 kB 00:00 (2/6): python2-protobuf-3.6.1-3.fc30.noarch.rpm 994 kB/s | 563 kB 00:00 (3/6): mysql-connector-python-8.0.17-1.fc30.x86_64.rpm 481 kB/s | 435 kB 00:00 (4/6): mysql-connector-python3-8.0.17-1.fc30.x86_64.rpm 612 kB/s | 429 kB 00:00 (5/6): mysql-connector-python-cext-8.0.17-1.fc30.x86_64.rpm 3.8 MB/s | 7.7 MB 00:02 (6/6): mysql-connector-python3-cext-8.0.17-1.fc30.x86_64.rpm 4.2 MB/s | 7.7 MB 00:01 ------------------------------------------------------------------------------------------------------------------------------------- Total 5.4 MB/s | 17 MB 00:03 warning: /var/cache/dnf/mysql-connectors-community-8bcc2bd350b53f70/packages/mysql-connector-python-8.0.17-1.fc30.x86_64.rpm: Header V3 DSA/SHA1 Signature, key ID 5072e1f5: NOKEY MySQL Connectors Community 7.0 MB/s | 27 kB 00:00 Importing GPG key 0x5072E1F5: Userid : "MySQL Release Engineering <mysql-build@oss.oracle.com>" Fingerprint: A4A9 4068 76FC BD3C 4567 70C8 8C71 8D3B 5072 E1F5 From : /etc/pki/rpm-gpg/RPM-GPG-KEY-mysql Key imported successfully Running transaction check Transaction check succeeded. Running transaction test Transaction test succeeded. Running transaction Preparing : 1/1 Installing : python3-protobuf-3.6.1-3.fc30.noarch 1/6 Installing : python2-protobuf-3.6.1-3.fc30.noarch 2/6 Installing : mysql-connector-python-8.0.17-1.fc30.x86_64 3/6 Installing : mysql-connector-python3-8.0.17-1.fc30.x86_64 4/6 Installing : mysql-connector-python3-cext-8.0.17-1.fc30.x86_64 5/6 Installing : mysql-connector-python-cext-8.0.17-1.fc30.x86_64 6/6 Running scriptlet: mysql-connector-python-cext-8.0.17-1.fc30.x86_64 6/6 Verifying : python2-protobuf-3.6.1-3.fc30.noarch 1/6 Verifying : python3-protobuf-3.6.1-3.fc30.noarch 2/6 Verifying : mysql-connector-python-8.0.17-1.fc30.x86_64 3/6 Verifying : mysql-connector-python-cext-8.0.17-1.fc30.x86_64 4/6 Verifying : mysql-connector-python3-8.0.17-1.fc30.x86_64 5/6 Verifying : mysql-connector-python3-cext-8.0.17-1.fc30.x86_64 6/6 Installed: mysql-connector-python-8.0.17-1.fc30.x86_64 mysql-connector-python-cext-8.0.17-1.fc30.x86_64 mysql-connector-python3-8.0.17-1.fc30.x86_64 mysql-connector-python3-cext-8.0.17-1.fc30.x86_64 python2-protobuf-3.6.1-3.fc30.noarch python3-protobuf-3.6.1-3.fc30.noarch Complete! |
Leveraging the MySQL Connector/Python Coding Examples documentation, Section 5.1 Connecting to MySQL Using Connector/Python here’s a test of the connection to MySQL 8.
# Import the library. import mysql.connector from mysql.connector import errorcode try: # Open connection. cnx = mysql.connector.connect(user='student', password='student', host='127.0.0.1', database='studentdb') # Print the value. print("Database connection resolved.") # Handle exception and close connection. except mysql.connector.Error as e: if e.errno == errorcode.ER_ACCESS_DENIED_ERROR: print("Something is wrong with your user name or password") elif e.errno == errorcode.ER_BAD_DB_ERROR: print("Database does not exist") else: print(e) # Close the connection when the try block completes. else: cnx.close() |
Leveraging the MySQL Connector/Python Coding Examples documentation, Section 5.4 Querying Data Using Connector/Python here’s a test of the connection to MySQL 8.
# Import the library. import datetime import mysql.connector from mysql.connector import errorcode try: # Open connection. cnx = mysql.connector.connect(user='student', password='student', host='127.0.0.1', database='studentdb') # Create cursor. cursor = cnx.cursor() # Set the query statement. query = ("SELECT " "CASE " " WHEN item_subtitle IS NULL THEN item_title " " ELSE CONCAT(item_title,': ',item_subtitle) " "END AS title, " "release_date " "FROM item " "WHERE release_date BETWEEN %s AND %s " "ORDER BY item_title") # Set the start and end date. start_date = datetime.date(1991, 1, 1) end_date = datetime.date(2004, 12, 31) # Execute cursor. cursor.execute(query, (start_date, end_date)) # Display the rows returned by the query. for (item_name, release_date) in cursor: print("{}, {:%d %b %Y}".format(item_name, release_date)) # Close cursor. cursor.close() # ------------------------------------------------------------ # Handle exception and close connection. except mysql.connector.Error as e: if e.errno == errorcode.ER_ACCESS_DENIED_ERROR: print("Something is wrong with your user name or password") elif e.errno == errorcode.ER_BAD_DB_ERROR: print("Database does not exist") else: print "Error code:", e.errno # error number print "SQLSTATE value:", e.sqlstate # SQLSTATE value print "Error message:", e.msg # error message # Close the connection when the try block completes. else: cnx.close() |
If you run the above in Python 2.7 it works fine. It fails to parse successfully in Python 3.x because the print() function requires the parentheses all the time. You would need to re-write the except block, like this with the parentheses:
# Handle exception and close connection. except mysql.connector.Error as e: if e.errno == errorcode.ER_ACCESS_DENIED_ERROR: print("Something is wrong with your user name or password") elif e.errno == errorcode.ER_BAD_DB_ERROR: print("Database does not exist") else: print("Error code:", e.errno) # error number print("SQLSTATE value:", e.sqlstate) # SQLSTATE value print("Error message:", e.msg) # error message |
While it works without the parentheses in Python 2.7, it also works with the parentheses. That means the best practice is to write cross compatible code by always using the parentheses with the print() function.
As always, I hope this helps somebody.j
Oracle 12c VARCHAR2?
The Oracle Database 12c documentation says you can set the maximum size of a VARCHAR2 to 32,767 bytes. That’s true except when you’re trying to map a large Java string to a VARCHAR2. It fails when the physical size of the Java string is greater than 4,000 bytes with an ORA-01002 or fetch out of sequence error.
SELECT read_text_file('C:\Data\loader\Hobbit1.txt')
*
ERROR at line 1:
ORA-24345: A Truncation or null fetch error occurred

ERROR:
ORA-01002: fetch out of sequence |
You need to grant privileges before you can test this code. You can grant privileges by connecting as the SYS user of a CDB (or non-multitenant database) or as the ADMIN user of a PDB with the AS SYSDBA clause. Then, you run the following command to grant external file access to the JVM inside Oracle Database 12c:
BEGIN DBMS_JAVA.GRANT_PERMISSION('IMPORTER' ,'SYS:java.io.FilePermission' ,'C:\Data\Loader\Hobbit1.txt' ,'read'); END; / |
The IMPORTER is a PDB user name, or a non-multitenant database user name. Please note that permissions must be granted on each physical file.
Here’s the code that raises the error when the external file is greater than 4,000 bytes:
1 2 3 4 5 6 7 8 9 10 11 12 13 14 15 16 17 18 19 20 21 22 23 24 25 26 27 28 29 30 31 32 33 34 35 36 37 38 39 40 41 42 43 44 45 46 47 48 49 | CREATE OR REPLACE AND COMPILE JAVA SOURCE NAMED "ReadFile" AS // Java library imports. import java.io.File; import java.io.BufferedReader; import java.io.FileNotFoundException; import java.io.IOException; import java.io.FileReader; import java.security.AccessControlException; // Class definition. public class ReadFile { // Define class variables. private static File file; private static FileReader inTextFile; private static BufferedReader inTextReader; private static StringBuffer output = new StringBuffer(); private static String outLine, outText; // Define readText() method. public static String readText(String fromFile) throws AccessControlException, IOException { // Read file. try { // Initialize File. file = new File(fromFile); // Check for valid file. if (file.exists()) { // Assign file to a stream. inTextFile = new FileReader(file); inTextReader = new BufferedReader(inTextFile); // Read character-by-character. while ((outLine = inTextReader.readLine()) != null) { output.append(outLine + "\n"); } // Assing the StringBuffer to a String. outText = output.toString(); // Close File. inTextFile.close(); } else { outText = new String("Empty"); }} catch (IOException e) { outText = new String(""); return outText; } return outText; }} / |
The PL/SQL wrapper should look like this:
1 2 3 4 5 | CREATE OR REPLACE FUNCTION read_text_file (from_file VARCHAR2) RETURN VARCHAR2 IS LANGUAGE JAVA NAME 'ReadFile.readText(java.lang.String) return java.lang.String'; / |
Then, you can query it like so:
SELECT read_text_file('C:\Data\loader\Hobbit1.txt') FROM dual; |
You can avoid the error by returning the Java file size as a CLOB data type with the following Java source code.
1 2 3 4 5 6 7 8 9 10 11 12 13 14 15 16 17 18 19 20 21 22 23 24 25 26 27 28 29 30 31 32 33 34 35 36 37 38 39 40 41 42 43 44 45 46 47 48 49 50 51 52 53 54 55 56 57 58 59 60 61 | CREATE OR REPLACE AND COMPILE JAVA SOURCE NAMED "ReadFile" AS // Java library imports. import java.io.File; import java.io.BufferedReader; import java.io.FileNotFoundException; import java.io.IOException; import java.io.FileReader; import java.security.AccessControlException; import java.sql.*; import oracle.sql.driver.*; import oracle.sql.*; // Class definition. public class ReadFile { // Define class variables. private static int i; private static File file; private static FileReader inTextFile; private static BufferedReader inTextReader; private static StringBuffer output = new StringBuffer(); private static String outLine, outText; private static CLOB outCLOB; // Define readText() method. public static oracle.sql.CLOB readText(String fromFile) throws AccessControlException, IOException, SQLException { // Read file. try { // Initialize File. file = new File(fromFile); // Check for valid file. if (file.exists()) { // Assign file to a stream. inTextFile = new FileReader(file); inTextReader = new BufferedReader(inTextFile); // Read character-by-character. while ((outLine = inTextReader.readLine()) != null) { output.append(outLine + "\n"); } // Assing the StringBuffer to a String. outText = output.toString(); // Declare an Oracle connection. Connection conn = DriverManager.getConnection("jdbc:default:connection:"); // Transfer the String to CLOB. outCLOB = CLOB.createTemporary((oracle.jdbc.OracleConnectionWrapper) conn, true, CLOB.DURATION_SESSION); i = outCLOB.setString(1,outText); // Close File. inTextFile.close(); } else { i = outCLOB.setString(1,"Empty"); }} catch (IOException e) { i = outCLOB.setString(1,""); return outCLOB; } return outCLOB; }} / |
The wrapper changes to return a CLOB and map a java.sql.CLOB as the return type of the Java library. This command works:
1 2 3 4 5 | CREATE OR REPLACE FUNCTION read_clob_file (from_file VARCHAR2) RETURN CLOB IS LANGUAGE JAVA NAME 'ReadFile.readText(java.lang.String) return oracle.sql.CLOB'; / |
You now query the PL/SQL wrapper with this type of effective SQL*Plus command-line command:
COLUMN atext FORMAT A60 HEADING "Text" COLUMN asize FORMAT 99,999 HEADING "Size" SELECT read_clob_file('C:\Data\loader\Hobbit1.txt') AS AText , LENGTH(read_clob_file('C:\Data\loader\Hobbit1.txt')) AS ASize FROM dual; |
As always, I hope this helps somebody.
Oracle OpenWorld 2013
I registered yesterday for Oracle OpenWorld 2013, and I’ll look forward to seeing friends there. Having worked in the Oracle 12c beta for a year, I’ll be interested in the presentations. Also, hearing more about Java 7 at JavaOne. On the downside, I’m missing MySQL Connect this year.

Cloud computing offers many possibilities, and container and pluggable databases are a great solution. We’ve two new acronyms with the Oracle 12c release. A containerized database is a CDB, and a pluggable database is a PDB. I’m looking forward to seeing more about the provisioning of PDBs during the conference. If you’re new to the changes, check out CDBs and PDBs in Chapter 17 in the Oracle 12c Concepts manual.
A couple of my favorite new features are Identity and Invisible Columns. If you’re unfamiliar with the new features for application development, let me recommend this Oracle White Paper. Also, for reference I’ve covered identity and invisible columns thoroughly in the Oracle Database 12c PL/SQL Programming book, which will be available in December.
Missing the MySQL Connect 2013 Bus

Unfortunately, travel budgets preclude me attending MySQL Connect 2013 this year (alas, I’ll miss the bus). 🙁 It was hard because I’d like to see what’s up with MySQL (since I was a closet MySQL user at Oracle before they acquired it). Anyway, if you’re there, make sure you check out MySQL Workbench 6 for me. Also, I’d like to thank Dave Stokes for the AWESOME review he wrote on Amazon.com for my MySQL Workbench: Data Modeling & Development book. Maybe, I’ll get to go to MySQL Connect 2014 next year.
