Archive for the ‘MySQL Workbench’ Category
MySQL Workbench Fits
My students wanted an illustration of where MySQL Workbench fits within the MySQL database. So, I overlaid it in this drawing from my old book on comparative SQL syntax for Oracle and MySQL. Anybody else have a cool alternative illustration?
The idea is the lightening bolt transmits an interactive call and reading a script file submits a call paradigm.

More or less MySQL processes a static query in the panel, like the following Python program process the dynamic query (on lines 71-78) with parameters sent when calling the Python script.
1 2 3 4 5 6 7 8 9 10 11 12 13 14 15 16 17 18 19 20 21 22 23 24 25 26 27 28 29 30 31 32 33 34 35 36 37 38 39 40 41 42 43 44 45 46 47 48 49 50 51 52 53 54 55 56 57 58 59 60 61 62 63 64 65 66 67 68 69 70 71 72 73 74 75 76 77 78 79 80 81 82 83 84 85 86 87 88 89 90 91 92 93 94 95 96 97 98 99 100 101 102 103 104 | #!/usr/bin/python # ------------------------------------------------------------ # Name: mysql-query2.py # Date: 20 Aug 2019 # ------------------------------------------------------------ # Purpose: # ------- # The program shows you how to provide agruments, convert # from a list to individual variables of the date type. # # You can call the program: # # ./mysql-query3.py 2001-01-01 2003-12-31 # # ------------------------------------------------------------ # Import the library. import sys import mysql.connector from datetime import datetime from datetime import date from mysql.connector import errorcode # Capture argument list. fullCmdArguments = sys.argv # Assignable variables. start_date = "" end_date = "" # Assign argument list to variable. argumentList = fullCmdArguments[1:] # Check and process argument list. # ============================================================ # If there are less than two arguments provide default values. # Else enumerate and convert strings to dates. # ============================================================ if (len(argumentList) < 2): # Set a default start date. if (isinstance(start_date,str)): start_date = date(1980, 1, 1) # Set the default end date. if (isinstance(end_date,str)): end_date = datetime.date(datetime.today()) else: # Enumerate through the argument list where beginDate precedes endDate as strings. try: for i, s in enumerate(argumentList): if (i == 0): start_date = datetime.date(datetime.fromisoformat(s)) elif (i == 1): end_date = datetime.date(datetime.fromisoformat(s)) except ValueError: print("One of the first two arguments is not a valid date (YYYY-MM-DD).") # Attempt the query. # ============================================================ # Use a try-catch block to manage the connection. # ============================================================ try: # Open connection. cnx = mysql.connector.connect(user='student', password='student', host='127.0.0.1', database='studentdb') # Create cursor. cursor = cnx.cursor() # Set the query statement. query = ("SELECT CASE " " WHEN item_subtitle IS NULL THEN CONCAT('''',item_title,'''') " " ELSE CONCAT('''',item_title,': ',item_subtitle,'''') " " END AS title, " "release_date " "FROM item " "WHERE release_date BETWEEN %s AND %s " "ORDER BY item_title") # Execute cursor. cursor.execute(query, (start_date, end_date)) # Display the rows returned by the query. for (title, release_date) in cursor: print("{}, {:%d-%b-%Y}".format(title, release_date)) # Close cursor. cursor.close() # ------------------------------------------------------------ # Handle exception and close connection. except mysql.connector.Error as e: if e.errno == errorcode.ER_ACCESS_DENIED_ERROR: print("Something is wrong with your user name or password") elif e.errno == errorcode.ER_BAD_DB_ERROR: print("Database does not exist") else: print("Error code:", e.errno) # error number print("SQLSTATE value:", e.sqlstate) # SQLSTATE value print("Error message:", e.msg) # error message # Close the connection when the try block completes. else: cnx.close() |
You could call this type of script from the Linux CLI (Command-Line Interface), like this:
./mysql-query3.py '2003-01-01' '2003-12-31' 2>/dev/null |
As always, I hope this helps those looking to understand things.
MySQL @SQL_MODE
Installing MySQL Workbench 8 on Windows, we discovered that the default configuration no longer sets ONLY_FULL_GROUP_BY as part of the default SQL_MODE parameter value. While I’ve written a stored function to set the SQL_MODE parameter value for a session, some students didn’t understand that such a call is only valid in the scope of a connection to the database server. They felt the function didn’t work because they didn’t understand the difference between connecting to the MySQL CLI and clicking the lightening bolt in MySQL Workbench.
So, here are the instructions to reset the default SQL_MODE parameter value for Windows. You need to edit the setting in the my.ini file, which is in the C:\ProgramData\MySQL\MySQL Server 8.0 directory. The default installation will have the following:
# Set the SQL mode to strict sql-mode="STRICT_TRANS_TABLES,NO_ENGINE_SUBSTITUTION" |
You need to change it to the following in an editor with Administrative privileges:
# Set the SQL mode to strict sql-mode="STRICT_TRANS_TABLES,NO_ENGINE_SUBSTITUTION,ONLY_FULL_GROUP_BY" |
Then, you need to connect to the services by launching services.msc from the command prompt. In the list of services find MYSQL80 service and restart it. You can verify it by connecting to the MySQL 8.0.* server and running the following SQL query:
SELECT @@SQL_MODE: |
That’s how you convert Windows to use only traditional group by behaviors in SQL. As always, I hope this helps those looking for a solution.
AlmaLinux Libraries
I discovered a dependency for MySQL Workbench on AlmaLinux 8 installation. I neglected to fully cover it when I documented the installation in a VM of AlmaLinux 9. I go back later and update that entry but for now you need the following dependencies:
proj-6.3.2-4.el8.x86_64.rpm proj-datumgrid-1.8-6.3.2.4.el8.noarch.rpm proj-devel-6.3.2-4.el8.x86_64.rpm |
Install like this:
sudo dnf install -y *.rpm |
Log file:
Last metadata expiration check: 3:01:53 ago on Fri 10 Feb 2023 03:37:49 AM UTC. Dependencies resolved. ========================================================================================== Package Architecture Version Repository Size ========================================================================================== Installing: proj x86_64 6.3.2-4.el8 @commandline 2.0 M proj-datumgrid noarch 1.8-6.3.2.4.el8 @commandline 5.4 M proj-devel x86_64 6.3.2-4.el8 @commandline 89 k Transaction Summary ========================================================================================== Install 3 Packages Total size: 7.5 M Installed size: 17 M Downloading Packages: Running transaction check Transaction check succeeded. Running transaction test Transaction test succeeded. Running transaction Preparing : 1/1 Installing : proj-datumgrid-1.8-6.3.2.4.el8.noarch 1/3 Installing : proj-6.3.2-4.el8.x86_64 2/3 Installing : proj-devel-6.3.2-4.el8.x86_64 3/3 Running scriptlet: proj-devel-6.3.2-4.el8.x86_64 3/3 Verifying : proj-6.3.2-4.el8.x86_64 1/3 Verifying : proj-datumgrid-1.8-6.3.2.4.el8.noarch 2/3 Verifying : proj-devel-6.3.2-4.el8.x86_64 3/3 Installed: proj-6.3.2-4.el8.x86_64 proj-datumgrid-1.8-6.3.2.4.el8.noarch proj-devel-6.3.2-4.el8.x86_64 Complete! |
A quick update while installing AlmaLinux for AWS.
AlmaLinux MySQL Workbench
AlmaLinux doesn’t natively support MySQL Workbench but these notes will help you install it. The great news is that MySQL Workbench works perfectly once you’ve installed all the dependent libraries. It’ll look like the following:
Disclaimer of sorts:
AlmaLinux is an open-source, community-driven project that intends to fill the gap left by the demise of the CentOS stable release. AlmaLinux is a 1:1 binary compatible fork of RHEL® 9 and it is built by the AlmaLinux OS Foundation as a standalone, completely free OS. The AlmaLinux OS Foundation will support future RHEL® releases by updating AlmaLinux. Ongoing development efforts are governed by the members of the community.
You can download MySQL Workbench from the following website:
https://dev.mysql.com/downloads/workbench |
When you open this page, select the Red Hat Enterprise Linux 9 / Oracle Linux 9 (x86, 64-bit), RPM Package from the dropdown menu. Then, click the Download button. You may be prompted for your credentials or to create new credentials, but you can skip that by clicking on the No thanks, just start my download link.
When the download completes, open a terminal session as the student user. Navigate to the Downloads directory with the following command:
cd $HOME/Downloads |
List the files in the $HOME/Downloads directory and you should see:
mysql-workbench-community-8.0.31-1.el9.x86_64.rpm |
As the sudoer user or root, run the following command (naturally, exclude sudo if you’re the root user):
sudo dnf install -y mysql-workbench-community-8.0.31-1.el9.x86_64.rpm |
It will most likely fail with an error message like this:
Last metadata expiration check: 2:50:04 ago on Thu 17 Nov 2022 09:33:15 AM EST. Error: Problem: conflicting requests - nothing provides gtkmm30-devel needed by mysql-workbench-community-8.0.31-1.el9.src - nothing provides libzip-devel needed by mysql-workbench-community-8.0.31-1.el9.src - nothing provides proj-devel needed by mysql-workbench-community-8.0.31-1.el9.src - nothing provides swig >= 3.0 needed by mysql-workbench-community-8.0.31-1.el9.src (try to add '--skip-broken' to skip uninstallable packages or '--nobest' to use not only best candidate packages) |
AlmaLinux doesn’t install these prerequisite packages. You’ll need to resolve these dependencies by installing them in the right order and groups before you can run the MySQL Workbench packages.
You can discover missing packages at the pkgs.org website. You need to resolve all four prerequisites before installing MySQL Workbench.
- Let’s start with the gtkmm30-devel package, which has eight separate dependencies. Assuming you’re still in your $HOME/Downloads directory, you can run the following command to get the gtkmm30-devel for AlmaLinux 9:
wget https://repo.almalinux.org/almalinux/9/CRB/x86_64/os/Packages/gtkmm30-devel-3.24.5-1.el9.x86_64.rpm
It downloads the following package:
gtkmm30-devel-3.24.5-1.el9.x86_64.rpm
If you attempt to run it, the gtkmm30-devel package raises the following errors:
sudo dnf install -y gtkmm30-devel-3.24.5-1.el9.x86_64.rpm
Last metadata expiration check: 0:41:13 ago on Thu 17 Nov 2022 02:39:59 PM EST.
Error:
 Problem: conflicting requests
  - nothing provides pkgconfig(atkmm-1.6) >= 2.24.2 needed by gtkmm30-devel-3.24.5-1.el9.x86_64
  - nothing provides pkgconfig(cairomm-1.0) >= 1.12.0 needed by gtkmm30-devel-3.24.5-1.el9.x86_64
  - nothing provides pkgconfig(giomm-2.4) >= 2.54.0 needed by gtkmm30-devel-3.24.5-1.el9.x86_64
  - nothing provides pkgconfig(pangomm-1.4) >= 1.12.0 needed by gtkmm30-devel-3.24.5-1.el9.x86_64
(try to add '--skip-broken' to skip uninstallable packages or '--nobest' to use not only best candidate packages)
While you only get four errors, there are more packages required. You need to use the wget utility to download these packages. I would recommend you create a temporary gtkmm30 subdirectory inside your $HOME/Downloads directory and change to that directory before downloading these files.
wget https://repo.almalinux.org/almalinux/9/CRB/x86_64/os/Packages/atkmm-devel-2.28.2-2.el9.x86_64.rpm
wget https://repo.almalinux.org/almalinux/9/CRB/x86_64/os/Packages/cairomm-devel-1.14.2-10.el9.x86_64.rpm
wget https://repo.almalinux.org/almalinux/9/AppStream/x86_64/os/Packages/gdk-pixbuf2-devel-2.42.6-2.el9.x86_64.rpm
wget https://repo.almalinux.org/almalinux/9/CRB/x86_64/os/Packages/glibmm24-devel-2.66.1-1.el9.x86_64.rpm
wget https://repo.almalinux.org/almalinux/9/AppStream/x86_64/os/Packages/gtk3-devel-3.24.31-2.el9.x86_64.rpm
wget https://repo.almalinux.org/almalinux/9/CRB/x86_64/os/Packages/pangomm-devel-2.46.1-1.el9.x86_64.rpm
wget https://repo.almalinux.org/almalinux/9/CRB/x86_64/os/Packages/libsigc++20-devel-2.10.7-2.el9.x86_64.rpm
You need to run these as a set of prerequisites, so from your gtkmm30 subdirectory use the following dnf command as the sudoer user:
sudo dnf install -y *.rpm
The log file for this is:
Display detailed console log →
Last metadata expiration check: 0:09:20 ago on Sun 20 Nov 2022 12:52:28 AM EST. Dependencies resolved. ================================================================================ Package Arch Version Repository Size ================================================================================ Installing: atkmm-devel x86_64 2.28.2-2.el9 @commandline 45 k cairomm-devel x86_64 1.14.2-10.el9 @commandline 62 k gdk-pixbuf2-devel x86_64 2.42.6-2.el9 @commandline 64 k glibmm24-devel x86_64 2.66.1-1.el9 @commandline 497 k gtk3-devel x86_64 3.24.31-2.el9 @commandline 4.1 M libsigc++20-devel x86_64 2.10.7-2.el9 @commandline 67 k pangomm-devel x86_64 2.46.1-1.el9 @commandline 65 k Upgrading: dbus-common noarch 1:1.12.20-6.el9 baseos 14 k dbus-daemon x86_64 1:1.12.20-6.el9 appstream 196 k dbus-libs x86_64 1:1.12.20-6.el9 baseos 151 k dbus-tools x86_64 1:1.12.20-6.el9 baseos 50 k fontconfig x86_64 2.14.0-1.el9 appstream 274 k freetype x86_64 2.10.4-9.el9 baseos 387 k fribidi x86_64 1.0.10-6.el9.2 appstream 84 k harfbuzz x86_64 2.7.4-8.el9 baseos 624 k harfbuzz-icu x86_64 2.7.4-8.el9 appstream 14 k libblkid x86_64 2.37.4-9.el9 baseos 107 k libfdisk x86_64 2.37.4-9.el9 baseos 154 k libmount x86_64 2.37.4-9.el9 baseos 133 k libselinux x86_64 3.4-3.el9 baseos 85 k libselinux-utils x86_64 3.4-3.el9 baseos 158 k libsepol x86_64 3.4-1.1.el9 baseos 315 k libsmartcols x86_64 2.37.4-9.el9 baseos 63 k libtiff x86_64 4.4.0-2.el9 appstream 195 k libuuid x86_64 2.37.4-9.el9 baseos 27 k libxml2 x86_64 2.9.13-2.el9 baseos 746 k pcre2 x86_64 10.40-2.el9 baseos 236 k pcre2-syntax noarch 10.40-2.el9 baseos 143 k pcre2-utf16 x86_64 10.40-2.el9 appstream 216 k pcre2-utf32 x86_64 10.40-2.el9 appstream 205 k python3-libselinux x86_64 3.4-3.el9 appstream 185 k python3-libxml2 x86_64 2.9.13-2.el9 baseos 226 k util-linux x86_64 2.37.4-9.el9 baseos 2.2 M util-linux-core x86_64 2.37.4-9.el9 baseos 434 k util-linux-user x86_64 2.37.4-9.el9 baseos 30 k Installing dependencies: at-spi2-atk-devel x86_64 2.38.0-4.el9 appstream 9.5 k at-spi2-core-devel x86_64 2.40.3-1.el9 appstream 134 k atk-devel x86_64 2.36.0-5.el9 appstream 172 k brotli x86_64 1.0.9-6.el9 appstream 313 k brotli-devel x86_64 1.0.9-6.el9 appstream 31 k bzip2-devel x86_64 1.0.8-8.el9 appstream 213 k cairo-devel x86_64 1.17.4-7.el9 appstream 190 k cairo-gobject-devel x86_64 1.17.4-7.el9 appstream 10 k dbus-devel x86_64 1:1.12.20-6.el9 appstream 33 k fontconfig-devel x86_64 2.14.0-1.el9 appstream 128 k freetype-devel x86_64 2.10.4-9.el9 appstream 1.1 M fribidi-devel x86_64 1.0.10-6.el9.2 appstream 25 k glib2-devel x86_64 2.68.4-5.el9 appstream 475 k graphite2-devel x86_64 1.3.14-9.el9 appstream 21 k harfbuzz-devel x86_64 2.7.4-8.el9 appstream 305 k libX11-devel x86_64 1.7.0-7.el9 appstream 940 k libXau-devel x86_64 1.0.9-8.el9 appstream 13 k libXcomposite-devel x86_64 0.4.5-7.el9 appstream 15 k libXcursor-devel x86_64 1.2.0-7.el9 appstream 21 k libXdamage-devel x86_64 1.1.5-7.el9 appstream 9.3 k libXext-devel x86_64 1.3.4-8.el9 appstream 72 k libXfixes-devel x86_64 5.0.3-16.el9 appstream 12 k libXft-devel x86_64 2.3.3-8.el9 appstream 18 k libXi-devel x86_64 1.7.10-8.el9 appstream 99 k libXinerama-devel x86_64 1.1.4-10.el9 appstream 13 k libXrandr-devel x86_64 1.5.2-8.el9 appstream 19 k libXrender-devel x86_64 0.9.10-16.el9 appstream 16 k libXtst-devel x86_64 1.2.3-16.el9 appstream 15 k libblkid-devel x86_64 2.37.4-9.el9 appstream 17 k libdatrie-devel x86_64 0.2.13-4.el9 appstream 132 k libepoxy-devel x86_64 1.5.5-4.el9 appstream 133 k libffi-devel x86_64 3.4.2-7.el9 appstream 29 k libglvnd-core-devel x86_64 1:1.3.4-1.el9 appstream 17 k libglvnd-devel x86_64 1:1.3.4-1.el9 appstream 155 k libicu-devel x86_64 67.1-9.el9 appstream 830 k libmount-devel x86_64 2.37.4-9.el9 appstream 18 k libpng-devel x86_64 2:1.6.37-12.el9 appstream 290 k libselinux-devel x86_64 3.4-3.el9 appstream 113 k libsepol-devel x86_64 3.4-1.1.el9 appstream 40 k libthai-devel x86_64 0.1.28-8.el9 appstream 117 k libtiff-devel x86_64 4.4.0-2.el9 appstream 513 k libxcb-devel x86_64 1.13.1-9.el9 appstream 1.0 M libxkbcommon-devel x86_64 1.0.3-4.el9 appstream 61 k libxml2-devel x86_64 2.9.13-2.el9 appstream 828 k pango-devel x86_64 1.48.7-2.el9 appstream 141 k pcre-cpp x86_64 8.44-3.el9.3 appstream 26 k pcre-devel x86_64 8.44-3.el9.3 appstream 470 k pcre-utf16 x86_64 8.44-3.el9.3 appstream 184 k pcre-utf32 x86_64 8.44-3.el9.3 appstream 174 k pcre2-devel x86_64 10.40-2.el9 appstream 474 k perl-Filter x86_64 2:1.60-4.el9 appstream 81 k perl-encoding x86_64 4:3.00-462.el9 appstream 62 k perl-open noarch 1.12-479.el9 appstream 25 k pixman-devel x86_64 0.40.0-5.el9 appstream 17 k sysprof-capture-devel x86_64 3.40.1-3.el9 appstream 59 k wayland-devel x86_64 1.19.0-4.el9 appstream 132 k xorg-x11-proto-devel noarch 2021.4-2.el9 appstream 262 k Transaction Summary ================================================================================ Install 64 Packages Upgrade 28 Packages Total size: 23 M Total download size: 18 M Downloading Packages: (1/85): at-spi2-atk-devel-2.38.0-4.el9.x86_64.r 38 kB/s | 9.5 kB 00:00 (2/85): atk-devel-2.36.0-5.el9.x86_64.rpm 334 kB/s | 172 kB 00:00 (3/85): brotli-devel-1.0.9-6.el9.x86_64.rpm 354 kB/s | 31 kB 00:00 (4/85): at-spi2-core-devel-2.40.3-1.el9.x86_64. 167 kB/s | 134 kB 00:00 (5/85): cairo-devel-1.17.4-7.el9.x86_64.rpm 1.9 MB/s | 190 kB 00:00 (6/85): cairo-gobject-devel-1.17.4-7.el9.x86_64 179 kB/s | 10 kB 00:00 (7/85): brotli-1.0.9-6.el9.x86_64.rpm 413 kB/s | 313 kB 00:00 (8/85): dbus-devel-1.12.20-6.el9.x86_64.rpm 549 kB/s | 33 kB 00:00 (9/85): bzip2-devel-1.0.8-8.el9.x86_64.rpm 505 kB/s | 213 kB 00:00 (10/85): fribidi-devel-1.0.10-6.el9.2.x86_64.rp 492 kB/s | 25 kB 00:00 (11/85): fontconfig-devel-2.14.0-1.el9.x86_64.r 891 kB/s | 128 kB 00:00 (12/85): graphite2-devel-1.3.14-9.el9.x86_64.rp 316 kB/s | 21 kB 00:00 (13/85): glib2-devel-2.68.4-5.el9.x86_64.rpm 1.1 MB/s | 475 kB 00:00 (14/85): harfbuzz-devel-2.7.4-8.el9.x86_64.rpm 850 kB/s | 305 kB 00:00 (15/85): freetype-devel-2.10.4-9.el9.x86_64.rpm 1.7 MB/s | 1.1 MB 00:00 (16/85): libXau-devel-1.0.9-8.el9.x86_64.rpm 170 kB/s | 13 kB 00:00 (17/85): libXcomposite-devel-0.4.5-7.el9.x86_64 273 kB/s | 15 kB 00:00 (18/85): libXcursor-devel-1.2.0-7.el9.x86_64.rp 344 kB/s | 21 kB 00:00 (19/85): libXdamage-devel-1.1.5-7.el9.x86_64.rp 133 kB/s | 9.3 kB 00:00 (20/85): libXfixes-devel-5.0.3-16.el9.x86_64.rp 256 kB/s | 12 kB 00:00 (21/85): libXext-devel-1.3.4-8.el9.x86_64.rpm 768 kB/s | 72 kB 00:00 (22/85): libXft-devel-2.3.3-8.el9.x86_64.rpm 324 kB/s | 18 kB 00:00 (23/85): libXinerama-devel-1.1.4-10.el9.x86_64. 205 kB/s | 13 kB 00:00 (24/85): libXi-devel-1.7.10-8.el9.x86_64.rpm 913 kB/s | 99 kB 00:00 (25/85): libXrender-devel-0.9.10-16.el9.x86_64. 295 kB/s | 16 kB 00:00 (26/85): libXrandr-devel-1.5.2-8.el9.x86_64.rpm 289 kB/s | 19 kB 00:00 (27/85): libXtst-devel-1.2.3-16.el9.x86_64.rpm 261 kB/s | 15 kB 00:00 (28/85): libblkid-devel-2.37.4-9.el9.x86_64.rpm 284 kB/s | 17 kB 00:00 (29/85): libX11-devel-1.7.0-7.el9.x86_64.rpm 1.4 MB/s | 940 kB 00:00 (30/85): libepoxy-devel-1.5.5-4.el9.x86_64.rpm 1.2 MB/s | 133 kB 00:00 (31/85): libdatrie-devel-0.2.13-4.el9.x86_64.rp 876 kB/s | 132 kB 00:00 (32/85): libffi-devel-3.4.2-7.el9.x86_64.rpm 426 kB/s | 29 kB 00:00 (33/85): libglvnd-core-devel-1.3.4-1.el9.x86_64 233 kB/s | 17 kB 00:00 (34/85): libmount-devel-2.37.4-9.el9.x86_64.rpm 280 kB/s | 18 kB 00:00 (35/85): libglvnd-devel-1.3.4-1.el9.x86_64.rpm 976 kB/s | 155 kB 00:00 (36/85): libpng-devel-1.6.37-12.el9.x86_64.rpm 1.9 MB/s | 290 kB 00:00 (37/85): libselinux-devel-3.4-3.el9.x86_64.rpm 801 kB/s | 113 kB 00:00 (38/85): libsepol-devel-3.4-1.1.el9.x86_64.rpm 636 kB/s | 40 kB 00:00 (39/85): libthai-devel-0.1.28-8.el9.x86_64.rpm 630 kB/s | 117 kB 00:00 (40/85): libicu-devel-67.1-9.el9.x86_64.rpm 1.3 MB/s | 830 kB 00:00 (41/85): libtiff-devel-4.4.0-2.el9.x86_64.rpm 1.6 MB/s | 513 kB 00:00 (42/85): libxkbcommon-devel-1.0.3-4.el9.x86_64. 710 kB/s | 61 kB 00:00 (43/85): pango-devel-1.48.7-2.el9.x86_64.rpm 914 kB/s | 141 kB 00:00 (44/85): pcre-cpp-8.44-3.el9.3.x86_64.rpm 425 kB/s | 26 kB 00:00 (45/85): pcre-devel-8.44-3.el9.3.x86_64.rpm 1.8 MB/s | 470 kB 00:00 (46/85): pcre-utf16-8.44-3.el9.3.x86_64.rpm 1.5 MB/s | 184 kB 00:00 (47/85): libxml2-devel-2.9.13-2.el9.x86_64.rpm 1.2 MB/s | 828 kB 00:00 (48/85): libxcb-devel-1.13.1-9.el9.x86_64.rpm 1.2 MB/s | 1.0 MB 00:00 (49/85): pcre-utf32-8.44-3.el9.3.x86_64.rpm 1.4 MB/s | 174 kB 00:00 (50/85): perl-Filter-1.60-4.el9.x86_64.rpm 704 kB/s | 81 kB 00:00 (51/85): perl-encoding-3.00-462.el9.x86_64.rpm 916 kB/s | 62 kB 00:00 (52/85): perl-open-1.12-479.el9.noarch.rpm 476 kB/s | 25 kB 00:00 (53/85): pixman-devel-0.40.0-5.el9.x86_64.rpm 272 kB/s | 17 kB 00:00 (54/85): sysprof-capture-devel-3.40.1-3.el9.x86 797 kB/s | 59 kB 00:00 (55/85): pcre2-devel-10.40-2.el9.x86_64.rpm 1.3 MB/s | 474 kB 00:00 (56/85): wayland-devel-1.19.0-4.el9.x86_64.rpm 1.0 MB/s | 132 kB 00:00 (57/85): xorg-x11-proto-devel-2021.4-2.el9.noar 1.3 MB/s | 262 kB 00:00 (58/85): dbus-daemon-1.12.20-6.el9.x86_64.rpm 1.3 MB/s | 196 kB 00:00 (59/85): fontconfig-2.14.0-1.el9.x86_64.rpm 1.7 MB/s | 274 kB 00:00 (60/85): harfbuzz-icu-2.7.4-8.el9.x86_64.rpm 217 kB/s | 14 kB 00:00 (61/85): fribidi-1.0.10-6.el9.2.x86_64.rpm 700 kB/s | 84 kB 00:00 (62/85): libtiff-4.4.0-2.el9.x86_64.rpm 1.5 MB/s | 195 kB 00:00 (63/85): pcre2-utf32-10.40-2.el9.x86_64.rpm 1.2 MB/s | 205 kB 00:00 (64/85): python3-libselinux-3.4-3.el9.x86_64.rp 1.5 MB/s | 185 kB 00:00 (65/85): pcre2-utf16-10.40-2.el9.x86_64.rpm 995 kB/s | 216 kB 00:00 (66/85): dbus-common-1.12.20-6.el9.noarch.rpm 203 kB/s | 14 kB 00:00 (67/85): dbus-tools-1.12.20-6.el9.x86_64.rpm 856 kB/s | 50 kB 00:00 (68/85): dbus-libs-1.12.20-6.el9.x86_64.rpm 1.3 MB/s | 151 kB 00:00 (69/85): libblkid-2.37.4-9.el9.x86_64.rpm 1.6 MB/s | 107 kB 00:00 (70/85): libfdisk-2.37.4-9.el9.x86_64.rpm 1.6 MB/s | 154 kB 00:00 (71/85): freetype-2.10.4-9.el9.x86_64.rpm 1.5 MB/s | 387 kB 00:00 (72/85): libmount-2.37.4-9.el9.x86_64.rpm 1.3 MB/s | 133 kB 00:00 (73/85): libselinux-3.4-3.el9.x86_64.rpm 820 kB/s | 85 kB 00:00 (74/85): harfbuzz-2.7.4-8.el9.x86_64.rpm 1.4 MB/s | 624 kB 00:00 (75/85): libselinux-utils-3.4-3.el9.x86_64.rpm 1.4 MB/s | 158 kB 00:00 (76/85): libuuid-2.37.4-9.el9.x86_64.rpm 448 kB/s | 27 kB 00:00 (77/85): libsmartcols-2.37.4-9.el9.x86_64.rpm 793 kB/s | 63 kB 00:00 (78/85): libsepol-3.4-1.1.el9.x86_64.rpm 1.6 MB/s | 315 kB 00:00 (79/85): pcre2-syntax-10.40-2.el9.noarch.rpm 1.2 MB/s | 143 kB 00:00 (80/85): pcre2-10.40-2.el9.x86_64.rpm 1.6 MB/s | 236 kB 00:00 (81/85): python3-libxml2-2.9.13-2.el9.x86_64.rp 1.4 MB/s | 226 kB 00:00 (82/85): libxml2-2.9.13-2.el9.x86_64.rpm 1.5 MB/s | 746 kB 00:00 (83/85): util-linux-user-2.37.4-9.el9.x86_64.rp 618 kB/s | 30 kB 00:00 (84/85): util-linux-core-2.37.4-9.el9.x86_64.rp 1.1 MB/s | 434 kB 00:00 (85/85): util-linux-2.37.4-9.el9.x86_64.rpm 1.9 MB/s | 2.2 MB 00:01 -------------------------------------------------------------------------------- Total 2.4 MB/s | 18 MB 00:07 Running transaction check Transaction check succeeded. Running transaction test Transaction test succeeded. Running transaction Preparing : 1/1 Installing : xorg-x11-proto-devel-2021.4-2.el9.noarch 1/120 Upgrading : libuuid-2.37.4-9.el9.x86_64 2/120 Upgrading : libblkid-2.37.4-9.el9.x86_64 3/120 Running scriptlet: libblkid-2.37.4-9.el9.x86_64 3/120 Upgrading : harfbuzz-2.7.4-8.el9.x86_64 4/120 Upgrading : freetype-2.10.4-9.el9.x86_64 5/120 Upgrading : libxml2-2.9.13-2.el9.x86_64 6/120 Upgrading : pcre2-syntax-10.40-2.el9.noarch 7/120 Upgrading : pcre2-10.40-2.el9.x86_64 8/120 Upgrading : libsepol-3.4-1.1.el9.x86_64 9/120 Upgrading : libselinux-3.4-3.el9.x86_64 10/120 Running scriptlet: libselinux-3.4-3.el9.x86_64 10/120 Upgrading : libmount-2.37.4-9.el9.x86_64 11/120 Upgrading : dbus-libs-1:1.12.20-6.el9.x86_64 12/120 Installing : libpng-devel-2:1.6.37-12.el9.x86_64 13/120 Installing : dbus-devel-1:1.12.20-6.el9.x86_64 14/120 Installing : libxml2-devel-2.9.13-2.el9.x86_64 15/120 Upgrading : libsmartcols-2.37.4-9.el9.x86_64 16/120 Installing : libsigc++20-devel-2.10.7-2.el9.x86_64 17/120 Installing : libffi-devel-3.4.2-7.el9.x86_64 18/120 Installing : wayland-devel-1.19.0-4.el9.x86_64 19/120 Upgrading : util-linux-core-2.37.4-9.el9.x86_64 20/120 Running scriptlet: util-linux-core-2.37.4-9.el9.x86_64 20/120 Installing : libxkbcommon-devel-1.0.3-4.el9.x86_64 21/120 Upgrading : dbus-tools-1:1.12.20-6.el9.x86_64 22/120 Installing : libsepol-devel-3.4-1.1.el9.x86_64 23/120 Upgrading : pcre2-utf16-10.40-2.el9.x86_64 24/120 Upgrading : pcre2-utf32-10.40-2.el9.x86_64 25/120 Installing : pcre2-devel-10.40-2.el9.x86_64 26/120 Installing : libselinux-devel-3.4-3.el9.x86_64 27/120 Upgrading : fontconfig-2.14.0-1.el9.x86_64 28/120 Running scriptlet: fontconfig-2.14.0-1.el9.x86_64 28/120 Upgrading : harfbuzz-icu-2.7.4-8.el9.x86_64 29/120 Installing : libblkid-devel-2.37.4-9.el9.x86_64 30/120 Installing : libmount-devel-2.37.4-9.el9.x86_64 31/120 Upgrading : libfdisk-2.37.4-9.el9.x86_64 32/120 Upgrading : util-linux-2.37.4-9.el9.x86_64 33/120 Installing : libXau-devel-1.0.9-8.el9.x86_64 34/120 Installing : libxcb-devel-1.13.1-9.el9.x86_64 35/120 Installing : libX11-devel-1.7.0-7.el9.x86_64 36/120 Installing : libXext-devel-1.3.4-8.el9.x86_64 37/120 Installing : libXfixes-devel-5.0.3-16.el9.x86_64 38/120 Installing : libXrender-devel-0.9.10-16.el9.x86_64 39/120 Installing : libXi-devel-1.7.10-8.el9.x86_64 40/120 Installing : libXtst-devel-1.2.3-16.el9.x86_64 41/120 Installing : libXcursor-devel-1.2.0-7.el9.x86_64 42/120 Installing : libXrandr-devel-1.5.2-8.el9.x86_64 43/120 Installing : libXcomposite-devel-0.4.5-7.el9.x86_64 44/120 Installing : libXdamage-devel-1.1.5-7.el9.x86_64 45/120 Installing : libXinerama-devel-1.1.4-10.el9.x86_64 46/120 Upgrading : dbus-common-1:1.12.20-6.el9.noarch 47/120 Running scriptlet: dbus-common-1:1.12.20-6.el9.noarch 47/120 Upgrading : libtiff-4.4.0-2.el9.x86_64 48/120 Installing : libtiff-devel-4.4.0-2.el9.x86_64 49/120 Upgrading : fribidi-1.0.10-6.el9.2.x86_64 50/120 Installing : fribidi-devel-1.0.10-6.el9.2.x86_64 51/120 Installing : sysprof-capture-devel-3.40.1-3.el9.x86_64 52/120 Installing : pixman-devel-0.40.0-5.el9.x86_64 53/120 Installing : perl-Filter-2:1.60-4.el9.x86_64 54/120 Installing : perl-encoding-4:3.00-462.el9.x86_64 55/120 Installing : perl-open-1.12-479.el9.noarch 56/120 Installing : pcre-utf32-8.44-3.el9.3.x86_64 57/120 Installing : pcre-utf16-8.44-3.el9.3.x86_64 58/120 Installing : pcre-cpp-8.44-3.el9.3.x86_64 59/120 Installing : pcre-devel-8.44-3.el9.3.x86_64 60/120 Installing : glib2-devel-2.68.4-5.el9.x86_64 61/120 Installing : atk-devel-2.36.0-5.el9.x86_64 62/120 Installing : glibmm24-devel-2.66.1-1.el9.x86_64 63/120 Installing : at-spi2-core-devel-2.40.3-1.el9.x86_64 64/120 Installing : at-spi2-atk-devel-2.38.0-4.el9.x86_64 65/120 Installing : gdk-pixbuf2-devel-2.42.6-2.el9.x86_64 66/120 Installing : libicu-devel-67.1-9.el9.x86_64 67/120 Installing : libglvnd-core-devel-1:1.3.4-1.el9.x86_64 68/120 Installing : libglvnd-devel-1:1.3.4-1.el9.x86_64 69/120 Installing : libepoxy-devel-1.5.5-4.el9.x86_64 70/120 Installing : libdatrie-devel-0.2.13-4.el9.x86_64 71/120 Installing : libthai-devel-0.1.28-8.el9.x86_64 72/120 Installing : graphite2-devel-1.3.14-9.el9.x86_64 73/120 Installing : bzip2-devel-1.0.8-8.el9.x86_64 74/120 Installing : brotli-1.0.9-6.el9.x86_64 75/120 Installing : brotli-devel-1.0.9-6.el9.x86_64 76/120 Installing : harfbuzz-devel-2.7.4-8.el9.x86_64 77/120 Installing : freetype-devel-2.10.4-9.el9.x86_64 78/120 Installing : fontconfig-devel-2.14.0-1.el9.x86_64 79/120 Installing : cairo-devel-1.17.4-7.el9.x86_64 80/120 Installing : cairo-gobject-devel-1.17.4-7.el9.x86_64 81/120 Installing : cairomm-devel-1.14.2-10.el9.x86_64 82/120 Installing : libXft-devel-2.3.3-8.el9.x86_64 83/120 Installing : pango-devel-1.48.7-2.el9.x86_64 84/120 Installing : gtk3-devel-3.24.31-2.el9.x86_64 85/120 Installing : pangomm-devel-2.46.1-1.el9.x86_64 86/120 Installing : atkmm-devel-2.28.2-2.el9.x86_64 87/120 Running scriptlet: dbus-daemon-1:1.12.20-6.el9.x86_64 88/120 Upgrading : dbus-daemon-1:1.12.20-6.el9.x86_64 88/120 Running scriptlet: dbus-daemon-1:1.12.20-6.el9.x86_64 88/120 Upgrading : util-linux-user-2.37.4-9.el9.x86_64 89/120 Upgrading : python3-libselinux-3.4-3.el9.x86_64 90/120 Upgrading : libselinux-utils-3.4-3.el9.x86_64 91/120 Upgrading : python3-libxml2-2.9.13-2.el9.x86_64 92/120 Cleanup : python3-libxml2-2.9.13-1.el9_0.1.x86_64 93/120 Running scriptlet: dbus-daemon-1:1.12.20-5.el9.x86_64 94/120 Cleanup : dbus-daemon-1:1.12.20-5.el9.x86_64 94/120 Running scriptlet: dbus-daemon-1:1.12.20-5.el9.x86_64 94/120 Cleanup : libselinux-utils-3.3-2.el9.x86_64 95/120 Cleanup : fontconfig-2.13.94-2.el9.x86_64 96/120 Running scriptlet: fontconfig-2.13.94-2.el9.x86_64 96/120 Cleanup : dbus-tools-1:1.12.20-5.el9.x86_64 97/120 Cleanup : python3-libselinux-3.3-2.el9.x86_64 98/120 Cleanup : util-linux-user-2.37.4-3.el9.x86_64 99/120 Cleanup : util-linux-2.37.4-3.el9.x86_64 100/120 Cleanup : util-linux-core-2.37.4-3.el9.x86_64 101/120 Cleanup : libmount-2.37.4-3.el9.x86_64 102/120 Cleanup : libfdisk-2.37.4-3.el9.x86_64 103/120 Cleanup : libselinux-3.3-2.el9.x86_64 104/120 Cleanup : harfbuzz-icu-2.7.4-5.el9.x86_64 105/120 Cleanup : pcre2-10.37-5.el9_0.x86_64 106/120 Cleanup : libblkid-2.37.4-3.el9.x86_64 107/120 Cleanup : freetype-2.10.4-6.el9.x86_64 108/120 Cleanup : pcre2-utf32-10.37-5.el9_0.x86_64 109/120 Cleanup : pcre2-utf16-10.37-5.el9_0.x86_64 110/120 Cleanup : pcre2-syntax-10.37-5.el9_0.noarch 111/120 Running scriptlet: dbus-common-1:1.12.20-5.el9.noarch 112/120 Cleanup : dbus-common-1:1.12.20-5.el9.noarch 112/120 Running scriptlet: dbus-common-1:1.12.20-5.el9.noarch 112/120 Cleanup : harfbuzz-2.7.4-5.el9.x86_64 113/120 Cleanup : libuuid-2.37.4-3.el9.x86_64 114/120 Cleanup : libsepol-3.3-2.el9.x86_64 115/120 Cleanup : libsmartcols-2.37.4-3.el9.x86_64 116/120 Cleanup : dbus-libs-1:1.12.20-5.el9.x86_64 117/120 Cleanup : libxml2-2.9.13-1.el9_0.1.x86_64 118/120 Cleanup : libtiff-4.2.0-3.el9.x86_64 119/120 Cleanup : fribidi-1.0.10-6.el9.x86_64 120/120 Running scriptlet: fontconfig-2.14.0-1.el9.x86_64 120/120 Running scriptlet: fribidi-1.0.10-6.el9.x86_64 120/120 Regex version mismatch, expected: 10.40 2022-04-14 actual: 10.37 2021-05-26 Regex version mismatch, expected: 10.40 2022-04-14 actual: 10.37 2021-05-26 Regex version mismatch, expected: 10.40 2022-04-14 actual: 10.37 2021-05-26 Regex version mismatch, expected: 10.40 2022-04-14 actual: 10.37 2021-05-26 Verifying : at-spi2-atk-devel-2.38.0-4.el9.x86_64 1/120 Verifying : at-spi2-core-devel-2.40.3-1.el9.x86_64 2/120 Verifying : atk-devel-2.36.0-5.el9.x86_64 3/120 Verifying : brotli-1.0.9-6.el9.x86_64 4/120 Verifying : brotli-devel-1.0.9-6.el9.x86_64 5/120 Verifying : bzip2-devel-1.0.8-8.el9.x86_64 6/120 Verifying : cairo-devel-1.17.4-7.el9.x86_64 7/120 Verifying : cairo-gobject-devel-1.17.4-7.el9.x86_64 8/120 Verifying : dbus-devel-1:1.12.20-6.el9.x86_64 9/120 Verifying : fontconfig-devel-2.14.0-1.el9.x86_64 10/120 Verifying : freetype-devel-2.10.4-9.el9.x86_64 11/120 Verifying : fribidi-devel-1.0.10-6.el9.2.x86_64 12/120 Verifying : glib2-devel-2.68.4-5.el9.x86_64 13/120 Verifying : graphite2-devel-1.3.14-9.el9.x86_64 14/120 Verifying : harfbuzz-devel-2.7.4-8.el9.x86_64 15/120 Verifying : libX11-devel-1.7.0-7.el9.x86_64 16/120 Verifying : libXau-devel-1.0.9-8.el9.x86_64 17/120 Verifying : libXcomposite-devel-0.4.5-7.el9.x86_64 18/120 Verifying : libXcursor-devel-1.2.0-7.el9.x86_64 19/120 Verifying : libXdamage-devel-1.1.5-7.el9.x86_64 20/120 Verifying : libXext-devel-1.3.4-8.el9.x86_64 21/120 Verifying : libXfixes-devel-5.0.3-16.el9.x86_64 22/120 Verifying : libXft-devel-2.3.3-8.el9.x86_64 23/120 Verifying : libXi-devel-1.7.10-8.el9.x86_64 24/120 Verifying : libXinerama-devel-1.1.4-10.el9.x86_64 25/120 Verifying : libXrandr-devel-1.5.2-8.el9.x86_64 26/120 Verifying : libXrender-devel-0.9.10-16.el9.x86_64 27/120 Verifying : libXtst-devel-1.2.3-16.el9.x86_64 28/120 Verifying : libblkid-devel-2.37.4-9.el9.x86_64 29/120 Verifying : libdatrie-devel-0.2.13-4.el9.x86_64 30/120 Verifying : libepoxy-devel-1.5.5-4.el9.x86_64 31/120 Verifying : libffi-devel-3.4.2-7.el9.x86_64 32/120 Verifying : libglvnd-core-devel-1:1.3.4-1.el9.x86_64 33/120 Verifying : libglvnd-devel-1:1.3.4-1.el9.x86_64 34/120 Verifying : libicu-devel-67.1-9.el9.x86_64 35/120 Verifying : libmount-devel-2.37.4-9.el9.x86_64 36/120 Verifying : libpng-devel-2:1.6.37-12.el9.x86_64 37/120 Verifying : libselinux-devel-3.4-3.el9.x86_64 38/120 Verifying : libsepol-devel-3.4-1.1.el9.x86_64 39/120 Verifying : libthai-devel-0.1.28-8.el9.x86_64 40/120 Verifying : libtiff-devel-4.4.0-2.el9.x86_64 41/120 Verifying : libxcb-devel-1.13.1-9.el9.x86_64 42/120 Verifying : libxkbcommon-devel-1.0.3-4.el9.x86_64 43/120 Verifying : libxml2-devel-2.9.13-2.el9.x86_64 44/120 Verifying : pango-devel-1.48.7-2.el9.x86_64 45/120 Verifying : pcre-cpp-8.44-3.el9.3.x86_64 46/120 Verifying : pcre-devel-8.44-3.el9.3.x86_64 47/120 Verifying : pcre-utf16-8.44-3.el9.3.x86_64 48/120 Verifying : pcre-utf32-8.44-3.el9.3.x86_64 49/120 Verifying : pcre2-devel-10.40-2.el9.x86_64 50/120 Verifying : perl-Filter-2:1.60-4.el9.x86_64 51/120 Verifying : perl-encoding-4:3.00-462.el9.x86_64 52/120 Verifying : perl-open-1.12-479.el9.noarch 53/120 Verifying : pixman-devel-0.40.0-5.el9.x86_64 54/120 Verifying : sysprof-capture-devel-3.40.1-3.el9.x86_64 55/120 Verifying : wayland-devel-1.19.0-4.el9.x86_64 56/120 Verifying : xorg-x11-proto-devel-2021.4-2.el9.noarch 57/120 Verifying : atkmm-devel-2.28.2-2.el9.x86_64 58/120 Verifying : cairomm-devel-1.14.2-10.el9.x86_64 59/120 Verifying : gdk-pixbuf2-devel-2.42.6-2.el9.x86_64 60/120 Verifying : glibmm24-devel-2.66.1-1.el9.x86_64 61/120 Verifying : gtk3-devel-3.24.31-2.el9.x86_64 62/120 Verifying : libsigc++20-devel-2.10.7-2.el9.x86_64 63/120 Verifying : pangomm-devel-2.46.1-1.el9.x86_64 64/120 Verifying : dbus-daemon-1:1.12.20-6.el9.x86_64 65/120 Verifying : dbus-daemon-1:1.12.20-5.el9.x86_64 66/120 Verifying : fontconfig-2.14.0-1.el9.x86_64 67/120 Verifying : fontconfig-2.13.94-2.el9.x86_64 68/120 Verifying : fribidi-1.0.10-6.el9.2.x86_64 69/120 Verifying : fribidi-1.0.10-6.el9.x86_64 70/120 Verifying : harfbuzz-icu-2.7.4-8.el9.x86_64 71/120 Verifying : harfbuzz-icu-2.7.4-5.el9.x86_64 72/120 Verifying : libtiff-4.4.0-2.el9.x86_64 73/120 Verifying : libtiff-4.2.0-3.el9.x86_64 74/120 Verifying : pcre2-utf16-10.40-2.el9.x86_64 75/120 Verifying : pcre2-utf16-10.37-5.el9_0.x86_64 76/120 Verifying : pcre2-utf32-10.40-2.el9.x86_64 77/120 Verifying : pcre2-utf32-10.37-5.el9_0.x86_64 78/120 Verifying : python3-libselinux-3.4-3.el9.x86_64 79/120 Verifying : python3-libselinux-3.3-2.el9.x86_64 80/120 Verifying : dbus-common-1:1.12.20-6.el9.noarch 81/120 Verifying : dbus-common-1:1.12.20-5.el9.noarch 82/120 Verifying : dbus-libs-1:1.12.20-6.el9.x86_64 83/120 Verifying : dbus-libs-1:1.12.20-5.el9.x86_64 84/120 Verifying : dbus-tools-1:1.12.20-6.el9.x86_64 85/120 Verifying : dbus-tools-1:1.12.20-5.el9.x86_64 86/120 Verifying : freetype-2.10.4-9.el9.x86_64 87/120 Verifying : freetype-2.10.4-6.el9.x86_64 88/120 Verifying : harfbuzz-2.7.4-8.el9.x86_64 89/120 Verifying : harfbuzz-2.7.4-5.el9.x86_64 90/120 Verifying : libblkid-2.37.4-9.el9.x86_64 91/120 Verifying : libblkid-2.37.4-3.el9.x86_64 92/120 Verifying : libfdisk-2.37.4-9.el9.x86_64 93/120 Verifying : libfdisk-2.37.4-3.el9.x86_64 94/120 Verifying : libmount-2.37.4-9.el9.x86_64 95/120 Verifying : libmount-2.37.4-3.el9.x86_64 96/120 Verifying : libselinux-3.4-3.el9.x86_64 97/120 Verifying : libselinux-3.3-2.el9.x86_64 98/120 Verifying : libselinux-utils-3.4-3.el9.x86_64 99/120 Verifying : libselinux-utils-3.3-2.el9.x86_64 100/120 Verifying : libsepol-3.4-1.1.el9.x86_64 101/120 Verifying : libsepol-3.3-2.el9.x86_64 102/120 Verifying : libsmartcols-2.37.4-9.el9.x86_64 103/120 Verifying : libsmartcols-2.37.4-3.el9.x86_64 104/120 Verifying : libuuid-2.37.4-9.el9.x86_64 105/120 Verifying : libuuid-2.37.4-3.el9.x86_64 106/120 Verifying : libxml2-2.9.13-2.el9.x86_64 107/120 Verifying : libxml2-2.9.13-1.el9_0.1.x86_64 108/120 Verifying : pcre2-10.40-2.el9.x86_64 109/120 Verifying : pcre2-10.37-5.el9_0.x86_64 110/120 Verifying : pcre2-syntax-10.40-2.el9.noarch 111/120 Verifying : pcre2-syntax-10.37-5.el9_0.noarch 112/120 Verifying : python3-libxml2-2.9.13-2.el9.x86_64 113/120 Verifying : python3-libxml2-2.9.13-1.el9_0.1.x86_64 114/120 Verifying : util-linux-2.37.4-9.el9.x86_64 115/120 Verifying : util-linux-2.37.4-3.el9.x86_64 116/120 Verifying : util-linux-core-2.37.4-9.el9.x86_64 117/120 Verifying : util-linux-core-2.37.4-3.el9.x86_64 118/120 Verifying : util-linux-user-2.37.4-9.el9.x86_64 119/120 Verifying : util-linux-user-2.37.4-3.el9.x86_64 120/120 Upgraded: dbus-common-1:1.12.20-6.el9.noarch dbus-daemon-1:1.12.20-6.el9.x86_64 dbus-libs-1:1.12.20-6.el9.x86_64 dbus-tools-1:1.12.20-6.el9.x86_64 fontconfig-2.14.0-1.el9.x86_64 freetype-2.10.4-9.el9.x86_64 fribidi-1.0.10-6.el9.2.x86_64 harfbuzz-2.7.4-8.el9.x86_64 harfbuzz-icu-2.7.4-8.el9.x86_64 libblkid-2.37.4-9.el9.x86_64 libfdisk-2.37.4-9.el9.x86_64 libmount-2.37.4-9.el9.x86_64 libselinux-3.4-3.el9.x86_64 libselinux-utils-3.4-3.el9.x86_64 libsepol-3.4-1.1.el9.x86_64 libsmartcols-2.37.4-9.el9.x86_64 libtiff-4.4.0-2.el9.x86_64 libuuid-2.37.4-9.el9.x86_64 libxml2-2.9.13-2.el9.x86_64 pcre2-10.40-2.el9.x86_64 pcre2-syntax-10.40-2.el9.noarch pcre2-utf16-10.40-2.el9.x86_64 pcre2-utf32-10.40-2.el9.x86_64 python3-libselinux-3.4-3.el9.x86_64 python3-libxml2-2.9.13-2.el9.x86_64 util-linux-2.37.4-9.el9.x86_64 util-linux-core-2.37.4-9.el9.x86_64 util-linux-user-2.37.4-9.el9.x86_64 Installed: at-spi2-atk-devel-2.38.0-4.el9.x86_64 at-spi2-core-devel-2.40.3-1.el9.x86_64 atk-devel-2.36.0-5.el9.x86_64 atkmm-devel-2.28.2-2.el9.x86_64 brotli-1.0.9-6.el9.x86_64 brotli-devel-1.0.9-6.el9.x86_64 bzip2-devel-1.0.8-8.el9.x86_64 cairo-devel-1.17.4-7.el9.x86_64 cairo-gobject-devel-1.17.4-7.el9.x86_64 cairomm-devel-1.14.2-10.el9.x86_64 dbus-devel-1:1.12.20-6.el9.x86_64 fontconfig-devel-2.14.0-1.el9.x86_64 freetype-devel-2.10.4-9.el9.x86_64 fribidi-devel-1.0.10-6.el9.2.x86_64 gdk-pixbuf2-devel-2.42.6-2.el9.x86_64 glib2-devel-2.68.4-5.el9.x86_64 glibmm24-devel-2.66.1-1.el9.x86_64 graphite2-devel-1.3.14-9.el9.x86_64 gtk3-devel-3.24.31-2.el9.x86_64 harfbuzz-devel-2.7.4-8.el9.x86_64 libX11-devel-1.7.0-7.el9.x86_64 libXau-devel-1.0.9-8.el9.x86_64 libXcomposite-devel-0.4.5-7.el9.x86_64 libXcursor-devel-1.2.0-7.el9.x86_64 libXdamage-devel-1.1.5-7.el9.x86_64 libXext-devel-1.3.4-8.el9.x86_64 libXfixes-devel-5.0.3-16.el9.x86_64 libXft-devel-2.3.3-8.el9.x86_64 libXi-devel-1.7.10-8.el9.x86_64 libXinerama-devel-1.1.4-10.el9.x86_64 libXrandr-devel-1.5.2-8.el9.x86_64 libXrender-devel-0.9.10-16.el9.x86_64 libXtst-devel-1.2.3-16.el9.x86_64 libblkid-devel-2.37.4-9.el9.x86_64 libdatrie-devel-0.2.13-4.el9.x86_64 libepoxy-devel-1.5.5-4.el9.x86_64 libffi-devel-3.4.2-7.el9.x86_64 libglvnd-core-devel-1:1.3.4-1.el9.x86_64 libglvnd-devel-1:1.3.4-1.el9.x86_64 libicu-devel-67.1-9.el9.x86_64 libmount-devel-2.37.4-9.el9.x86_64 libpng-devel-2:1.6.37-12.el9.x86_64 libselinux-devel-3.4-3.el9.x86_64 libsepol-devel-3.4-1.1.el9.x86_64 libsigc++20-devel-2.10.7-2.el9.x86_64 libthai-devel-0.1.28-8.el9.x86_64 libtiff-devel-4.4.0-2.el9.x86_64 libxcb-devel-1.13.1-9.el9.x86_64 libxkbcommon-devel-1.0.3-4.el9.x86_64 libxml2-devel-2.9.13-2.el9.x86_64 pango-devel-1.48.7-2.el9.x86_64 pangomm-devel-2.46.1-1.el9.x86_64 pcre-cpp-8.44-3.el9.3.x86_64 pcre-devel-8.44-3.el9.3.x86_64 pcre-utf16-8.44-3.el9.3.x86_64 pcre-utf32-8.44-3.el9.3.x86_64 pcre2-devel-10.40-2.el9.x86_64 perl-Filter-2:1.60-4.el9.x86_64 perl-encoding-4:3.00-462.el9.x86_64 perl-open-1.12-479.el9.noarch pixman-devel-0.40.0-5.el9.x86_64 sysprof-capture-devel-3.40.1-3.el9.x86_64 wayland-devel-1.19.0-4.el9.x86_64 xorg-x11-proto-devel-2021.4-2.el9.noarch Complete!
Now return to your $HOME/Downloads directory and run the following command. You’ll notice that it installs and upgrades many more packages than you might expect.
sudo dnf install -y gtkmm30-devel-3.24.5-1.el9.x86_64.rpm
The log file for this is:
Display detailed console log →
Last metadata expiration check: 1:22:32 ago on Sun 20 Nov 2022 12:52:28 AM EST.
Dependencies resolved.
================================================================================
 Package             Architecture Version              Repository          Size
================================================================================
Installing:
 gtkmm30-devel       x86_64       3.24.5-1.el9         @commandline       605 k

Transaction Summary
================================================================================
Install  1 Package

Total size: 605 k
Installed size: 4.7 M
Downloading Packages:
Running transaction check
Transaction check succeeded.
Running transaction test
Transaction test succeeded.
Running transaction
Regex version mismatch, expected: 10.40 2022-04-14 actual: 10.37 2021-05-26
Regex version mismatch, expected: 10.40 2022-04-14 actual: 10.37 2021-05-26
  Preparing        :                                                        1/1
  Installing       : gtkmm30-devel-3.24.5-1.el9.x86_64                      1/1
  Running scriptlet: gtkmm30-devel-3.24.5-1.el9.x86_64                      1/1
  Verifying        : gtkmm30-devel-3.24.5-1.el9.x86_64                      1/1

Installed:
  gtkmm30-devel-3.24.5-1.el9.x86_64

Complete!
All that done and you’ve only got the first of four dependencies resovled.
- Next, start with the libzip-devel package, which has a couple dependencies. Assuming you’re still in your $HOME/Downloads directory, you can run the following command to get the libzip-devel and its prerequisite packages for AlmaLinux 9:
wget https://repo.almalinux.org/almalinux/9/CRB/x86_64/os/Packages/libzip-devel-1.7.3-7.el9.x86_64.rpm
wget https://repo.almalinux.org/almalinux/9/AppStream/x86_64/os/Packages/cmake-filesystem-3.20.2-7.el9.x86_64.rpm
wget https://repo.almalinux.org/almalinux/9/AppStream/x86_64/os/Packages/libzip-1.7.3-7.el9.x86_64.rpm
You can run the prerequisites with the following command:
sudo dnf install -y cmake*.rpm libzip-1.7.3*.rpm
Now, you can run the libzip-devel package with this syntax:
sudo dnf install -y libzip-devel*.rpm
Having resolved the two dependencies, you can install the compression development kit. This completes the second step.
-
Next, you need to apply the proj_devel package for AlmaLinux 9:
wget https://download-ib01.fedoraproject.org/pub/epel/9/Everything/x86_64/Packages/p/proj-devel-8.2.0-1.el9.x86_64.rpm
Now, you can run the proj-devel package with this syntax:
sudo dnf install -y proj-devel-8.2.0-1.el9.x86_64.rpm
-
Next, you need to apply the swig packages for AlmaLinux 9:
wget https://repo.almalinux.org/almalinux/9/CRB/x86_64/os/Packages/swig-4.0.2-8.el9.x86_64.rpm
wget https://repo.almalinux.org/almalinux/9/CRB/x86_64/os/Packages/swig-doc-4.0.2-8.el9.noarch.rpm
wget https://repo.almalinux.org/almalinux/9/CRB/x86_64/os/Packages/swig-gdb-4.0.2-8.el9.x86_64.rpm
sudo dnf install -y swig*.rpm
-
Next, you need to apply the mysql-community-workbench packages for AlmaLinux 9. The download instructions where provided above. You apply the packages with the following command.
sudo dnf install -y mysql-workbench-community-8.0.31-1.el9.x86_64.rpm
Display detailed console log →
Last metadata expiration check: 1:06:04 ago on Sun 20 Nov 2022 03:28:30 PM EST.
Dependencies resolved.
================================================================================
 Package                      Arch      Version           Repository       Size
================================================================================
Installing:
 mysql-workbench-community    x86_64    8.0.31-1.el9      @commandline     39 M
Upgrading:
 proj                         x86_64    8.2.0-1.el9       epel            2.5 M

Transaction Summary
================================================================================
Install  1 Package
Upgrade  1 Package

Total size: 41 M
Total download size: 2.5 M
Downloading Packages:
proj-8.2.0-1.el9.x86_64.rpm                     388 kB/s | 2.5 MB     00:06
--------------------------------------------------------------------------------
Total                                           354 kB/s | 2.5 MB     00:07
Extra Packages for Enterprise Linux 9 - x86_64  1.6 MB/s | 1.6 kB     00:00
Importing GPG key 0x3228467C:
 Userid     : "Fedora (epel9) <epel@fedoraproject.org>"
 Fingerprint: FF8A D134 4597 106E CE81 3B91 8A38 72BF 3228 467C
 From       : /etc/pki/rpm-gpg/RPM-GPG-KEY-EPEL-9
Key imported successfully
Running transaction check
Transaction check succeeded.
Running transaction test
Transaction test succeeded.
Running transaction
Regex version mismatch, expected: 10.40 2022-04-14 actual: 10.37 2021-05-26
Regex version mismatch, expected: 10.40 2022-04-14 actual: 10.37 2021-05-26
  Preparing        :                                                        1/1
  Upgrading        : proj-8.2.0-1.el9.x86_64                                1/3
  Installing       : mysql-workbench-community-8.0.31-1.el9.x86_64          2/3
  Running scriptlet: mysql-workbench-community-8.0.31-1.el9.x86_64          2/3
  Cleanup          : proj-4.8.0-4.el7.x86_64                                3/3
  Running scriptlet: proj-4.8.0-4.el7.x86_64                                3/3
  Verifying        : mysql-workbench-community-8.0.31-1.el9.x86_64          1/3
  Verifying        : proj-8.2.0-1.el9.x86_64                                2/3
  Verifying        : proj-4.8.0-4.el7.x86_64                                3/3

Upgraded:
  proj-8.2.0-1.el9.x86_64
Installed:
  mysql-workbench-community-8.0.31-1.el9.x86_64

Complete!
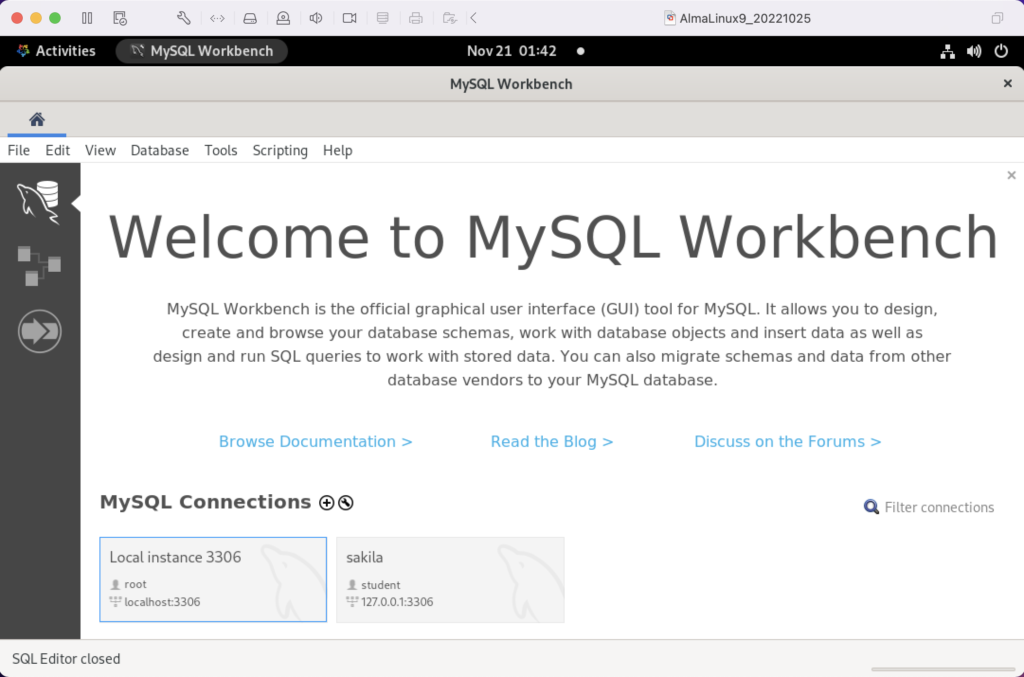
After applying the dependent and mysql-community-workbench packages, you can launch MySQL Workbench by clicking the Activities symbol in the upper left hand corner. That displays the nine-dots for Show Applications icon. Click the Show Applications icon and choose the MySQL Workbench icon to launch MySQL Workbench.
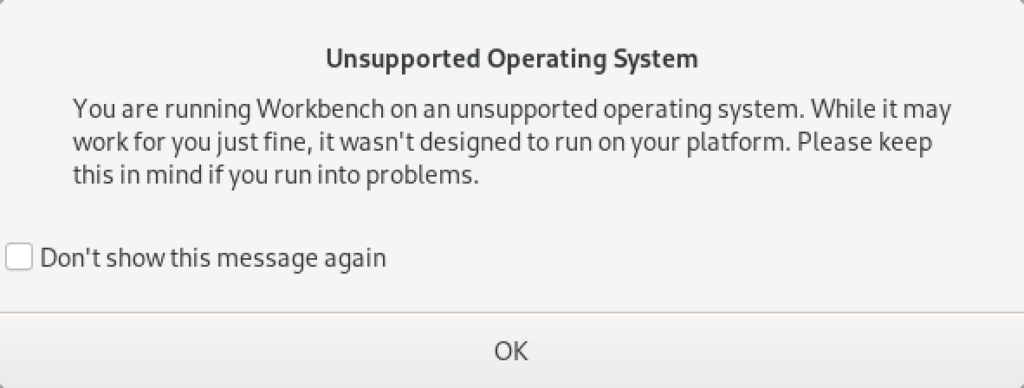
You’ll be prompted with the following dialog. Just click Don’t show this message again checkbox and the OK button to launch MySQL Workbench.
As always, I hope this helps those looking to solve a real problem.
MySQL Workbench Keys
As I teach students how to create tables in MySQL Workbench, it’s always important to review the meaning of the checkbox keys. Then, I need to remind them that every table requires a natural key from our prior discussion on normalization. I explain that a natural key is a compound candidate key (made up of two or more column values), and that it naturally defines uniqueness for each row in a table.
Then, we discuss surrogate keys, which are typically ID column keys. I explain that surrogate keys are driven by sequences in the database. While a number of databases disclose the name of sequences, MySQL treats the sequence as an attribute of the table. In Object-Oriented Analysis and Design (OOAD), that makes the sequence a member of the table by composition rather than aggregation. Surrogate keys are also unique in the table but should never be used to determine uniqueness like the natural key. Surrogate keys are also candidate keys, like a VIN number uniquely identifies a vehicle.
In a well designed table you always have two candidate keys: One describes the unique row and the other assigns a number to it. While you can perform joins by using either candidate key, you always should use the surrogate key for joins statements. This means you elect, or choose, the surrogate candidate key as the primary key. Then, you build a unique index for the natural key, which lets you query any unique row with human decipherable words.
The column attribute table for MySQL Workbench is:
| Key | Meaning |
|---|---|
| PK | Designates a primary key column. |
| NN | Designates a not-null column constraint. |
| UQ | Designates a column contains a unique value for every row. |
| BIN | Designates a VARCHAR data type column so that its values are stored in a case-sensitive fashion. You can’t apply this constraint to other data types. |
| UN | Designates a column contains an unsigned numeric data type. The possible values are 0 to the maximum number of the data type, like integer, float, or double. The value 0 isn’t possible when you also select the PK and AI check boxes, which ensures the column automatically increments to the maximum value of the column. |
| ZF | Designates a zero fill populates zeros in front of any number data type until all space is consumed, which acts like a left pad function with zeros. |
| AI | Designates AUTO_INCREMENT and should only be checked for a surrogate primary key value. |
All surrogate key columns should check the PK, NN, UN, and AI checkboxes. The default behavior checks only the PK and NN checkboxes and leaves the UN and AI boxes unchecked. You should also click the UN checkbox with the AI checkbox for all surrogate key columns. The AI checkbox enables AUTO_INCREMENT behavior. The UN checkbox ensure you have the maximum number of integers before you would migrate the table to a double precision number. More or less, this is what I wrote in MySQL Workbench Data Modeling & Development as the primary product guide in 2013, and what you find in the MySQL Workbench Manual 8.1.10.2 Columns Tab section.
Active tables grow quickly and using a signed int means you run out of rows more quickly. This is an important design consideration because using a unsigned int adds a maintenance task later. The maintenance task will require changing the data type of all dependent foreign key columns before changing the primary key column’s data type. Assuming you’re design uses referential integrity constraints, implemented as a foreign keys, you will need to:
- Remove any foreign key constraints before changing the referenced primary key and dependent foreign key column’s data types.
- Change the primary and foreign key column’s data types.
- Add back foreign key constraints after changing the referenced primary key and dependent foreign key column’s data types.
While fixing a less optimal design is a relatively simple scripting exercise for most data engineers, you can avoid this maintenance task. Implement all surrogate primary key columns and foreign key columns with the signed int as their initial data type.
The following small ERD displays a multi-language lookup table, which is preferable to a monolinquistic enum data type.:

A design uses a lookup table when there are known lists of selections to make. There are known lists that occur in most if not all business applications. Maintaining that list of values is an application setup task and requires the development team to build an entry and update form to input and maintain the lists.
While some MySQL examples demonstrate these types of lists by using the MySQL enum data type. However, the MySQL enum type doesn’t support multilingual implementations, isn’t readily portable to other relational database, and has a number of limitations.
A lookup table is the better solution to using an enum data type. It typically follows this pattern:
- Identify the target table and column where a list is useful. Use the table_name and column_name columns as a super key to identify the location where the list belongs.
- Identify a unique type identifier for the list. Store the unique type value in the type column of the lookup table.
- Use a lang column to enable multilingual lists.
The combination of the table_name, column_name, type, and lang let you identify unique sets. You can find a monolingual implementation in these two older blog posts:
The column view of the lookup table shows the appropriate design checkboxes:

While most foreign keys use copies of surrogate keys, there are instances when you copy the natural key value from another table rather than the surrogate key. This is done when your application will frequently query the dependent lookup table without a join to the lang table, which means the foreign key value should be a human friendly foreign key value that works as a super key.
A super key is a column or set of columns that uniquely identifies a rows in the scope of a relation. For this example, the lang column identifies rows that belong to a language in a multilingual data model. Belonging to a language is the relation between the lookup and language table. It is also a key when filtering rows with a specific lang value from the lookup table.
You navigate to the foreign key tab to create a lookup_fk foreign key constraint, like:

With this type of foreign key constraint, you copy the lang value from the language table when inserting the lookup table values. Then, your HTML forms can use the lookup table’s meaning column in any of the supported languages, like:
SELECT lookup_id , type , meaning FROM lookup WHERE table_name = 'some_table_name' AND column_name = 'some_column_name' AND lang = 'some_lang_name'; |
The type column value isn’t used in the WHERE clause to filter the data set because it is unique within the relation of the table_name, column_name, and lang column values. It is always non-unique when you exclude the lang column value, and potentially non-unique for another combination of the table_name and column_name column values.
As a rule, most foreign key references are to the lookup table’s surrogate primary key because the meaning column’s value is too long to copy into the referencing table or subject to change in the base or translated languages. Small values, with intrinsic meaning, are stored in a code column in many implementations, like the lang column. Those typically follow the same implementation rule as the lang column and are copied into the referencing table.
If I’ve left questions, let me know. Other wise, I hope this helps qualify a best design practice.
SQL Handling Nulls
Interesting questions always come via my students. For example, “Why does the selective aggregation sample return null values as totals from the SUM() function in MySQL?”
First, here’s the code to build the sample table for the problem:
DROP TABLE IF EXISTS transaction; CREATE TABLE transaction ( transaction_id int unsigned primary key auto_increment , transaction_date date , transaction_amount double ); INSERT INTO transaction ( transaction_date, transaction_amount ) VALUES ('2021-01-10', 56) ,('2021-02-14',23.02) ,('2021-03-31',31.06) ,('2021-01-01',.25) ,('2020-01-02', 52) ,('2020-02-08',22.02) ,('2020-03-26',32.06) ,('2020-01-12',.75);; |
Now, here’s the selective aggregation query:
SELECT EXTRACT(YEAR FROM transaction_date) AS "Year" , SUM( CASE WHEN EXTRACT(MONTH FROM transaction_date) = 1 THEN transaction_amount END) AS "Jan" , SUM( CASE WHEN EXTRACT(MONTH FROM transaction_date) = 2 THEN transaction_amount END) AS "Feb" , SUM( CASE WHEN EXTRACT(MONTH FROM transaction_date) = 3 THEN transaction_amount END) AS "Mar" , SUM( CASE WHEN EXTRACT(MONTH FROM transaction_date) IN (1,2,3) THEN transaction_amount END) AS "1FQ" FROM transaction WHERE transaction_date BETWEEN '2020-01-15' AND '2021-03-15' GROUP BY EXTRACT(YEAR FROM transaction_date) ORDER BY 1; |
It produces the following correct results (at least in response to the query above):
+------+-------+-------+-------+-------+ | Year | Jan | Feb | Mar | 1FQ | +------+-------+-------+-------+-------+ | 2020 | NULL | 22.02 | 32.06 | 54.08 | | 2021 | 56.25 | 23.02 | NULL | 79.27 | +------+-------+-------+-------+-------+ 2 rows in set (0.02 sec) |
Why do you get null values for January 2020 and March 2021? That’s because the query returns null values when the conditions in the SELECT-list aren’t met for a row return. This happens:
- When a row is returned for the month of February or March a null is returned in the January column.
- When a row is returned for the month of January or March a null is returned in the February column.
- When a row is returned for the month of January or February a null is returned in the March column.
That means there needs to be an ELSE clause in each of the CASE statements that sets the return value to zero. For example, the following query includes the ELSE clause and some nice formatting tricks:
SELECT EXTRACT(YEAR FROM transaction_date) AS "Year" , CONCAT('$',LPAD(FORMAT(SUM( CASE WHEN EXTRACT(MONTH FROM transaction_date) = 1 THEN transaction_amount ELSE 0 END),2),8,' ')) AS "Jan" , LPAD(FORMAT(SUM( CASE WHEN EXTRACT(MONTH FROM transaction_date) = 2 THEN transaction_amount ELSE 0 END),2),8,' ') AS "Feb" , LPAD(FORMAT(SUM( CASE WHEN EXTRACT(MONTH FROM transaction_date) = 3 THEN transaction_amount ELSE 0 END),2),8,' ') AS "Mar" , LPAD(FORMAT(SUM( CASE WHEN EXTRACT(MONTH FROM transaction_date) IN (1,2,3) THEN transaction_amount ELSE 0 END),2),8,' ') AS "1FQ" FROM transaction WHERE transaction_date BETWEEN '2020-01-15' AND '2021-03-15' GROUP BY EXTRACT(YEAR FROM transaction_date) ORDER BY 1; |
It returns:
+------+-----------+----------+----------+----------+ | Year | Jan | Feb | Mar | 1FQ | +------+-----------+----------+----------+----------+ | 2020 | $ 0.00 | 22.02 | 32.06 | 54.08 | | 2021 | $ 56.25 | 23.02 | 0.00 | 79.27 | +------+-----------+----------+----------+----------+ 2 rows in set (0.01 sec) |
As always, I hope this helps answer a question that somebody is trying to sort out.
Customer ERD
Now that we’ve migrated to MySQL for our core database course, I’m building MySQL Workbench analysis problems. We start with a lecture trying to flush out a simple address, and then ask them to figure out how to link it to a customer table.

Designing it, I emphasized how it resolves the issue of a city occurring in multiple counties and states, like Fremont. Fremont occurs 17 times in the US and once in Haiti:

Naturally, I left two other design issues in the problem. I’m working through it for the first time with classes tomorrow. I hope it works well. Any comments?
Put MySQL in PATH
After downloading and installing MySQL 8.0.24 yesterday, I opened a command shell. In the command shell, I could access the MySQL Shell (mysqlsh.exe) but not the MySQL Client (mysql.exe). Typing in the following:
C:\WINDOWS\system32>mysql |
It returned:
'mysql' is not recognized as an internal or external command, operable program or batch file. |
The MySQL Client (mysql.exe) was installed because MySQL Workbench relies on it. However, the MySQL Microsoft Software Installer (MSI) does not put the mysql.exe file’s directory in the common Windows %PATH% environment variable. You can find the required %PATH% directory variable by opening the File Manager and searching for the mysql.exe file.
You should return several directories and programs but the directory you want is:
C:\Program Files\MySQL\MySQL Server 8.0\bin |
You can test it by using the SET command in the Microsoft Operating System, like this:
SET PATH=C:\Program Files\MySQL\MySQL Server 8.0\bin;%PATH% |
You can now call the mysql.exe program in your current shell session with the following syntax:
mysql -uroot -p |
You will be prompted for the password and then connected to the database as follows:
Welcome to the MySQL monitor. Commands end with ; or \g. Your MySQL connection id is 19 Server version: 8.0.24 MySQL Community Server - GPL Copyright (c) 2000, 2021, Oracle and/or its affiliates. Oracle is a registered trademark of Oracle Corporation and/or its affiliates. Other names may be trademarks of their respective owners. Type 'help;' or '\h' for help. Type '\c' to clear the current input statement. mysql> |
Unfortunately, the SET command only sets the %PATH% environment variable in the current session. You can set the system %PATH% environment variable globally by following these steps:
- In Search, search for and then select: System (Control Panel)
- In Settings dialog enter “Environment” in the search box and it will display:
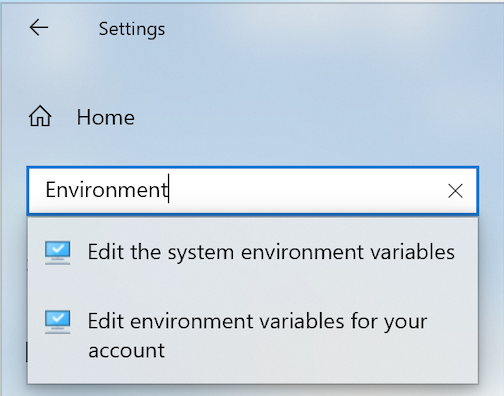
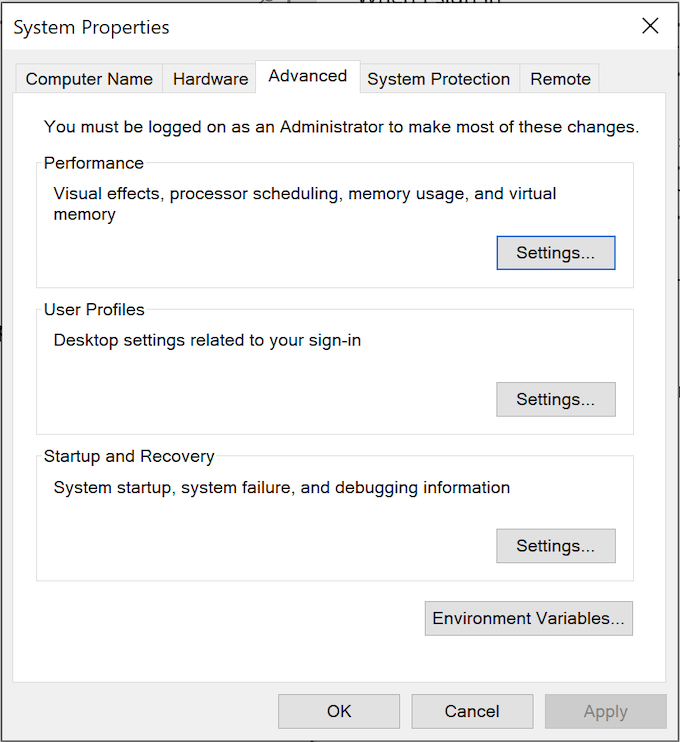
- Chose “Edit the system environment variables” option. You will see the following “System Properties” dialog:
- Click the “Environment Variable” button to display the “Environment Variables” dialog. Click on the Path system variable before clicking the Edit button beneath.
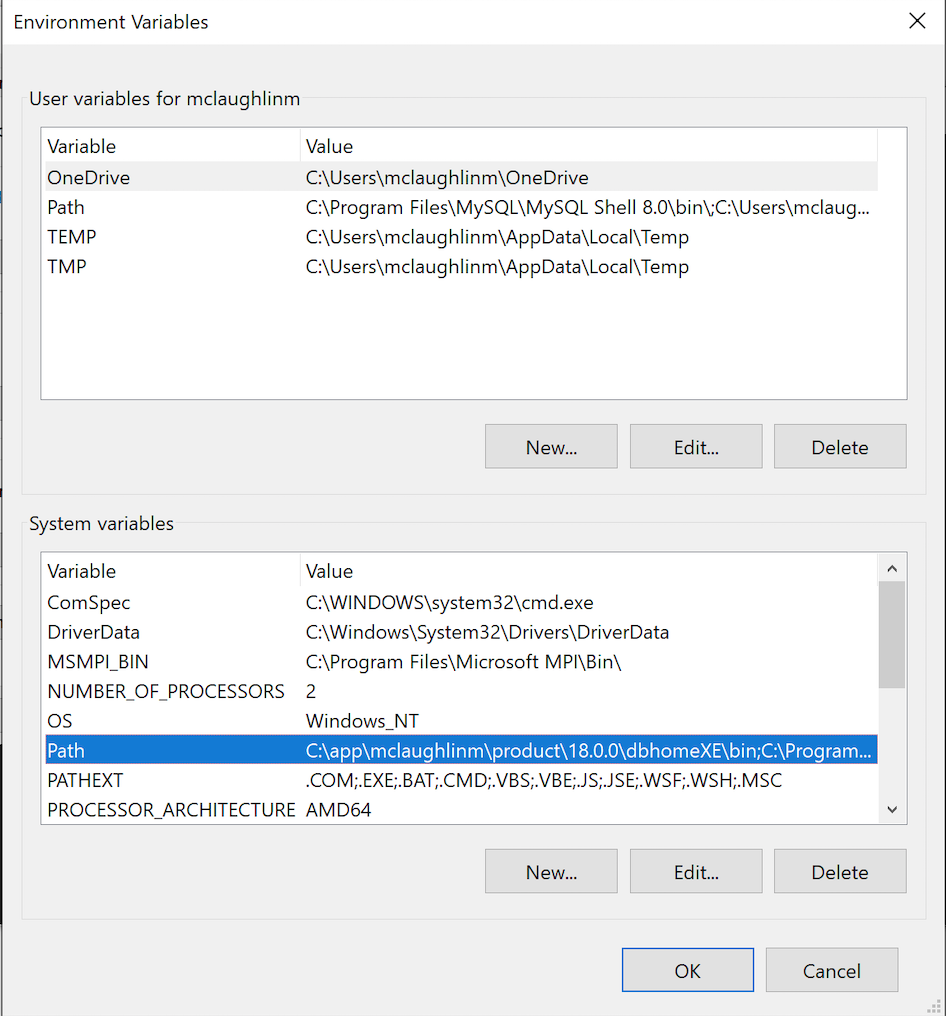
- Click the “New” button and enter “
C:\Program Files\MySQL\MySQL Server 8.0\bin, and click the “OK” button. The next time you query the computer system’s%PATH%environment variable, it will show you the list of path locations that the operating system looks at for command files. It’s actually stored as a semicolon-delimited list in Windows 10 (and, as a colon-delimited list in Linux or Unix).
The next time you open a command shell, the %PATH% environment variable will find the mysql.exe program. As always, I hope these instructions help the reader.
MySQL macOS Docker
While you can download MySQL as a DMG package, a number of users would prefer to install it as a Docker instance. You won’t find the macOS downloads on the same web site as other downloads. You can use the following macOS download site.

After installing Docker on your macOS, you can pull a copy of the current MySQL Server with the following command:
docker pull mysql/mysql-server |
You should create a mysql directory inside your ~/Documents directory with this command:
mkdir ~/Documents/mysql |
Then, you should use the cd command to change into the ~/Documents/mysql directory and run this command:
pwd |
It should return the following directory:
/Users/<user_name>/Documents/mysql |
Use the /Users/<user_name>/Documents/mysql as the
docker run --name=mysql1 --volume=<path_to_folder>:/var/lib/mysql -p 33060:3306/tcp -d mysql/mysql-server |
The --name option value is mysql1 and it becomes the container value. Docker mounts the column in the ~/Documents/mysql folder. All data from the Docker container under the /var/lib/mysql directory will persist in this directory. This directory will still contain the database when the container is shut down.
The docker run command maps the localhost’s 33060 port to the 3306 port on the Docker container. You will use the 33060 port to connect to the Docker instance of MySQL. It raises a dialog box asking for permission to access the directory. You need to allow Docker to write to the ~/Documents/mysql directory.
You can verify that the Docker container is running with the following command:
docker ps |
It should return:
CONTAINER ID IMAGE COMMAND CREATED STATUS PORTS NAMES 142b5c491cd8 mysql/mysql-server "/entrypoint.sh mysq…" 7 minutes ago Up 6 minutes (healthy) 33060-33061/tcp, 0.0.0.0:33060->3306/tcp mysql1 |
You can get the MySQL generated root password with this Docker command:
docker logs mysql1 2>&1 | grep GENERATED |
It returns something like the following:
[Entrypoint] GENERATED ROOT PASSWORD: vop#3GNYqK3nC@S@N3haf3nox5E |
Use the following Docker command to connect to the Docker container:
docker exec -it mysql1 /bin/bash |
It launches a Bash shell inside the Docker container:
bash-4.2# |
Start the mysql Command-Line Interface (CLI):
mysql -uroot -p |
You are then prompted for a password:
Enter password: |
After successfully entering the password, you’ll see the following:
Welcome to the MySQL monitor. Commands end with ; or \g. Your MySQL connection id is 55 Server version: 8.0.22 Copyright (c) 2000, 2020, Oracle and/or its affiliates. All rights reserved. Oracle is a registered trademark of Oracle Corporation and/or its affiliates. Other names may be trademarks of their respective owners. Type 'help;' or '\h' for help. Type '\c' to clear the current input statement. mysql> |
Unless you want to remember that hugely complex root password, you should consider changing it to something simple like, 'cangetin' with the following command:
ALTER USER 'root'@'localhost' IDENTIFIED WITH MYSQL_NATIVE_PASSWORD BY 'cangetin'; |
Next, you should check for the installed databases with this command:
show databases; |
It will return:
+--------------------+ | Database | +--------------------+ | information_schema | | mysql | | performance_schema | | sys | +--------------------+ 4 rows in set (0.01 sec) |
Exiting mysql, you can see the contents of the root user’s directory with this list command:
ls -al |
It should return:
total 84 drwxr-xr-x 1 root root 4096 Jan 12 03:41 . drwxr-xr-x 1 root root 4096 Jan 12 03:41 .. -rwxr-xr-x 1 root root 0 Jan 12 03:41 .dockerenv lrwxrwxrwx 1 root root 7 Oct 12 22:06 bin -> usr/bin dr-xr-xr-x 2 root root 4096 Apr 11 2018 boot drwxr-xr-x 5 root root 340 Jan 12 03:41 dev drwxr-xr-x 2 root root 4096 Oct 19 05:47 docker-entrypoint-initdb.d -rwxr-xr-x 1 root root 7496 Oct 19 05:37 entrypoint.sh drwxr-xr-x 1 root root 4096 Jan 12 03:41 etc -rw-r--r-- 1 root root 86 Jan 12 03:41 healthcheck.cnf -rwxr-xr-x 1 root root 1073 Oct 19 05:37 healthcheck.sh drwxr-xr-x 2 root root 4096 Apr 11 2018 home lrwxrwxrwx 1 root root 7 Oct 12 22:06 lib -> usr/lib lrwxrwxrwx 1 root root 9 Oct 12 22:06 lib64 -> usr/lib64 drwxr-xr-x 2 root root 4096 Apr 11 2018 media drwxr-xr-x 2 root root 4096 Apr 11 2018 mnt -rw-r--r-- 1 root root 0 Jan 12 03:41 mysql-init-complete drwxr-xr-x 2 root root 4096 Apr 11 2018 opt dr-xr-xr-x 127 root root 0 Jan 12 03:41 proc dr-xr-x--- 1 root root 4096 Jan 12 04:21 root drwxr-xr-x 1 root root 4096 Oct 19 05:47 run lrwxrwxrwx 1 root root 8 Oct 12 22:06 sbin -> usr/sbin drwxr-xr-x 2 root root 4096 Apr 11 2018 srv dr-xr-xr-x 13 root root 0 Jan 12 03:41 sys drwxrwxrwt 1 root root 4096 Jan 12 03:41 tmp drwxr-xr-x 1 root root 4096 Oct 12 22:06 usr drwxr-xr-x 1 root root 4096 Oct 12 22:06 var |
At this point, you have to make a choice about how you will access the MySQL database. You have a couple options:
- Create an individual
studentuser that can access the MySQL-Server as a micro-service, which would only be a MySQL user connecting through MySQL workbench. At least, that’s the only connection option unless you likewise install themysqlclient on your host macOS. Themysqlclient lets you connect from the host operating system through the Command-Line Interface (CLI). - Create a local
studentuser account inside the Docker container. It will have access to the container file system and mimic the behavior of a non-rootuser on a server.
Let’s create both for this demonstration. Reconnect as the root user and issue the following two commands:
CREATE USER 'student'@'localhost' IDENTIFIED WITH MYSQL_NATIVE_PASSWORD BY 'student'; CREATE USER 'student'@'%.%.%.%' IDENTIFIED WITH MYSQL_NATIVE_PASSWORD BY 'student'; |
The first version of the student user lets you access the database from inside the Docker container. The second version of the student user lets you access the database from MySQL Workbench deployed on your base macOS.
You can add a sakila database and grant all privileges to the student user with the following command as the root user:
CREATE DATABASE sakila; GRANT ALL ON sakila.* TO 'student'@'localhost'; GRANT ALL ON sakila.* TO 'student'@'%.%.%.%'; |
You need to get the sakila database from the Internet within the Docker container. Exit the mysql client with the following command:
quit; |
As the root user, install the wget and tar Linux utilities with this command:
yum install -y wget tar |
As the student user, you can use the wget command to grab a copy of the sakila database and store the database locally. Use the cd command to get to your ${HOME} directory, like:
cd |
Use this syntax to get a copy of the sakila database:
wget http://downloads.mysql.com/docs/sakila-db.tar.gz |
Use the ls command to verify the download, then run the following set of Linux commands from the Linux CLI:
tar -xzf sakila-db.tar.gz cd sakila-db |
Run the following two commands from the sakila-db directory:
mysql -ustudent -p < sakila-schema.sql mysql -ustudent -p < sakila-data.sql |
or, you can connect as the student user to the MySQL client and run them there:
source sakila-schema.sql source sakila-data.sql |
You create a non-root student user for the Docker container from the macOS host opearting system. Which means you need to quit; the mysql client, and exit the root user’s session with the Docker container.
At the terminal in your macOS, issue the following Docker command to create a student account in the mysql1 container:
docker exec mysql1 bash -c "useradd -u 501 -g mysql -G users \ > -d /home/student -s /bin/bash -c "Student" -n student" |
Now, you can connect as the student user to the mysql1 container, with the following Docker command:
docker exec -it --user student mysql1 bash |
The first time you connect, you will be a the / (root) directory. Use the following cd command to go to the student user’s home directory:
cd |
Then, type the following command to set the student user’s home directory as the default. You need to use this command because vim isn’t installed in the default Docker container, which would let you interactively edit files. It appends the necessary Bash shell command to the end of the .bashrc file.
echo 'cd ${HOME}' >> .bashrc |
With this change, the student user will always be available form its home directory next time you connect to the mysql1 container. You can use scp to move files into the student user’s home (/home/student) directory. However, you can create a quick test.sql file like this:
echo "select user();" > test.sql |
Connect to the mysql CLI with as the student user:
mysql -ustudent -p |
Call your test.sql file from the Linux CLI, like:
mysql -ustudent -p < test.sql |
or, you can run the test.sql program as follows form the MySQL command-line:
source test.sql |
It will return:
+-------------------+ | user() | +-------------------+ | student@localhost | +-------------------+ 1 row in set (0.00 sec) |
That’s the basic setup of the Docker MySQL Container on the macOS. You can do much more once you’ve configured it like this. For example, you can add vim to your library repository as the root user with the following command:
yum install -y vim |
It just takes a minute or a bit more. Adding vim opens up so much flexibility for you inside the Docker container, it’s impossible for me to resist. 😉
MySQL sakila Database
While I thought my instructions were clear, it appears there should have been more in my examples for using the MySQL MSI. A key thing that happened is that students opted not to install:
Samples and Examples 8.0.22 |
Unfortunately, they may not have read the Preface of Alan Beaulieu’s Learning SQL, 3rd Edition where he explains how to manually download the files from the MySQL web site. Here are those, very clear, instructions (pg. XV) with my additions in italics for the MySQL Shell:
First, you will need to launch the mysql command-line client or the mysqlsh command-line shell, and provide a password, and then perform the following steps:
- Go to https://dev.mysql.com/doc/index-other.html and download the files for the “
sakiladatabase” under the Example Database section. - Put the files in the local directory such as
C:\temp\sakila-db(used for the next two steps, but overwrite with your directory path). - Type
source c:\temp\sakila-db\sakila-schema.sql
and press enter.
- Type
source c:\temp\sakila-db\sakila-data.sql
and press enter.
These instructions let you create the sakila database without rerunning the MSI to add a product. Naturally, you can avoid these steps by using the GUI approach provided in the MySQL MSI file.
As always, I hope this helps those looking for how to solve problems.
