Archive for the ‘Windows7’ Category
Python variable not defined
While working with a programming example for my students, I ran into an interesting run-time error when I changed their approach to importing Python’s random module. Here’s the raised error message:
Traceback (most recent call last): File "windowBouncingBalls.py", line 84, in <module> speed = [choice([-2,2]), choice([-2,2])] NameError: name 'choice' is not defined |
You raise the missing choice identifier when two things occur. The first thing requires you to use a standard import statement, like the following example, and the second thing requires you to continue to reference the identifier as “choice“.
import random |
You can avoid the error by making the import of random like this:
from random import * |
Or, you can leave the ordinary import statement and fully qualify the choice identifier with the random module name, like this:
speed = [random.choice([-2,2]), random.choice([-2,2])] |
As always, I hope this helps those who encounter a similar problem.
PostgreSQL Install-Windows
A number of folks have asked me to create a post of a PostgreSQL installation on Windows. So, here is my step-by-step PostgreSQL 9.3 installation, and you can go further and learn how to setup your own PostgreSQL database schema.
Download PostgreSQL Database
You can start the download of PostgreSQL from this site. It leads you to the EnterpriseDB site, where you can download the prepackaged software.
Install PostgreSQL 9.3 on Windows
These steps walk you through installing PostgreSQL and the the pgJDBC v9.3, psqlODBC (32 bit), and psqlODBC (64 bit) packages.

- The first thing you need to do is launch the PostgreSQL file from download folder.

- After launching the downloaded file, you see an Open File – Security Warning dialog message. Click the Run button to run the PostgreSQL executable file.

- The first dialog screen is the Setup – PostgreSQL dialog, which welcomes you and prompts you to start the installtion of PostgreSQL. Click the Next button to continue.

- The Installation Directory dialog sets the location for the PostgreSQL server. Click the Next button to continue.

- The Data Directory dialog sets the location for the PostgreSQL server’s data repository. Click the Next button to continue.

- The first Setup dialog sets the database’s superuser password. Click the Next button to continue.

- The second Setup dialog sets the database’s listener port, which is Port
5432by default. Click the Next button to continue.

- The third Setup dialog sets the database’s default Locale. Click the Next button to continue.

- The Ready to Install dialog lets you start the installation. Click the Next button to continue.

- The Installing dialog lets you montor the unpacking of programs for the installation. You need not click any buttons to continue.

- The Completing the PostgreSQL Setup Wizard dialog advises you that you’ve completed the setup. Checking the Stack Builder check box lets you download and install additional tools, drivers, and applications. Click the Next button to continue.

- This is Welcome dialog to the Stack Builder. Click the Next button to continue.

- This is dialog lets you select applications that you would like to install. Click the plus symbol for the Database Drivers option to continue.

- In the modified dialog, click the pgJDBC v9.3, psqlODBC (32 bit), and psqlODBC (64 bit) check boxes. Then, click the Next button to continue.

- This dialog tells you the pgJDBC v9.3, psqlODBC (32 bit), and psqlODBC (64 bit) installed packages. Click the Next button to continue.

- This dialog lays a downloading progress bar while loading the additional packages. You don’t need to do anything to continue.

- This dialog lays a downloading progress bar while loading the additional packages. Click the Next button to continue.

- The Setup pgJDBC dialog welcomes you to the setup wizard. Click the Next button to continue.

- The Installation Directory dialog lets you set the pgJDBC installation directory. Click the Next button to continue.

- The Ready to Install dialog lets you install the pgJDBC package. Click the Next button to install it.

- The Setup dialog confirms you’ve installed the add-on packages. Click the Finish button to complete the installation.
Configure psqlODBC on Windows
These steps walk you through configuring the psqlODBC packages.

- The Setup dialog helps you configure the psqlODBC package. Click the Next button to install it.

- The Installation Directory dialog lets you set the psqlODBC installation directory. Click the Next button to continue.

- The Ready to Install dialog lets you install the psqlODBC package. Click the Next button to install it.
- The Ready to Install dialog lets you install the psqlODBC package. Click the Next button to install it.

- The Installing psqlODBC dialog displays a dialog while installing the psqlODBC package(s). You need not click anything, the dialog dismisses itself when complete.

- The Installing psqlODBC dialog displays a dialog while installing the psqlODBC package(s). You need not click anything, the dialog dismisses itself when complete.

- The Stack Builder dialog displays a message that everything is installed. Click the Finish button when complete.
Connect to the Default PostgreSQL database
You have two options for connecting to the PostgreSQL database. One uses the GUI pgAdmin III console and the other uses the command line.
Connect through pgAdmin III to the PostgreSQL Database

- In Windows, navigate to through the Start to the pgAdmin III menu option.

- After launching pgAdmin III, you’ll see the pgAdmin II console, displayed at left.

- Right click on the PostgreSQL 9.3 (localhost:5432) item in the Object browser and click the Connect menu choice from the floating menu.

- Enter the password you chose when installing the PostgreSQL Server, and click the OK button.
Connect through the Command-line to the PostgreSQL Database
These steps show you how to connect through the PostgreSQL Command Line Interface (CLI) – psql. psql is like Oracle’s sqlplus, MySQL’s mysql, and Microsoft SQL Server’s sqlcmd CLI interfaces. By default, the PostgreSQL binary directory is not in your default %PATH% environment variable, so you need to add it. I recommend an environment file because in a test situation you may not want to use it all the time.
Create the following directory for the environment file:
C:\Data\PostgreSQL\env |
You can create an environment file with any text editor or do it at the command line, like this:
COPY CON postgresqlenv.bat SET PATH=%PATH%;C:\Program Files\PostgreSQL\9.3\bin;. ^Z |
Then, you can source the environment file like this:
C:\> postgresql.bat |
Now, you can connect to the default database provided you understand that PostgreSQL Stack Builder set some values that differ from the defaults if you installed it manually. Specifically, they set the default value of the database to postgres and default value of the user to postgres.
That means you can connect with the following, provided you remember the password you used during installation:
C:\> psql -d postgres -U postgres |
You should see the following when you connect:
C:\> psql -d postgres -U postgres Password for user postgres: psql (9.3.3) WARNING: Console code page (437) differs from Windows code page (1252) 8-bit characters might not work correctly. See psql reference page "Notes for Windows users" for details. Type "help" for help. |
You can now submit interactive SQL statements or run batch files, like:
postgres=# SELECT 'Hello World!'; |
It displays:
?COLUMN? -------------- Hello World! (1 ROW) |
Adding a column alias to the string literal gives a more readable formatted output:
postgres=# SELECT 'Hello World!' AS "String Literal"; |
It displays:
String Literal ---------------- Hello World! (1 ROW) |
PostgreSQL’s CLI Help
You have the ability to do a lot with the PostgreSQL psql CLI. The general command to discover help is help, and it displays the following:
postgres=# help You are USING psql, the command-line interface TO PostgreSQL. TYPE: \copyright FOR distribution terms \h FOR help WITH SQL commands \? FOR help WITH psql commands \g OR terminate WITH semicolon TO EXECUTE query \q TO quit |
You quit PostgreSQL with a \q command:
postgres=# \q |
You can find more help with the \HELP or the \? commands:
\HELP |
It displays the following:
Available help: ABORT CLUSTER DEALLOCATE END ALTER AGGREGATE COMMENT DECLARE EXECUTE ALTER COLLATION COMMIT DELETE EXPLAIN ALTER CONVERSION COMMIT PREPARED DISCARD FETCH ALTER DATABASE COPY DO GRANT ALTER DEFAULT PRIVILEGES CREATE AGGREGATE DROP AGGREGATE INSERT ALTER DOMAIN CREATE CAST DROP CAST LISTEN ALTER EVENT TRIGGER CREATE COLLATION DROP COLLATION LOAD ALTER EXTENSION CREATE CONVERSION DROP CONVERSION LOCK ALTER FOREIGN DATA WRAPPER CREATE DATABASE DROP DATABASE MOVE ALTER FOREIGN TABLE CREATE DOMAIN DROP DOMAIN NOTIFY ALTER FUNCTION CREATE EVENT TRIGGER DROP EVENT TRIGGER PREPARE ALTER GROUP CREATE EXTENSION DROP EXTENSION PREPARE TRANSACTION ALTER INDEX CREATE FOREIGN DATA WRAPPER DROP FOREIGN DATA WRAPPER REASSIGN OWNED ALTER LANGUAGE CREATE FOREIGN TABLE DROP FOREIGN TABLE REFRESH MATERIALIZED VIEW ALTER LARGE OBJECT CREATE FUNCTION DROP FUNCTION REINDEX ALTER MATERIALIZED VIEW CREATE GROUP DROP GROUP RELEASE SAVEPOINT ALTER OPERATOR CREATE INDEX DROP INDEX RESET ALTER OPERATOR CLASS CREATE LANGUAGE DROP LANGUAGE REVOKE ALTER OPERATOR FAMILY CREATE MATERIALIZED VIEW DROP MATERIALIZED VIEW ROLLBACK ALTER ROLE CREATE OPERATOR DROP OPERATOR ROLLBACK PREPARED ALTER RULE CREATE OPERATOR CLASS DROP OPERATOR CLASS ROLLBACK TO SAVEPOINT ALTER OPERATOR CREATE INDEX DROP INDEX RESET ALTER OPERATOR CLASS CREATE LANGUAGE DROP LANGUAGE REVOKE ALTER OPERATOR FAMILY CREATE MATERIALIZED VIEW DROP MATERIALIZED VIEW ROLLBACK ALTER ROLE CREATE OPERATOR DROP OPERATOR ROLLBACK PREPARED ALTER RULE CREATE OPERATOR CLASS DROP OPERATOR CLASS ROLLBACK TO SAVEPOINT ALTER SCHEMA CREATE OPERATOR FAMILY DROP OPERATOR FAMILY SAVEPOINT ALTER SEQUENCE CREATE ROLE DROP OWNED SECURITY LABEL ALTER SERVER CREATE RULE DROP ROLE SELECT ALTER TABLE CREATE SCHEMA DROP RULE SELECT INTO ALTER TABLESPACE CREATE SEQUENCE DROP SCHEMA SET ALTER TEXT SEARCH CONFIGURATION CREATE SERVER DROP SEQUENCE SET CONSTRAINTS ALTER TEXT SEARCH DICTIONARY CREATE TABLE DROP SERVER SET ROLE ALTER TEXT SEARCH PARSER CREATE TABLE AS DROP TABLE SET SESSION AUTHORIZATION ALTER TEXT SEARCH TEMPLATE CREATE TABLESPACE DROP TABLESPACE SET TRANSACTION ALTER TRIGGER CREATE TEXT SEARCH CONFIGURATION DROP TEXT SEARCH CONFIGURATION SHOW ALTER TYPE CREATE TEXT SEARCH DICTIONARY DROP TEXT SEARCH DICTIONARY START TRANSACTION ALTER USER CREATE TEXT SEARCH PARSER DROP TEXT SEARCH PARSER TABLE ALTER USER MAPPING CREATE TEXT SEARCH TEMPLATE DROP TEXT SEARCH TEMPLATE TRUNCATE ALTER VIEW CREATE TRIGGER DROP TRIGGER UNLISTEN ANALYZE CREATE TYPE DROP TYPE UPDATE BEGIN CREATE USER DROP USER VACUUM CHECKPOINT CREATE USER MAPPING DROP USER MAPPING VALUES CLOSE CREATE VIEW DROP VIEW WITH |
You can find more help with the \HELP or the \? commands:
\? |
It displays the following:
General
  \copyright             show PostgreSQL usage and distribution terms
  \g [FILE] or ;         execute query (and send results to file or |pipe)
  \gset [PREFIX]         execute query and store results in psql variables
  \h [NAME]              help on syntax of SQL commands, * for all commands
  \q                     quit psql
  \watch [SEC]           execute query every SEC seconds

Query Buffer
  \e [FILE] [LINE]       edit the query buffer (or file) with external editor
  \ef [FUNCNAME [LINE]]  edit function definition with external editor
  \p                     show the contents of the query buffer
  \r                     reset (clear) the query buffer
  \s [FILE]              display history or save it to file
  \w FILE                write query buffer to file

Input/Output
  \copy ...              perform SQL COPY with data stream to the client host
  \echo [STRING]         write string to standard output
  \i FILE                execute commands from file
  \ir FILE               as \i, but relative to location of current script
  \o [FILE]              send all query results to file or |pipe
  \qecho [STRING]        write string to query output stream (see \o)

Informational
  (options: S = show system objects, + = additional detail)
  \d[S+]                 list tables, views, and sequences
  \d[S+]  NAME           describe table, view, sequence, or index
  \da[S]  [PATTERN]      list aggregates
  \db[+]  [PATTERN]      list tablespaces
  \dc[S+] [PATTERN]      list conversions
  \dC[+]  [PATTERN]      list casts
  \dd[S]  [PATTERN]      show object descriptions not displayed elsewhere
  \ddp    [PATTERN]      list default privileges
  \dD[S+] [PATTERN]      list domains
  \det[+] [PATTERN]      list foreign tables
  \des[+] [PATTERN]      list foreign servers
  \deu[+] [PATTERN]      list user mappings
  \dew[+] [PATTERN]      list foreign-data wrappers
  \df[antw][S+] [PATRN]  list [only agg/normal/trigger/window] functions
  \dF[+]  [PATTERN]      list text search configurations
  \dFd[+] [PATTERN]      list text search dictionaries
  \dFp[+] [PATTERN]      list text search parsers
  \dFt[+] [PATTERN]      list text search templates
  \dg[+]  [PATTERN]      list roles
  \di[S+] [PATTERN]      list indexes
  \dl                    list large objects, same as \lo_list
  \dL[S+] [PATTERN]      list procedural languages
  \dm[S+] [PATTERN]      list materialized views
  \dn[S+] [PATTERN]      list schemas
  \do[S]  [PATTERN]      list operators
  \dO[S+] [PATTERN]      list collations
  \dp     [PATTERN]      list table, view, and sequence access privileges
  \drds [PATRN1 [PATRN2]] list per-database role settings
  \ds[S+] [PATTERN]      list sequences
  \dt[S+] [PATTERN]      list tables
  \dT[S+] [PATTERN]      list data types
  \du[+]  [PATTERN]      list roles
  \dv[S+] [PATTERN]      list views
  \dE[S+] [PATTERN]      list foreign tables
  \dx[+]  [PATTERN]      list extensions
  \dy     [PATTERN]      list event triggers
  \l[+]   [PATTERN]      list databases
  \sf[+] FUNCNAME        show a function's definition
  \z      [PATTERN]      same as \dp

Formatting
  \a                     toggle between unaligned and aligned output mode
  \C [STRING]            set table title, or unset if none
  \f [STRING]            show or set field separator for unaligned query output
  \H                     toggle HTML output mode (currently off)
  \pset NAME [VALUE]     set table output option
                         (NAME := {format|border|expanded|fieldsep|fieldsep_zero|footer|null|
                         numericlocale|recordsep|recordsep_zero|tuples_only|title|tableattr|pager})
  \t [on|off]            show only rows (currently off)
  \T [STRING]            set HTML <table> tag attributes, or unset if none
  \x [on|off|auto]       toggle expanded output (currently off)

Connection
  \c[onnect] {[DBNAME|- USER|- HOST|- PORT|-] | conninfo}
                         connect to new database (currently "studentdb")
  \encoding [ENCODING]   show or set client encoding
  \password [USERNAME]   securely change the password for a user
  \conninfo              display information about current connection

Operating System
  \cd [DIR]              change the current working directory
  \setenv NAME [VALUE]   set or unset environment variable
  \timing [on|off]       toggle timing of commands (currently off)
  \! [COMMAND]           execute command in shell or start interactive shell

Variables
  \prompt [TEXT] NAME    prompt user to set internal variable
  \set [NAME [VALUE]]    set internal variable, or list all if no parameters
  \unset NAME            unset (delete) internal variable

Large Objects
  \lo_export LOBOID FILE
  \lo_import FILE [COMMENT]
  \lo_list
\lo_unlink LOBOID large object operations |
Have fun exploring PostgreSQL. You can click here to learn how to setup your own tablespace, database, and user. As always, I hope this helps those looking to discover how to install and use PostgreSQL.
Mac Mini to the rescue
In teaching, I had a problem because my students have different base operating systems, like Windows 7, Windows 8, Linux, and Mac OS X. I needed a teaching and lecture platform that would let me teach it all (not to mention support their environments). That meant it had to virtualize any of the following with a portable device:
- Windows 7 or 8 hosting natively an Oracle Database 11g XE, 11g, or 12c and MySQL Database 5.6
- Windows 7 or 8 hosting a Fedora or Oracle Unbreakable Linux VM (3 or 4 GB) with Oracle Database 11g XE, 11g, or 12c and MySQL Database 5.6
- Mac OS X hosting a Fedora or Oracle Unbreakable Linux VM (3 or 4 GB) with Oracle Database 11g XE, 11g, or 12c and MySQL Database 5.6
- Ubuntu hosting a Fedora or Oracle Unbreakable Linux VM (3 or 4 GB) with Oracle Database 11g XE, 11g, or 12c and MySQL Database 5.6
I never considered a manufacturer other than Apple for a laptop since they adopted the Intel chip. Too many of the others sell non-hyperthreaded laptop machines that they market as i5 or i7 64-bit OS machines when they’re not. Some of those vendors disable the hyperthreading facility while others provide motherboards that can’t support hyperthreading. The ones I dislike the most provide a BIOS setting that gives the impression you can enable hyperthreading when you can’t. All Apple devices, MacBook, MacBook Pro, Mac Mini, and Mac Pro do fully support a 64-bit OS and their virtualization.
A MacBook Pro came to mind but the disk space requirements were 1 TB, and that’s too pricey. I went with the Mac Mini because with 16 GB of memory and a 1 TB drive it was only $1,200. Add a wireless keyboard and mighty mouse, and an HDMI and mini-DVI connections, and I had my solution. Naturally, my desktop is a one generation old Mac Pro with 64 GB of memory and 12 TB of disk space, which supports all the virtual machines used for testing. Note to Apple marketing staff: The prior version of the Mac Pro let you pay reasonable (3rd party) prices for the additional memory and disk drives.
The Mac Mini means I can travel anywhere and plug into the console and demo tools and techniques from a myriad set of platforms without the hassle of moving on and off to frequently VM images. It’s a great solution with only one downside, HDMI to DVI sometimes creates purple toned screens. It’s unfortunate because some venues have monitors that don’t support HDMI).
Oracle 12c on Windows 7
Here are step-by-step instructions for installing Oracle Database 12c Release 1 on Windows 7. This is more or less to install a Desktop version of Oracle 12c. I posted other versions for Oracle Database 11gR1 and 11gR2. While some report that they installation doesn’t work for them, its typically because they didn’t configured their Windows 7 environment.
Here are some Windows 7 configuration caveats before you perform this installation, and they are:
Windows 7 Configuration Steps
- Make sure you have at least 3 GB of memory on your Windows PC, or that you can allocate 4 GB of memory to your virtual machine for Windows.
- Install Oracle’s JDK 7 for 64-bit OS with NetBeans and 32-bit OS when running on a 64-bit machine. The installer is smart enough to only install NetBeans once. The JDK 7 32-bit installation supports SQL Developer.
- Disable Microsoft’s User Access Controls (UAC). I blogged about a set of Windows 7 gripes, and the second point shows you the screen shots that let you disable UAC on Windows 7.
- Configure your
C:\Windows\System32\drivers\etc\hostsfile. Use lines 1 through 3 when you’re using a DHCP IP address, and lines 1 through 4 when you’re using a static IP address. If you want to set a static IP address, check this old post on how to set a static IP address. Please note that thehostnameneeds to be lowercase.
1 2 3 | 127.0.0.1 localhost
::1 localhost
127.0.0.1 oracle12c oracle12c.techtinker.com |
Line 4, only use for a static IP address, would look like this on the 192.168.* subdomain:
4 | 192.168.0.5 oracle12c oracle12c.techtinker.com |
- Create a user account name that doesn’t have a white space, like
McLaughlinMin the screen shots, and assign it Administrator privileges. During the install, you’ll be prompted to create a non-administrator account to start Oracle.
Oracle Database 12c Release 1 Installation Steps
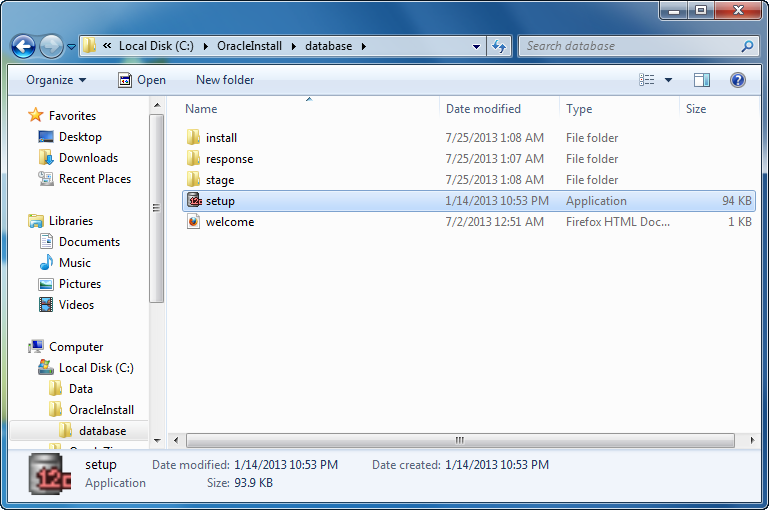
- The first thing you need to do is unzip the two zip files into a common directory. I’ve chosen to create an OracleInstall folder. Oracle creates a database folder inside it. Within the database folder, click the Setup file to launch the Oracle Installer.
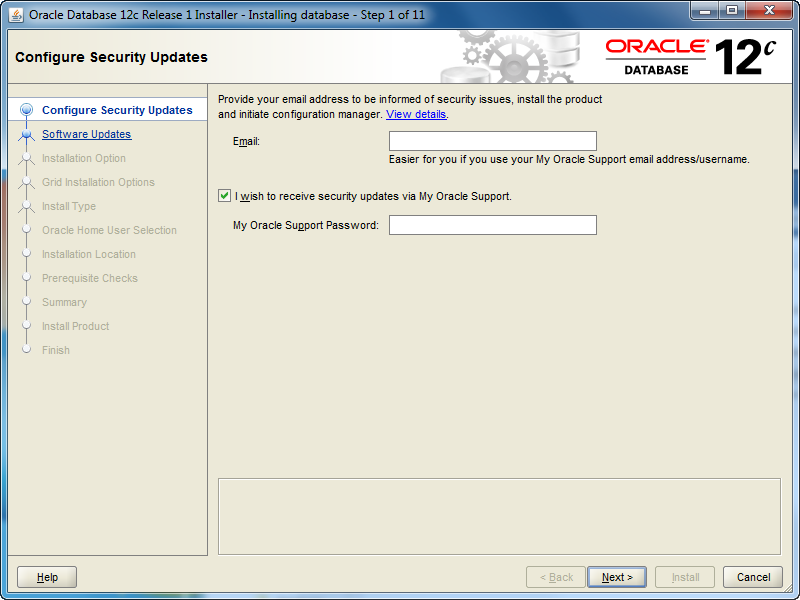
- After launching the Oracle Installer, the Configure Security Updates screen is your first stop. You may provide your email (attached to your Oracle Support Contract) and Oracle Support password, or uncheck the box and you can simply install a Desktop test environment. Click the Next button to proceed.
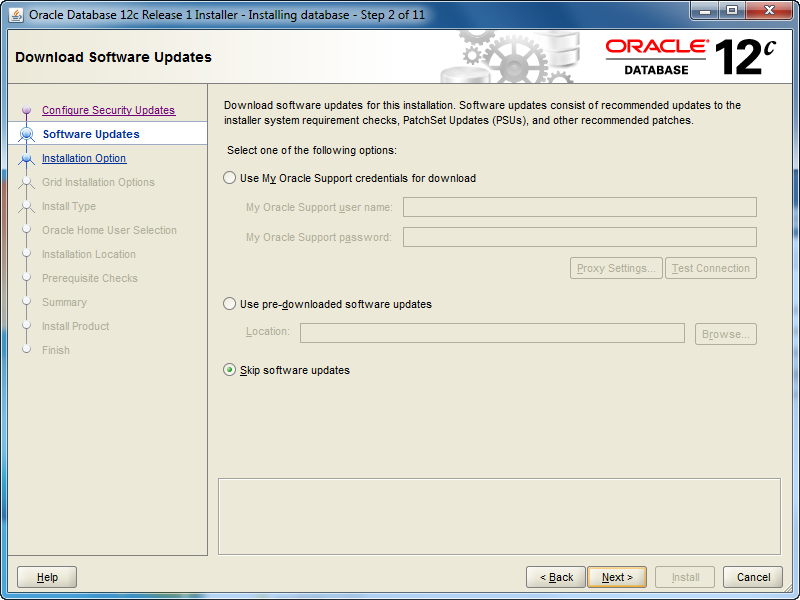
- The Software Updates is the next screen. If you want to check for updates, click and enter your Oracle Support credentials. If you want to install the base release, click the Skip software updates radio button. After making a choice about what you want to do with updates, click the Next button to proceed with the install.
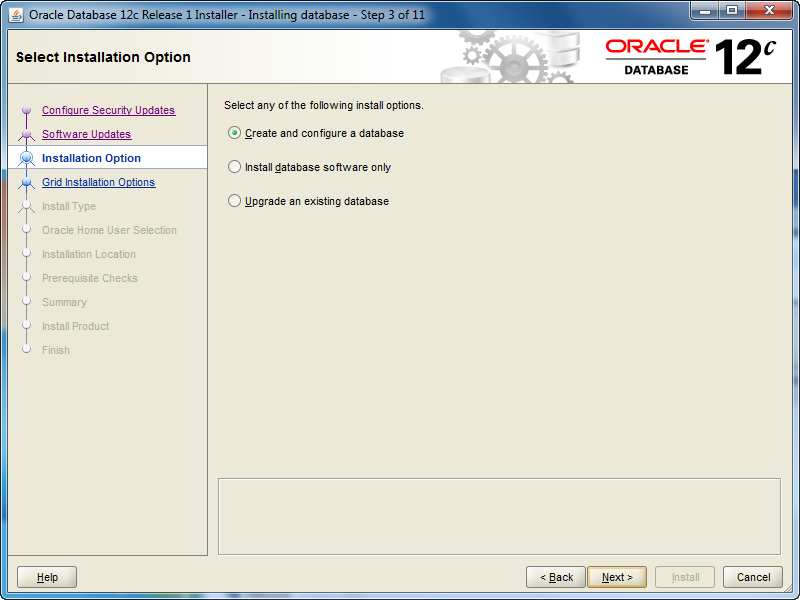
- The Installation Option screen lets you chose whether you want to Create and configure a database (sample database), Intall database software only, or Upgrade an existing database. Check the appropriate radio button and then click the Next button to proceed with the install.
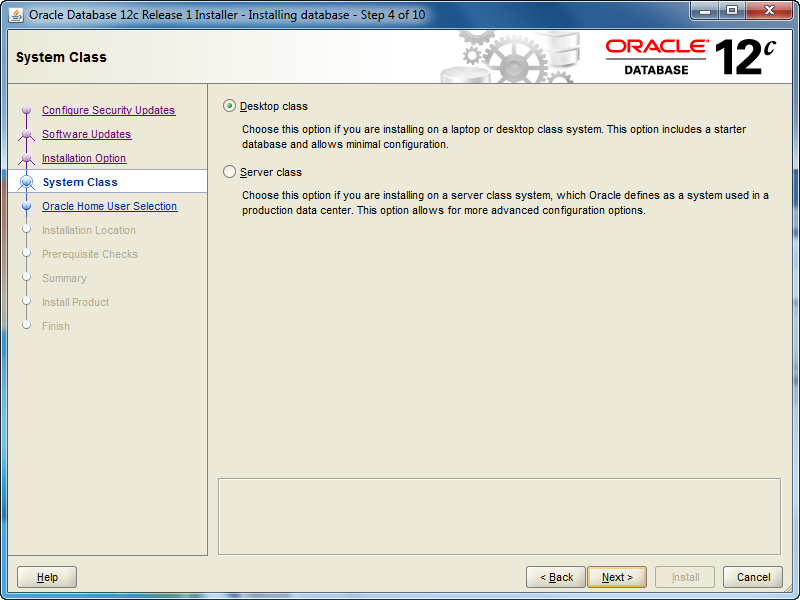
- The System Class screen lets you chose whether you want to install a Desktop class (ideal for develoers to play around in) or a Server class. Check the appropriate radio button and then click the Next button to proceed with the install.
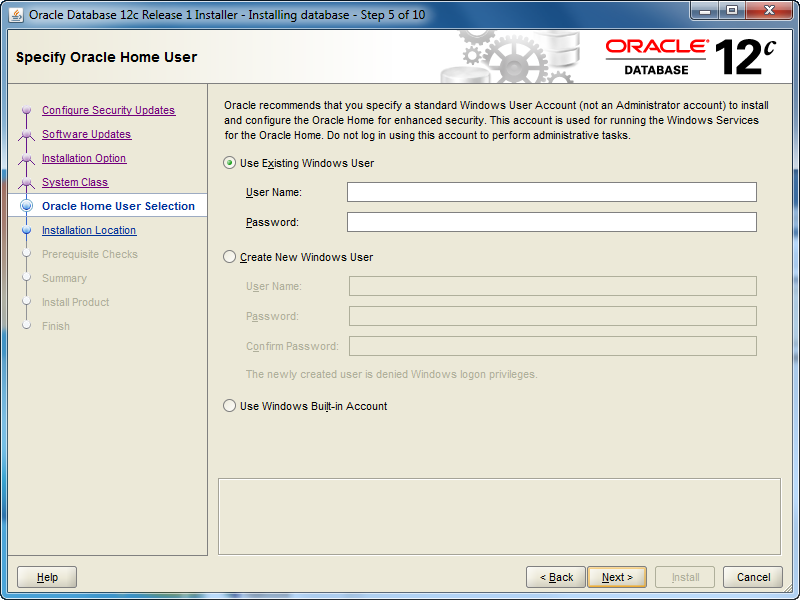
- The Oracle Home User Selection screen lets you chose whether you want to Use Existing Windows User (that’s fine if you created one previously), Create New Windows User (what I’ll do next), or Use Windows Built-in Account. Check the appropriate radio button and then click the Next button to proceed with the install.
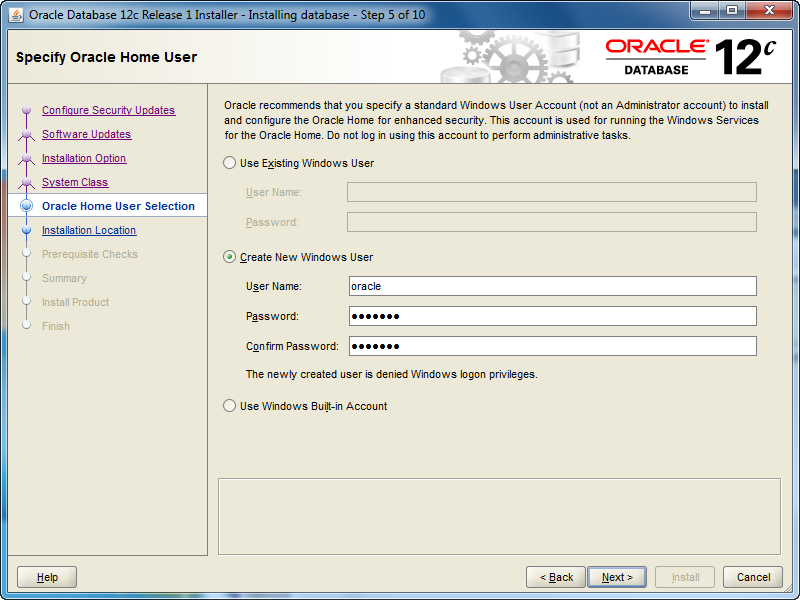
- The Oracle Home User Selection screen lets you Create New Windows User, and that’s what I’ve done with the
oracleuser (it could be whatever you like). Click the Next button to proceed with the install.
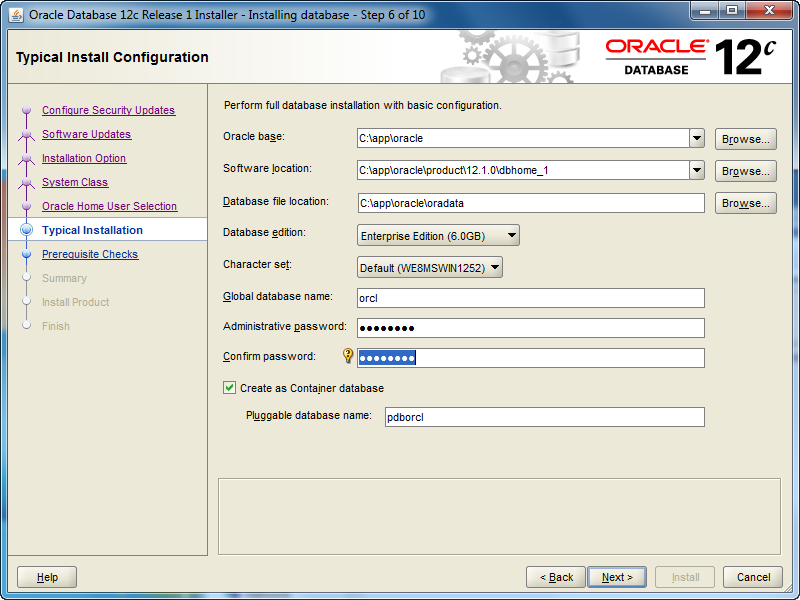
- The Typical Install Configuration screen lets you customize your installation. I’ve only opted to provide an Oracle compliant password while accepting the defaults. Click the Next button to proceed with the install.
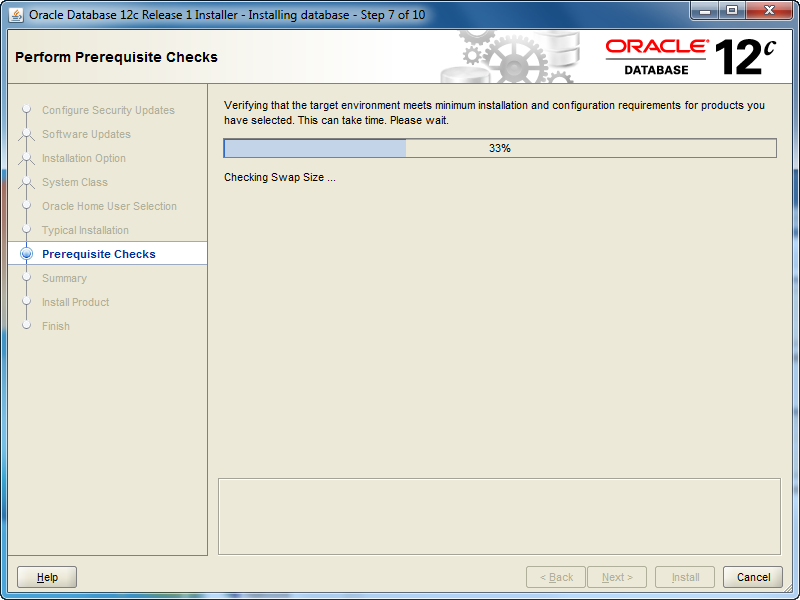
- The Perform Prerequisite Checks screen initially displays a task bar. You need some patience, it’ll show you the next screen if everything is fine.
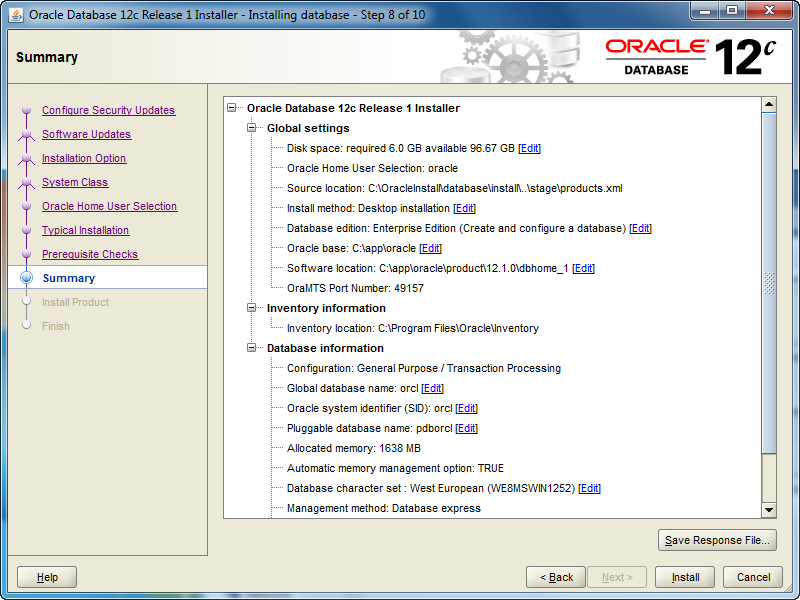
- The Summary screen tells you what you’re going to install. Read it over, save a copy for later, and when everything is right then click the Next button to install.
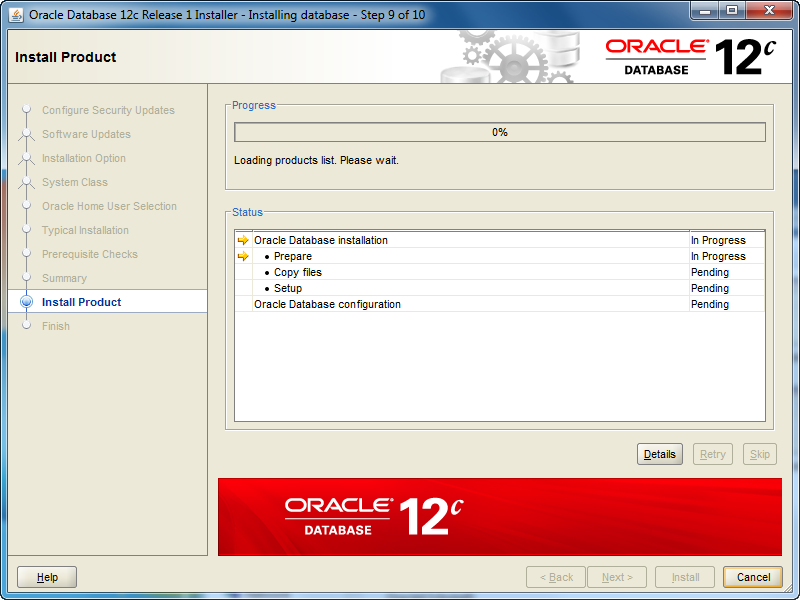
- The Install Product screen tells you what you’re installing and it can take some time. Don’t walk away too quickly because you’re most likely going to have to allow access for the installation to complete successfully.
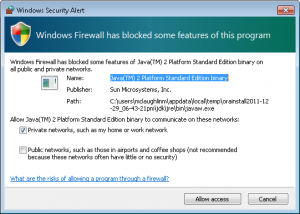
- You should see two Windows Security Alerts with the installation. Click the Allow access button to continue successfully.
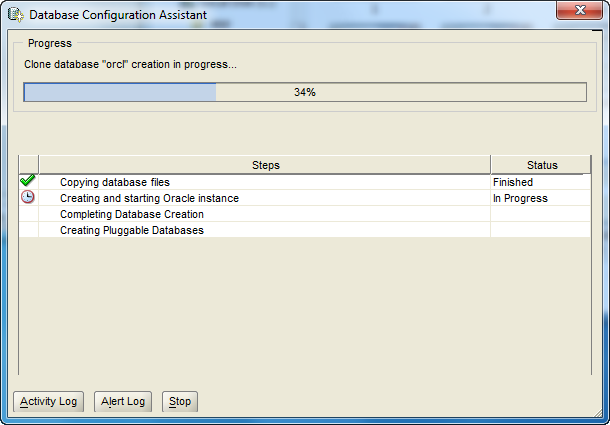
- The Database Configuration Assistant screen tells you that you’ve been successful to this point. Although, this is where several errors can occur when you failed to correctly configure Windows 7 before installation. This takes some time to run, here’s where you can take a break.
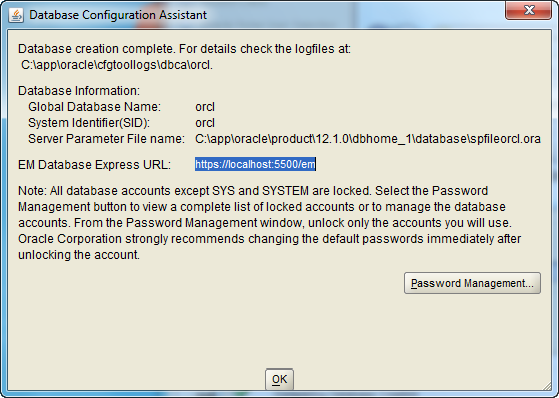
- The second Database Configuration Assistant screen lets you configure passwords for the database accounts. I’m skipping that by accepting the defaults and clicking the OK button to proceed.
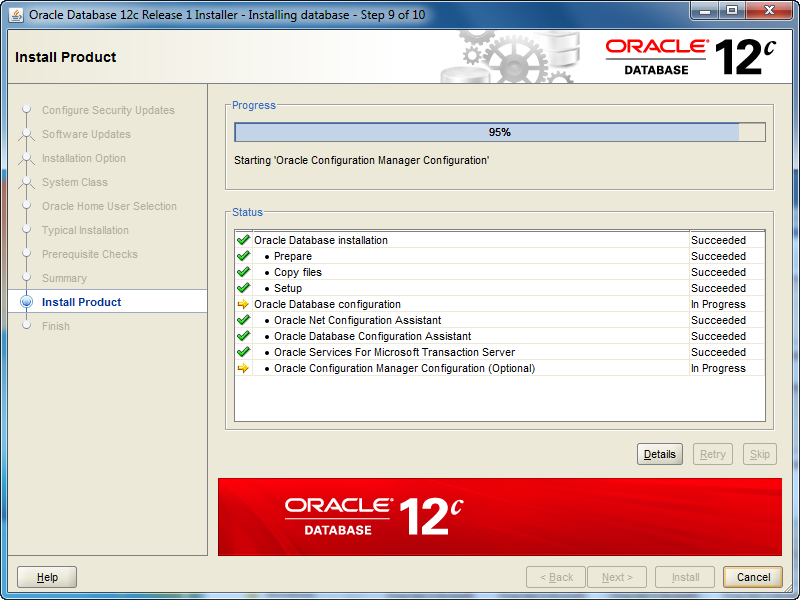
- The Install Product screen reappears while most of the database cloning operation has finished. At this point, it starts configuring the Oracle Enterprise Manager (OEM). It can take a couple minutes to complete. Simply monitor it.

- The Finish screen appears after everything has worked. Click the Close button to finish the install.
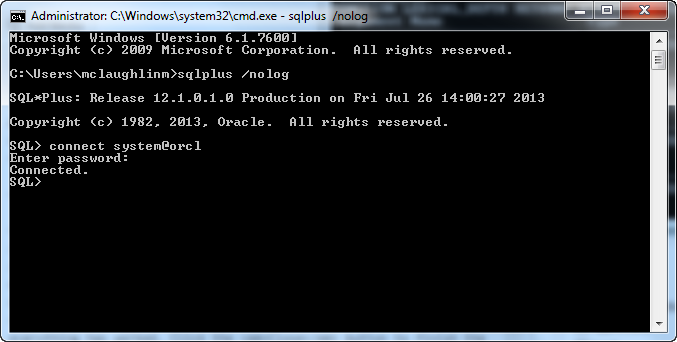
- Now, you can open a Windows command shell and call the
sqlplusexecutable with a/nologoption (denies login credentials form OS history files). Then, you can connect using the TNSorclalias, which verifies your networkinglistener.oraandtnsnames.orafiles are setup correctly. You should see the following in the command shell when the installation was successful.
C:\Users\mclaughlinm>sqlplus /nolog SQL*Plus: Release 12.1.0.1.0 Production on Fri Jul 26 02:00:19 2013 Copyright (c) 1982, 2013, Oracle. All rights reserved. Connected to: Oracle Database 12c Enterprise Edition Release 12.1.0.1.0 - 64bit Production With the Partitioning, OLAP, Advanced Analytics and Real Application Testing options SQL> connect system@orcl Enter password: Connected. |
Oracle 12c changes the dynamics on users. You now have two types of databases. One is a Container Database (CDB) and the other is a Pluggable Database (PDB). While Oracle’s default container users, like SYS, SYSTEM, and so forth, remain unchanged, you create new CDB users with a C##<user_name> preface. PDB users are a different matter, and they can retain the same format used previously for user-defined users. You set PDB users as the ADMIN user for a pluggable database when you provision it.
Subsequent to this post, I’ve posted how you can provision an Oracle 12c Pluggable Database (PDB), and you can find it in this post. AS always, I hope that this helps those trying to find a quick shortcut on reading the instructions. 😉
Site Blocked in Russia?
This is either too funny 🙂 or too sad. 🙁
An acquaintance sent me this image from a cyber cafe or hotel in Russia. It says that my blog site is prohibited and violates Russian law, and that they’re blocking my site in accordance with the Russian Federal Law of 27.07.2006 No. 149-FZ.
All I can say is, “Wow!” I didn’t know that stuff about writing programs, web pages, and solving generic database and operating system problems was so sensitive. For that matter, I didn’t know what I post would interest any government. I half wonder whether my friend’s pulling my leg.
As I reflect on it, could it be that Oracle post on how to write an encrypted object type? or, how with proper OS credentials how you reset MySQL’s root password? or, how to verify a socket in Perl? Nah, it’s probably the one on how to set a static IP in Windows – that’s truly sensitive stuff. 😉
Does anybody who reads the blog have any clue about what would drive the Russian government to block a technology blog site like mine? My serious guess is that there is somebody who hosts with the same provider who’s done something tacky.
ActivePerl on Windows
I actively maintain virtual test instances for my writing and teaching on Windows 7, Red Hat Enterprise Linux, Fedora, and Solaris. Perl on Windows is always interesting. I use ActivePerl on Windows 7 rather than Strawberry Perl, and it was interesting to see this note after I upgraded to the most current Community Edition of ActivePerl (5.16.3).
I thought it might be kind to post ActiveState’s Release Note because you should really read it before you try to install ActivePerl on Windows 7/8. Just make sure you’ve removed any earlier version of ActivePerl before trying the install. That’s what I did, and surprise, there weren’t any problems.
While the installation doesn’t tell you that you need to restart the Windows 7 operating system, you do. If you don’t restart Windows 7 after the ActivePerl install, you’ll get the following error message:
install_driver(mysql) failed: Can't locate DBD/mysql.pm in @INC |
You can grab the DBD::MySQL bundle with this command:
perl -MCPAN -e install Bundle::DBD::mysql |
It downloads the MinGW (Minimalist GNU for Windows) C/C++ compiler, but it’ll be nested and not conflict with one if you have installed it independently. Absence of the compiler means you can’t attempt to build the library.
Proceeding further, I discovered a number of incompatibilities. The basic commands require you to load CPAN (Comprehensive Perl Archive Network) shell:
perl -MCPAN -e shell |
Inside the Perl CPAN shell:
cpan> force install DBD:mysql --mysql_config C:\ProgramData\MySQL\MySQL Server 5.6 |
You also need to create a MySQL anonymous user in the database to support the default user during compilation, and if you dropped the test database you need to recreate it. I also ended up creating an ODBC user. Here are the commands to run as the root superuser:
CREATE USER 'ODBC'@'localhost'; CREATE USER ''@'localhost' IDENTIFIED BY 's3krit'; GRANT ALL ON test.* TO ''@'localhost'; |
I also took the time to update the MySQL test.pl to Perl 5.16; unfortunately, at the end of the day I didn’t get it working. Maybe I’ll try back in a few weeks. You need to change line 57 from port 5050 to port 3306, and “SharedSecret” to “s3krit“, as shown:

Here’s are the edits required test.pl program on lines 189 and 194:

The only release note provided is below, which I found inadequate. If you find the trick before me, please post it.
Windows
- The
fork()emulation has known limitations. See perlfork for a detailed summary. In particular,fork()emulation will not work correctly with extensions that are either not thread-safe, or maintain internal state that cannot be cloned in the pseudo-child process. This caveat currently applies to extensions such as Tk and Storable. - It seems that some people are having problems with the ActivePerl MSI installer. The first thing to note is that you CANNOT install ActivePerl 5.16 over an older version of ActivePerl based on 5.14, 5.12, 5.10, 5.8, 5.6 or 5.005, such as build 1204 or any other 1200, 1000, 800, 600 or 500 series build. We have determined that some of these problems are due to other installations of Perl that may be pointed at by something in the environment.
The sure-fire solution is to make absolutely certain that no other installations of Perl are on the target machine. Realizing that this is not always possible, you can follow these steps to ensure the other installations will not interfere.
- Stop the “Windows Installer” service. This can be accomplished from the command prompt using the following command:
C:\> net stop "Windows Installer" - Temporarily remove or rename
PERLLIBandPERL5LIBenvironment variables in the system environment. - Temporarily remove or rename the following registry values:
[\\HKEY_LOCAL_MACHINE\Software\Perl] lib = <directory> (REG_SV)
[\\HKEY_LOCAL_MACHINE\Software\Perl] sitelib = <directory> (REG_SV)
[\\HKEY_LOCAL_MACHINE\Software\Perl] lib-<PerlVersion> = <directory> (REG_SV)
[\\HKEY_LOCAL_MACHINE\Software\Perl] sitelib-<PerlVersion> = <directory>(REG_SV)
- Proceed with the installation.
Once the installation has completed successfully, the above actions may be undone although restoring the environment variables or the registry values may interfere with the proper operation of your new ActivePerl installation. In order to perform all of the above steps, you will need to have Administrative privileges on the target machine. If you do not have the required privileges you should contact your Administrator.
- Stop the “Windows Installer” service. This can be accomplished from the command prompt using the following command:
SQL Developer JVM Fix
It’s amazing the moving parts in Oracle Database 11g, and the ones that I don’t use after installation for a while often reach out to teach me something new. That’s what happened when I went to launch SQL Developer on my Windows 7 Professional 64-bit installation.
I got the message Unable to find a Java Virtual Machine, as shown in the image below. It really means unable to find a 32-bit Java 5 or Java 6 (1.6.0_4+) SDK home. Although the installation appeared fine, it pointed the SQL Developer configuration file to an incompatible 64-bit Java 7 SDK.

You fix this error by following these steps:
- Open the
sqldeveloper.conffile and check theSetJavaHomeparameter value. You find thesqldeveloper.conffile in the following directory:
%ORACLE_HOME\sqldeveloper\sqldeveloper\bin |
- Install the 32-bit Java 6 (1.6.0_4+) SDK on the operating system if not installed already. You can check whether it’s installed by looking for it in the Program Files (x86) folder.
- Change the value of the
SetJavaHomeparameter to point to the new 32-bit Java 6 home directory (or folder). The following change to line 18 in thesqldeveloper.conffile should fix it on your installation (provided that’s your version of the JVM).
18 | SetJavaHome C:\Program Files (x86)\Java\jdk1.6.0_34 |
Hope this helps those who run into the same issue.
Oracle and Java Tutorial
I’m posting this because of a question raised against this older post on how to configure the %CLASSPATH% to find the ojdbc6.jar file. This is the lab file I use in my Database 1 class to expose students to the moving parts of writing Java programs against the Oracle database. That’s why I choose to use a CLOB data type, which requires Oracle’s DBMS_LOB package and wrapping stored procedures.
If you want the same content for MySQL, here’s the link. The full program in either blog entry is available by clicking on the fold/unfold Java Source Code Program widget at the bottom of the respective posts.
This demonstrates how to create an Java infrastructure for reading and writing large text files to an Oracle database. The example provides:
- A
FileIO.jarlibrary that lets you enter Oracle connection parameters through aJOptionPane, and a customizedJFileChooserto filter and read source files from the file system. - A
ojdbc6.jarfile, which is Oracle’s library for JDBC communication with the Oracle Databases.
The steps to compiling and testing this code are qualified below:
- Download and install the Java Software Development Kit (JSDK) for Java 6.
- Create a
C:\JavaTestfolder on Windows, or a/JavaTestdirectory from some mount point of your choice. - Download and position the
ojdbc6.jarandFileIO.jarfiles in theJavaTestdirectory. - Create a batch file to source your environment path (%PATH% on Windows and $PATH on Linux or Mac OS X) and the two Java Archive (JAR) files. A sample batch file is noted below:
set PATH=C:\Program Files\Java\jdk1.6.0_07\bin;%PATH% set CLASSPATH=C:\JavaDev\Java6\ojdbc6.jar;C:\JavaDev\Java6\FileIO.jar;. |
You can run this file by simply typing the files first name. On Linux or Mac OS X, you first need to grant it privileges with the chmod command as 755.
- Copy the
WriteReadCLOB.javacode from the bottom of this posting and also put it into theJavaTestdirectory. - Compile the
WriteReadCLOB.javasource code with thejavacutility, as shown below:
javac WriteReadCLOB.java |
After you compile it, you should run it as follows:
java WriteReadCLOB |
- Before running the code, you’ll need to seed (
INSERT) a row that meets the desired hard coded criteria. It requires anITEM_TITLEvalue of'The Lord of the Rings - Fellowship of the Ring'and anITEM_SUBTITLEof'Widescreen Edition'in theITEMtable. - When it runs, you’ll see the following tabbed
JOptionPane.

You need to enter the following values before clicking the OK button:
- Host: The
hostnameof your machine. - Port: The
portthat the Oracle Listener is running on (the default value is1521). - Database: The Oracle TNS Alias, which is
orclfor the full database sample database orxefor the Oracle Database 10g Express Edition. - UserID: The
user(schema) name where you’ve created anITEMtable. - Password: The
passwordfor the user’s account.
In the JFileChooser, select a file to upload to the database.

You should see what you uploaded displayed in a JFrame.
Java Source Code Program ↓
The drop down unfolds the WriteReadCLOB.java source code.
The following program has dependencies on the FileIO.jar file. You need to download it and put it in your $CLASSPATH for Linux or Mac OS X or %CLASSPATH% for Windows.
1 2 3 4 5 6 7 8 9 10 11 12 13 14 15 16 17 18 19 20 21 22 23 24 25 26 27 28 29 30 31 32 33 34 35 36 37 38 39 40 41 42 43 44 45 46 47 48 49 50 51 52 53 54 55 56 57 58 59 60 61 62 63 64 65 66 67 68 69 70 71 72 73 74 75 76 77 78 79 80 81 82 83 84 85 86 87 88 89 90 91 92 93 94 95 96 97 98 99 100 101 102 103 104 105 106 107 108 109 110 111 112 113 114 115 116 117 118 119 120 121 122 123 124 125 126 127 128 129 130 131 132 133 134 135 136 137 138 139 140 141 142 143 144 145 146 147 148 149 150 151 152 153 154 155 156 157 158 159 160 161 162 163 164 165 166 167 168 169 170 171 172 173 174 175 176 177 178 179 180 181 182 183 184 185 186 187 188 189 190 191 192 193 194 195 196 197 198 199 200 201 202 203 204 205 206 207 208 209 210 211 212 213 214 215 216 217 218 219 220 221 222 223 224 225 226 227 228 229 230 231 232 233 234 235 236 237 238 239 240 241 242 243 244 245 246 247 248 249 250 251 252 253 254 255 256 257 258 259 260 261 262 263 264 265 266 267 268 269 270 271 272 273 274 275 276 277 278 279 280 281 282 283 284 285 286 287 | // -------------------------------------------------------------------- // WriteReadCLOB.java // by Michael McLaughlin // // This code demonstrates reading a large text file and displaying // the text stream in a JLabel in a JFrame. // // The UPDATE and SELECT statements have dependencies on the // create_store.sql script. // -------------------------------------------------------------------- // Java Application class imports. import java.awt.Dimension; import java.awt.Font; import java.awt.GridLayout; import java.io.Reader; import javax.swing.JFrame; import javax.swing.JLabel; import javax.swing.JOptionPane; import javax.swing.JPanel; import javax.swing.JScrollPane; import javax.swing.JTextArea; // Generic JDBC imports. import java.sql.CallableStatement; import java.sql.Clob; import java.sql.Connection; import java.sql.DatabaseMetaData; import java.sql.ResultSet; import java.sql.ResultSetMetaData; import java.sql.SQLException; import java.sql.Statement; // Oracle JDBC import. import oracle.jdbc.driver.OracleDriver; import oracle.jdbc.pool.OracleDataSource; // Include book libraries (available at publisher website). import plsql.jdbc.DataConnectionPane; import plsql.fileio.FileIO; // -------------------------------------------------------------------/ public class WriteReadCLOB extends JFrame { // Define database connections. private String host; private String port; private String dbname; private String userid; private String passwd; // Define data connection pane. private DataConnectionPane message = new DataConnectionPane(); // Construct the class. public WriteReadCLOB (String s) { super(s); // Get database connection values or exit. if (JOptionPane.showConfirmDialog(this,message ,"Set Oracle Connection String Values" ,JOptionPane.OK_CANCEL_OPTION) == 0) { // Set class connection variables. host = message.getHost(); port = message.getPort(); dbname = message.getDatabase(); userid = message.getUserID(); passwd = message.getPassword(); // Print connection to console (debugging tool). message.getConnection(); // Create a JPanel for data display. ManageCLOB panel = new ManageCLOB(); // Configure the JPanel. panel.setOpaque(true); setContentPane(panel); // Configure the JFrame. setDefaultCloseOperation(JFrame.EXIT_ON_CLOSE); setLocation(100,100); pack(); setVisible(true); } else System.exit(1); } // -------------------------------------------------------------------/ private class ManageCLOB extends JPanel { // Define display variables. private String clobText; private JScrollPane scrollPane; private JTextArea textArea; // -----------------------------------------------------------------/ public ManageCLOB () { // Set layout manager. super(new GridLayout(1,0)); // Assign file read to String. clobText = FileIO.openFile(FileIO.findFile(this)); // Insert record before querying it. if (clobText.length() > 0) { if (insertClob(host,port,dbname,userid,passwd,clobText)) clobText = getQuery(host,port,dbname,userid,passwd); else clobText = null; } else System.exit(2); // Construct text area and format it. textArea = new JTextArea(clobText); textArea.setEditable(false); textArea.setFont(new Font(Font.SANS_SERIF,Font.PLAIN,14)); textArea.setLineWrap(true); textArea.setRows(10); textArea.setSize(400,100); textArea.setWrapStyleWord(true); // Put the image in container, and add label to panel. scrollPane = new JScrollPane(textArea); add(scrollPane); } // ---------------------------------------------------------------/ private Boolean insertClob(String host,String port,String dbname ,String user,String pswd,String fileString) { try { // Set the Pooled Connection Source OracleDataSource ods = new OracleDataSource(); String url = "jdbc:oracle:thin:@//"+host+":"+port+"/"+dbname; ods.setURL(url); ods.setUser(userid); ods.setPassword(passwd); // Define connection. Connection conn = ods.getConnection(); // Create statement. CallableStatement stmt = conn.prepareCall("UPDATE item "+ "SET item_desc = ? "+ "WHERE item_title = "+ "'The Lord of the Rings - Fellowship of the Ring'"+ "AND item_subtitle = 'Widescreen Edition'"); // Set string into statement. stmt.setString(1,fileString); // Execute query. if (stmt.execute()) conn.commit(); // Close resources. stmt.close(); conn.close(); // Return CLOB as a String data type. return true; } // End of connection try-block. catch (SQLException e) { if (e.getSQLState() == null) { System.out.println( new SQLException("Oracle Thin Client Net8 Connection Error.", "ORA-" + e.getErrorCode() + ": Incorrect Net8 thin client arguments:\n\n" + " host name [" + host + "]\n" + " port number [" + port + "]\n" + " database name [" + dbname + "]\n" , e.getErrorCode()).getSQLState()); // Return an empty String on error. return false; } else { System.out.println(e.getMessage()); // Return an empty String on error. return false; }}} // -----------------------------------------------------------------/ private String getQuery(String host,String port,String dbname ,String user,String pswd) { // Define method variables. char[] buffer; int count = 0; int length = 0; String data = null; String[] type; StringBuffer sb; try { // Set the Pooled Connection Source OracleDataSource ods = new OracleDataSource(); String url = "jdbc:oracle:thin:@//"+host+":"+port+"/"+dbname; ods.setURL(url); ods.setUser(userid); ods.setPassword(passwd); // Define connection. Connection conn = ods.getConnection(); // Define metadata object. DatabaseMetaData dmd = conn.getMetaData(); // Create statement. Statement stmt = conn.createStatement(); // Execute query. ResultSet rset = stmt.executeQuery( "SELECT item_desc " + "FROM item " + "WHERE item_title = " + "'The Lord of the Rings - Fellowship of the Ring'"+ "AND item_subtitle = 'Widescreen Edition'"); // Get the query metadata, size array and assign column values. ResultSetMetaData rsmd = rset.getMetaData(); type = new String[rsmd.getColumnCount()]; for (int col = 0;col < rsmd.getColumnCount();col++) type[col] = rsmd.getColumnTypeName(col + 1); // Read rows and only CLOB data type columns. while (rset.next()) { for (int col = 0;col < rsmd.getColumnCount();col++) { if (type[col] == "CLOB") { // Assign result set to CLOB variable. Clob clob = rset.getClob(col + 1); // Check that it is not null and read the character stream. if (clob != null) { Reader is = clob.getCharacterStream(); // Initialize local variables. sb = new StringBuffer(); length = (int) clob.length(); // Check CLOB is not empty. if (length > 0) { // Initialize control structures to read stream. buffer = new char[length]; count = 0; // Read stream and append to StringBuffer. try { while ((count = is.read(buffer)) != -1) sb.append(buffer); // Assign StringBuffer to String. data = new String(sb); } catch (Exception e) {} } else data = (String) null; } else data = (String) null; } else { data = (String) rset.getObject(col + 1); }}} // Close resources. rset.close(); stmt.close(); conn.close(); // Return CLOB as a String data type. return data; } catch (SQLException e) { if (e.getSQLState() == null) { System.out.println( new SQLException("Oracle Thin Client Net8 Connection Error.", "ORA-" + e.getErrorCode() + ": Incorrect Net8 thin client arguments:\n\n" + " host name [" + host + "]\n" + " port number [" + port + "]\n" + " database name [" + dbname + "]\n" , e.getErrorCode()).getSQLState()); // Return an empty String on error. return data; } else { System.out.println(e.getMessage()); return data; }} finally { if (data == null) System.exit(1); }}} // -----------------------------------------------------------------/ public static void main(String[] args) { // Define window. WriteReadCLOB frame = new WriteReadCLOB("Write & Read CLOB Text"); }} |
Delay or synchronize it?
A couple students in one of my classes ran into a problem when competing Java threads tried to insert new rows in a table. They raised an error when they tried the DELAY keyword to avoid the race (collision) condition in an INSERT statement. It was simple to explain to them that the DELAY keyword doesn’t work with an InnoDB table. Any attempt throws the following error:
ERROR 1616 (HY000): DELAYED OPTION NOT supported FOR TABLE 'message' |
Important Update: INSERT DELAYED is gone in MySQL 5.6.6 (announcement) and the whole issue comes down to synchronizing threads (some dislike the solution) or using the ON DUPLICATE KEY clause.
They retested their Java application after redefining the target table using the MyISAM engine. They found it worked but that’s a bad fix in Java (a brief Java/MySQL tutorial post). They really needed to synchronize the Java thread (line #22), leave out the DELAY keyword, and manage the table with the InnoDB engine. Here’s the modified Java code (by the way, they named their project VulcanTech if you’re wondering about the packages in the import statement):
1 2 3 4 5 6 7 8 9 10 11 12 13 14 15 16 17 18 19 20 21 22 23 24 25 26 27 28 29 30 31 32 33 | package vulcantech.vth.server.commands; import java.io.IOException; import java.net.Socket; import vulcantech.vth.server.combeans.MessageBean; public class MessageHandler implements Handler { @Override public void handleIt(Object... args) { MessageBean message = (MessageBean) args[0]; Socket sock = (Socket) args[1]; DatabaseConnection dbconnection = new DatabaseConnection(); String update = new String("INSERT INTO message(message_timestamp, sender, recipient, message, checked) VALUES(\'" + message.getTimeStamp() + "\', \'" + message.getSender() + "\', \'" + message.getRecipient() + "\', \'" + message.getMessage() + "\', b\'0\')"); synchronized (this) { dbconnection.executeUpdate(update); } try { sock.getOutputStream().write(1); } catch (IOException e) { e.printStackTrace(); } dbconnection.close(); } } |
Hope this helps those who encounter race conditions against MySQL when you’re writing Enterprise Java Beans (EJBs).
Zend CE has a Worm?
After updating the AVGFree virus definitions, I was surprised to find that Zend CE (Community Edition) 4.0.6 had a reported worm in the JavaServer.exe file. There was greater surprise when Zend CE 5.3.9 (5.6.0-SP1) also had the same reported worm.
This is the message identifying the worm (click on it to see a full size image), and you can read about this particular worm on the Mcafee site or the AVG threat labs site:

If you check AVGFree’s page, the actual infection isn’t a stated variant, but it appears the heuristics are a bit aggressive.
File Name: C:\Program Files (x86)\Zend\ZendServer\bin\JavaServer.exe
Infection: Win32/DH.FF860061{00000000-00080000-00000000} |
Unless you have the full version of AVGFree or another security program to try and fix the file, you can only quarantine the file. Quarantine or removal disables Zend CE from working. It begs the question: “How does Zend release a core file with a worm?” or “Is AVGFree reporting a false positive?”
Update: AVGFree was providing a false positive. In addition to the checks by Zeev at Zend, I created a new test instance with Norton 360 and it likewise found no virus/worm in Zend’s JavaServer.exe file. Hopefully the post will prevent others from spending more than a Google search to sort it out.
Since I use AVGFree on all my Windows 7 VM test instances, it seemed logical to illustrate how to work around this current false positive and annoying quarantining of the core JavaServer.exe file from the Zend Server. There are two sets of tasks, the first requires removing the file from quarantine and the second eliminates future scans from quarantining the file again.
Remove the file from the Virus Vault
- Launch AVGFree and navigate to the History menu option and choose the Virus Vault option, as shown below.

- Click the Virus Vault option in the list of the History, which displays the following screen. Click the Infection row and then click the Restore button to remove the file from the virus vault.

- A confirmation dialog opens and you click the Yes button to proceed.

- The Infection row is gone When you’re returned to the History dialog. Click the Close button to complete this task.

Exclude the file from future scans
- Select the Tools menu option and choose the Advanced settings … option, as shown below.

- Click the Excluded files option in the list of the History, which displays the following screen. Click the Add button to select the file for exclusion. Click the Apply button to effect the change and the OK button to complete the change.

All I can say, one the AVGFree false positive was annoying and it’s dark at 3 a.m. and light the next day. 😉
Thanks to those who knew or surmised it was AVGFree’s heuristics and took the time to add a comment.
