Oracle Client 10g on Mac
The best thing about working on a MacBook or MacBook Pro is working on it, not working on the VMWare Fusion instance. The virtual machine should be a background process, whether it is a Linux, Windows XP Pro or Vista instance. You’ll find out how to do that here. You’ll be able to run SQL*Plus from the Mac OS command-line, SQL*Developer natively in Mac OS, and Oracle Enterprise Manager in Mac browser (of your choosing). Oddly, the few distracting Java errors that SQL*Developer raises on a PC don’t get raised on the Mac OS X.
At present, Oracle databases don’t run natively on Mac OS X with an Intel processor. You can run Oracle Database 10gR1 on a G5 (PowerPC 970) processor (a detail I apparently missed in the installation notes on the Oracle Technical Network), but why do that? You can run Oracle Database 10gR2, Oracle Database 10g Express Edition, or Oracle Database 11g in a virtual machine on a MacBook, MacBook Pro, or Mac Pro.
Unless you require Java or User Defined Object Types (UDTs) inside your development instance, I’d recommend you install Oracle Database 10g Express Edition on a MacBook or MacBook Pro when you have 2GBs of memory or less. If you have 4GBs of memory, they all work fine. They actually do work on Vista but I’ve heard the new Vista license agreements may prohibit their use on Mac OS X in a VM. I’ve found Windows XP Pro x64 bit works best if you want to run Windows, and Red Hat 4.0 Advanced Server screams in the VM with enough memory.
Enough introduction, here are the steps. A word to the wise, read carefully!!!
1. I’d recommend VMWare Fusion for the virtual server. There were enough problems with Parallels that I simply ditched it. When you install VMWare, download the current release from the web (VMWare Fusion 2.0 is available as of 9/12/2008). After downloading, use your license during the installation. You can use the copy in the box, but I’ve never found one in the box to work (though I’ve only tried 4 of them).
2. Install your operating system in the Virtual Machine (VM). I’d recommend that you take the time to configure memory before hand because it runs a lot faster if you do. Skipping the one-click installation may save you time because I’ve found it still has some warts. You have two choices for configuring the network. One is NAT and the other is a bridged network. The bridged network is the most like separate machines but it may not work in certain commercial settings. For example, if a router disallows calls from one machine to another in a subnet, you should use NAT. NAT means your native Mac OS acts as the gateway, and it ensures that your external router configurations won’t block communication between your Mac OS and the virtual machine instances. The down side for NAT is that you can’t communicate between servers without some additional work (hopefully, I’ll be able to add those steps after Oracle Open World).
2(a). A quick screen shot of how you want to configure VMWare NAT network, you get there by clicking Virtual Machine, Network, Network Settings…

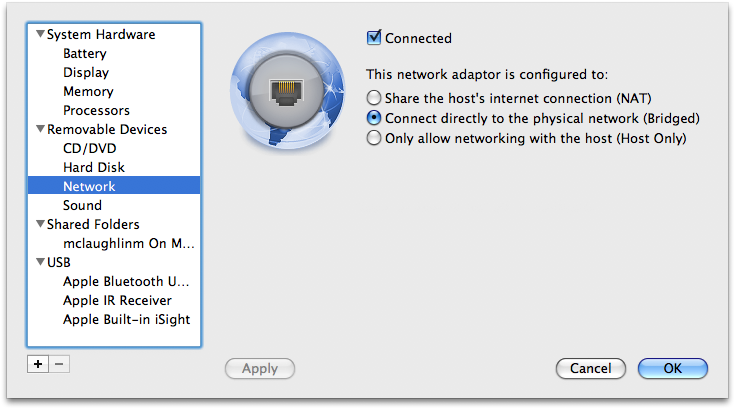
2(b). A quick screen shot of how you want to configure VMWare bridged network, you get there by clicking Virtual Machine, Network, Network Settings…
3. Once you’ve installed the operating system and patched it to the current level, you should name your machine before installing the Oracle Database. You should also configure your hosts file with the computer name, which is covered in the next step. You’ll regret it if you do forget it. All is not lost If you forget to edit your hosts file, you can rebuild the Enterprise Manager by following the instructions in this earlier blog page. Also, the standard and enterprise releases of the Oracle Database requires that you avoid white spaces in the user name.
4. Don’t forget to add that name into the C:>WINDOWS\System32\drivers\etc\hosts file or the Linux /etc/hosts file, like this:
xxx.xxx.xxx.xxx hostname hostname.domain.com |
You can find the IP address by using the “ifconfig -a” command in Linux, and the “ipconfig” command in Microsoft Windows.
4(a). The following is the screen shot for a NAT networking configuration. In case you’re not a networking guru, there are three addresses left open by Internet Assigned Numbers Authority (IANA) RFC 1918. 172.16/12 prefix is one of those.
VMWare Fusion has several releases, in general here are the settings that I’ve noticed:
- VMWare Fusion, Version 1.x, typically uses
172.16.113.xfor private addressing. - VMWare Fusion, Version 2.x, typically uses
172.16.153.xfor private addressing. - VMWare Fusion, Version 3.x, typically uses
172.16.123.xfor private addressing.
If you want a virtual machine to call another virtual machine, you’ll need to map the other virtual machine in its hosts file.
In Windows, you’ll find this in the C:\> WINDOWS\system32\drivers\etc\hosts file; and the /etc/hosts file on Linux or Unix.
# Copyright (c) 1993-1999 Microsoft Corp. # # This is a sample HOSTS file used by Microsoft TCP/IP for Windows. # # This file contains the mappings of IP addresses to host names. Each # entry should be kept on an individual line. The IP address should # be placed in the first column followed by the corresponding host name. # The IP address and the host name should be separated by at least one # space. # # Additionally, comments (such as these) may be inserted on individual # lines or following the machine name denoted by a '#' symbol. # # For example: # # 102.54.94.97 rhino.acme.com # source server # 38.25.63.10 x.acme.com # x client host 127.0.0.1 localhost 172.16.113.3 localhost 172.16.113.128 mclaughlin11g mclaughlin11g.techtinker.com |
Note:
The range for static IP addresses in your NAT range is 172.16.113.3 to 172.16.113.127. IP addresses 172.16.113.128 and above are DCHP assigned addresses for VMWare Fusion 1.x, which was used for this article. VMWare Fusion, Version 2.x, uses 172.16.153.3 to 172.16.153.127 for static IP addresses and 172.16.153.128 and above.
4(b). The following is the screen shot for a bridged networking configuration. In case you’re not a networking guru, there are three addresses left open by Internet Assigned Numbers Authority (IANA) RFC 1918. 192/16 prefix is one of those. This is the one you’d most likely see if you’re working in a home netwroking environment.
In Windows, you’ll find this in the C:\> WINDOWS\system32\drivers\etc\hosts file; and the /etc/hosts file on Linux or Unix.
# Copyright (c) 1993-1999 Microsoft Corp. # # This is a sample HOSTS file used by Microsoft TCP/IP for Windows. # # This file contains the mappings of IP addresses to host names. Each # entry should be kept on an individual line. The IP address should # be placed in the first column followed by the corresponding host name. # The IP address and the host name should be separated by at least one # space. # # Additionally, comments (such as these) may be inserted on individual # lines or following the machine name denoted by a '#' symbol. # # For example: # # 102.54.94.97 rhino.acme.com # source server # 38.25.63.10 x.acme.com # x client host 127.0.0.1 localhost 192.168.0.9 localhost 192.168.0.9 mclaughlin11g mclaughlin11g.techtinker.com |
Alternatively, you’ll enter the following IP address if you’re double NAT’d through an Airport Extreme, like me:
127.0.0.1 localhost 172.16.113.3 localhost 172.16.113.3 mclaughlin11g mclaughlin11g.techtinker.com |
If you’re configuring Microsoft Vista, you should note that you can’t edit the hosts file without changing your security permissions. You begin that process by right clicking on the file in Windows Explorer. In the hosts Properties dialog, choose the Security tab and click on your user name before clicking the Edit … button. Allow Full Control to make the changes, but note the original settings. Good system administrations skills would indicate you re-establish security after making the change, and that’s why you’ll need those original settings.
Changing IP Addresses:
If you switch between bridged and NAT, or vice versa, don’t forget that you need to release and renew a DHCP address. The following two steps let you do that:
a. As the Administrator, or privileged account, type the following:
C:\> ipconfig /release |
b. As the Administrator, or privileged account, type the following:
C:\> ipconfig /renew |
Note:
A caveat here for those using DHCP addresses. They may change over time. You may need to revisit this multiple times. If you’re on several networks, you may opt to put all IP addresses that your computer typically holds. Multiple addresses aren’t a problem because it looks for any match in the list to resolve the hostname. This means you can have the information in the file to support multiple network environments where you may travel with your Mac Book or Mac Book Pro, and avoid reconfiguring between locations.
Static IP Addresses in VMWare Fusion:
I’d strongly recommend that you use static IP addresses. They’re straight forward if you remember a couple things: (a) you need to use a port address in the defined range – 172.16.113.3 to 172.16.113.127 (version 1.x and 172.16.153.3 to 172.16.153.127 (version 2.x), and (b) you need to explicitly provide a DNS server IP address.
The following shows how to set a static IP address by platform (only Windows at present):
a. Navigate to the Control Panel, and open the Network Connections. This presents you with the Network Connections window. You should click the Local Area Connection icon, as shown in the screen capture (updated instructions for Windows 7):

b. In the Local Area Connection window, click the Properties button, as shown in the screen capture:

c. In the Local Area Connection Properties window, choose the Internet Protocol (TCP/IP) and then click the Properties button, as shown in the screen capture:

d. In the Internet Protocol (TCP/IP) window, you should enter an IP address in the static range of values, a subnet mask of 255.255.255.0, and a default gateway – which should always be 172.16.113.2 (at least in version 1.x) and 172.16.153.2 (in version 2.x). You should install DHCP first to discover the default gateway. You can discover it by issuing the following command:
C:\> ipconfig |
The last step requires you to select a DNS server. You can find the DNS server of your Mac OS by running the following command:
cat /etc/resolv.conf |
Enter one of the nameserver values. I generally take the first one offered. You can also create a Ubuntu virtual machine, and run DNS there. The following shows the screen capture for the Internet Protocol (TCP/IP) window (by the way the one used was snagged in the screen capture came from the wireless network at Oracle OpenWorld 2008):

After you’ve made these entries, click the OK button for the Local Area Connection Properties window and the Local Area Connection window. Then, click the Close button for the Local Area Connection window and close window widget for the the Network Connections window.
Note #1:
Please remember the DNS server changes when you connect to a different network. You’ll have to check it and change it as you change networks.
In a home network, the Airport Extreme typically double NAT’d, and it uses 10.0.1.1 as the DNS server. This DNS server only lets you manage outbound requests from your VM. You need to configure your own DNS server locally on the Mac OS if you want to interconnect between VMs, or you can use hosts file validation as shown in this blog page.
5. Install the Oracle Database version of your choice in the VM, then confirm that you can connect to the database through the SQL*Plus. This connection should be self-contained in the VM. You use syntax like this for a schema or user named PLSQL with a (trivial) password of PLSQL and the TNS alias from the tnsnames.ora file is ORCL (typically true with an Oracle 10g or 11g installation).
C:\> sqlplus plsql/plsql@orcl |
If you’re installing Oracle Database 10g Express Edition, the TNS alias is
XE and should look like this:
C:\> sqlplus plsql/plsql@xe |
Note #2:
Before you move ahead with the installation, you should check your listener.ora and tnsnames.ora files. You can find the files in the $ORACLE_HOME\network\admin directory. They should have your hostname and not an IP address as the HOST variable values, like those in the following illustration. The top image is the listener.ora file, and the bottom image is the tnsnames.ora file.

For reference, the equivalent Windows environment variable is %ORACLE_HOME%. The environment variables should point to your Oracle home directory.
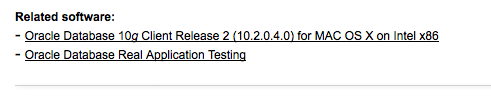
6. Once you’ve done that, you’re ready for the Mac OS X part of the equation. Download the Oracle Database 10g Client Release 2 from the otn.oracle.com web site.
7. Unzip the file and put both the doc and ohome directories into a folder named instantclient, which I chose to put in the /Applications folder.
8. Now for the Linux tricks. You need to setup a couple environment variables. The easiest way to do this in Mac OS X is to put them in a .bash_login shell script in your user account. Go to the Macintosh HD icon and click it. Then, navigate to the Applications folder. Open the Utilties folder from the Applications folder, and launch the Terminal application. If you put the Oracle Client where I said to put it, then do exactly what I’ve got but if you improvised, adjust here too.
8(a). Open the .bash_login file with vi (it won’t hurt too badly), and enter command mode by typing an “i“. It is possible that the file may not exist, you can use the touch utility to create a .bash_login file or simple type this to create and edit the file:
vi .bash_login |
After you open the file, use the i to enter data because it opens in command mode. Then, type the following (slowly, if you’re new to vi), backspace should help cleanup errors:
export set ORACLE_HOME=/Applications/instantclient/ohome export set DYLD_LIBRARY_PATH=$ORACLE_HOME/lib export set TNS_ADMIN=$ORACLE_HOME/network/admin export set PATH=$PATH:$ORACLE_HOME/bin |
8(b). Close vi by taking these two steps. First, click the “Esc” key, it puts you in command mode. Second, type “:wq” (that’s a colon, a w and a q) from command-mode. The file is now closed.
8(c). Open a new Terminal session, and check your handiwork by typing the following echo commands from the terminal prompt, which should show you what you typed in above. If this didn’t work, return to the step 8(a) and 8(b) until it works.
echo $ORACLE_HOME echo $DYLD_LIBRARY_PATH echo $TNS_ADMIN echo $PATH |
This step means that every time you open a Terminal, you can run SQL*Plus against the Oracle Database in the VM instance. Naturally, you’ll need the VM instance up and running concurrently.
9. You need to enter the IP address and hostname for your virtual machine in the /etc/hosts file on your Mac. This requires the superuser account. You will again use vi to edit this file. You’ll need to use sudo to open this file, like this:
sudo vi /etc/hosts |
Add the following line at the bottom of the existing file, and don’t change anything else (unless you’d like to reinstall everything). This entry is generally required with NAT IP addresses, and it is optional with bridged networkds when the DNS server resolves IP addresses. If you’re running disconnected from a network, it is also required.
xxx.xxx.xxx.xxx hostname_of_vm_machine |
You should use the IP value from your virtual machine’s hostname file. You’ll need to use :wq! to close the file. This is required of key files. The bang operator (!) tells the OS you’re sure you want to make the change.
This change lets you reach the virtual machine because you’ve now qualified the server to your Mac OS. This is known as host file resolution.
You actually have two options to qualify virtual machines to the local Mac OS. They are host file or DNS resolution. Host file resolution is easy because you simply add the private IP address and name to the Mac OS hosts file. DNS resolution can be done in the VMWare network configuration files, or on an external DNS server. An example of the Mac OS hosts file is:
## # Host Database # # localhost is used to configure the loopback interface # when the system is booting. Do not change this entry. ## 127.0.0.1 localhost 127.0.0.1 MichaelMcLaughlin.local 255.255.255.255 broadcasthost ::1 fe80::1%lo0 localhost 172.16.113.128 mclaughlin11g |
If you’re doing this on a corporate network, you’ll probably need to append the domain to the hostname. It is a good idea to use the unqualified and qualified hostname together (a qualified hostname includes the domain name). The configuration of your nameserver determines whether or not you need to use an unqualified or qualified hostname. You can find your nameserver in the /etc/resolv.conf file. A fully qualified hostname configuration line would look like this in your /etc/hosts file:
172.16.113.128 mclaughlin11g mclaughlin11g.techtinker.com |
As noted above, DHCP IP addresses may change because another computer can snag your DHCP lease. You may have to change this IP address over time. Also, you can enter multiples when you connect to different networks. Resolution of the IP address or hostname looks for a match in the list.
It’s simpler then the server VM instance because you won’t need a domain at this time. You would if you’re configuring Apache but that’ll have to be another blog page. You can test whether you can connect to the virtual machine by running a simple ping test, like …
ping hostname |
If it resolves, you can continue. Otherwise you need to stop and fix it.
Ah, the question is how do you fix it? The first thing you need to do, is open ICMP requests in your firewall, or disable your firewall. I recommend the former because when I post how you can open communication into these virtual machines you’ll want to have your firewall running. There are two steps in Windows to open the firewall.
First, navigate to your control panel, and open the Windows Firewall. Choose the Advanced tab as shown in the screen capture:

Second, allow incoming echo requests. You choose the Settings… button in the ICMP region to enable echo requests. This also allows echo acknowledgments or replies. After enabling the echo requests, you should click the OK button in the ICMP Settings and Windows Firewall windows.

Since there are too many Linux firewalls, I leave those instructions to you. Just remember that the ping utility resolves everything at networking level 3, which is IP, UDP, ICMP, et cetera.
At this point, you should have also added port exceptions for SQL*Plus on port 1521 and Oracle Enterprise Manager on port 1158. You do that from the Windows Firewall too. The Add Port … button lets you create port exceptions. Port exceptions allow traffic through only one port, and let your firewall protect other aspects of your machine.

You only need to open TCP for both the SQL*Plus and Oracle Enterprise Manager exceptions. The exception configuration for the Oracle Enterprise Manager looks like the following:

Now that your firewall is open a bit, you can proceed with testing the Mac OS side of the configuration. Don’t forget to click the OK button to save the port exception.
10. Copy your tnsnames.ora file from the Oracle home directory in your VM. It is found in the (Linux or Unix) $ORACLE_HOME/network/admin or (Windows) %ORACLE_HOME%\network\admin directory. You need to put it in the equivalent Oracle home directory on the client installation, which is this unless you improvised:
/Applications/instantclient/ohome/network/admin |
If you don’t want to copy it, you can use the vi utility to create a tnsnames.ora file by typing something like the following. Change the HOST to the name of your virtual machine, the PORT to the correct value of the listener port, and the SERVICE_NAME to the name of your database instance.
ORCL = (DESCRIPTION = (ADDRESS = (PROTOCOL = TCP)(HOST = mclaughlin11g)(PORT = 1521)) (CONNECT_DATA = (SERVER = DEDICATED) (SERVICE_NAME = orcl) ) ) |
11. Now, you’re prepared to test how well you’ve setup the environment. The first step confirms that Oracle’s TNS (Transparent Network Substrate) is configured properly. You test it with the Oracle tnsping utility. The argument is the TNS alias (or service name) in a tnsnames.ora file. It is typically orcl or xe for demonstration instances. I’ve used the one from the general releases.
tnsping orcl |
If you receive a success, move on to the next step and check SQL*Plus connectivity. The tnsping utility uses the tnsnames.ora file to resolve where it should request an acknowledgment. It checks in the local directory before the $ORACLE_HOME/network/admin directory, unless you’ve set the $TNS_ADMIN environment variable. If the $TNS_ADMIN variable is set, tnsping looks there first.
MichaelMcLaughlin:~ mclaughlinm$ tnsping orcl TNS Ping Utility for MacOS X Server: Version 10.2.0.4.0 - Production on 08-NOV-2008 19:35:55 Copyright (c) 1997, 2007, Oracle. All rights reserved. Used parameter files: Used TNSNAMES adapter to resolve the alias )SERVICE_NAME = orcl)= TCP)(HOST = mclaughlin11g)(PORT = 1521)) OK (10 msec) |
A failure is generally represented by an ORA-12514 or ORA-12162. These typically mean you’ll need to troubleshoot the configuration of the Oracle listener. Either typically means that the IP addresses between the OS X client and VM server differ. If you’re using hosts file validation, please check to make sure you have the same IP address is both the Mac /etc/hosts file and VM hosts file. If you’re using DNS validation, you should ensure that the IP addresses map to a valid DNS host name. You can use the nslookup command to see if the IP address returns the hostname or hostname returns the IP address.
After making changes, you need to stop and restart the Oracle listener to test any changes. Linux also requires you to restart network services. These changes are made inside the respective virtual machines.
Unfortunately, you could get a message that the executable isn’t found. You can check whether you’ve configured your (Mac OS X) $PATH variable with this command:
which -a tnsping |
You’re $PATH variable is pointing to the wrong place if nothing is returned. Return to step 8(a) and fix it. The which command lets you find executable programs in your current $PATH. The -a option lets you see the order in which two copies of the same executable are called. The one returned first by the which -a call is always the one called because of the order of precedence set in the current $PATH environment variable.
12. You can check whether Oracle SQL*Plus works here by using the following type of syntax:
sqlplus plsql/plsql@orcl |
If you connect, that’s great! Move on to the next step.
MichaelMcLaughlin:~ mclaughlinm$ sqlplus plsql/plsql@orcl SQL*Plus: Release 10.2.0.4.0 - Production on Sat Nov 8 19:45:08 2008 Copyright (c) 1982, 2007, Oracle. All Rights Reserved. Connected to: Oracle Database 11g Enterprise Edition Release 11.1.0.6.0 - Production With the Partitioning, OLAP, Data Mining and Real Application Testing options SQL> |
If not, there are a couple errors that might occur. One is that the executable can’t be found, you can check that with similar syntax to that found in step 11 above:
which -a sqlplus |
If nothing is returned, fix the $PATH environment variable in step 8(a). The other is an ORA-12545, which in this case most likely means that the IP address in the VM hosts file is incorrect.
13. Hopefully, this is a lucky number. Download SQL*Developer for the Mac OS X from the otn.oracle.com web site, here’s the one you want:
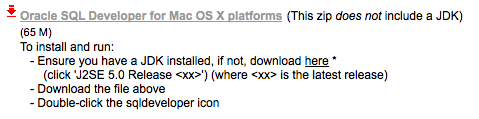
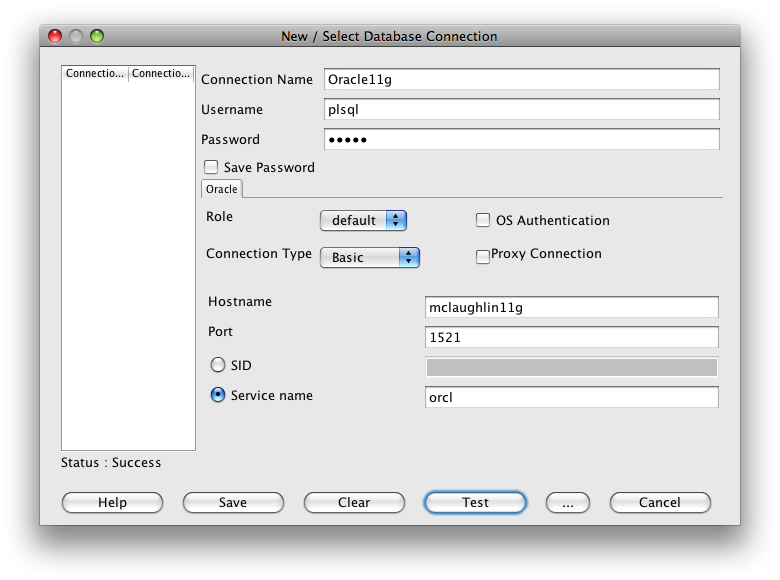
You should unzip it, and put it into the Applications folder. Launch SQL*Developer. Right click the Connections in the left column, and you should complete the connection like this:
Note:
The Service name should be xe not orcl when you’ve installed or are connecting the sample database from the Oracle Database 10g Express Edition.
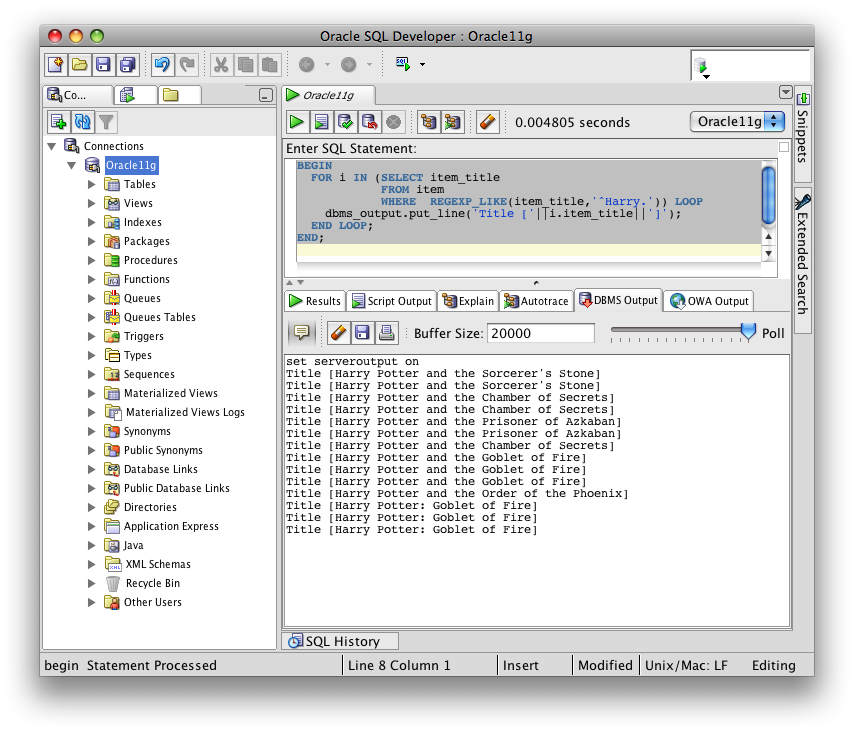
14. Now you can test SQL*Developer. Here’s a quick screen shot of it working. You can click the image for the full size screen shot, which wouldn’t fit the style of the blog.
15(a). You can configure the Oracle Enterprise Manager (OEM) to run now. The only possible missing link is the security credentials. You’ll find out how to override those in this prior blog post. The following is a screen shot of the OEM product running on a Mac through NAT to a virtual machine:

15(b). If you’re installing Oracle Database 10g Express Edition (XE), you must enable the web interface to work beyond the virtual machine (or localhost). Inside the VM, open the Oracle XE home page, authenticate as the privileged SYSTEM user, then click the Manage HTTP Access link in the shadow box Tasks region on the right hand side of the web page.
This opens the Manage HTTP Access page. Click the radio button for Available from local server and remote clients option. Then, click the Apply Changes button to make the Oracle Applications Express web console available on your Mac OS X.

This concludes the steps. I hope it works for you. If it didn’t work, please post a comment. Also, if I didn’t catch the right tags, please let me know.
For those who want to configure Oracle Internet Directory from the Mac OS, John Piwowar has laid it out in his blog here. That’s the oidadmin utility.
Gotchas:
1. If you encounter an “the network bridge device on /dev/vmnet0 is not running” when trying to start your VMWare instance, don’t panic. A service didn’t start correctly. You can reboot your Mac or you can run the following command from the /Library/Application Support/VMWare Fusion directory (options are --start, --stop, or --restart):
sudo boot.sh --restart |
You can also find how to configure a VMWare Windows virtual machine here. It has instructions for both NAT and bridged networks.

I’ve got parallels on an iMac but I typically do most work on VMWare.
maclochlainn
9 May 12 at 10:59 pm
[…] https://blog.mclaughlinsoftware.comhow-to-configure-mac-os-x-as-an-oracle-client/ […]
Install Oracle using Mac OS X Lion and Centos | Diaspar
12 Aug 12 at 5:04 pm
hello sir, i liked your very first sentence, and i agree with you.
Sir, i tried my best to install oracle 10g on mac os x 10.7.3 LION, but at max i can install the software only, i have a database installed on vm-ware fusion on win-7. So, is there any way to copy that database from there, and yes i tried to create database manually, but when creating password file for sys i am getting segmentation fault-11, and i am unable to start sqlplus.. Same error of segmentation fault.
any solution will be highly appreciated.
Thank you sir.
anand
27 Oct 12 at 11:28 pm
I’m not sure what you’re trying to do. Are you trying to install Oracle 10g Client software on the Mac or Oracle 10g Database on the Mac? If it’s the latter, it won’t work because you need to have the Mac OS X Server software.
maclochlainn
28 Oct 12 at 1:11 am
yes sir you right.
Anyways i am stucked at step-6, i have oracle database 10g for mac, and in that directory i can find- folders as doc, install, response,runinstaller,stage and a welcome.html. But i can’t find ‘ohome’.
please help
anand
28 Oct 12 at 5:37 am
sir, please help me out, from where can i get ohome?
anand
29 Oct 12 at 12:06 pm
Anand, I believe you’re saying that you want to install Oracle 10g on Mac OS X, not Mac OS X Server. If that’s correct, you can’t. The binaries aren’t compatible and you’ll raise signal 10/11 because of the incompatibilities. You can only install the Oracle Client software on a Mac OS X (non-server).
maclochlainn
29 Oct 12 at 12:52 pm
Sir, thanks for your support, finally i got what i wanted. I have installed win-xp on vmware fusion, and then oracle database on xp. Now i can work on SQLDeveloper, eclipse java IDE, isql*plus on mac only.
anand
30 Oct 12 at 1:16 pm
Do u know “how to install and configure in window 7”?
if u know then please tell me the step wise for installing and configuring .
bullet
17 Mar 13 at 2:47 am
I recommend free MySQL-manager for OSX – Valentina Studio, check it out.
andre
27 Feb 14 at 4:21 am
[…] install Oracle Client software on Mac OS X […]
developer friendly OS
18 Apr 14 at 4:28 pm
[…] you can install Oracle Client software MySQL server natively on the Mac OS X […]
AU/X, NeXTSTEP, and Mac OS X | InsideMySQL
18 Apr 14 at 6:46 pm
[…] run MySQL Database server natively […]
AU/X, NeXTSTEP, & OS X
19 Apr 14 at 1:21 pm