Archive for the ‘Linux Developer’ tag
Ubuntu Pro Upgrade?
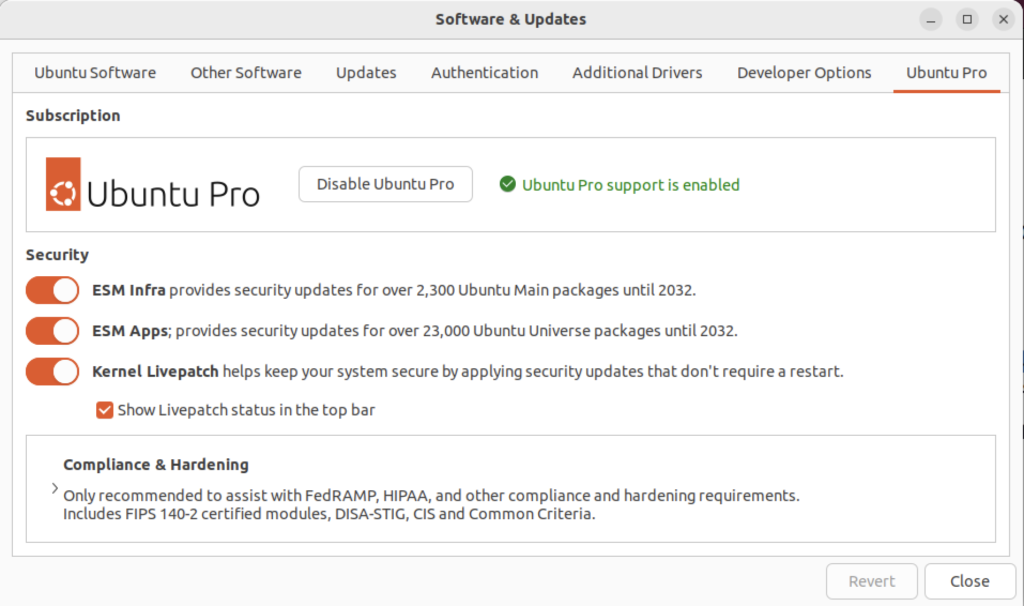
There wasn’t a choice when I chose to update the Ubuntu instance. I was compelled to upgrade to Ubuntu Pro. According to the upgrade I have five free installations. You can read more about Ubuntu Pro on this web page, and find their pricing schedule on this page.
Native sqlplus editing
I have to remind myself from time to time that Ubuntu is a Desktop or Workstation and by default can go missing key server software, like ssh. This became evident when I wanted to check whether I could run sqlplus from my Mac OS terminal through my Ubuntu VM and internally embedded Oracle Database 23c Free docker instance.
If like me you forgot to add it, you can add the ssh service with the following commands to your Ubuntu VM:
sudo apt update sudo apt install -y openssh-server sudo systemctl start ssh.service |
Then, you can test the installation with an ssh call to localhost, like:
ssh localhost |
You should see the following, where you need to enter the sudoer’s password to continue. Your localhost target causes an authenticity check, like:
The authenticity of host 'localhost (127.0.0.1)' can't be established. ED25519 key fingerprint is SHA256:js8knEf/lOE1rSss3u8lP4Ii634Y0CkUz+oJM5dt3w4. This key is not known by any other names Are you sure you want to continue connecting (yes/no/[fingerprint])? |
Enter yes to continue:
Are you sure you want to continue connecting (yes/no/[fingerprint])? yes |
It will now add localhost to the list of known hosts provide standard messages, as shown below.
Warning: Permanently added 'localhost' (ED25519) to the list of known hosts. student@localhost's password: Welcome to Ubuntu 22.04.3 LTS (GNU/Linux 6.2.0-39-generic x86_64) * Documentation: https://help.ubuntu.com * Management: https://landscape.canonical.com * Support: https://ubuntu.com/advantage Expanded Security Maintenance for Applications is not enabled. 9 updates can be applied immediately. 5 of these updates are standard security updates. To see these additional updates run: apt list --upgradable Enable ESM Apps to receive additional future security updates. See https://ubuntu.com/esm or run: sudo pro status The programs included with the Ubuntu system are free software; the exact distribution terms for each program are described in the individual files in /usr/share/doc/*/copyright. Ubuntu comes with ABSOLUTELY NO WARRANTY, to the extent permitted by applicable law. |
Having verified the installation and functionality of ssh in the Ubuntu VM. Then, I launched a Terminal session on my MacBookPro base operating system. Using the Ubuntu instance ssh and a customized Bash function, I discovered its IP address.
The following is the get_ip() user-defined function in the Ubuntu instance’s student user’s customized .bashrc file:
# Return the local instance's IP address. get_ip () { echo `hostname -I | cut -f1 -d' '` } |
In this instance, it returned:
192.168.195.155 |
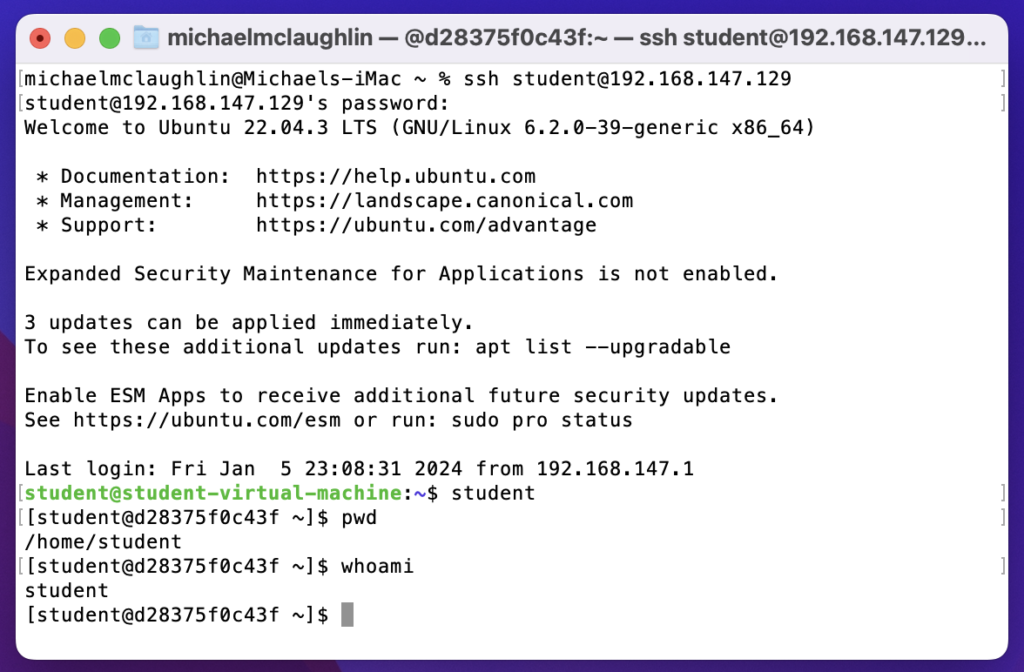
With the IP address, I secured shelled into my Ubuntu sudoer student user like this:
ssh student@192.168.195.155 |
It’ll prompt you for the remote server’s student password, like:
student@192.168.195.155's password: |
After entering the correct password, I got the standard reply of a valid connection:
Welcome to Ubuntu 22.04.3 LTS (GNU/Linux 6.2.0-39-generic x86_64) * Documentation: https://help.ubuntu.com * Management: https://landscape.canonical.com * Support: https://ubuntu.com/advantage Expanded Security Maintenance for Applications is not enabled. 9 updates can be applied immediately. 5 of these updates are standard security updates. To see these additional updates run: apt list --upgradable Enable ESM Apps to receive additional future security updates. See https://ubuntu.com/esm or run: sudo pro status Last login: Fri Jan 5 18:13:21 2024 from 127.0.0.1 |
Next, I connected to the Ubuntu Docker Oracle Database 23c Free instance with this syntax:
docker exec -it --user student oracle23c bash |
At the prompt for the Docker instance of Oracle Database 23c Free, you can type sqlplus to work directly against the Oracle Database 23c Free instance with a pluggable c##student database user.
sqlplus c##student/student SQL*Plus: Release 23.0.0.0.0 - Production on Sat Jan 6 01:38:06 2024 Version 23.3.0.23.09 Copyright (c) 1982, 2023, Oracle. All rights reserved. Last Successful login time: Sat Dec 23 2023 04:30:00 +00:00 Connected to: Oracle Database 23c Free Release 23.0.0.0.0 - Develop, Learn, and Run for Free Version 23.3.0.23.09 |
Now, I can interactively edit my files with vi in the Docker Oracle Database 23c Free directory. The following demonstrates using the sandboxed student() function from my earlier Oracle 23c Free SQL*Plus blog post and connects as a sandboxed student user in the Docker Oracle 23c Free container. The image uses a different Mac OS and different Ubuntu VM from the earlier entries in this blog post from the earlier examples.
You can edit and test the files in the Docker Oracle 23c Free instance through the command-line interface (CLI). You can further automate the ssh connection by making the Ubuntu instance’s IP address a static address instead of a DCHP-assigned address; and then you can put it in the Mac OS’s /etc/hosts file which lets you resolve it by name (through file versus DNS resolution).
As always, I hope this helps those looking for a solution.
Ubuntu Desktop 22.04

I finally got around to installing Ubuntu Desktop, Version 22.04, on my MacBook Pro 2014 since OS X stopped allowing upgrades on the device in 2021. While I replaced it in 2021 with a new MacBook Pro with an i9 Intel Chip. The Ubuntu documentation gave clear instructions on how to create a bootable USB drive before replacing the Mac OS software..
Unfortunately, networking was not well covered. It left me with two questions:
- How to configure Ubuntu Desktop 22.04 to the network?
You need to use an RJ45 network cable (in this case also an RJ45 to Thunderbolt adapter) and reboot the OS. It will automatically configure your DCHP connection.
- How to configure Wifi for Ubuntu Desktop 22.04?
You need to download and install a library, which is covered below.
After the Ubuntu Desktop installation, I noticed it didn’t provide any opportunity to update the software or configure the network. It also was not connected to the network. I connected the MacBook Pro to a physical Internet cable and rebooted the Ubuntu OS. It recognized the wired network. Then, I upgraded the installed libraries, which is almost always the best choice.
At this point, I noticed that the libraries to enable a WiFi connection were not installed. So, I installed the missing Wifi libraries with this command:
sudo apt-get install dbms bcmwl-kernel-source |
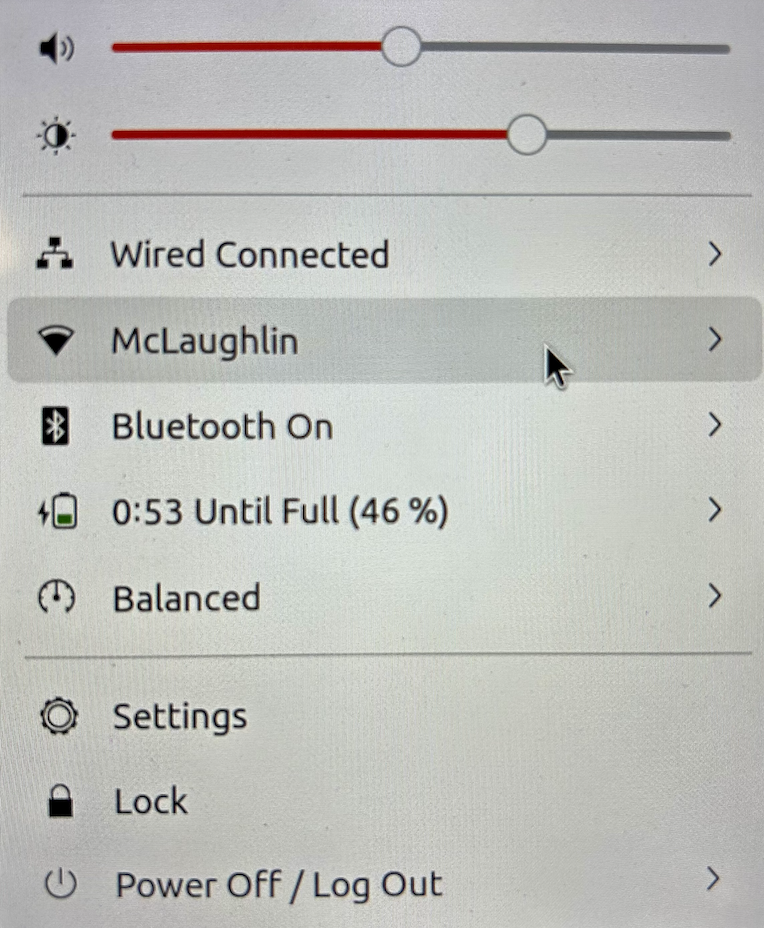
After you’ve installed the bcmwl-kernel-source libraries, navigate to the top right where you’ll find a small network icon. Click on the network icon and you’ll see the following dialog. Click on your designated Wifi, enter the password and you’ll have a Wifi connection.
As always, I hope this note helps those trying to solve a real world problem.
A tkprof Korn Shell
Reviewing old files, I thought posting my tkprof.ksh would be helpful. So, here’s the script that assumes you’re using Oracle e-Business Suite (Demo database, hence the APPS/APPS connection); and if I get a chance this summer I’ll convert it to Bash shell.
#!/bin/ksh
# -------------------------------------------------------------------------
# Author:   Michael McLaughlin
# Name:     tkprof.ksh

# Purpose:  The program takes the following arguments:
#           1. A directory
#           2. A search string
#           3. A target directory
#           It assumes raw trace files have an extension of ".trc".
#           The output file name follows this pattern (because it is
#           possible for multiple tracefiles to be written during the
#           same minute).
# -------------------------------------------------------------------------

# Function to find minimum field delimiter.
function min
{
  # Find the whitespace that preceeds the file date.
  until [[ $(ls -al $i | cut -c$minv-$minv) == " " ]]; do
    let minv=minv+1
  done
}

# Function to find maximum field delimiter.
function max
{
  # Find the whitespace that succeeds the file date.
  until [[ $(ls -al $i | cut -c$maxv-$maxv) == " " ]]; do
    let maxv=maxv+1
  done
}

# Debugging enabled by unremarking the "set -x"
# set -x

# Print header information
print =================================================================
print Running [tkprof.ksh] script ...

# Evaluate whether an argument is provide and if no argument
# is provided, then substitute the present working directory.
if   [[ $# == 0 ]]; then
  dir=${PWD}
  str="*"
  des=${PWD}
elif [[ $# == 1 ]]; then
  dir=${1}
  str="*"
  des=${1}
elif [[ $# == 2 ]]; then
  dir=${1}
  str=${2}
  des=${1}
elif [[ $# == 3 ]]; then
  dir=${1}
  str=${2}
  des=${3}
fi

# Evaluate whether the argument is a directory file.
if [[ -d ${dir} ]] && [[ -d ${des} ]]; then

  # Print what directory and search string are targets.
  print =================================================================
  print Run in tkprof from [${dir}] directory ...
  print The files contain a string of [${str}] ...
  print =================================================================

  # Evaluate whether the argument is the present working
  # directory and if not change directory to that target
  # directory so file type evaluation will work.
  if [[ ${dir} != ${PWD} ]]; then
    cd ${dir}
  fi

  # Set file counter.
  let fcnt=0

  # Submit compression to the background as a job.
  for i in $(grep -li "${str}" *.trc); do

    # Evaluate whether file is an ordinary file.
    if [[ -f ${i} ]]; then

      # Set default values each iteration.
      let minv=40
      let maxv=53

      # Increment counter.
      let fcnt=fcnt+1

      # Call functions to reset min and max values where necessary.
      min ${i}
      max ${i}

      # Parse date stamp from trace file without multiple IO calls.
      # Assumption that the file is from the current year.
      date=$(ls -al ${i} | cut -c${minv}-${maxv})
      mon=$(echo ${date} | cut -c1-3)
      yr=$(date          | cut -c25-28)

      # Validate month is 10 or greater to pad for reduced whitespace.
      if (( $(echo ${date} | cut -c5-6) < 10 )); then
        day=0$(echo ${date}| cut -c5-5)
        hr=$(echo ${date}  | cut -c7-8)
        min=$(echo ${date} | cut -c10-11)
      else
        day=$(echo ${date} | cut -c5-6)
        hr=$(echo ${date}  | cut -c8-9)
        min=$(echo ${date} | cut -c11-12)
      fi

      fn=file${fcnt}_${day}-${mon}-${yr}_${hr}:${min}:${day}

      print Old [$i] and new [$des/$fn]
      tkprof ${i} ${des}/${fn}.prf explain=APPS/APPS sort='(prsela,exeela,fchela)'

      # Print what directory and search string are targets.
      print =================================================================
    fi
  done

else
  # Print message that a directory argument was not provided.
  print You failed to provie a single valid directory argument.
fi |
I hope this helps those looking for a solution.
Bash Debug Function
My students working in Linux would have a series of labs to negotiate and I’d have them log the activities of their Oracle SQL scripts. Many of them would suffer quite a bit because they didn’t know how to find the errors in the log files.
I wrote this SQL function for them to put in their .bashrc files. It searches all the .txt files for errors and organizes them by log file, line number, and descriptive error message.
errors () { label="File Name:Line Number:Error Code"; list=`ls ./*.$1 | wc -l`; if [[ ${list} -eq 1 ]]; then echo ${label}; echo "----------------------------------------"; filename=`ls *.txt`; echo ${filename}:`find . -type f | grep -in *.txt -e ora\- -e pls\- -e sp2\-`; else if [[ ${list} -gt 1 ]]; then echo ${label}; echo "----------------------------------------"; find . -type f | grep --color=auto -in *.txt -e ora\- -e pls\- -e sp2\-; fi; fi } |
I hope it helps others now too.
JavaScript Streams?
A quick followup to my post on how to write a server-side shell component in JavaScript. Naturally, it’s based on a question posed to me about the original article. It asked, “Why didn’t I use JavaScript’s streams instead of synchronized files?”
Moreover, the question asks why I wrote logic (lines 69 thru 105) that wrote to local files rather than a stream. While they didn’t provide an example, here’s a rewritten solution that uses a stream.
69 70 71 72 73 74 75 76 77 78 79 80 81 82 83 84 85 86 87 88 89 90 91 92 | else { // Returns RowDataPacket from query. for(let element in result) { data += result[element].item_title + ', ' + result[element].release_date = '\n' } // Write file when data string is not empty. if (data.length > 0) { buffer = Buffer.alloc(data.length, data) // Check for data from database query and write file. if (path.length > 0) { let writeStream = fs.createWriteStream(path) writeStream.write(buffer) writeStream.on(buffer) } // Set standard out (stdout) and exit program. console.log(data) process.exit(0) } else { console.error('Query returned no rows.') } } |
The Node.js stream replacement code has a significant problem when the target file can’t be read and written to by a Node.js application. This could be an ownership- or permission-driven problem coupled with the lazy file opening behavior of a stream in JavaScript. The lazy open is a hidden behavior of the createWriteStream() method, which actually calls the fs.open() method. It may raise the following type of error:
events.js:174
     throw er; // Unhandled 'error' event
     ^

Error: EACCES: permission denied, open 'output.csv'
Emitted 'error' event at:
   at lazyFs.open (internal/fs/streams.js:277:12)
at FSReqWrap.args [as oncomplete] (fs.js:140:20) |
You can prevent this type of unhandled exception by putting this type of block right after you verify the target file name in the script. It ensures that your program raises a handled exception before your code tries to access a target file as a stream.
69 70 71 72 73 74 75 76 | // Verify access to the file. try { fs.accessSync(path, (fs.constants.R_OK && fs.constants.W_OK)) access = true } catch { console.error("Error accessing [%s] file.", path) } |
Naturally, you also need to define the access variable at the top of your script. The preceding block lets you set the access variable to true on line 72 when you have permissions to the file used by the stream. It also lets you replace line 76 (from the prior example code) with the following statement that effectively blocks any attempt to use a stream that will fail because of the lazy file opening process:
76 | if (access && (path.length > 0)) { |
Adding the extra block does lengthen the program, and change line numbers. I hope I’ve adjusted in a way that makes sense by referencing the old numbers for the change of the decision making if-statement.
As always, I hope this helps those looking for a related solution.
Node.js Fedora Install
I want to add the MEAN (MongoDB, Express.js, Angular.js, and Node.js) stack to my backend server development course. This post documents the installation and configuration of components on Fedora 30.
The first step requires installing the Node package. The Node package also contains the Node package manager (npm). You install the Node packages as the root user or as a sudoer user with the following command.
yum install -y npm |
It should produce the following installation log:
Last metadata expiration check: 1:10:42 ago on Wed 08 Jul 2020 06:57:52 PM MDT. Dependencies resolved. ================================================================================================================================ Package Architecture Version Repository Size ================================================================================================================================ Installing: npm x86_64 1:6.13.4-1.10.19.0.1.fc30 updates 3.8 M Installing dependencies: nodejs x86_64 1:10.19.0-1.fc30 updates 88 k nodejs-libs x86_64 1:10.19.0-1.fc30 updates 9.1 M Installing weak dependencies: nodejs-full-i18n x86_64 1:10.19.0-1.fc30 updates 7.3 M Transaction Summary ================================================================================================================================ Install 4 Packages Total download size: 20 M Installed size: 91 M Downloading Packages: (1/4): nodejs-10.19.0-1.fc30.x86_64.rpm 173 kB/s | 88 kB 00:00 (2/4): nodejs-full-i18n-10.19.0-1.fc30.x86_64.rpm 2.8 MB/s | 7.3 MB 00:02 (3/4): nodejs-libs-10.19.0-1.fc30.x86_64.rpm 2.7 MB/s | 9.1 MB 00:03 (4/4): npm-6.13.4-1.10.19.0.1.fc30.x86_64.rpm 1.3 MB/s | 3.8 MB 00:02 -------------------------------------------------------------------------------------------------------------------------------- Total 4.9 MB/s | 20 MB 00:04 Running transaction check Transaction check succeeded. Running transaction test Transaction test succeeded. Running transaction Running scriptlet: npm-1:6.13.4-1.10.19.0.1.fc30.x86_64 1/1 Preparing : 1/1 Installing : nodejs-libs-1:10.19.0-1.fc30.x86_64 1/4 Installing : nodejs-full-i18n-1:10.19.0-1.fc30.x86_64 2/4 Installing : npm-1:6.13.4-1.10.19.0.1.fc30.x86_64 3/4 Installing : nodejs-1:10.19.0-1.fc30.x86_64 4/4 Running scriptlet: nodejs-1:10.19.0-1.fc30.x86_64 4/4 Verifying : nodejs-1:10.19.0-1.fc30.x86_64 1/4 Verifying : nodejs-full-i18n-1:10.19.0-1.fc30.x86_64 2/4 Verifying : nodejs-libs-1:10.19.0-1.fc30.x86_64 3/4 Verifying : npm-1:6.13.4-1.10.19.0.1.fc30.x86_64 4/4 Installed: nodejs-1:10.19.0-1.fc30.x86_64 nodejs-full-i18n-1:10.19.0-1.fc30.x86_64 nodejs-libs-1:10.19.0-1.fc30.x86_64 npm-1:6.13.4-1.10.19.0.1.fc30.x86_64 Complete! |
After installing the Node package, you should use the Node package manager (npm) to install the Node Monitor nodemon. nodemon is a popular utility that automatically lets you restart Node programs when you make changes to the source code.
While npm is installed as part of the Node package, you must use npm to install the Node Monitor. The following command installs the nodemon globally on your Fedora system. The -g flag lets you install it globally, which is important when you manage package.json files.
npm install -g nodemon |
You install nodemon globally but most of your web app or project files will be installed locally. Node is a different paradigm than building an Apache or IIS web application because Node provides a framework for you to build a web server.
Here’s a quick Hello World! example that I borrowed a JavaScript helloworld.js file from an excellent Web Development with Node & Express: Leveraging the JavaScript Stack by Ethan Brown. For those who haven’t worked with JavaScript in years, semicolons are optional now.
/* Construct a web server. */ const http = require('http') const port = process.env.PORT || 3000 const server = http.createServer((req, res) => { res.writeHead(200, { 'Content-Type': 'text/plain' }) res.end('Hello world!') }) server.listen(port, () => console.log(`server started on port ${port}); ` + 'press Ctrl-C to terminate...')) |
I put this in /var/www/html/node directory, which is owned by the superuser, root. You need to start the server before accessing it from a browser. You can start the program with the following syntax as a privileged user:
node /var/www/html/node/helloworld.js |
Then, you can use the localhost to access it with the following URL:
http://localhost:3000 |
It will display the following:

Next, you need to use the Node Package Manager (npm) to install the Express.js packages. You do that with the following syntax:
npm install -g express express-generator |
It should produce a console out put like the following:
npm WARN deprecated mkdirp@0.5.1: Legacy versions of mkdirp are no longer supported. Please update to mkdirp 1.x. (Note that the API surface has changed to use Promises in 1.x.) /usr/local/bin/express -> /usr/local/lib/node_modules/express-generator/bin/express-cli.js + express@4.17.1 + express-generator@4.16.1 added 60 packages from 42 contributors in 4.798s |
After you install all the packages, you can inspect them with the following command. The packages are found in the /usr/local/lib/node_modules/express directory. The listing is generated from the package.json file on Fedora and Ubuntu Linux.
npm list -g |
It should display something like this:
/usr/local/lib ├─┬ express@4.17.1 │ ├─┬ accepts@1.3.7 │ │ ├─┬ mime-types@2.1.27 │ │ │ └── mime-db@1.44.0 │ │ └── negotiator@0.6.2 │ ├── array-flatten@1.1.1 │ ├─┬ body-parser@1.19.0 │ │ ├── bytes@3.1.0 │ │ ├── content-type@1.0.4 deduped │ │ ├── debug@2.6.9 deduped │ │ ├── depd@1.1.2 deduped │ │ ├─┬ http-errors@1.7.2 │ │ │ ├── depd@1.1.2 deduped │ │ │ ├── inherits@2.0.3 │ │ │ ├── setprototypeof@1.1.1 deduped │ │ │ ├── statuses@1.5.0 deduped │ │ │ └── toidentifier@1.0.0 │ │ ├─┬ iconv-lite@0.4.24 │ │ │ └── safer-buffer@2.1.2 │ │ ├── on-finished@2.3.0 deduped │ │ ├── qs@6.7.0 deduped │ │ ├─┬ raw-body@2.4.0 │ │ │ ├── bytes@3.1.0 deduped │ │ │ ├── http-errors@1.7.2 deduped │ │ │ ├── iconv-lite@0.4.24 deduped │ │ │ └── unpipe@1.0.0 deduped │ │ └── type-is@1.6.18 deduped │ ├─┬ content-disposition@0.5.3 │ │ └── safe-buffer@5.1.2 deduped │ ├── content-type@1.0.4 │ ├── cookie@0.4.0 │ ├── cookie-signature@1.0.6 │ ├─┬ debug@2.6.9 │ │ └── ms@2.0.0 │ ├── depd@1.1.2 │ ├── encodeurl@1.0.2 │ ├── escape-html@1.0.3 │ ├── etag@1.8.1 │ ├─┬ finalhandler@1.1.2 │ │ ├── debug@2.6.9 deduped │ │ ├── encodeurl@1.0.2 deduped │ │ ├── escape-html@1.0.3 deduped │ │ ├── on-finished@2.3.0 deduped │ │ ├── parseurl@1.3.3 deduped │ │ ├── statuses@1.5.0 deduped │ │ └── unpipe@1.0.0 │ ├── fresh@0.5.2 │ ├── merge-descriptors@1.0.1 │ ├── methods@1.1.2 │ ├─┬ on-finished@2.3.0 │ │ └── ee-first@1.1.1 │ ├── parseurl@1.3.3 │ ├── path-to-regexp@0.1.7 │ ├─┬ proxy-addr@2.0.6 │ │ ├── forwarded@0.1.2 │ │ └── ipaddr.js@1.9.1 │ ├── qs@6.7.0 │ ├── range-parser@1.2.1 │ ├── safe-buffer@5.1.2 │ ├─┬ send@0.17.1 │ │ ├── debug@2.6.9 deduped │ │ ├── depd@1.1.2 deduped │ │ ├── destroy@1.0.4 │ │ ├── encodeurl@1.0.2 deduped │ │ ├── escape-html@1.0.3 deduped │ │ ├── etag@1.8.1 deduped │ │ ├── fresh@0.5.2 deduped │ │ ├── http-errors@1.7.2 deduped │ │ ├── mime@1.6.0 │ │ ├── ms@2.1.1 │ │ ├── on-finished@2.3.0 deduped │ │ ├── range-parser@1.2.1 deduped │ │ └── statuses@1.5.0 deduped │ ├─┬ serve-static@1.14.1 │ │ ├── encodeurl@1.0.2 deduped │ │ ├── escape-html@1.0.3 deduped │ │ ├── parseurl@1.3.3 deduped │ │ └── send@0.17.1 deduped │ ├── setprototypeof@1.1.1 │ ├── statuses@1.5.0 │ ├─┬ type-is@1.6.18 │ │ ├── media-typer@0.3.0 │ │ └── mime-types@2.1.27 deduped │ ├── utils-merge@1.0.1 │ └── vary@1.1.2 └─┬ express-generator@4.16.1 ├── commander@2.15.1 ├── ejs@2.6.1 ├─┬ minimatch@3.0.4 │ └─┬ brace-expansion@1.1.11 │ ├── balanced-match@1.0.0 │ └── concat-map@0.0.1 ├─┬ mkdirp@0.5.1 │ └── minimist@0.0.8 └── sorted-object@2.0.1 |
You can also create a secure node site (HTTPS) with the following additional steps. They include creating a self-signed secure public and private key. This creates the public key:
openssl genrsa -out key.pem |
The openssl command will generate a private key key.pem file. It generates something like the following text message to console:
Generating RSA private key, 2048 bit long modulus (2 primes) ...........+++++ .............................................+++++ e is 65537 (0x010001) |
Next, you need to generate a self-signed certificate. You do this in two steps.
- Create a Distinguished Name (
DN) file. Thecsr.pemfile is theDNfile. You need it to create a self-signed certificate:openssl req -new -key key.pem -out csr.pem
It will prompt you for values, like the following:
You are about to be asked to enter information that will be incorporated
into your certificate request.
What you are about to enter is what is called a Distinguished Name or a DN.
There are quite a few fields but you can leave some blank
For some fields there will be a default value,
If you enter '.', the field will be left blank.
-----
Country Name (2 letter code) [XX]:
State or Province Name (full name) []:MiddleEarth
Locality Name (eg, city) [Default City]:Rivendell
Organization Name (eg, company) [Default Company Ltd]:Fellowship
Organizational Unit Name (eg, section) []:Self
Common Name (eg, your name or your server's hostname) []:Localhost
Email Address []:bilbo@loth.org

Please enter the following 'extra' attributes
to be sent with your certificate request
A challenge password []:friend
An optional company name []:Bilbo
- Use the DN file to create your secure certificate. The following
opensslcommand creates the certificate file by using your private keykey.pemandDNcsr.pemfiles.openssl x509 -req -days 9999 -in csr.pem -signkey key.pem -out cert.pem
It should generate a Secure certificate cert.pem file and return something like the following to the console.
Signature ok
subject=C = XX, ST = MiddleEarth, L = Rivendell, O = Fellowship, OU = Self, CN = Localhost, emailAddress = bilbo@loth.org
Getting Private key
You can put these private key (key.pem) and certificate (cert.pem) files in an ssl subdirectory of the directory where you put the JavaScript program. The following creates a secure server page with the following code.
/* Construct a secure web server. */ const https = require('https') const fs = require('fs') const port = process.env.PORT || 3000 const options = { key: fs.readFileSync('ssl/key.pem'), cert: fs.readFileSync('ssl/cert.pem') } const server = https.createServer((options, res) => { res.writeHead(200, { 'Content-Type': 'text/plain' }) res.end('Hello world!') }) server.listen(port, () => console.log(`server started on port ${port}); ` + 'press Ctrl-C to terminate...')) |
If you try launch your browser using the localhost instead of a DNS or file resolved network name on the designated port, it will raise the following security error:
This site can't be reached https's server IP address could not be found. DNS_PROBE_FINISHED_NXDOMAIN |
An alternate approach to writing a secure server includes using Express.js library. The syntax changes somewhat and you include two new libraries, as shown below:
/* Construct a secure web server. */ const https = require('https') const express = require('express') const fs = require('fs') const app = express() const port = process.env.PORT || 3001 const options = { key: fs.readFileSync('ssl/key.pem'), cert: fs.readFileSync('ssl/cert.pem') } https.createServer(options, app).listen(port, () => { console.log(`Express started in ${app.get('env')} mode ` + `on port + ${port}.`) }) |
This will fail with the following error message if you’re running it with a global installation unless you set the $NODE_PATH environment variable correctly. Without setting the variable you may get the following error message:
internal/modules/cjs/loader.js:638 throw err; ^ Error: Cannot find module 'express' at Function.Module._resolveFilename (internal/modules/cjs/loader.js:636:15) at Function.Module._load (internal/modules/cjs/loader.js:562:25) at Module.require (internal/modules/cjs/loader.js:692:17) at require (internal/modules/cjs/helpers.js:25:18) at Object.<anonymous> (/var/www/html/node/helloworldsecure.js:3:17) at Module._compile (internal/modules/cjs/loader.js:778:30) at Object.Module._extensions..js (internal/modules/cjs/loader.js:789:10) at Module.load (internal/modules/cjs/loader.js:653:32) at tryModuleLoad (internal/modules/cjs/loader.js:593:12) at Function.Module._load (internal/modules/cjs/loader.js:585:3) |
Sometimes they’ll advise you to do an individual user installation of Express.js to get past this error but that’s not necessary. You just need to set the $NODE_PATH environment variable as follows:
export NODE_PATH=/usr/local/lib/node_modules |
This will enable the JavaScript to work without error and without a specific user installation. Assuming you name either of these programs as helloworldsecure.js, you run them with the following command:
node helloworldsecure.js |
You can terminate the program with a Ctrl+c or if use the kill -15 pid command if you started it as a background process. You can find the process ID (pid) with the jobs command.
As always, I hope this is helpful to those starting out with this cool technology stack.
Recursive bash function
While teaching a class on the Linux Command-Line (CLI), the book gave an example of generating a list of random US telephone numbers into a file. The book uses the RANDOM function to generate segments of the telephone number, and then the grep command to identify malformed telephone numbers.
My students wanted me to explain why the numbers were malformed. I had to explain that the RANDOM function returns a random number between 1 and 99,999. The RANDOM function may return a 1 to 5 digit random number, which means you may get a 1-digit or 2-digit number when you request a 3-digit random number or a 1- to 3-digit number when you request a 4-digit random number.
The author’s example is:
for i in {1..10}; do echo "(${RANDOM:0:3}) ${RANDOM:0:3}-${RANDOM:0:4}" >> list.txt done |
They asked if there was a way to write a shell script that guaranteed random but well-formed US telephone numbers. I said yes, however, you need to write a recursive bash shell function and assign the result to a global variable set in the shell script.
They seemed doubtful, so I wrote it for them. Here’s the script if you’re interested in learning more about bash shell scripting. While I implemented it with an bash array, that’s optional.
#!/usr/bin/bash # ============================================================ # Name: telephone.sh # Author: Michael McLaughlin # Date: 05-May-2020 # ------------------------------------------------------------ # Purpose: Demonstrate how to generate random telehpone # numbers. The RANDOM function returns a random # number between 1 and 99999; and while you can # easily shave off a extra digit guarnteeing a # value above 100 is impossible without logic. # ============================================================ targetLength() { # Declare variable in function-level scope. randomString='' # Check the number of parameters to process. if [[ ${#} = 2 ]]; then # Assign value to function-level and local variables. randomString=${1} formatLength=${2} # Get the length of the telephone number as integer. length=`echo -n ${randomString} | wc -c` # Calculate any shortfall. short=$((${formatLength}-${length})) # Check if the telephone number is too short. if [[ ${short} > 0 ]]; then randomString=`echo "${randomString}${RANDOM:0:${short}}"` fi fi # Check if the combination of random numbers equals the target length # and assign the value to the global variable, or repeat processing # by making a recursive function call. if [[ `echo -n ${randomString} | wc -c` = ${formatLength} ]]; then result=${randomString} else targetLength ${randomString} ${formatLength} fi } # Declare global variable to support targetLength(). result='' # Declare an array of strings. declare -A telephone_parts # Generate one hundred random telephone numbers. for i in {1..100}; do # Create random three digit area code. targetLength ${RANDOM:0:3} 3 telephone_parts[1]=${result} # Create random three digit prefix code. targetLength ${RANDOM:0:3} 3 telephone_parts[2]=${result} # Create random four digit number code. targetLength ${RANDOM:0:4} 4 telephone_parts[3]=${result} # Print the telephone numbers. echo "[${i}] (${telephone_parts[1]}) ${telephone_parts[2]}-${telephone_parts[3]}" done |
For reference, a recursive function call isn’t required here. It could be done more effectively with the following while loop:
targetLength() { # Declare variable in function-level scope. randomString='' short=1 # Check the number of parameters to process. if [[ ${#} = 2 ]]; then # Assign value to function-level and local variables. randomString=${1} formatLength=${2} # Check if the telephone number is too short. while [[ ${short} > 0 ]]; do # Get the length of the telephone number as integer. length=`echo -n ${randomString} | wc -c` # Calculate any shortfall. short=$((${formatLength}-${length})) # Assign new value to randomString. randomString=`echo "${randomString}${RANDOM:0:${short}}"` done # Assign randomString to global result variable. result=${randomString} fi } |
As always, I hope this helps those you want to learn or solve a problem.
MySQL Linux to Windows
My students want to transfer their course setup MySQL files from the Linux VM that I provide to Microsoft Windows 10. This post explains how because I found a couple small errors in the Google’d posts they would most likely see.
The first step is required because when I didn’t assign a name or domain to the the Fedora VM, which allows it to run as localhost on any student machine. In tandem, I didn’t assign a static IP address but opted for dynamic IP assignment. That means, the first step to securely copy the files requires you to find the assigned IP address. You can do that with the following Linux command:
ifconfig -a | grep 'inet[[:blank:]]' | head -1 | cut -c 14-30 |
It would return something like:
192.168.147.198 |
After you have discovered the IP address, you need to download PuTTy from their web site because includes the pscp (PuTTy Secure Copy) utility. I recommend you click on the MSI (Microsoft Installer Package) file, and install it on your Windows machine. As a rule, you should accept the default location, which is C:\Program Files\PuTTy.
While you could alter your system-level %PATH% environment variable after you install the software, I recommend you only include it in the %PATH% within the scope of a Command (cmd) shell. Navigate to your Windows Start and enter cmd in the search field. It should launch the Command Prompt terminal, which is a terminal emulator.
In the terminal editor, type the following case sensitive command to add the PuTTy directory to your path (yes, it’s case sensitive):
SET PATH=%PATH%;%ProgramFiles%\PuTTy |
Now, you can securely copy the files and directory structure from Linux to Windows with the following command (where you replace the traditional server name with the dynamically assigned IP address). You should also be in the target directory where you want the files and directories copied:
C:\Data\cit225>pscp -r student@192.168.147.198:/home/student/Data/cit225/mysql . |
After entering the password for the student on the Linux VM, you should see the following copy over:
Raiders2.png | 99 kB | 99.5 kB/s | ETA: 00:00:00 | 100% LordOfTheRings3.png | 119 kB | 119.8 kB/s | ETA: 00:00:00 | 100% HarryPotter4.png | 103 kB | 103.9 kB/s | ETA: 00:00:00 | 100% Raiders1.png | 92 kB | 92.4 kB/s | ETA: 00:00:00 | 100% Raiders3.png | 123 kB | 123.9 kB/s | ETA: 00:00:00 | 100% LordOfTheRings2.png | 111 kB | 111.7 kB/s | ETA: 00:00:00 | 100% LordOfTheRings1.png | 103 kB | 104.0 kB/s | ETA: 00:00:00 | 100% HarryPotter2.png | 118 kB | 118.7 kB/s | ETA: 00:00:00 | 100% HarryPotter7.png | 150 kB | 150.2 kB/s | ETA: 00:00:00 | 100% HarryPotter3.png | 106 kB | 106.1 kB/s | ETA: 00:00:00 | 100% HarryPotter5.png | 82 kB | 82.5 kB/s | ETA: 00:00:00 | 100% HarryPotter6.png | 129 kB | 129.9 kB/s | ETA: 00:00:00 | 100% HarryPotter1.png | 118 kB | 118.8 kB/s | ETA: 00:00:00 | 100% HarryPotter8.png | 150 kB | 150.9 kB/s | ETA: 00:00:00 | 100% HarryPotter8.txt | 8 kB | 8.5 kB/s | ETA: 00:00:00 | 100% HarryPotter3.txt | 5 kB | 5.8 kB/s | ETA: 00:00:00 | 100% HarryPotter5.txt | 7 kB | 7.9 kB/s | ETA: 00:00:00 | 100% HarryPotter1.txt | 6 kB | 6.6 kB/s | ETA: 00:00:00 | 100% HarryPotter2.txt | 7 kB | 7.8 kB/s | ETA: 00:00:00 | 100% Raiders3.txt | 5 kB | 5.6 kB/s | ETA: 00:00:00 | 100% HarryPotter4.txt | 7 kB | 7.5 kB/s | ETA: 00:00:00 | 100% HarryPotter7.txt | 5 kB | 5.4 kB/s | ETA: 00:00:00 | 100% HarryPotter6.txt | 7 kB | 7.4 kB/s | ETA: 00:00:00 | 100% LOTRFellowship.txt | 4 kB | 5.0 kB/s | ETA: 00:00:00 | 100% apply_store_base.sql | 1 kB | 1.6 kB/s | ETA: 00:00:00 | 100% query_membership.sql | 0 kB | 0.3 kB/s | ETA: 00:00:00 | 100% apply_mysql_lab1.sql | 1 kB | 1.9 kB/s | ETA: 00:00:00 | 100% configure_mysql_web.sql | 37 kB | 37.1 kB/s | ETA: 00:00:00 | 100% seed_mysql_store_ri2.sql | 58 kB | 58.5 kB/s | ETA: 00:00:00 | 100% cleanup_mysql_store.sql | 5 kB | 5.4 kB/s | ETA: 00:00:00 | 100% create_mysql_store_ri2.sq | 21 kB | 21.1 kB/s | ETA: 00:00:00 | 100% |
My students will need to repeat this step to transfer all of the sample PHP files that demonstrate web application patterns. They also need to inspect individual files to ensure any path referencing commands are manually converted to their new Windows equivalent.
They can move the physical files as the root superuser with the following pscp command provide you haven’t stored the files somewhere other than the default location:
C:\Data\temp>pscp -r root@192.168.147.198:/var/lib/mysql . |
As always, I hope this helps those trying to sort things out.
Linux mongod Service
The installation of MongoDB doesn’t do everything for you. In fact, the first time you start the mongod service, like this as the root user or sudoer user with the command:
service mongod start |
A sudoer user will be prompted for their password, like

A typical MongoDB instance raises the following errors:
Redirecting to /bin/systemctl start mongod.service [student@localhost cit425]$ mongo MongoDB shell version v3.4.11 connecting to: mongodb://127.0.0.1:27017 MongoDB server version: 3.4.11 Server has startup warnings: 2018-10-29T10:51:57.515-0600 I STORAGE [initandlisten] 2018-10-29T10:51:57.515-0600 I STORAGE [initandlisten] ** WARNING: Using the XFS filesystem is strongly recommended with the WiredTiger storage engine 2018-10-29T10:51:57.515-0600 I STORAGE [initandlisten] ** See http://dochub.mongodb.org/core/prodnotes-filesystem 2018-10-29T10:51:58.264-0600 I CONTROL [initandlisten] 2018-10-29T10:51:58.264-0600 I CONTROL [initandlisten] ** WARNING: Access control is not enabled for the database. 2018-10-29T10:51:58.264-0600 I CONTROL [initandlisten] ** Read and write access to data and configuration is unrestricted. 2018-10-29T10:51:58.264-0600 I CONTROL [initandlisten] 2018-10-29T10:51:58.265-0600 I CONTROL [initandlisten] 2018-10-29T10:51:58.265-0600 I CONTROL [initandlisten] ** WARNING: soft rlimits too low. rlimits set to 15580 processes, 64000 files. Number of processes should be at least 32000 : 0.5 times number of files. |
You can fix this by following the MongoDB instructions for the Unix ulimit Settings, which will tell you to create a mongod file in the /etc/systemd/system directory. You should create this file as the root superuser. This is what you should put in the file:
[Unit] Description=MongoDB Documentation=man:mongo [Service] # Other directives omitted # (file size) LimitFSIZE=infinity # (cpu time) LimitCPU=infinity # (virtual memory size) LimitAS=infinity # (locked-in-memory size) LimitMEMLOCK=infinity # (open files) LimitNOFILE=64000 # (processes/threads) LimitNPROC=64000 |
Then, you should be able to restart the mongod service without any warnings with this command:
service mongod restart |
As always, I hope this helps somebody.
