Archive for the ‘MySQL Techniques’ tag
Ubuntu, Perl & MySQL
Configuring Perl to work with MySQL is straight forward. While Perl is installed generally, you may need to install the libdbd-mysql-perl library.
You install it as a sudoer user with this syntax:
sudo apt install -y libdbd-mysql-perl |
Display detailed console log →
Reading package lists... Done Building dependency tree... Done Reading state information... Done The following additional packages will be installed: libmysqlclient21 The following NEW packages will be installed: libdbd-mysql-perl libmysqlclient21 0 upgraded, 2 newly installed, 0 to remove and 12 not upgraded. Need to get 1,389 kB of archives. After this operation, 7,143 kB of additional disk space will be used. Get:1 http://us.archive.ubuntu.com/ubuntu jammy-updates/main amd64 libmysqlclient21 amd64 8.0.35-0ubuntu0.22.04.1 [1,301 kB] Get:2 http://us.archive.ubuntu.com/ubuntu jammy-updates/universe amd64 libdbd-mysql-perl amd64 4.050-5ubuntu0.22.04.1 [87.6 kB] Fetched 1,389 kB in 1s (1,213 kB/s) Selecting previously unselected package libmysqlclient21:amd64. (Reading database ... 235085 files and directories currently installed.) Preparing to unpack .../libmysqlclient21_8.0.35-0ubuntu0.22.04.1_amd64.deb ... Unpacking libmysqlclient21:amd64 (8.0.35-0ubuntu0.22.04.1) ... Selecting previously unselected package libdbd-mysql-perl:amd64. Preparing to unpack .../libdbd-mysql-perl_4.050-5ubuntu0.22.04.1_amd64.deb ... Unpacking libdbd-mysql-perl:amd64 (4.050-5ubuntu0.22.04.1) ... Setting up libmysqlclient21:amd64 (8.0.35-0ubuntu0.22.04.1) ... Setting up libdbd-mysql-perl:amd64 (4.050-5ubuntu0.22.04.1) ... Processing triggers for man-db (2.10.2-1) ... Processing triggers for libc-bin (2.35-0ubuntu3.5) ... |
You can find the Perl version with the following version.pl program:
1 2 3 4 | #!/usr/bin/perl -w # Print the version. print "Perl ".$]."\n"; |
The first line lets you call the program without prefacing the program name with perl. The first line invokes a subshell of perl by default. You just need to ensure the file has read and execute privileges to run by using the
chmod 755 version.pl |
You call it with this:
./version.pl |
It prints:
Perl 5.034000 |
The following static_query.pl Perl program uses the Perl DBI library to query and return a data set based on a static query.
1 2 3 4 5 6 7 8 9 10 11 12 13 14 15 16 17 18 19 20 21 22 23 24 25 26 27 28 29 30 31 32 33 34 35 36 37 | #!/usr/bin/perl -w # Use the DBI library. use DBI; use strict; use warnings; # Create a connection. my $dbh = DBI->connect("DBI:mysql:database=studentdb;host=localhost:3306" ,"student","student",{'RaiseError' => 1}); # Create SQL statement. my $sql = "SELECT i.item_title , ra.rating , cl.common_lookup_meaning FROM item i INNER JOIN common_lookup cl ON i.item_type = cl.common_lookup_id INNER JOIN rating_agency ra ON i.item_rating_id = ra.rating_agency_id WHERE i.item_title LIKE 'Harry%' AND cl.common_lookup_type = 'BLU-RAY'"; # Prepare SQL statement. my $sth = $dbh->prepare($sql); # Execute statement and read result set. $sth->execute() or die $DBI::errstr; # Read through returned rows, assign elements explicitly to match SELECT-list. while (my @row = $sth->fetchrow_array()) { my $item_title = $row[0]; my $rating = $row[1]; my $lookup_meaning = $row[2]; print "$item_title, $rating, $lookup_meaning\n"; } # Close resources. $sth->finish(); |
It returns the following rows from the sample database:
Harry Potter and the Sorcerer's Stone, PG, Blu-ray Harry Potter and the Chamber of Secrets, PG, Blu-ray Harry Potter and the Prisoner of Azkaban, PG, Blu-ray Harry Potter and the Goblet of Fire, PG-13, Blu-ray |
The following dynamic_query.pl Perl program uses the Perl DBI library to prepare a query, bind a local variable into the query, and return a data set based on a dynamic query.
1 2 3 4 5 6 7 8 9 10 11 12 13 14 15 16 17 18 19 20 21 22 23 24 25 26 27 28 29 30 31 32 33 34 35 36 37 38 39 40 41 42 43 | #!/usr/bin/perl -w # Use the DBI library. use DBI; use strict; use warnings; # Mimic a function parameter by using a local variable. my $item_title_in = 'Star'; # Create a connection. my $dbh = DBI->connect("DBI:mysql:database=studentdb;host=localhost:3306" ,"student","student",{'RaiseError' => 1}); # Create SQL statement. my $sql = "SELECT i.item_title , ra.rating , cl.common_lookup_meaning FROM item i INNER JOIN common_lookup cl ON i.item_type = cl.common_lookup_id INNER JOIN rating_agency ra ON i.item_rating_id = ra.rating_agency_id WHERE i.item_title LIKE CONCAT(?,'%') AND cl.common_lookup_type = 'BLU-RAY'"; # Prepare SQL statement. my $sth = $dbh->prepare($sql); # Bind a variable to first parameter in the query string. $sth->bind_param(1, $item_title_in); # Execute statement and read result set. $sth->execute() or die $DBI::errstr; # Read through returned rows, assign elements explicitly to match SELECT-list. while (my @row = $sth->fetchrow_array()) { my $item_title = $row[0]; my $rating = $row[1]; my $lookup_meaning = $row[2]; print "$item_title, $rating, $lookup_meaning\n"; } # Close resources. $sth->finish(); |
It returns the following rows from the sample database:
Star Wars II, PG, Blu-ray |
You can replace lines 34 through 40 with the following to read any number of columns into a comma-delimited row return:
34 35 36 37 38 39 40 41 42 43 44 45 46 47 48 | # Read through returned rows, assign elements explicitly to match SELECT-list. while (my @row = $sth->fetchrow_array()) { # Read through a dynamic column list for column separated display. my $result = ''; foreach(@row) { if (length($result) == 0) { $result = $_; } else { $result .= ", " . $_; } } # Print comma-separted values by row. print $result . "\n" } |
It returns the following rows from the sample database:
Star Wars II, PG, Blu-ray |
As always, I hope this helps the reader solve a problem.
AlmaLinux+Java+MySQL
AlmaLinux generally has Java installed. You can check whether java is installed with this command:
which -a java |
It should return:
/usr/bin/java |
Then, you can check the Java version with this command:
java -version |
For AlmaLinux 9, it should return:
openjdk version "11.0.17" 2022-10-18 LTS OpenJDK Runtime Environment (Red_Hat-11.0.17.0.8-2.el9_0) (build 11.0.17+8-LTS) OpenJDK 64-Bit Server VM (Red_Hat-11.0.17.0.8-2.el9_0) (build 11.0.17+8-LTS, mixed mode, sharing) |
Next, you check whether javac is installed. You can use the which command to determine whether it is installed. Generally, its not installed and you use this command to
sudo dnf search jdk | egrep -- '-17' |
It should return:
Last metadata expiration check: 0:11:17 ago on Mon 19 Dec 2022 11:32:48 PM EST. java-17-openjdk.x86_64 : OpenJDK 17 Runtime Environment java-17-openjdk-demo.x86_64 : OpenJDK 17 Demos java-17-openjdk-devel.x86_64 : OpenJDK 17 Development Environment java-17-openjdk-headless.x86_64 : OpenJDK 17 Headless Runtime Environment java-17-openjdk-javadoc.x86_64 : OpenJDK 17 API documentation java-17-openjdk-javadoc-zip.x86_64 : OpenJDK 17 API documentation compressed in a single archive java-17-openjdk-jmods.x86_64 : JMods for OpenJDK 17 java-17-openjdk-src.x86_64 : OpenJDK 17 Source Bundle java-17-openjdk-static-libs.x86_64 : OpenJDK 17 libraries for static linking |
Now, you can install the Java JDK with the following dnf command:
sudo dnf install java-17-openjdk java-17-openjdk-devel |
The log file for this is:
Display detailed console log →
Last metadata expiration check: 0:28:26 ago on Mon 19 Dec 2022 11:32:48 PM EST. Dependencies resolved. ================================================================================ Package Arch Version Repository Size ================================================================================ Installing: java-17-openjdk x86_64 1:17.0.5.0.8-2.el9_0 appstream 237 k java-17-openjdk-devel x86_64 1:17.0.5.0.8-2.el9_0 appstream 4.7 M Installing dependencies: java-17-openjdk-headless x86_64 1:17.0.5.0.8-2.el9_0 appstream 40 M ttmkfdir x86_64 3.0.9-65.el9 appstream 52 k xorg-x11-fonts-Type1 noarch 7.5-33.el9 appstream 499 k Transaction Summary ================================================================================ Install 5 Packages Total download size: 45 M Installed size: 199 M Is this ok [y/N]: y Downloading Packages: (1/5): java-17-openjdk-17.0.5.0.8-2.el9_0.x86_6 342 kB/s | 237 kB 00:00 (2/5): ttmkfdir-3.0.9-65.el9.x86_64.rpm 520 kB/s | 52 kB 00:00 (3/5): xorg-x11-fonts-Type1-7.5-33.el9.noarch.r 849 kB/s | 499 kB 00:00 (4/5): java-17-openjdk-devel-17.0.5.0.8-2.el9_0 1.7 MB/s | 4.7 MB 00:02 (5/5): java-17-openjdk-headless-17.0.5.0.8-2.el 6.1 MB/s | 40 MB 00:06 -------------------------------------------------------------------------------- Total 6.3 MB/s | 45 MB 00:07 Running transaction check Transaction check succeeded. Running transaction test Transaction test succeeded. Running transaction Regex version mismatch, expected: 10.40 2022-04-14 actual: 10.37 2021-05-26 Regex version mismatch, expected: 10.40 2022-04-14 actual: 10.37 2021-05-26 Running scriptlet: java-17-openjdk-headless-1:17.0.5.0.8-2.el9_0.x86_64 1/1 Preparing : 1/1 Installing : java-17-openjdk-headless-1:17.0.5.0.8-2.el9_0.x86_64 1/5 Running scriptlet: java-17-openjdk-headless-1:17.0.5.0.8-2.el9_0.x86_64 1/5 Installing : ttmkfdir-3.0.9-65.el9.x86_64 2/5 Installing : xorg-x11-fonts-Type1-7.5-33.el9.noarch 3/5 Running scriptlet: xorg-x11-fonts-Type1-7.5-33.el9.noarch 3/5 Installing : java-17-openjdk-1:17.0.5.0.8-2.el9_0.x86_64 4/5 Running scriptlet: java-17-openjdk-1:17.0.5.0.8-2.el9_0.x86_64 4/5 Installing : java-17-openjdk-devel-1:17.0.5.0.8-2.el9_0.x86_64 5/5 Running scriptlet: java-17-openjdk-devel-1:17.0.5.0.8-2.el9_0.x86_64 5/5 Running scriptlet: java-17-openjdk-headless-1:17.0.5.0.8-2.el9_0.x86_64 5/5 Running scriptlet: java-17-openjdk-1:17.0.5.0.8-2.el9_0.x86_64 5/5 Running scriptlet: java-17-openjdk-devel-1:17.0.5.0.8-2.el9_0.x86_64 5/5 Verifying : java-17-openjdk-1:17.0.5.0.8-2.el9_0.x86_64 1/5 Verifying : java-17-openjdk-devel-1:17.0.5.0.8-2.el9_0.x86_64 2/5 Verifying : java-17-openjdk-headless-1:17.0.5.0.8-2.el9_0.x86_64 3/5 Verifying : ttmkfdir-3.0.9-65.el9.x86_64 4/5 Verifying : xorg-x11-fonts-Type1-7.5-33.el9.noarch 5/5 Installed: java-17-openjdk-1:17.0.5.0.8-2.el9_0.x86_64 java-17-openjdk-devel-1:17.0.5.0.8-2.el9_0.x86_64 java-17-openjdk-headless-1:17.0.5.0.8-2.el9_0.x86_64 ttmkfdir-3.0.9-65.el9.x86_64 xorg-x11-fonts-Type1-7.5-33.el9.noarch Complete! |
After installing javac, you can verify it with the which command, and check the version with the javac utility.
which -a javac |
It should return:
/usr/bin/javac |
Then, you can check the Java version with this command:
java -version |
For AlmaLinux 9, it should return:
javac 17.0.5 |
Now, you need to download and install the jdk with the dnf utility. You download the jdk package with the wget utility.
wget https://download.oracle.com/java/17/latest/jdk-17_linux-x64_bin.rpm |
It will generate the following console output:
--2022-12-20 00:12:34-- https://download.oracle.com/java/17/latest/jdk-17_linux-x64_bin.rpm Resolving download.oracle.com (download.oracle.com)... 23.192.208.88 Connecting to download.oracle.com (download.oracle.com)|23.192.208.88|:443... connected. HTTP request sent, awaiting response... 200 OK Length: 163101336 (156M) [application/x-redhat-package-manager] Saving to: ‘jdk-17_linux-x64_bin.rpm’ jdk-17_linux-x64_bi 100%[===================>] 155.54M 11.1MB/s in 17s 2022-12-20 00:12:51 (9.01 MB/s) - ‘jdk-17_linux-x64_bin.rpm’ saved [163101336/163101336] |
You install the jdk package with the dnf utility.
sudo rpm -Uvh jdk-17_linux-x64_bin.rpm |
The log file for this is:
Display detailed console log →
warning: jdk-17_linux-x64_bin.rpm: Header V3 RSA/SHA256 Signature, key ID ec551f03: NOKEY Verifying... ################################# [100%] Regex version mismatch, expected: 10.40 2022-04-14 actual: 10.37 2021-05-26 Regex version mismatch, expected: 10.40 2022-04-14 actual: 10.37 2021-05-26 Preparing... ################################# [100%] Updating / installing... 1:jdk-17-2000:17.0.5-ga ################################# [100%] |
After installing everything, you need to set the default Java. You can discover the available Java versions with the following command:
sudo alternatives --config java |
It should return a list and the ability to select one by using the “Selection” number. I recommend you chose #2.
There are 3 programs which provide 'java'. Selection Command ----------------------------------------------- 1 java-11-openjdk.x86_64 (/usr/lib/jvm/java-11-openjdk-11.0.17.0.8-2.el9_0.x86_64/bin/java) 2 java-17-openjdk.x86_64 (/usr/lib/jvm/java-17-openjdk-17.0.5.0.8-2.el9_0.x86_64/bin/java) *+ 3 /usr/java/jdk-17.0.5/bin/java Enter to keep the current selection[+], or type selection number: 2 |
Then, you can check the Java version with this command:
java -version |
Now, it should return:
openjdk version "17.0.5" 2022-10-18 LTS OpenJDK Runtime Environment (Red_Hat-17.0.5.0.8-2.el9_0) (build 17.0.5+8-LTS) OpenJDK 64-Bit Server VM (Red_Hat-17.0.5.0.8-2.el9_0) (build 17.0.5+8-LTS, mixed mode, sharing) |
You should define the $JAVA_HOME environment variable in the /etc/profile file. Sometimes, it is also appropriate to include it in your .bashrc file.
export set JAVA_HOME="/usr/lib/jvm/java-17-openjdk-17.0.5.0.8-2.el9_0.x86_64/bin" |
You should also add it to your $PATH variable in your .bashrc file, like:
export set PATH=$PATH:$JAVA_HOME |
Now, let’s write the basic “Hello World” program in Java:
// Define the Java program. public class HelloWorld { public static void main(String[] args) { System.out.println("Hello World!"); } } |
Compile it with:
javac HelloWorld.java |
Run it with the java command:
java HelloWorld |
It prints:
Hello World! |
Let’s download the MySQL/J Connector from the MySQL website, where we con select the operating system and its version, as shown in the image.
![]()
After you download the mysql-connector-j RPM package, you can install it with the following dnf command:
sudo dnf install -y mysql-connector-j-8.0.31-1.el9.noarch.rpm |
The log file for this is:
Display detailed console log →
Last metadata expiration check: 2:02:56 ago on Mon 19 Dec 2022 11:32:48 PM EST. Dependencies resolved. ================================================================================ Package Arch Version Repository Size ================================================================================ Installing: mysql-connector-j noarch 1:8.0.31-1.el9 @commandline 2.3 M Transaction Summary ================================================================================ Install 1 Package Total size: 2.3 M Installed size: 2.7 M Downloading Packages: Running transaction check Transaction check succeeded. Running transaction test Transaction test succeeded. Running transaction Regex version mismatch, expected: 10.40 2022-04-14 actual: 10.37 2021-05-26 Regex version mismatch, expected: 10.40 2022-04-14 actual: 10.37 2021-05-26 Preparing : 1/1 Installing : mysql-connector-j-1:8.0.31-1.el9.noarch 1/1 Verifying : mysql-connector-j-1:8.0.31-1.el9.noarch 1/1 Installed: mysql-connector-j-1:8.0.31-1.el9.noarch Complete! |
You should add the $CLASSPATH to your .bashrc file. Add the following line to your .bashrc file and resource your .bashrc file to test the JDBC driver.
export set CLASSPATH="/usr/share/java/mysql-connector-j.jar:." |
Let’s write a slightly larger Java program that tests connectivity to the MySQL database, like:
// Import classes. import java.sql.*; /* You can't include the following on Linux without raising an exception. */ // import com.mysql.jdbc.Driver; public class MySQLConnector { public MySQLConnector() { /* Declare variables that require explicit assignments because they're addressed in the finally block. */ Connection conn = null; Statement stmt = null; ResultSet rset = null; /* Declare other variables. */ String url; String username = "student"; String password = "student"; String database = "studentdb"; String hostname = "localhost"; String port = "3306"; String sql; /* Attempt a connection. */ try { // Set URL. url = "jdbc:mysql://" + hostname + ":" + port + "/" + database; // Create instance of MySQLDriver. Class.forName ("com.mysql.cj.jdbc.Driver").newInstance(); conn = DriverManager.getConnection (url, username, password); // Query the version of the database. sql = "SELECT version()"; stmt = conn.createStatement(); rset = stmt.executeQuery(sql); System.out.println ("Database connection established"); // Read row returns for one column. while (rset.next()) { System.out.println("MySQLDriver Version [" + rset.getString(1) + "]"); } } catch (SQLException e) { System.err.println ("Cannot connect to database server:"); System.out.println(e.getMessage()); } catch (ClassNotFoundException e) { System.err.println ("Cannot find MySQL driver class:"); System.out.println(e.getMessage()); } catch (InstantiationException e) { System.err.println ("Cannot instantiate class:"); System.out.println(e.getMessage()); } catch (IllegalAccessException e) { System.err.println ("Illegal access exception:"); System.out.println(e.getMessage()); } finally { if (conn != null) { try { rset.close(); stmt.close(); conn.close(); System.out.println ("Database connection terminated"); } catch (Exception e) { /* ignore close errors */ } } } } /* Unit test. */ public static void main(String args[]) { new MySQLDriver(); } } |
Just a note, there’s a deprecated behavior introduced in MySQL 8.0.24, which produces the following error message when compiled looking for deprecation:
javac -Xlint:deprecation MySQLDriver.java |
It produces the following error message, which I hope to sort and update later in the week:
MySQLDriver.java:30: warning: [deprecation] newInstance() in Class has been deprecated
      Class.forName ("com.mysql.cj.jdbc.Driver").newInstance();
                                                ^
  where T is a type-variable:
    T extends Object declared in class Class
1 warning |
The code does compile because the deprecation is only a warning. When you run the program, like:
java MySQLDriver |
It returns, confirming a connection to the MySQL database:
Database connection established MySQLDriver Version [8.0.30] Database connection terminated |
As always, I hope this helps those trying to sort out new behaviors.
AlmaLinux MySQL+Perl
A quick primer on Perl programs connecting to the MySQL database. It’s another set of coding examples for the AlmaLinux instance that I’m building for students. This one demonstrates basic Perl programs, connecting to MySQL, returning data sets by reference and position, dynamic queries, and input parameters to dynamic queries.
- Naturally, a hello.pl is a great place to start:
#!/usr/bin/perl

# Hello World program.
print "Hello World!\n";
After setting the permissions to -rwxr-xr-x. with this command:
chmod 755 hello.pl
You call it like this from the Command-Line Interface (CLI):
./hello.pl
It prints:
Hello World! - Next, a connect.pl program lets us test the Perl::DBI connection to the MySQL database.
#!/usr/bin/perl

# Import libraries.
use strict;
use warnings;
use v5.10;     # for say() function
use DBI;

# Print with say() function message.
say "Perl MySQL Connect Attempt.";

# MySQL data source name should have a valid database as the
# third argument; this uses the sakila demo database.
my $dsn = "DBI:mysql:sakila";

# Local variables to build the connection string.
my $username = "student";
my $password = "student";

# Set arguments for MySQL database error management.
my %attr = ( PrintError=>0,  # turn off error reporting via warn()
             RaiseError=>1);   # turn on error reporting via die()

# Create connction with a data source name, user name and password.
my $dbh  = DBI->connect($dsn,$username,$password, \%attr);

# Print with say() function valid connection message.
say "Connected to the MySQL database.";
After setting the permissions to -rwxr-xr-x. you call it with this CLI command:
./connect.pl
It prints:
Perl MySQL Connect Attempt.
Connected to the MySQL database.
- After connecting to the database lets query a couple columns by reference notation in a static.pl program. This one just returns the result of the MySQL version() and database() functions.
#!/usr/bin/perl

# Import libraries.
use strict;
use warnings;
use v5.10;     # for say() function
use DBI;

# Print with say() function message.
say "Perl MySQL Connect Attempt.";

# MySQL data source name must have a valid database as the
# third argument; this uses the sakila demo database.
my $dsn = "DBI:mysql:sakila";

# Local variables to build the connection string.
my $username = "student";
my $password = "student";

# Set arguments for MySQL database error management.
my %attr = ( PrintError=>0,  # turn off error reporting via warn()
             RaiseError=>1); # turn on error reporting via die()

# Create connction with a data source name, user name and password.
my $dbh  = DBI->connect($dsn,$username,$password, \%attr);

# Creaet a static SQL statement or query.
my $sth = $dbh->prepare("SELECT version() AS version \
	                 ,      database() AS db_name");

# Execute the static statement.
$sth->execute() or die "Execution failed: $dbh->errstr()";

# Read data and print by reference.
print "----------------------------------------\n";
while (my $ref = $sth->fetchrow_hashref()) {
  print "MySQL Version:  $ref->{'version'}\nMySQL Database: $ref->{'db_name'}\n";
}
print "----------------------------------------\n";

# Close the statement.
$sth->finish;

# Disconnect from database connection.
$dbh->disconnect();

# Print with say() function valid connection message.
say "Connected to the MySQL database.";
After setting the permissions to -rwxr-xr-x. you call it with this CLI command:
./static.pl
It prints:
Perl MySQL Connect Attempt.
----------------------------------------
MySQL Version:  8.0.30
MySQL Database: sakila
----------------------------------------
Connected to the MySQL database.
- After connecting to the database and securing variables by reference notation, lets return the value as an array of rows in a columns.pl program. This one just returns data from the film table of the sakila database. It is a static query because all the values are contained inside the SQL statement.
#!/usr/bin/perl

# Import libraries.
use strict;
use warnings;
use v5.10;     # for say() function
use DBI;

# Print with say() function message.
say "Perl MySQL Connect Attempt.";

# MySQL data source name must have a valid database as the
# third argument; this uses the sakila demo database.
my $dsn = "DBI:mysql:sakila";

# Local variables to build the connection string.
my $username = "student";
my $password = "student";

# Set arguments for MySQL database error management.
my %attr = ( PrintError=>0,  # turn off error reporting via warn()
             RaiseError=>1); # turn on error reporting via die()

# Create connction with a data source name, user name and password.
my $dbh  = DBI->connect($dsn,$username,$password, \%attr);

# Creaet a static SQL statement or query.
my $sth = $dbh->prepare("SELECT title         \
	                 ,      release_year  \
			 ,      rating        \
			 FROM   film          \
			 WHERE  title LIKE 'roc%'");

# Execute the static statement.
$sth->execute() or die "Execution failed: $dbh->errstr()";

# Read data and print by comma-delimited row position.
print "----------------------------------------\n";
while (my @row = $sth->fetchrow_array()) {
  print join(", ", @row), "\n";
}
print "----------------------------------------\n";

# Close the statement.
$sth->finish;

# Disconnect from database connection.
$dbh->disconnect();

# Print with say() function valid connection message.
say "Connected to the MySQL database.";
After setting the permissions to -rwxr-xr-x. you call it with this CLI command:
./columns.pl
It prints:
Perl MySQL Connect Attempt.
----------------------------------------
ROCK INSTINCT, 2006, G
ROCKETEER MOTHER, 2006, PG-13
ROCKY WAR, 2006, PG-13
----------------------------------------
Connected to the MySQL database.
- After connecting to the database and securing variables by reference notation, lets return the value as an array of rows in a dynamic.pl program. This one just returns data from the film table of the sakila database. It is a dynamic query because a string passed to the execute method and that value is bound to a ? placeholder in the SQL statement.
#!/usr/bin/perl

# Import libraries.
use strict;
use warnings;
use v5.10;     # for say() function
use DBI;

# Print with say() function message.
say "Perl MySQL Connect Attempt.";

# MySQL data source name must have a valid database as the
# third argument; this uses the sakila demo database.
my $dsn = "DBI:mysql:sakila";

# Local variables to build the connection string.
my $username = "student";
my $password = "student";

# Set arguments for MySQL database error management.
my %attr = ( PrintError=>0,  # turn off error reporting via warn()
             RaiseError=>1); # turn on error reporting via die()

# Create connction with a data source name, user name and password.
my $dbh  = DBI->connect($dsn,$username,$password, \%attr);

# Creaet a static SQL statement or query.
my $sth = $dbh->prepare("SELECT title         \
	                 ,      release_year  \
			 ,      rating        \
			 FROM   film          \
			 WHERE  title LIKE CONCAT(?,'%')");

# Execute the dynamic statement by providing an input parameter.
$sth->execute('roc') or die "Execution failed: $dbh->errstr()";

# Read data and print by comma-delimited row position.
print "----------------------------------------\n";
while (my @row = $sth->fetchrow_array()) {
  print join(", ", @row), "\n";
}
print "----------------------------------------\n";

# Close the statement.
$sth->finish;

# Disconnect from database connection.
$dbh->disconnect();

# Print with say() function valid connection message.
say "Connected to the MySQL database.";
After setting the permissions to -rwxr-xr-x. you call it with this CLI command:
./dynamic.pl
It prints:
Perl MySQL Connect Attempt.
----------------------------------------
ROCK INSTINCT, 2006, G
ROCKETEER MOTHER, 2006, PG-13
ROCKY WAR, 2006, PG-13
----------------------------------------
Connected to the MySQL database.
- After connecting to the database and securing variables by reference notation, lets return the value as an array of rows in a input.pl program. This one just returns data from the film table of the sakila database. It is a dynamic query because an input parameter is passed to a local variable and the local variable is bound to a ? placeholder in the SQL statement.
#!/usr/bin/perl

# Import libraries.
use strict;
use warnings;
use v5.10;     # for say() function
use DBI;

# Get the index value of the maximum argument in the
# argument.
my $argc = $#ARGV;

# Accept first argument value as parameter.
my $param = $ARGV[$argc];

# Verify variable value assigned.
if (not defined $param) {
  die "Need parameter value.\n";
}

# Print with say() function message.
say "Perl MySQL Connect Attempt.";

# MySQL data source name must have a valid database as the
# third argument; this uses the sakila demo database.
my $dsn = "DBI:mysql:sakila";

# Local variables to build the connection string.
my $username = "student";
my $password = "student";

# Set arguments for MySQL database error management.
my %attr = ( PrintError=>0,  # turn off error reporting via warn()
             RaiseError=>1); # turn on error reporting via die()

# Create connction with a data source name, user name and password.
my $dbh  = DBI->connect($dsn,$username,$password, \%attr);

# Creaet a static SQL statement or query.
my $sth = $dbh->prepare("SELECT title         \
	                 ,      release_year  \
			 ,      rating        \
			 FROM   film          \
			 WHERE  title LIKE CONCAT(?,'%')");

# Execute the static statement.
$sth->execute($param) or die "Execution failed: $dbh->errstr()";

# Read data and print by comma-delimited row position.
print "----------------------------------------\n";
while (my @row = $sth->fetchrow_array()) {
  print join(", ", @row), "\n";
}
print "----------------------------------------\n";

# Close the statement.
$sth->finish;

# Disconnect from database connection.
$dbh->disconnect();

# Print with say() function valid connection message.
say "Connected to the MySQL database.";
After setting the permissions to -rwxr-xr-x. you call it with this CLI command:
./input.pl ta
It prints:
Perl MySQL Connect Attempt.
----------------------------------------
TADPOLE PARK, 2006, PG
TALENTED HOMICIDE, 2006, PG
TARZAN VIDEOTAPE, 2006, PG-13
TAXI KICK, 2006, PG-13
----------------------------------------
Connected to the MySQL database.
I think these examples cover most of the basic elements of writing Perl against the MySQL database. If I missed something you think would be useful, please advise. As always, I hope this helps those working with the MySQL and Perl products.
MySQL on AlmaLinux
After installing AlmaLinux in a VMware VM on my MacBook Pro (Intel Chip), and updating the packages with the following command:
sudo dnf upgrade --refresh -y |
MySQL was first on my installation and configuration list. Here are the commands to install and configure it on AlmaLinux.
Install the MySQL Server packages and dependents:
sudo dnf install mysql mysql-server -y |
Install the MySQL service utilities with the initscripts package, using the following command:
sudo yum install -y initscripts |
Start the MySQL daemon with the following command:
sudo service mysqld start |
Connect and verify the root user can connect to the database. At this point, you’ve not set the root user’s password and should use the following syntax:
mysql -uroot |
It should connect and display:
Welcome to the MySQL monitor. Commands end with ; or \g. Your MySQL connection id is 10 Server version: 8.0.30 Source distribution Copyright (c) 2000, 2022, Oracle and/or its affiliates. Oracle is a registered trademark of Oracle Corporation and/or its affiliates. Other names may be trademarks of their respective owners. Type 'help;' or '\h' for help. Type '\c' to clear the current input statement. mysql> |
Exit MySQL and run the following command:
mysql_secure_installation |
It’ll run you through the following prompts, which you may change to suit your installation. My choices are a trivial student database isolated inside a VM.
Securing the MySQL server deployment. Connecting to MySQL using a blank password. VALIDATE PASSWORD COMPONENT can be used to test passwords and improve security. It checks the strength of password and allows the users to set only those passwords which are secure enough. Would you like to setup VALIDATE PASSWORD component? Press y|Y for Yes, any other key for No: n Please set the password for root here. New password: Re-enter new password: By default, a MySQL installation has an anonymous user, allowing anyone to log into MySQL without having to have a user account created for them. This is intended only for testing, and to make the installation go a bit smoother. You should remove them before moving into a production environment. Remove anonymous users? (Press y|Y for Yes, any other key for No) : y Success. Normally, root should only be allowed to connect from 'localhost'. This ensures that someone cannot guess at the root password from the network. Disallow root login remotely? (Press y|Y for Yes, any other key for No) : y Success. By default, MySQL comes with a database named 'test' that anyone can access. This is also intended only for testing, and should be removed before moving into a production environment. Remove test database and access to it? (Press y|Y for Yes, any other key for No) : y - Dropping test database... Success. - Removing privileges on test database... Success. Reloading the privilege tables will ensure that all changes made so far will take effect immediately. Reload privilege tables now? (Press y|Y for Yes, any other key for No) : y Success. All done! |
The next step requires setting up the sample sakila and studentdb database. The syntax has changed from prior releases. Here are the new three steps:
- Grant the root user the privilege to grant to others, which root does not have by default. You use the following syntax as the MySQL root user:
mysql> GRANT ALL ON *.* TO 'root'@'localhost';
- Download the sakila database, which you can download from this site. Click on the sakila database’s TGZ download.

When you download the sakila zip file it creates a sakila-db folder in the /home/student/Downloads directory. Copy the sakila-db folder into the /home/student/Data/sakila directory. Then, change to the /home/student/Data/sakila/sakila-db directory, connect to mysql as the root user, and run the following command:
mysql> SOURCE /home/student/Data/sakila/sakila-db/sakila-schema.sql
mysql> SOURCE /home/student/Data/sakila/sakila-db/sakila-data.sql
- Create the studentdb database with the following command as the MySQL root user:
mysql> CREATE DATABASE studentdb; - Create the user with a clear English password and grant the user student full privileges on the sakila and studentdb databases:
mysql> CREATE USER 'student'@'localhost' IDENTIFIED WITH mysql_native_password BY 'student';
mysql> GRANT ALL ON studentdb.* TO 'student'@'localhost';
mysql> GRANT ALL ON sakila.* TO 'student'@'localhost';
You can now connect to a sandboxed sakila database with the student user’s credentials, like:
mysql -ustudent -p -Dsakila |
or, you can now connect to a sandboxed studentdb database with the student user’s credentials, like:
mysql -ustudent -p -Dstudentdb |
As always, I hope code and step complete instructions help others get things done more quickly.
MySQL CSV Output
Saturday, I posted how to use Microsoft ODBC DSN to connect to MySQL. Somebody didn’t like the fact that the PowerShell program failed to write a *.csv file to disk because the program used the Write-Host command to write to the content of the query to the console.
I thought that approach was a better as an example. However, it appears that it wasn’t because not everybody knows simple redirection. The original program can transfer the console output to a file, like:
powershell .\MySQLODBC.ps1 > output.csv |
So, the first thing you need to do is add a parameter list, like:
2 3 4 | param ( [Parameter(Mandatory)][string]$fileName ) |
Anyway, it’s trivial to demonstrate how to modify the PowerShell program to write to a disk. You should also create a virtual PowerShell drive before writing the file. That’s because you can change the physical directory anytime you want with minimal changes to rest of your code’s file references.
You can create a PowerShell virtual drive with the following command:
7 8 | New-PSDrive -Name test -PSProvider FileSystem -Description 'Test area' ` -Root C:\Data\cit225\mysql\test |
but, it will write the following to console:
Name Used (GB) Free (GB) Provider Root CurrentLocation ---- --------- --------- -------- ---- --------------- test 0.00 28.74 FileSystem C:\Data\cit225\mysql\test |
You can suppress the console output with Microsoft’s version of redirection to the void (> /dev/null), which pipes (|) the standard out (stdout) to Out-Null, like:
7 8 | New-PSDrive -Name test -PSProvider FileSystem -Description 'Test area' ` -Root C:\Data\cit225\mysql\test | Out-Null |
Since the program may run before an output file has been created, or after its been created and removed, you need to check whether the file exists before attempting to remove it. PowerShell provides the Test-Path command to check for the existence of a file and the Remove-Item command to remove a file, like:
11 12 | if (Test-Path test:$fileName) { Remove-Item -Path test:$fileName } |
Then, you simply replace the Write-Host call in the other program with the Add-Content command:
Add-Content -Value $output -Path test:$fileName |
Now, the PowerShell script file writes the MySQL query’s output to an output.csv file. You can call the MySQLContact.ps1 script file with the following syntax:
powershell MySQLContact.ps1 output.csv |
In case these changes don’t make sense outside the scope of the full script, here is the rewritten script:
1 2 3 4 5 6 7 8 9 10 11 12 13 14 15 16 17 18 19 20 21 22 23 24 25 26 27 28 29 30 31 32 33 34 35 36 37 38 39 40 41 42 43 44 45 46 47 48 49 50 51 52 53 54 55 56 57 58 59 60 61 62 63 64 65 66 | # Define parameter list for mandatory file name. param ( [Parameter(Mandatory)][string]$fileName ) # Define a PowerShell Virtual Drive. New-PSDrive -Name test -PSProvider FileSystem -Description 'Test area' ` -Root C:\Data\cit225\mysql\test | Out-Null # Remove the file only when it exists. if (Test-Path test:$fileName) { Remove-Item -Path test:$fileName } # Define a ODBC DSN connection string. $ConnectionString = 'DSN=MySQLODBC2' # Define a MySQL Command Object for a non-query. $Connection = New-Object System.Data.Odbc.OdbcConnection; $Connection.ConnectionString = $ConnectionString # Attempt connection. try { $Connection.Open() # Create a SQL command. $Command = $Connection.CreateCommand(); $Command.CommandText = "SELECT last_name " + ", first_name " + "FROM contact " + "ORDER BY 1, 2"; # Attempt to read SQL command. try { $row = $Command.ExecuteReader(); # Read while records are found. while ($row.Read()) { # Initialize output for each row. $output = "" # Navigate across all columns (only two in this example). for ($column = 0; $column -lt $row.FieldCount; $column += 1) { # Mechanic for comma-delimit between last and first name. if ($output.length -eq 0) { $output += $row[$column] } else { $output += ", " + $row[$column] } } # Write the output from the database to a file. Add-Content -Value $output -Path test:$fileName } } catch { Write-Error "Message: $($_.Exception.Message)" Write-Error "StackTrace: $($_.Exception.StackTrace)" Write-Error "LoaderExceptions: $($_.Exception.LoaderExceptions)" } finally { # Close the reader. $row.Close() } } catch { Write-Error "Message: $($_.Exception.Message)" Write-Error "StackTrace: $($_.Exception.StackTrace)" Write-Error "LoaderExceptions: $($_.Exception.LoaderExceptions)" } finally { $Connection.Close() } |
While I understand you might want to go to this level of effort if you where building a formal cmdlet, I’m not convinced its worth the effort in an ordinary PowerShell script. However, I don’t like to leave a question unanswered.
MySQL ODBC DSN
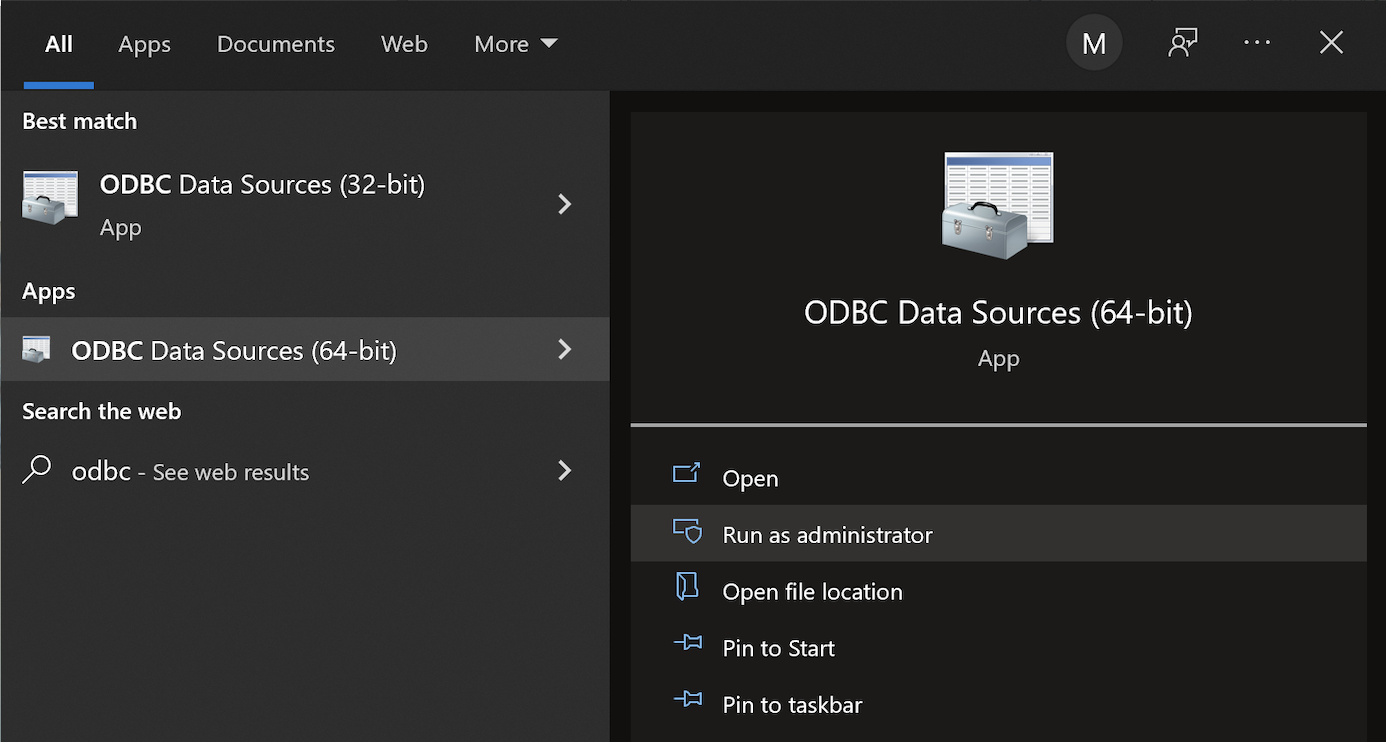
This post explains and demonstrates how to install, configure, and use the MySQL’s ODBC libraries and a DSN (Data Source Name) to connect your Microsoft PowerShell programs to a locally or remotely installed MySQL database. After you’ve installed the MySQL ODBC library, use Windows search field to find the ODBC Data Sources dialog and run it as administrator.
There are four steps to setup, test, and save your ODBC Data Source Name (DSN) for MySQL. You can click on the images on the right to launch them in a more readable format or simply read the instructions.
MySQL ODBC Setup Steps
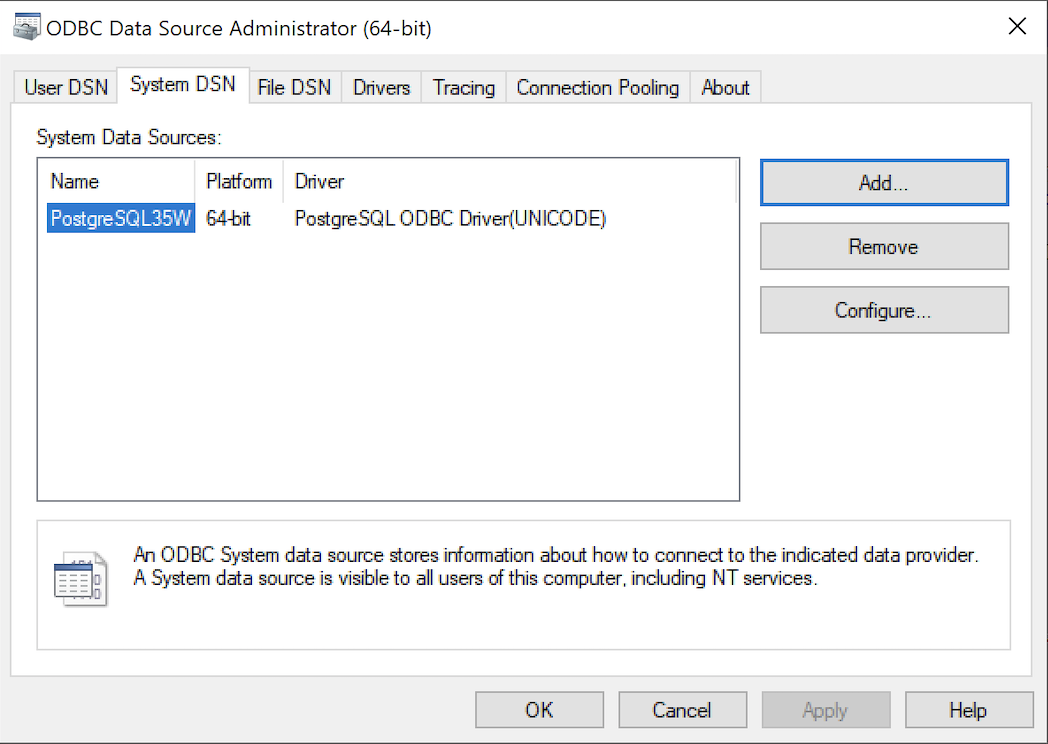
- Click the SystemDSN tab to see he view which is exactly like the User DSN tab. Click the Add button to start the workflow.
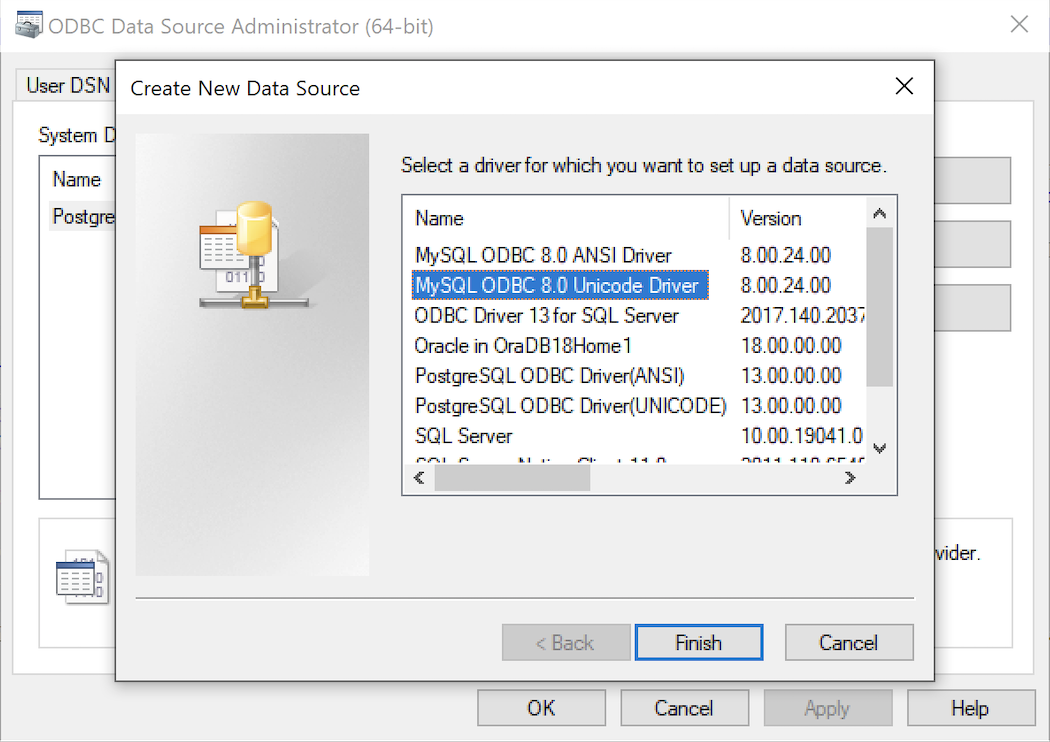
- The Create New Data Source dialog requires you select the MySQL ODBC Driver(UNICODE) option from the list and click the Finish button to proceed.
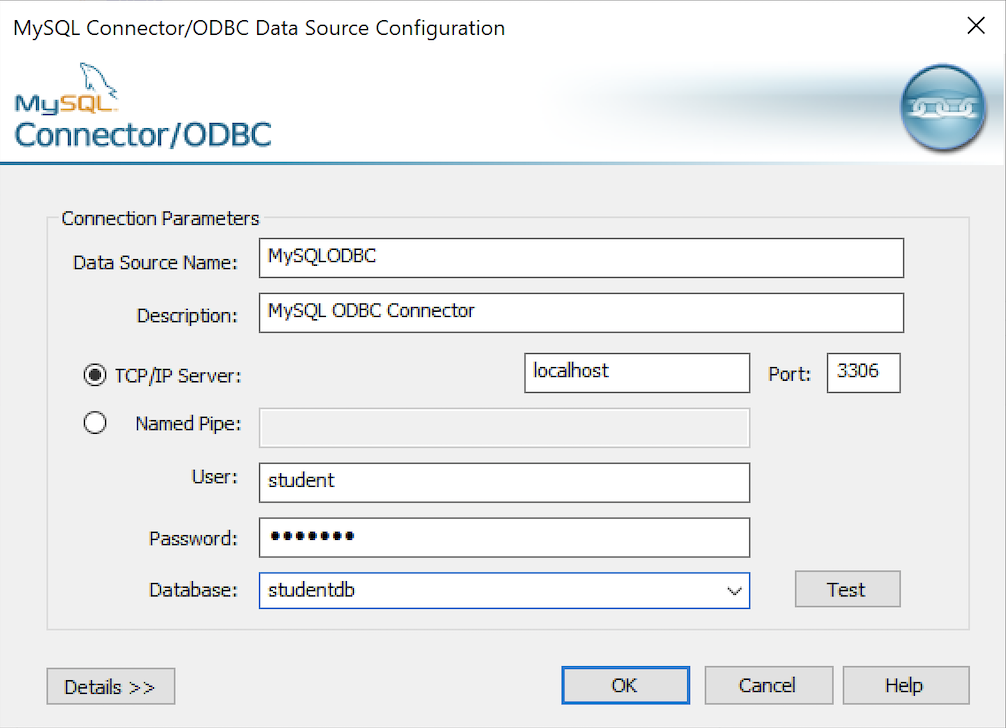
- The MySQL Unicode ODBC Driver Setup dialog should complete the prompts as follows below. If you opt for localhost as the server value and you have a DCHP IP address, make sure you’ve configured your hosts file in the C:\Windows\System32\drivers\etc directory. You should enter the following two lines in the hosts file:
127.0.0.1  localhost
::1        localhost
These are the string values you should enter in the MySQL Unicode ODBC Driver Setup dialog:
Data Source: MySQLODBC
Database:    studentdb
Server:      localhost
User Name:   student
Description: MySQL ODBC Connector
Port:        3306
Password:    student
After you complete the entry, click the Test button.
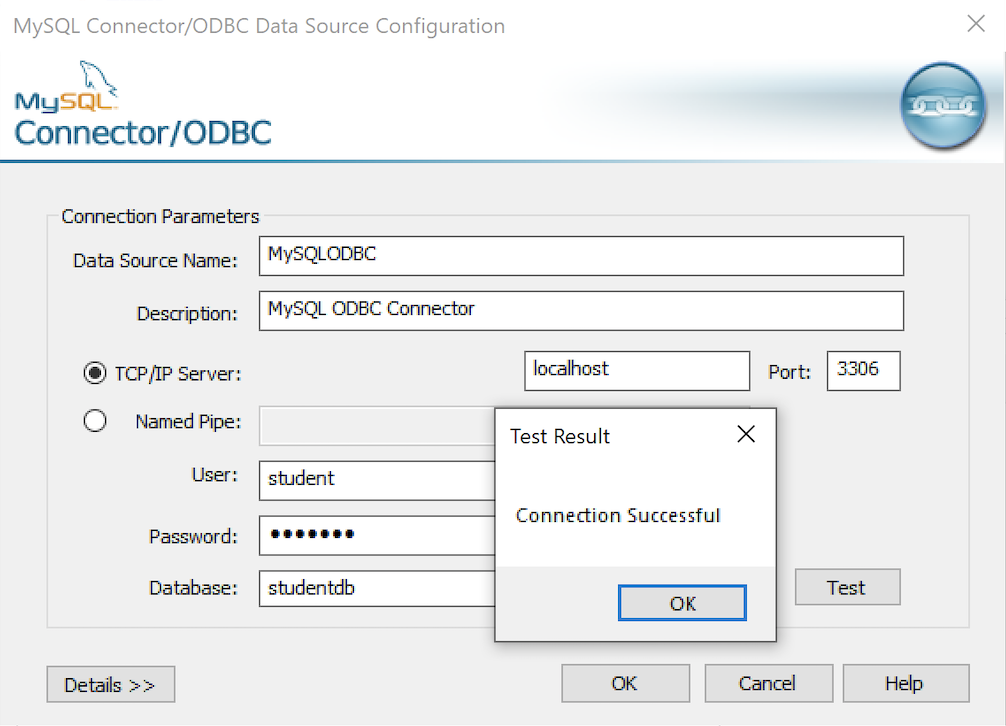
- The Connection Test dialog should return a “Connection successful” message. Click the OK button to continue, and then click the OK button in the next two screens.
After you have created the System MySQL ODBC Setup, it’s time to build a PowerShell Cmdlet (or, Commandlet). Some documentation and blog notes incorrectly suggest you need to write a connection string with a UID and password, like:
$ConnectionString = 'DSN=MySQLODBC;Uid=student;Pwd=student' |
You can do that if you leave the UID and password fields empty in the MySQL ODBC Setup but it’s recommended to enter them there to avoid putting them in your PowerShell script file.
The UID and password are unnecessary in the connection string when they’re in MySQL ODBC DSN. You can use a connection string like the following when the UID and password are in the DSN:
$ConnectionString = 'DSN=MySQLODBC' |
You can create a MySQLCursor.ps1 Cmdlet like the following:
1 2 3 4 5 6 7 8 9 10 11 12 13 14 15 16 17 18 19 20 21 22 23 24 25 26 27 28 29 30 31 32 33 34 35 36 37 | # Define a ODBC DSN connection string. $ConnectionString = 'DSN=MySQLODBC' # Define a MySQL Command Object for a non-query. $Connection = New-Object System.Data.Odbc.OdbcConnection; $Connection.ConnectionString = $ConnectionString # Attempt connection. try { $Connection.Open() # Create a SQL command. $Command = $Connection.CreateCommand(); $Command.CommandText = "SELECT database();"; # Attempt to read SQL command. try { $Reader = $Command.ExecuteReader(); # Read while records are found. while ($Reader.Read()) { Write-Host "Current Database [" $Reader[0] "]"} } catch { Write-Host "Message: $($_.Exception.Message)" Write-Host "StackTrace: $($_.Exception.StackTrace)" Write-Host "LoaderExceptions: $($_.Exception.LoaderExceptions)" } finally { # Close the reader. $Reader.Close() } } catch { Write-Host "Message: $($_.Exception.Message)" Write-Host "StackTrace: $($_.Exception.StackTrace)" Write-Host "LoaderExceptions: $($_.Exception.LoaderExceptions)" } finally { $Connection.Close() } |
Line 14 assigns a SQL query that returns a single row with one column as the CommandText of a Command object. Line 22 reads the zero position of a row or record set with only one column.
You call the MySQLCursor.ps1 Cmdlet with the following syntax:
powershell .\MySQLCursor.ps1 |
It returns:
Current Database [ studentdb ] |
A more realistic way to write a query would return multiple rows with a set of two or more columns. The following program queries a table with multiple rows of two columns, but the program logic can manage any number of columns.
# Define a ODBC DSN connection string. $ConnectionString = 'DSN=MySQLODBC' # Define a MySQL Command Object for a non-query. $Connection = New-Object System.Data.Odbc.OdbcConnection; $Connection.ConnectionString = $ConnectionString # Attempt connection. try { $Connection.Open() # Create a SQL command. $Command = $Connection.CreateCommand(); $Command.CommandText = "SELECT last_name, first_name FROM contact ORDER BY 1, 2"; # Attempt to read SQL command. try { $row = $Command.ExecuteReader(); # Read while records are found. while ($row.Read()) { # Initialize output for each row. $output = "" # Navigate across all columns (only two in this example). for ($column = 0; $column -lt $row.FieldCount; $column += 1) { # Mechanic for comma-delimit between last and first name. if ($output.length -eq 0) { $output += $row[$column] } else { $output += ", " + $row[$column] } } # Write the output from the database. Write-Host $output } } catch { Write-Host "Message: $($_.Exception.Message)" Write-Host "StackTrace: $($_.Exception.StackTrace)" Write-Host "LoaderExceptions: $($_.Exception.LoaderExceptions)" } finally { # Close the reader. $row.Close() } } catch { Write-Host "Message: $($_.Exception.Message)" Write-Host "StackTrace: $($_.Exception.StackTrace)" Write-Host "LoaderExceptions: $($_.Exception.LoaderExceptions)" } finally { $Connection.Close() } |
You call the MySQLContact.ps1 Cmdlet with the following syntax:
powershell .\MySQLContact.ps1 |
It returns an ordered set of comma-separated values, like
Clinton, Goeffrey Gretelz, Simon Moss, Wendy Potter, Ginny Potter, Harry Potter, Lily Royal, Elizabeth Smith, Brian Sweeney, Ian Sweeney, Matthew Sweeney, Meaghan Vizquel, Doreen Vizquel, Oscar Winn, Brian Winn, Randi |
As always, I hope this helps those looking for a complete concrete example of how to make Microsoft Powershell connect and query results from a MySQL database.
MySQL 5-Table Procedure
A student wanted a better example of writing a MySQL Persistent Stored Module (PSM) that maintains transactional scope across a couple tables. Here’s the one I wrote about ten years ago to build the MySQL Video Store model. It looks I neglected to put it out there before, so here it is for reference.
-- Conditionally drop procedure if it exists. DROP PROCEDURE IF EXISTS contact_insert; -- Reset the delimiter so that a semicolon can be used as a statement and block terminator. DELIMITER $$ SELECT 'CREATE PROCEDURE contact_insert' AS "Statement"; CREATE PROCEDURE contact_insert ( pv_member_type CHAR(12) , pv_account_number CHAR(19) , pv_credit_card_number CHAR(19) , pv_credit_card_type CHAR(12) , pv_first_name CHAR(20) , pv_middle_name CHAR(20) , pv_last_name CHAR(20) , pv_contact_type CHAR(12) , pv_address_type CHAR(12) , pv_city CHAR(30) , pv_state_province CHAR(30) , pv_postal_code CHAR(20) , pv_street_address CHAR(30) , pv_telephone_type CHAR(12) , pv_country_code CHAR(3) , pv_area_code CHAR(6) , pv_telephone_number CHAR(10)) MODIFIES SQL DATA BEGIN /* Declare variables to manipulate auto generated sequence values. */ DECLARE member_id int unsigned; DECLARE contact_id int unsigned; DECLARE address_id int unsigned; DECLARE street_address_id int unsigned; DECLARE telephone_id int unsigned; /* Declare local constants for who-audit columns. */ DECLARE lv_created_by int unsigned DEFAULT 1001; DECLARE lv_creation_date DATE DEFAULT UTC_DATE(); DECLARE lv_last_updated_by int unsigned DEFAULT 1001; DECLARE lv_last_update_date DATE DEFAULT UTC_DATE(); /* Declare a locally scoped variable. */ DECLARE duplicate_key INT DEFAULT 0; /* Declare a duplicate key handler */ DECLARE CONTINUE HANDLER FOR 1062 SET duplicate_key = 1; /* Start the transaction context. */ START TRANSACTION; /* Create a SAVEPOINT as a recovery point. */ SAVEPOINT all_or_none; /* Insert into the first table in sequence based on inheritance of primary keys by foreign keys. */ INSERT INTO member ( member_type , account_number , credit_card_number , credit_card_type , created_by , creation_date , last_updated_by , last_update_date ) VALUES ((SELECT common_lookup_id FROM common_lookup WHERE common_lookup_context = 'MEMBER' AND common_lookup_type = pv_member_type) , pv_account_number , pv_credit_card_number ,(SELECT common_lookup_id FROM common_lookup WHERE common_lookup_context = 'MEMBER' AND common_lookup_type = pv_credit_card_type) , lv_created_by , lv_creation_date , lv_last_updated_by , lv_last_update_date ); /* Preserve the sequence by a table related variable name. */ SET member_id = last_insert_id(); /* Insert into the first table in sequence based on inheritance of primary keys by foreign keys. */ INSERT INTO contact VALUES ( null , member_id ,(SELECT common_lookup_id FROM common_lookup WHERE common_lookup_context = 'CONTACT' AND common_lookup_type = pv_contact_type) , pv_first_name , pv_middle_name , pv_last_name , lv_created_by , lv_creation_date , lv_last_updated_by , lv_last_update_date ); /* Preserve the sequence by a table related variable name. */ SET contact_id = last_insert_id(); /* Insert into the first table in sequence based on inheritance of primary keys by foreign keys. */ INSERT INTO address VALUES ( null , last_insert_id() ,(SELECT common_lookup_id FROM common_lookup WHERE common_lookup_context = 'MULTIPLE' AND common_lookup_type = pv_address_type) , pv_city , pv_state_province , pv_postal_code , lv_created_by , lv_creation_date , lv_last_updated_by , lv_last_update_date ); /* Preserve the sequence by a table related variable name. */ SET address_id = last_insert_id(); /* Insert into the first table in sequence based on inheritance of primary keys by foreign keys. */ INSERT INTO street_address VALUES ( null , last_insert_id() , pv_street_address , lv_created_by , lv_creation_date , lv_last_updated_by , lv_last_update_date ); /* Insert into the first table in sequence based on inheritance of primary keys by foreign keys. */ INSERT INTO telephone VALUES ( null , contact_id , address_id ,(SELECT common_lookup_id FROM common_lookup WHERE common_lookup_context = 'MULTIPLE' AND common_lookup_type = pv_telephone_type) , pv_country_code , pv_area_code , pv_telephone_number , lv_created_by , lv_creation_date , lv_last_updated_by , lv_last_update_date); /* This acts as an exception handling block. */ IF duplicate_key = 1 THEN /* This undoes all DML statements to this point in the procedure. */ ROLLBACK TO SAVEPOINT all_or_none; END IF; /* This commits the write when successful and is harmless otherwise. */ COMMIT; END; $$ -- Reset the standard delimiter to let the semicolon work as an execution command. DELIMITER ; |
You can then call the procedure, like:
SELECT 'CALL contact_insert() PROCEDURE 5 times' AS "Statement"; CALL contact_insert('INDIVIDUAL','R11-514-34','1111-1111-1111-1111','VISA_CARD','Goeffrey','Ward','Clinton','CUSTOMER','HOME','Provo','Utah','84606','118 South 9th East','HOME','011','801','423\-1234'); CALL contact_insert('INDIVIDUAL','R11-514-35','1111-2222-1111-1111','VISA_CARD','Wendy',null,'Moss','CUSTOMER','HOME','Provo','Utah','84606','1218 South 10th East','HOME','011','801','423-1234'); CALL contact_insert('INDIVIDUAL','R11-514-36','1111-1111-2222-1111','VISA_CARD','Simon','Jonah','Gretelz','CUSTOMER','HOME','Provo','Utah','84606','2118 South 7th East','HOME','011','801','423-1234'); CALL contact_insert('INDIVIDUAL','R11-514-37','1111-1111-1111-2222','MASTER_CARD','Elizabeth','Jane','Royal','CUSTOMER','HOME','Provo','Utah','84606','2228 South 14th East','HOME','011','801','423-1234'); CALL contact_insert('INDIVIDUAL','R11-514-38','1111-1111-3333-1111','VISA_CARD','Brian','Nathan','Smith','CUSTOMER','HOME','Spanish Fork','Utah','84606','333 North 2nd East','HOME','011','801','423-1234'); |
I hope this code complete approach helps those looking to learn how to write MySQL PSMs.
Read CSV with Python
In 2009, I showed an example of how to use the MySQL LOAD DATA INFILE command. Last year, I updated the details to reset the secure_file-priv privilege to use the LOAD DATA INFILE command, but you can avoid that approach with a simple Python 3 program like the one in this example. You also can use MySQL Shell’s new parallel table import feature, introduced in 8.0.17, as noted in a comment on this blog post.
The example requires creating an avenger table, avenger.csv file, a readWriteData.py Python script, run the readWriteData.py Python script, and a query that validates the insertion of the avenger.csv file’s data into the avenger table. The complete code in five steps using the sakila demonstration database:
- Creating the avenger table with the create_avenger.sql script:
-- Conditionally drop the avenger table.
DROP TABLE IF EXISTS avenger;

-- Create the avenger table.
CREATE TABLE avenger
( avenger_id    int unsigned PRIMARY KEY AUTO_INCREMENT
, first_name    varchar(20)
, last_name     varchar(20)
, avenger_name  varchar(20))
  ENGINE=InnoDB
  AUTO_INCREMENT=1001
  DEFAULT CHARSET=utf8mb4
  COLLATE=utf8mb4_0900_ai_ci;
- Create the avenger.csv file with the following data:
Anthony,Stark,Iron Man
Thor,Odinson,God of Thunder
Steven,Rogers,Captain America
Bruce,Banner,Hulk
Clinton,Barton,Hawkeye
Natasha,Romanoff,Black Widow
Peter,Parker,Spiderman
Steven,Strange,Dr. Strange
Scott,Lange,Ant-man
Hope,van Dyne,Wasp
- Create the readWriteFile.py Python 3 script:
# Import libraries.
import csv
import mysql.connector
from mysql.connector import errorcode
from csv import reader

#  Attempt the statement.
# ============================================================
#  Use a try-catch block to manage the connection.
# ============================================================
try:
  # Open connection.
  cnx = mysql.connector.connect( user='student'
                               , password='student'
                               , host='127.0.0.1'
                               , database='sakila')
  # Create cursor.
  cursor = cnx.cursor()

  # Open file in read mode and pass the file object to reader.
  with open('avenger.csv', 'r') as read_obj:
    csv_reader = reader(read_obj)

    # Declare the dynamic statement.
    stmt = ("INSERT INTO avenger "
            "(first_name, last_name, avenger_name) "
            "VALUES "
            "(%s, %s, %s)")

    # Iterate over each row in the csv using reader object
    for row in csv_reader:
      cursor.execute(stmt, row)

    # Commit the writes.
    cnx.commit()

    #close the connection to the database.
    cursor.close()

# Handle exception and close connection.
except mysql.connector.Error as e:
  if e.errno == errorcode.ER_ACCESS_DENIED_ERROR:
    print("Something is wrong with your user name or password")
  elif e.errno == errorcode.ER_BAD_DB_ERROR:
    print("Database does not exist")
  else:
    print("Error code:", e.errno)        # error number
    print("SQLSTATE value:", e.sqlstate) # SQLSTATE value
    print("Error message:", e.msg)       # error message

# Close the connection when the try block completes.
else:
  cnx.close()
- Run the readWriteFile.py file:
python3 readWriteFile.py
- Query the avenger table:
SELECT * FROM avenger;It returns:
+------------+------------+-----------+-----------------+
| avenger_id | first_name | last_name | avenger_name    |
+------------+------------+-----------+-----------------+
|       1001 | Anthony    | Stark     | Iron Man        |
|       1002 | Thor       | Odinson   | God of Thunder  |
|       1003 | Steven     | Rogers    | Captain America |
|       1004 | Bruce      | Banner    | Hulk            |
|       1005 | Clinton    | Barton    | Hawkeye         |
|       1006 | Natasha    | Romanoff  | Black Widow     |
|       1007 | Peter      | Parker    | Spiderman       |
|       1008 | Steven     | Strange   | Dr. Strange     |
|       1009 | Scott      | Lange     | Ant-man         |
|       1010 | Hope       | van Dyne  | Wasp            |
+------------+------------+-----------+-----------------+
10 rows in set (0.00 sec)
MySQL DropIndexIfExists
In reply to a question about how to conditionally drop an index on a table in MySQL. It appears the syntax doesn’t exist. However, maybe it does and I missed it. If I did miss it, I’m sure somebody will let me know. However, I simply have a dropIndexIfExists stored procedure for this type of database maintenance.
Below is my dropIndexIfExists stored procedure:
-- Conditionally drop the procedure. DROP PROCEDURE IF EXISTS dropIndexIfExists; -- Change the default semicolon delimiter to write a PSM -- (Persistent Stored Module) or stored procedure. DELIMITER $$ -- Create the procedure. CREATE PROCEDURE dropIndexIfExists ( pv_table_name VARCHAR(64) , pv_index_name VARCHAR(64)) BEGIN /* Declare a local variable for the SQL statement. */ DECLARE stmt VARCHAR(1024); /* Set a session variable with two parameter markers. */ SET @SQL := CONCAT('ALTER TABLE ',pv_table_name,'DROP INDEX ',pv_index_name); /* Check if the constraint exists. */ IF EXISTS (SELECT NULL FROM information_schema.statistics s WHERE s.index_schema = database() AND s.table_name = pv_table_name AND s.index_name = pv_index_name) THEN /* Dynamically allocated and run statement. */ PREPARE stmt FROM @SQL; EXECUTE stmt; DEALLOCATE PREPARE stmt; END IF; END; $$ -- Reset the default semicolon delimiter. DELIMITER ; |
You call the procedure like:
CALL dropIndexIfExists('payment','idx_payment01'); |
As always, I hope this helps those looking for a solution.
MySQL WITH Clause
When I went over my example of using the WITH clause to solve how to use a series of literal values in data sets, some students got it right away and some didn’t. The original post showed how to solve a problem where one value in the data set is returned in the SELECT-list and two values are used as the minimum and maximum values with a BETWEEN operator. It used three approaches with literal values:
- A list of Python dictionaries that require you to filter the return set from the database through a range loop and if statement that mimics a SQL BETWEEN operator.
- A WITH clause that accepts the literals as bind variables to filter the query results inside the query.
- A table design that holds the literals values that an analyst might use for reporting.
It was the last example that required elaboration. I explained you might build a web form that uses a table, and the table could allow a data analyst to enter parameter sets. That way the analyst could submit a flag value to use one or another set of values. I threw out the idea on the whiteboard of introducing a report column to the prior post’s level table. The student went off to try it.
Two problems occurred. The first was in the design of the new table and the second was how to properly use the MySQL Python driver.
Below is a formal table design that supports this extension of the first blog post as a list of parameter values. It uses a report column as a super key to return a set of possible values. One value will show in the SELECT-list and the other two values deploy as the minimum and maximum values in a BETWEEN operator. It is seeded with two sets of values. One of the report possibilities is Summary level with three possibilities and the other is the Detail level with five possibilities.
-- Conditionally drop the levels table. DROP TABLE IF EXISTS levels; -- Create the levels list. CREATE TABLE levels ( level VARCHAR(16) , report ENUM('Summary','Detail') , min_roles INT , max_roles INT ); -- Insert values into the list table. INSERT INTO levels ( level, report, min_roles, max_roles ) VALUES ('Hollywood Star','Summary', 30, 99999) ,('Prolific Actor','Summary', 20, 29) ,('Newcommer','Summary', 1, 19) ,('Hollywood Star','Detail', 30, 99999) ,('Prolific Actor','Detail', 20, 29) ,('Regular Actor','Detail', 10, 19) ,('Actor','Detail', 5, 9) ,('Newcommer','Detail', 1, 4); |
The foregoing table design uses an ENUM type because reporting parameter sets are typically fewer than 64 possibilities. If you use the table to support multiple reports, you should add a second super key column like report_type. The report_type column key would let you use the table to support a series of different report parameter lists.
While the student used a %s inside the query, they created a runtime error when trying to pass the single bind variable into the query. The student misunderstood how to convert a report column input parameter variable into a tuple, which shows up when the student calls the Python MySQL Driver, like this:
59 | cursor.execute(query, (report)) |
The student’s code generated the following error stack:
Traceback (most recent call last):
  File "./python-with-clause.py", line 59, in <module>
    cursor.execute(query,(report))
  File "/usr/lib/python3.7/site-packages/mysql/connector/cursor_cext.py", line 248, in execute
    prepared = self._cnx.prepare_for_mysql(params)
  File "/usr/lib/python3.7/site-packages/mysql/connector/connection_cext.py", line 632, in prepare_for_mysql
    raise ValueError("Could not process parameters")
ValueError: Could not process parameters |
The ValueError should indicate to the developer that they’ve used a wrong data type in the call to the method:
cursor.execute(<class 'str'>,<class 'tuple'>) |
This clearly was a misunderstanding of how to cast a single string to a tuple. A quick explanation of how Python casts a single string into a tuple can best be illustrated inside an interactive Python shell, like:
>>> # Define a variable. >>> x = 'Detail' >>> # An incorrect attempt to make a string a tuple. >>> y = (x) >>> # Check type of y after assignment. >>> print(type(y)) <class 'str'> >>> # A correct attempt to make a string a tuple. >>> y = tuple(x) >>> # Check type of y after assignment. >>> print(type(y)) <class 'tuple'> >>> # An alternative to make a string a tuple. >>> z = (x,) >>> # Check type of z after assignment. >>> print(type(z)) <class 'tuple'> |
So, the fix was quite simple to line 59:
59 | cursor.execute(query, (report,)) |
The student started with a copy of a Python program that I provided. I fixed the argument handling and added some comments. The line 59 reference above maps to this code example.
1 2 3 4 5 6 7 8 9 10 11 12 13 14 15 16 17 18 19 20 21 22 23 24 25 26 27 28 29 30 31 32 33 34 35 36 37 38 39 40 41 42 43 44 45 46 47 48 49 50 51 52 53 54 55 56 57 58 59 60 61 62 63 64 65 66 67 68 69 70 71 72 73 74 75 76 77 78 79 80 81 82 83 84 85 | # Import the library. import sys import mysql.connector from mysql.connector import errorcode # Capture argument list. fullCmdArguments = sys.argv # Assign argument list to variable. argumentList = fullCmdArguments[1:] # Define a standard report variable. report = "Summary" # Check and process argument list. # ============================================================ # If there are less than two arguments provide default values. # Else enumerate and convert strings to dates. # ============================================================ if (len(argumentList) == 1): # Set a default start date. if (isinstance(report,str)): report = argumentList[0] # Attempt the query. # ============================================================ # Use a try-catch block to manage the connection. # ============================================================ try: # Open connection. cnx = mysql.connector.connect(user='student', password='student', host='127.0.0.1', database='sakila') # Create cursor. cursor = cnx.cursor() # Set the query statement. query = ("WITH actors AS " "(SELECT a.actor_id " " , a.first_name " " , a.last_name " " , COUNT(fa.actor_id) AS num_roles " " FROM actor a INNER JOIN film_actor fa " " ON a.actor_id = fa.actor_id " " GROUP BY a.actor_id " " , a.first_name " " , a.last_name ) " " SELECT a.first_name " " , a.last_name " " , l.level " " , a.num_roles " " FROM actors a CROSS JOIN levels l " " WHERE a.num_roles BETWEEN l.min_roles AND l.max_roles " " AND l.report = %s " " ORDER BY a.last_name " " , a.first_name") # Execute cursor. cursor.execute(query,(report,)) # Display the rows returned by the query. for (first_name, last_name, level, num_roles) in cursor: print('{0} {1} is a {2} with {3} films.'.format( first_name.title() , last_name.title() , level.title() , num_roles)) # Close cursor. cursor.close() # ------------------------------------------------------------ # Handle exception and close connection. except mysql.connector.Error as e: if e.errno == errorcode.ER_ACCESS_DENIED_ERROR: print("Something is wrong with your user name or password") elif e.errno == errorcode.ER_BAD_DB_ERROR: print("Database does not exist") else: print("Error code:", e.errno) # error number print("SQLSTATE value:", e.sqlstate) # SQLSTATE value print("Error message:", e.msg) # error message # Close the connection when the try block completes. else: cnx.close() |
A Linux shell program like the following (provided the name of the shell script and Python program are the same) can run the Python program with or without a parameter. It works without a parameter because it sets a default value for the report variable.
# Switch the file extension and run the python program. file=${0/%sh/py} python3 ${file} "${@}" |
You call the shell script like this:
./python-with-clause.sh Detail |
As always, I hope this helps those looking for a solution.
