Archive for the ‘Windows 7’ tag
Oracle 12c on Windows 7
Here are step-by-step instructions for installing Oracle Database 12c Release 1 on Windows 7. This is more or less to install a Desktop version of Oracle 12c. I posted other versions for Oracle Database 11gR1 and 11gR2. While some report that they installation doesn’t work for them, its typically because they didn’t configured their Windows 7 environment.
Here are some Windows 7 configuration caveats before you perform this installation, and they are:
Windows 7 Configuration Steps
- Make sure you have at least 3 GB of memory on your Windows PC, or that you can allocate 4 GB of memory to your virtual machine for Windows.
- Install Oracle’s JDK 7 for 64-bit OS with NetBeans and 32-bit OS when running on a 64-bit machine. The installer is smart enough to only install NetBeans once. The JDK 7 32-bit installation supports SQL Developer.
- Disable Microsoft’s User Access Controls (UAC). I blogged about a set of Windows 7 gripes, and the second point shows you the screen shots that let you disable UAC on Windows 7.
- Configure your
C:\Windows\System32\drivers\etc\hostsfile. Use lines 1 through 3 when you’re using a DHCP IP address, and lines 1 through 4 when you’re using a static IP address. If you want to set a static IP address, check this old post on how to set a static IP address. Please note that thehostnameneeds to be lowercase.
1 2 3 | 127.0.0.1 localhost
::1 localhost
127.0.0.1 oracle12c oracle12c.techtinker.com |
Line 4, only use for a static IP address, would look like this on the 192.168.* subdomain:
4 | 192.168.0.5 oracle12c oracle12c.techtinker.com |
- Create a user account name that doesn’t have a white space, like
McLaughlinMin the screen shots, and assign it Administrator privileges. During the install, you’ll be prompted to create a non-administrator account to start Oracle.
Oracle Database 12c Release 1 Installation Steps
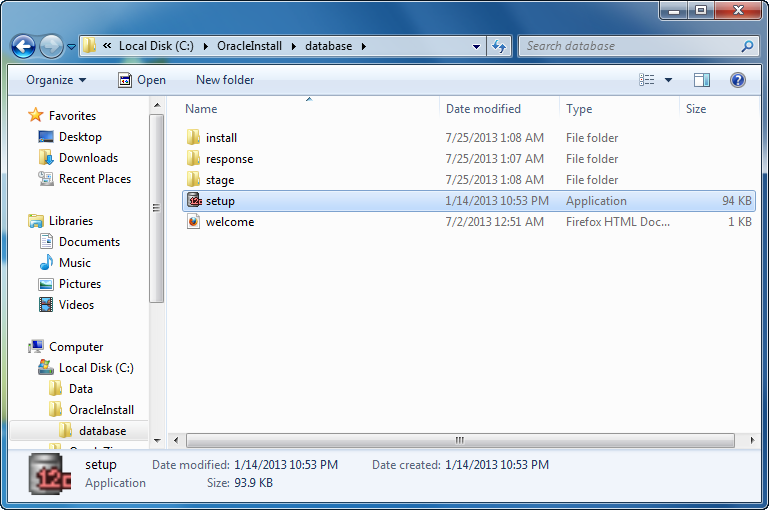
- The first thing you need to do is unzip the two zip files into a common directory. I’ve chosen to create an OracleInstall folder. Oracle creates a database folder inside it. Within the database folder, click the Setup file to launch the Oracle Installer.
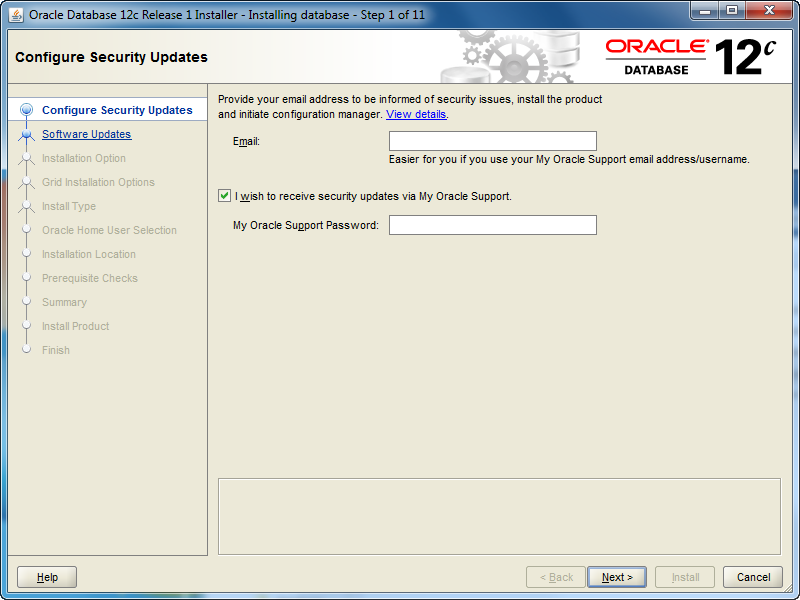
- After launching the Oracle Installer, the Configure Security Updates screen is your first stop. You may provide your email (attached to your Oracle Support Contract) and Oracle Support password, or uncheck the box and you can simply install a Desktop test environment. Click the Next button to proceed.
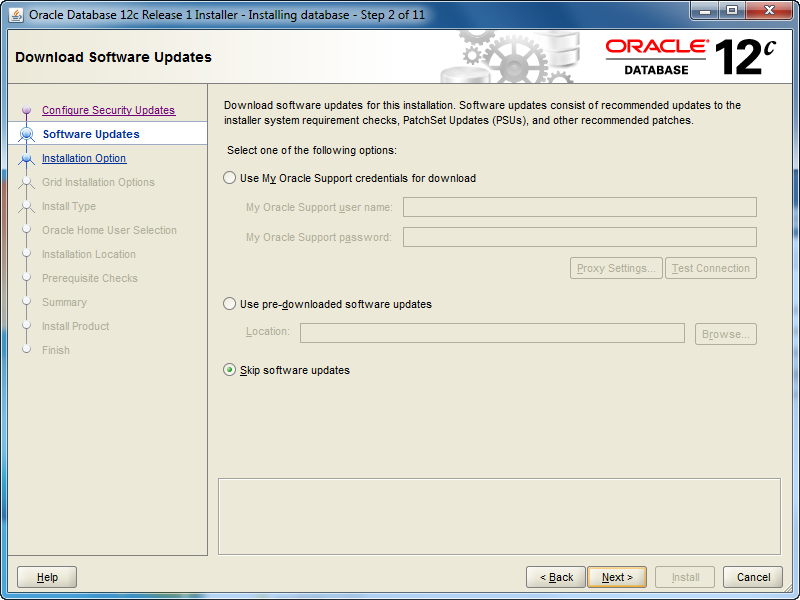
- The Software Updates is the next screen. If you want to check for updates, click and enter your Oracle Support credentials. If you want to install the base release, click the Skip software updates radio button. After making a choice about what you want to do with updates, click the Next button to proceed with the install.
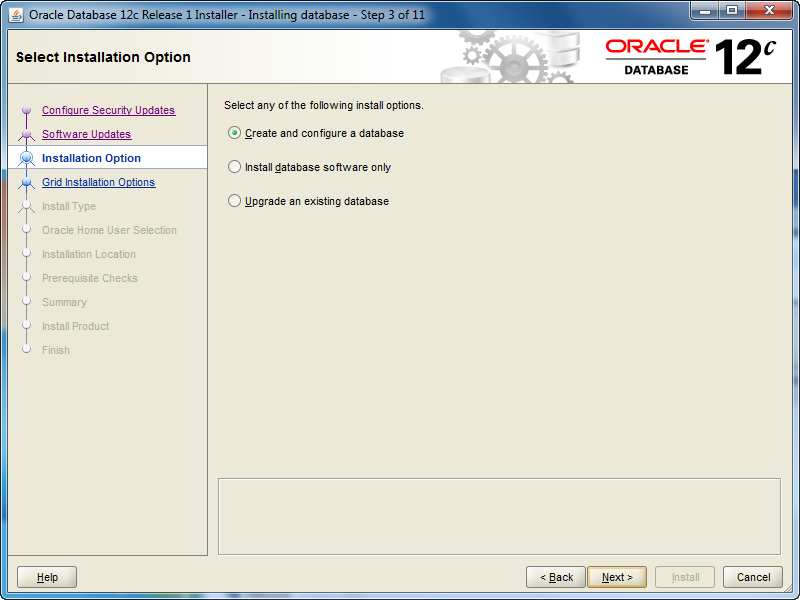
- The Installation Option screen lets you chose whether you want to Create and configure a database (sample database), Intall database software only, or Upgrade an existing database. Check the appropriate radio button and then click the Next button to proceed with the install.
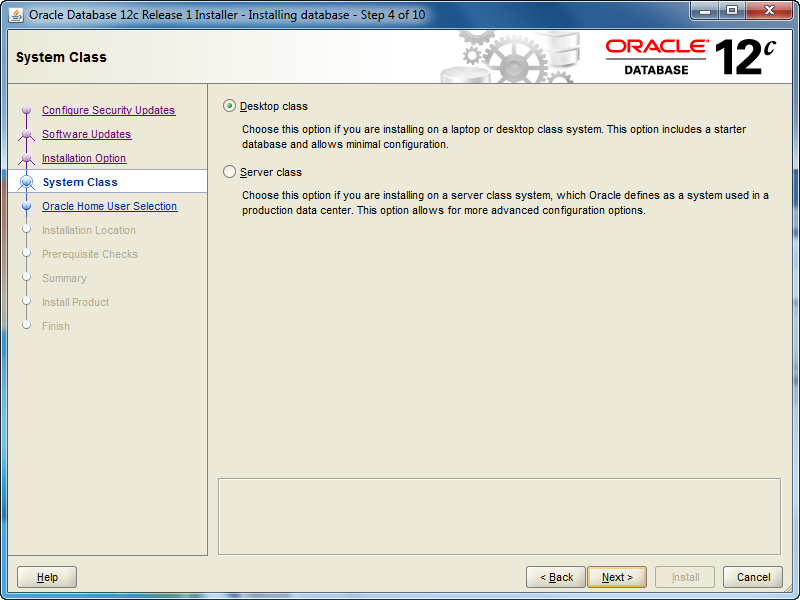
- The System Class screen lets you chose whether you want to install a Desktop class (ideal for develoers to play around in) or a Server class. Check the appropriate radio button and then click the Next button to proceed with the install.
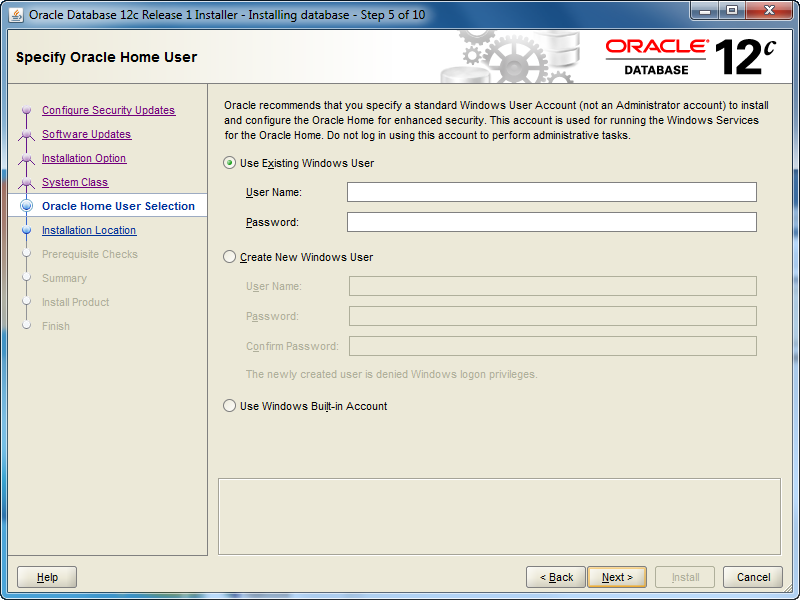
- The Oracle Home User Selection screen lets you chose whether you want to Use Existing Windows User (that’s fine if you created one previously), Create New Windows User (what I’ll do next), or Use Windows Built-in Account. Check the appropriate radio button and then click the Next button to proceed with the install.
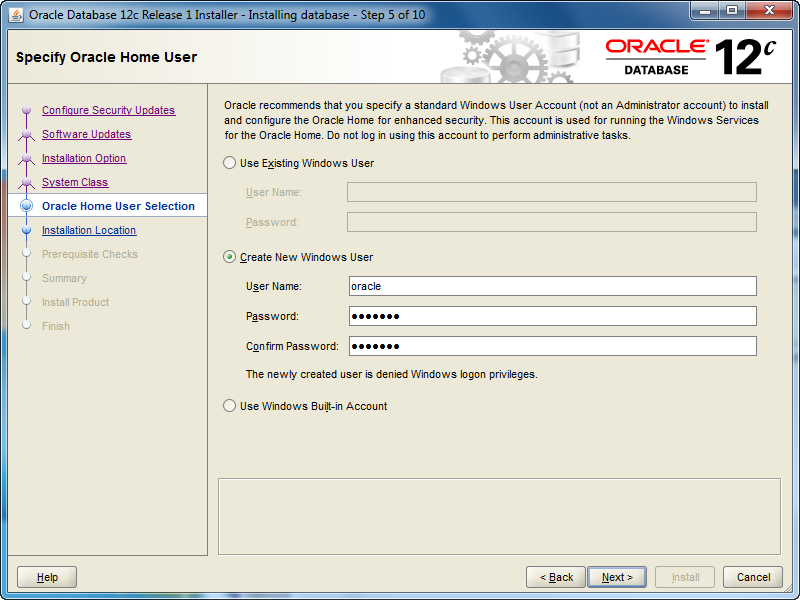
- The Oracle Home User Selection screen lets you Create New Windows User, and that’s what I’ve done with the
oracleuser (it could be whatever you like). Click the Next button to proceed with the install.
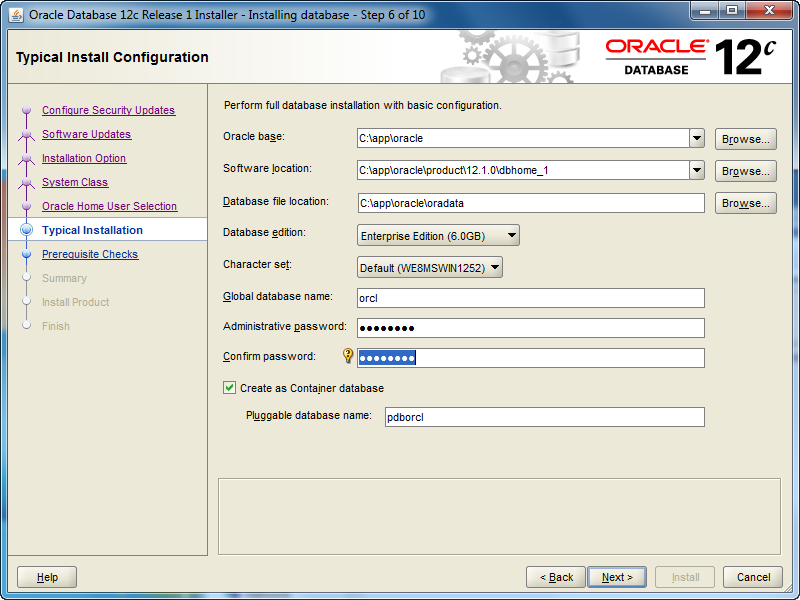
- The Typical Install Configuration screen lets you customize your installation. I’ve only opted to provide an Oracle compliant password while accepting the defaults. Click the Next button to proceed with the install.
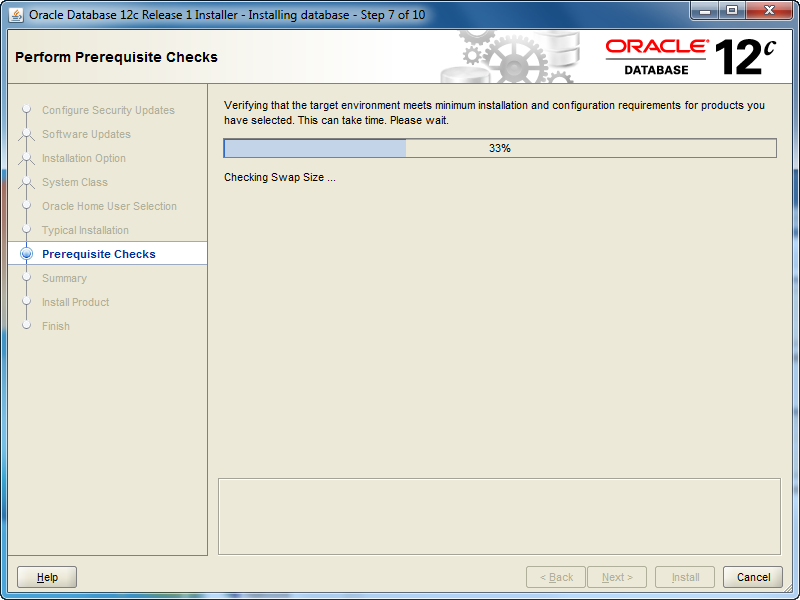
- The Perform Prerequisite Checks screen initially displays a task bar. You need some patience, it’ll show you the next screen if everything is fine.
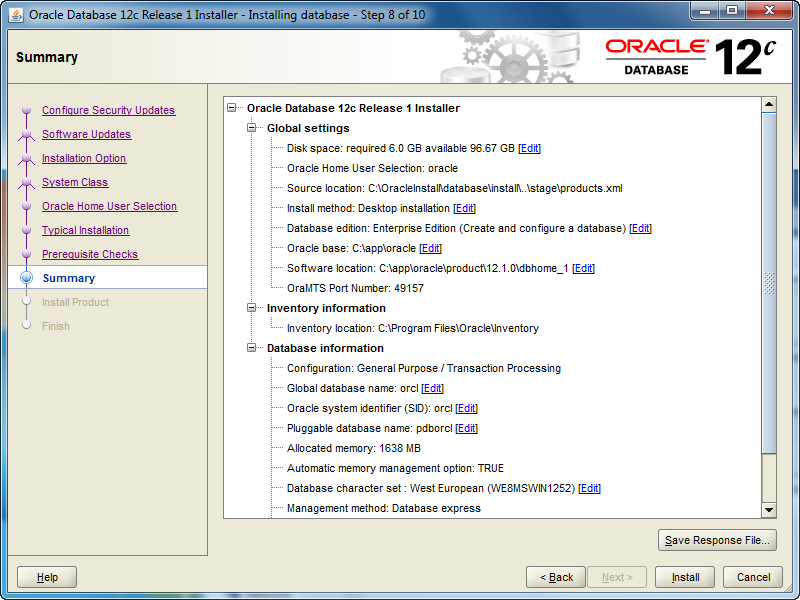
- The Summary screen tells you what you’re going to install. Read it over, save a copy for later, and when everything is right then click the Next button to install.
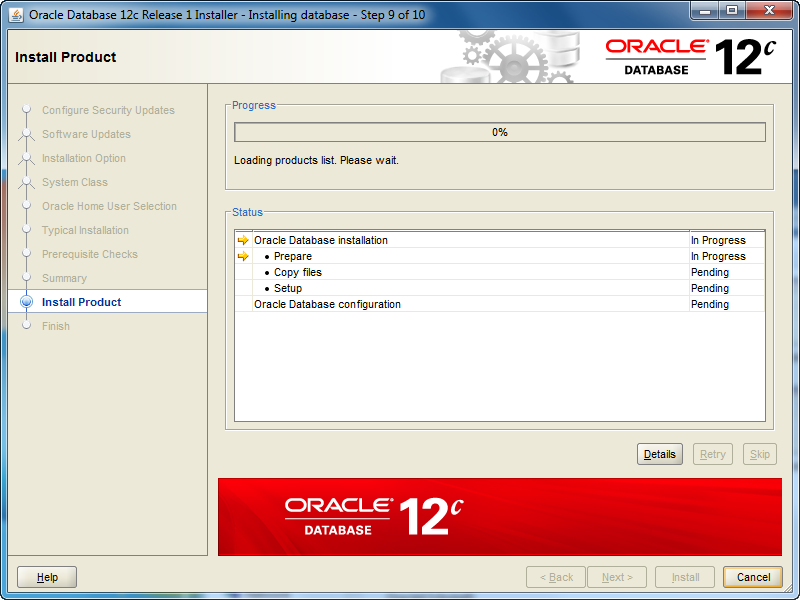
- The Install Product screen tells you what you’re installing and it can take some time. Don’t walk away too quickly because you’re most likely going to have to allow access for the installation to complete successfully.
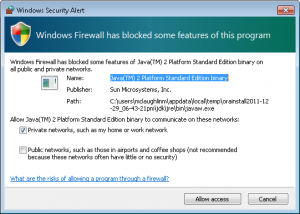
- You should see two Windows Security Alerts with the installation. Click the Allow access button to continue successfully.
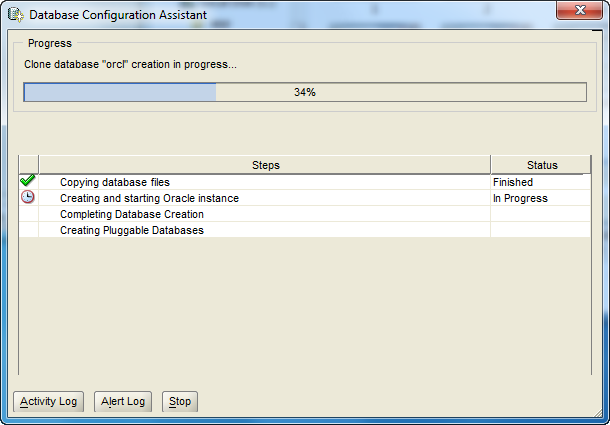
- The Database Configuration Assistant screen tells you that you’ve been successful to this point. Although, this is where several errors can occur when you failed to correctly configure Windows 7 before installation. This takes some time to run, here’s where you can take a break.
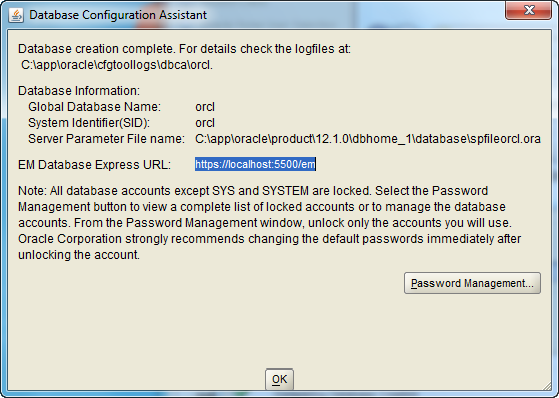
- The second Database Configuration Assistant screen lets you configure passwords for the database accounts. I’m skipping that by accepting the defaults and clicking the OK button to proceed.
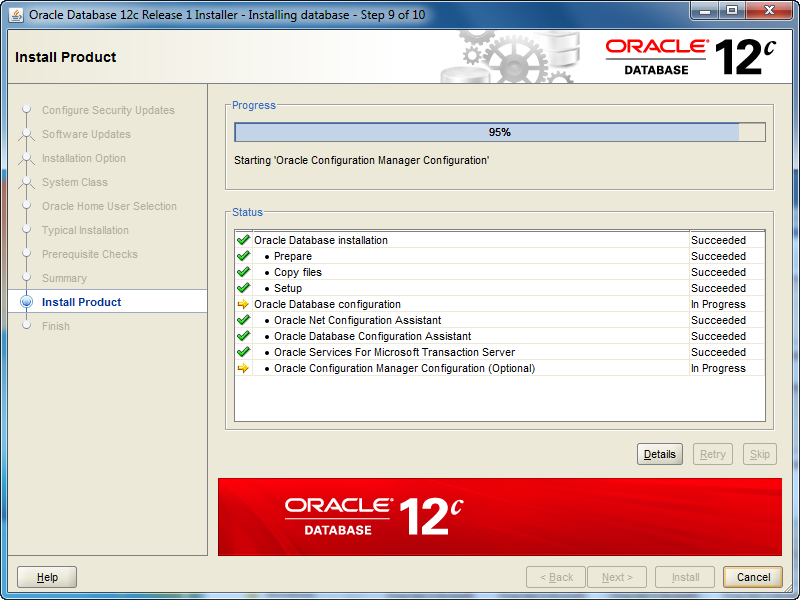
- The Install Product screen reappears while most of the database cloning operation has finished. At this point, it starts configuring the Oracle Enterprise Manager (OEM). It can take a couple minutes to complete. Simply monitor it.

- The Finish screen appears after everything has worked. Click the Close button to finish the install.
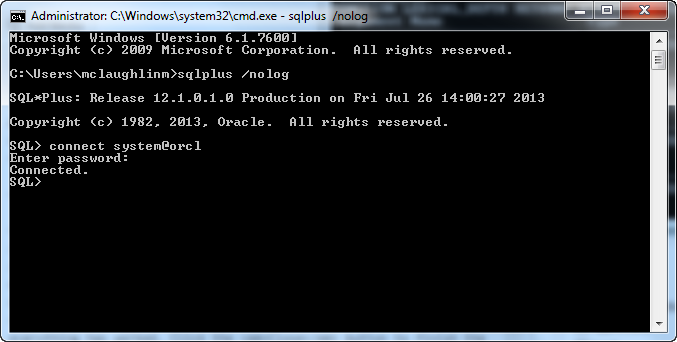
- Now, you can open a Windows command shell and call the
sqlplusexecutable with a/nologoption (denies login credentials form OS history files). Then, you can connect using the TNSorclalias, which verifies your networkinglistener.oraandtnsnames.orafiles are setup correctly. You should see the following in the command shell when the installation was successful.
C:\Users\mclaughlinm>sqlplus /nolog SQL*Plus: Release 12.1.0.1.0 Production on Fri Jul 26 02:00:19 2013 Copyright (c) 1982, 2013, Oracle. All rights reserved. Connected to: Oracle Database 12c Enterprise Edition Release 12.1.0.1.0 - 64bit Production With the Partitioning, OLAP, Advanced Analytics and Real Application Testing options SQL> connect system@orcl Enter password: Connected. |
Oracle 12c changes the dynamics on users. You now have two types of databases. One is a Container Database (CDB) and the other is a Pluggable Database (PDB). While Oracle’s default container users, like SYS, SYSTEM, and so forth, remain unchanged, you create new CDB users with a C##<user_name> preface. PDB users are a different matter, and they can retain the same format used previously for user-defined users. You set PDB users as the ADMIN user for a pluggable database when you provision it.
Subsequent to this post, I’ve posted how you can provision an Oracle 12c Pluggable Database (PDB), and you can find it in this post. AS always, I hope that this helps those trying to find a quick shortcut on reading the instructions. 😉
MySQL 5.6 Install Steps
My install instructions on the web site were old, somebody wanted me to publish another set of screen capture for the MySQL 5.6 install and configuration. This is it for Windows 7 using the downloadable MSI file.
Installation Steps
The installation from MySQL’s perspective is actually the installation and configuration of MySQL. For your convenience and reference, I’ve already installed the pre-requisites for MySQL. They’re:
- Visual Studio Tools for Office 20120 Runtime
- Microsoft .NET Framework 4 Client Profile
- Microsoft Excel 2007 or greater
- Microsoft .NET Framework 4 Client Profile
- Microsoft Visual C++ 2010 32-bit runtime
- Microsoft .NET Framework 4 Client Profile
Below are the installation steps after you download the current release .msi file. The icon should look like the one to the right. For this example, I”m using the
 mysql-installer-community-5.6.11.0.msi. Double-click the icon on your desktop or from your C:\Users\username\Downloads folder. While working through the steps, you can launch any of the small images to the left if you’d like to see what your screen should look like (generally with a right click to open in a new window).

- The first screen is a Windows 7 dialog box. Click the Run button to install launch the MySQL 5.6 Installer.

- The second screen is a Windows 7 dialog box. It advises you that the MySQL Installer is working and lets you cancel that operation. Don’t click the Cancel button unless you want to stop the MySQL 5.6 Installer.

- The third screen is a MySQL Installer message box. It closes when ready to proceed. Ignore it, unless it’s there for more than a couple minutes. If that occurs you’ve got something wrong with your Windows installation or a very slow computer. If the former, kill the installation process; if the latter, wait patiently.

- The fourth screen in the process is the first MySQL Installer screen. Here you choose what you want to do. You can install MySQL products, inquire about MySQL, or check physical resource components. Provided you installed the prerequisites listed above, you should be prepared to install MySQL Products. Click the Install MySQL Products link to proceed or one of the others to explore.

- The second MySQL Installer screen is the license form. You must check the I accept the license terms checkbox to enable the Next button. Once the Next button is enabled, click it to proceed.

- The third MySQL Installer screen connects to the Internet and finds the latest product update. You can check the Skip the check for updates (not recommended) checkbox to skip this but for the example we’ll check anyway. Click the Execute button to proceed.
- The fourth MySQL Installer screen connects to the Internet and finds the latest product update. You can check the Skip the check for updates (not recommended) checkbox to skip this but for the example we’ll check anyway. Click the Execute button to proceed.

- The fifth MySQL Installer screen acknowledges the latest update is what you’re installing. Click the Next button to proceed.

-
The sixth MySQL Installer screen gives you five choices for the installation, which are listed below. You most likely want to install the Developer Default, so click the Developer Default radio button and then, click the Next button to proceed.
- MySQL Server
- Both the client and server software for the MySQL Server
- MySQL Workbench
- The GUI application to develop for and manage the server.
- MySQL Visual Studio Plugin
- To work with the MySQL Server from VS.
- MySQL Connectors
- Connector/Net, Java, C/C++, OBDC and others.
- Examples and tutorials
- To help you get started with your development.
- Documentation
- Allows you to read the documentation offline.

- The seventh MySQL Installer screen performs a system check for the pre-requisites, which I listed before the installation. Assuming you installed them, you should see a screen that confirms your system configuration is ready for installation. Click the Next button to proceed.

-
The eighth MySQL Installer screen performs displays the products that it’ll install, which are listed below and available in the full image to the left. Click the Execute button to install the products.
- MySQL Server 5.6.11
- MySQL Workbench CE 5.2.47
- MySQL Notifier 1.0.3
- MySQL for Excel 1.1.1
- Connector/ODBC 5.2.4
- Connector/C++ 1.1.2
- Connector/C++ 1.1.2
- Connector/J 5.1.24
- Connector/NET 6.6.5
- MySQL Documentation 5.6.11
- Samples and Examples 5.6.11

- The nineth MySQL Installer screen shows the installation by product and it can take a couple minutes. The screen to the left displays progress more than halfway complete. You don’t need to do anything in this step until all products are complete.

- The tenth MySQL Installer screen shows the completed installation. Everything should install successfully, as shown in the image. Click the Next button to proceed.
This concludes the installation of the MySQL products. The next section shows you how to configure MySQL.
Configuration Steps
You have two basic options, the simple one and the advanced one. These steps will show you how to perform an advanced configuration. I’ve opted to maintain the step numbering from the beginning of the installation. Here are the steps:

- The eleventh MySQL Installer screen is the first MySQL Configuration screen. You can click the Show Details button or begin the configuration. Click the Next button to proceed.

- The second MySQL Configuration screen sets the server configuration type, enables TCP/IP networking (as opposed to a socket model), and lets you enable Advanced Configuration. For this installation, we enable the Show Advanced Options checkbox before you click the Next button.

-
The third MySQL Configuration screen sets the password and lets you create MySQL User Accounts. It’s much easier to let the install proceed and use MySQL Workbench to create databases, users, and roles; plus grant permissions through the GUI environment. Enter the
rootpassword twice, a trivial and unsecure passwordcangetinis what I recommend to my students who won’t have any meaningful information in the database. Make sure you can remember the password you enter. Clearly, a better password is required for real environments. After entering the password twice, click the Next button to proceed.

-
The fourth MySQL Configuration screen sets the Windows Service Name, and you should probably make sure there isn’t another MySQL56 service on the machine before you proceed. You have the choice of running the Windows Service using the Standard System Account or a Customer User account. Unless you’re an expert at Windows 7 administration, you should probably choose the Standard System Account as the one running the Windows 7 service. Click the Next button.

-
The fifth MySQL Configuration screen sets the logging options. You only need Show Query Log typically, but the Error Log is helpful. Make the choices and click the Next button.

- The sixth MySQL Configuration screen explains the next step. It installs the sample files and example databases. You can see what you’ve installed when you click the Show Details button, which is what I did to get the image at the left. The default choice installs the samples and example databases, which can’t hurt. You’ll need the test database if you install DBD::mysql for Perl. If you don’t want them, you can drop them from the database.

-
The seventh MySQL Configuration screen explains you’ve completed configuring the MySQL Server. Click the Next button to proceed.

-
The eighth MySQL Configuration screen explains you’ve finished everything. You can copy the log file to clipboard, which allows you to see everything that was done. Click the Finish button to complete the installation and configuration.
Just one caveat (that’s a warning), this installation doesn’t put the MySQL executable into your System %PATH% variable. You’ll need to do that, and if I get a chance I’ll put a post together for that. I know one or two of my students may need it later.
I hope this helps those you are using the new installer for the first time. It’s a superior tool to the old one, which was also a good tool.
