Oracle Client 10g on Mac
The best thing about working on a MacBook or MacBook Pro is working on it, not working on the VMWare Fusion instance. The virtual machine should be a background process, whether it is a Linux, Windows XP Pro or Vista instance. You’ll find out how to do that here. You’ll be able to run SQL*Plus from the Mac OS command-line, SQL*Developer natively in Mac OS, and Oracle Enterprise Manager in Mac browser (of your choosing). Oddly, the few distracting Java errors that SQL*Developer raises on a PC don’t get raised on the Mac OS X.
At present, Oracle databases don’t run natively on Mac OS X with an Intel processor. You can run Oracle Database 10gR1 on a G5 (PowerPC 970) processor (a detail I apparently missed in the installation notes on the Oracle Technical Network), but why do that? You can run Oracle Database 10gR2, Oracle Database 10g Express Edition, or Oracle Database 11g in a virtual machine on a MacBook, MacBook Pro, or Mac Pro.
Unless you require Java or User Defined Object Types (UDTs) inside your development instance, I’d recommend you install Oracle Database 10g Express Edition on a MacBook or MacBook Pro when you have 2GBs of memory or less. If you have 4GBs of memory, they all work fine. They actually do work on Vista but I’ve heard the new Vista license agreements may prohibit their use on Mac OS X in a VM. I’ve found Windows XP Pro x64 bit works best if you want to run Windows, and Red Hat 4.0 Advanced Server screams in the VM with enough memory.
Enough introduction, here are the steps. A word to the wise, read carefully!!!
1. I’d recommend VMWare Fusion for the virtual server. There were enough problems with Parallels that I simply ditched it. When you install VMWare, download the current release from the web (VMWare Fusion 2.0 is available as of 9/12/2008). After downloading, use your license during the installation. You can use the copy in the box, but I’ve never found one in the box to work (though I’ve only tried 4 of them).
2. Install your operating system in the Virtual Machine (VM). I’d recommend that you take the time to configure memory before hand because it runs a lot faster if you do. Skipping the one-click installation may save you time because I’ve found it still has some warts. You have two choices for configuring the network. One is NAT and the other is a bridged network. The bridged network is the most like separate machines but it may not work in certain commercial settings. For example, if a router disallows calls from one machine to another in a subnet, you should use NAT. NAT means your native Mac OS acts as the gateway, and it ensures that your external router configurations won’t block communication between your Mac OS and the virtual machine instances. The down side for NAT is that you can’t communicate between servers without some additional work (hopefully, I’ll be able to add those steps after Oracle Open World).
2(a). A quick screen shot of how you want to configure VMWare NAT network, you get there by clicking Virtual Machine, Network, Network Settings…

2(b). A quick screen shot of how you want to configure VMWare bridged network, you get there by clicking Virtual Machine, Network, Network Settings…
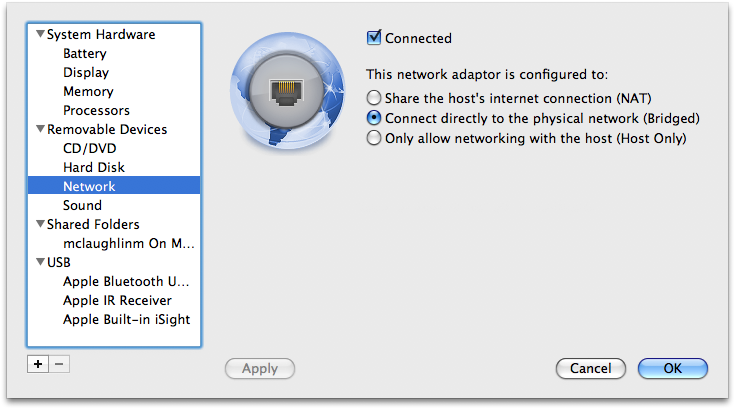
3. Once you’ve installed the operating system and patched it to the current level, you should name your machine before installing the Oracle Database. You should also configure your hosts file with the computer name, which is covered in the next step. You’ll regret it if you do forget it. All is not lost If you forget to edit your hosts file, you can rebuild the Enterprise Manager by following the instructions in this earlier blog page. Also, the standard and enterprise releases of the Oracle Database requires that you avoid white spaces in the user name.
4. Don’t forget to add that name into the C:>WINDOWS\System32\drivers\etc\hosts file or the Linux /etc/hosts file, like this:
xxx.xxx.xxx.xxx hostname hostname.domain.com |
You can find the IP address by using the “ifconfig -a” command in Linux, and the “ipconfig” command in Microsoft Windows.
4(a). The following is the screen shot for a NAT networking configuration. In case you’re not a networking guru, there are three addresses left open by Internet Assigned Numbers Authority (IANA) RFC 1918. 172.16/12 prefix is one of those.
VMWare Fusion has several releases, in general here are the settings that I’ve noticed:
- VMWare Fusion, Version 1.x, typically uses
172.16.113.xfor private addressing. - VMWare Fusion, Version 2.x, typically uses
172.16.153.xfor private addressing. - VMWare Fusion, Version 3.x, typically uses
172.16.123.xfor private addressing.
If you want a virtual machine to call another virtual machine, you’ll need to map the other virtual machine in its hosts file.
In Windows, you’ll find this in the C:\> WINDOWS\system32\drivers\etc\hosts file; and the /etc/hosts file on Linux or Unix.
# Copyright (c) 1993-1999 Microsoft Corp. # # This is a sample HOSTS file used by Microsoft TCP/IP for Windows. # # This file contains the mappings of IP addresses to host names. Each # entry should be kept on an individual line. The IP address should # be placed in the first column followed by the corresponding host name. # The IP address and the host name should be separated by at least one # space. # # Additionally, comments (such as these) may be inserted on individual # lines or following the machine name denoted by a '#' symbol. # # For example: # # 102.54.94.97 rhino.acme.com # source server # 38.25.63.10 x.acme.com # x client host 127.0.0.1 localhost 172.16.113.3 localhost 172.16.113.128 mclaughlin11g mclaughlin11g.techtinker.com |
Note:
The range for static IP addresses in your NAT range is 172.16.113.3 to 172.16.113.127. IP addresses 172.16.113.128 and above are DCHP assigned addresses for VMWare Fusion 1.x, which was used for this article. VMWare Fusion, Version 2.x, uses 172.16.153.3 to 172.16.153.127 for static IP addresses and 172.16.153.128 and above.
4(b). The following is the screen shot for a bridged networking configuration. In case you’re not a networking guru, there are three addresses left open by Internet Assigned Numbers Authority (IANA) RFC 1918. 192/16 prefix is one of those. This is the one you’d most likely see if you’re working in a home netwroking environment.
In Windows, you’ll find this in the C:\> WINDOWS\system32\drivers\etc\hosts file; and the /etc/hosts file on Linux or Unix.
# Copyright (c) 1993-1999 Microsoft Corp. # # This is a sample HOSTS file used by Microsoft TCP/IP for Windows. # # This file contains the mappings of IP addresses to host names. Each # entry should be kept on an individual line. The IP address should # be placed in the first column followed by the corresponding host name. # The IP address and the host name should be separated by at least one # space. # # Additionally, comments (such as these) may be inserted on individual # lines or following the machine name denoted by a '#' symbol. # # For example: # # 102.54.94.97 rhino.acme.com # source server # 38.25.63.10 x.acme.com # x client host 127.0.0.1 localhost 192.168.0.9 localhost 192.168.0.9 mclaughlin11g mclaughlin11g.techtinker.com |
Alternatively, you’ll enter the following IP address if you’re double NAT’d through an Airport Extreme, like me:
127.0.0.1 localhost 172.16.113.3 localhost 172.16.113.3 mclaughlin11g mclaughlin11g.techtinker.com |
If you’re configuring Microsoft Vista, you should note that you can’t edit the hosts file without changing your security permissions. You begin that process by right clicking on the file in Windows Explorer. In the hosts Properties dialog, choose the Security tab and click on your user name before clicking the Edit … button. Allow Full Control to make the changes, but note the original settings. Good system administrations skills would indicate you re-establish security after making the change, and that’s why you’ll need those original settings.
Changing IP Addresses:
If you switch between bridged and NAT, or vice versa, don’t forget that you need to release and renew a DHCP address. The following two steps let you do that:
a. As the Administrator, or privileged account, type the following:
C:\> ipconfig /release |
b. As the Administrator, or privileged account, type the following:
C:\> ipconfig /renew |
Note:
A caveat here for those using DHCP addresses. They may change over time. You may need to revisit this multiple times. If you’re on several networks, you may opt to put all IP addresses that your computer typically holds. Multiple addresses aren’t a problem because it looks for any match in the list to resolve the hostname. This means you can have the information in the file to support multiple network environments where you may travel with your Mac Book or Mac Book Pro, and avoid reconfiguring between locations.
Static IP Addresses in VMWare Fusion:
I’d strongly recommend that you use static IP addresses. They’re straight forward if you remember a couple things: (a) you need to use a port address in the defined range – 172.16.113.3 to 172.16.113.127 (version 1.x and 172.16.153.3 to 172.16.153.127 (version 2.x), and (b) you need to explicitly provide a DNS server IP address.
The following shows how to set a static IP address by platform (only Windows at present):
a. Navigate to the Control Panel, and open the Network Connections. This presents you with the Network Connections window. You should click the Local Area Connection icon, as shown in the screen capture (updated instructions for Windows 7):

b. In the Local Area Connection window, click the Properties button, as shown in the screen capture:

c. In the Local Area Connection Properties window, choose the Internet Protocol (TCP/IP) and then click the Properties button, as shown in the screen capture:

d. In the Internet Protocol (TCP/IP) window, you should enter an IP address in the static range of values, a subnet mask of 255.255.255.0, and a default gateway – which should always be 172.16.113.2 (at least in version 1.x) and 172.16.153.2 (in version 2.x). You should install DHCP first to discover the default gateway. You can discover it by issuing the following command:
C:\> ipconfig |
The last step requires you to select a DNS server. You can find the DNS server of your Mac OS by running the following command:
cat /etc/resolv.conf |
Enter one of the nameserver values. I generally take the first one offered. You can also create a Ubuntu virtual machine, and run DNS there. The following shows the screen capture for the Internet Protocol (TCP/IP) window (by the way the one used was snagged in the screen capture came from the wireless network at Oracle OpenWorld 2008):

After you’ve made these entries, click the OK button for the Local Area Connection Properties window and the Local Area Connection window. Then, click the Close button for the Local Area Connection window and close window widget for the the Network Connections window.
Note #1:
Please remember the DNS server changes when you connect to a different network. You’ll have to check it and change it as you change networks.
In a home network, the Airport Extreme typically double NAT’d, and it uses 10.0.1.1 as the DNS server. This DNS server only lets you manage outbound requests from your VM. You need to configure your own DNS server locally on the Mac OS if you want to interconnect between VMs, or you can use hosts file validation as shown in this blog page.
5. Install the Oracle Database version of your choice in the VM, then confirm that you can connect to the database through the SQL*Plus. This connection should be self-contained in the VM. You use syntax like this for a schema or user named PLSQL with a (trivial) password of PLSQL and the TNS alias from the tnsnames.ora file is ORCL (typically true with an Oracle 10g or 11g installation).
C:\> sqlplus plsql/plsql@orcl |
If you’re installing Oracle Database 10g Express Edition, the TNS alias is
XE and should look like this:
C:\> sqlplus plsql/plsql@xe |
Note #2:
Before you move ahead with the installation, you should check your listener.ora and tnsnames.ora files. You can find the files in the $ORACLE_HOME\network\admin directory. They should have your hostname and not an IP address as the HOST variable values, like those in the following illustration. The top image is the listener.ora file, and the bottom image is the tnsnames.ora file.

For reference, the equivalent Windows environment variable is %ORACLE_HOME%. The environment variables should point to your Oracle home directory.
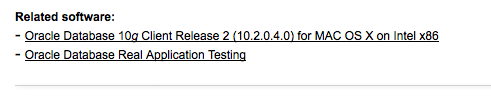
6. Once you’ve done that, you’re ready for the Mac OS X part of the equation. Download the Oracle Database 10g Client Release 2 from the otn.oracle.com web site.
7. Unzip the file and put both the doc and ohome directories into a folder named instantclient, which I chose to put in the /Applications folder.
8. Now for the Linux tricks. You need to setup a couple environment variables. The easiest way to do this in Mac OS X is to put them in a .bash_login shell script in your user account. Go to the Macintosh HD icon and click it. Then, navigate to the Applications folder. Open the Utilties folder from the Applications folder, and launch the Terminal application. If you put the Oracle Client where I said to put it, then do exactly what I’ve got but if you improvised, adjust here too.
8(a). Open the .bash_login file with vi (it won’t hurt too badly), and enter command mode by typing an “i“. It is possible that the file may not exist, you can use the touch utility to create a .bash_login file or simple type this to create and edit the file:
vi .bash_login |
After you open the file, use the i to enter data because it opens in command mode. Then, type the following (slowly, if you’re new to vi), backspace should help cleanup errors:
export set ORACLE_HOME=/Applications/instantclient/ohome export set DYLD_LIBRARY_PATH=$ORACLE_HOME/lib export set TNS_ADMIN=$ORACLE_HOME/network/admin export set PATH=$PATH:$ORACLE_HOME/bin |
8(b). Close vi by taking these two steps. First, click the “Esc” key, it puts you in command mode. Second, type “:wq” (that’s a colon, a w and a q) from command-mode. The file is now closed.
8(c). Open a new Terminal session, and check your handiwork by typing the following echo commands from the terminal prompt, which should show you what you typed in above. If this didn’t work, return to the step 8(a) and 8(b) until it works.
echo $ORACLE_HOME echo $DYLD_LIBRARY_PATH echo $TNS_ADMIN echo $PATH |
This step means that every time you open a Terminal, you can run SQL*Plus against the Oracle Database in the VM instance. Naturally, you’ll need the VM instance up and running concurrently.
9. You need to enter the IP address and hostname for your virtual machine in the /etc/hosts file on your Mac. This requires the superuser account. You will again use vi to edit this file. You’ll need to use sudo to open this file, like this:
sudo vi /etc/hosts |
Add the following line at the bottom of the existing file, and don’t change anything else (unless you’d like to reinstall everything). This entry is generally required with NAT IP addresses, and it is optional with bridged networkds when the DNS server resolves IP addresses. If you’re running disconnected from a network, it is also required.
xxx.xxx.xxx.xxx hostname_of_vm_machine |
You should use the IP value from your virtual machine’s hostname file. You’ll need to use :wq! to close the file. This is required of key files. The bang operator (!) tells the OS you’re sure you want to make the change.
This change lets you reach the virtual machine because you’ve now qualified the server to your Mac OS. This is known as host file resolution.
You actually have two options to qualify virtual machines to the local Mac OS. They are host file or DNS resolution. Host file resolution is easy because you simply add the private IP address and name to the Mac OS hosts file. DNS resolution can be done in the VMWare network configuration files, or on an external DNS server. An example of the Mac OS hosts file is:
## # Host Database # # localhost is used to configure the loopback interface # when the system is booting. Do not change this entry. ## 127.0.0.1 localhost 127.0.0.1 MichaelMcLaughlin.local 255.255.255.255 broadcasthost ::1 fe80::1%lo0 localhost 172.16.113.128 mclaughlin11g |
If you’re doing this on a corporate network, you’ll probably need to append the domain to the hostname. It is a good idea to use the unqualified and qualified hostname together (a qualified hostname includes the domain name). The configuration of your nameserver determines whether or not you need to use an unqualified or qualified hostname. You can find your nameserver in the /etc/resolv.conf file. A fully qualified hostname configuration line would look like this in your /etc/hosts file:
172.16.113.128 mclaughlin11g mclaughlin11g.techtinker.com |
As noted above, DHCP IP addresses may change because another computer can snag your DHCP lease. You may have to change this IP address over time. Also, you can enter multiples when you connect to different networks. Resolution of the IP address or hostname looks for a match in the list.
It’s simpler then the server VM instance because you won’t need a domain at this time. You would if you’re configuring Apache but that’ll have to be another blog page. You can test whether you can connect to the virtual machine by running a simple ping test, like …
ping hostname |
If it resolves, you can continue. Otherwise you need to stop and fix it.
Ah, the question is how do you fix it? The first thing you need to do, is open ICMP requests in your firewall, or disable your firewall. I recommend the former because when I post how you can open communication into these virtual machines you’ll want to have your firewall running. There are two steps in Windows to open the firewall.
First, navigate to your control panel, and open the Windows Firewall. Choose the Advanced tab as shown in the screen capture:

Second, allow incoming echo requests. You choose the Settings… button in the ICMP region to enable echo requests. This also allows echo acknowledgments or replies. After enabling the echo requests, you should click the OK button in the ICMP Settings and Windows Firewall windows.

Since there are too many Linux firewalls, I leave those instructions to you. Just remember that the ping utility resolves everything at networking level 3, which is IP, UDP, ICMP, et cetera.
At this point, you should have also added port exceptions for SQL*Plus on port 1521 and Oracle Enterprise Manager on port 1158. You do that from the Windows Firewall too. The Add Port … button lets you create port exceptions. Port exceptions allow traffic through only one port, and let your firewall protect other aspects of your machine.

You only need to open TCP for both the SQL*Plus and Oracle Enterprise Manager exceptions. The exception configuration for the Oracle Enterprise Manager looks like the following:

Now that your firewall is open a bit, you can proceed with testing the Mac OS side of the configuration. Don’t forget to click the OK button to save the port exception.
10. Copy your tnsnames.ora file from the Oracle home directory in your VM. It is found in the (Linux or Unix) $ORACLE_HOME/network/admin or (Windows) %ORACLE_HOME%\network\admin directory. You need to put it in the equivalent Oracle home directory on the client installation, which is this unless you improvised:
/Applications/instantclient/ohome/network/admin |
If you don’t want to copy it, you can use the vi utility to create a tnsnames.ora file by typing something like the following. Change the HOST to the name of your virtual machine, the PORT to the correct value of the listener port, and the SERVICE_NAME to the name of your database instance.
ORCL = (DESCRIPTION = (ADDRESS = (PROTOCOL = TCP)(HOST = mclaughlin11g)(PORT = 1521)) (CONNECT_DATA = (SERVER = DEDICATED) (SERVICE_NAME = orcl) ) ) |
11. Now, you’re prepared to test how well you’ve setup the environment. The first step confirms that Oracle’s TNS (Transparent Network Substrate) is configured properly. You test it with the Oracle tnsping utility. The argument is the TNS alias (or service name) in a tnsnames.ora file. It is typically orcl or xe for demonstration instances. I’ve used the one from the general releases.
tnsping orcl |
If you receive a success, move on to the next step and check SQL*Plus connectivity. The tnsping utility uses the tnsnames.ora file to resolve where it should request an acknowledgment. It checks in the local directory before the $ORACLE_HOME/network/admin directory, unless you’ve set the $TNS_ADMIN environment variable. If the $TNS_ADMIN variable is set, tnsping looks there first.
MichaelMcLaughlin:~ mclaughlinm$ tnsping orcl TNS Ping Utility for MacOS X Server: Version 10.2.0.4.0 - Production on 08-NOV-2008 19:35:55 Copyright (c) 1997, 2007, Oracle. All rights reserved. Used parameter files: Used TNSNAMES adapter to resolve the alias )SERVICE_NAME = orcl)= TCP)(HOST = mclaughlin11g)(PORT = 1521)) OK (10 msec) |
A failure is generally represented by an ORA-12514 or ORA-12162. These typically mean you’ll need to troubleshoot the configuration of the Oracle listener. Either typically means that the IP addresses between the OS X client and VM server differ. If you’re using hosts file validation, please check to make sure you have the same IP address is both the Mac /etc/hosts file and VM hosts file. If you’re using DNS validation, you should ensure that the IP addresses map to a valid DNS host name. You can use the nslookup command to see if the IP address returns the hostname or hostname returns the IP address.
After making changes, you need to stop and restart the Oracle listener to test any changes. Linux also requires you to restart network services. These changes are made inside the respective virtual machines.
Unfortunately, you could get a message that the executable isn’t found. You can check whether you’ve configured your (Mac OS X) $PATH variable with this command:
which -a tnsping |
You’re $PATH variable is pointing to the wrong place if nothing is returned. Return to step 8(a) and fix it. The which command lets you find executable programs in your current $PATH. The -a option lets you see the order in which two copies of the same executable are called. The one returned first by the which -a call is always the one called because of the order of precedence set in the current $PATH environment variable.
12. You can check whether Oracle SQL*Plus works here by using the following type of syntax:
sqlplus plsql/plsql@orcl |
If you connect, that’s great! Move on to the next step.
MichaelMcLaughlin:~ mclaughlinm$ sqlplus plsql/plsql@orcl SQL*Plus: Release 10.2.0.4.0 - Production on Sat Nov 8 19:45:08 2008 Copyright (c) 1982, 2007, Oracle. All Rights Reserved. Connected to: Oracle Database 11g Enterprise Edition Release 11.1.0.6.0 - Production With the Partitioning, OLAP, Data Mining and Real Application Testing options SQL> |
If not, there are a couple errors that might occur. One is that the executable can’t be found, you can check that with similar syntax to that found in step 11 above:
which -a sqlplus |
If nothing is returned, fix the $PATH environment variable in step 8(a). The other is an ORA-12545, which in this case most likely means that the IP address in the VM hosts file is incorrect.
13. Hopefully, this is a lucky number. Download SQL*Developer for the Mac OS X from the otn.oracle.com web site, here’s the one you want:
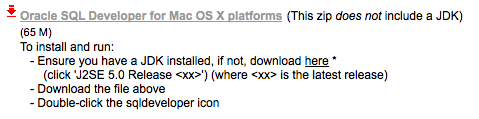
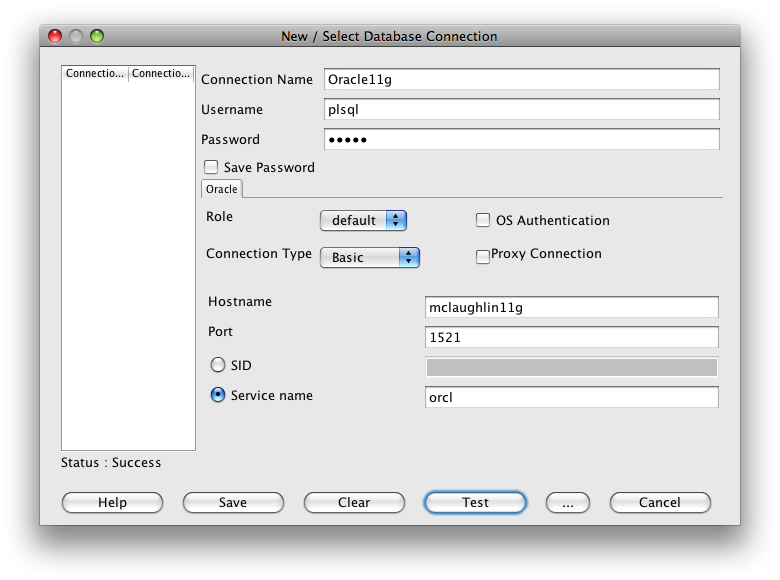
You should unzip it, and put it into the Applications folder. Launch SQL*Developer. Right click the Connections in the left column, and you should complete the connection like this:
Note:
The Service name should be xe not orcl when you’ve installed or are connecting the sample database from the Oracle Database 10g Express Edition.
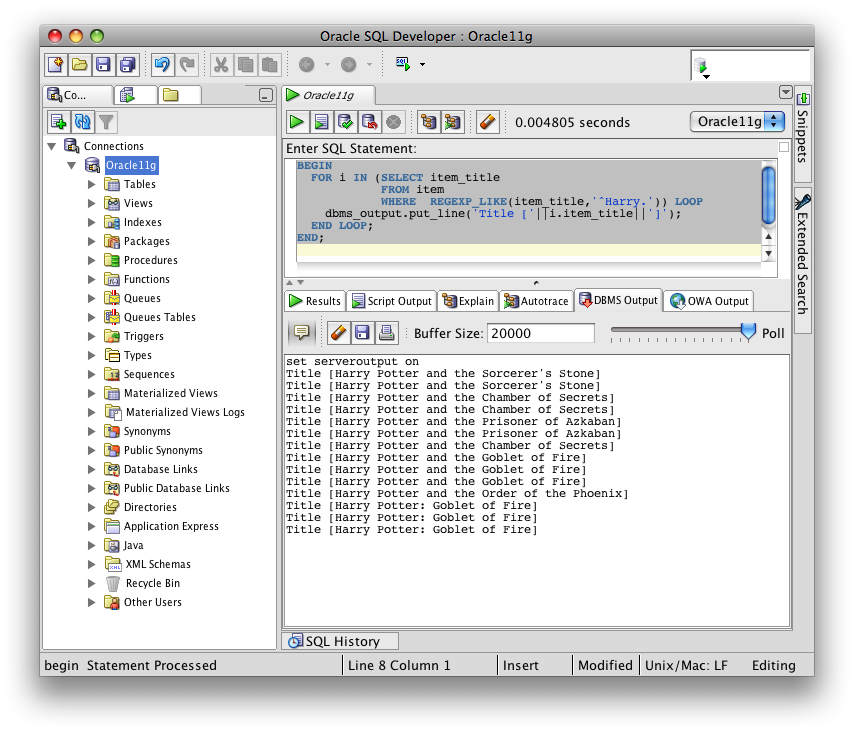
14. Now you can test SQL*Developer. Here’s a quick screen shot of it working. You can click the image for the full size screen shot, which wouldn’t fit the style of the blog.
15(a). You can configure the Oracle Enterprise Manager (OEM) to run now. The only possible missing link is the security credentials. You’ll find out how to override those in this prior blog post. The following is a screen shot of the OEM product running on a Mac through NAT to a virtual machine:

15(b). If you’re installing Oracle Database 10g Express Edition (XE), you must enable the web interface to work beyond the virtual machine (or localhost). Inside the VM, open the Oracle XE home page, authenticate as the privileged SYSTEM user, then click the Manage HTTP Access link in the shadow box Tasks region on the right hand side of the web page.
This opens the Manage HTTP Access page. Click the radio button for Available from local server and remote clients option. Then, click the Apply Changes button to make the Oracle Applications Express web console available on your Mac OS X.

This concludes the steps. I hope it works for you. If it didn’t work, please post a comment. Also, if I didn’t catch the right tags, please let me know.
For those who want to configure Oracle Internet Directory from the Mac OS, John Piwowar has laid it out in his blog here. That’s the oidadmin utility.
Gotchas:
1. If you encounter an “the network bridge device on /dev/vmnet0 is not running” when trying to start your VMWare instance, don’t panic. A service didn’t start correctly. You can reboot your Mac or you can run the following command from the /Library/Application Support/VMWare Fusion directory (options are --start, --stop, or --restart):
sudo boot.sh --restart |
You can also find how to configure a VMWare Windows virtual machine here. It has instructions for both NAT and bridged networks.

This is exactly the configuration I recommend for your CIT 320, 420, 425 students. They all think it’s a pain, but once you’ve got this up and running it is very nice to be able to develop and code in OS X and assume the Oracle server is exactly that, an Oracle server on another machine. This is how they will use it in the work environment so they’d better be used to it in class as well. Very nice post.
Mike Farmer
2 Sep 08 at 1:30 pm
Thank you for posting this for all of us. Very helpful! It is too bad that Oracle isn’t on top of this. Way to be on the ball and shame on Oracle.
Mike Grace
9 Sep 08 at 8:29 pm
Yes, it’s unfortunate that the install notes don’t clearly state what all the steps are to setup the Oracle Client software. They do however say to reference the libraries but they assume people know how to do that, which is probably not a good assumption. They also assume that those configuring the Oracle Client software understand the networking model, and how to configure and troubleshoot the listener.ora and tnsnames.ora files. I think this shortfall is common with all software vendors because documentation doesn’t get too much actionable user acceptance testing.
maclochlainn
10 Sep 08 at 3:00 am
Correct me if I am wrong but I think Oracle has now come out with 10gR2 that will run native on the Intel macs. If this is really what I think it is I am going to be really excited. I found it while looking for oracle to install on my tower that I just set up at home as a server.
Download
* http://www.oracle.com/technology/software/products/database/oracle10g/htdocs/10204macsoft.html
Installation guide
* http://download.oracle.com/docs/cd/B19306_01/install.102/e12121/toc.htm
Mike Grace
21 Sep 08 at 6:42 am
Mike, That’s the Oracle Client software that the article discusses. While the Oracle client is large, it doesn’t let you have the database natively on the Mac OS. For a moment, I’d hope it was something I missed. I’ve asked a lot of people at Oracle to consider releasing at least Oracle Database 10g Express Edition (XE). It appears there’s some talk, maybe that will translate to action, and a native Mac Intel port of the product.
maclochlainn
21 Sep 08 at 2:34 pm
Sad day! 🙁 I was hoping that Oracle had made a breakthrough in their thinking. In the mean time I will just have to install Oracle on my XP server that I just got running at home. I have done a little bit of searching and found that Oracle and Apache can work together but in your experience do they “play nice”? In your opinion what would be the best companion for Oracle? Thanks!
Mike Grace
21 Sep 08 at 9:44 pm
Yes, Apache plays well with Oracle and vice versa. The Application Express web application runs on an Apache implementation that is deployed internally in Oracle. I show how you can access it for your own applications in Chapter 16 of my Oracle Database 11g PL/SQL Programming.
Oracle also ships their Oracle Application Server (AS), which includes some serious production utilities missing in generic Apache. If you plan to implement PHP on Oracle it is called OPAL (Oracle, PHP/Perl/Python, Apache, and Linux) and you’ll need Zend Core for Oracle to have a supported environment. More on that stack is found in my OPAL book found in the @About section.
maclochlainn
21 Sep 08 at 10:22 pm
At first i could not get the tnsnames to work, but at step nine when i included the hostname with the domain it worked. Great instructions though. Thanks.
mxshrestha
11 Nov 08 at 10:42 pm
Great catch on step #9! I’ve added the details on the qualified hostname. Thanks!
maclochlainn
11 Nov 08 at 11:24 pm
Hi,
I followed the exact steps you mentioned. But I am getting stuck at the tnsping step. I get a “Bus error” when I type in tnsping xe
for that matter just typing “tnsping” itself gives a “Bus error”.
Let me know if you have any ideas. I have re-checked all my IP settings etc.
Bharat Shrinevas
26 Nov 08 at 3:29 am
Ok I thought this might help. Just pulled up the Crashreport details. I am running Leopard 10.5.5. Is this more related to the oracle code than anything to do with my machine. Let me know if you have any ideas. Thanks!
——————
Process: tnsping [1104]
Path: /Applications/instantclient/ohome/bin/tnsping
Identifier: tnsping
Version: ??? (???)
Code Type: X86 (Native)
Parent Process: bash [983]
Date/Time: 2008-11-26 00:03:07.867 -0800
OS Version: Mac OS X 10.5.5 (9F2114)
Report Version: 6
Exception Type: EXC_BAD_ACCESS (SIGBUS)
Exception Codes: KERN_PROTECTION_FAILURE at 0x0000000000000000
Crashed Thread: 0
Thread 0 Crashed:
0 libclntsh.dylib.10.1 0x014556d4 mac_shared_library_environ_init_routine + 18
1 dyld 0x8fe15a82 ImageLoaderMachO::doInitialization(ImageLoader::LinkContext const&) + 162
2 dyld 0x8fe0e723 ImageLoader::recursiveInitialization(ImageLoader::LinkContext const&, unsigned int) + 307
3 dyld 0x8fe0e6b5 ImageLoader::recursiveInitialization(ImageLoader::LinkContext const&, unsigned int) + 197
4 dyld 0x8fe0e809 ImageLoader::runInitializers(ImageLoader::LinkContext const&) + 57
5 dyld 0x8fe04102 dyld::initializeMainExecutable() + 146
6 dyld 0x8fe07b5f dyld::_main(mach_header const*, unsigned long, int, char const**, char const**, char const**) +
2975
7 dyld 0x8fe01872 dyldbootstrap::start(mach_header const*, int, char const**, long) + 818
8 dyld 0x8fe01037 _dyld_start + 39
Thread 0 crashed with X86 Thread State (32-bit):
eax: 0x00000000 ebx: 0x014556ce ecx: 0x963008ad edx: 0x01455000
edi: 0x8fe2fc20 esi: 0x01455478 ebp: 0xbfffe0d8 esp: 0xbfffe0d0
ss: 0x0000001f efl: 0x00010282 eip: 0x014556d4 cs: 0x00000017
ds: 0x0000001f es: 0x0000001f fs: 0x00000000 gs: 0x00000037
cr2: 0x00000000
Binary Images:
0x1000 – 0x2ffc +tnsping ??? (???) /Applications/instantclient/ohome/bin/tnsping
0x191000 – 0x2c8fff +libnnz10.dylib ??? (???) /Applications/instantclient/ohome/lib/libnnz10.dylib
0x1455000 – 0x26edfe7 +libclntsh.dylib.10.1 ??? (???) /Applications/instantclient/ohome/lib/libclntsh.dylib.10.1
0x8fe00000 – 0x8fe2da53 dyld 96.2 (???) /usr/lib/dyld
0x91764000 – 0x9176bfe9 libgcc_s.1.dylib ??? (???) /usr/lib/libgcc_s.1.dylib
0x937af000 – 0x937b3fff libmathCommon.A.dylib ??? (???) /usr/lib/system/libmathCommon.A.dylib
0x962f7000 – 0x9645eff3 libSystem.B.dylib ??? (???) /usr/lib/libSystem.B.dylib
0xffff0000 – 0xffff1780 libSystem.B.dylib ??? (???) /usr/lib/libSystem.B.dylib
Bharat Shrinevas
26 Nov 08 at 4:27 am
A bus error is a signal 10 error. It deals with memory allocation mismatches.
Can you clarify:
1. Mac Model (Mac Book, et cetera):
2. Mac Architecture (G4, Core Dual):
3. Virtualization Software (Y/N):
4. Oracle download (Oracle_10204Client_MAC_X86.zip):
Thanks, Michael
maclochlainn
26 Nov 08 at 10:05 pm
Thanks for getting back. Answers to your questions below
1. Mac Model: MacBook Pro (latest one) with Intel core 2 Duo
2. Intel core 2 Duo
3. Virtualization software: VMware Fusion 2.0
4. Oracle Download: Oracle_10204Client_MAC_X86.zip
Thanks,
Bharat
Bharat Shrinevas
26 Nov 08 at 10:50 pm
The good news is that configuration should work. I’ve got it running on Mac Book Pro (4 GB RAM) and Mac Pro (14 GB RAM). This is what I see on my Mac Book Pro with the Windows XP VM running in VMWare 2.0.0, taken from the Activity Monitor dialog (Applications -> Utilities -> Activity Monitor):
Does the error occur with any other applications? If not, you may want to remove the Oracle Client and re-install it. If that doesn’t work, the bad news is the next tests can be very tedious. You should check and rule out the following:
Memory: Do you have 4 GB of RAM? Did you get it from Apple.com, Crucial.com, or another party? You can put back the original RAM, start the machine without starting the VM, then try to run
tnspingwithout any arguments. If the original error results from too little memory, it should raise aTNS-03502and not the bus error because VMWare Fusion is shutdown. This test points to a problem with the memory chips.Device Drivers: Some 3rd party device drivers can cause memory problems. If you have any remove them and retest.
OS Integrity: The absolutely last thing you should check is if the OS is healthy. Generally, you do that by reinstalling it.
maclochlainn
27 Nov 08 at 12:21 pm
Hello,
I have exactly the same problem as Bharat: Whenever I try to execute tnsping or sqlplus from the Terminal on my MacBook with OS X 10.5.5, I just get a generic “bus error” – nothing else.
A normal ping works of course and Navicat Lite (http://oracle.navicat.com/) connects perfectly to the Oracle server, no matter if I use TNS login or the so called basic login. I can send SQL queries, too as long as I use Navicat’s built in tool. But as soon as I start SQL*Plus from within Navicat, I get the same bus errors again.
There are no problems with tnsping or sqlplus on a Windows XP PC or an OS X 10.4.11 PPC Mac, so the database server should be working within normal paramters.
I assume that tnsnames.ora and environment variables are configured correctly on my Intel MacBook with OS X 10.5.5, too – otherwise Navicat would not connect either.
Any ideas?
(1. Mac Model: MacBook (latest one), 4 GB RAM
2. Intel core 2 Duo, 2 GHz
3. Virtualization software: none – dedicated Windows Oracle server in the network
4. Oracle Download: Oracle_10204Client_MAC_X86.zip)
Markus Klose
3 Dec 08 at 10:13 am
Bharat & Markus,
This was definitely interesting. I was able to get a student with a new Mac Book Pro to volunteer for testing. Bad news, I’ve replicated your problem. We swapped the drive out to a Mac Pro and booted it with the same results. Therefore, it’s appears to be a software issue.
Unfortunately, I may not be able to dedicate the time to testing until next week because my father-in-law passed away this morning. When I get back from the funeral, I’ll check comparative objects in all library archives and update you with any findings.
As to Navicat, it communicates through the JDBC not OCI8 communication channel to the database. The
tnspingutility uses ICMP calls, andsqlplususes the OCI8 channel (TCP calls), which is why it requires the Oracle Client installation.maclochlainn
3 Dec 08 at 11:42 pm
Any more info. on this? I have had the same problem with the same new mac book hardware as listed above since 3/Nov/08. I posted then on OTN, along with others, but no fix has been posted. My intel mac pro (tower) works fine. As you mentioned, this affects all OCI apps, mine, and supplied apps such as sqlplus. Interestingly enough one of the OTN posters said sqlplus works under dtruss (dtrace).
Garrison
10 Dec 08 at 9:15 am
Some additional information on the issue mentioned above: Apple published a firmware update for various MacBooks yesterday.
However, the update does *not* solve the problem – I still get bus error when calling tnsping or sqlplus.
Markus Klose
11 Dec 08 at 4:15 am
On the OTN web site there are 2 options for 10g client for Mac. One is the instant client stuff and another – Oracle_10204Client_MAC_X86.zip which, according to the web page and install notes is the full client (including admin tools). It’s about 3 times the size of the instantclient downloads. I have it all up and running – the notes above helped a lot – but I can’t seem to fin export/import utilis anywhere. This is the only whole I have in getting rid of a windows vm – I need to be able to run exp. Am I missing something here? I really could do without a gig of disk in a windows vm to load the Oracle 10g client (Administrator) for Windows just to run a simple export utility.
Thanx…
Greg Mancuso
12 Dec 08 at 9:33 am
The import and export tools are components of the database and designed to work on a single server. They don’t support RPC import or export activities and aren’t part of the Oracle Client software.
maclochlainn
12 Dec 08 at 11:40 am
Apple’s Mac OS X 10.5.6 update seems to solve the problem. As always, it is better to install the combo version rather than the delta update.
tnsping and sqlplus are working now on my MacBook – does anyone else here have similar experiences after updating to 10.5.6?
Markus Klose
16 Dec 08 at 2:57 am
Thanx. I guess that is my confusion. exp.exe and imp.exe are part of the Oracle client for Windows when installed in dev or admin versions. They do not get installed if installed in runtime or instantclient modes.
I keep a windows vm just so I can pull a local export of a database. It seems that I should have similar capabilities from the “full” Mac client.
Thanx again for the help.
Greg Mancuso
16 Dec 08 at 2:15 pm
I’d narrowed it down to the library differences between an old MacBook Pro Leopard install and the new install, which included four additional components. Today, I went into the BYU – Idaho Bookstore and tested it on a new MacBook Pro. I replicated the error on Mac OS X 10.5.5 (9F33), Darwin 9.5.0. When I upgraded it to Mac OS X 10.5.6 (9G55), Darwin 9.6.0, the error goes away. I should note that I also applied the firmware upgrade too. My thanks to Markus for alerting us to the effects of the update.
maclochlainn
17 Dec 08 at 11:11 am
Thanks for the interesting article.
Unfortunately I have the same problem as Markus and Bharat, but in my case I am already running the latest updates on my macbook.
Does anyone know what could cause that problem?
My set up:
MacBook (latest model)
Oracle_10204Client_MAC_X86.zip
the database is on a windows server, not in vmware or parallels
Any help is appreciated
Thomas Wedehase
8 Jan 09 at 4:14 am
Are you running Mac OS X 10.5.6 (9G55)?
maclochlainn
8 Jan 09 at 4:13 pm
I checked again to be absolutely certain.
I am running 10.5.6 (9G55)
Thomas Wedehase
9 Jan 09 at 4:14 am
Just to let you know that those using the express edition of the database need to use “xe” instead of “orcl” in steps 5 and 13.
Andre Kradolfer
9 Jan 09 at 3:40 pm
hi followed all the steps but im getting
TNS-12541 on macosx
no listener ?
ping to vmware is fine. server on vmware working. sqlplus on vmware working.
Any idea?
thnks
alkatal
13 Jan 09 at 6:16 pm
You can check this blog post for information on resolving a
ORA-12541error. I’d guess that you’ve got a firewall blocking either ICMP or TCP incoming traffic. Did thetnspingverification work from Step 11 above? If not, you may want to take another look at Step 8.maclochlainn
13 Jan 09 at 7:12 pm
Andre,
I’ve updated Steps 5 and 13 with the requested information. I also added Step 15(b) to describe how to make the Oracle Application Express web pages available in the Mac OS. Thanks for the feedback.
maclochlainn
13 Jan 09 at 7:34 pm
TNS-12541
looks like i dont have lsnrctl. I installed the client from
http://www.oracle.com/technology/software/products/database/oracle10g/htdocs/10204macsoft.html
is there another package to install so i can get lsnrctl in order to test the listener.
I m using an xe db and exported ORACLE_SID=XE on macosx
alkatal
14 Jan 09 at 7:07 am
The
lsnrctlutility is only a server component. It isn’t installed on the Mac OS X. You’ll find it in the Oracle Server. If your VM is running Windows, it’s also a service. You can open your services dialog to confirm that it is running, or from the command prompt, you can run the following command to see if it is running (required in Linux or Unix):C:> lsnrctl statusmaclochlainn
14 Jan 09 at 11:33 am
Thomas,
I’ve gone back and re-verified the steps on a new MacBook and MacBook Pro. I’m not sure what problem you’re encountering but my testing isn’t surfacing a bus error after applying the Mac OS X 10.5.6 update and firmware 1.5 upgrade.
maclochlainn
19 Jan 09 at 12:04 pm
I recently had to set up Oracle again on my Macs, and found the experience with Parallels to be relatively painless this time round, mainly because they provide a pre-built VM on their site consisting of Fedora+Oracle XE – it even runs up a Bonjour service for the admin console.
(Which unfortunately doesn’t work properly with Safari 4, so you need to copy the URL to Firefox to get in).
But basically it’s now very simple – most of the issues were then around sql*plus install on the OS X side, and I didn’t have to edit .hosts, or fiddle with the parallels network settings this time.
My new problem – how to get a backup out of the Fedora VM to OS X!
Anyway, point of the comment is to say it may be worth revisiting the Parallels set up, as it’s improved a lot in last 9 months or so.
JulesLt
13 May 09 at 5:06 pm
Having once used Parallels extensively, I think that VMWare is where I’ll stay. I’ve got a huge repository of VM’s now there. However, I’m glad it worked for you. 🙂
maclochlainn
14 May 09 at 11:48 am
This post provides an explanation of configuring VMWare Fusion, which isn’t release dependent.
VMWare Fusion NAT
1 Mar 10 at 11:41 pm
[…] Another take on providing instructions built from this page […]
non-random ramble :: Install Oracle XE 10g On OS X with VMWare Fusion
21 Apr 10 at 7:40 am
Hi,
I have Oracle 10g installed on my native Mac OS X. No need to have Windows on VMWare.
Jojo
6 Oct 10 at 10:19 am
What release of Mac OS X (sw_vers)?
maclochlainn
8 Oct 10 at 11:53 pm
Hi, I have followed the instructions and have been able to run SQL*Plus directly on the Mac side connecting to Oracle 11g in a VMWare virtual machine. This is great. 🙂
I am wondering though if it is possible to make the fixed IP address ‘visible’ (I’m not a network guy) on the Mac side so that I wouldn’t have to modify
/etc/hostsevery time I move to another network.I have tried to make that work on my own but cannot even get “ping” to find the fixed
IP, much less thehostnameI’ve assigned.Any suggestions?
Thank you for this excellent article. Until we get native Oracle 11g on the Mac (apparently the 10g was just a fluke) this is a good way to go.
Jack
Jack
11 Oct 10 at 6:56 pm
p.s. Is tnsping still available anywhere? I have downloaded the 11g instantclient ‘lite’ and ‘sqlplus’ and the ONLY executable I can find in either is SQL*Plus.
Jack
11 Oct 10 at 6:57 pm
Have you tried this blog post on configuring VMWare Static IP ports?
maclochlainn
13 Oct 10 at 9:27 pm
I have followed the instructions on the referenced post, but it hasn’t helped.
Let me share what I think are the critical values and see if anyone can spot anything…
dhcpd.confsubnet 172.16.120.0 netmask 255.255.255.0 { range 172.16.120.128 172.16.120.254 ...on the XP side I had added the following line to the hosts file:
in the network connection 2 the TCP/IP settings are:
IP 172.16.120.4
Subnet 255.255.255.0
Default gateway 172.16.120.2 (and I’ve tried 10.0.0.1 and 208.67.222.222 (opendns))
On the XP side I can ping 172.16.120.4 and 10.0.0.1
On the Mac side I have added the following line to /etc/hosts:
The
dhcpd.conffile did not have an entry for “host vmnet8”I added the following:
The fixed-address value is from
~/Documents/Virtual Machines/VMName/VMName.vmxAny suggestions would be appreciated. Please let me know if I’ve missed providing any important values/setttings/whatever?
Thanks for the help, Donnachaidh
Jack
19 Oct 10 at 4:41 pm
I’m assuming you checked the status and restarted the VMWare Fusion, but if not you should try that. If that doesn’t work, change it back to bridged and see if you can ping the server. Last, I’d check the assigned ethernet address (Mac Address). If that doesn’t work, let me know and I take a closer look.
maclochlainn
19 Oct 10 at 9:42 pm
Jack, The
tnspingis found in the Oracle Client software installation in the$ORACLE_HOME/bindirectory. Have you set the your Mac OS X$PATHvariable to include the Oracle Client/bindirectory?maclochlainn
21 Oct 10 at 8:41 pm
[…] and so here is the blog to explain it. I would like to credit Michael McLaughlin for an excellent article that explains very clearly how mac, vmware fusion 3.1.2 and guest windows xp on […]
Access Oracle on Virtual windows7 from OS X
22 May 11 at 6:09 pm
Hi,
I am somewhat unfamiliar with the technical side of computers, I’ll put that right out there. I have a practical question. Will the instructions that you give in this post work for me? Here’s my situation: I have a MacBook Pro and a MacBook Air (I would prefer to use the Air if at all possible). I need to access Oracle Remote Data Capture for work. So, is that the situation you’re posting about here? Also, have there been any updates since the initial posting? For instance, have you found that newer versions of Parallels function better than the 2008 versions, or do you still find that VMWare Fusion works better? Would be truly appreciative of any help you can offer.
Thanks,
Katie
Katie Knipscher
14 Sep 11 at 1:54 pm
Yes, I wrote that some time ago. The instructions have been tested through Snow Leopard but not on Lion. They should work with any virtual machine software you choose to use, like Oracle VirtualBox or Parallels. I use VMWare Fusion and Oracle VirtualBox. I just haven’t paid for Parallels to test it. If they gave me a copy, I’d test it and blog about it then.
maclochlainn
14 Sep 11 at 9:16 pm
I just tried this on Mac OS X Lion, and it works great! Thanks for this walk though!
Kreeves
17 Apr 12 at 2:03 pm
Interesting that you ditched parallels. I use parallels and ditched VMWare Fusion because it had all sorts of issues. It also runs a lot faster.
No, I am not affiliated with them in any way. It would actually be nice if they talked to me occasionally. Of course I am using Parallels for Mac, not the Parallels desktop version. Maybe that explains the difference.
sweetfa
8 May 12 at 10:18 pm