Archive for April, 2021
MySQL+Credentials
The first tutorial supplementing the MySQL Connector/NET Developer Guide showed you how to connect and run static INSERT statement. It was a barebones PowerShell script with the MySQL Connector. This post shows you how to run a PowerShell script that uses a dynamic form to gather the MySQL credentials and then run a static query. Below is the MySQL Credentials form.

You enter the correct user name, password, hostname (or IP address), port, and database, like this:

Here’s the complete code for this staticQuery.ps1 PowerShell script:
# Add libraries for form components. Add-Type -AssemblyName System.Windows.Forms Add-Type -AssemblyName System.Drawing # Define a user credential form. $form = New-Object System.Windows.Forms.Form $form.Text = 'User Credential Form' $form.Size = New-Object System.Drawing.Size(300,240) $form.StartPosition = 'CenterScreen' # Define a button and assign it and its controls to a form. $loginButton = New-Object System.Windows.Forms.Button $loginButton.Location = New-Object System.Drawing.Point(60,160) $loginButton.Size = New-Object System.Drawing.Size(75,23) $loginButton.Text = 'Login' $loginButton.DialogResult = [System.Windows.Forms.DialogResult]::OK $form.AcceptButton = $loginButton $form.Controls.Add($loginButton) # Define a button and assign it and its controls to a form. $cancelButton = New-Object System.Windows.Forms.Button $cancelButton.Location = New-Object System.Drawing.Point(155,160) $cancelButton.Size = New-Object System.Drawing.Size(75,23) $cancelButton.Text = 'Cancel' $cancelButton.DialogResult = [System.Windows.Forms.DialogResult]::Cancel $form.CancelButton = $cancelButton $form.Controls.Add($cancelButton) # Define a label and assign it and its controls to a form. $userLabel = New-Object System.Windows.Forms.Label $userLabel.Location = New-Object System.Drawing.Point(30,15) $userLabel.Size = New-Object System.Drawing.Size(100,20) $userLabel.Text = 'Enter User Name:' $form.Controls.Add($userLabel) # Define a TextBox and assign it and its controls to a form. $userTextBox = New-Object System.Windows.Forms.TextBox $userTextBox.Location = New-Object System.Drawing.Point(140,15) $userTextBox.Size = New-Object System.Drawing.Size(100,20) $form.Controls.Add($userTextBox) # Define a label and assign it and its controls to a form. $pwdLabel = New-Object System.Windows.Forms.Label $pwdLabel.Location = New-Object System.Drawing.Point(30,40) $pwdLabel.Size = New-Object System.Drawing.Size(100,20) $pwdLabel.Text = 'Enter Password:' $form.Controls.Add($pwdLabel) # Define a TextBox and assign it and its controls to a form. $pwdTextBox = New-Object System.Windows.Forms.TextBox $pwdTextBox.Location = New-Object System.Drawing.Point(140,40) $pwdTextBox.Size = New-Object System.Drawing.Size(100,20) $pwdTextBox.PasswordChar = "*" $form.Controls.Add($pwdTextBox) # Define a label and assign it and its controls to a form. $hostLabel = New-Object System.Windows.Forms.Label $hostLabel.Location = New-Object System.Drawing.Point(30,65) $hostLabel.Size = New-Object System.Drawing.Size(100,20) $hostLabel.Text = 'Enter Hostname:' $form.Controls.Add($hostLabel) # Define a TextBox and assign it and its controls to a form. $hostTextBox = New-Object System.Windows.Forms.TextBox $hostTextBox.Location = New-Object System.Drawing.Point(140,65) $hostTextBox.Size = New-Object System.Drawing.Size(100,20) $form.Controls.Add($hostTextBox) # Define a label and assign it and its controls to a form. $portLabel = New-Object System.Windows.Forms.Label $portLabel.Location = New-Object System.Drawing.Point(30,90) $portLabel.Size = New-Object System.Drawing.Size(100,20) $portLabel.Text = 'Enter Port #:' $form.Controls.Add($portLabel) # Define a TextBox and assign it and its controls to a form. $portTextBox = New-Object System.Windows.Forms.TextBox $portTextBox.Location = New-Object System.Drawing.Point(140,90) $portTextBox.Size = New-Object System.Drawing.Size(100,20) $form.Controls.Add($portTextBox) # Define a label and assign it and its controls to a form. $dbLabel = New-Object System.Windows.Forms.Label $dbLabel.Location = New-Object System.Drawing.Point(30,115) $dbLabel.Size = New-Object System.Drawing.Size(100,20) $dbLabel.Text = 'Enter DB Name:' $form.Controls.Add($dbLabel) # Define a TextBox and assign it and its controls to a form. $dbTextBox = New-Object System.Windows.Forms.TextBox $dbTextBox.Location = New-Object System.Drawing.Point(140,115) $dbTextBox.Size = New-Object System.Drawing.Size(100,20) $form.Controls.Add($dbTextBox) $form.Topmost = $true $form.Add_Shown({$userTextBox.Select()}) $result = $form.ShowDialog() if ($result -eq [System.Windows.Forms.DialogResult]::OK) { # Assign inputs to connection variables. $uid = $userTextBox.Text $pwd = $pwdTextBox.Text $server = $hostTextBox.Text $port= $portTextBox.Text $dbName = $dbTextBox.Text # Declare connection string. $credentials = 'server=' + $server + ';port=' + $port + ';uid=' + $uid + ';pwd=' + $pwd + ';database=' + $dbName # Connect to the libaray MySQL.Data.dll Add-Type -Path 'C:\Program Files (x86)\MySQL\Connector NET 8.0\Assemblies\v4.5.2\MySql.Data.dll' # Create a MySQL Database connection variable that qualifies: # [Driver]@ConnectionString # ============================================================ # You can assign the connection string before using it or # while using it, which is what we do below by assigning # literal values for the following names: # - server=<ip_address> or 127.0.0.1 for localhost # - port=<port #> # - uid=<user_name> # - pwd=<password> # - database=<database_name> # ============================================================ $Connection = [MySql.Data.MySqlClient.MySqlConnection]@{ConnectionString=$credentials} $Connection.Open() # Define a MySQL Command Object for a non-query. $sqlCommand = New-Object MySql.Data.MySqlClient.MySqlCommand $sqlDataAdapter = New-Object MySql.Data.MySqlClient.MySqlDataAdapter $sqlDataSet = New-Object System.Data.DataSet # Assign the connection and command text to the MySQL command object. $sqlCommand.Connection = $Connection $sqlCommand.CommandText = 'SELECT CONCAT(first_name," ",last_name) AS full_name ' + ', avenger ' + 'FROM avenger' # Assign the connection and command text to the query method of # the data adapter object. $sqlDataAdapter.SelectCommand=$sqlCommand # Assign the tuples of data to a data set and return the number of rows fetched. $rowsFetched=$sqlDataAdapter.Fill($sqlDataSet, "data") # Print to console the data returned from the query. foreach($row in $sqlDataSet.tables[0]) { write-host "Avenger:" $row.avenger "is" $row.full_name } # Close the MySQL connection. $Connection.Close() } |
I created an avenger table and populated it with six rows of data:
-- Create the avenger table. CREATE TABLE db_connect ( db_connect_id INT UNSIGNED PRIMARY KEY AUTO_INCREMENT , version VARCHAR(10) , user VARCHAR(24) , db_name VARCHAR(10)); -- Seed the avenger table with data. INSERT INTO avenger ( first_name, last_name, avenger ) VALUES ('Anthony', 'Stark', 'Iron Man') ,('Thor', 'Odinson', 'God of Thunder') ,('Steven', 'Rogers', 'Captain America') ,('Bruce', 'Banner', 'Hulk') ,('Clinton', 'Barton', 'Hawkeye') ,('Natasha', 'Romanoff', 'Black Widow'); |
You run the staticQuery.ps1 PowerShell script from the Windows command shell with the following syntax:
powershell .\staticQuery.ps1 |
After running the staticQuery.ps1 PowerShell script, it writes the following to the local console but with minimal effort you can redirect it to a file:
Avenger: Iron Man is Anthony Stark Avenger: God of Thunder is Thor Odinson Avenger: Captain America is Steven Rogers Avenger: Hulk is Bruce Banner Avenger: Hawkeye is Clinton Barton Avenger: Black Widow is Natasha Romanoff |
As always, I hope this helps those looking to use this technology. My guess is the principal uses will be DevOps and Data Engineers.
MySQL+PowerShell
It was interesting to note that the MySQL Connector/NET Developer Guide doesn’t have any instructions for connecting to the MySQL database from Microsoft Powershell. I thought it would be helpful to write a couple demonstrations scripts, especially when a quick search didn’t find a set of easy to follow samples.
The connection process to MySQL with Powershell is easiest with a non-query, so I created a db_connect table into which I could write a row of data:
CREATE TABLE db_connect ( db_connect_id INT UNSIGNED PRIMARY KEY AUTO_INCREMENT , version VARCHAR(10) , user VARCHAR(24) , db_name VARCHAR(10)); |
The following insert.ps1 PowerShell script connects to the MySQL database with the NET 8.0 Connector (check here for the newer DSN ODBC approach), and inserts one row into the db_connect table:
# Connect to the libaray MySQL.Data.dll Add-Type -Path 'C:\Program Files (x86)\MySQL\Connector NET 8.0\Assemblies\v4.5.2\MySql.Data.dll' # Create a MySQL Database connection variable that qualifies: # [Driver]@ConnectionString # ============================================================ # You can assign the connection string before using it or # while using it, which is what we do below by assigning # literal values for the following names: # - server=<ip_address> or 127.0.0.1 for localhost # - uid=<user_name> # - pwd=<password> # - database=<database_name> # ============================================================ $Connection = [MySql.Data.MySqlClient.MySqlConnection]@{ConnectionString='server=127.0.0.1;uid=student;pwd=student;database=studentdb'} $Connection.Open() # Define a MySQL Command Object for a non-query. $sql = New-Object MySql.Data.MySqlClient.MySqlCommand $sql.Connection = $Connection $sql.CommandText = 'INSERT INTO db_connect (version, user, db_name)(SELECT version(), user(), database())' $sql.ExecuteNonQuery() # Close the MySQL connection. $Connection.Close() |
The ConnectionString above uses the standard local 127.0.0.1 IP address as the server location. You could just as easily use localhost as the server location if you’re testing on your own machine.
You run the insert.ps1 PowerShell script from the Windows command shell:
powershell .\insert.ps1 |
After running the insert.ps1 PowerShell script, you can connect to the studentdb database. Then, run the following query:
SELECT version AS "Version" , user AS "User" , db_name AS "Database" FROM db_connect; |
It displays:
+---------+-------------------+-----------+ | Version | User | Database | +---------+-------------------+-----------+ | 8.0.21 | student@localhost | studentdb | +---------+-------------------+-----------+ 1 row in set (0.01 sec) |
If you’re interested in writing a Connection Prompt dialog for PowerShell, the complete code is in this other blog post of mine. It also provides the instructions to put the code into a reusable PowerShell library. Also, if you’re interested in how to pass option flags and parameters I put that in this new blog post.
As always, I hope this helps those trying to use PowerShell as a scripting tool to insert, update, or delete data.
What Identifier?
It’s always interesting to see students find the little nuances that SQL*Plus can generate. One of the first things we cover is the concept of calling PL/SQL interactively versus through an embedded call. The easiest and first exercise simply uses an insecure call like:
sqlplus -s student/student @call.sql |
to the call.sql program:
SQL> DECLARE 2 lv_input VARCHAR2(20); 3 BEGIN 4 lv_input := '&1'; 5 dbms_output.put_line('['||lv_input||']'); 6 END; 7 / |
It prints the following to console:
Enter value for 1: machine old 4: lv_input := '&1'; new 4: lv_input := 'machine'; [machine] PL/SQL procedure successfully completed. |
Then, we change the '&1' parameter variable to '&mystery' and retest the program, which prints the following to the console:
Enter value for mystery: machine old 4: lv_input := '&mystery'; new 4: lv_input := 'machine'; [machine] PL/SQL procedure successfully completed. |
After showing a numeric and string input parameter, we remove the quotation from the lv_input input parameter and raise the following error:
Enter value for mystery: machine
old   4:   lv_input := &mystery;
new   4:   lv_input := machine;
  lv_input := machine;
              *
ERROR at line 4:
ORA-06550: line 4, column 15:
PLS-00201: identifier 'MACHINE' must be declared
ORA-06550: line 4, column 3:
PL/SQL: Statement ignored |
The point of the exercise is to spell out that the default input value is numeric and that if you pass a string it becomes an identifier in the scope of the program. So, we rewrite the call.sql program file by adding a machine variable, like:
SQL> DECLARE 2 lv_input VARCHAR2(20); 3 machine VARCHAR2(20) := 'Mystery Machine'; 4 BEGIN 5 lv_input := &mystery; 6 dbms_output.put_line('['||lv_input||']'); 7 END; 8 / |
It prints the following:
Enter value for mystery: machine old 5: lv_input := &mystery; new 5: lv_input := machine; [Mystery Machine] PL/SQL procedure successfully completed. |
The parameter name becomes an identifier and maps to the variable machine. That mapping means it prints the value of the machine variable.
While this is what we’d call a terminal use case, it is a fun way to illustrate an odd PL/SQL behavior. As always, I hope its interesting for those who read it.
Put MySQL in PATH
After downloading and installing MySQL 8.0.24 yesterday, I opened a command shell. In the command shell, I could access the MySQL Shell (mysqlsh.exe) but not the MySQL Client (mysql.exe). Typing in the following:
C:\WINDOWS\system32>mysql |
It returned:
'mysql' is not recognized as an internal or external command, operable program or batch file. |
The MySQL Client (mysql.exe) was installed because MySQL Workbench relies on it. However, the MySQL Microsoft Software Installer (MSI) does not put the mysql.exe file’s directory in the common Windows %PATH% environment variable. You can find the required %PATH% directory variable by opening the File Manager and searching for the mysql.exe file.
You should return several directories and programs but the directory you want is:
C:\Program Files\MySQL\MySQL Server 8.0\bin |
You can test it by using the SET command in the Microsoft Operating System, like this:
SET PATH=C:\Program Files\MySQL\MySQL Server 8.0\bin;%PATH% |
You can now call the mysql.exe program in your current shell session with the following syntax:
mysql -uroot -p |
You will be prompted for the password and then connected to the database as follows:
Welcome to the MySQL monitor. Commands end with ; or \g. Your MySQL connection id is 19 Server version: 8.0.24 MySQL Community Server - GPL Copyright (c) 2000, 2021, Oracle and/or its affiliates. Oracle is a registered trademark of Oracle Corporation and/or its affiliates. Other names may be trademarks of their respective owners. Type 'help;' or '\h' for help. Type '\c' to clear the current input statement. mysql> |
Unfortunately, the SET command only sets the %PATH% environment variable in the current session. You can set the system %PATH% environment variable globally by following these steps:
- In Search, search for and then select: System (Control Panel)
- In Settings dialog enter “Environment” in the search box and it will display:
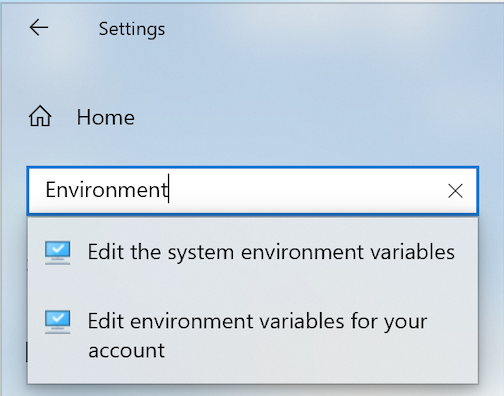
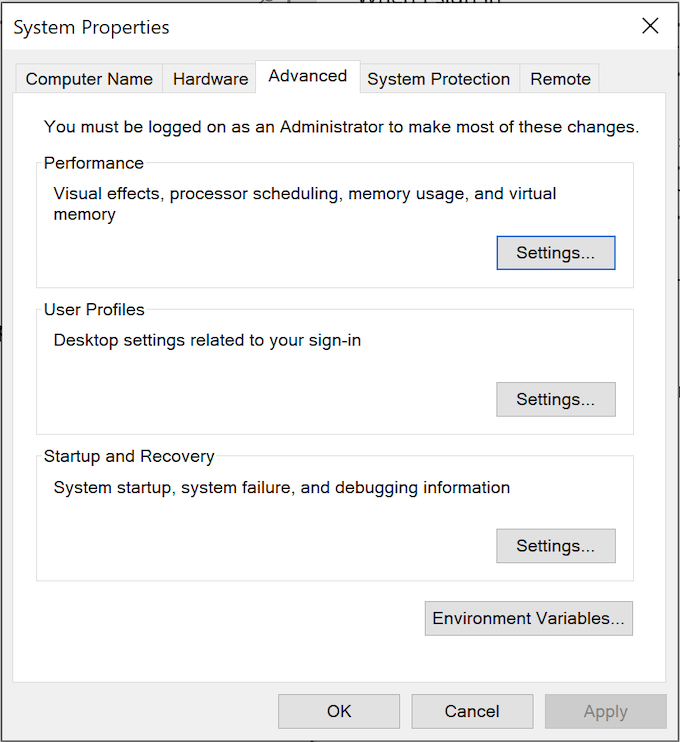
- Chose “Edit the system environment variables” option. You will see the following “System Properties” dialog:
- Click the “Environment Variable” button to display the “Environment Variables” dialog. Click on the Path system variable before clicking the Edit button beneath.
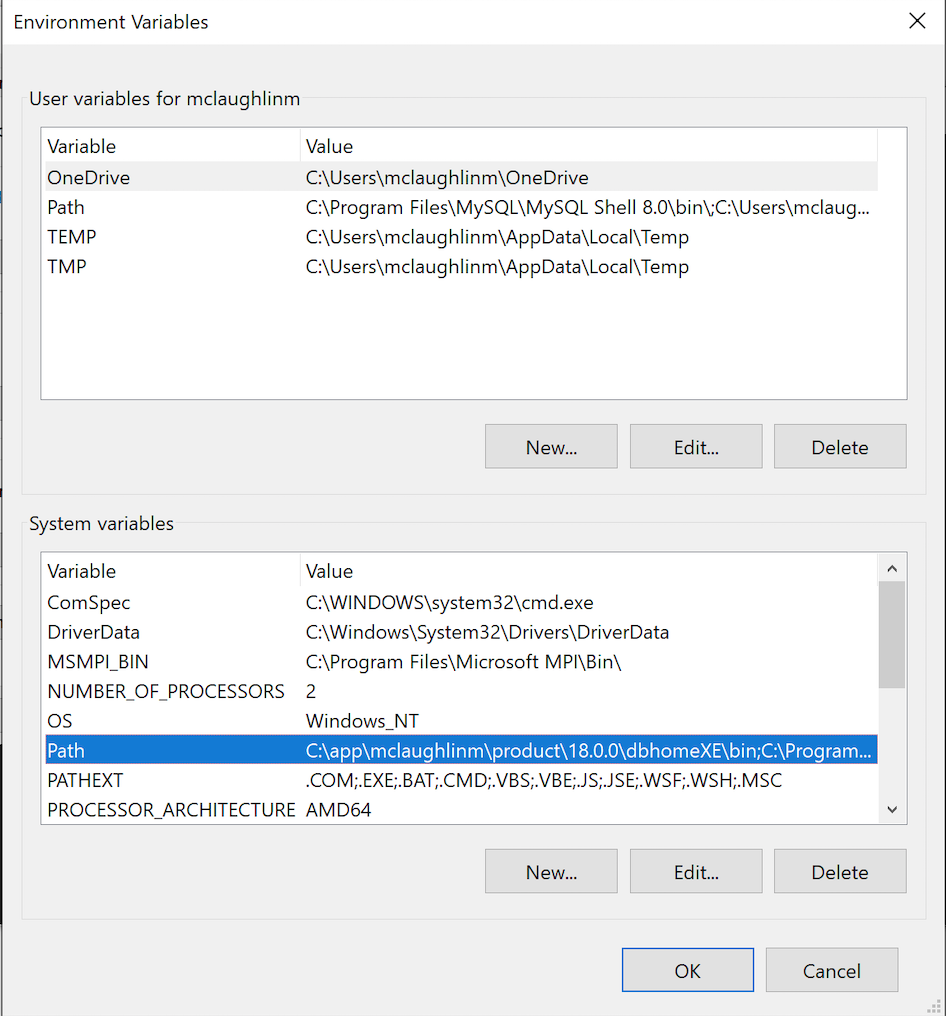
- Click the “New” button and enter “
C:\Program Files\MySQL\MySQL Server 8.0\bin, and click the “OK” button. The next time you query the computer system’s%PATH%environment variable, it will show you the list of path locations that the operating system looks at for command files. It’s actually stored as a semicolon-delimited list in Windows 10 (and, as a colon-delimited list in Linux or Unix).
The next time you open a command shell, the %PATH% environment variable will find the mysql.exe program. As always, I hope these instructions help the reader.
MongoDB Two Step
Sometimes a bit of humor helps with a new topic. Creating a database in MongoDB is a two-step process, like the Texas Two-Step (a nick name for a country/western two-step danced in common time). A Texas Two Step is a one-two, one-two shuffle which is like the two-step process for how you create a MongoDB database.
While databases in MongoDB are a multiuser sandbox like a relational database, you can’t simply create them and grant them privileges. You must first USE the database and then put a collection (a.k.a., equivalent to a table in MySQL) in it. This blog post shows you how to create a MongoDB play database with an actor collection. It shows you the commands to create the a database with one collection in it and how to verify its existence.
You connect through the mongo shell, like:
mongo |
The first-step requires you to connect to the play database even though it doesn’t exist. You do that by typing:
> use play |
You can verify you’re in the play database by typing the db command, which the mongo shell treats as an expression. It returns play, as the name of the current database.
However, when you call the shell show dbs helper:
> show dbs |
It displays:
admin 0.000GB config 0.000GB local 0.000GB |
You also should note that the play database still doesn’t exist when you run the JavaScript equivalent to the shell show dbs helper:
> db.getMongo().getDBs() |
It returns the following list of databases, which excludes the as yet not created play database:
{
  "databases" : [
    {
      "name" : "admin",
      "sizeOnDisk" : 32768,
      "empty" : false
    },
    {
      "name" : "config",
      "sizeOnDisk" : 61440,
      "empty" : false
    },
    {
      "name" : "local",
      "sizeOnDisk" : 81920,
      "empty" : false
    }
  ],
  "totalSize" : 176128,
  "ok" : 1
} |
You create an actor collection (a.k.a. the equivalent of a relational table) with the following syntax, where db maps to the play database that you’re using. Note that you must create or insert one document to begin a document collection. While you can use the insert method, you should use either the newer insertOne() or insertMany() methods.
> db.actors.insertOne({"actor" : {"first_name" : "Chris", "last_name" : "Pine"}, "age" : 40 }) |
A new call to the shell show dbs helper:
> show dbs |
displays your new play database:
admin 0.000GB config 0.000GB local 0.000GB play 0.000GB |
You can add two more documents (a.k.a. for rows in a relational database) with the insertMany() method:
> db.actors.insertMany([{"actor" : {"first_name" : "Chris", "last_name" : "Evans"}, "age" : 39 } ,{"actor" : {"first_name" : "Chris", "last_name" : "Pratt"}, "age" : 41 }]) |
A quick word to the JavaScript novices out there. Don’t forget the square brackets ([{},{},...]) in the insertMany() method call or you’ll get an error like this:
2021-04-12T16:20:13.237-0600 E QUERY [js] TypeError: documents.map is not a function : DBCollection.prototype.insertMany@src/mongo/shell/crud_api.js:295:1 @(shell):1:1 |
You call the shell show collections helper or db.getMongo().getCollectionNames() JavaScript function to display the collections in the play database. The show collections displays a list of collections, and the db.getMongo().getCollectionNames() displays an JavaScript array of collections.
If you’re like me, Mongo’s db convention is a bit risky that I could do something in the wrong database. So, I put the following function into my .mongorc.js (a.k.a., MongoDB Resource file):
prompt = function() { var dbName = db; return dbName + "> " } |
It ensures you will see the current database name to the left of the prompt (“>”), like:
play> |
You can query the documents from the actors collection with the following:
play> db.actors.find().pretty() |
It returns:
{
  "_id" : ObjectId("6074c692813c5a85db9cc9df"),
  "actor" : {
    "first_name" : "Chris",
    "last_name" : "Pine"
  },
  "age" : 40
}
{
  "_id" : ObjectId("6074c7ea813c5a85db9cc9e0"),
  "actor" : {
    "first_name" : "Chris",
    "last_name" : "Evans"
  },
  "age" : 39
}
{
  "_id" : ObjectId("6074c7ea813c5a85db9cc9e1"),
  "actor" : {
    "first_name" : "Chris",
    "last_name" : "Pratt"
  },
  "age" : 41
} |
As always, I hope this helps those looking for a solution.
MongoDB Script Test
There are many ways to test and edit files. A lot of developers only use their favorite Integrated Developer Environment (IDE) but I find testing script files within the scope of a pipelined set of scripts much faster.
The ability to edit a JavaScript file from within the mongo Shell would be nice but unfortunately, it doesn’t exist. You are able to edit a complex variable with a mechanism quite like the Oracle Database. Rather than leave you hanging on how to edit a complex variable in the mongo shell, here are the steps before launching into how to test your JavaScript files:
- You can enter this manually during any connection to the
mongoshell or put it in your.mongorc.jsconfiguration file, like this in Fedora with the fully qualified filename:EDITOR="/usr/bin/vim"
- Let’s say you have a
stoogesarray variable that contains “Moe”, “Curly”, and “Larry” and you want to add “Shemp” to the variable. You can edit thestoogesarray variable withviand add “Shemp” to it by typing edit and the stooges variable name.edit stooges
- Then, you can test the
stoogesarray variable’s new values:stooges
- It returns the following:
[ "Moe", "Curly", "Shemp", "Larry" ]
Unfortunately, these changes to the demo array variable will be lost after you break the connection. While it does afford a quick test case, you should make the changes in the external JavaScript file. Then, the change is there the the next time you access the resource file.
Here’s my quick edit and test script technique for MongoDB from your present working directory:
- Assume you create a
compliment.jstest file, like:/* Declare an array variable and random index value. */ var compliment = ["Bashful","Doc","Dopey","Grumpy","Happy","Sleepy","Sneezy"] var index = Math.floor(Math.random()*7) /* Print a welcome message. */ print("Hello, " + compliment[index] + ".")
- You can edit the
compliment.jsfile withviand test the script interactively from the present working directory.- You can edit the file with the following syntax:
vi compliment.js -
then, you can test the
task.sqlfile:mongo --nodb --norc < compliment.js
- The
--nodboption instructs MongoDB to not connect to a database and the--norcoption instructs MongoDB to not load your.mongorc.jsfile. Effectively, disabling the database connection and loading of the MongoDB resource file (.mongorc.js) lets you test your code in MongoDB’s Javascript shell unencumbered by any overhead from the MongoDB server.The foregoing script returns the following:
MongoDB shell version v4.0.19
Hello, Sneezy.
bye
- If you have the desired outcome, you’re done. However, if you need further change you repeat the process.
- You can edit the file with the following syntax:
As always, I hope this helps those looking for a quick way to accomplish a task.
MySQL Script Test
There are many ways to test and edit files. A lot of developers only use their favorite Integrated Developer Environment (IDE) but I find testing script files within the scope of a pipelined set of scripts much faster.
The ability to edit a script from within the MySQL Command-Line Interface (CLI) or MySQL Shell would be nice but unfortunately, doesn’t exist. You can always subshell to edit a file or list files in the present working directory, like:
mysql> \! vi task.sql |
I prefer to test at the OS level while leveraging the up-arrow key for command history. Here’s my quick edit and test script technique from your present working directory:
- Assume you create a
task.sqltest file, like:SELECT user() AS "Current User"\G
- You can edit with
vioremacand test the script interactively from the present working directory.- You can edit the file with the following syntax:
vi task.sql -
then, you can test the
task.sqlfile:mysql -ustudent -p -Dstudentdb < task.sql
- It returns the following:
Enter password:
*************************** 1. row ***************************
Current User: student@localhost
- If you have the desired outcome, you’re done. However, if you need further change you repeat the process.
- You can edit the file with the following syntax:
As always, I hope this helps those looking for a quick way to accomplish a task.
MySQL & macOS Silicon
It’s a problem for my students who purchased the new Apple hardware that uses Apple Silicon because they can’t install a Docker MySQL instance. However, there is Homebrew formula that works on macOS Big Sur and the new Apple silicon. It supports:
- Intel Silicon: macOS Big Sur, Catalina, and Mojave
- Apple Silicon: macOS Big Sur
The Homebrew Formula does have conflicts that you may need to avoid. It is a solution for those with the new Apple silicon.
As always, I hope this helps those looking for a solution.
