Archive for November, 2022
AlmaLinux+PostgreSQL
This installs PostgreSQL 15 on AlmaLinux 9 (don’t forget the PostgreSQL 15 Documentation site). The executable is available in the script that the postgresql.org provides; however, it seems appropriate to show how to find that script for any platform.
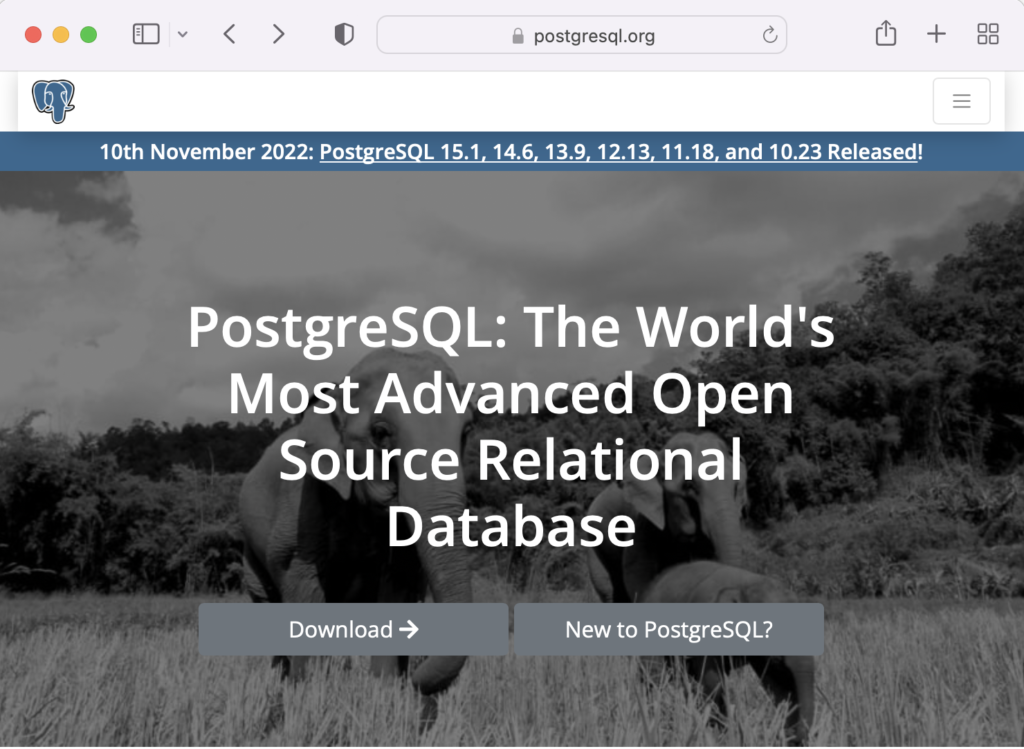
When you launch the postgres.org web site, you will see the following dialog. Click the Download-> button to choose an operating system.
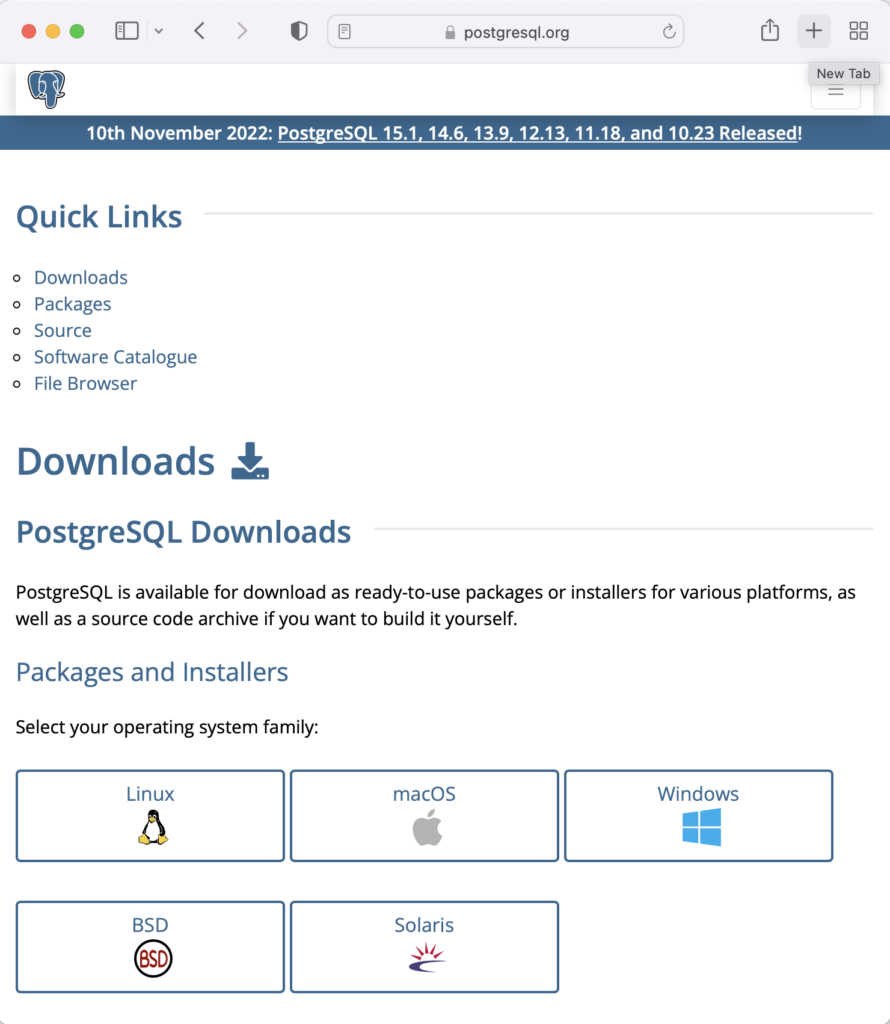
On the next webpage, click on the Linux icon button to proceed.
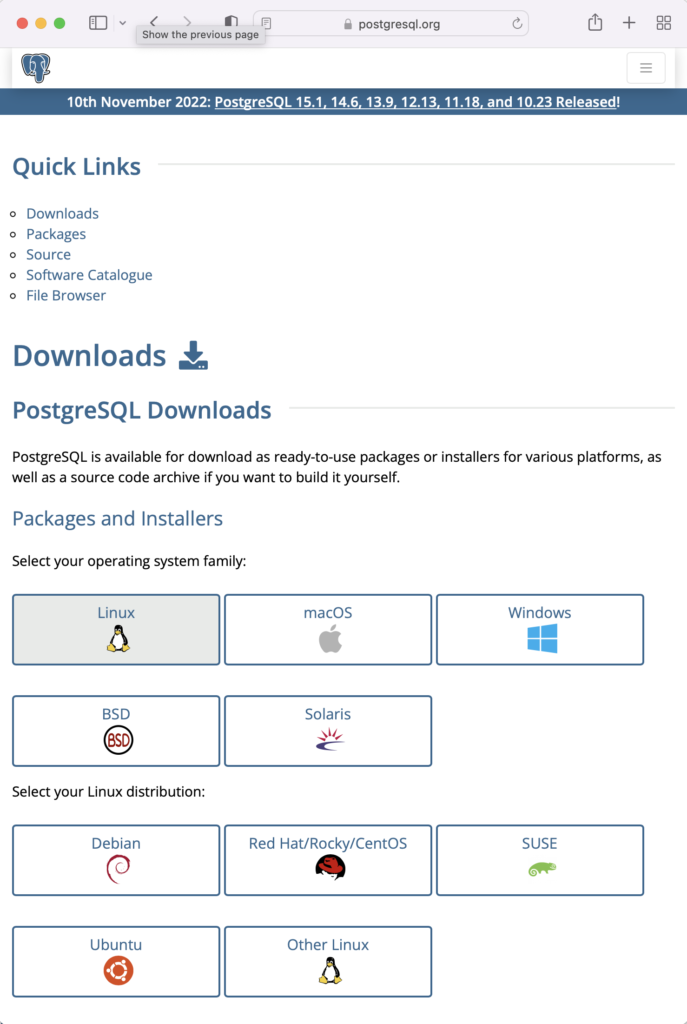
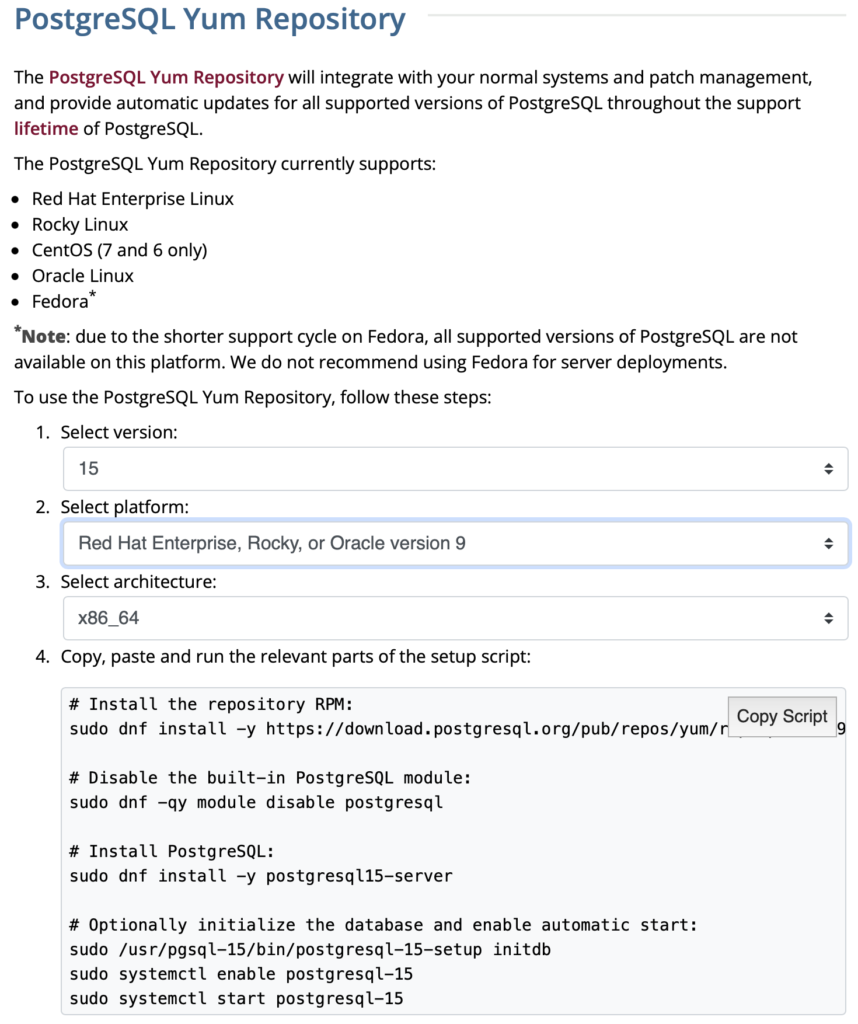
This page expands for you to choose a Linux distribution. Click on the Red Hat/Rocky/CentOS button to proceed.
This web page lets you choose a platform, which should be Red Hat Enterprise, Rocky, or Oracle version 9.
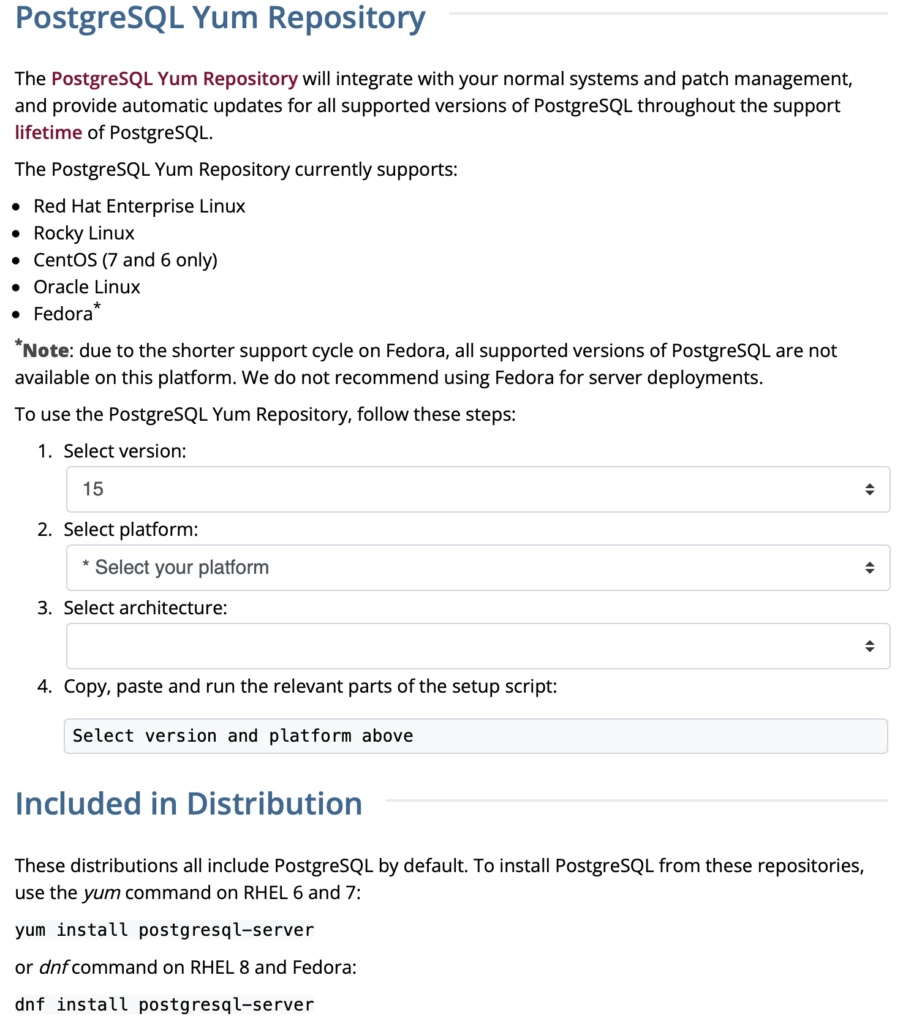
The selection fills out the web page and provides a setup script. The script installs the PostgreSQL packages, disables the built-in PostgreSQL module, installs PostgreSQL 15 Server, initialize, enable, and start PostgreSQL Server.
Here are the detailed steps:
- Install the PostgreSQL by updating dependent packages before installing it with the script provided by the PostgreSQL download web site:
# Install the repository RPM:
sudo dnf install -y https://download.postgresql.org/pub/repos/yum/reporpms/EL-9-x86_64/pgdg-redhat-repo-latest.noarch.rpm

# Disable the built-in PostgreSQL module:
sudo dnf -qy module disable postgresql

# Install PostgreSQL:
sudo dnf install -y postgresql15-server

# Optionally initialize the database and enable automatic start:
sudo /usr/pgsql-15/bin/postgresql-15-setup initdb
sudo systemctl enable postgresql-15
sudo systemctl start postgresql-15
Display detailed console log →
Last metadata expiration check: 20:38:10 ago on Mon 21 Nov 2022 02:07:25 AM EST.
pgdg-redhat-repo-latest.noarch.rpm              3.6 kB/s |  12 kB     00:03
Dependencies resolved.
================================================================================
 Package                 Architecture  Version        Repository           Size
================================================================================
Installing:
 pgdg-redhat-repo        noarch        42.0-28        @commandline         12 k

Transaction Summary
================================================================================
Install  1 Package

Total size: 12 k
Installed size: 14 k
Downloading Packages:
Running transaction check
Transaction check succeeded.
Running transaction test
Transaction test succeeded.
Running transaction
Regex version mismatch, expected: 10.40 2022-04-14 actual: 10.37 2021-05-26
Regex version mismatch, expected: 10.40 2022-04-14 actual: 10.37 2021-05-26
  Preparing        :                                                        1/1
  Installing       : pgdg-redhat-repo-42.0-28.noarch                        1/1
  Verifying        : pgdg-redhat-repo-42.0-28.noarch                        1/1

Installed:
  pgdg-redhat-repo-42.0-28.noarch

Complete!
Importing GPG key 0x442DF0F8:
 Userid     : "PostgreSQL RPM Building Project <pgsql-pkg-yum@postgresql.org>"
 Fingerprint: 68C9 E2B9 1A37 D136 FE74 D176 1F16 D2E1 442D F0F8
 From       : /etc/pki/rpm-gpg/RPM-GPG-KEY-PGDG
Importing GPG key 0x442DF0F8:
 Userid     : "PostgreSQL RPM Building Project <pgsql-pkg-yum@postgresql.org>"
 Fingerprint: 68C9 E2B9 1A37 D136 FE74 D176 1F16 D2E1 442D F0F8
 From       : /etc/pki/rpm-gpg/RPM-GPG-KEY-PGDG
Importing GPG key 0x442DF0F8:
 Userid     : "PostgreSQL RPM Building Project <pgsql-pkg-yum@postgresql.org>"
 Fingerprint: 68C9 E2B9 1A37 D136 FE74 D176 1F16 D2E1 442D F0F8
 From       : /etc/pki/rpm-gpg/RPM-GPG-KEY-PGDG
Importing GPG key 0x442DF0F8:
 Userid     : "PostgreSQL RPM Building Project <pgsql-pkg-yum@postgresql.org>"
 Fingerprint: 68C9 E2B9 1A37 D136 FE74 D176 1F16 D2E1 442D F0F8
 From       : /etc/pki/rpm-gpg/RPM-GPG-KEY-PGDG
Importing GPG key 0x442DF0F8:
 Userid     : "PostgreSQL RPM Building Project <pgsql-pkg-yum@postgresql.org>"
 Fingerprint: 68C9 E2B9 1A37 D136 FE74 D176 1F16 D2E1 442D F0F8
 From       : /etc/pki/rpm-gpg/RPM-GPG-KEY-PGDG
Importing GPG key 0x442DF0F8:
 Userid     : "PostgreSQL RPM Building Project <pgsql-pkg-yum@postgresql.org>"
 Fingerprint: 68C9 E2B9 1A37 D136 FE74 D176 1F16 D2E1 442D F0F8
 From       : /etc/pki/rpm-gpg/RPM-GPG-KEY-PGDG
Importing GPG key 0x442DF0F8:
 Userid     : "PostgreSQL RPM Building Project <pgsql-pkg-yum@postgresql.org>"
 Fingerprint: 68C9 E2B9 1A37 D136 FE74 D176 1F16 D2E1 442D F0F8
 From       : /etc/pki/rpm-gpg/RPM-GPG-KEY-PGDG
Unable to resolve argument postgresql
Error: Problems in request:
missing groups or modules: postgresql
Last metadata expiration check: 0:00:02 ago on Mon 21 Nov 2022 10:46:16 PM EST.
Dependencies resolved.
================================================================================
 Package                  Arch        Version                 Repository   Size
================================================================================
Installing:
 postgresql15-server      x86_64      15.1-1PGDG.rhel9        pgdg15      6.0 M
Installing dependencies:
 lz4                      x86_64      1.9.3-5.el9             baseos       58 k
 postgresql15             x86_64      15.1-1PGDG.rhel9        pgdg15      1.5 M
 postgresql15-libs        x86_64      15.1-1PGDG.rhel9        pgdg15      296 k

Transaction Summary
================================================================================
Install  4 Packages

Total download size: 7.8 M
Installed size: 33 M
Downloading Packages:
(1/4): lz4-1.9.3-5.el9.x86_64.rpm                91 kB/s |  58 kB     00:00
(2/4): postgresql15-libs-15.1-1PGDG.rhel9.x86_6  97 kB/s | 296 kB     00:03
(3/4): postgresql15-15.1-1PGDG.rhel9.x86_64.rpm 214 kB/s | 1.5 MB     00:07
(4/4): postgresql15-server-15.1-1PGDG.rhel9.x86 371 kB/s | 6.0 MB     00:16
--------------------------------------------------------------------------------
Total                                           446 kB/s | 7.8 MB     00:17
PostgreSQL 15 for RHEL / Rocky 9 - x86_64       1.4 MB/s | 1.7 kB     00:00
Importing GPG key 0x442DF0F8:
 Userid     : "PostgreSQL RPM Building Project <pgsql-pkg-yum@postgresql.org>"
 Fingerprint: 68C9 E2B9 1A37 D136 FE74 D176 1F16 D2E1 442D F0F8
 From       : /etc/pki/rpm-gpg/RPM-GPG-KEY-PGDG
Key imported successfully
Running transaction check
Transaction check succeeded.
Running transaction test
Transaction test succeeded.
Running transaction
Regex version mismatch, expected: 10.40 2022-04-14 actual: 10.37 2021-05-26
Regex version mismatch, expected: 10.40 2022-04-14 actual: 10.37 2021-05-26
  Preparing        :                                                        1/1
  Installing       : postgresql15-libs-15.1-1PGDG.rhel9.x86_64              1/4
  Running scriptlet: postgresql15-libs-15.1-1PGDG.rhel9.x86_64              1/4
  Installing       : lz4-1.9.3-5.el9.x86_64                                 2/4
  Installing       : postgresql15-15.1-1PGDG.rhel9.x86_64                   3/4
  Running scriptlet: postgresql15-15.1-1PGDG.rhel9.x86_64                   3/4
  Running scriptlet: postgresql15-server-15.1-1PGDG.rhel9.x86_64            4/4
  Installing       : postgresql15-server-15.1-1PGDG.rhel9.x86_64            4/4
  Running scriptlet: postgresql15-server-15.1-1PGDG.rhel9.x86_64            4/4
Regex version mismatch, expected: 10.40 2022-04-14 actual: 10.37 2021-05-26
Regex version mismatch, expected: 10.40 2022-04-14 actual: 10.37 2021-05-26

  Verifying        : lz4-1.9.3-5.el9.x86_64                                 1/4
  Verifying        : postgresql15-15.1-1PGDG.rhel9.x86_64                   2/4
  Verifying        : postgresql15-libs-15.1-1PGDG.rhel9.x86_64              3/4
  Verifying        : postgresql15-server-15.1-1PGDG.rhel9.x86_64            4/4

Installed:
  lz4-1.9.3-5.el9.x86_64
  postgresql15-15.1-1PGDG.rhel9.x86_64
  postgresql15-libs-15.1-1PGDG.rhel9.x86_64
  postgresql15-server-15.1-1PGDG.rhel9.x86_64

Complete!
Initializing database ... /sbin/restorecon: Regex version mismatch, expected: 10.40 2022-04-14 actual: 10.37 2021-05-26
/sbin/restorecon: Regex version mismatch, expected: 10.40 2022-04-14 actual: 10.37 2021-05-26
/sbin/restorecon: Regex version mismatch, expected: 10.40 2022-04-14 actual: 10.37 2021-05-26
/sbin/restorecon: Regex version mismatch, expected: 10.40 2022-04-14 actual: 10.37 2021-05-26
/sbin/restorecon: Regex version mismatch, expected: 10.40 2022-04-14 actual: 10.37 2021-05-26
/sbin/restorecon: Regex version mismatch, expected: 10.40 2022-04-14 actual: 10.37 2021-05-26
OK

Created symlink /etc/systemd/system/multi-user.target.wants/postgresql-15.service → /usr/lib/systemd/system/postgresql-15.service.
- The simpmlest way to verify the installation is to check for the psql executable. You can do that with this command:
which psqlIt should return:
/usr/bin/psql
- Attempt to login with the following command-line interface (CLI) syntax:
psql -U postgres -W
It should fail and return the following:
psql: error: connection to server on socket "/var/run/postgresql/.s.PGSQL.5432" failed: FATAL: Peer authentication failed for user "postgres"
This error occurs because you’re not the postgres user, and all other users must designate that they’re connecting to an account with a password. The following steps let you configure the Operating System (OS).
-
You must shell out to the root superuser’s account, and then shell out to the postgres user’s account to test your connection because postgres user’s account disallows direct connection.
su - root
su - postgres
You can verify the current postgres user with this command:
whoamiIt should return the following:
postgres
As the postgres user, you connect to the database without a password. You use the following syntax:
psql -U postgresIt should display the following:
psql (15.1)
Type "help" for help.
-
At this point, you have some operating system (OS) stuff to setup before configuring a PostgreSQL sandboxed videodb database and student user. Exit psql with the following command:
postgres=# \q
Navigate to the PostgreSQL home database directory as the postgres user with this command:
cd /var/lib/pgsql/15/data
Edit the pg_hba.conf file to add lines for the postgres and student users:
# TYPE  DATABASE        USER            ADDRESS                 METHOD

# "local" is for Unix domain socket connections only
local   all             all                                     peer
local   all             postgres                                peer
local   all             student                                 peer

# IPv4 local connections:
host    all             all             127.0.0.1/32            scram-sha-256
# IPv6 local connections:
host    all             all             ::1/128                 scram-sha-256
# Allow replication connections from localhost, by a user with the
# replication privilege.
local   replication     all                                     scram-sha-256
host    replication     all             127.0.0.1/32            scram-sha-256
host    replication     all             ::1/128                 scram-sha-256
Navigate up the directory tree from the /var/lib/pgsql/15/data directory, which is also the data dictionary, to the following /var/lib/pgsql/15 base directory:
cd /var/lib/pgsql/15
Create a new video_db directory. This is where you will deploy the video_db tablespace. You create this directory with the following command:
mkdir video_dbChange the video_db permissions to read, write, and execute for only the owner with this syntax as the postgres user:
chmod 700 video_db
-
Exit the postgres user with the exit command and open PostgreSQL’s 5432 listener port as the root user. You can use the following command, as the root user:
firewall-cmd --zone=public --add-port 5432/tcp --permanent
-
You must shell out from the root user to the postgres user with the following command:
su - postgres
-
You must shell out to the root superuser’s account, and then shell out to the postgres user’s account to test your connection because postgres user’s account disallows direct connection.
- Connect to the postgres account and perform the following commands:
- After connecting as the postgres superuser, you can create a video_db tablespace with the following syntax:
CREATE TABLESPACE video_db
  OWNER postgres
  LOCATION 'C:\Users\username\video_db';
This will return the following:
CREATE TABLESPACE
You can query whether you successfully create the video_db tablespace with the following:
SELECT * FROM pg_tablespace;
It should return the following:
  oid  |  spcname   | spcowner | spcacl | spcoptions
-------+------------+----------+--------+------------
  1663 | pg_default |       10 |        |
  1664 | pg_global  |       10 |        |
 16389 | video_db   |       10 |        |
(3 rows)
-
You need to know the PostgreSQL default collation before you create a new database. You can write the following query to determine the default correlation:
postgres=# SELECT datname, datcollate FROM pg_database WHERE datname = 'postgres';
It should return something like this:
 datname  | datcollate
----------+-------------
 postgres | en_US.UTF-8
(1 row)
The datcollate value of the postgres database needs to the same value for the LC_COLLATE and LC_CTYPE parameters when you create a database. You can create a videodb database with the following syntax provided you’ve made appropriate substitutions for the LC_COLLATE and LC_CTYPE values below:
CREATE DATABASE videodb
  WITH OWNER = postgres
  ENCODING = 'UTF8'
  TABLESPACE = video_db
  LC_COLLATE = 'en_US.UTF-8'
  LC_CTYPE = 'en_US.UTF-8'
  CONNECTION LIMIT = -1;
You can verify the creation of the videodb with the following command:
postgres# \l
It should show you a display like the following:
List of databases Name | Owner | Encoding | Collate | Ctype | ICU Locale | Locale Provider | Access privileges -----------+----------+----------+-------------+-------------+------------+-----------------+----------------------- postgres | postgres | UTF8 | en_US.UTF-8 | en_US.UTF-8 | | libc | template0 | postgres | UTF8 | en_US.UTF-8 | en_US.UTF-8 | | libc | =c/postgres + | | | | | | | postgres=CTc/postgres template1 | postgres | UTF8 | en_US.UTF-8 | en_US.UTF-8 | | libc | =c/postgres + | | | | | | | postgres=CTc/postgres videodb | postgres | UTF8 | en_US.UTF-8 | en_US.UTF-8 | | libc | (4 rows)Then, you can assign comment to the database with the following syntax:
COMMENT ON DATABASE videodb IS 'Video Store Database';
- After connecting as the postgres superuser, you can create a video_db tablespace with the following syntax:
- Create a Role, Grant, and User:
In this section you create a dba role, grant privileges on a videodb database to a role, and create a user with the role that you created previously with the following three statements. There are three steps in this sections.
- The first step creates a dba role:
CREATE ROLE dba WITH SUPERUSER;
- The second step grants all privileges on the videodb database to both the postgres superuser and the dba role:
GRANT TEMPORARY, CONNECT ON DATABASE videodb TO PUBLIC;
GRANT ALL PRIVILEGES ON DATABASE videodb TO postgres;
GRANT ALL PRIVILEGES ON DATABASE videodb TO dba;
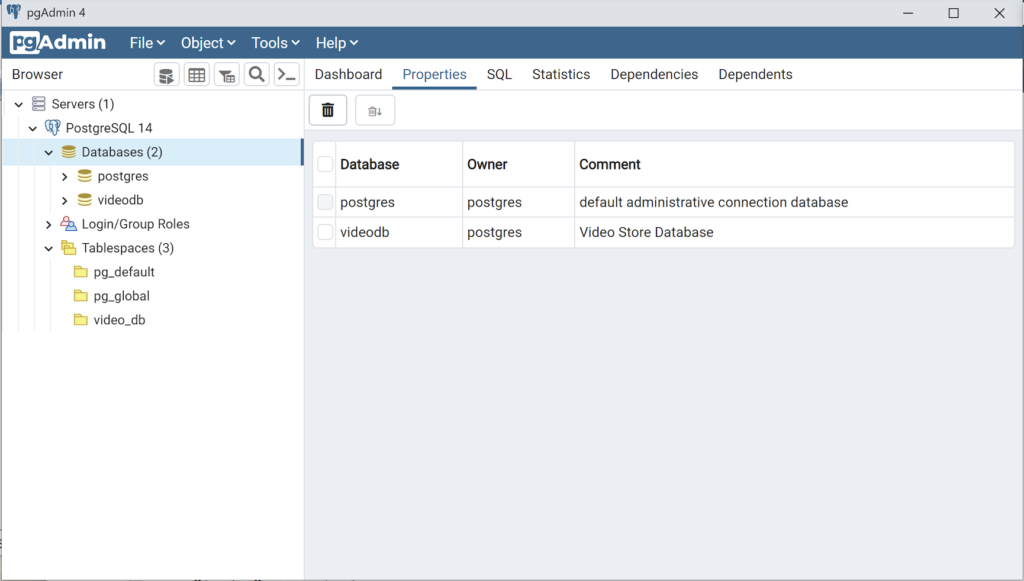
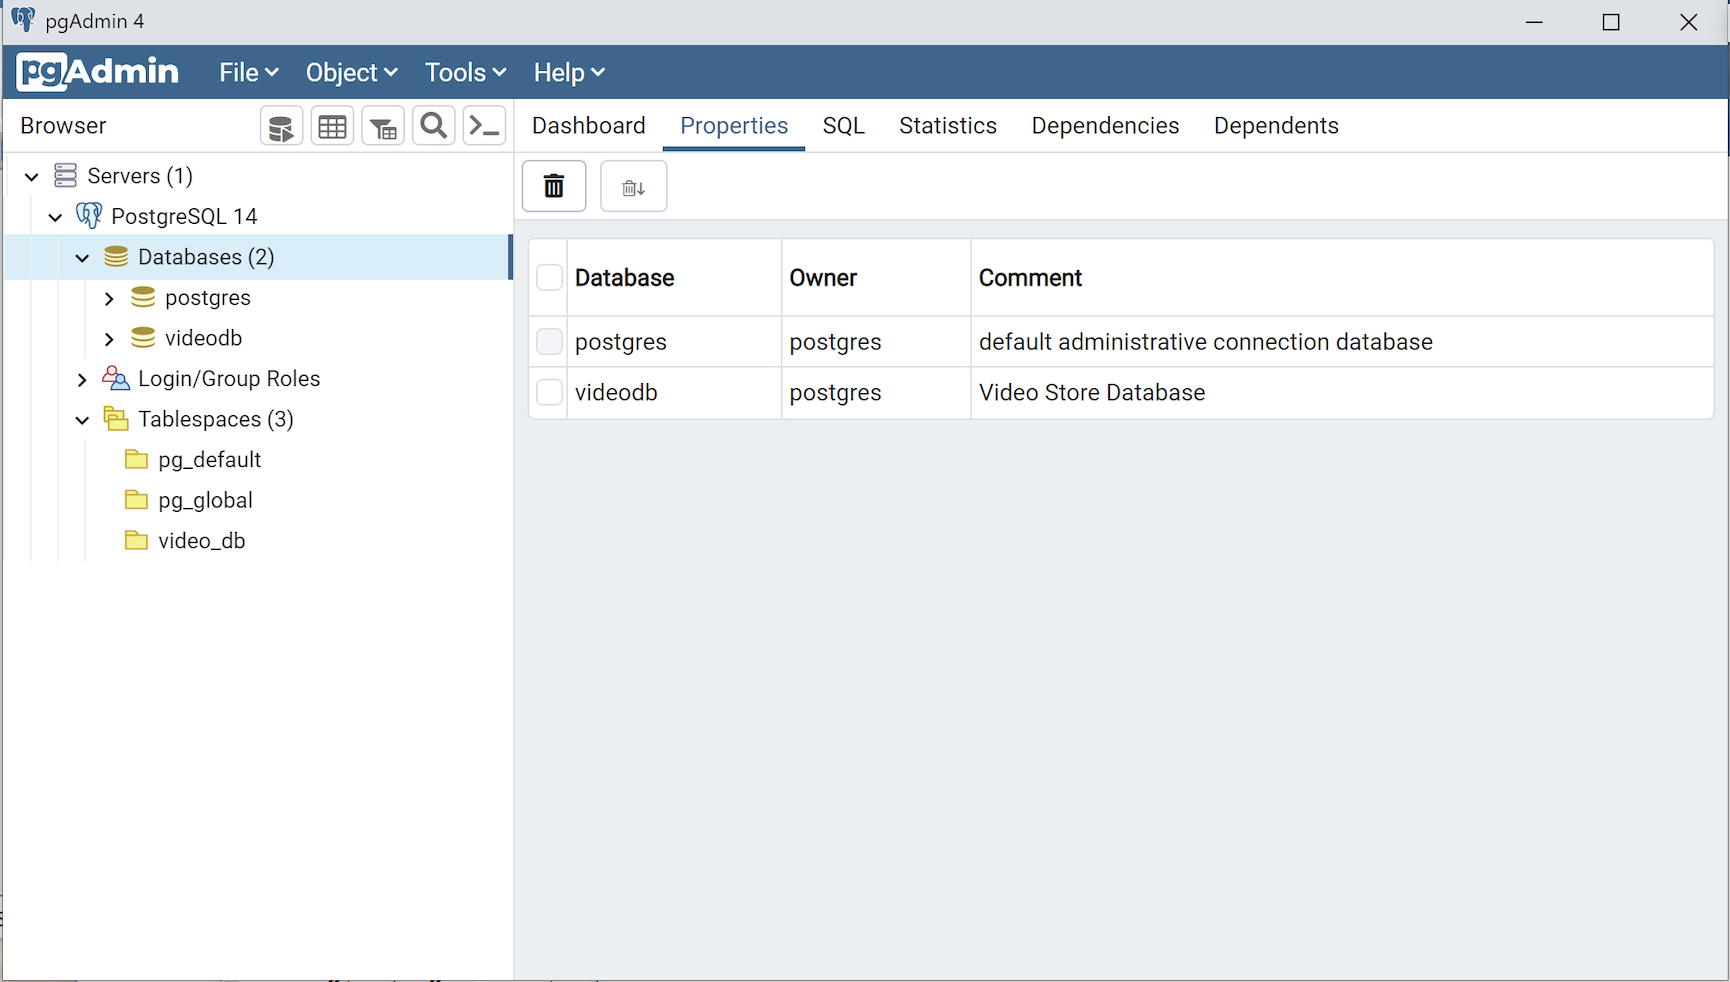
Any work in pgAdmin4 requires a grant on the videodb database to the postgres superuser. The grant enables visibility of the videodb database in the pgAdmin4 console as shown in the following image.
- The third step changes the ownership of the videodb database to the student user:
ALTER DATABASE videodb OWNER TO student;
You can verify the change of ownership for the videodb from the postgres user to student user with the following command:
postgres# \l
It should show you a display like the following:
List of databases Name | Owner | Encoding | Collate | Ctype | ICU Locale | Locale Provider | Access privileges -----------+----------+----------+-------------+-------------+------------+-----------------+----------------------- postgres | postgres | UTF8 | en_US.UTF-8 | en_US.UTF-8 | | libc | template0 | postgres | UTF8 | en_US.UTF-8 | en_US.UTF-8 | | libc | =c/postgres + | | | | | | | postgres=CTc/postgres template1 | postgres | UTF8 | en_US.UTF-8 | en_US.UTF-8 | | libc | =c/postgres + | | | | | | | postgres=CTc/postgres videodb | student | UTF8 | en_US.UTF-8 | en_US.UTF-8 | | libc | =Tc/student + | | | | | | | student=CTc/student + | | | | | | | dba=CTc/student (4 rows) - The fourth step creates a student user with the dba role:
CREATE USER student
  WITH ROLE dba
       ENCRYPTED PASSWORD 'student';
After this step, you need to disconnect as the postgres superuser with the following command:
\q
- The first step creates a dba role:
- Connect to the videodb database as the student user with the PostgreSQL CLI, create a new_hire table and quit the database.
The following syntax lets you connect to a videodb database as the student user. You should note that the Linux OS student user name should match the database user name.
psql -Ustudent -W -dvideodb
You create the new_hire table in the public schema of the videodb database with the following syntax:
CREATE TABLE new_hire
( new_hire_id  SERIAL        CONSTRAINT new_hire_pk PRIMARY KEY
, first_name   VARCHAR(20)   NOT NULL
, middle_name  VARCHAR(20)
, last_name    VARCHAR(20)   NOT NULL
, hire_date    DATE          NOT NULL
, UNIQUE(first_name, middle_name, hire_date));
You can describe the new_hire table with the following command:
\d new_hire
You quit the psql connection with a quit; or \q, like so
quit;
- Installing, configuring, and launching pgadmin4 (don’t forget the pgAdmin 4 Documentation site):
- You need to install three sets of packages. They’re the pgadmin-server, policycoreutils-python-utils, and pgadmin4-desktop.
- Apply the pgadmin-server package:
sudo yum install https://ftp.postgresql.org/pub/pgadmin/pgadmin4/yum/redhat/rhel-9Server-x86_64/pgadmin4-server-6.16-1.el9.x86_64.rpm
Display detailed console log →
Last metadata expiration check: 0:36:13 ago on Mon 28 Nov 2022 12:59:07 AM EST.
pgadmin4-server-6.16-1.el9.x86_64.rpm                                                           1.9 MB/s |  73 MB     00:38
Dependencies resolved.
================================================================================================================================
 Package                           Architecture             Version                        Repository                      Size
================================================================================================================================
Installing:
 pgadmin4-server                   x86_64                   6.16-1.el9                     @commandline                    73 M

Transaction Summary
================================================================================================================================
Install  1 Package

Total size: 73 M
Installed size: 265 M
Is this ok [y/N]: y
Downloading Packages:
Running transaction check
Transaction check succeeded.
Running transaction test
Transaction test succeeded.
Running transaction
Regex version mismatch, expected: 10.40 2022-04-14 actual: 10.37 2021-05-26
Regex version mismatch, expected: 10.40 2022-04-14 actual: 10.37 2021-05-26
  Preparing        :                                                                                                        1/1
  Installing       : pgadmin4-server-6.16-1.el9.x86_64                                                                      1/1
  Verifying        : pgadmin4-server-6.16-1.el9.x86_64                                                                      1/1

Installed:
  pgadmin4-server-6.16-1.el9.x86_64

Complete!
- Apply or upgrade (which is the default at this point) the policycoreutils-python-utils package:
sudo dnf install policycoreutils-python-utils
Display detailed console log →
Last metadata expiration check: 0:50:44 ago on Mon 28 Nov 2022 12:59:07 AM EST.
Package policycoreutils-python-utils-3.3-6.el9_0.noarch is already installed.
Dependencies resolved.
================================================================================================================================
 Package                                      Architecture           Version                    Repository                 Size
================================================================================================================================
Upgrading:
 libsemanage                                  x86_64                 3.4-2.el9                  baseos                    118 k
 policycoreutils                              x86_64                 3.4-4.el9                  baseos                    202 k
 policycoreutils-devel                        x86_64                 3.4-4.el9                  appstream                 139 k
 policycoreutils-python-utils                 noarch                 3.4-4.el9                  appstream                  69 k
 python3-libsemanage                          x86_64                 3.4-2.el9                  appstream                  80 k
 python3-policycoreutils                      noarch                 3.4-4.el9                  appstream                 2.0 M

Transaction Summary
================================================================================================================================
Upgrade  6 Packages

Total download size: 2.6 M
Is this ok [y/N]: y
Downloading Packages:
(1/6): policycoreutils-python-utils-3.4-4.el9.noarch.rpm                                         28 kB/s |  69 kB     00:02
(2/6): python3-libsemanage-3.4-2.el9.x86_64.rpm                                                  32 kB/s |  80 kB     00:02
(3/6): policycoreutils-devel-3.4-4.el9.x86_64.rpm                                                55 kB/s | 139 kB     00:02
(4/6): libsemanage-3.4-2.el9.x86_64.rpm                                                         189 kB/s | 118 kB     00:00
(5/6): python3-policycoreutils-3.4-4.el9.noarch.rpm                                             2.8 MB/s | 2.0 MB     00:00
(6/6): policycoreutils-3.4-4.el9.x86_64.rpm                                                     302 kB/s | 202 kB     00:00
--------------------------------------------------------------------------------------------------------------------------------
Total                                                                                           521 kB/s | 2.6 MB     00:05
Running transaction check
Transaction check succeeded.
Running transaction test
Transaction test succeeded.
Running transaction
Regex version mismatch, expected: 10.40 2022-04-14 actual: 10.37 2021-05-26
Regex version mismatch, expected: 10.40 2022-04-14 actual: 10.37 2021-05-26
  Preparing        :                                                                                                        1/1
  Upgrading        : libsemanage-3.4-2.el9.x86_64                                                                          1/12
  Upgrading        : python3-libsemanage-3.4-2.el9.x86_64                                                                  2/12
  Upgrading        : policycoreutils-3.4-4.el9.x86_64                                                                      3/12
  Running scriptlet: policycoreutils-3.4-4.el9.x86_64                                                                      3/12
  Upgrading        : python3-policycoreutils-3.4-4.el9.noarch                                                              4/12
  Upgrading        : policycoreutils-python-utils-3.4-4.el9.noarch                                                         5/12
  Upgrading        : policycoreutils-devel-3.4-4.el9.x86_64                                                                6/12
  Cleanup          : policycoreutils-devel-3.3-6.el9_0.x86_64                                                              7/12
  Cleanup          : policycoreutils-python-utils-3.3-6.el9_0.noarch                                                       8/12
  Cleanup          : python3-policycoreutils-3.3-6.el9_0.noarch                                                            9/12
  Cleanup          : python3-libsemanage-3.3-2.el9.x86_64                                                                 10/12
  Running scriptlet: policycoreutils-3.3-6.el9_0.x86_64                                                                   11/12
  Cleanup          : policycoreutils-3.3-6.el9_0.x86_64                                                                   11/12
  Cleanup          : libsemanage-3.3-2.el9.x86_64                                                                         12/12
  Running scriptlet: libsemanage-3.3-2.el9.x86_64                                                                         12/12
  Verifying        : policycoreutils-devel-3.4-4.el9.x86_64                                                                1/12
  Verifying        : policycoreutils-devel-3.3-6.el9_0.x86_64                                                              2/12
  Verifying        : policycoreutils-python-utils-3.4-4.el9.noarch                                                         3/12
  Verifying        : policycoreutils-python-utils-3.3-6.el9_0.noarch                                                       4/12
  Verifying        : python3-libsemanage-3.4-2.el9.x86_64                                                                  5/12
  Verifying        : python3-libsemanage-3.3-2.el9.x86_64                                                                  6/12
  Verifying        : python3-policycoreutils-3.4-4.el9.noarch                                                              7/12
  Verifying        : python3-policycoreutils-3.3-6.el9_0.noarch                                                            8/12
  Verifying        : libsemanage-3.4-2.el9.x86_64                                                                          9/12
  Verifying        : libsemanage-3.3-2.el9.x86_64                                                                         10/12
  Verifying        : policycoreutils-3.4-4.el9.x86_64                                                                     11/12
  Verifying        : policycoreutils-3.3-6.el9_0.x86_64                                                                   12/12

Upgraded:
  libsemanage-3.4-2.el9.x86_64                   policycoreutils-3.4-4.el9.x86_64      policycoreutils-devel-3.4-4.el9.x86_64
  policycoreutils-python-utils-3.4-4.el9.noarch  python3-libsemanage-3.4-2.el9.x86_64  python3-policycoreutils-3.4-4.el9.noarch

Complete!
- Apply the pgadmin4-desktop package:
sudo dnf install -y https://ftp.postgresql.org/pub/pgadmin/pgadmin4/yum/redhat/rhel-9Server-x86_64/pgadmin4-desktop-6.16-1.el9.x86_64.rpm
Display detailed console log →
Last metadata expiration check: 1:14:02 ago on Mon 28 Nov 2022 12:59:07 AM EST.
pgadmin4-desktop-6.16-1.el9.x86_64.rpm                                                          3.1 MB/s |  88 MB     00:28
Dependencies resolved.
================================================================================================================================
 Package                          Architecture           Version                             Repository                    Size
================================================================================================================================
Installing:
 pgadmin4-desktop                 x86_64                 6.16-1.el9                          @commandline                  88 M
Installing dependencies:
 libatomic                        x86_64                 11.3.1-2.1.el9.alma                 baseos                        56 k

Transaction Summary
================================================================================================================================
Install  2 Packages

Total size: 88 M
Total download size: 56 k
Installed size: 341 M
Downloading Packages:
libatomic-11.3.1-2.1.el9.alma.x86_64.rpm                                                         83 kB/s |  56 kB     00:00
--------------------------------------------------------------------------------------------------------------------------------
Total                                                                                            39 kB/s |  56 kB     00:01
Running transaction check
Transaction check succeeded.
Running transaction test
Transaction test succeeded.
Running transaction
Regex version mismatch, expected: 10.40 2022-04-14 actual: 10.37 2021-05-26
Regex version mismatch, expected: 10.40 2022-04-14 actual: 10.37 2021-05-26
  Preparing        :                                                                                                        1/1
  Installing       : libatomic-11.3.1-2.1.el9.alma.x86_64                                                                   1/2
  Installing       : pgadmin4-desktop-6.16-1.el9.x86_64                                                                     2/2
  Running scriptlet: pgadmin4-desktop-6.16-1.el9.x86_64                                                                     2/2
  Verifying        : libatomic-11.3.1-2.1.el9.alma.x86_64                                                                   1/2
  Verifying        : pgadmin4-desktop-6.16-1.el9.x86_64                                                                     2/2

Installed:
  libatomic-11.3.1-2.1.el9.alma.x86_64                            pgadmin4-desktop-6.16-1.el9.x86_64

Complete!
- Apply the pgadmin-server package:
- You configure your .bashrc file to add the pgadmin4 directory to your $PATH environment variable.
# Add the pgadmin4 executable to the $PATH.
export set PATH=$PATH:/usr/pgadmin4/bin
You also configure your .bashrc file to add a pgadmin4 function, which simplifies how you call the pgadmin4 executable.
# Function to ensure pgadmin4 call is simplified and without warnings.
pgadmin4 ()
{
  # Call the pgadmin4 executable.
  if [[ `type -t pgadmin4` = 'function' ]]; then
    if [ -f "/usr/pgadmin4/bin/pgadmin4" ]; then
      /usr/pgadmin4/bin/pgadmin4 2>/dev/null &
    else
      echo "[/usr/pgadmin4/bin/pgadmin4] is not found."
    fi
  else
    echo "[pgadmin4] is not a function"
  fi
}
You can launch your pgadmin4 program file now with the following syntax as the student user:
pgadmin4
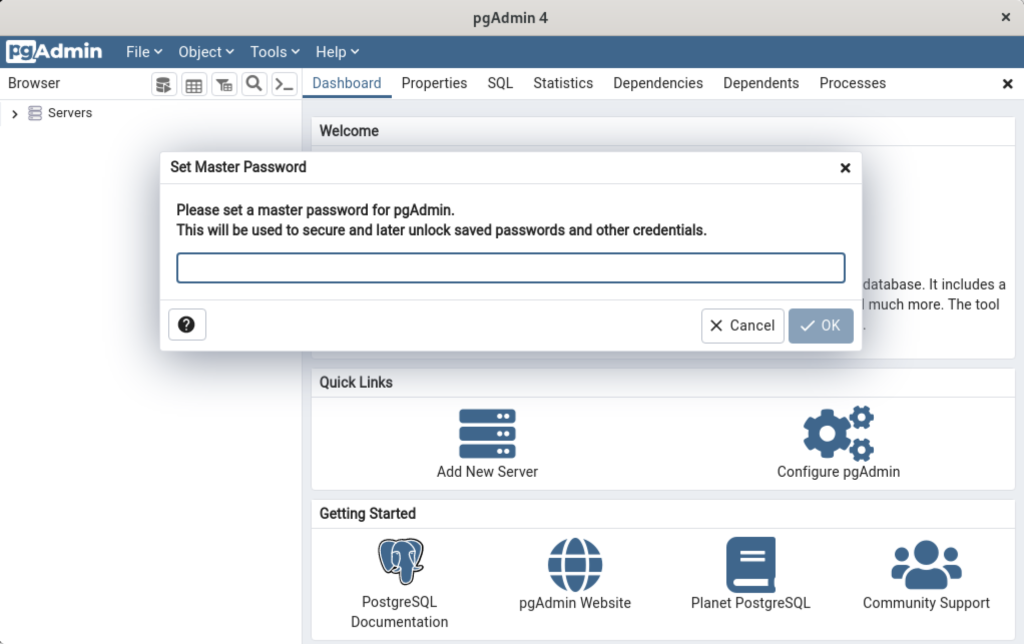
It takes a couple moments to launch the pgadmin4 desktop. The initial screen will look like:

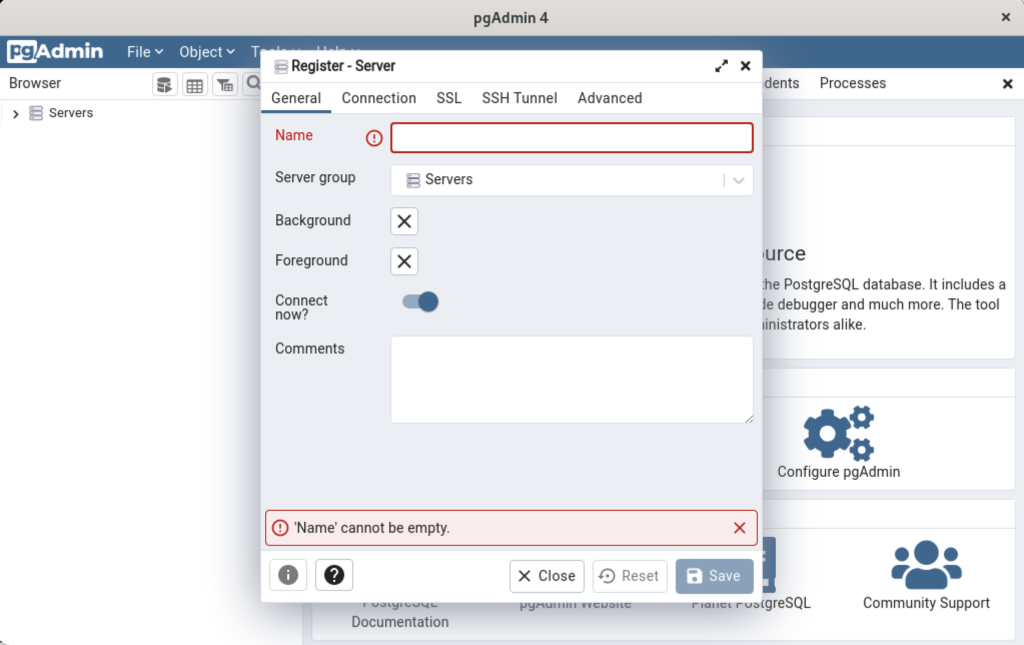
After pgadmin4 launches, you’re prompted for a master password. Enter the password and click the OK button to proceed.
After entering the password, you arrive at the base dialog, as shown.
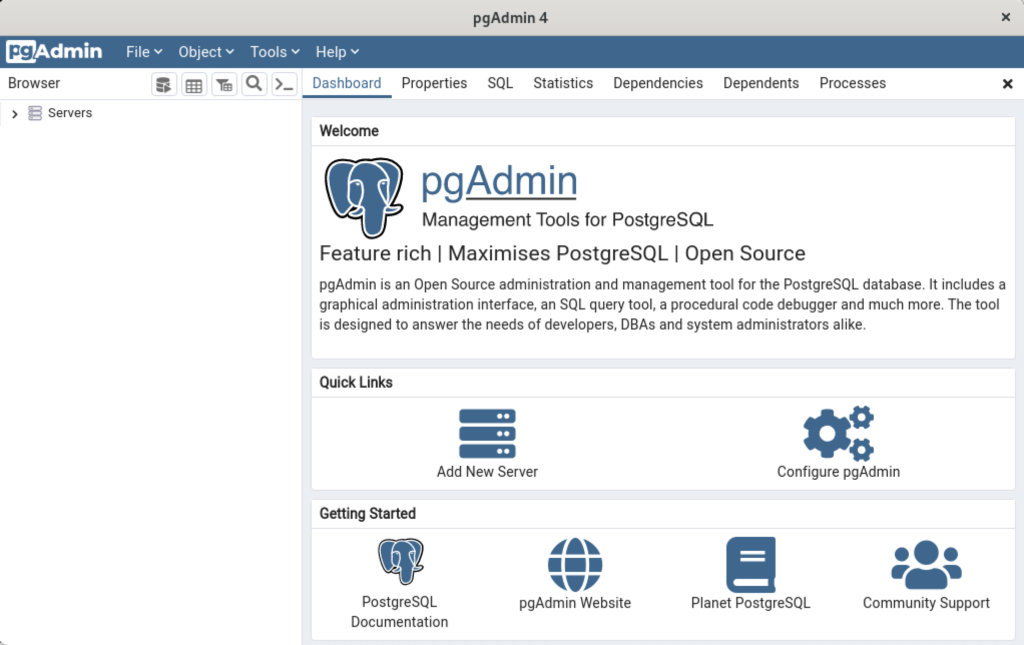
Click the Add New Server link, which prompts you to register your database. Enter videodb in the Name field and click the Connection tab to the right of the General tab.
In the Connection dialog, enter the following values:
- Host name/address: localhost
- Port: 5432
- Maintenance database: postgres
- Username: student
- Password: student

Enter a name for your database. In this example, videodb is the Server Name. Click the Save button to proceed.

- You need to install three sets of packages. They’re the pgadmin-server, policycoreutils-python-utils, and pgadmin4-desktop.
This completes the instructions for installing, configuring, and using PostgreSQL on AlmaLinux. As always, I hope it helps those looking for instructions.
AlmaLinux MySQL Workbench
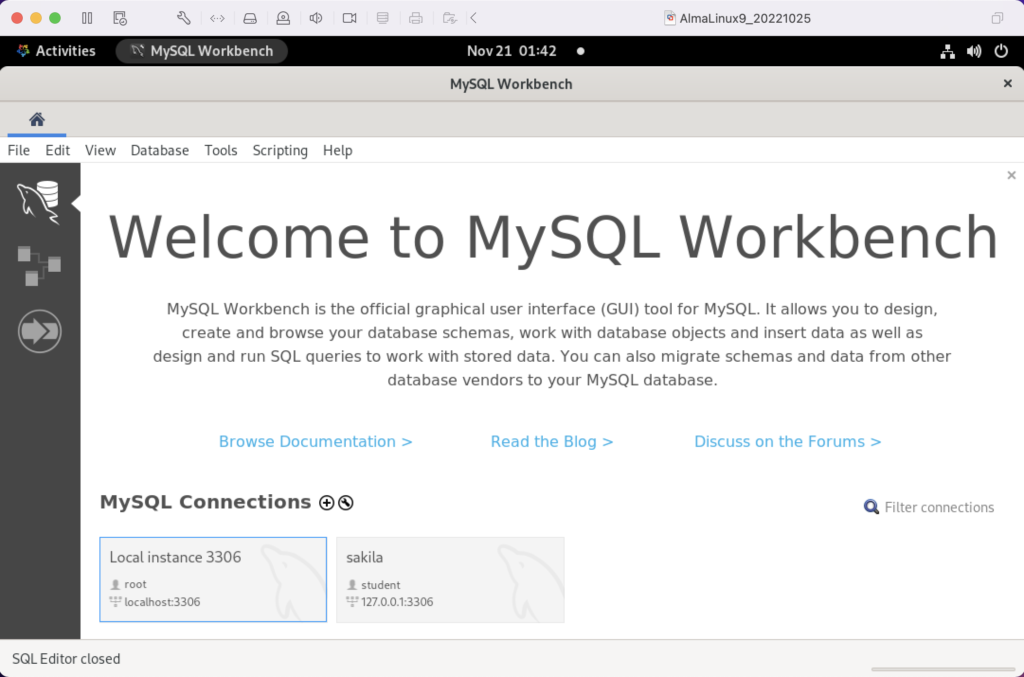
AlmaLinux doesn’t natively support MySQL Workbench but these notes will help you install it. The great news is that MySQL Workbench works perfectly once you’ve installed all the dependent libraries. It’ll look like the following:
Disclaimer of sorts:
AlmaLinux is an open-source, community-driven project that intends to fill the gap left by the demise of the CentOS stable release. AlmaLinux is a 1:1 binary compatible fork of RHEL® 9 and it is built by the AlmaLinux OS Foundation as a standalone, completely free OS. The AlmaLinux OS Foundation will support future RHEL® releases by updating AlmaLinux. Ongoing development efforts are governed by the members of the community.
You can download MySQL Workbench from the following website:
https://dev.mysql.com/downloads/workbench |
When you open this page, select the Red Hat Enterprise Linux 9 / Oracle Linux 9 (x86, 64-bit), RPM Package from the dropdown menu. Then, click the Download button. You may be prompted for your credentials or to create new credentials, but you can skip that by clicking on the No thanks, just start my download link.
When the download completes, open a terminal session as the student user. Navigate to the Downloads directory with the following command:
cd $HOME/Downloads |
List the files in the $HOME/Downloads directory and you should see:
mysql-workbench-community-8.0.31-1.el9.x86_64.rpm |
As the sudoer user or root, run the following command (naturally, exclude sudo if you’re the root user):
sudo dnf install -y mysql-workbench-community-8.0.31-1.el9.x86_64.rpm |
It will most likely fail with an error message like this:
Last metadata expiration check: 2:50:04 ago on Thu 17 Nov 2022 09:33:15 AM EST. Error: Problem: conflicting requests - nothing provides gtkmm30-devel needed by mysql-workbench-community-8.0.31-1.el9.src - nothing provides libzip-devel needed by mysql-workbench-community-8.0.31-1.el9.src - nothing provides proj-devel needed by mysql-workbench-community-8.0.31-1.el9.src - nothing provides swig >= 3.0 needed by mysql-workbench-community-8.0.31-1.el9.src (try to add '--skip-broken' to skip uninstallable packages or '--nobest' to use not only best candidate packages) |
AlmaLinux doesn’t install these prerequisite packages. You’ll need to resolve these dependencies by installing them in the right order and groups before you can run the MySQL Workbench packages.
You can discover missing packages at the pkgs.org website. You need to resolve all four prerequisites before installing MySQL Workbench.
- Let’s start with the gtkmm30-devel package, which has eight separate dependencies. Assuming you’re still in your $HOME/Downloads directory, you can run the following command to get the gtkmm30-devel for AlmaLinux 9:
wget https://repo.almalinux.org/almalinux/9/CRB/x86_64/os/Packages/gtkmm30-devel-3.24.5-1.el9.x86_64.rpm
It downloads the following package:
gtkmm30-devel-3.24.5-1.el9.x86_64.rpm
If you attempt to run it, the gtkmm30-devel package raises the following errors:
sudo dnf install -y gtkmm30-devel-3.24.5-1.el9.x86_64.rpm
Last metadata expiration check: 0:41:13 ago on Thu 17 Nov 2022 02:39:59 PM EST.
Error:
 Problem: conflicting requests
  - nothing provides pkgconfig(atkmm-1.6) >= 2.24.2 needed by gtkmm30-devel-3.24.5-1.el9.x86_64
  - nothing provides pkgconfig(cairomm-1.0) >= 1.12.0 needed by gtkmm30-devel-3.24.5-1.el9.x86_64
  - nothing provides pkgconfig(giomm-2.4) >= 2.54.0 needed by gtkmm30-devel-3.24.5-1.el9.x86_64
  - nothing provides pkgconfig(pangomm-1.4) >= 1.12.0 needed by gtkmm30-devel-3.24.5-1.el9.x86_64
(try to add '--skip-broken' to skip uninstallable packages or '--nobest' to use not only best candidate packages)
While you only get four errors, there are more packages required. You need to use the wget utility to download these packages. I would recommend you create a temporary gtkmm30 subdirectory inside your $HOME/Downloads directory and change to that directory before downloading these files.
wget https://repo.almalinux.org/almalinux/9/CRB/x86_64/os/Packages/atkmm-devel-2.28.2-2.el9.x86_64.rpm
wget https://repo.almalinux.org/almalinux/9/CRB/x86_64/os/Packages/cairomm-devel-1.14.2-10.el9.x86_64.rpm
wget https://repo.almalinux.org/almalinux/9/AppStream/x86_64/os/Packages/gdk-pixbuf2-devel-2.42.6-2.el9.x86_64.rpm
wget https://repo.almalinux.org/almalinux/9/CRB/x86_64/os/Packages/glibmm24-devel-2.66.1-1.el9.x86_64.rpm
wget https://repo.almalinux.org/almalinux/9/AppStream/x86_64/os/Packages/gtk3-devel-3.24.31-2.el9.x86_64.rpm
wget https://repo.almalinux.org/almalinux/9/CRB/x86_64/os/Packages/pangomm-devel-2.46.1-1.el9.x86_64.rpm
wget https://repo.almalinux.org/almalinux/9/CRB/x86_64/os/Packages/libsigc++20-devel-2.10.7-2.el9.x86_64.rpm
You need to run these as a set of prerequisites, so from your gtkmm30 subdirectory use the following dnf command as the sudoer user:
sudo dnf install -y *.rpm
The log file for this is:
Display detailed console log →
Last metadata expiration check: 0:09:20 ago on Sun 20 Nov 2022 12:52:28 AM EST. Dependencies resolved. ================================================================================ Package Arch Version Repository Size ================================================================================ Installing: atkmm-devel x86_64 2.28.2-2.el9 @commandline 45 k cairomm-devel x86_64 1.14.2-10.el9 @commandline 62 k gdk-pixbuf2-devel x86_64 2.42.6-2.el9 @commandline 64 k glibmm24-devel x86_64 2.66.1-1.el9 @commandline 497 k gtk3-devel x86_64 3.24.31-2.el9 @commandline 4.1 M libsigc++20-devel x86_64 2.10.7-2.el9 @commandline 67 k pangomm-devel x86_64 2.46.1-1.el9 @commandline 65 k Upgrading: dbus-common noarch 1:1.12.20-6.el9 baseos 14 k dbus-daemon x86_64 1:1.12.20-6.el9 appstream 196 k dbus-libs x86_64 1:1.12.20-6.el9 baseos 151 k dbus-tools x86_64 1:1.12.20-6.el9 baseos 50 k fontconfig x86_64 2.14.0-1.el9 appstream 274 k freetype x86_64 2.10.4-9.el9 baseos 387 k fribidi x86_64 1.0.10-6.el9.2 appstream 84 k harfbuzz x86_64 2.7.4-8.el9 baseos 624 k harfbuzz-icu x86_64 2.7.4-8.el9 appstream 14 k libblkid x86_64 2.37.4-9.el9 baseos 107 k libfdisk x86_64 2.37.4-9.el9 baseos 154 k libmount x86_64 2.37.4-9.el9 baseos 133 k libselinux x86_64 3.4-3.el9 baseos 85 k libselinux-utils x86_64 3.4-3.el9 baseos 158 k libsepol x86_64 3.4-1.1.el9 baseos 315 k libsmartcols x86_64 2.37.4-9.el9 baseos 63 k libtiff x86_64 4.4.0-2.el9 appstream 195 k libuuid x86_64 2.37.4-9.el9 baseos 27 k libxml2 x86_64 2.9.13-2.el9 baseos 746 k pcre2 x86_64 10.40-2.el9 baseos 236 k pcre2-syntax noarch 10.40-2.el9 baseos 143 k pcre2-utf16 x86_64 10.40-2.el9 appstream 216 k pcre2-utf32 x86_64 10.40-2.el9 appstream 205 k python3-libselinux x86_64 3.4-3.el9 appstream 185 k python3-libxml2 x86_64 2.9.13-2.el9 baseos 226 k util-linux x86_64 2.37.4-9.el9 baseos 2.2 M util-linux-core x86_64 2.37.4-9.el9 baseos 434 k util-linux-user x86_64 2.37.4-9.el9 baseos 30 k Installing dependencies: at-spi2-atk-devel x86_64 2.38.0-4.el9 appstream 9.5 k at-spi2-core-devel x86_64 2.40.3-1.el9 appstream 134 k atk-devel x86_64 2.36.0-5.el9 appstream 172 k brotli x86_64 1.0.9-6.el9 appstream 313 k brotli-devel x86_64 1.0.9-6.el9 appstream 31 k bzip2-devel x86_64 1.0.8-8.el9 appstream 213 k cairo-devel x86_64 1.17.4-7.el9 appstream 190 k cairo-gobject-devel x86_64 1.17.4-7.el9 appstream 10 k dbus-devel x86_64 1:1.12.20-6.el9 appstream 33 k fontconfig-devel x86_64 2.14.0-1.el9 appstream 128 k freetype-devel x86_64 2.10.4-9.el9 appstream 1.1 M fribidi-devel x86_64 1.0.10-6.el9.2 appstream 25 k glib2-devel x86_64 2.68.4-5.el9 appstream 475 k graphite2-devel x86_64 1.3.14-9.el9 appstream 21 k harfbuzz-devel x86_64 2.7.4-8.el9 appstream 305 k libX11-devel x86_64 1.7.0-7.el9 appstream 940 k libXau-devel x86_64 1.0.9-8.el9 appstream 13 k libXcomposite-devel x86_64 0.4.5-7.el9 appstream 15 k libXcursor-devel x86_64 1.2.0-7.el9 appstream 21 k libXdamage-devel x86_64 1.1.5-7.el9 appstream 9.3 k libXext-devel x86_64 1.3.4-8.el9 appstream 72 k libXfixes-devel x86_64 5.0.3-16.el9 appstream 12 k libXft-devel x86_64 2.3.3-8.el9 appstream 18 k libXi-devel x86_64 1.7.10-8.el9 appstream 99 k libXinerama-devel x86_64 1.1.4-10.el9 appstream 13 k libXrandr-devel x86_64 1.5.2-8.el9 appstream 19 k libXrender-devel x86_64 0.9.10-16.el9 appstream 16 k libXtst-devel x86_64 1.2.3-16.el9 appstream 15 k libblkid-devel x86_64 2.37.4-9.el9 appstream 17 k libdatrie-devel x86_64 0.2.13-4.el9 appstream 132 k libepoxy-devel x86_64 1.5.5-4.el9 appstream 133 k libffi-devel x86_64 3.4.2-7.el9 appstream 29 k libglvnd-core-devel x86_64 1:1.3.4-1.el9 appstream 17 k libglvnd-devel x86_64 1:1.3.4-1.el9 appstream 155 k libicu-devel x86_64 67.1-9.el9 appstream 830 k libmount-devel x86_64 2.37.4-9.el9 appstream 18 k libpng-devel x86_64 2:1.6.37-12.el9 appstream 290 k libselinux-devel x86_64 3.4-3.el9 appstream 113 k libsepol-devel x86_64 3.4-1.1.el9 appstream 40 k libthai-devel x86_64 0.1.28-8.el9 appstream 117 k libtiff-devel x86_64 4.4.0-2.el9 appstream 513 k libxcb-devel x86_64 1.13.1-9.el9 appstream 1.0 M libxkbcommon-devel x86_64 1.0.3-4.el9 appstream 61 k libxml2-devel x86_64 2.9.13-2.el9 appstream 828 k pango-devel x86_64 1.48.7-2.el9 appstream 141 k pcre-cpp x86_64 8.44-3.el9.3 appstream 26 k pcre-devel x86_64 8.44-3.el9.3 appstream 470 k pcre-utf16 x86_64 8.44-3.el9.3 appstream 184 k pcre-utf32 x86_64 8.44-3.el9.3 appstream 174 k pcre2-devel x86_64 10.40-2.el9 appstream 474 k perl-Filter x86_64 2:1.60-4.el9 appstream 81 k perl-encoding x86_64 4:3.00-462.el9 appstream 62 k perl-open noarch 1.12-479.el9 appstream 25 k pixman-devel x86_64 0.40.0-5.el9 appstream 17 k sysprof-capture-devel x86_64 3.40.1-3.el9 appstream 59 k wayland-devel x86_64 1.19.0-4.el9 appstream 132 k xorg-x11-proto-devel noarch 2021.4-2.el9 appstream 262 k Transaction Summary ================================================================================ Install 64 Packages Upgrade 28 Packages Total size: 23 M Total download size: 18 M Downloading Packages: (1/85): at-spi2-atk-devel-2.38.0-4.el9.x86_64.r 38 kB/s | 9.5 kB 00:00 (2/85): atk-devel-2.36.0-5.el9.x86_64.rpm 334 kB/s | 172 kB 00:00 (3/85): brotli-devel-1.0.9-6.el9.x86_64.rpm 354 kB/s | 31 kB 00:00 (4/85): at-spi2-core-devel-2.40.3-1.el9.x86_64. 167 kB/s | 134 kB 00:00 (5/85): cairo-devel-1.17.4-7.el9.x86_64.rpm 1.9 MB/s | 190 kB 00:00 (6/85): cairo-gobject-devel-1.17.4-7.el9.x86_64 179 kB/s | 10 kB 00:00 (7/85): brotli-1.0.9-6.el9.x86_64.rpm 413 kB/s | 313 kB 00:00 (8/85): dbus-devel-1.12.20-6.el9.x86_64.rpm 549 kB/s | 33 kB 00:00 (9/85): bzip2-devel-1.0.8-8.el9.x86_64.rpm 505 kB/s | 213 kB 00:00 (10/85): fribidi-devel-1.0.10-6.el9.2.x86_64.rp 492 kB/s | 25 kB 00:00 (11/85): fontconfig-devel-2.14.0-1.el9.x86_64.r 891 kB/s | 128 kB 00:00 (12/85): graphite2-devel-1.3.14-9.el9.x86_64.rp 316 kB/s | 21 kB 00:00 (13/85): glib2-devel-2.68.4-5.el9.x86_64.rpm 1.1 MB/s | 475 kB 00:00 (14/85): harfbuzz-devel-2.7.4-8.el9.x86_64.rpm 850 kB/s | 305 kB 00:00 (15/85): freetype-devel-2.10.4-9.el9.x86_64.rpm 1.7 MB/s | 1.1 MB 00:00 (16/85): libXau-devel-1.0.9-8.el9.x86_64.rpm 170 kB/s | 13 kB 00:00 (17/85): libXcomposite-devel-0.4.5-7.el9.x86_64 273 kB/s | 15 kB 00:00 (18/85): libXcursor-devel-1.2.0-7.el9.x86_64.rp 344 kB/s | 21 kB 00:00 (19/85): libXdamage-devel-1.1.5-7.el9.x86_64.rp 133 kB/s | 9.3 kB 00:00 (20/85): libXfixes-devel-5.0.3-16.el9.x86_64.rp 256 kB/s | 12 kB 00:00 (21/85): libXext-devel-1.3.4-8.el9.x86_64.rpm 768 kB/s | 72 kB 00:00 (22/85): libXft-devel-2.3.3-8.el9.x86_64.rpm 324 kB/s | 18 kB 00:00 (23/85): libXinerama-devel-1.1.4-10.el9.x86_64. 205 kB/s | 13 kB 00:00 (24/85): libXi-devel-1.7.10-8.el9.x86_64.rpm 913 kB/s | 99 kB 00:00 (25/85): libXrender-devel-0.9.10-16.el9.x86_64. 295 kB/s | 16 kB 00:00 (26/85): libXrandr-devel-1.5.2-8.el9.x86_64.rpm 289 kB/s | 19 kB 00:00 (27/85): libXtst-devel-1.2.3-16.el9.x86_64.rpm 261 kB/s | 15 kB 00:00 (28/85): libblkid-devel-2.37.4-9.el9.x86_64.rpm 284 kB/s | 17 kB 00:00 (29/85): libX11-devel-1.7.0-7.el9.x86_64.rpm 1.4 MB/s | 940 kB 00:00 (30/85): libepoxy-devel-1.5.5-4.el9.x86_64.rpm 1.2 MB/s | 133 kB 00:00 (31/85): libdatrie-devel-0.2.13-4.el9.x86_64.rp 876 kB/s | 132 kB 00:00 (32/85): libffi-devel-3.4.2-7.el9.x86_64.rpm 426 kB/s | 29 kB 00:00 (33/85): libglvnd-core-devel-1.3.4-1.el9.x86_64 233 kB/s | 17 kB 00:00 (34/85): libmount-devel-2.37.4-9.el9.x86_64.rpm 280 kB/s | 18 kB 00:00 (35/85): libglvnd-devel-1.3.4-1.el9.x86_64.rpm 976 kB/s | 155 kB 00:00 (36/85): libpng-devel-1.6.37-12.el9.x86_64.rpm 1.9 MB/s | 290 kB 00:00 (37/85): libselinux-devel-3.4-3.el9.x86_64.rpm 801 kB/s | 113 kB 00:00 (38/85): libsepol-devel-3.4-1.1.el9.x86_64.rpm 636 kB/s | 40 kB 00:00 (39/85): libthai-devel-0.1.28-8.el9.x86_64.rpm 630 kB/s | 117 kB 00:00 (40/85): libicu-devel-67.1-9.el9.x86_64.rpm 1.3 MB/s | 830 kB 00:00 (41/85): libtiff-devel-4.4.0-2.el9.x86_64.rpm 1.6 MB/s | 513 kB 00:00 (42/85): libxkbcommon-devel-1.0.3-4.el9.x86_64. 710 kB/s | 61 kB 00:00 (43/85): pango-devel-1.48.7-2.el9.x86_64.rpm 914 kB/s | 141 kB 00:00 (44/85): pcre-cpp-8.44-3.el9.3.x86_64.rpm 425 kB/s | 26 kB 00:00 (45/85): pcre-devel-8.44-3.el9.3.x86_64.rpm 1.8 MB/s | 470 kB 00:00 (46/85): pcre-utf16-8.44-3.el9.3.x86_64.rpm 1.5 MB/s | 184 kB 00:00 (47/85): libxml2-devel-2.9.13-2.el9.x86_64.rpm 1.2 MB/s | 828 kB 00:00 (48/85): libxcb-devel-1.13.1-9.el9.x86_64.rpm 1.2 MB/s | 1.0 MB 00:00 (49/85): pcre-utf32-8.44-3.el9.3.x86_64.rpm 1.4 MB/s | 174 kB 00:00 (50/85): perl-Filter-1.60-4.el9.x86_64.rpm 704 kB/s | 81 kB 00:00 (51/85): perl-encoding-3.00-462.el9.x86_64.rpm 916 kB/s | 62 kB 00:00 (52/85): perl-open-1.12-479.el9.noarch.rpm 476 kB/s | 25 kB 00:00 (53/85): pixman-devel-0.40.0-5.el9.x86_64.rpm 272 kB/s | 17 kB 00:00 (54/85): sysprof-capture-devel-3.40.1-3.el9.x86 797 kB/s | 59 kB 00:00 (55/85): pcre2-devel-10.40-2.el9.x86_64.rpm 1.3 MB/s | 474 kB 00:00 (56/85): wayland-devel-1.19.0-4.el9.x86_64.rpm 1.0 MB/s | 132 kB 00:00 (57/85): xorg-x11-proto-devel-2021.4-2.el9.noar 1.3 MB/s | 262 kB 00:00 (58/85): dbus-daemon-1.12.20-6.el9.x86_64.rpm 1.3 MB/s | 196 kB 00:00 (59/85): fontconfig-2.14.0-1.el9.x86_64.rpm 1.7 MB/s | 274 kB 00:00 (60/85): harfbuzz-icu-2.7.4-8.el9.x86_64.rpm 217 kB/s | 14 kB 00:00 (61/85): fribidi-1.0.10-6.el9.2.x86_64.rpm 700 kB/s | 84 kB 00:00 (62/85): libtiff-4.4.0-2.el9.x86_64.rpm 1.5 MB/s | 195 kB 00:00 (63/85): pcre2-utf32-10.40-2.el9.x86_64.rpm 1.2 MB/s | 205 kB 00:00 (64/85): python3-libselinux-3.4-3.el9.x86_64.rp 1.5 MB/s | 185 kB 00:00 (65/85): pcre2-utf16-10.40-2.el9.x86_64.rpm 995 kB/s | 216 kB 00:00 (66/85): dbus-common-1.12.20-6.el9.noarch.rpm 203 kB/s | 14 kB 00:00 (67/85): dbus-tools-1.12.20-6.el9.x86_64.rpm 856 kB/s | 50 kB 00:00 (68/85): dbus-libs-1.12.20-6.el9.x86_64.rpm 1.3 MB/s | 151 kB 00:00 (69/85): libblkid-2.37.4-9.el9.x86_64.rpm 1.6 MB/s | 107 kB 00:00 (70/85): libfdisk-2.37.4-9.el9.x86_64.rpm 1.6 MB/s | 154 kB 00:00 (71/85): freetype-2.10.4-9.el9.x86_64.rpm 1.5 MB/s | 387 kB 00:00 (72/85): libmount-2.37.4-9.el9.x86_64.rpm 1.3 MB/s | 133 kB 00:00 (73/85): libselinux-3.4-3.el9.x86_64.rpm 820 kB/s | 85 kB 00:00 (74/85): harfbuzz-2.7.4-8.el9.x86_64.rpm 1.4 MB/s | 624 kB 00:00 (75/85): libselinux-utils-3.4-3.el9.x86_64.rpm 1.4 MB/s | 158 kB 00:00 (76/85): libuuid-2.37.4-9.el9.x86_64.rpm 448 kB/s | 27 kB 00:00 (77/85): libsmartcols-2.37.4-9.el9.x86_64.rpm 793 kB/s | 63 kB 00:00 (78/85): libsepol-3.4-1.1.el9.x86_64.rpm 1.6 MB/s | 315 kB 00:00 (79/85): pcre2-syntax-10.40-2.el9.noarch.rpm 1.2 MB/s | 143 kB 00:00 (80/85): pcre2-10.40-2.el9.x86_64.rpm 1.6 MB/s | 236 kB 00:00 (81/85): python3-libxml2-2.9.13-2.el9.x86_64.rp 1.4 MB/s | 226 kB 00:00 (82/85): libxml2-2.9.13-2.el9.x86_64.rpm 1.5 MB/s | 746 kB 00:00 (83/85): util-linux-user-2.37.4-9.el9.x86_64.rp 618 kB/s | 30 kB 00:00 (84/85): util-linux-core-2.37.4-9.el9.x86_64.rp 1.1 MB/s | 434 kB 00:00 (85/85): util-linux-2.37.4-9.el9.x86_64.rpm 1.9 MB/s | 2.2 MB 00:01 -------------------------------------------------------------------------------- Total 2.4 MB/s | 18 MB 00:07 Running transaction check Transaction check succeeded. Running transaction test Transaction test succeeded. Running transaction Preparing : 1/1 Installing : xorg-x11-proto-devel-2021.4-2.el9.noarch 1/120 Upgrading : libuuid-2.37.4-9.el9.x86_64 2/120 Upgrading : libblkid-2.37.4-9.el9.x86_64 3/120 Running scriptlet: libblkid-2.37.4-9.el9.x86_64 3/120 Upgrading : harfbuzz-2.7.4-8.el9.x86_64 4/120 Upgrading : freetype-2.10.4-9.el9.x86_64 5/120 Upgrading : libxml2-2.9.13-2.el9.x86_64 6/120 Upgrading : pcre2-syntax-10.40-2.el9.noarch 7/120 Upgrading : pcre2-10.40-2.el9.x86_64 8/120 Upgrading : libsepol-3.4-1.1.el9.x86_64 9/120 Upgrading : libselinux-3.4-3.el9.x86_64 10/120 Running scriptlet: libselinux-3.4-3.el9.x86_64 10/120 Upgrading : libmount-2.37.4-9.el9.x86_64 11/120 Upgrading : dbus-libs-1:1.12.20-6.el9.x86_64 12/120 Installing : libpng-devel-2:1.6.37-12.el9.x86_64 13/120 Installing : dbus-devel-1:1.12.20-6.el9.x86_64 14/120 Installing : libxml2-devel-2.9.13-2.el9.x86_64 15/120 Upgrading : libsmartcols-2.37.4-9.el9.x86_64 16/120 Installing : libsigc++20-devel-2.10.7-2.el9.x86_64 17/120 Installing : libffi-devel-3.4.2-7.el9.x86_64 18/120 Installing : wayland-devel-1.19.0-4.el9.x86_64 19/120 Upgrading : util-linux-core-2.37.4-9.el9.x86_64 20/120 Running scriptlet: util-linux-core-2.37.4-9.el9.x86_64 20/120 Installing : libxkbcommon-devel-1.0.3-4.el9.x86_64 21/120 Upgrading : dbus-tools-1:1.12.20-6.el9.x86_64 22/120 Installing : libsepol-devel-3.4-1.1.el9.x86_64 23/120 Upgrading : pcre2-utf16-10.40-2.el9.x86_64 24/120 Upgrading : pcre2-utf32-10.40-2.el9.x86_64 25/120 Installing : pcre2-devel-10.40-2.el9.x86_64 26/120 Installing : libselinux-devel-3.4-3.el9.x86_64 27/120 Upgrading : fontconfig-2.14.0-1.el9.x86_64 28/120 Running scriptlet: fontconfig-2.14.0-1.el9.x86_64 28/120 Upgrading : harfbuzz-icu-2.7.4-8.el9.x86_64 29/120 Installing : libblkid-devel-2.37.4-9.el9.x86_64 30/120 Installing : libmount-devel-2.37.4-9.el9.x86_64 31/120 Upgrading : libfdisk-2.37.4-9.el9.x86_64 32/120 Upgrading : util-linux-2.37.4-9.el9.x86_64 33/120 Installing : libXau-devel-1.0.9-8.el9.x86_64 34/120 Installing : libxcb-devel-1.13.1-9.el9.x86_64 35/120 Installing : libX11-devel-1.7.0-7.el9.x86_64 36/120 Installing : libXext-devel-1.3.4-8.el9.x86_64 37/120 Installing : libXfixes-devel-5.0.3-16.el9.x86_64 38/120 Installing : libXrender-devel-0.9.10-16.el9.x86_64 39/120 Installing : libXi-devel-1.7.10-8.el9.x86_64 40/120 Installing : libXtst-devel-1.2.3-16.el9.x86_64 41/120 Installing : libXcursor-devel-1.2.0-7.el9.x86_64 42/120 Installing : libXrandr-devel-1.5.2-8.el9.x86_64 43/120 Installing : libXcomposite-devel-0.4.5-7.el9.x86_64 44/120 Installing : libXdamage-devel-1.1.5-7.el9.x86_64 45/120 Installing : libXinerama-devel-1.1.4-10.el9.x86_64 46/120 Upgrading : dbus-common-1:1.12.20-6.el9.noarch 47/120 Running scriptlet: dbus-common-1:1.12.20-6.el9.noarch 47/120 Upgrading : libtiff-4.4.0-2.el9.x86_64 48/120 Installing : libtiff-devel-4.4.0-2.el9.x86_64 49/120 Upgrading : fribidi-1.0.10-6.el9.2.x86_64 50/120 Installing : fribidi-devel-1.0.10-6.el9.2.x86_64 51/120 Installing : sysprof-capture-devel-3.40.1-3.el9.x86_64 52/120 Installing : pixman-devel-0.40.0-5.el9.x86_64 53/120 Installing : perl-Filter-2:1.60-4.el9.x86_64 54/120 Installing : perl-encoding-4:3.00-462.el9.x86_64 55/120 Installing : perl-open-1.12-479.el9.noarch 56/120 Installing : pcre-utf32-8.44-3.el9.3.x86_64 57/120 Installing : pcre-utf16-8.44-3.el9.3.x86_64 58/120 Installing : pcre-cpp-8.44-3.el9.3.x86_64 59/120 Installing : pcre-devel-8.44-3.el9.3.x86_64 60/120 Installing : glib2-devel-2.68.4-5.el9.x86_64 61/120 Installing : atk-devel-2.36.0-5.el9.x86_64 62/120 Installing : glibmm24-devel-2.66.1-1.el9.x86_64 63/120 Installing : at-spi2-core-devel-2.40.3-1.el9.x86_64 64/120 Installing : at-spi2-atk-devel-2.38.0-4.el9.x86_64 65/120 Installing : gdk-pixbuf2-devel-2.42.6-2.el9.x86_64 66/120 Installing : libicu-devel-67.1-9.el9.x86_64 67/120 Installing : libglvnd-core-devel-1:1.3.4-1.el9.x86_64 68/120 Installing : libglvnd-devel-1:1.3.4-1.el9.x86_64 69/120 Installing : libepoxy-devel-1.5.5-4.el9.x86_64 70/120 Installing : libdatrie-devel-0.2.13-4.el9.x86_64 71/120 Installing : libthai-devel-0.1.28-8.el9.x86_64 72/120 Installing : graphite2-devel-1.3.14-9.el9.x86_64 73/120 Installing : bzip2-devel-1.0.8-8.el9.x86_64 74/120 Installing : brotli-1.0.9-6.el9.x86_64 75/120 Installing : brotli-devel-1.0.9-6.el9.x86_64 76/120 Installing : harfbuzz-devel-2.7.4-8.el9.x86_64 77/120 Installing : freetype-devel-2.10.4-9.el9.x86_64 78/120 Installing : fontconfig-devel-2.14.0-1.el9.x86_64 79/120 Installing : cairo-devel-1.17.4-7.el9.x86_64 80/120 Installing : cairo-gobject-devel-1.17.4-7.el9.x86_64 81/120 Installing : cairomm-devel-1.14.2-10.el9.x86_64 82/120 Installing : libXft-devel-2.3.3-8.el9.x86_64 83/120 Installing : pango-devel-1.48.7-2.el9.x86_64 84/120 Installing : gtk3-devel-3.24.31-2.el9.x86_64 85/120 Installing : pangomm-devel-2.46.1-1.el9.x86_64 86/120 Installing : atkmm-devel-2.28.2-2.el9.x86_64 87/120 Running scriptlet: dbus-daemon-1:1.12.20-6.el9.x86_64 88/120 Upgrading : dbus-daemon-1:1.12.20-6.el9.x86_64 88/120 Running scriptlet: dbus-daemon-1:1.12.20-6.el9.x86_64 88/120 Upgrading : util-linux-user-2.37.4-9.el9.x86_64 89/120 Upgrading : python3-libselinux-3.4-3.el9.x86_64 90/120 Upgrading : libselinux-utils-3.4-3.el9.x86_64 91/120 Upgrading : python3-libxml2-2.9.13-2.el9.x86_64 92/120 Cleanup : python3-libxml2-2.9.13-1.el9_0.1.x86_64 93/120 Running scriptlet: dbus-daemon-1:1.12.20-5.el9.x86_64 94/120 Cleanup : dbus-daemon-1:1.12.20-5.el9.x86_64 94/120 Running scriptlet: dbus-daemon-1:1.12.20-5.el9.x86_64 94/120 Cleanup : libselinux-utils-3.3-2.el9.x86_64 95/120 Cleanup : fontconfig-2.13.94-2.el9.x86_64 96/120 Running scriptlet: fontconfig-2.13.94-2.el9.x86_64 96/120 Cleanup : dbus-tools-1:1.12.20-5.el9.x86_64 97/120 Cleanup : python3-libselinux-3.3-2.el9.x86_64 98/120 Cleanup : util-linux-user-2.37.4-3.el9.x86_64 99/120 Cleanup : util-linux-2.37.4-3.el9.x86_64 100/120 Cleanup : util-linux-core-2.37.4-3.el9.x86_64 101/120 Cleanup : libmount-2.37.4-3.el9.x86_64 102/120 Cleanup : libfdisk-2.37.4-3.el9.x86_64 103/120 Cleanup : libselinux-3.3-2.el9.x86_64 104/120 Cleanup : harfbuzz-icu-2.7.4-5.el9.x86_64 105/120 Cleanup : pcre2-10.37-5.el9_0.x86_64 106/120 Cleanup : libblkid-2.37.4-3.el9.x86_64 107/120 Cleanup : freetype-2.10.4-6.el9.x86_64 108/120 Cleanup : pcre2-utf32-10.37-5.el9_0.x86_64 109/120 Cleanup : pcre2-utf16-10.37-5.el9_0.x86_64 110/120 Cleanup : pcre2-syntax-10.37-5.el9_0.noarch 111/120 Running scriptlet: dbus-common-1:1.12.20-5.el9.noarch 112/120 Cleanup : dbus-common-1:1.12.20-5.el9.noarch 112/120 Running scriptlet: dbus-common-1:1.12.20-5.el9.noarch 112/120 Cleanup : harfbuzz-2.7.4-5.el9.x86_64 113/120 Cleanup : libuuid-2.37.4-3.el9.x86_64 114/120 Cleanup : libsepol-3.3-2.el9.x86_64 115/120 Cleanup : libsmartcols-2.37.4-3.el9.x86_64 116/120 Cleanup : dbus-libs-1:1.12.20-5.el9.x86_64 117/120 Cleanup : libxml2-2.9.13-1.el9_0.1.x86_64 118/120 Cleanup : libtiff-4.2.0-3.el9.x86_64 119/120 Cleanup : fribidi-1.0.10-6.el9.x86_64 120/120 Running scriptlet: fontconfig-2.14.0-1.el9.x86_64 120/120 Running scriptlet: fribidi-1.0.10-6.el9.x86_64 120/120 Regex version mismatch, expected: 10.40 2022-04-14 actual: 10.37 2021-05-26 Regex version mismatch, expected: 10.40 2022-04-14 actual: 10.37 2021-05-26 Regex version mismatch, expected: 10.40 2022-04-14 actual: 10.37 2021-05-26 Regex version mismatch, expected: 10.40 2022-04-14 actual: 10.37 2021-05-26 Verifying : at-spi2-atk-devel-2.38.0-4.el9.x86_64 1/120 Verifying : at-spi2-core-devel-2.40.3-1.el9.x86_64 2/120 Verifying : atk-devel-2.36.0-5.el9.x86_64 3/120 Verifying : brotli-1.0.9-6.el9.x86_64 4/120 Verifying : brotli-devel-1.0.9-6.el9.x86_64 5/120 Verifying : bzip2-devel-1.0.8-8.el9.x86_64 6/120 Verifying : cairo-devel-1.17.4-7.el9.x86_64 7/120 Verifying : cairo-gobject-devel-1.17.4-7.el9.x86_64 8/120 Verifying : dbus-devel-1:1.12.20-6.el9.x86_64 9/120 Verifying : fontconfig-devel-2.14.0-1.el9.x86_64 10/120 Verifying : freetype-devel-2.10.4-9.el9.x86_64 11/120 Verifying : fribidi-devel-1.0.10-6.el9.2.x86_64 12/120 Verifying : glib2-devel-2.68.4-5.el9.x86_64 13/120 Verifying : graphite2-devel-1.3.14-9.el9.x86_64 14/120 Verifying : harfbuzz-devel-2.7.4-8.el9.x86_64 15/120 Verifying : libX11-devel-1.7.0-7.el9.x86_64 16/120 Verifying : libXau-devel-1.0.9-8.el9.x86_64 17/120 Verifying : libXcomposite-devel-0.4.5-7.el9.x86_64 18/120 Verifying : libXcursor-devel-1.2.0-7.el9.x86_64 19/120 Verifying : libXdamage-devel-1.1.5-7.el9.x86_64 20/120 Verifying : libXext-devel-1.3.4-8.el9.x86_64 21/120 Verifying : libXfixes-devel-5.0.3-16.el9.x86_64 22/120 Verifying : libXft-devel-2.3.3-8.el9.x86_64 23/120 Verifying : libXi-devel-1.7.10-8.el9.x86_64 24/120 Verifying : libXinerama-devel-1.1.4-10.el9.x86_64 25/120 Verifying : libXrandr-devel-1.5.2-8.el9.x86_64 26/120 Verifying : libXrender-devel-0.9.10-16.el9.x86_64 27/120 Verifying : libXtst-devel-1.2.3-16.el9.x86_64 28/120 Verifying : libblkid-devel-2.37.4-9.el9.x86_64 29/120 Verifying : libdatrie-devel-0.2.13-4.el9.x86_64 30/120 Verifying : libepoxy-devel-1.5.5-4.el9.x86_64 31/120 Verifying : libffi-devel-3.4.2-7.el9.x86_64 32/120 Verifying : libglvnd-core-devel-1:1.3.4-1.el9.x86_64 33/120 Verifying : libglvnd-devel-1:1.3.4-1.el9.x86_64 34/120 Verifying : libicu-devel-67.1-9.el9.x86_64 35/120 Verifying : libmount-devel-2.37.4-9.el9.x86_64 36/120 Verifying : libpng-devel-2:1.6.37-12.el9.x86_64 37/120 Verifying : libselinux-devel-3.4-3.el9.x86_64 38/120 Verifying : libsepol-devel-3.4-1.1.el9.x86_64 39/120 Verifying : libthai-devel-0.1.28-8.el9.x86_64 40/120 Verifying : libtiff-devel-4.4.0-2.el9.x86_64 41/120 Verifying : libxcb-devel-1.13.1-9.el9.x86_64 42/120 Verifying : libxkbcommon-devel-1.0.3-4.el9.x86_64 43/120 Verifying : libxml2-devel-2.9.13-2.el9.x86_64 44/120 Verifying : pango-devel-1.48.7-2.el9.x86_64 45/120 Verifying : pcre-cpp-8.44-3.el9.3.x86_64 46/120 Verifying : pcre-devel-8.44-3.el9.3.x86_64 47/120 Verifying : pcre-utf16-8.44-3.el9.3.x86_64 48/120 Verifying : pcre-utf32-8.44-3.el9.3.x86_64 49/120 Verifying : pcre2-devel-10.40-2.el9.x86_64 50/120 Verifying : perl-Filter-2:1.60-4.el9.x86_64 51/120 Verifying : perl-encoding-4:3.00-462.el9.x86_64 52/120 Verifying : perl-open-1.12-479.el9.noarch 53/120 Verifying : pixman-devel-0.40.0-5.el9.x86_64 54/120 Verifying : sysprof-capture-devel-3.40.1-3.el9.x86_64 55/120 Verifying : wayland-devel-1.19.0-4.el9.x86_64 56/120 Verifying : xorg-x11-proto-devel-2021.4-2.el9.noarch 57/120 Verifying : atkmm-devel-2.28.2-2.el9.x86_64 58/120 Verifying : cairomm-devel-1.14.2-10.el9.x86_64 59/120 Verifying : gdk-pixbuf2-devel-2.42.6-2.el9.x86_64 60/120 Verifying : glibmm24-devel-2.66.1-1.el9.x86_64 61/120 Verifying : gtk3-devel-3.24.31-2.el9.x86_64 62/120 Verifying : libsigc++20-devel-2.10.7-2.el9.x86_64 63/120 Verifying : pangomm-devel-2.46.1-1.el9.x86_64 64/120 Verifying : dbus-daemon-1:1.12.20-6.el9.x86_64 65/120 Verifying : dbus-daemon-1:1.12.20-5.el9.x86_64 66/120 Verifying : fontconfig-2.14.0-1.el9.x86_64 67/120 Verifying : fontconfig-2.13.94-2.el9.x86_64 68/120 Verifying : fribidi-1.0.10-6.el9.2.x86_64 69/120 Verifying : fribidi-1.0.10-6.el9.x86_64 70/120 Verifying : harfbuzz-icu-2.7.4-8.el9.x86_64 71/120 Verifying : harfbuzz-icu-2.7.4-5.el9.x86_64 72/120 Verifying : libtiff-4.4.0-2.el9.x86_64 73/120 Verifying : libtiff-4.2.0-3.el9.x86_64 74/120 Verifying : pcre2-utf16-10.40-2.el9.x86_64 75/120 Verifying : pcre2-utf16-10.37-5.el9_0.x86_64 76/120 Verifying : pcre2-utf32-10.40-2.el9.x86_64 77/120 Verifying : pcre2-utf32-10.37-5.el9_0.x86_64 78/120 Verifying : python3-libselinux-3.4-3.el9.x86_64 79/120 Verifying : python3-libselinux-3.3-2.el9.x86_64 80/120 Verifying : dbus-common-1:1.12.20-6.el9.noarch 81/120 Verifying : dbus-common-1:1.12.20-5.el9.noarch 82/120 Verifying : dbus-libs-1:1.12.20-6.el9.x86_64 83/120 Verifying : dbus-libs-1:1.12.20-5.el9.x86_64 84/120 Verifying : dbus-tools-1:1.12.20-6.el9.x86_64 85/120 Verifying : dbus-tools-1:1.12.20-5.el9.x86_64 86/120 Verifying : freetype-2.10.4-9.el9.x86_64 87/120 Verifying : freetype-2.10.4-6.el9.x86_64 88/120 Verifying : harfbuzz-2.7.4-8.el9.x86_64 89/120 Verifying : harfbuzz-2.7.4-5.el9.x86_64 90/120 Verifying : libblkid-2.37.4-9.el9.x86_64 91/120 Verifying : libblkid-2.37.4-3.el9.x86_64 92/120 Verifying : libfdisk-2.37.4-9.el9.x86_64 93/120 Verifying : libfdisk-2.37.4-3.el9.x86_64 94/120 Verifying : libmount-2.37.4-9.el9.x86_64 95/120 Verifying : libmount-2.37.4-3.el9.x86_64 96/120 Verifying : libselinux-3.4-3.el9.x86_64 97/120 Verifying : libselinux-3.3-2.el9.x86_64 98/120 Verifying : libselinux-utils-3.4-3.el9.x86_64 99/120 Verifying : libselinux-utils-3.3-2.el9.x86_64 100/120 Verifying : libsepol-3.4-1.1.el9.x86_64 101/120 Verifying : libsepol-3.3-2.el9.x86_64 102/120 Verifying : libsmartcols-2.37.4-9.el9.x86_64 103/120 Verifying : libsmartcols-2.37.4-3.el9.x86_64 104/120 Verifying : libuuid-2.37.4-9.el9.x86_64 105/120 Verifying : libuuid-2.37.4-3.el9.x86_64 106/120 Verifying : libxml2-2.9.13-2.el9.x86_64 107/120 Verifying : libxml2-2.9.13-1.el9_0.1.x86_64 108/120 Verifying : pcre2-10.40-2.el9.x86_64 109/120 Verifying : pcre2-10.37-5.el9_0.x86_64 110/120 Verifying : pcre2-syntax-10.40-2.el9.noarch 111/120 Verifying : pcre2-syntax-10.37-5.el9_0.noarch 112/120 Verifying : python3-libxml2-2.9.13-2.el9.x86_64 113/120 Verifying : python3-libxml2-2.9.13-1.el9_0.1.x86_64 114/120 Verifying : util-linux-2.37.4-9.el9.x86_64 115/120 Verifying : util-linux-2.37.4-3.el9.x86_64 116/120 Verifying : util-linux-core-2.37.4-9.el9.x86_64 117/120 Verifying : util-linux-core-2.37.4-3.el9.x86_64 118/120 Verifying : util-linux-user-2.37.4-9.el9.x86_64 119/120 Verifying : util-linux-user-2.37.4-3.el9.x86_64 120/120 Upgraded: dbus-common-1:1.12.20-6.el9.noarch dbus-daemon-1:1.12.20-6.el9.x86_64 dbus-libs-1:1.12.20-6.el9.x86_64 dbus-tools-1:1.12.20-6.el9.x86_64 fontconfig-2.14.0-1.el9.x86_64 freetype-2.10.4-9.el9.x86_64 fribidi-1.0.10-6.el9.2.x86_64 harfbuzz-2.7.4-8.el9.x86_64 harfbuzz-icu-2.7.4-8.el9.x86_64 libblkid-2.37.4-9.el9.x86_64 libfdisk-2.37.4-9.el9.x86_64 libmount-2.37.4-9.el9.x86_64 libselinux-3.4-3.el9.x86_64 libselinux-utils-3.4-3.el9.x86_64 libsepol-3.4-1.1.el9.x86_64 libsmartcols-2.37.4-9.el9.x86_64 libtiff-4.4.0-2.el9.x86_64 libuuid-2.37.4-9.el9.x86_64 libxml2-2.9.13-2.el9.x86_64 pcre2-10.40-2.el9.x86_64 pcre2-syntax-10.40-2.el9.noarch pcre2-utf16-10.40-2.el9.x86_64 pcre2-utf32-10.40-2.el9.x86_64 python3-libselinux-3.4-3.el9.x86_64 python3-libxml2-2.9.13-2.el9.x86_64 util-linux-2.37.4-9.el9.x86_64 util-linux-core-2.37.4-9.el9.x86_64 util-linux-user-2.37.4-9.el9.x86_64 Installed: at-spi2-atk-devel-2.38.0-4.el9.x86_64 at-spi2-core-devel-2.40.3-1.el9.x86_64 atk-devel-2.36.0-5.el9.x86_64 atkmm-devel-2.28.2-2.el9.x86_64 brotli-1.0.9-6.el9.x86_64 brotli-devel-1.0.9-6.el9.x86_64 bzip2-devel-1.0.8-8.el9.x86_64 cairo-devel-1.17.4-7.el9.x86_64 cairo-gobject-devel-1.17.4-7.el9.x86_64 cairomm-devel-1.14.2-10.el9.x86_64 dbus-devel-1:1.12.20-6.el9.x86_64 fontconfig-devel-2.14.0-1.el9.x86_64 freetype-devel-2.10.4-9.el9.x86_64 fribidi-devel-1.0.10-6.el9.2.x86_64 gdk-pixbuf2-devel-2.42.6-2.el9.x86_64 glib2-devel-2.68.4-5.el9.x86_64 glibmm24-devel-2.66.1-1.el9.x86_64 graphite2-devel-1.3.14-9.el9.x86_64 gtk3-devel-3.24.31-2.el9.x86_64 harfbuzz-devel-2.7.4-8.el9.x86_64 libX11-devel-1.7.0-7.el9.x86_64 libXau-devel-1.0.9-8.el9.x86_64 libXcomposite-devel-0.4.5-7.el9.x86_64 libXcursor-devel-1.2.0-7.el9.x86_64 libXdamage-devel-1.1.5-7.el9.x86_64 libXext-devel-1.3.4-8.el9.x86_64 libXfixes-devel-5.0.3-16.el9.x86_64 libXft-devel-2.3.3-8.el9.x86_64 libXi-devel-1.7.10-8.el9.x86_64 libXinerama-devel-1.1.4-10.el9.x86_64 libXrandr-devel-1.5.2-8.el9.x86_64 libXrender-devel-0.9.10-16.el9.x86_64 libXtst-devel-1.2.3-16.el9.x86_64 libblkid-devel-2.37.4-9.el9.x86_64 libdatrie-devel-0.2.13-4.el9.x86_64 libepoxy-devel-1.5.5-4.el9.x86_64 libffi-devel-3.4.2-7.el9.x86_64 libglvnd-core-devel-1:1.3.4-1.el9.x86_64 libglvnd-devel-1:1.3.4-1.el9.x86_64 libicu-devel-67.1-9.el9.x86_64 libmount-devel-2.37.4-9.el9.x86_64 libpng-devel-2:1.6.37-12.el9.x86_64 libselinux-devel-3.4-3.el9.x86_64 libsepol-devel-3.4-1.1.el9.x86_64 libsigc++20-devel-2.10.7-2.el9.x86_64 libthai-devel-0.1.28-8.el9.x86_64 libtiff-devel-4.4.0-2.el9.x86_64 libxcb-devel-1.13.1-9.el9.x86_64 libxkbcommon-devel-1.0.3-4.el9.x86_64 libxml2-devel-2.9.13-2.el9.x86_64 pango-devel-1.48.7-2.el9.x86_64 pangomm-devel-2.46.1-1.el9.x86_64 pcre-cpp-8.44-3.el9.3.x86_64 pcre-devel-8.44-3.el9.3.x86_64 pcre-utf16-8.44-3.el9.3.x86_64 pcre-utf32-8.44-3.el9.3.x86_64 pcre2-devel-10.40-2.el9.x86_64 perl-Filter-2:1.60-4.el9.x86_64 perl-encoding-4:3.00-462.el9.x86_64 perl-open-1.12-479.el9.noarch pixman-devel-0.40.0-5.el9.x86_64 sysprof-capture-devel-3.40.1-3.el9.x86_64 wayland-devel-1.19.0-4.el9.x86_64 xorg-x11-proto-devel-2021.4-2.el9.noarch Complete!
Now return to your $HOME/Downloads directory and run the following command. You’ll notice that it installs and upgrades many more packages than you might expect.
sudo dnf install -y gtkmm30-devel-3.24.5-1.el9.x86_64.rpm
The log file for this is:
Display detailed console log →
Last metadata expiration check: 1:22:32 ago on Sun 20 Nov 2022 12:52:28 AM EST.
Dependencies resolved.
================================================================================
 Package             Architecture Version              Repository          Size
================================================================================
Installing:
 gtkmm30-devel       x86_64       3.24.5-1.el9         @commandline       605 k

Transaction Summary
================================================================================
Install  1 Package

Total size: 605 k
Installed size: 4.7 M
Downloading Packages:
Running transaction check
Transaction check succeeded.
Running transaction test
Transaction test succeeded.
Running transaction
Regex version mismatch, expected: 10.40 2022-04-14 actual: 10.37 2021-05-26
Regex version mismatch, expected: 10.40 2022-04-14 actual: 10.37 2021-05-26
  Preparing        :                                                        1/1
  Installing       : gtkmm30-devel-3.24.5-1.el9.x86_64                      1/1
  Running scriptlet: gtkmm30-devel-3.24.5-1.el9.x86_64                      1/1
  Verifying        : gtkmm30-devel-3.24.5-1.el9.x86_64                      1/1

Installed:
  gtkmm30-devel-3.24.5-1.el9.x86_64

Complete!
All that done and you’ve only got the first of four dependencies resovled.
- Next, start with the libzip-devel package, which has a couple dependencies. Assuming you’re still in your $HOME/Downloads directory, you can run the following command to get the libzip-devel and its prerequisite packages for AlmaLinux 9:
wget https://repo.almalinux.org/almalinux/9/CRB/x86_64/os/Packages/libzip-devel-1.7.3-7.el9.x86_64.rpm
wget https://repo.almalinux.org/almalinux/9/AppStream/x86_64/os/Packages/cmake-filesystem-3.20.2-7.el9.x86_64.rpm
wget https://repo.almalinux.org/almalinux/9/AppStream/x86_64/os/Packages/libzip-1.7.3-7.el9.x86_64.rpm
You can run the prerequisites with the following command:
sudo dnf install -y cmake*.rpm libzip-1.7.3*.rpm
Now, you can run the libzip-devel package with this syntax:
sudo dnf install -y libzip-devel*.rpm
Having resolved the two dependencies, you can install the compression development kit. This completes the second step.
-
Next, you need to apply the proj_devel package for AlmaLinux 9:
wget https://download-ib01.fedoraproject.org/pub/epel/9/Everything/x86_64/Packages/p/proj-devel-8.2.0-1.el9.x86_64.rpm
Now, you can run the proj-devel package with this syntax:
sudo dnf install -y proj-devel-8.2.0-1.el9.x86_64.rpm
-
Next, you need to apply the swig packages for AlmaLinux 9:
wget https://repo.almalinux.org/almalinux/9/CRB/x86_64/os/Packages/swig-4.0.2-8.el9.x86_64.rpm
wget https://repo.almalinux.org/almalinux/9/CRB/x86_64/os/Packages/swig-doc-4.0.2-8.el9.noarch.rpm
wget https://repo.almalinux.org/almalinux/9/CRB/x86_64/os/Packages/swig-gdb-4.0.2-8.el9.x86_64.rpm
sudo dnf install -y swig*.rpm
-
Next, you need to apply the mysql-community-workbench packages for AlmaLinux 9. The download instructions where provided above. You apply the packages with the following command.
sudo dnf install -y mysql-workbench-community-8.0.31-1.el9.x86_64.rpm
Display detailed console log →
Last metadata expiration check: 1:06:04 ago on Sun 20 Nov 2022 03:28:30 PM EST.
Dependencies resolved.
================================================================================
 Package                      Arch      Version           Repository       Size
================================================================================
Installing:
 mysql-workbench-community    x86_64    8.0.31-1.el9      @commandline     39 M
Upgrading:
 proj                         x86_64    8.2.0-1.el9       epel            2.5 M

Transaction Summary
================================================================================
Install  1 Package
Upgrade  1 Package

Total size: 41 M
Total download size: 2.5 M
Downloading Packages:
proj-8.2.0-1.el9.x86_64.rpm                     388 kB/s | 2.5 MB     00:06
--------------------------------------------------------------------------------
Total                                           354 kB/s | 2.5 MB     00:07
Extra Packages for Enterprise Linux 9 - x86_64  1.6 MB/s | 1.6 kB     00:00
Importing GPG key 0x3228467C:
 Userid     : "Fedora (epel9) <epel@fedoraproject.org>"
 Fingerprint: FF8A D134 4597 106E CE81 3B91 8A38 72BF 3228 467C
 From       : /etc/pki/rpm-gpg/RPM-GPG-KEY-EPEL-9
Key imported successfully
Running transaction check
Transaction check succeeded.
Running transaction test
Transaction test succeeded.
Running transaction
Regex version mismatch, expected: 10.40 2022-04-14 actual: 10.37 2021-05-26
Regex version mismatch, expected: 10.40 2022-04-14 actual: 10.37 2021-05-26
  Preparing        :                                                        1/1
  Upgrading        : proj-8.2.0-1.el9.x86_64                                1/3
  Installing       : mysql-workbench-community-8.0.31-1.el9.x86_64          2/3
  Running scriptlet: mysql-workbench-community-8.0.31-1.el9.x86_64          2/3
  Cleanup          : proj-4.8.0-4.el7.x86_64                                3/3
  Running scriptlet: proj-4.8.0-4.el7.x86_64                                3/3
  Verifying        : mysql-workbench-community-8.0.31-1.el9.x86_64          1/3
  Verifying        : proj-8.2.0-1.el9.x86_64                                2/3
  Verifying        : proj-4.8.0-4.el7.x86_64                                3/3

Upgraded:
  proj-8.2.0-1.el9.x86_64
Installed:
  mysql-workbench-community-8.0.31-1.el9.x86_64

Complete!
After applying the dependent and mysql-community-workbench packages, you can launch MySQL Workbench by clicking the Activities symbol in the upper left hand corner. That displays the nine-dots for Show Applications icon. Click the Show Applications icon and choose the MySQL Workbench icon to launch MySQL Workbench.
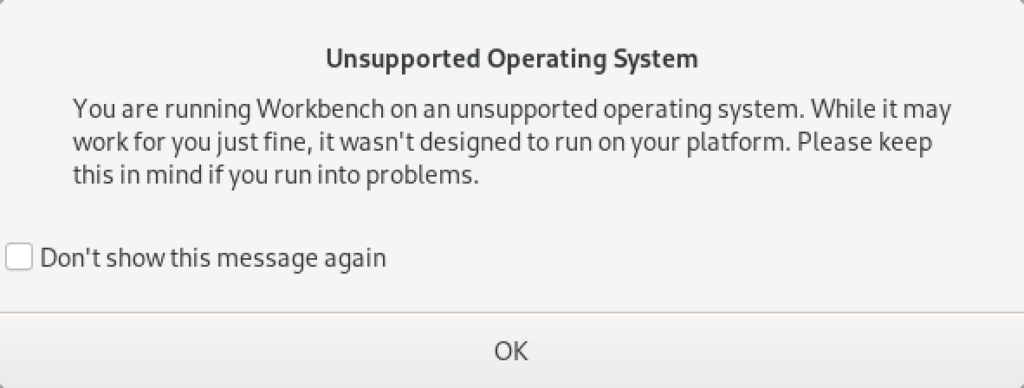
You’ll be prompted with the following dialog. Just click Don’t show this message again checkbox and the OK button to launch MySQL Workbench.
As always, I hope this helps those looking to solve a real problem.
AlmaLinux MySQL+Perl
A quick primer on Perl programs connecting to the MySQL database. It’s another set of coding examples for the AlmaLinux instance that I’m building for students. This one demonstrates basic Perl programs, connecting to MySQL, returning data sets by reference and position, dynamic queries, and input parameters to dynamic queries.
- Naturally, a hello.pl is a great place to start:
#!/usr/bin/perl

# Hello World program.
print "Hello World!\n";
After setting the permissions to -rwxr-xr-x. with this command:
chmod 755 hello.pl
You call it like this from the Command-Line Interface (CLI):
./hello.pl
It prints:
Hello World! - Next, a connect.pl program lets us test the Perl::DBI connection to the MySQL database.
#!/usr/bin/perl

# Import libraries.
use strict;
use warnings;
use v5.10;     # for say() function
use DBI;

# Print with say() function message.
say "Perl MySQL Connect Attempt.";

# MySQL data source name should have a valid database as the
# third argument; this uses the sakila demo database.
my $dsn = "DBI:mysql:sakila";

# Local variables to build the connection string.
my $username = "student";
my $password = "student";

# Set arguments for MySQL database error management.
my %attr = ( PrintError=>0,  # turn off error reporting via warn()
             RaiseError=>1);   # turn on error reporting via die()

# Create connction with a data source name, user name and password.
my $dbh  = DBI->connect($dsn,$username,$password, \%attr);

# Print with say() function valid connection message.
say "Connected to the MySQL database.";
After setting the permissions to -rwxr-xr-x. you call it with this CLI command:
./connect.pl
It prints:
Perl MySQL Connect Attempt.
Connected to the MySQL database.
- After connecting to the database lets query a couple columns by reference notation in a static.pl program. This one just returns the result of the MySQL version() and database() functions.
#!/usr/bin/perl

# Import libraries.
use strict;
use warnings;
use v5.10;     # for say() function
use DBI;

# Print with say() function message.
say "Perl MySQL Connect Attempt.";

# MySQL data source name must have a valid database as the
# third argument; this uses the sakila demo database.
my $dsn = "DBI:mysql:sakila";

# Local variables to build the connection string.
my $username = "student";
my $password = "student";

# Set arguments for MySQL database error management.
my %attr = ( PrintError=>0,  # turn off error reporting via warn()
             RaiseError=>1); # turn on error reporting via die()

# Create connction with a data source name, user name and password.
my $dbh  = DBI->connect($dsn,$username,$password, \%attr);

# Creaet a static SQL statement or query.
my $sth = $dbh->prepare("SELECT version() AS version \
	                 ,      database() AS db_name");

# Execute the static statement.
$sth->execute() or die "Execution failed: $dbh->errstr()";

# Read data and print by reference.
print "----------------------------------------\n";
while (my $ref = $sth->fetchrow_hashref()) {
  print "MySQL Version:  $ref->{'version'}\nMySQL Database: $ref->{'db_name'}\n";
}
print "----------------------------------------\n";

# Close the statement.
$sth->finish;

# Disconnect from database connection.
$dbh->disconnect();

# Print with say() function valid connection message.
say "Connected to the MySQL database.";
After setting the permissions to -rwxr-xr-x. you call it with this CLI command:
./static.pl
It prints:
Perl MySQL Connect Attempt.
----------------------------------------
MySQL Version:  8.0.30
MySQL Database: sakila
----------------------------------------
Connected to the MySQL database.
- After connecting to the database and securing variables by reference notation, lets return the value as an array of rows in a columns.pl program. This one just returns data from the film table of the sakila database. It is a static query because all the values are contained inside the SQL statement.
#!/usr/bin/perl

# Import libraries.
use strict;
use warnings;
use v5.10;     # for say() function
use DBI;

# Print with say() function message.
say "Perl MySQL Connect Attempt.";

# MySQL data source name must have a valid database as the
# third argument; this uses the sakila demo database.
my $dsn = "DBI:mysql:sakila";

# Local variables to build the connection string.
my $username = "student";
my $password = "student";

# Set arguments for MySQL database error management.
my %attr = ( PrintError=>0,  # turn off error reporting via warn()
             RaiseError=>1); # turn on error reporting via die()

# Create connction with a data source name, user name and password.
my $dbh  = DBI->connect($dsn,$username,$password, \%attr);

# Creaet a static SQL statement or query.
my $sth = $dbh->prepare("SELECT title         \
	                 ,      release_year  \
			 ,      rating        \
			 FROM   film          \
			 WHERE  title LIKE 'roc%'");

# Execute the static statement.
$sth->execute() or die "Execution failed: $dbh->errstr()";

# Read data and print by comma-delimited row position.
print "----------------------------------------\n";
while (my @row = $sth->fetchrow_array()) {
  print join(", ", @row), "\n";
}
print "----------------------------------------\n";

# Close the statement.
$sth->finish;

# Disconnect from database connection.
$dbh->disconnect();

# Print with say() function valid connection message.
say "Connected to the MySQL database.";
After setting the permissions to -rwxr-xr-x. you call it with this CLI command:
./columns.pl
It prints:
Perl MySQL Connect Attempt.
----------------------------------------
ROCK INSTINCT, 2006, G
ROCKETEER MOTHER, 2006, PG-13
ROCKY WAR, 2006, PG-13
----------------------------------------
Connected to the MySQL database.
- After connecting to the database and securing variables by reference notation, lets return the value as an array of rows in a dynamic.pl program. This one just returns data from the film table of the sakila database. It is a dynamic query because a string passed to the execute method and that value is bound to a ? placeholder in the SQL statement.
#!/usr/bin/perl

# Import libraries.
use strict;
use warnings;
use v5.10;     # for say() function
use DBI;

# Print with say() function message.
say "Perl MySQL Connect Attempt.";

# MySQL data source name must have a valid database as the
# third argument; this uses the sakila demo database.
my $dsn = "DBI:mysql:sakila";

# Local variables to build the connection string.
my $username = "student";
my $password = "student";

# Set arguments for MySQL database error management.
my %attr = ( PrintError=>0,  # turn off error reporting via warn()
             RaiseError=>1); # turn on error reporting via die()

# Create connction with a data source name, user name and password.
my $dbh  = DBI->connect($dsn,$username,$password, \%attr);

# Creaet a static SQL statement or query.
my $sth = $dbh->prepare("SELECT title         \
	                 ,      release_year  \
			 ,      rating        \
			 FROM   film          \
			 WHERE  title LIKE CONCAT(?,'%')");

# Execute the dynamic statement by providing an input parameter.
$sth->execute('roc') or die "Execution failed: $dbh->errstr()";

# Read data and print by comma-delimited row position.
print "----------------------------------------\n";
while (my @row = $sth->fetchrow_array()) {
  print join(", ", @row), "\n";
}
print "----------------------------------------\n";

# Close the statement.
$sth->finish;

# Disconnect from database connection.
$dbh->disconnect();

# Print with say() function valid connection message.
say "Connected to the MySQL database.";
After setting the permissions to -rwxr-xr-x. you call it with this CLI command:
./dynamic.pl
It prints:
Perl MySQL Connect Attempt.
----------------------------------------
ROCK INSTINCT, 2006, G
ROCKETEER MOTHER, 2006, PG-13
ROCKY WAR, 2006, PG-13
----------------------------------------
Connected to the MySQL database.
- After connecting to the database and securing variables by reference notation, lets return the value as an array of rows in a input.pl program. This one just returns data from the film table of the sakila database. It is a dynamic query because an input parameter is passed to a local variable and the local variable is bound to a ? placeholder in the SQL statement.
#!/usr/bin/perl

# Import libraries.
use strict;
use warnings;
use v5.10;     # for say() function
use DBI;

# Get the index value of the maximum argument in the
# argument.
my $argc = $#ARGV;

# Accept first argument value as parameter.
my $param = $ARGV[$argc];

# Verify variable value assigned.
if (not defined $param) {
  die "Need parameter value.\n";
}

# Print with say() function message.
say "Perl MySQL Connect Attempt.";

# MySQL data source name must have a valid database as the
# third argument; this uses the sakila demo database.
my $dsn = "DBI:mysql:sakila";

# Local variables to build the connection string.
my $username = "student";
my $password = "student";

# Set arguments for MySQL database error management.
my %attr = ( PrintError=>0,  # turn off error reporting via warn()
             RaiseError=>1); # turn on error reporting via die()

# Create connction with a data source name, user name and password.
my $dbh  = DBI->connect($dsn,$username,$password, \%attr);

# Creaet a static SQL statement or query.
my $sth = $dbh->prepare("SELECT title         \
	                 ,      release_year  \
			 ,      rating        \
			 FROM   film          \
			 WHERE  title LIKE CONCAT(?,'%')");

# Execute the static statement.
$sth->execute($param) or die "Execution failed: $dbh->errstr()";

# Read data and print by comma-delimited row position.
print "----------------------------------------\n";
while (my @row = $sth->fetchrow_array()) {
  print join(", ", @row), "\n";
}
print "----------------------------------------\n";

# Close the statement.
$sth->finish;

# Disconnect from database connection.
$dbh->disconnect();

# Print with say() function valid connection message.
say "Connected to the MySQL database.";
After setting the permissions to -rwxr-xr-x. you call it with this CLI command:
./input.pl ta
It prints:
Perl MySQL Connect Attempt.
----------------------------------------
TADPOLE PARK, 2006, PG
TALENTED HOMICIDE, 2006, PG
TARZAN VIDEOTAPE, 2006, PG-13
TAXI KICK, 2006, PG-13
----------------------------------------
Connected to the MySQL database.
I think these examples cover most of the basic elements of writing Perl against the MySQL database. If I missed something you think would be useful, please advise. As always, I hope this helps those working with the MySQL and Perl products.
