Archive for May, 2024
Updating Nested ADTs
The first part of this series showed how you can leverage Oracle’s SQL syntax with UDT columns and collection columns. It would be nice if Oracle gave you some SQL to work with the elements of ADT collections, but they don’t. After all, that’s why you have this article.
While you could change the setup of the prior example table, it’s easier to create a new customer table. The new customer table drops the address column. There’s also a new pizza table. The pizza table includes an ingredient ADT collection column, which by design holds a unique set of ingredients for each pizza.
Realistically, ADT collections of numbers, characters, and dates have little value by themselves. That’s because those data types typically don’t have much meaning. A set of unique strings can be useful for certain use cases.
You create the list ADT type with this syntax:
SQL> CREATE OR REPLACE 2 TYPE list IS TABLE OF VARCHAR2(20); 3 / |
You create the customer and pizza tables, and customer_s and pizza_s sequences with the following syntax:
SQL> CREATE TABLE customer 2 ( customer_id NUMBER 3 , first_name VARCHAR2(20) 4 , last_name VARCHAR2(20) 5 , CONSTRAINT pk_customer PRIMARY KEY (customer_id)); SQL> CREATE SEQUENCE customer_s; SQL> CREATE TABLE pizza 2 ( pizza_id NUMBER 3 , customer_id NUMBER 4 , pizza_size VARCHAR2(10) 5 , ingredients LIST 6 , CONSTRAINT pk_pizza PRIMARY KEY (pizza_id) 7 , CONSTRAINT ck_pizza_size 8 CHECK (pizza_size IN ('Mini','Small','Medium','Large','Very Large'))) 9 NESTED TABLE ingredients STORE AS ingredient_table; SQL> CREATE SEQUENCE pizza_s; |
The customer table only has scalar columns. The pizza table has the ingredient ADT collection column. Line 9 creates a nested ingredient_table for the ingredient ADT collection column.
There is a primary and foreign key relationship between the customer and pizza tables. That relationship between the tables requires that you insert rows into the customer table before you insert rows into the pizza table.
The sample script populates the customer table with characters from the Green Arrow television show, as follows:
  Customer
    ID # Last Name  First Name
-------- ---------- ----------
       1 Queen      Oliver
       2 Queen      Thea
       3 Queen      Moira
       4 Lance      Dinah
       5 Lance      Quentin
       6 Diggle     John
7 Wilson Slade |
Next, you can insert three rows into the pizza table. Each has different ingredients in the ingredient ADT column.
The following is the syntax for the INSERT statements:
SQL> INSERT INTO pizza 2 VALUES 3 ( pizza_s.NEXTVAL 4 ,(SELECT c.customer_id FROM customer c 5 WHERE c.first_name = 'Quentin' AND c.last_name = 'Lance') 6 ,'Large' 7 , list('Cheese','Marinara Sauce','Sausage','Salami')); SQL> INSERT INTO pizza 2 VALUES 3 ( pizza_s.NEXTVAL 4 ,(SELECT c.customer_id FROM customer c 5 WHERE c.first_name = 'Thea' AND c.last_name = 'Queen') 6 ,'Medium' 7 , list('Cheese','Marinara Sauce','Canadian Bacon','Pineapple')); SQL> INSERT INTO pizza 2 VALUES 3 ( pizza_s.NEXTVAL 4 ,(SELECT c.customer_id FROM customer c 5 WHERE c.first_name = 'John' AND c.last_name = 'Diggle') 6 ,'Small' 7 , list('Cheese','BBQ Sauce','Chicken')); |
Querying results from tables with nested ADT columns provides interesting results. An ordinary query, like this:
SQL> COL pizza_id FORMAT 99999 HEADING "Pizza|ID #" SQL> COL pizza_size FORMAT A6 HEADING "Pizza|Size" SQL> COL ingredients FORMAT A64 HEADING "Ingredients" SQL> SELECT pizza_id 2 , pizza_size 3 , ingredients 4 FROM pizza; |
… returns the following results with a flattened object type:
Pizza Pizza
  ID # Size   Ingredients
------ ------ ----------------------------------------------------------------“
     1 Large  LIST('Cheese', 'Marinara Sauce', 'Sausage', 'Salami')
     2 Medium LIST('Cheese', 'Marinara Sauce', 'Canadian Bacon', 'Pineapple')
3 Small LIST('Cheese', 'BBQ Sauce', 'Chicken') |
If you use a CROSS JOIN it multiplies each row times the number of items in the ADT collection column. The multiplication hides the results.
The best solution for displaying results from an ADT collection requires that you serialize the results. The following serialize_set PL/SQL function creates a serialized comma separated list:
SQL> CREATE OR REPLACE 2 FUNCTION serialize_set (pv_list LIST) RETURN VARCHAR2 IS 3 /* Declare a return string as large as you need. */ 4 lv_comma_string VARCHAR2(60); 5 BEGIN 6 /* Read list of values and serialize them in a string. */ 7 FOR i IN 1..pv_list.COUNT LOOP 8 IF NOT i = pv_list.COUNT THEN 9 lv_comma_string := lv_comma_string || pv_list(i) || ', '; 10 ELSE 11 lv_comma_string := lv_comma_string || pv_list(i); 12 END IF; 13 END LOOP; 14 RETURN lv_comma_string; 15 END serialize_set; |
You can now write a query that uses your PL/SQL function to format the ADT collection column values into a single row. The syntax for the query is:
SQL> SELECT pizza_id 2 , pizza_size 3 , serialize_set(ingredients) AS ingredients 4 FROM pizza; |
It returns:
Pizza Pizza
  ID # Size   Ingredients
------ ------ -----------------------------------------------------------
     1 Large  Cheese, Marinara Sauce, Sausage, Salami
     2 Medium Cheese, Marinara Sauce, Canadian Bacon, Pineapple
3 Small Cheese, BBQ Sauce, Chicken |
At this point, you know how to create a table with an ADT collection column and how to insert values. The Oracle documentation says you can only replace the whole content of the ADT column in an UPDATE statement. That’s true in practice but not in principle.
The principal differs because you can write PL/SQL functions that add, change, or remove elements from the ADT collection that works in an UPDATE statement. The trick is quite simple. You achieve it by:
- Passing the current ADT collection as a IN-only mode parameter
- Passing any new parameters when you add or change elements
- Passing any old parameters when you change or remove elements
Now, you will learn how to create the add_elements, change_elements, and remove_elements PL/SQL functions. They let you use an UPDATE statement to add, change, or remove elements from an ADT collection column.
Adding ADT elements with an UPDATE statement
This section shows you how to add elements to an ADT collection column with an UPDATE statement. The add_elements PL/SQL function can add one or many elements to an ADT collection column. That’s possible because the new element or elements are passed to the function inside an ADT collection parameter.
The merit of this type of solution is that you only need one function to accomplish two tasks. The test cases show you how to pass one new element or a set of new elements.
An alternative solution would have you write two functions. One would accept a collection parameter and a variable length string, and the other would accept two collection parameters. Many developers might choose to do that because they would like to leverage overloading inside PL/SQL packages. You should ask yourself one question when you make the decision about your approach to this problem: Which is easier to maintain and use?
The following creates the add_elements PL/SQL function:
SQL> CREATE OR REPLACE 2 FUNCTION add_elements 3 ( pv_list LIST 4 , pv_element LIST ) RETURN LIST IS 5 /* Declare local return collection variable. */ 6 lv_list LIST; 7 BEGIN 8 /* Check for instantiated collection and initialize when necessary. */ 9 IF pv_list IS NULL THEN 10 lv_list := list(); 11 ELSE 12 /* Assign parameter collection to local collection variable. */ 13 lv_list := pv_list; 14 FOR i IN 1..pv_element.COUNT LOOP 15 /* Check to avoid duplicates, allocate memory and assign value. */ 16 IF NOT list(pv_element(i)) SUBMULTISET OF lv_list THEN 17 lv_list.EXTEND; 18 lv_list(lv_list.COUNT) := pv_element(i); 19 END IF; 20 END LOOP; 21 END IF; 22 23 /* Return new collection. */ 24 RETURN lv_list; 25 END add_elements; 26 / |
Line 3 and 4 define the two parameters of the add_elements function as ADT collections. Line 4 also designates the return type of the function, which is the same ADT collection.
Line 6 declares a local ADT collection variable. You need a local lv_list ADT collection variable because you want to accept two collections and merge them into the local ADT collection variable. Then, you return the local ADT collection variable as the function outcome.
Line 9 checks whether the pv_list parameter is null. Line 10 initializes the lv_list variable when it is null to avoid an unitialized error when you try to assign values to it. Line 13 assigns an initialized ADT collection column’s value to the local lv_list variable. Line 14 starts a loop through the ADT collection you want to add to the ingredient column’s list of values.
Line 16 use the SUBMULTISET set operator to ensure that only new add elements when they don’t already exist in the ingredient ADT collection column. Line 17 allocates memory space in the lv_list variable, and line 18 assigns a new element to it.
You could extend memory for the total count of elements but that would make the index assignment on line 18 more complex. Combining them increments the count of items and lets you use the count as the index value. Line 24 returns the local ADT collection and replaces the original ingredient column value.
The test case for the function should ensure that only unique values are assigned to the ingredient ADT collection column value. This can be done by a three-step test case. The test queries the values in the ADT collection column, updates them, and re-queries them.
The following query shows you the contents of the row:
SQL> SELECT pizza_id, pizza_size 2 , serialize_set(ingredients) AS ingredients 3 FROM pizza 4 WHERE customer_id = 5 ( SELECT customer_id FROM customer 6 WHERE first_name = 'Quentin' AND last_name = 'Lance' ); |
It returns:
Pizza Pizza
  ID # Size   Ingredients
------ ------ -----------------------------------------------------------
1 Large Cheese, Marinara Sauce, Sausage, Salami |
You can update the ADT collection column’s values with the following UPDATE statement. It attempts to add Sausage and Italian Sausage to the list of values. The function should add only Italian Sausage because Sausage already exists in the list of values. When you re-query the row you will see that the add_elements added only the element Italian Sausage.
You would use the following UPDATE statement:
SQL> UPDATE pizza 2 SET ingredients = 3 add_elements(ingredients,list('Italian Sausage','Sausage')) 4 WHERE customer_id = 5 (SELECT customer_id FROM customer 6 WHERE first_name = 'Quentin' AND last_name = 'Lance'); |
Line 3 calls the add_elements PL/SQL function with the ingredient ADT collection column’s value as the first parameter. The second parameter is a dynamically created list of the elements. It contains the element or elements you want to add to the ingredient column’s values.
Re-querying the row, you should see that the UPDATE statement added only the Italian Sausage element to the row. You should see the following output:
Pizza Pizza
  ID # Size   Ingredients
------ ------ -----------------------------------------------------------
1 Large Cheese, Marinara Sauce, Sausage, Salami, Italian Sausage' |
As you can see, the call to the add_elements function adds only Italian Sausage to the list of values in the ingredient column, while a comma delimited list of single quote delimited strings allows you to add multiple elements. You add one element by making it the only single quote delimited item in the list constructor call.
Updating ADT elements with an UPDATE statement
This section shows you how to change elements in an ADT collection column with an UPDATE statement. The change_elements PL/SQL function can change one to many elements in an ADT collection column. That’s possible because the change element or elements are passed to the function inside ADT collection parameters.
Unlike the add_elements function, the change_elements function requires an ADT collection parameter and a UDT collection element. The UDT collection needs to hold an old and new value.
The alternative approach would require you to try and synchronize two ADT collection value sets. One would hold all the old values and the other would hold all the new values, and they would both need to be synchronized in mirrored positional order.
You define a pair UDT object type such as the following:
SQL> CREATE OR REPLACE 2 TYPE pair IS OBJECT 3 ( old VARCHAR2(20) 4 , NEW VARCHAR2(20)); 5 / |
Next, you define a change UDT collection type:
SQL> CREATE OR REPLACE 2 TYPE change IS TABLE OF pair; 3 / |
You define the change_element function as shown below:
SQL> CREATE OR REPLACE 2 FUNCTION change_elements 3 ( pv_list LIST 4 , pv_element CHANGE ) RETURN LIST IS 5 /* Declare local return collection variable. */ 6 lv_list LIST; 7 BEGIN 8 /* Check for instantiated collection and initialize when necessary. */ 9 IF pv_list IS NULL THEN 10 lv_list := list(); 11 ELSE 12 /* Assign parameter collection to local collection variable. */ 13 lv_list := pv_list; 14 FOR i IN 1..pv_element.COUNT LOOP 15 /* Check to avoid duplicates, allocate memory and assign value. */ 16 IF NOT list(pv_element(i).old) SUBMULTISET OF lv_list THEN 17 lv_list.EXTEND; 18 lv_list(lv_list.COUNT) := pv_element(i).NEW; 19 END IF; 20 END LOOP; 21 END IF; 22 23 /* Return new collection. */ 24 RETURN lv_list; 25 END change_elements; 26 / |
Line 3 and 4 define the two parameters of the change_elements function. The first pv_list parameter uses the list ADT collection type and the list type that matches the ingredient column’s data type. Line 4 defines a parameter that uses the change UDT collection type, which is a collection of the pair UDT type.
Line 6 declares a local ADT collection variable, such as the add_elements function. The lv_list variable also serves the same purpose as it does in the add_elements function.
Line 9 checks whether the pv_list parameter is null. Line 10 initializes the lv_list variable when it is null to avoid an unitialized error when you try to assign values to it. Line 13 assigns an initialized ADT collection column’s value to the local lv_list variable. Line 14 starts a loop through the ADT collection you want to add to the ingredient column’s list of values.
Line 16 uses the SUBMULTISET set operator to ensure that the old element exists in the ingredient ADT collection column. Line 17 allocates memory space in the lv_list variable, and line 18 assigns the new element to it.
The change_elements function couples the memory allocation with the assignment of new values. Line 24 returns the local ADT collection and replaces the original ingredient column value.
The test case shows you how to pass one old and one new element or a set of old and new elements. The initial query shows you the data before the update:
SQL> SELECT pizza_id, pizza_size 2 , serialize_set(ingredients) AS ingredients 3 FROM pizza 4 WHERE customer_id = 5 (SELECT customer_id FROM customer 6 WHERE first_name = 'Thea' AND last_name = 'Queen'); |
It returns:
Pizza Pizza
  ID # Size   Ingredients
------ ------ -----------------------------------------------------------
2 Medium Cheese, Marinara Sauce, Canadian Bacon |
You now update the row with the following query:
SQL> UPDATE pizza 2 SET ingredients = 3 change_elements(ingredients 4 ,change(pair(old => 'Italian Sausage' 5 ,NEW => 'Linguica'))) 6 WHERE customer_id = 7 ( SELECT customer_id FROM customer 8 WHERE first_name = 'Thea' AND last_name = 'Queen' ); |
When you re-query the row, it shows you the following:
Pizza Pizza
  ID # Size   Ingredients
------ ------ -----------------------------------------------------------
2 Medium Cheese, Marinara Sauce, Canadian Bacon, Linguica |
As you can see, the call to the change_elements function changes onlyItalian Sausage to Linguica in the list of values in the ingredient column, while a comma delimited list of pair UDT values allows you to change multiple elements. You change one element by making it the only pair UDT in the change constructor call.
Removing ADT elements with an UPDATE statement
This section shows you how to remove elements from an ADT collection column with an UPDATE statement. The remove_elements PL/SQL function can remove one to many elements from an ADT collection column.
The remove_elements function works much like the add_elements function. It uses the same ADT collections as the add_elements function.
The code for the remove_elements function is:
SQL> CREATE OR REPLACE 2 FUNCTION remove_elements 3 ( pv_list LIST 4 , pv_elements LIST ) RETURN LIST IS 5 /* Declare local return collection variable. */ 6 lv_list LIST; 7 BEGIN 8 /* Check for instantiation and element membership. */ 9 IF NOT (pv_list IS NULL AND pv_elements IS NULL) AND 10 (pv_list.COUNT > 0 AND pv_elements.COUNT > 0) THEN 11 /* Assign parameters to local variables. */ 12 lv_list := pv_list; 13 /* Remove any elements from a collection. */ 14 FOR i IN 1..lv_list.COUNT LOOP 15 FOR j IN 1..pv_elements.COUNT LOOP 16 IF lv_list(i) = pv_elements(j) THEN 17 lv_list.DELETE(i); 18 EXIT; 19 END IF; 20 END LOOP; 21 END LOOP; 22 END IF; 23 24 /* Return modified collection. */ 25 RETURN lv_list; 26 END remove_elements; 27 / |
Lines 3, 4, and 6 work like the add_elements function. Lines 9 and 10 differ because they check for initialized collections that hold at least one element each. Line 12 mimics the behavior of line 13 in the add_elements function. Lines 14 through 16 implements a nested loop and filtering IF-statement. The IF-statement checks for a valid element to remove from the ingredient ADT column’s list of values.
Line 17 removes an element from the list. Line 18 exits the inner loop to skip the evaluation of other non-matches. It’s possible to do this because the add_elements and change_elements functions ensure a unique list of string values in the ingredient ADT collection.
The test case for the remove_elements function works like the earlier tests. You query the row that you will update to check its values; for instance:
SQL> SELECT pizza_id, pizza_size 2 , serialize_set(ingredients) AS ingredients 3 FROM pizza 4 WHERE customer_id = 5 (SELECT customer_id FROM customer 6 WHERE first_name = 'Thea' AND last_name = 'Queen'); |
It should return:
Pizza Pizza
  ID # Size   Ingredients
------ ------ ----------------------------------------------------------------
2 Medium Cheese, Marinara Sauce, Canadian Bacon, Linguica |
You would remove an element from the ingredient ADT collection column with the following UPDATE statement:
SQL> UPDATE pizza 2 SET ingredients = 3 remove_elements(ingredients,list('Canadian Bacon')) 4 WHERE customer_id = 5 ( SELECT customer_id FROM customer 6 WHERE first_name = 'Thea' AND last_name = 'Queen' ); |
When you re-query the row, you should see that Canadian Bacon is no longer an element in the ingredient ADT collection column. Like this:
Pizza Pizza
  ID # Size   Ingredients
------ ------ ----------------------------------------------------------------
2 Medium Cheese, Marinara Sauce, Linguica |
This two article series has shown you the differences between working with ADT and UDT collection. It has also shown you how to create PL/SQL functions to enable you to add, change, and remove elements from ADT column inside an UPDATE statement.
The next step would be for you to put the serialize_set, add_elements, change_elements, and remove_elements functions into an adt package. That package would look like:
SQL> CREATE OR REPLACE 2 PACKAGE adt IS 3 4 FUNCTION add_elements 5 ( pv_list LIST 6 , pv_element LIST ) RETURN LIST; 7 8 FUNCTION change_elements 9 ( pv_list LIST 10 , pv_element CHANGE ) RETURN LIST; 11 12 FUNCTION remove_elements 13 ( pv_list LIST 14 , pv_elements LIST ) RETURN LIST; 15 16 FUNCTION serialize_set 17 (pv_list LIST) RETURN VARCHAR2; 18 19 END adt; 20 / |
Beyond writing an ADT package to manage a list of variable length strings, you have the opportunity to extend behaviors further through overloading. Overloading lets you define functions that use the same name with different parameter lists.
For example, you could define the LIST_D, LIST_N, and LIST_S as SQL ADT where they would implement ADTs of dates, numbers, and strings respectively. Then, you would write three versions of the preceding four functions. Each set of functions would work with one of the type specific ADTs, and provide you with a powerful utility package to add, change, remove, and serialize the values of date, number, and string ADTs.
When you put all the related functions into a package you simplify access and organize for reusability. That way you have all the tools you need inside a single adt package to write advanced UPDATE statements against ADT nested tables.
Updating Nested Tables
This two-part series covers how you update User-Defined Types (UDTs) and Attribute Data Types (ADTs). There are two varieties of UDTs. One is a column of a UDT object type and the other a UDT collection of a UDT object type.
You update nested UDT columns by leveraging the TABLE function. The TABLE function lets you create a result set, and access a UDT object or collection column. You need to combine the TABLE function and a CROSS JOIN to update elements of a UDT collection column.
ADTs are collections of a scalar data types. Oracle’s scalar data types are DATE, NUMBER, CHAR and VARCHAR2 (or, variable length strings). ADTs are unique and from some developer’s perspective difficult to work with.
The first article in this series shows you how to work with a UDT object type column and a UDT collection type. The second article will show you how to work with an ADT collection type.
PL/SQL uses ADT collections all the time. PL/SQL also uses User-Defined Types (UDTs) collections all the time. UDTs can be record or object types, or collections of records and objects. Record types are limited, and only work inside a PL/SQL scope. Object types are less limited and you can use them in a SQL or PL/SQL scope.
Object types come in two flavors. One acts as a typical record structure and has no methods and the other acts like an object type in any object-oriented programming language (OOPL). This article refers only to object types like typical record structures. That means when you read ADTs you should think of a SQL collection of a scalar data type, and when you read UDTs you should think of a SQL collection of an object type without methods.
You can create tables that hold nested tables. Nested tables can use a SQL ADT or UDT data type. Inserting data into nested tables is straightforward when you understand the syntax, but updating nested tables can be complex. The complexity exists because Oracle treats nested tables of ADTs differently than UDTs. My article series will show you how to simplify updating ADT columns.
That’s why it has two parts:
- How you insert and update rows with UDT columns and collection columns
- How you insert and update rows with ADT collection columns
If you’re asking yourself why there isn’t a section for deleting rows, that’s simple. You delete them the same way as you would any other row, using the DELETE statement.
How you insert and update rows with UDT columns and collection columns
This section shows you how to create a table with a UDT column and a UDT collection column. It also shows you how to insert and update the embedded columns.
You insert into any ordinary UDT column by prefacing the data with a constructor name. A constructor name is the same as a UDT name. The following creates an address_type UDT that you will use inside a customer table:
SQL> CREATE OR REPLACE 2 TYPE address_type IS OBJECT 3 ( street VARCHAR2(20) 4 , city VARCHAR2(30) 5 , state VARCHAR2(2) 6 , zip VARCHAR2(5)); 7 / |
You should take note that the address_type UDT doesn’t have any methods. All object types without methods have a default constructor. The default constructor follows the same rules as tables in the database.
Create the sample customer table with an address column that uses the address_type UDT as its data type; for instance:
SQL> CREATE TABLE customer 2 ( customer_id NUMBER 3 , first_name VARCHAR2(20) 4 , last_name VARCHAR2(20) 5 , address ADDRESS_TYPE 6 , CONSTRAINT pk_customer PRIMARY KEY (customer_id)); |
Line 5 defines the address column with the address_type UDT. You insert a row with an embedded address_type data record as follows:
SQL> INSERT 2 INTO customer 3 VALUES 4 ( customer_s.NEXTVAL 5 ,'Oliver' 6 ,'Queen' 7 , address_type( street => '1 Park Place' 8 , city => 'Starling City' 9 , state => 'NY' 10 , zip => '10001')); |
Lines 7 through 10 includes the constructor call to the address_type UDT. The address_type constructor uses named notation rather than positional notation. You should always try to use named notation for object type constructor calls.
Updating an element of a UDT object structure is straightforward, because you simply refer to the column and a member of the UDT object structure. The syntax for that type of UPDATE statement follows:
SQL> UPDATE customer c 2 SET c.address.state = 'NJ' 3 WHERE c.first_name = 'Oliver' 4 AND c.last_name = 'Queen'; |
The address_type UDT works for an object structure but not for a UDT collection. You need to add a column to differentiate between rows of the nested collection. You can redefine the address_type UDT as follows:
SQL> CREATE OR REPLACE 2 TYPE address_type IS OBJECT 3 ( status VARCHAR2(8) 4 , street VARCHAR2(20) 5 , city VARCHAR2(30) 6 , state VARCHAR2(2) 7 , zip VARCHAR2(5)); 8 / |
After creating the UDT object type, you need to create an address_table UDT collection of the address_type UDT object type. You use the following syntax to create the SQL collection:
SQL> CREATE OR REPLACE 2 TYPE address_table IS TABLE OF address_type; 3 / |
Having both the UDT object and collection types, you can drop and create the customer table with the following syntax:
SQL> CREATE TABLE customer 2 ( customer_id NUMBER 3 , first_name VARCHAR2(20) 4 , last_name VARCHAR2(20) 5 , address ADDRESS_TABLE 6 , CONSTRAINT pk_customer PRIMARY KEY (customer_id)) 7 NESTED TABLE address STORE AS address_tab; |
Line 5 defines the address column as a UDT collection. Line 7 instructs how to store the UDT collection as a nested table. You designate the address column as the nested table and store it as an address_tab table. You can access the nested table only through its container, which is the customer table.
You can insert rows into the customer table with the following syntax. This example stores a single row with two elements of the address_type in the nested table:
SQL> INSERT 2 INTO customer 3 VALUES 4 ( customer_s.NEXTVAL 5 ,'Oliver' 6 ,'Queen' 7 , address_table( 8 address_type( status => 'Obsolete' 9 , street => '1 Park Place' 10 , city => 'Starling City' 11 , state => 'NY' 12 , zip => '10001') 13 , address_type( status => 'Current' 14 , street => '1 Dockland Street' 15 , city => 'Starling City' 16 , state => 'NY' 17 , zip => '10001'))); |
Lines 7 through 17 have two constructor calls for the address_type UDT object type inside the address_table UDT collection. After you insert an address_table UDT collection, you can query an element by using the SQL built-in TABLE function and a CROSS JOIN. The TABLE function returns a SQL result set. The CROSS JOIN lets you create cross product that you can filter inside the WHERE clause.
A CROSS JOIN between two tables or a table and result set from a nested table matches every row in the customer table with every row in the nested table. A best practice would include a WHERE clause that filters the nested table to a single row in the result set.
The syntax for such a query is complex, and follows below:
SQL> COL first_name FORMAT A8 HEADING "First|Name" SQL> COL last_name FORMAT A8 HEADING "Last|Name" SQL> COL street FORMAT A20 HEADING "Street" SQL> COL city FORMAT A14 HEADING "City" SQL> COL state FORMAT A5 HEADING "State" SQL> SELECT c.first_name 2 , c.last_name 3 , a.street 4 , a.city 5 , a.state 6 FROM customer c CROSS JOIN TABLE(c.address) a 7 WHERE a.status = 'Current'; |
As mentioned, the TABLE function on line 6 translates the UDT collection into a SQL result set, which acts as a temporary table. The alias a becomes the name of the temporary table. Lines 3, 4, 5, and 7 all reference the temporary table.
The query should return the following for the customer and their current address value:
First Last Name Name Street City State -------- -------- -------------------- -------------- ----- Oliver Queen 1 Dockland Street Starling City NY |
Oracle thought through the fact that you should be able to update UDT collections. The same TABLE function lets you update elements in the nested table. You can update the elements in nested UDT tables provided you create a unique key, such as a natural key or primary key. Oracle’s syntax doesn’t support constraints on nested tables, which means you need to implement it by design and protect by carefully controlling inserts and updates to the nested table.
You can update the state value of the current address with the following UPDATE statement:
SQL> UPDATE TABLE(SELECT c.address 2 FROM customer c 3 WHERE c.first_name = 'Oliver' 4 AND c.last_name = 'Queen') a 5 SET a.state = 'NJ' 6 WHERE a.status = 'Current'; |
Line 5 sets the current state value in the address_table UDT nested table. Line 6 filters the nested table to the current address element. You need to ensure that any UDT object type holds a member attribute or set of member attributes that holds a unique value. That’s because you need to ensure that there’s a way to find a unique element within a UDT collection. If you require the table, you should see the change inside the nested table.
Oracle does not provide equivalent syntax for such a change in an ADT collection type. The second article in this series show you how to implement PL/SQL functions to solve that problem.
Oracle23ai Ubuntu Install

What to do with a Late 2015 iMac with an i7 Quad CPU running at 3.4 GHz, 32 GB or RAM, a 5K Display and an almost warn out hybrid 1 TB hard disk? You could sell it to Apple for pennies, but why enrich them. I opted to upgrade it with an OWC kit that had a 2 TB SSD Disk. Then, I installed Ubuntu 22.0.4 and built a DaaS (Database as a Service) machine with Oracle Database 23ai in a Docker container, and MySQL 8 and PostgreSQL 14 natively.
I’ve posted on installing MySQL 8 and PostgreSQL 14 on Ubuntu before when I repurposed my late 2014 MacBook Pro. This post covers the installation of Docker and Oracle Database 23ai.
Install Docker
Contrary to the instructions, you should do the following as a sudoer user:
sudo apt install -y docker.io |
Install all dependency packages using the following command:
sudo snap install docker |
You should see the following:
docker 20.10.24 from Canonical✓ installed |
You can verify the Docker install with the following command:
sudo docker --version |
It should show something like this:
Docker version 24.0.5, build 24.0.5-0ubuntu1~22.04.1 |
You can check the pulled containers with the following command but at this point there should be no pulled containers.
sudo docker images |
At this point, a docker group already exists but you need to add your user to the docker group with the following command:
sudo usermod -aG docker $USER |
Using the Docker Commands:
- To activate the logging, utilize the -f parameter.
- To divide JSON, use Docker by default; to extract individual keys, use JQ.
- In your Container file, there are quite a few areas where commands may be specified.
- Posting to the volumes could be more effective while the picture is being built.
- Docker offers a highly efficient way to create an alias for its own built-in commands. This makes it easier to set up and handle lengthy and enormous orders. These alias values are stored in the directories /.bashrc or and /.bash_aliases.
- Docker offers further assistance to remove unused code fragments from the installation of the container.
- Docker always favors reading statements from the container file that have not changed. Therefore, time savings may be realized by arranging what is shown in the container file in a way that ensures the elements that are susceptible to change are shown towards the end of the document and those that are most likely to undergo change are shown at the top.
Install Oracle Database 23ai Free in a Docker container
Use the following command to pull and install the Oracle Database 23ai container:
sudo docker run --name oracle23ai -p 1521:1521 -p 5500:5500 -e ORACLE_PWD=cangetin container-registry.oracle.com/database/free:latest |
After installing the Oracle Database 23ai Free container, you can access it as the root user by default with this syntax:
docker exec -it -u root oracle23ai bash |
At the root prompt, you can connect to the system schema with the following command:
sqlplus system/cangetin@FREE |
You should see the following:
SQL*Plus: RELEASE 23.0.0.0.0 - Production ON Thu May 9 03:56:57 2024 Version 23.4.0.24.05 Copyright (c) 1982, 2024, Oracle. ALL rights reserved. LAST SUCCESSFUL login TIME: Wed Apr 24 2024 21:23:00 +00:00 Connected TO: Oracle DATABASE 23ai Free RELEASE 23.0.0.0.0 - Develop, Learn, AND Run FOR Free Version 23.4.0.24.05 SQL> |
Create a c##student as a sandbox user:
After you create and provision the Oracle Database 21ai Free, you can create a c##student sand-boxed user with the following two step process.
- Create a c##student Oracle user account with the following command as the system user:
CREATE USER c##student IDENTIFIED BY student
DEFAULT TABLESPACE users QUOTA 200M ON users
TEMPORARY TABLESPACE temp;
- Grant necessary privileges to the newly created c##student user:
GRANT CREATE CLUSTER, CREATE INDEXTYPE, CREATE OPERATOR
,     CREATE PROCEDURE, CREATE SEQUENCE, CREATE SESSION
,     CREATE TABLE, CREATE TRIGGER, CREATE TYPE
,     CREATE VIEW TO c##student;
- Connect to the sandboxed user with the following syntax (by the way it’s a pluggable user account as qualified in Oracle Database 12c forward):
SQL> CONNECT c##student/student@FREE
or, disconnect and reconnect with this syntax:
sqlplus system/cangetin@FREE
Set Docker Oracle 23ai to start always
Assuming that your container name was oracle23ai, as qualified above, you can run the following command to automatically restart the Docker container:
docker update --restart=always `docker ps -aqf "name=oracle23ai"` |
The docker command inside the backquotes uses the Docker instance’s name to return the Docker container_id value, which can also be seen when you run the following command:
docker ps |
which returns:
CONTAINER ID IMAGE COMMAND CREATED STATUS PORTS NAMES b211f494e692 container-registry.oracle.com/database/free:latest "/bin/bash -c $ORACL…" 13 days ago Up 18 minutes (healthy) 0.0.0.0:1521->1521/tcp, :::1521->1521/tcp, 0.0.0.0:5500->5500/tcp, :::5500->5500/tcp oracle23ai |
The Docker container_id value is required when you perform a Docker update operation.
Configuring your Docker Oracle 23ai environment
Unless you like memorizing the Docker command-line, you may automate connecting as the root user or add a sand boxed user. The root user typically has more power than you need to perform ordinary development and use-case testing tasks.
A sand boxed user has narrow access, can’t start and stop the database instance or perform Oracle Datasbase 23ai administration. In this segment, you’ll learn how to create a couple local Bash functions to simplify your use of the Oracle Database 23ai container; and how to extend the configuration of Oracle’s Docker container:
- Adding a student user to the Docker container and configuring it to access the Oracle Database 23ai locally from within the Docker container using a direct sqlplus connection.
- Configuring the Docker container to support external files and leverage a shared directory with your base operating system.
Automating Docker instance connections:
The following shows you how to add a local Bash function to automate access to the Docker container from the Linux command-line. You put the following Bash function in your base Linux operating system’s user .bashrc file:
- Create the following Bash function:
# User defined function to launch Oracle 23 ai container
# as the root user.
admin ()
{
    # Discover the fully qualified program name.
    path=`which docker 2>/dev/null`
    file=''

    # Parse the program name from the path.
    if [ -n ${path} ]; then
        file=${path##/*/}
    fi

    # Wrap when there is a file and it is rewrap.
    if [ -n ${file} ] && [[ ${file} = "docker" ]]; then
        python -c "import subprocess; subprocess.run(['docker exec -it --user root oracle23ai bash'], shell=True)"
    else
        echo "Docker is unavailable: Install the docker package."
    fi
}
- After you source the .bashrc file or simply reconnect as to the terminal as your user, which resources the .bashrc file, you can access the oracle23ai Docker instance with this command:
admin
It will display a new prompt with the root user and the Docker container_id value, like:
[root@b211f494e692 oracle]#
You can exit the Docker container by typing exit at the Linux command line. If you curious what version of Linux you’re using inside the Docker instance, you can’t use the uname command because it returns the hosting Linux distribution (distro). You must use the following when inside the Docker instance:
cat /etc/os-release
or, outside the Docker instance you can use the following docker command:
docker exec oracle23ai cat /etc/os-release
Either way, for an Oracle Database 23ai container, it should return:
NAME="Oracle Linux Server"
VERSION="8.9"
ID="ol"
ID_LIKE="fedora"
VARIANT="Server"
VARIANT_ID="server"
VERSION_ID="8.9"
PLATFORM_ID="platform:el8"
PRETTY_NAME="Oracle Linux Server 8.9"
ANSI_COLOR="0;31"
CPE_NAME="cpe:/o:oracle:linux:8:9:server"
HOME_URL="https://linux.oracle.com/"
BUG_REPORT_URL="https://github.com/oracle/oracle-linux"

ORACLE_BUGZILLA_PRODUCT="Oracle Linux 8"
ORACLE_BUGZILLA_PRODUCT_VERSION=8.9
ORACLE_SUPPORT_PRODUCT="Oracle Linux"
ORACLE_SUPPORT_PRODUCT_VERSION=8.9
Unfortunately, Oracle has appeared to block updates to the Oracle Unbreakable Linux 8 instance inside the container, which makes native SQL*Plus use more difficult. That’s because you’ll need to install the Oracle SQL*Plus client in the hosting Operating System.
I’ve written a separate blog post that instructs you on how to install and use Oracle SQL*Plus client on Ubuntu.
Install SQL Developer in the base Linux operating system
The first steps are installing the Java Runtime Environment and Java Development Kit, and then downloading, installing and configuring SQL Developer. These are the required steps:
- Install the Java Runtime Environment:
sudo apt install default-jre
The log file for this is:
Display detailed console log →
Reading package lists... Done
Building dependency tree... Done
Reading state information... Done
The following additional packages will be installed:
 ca-certificates-java default-jre-headless fonts-dejavu-extra java-common
 libatk-wrapper-java libatk-wrapper-java-jni openjdk-11-jre
 openjdk-11-jre-headless
Suggested packages:
 fonts-ipafont-gothic fonts-ipafont-mincho fonts-wqy-microhei
 | fonts-wqy-zenhei
The following NEW packages will be installed:
 ca-certificates-java default-jre default-jre-headless fonts-dejavu-extra
 java-common libatk-wrapper-java libatk-wrapper-java-jni openjdk-11-jre
 openjdk-11-jre-headless
0 upgraded, 9 newly installed, 0 to remove and 4 not upgraded.
Need to get 44.9 MB of archives.
After this operation, 185 MB of additional disk space will be used.
Do you want to continue? [Y/n] Y
Get:1 http://us.archive.ubuntu.com/ubuntu jammy/main amd64 java-common all 0.72build2 [6,782 B]
Get:2 http://us.archive.ubuntu.com/ubuntu jammy-updates/main amd64 openjdk-11-jre-headless amd64 11.0.21+9-0ubuntu1~22.04 [42.5 MB]
Get:3 http://us.archive.ubuntu.com/ubuntu jammy/main amd64 default-jre-headless amd64 2:1.11-72build2 [3,042 B]
Get:4 http://us.archive.ubuntu.com/ubuntu jammy-updates/main amd64 ca-certificates-java all 20190909ubuntu1.2 [12.1 kB]
Get:5 http://us.archive.ubuntu.com/ubuntu jammy-updates/main amd64 openjdk-11-jre amd64 11.0.21+9-0ubuntu1~22.04 [214 kB]
Get:6 http://us.archive.ubuntu.com/ubuntu jammy/main amd64 default-jre amd64 2:1.11-72build2 [896 B]
Get:7 http://us.archive.ubuntu.com/ubuntu jammy/main amd64 fonts-dejavu-extra all 2.37-2build1 [2,041 kB]
Get:8 http://us.archive.ubuntu.com/ubuntu jammy/main amd64 libatk-wrapper-java all 0.38.0-5build1 [53.1 kB]
Get:9 http://us.archive.ubuntu.com/ubuntu jammy/main amd64 libatk-wrapper-java-jni amd64 0.38.0-5build1 [49.0 kB]
Fetched 44.9 MB in 14s (3,270 kB/s)
Selecting previously unselected package java-common.
(Reading database ... 203118 files and directories currently installed.)
Preparing to unpack .../0-java-common_0.72build2_all.deb ...
Unpacking java-common (0.72build2) ...
Selecting previously unselected package openjdk-11-jre-headless:amd64.
Preparing to unpack .../1-openjdk-11-jre-headless_11.0.21+9-0ubuntu1~22.04_amd64
.deb ...
Unpacking openjdk-11-jre-headless:amd64 (11.0.21+9-0ubuntu1~22.04) ...
Selecting previously unselected package default-jre-headless.
Preparing to unpack .../2-default-jre-headless_2%3a1.11-72build2_amd64.deb ...
Unpacking default-jre-headless (2:1.11-72build2) ...
Selecting previously unselected package ca-certificates-java.
Preparing to unpack .../3-ca-certificates-java_20190909ubuntu1.2_all.deb ...
Unpacking ca-certificates-java (20190909ubuntu1.2) ...
Selecting previously unselected package openjdk-11-jre:amd64.
Preparing to unpack .../4-openjdk-11-jre_11.0.21+9-0ubuntu1~22.04_amd64.deb ...
Unpacking openjdk-11-jre:amd64 (11.0.21+9-0ubuntu1~22.04) ...
Selecting previously unselected package default-jre.
Preparing to unpack .../5-default-jre_2%3a1.11-72build2_amd64.deb ...
Unpacking default-jre (2:1.11-72build2) ...
Selecting previously unselected package fonts-dejavu-extra.
Preparing to unpack .../6-fonts-dejavu-extra_2.37-2build1_all.deb ...
Unpacking fonts-dejavu-extra (2.37-2build1) ...
Selecting previously unselected package libatk-wrapper-java.
Preparing to unpack .../7-libatk-wrapper-java_0.38.0-5build1_all.deb ...
Unpacking libatk-wrapper-java (0.38.0-5build1) ...
Selecting previously unselected package libatk-wrapper-java-jni:amd64.
Preparing to unpack .../8-libatk-wrapper-java-jni_0.38.0-5build1_amd64.deb ...
Unpacking libatk-wrapper-java-jni:amd64 (0.38.0-5build1) ...
Setting up java-common (0.72build2) ...
Setting up fonts-dejavu-extra (2.37-2build1) ...
Setting up libatk-wrapper-java (0.38.0-5build1) ...
Setting up libatk-wrapper-java-jni:amd64 (0.38.0-5build1) ...
Setting up default-jre-headless (2:1.11-72build2) ...
Setting up openjdk-11-jre-headless:amd64 (11.0.21+9-0ubuntu1~22.04) ...
update-alternatives: using /usr/lib/jvm/java-11-openjdk-amd64/bin/java to provid
e /usr/bin/java (java) in auto mode
update-alternatives: using /usr/lib/jvm/java-11-openjdk-amd64/bin/jjs to provide
/usr/bin/jjs (jjs) in auto mode
update-alternatives: using /usr/lib/jvm/java-11-openjdk-amd64/bin/keytool to pro
vide /usr/bin/keytool (keytool) in auto mode
update-alternatives: using /usr/lib/jvm/java-11-openjdk-amd64/bin/rmid to provid
e /usr/bin/rmid (rmid) in auto mode
update-alternatives: using /usr/lib/jvm/java-11-openjdk-amd64/bin/rmiregistry to
provide /usr/bin/rmiregistry (rmiregistry) in auto mode
update-alternatives: using /usr/lib/jvm/java-11-openjdk-amd64/bin/pack200 to pro
vide /usr/bin/pack200 (pack200) in auto mode
update-alternatives: using /usr/lib/jvm/java-11-openjdk-amd64/bin/unpack200 to p
rovide /usr/bin/unpack200 (unpack200) in auto mode
update-alternatives: using /usr/lib/jvm/java-11-openjdk-amd64/lib/jexec to provi
de /usr/bin/jexec (jexec) in auto mode
Setting up openjdk-11-jre:amd64 (11.0.21+9-0ubuntu1~22.04) ...
Setting up default-jre (2:1.11-72build2) ...
Setting up ca-certificates-java (20190909ubuntu1.2) ...
head: cannot open '/etc/ssl/certs/java/cacerts' for reading: No such file or dir
ectory
Adding debian:QuoVadis_Root_CA_1_G3.pem
Adding debian:GlobalSign_Root_E46.pem
Adding debian:T-TeleSec_GlobalRoot_Class_3.pem
Adding debian:Certum_Trusted_Network_CA.pem
Adding debian:Buypass_Class_2_Root_CA.pem
Adding debian:NetLock_Arany_=Class_Gold=_Főtanúsítvány.pem
Adding debian:e-Szigno_Root_CA_2017.pem
Adding debian:emSign_Root_CA_-_G1.pem
Adding debian:D-TRUST_BR_Root_CA_1_2020.pem
Adding debian:Hongkong_Post_Root_CA_3.pem
Adding debian:GlobalSign_ECC_Root_CA_-_R4.pem
Adding debian:NAVER_Global_Root_Certification_Authority.pem
Adding debian:UCA_Extended_Validation_Root.pem
Adding debian:AffirmTrust_Premium.pem
Adding debian:Entrust_Root_Certification_Authority.pem
Adding debian:DigiCert_Trusted_Root_G4.pem
Adding debian:CFCA_EV_ROOT.pem
Adding debian:ePKI_Root_Certification_Authority.pem
Adding debian:Hellenic_Academic_and_Research_Institutions_ECC_RootCA_2015.pem
Adding debian:HARICA_TLS_RSA_Root_CA_2021.pem
Adding debian:GlobalSign_Root_CA_-_R6.pem
Adding debian:TWCA_Global_Root_CA.pem
Adding debian:Trustwave_Global_ECC_P384_Certification_Authority.pem
Adding debian:ISRG_Root_X1.pem
Adding debian:Starfield_Services_Root_Certificate_Authority_-_G2.pem
Adding debian:QuoVadis_Root_CA_3.pem
Adding debian:Security_Communication_Root_CA.pem
Adding debian:DigiCert_TLS_RSA4096_Root_G5.pem
Adding debian:Entrust_Root_Certification_Authority_-_EC1.pem
Adding debian:Security_Communication_RootCA3.pem
Adding debian:TeliaSonera_Root_CA_v1.pem
Adding debian:vTrus_ECC_Root_CA.pem
Adding debian:AC_RAIZ_FNMT-RCM_SERVIDORES_SEGUROS.pem
Adding debian:Certum_EC-384_CA.pem
Adding debian:Microsec_e-Szigno_Root_CA_2009.pem
Adding debian:ssl-cert-snakeoil.pem
Adding debian:USERTrust_ECC_Certification_Authority.pem
Adding debian:CA_Disig_Root_R2.pem
Adding debian:Certum_Trusted_Network_CA_2.pem
Adding debian:ACCVRAIZ1.pem
Adding debian:TunTrust_Root_CA.pem
Adding debian:Buypass_Class_3_Root_CA.pem
Adding debian:D-TRUST_Root_Class_3_CA_2_2009.pem
Adding debian:Security_Communication_ECC_RootCA1.pem
Adding debian:GTS_Root_R2.pem
Adding debian:Certigna.pem
Adding debian:SSL.com_EV_Root_Certification_Authority_RSA_R2.pem
Adding debian:Entrust.net_Premium_2048_Secure_Server_CA.pem
Adding debian:E-Tugra_Global_Root_CA_ECC_v3.pem
Adding debian:Hongkong_Post_Root_CA_1.pem
Adding debian:SZAFIR_ROOT_CA2.pem
Adding debian:TUBITAK_Kamu_SM_SSL_Kok_Sertifikasi_-_Surum_1.pem
Adding debian:Atos_TrustedRoot_2011.pem
Adding debian:DigiCert_High_Assurance_EV_Root_CA.pem
Adding debian:emSign_Root_CA_-_C1.pem
Adding debian:Go_Daddy_Root_Certificate_Authority_-_G2.pem
Adding debian:GDCA_TrustAUTH_R5_ROOT.pem
Adding debian:GlobalSign_Root_CA_-_R3.pem
Adding debian:DigiCert_Assured_ID_Root_G3.pem
Adding debian:Autoridad_de_Certificacion_Firmaprofesional_CIF_A62634068_2.pem
Adding debian:Certainly_Root_R1.pem
Adding debian:vTrus_Root_CA.pem
Adding debian:Certainly_Root_E1.pem
Adding debian:Autoridad_de_Certificacion_Firmaprofesional_CIF_A62634068.pem
Adding debian:TWCA_Root_Certification_Authority.pem
Adding debian:Starfield_Root_Certificate_Authority_-_G2.pem
Adding debian:Amazon_Root_CA_3.pem
Adding debian:GTS_Root_R1.pem
Adding debian:SwissSign_Gold_CA_-_G2.pem
Adding debian:Certum_Trusted_Root_CA.pem
Adding debian:Hellenic_Academic_and_Research_Institutions_RootCA_2015.pem
Adding debian:AffirmTrust_Networking.pem
Adding debian:emSign_ECC_Root_CA_-_G3.pem
Adding debian:HARICA_TLS_ECC_Root_CA_2021.pem
Adding debian:certSIGN_ROOT_CA.pem
Adding debian:Actalis_Authentication_Root_CA.pem
Adding debian:SSL.com_Root_Certification_Authority_RSA.pem
Adding debian:Certigna_Root_CA.pem
Adding debian:XRamp_Global_CA_Root.pem
Adding debian:Baltimore_CyberTrust_Root.pem
Adding debian:Trustwave_Global_ECC_P256_Certification_Authority.pem
Adding debian:QuoVadis_Root_CA_2_G3.pem
Adding debian:GTS_Root_R3.pem
Adding debian:COMODO_RSA_Certification_Authority.pem
Adding debian:ISRG_Root_X2.pem
Adding debian:SwissSign_Silver_CA_-_G2.pem
Adding debian:IdenTrust_Public_Sector_Root_CA_1.pem
Adding debian:Microsoft_ECC_Root_Certificate_Authority_2017.pem
Adding debian:UCA_Global_G2_Root.pem
Adding debian:DigiCert_Assured_ID_Root_CA.pem
Adding debian:Entrust_Root_Certification_Authority_-_G2.pem
Adding debian:QuoVadis_Root_CA_2.pem
Adding debian:Trustwave_Global_Certification_Authority.pem
Adding debian:OISTE_WISeKey_Global_Root_GB_CA.pem
Adding debian:HiPKI_Root_CA_-_G1.pem
Adding debian:E-Tugra_Certification_Authority.pem
Adding debian:GTS_Root_R4.pem
Adding debian:Amazon_Root_CA_2.pem
Adding debian:Amazon_Root_CA_1.pem
Adding debian:SecureTrust_CA.pem
Adding debian:GlobalSign_Root_R46.pem
Adding debian:IdenTrust_Commercial_Root_CA_1.pem
Adding debian:DigiCert_Global_Root_G2.pem
Adding debian:Comodo_AAA_Services_root.pem
Adding debian:SSL.com_Root_Certification_Authority_ECC.pem
Adding debian:T-TeleSec_GlobalRoot_Class_2.pem
Adding debian:Starfield_Class_2_CA.pem
Adding debian:DigiCert_Global_Root_CA.pem
Adding debian:SecureSign_RootCA11.pem
Adding debian:certSIGN_Root_CA_G2.pem
Adding debian:DigiCert_TLS_ECC_P384_Root_G5.pem
Adding debian:Entrust_Root_Certification_Authority_-_G4.pem
Adding debian:OISTE_WISeKey_Global_Root_GC_CA.pem
Adding debian:DigiCert_Global_Root_G3.pem
Adding debian:Secure_Global_CA.pem
Adding debian:Microsoft_RSA_Root_Certificate_Authority_2017.pem
Adding debian:DigiCert_Assured_ID_Root_G2.pem
Adding debian:Telia_Root_CA_v2.pem
Adding debian:emSign_ECC_Root_CA_-_C3.pem
Adding debian:COMODO_Certification_Authority.pem
Adding debian:AffirmTrust_Premium_ECC.pem
Adding debian:GLOBALTRUST_2020.pem
Adding debian:E-Tugra_Global_Root_CA_RSA_v3.pem
Adding debian:Amazon_Root_CA_4.pem
Adding debian:COMODO_ECC_Certification_Authority.pem
Adding debian:AffirmTrust_Commercial.pem
Adding debian:SSL.com_EV_Root_Certification_Authority_ECC.pem
Adding debian:AC_RAIZ_FNMT-RCM.pem
Adding debian:Go_Daddy_Class_2_CA.pem
Adding debian:QuoVadis_Root_CA_3_G3.pem
Adding debian:D-TRUST_EV_Root_CA_1_2020.pem
Adding debian:GlobalSign_Root_CA.pem
Adding debian:GlobalSign_ECC_Root_CA_-_R5.pem
Adding debian:USERTrust_RSA_Certification_Authority.pem
Adding debian:D-TRUST_Root_Class_3_CA_2_EV_2009.pem
Adding debian:Izenpe.com.pem
Adding debian:ANF_Secure_Server_Root_CA.pem
Adding debian:Security_Communication_RootCA2.pem
done.
Processing triggers for mailcap (3.70+nmu1ubuntu1) ...
Processing triggers for fontconfig (2.13.1-4.2ubuntu5) ...
Processing triggers for desktop-file-utils (0.26-1ubuntu3) ...
Processing triggers for hicolor-icon-theme (0.17-2) ...
Processing triggers for gnome-menus (3.36.0-1ubuntu3) ...
Processing triggers for man-db (2.10.2-1) ...
Processing triggers for ca-certificates (20230311ubuntu0.22.04.1) ...
Updating certificates in /etc/ssl/certs...
0 added, 0 removed; done.
Running hooks in /etc/ca-certificates/update.d...

done.
done.
- Install the Java Runtime Environment:
sudo apt install -y default-idk
The log file for this is:
Display detailed console log →
Reading package lists... Done
Building dependency tree... Done
Reading state information... Done
The following additional packages will be installed:
 default-jdk-headless libice-dev libpthread-stubs0-dev libsm-dev libx11-dev
 libxau-dev libxcb1-dev libxdmcp-dev libxt-dev openjdk-11-jdk
 openjdk-11-jdk-headless x11proto-dev xorg-sgml-doctools xtrans-dev
Suggested packages:
 libice-doc libsm-doc libx11-doc libxcb-doc libxt-doc openjdk-11-demo
 openjdk-11-source visualvm
The following NEW packages will be installed:
 default-jdk default-jdk-headless libice-dev libpthread-stubs0-dev libsm-dev
 libx11-dev libxau-dev libxcb1-dev libxdmcp-dev libxt-dev openjdk-11-jdk
 openjdk-11-jdk-headless x11proto-dev xorg-sgml-doctools xtrans-dev
0 upgraded, 15 newly installed, 0 to remove and 4 not upgraded.
Need to get 76.9 MB of archives.
After this operation, 90.6 MB of additional disk space will be used.
Get:1 http://us.archive.ubuntu.com/ubuntu jammy-updates/main amd64 openjdk-11-jdk-headless amd64 11.0.21+9-0ubuntu1~22.04 [73.5 MB]
Get:2 http://us.archive.ubuntu.com/ubuntu jammy/main amd64 default-jdk-headless amd64 2:1.11-72build2 [942 B]
Get:3 http://us.archive.ubuntu.com/ubuntu jammy-updates/main amd64 openjdk-11-jdk amd64 11.0.21+9-0ubuntu1~22.04 [1,327 kB]
Get:4 http://us.archive.ubuntu.com/ubuntu jammy/main amd64 default-jdk amd64 2:1.11-72build2 [908 B]
Get:5 http://us.archive.ubuntu.com/ubuntu jammy/main amd64 xorg-sgml-doctools all 1:1.11-1.1 [10.9 kB]
Get:6 http://us.archive.ubuntu.com/ubuntu jammy/main amd64 x11proto-dev all 2021.5-1 [604 kB]
Get:7 http://us.archive.ubuntu.com/ubuntu jammy/main amd64 libice-dev amd64 2:1.0.10-1build2 [51.4 kB]
Get:8 http://us.archive.ubuntu.com/ubuntu jammy/main amd64 libpthread-stubs0-dev amd64 0.4-1build2 [5,516 B]
Get:9 http://us.archive.ubuntu.com/ubuntu jammy/main amd64 libsm-dev amd64 2:1.2.3-1build2 [18.1 kB]
Get:10 http://us.archive.ubuntu.com/ubuntu jammy/main amd64 libxau-dev amd64 1:1.0.9-1build5 [9,724 B]
Get:11 http://us.archive.ubuntu.com/ubuntu jammy/main amd64 libxdmcp-dev amd64 1:1.1.3-0ubuntu5 [26.5 kB]
Get:12 http://us.archive.ubuntu.com/ubuntu jammy/main amd64 xtrans-dev all 1.4.0-1 [68.9 kB]
Get:13 http://us.archive.ubuntu.com/ubuntu jammy/main amd64 libxcb1-dev amd64 1.14-3ubuntu3 [86.5 kB]
Get:14 http://us.archive.ubuntu.com/ubuntu jammy-updates/main amd64 libx11-dev amd64 2:1.7.5-1ubuntu0.3 [744 kB]
Get:15 http://us.archive.ubuntu.com/ubuntu jammy/main amd64 libxt-dev amd64 1:1.2.1-1 [396 kB]
Fetched 76.9 MB in 6s (12.7 MB/s)
Selecting previously unselected package openjdk-11-jdk-headless:amd64.
(Reading database ... 203527 files and directories currently installed.)
Preparing to unpack .../00-openjdk-11-jdk-headless_11.0.21+9-0ubuntu1~22.04_amd6
4.deb ...
Unpacking openjdk-11-jdk-headless:amd64 (11.0.21+9-0ubuntu1~22.04) ...
Selecting previously unselected package default-jdk-headless.
Preparing to unpack .../01-default-jdk-headless_2%3a1.11-72build2_amd64.deb ...
Unpacking default-jdk-headless (2:1.11-72build2) ...
Selecting previously unselected package openjdk-11-jdk:amd64.
Preparing to unpack .../02-openjdk-11-jdk_11.0.21+9-0ubuntu1~22.04_amd64.deb ...
Unpacking openjdk-11-jdk:amd64 (11.0.21+9-0ubuntu1~22.04) ...
Selecting previously unselected package default-jdk.
Preparing to unpack .../03-default-jdk_2%3a1.11-72build2_amd64.deb ...
Unpacking default-jdk (2:1.11-72build2) ...
Selecting previously unselected package xorg-sgml-doctools.
Preparing to unpack .../04-xorg-sgml-doctools_1%3a1.11-1.1_all.deb ...
Unpacking xorg-sgml-doctools (1:1.11-1.1) ...
Selecting previously unselected package x11proto-dev.
Preparing to unpack .../05-x11proto-dev_2021.5-1_all.deb ...
Unpacking x11proto-dev (2021.5-1) ...
Selecting previously unselected package libice-dev:amd64.
Preparing to unpack .../06-libice-dev_2%3a1.0.10-1build2_amd64.deb ...
Unpacking libice-dev:amd64 (2:1.0.10-1build2) ...
Selecting previously unselected package libpthread-stubs0-dev:amd64.
Preparing to unpack .../07-libpthread-stubs0-dev_0.4-1build2_amd64.deb ...
Unpacking libpthread-stubs0-dev:amd64 (0.4-1build2) ...
Selecting previously unselected package libsm-dev:amd64.
Preparing to unpack .../08-libsm-dev_2%3a1.2.3-1build2_amd64.deb ...
Unpacking libsm-dev:amd64 (2:1.2.3-1build2) ...
Selecting previously unselected package libxau-dev:amd64.
Preparing to unpack .../09-libxau-dev_1%3a1.0.9-1build5_amd64.deb ...
Unpacking libxau-dev:amd64 (1:1.0.9-1build5) ...
Selecting previously unselected package libxdmcp-dev:amd64.
Preparing to unpack .../10-libxdmcp-dev_1%3a1.1.3-0ubuntu5_amd64.deb ...
Unpacking libxdmcp-dev:amd64 (1:1.1.3-0ubuntu5) ...
Selecting previously unselected package xtrans-dev.
Preparing to unpack .../11-xtrans-dev_1.4.0-1_all.deb ...
Unpacking xtrans-dev (1.4.0-1) ...
Selecting previously unselected package libxcb1-dev:amd64.
Preparing to unpack .../12-libxcb1-dev_1.14-3ubuntu3_amd64.deb ...
Unpacking libxcb1-dev:amd64 (1.14-3ubuntu3) ...
Selecting previously unselected package libx11-dev:amd64.
Preparing to unpack .../13-libx11-dev_2%3a1.7.5-1ubuntu0.3_amd64.deb ...
Unpacking libx11-dev:amd64 (2:1.7.5-1ubuntu0.3) ...
Selecting previously unselected package libxt-dev:amd64.
Preparing to unpack .../14-libxt-dev_1%3a1.2.1-1_amd64.deb ...
Unpacking libxt-dev:amd64 (1:1.2.1-1) ...
Setting up openjdk-11-jdk-headless:amd64 (11.0.21+9-0ubuntu1~22.04) ...
update-alternatives: using /usr/lib/jvm/java-11-openjdk-amd64/bin/jar to provide
/usr/bin/jar (jar) in auto mode
update-alternatives: using /usr/lib/jvm/java-11-openjdk-amd64/bin/jarsigner to p
rovide /usr/bin/jarsigner (jarsigner) in auto mode
update-alternatives: using /usr/lib/jvm/java-11-openjdk-amd64/bin/javac to provi
de /usr/bin/javac (javac) in auto mode
update-alternatives: using /usr/lib/jvm/java-11-openjdk-amd64/bin/javadoc to pro
vide /usr/bin/javadoc (javadoc) in auto mode
update-alternatives: using /usr/lib/jvm/java-11-openjdk-amd64/bin/javap to provi
de /usr/bin/javap (javap) in auto mode
update-alternatives: using /usr/lib/jvm/java-11-openjdk-amd64/bin/jcmd to provid
e /usr/bin/jcmd (jcmd) in auto mode
update-alternatives: using /usr/lib/jvm/java-11-openjdk-amd64/bin/jdb to provide
/usr/bin/jdb (jdb) in auto mode
update-alternatives: using /usr/lib/jvm/java-11-openjdk-amd64/bin/jdeprscan to p
rovide /usr/bin/jdeprscan (jdeprscan) in auto mode
update-alternatives: using /usr/lib/jvm/java-11-openjdk-amd64/bin/jdeps to provi
de /usr/bin/jdeps (jdeps) in auto mode
update-alternatives: using /usr/lib/jvm/java-11-openjdk-amd64/bin/jfr to provide
/usr/bin/jfr (jfr) in auto mode
update-alternatives: using /usr/lib/jvm/java-11-openjdk-amd64/bin/jimage to prov
ide /usr/bin/jimage (jimage) in auto mode
update-alternatives: using /usr/lib/jvm/java-11-openjdk-amd64/bin/jinfo to provi
de /usr/bin/jinfo (jinfo) in auto mode
update-alternatives: using /usr/lib/jvm/java-11-openjdk-amd64/bin/jlink to provi
de /usr/bin/jlink (jlink) in auto mode
update-alternatives: using /usr/lib/jvm/java-11-openjdk-amd64/bin/jmap to provid
e /usr/bin/jmap (jmap) in auto mode
update-alternatives: using /usr/lib/jvm/java-11-openjdk-amd64/bin/jmod to provid
e /usr/bin/jmod (jmod) in auto mode
update-alternatives: using /usr/lib/jvm/java-11-openjdk-amd64/bin/jps to provide
/usr/bin/jps (jps) in auto mode
update-alternatives: using /usr/lib/jvm/java-11-openjdk-amd64/bin/jrunscript to
provide /usr/bin/jrunscript (jrunscript) in auto mode
update-alternatives: using /usr/lib/jvm/java-11-openjdk-amd64/bin/jshell to prov
ide /usr/bin/jshell (jshell) in auto mode
update-alternatives: using /usr/lib/jvm/java-11-openjdk-amd64/bin/jstack to prov
ide /usr/bin/jstack (jstack) in auto mode
update-alternatives: using /usr/lib/jvm/java-11-openjdk-amd64/bin/jstat to provi
de /usr/bin/jstat (jstat) in auto mode
update-alternatives: using /usr/lib/jvm/java-11-openjdk-amd64/bin/jstatd to prov
ide /usr/bin/jstatd (jstatd) in auto mode
update-alternatives: using /usr/lib/jvm/java-11-openjdk-amd64/bin/rmic to provid
e /usr/bin/rmic (rmic) in auto mode
update-alternatives: using /usr/lib/jvm/java-11-openjdk-amd64/bin/serialver to p
rovide /usr/bin/serialver (serialver) in auto mode
update-alternatives: using /usr/lib/jvm/java-11-openjdk-amd64/bin/jaotc to provi
de /usr/bin/jaotc (jaotc) in auto mode
update-alternatives: using /usr/lib/jvm/java-11-openjdk-amd64/bin/jhsdb to provi
de /usr/bin/jhsdb (jhsdb) in auto mode
Setting up libpthread-stubs0-dev:amd64 (0.4-1build2) ...
Setting up xtrans-dev (1.4.0-1) ...
Setting up default-jdk-headless (2:1.11-72build2) ...
Setting up openjdk-11-jdk:amd64 (11.0.21+9-0ubuntu1~22.04) ...
update-alternatives: using /usr/lib/jvm/java-11-openjdk-amd64/bin/jconsole to pr
ovide /usr/bin/jconsole (jconsole) in auto mode
Setting up xorg-sgml-doctools (1:1.11-1.1) ...
Setting up default-jdk (2:1.11-72build2) ...
Processing triggers for sgml-base (1.30) ...
Setting up x11proto-dev (2021.5-1) ...
Setting up libxau-dev:amd64 (1:1.0.9-1build5) ...
Setting up libice-dev:amd64 (2:1.0.10-1build2) ...
Setting up libsm-dev:amd64 (2:1.2.3-1build2) ...
Processing triggers for man-db (2.10.2-1) ...
Setting up libxdmcp-dev:amd64 (1:1.1.3-0ubuntu5) ...
Setting up libxcb1-dev:amd64 (1.14-3ubuntu3) ...
Setting up libx11-dev:amd64 (2:1.7.5-1ubuntu0.3) ...
Setting up libxt-dev:amd64 (1:1.2.1-1) ...
- Download SQL Developer from here; and then install SQL Developer to the /opt directory on your Ubuntu local instance:
Use the following command to unzip the SQL Developer files to the /opt directory:
sudo unzip ~/Downloads/sqldeveloper-23.1.0.097.1607-no-jre.zip
- Create the following /usr/local/bin/sqldeveloper symbolic link:
sudo ln -s /opt/sqldeveloper/sqldeveloper.sh /usr/local/bin/sqldeveloper
- Edit the /opt/sqldeveloper/sqldeveloper.sh file by replacing the following line:
cd "`dirname $0`"/sqldeveloper/bin && bash sqldeveloper $*
with this version:
/opt/sqldeveloper/sqldeveloper/bin/sqldeveloper $*
- Now, you can launch SQL Developer from any location on your local Ubuntu operating system, like:
sqldeveloper
- You can now connect as the system user through SQL Developer to the Oracle Database 23ai Free Docker instance with the following connection information:
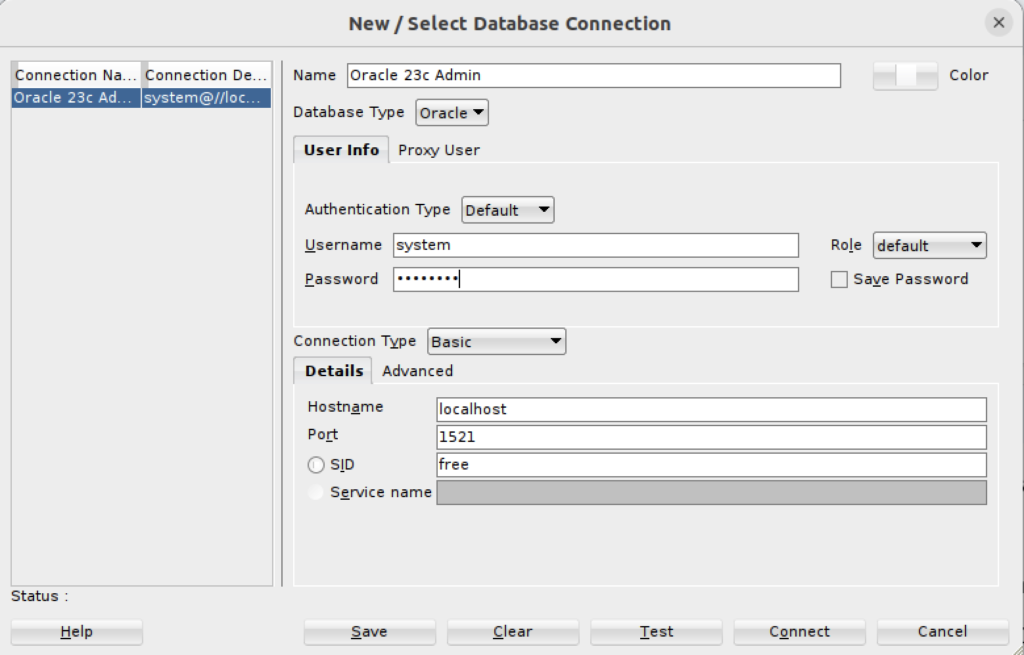
(Excuse recycling the version from 21c but I didn’t see any utility in making a new screen shot.)
- You can also create a Desktop shortcut by creating the sqldeveloper.desktop file in the /usr/share/applications directory. The SQL Developer icon is provided in the sqldeveloper base directory.

You should create the following sqldeveloper.desktop file to use a Desktop shortcut:
[Desktop Entry]
Name=Oracle SQL Developer
Comment=SQL Developer from Oracle
GenericName=SQL Tool
Exec=/usr/local/bin/sqldeveloper
Icon=/opt/sqldeveloper/icon.png
Type=Application
StartupNotify=true
Categories=Utility;Oracle;Development;SQL;
As always, I hope this helps those trying to accomplish this task.
