Archive for April, 2015
Leaf node queries
A reader posted A dynamic level limiting hierarchical query about Oracle’s hierarchical queries. They wanted to know how to capture only the hierarchy above the level where the first leaf node occurs. They gave me the following hierarchy map as an example:
               1                                    2
        +-------------+                       +-----------+
        |             |                       |           |
        3             5                       4           6
    +---------+    +-----------+           +-----+    +------+
    |         |    |           |           |     |    |      |
    7         9    11          13          8     10   12     14
+-----+   +-----+  +--+    +-------+                       +-----+
|     |   |     |     |    |       |                       |     |
15    17  19    21    23   27      29                     16     18
                                                                 +---+
                                                                     |
20 |
You can find the node values and hierarchical level with the following query:
SELECT tt.child_id , LEVEL FROM test_temp tt WHERE CONNECT_BY_ISLEAF = 1 START WITH tt.parent_id IS NULL CONNECT BY PRIOR tt.child_id = tt.parent_id ORDER BY 2; |
We really don’t need the node values to solve the problem. We only need the lowest LEVEL value returned by the query, which is 3. The combination of the MIN and CONNECT_BY_ISLEAF functions let us solve this problem without writing a PL/SQL solution. The subquery returns the lowest level value, which is the first level where a leaf node occurs.
SELECT LPAD(' ', 2*(LEVEL - 1)) || tt.child_id AS child_id FROM test_temp tt WHERE LEVEL <= (SELECT MIN(LEVEL) FROM test_temp tt WHERE CONNECT_BY_ISLEAF = 1 START WITH tt.parent_id IS NULL CONNECT BY PRIOR tt.child_id = tt.parent_id) START WITH tt.parent_id IS NULL CONNECT BY PRIOR tt.child_id = tt.parent_id; |
It returns:
               1                                    2
        +-------------+                       +-----------+
        |             |                       |           |
        3             5                       4           6
    +---------+    +-----------+           +-----+    +------+
    |         |    |           |           |     |    |      |
7 9 11 13 8 10 12 14 |
While I answered the question in a comment originally, it seemed an important trick that should be shared in its own post.
Netbeans 8 – Fedora
Some of my students want to use the Fedora image that I built for my database classes in my Java software development life cycle course. As a result, they wanted a Java development environment installed. I examined JDeveloper 11g (11.1.1.7.0) and 12c (12.1.3) but resolved on the more generic Netbeans 8 (8.0.2) IDE.
JDK 7 with Netbeans 8 Download
You can download the generic Netbeans 8 IDE or the JDK 8 with Netbeans for the Linux installation. After you download the executable program, you should follow these instructions to install the Netbeans 8 IDE on Fedora.
As the student user, you can download the file to your ~student/Downloads directory and then run these two commands:
chmod +x ./jdk-7u80-nb-8_0_2-linux-x64.sh sudo ./jdk-7u80-nb-8_0_2-linux-x64.sh |
It produces the following output log:
Configuring the installer... Searching for JVM on the system... Preparing bundled JVM ... Extracting installation data... Running the installer wizard... |
Then, it launches the installer. These screens show you how to install and create your first Java project.
JDK 7 with Netbeans 8 Installation

- The first installation dialog welcomes you to the JDK 7 Update and NetBeans 8 Installer. Click the Next button to proceed.

- The second installation dialog asks you to accept the terms in the license agreement. Click the Next button to proceed.

- The third installation dialog asks you to install Netbeans 8. Click the Browse button if you would like to install it in a different area. Click the Next button to proceed.

- The fourth installation dialog asks you to install another Java JDK 7 that supports the current release of Netbeans 8. Click the Browse button if you would like to install it in a different area. Click the Next button to proceed.

- The fifth installation dialog shows you the progress bar for installing Java JDK 7 that supports the current release of Netbeans 8. You may not need to click the Next button to proceed because it should progress to the Netbeans progress dialog. Click the Next button to proceed when it doesn’t do it automatically.
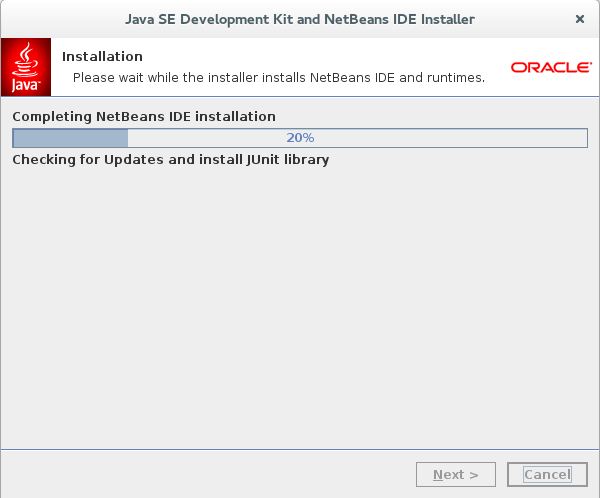
- The sixth installation dialog shows you the progress bar for installing Netbeans 8. Click the Next button to proceed when it doesn’t do it automatically.

- The next screen is the final screen of the Java SE Development Kit and NetBeans IDE Installer. Click the Finish button to complete the installation.
After the installation, you need to check if the netbeans program can be found by users. It shouldn’t be found at this point because it isn’t in the default $PATH environment variable.
Configuring the student user
You can set the $PATH variable dynamically like this:
export PATH=$PATH:/usr/local/netbeans-8.0.2/bin |
The netbeans program location was set in Step #4 of the Netbeans installation. After setting the $PATH environment variable, you can run netbeans with this syntax:
./netbeans & |
However, the better approach is to put the following lines in your .bashrc file. This change ensures that you can access the netbeans program anytime you launch a Terminal session.
# Add netbeans to the user's PATH variable. export PATH=$PATH:/usr/local/netbeans-8.0.2/bin |
After you have configured the student user’s .bashrc file, you can now use Netbeans to create a Java project.
Create a new Netbeans project

- The next screen is the Netbeans 8 Start Page. This is where you can create your first Java development project.

- You click the File menu and then the New Project menu option to open a new project.

- It launches the New Project dialog at Step #1 – Choose Project, where you choose Java from your Categories list and Java Application from the Projects list. You click the Next button to continue.

- It launches the New Project dialog at Step #2 – Name and Location, where you enter a Project Name. The example uses
MySQLJavaas the project name. You click the Next button to continue.

- It launches the
MySQLJava.javatab in the Netbeans 8 application. This is where you can enter your code.
You should download JDK 8 with Netbeans 8. When you install JDK 8 with Netbeans 8 into an environment with a preinstalled JDK 7 (old as it is) with Netbeans 8, the installer only adds the JDK 8.
The following segments of the post show you how to download and install JDK 8 with Netbeans 8, and how to configure Netbeans to work with the JDK 7 and JDK 8 as interchangeable libraries.
JDK 8 with Netbeans 8 Download
You can now download the JDK 8 with Netbeans for the Linux installation. After you download the executable program, you should follow these instructions to install it on Fedora.
As the student user, you can download the file to your ~student/Downloads directory and then run these two commands:
chmod +x ./jdk-8u45-nb-8_0_2-linux-x64.sh sudo ./jdk-8u45-nb-8_0_2-linux-x64.sh |
It produces the following output log:
Configuring the installer... Searching for JVM on the system... Preparing bundled JVM ... Extracting installation data... Running the installer wizard... |
Then, it launches the installer, which will be very similar to the steps you went through earlier. There are differences. There are only five screens that you navigate as opposed to the seven from the earlier JDK 7 with Netbeans 8 installation, as you’ll see below.
JDK 8 with Netbeans 8 Installation

- The first installation dialog welcomes you to the JDK 8 Update and NetBeans 8 Installer. Click the Next button to proceed.

- The second installation dialog installs the JDK 8. Click the Next button to proceed.

- The third installation dialog is a summary of what you’ll install. Click the Install button to proceed.

- The fourth installation dialog shows you a progress bar. You don’t need to do anything but watch the progress.

- The fifth installation dialog shows you the installation is complete. Click the Finish button to proceed when it doesn’t do it automatically.
After you have installed the JDK 8 SE, you can use Netbeans to add the JDK 8 platform.
Add the JDK 8 Platform to Netbeans 8
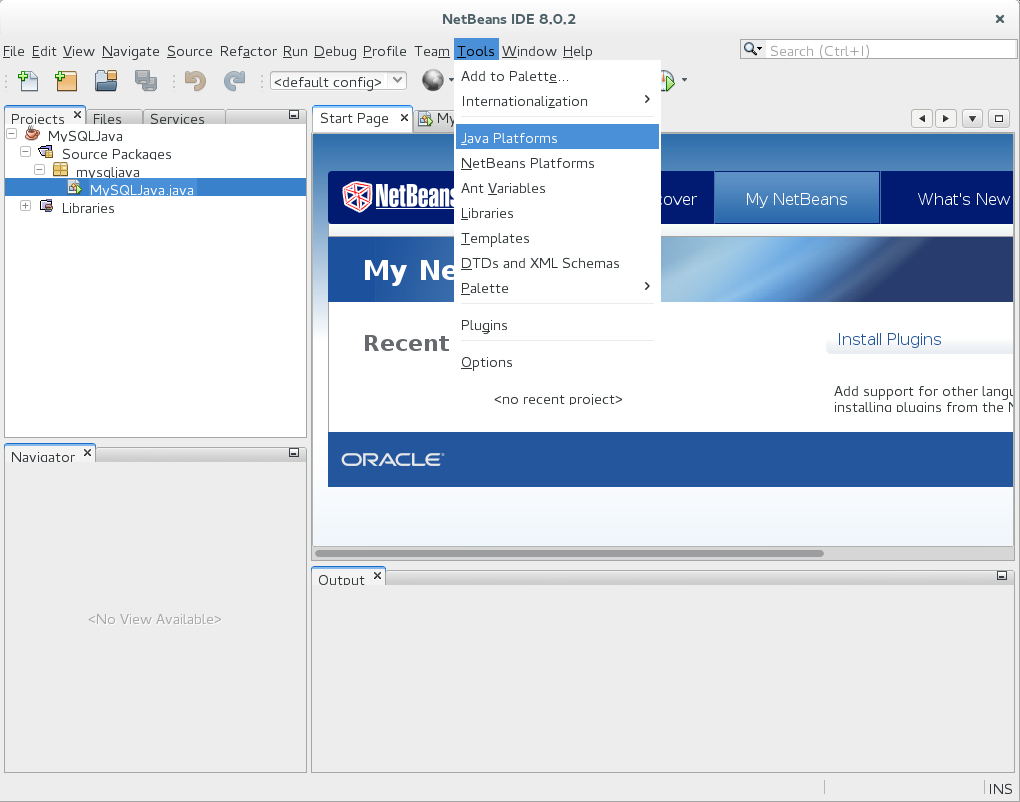
- After you open Netbeans 8, you choose the Tools menu choice. Then, you select the Java Platforms menu option.

- It launches the Java Platform Manager dialog. You click the Add Platform button to add the JDK 8 platform.

- It launches the Add Java Platform dialog. Leave the Java Standard Edition radio button checked. You click the Next button to proceed.

- It launches the Add Java Platform file chooser dialog. Here you navigate to find the JDK 8 software, which is located in
/usr/local/jdk1.8.0_45directory.

- After selecting the
/usr/local/jdk1.8.0_45directory as the platform folder, click the Next button to proceed.

- After setting the directory, you’re asked to verify the Java Platform information. If it’s correct, click the Finish button to proceed.

- After finishing the installation, you’ll see that you have two installed Java Platforms. Unfortunately, the first one installed is the default unless you modify the
netbeans.conffile. You click the Close button to complete the process.
Set JDK 8 Platform as the Default Java Platform for Netbeans 8
After adding the JDK 8 Java Platform, you can change the default setting my manually editing the /usr/local/netbeans-8.0.2/etc/netbeans.conf file. You simply remark out the line for JDK 7 and replace it with one for JDK 8, as shown below. The next time you boot the Netbeans application it uses Java 1.8.
netbeans_jdkhome="/usr/local/jdk1.8.0_45" |
The next time you launch Netbeans 8, it will use JDK 8 because you set that as the default Java Platform
As always, I hope this helps those looking for information like this.
SQL Developer – Fedora
This is the continuation of my efforts to stage an awesome Fedora developer’s instance. It shows you how to install Java 1.8 software development kit, which is nice to have. Though you can’t use Java 1.8 officially with Oracle SQL Developer 4.0.3 it is required for Oracle SQL Developer 4.1. Fortunately, the Oracle Product Manager, Jeff Smith has advised us that you can use Java 1.8 JDK with Oracle SQL Developer 4.0.3, and he’s written a comment to the blog post that it runs better with the Java 1.8 SDK.
After you install Oracle SQL Developer 4.0.3 or Oracle SQL Developer 4.1, you can watch Jeff Smith’s YouTube Video on SQL Developer 3.1 to learn how to use the basics of SQL Developer. I couldn’t find an updated version of the video for SQL Developer 4 but I didn’t try too hard.
You use yum as the root user to install Java SDK 1.8, much like my earlier Installing the Java SDK 1.7 and Java-MySQL Sample Program. The following command installs Java 8:
yum install -y java-1.8* |
It produces the following output:
Loaded plugins: langpacks, refresh-packagekit
fedora/20/x86_64/metalink                                   |  18 kB  00:00
mysql-connectors-community                                  | 2.5 kB  00:00
mysql-tools-community                                       | 2.5 kB  00:00
mysql56-community                                           | 2.5 kB  00:00
pgdg93                                                      | 3.6 kB  00:00
updates/20/x86_64/metalink                                  |  16 kB  00:00
updates                                                     | 4.9 kB  00:00
(1/2): mysql-tools-community/20/x86_64/primary_db           |  21 kB  00:00
(2/2): updates/20/x86_64/primary_db                         |  13 MB  00:09
updates/20/x86_64/pkgtags
updates
(1/2): updates/20/x86_64/pkgtags                            | 1.4 MB  00:02
(2/2): updates/20/x86_64/updateinfo                         | 1.9 MB  00:04
Package 1:java-1.8.0-openjdk-headless-1.8.0.31-1.b13.fc20.x86_64 already installed and latest version
Package 1:java-1.8.0-openjdk-javadoc-1.8.0.31-1.b13.fc20.noarch already installed and latest version
Resolving Dependencies
--> Running transaction check
---> Package java-1.8.0-openjdk.x86_64 1:1.8.0.31-1.b13.fc20 will be installed
---> Package java-1.8.0-openjdk-accessibility.x86_64 1:1.8.0.31-1.b13.fc20 will be installed
---> Package java-1.8.0-openjdk-demo.x86_64 1:1.8.0.31-1.b13.fc20 will be installed
---> Package java-1.8.0-openjdk-devel.x86_64 1:1.8.0.31-1.b13.fc20 will be installed
---> Package java-1.8.0-openjdk-src.x86_64 1:1.8.0.31-1.b13.fc20 will be installed
--> Finished Dependency Resolution

Dependencies Resolved

================================================================================
 Package                          Arch   Version                  Repository
                                                                           Size
================================================================================
Installing:
 java-1.8.0-openjdk               x86_64 1:1.8.0.31-1.b13.fc20    updates 201 k
 java-1.8.0-openjdk-accessibility x86_64 1:1.8.0.31-1.b13.fc20    updates  12 k
 java-1.8.0-openjdk-demo          x86_64 1:1.8.0.31-1.b13.fc20    updates 1.9 M
 java-1.8.0-openjdk-devel         x86_64 1:1.8.0.31-1.b13.fc20    updates 9.2 M
 java-1.8.0-openjdk-src           x86_64 1:1.8.0.31-1.b13.fc20    updates  45 M

Transaction Summary
================================================================================
Install  5 Packages

Total download size: 56 M
Installed size: 92 M
Downloading packages:
(1/5): java-1.8.0-openjdk-accessibility-1.8.0.31-1.b13.fc20 |  12 kB  00:00
(2/5): java-1.8.0-openjdk-1.8.0.31-1.b13.fc20.x86_64.rpm    | 201 kB  00:02
(3/5): java-1.8.0-openjdk-demo-1.8.0.31-1.b13.fc20.x86_64.r | 1.9 MB  00:03
(4/5): java-1.8.0-openjdk-devel-1.8.0.31-1.b13.fc20.x86_64. | 9.2 MB  00:07
(5/5): java-1.8.0-openjdk-src-1.8.0.31-1.b13.fc20.x86_64.rp |  45 MB  05:05
--------------------------------------------------------------------------------
Total                                              187 kB/s |  56 MB  05:05
Running transaction check
Running transaction test
Transaction test succeeded
Running transaction (shutdown inhibited)
  Installing : 1:java-1.8.0-openjdk-1.8.0.31-1.b13.fc20.x86_64              1/5
  Installing : 1:java-1.8.0-openjdk-devel-1.8.0.31-1.b13.fc20.x86_64        2/5
  Installing : 1:java-1.8.0-openjdk-demo-1.8.0.31-1.b13.fc20.x86_64         3/5
  Installing : 1:java-1.8.0-openjdk-accessibility-1.8.0.31-1.b13.fc20.x86   4/5
  Installing : 1:java-1.8.0-openjdk-src-1.8.0.31-1.b13.fc20.x86_64          5/5
  Verifying  : 1:java-1.8.0-openjdk-devel-1.8.0.31-1.b13.fc20.x86_64        1/5
  Verifying  : 1:java-1.8.0-openjdk-demo-1.8.0.31-1.b13.fc20.x86_64         2/5
  Verifying  : 1:java-1.8.0-openjdk-1.8.0.31-1.b13.fc20.x86_64              3/5
  Verifying  : 1:java-1.8.0-openjdk-accessibility-1.8.0.31-1.b13.fc20.x86   4/5
  Verifying  : 1:java-1.8.0-openjdk-src-1.8.0.31-1.b13.fc20.x86_64          5/5

Installed:
  java-1.8.0-openjdk.x86_64 1:1.8.0.31-1.b13.fc20
  java-1.8.0-openjdk-accessibility.x86_64 1:1.8.0.31-1.b13.fc20
  java-1.8.0-openjdk-demo.x86_64 1:1.8.0.31-1.b13.fc20
  java-1.8.0-openjdk-devel.x86_64 1:1.8.0.31-1.b13.fc20
  java-1.8.0-openjdk-src.x86_64 1:1.8.0.31-1.b13.fc20

Complete! |
Then, you go to Oracle’s SQL Developer 4.0.3 web page or Oracle’s Beta SQL Developer 4.1 web page and download the SQL Developer RPM. At the time of writing, you download the following SQL Developer 4.0.3 RPM:
sqldeveloper-4.0.3.16.84-1.noarch.rpm |
Assuming you download the sqldeveloper-4.0.3.16.84-1.noarch.rpm file to the student user’s account. It will download into the /home/student/Downloads directory. You run the SQL Developer RPM file with the following syntax as the root user:
rpm -Uhv /home/student/Downloads/sqldeveloper-4.0.3.16.84-1.noarch.rpm |
Running the SQL Developer RPM produces the following output:
Preparing... ################################# [100%] Updating / installing... 1:sqldeveloper-4.0.3.16.84-1 ################################# [100%] |
You can now run the sqldeveloper.sh file as the root user with the following syntax:
/opt/sqldeveloper/sqldeveloper.sh |
At this point, it’s important to note that my download from the Oracle SQL Developer 4.1 page turned out to be SQL Developer 4.0.3. It prompts you for the correct Java JDK, as shown below. You may opt to enter the path to the Java JDK 1.8 for SQL Developer 4.1 because until today you downloaded the Oracle SQL Developer 4.0.3 version from the Oracle SQL Developer 4.1 page. Naturally, the Oracle SQL Developer 4.1 instructions say to use the Java 1.8 JDK on the RPM for Linux Installation Notes web page, as shown below:

If you assume from the instructions on the Oracle instruction page above that Oracle SQL Developer 4.0.3 and Oracle SQL Developer 4.1 support Java 1.8 JDK, you may enter the location for the Java JDK 1.8 when prompted. Jeff Smith, the Product Manager wrote this blog post on Oracle SQL Developer 4: Windows and the JDK. Unfortunately, you’ll see the following message if you attempt to run Oracle SQL Developer 4.0.3 with the Java 1.8 SDK at the command-line:
Oracle SQL Developer Copyright (c) 1997, 2014, Oracle and/or its affiliates. All rights reserved. Type the full pathname of a JDK installation (or Ctrl-C to quit), the path will be stored in /root/.sqldeveloper/4.0.0/product.conf /usr/lib/jvm/java-1.8.0-openjdk-1.8.0.31.x86_64 OpenJDK 64-Bit Server VM warning: ignoring option MaxPermSize=256M; support was removed in 8.0 |
It also raises the following error message dialog:

Text version of Unsupported JDK Version error message:
Running this product is supported with a minimum Java version of 1.7.0_51 and a maximum version less than 1.8.
Update the SetJavaHome in “/root/.sqldeveloper/4.0.0/product.conf” to point to another Java.
This produce will not be supported, and may not run correctly if you proceed. Continue anyway?
The error dialog message tells us that the instructions on the RPM for Linux Installation Notes web page can be misleading. You really need to use the Java JDK 1.7 to be supported officially, but you can safely ignore the error.
If you want a certified component, leave the “Skip This Message Next Time” checkbox unchecked and click the “No” button to continue. At this point, there’s no automatic recovery. You need to open the following file:
/root/.sqldeveloper/4.0.0/product.conf |
You need to change the SetJavaHome parameter in the file to the following:
# SetJavaHome /path/jdk SetJavaHome /usr/lib/jvm/java-1.7.0-openjdk-1.7.0.79-2.5.5.0.fc20.x86_64 |
After making the change, you can re-run the sqldeveloper.sh shell as follows:
/opt/sqldeveloper/sqldeveloper.sh |
It launches the following dialog message:

The installation pauses to ask you if you want to transfer an existing SQL Developer configuration by raising the following dialog. Assuming this is a new installation, the installer won’t find a prior configuration file. You need to click the “No” button to proceed.

The installation continues and launches SQL Developer. The first time launch shows you the following Oracle Usage Tracking dialog. If you don’t want your use monitored, uncheck the “Allow automated usage reporting to Oracle” checkbox. Click the “OK” button to continue.
![]()
After dismissing the Oracle Usage Tracking dialog, you see the SQL Developer environment:

After installing SQL Developer in the root account, you can install it as the student user. You use this command as the student user:
/opt/sqldeveloper/sqldeveloper.sh |
It returns the following error because it’s the second installation and SQL Developer doesn’t prompt you to configure the user’s product.conf file with the working JDK location:
Oracle SQL Developer Copyright (c) 1997, 2014, Oracle and/or its affiliates. All rights reserved. Type the full pathname of a JDK installation (or Ctrl-C to quit), the path will be stored in /home/student/.sqldeveloper/4.0.0/product.conf Error: Unable to get APP_JAVA_HOME input from stdin after 10 tries |
You need to edit the /home/student/.sqldeveloper/4.0.0/product.conf file, and add the following line to the file:
# SetJavaHome /path/jdk SetJavaHome /usr/lib/jvm/java-1.7.0-openjdk-1.7.0.79-2.5.5.0.fc20.x86_64 |
Now, you can launch SQL Developer with the following command:
/opt/sqldeveloper/sqldeveloper.sh |
Alternatively, you can add the following alias to the student user’s .bashrc file:
# Set alias for SQL Developer tool. alias sqldeveloper="/opt/sqldeveloper/sqldeveloper.sh" |
You can now launch the SQL Developer tool, like this as the student user:
sqldeveloper |
You see the following when SQL Developer launches:

As always, I hope this helps those trying to sort out installing SQL Developer on a Fedora server.
MySQL OCP Exams
 Planning out my year, I decided to take the Oracle OCP and MySQL OCP exams. I checked for review books and was pleasantly surprised to find the soon to be released OCP MySQL Database Administrator Exam Guide (Exam 1Z0-883). However, I noticed that the book was actually prepared for the obsolete and discountinued Exams 1Z0-870, 1Z0-873, and 1Z0-874. As it turns out, Steve O’Hearn has informed me that there isn’t a book and that the posting in Amazon.com is in error.
There isn’t an alternative review book for the OCP MySQL 5.6 Developer or Database Administrator Exams. The question that I have is simple: “How relevant is this book because it was prepared for the older exams?” There isn’t a table of content published on the Amazon.com site. If there was a table of contents it could help me determine how close the book’s content is to the new exam.
As a preparation to figure out the value of the book as a study guide, I’ve reviewed the current Oracle MySQL Training Objectives (listed below). The new MySQL OCP Developer and Administrator exams have the following descriptions and objectives:
- MySQL 5.6 Developer 1Z0-882. Oracle provides the following outline for their MySQL for Developer (Ed 3) training course:
Course Objectives
- Describe the MySQL client/server architecture
- Use MySQL client programs and common options
- Program MySQL applications with Java and PHP connectors
- Use a “NoSQL” approach to store and retrieve data
- Design efficient tables
- Create and delete database objects
- Use expressions in SQL statements
- Examine database metadata
- Use SQL statements to modify table data
- Maintain database integrity with transactions
- Write multiple table queries
- Create “virtual tables” containing specific data
- Create user-defined variables, prepared statements, and stored routines
- Create and manage triggers
- Identify and deal with errors and exceptions in client programs
- Write queries that are fast and effective, even under heavy loads
- MySQL 5.6 Database Administrator 1Z0-883. Oracle provides the following outline for their MySQL for Database Administrators (Ed 3.1) training course:
Course Objectives
- Describe the MySQL Architecture
- Install and Upgrade MySQL
- Use the INFORMATION_SCHEMA database to access metadata
- Perform the MySQL start and shutdown operations
- Configure MySQL server options at runtime
- Use available tools including MySQL Workbench
- Evaluate data types and character sets for performance issues
- Understand data locking in MySQL
- Understand the use of the InnoDB storage engine with MySQL
- Maintain integrity of a MySQL installation
- Use triggers for administration tasks
- Use Enterprise Audit and Pluggable Authentication
- Configure advanced replication topologies for high availability
- Describe introductory performance tuning techniques
- Perform backup and restore operations
- Automate administrative tasks with scheduled events
As always, I hope this helps those who read it; and, in this case I hope it helps you make an effective decision on preparation resources for the MySQL 5.6 OCP exams.
Add zsh to Fedora
One of my students requested an option to the bash shell. It was interesting to hear that he wanted me to instal the zsh in my Fedora image. There’s only one book that I’m aware of that’s been published on the Z Shell, and it is From Bash to Z Shell.
This post shows how to add the zsh to my Fedora image because I already release a new one for the term without the zsh shell. You use the yum utility as the root user to install the zsh library:
yum install -y zsh |
It should produce an output stream like the following, which required accessing the alternate mirror site:
Loaded plugins: langpacks, refresh-packagekit mysql-connectors-community | 2.5 kB 00:00 mysql-tools-community | 2.5 kB 00:00 mysql56-community | 2.5 kB 00:00 pgdg93 | 3.6 kB 00:00 updates/20/x86_64/metalink | 14 kB 00:00 updates | 4.9 kB 00:00 (1/3): mysql-connectors-community/20/x86_64/primary_db | 8.8 kB 00:00 (2/3): pgdg93/20/x86_64/primary_db | 83 kB 00:01 (3/3): updates/20/x86_64/primary_db | 13 MB 00:13 updates/20/x86_64/pkgtags FAILED http://mirror.utexas.edu/fedora/linux/updates/20/x86_64/repodata/1ea83dc402a2bcba53f9b0011ecfa0d579b5a316e4c7f01ec5f1166dcdca138f-pkgtags.sqlite.gz: [Errno 14] HTTP Error 404 - Not Found Trying other mirror. (1/2): updates/20/x86_64/updateinfo | 1.9 MB 00:07 (2/2): updates/20/x86_64/pkgtags | 1.4 MB 00:01 Resolving Dependencies --> Running transaction check ---> Package zsh.x86_64 0:5.0.7-6.fc20 will be installed --> Finished Dependency Resolution Dependencies Resolved ================================================================================ Package Arch Version Repository Size ================================================================================ Installing: zsh x86_64 5.0.7-6.fc20 updates 2.5 M Transaction Summary ================================================================================ Install 1 Package Total download size: 2.5 M Installed size: 5.9 M Downloading packages: zsh-5.0.7-6.fc20.x86_64.rpm | 2.5 MB 00:03 Running transaction check Running transaction test Transaction test succeeded Running transaction (shutdown inhibited) Installing : zsh-5.0.7-6.fc20.x86_64 1/1 Verifying : zsh-5.0.7-6.fc20.x86_64 1/1 Installed: zsh.x86_64 0:5.0.7-6.fc20 Complete! |
Once you’ve installed the zsh, you can configure like you would the bash shell. You make edits to individual .zshrc files and generic changes to the /etc/zshrc file. You can find the documentation to edit the zsh in the User’s Guide to the Z-Shell.
The following is a modified .zshrc file. The changes enable the up-arrow in Oracle’s sqlplus and provides you with a color prompt, like this:
# Source global definitions if [ -f /etc/zshrc ]; then . /etc/zshrc fi # Uncomment the following line if you don't like systemctl's auto-paging feature: # export SYSTEMD_PAGER= # Set the JAVA_HOME path. export JAVA_HOME=/usr/lib/jvm/java-1.7.0-openjdk-1.7.0.75-2.5.4.2.fc20.x86_64 # Set the CLASSPATH path. export CLASSPATH=/usr/share/java/mysql-connector-java.jar:. # User specific aliases and functions . /u01/app/oracle/product/11.2.0/xe/bin/oracle_env.sh # Wrap sqlplus with rlwrap to edit prior lines with the # up, down, left and right keys. sqlplus() { if [ "$RLWRAP" = "0" ]; then sqlplus "$@" else rlwrap sqlplus "$@" fi } # Set the bindkey. bindkey -v bindkey "^R" history-incremental-search-backward export EDITOR="vim" # history stuff HISTFILE=~/.zsh-histfile HISTSIZE=2000 # Set vi as a command line editor. set -o vi autoload -U colors && colors PS1="[%{$fg[red]%}%n%{$reset_color%}@%{$fg[blue]%}%m %{$fg[yellow]%}%~%{$reset_color%}% ]$ " |
The zsh prompt looks like the following:
[student@localhost ~]$
If you’re configured with a bash shell, you can change your shell to a zsh with the following command:
chsh -s /bin/zsh |
As always, I hope this helps those looking for this type of information.
Oracle Cleanup a Schema
Back in January 2014, I wrote a script to cleanup an Oracle student schema. It worked well until I started using APEX 4 in my student schema. You create the following 75 objects when you create an APEX 4 schema.
OBJECT TYPE TOTAL ------------ ------- TABLE 17 INDEX 28 SEQUENCE 5 TRIGGER 14 LOB 9 FUNCTION 2 |
Here’s the modified script that ignores the objects created automatically by Oracle APEX when you create a student workspace:
BEGIN FOR i IN (SELECT object_name , object_type , last_ddl_time FROM user_objects WHERE object_name NOT IN ('APEX$_WS_WEBPG_SECTION_HISTORY','APEX$_WS_WEBPG_SECTIONS_T1' ,'APEX$_WS_WEBPG_SECTIONS_PK','APEX$_WS_WEBPG_SECTIONS' ,'APEX$_WS_WEBPG_SECHIST_IDX1','APEX$_WS_TAGS_T1' ,'APEX$_WS_TAGS_PK','APEX$_WS_TAGS_IDX2','APEX$_WS_TAGS_IDX1' ,'APEX$_WS_TAGS','APEX$_WS_ROWS_T1','APEX$_WS_ROWS_PK' ,'APEX$_WS_ROWS_IDX','APEX$_WS_ROWS','APEX$_WS_NOTES_T1' ,'APEX$_WS_NOTES_PK','APEX$_WS_NOTES_IDX2','APEX$_WS_NOTES_IDX1' ,'APEX$_WS_NOTES','APEX$_WS_LINKS_T1','APEX$_WS_LINKS_PK' ,'APEX$_WS_LINKS_IDX2','APEX$_WS_LINKS_IDX1','APEX$_WS_LINKS' ,'APEX$_WS_HISTORY_IDX','APEX$_WS_HISTORY','APEX$_WS_FILES_T1' ,'APEX$_WS_FILES_PK','APEX$_WS_FILES_IDX2','APEX$_WS_FILES_IDX1' ,'APEX$_WS_FILES','APEX$_ACL_T1','APEX$_ACL_PK','APEX$_ACL_IDX1' ,'APEX$_ACL','CUSTOM_AUTH','CUSTOM_HASH','DEPT','EMP' ,'UPDATE_ORDER_TOTAL') AND NOT ((object_name LIKE 'DEMO%' OR object_name LIKE 'INSERT_DEMO%' OR object_name LIKE 'BI_DEMO%') AND object_type IN ('TABLE','INDEX','SEQUENCE','TRIGGER')) AND NOT (object_name LIKE 'SYS_LOB%' AND object_type = 'LOB') AND NOT (object_name LIKE 'SYS_C%' AND object_type = 'INDEX') ORDER BY object_type DESC) LOOP /* Drop types in descending order. */ IF i.object_type = 'TYPE' THEN /* Drop type and force operation because dependencies may exist. Oracle 12c also fails to remove object types with dependents in pluggable databases (at least in release 12.1). Type evolution works in container database schemas. */ EXECUTE IMMEDIATE 'DROP '||i.object_type||' '||i.object_name||' FORCE'; /* Drop table tables in descending order. */ ELSIF i.object_type = 'TABLE' THEN /* Drop table with cascading constraints to ensure foreign key constraints don't prevent the action. */ EXECUTE IMMEDIATE 'DROP '||i.object_type||' '||i.object_name||' CASCADE CONSTRAINTS PURGE'; /* Oracle 12c ONLY: Purge the recyclebin to dispose of system-generated sequence values because dropping the table doesn't automatically remove them from the active session. CRITICAL: Remark out the following when working in Oracle Database 11g. */ EXECUTE IMMEDIATE 'PURGE RECYCLEBIN'; ELSIF i.object_type = 'LOB' OR i.object_type = 'INDEX' THEN /* A system generated LOB column or INDEX will cause a failure in a generic drop of a table because it is listed in the cursor but removed by the drop of its table. This NULL block ensures there is no attempt to drop an implicit LOB data type or index because the dropping the table takes care of it. */ NULL; ELSE dbms_output.put_line('DROP '||i.object_type||' '||i.object_name||';'); /* Drop any other objects, like sequences, functions, procedures, and packages. */ EXECUTE IMMEDIATE 'DROP '||i.object_type||' '||i.object_name; END IF; END LOOP; END; / |
As always, I hope this helps others.
Ruby Thin Web Server
Somebody suggested that I try out thin, “A fast and very simple Ruby web server.” So, I thought it might be interesting to test, and a simplification over Rails to demonstrate an small Ruby MVC pattern.
Installing thin seemed straight forward as a gem installation, like
gem install thin |
The initial install didn’t work out of the box because I’d neglected to install the gcc-c++ library. It raised the following errors:
Fetching: eventmachine-1.0.7.gem (100%)
Building native extensions.  This could take a while...
ERROR:  Error installing thin:
	ERROR: Failed to build gem native extension.

    /usr/bin/ruby extconf.rb
checking for main() in -lssl... no
checking for rb_trap_immediate in ruby.h,rubysig.h... no
checking for rb_thread_blocking_region()... yes
checking for ruby/thread.h... yes
checking for rb_thread_call_without_gvl() in ruby/thread.h... yes
checking for inotify_init() in sys/inotify.h... yes
checking for writev() in sys/uio.h... yes
checking for rb_thread_fd_select()... yes
checking for rb_fdset_t in ruby/intern.h... yes
checking for rb_wait_for_single_fd()... yes
checking for rb_enable_interrupt()... no
checking for rb_time_new()... yes
checking for sys/event.h... no
checking for epoll_create() in sys/epoll.h... yes
checking for clock_gettime()... yes
checking for CLOCK_MONOTONIC_RAW in time.h... yes
checking for CLOCK_MONOTONIC in time.h... yes
creating Makefile

make "DESTDIR="
g++ -I. -I/usr/include -I/usr/include/ruby/backward -I/usr/include -I. -DWITHOUT_SSL -DBUILD_FOR_RUBY -DHAVE_RB_THREAD_BLOCKING_REGION -DHAVE_TBR -DHAVE_RUBY_THREAD_H -DHAVE_RB_THREAD_CALL_WITHOUT_GVL -DHAVE_RB_THREAD_CALL_WITHOUT_GVL -DHAVE_INOTIFY_INIT -DHAVE_INOTIFY -DHAVE_WRITEV -DHAVE_WRITEV -DHAVE_RB_THREAD_FD_SELECT -DHAVE_RB_THREAD_FD_SELECT -DHAVE_TYPE_RB_FDSET_T -DHAVE_RB_FDSET_T -DHAVE_RB_WAIT_FOR_SINGLE_FD -DHAVE_RB_TIME_NEW -DOS_UNIX -DHAVE_EPOLL_CREATE -DHAVE_EPOLL -DHAVE_CLOCK_GETTIME -DHAVE_CONST_CLOCK_MONOTONIC_RAW -DHAVE_CONST_CLOCK_MONOTONIC    -fPIC -O2 -g -pipe -Wall -Wp,-D_FORTIFY_SOURCE=2 -fexceptions -fstack-protector-strong --param=ssp-buffer-size=4 -grecord-gcc-switches -mtune=generic -m64 -o ed.o -c ed.cpp
make: g++: Command not found
make: *** [ed.o] Error 127


Gem files will remain installed in /usr/local/share/gems/gems/eventmachine-1.0.7 for inspection.
Results logged to /usr/local/share/gems/gems/eventmachine-1.0.7/ext/gem_make.out |
Naturally, I installed the gcc-c++ library with the yum utility, like this:
yum list gcc-c++ |
It displayed the following log output:
Loaded plugins: langpacks, refresh-packagekit mysql-connectors-community | 2.5 kB 00:00 mysql-tools-community | 2.5 kB 00:00 mysql56-community | 2.5 kB 00:00 pgdg93 | 3.6 kB 00:00 updates/20/x86_64/metalink | 14 kB 00:00 updates | 4.9 kB 00:00 updates/20/x86_64/primary_db | 13 MB 00:04 (1/2): updates/20/x86_64/updateinfo | 1.9 MB 00:02 (2/2): updates/20/x86_64/pkgtags | 1.4 MB 00:00 Resolving Dependencies --> Running transaction check ---> Package gcc-c++.x86_64 0:4.8.3-7.fc20 will be installed --> Processing Dependency: libstdc++-devel = 4.8.3-7.fc20 for package: gcc-c++-4.8.3-7.fc20.x86_64 --> Running transaction check ---> Package libstdc++-devel.x86_64 0:4.8.3-7.fc20 will be installed --> Finished Dependency Resolution Dependencies Resolved ================================================================================ Package Arch Version Repository Size ================================================================================ Installing: gcc-c++ x86_64 4.8.3-7.fc20 updates 7.2 M Installing for dependencies: libstdc++-devel x86_64 4.8.3-7.fc20 updates 1.5 M Transaction Summary ================================================================================ Install 1 Package (+1 Dependent package) Total download size: 8.7 M Installed size: 25 M Downloading packages: (1/2): gcc-c++-4.8.3-7.fc20.x86_64.rpm | 7.2 MB 00:05 (2/2): libstdc++-devel-4.8.3-7.fc20.x86_64.rpm | 1.5 MB 00:01 -------------------------------------------------------------------------------- Total 1.3 MB/s | 8.7 MB 00:06 Running transaction check Running transaction test Transaction test succeeded Running transaction (shutdown inhibited) Installing : libstdc++-devel-4.8.3-7.fc20.x86_64 1/2 Installing : gcc-c++-4.8.3-7.fc20.x86_64 2/2 Verifying : gcc-c++-4.8.3-7.fc20.x86_64 1/2 Verifying : libstdc++-devel-4.8.3-7.fc20.x86_64 2/2 Installed: gcc-c++.x86_64 0:4.8.3-7.fc20 Dependency Installed: libstdc++-devel.x86_64 0:4.8.3-7.fc20 Complete! |
After installing the gcc-c++ libraries, I reran the gem utility to install the thin utility. It created three Ruby Gems: eventmachine-1.0.7, daemons-1.2.2.gem, and thin-1.6.3.gem, as shown:
Building native extensions. This could take a while... Successfully installed eventmachine-1.0.7 Fetching: daemons-1.2.2.gem (100%) Successfully installed daemons-1.2.2 Fetching: thin-1.6.3.gem (100%) Building native extensions. This could take a while... Successfully installed thin-1.6.3 Parsing documentation for daemons-1.2.2 Installing ri documentation for daemons-1.2.2 Parsing documentation for eventmachine-1.0.7 Installing ri documentation for eventmachine-1.0.7 Parsing documentation for thin-1.6.3 Installing ri documentation for thin-1.6.3 Done installing documentation for daemons, eventmachine, thin after 11 seconds 3 gems installed |
Having created the Ruby Gems, I followed the thin instruction on the web site, and created the following Ruby web server:
app = proc do |env| [ 200, # Status code { # Response headers 'Content-Type' => 'text/html', 'Content-Length' => '12', }, ['Hello World!'] # Response body ] end # You can install Rack middlewares # to do some crazy stuff like logging, # filtering, auth or build your own. use Rack::CommonLogger run app |
Then, I tested the Ruby web server with the following command:
thin start -R thin.ru |
It displayed the following test server as the result of localhost:3000 URL:

As always, I hope this helps those who land on this page.
Find a string in files
From time to time, folks ask questions about how to solve common problems in Linux or Unix. Today, the question is: “How do I find a list of files that contain a specific string?” There are two alternatives with the find command, and the following sample searches look for files that contain a sqlite3 string literal.
- Search for only the file names:
find . -type f | xargs grep -li sqlite3 |
Or, the more verbose:
find . -type f -exec grep -li sqlite3 /dev/null {} + |
- Search for the file names and text line:
find . -type f | xargs grep -i sqlite3 |
Or, the more verbose:
find . -type f -exec grep -i sqlite3 /dev/null {} + |
Don’t exclude the /dev/null from the verbose syntax or you’ll get the things you lack permissions to inspect or that raise other errors. I don’t post a lot of Linux or Unix tips and techniques, and you may find this site more useful to answer these types of questions:
Unix & Linux Stack Exchange web site
As always, I hope this helps those you land on the blog page.
Ruby-MySQL Columns
Last week I posted how to configure and test Ruby and MySQL. Somebody asked me how to handle a dynamic list of columns. So, here’s a quick little program to show you how to read the dynamic list of column (and this updated blog post has the 2024 update for the new Mysql2 ODBC driver):
1 2 3 4 5 6 7 8 9 10 11 12 13 14 15 16 17 18 19 20 21 22 23 24 25 26 27 28 29 30 31 32 33 34 35 36 37 | require 'rubygems' require 'mysql' # Begin block. begin # Create a new connection resource. db = Mysql.new('localhost','student','student','studentdb') # Create a result set. rs = db.query('SELECT item_title, item_rating FROM item') # Read through the result set hash. rs.each do | row | out = "" i = 0 while i < db.field_count # Check if not last column. if i < db.field_count - 1 out += "#{row[i]}, " else out += "#{row[i]}" end i += 1 end puts "#{out}" end # Release the result set resources. rs.free rescue Mysql::Error => e # Print the error. puts "ERROR #{e.errno} (#{e.sqlstate}): #{e.error}" puts "Can't connect to MySQL database specified." # Signal an error. exit 1 ensure # Close the connection when it is open. db.close if db end |
The new logic on lines 13 through 22 reads the list of columns into a comma delimited list of values. The if-block checks to make sure it doesn’t append a comma to the last column in the list. It prints output like:
The Hunt for Red October, PG Star Wars I, PG Star Wars II, PG Star Wars II, PG Star Wars III, PG13 The Chronicles of Narnia, PG RoboCop, Mature Pirates of the Caribbean, Teen The Chronicles of Narnia, Everyone MarioKart, Everyone Splinter Cell, Teen Need for Speed, Everyone The DaVinci Code, Teen Cars, Everyone Beau Geste, PG I Remember Mama, NR Tora! Tora! Tora!, G A Man for All Seasons, G Hook, PG Around the World in 80 Days, G Harry Potter and the Sorcerer's Stone, PG Camelot, G |
As always, I hope this helps those looking for a solution.
Java-MySQL Program
It turns out that configuring Perl wasn’t the last step for my student instance. It appears that I neglected to configure my student instance to support Java connectivity to MySQL. This post reviews the configuration of Java to run programs against MySQL. It also covers the new syntax on how you register a DriverManager, and avoid Java compilation errors with the older syntax.
In prior posts, I’ve shown how to use Perl , PHP, Python, and Ruby languages to query a MySQL database on Linux.
You need to install the Open JDK libraries with the yum utility command:
yum install -y java-1.7.0-openjdk* |
It should generate the following log output:
Loaded plugins: langpacks, refresh-packagekit Package 1:java-1.7.0-openjdk-1.7.0.75-2.5.4.2.fc20.x86_64 already installed and latest version Package 1:java-1.7.0-openjdk-headless-1.7.0.75-2.5.4.2.fc20.x86_64 already installed and latest version Resolving Dependencies --> Running transaction check ---> Package java-1.7.0-openjdk-accessibility.x86_64 1:1.7.0.75-2.5.4.2.fc20 will be installed --> Processing Dependency: java-atk-wrapper for package: 1:java-1.7.0-openjdk-accessibility-1.7.0.75-2.5.4.2.fc20.x86_64 ---> Package java-1.7.0-openjdk-demo.x86_64 1:1.7.0.75-2.5.4.2.fc20 will be installed ---> Package java-1.7.0-openjdk-devel.x86_64 1:1.7.0.75-2.5.4.2.fc20 will be installed ---> Package java-1.7.0-openjdk-javadoc.noarch 1:1.7.0.75-2.5.4.2.fc20 will be installed ---> Package java-1.7.0-openjdk-src.x86_64 1:1.7.0.75-2.5.4.2.fc20 will be installed --> Running transaction check ---> Package java-atk-wrapper.x86_64 0:0.30.4-4.fc20 will be installed --> Finished Dependency Resolution Dependencies Resolved ================================================================================ Package Arch Version Repository Size ================================================================================ Installing: java-1.7.0-openjdk-accessibility x86_64 1:1.7.0.75-2.5.4.2.fc20 updates 32 k java-1.7.0-openjdk-demo x86_64 1:1.7.0.75-2.5.4.2.fc20 updates 1.9 M java-1.7.0-openjdk-devel x86_64 1:1.7.0.75-2.5.4.2.fc20 updates 9.2 M java-1.7.0-openjdk-javadoc noarch 1:1.7.0.75-2.5.4.2.fc20 updates 14 M java-1.7.0-openjdk-src x86_64 1:1.7.0.75-2.5.4.2.fc20 updates 39 M Installing for dependencies: java-atk-wrapper x86_64 0.30.4-4.fc20 fedora 71 k Transaction Summary ================================================================================ Install 12 Packages (+1 Dependent package) Total download size: 163 M Installed size: 765 M Downloading packages: (1/6): java-1.7.0-openjdk-accessibility-1.7.0.75-2.5.4.2.f | 32 kB 00:00 (2/6): java-1.7.0-openjdk-demo-1.7.0.75-2.5.4.2.fc20.x86_6 | 1.9 MB 00:02 (3/6): java-1.7.0-openjdk-devel-1.7.0.75-2.5.4.2.fc20.x86_ | 9.2 MB 00:05 (4/6): java-1.7.0-openjdk-javadoc-1.7.0.75-2.5.4.2.fc20.no | 14 MB 00:04 (5/6): java-atk-wrapper-0.30.4-4.fc20.x86_64.rpm | 71 kB 00:00 (6/6): java-1.7.0-openjdk-src-1.7.0.75-2.5.4.2.fc20.x86_6 | 39 MB 00:23 -------------------------------------------------------------------------------- Total 4.5 MB/s | 163 MB 00:36 Running transaction check Running transaction test Transaction test succeeded Running transaction (shutdown inhibited) Installing : java-atk-wrapper-0.30.4-4.fc20.x86_64 3/13 Installing : 1:java-1.7.0-openjdk-accessibility-1.7.0.75-2.5.4.2.fc20 4/13 Installing : 1:java-1.7.0-openjdk-devel-1.7.0.75-2.5.4.2.fc20.x86_64 9/13 Installing : 1:java-1.7.0-openjdk-src-1.7.0.75-2.5.4.2.fc20.x86_64 10/13 Installing : 1:java-1.7.0-openjdk-javadoc-1.7.0.75-2.5.4.2.fc20.noarc 12/13 Installing : 1:java-1.7.0-openjdk-demo-1.7.0.75-2.5.4.2.fc20.x86_64 13/13 Verifying : 1:java-1.7.0-openjdk-demo-1.7.0.75-2.5.4.2.fc20.x86_64 2/13 Verifying : 1:java-1.7.0-openjdk-javadoc-1.7.0.75-2.5.4.2.fc20.noarc 3/13 Verifying : java-atk-wrapper-0.30.4-4.fc20.x86_64 5/13 Verifying : 1:java-1.7.0-openjdk-accessibility-1.7.0.75-2.5.4.2.fc20 6/13 Verifying : 1:java-1.7.0-openjdk-devel-1.7.0.75-2.5.4.2.fc20.x86_64 8/13 Verifying : 1:java-1.7.0-openjdk-src-1.7.0.75-2.5.4.2.fc20.x86_64 12/13 Installed: java-1.7.0-openjdk-accessibility.x86_64 1:1.7.0.75-2.5.4.2.fc20 java-1.7.0-openjdk-demo.x86_64 1:1.7.0.75-2.5.4.2.fc20 java-1.7.0-openjdk-devel.x86_64 1:1.7.0.75-2.5.4.2.fc20 java-1.7.0-openjdk-javadoc.noarch 1:1.7.0.75-2.5.4.2.fc20 java-1.7.0-openjdk-src.x86_64 1:1.7.0.75-2.5.4.2.fc20 Dependency Installed: java-atk-wrapper.x86_64 0:0.30.4-4.fc20 Complete! |
You can find the Java compiler’s version with the following command:
javac -version |
It should show you the following Java version:
javac 1.7.0_75 |
Next, you need to install the mysql-connector-java library with yum like this:
yum install -y mysql-connector-java |
It should generate the following installation output:
Loaded plugins: langpacks, refresh-packagekit mysql-connectors-community | 2.5 kB 00:00 mysql-tools-community | 2.5 kB 00:00 mysql56-community | 2.5 kB 00:00 pgdg93 | 3.6 kB 00:00 updates/20/x86_64/metalink | 15 kB 00:00 Resolving Dependencies --> Running transaction check ---> Package mysql-connector-java.noarch 1:5.1.28-1.fc20 will be installed --> Processing Dependency: jta >= 1.0 for package: 1:mysql-connector-java-5.1.28-1.fc20.noarch --> Processing Dependency: slf4j for package: 1:mysql-connector-java-5.1.28-1.fc20.noarch --> Running transaction check ---> Package geronimo-jta.noarch 0:1.1.1-15.fc20 will be installed ---> Package slf4j.noarch 0:1.7.5-3.fc20 will be installed --> Processing Dependency: mvn(log4j:log4j) for package: slf4j-1.7.5-3.fc20.noarch --> Processing Dependency: mvn(javassist:javassist) for package: slf4j-1.7.5-3.fc20.noarch --> Processing Dependency: mvn(commons-logging:commons-logging) for package: slf4j-1.7.5-3.fc20.noarch --> Processing Dependency: mvn(commons-lang:commons-lang) for package: slf4j-1.7.5-3.fc20.noarch --> Processing Dependency: mvn(ch.qos.cal10n:cal10n-api) for package: slf4j-1.7.5-3.fc20.noarch --> Running transaction check ---> Package apache-commons-lang.noarch 0:2.6-13.fc20 will be installed ---> Package apache-commons-logging.noarch 0:1.1.3-8.fc20 will be installed --> Processing Dependency: mvn(logkit:logkit) for package: apache-commons-logging-1.1.3-8.fc20.noarch --> Processing Dependency: mvn(avalon-framework:avalon-framework-api) for package: apache-commons-logging-1.1.3-8.fc20.noarch ---> Package cal10n.noarch 0:0.7.7-3.fc20 will be installed ---> Package javassist.noarch 0:3.16.1-6.fc20 will be installed ---> Package log4j.noarch 0:1.2.17-14.fc20 will be installed --> Processing Dependency: mvn(org.apache.geronimo.specs:geronimo-jms_1.1_spec) for package: log4j-1.2.17-14.fc20.noarch --> Processing Dependency: mvn(javax.mail:mail) for package: log4j-1.2.17-14.fc20.noarch --> Running transaction check ---> Package avalon-framework.noarch 0:4.3-9.fc20 will be installed --> Processing Dependency: xalan-j2 for package: avalon-framework-4.3-9.fc20.noarch ---> Package avalon-logkit.noarch 0:2.1-13.fc20 will be installed --> Processing Dependency: tomcat-servlet-3.0-api for package: avalon-logkit-2.1-13.fc20.noarch ---> Package geronimo-jms.noarch 0:1.1.1-17.fc20 will be installed ---> Package javamail.noarch 0:1.5.0-6.fc20 will be installed --> Running transaction check ---> Package tomcat-servlet-3.0-api.noarch 0:7.0.52-2.fc20 will be installed ---> Package xalan-j2.noarch 0:2.7.1-22.fc20 will be installed --> Processing Dependency: xerces-j2 for package: xalan-j2-2.7.1-22.fc20.noarch --> Processing Dependency: osgi(org.apache.xerces) for package: xalan-j2-2.7.1-22.fc20.noarch --> Running transaction check ---> Package xerces-j2.noarch 0:2.11.0-17.fc20 will be installed --> Processing Dependency: xml-commons-resolver >= 1.2 for package: xerces-j2-2.11.0-17.fc20.noarch --> Processing Dependency: xml-commons-apis >= 1.4.01 for package: xerces-j2-2.11.0-17.fc20.noarch --> Processing Dependency: osgi(org.apache.xml.resolver) for package: xerces-j2-2.11.0-17.fc20.noarch --> Processing Dependency: osgi(javax.xml) for package: xerces-j2-2.11.0-17.fc20.noarch --> Running transaction check ---> Package xml-commons-apis.noarch 0:1.4.01-14.fc20 will be installed ---> Package xml-commons-resolver.noarch 0:1.2-14.fc20 will be installed --> Finished Dependency Resolution Dependencies Resolved ================================================================================ Package Arch Version Repository Size ================================================================================ Installing: mysql-connector-java noarch 1:5.1.28-1.fc20 updates 1.3 M Installing for dependencies: apache-commons-lang noarch 2.6-13.fc20 fedora 281 k apache-commons-logging noarch 1.1.3-8.fc20 updates 78 k avalon-framework noarch 4.3-9.fc20 fedora 87 k avalon-logkit noarch 2.1-13.fc20 fedora 87 k cal10n noarch 0.7.7-3.fc20 fedora 37 k geronimo-jms noarch 1.1.1-17.fc20 fedora 32 k geronimo-jta noarch 1.1.1-15.fc20 fedora 21 k javamail noarch 1.5.0-6.fc20 fedora 606 k javassist noarch 3.16.1-6.fc20 fedora 626 k log4j noarch 1.2.17-14.fc20 fedora 449 k slf4j noarch 1.7.5-3.fc20 fedora 173 k tomcat-servlet-3.0-api noarch 7.0.52-2.fc20 updates 207 k xalan-j2 noarch 2.7.1-22.fc20 updates 1.9 M xerces-j2 noarch 2.11.0-17.fc20 updates 1.1 M xml-commons-apis noarch 1.4.01-14.fc20 fedora 227 k xml-commons-resolver noarch 1.2-14.fc20 fedora 108 k Transaction Summary ================================================================================ Install 1 Package (+16 Dependent packages) Total download size: 7.3 M Installed size: 10 M Downloading packages: (1/17): apache-commons-logging-1.1.3-8.fc20.noarch.rpm | 78 kB 00:00 (2/17): apache-commons-lang-2.6-13.fc20.noarch.rpm | 281 kB 00:00 (3/17): avalon-framework-4.3-9.fc20.noarch.rpm | 87 kB 00:00 (4/17): avalon-logkit-2.1-13.fc20.noarch.rpm | 87 kB 00:00 (5/17): cal10n-0.7.7-3.fc20.noarch.rpm | 37 kB 00:00 (6/17): geronimo-jms-1.1.1-17.fc20.noarch.rpm | 32 kB 00:00 (7/17): geronimo-jta-1.1.1-15.fc20.noarch.rpm | 21 kB 00:00 (8/17): javamail-1.5.0-6.fc20.noarch.rpm | 606 kB 00:00 (9/17): javassist-3.16.1-6.fc20.noarch.rpm | 626 kB 00:00 (10/17): log4j-1.2.17-14.fc20.noarch.rpm | 449 kB 00:00 (11/17): slf4j-1.7.5-3.fc20.noarch.rpm | 173 kB 00:00 (12/17): mysql-connector-java-5.1.28-1.fc20.noarch.rpm | 1.3 MB 00:01 (13/17): tomcat-servlet-3.0-api-7.0.52-2.fc20.noarch.rpm | 207 kB 00:00 (14/17): xalan-j2-2.7.1-22.fc20.noarch.rpm | 1.9 MB 00:00 (15/17): xerces-j2-2.11.0-17.fc20.noarch.rpm | 1.1 MB 00:00 (16/17): xml-commons-apis-1.4.01-14.fc20.noarch.rpm | 227 kB 00:00 (17/17): xml-commons-resolver-1.2-14.fc20.noarch.rpm | 108 kB 00:00 -------------------------------------------------------------------------------- Total 1.3 MB/s | 7.3 MB 00:05 Running transaction check Running transaction test Transaction test succeeded Running transaction (shutdown inhibited) Installing : xml-commons-apis-1.4.01-14.fc20.noarch 1/17 Installing : geronimo-jms-1.1.1-17.fc20.noarch 2/17 Installing : xml-commons-resolver-1.2-14.fc20.noarch 3/17 Installing : xerces-j2-2.11.0-17.fc20.noarch 4/17 Installing : xalan-j2-2.7.1-22.fc20.noarch 5/17 Installing : javamail-1.5.0-6.fc20.noarch 6/17 Installing : log4j-1.2.17-14.fc20.noarch 7/17 Installing : tomcat-servlet-3.0-api-7.0.52-2.fc20.noarch 8/17 Installing : avalon-framework-4.3-9.fc20.noarch 9/17 Installing : avalon-logkit-2.1-13.fc20.noarch 10/17 Installing : apache-commons-logging-1.1.3-8.fc20.noarch 11/17 Installing : javassist-3.16.1-6.fc20.noarch 12/17 Installing : cal10n-0.7.7-3.fc20.noarch 13/17 Installing : apache-commons-lang-2.6-13.fc20.noarch 14/17 Installing : slf4j-1.7.5-3.fc20.noarch 15/17 Installing : geronimo-jta-1.1.1-15.fc20.noarch 16/17 Installing : 1:mysql-connector-java-5.1.28-1.fc20.noarch 17/17 Verifying : geronimo-jta-1.1.1-15.fc20.noarch 1/17 Verifying : geronimo-jms-1.1.1-17.fc20.noarch 2/17 Verifying : xalan-j2-2.7.1-22.fc20.noarch 3/17 Verifying : apache-commons-lang-2.6-13.fc20.noarch 4/17 Verifying : slf4j-1.7.5-3.fc20.noarch 5/17 Verifying : log4j-1.2.17-14.fc20.noarch 6/17 Verifying : avalon-framework-4.3-9.fc20.noarch 7/17 Verifying : xerces-j2-2.11.0-17.fc20.noarch 8/17 Verifying : cal10n-0.7.7-3.fc20.noarch 9/17 Verifying : avalon-logkit-2.1-13.fc20.noarch 10/17 Verifying : 1:mysql-connector-java-5.1.28-1.fc20.noarch 11/17 Verifying : xml-commons-resolver-1.2-14.fc20.noarch 12/17 Verifying : xml-commons-apis-1.4.01-14.fc20.noarch 13/17 Verifying : javassist-3.16.1-6.fc20.noarch 14/17 Verifying : tomcat-servlet-3.0-api-7.0.52-2.fc20.noarch 15/17 Verifying : javamail-1.5.0-6.fc20.noarch 16/17 Verifying : apache-commons-logging-1.1.3-8.fc20.noarch 17/17 Installed: mysql-connector-java.noarch 1:5.1.28-1.fc20 Dependency Installed: apache-commons-lang.noarch 0:2.6-13.fc20 apache-commons-logging.noarch 0:1.1.3-8.fc20 avalon-framework.noarch 0:4.3-9.fc20 avalon-logkit.noarch 0:2.1-13.fc20 cal10n.noarch 0:0.7.7-3.fc20 geronimo-jms.noarch 0:1.1.1-17.fc20 geronimo-jta.noarch 0:1.1.1-15.fc20 javamail.noarch 0:1.5.0-6.fc20 javassist.noarch 0:3.16.1-6.fc20 log4j.noarch 0:1.2.17-14.fc20 slf4j.noarch 0:1.7.5-3.fc20 tomcat-servlet-3.0-api.noarch 0:7.0.52-2.fc20 xalan-j2.noarch 0:2.7.1-22.fc20 xerces-j2.noarch 0:2.11.0-17.fc20 xml-commons-apis.noarch 0:1.4.01-14.fc20 xml-commons-resolver.noarch 0:1.2-14.fc20 Complete! |
I must write too much Java code for the Windows platform because I didn’t notice the change in how the DriverManager should be instantiated. Initially, I wrote the program using the following declaration for the DriverManager class:
30 | DriverManager.registerDriver(new com.mysql.jdbc.Driver()); |
While it worked on Windows, the same syntax in the MySQL.java program raised two errors on the Linux server. One for the declaration of the com.mysql.jdbc.Driver class and another trying to declare an instance of Driver class.
These are the two errors:
MySQL.java:5: error: package com.mysql.jdbc does not exist import com.mysql.jdbc.Driver; ^ MySQL.java:31: error: package com.mysql.jdbc does not exist DriverManager.registerDriver(new com.mysql.jdbc.Driver()); ^ |
I rewrote the MySQL.java program as follows, and it works on both implementations:
1 2 3 4 5 6 7 8 9 10 11 12 13 14 15 16 17 18 19 20 21 22 23 24 25 26 27 28 29 30 31 32 33 34 35 36 37 38 39 40 41 42 43 44 45 46 47 48 49 50 51 52 53 54 55 56 57 58 59 60 61 62 63 64 65 66 67 68 69 70 71 72 73 74 75 76 77 | // Import classes. import java.sql.*; /* You can't include the following on Linux without raising an exception. */ // import com.mysql.jdbc.Driver; public class MySQL { public MySQL() { /* Declare variables that require explicit assignments because they're addressed in the finally block. */ Connection conn = null; Statement stmt = null; ResultSet rset = null; /* Declare other variables. */ String url; String username = "student"; String password = "student"; String database = "studentdb"; String hostname = "localhost"; String port = "3306"; String sql; /* Attempt a connection. */ try { // Set URL. url = "jdbc:mysql://" + hostname + ":" + port + "/" + database; // Create instance of MySQL. Class.forName ("com.mysql.jdbc.Driver").newInstance(); conn = DriverManager.getConnection (url, username, password); // Query the version of the database. sql = "SELECT version()"; stmt = conn.createStatement(); rset = stmt.executeQuery(sql); System.out.println ("Database connection established"); // Read row returns for one column. while (rset.next()) { System.out.println("MySQL Version [" + rset.getString(1) + "]"); } } catch (SQLException e) { System.err.println ("Cannot connect to database server:"); System.out.println(e.getMessage()); } catch (ClassNotFoundException e) { System.err.println ("Cannot connect to database server:"); System.out.println(e.getMessage()); } catch (InstantiationException e) { System.err.println ("Cannot connect to database server:"); System.out.println(e.getMessage()); } catch (IllegalAccessException e) { System.err.println ("Cannot connect to database server:"); System.out.println(e.getMessage()); } finally { if (conn != null) { try { rset.close(); stmt.close(); conn.close(); System.out.println ("Database connection terminated"); } catch (Exception e) { /* ignore close errors */ } } } } /* Unit test. */ public static void main(String args[]) { new MySQL(); } } |
The old approach to the DriverManager and Driver classes disallows the use of three of the exceptions in the sample code: ClassNotFoundException, InstantiationException, and IllegalAccessException classes. The new syntax works on Linux, Mac OS X, and Windows. If you’re running on Mac OS X, you need to import the following additional library in the MySQL.java program:
import com.apple.eawt.*; |
Before you compile the MySQL.java program, you need to put the mysql-connector-java.jar and your present working directory into your environment’s $CLASSPATH variable. You can set the $CLASSPATH variable at the command-line or embed the following in your .bashrc file:
export CLASSPATH=/usr/share/java/mysql-connector-java.jar:. |
If you embedded it in the .bashrc file, you need to source that file or restart your terminal session, which resources the .bashrc for you. You can source your .bashrc file from an active Terminal session in your home directory with this syntax:
. ./.bashrc |
If you’re new to Java and the MySQL Connector/J, you compile the MySQL.java program with the following syntax. At least, it works when you have the MySQL.java source file in the present working directory and want to create the class file in the same directory. You can find more about the javac command-line at the www.tutorialpoint.com web site>
javac -verbose -cp . MySQL.java |
Then, you can run it with the class file with this syntax:
java MySQL |
It should return the following:
Database connection established MySQL Version [5.6.24] Database connection terminated |
If you’d prefer to return data, you can replace line 34 in the MySQL.java program with a query against a table, like:
34 | sql = "SELECT item_title, item_rating FROM item"; |
Then, change line 42 in the MySQL.java program with syntax to manage the output, like:
42 | System.out.println(rset.getString(1) + ", " + rset.getString(2)); } |
Recompile it, and rerun the MySQL class file with this syntax:
java MySQL |
It should return the following:
Database connection established The Hunt for Red October, PG Star Wars I, PG Star Wars II, PG Star Wars II, PG Star Wars III, PG13 The Chronicles of Narnia, PG RoboCop, Mature Pirates of the Caribbean, Teen The Chronicles of Narnia, Everyone MarioKart, Everyone Splinter Cell, Teen Need for Speed, Everyone The DaVinci Code, Teen Cars, Everyone Beau Geste, PG I Remember Mama, NR Tora! Tora! Tora!, G A Man for All Seasons, G Hook, PG Around the World in 80 Days, G Harry Potter and the Chamber of Secrets, PG Camelot, G Database connection terminated |
As always, I hope this helps those looking for a solution.
