Archive for September, 2020
MySQL Shell Parsing
I’ve been experimenting with the mysqlsh since installing it last week. It’s been interesting. Overall, I’m totally impressed but I did find a problem with how it parses stored procedures.
First thought is always, is it my code? I checked the file by running it as a script file through MySQL Workbench. It ran perfectly in MySQL Workbench but failed repeatedly when run from the mysqlsh utility. Next step, reduce the code to a small test case, retest it, and log a bug if it is replicated. My test case in a test.sql file generates the following errors when run from the mysqlsh utility:
MySQL localhost:33060+ ssl studentdb SQL > source test.sql Query OK, 0 rows affected (0.0003 sec) ERROR: 1064: You have an error in your SQL syntax; check the manual that corresponds to your MySQL server version for the right syntax to use near 'CREATE PROCEDURE test ( pv_input1 CHAR(12) , pv_input2 CHAR(19)) MODIFIES SQL ' at line 2 Query OK, 0 rows affected (0.0002 sec) Query OK, 0 rows affected (0.0003 sec) ERROR: 1305: PROCEDURE studentdb.test does not exist |
The same file generates this series of successful messages when run as a script file from MySQL Workbench:
Preparing... Importing test.sql... Finished executing script Statement CREATE PROCEDURE test pv_input1 One Operation completed successfully |
For those who are curious enough to review the test case, here it is:
-- Reset the delimiter so that a semicolon can be used as a statement and block terminator. DELIMITER $$ SELECT 'CREATE PROCEDURE test' AS "Statement"; CREATE PROCEDURE test ( pv_input1 CHAR(12) , pv_input2 CHAR(19)) MODIFIES SQL DATA BEGIN SELECT CONCAT(pv_input1,', ',pv_input2) AS message; END; $$ -- Reset the standard delimiter to let the semicolon work as an execution command. DELIMITER ; -- Call the test procedure. CALL test('One','Two'); |
The reply in the bug explained the behavior difference between MySQL Workbench and the MySQL Shell (mysqlsh) environments. MySQL Workbench uses the MySQL client, which supports multiple client statements with the CLIENT_MULTI_STATEMENTS option. Recognizing that, the logging entry SELECT statement should move to a position before setting the DELIMITER, like:
-- Set a label for the log file. SELECT 'CREATE PROCEDURE test' AS "Statement"; -- Reset the delimiter so that a semicolon can be used as a statement and block terminator. DELIMITER $$ CREATE PROCEDURE test ( pv_input1 CHAR(12) , pv_input2 CHAR(19)) MODIFIES SQL DATA BEGIN SELECT CONCAT(pv_input1,', ',pv_input2) AS message; END; $$ -- Reset the standard delimiter to let the semicolon work as an execution command. DELIMITER ; -- Call the test procedure. CALL test('One','Two'); |
The new test case only submits one statement at a time. The logging query is submitted by the semicolon, and the test procedure by the double dollar ($$) symbol set.
So, I was correct identifying a parsing behavior difference between MySQL Workbench and MySQL Shell. It appears to be a difference by design but the MySQL Shell documentation fails to explain it can’t manage multiple statements. I hope identifying this saves others time.
It’s also true that the MySQL client software supports TEE and NOTEE to write log files. Unfortunately, MySQL Shell (mysqlsh) doesn’t support the TEE and NOTEE syntax. You can only do minimal logging with the control of standard error (stderr) by using the application and AdminAPI log utilities, which are covered in Chapter 8 of the MySQL Shell 8.0 documentation.
MySQL Unicode Warning
It’s always interesting when I upgrade from one release to the next. I learn new things, and in the case of MySQL’s installation and maintenance I become more grateful for the great team of developers working to produce MySQL 8.
A warning that caught my eye in MySQL 8 (8.0.21) was this one on Unicode with the utf8 character code:
Warning (code 3719): 'utf8' is currently an alias for the character set UTF8MB3, but will be an alias for UTF8MB4 in a future release. Please consider using UTF8MB4 in order to be unambiguous. |
Currently, a character alias for utf8mb3 is an alias for the deprecated utf8mb3 (a 3-byte character set) until it is removed. When the utf8mb3 character set is removed in a subsequent release the utf8 alias will represent the utf8mb4 (a 4-byte character set), which includes BMP and supplemental character support.
It appears to me that its probably a good time to proactively provision disk space for an upgrade to utf8mb4 (a 4-byte character set). It also probably time to use the utf8mb4 character set rather than the utf8 character set alias. The MySQL Server team wrote a blog entry on the when to use which one. Naturally, all this will have a substantial impact on disk space allocated to the database.
MySQL Provisioning
I’ve been using MySQL 8 on Linux for a couple years but the Linux repository version didn’t install the new MySQL Shell. So, I discovered the new MySQL Shell when I installed MySQL 8 (8.0.21) on Windows to teach my student how to use it to learn SQL commands. I encourage you to read the full MySQL Shell document.
The following is a tutorial to provision a student user and studentdb database in MySQL. It uses the MySQL Shell (mysqlsh) and stages for uploads of comma-separated values files.
After installing MySQL on the Windows 10 OS, open the Window OS Command Line Interface (CLI) shell by entering the following in the search field at the bottom left:
cmd |
It launches a CLI interface to the Windows OS. The cmd (command) utility opens the CLI in the following directory (where you substitute your user’s name for the username placeholder below):
C:\Users\username |
At the command prompt, you would enter mysql to launch the old MySQL CLI. Instead of that, you enter mysqlsh to launch the new MySQL CLI as the root user. The command to launch the MySQL Shell as the root user is:
mysqlsh -uroot -p |
It should return the following and prompt you for a single character entry to save the password for the Operating System user. As a rule, in a development instance that’s a good idea and practice.
MySQL Shell 8.0.21 Copyright (c) 2016, 2020, Oracle and/or its affiliates. All rights reserved. Oracle is a registered trademark of Oracle Corporation and/or its affiliates. Other names may be trademarks of their respective owners. Type '\help' or '\?' for help; '\quit' to exit. Creating a session to 'root@localhost' Please provide the password for 'root@localhost:33060': ******** Save password for 'root@localhost:33060'? [Y]es/[N]o/Ne[v]er (default No): y Fetching schema names for autocompletion... Press ^C to stop. Your MySQL connection id is 9 (X protocol) Server version: 8.0.21 MySQL Community Server - GPL No default schema selected; type \use <schema> to set one. MySQL localhost:33060+ ssl JS > |
The prompt will not accept SQL commands because it always initializes in the JavaScript (JS) context. The MySQL Shell supports three interactive interfaces: JavaScript, Python, and SQL.
You can verify the integrity of the shell from the JavaScript (JS) context as the root user with the following command:
MySQL localhost:33060+ ssl JS > shell.status() |
As the root user, it should return something like this:
MySQL Shell version 8.0.21 Connection Id: 9 Default schema: Current schema: Current user: root@localhost SSL: Cipher in use: TLS_AES_256_GCM_SHA384 TLSv1.3 Using delimiter: ; Server version: 8.0.21 MySQL Community Server - GPL Protocol version: X protocol Client library: 8.0.21 Connection: localhost via TCP/IP TCP port: 33060 Server characterset: utf8mb4 Schema characterset: utf8mb4 Client characterset: utf8mb4 Conn. characterset: utf8mb4 Result characterset: utf8mb4 Compression: Enabled (DEFLATE_STREAM) Uptime: 20 hours 4 min 19.0000 sec |
You can switch to the SQL context as the root or any other user with this command. The switch only changes your form of interaction with the server and you remain connected as the root user:
MySQL localhost:33060+ ssl JS > \sql |
You can verify that your session is still owned by the root user with the following SELECT statement:
MySQL localhost:33060+ ssl SQL > SELECT user(); |
It returns:
+----------------+ | user() | +----------------+ | root@localhost | +----------------+ 1 row in set (0.0005 sec) |
The next step shows you how to setup a sample studentdb database. Some syntax has changed from prior MySQL releases. Here are the three steps:
- Create the
studentdbdatabase with the following command as the MySQLrootuser:MySQL localhost:33060+ ssl SQL > CREATE DATABASE studentdb;
- Grant the
rootuser the privilege to grant to others, which root does not have by default. You use the following syntax as the MySQLrootuser:MySQL localhost:33060+ ssl SQL > GRANT ALL ON *.* TO 'root'@'localhost';
- Create the user with a clear English password and grant the user
studentfull privileges on thestudentdbdatabase:MySQL localhost:33060+ ssl SQL > CREATE USER 'student'@'localhost' IDENTIFIED WITH mysql_native_password BY 'student'; MySQL localhost:33060+ ssl SQL > GRANT ALL ON studentdb.* TO 'student'@'localhost';
- Our sample database uses large file uploads with MySQL’s LOAD command, which means you need to grant one additional global privilege:
MySQL localhost:33060+ ssl SQL > GRANT FILE ON *.* TO 'student'@'localhost';
The MySQL FILE privilege is a global privilege to read and write files on the local server. MySQL 8 installation on Windows 10 sets the following directory as the target for uploading files in the my.ini file:
# Secure File Priv. secure-file-priv="C:/ProgramData/MySQL/MySQL Server 8.0/Uploads" |
You can find the setting in the C:\ProgramData\MySQL\MySQL Server 8.0\my.ini file. You can find this value without referencing the my.ini file by querying the data:
show variables like 'secure_file_priv'; |
A new installation should return:
+------------------+------------------------------------------------+ | Variable_name | Value | +------------------+------------------------------------------------+ | secure_file_priv | C:\ProgramData\MySQL\MySQL Server 8.0\Uploads\ | +------------------+------------------------------------------------+ 1 row in set (0.2253 sec) |
You can test the ability to use the LOAD command with the following avenger.csv test file. Copy it into the C:\ProgramData\MySQL\MySQL Server 8.0\Uploads directory and make sure the directory permissions are set to read-only for Everyone (check the Microsoft OS documentation if these concepts are new to you).
1,'Anthony','Stark','Iron Man' 2,'Thor','Odinson','God of Thunder' 3,'Steven','Rogers','Captain America' 4,'Bruce','Banner','Hulk' 5,'Clinton','Barton','Hawkeye' 6,'Natasha','Romanoff','Black Widow' |
Open another cmd (command) CLI and put the following code into a file that you save as avenger.sql in the C:\Users\username directory.
-- Conditionally drop objects. SELECT 'AVENGER' AS "Drop Table"; DROP TABLE IF EXISTS avenger; -- Create an avenger table. CREATE TABLE avenger ( avenger_id INT UNSIGNED PRIMARY KEY AUTO_INCREMENT , first_name VARCHAR(20) , last_name VARCHAR(20) , character_name VARCHAR(20)) ENGINE=InnoDB DEFAULT=utf8; -- Load the data from a file, don't forget the \n after the \r on Windows or it won't work. LOAD DATA INFILE 'C:/ProgramData/MySQL/MySQL Server 8.0/Uploads/avenger.csv' -- LOAD DATA INFILE 'avenger.csv' INTO TABLE avenger FIELDS TERMINATED BY ',' ENCLOSED BY '"' ESCAPED BY '/' LINES TERMINATED BY '\r\n'; -- Select the uploaded records. SELECT * FROM avenger; |
From the cmd (command) shell, launch the MySQL Shell as the student user with the following syntax:
mysqlsh -ustudent -p -Dstudentdb |
At the MySQL Shell (mysqlsh) prompt switch from the default JavaScript (JS) context to SQL context and run the following query:
MySQL localhost:33060+ ssl studentdb SQL > \sql MySQL localhost:33060+ ssl studentdb SQL > SELECT user(), database(); |
If you did everything above correctly, it should return:
+-------------------+------------+ | user() | database() | +-------------------+------------+ | student@localhost | studentdb | +-------------------+------------+ 1 row in set (0.0003 sec) |
Again, assuming you did everything above correctly, you should be able to run your avenger.sql script file from the MySQL Shell (mysqlsh) prompt, like:
MySQL localhost:33060+ ssl studentdb SQL > source avenger.sql |
It should return output like the following:
Query OK, 0 rows affected (0.0003 sec) +------------+ | Drop Table | +------------+ | AVENGER | +------------+ 1 row in set (0.0003 sec) Query OK, 0 rows affected (0.0595 sec) Query OK, 0 rows affected (0.0002 sec) Query OK, 0 rows affected (0.1293 sec) Query OK, 0 rows affected (0.0002 sec) Query OK, 6 rows affected (0.0046 sec) Records: 6 Deleted: 0 Skipped: 0 Warnings: 0 Query OK, 0 rows affected (0.0004 sec) +------------+------------+------------+-------------------+ | avenger_id | first_name | last_name | character_name | +------------+------------+------------+-------------------+ | 1 | 'Anthony' | 'Stark' | 'Iron Man' | | 2 | 'Thor' | 'Odinson' | 'God of Thunder' | | 3 | 'Steven' | 'Rogers' | 'Captain America' | | 4 | 'Bruce' | 'Banner' | 'Hulk' | | 5 | 'Clinton' | 'Barton' | 'Hawkeye' | | 6 | 'Natasha' | 'Romanoff' | 'Black Widow' | +------------+------------+------------+-------------------+ 6 rows in set (0.0005 sec) |
You now have a student user and studentdb database like my students. I hope it was fun to build.
You can find the my.ini file in the C:\ProgramData\MySQL\MySQL Server 8.0 directory of a standard Windows 10 file system. Its a good idea not to change anything unless you know what you’re doing, and remember you need to restart the Microsoft MySQL80 Service for any change to be made effective in your database operations.
MySQL File Privilege
While preparing a set of student instructions to create a MySQL 8 (8.0.21) Windows 10 instance I found an error with LOAD command and the --secure-file_priv variable set in the my.ini file. After granting the global FILE permission to the previously provisioned student user:
GRANT FILE ON *.* TO 'student'@'localhost'; |
Any attempt to run the following command failed:
LOAD DATA INFILE 'C:\ProgramData\MySQL\MySQL Server 8.0\Uploads\avenger.csv' INTO TABLE avenger FIELDS TERMINATED BY ',' ENCLOSED BY '"' ESCAPED BY '\\' LINES TERMINATED BY '\r\n'; |
and, raise this error message:
ERROR: 1290: The MySQL server is running with the --secure-file-priv option so it cannot execute this statement |
The following covers my exploration to try and fix this error without removing a designated directory for secure file uploads. While MySQL 5.7 contains the request for he server-file-priv variable, there is nothing in the MySQL System Server Variables document on how to troubleshoot the server-file-priv variable when set. Somehow, I think there should be some mention of how to resolve this error without unsetting the server-file-privy variable.
I checked and fixed all Windows 10 sharing and read-write privileges on the secure-file-priv designated directory. They Windows 10 settings allowed for global sharing and both read and write privileges, but the LOAD command failed to load the file contents from the authorized Uploads directory.
The MySQL FILE privilege is a global privilege to read and write files on the local server. MySQL 8 installation on Windows 10 sets the following directory as the target for uploading files in the my.ini file:
# Secure File Priv. secure-file-priv="C:/ProgramData/MySQL/MySQL Server 8.0/Uploads" |
You can find the setting in the C:\ProgramData\MySQL\MySQL Server 8.0\my.ini file. You can find this value without referencing the my.ini file by querying the data:
show variables like 'secure_file_priv'; |
A new installation should return:
+------------------+------------------------------------------------+ | Variable_name | Value | +------------------+------------------------------------------------+ | secure_file_priv | C:\ProgramData\MySQL\MySQL Server 8.0\Uploads\ | +------------------+------------------------------------------------+ 1 row in set (0.2253 sec) |
You can find the my.ini file in the C:\ProgramData\MySQL\MySQL Server 8.0 directory of a standard Windows 10 file system.
- Using the Windows’ File Explorer, I checked the
Uploadsdirectory’s privileges by right clicking theUploadsdirectory to check the Properties of the directory in the File Explorer dialog box:

- The General tab indicates that the files are Read-only, as shown:

I unchecked the Read-only checkbox. Then, I retested it with the same negative results.

- The Sharing tab indicates that the files are Shared, as shown:


- Clicking the Share … button, the files in this directory are shared with Read/Write permissions to Everyone, as shown below.


- The Security tab indicates that the files Everyone has Full control of the files in this directory, as shown:


Unfortunately, with all these set appropriately the secure-file-priv variable appears to block reading files from the designated secure directory. It appeared that I may have to remove the secure-file-priv setting from the my.ini file and reboot the server. Then, I found my error in the SQL LOAD command. I wasn’t backquoting the backslashes.
The only way that the LOAD command would work required the following steps:
- I put the
avenger.csvfile in the following directory pointed to by thesecure-file-privsvalue in themy.ini.C:\ProgramData\MySQL\MySQL Server 8.0\Uploads - Updated the SQL
LOADstatement to backquote the backslashes:LOAD DATA INFILE 'C:\\ProgramData\\MySQL\\MySQL Server 8.0\\Uploads\\avenger.csv' INTO TABLE avenger FIELDS TERMINATED BY ',' ENCLOSED BY '"' ESCAPED BY '\\' LINES TERMINATED BY '\r\n';
The
LOADcommand worked and put the CSV file contents into theavengertable, as shown in the query results below:+------------+------------+------------+-------------------+ | avenger_id | first_name | last_name | character_name | +------------+------------+------------+-------------------+ | 1 | 'Anthony' | 'Stark' | 'Iron Man' | | 2 | 'Thor' | 'Odinson' | 'God of Thunder' | | 3 | 'Steven' | 'Rogers' | 'Captain America' | | 4 | 'Bruce' | 'Banner' | 'Hulk' | | 5 | 'Clinton' | 'Barton' | 'Hawkeye' | | 6 | 'Natasha' | 'Romanoff' | 'Black Widow' | +------------+------------+------------+-------------------+ 6 rows in set (0.0005 sec)
I got in a rush and over thought it. However, this is how you make it work. Naturally, you can point the secure-file-privs variable to another location of your choice.
I should also note that MySQL is smart enough to change forward slashes to backslashes in the Windows OS. That means you could also use the following SQL LOAD statement:
LOAD DATA INFILE 'C:/ProgramData/MySQL/MySQL Server 8.0/Uploads/avenger.csv' INTO TABLE avenger FIELDS TERMINATED BY ',' ENCLOSED BY '"' ESCAPED BY '/' LINES TERMINATED BY '\r\n'; |
As always, I hope this helps those looking for a solution.
MySQL 8.0 Install
MySQL will be used for our online sections because the VMware instance and Docker configurations where too large to effectively download this term.
MySQL 8.0.21 Installation Steps
After you download the MySQL 8 MSI file, you will perform the following 24 steps to install MySQL on Windows 10. If you want a full developer install you must install Microsoft Excel and Visual Studio first.
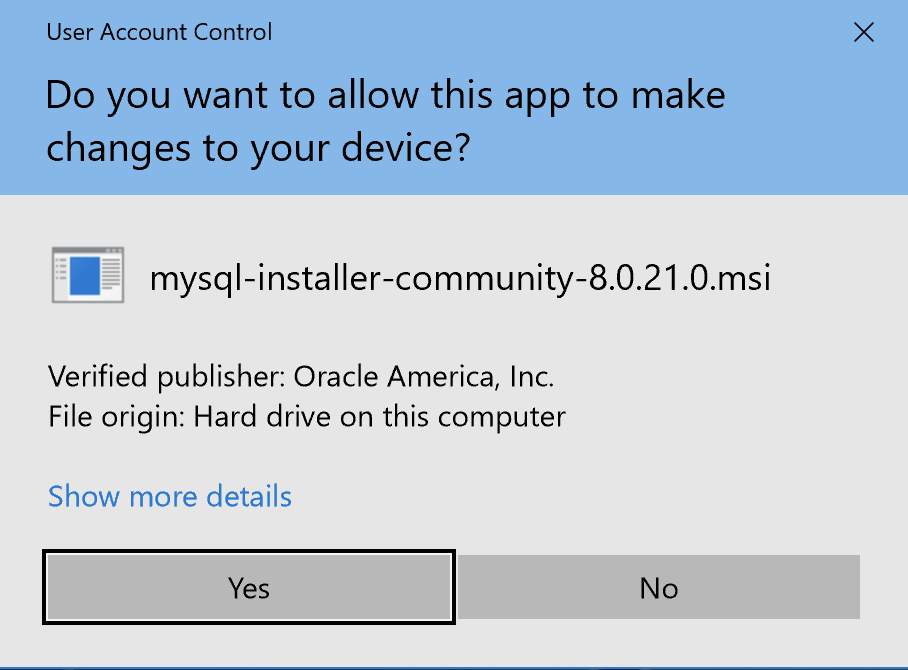
- The first thing you need to do is grant privileges to allow the MySQL Installer application to work in Windows 10. Click the Yes button to authorize the MySQL Installer to run.
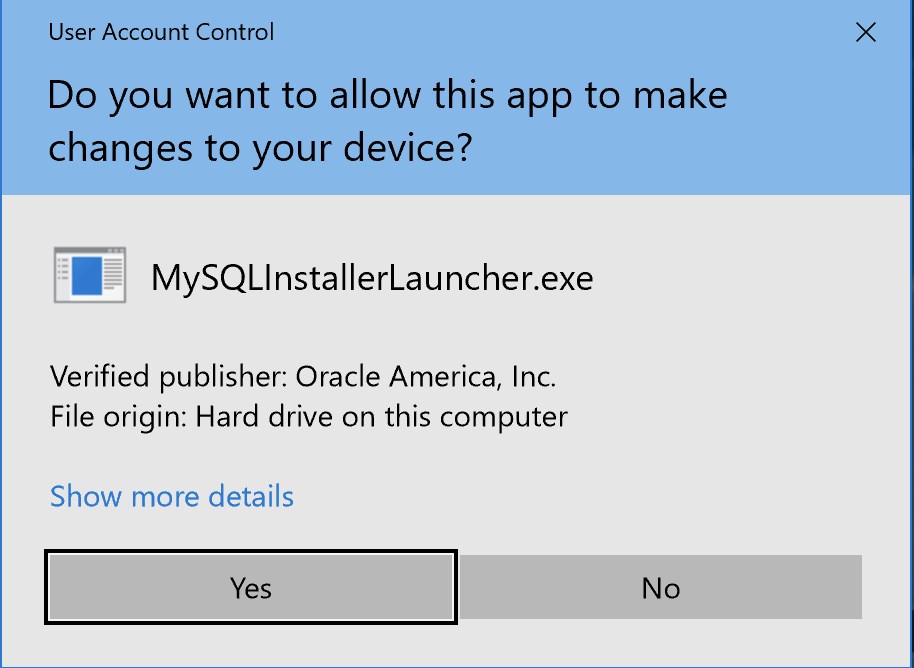
- The next thing you need to do is grant privileges to allow the MySQL Installer Launcher application to work in Windows 10. Click the Yes button to authorize the MySQL Installer to run.

- Now you start the install by choosing a setup type. As a rule, I recommend you install the Developer Default. It is the default selection and preselected for you. Click the Next button to verify that you can install what you’ve selected.
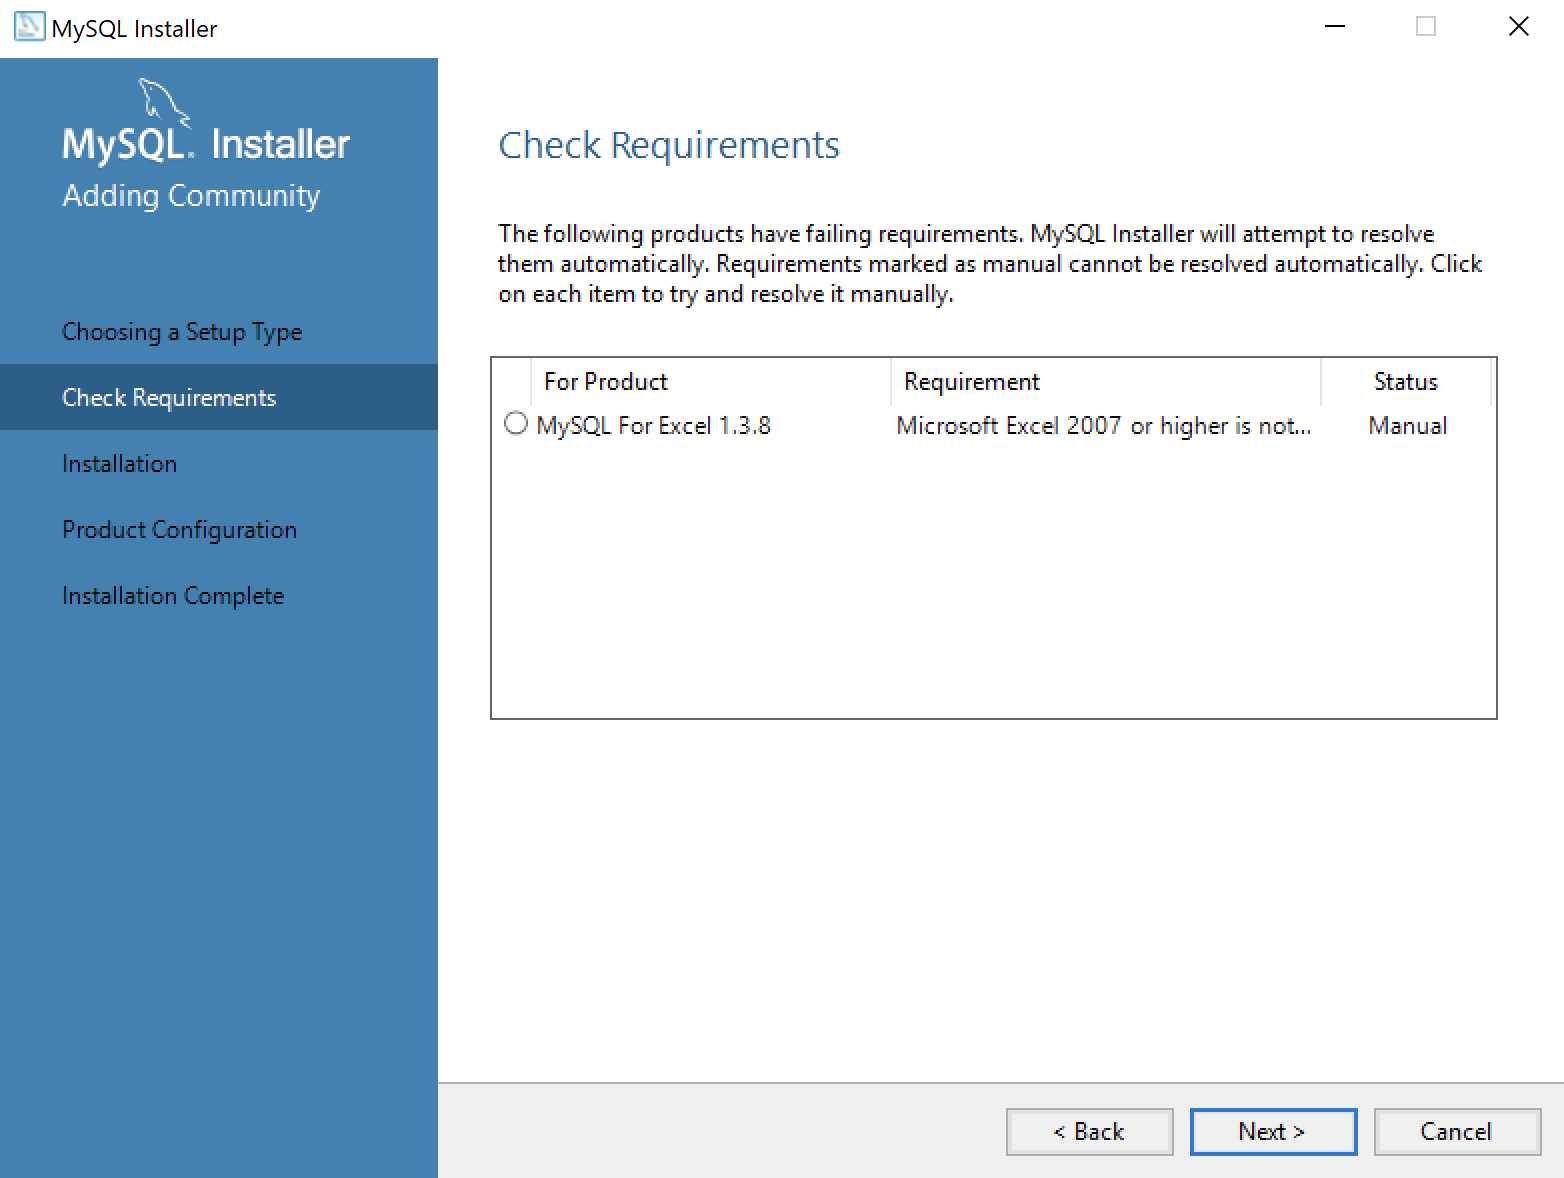
- The next workflow step checks requirements and lists any unmet requirements. The workflow lists the requirements for MySQL for Excel 1.3.8 as unmet because Microsoft Excel is not installed. Click the Next button when there are no unmet requirements in the list. Click the Back button to remove MySQL for Excel 1.3.8 from the setup selection.

- Returning to the setup type workflow, you should select the Custom radio button. Click the Next button to view the list of selected types.
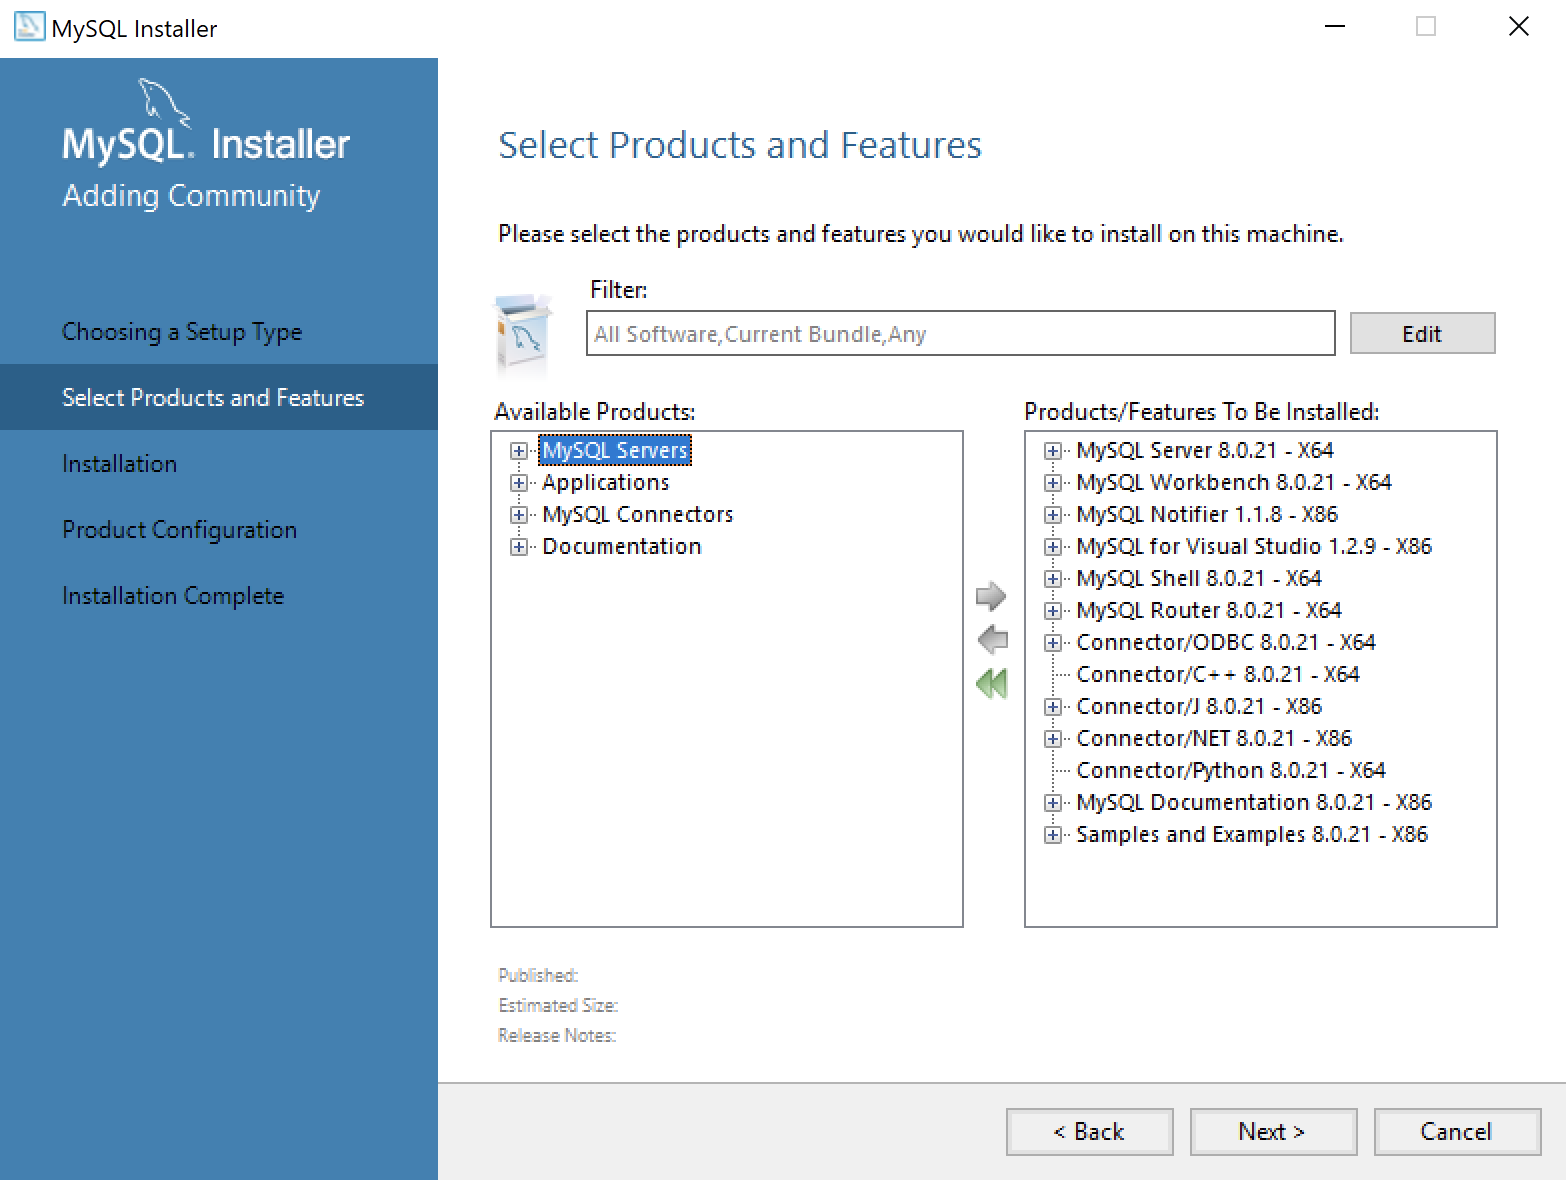
- Use the green arrow pointing to the left to remove MySQL for Excel 1.3.8 from the list. Click the Next button to continue the MySQL Installer to install the selected MySQL libraries.
- This dialog will display for several minutes as each of the MySQL Installer modules is. Click the Next button to move forward in the MySQL Installer workflow.
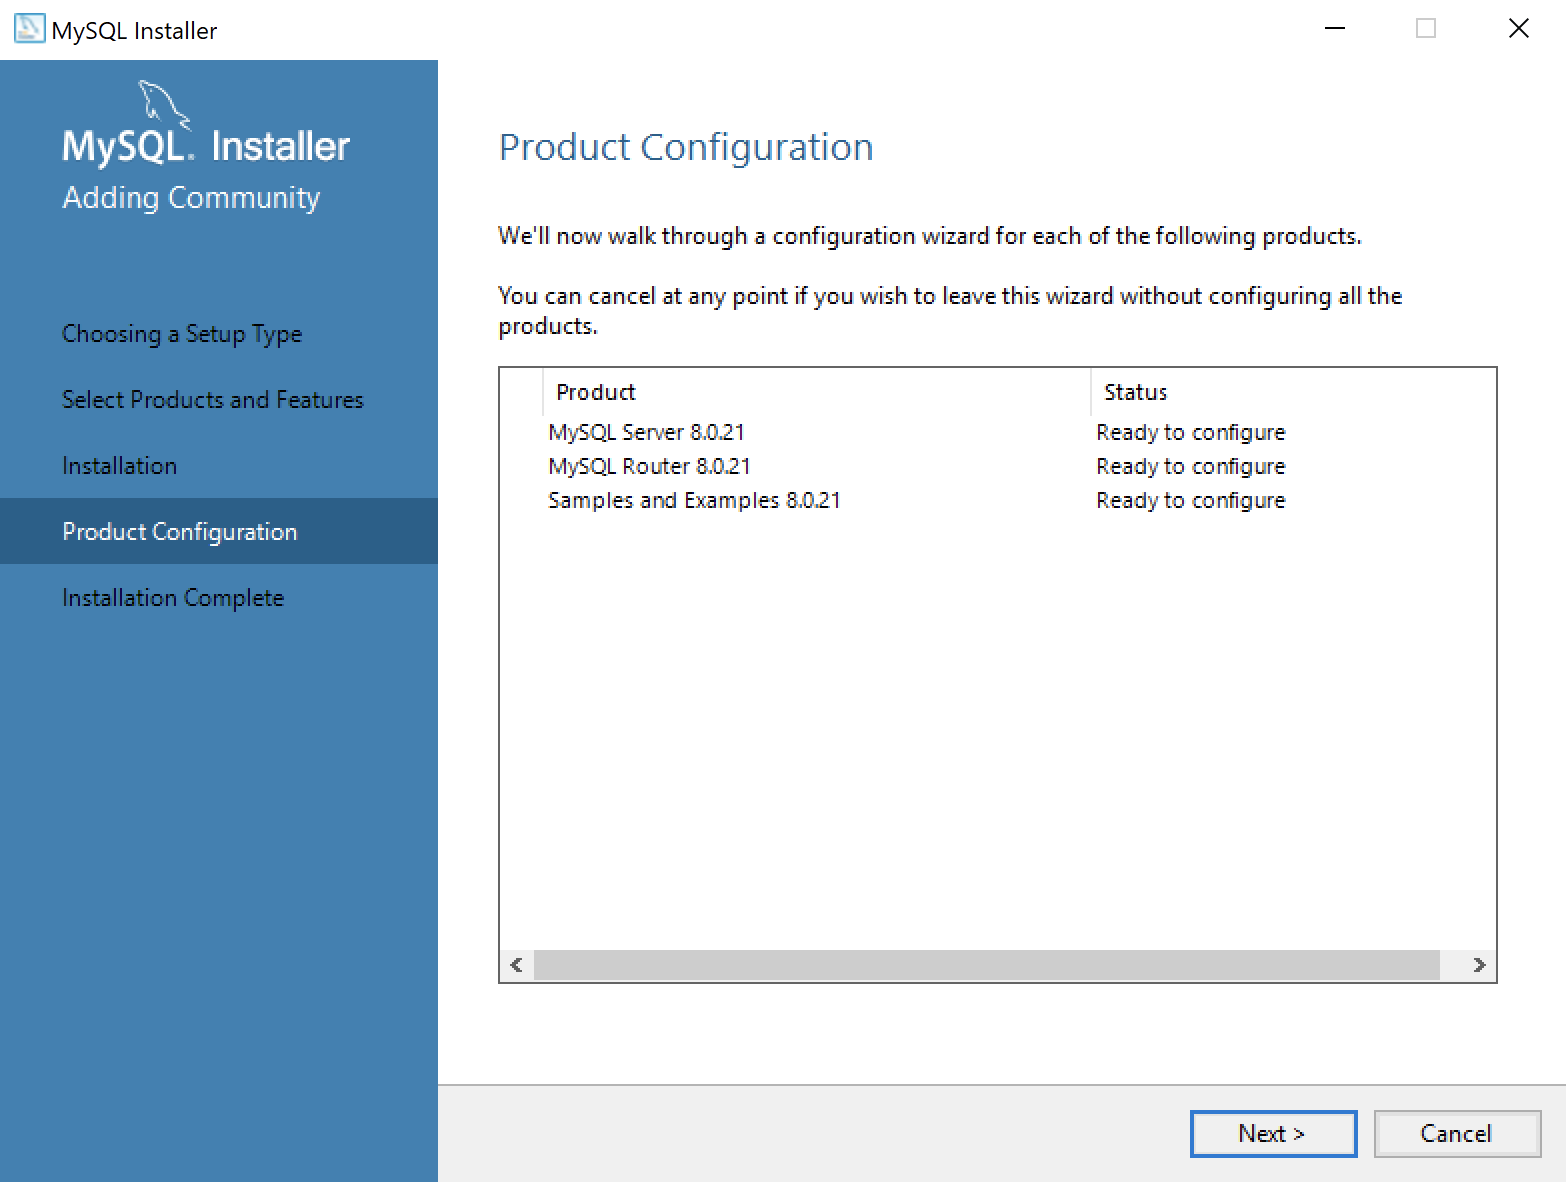
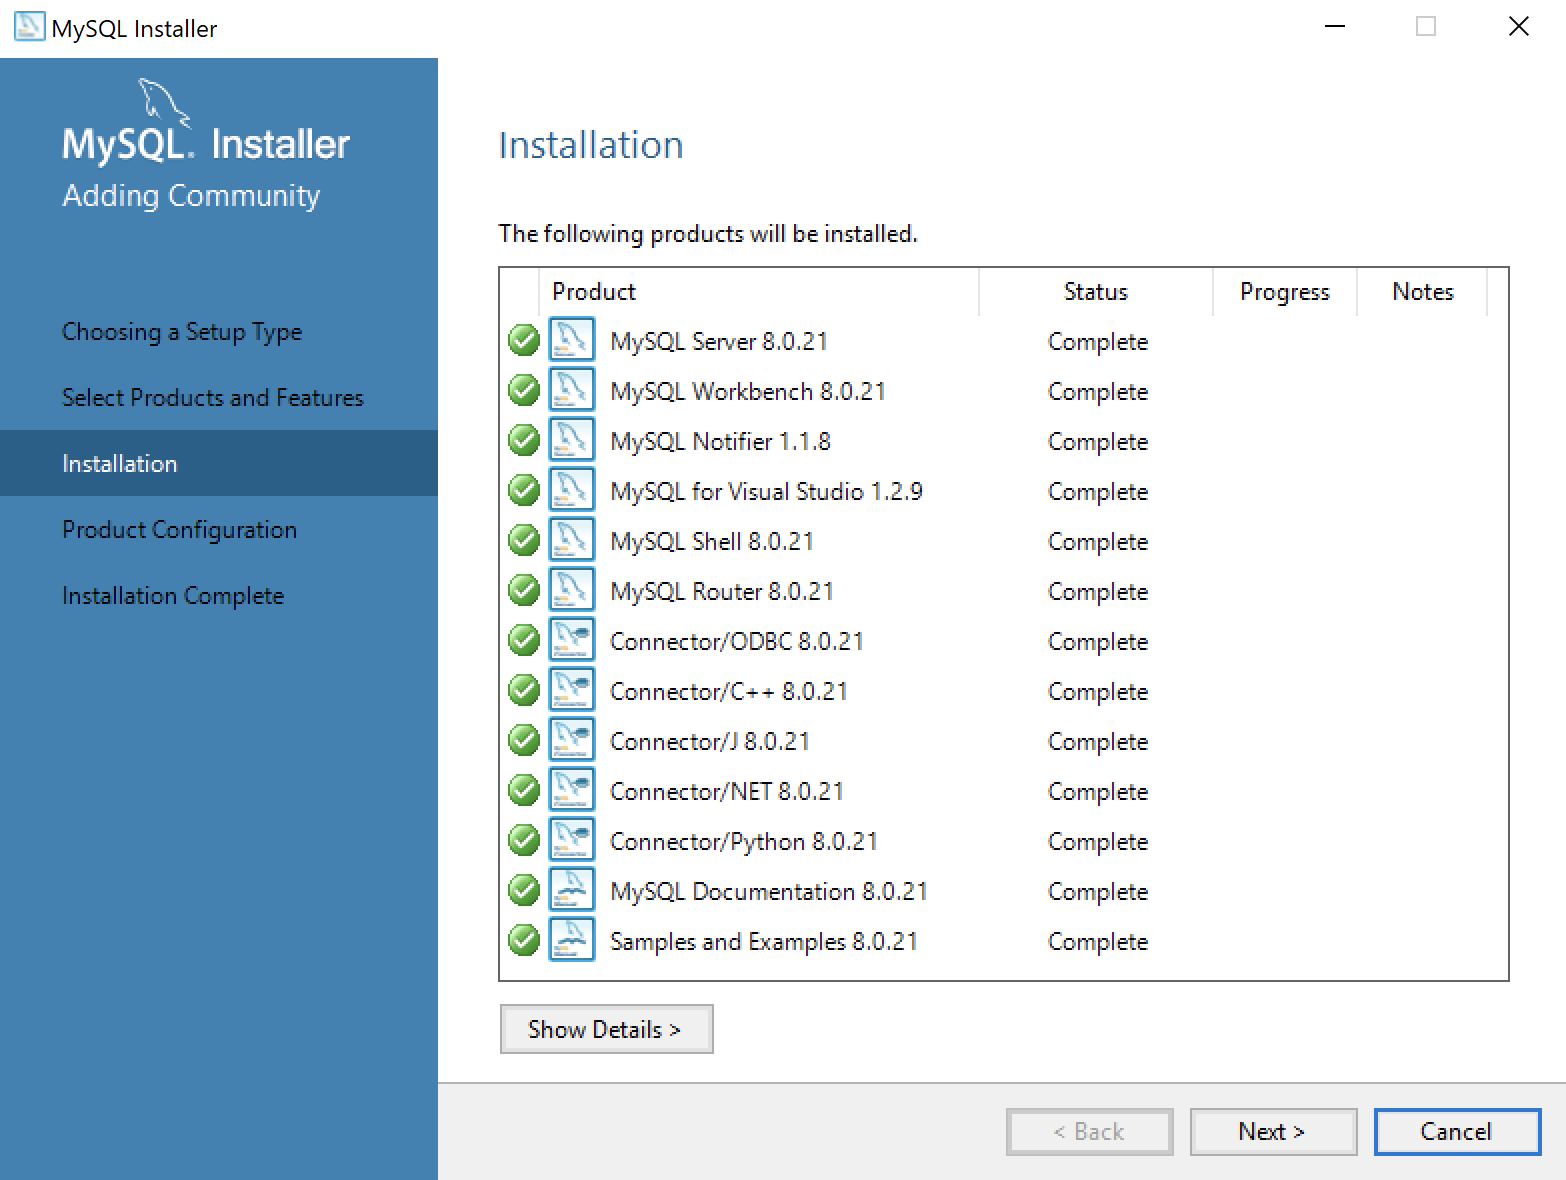
- This dialog qualifies that there are three products to configure. Click the Next button to begin configuration of these products.
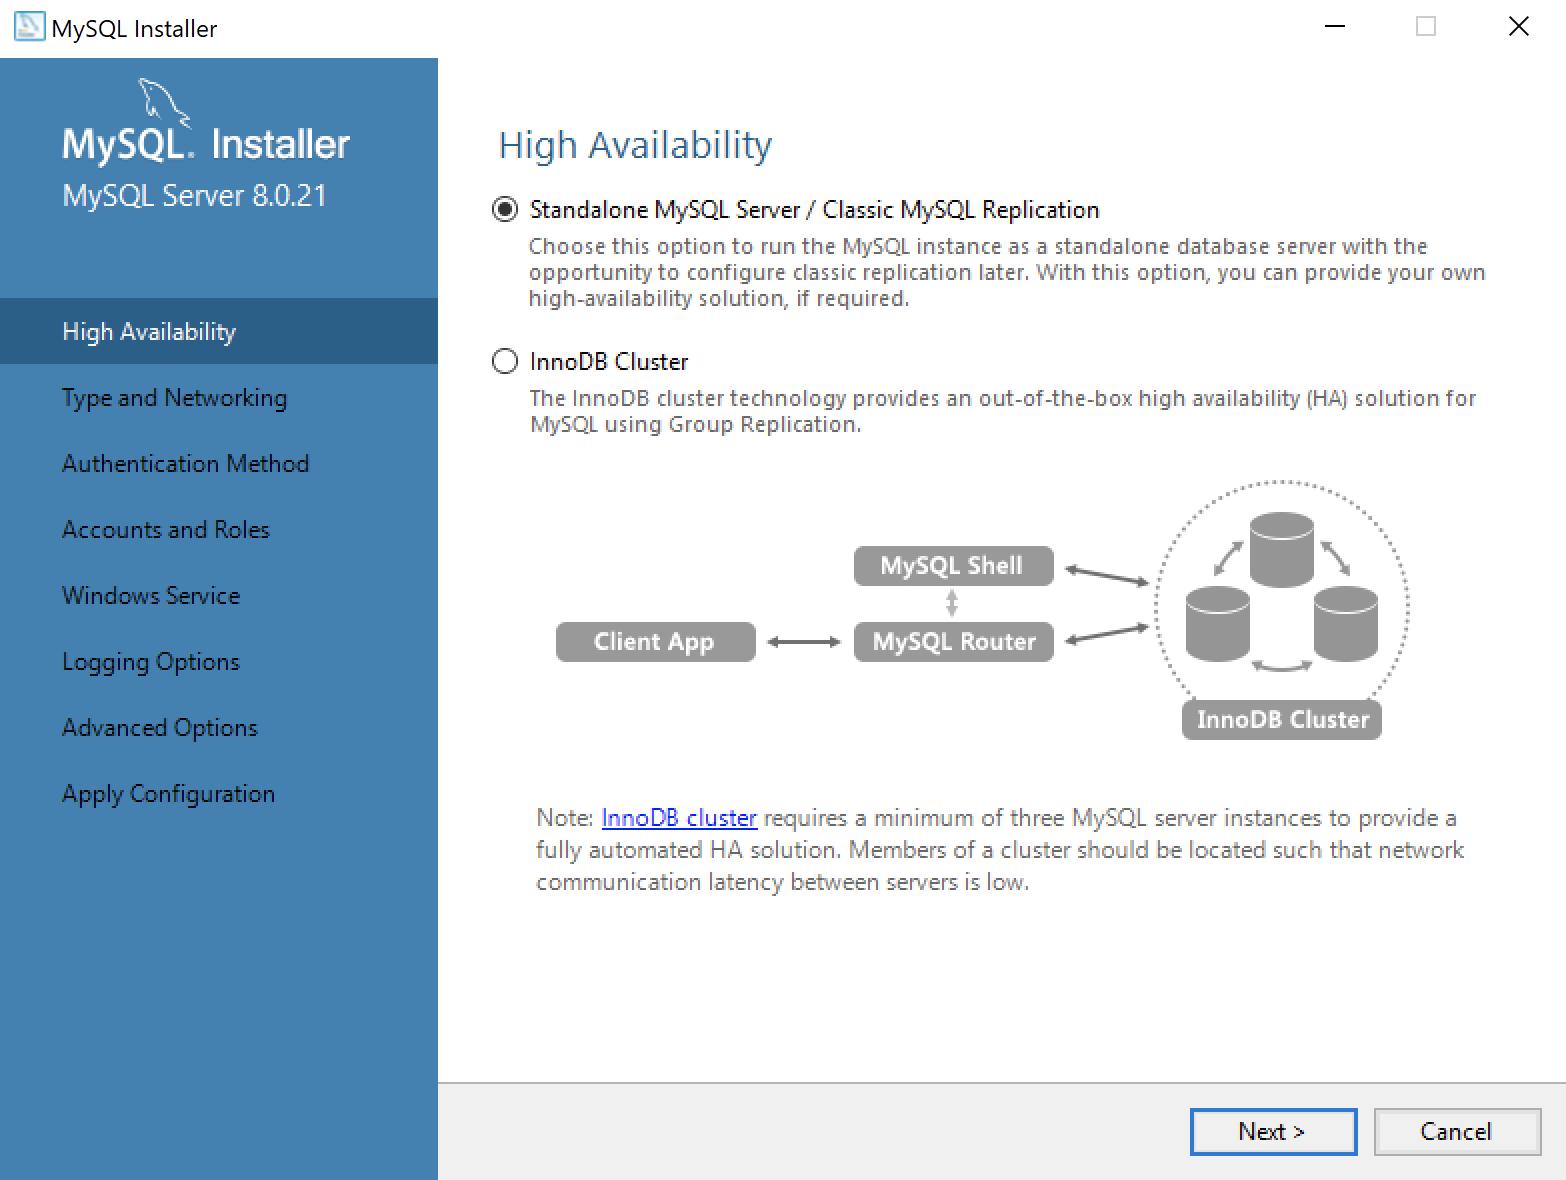
- This dialog lets you choose between a Standalone MySQL Server / Classic MySQL Replication and InnoDB Cluster. You should choose the Standalone MySQL Server for a developer installation on a laptop or desktop. Click the Next button to continue the MySQL Installer configuration.
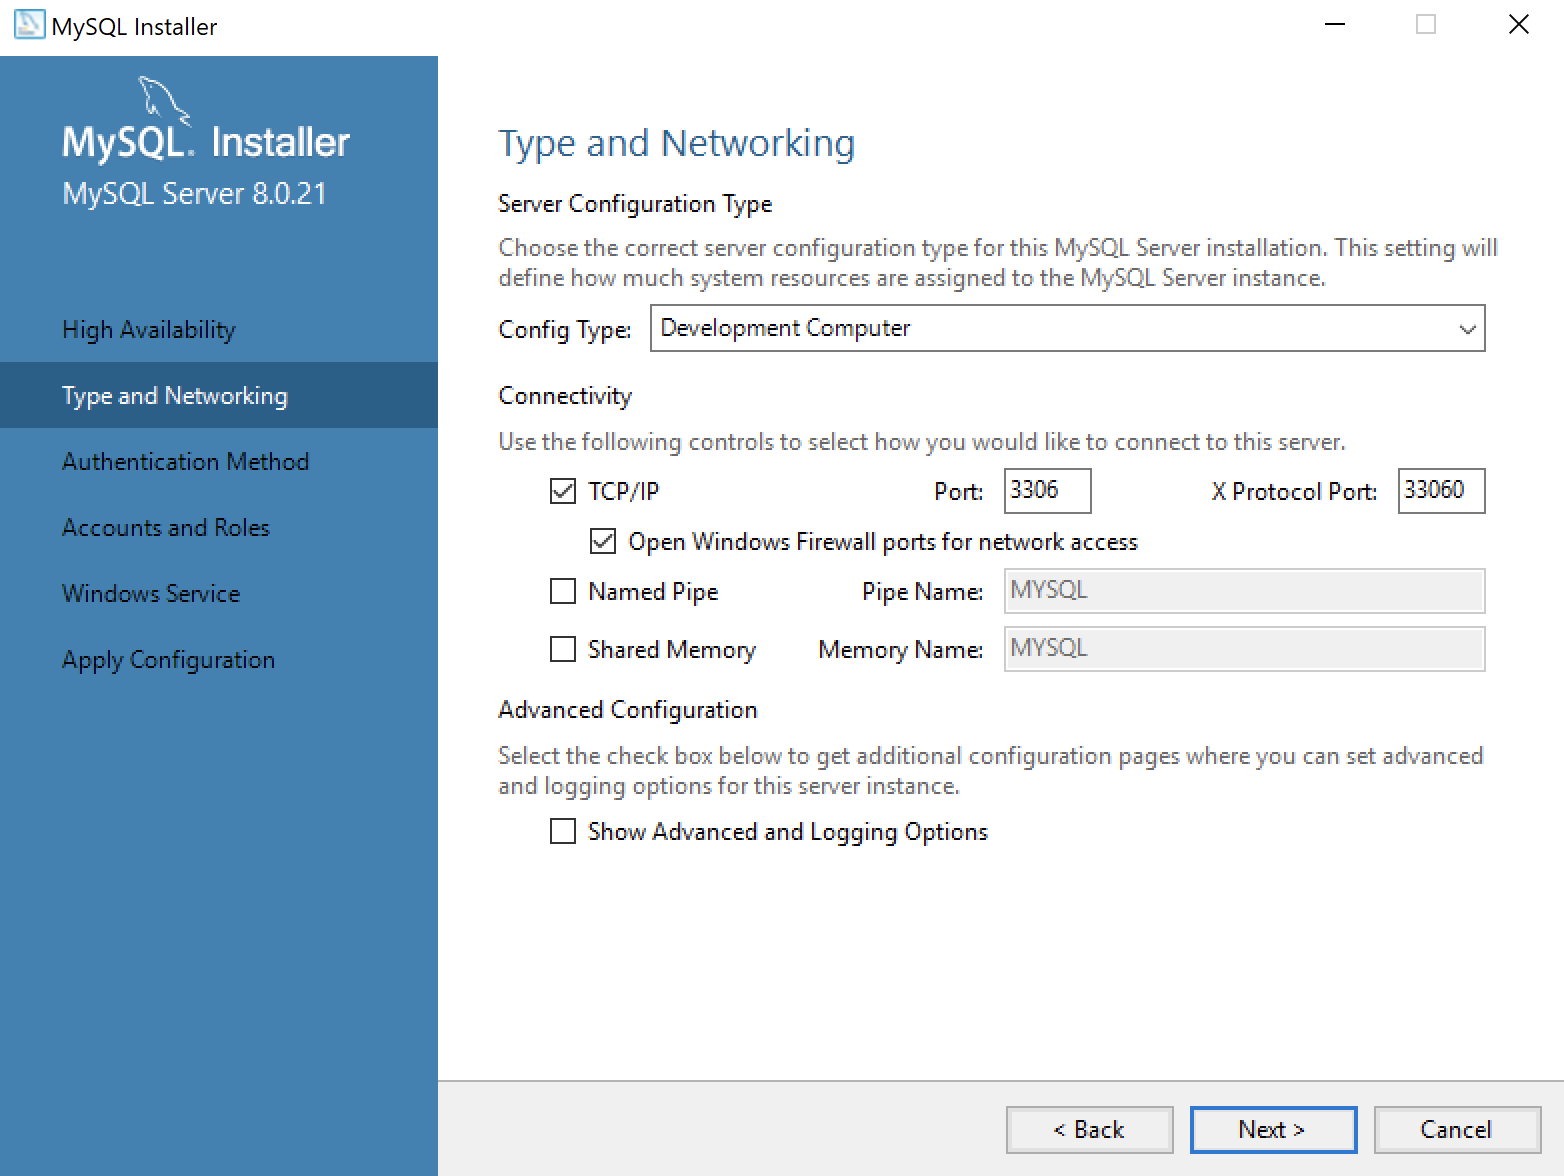
- This dialog lets you choose set the type and networking values. They should be preselected as they are in the screen image. Click the Next button to continue the MySQL Installer configuration.
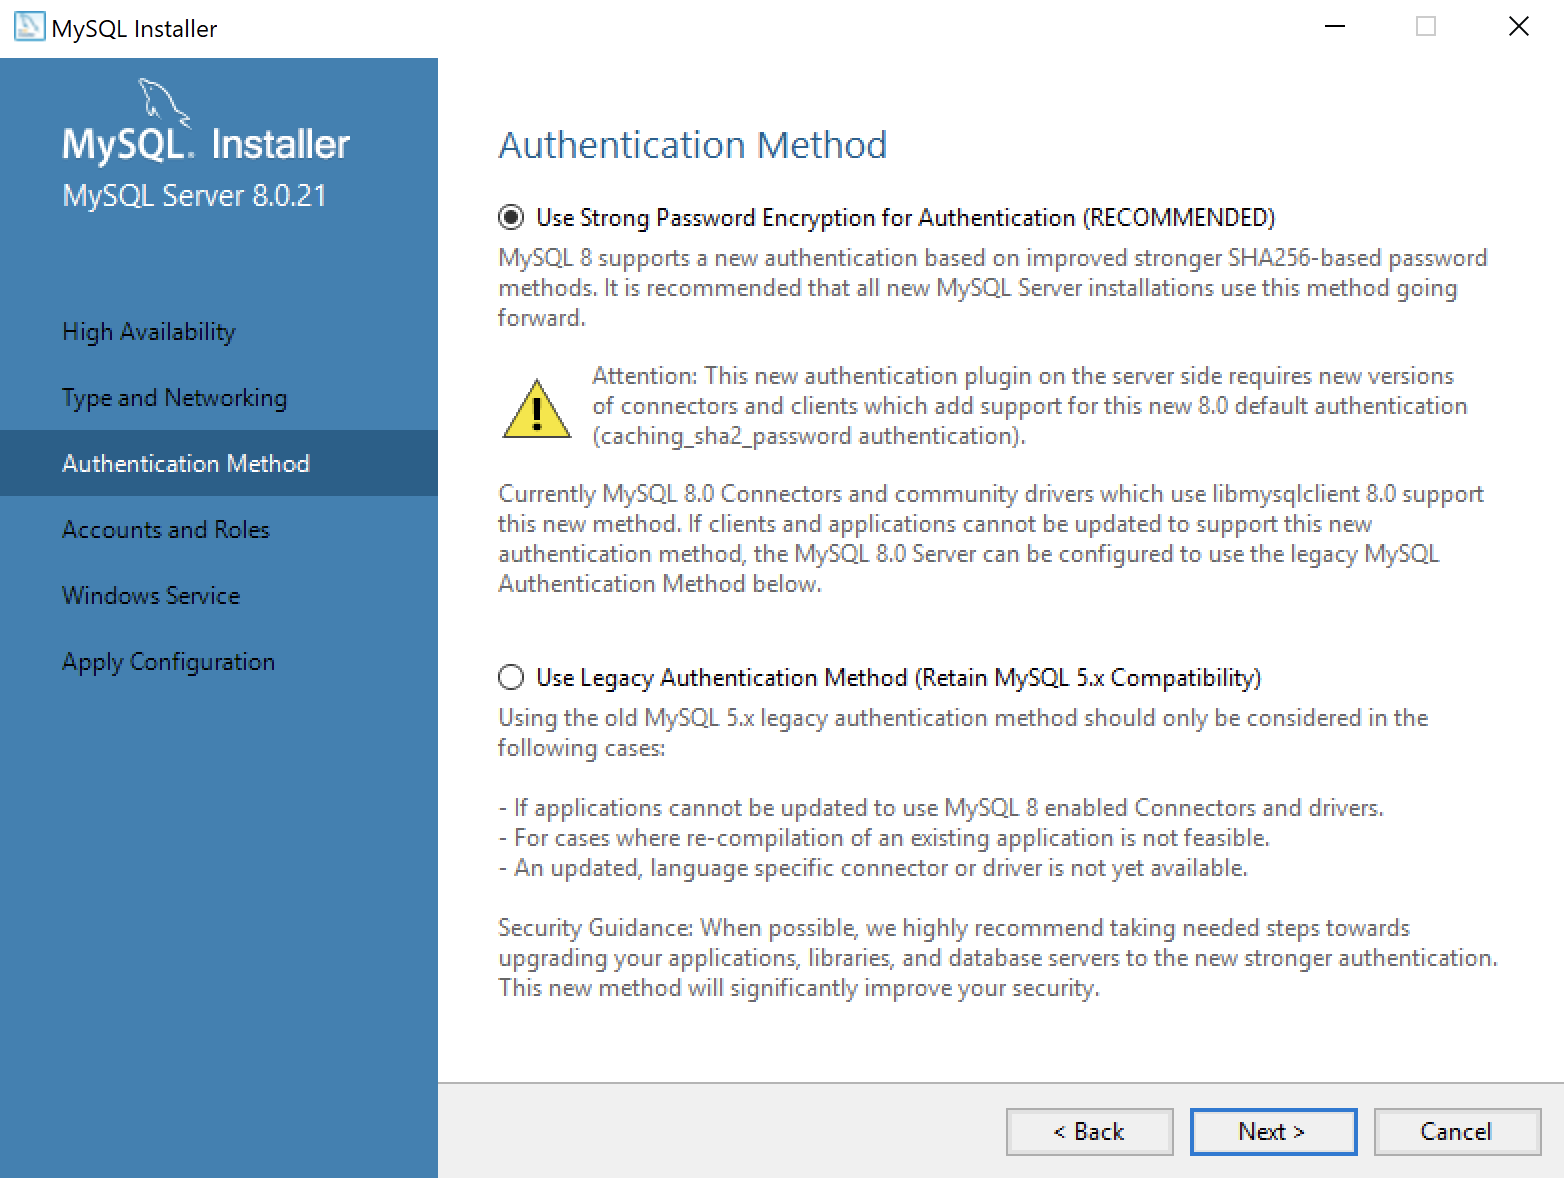
- This dialog lets you choose between SHA256-based and the older MD5 encryption. Click Use Strong Password Encryption for Authentication (RECOMMENDED) radio button. Click the Next button to continue the MySQL Installer configuration.
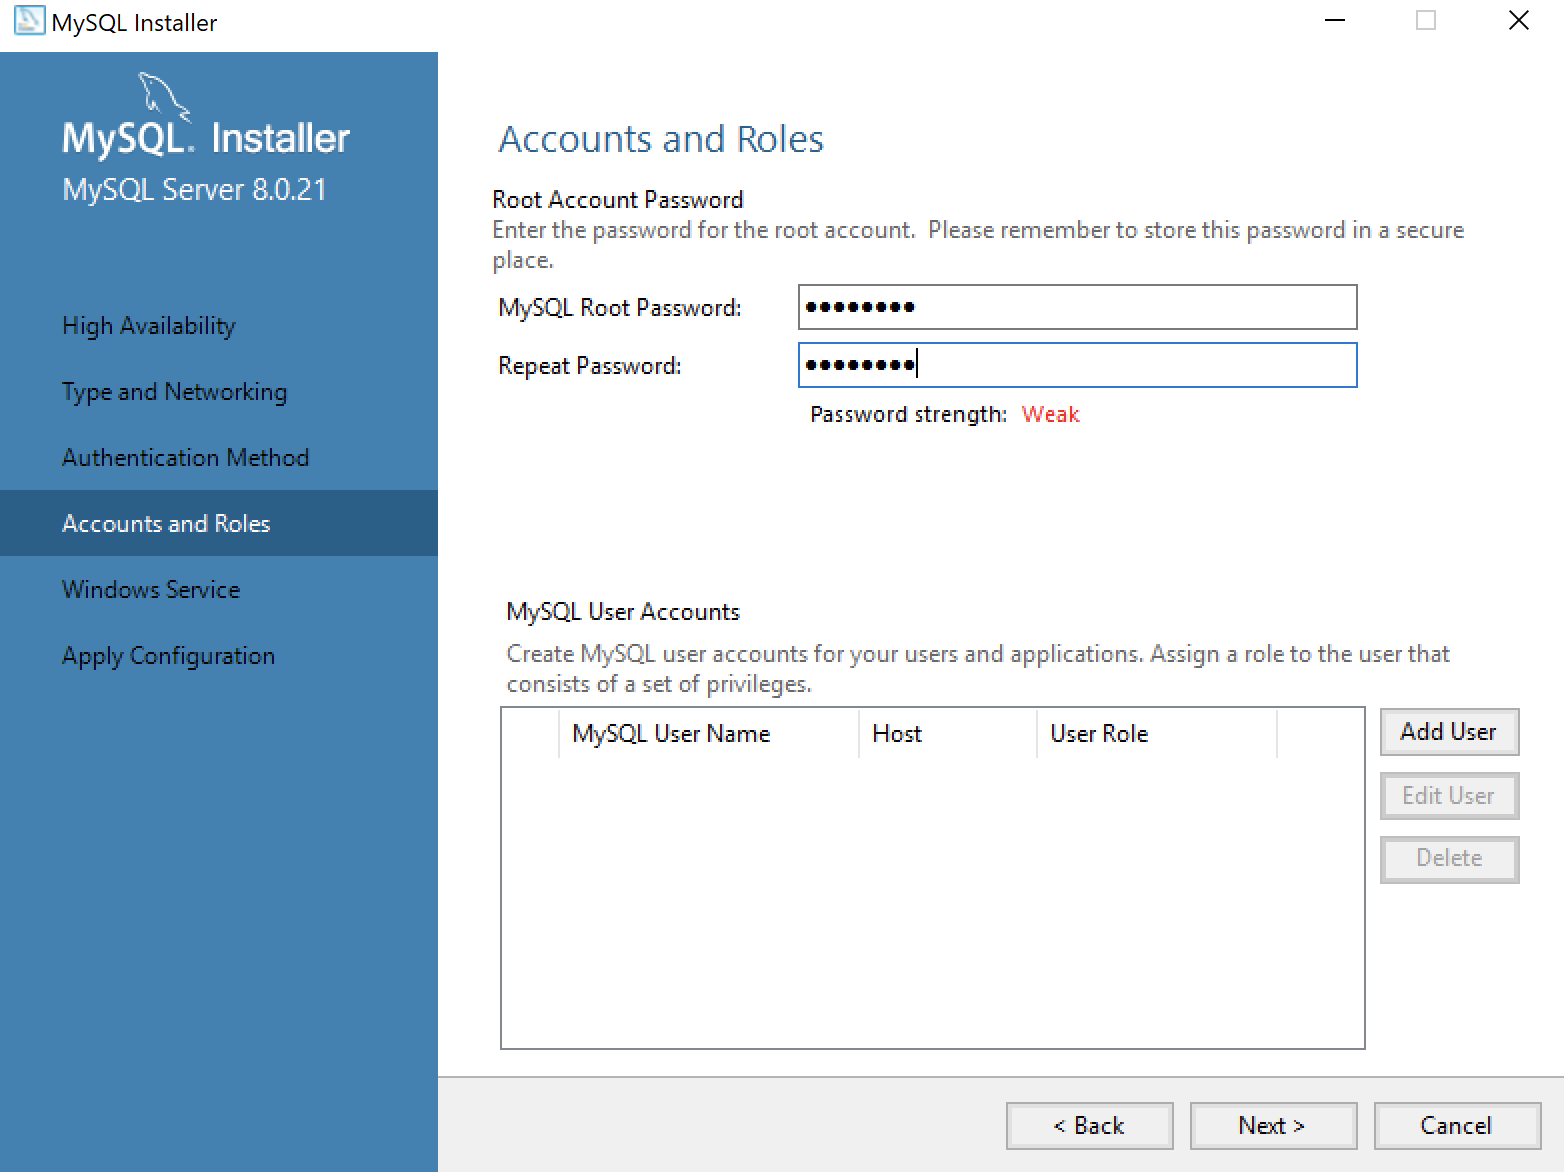
- This dialog lets you enter the MySQL Root Password. Click the Next button to continue the MySQL Installer configuration.
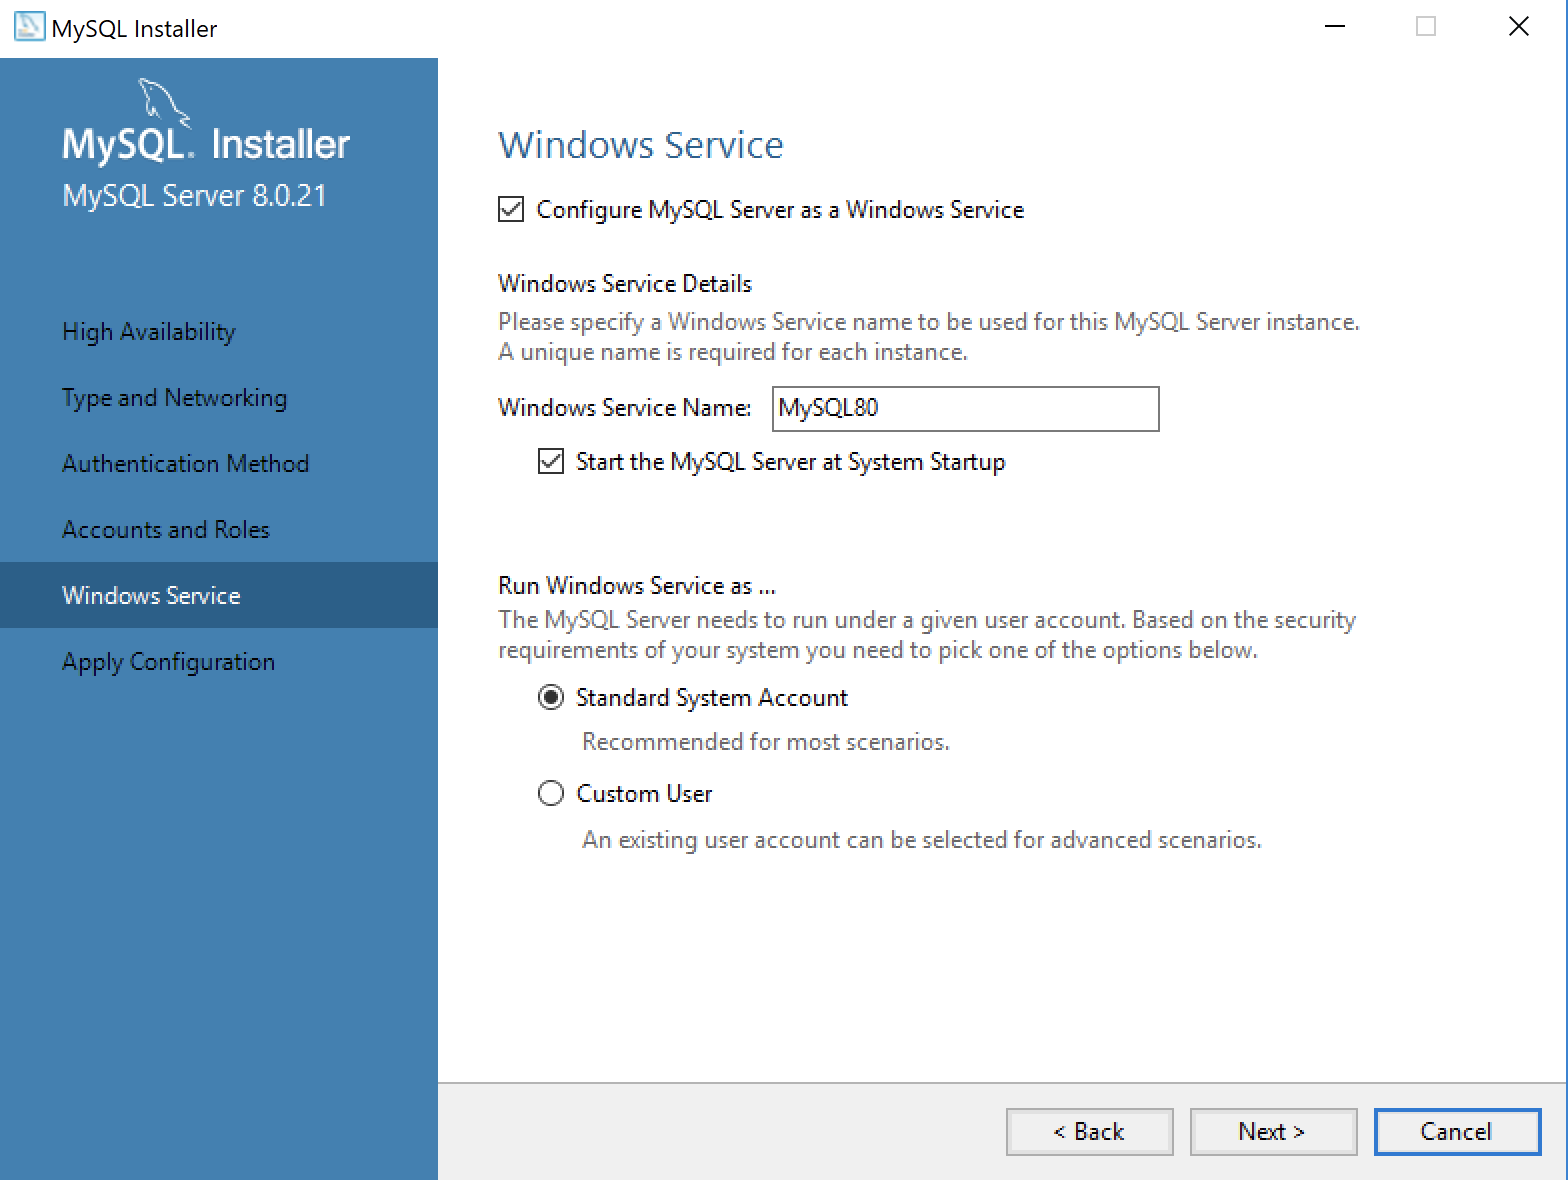
- This dialog lets you enter a Windows Service Name and install a Standard System Account or Custom User account. Click the Next button to continue the MySQL Installer configuration.
- This dialog lets you apply the configuration of the MySQL Server or Custom User product. Click the Next button to continue the MySQL Server configuration.
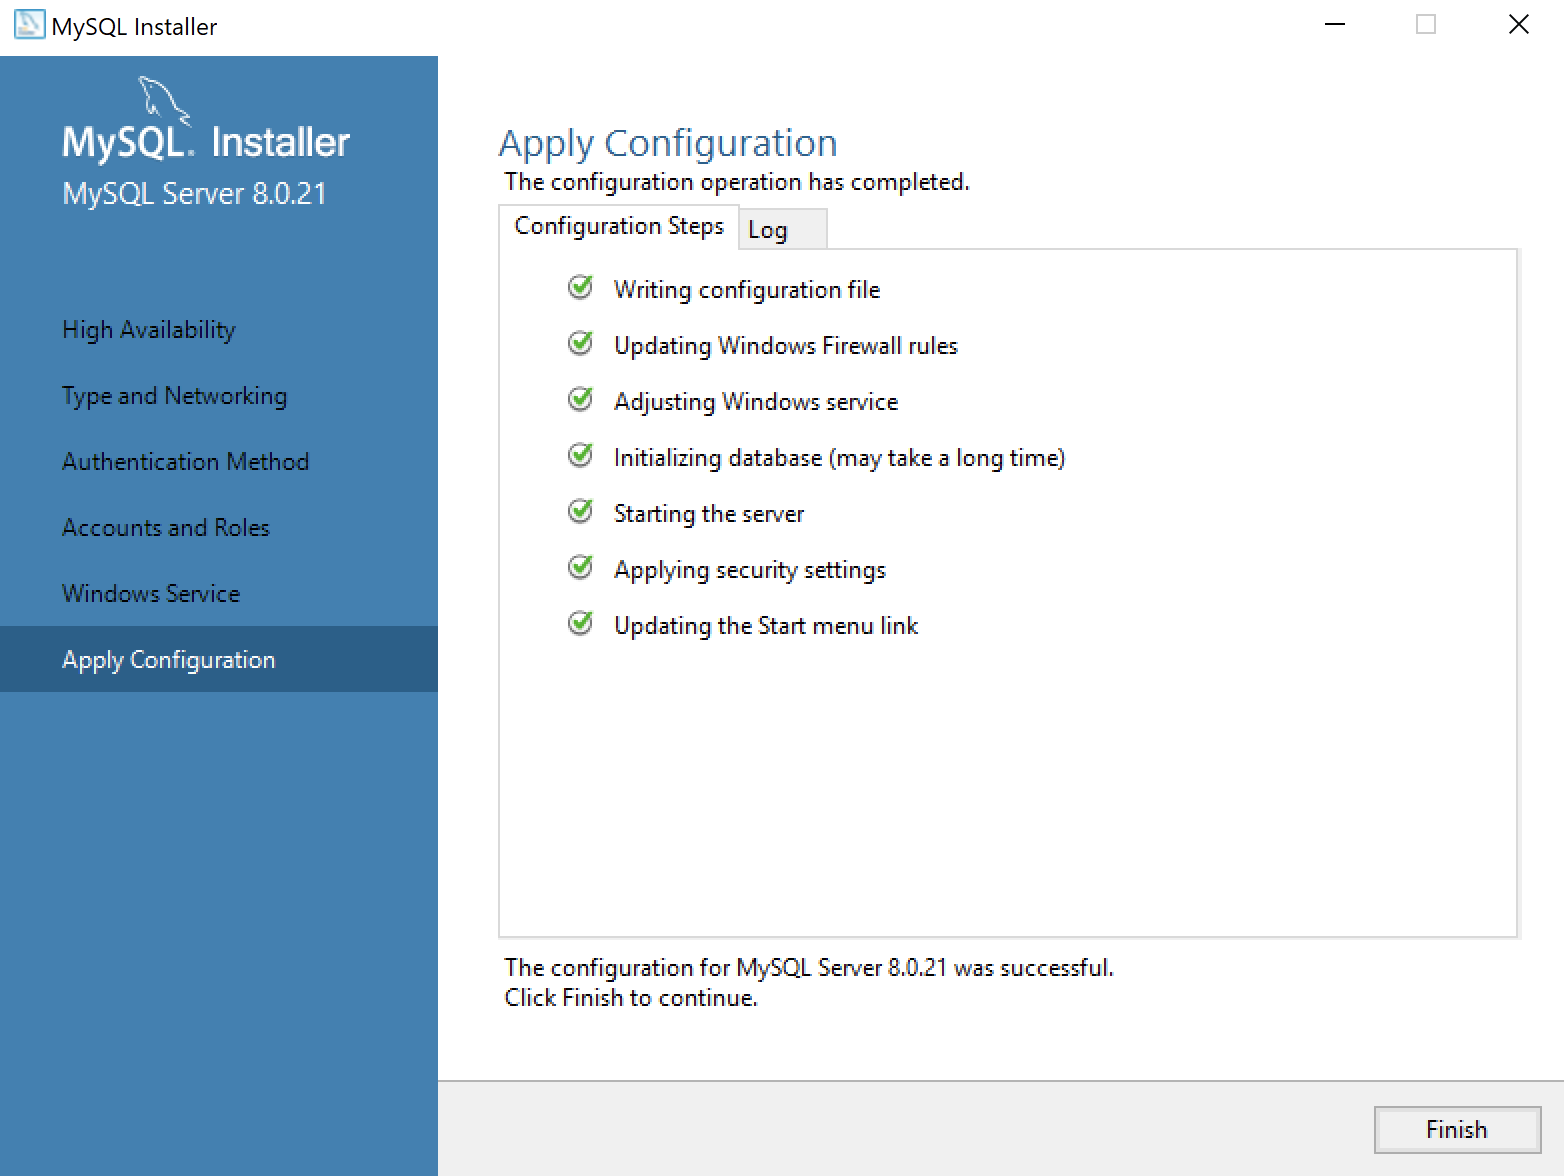
- This dialog lets you watch the progress of the MySQL Server or Custom User configuration. Click the Finish button to complete the MySQL Server configuration.
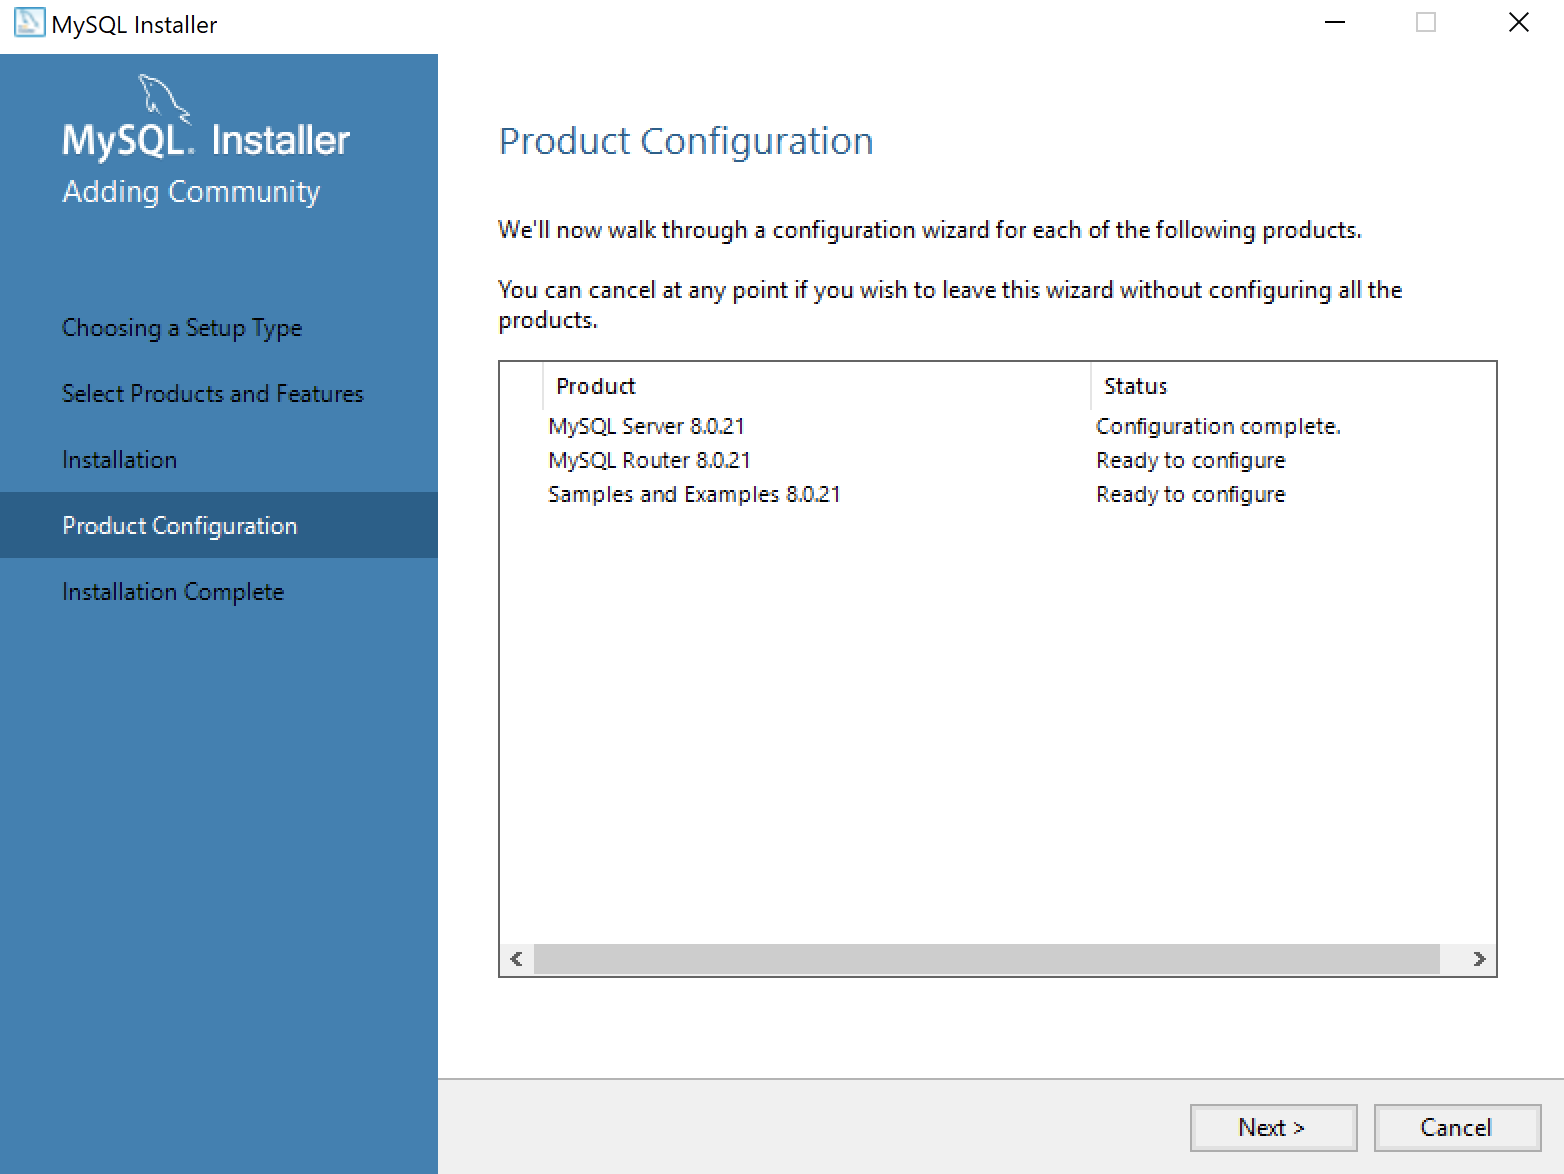
- This dialog lets you choose the next MySQL Router product for configuration. Click the Next button to begin the MySQL Router configuration.
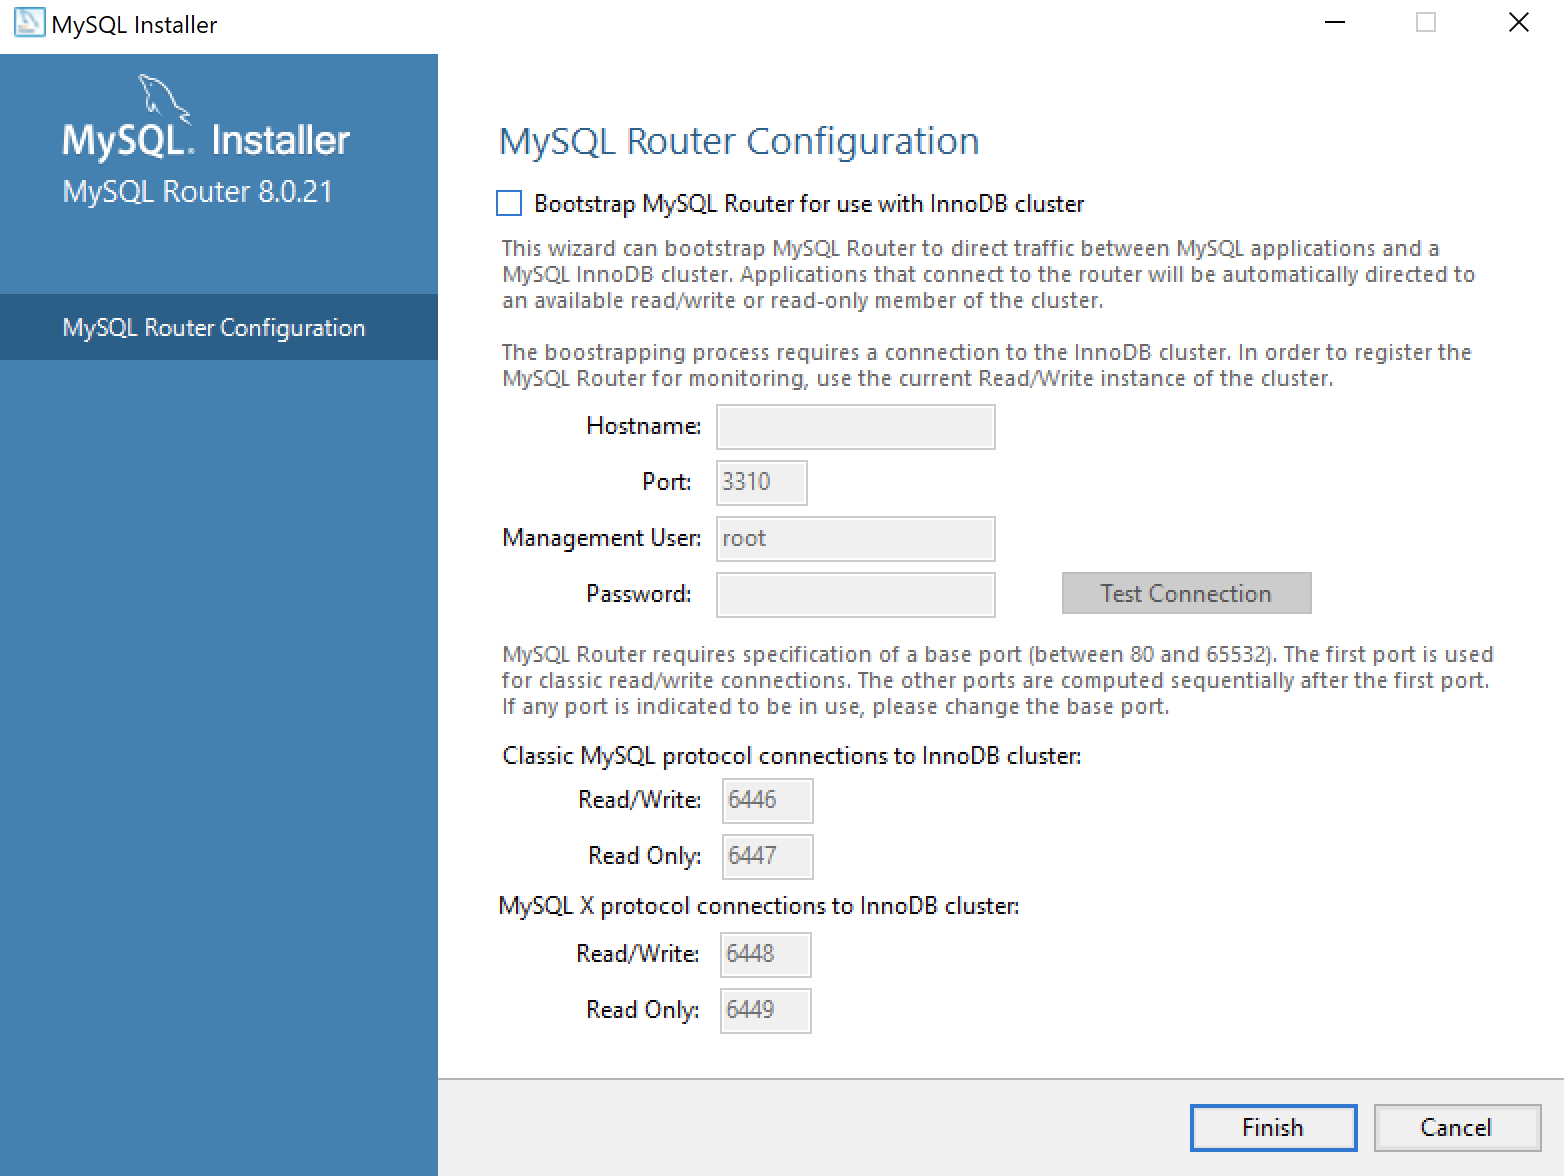
- This dialog allows you to configure the MySQL Router Configuration product. Leave the
HostnameandPasswordfields blank when you do not want to configure the MySQL Router Configuration product. Click the Finish button to complete the MySQL Router workflow.

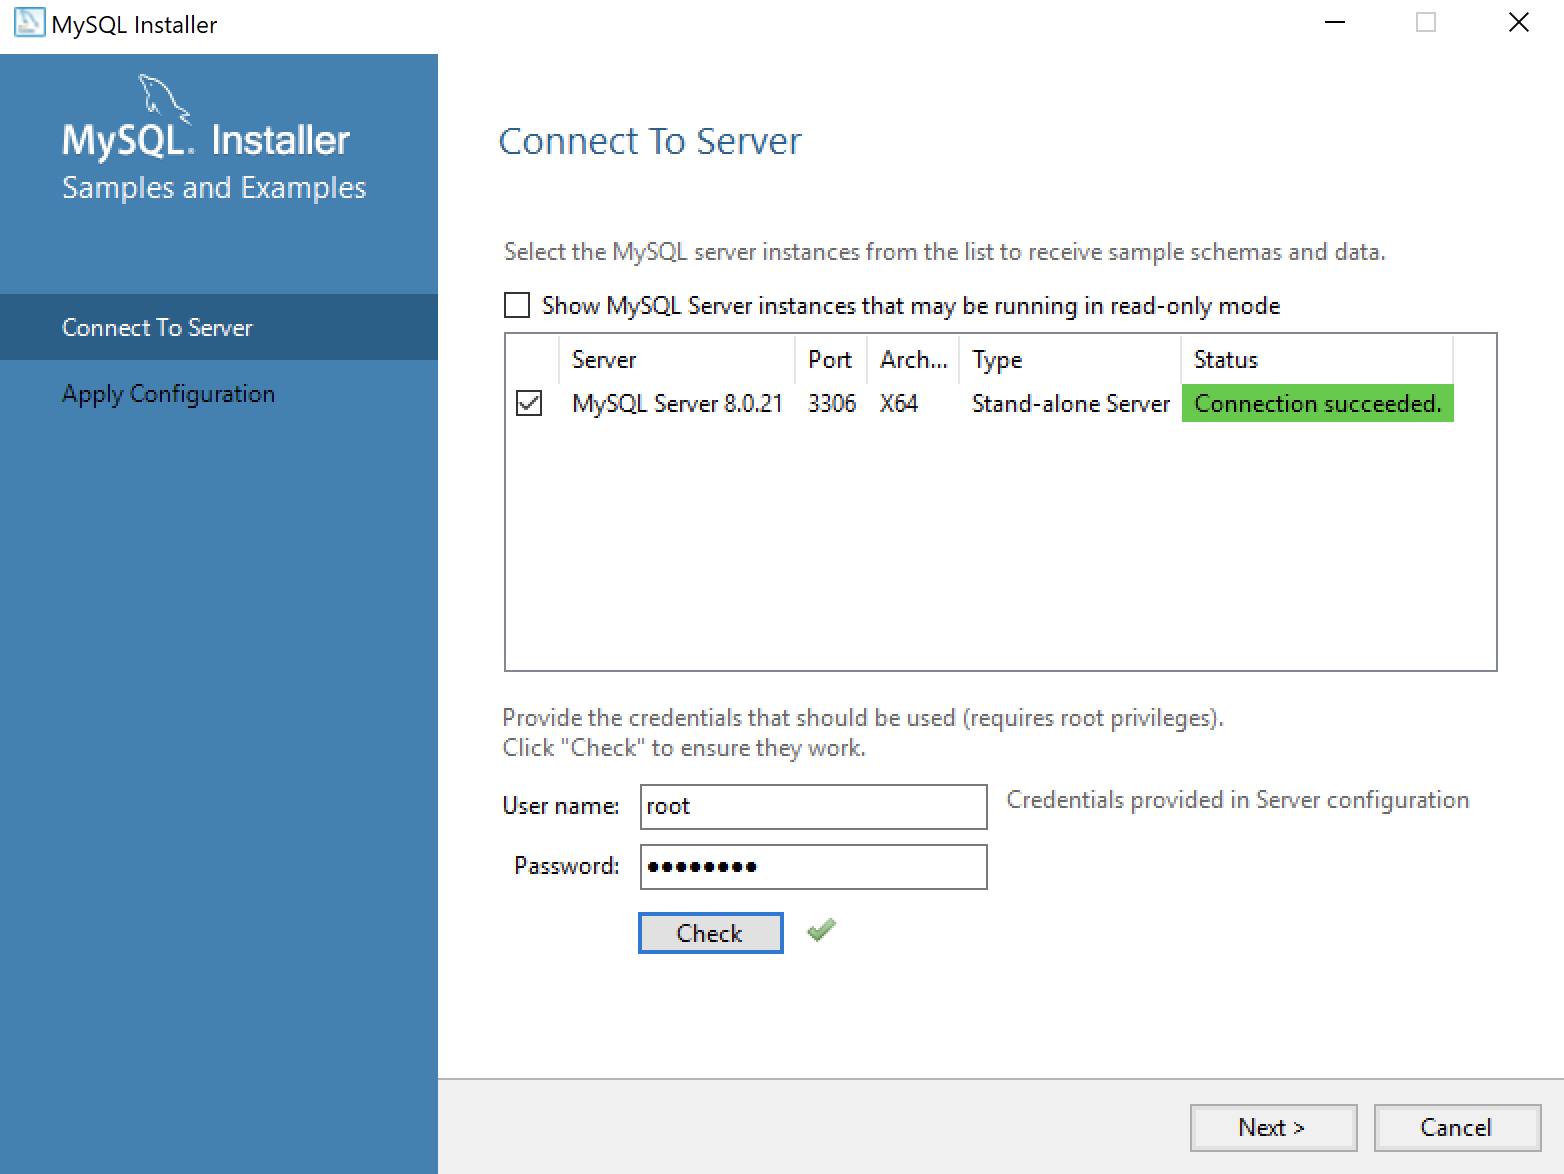
- This dialog lets you choose the next Samples and Examples product for configuration. Click the Next button to begin the Samples and Examples configuration.

- This dialog lets you create a Windows 10 MySQL Service. You enter the
rootpassword that you entered in Step #12. After you enterrootpassword, click the Check button to verify therootpassword. The Check button enables the Next button when therootaccount’s password is validated. Click the now enabled Next button to create the MySQL Service.
- This dialog lets you create a Windows 10 MySQL Service. Click the now enabled Next button to create the MySQL Service.
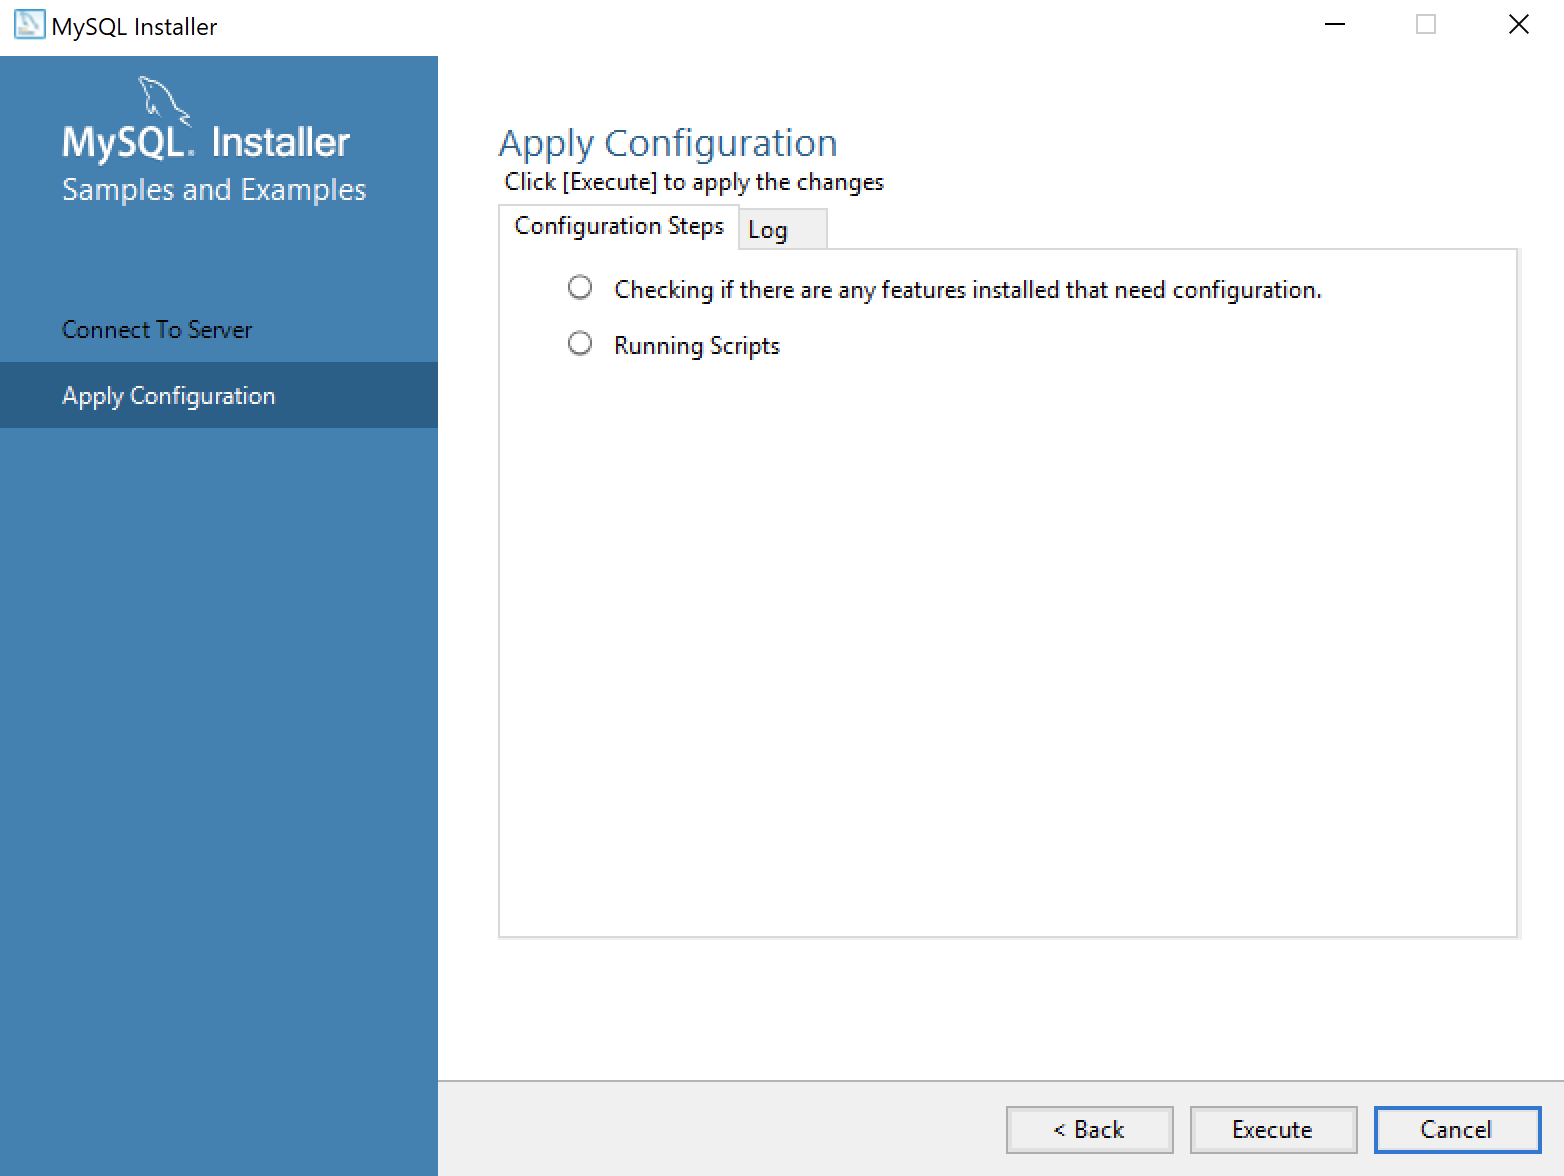
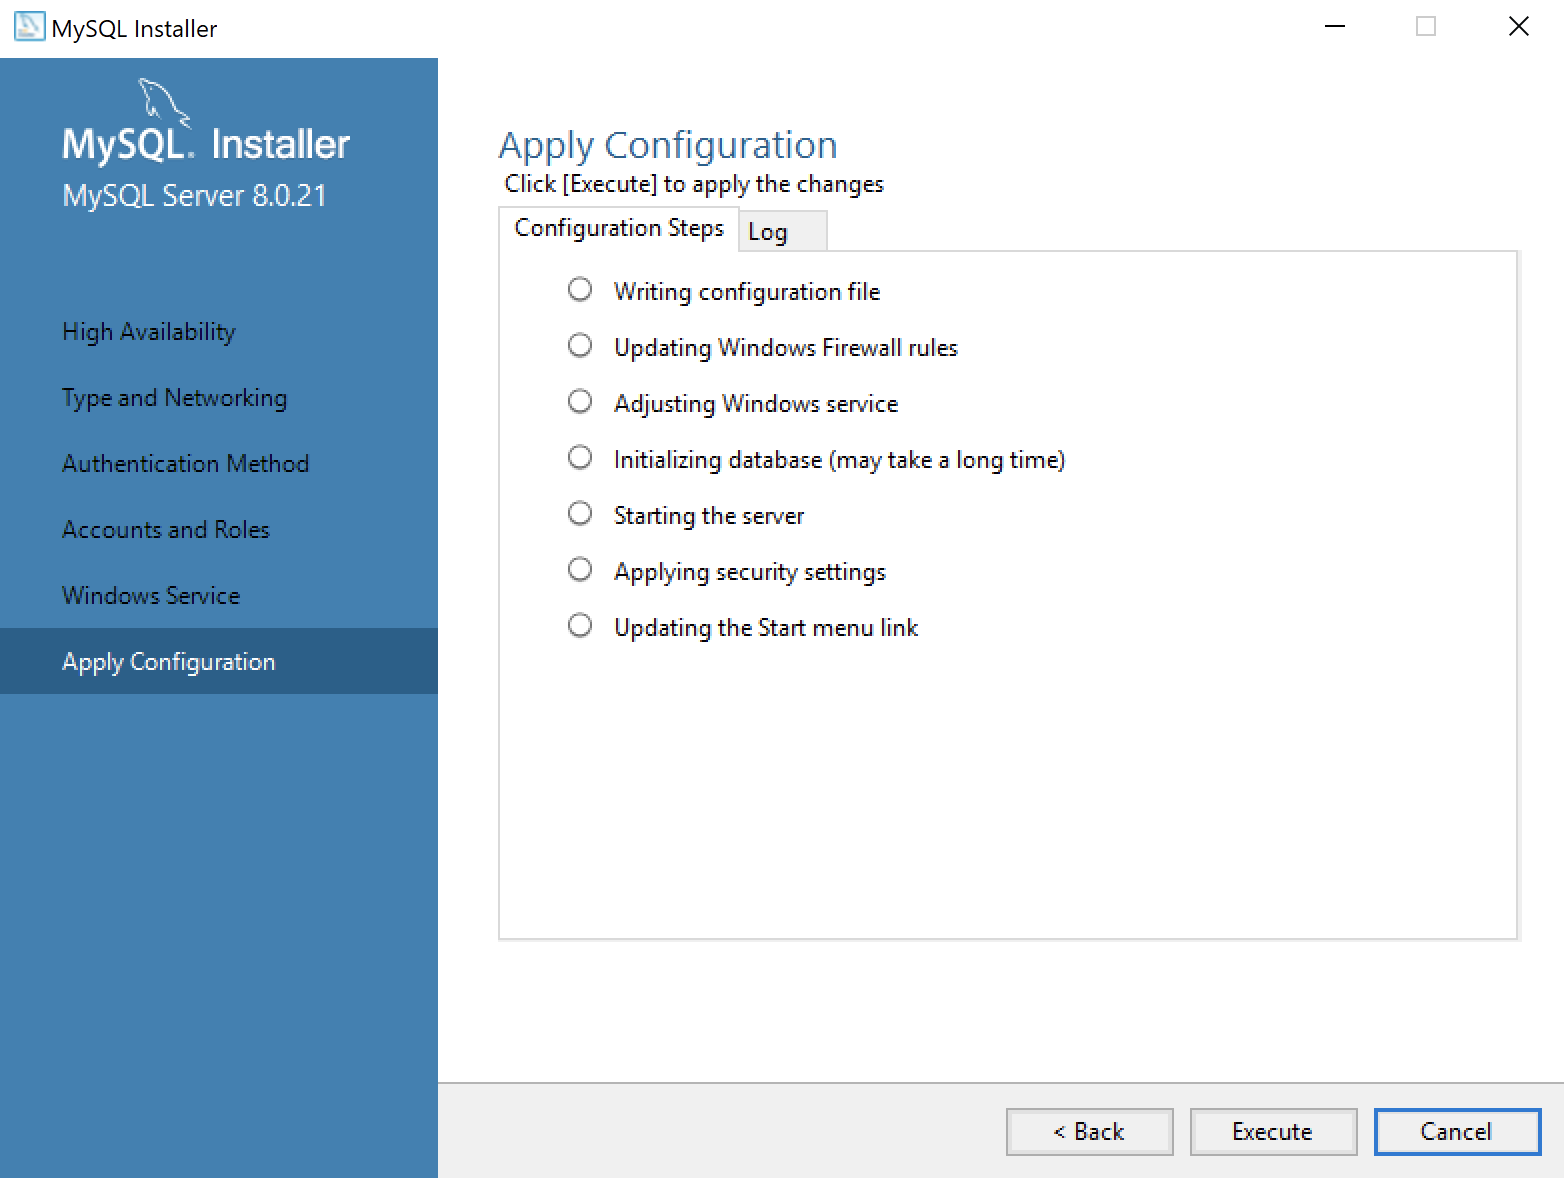
- This dialog applies all the configurations selected. Click the Execute button to proceed with the configuration.
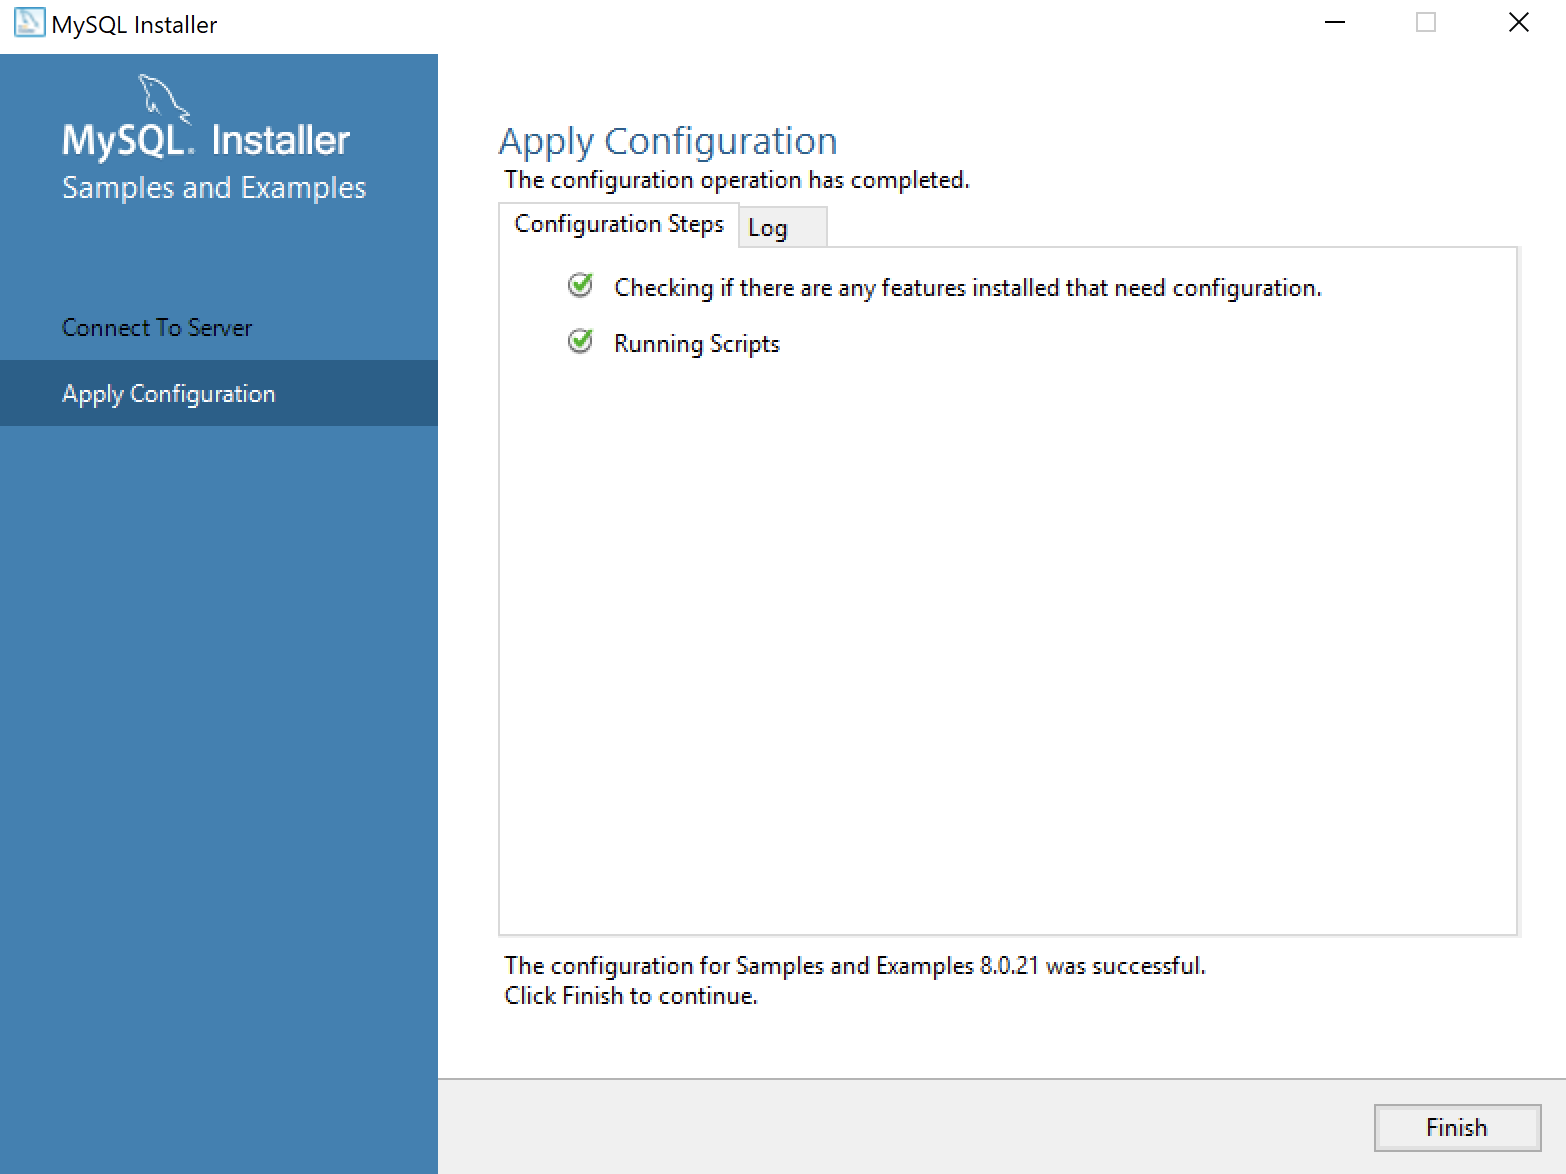
- This dialog lets you watch the progress of the configuration. Click the Finish button to complete the product configurations.

- This dialog the product configurations. You should note that the MySQL Router was not configured or needed. Click the Next button to complete the installation.
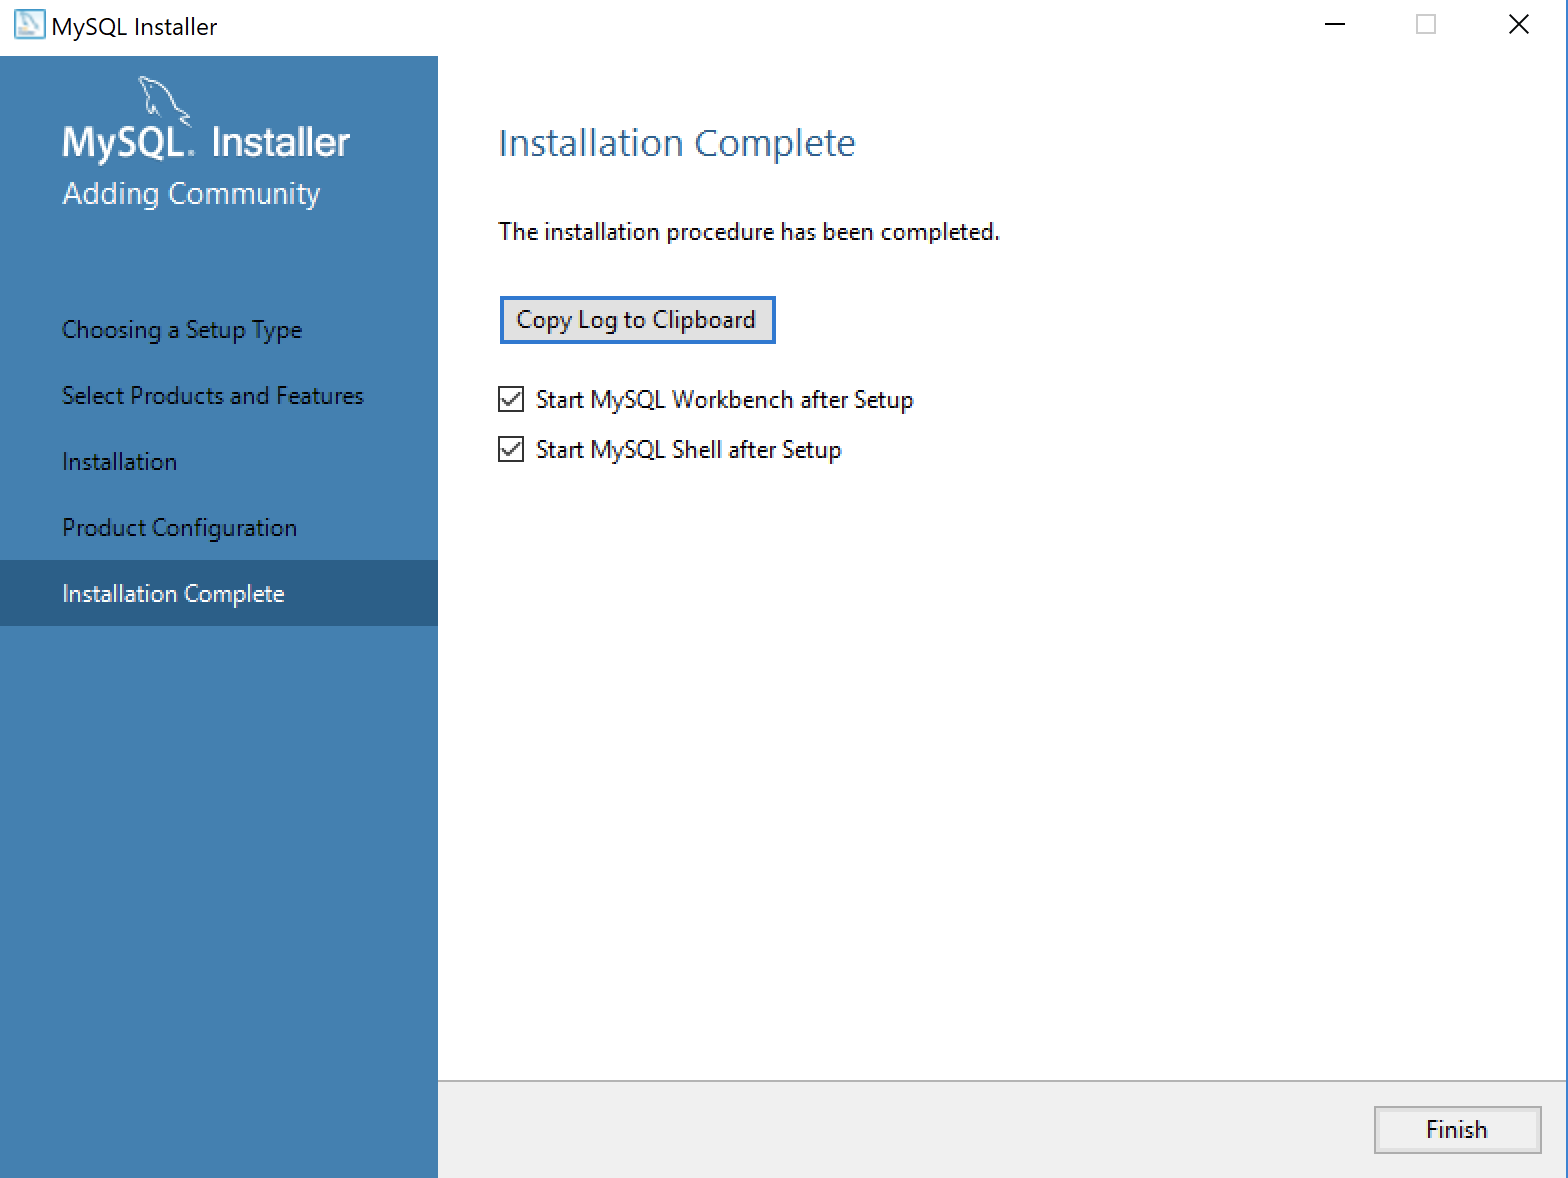
- This dialog completes the workflow and launches MySQL Workbench and Shell. Click the Finish button to complete the installation and configuration processes.
After you install MySQL, the following shows you how to provision a studentdb database. It also shows you how to enable the global file privilege and how to read data from an external comma-separated values (CSV) file.
Wrap Oracle’s tnsping
If you’ve worked with the Oracle database a while, you probably noticed that some utilities write to stdout for both standard output and what should be standard error (stderr). One of those commands is the tnsping utility.
You can wrap the tnsping command to send the TNS-03505 error to stdout with the following code. I put Bash functions like these in a library.sh script, which I can source when automating tasks.
1 2 3 4 5 6 7 8 9 10 11 12 13 14 15 16 | #!/usr/bin/bash tnsping() { if [ ! -z ${1} ]; then # Set default return value. stdout=`$ORACLE_HOME/bin/tnsping ${1} | tail -1` # Check stdout to return 0 for success and 1 for failure. if [[ `echo ${stdout} | cut -c1-9` = 'TNS-03505' ]]; then python -c 'import os, sys; arg = sys.argv[1]; os.write(2,arg + "\n")' "${stdout}" else echo "${1}" fi fi } |
You should notice that the script uses a Python call to redirect the error message to standard out (stdout), which highlights some of the tricks and techniques available when you combine single-line Python routines with Bash shell. However, let’s get real. You can redirect in Bash shell with the following:
1 2 3 4 5 6 7 8 9 10 11 12 13 14 15 16 | #!/usr/bin/bash tnsping() { if [ ! -z ${1} ]; then # Set default return value. stdout=`$ORACLE_HOME/bin/tnsping ${1} | tail -1` # Check stdout to return 0 for success and 1 for failure. if [[ `echo ${stdout} | cut -c1-9` = 'TNS-03505' ]]; then echo ${stdout} 1>&2 else echo "${1}" fi fi } |
Interactively, we can now test a non-existent service name like wrong with this syntax:
tnsping wrong |
It’ll print the standard error to console, like:
TNS-03505: Failed to resolve name |
or, you can suppress standard error (stderr) by redirecting it to the traditional black hole, like:
tnsping wrong 2>/dev/null |
After redirecting standard error (stderr), you simply receive nothing back. That lets you evaluate in another script whether or not the utility raises an error.
In an automating Bash shell script, you use the source command to put the Bash function in scope, like this:
source library.sh |
As always, I hope this helps those looking for a solution.
SQL Developer JDK
In my classes, we use a VMware Linux install with SQL Developer. One of my students called me in a panic after an upgrade of packages when SQL Developer failed to launch. The student was astute enough to try running it from the command line where it generates an error like:
Oracle SQL Developer Copyright (c) 2005, 2018, Oracle and/or its affiliates. All rights reserved. /opt/sqldeveloper/sqldeveloper/bin/../../ide/bin/launcher.sh: line 954: [: : integer expression expected The JDK (/usr/lib/jvm/java-1.8.0-openjdk-1.8.0.222.b10-0.fc30.x86_64/) is not a valid JDK. The JDK was specified by a SetJavaHome directive in a .conf file or by a --setjavahome option. Type the full pathname of a JDK installation (or Ctrl-C to quit), the path will be stored in /home/student/.sqldeveloper/19.2.0/product.conf Error: Unable to get APP_JAVA_HOME input from stdin after 10 tries |
The error is simple, the SQL Developer package update wipe clean the configuration of the SetJavaHome variable in the user’s ~/.sqldeveloper/19.2.0/product.conf file. The fix is three steps because its very likely that the Java packages were also updated. Here’s how to fix it:
- Navigate to the directory where you’ve installed the Java Virtual Machine (JVM) and find the current version of the JVM installed:
cd /usr/lib/jvm
ls java*
It will return a set of files, like:
java
java-1.8.0
java-1.8.0-openjdk
java-1.8.0-openjdk-1.8.0.252.b09-0.fc30.x86_64
java-openjdk
jre
jre-1.8.0
jre-1.8.0-openjdk
jre-1.8.0-openjdk-1.8.0.252.b09-0.fc30.x86_64
jre-openjdk
- Navigate to your user’s product configuration file with this command:
cd ~/.sqldeveloper/19.2.0
- Add the following line to the
product.conffile:# SetJavaHome /path/jdk SetJavaHome /usr/lib/jvm/java-1.8.0-openjdk-1.8.0.252.b09-0.fc30.x86_64/
Now, you should be able to run it from the command line. The shortcut icon should also work if one was installed. Also, don’t forget to update your $JAVA_HOME variable in the master Bash resource file, or your local user’s .bashrc files.
As always, I hope this helps those looking for a quick solution.
Oracle Docker Container
Install, configure, and use an Oracle Docker Container
Installing a Docker instance isn’t quite straightforward nor is it terribly difficult. It can be quite overwhelming if you’re unfamiliar with the technology of virtualization and containerization. This essay shows you how to create, configure, and manage an Oracle Database 18c XE Docker instance on the macOS. There are some slight differences when you install it on Windows OS.
Installation
You need to download the Oracle Database 18c XE file for Linux. You will find it on Oracle’s OTN website at https://www.oracle.com/downloads/. Click the Database link under the Developer Downloads banner. You want to download the Oracle Database Express Edition (XE), Release 18.4.0.0.0 (18c) file.
The file is a Linux Red Hat Package Manager (rpm) file. The file is approximately 2.5 GB in size, which means you may want to take a break while downloading it. Whether you take a break or not, this step may take more time than you like.
While downloading the Oracle database, you want to work on the two other tasks concurrently. You need to download and install Docker and Homebrew software, which aren’t installed from Apple’s Application Store. Many macOS systems disallow by default software from outside the comfy boundaries and inspections of the Apps Store. You may need to change your system preferences to install Docker and Homebrew.
You can download Docker for the macOS from the following website:
https://docs.docker.com/docker-for-mac/install/
The Homebrew (the missing package manager for macOS) website will tell you to install it from the macOS Command Line Interface (CLI). Please note that you must already have the Xcode Command Line Tools installed before you install Homebrew. The following Homebrew installation will update your Command Line Tools to macOS Mojave Version 10.14.
Open a Terminal session from your finder and run this command:
bash -c "$(curl -fsSL https://raw.githubusercontent.com/Homebrew/install/master/install.sh)" |
After you install Homebrew in the Terminal, type the following to go to your user’s home folder (or directory):
cd |
In your home directory (/Users/username [~]), create the docker-images directory from the available GitHub docker containers with these two commands (separated by the semicolon):
cd ~/; git clone https://github.com/oracle/docker-images.git |
Move the Oracle Database XE 18c rpm file from your Downloads folder to the target docker-images subfolder with the following command:
mv ~/Downloads/oracle-database-xe-18c-1.0-1.x86_64-2.rpm \ ~/docker-images/OracleDatabase/SingleInstance/dockerfiles/18.4.0/. |
Change your present working directory with the following cd command:
cd docker-images/OracleDatabase/SingleInstance/dockerfiles |
Build the Docker image with the following command (from the directory where the buildDockerImage.sh shell script is found):
./buildDockerImage.sh -v 18.4.0 -x |
The Docker image build takes quite some time. It may take more than 10 minutes on some macOS computers. After it completes, you should see that it was successfully built and tagged in the Terminal. You can confirm the image build with this command:
docker images |
It should return something like this:
REPOSITORY TAG IMAGE ID CREATED SIZE oracle/database 18.4.0-xe 926f4349b277 12 minutes ago 5.89GB oraclelinux 7-slim 153f8d73287e 8 weeks ago 131MB |
Before you start your Docker container, you need to open a Terminal session. You will be in your home directory, which should give you a prompt like:
machine_name:~ username$ |
If you issue a pwd command, you should see the following:
/Users/username |
Create an oracle directory as subdirectory:
mkdir oracle |
While you might wonder about the oracle directory at this point, it’s to help keep straight Docker containers on the macOS file system. For example, when you install Docker instances for MySQL and PostgreSQL, you can see the Docker file systems as:
/Users/username/mysql /Users/username/oracle /Users/username/postgres |
Now, you start the Docker container with the following command:
sudo \ docker run --name videodb -d -p 51521:1521 -p 55500:5500 -e ORACLE_PWD=cangetin \ -e ORACLE_CHARACTERSET=AL32UTF8 -v ~/oracle:/home oracle/database:18.4.0-xe |
After starting the Docker container, you check the container’s status the following command:
docker ps |
Congratulations, you have successfully installed the Docker container.
Configure
The standard docker container prepares a base platform for you. It doesn’t create a schema or containerized user. It simply installs the Oracle Database Management System (DBMS) and Oracle Listener. You need to configure your Linux environment and your database.
You connect to the container as the root user, like:
docker exec -it videodb bash |
You should update any of the older packages with the following command:
yum update |
Next, you should install the openssh-server and vim packages. They’re not installed as part of the docker container’s default configuration. You’ll need them when you create non-root users and edit configuration files. This command installs them both:
yum openssh-server vim |
There are a number of things for you to do at this point. They don’t all have to be done in the order that this essay takes. Like any other installation of Oracle on Linux, there is an oracle user who owns the installation. The oracle user is a non-login user. A non-login user doesn’t have a password and disallows a ssh connection. You need to first become the root user before you can use the su (substitute user) command to become the oracle user. Only superuser accounts hold the privileges to su without credentials because they’re trusted users.
The easiest thing to do while you’re the root user is test your ability to connect to the Oracle database’s system schema. You set the system schema’s password to cangetin when you ran the docker run command. At the command prompt, type the following to connect to the database:
sqlplus system/cangetin@xe |
You should see the following when you connect as the system user:
SQL*Plus: Release 18.0.0.0.0 - Production on Sun Sep 13 02:48:44 2020 Version 18.4.0.0.0 Copyright (c) 1982, 2018, Oracle. All rights reserved. Last Successful login time: Sat Sep 12 2020 21:13:33 +00:00 Connected to: Oracle Database 18c Express Edition Release 18.0.0.0.0 - Production Version 18.4.0.0.0 SQL> |
Please note that only the oracle user can connect without referencing the @xe service identifier, which is defined in the $ORACLE_HOME/network/admin/tnsnames.ora file. You can read more about the SQL*Net configuration in the documentation. The quit command exits the SQL*Plus Command Line Interface. At this point, as root, lets you create a missing vi symbolic link to the vim utility you installed earlier.
ln -s /usr/bin/vim /usr/bin/vi |
With vi configured, let’s su to the oracle user and create an .bashrc file for it. You should note that a non-login user doesn’t have a .bashrc file by default. You become the oracle user with the following command:
su oracle |
You may notice that you’re not in the oracle user’s home directory. Let’s change that by moving to the correct home directory.
The home directory for any user is configured in the /etc/passwd file and available by using the echo command to see the $HOME environment variable’s value. This is true for Red Hat, Oracle Unbreakable Linux, CentOS, and Fedora distributions. They create users’ home directories as subdirectories in the /home directory.
The .bashrc file is a hidden file. Hidden files have no file name before the period and are not visible with an ls (list) command. You can find them by using a -al flag value with the ls command
ls -al |
You can use the vi editor to create a .bashrc file like this:
vi .bashrc |
A minimal oracle .bashrc (bash resource) file should look like this:
# Source global definitions if [ -f /etc/bashrc ]; then . /etc/bashrc fi # User specific environment if ! [[ "$PATH" =~ "$HOME/.local/bin:$HOME/bin:" ]] then PATH="$HOME/.local/bin:$HOME/bin:$PATH" fi export PATH # Set Prompt export PS1="[\u@localhost \W]\$ " # Change to home directory. cd $HOME # Uncomment the following line if you don't like systemctl's auto-paging feature: # export SYSTEMD_PAGER= # User specific aliases and functions |
If you know about the Linux CLI prompt, the localhost string may seem odd. It’s there to suppress the random string otherwise provided by the docker container.
A number of other Oracle environment parameters have already been set. You can see them with this command:
env | grep -i oracle |
You can connect as the privileged sysdba role, once known as the internal user, to start and stop the database instance without stopping the docker container. That command syntax is:
sqlplus / as sysdba |
Only the oracle user has privileges to connect with the sysdba role by default. That’s because the oracle user is the owner of the Oracle database installation.
While connected as the oracle user, you should make three changes. One change to oracle executable file permissions and two changes to the glogin.sql default configuration file.
The initial permissions on the $ORACLE_HOME/bin/oracle executable file in the docker container are shown below.
-rwxr-x--x 1 oracle oinstall 437755981 Oct 18 2018 oracle |
The setuid bit is disabled when the user’s permissions are rwx. The oracle executable should always run with the permissions and ownership of the oracle user. That only happens when the setuid bit is enabled. You set the setuid. bit with the following syntax as the oracle user or privileged root superuser (from the $ORACLE_HOME/bin directory):
chmod u+s oracle |
Relisting the file in a long list view (ls -al) after the change, you should see the following:
-rwsr-x--x 1 oracle oinstall 437755981 Oct 18 2018 oracle |
The setuid bit is enabled when the user permissions are rws. Connections to the database by non-privileged Oracle users may raise ORA-01017 and ORA-12547 errors when the setuid bit is unset.
The glogin.sql file is read and processed with every connection to the database. Therefore, you should put little in there, and some would argue nothing in there. You’re going to enter the command that lets you interactively launch vi from a SQL> command prompt and set a SQL*Plus environment variable. The SQL*Plus environment variable lets you see debug messages raised by your PL/SQL programs.
To edit the glogin.sql file, change your terminal directory as follows:
cd $ORACLE_HOME/sqlplus/admin |
Add the following two lines at the bottom of the glogin.sql file:
define _editor=vi SET SERVEROUTPUT ON SIZE UNLIMITED |
That’s it for configuring the oracle user’s account. Type exit to return to the root user shell. Type exit again, this time to leave the root user’s account and return to your hosting macOS.
The next configuration step sets up a non-privileged student account in Linux. You setup the student user with the following Docker command (for reference, it can’t be done from within the docker container):
sudo \ docker exec -it videodb bash -c "useradd -u 501 -g dba -G users \ -d /home/student -s /bin/bash -c "Student" -n student" |
You will be prompted for a password when this command runs. Try to keep the password simple. Using a password like cangetin is recommended when it’s a development instance. You can connect with the following docker command:
docker exec -it --user student videodb bash |
After logging in to the docker container as the student user, you need to configure the .bashrc file. You should use the following minimal .bashrc file in the /home/student directory, which you can create with the vi editor.
# Source global definitions if [ -f /etc/bashrc ]; then . /etc/bashrc fi # User specific environment if ! [[ "$PATH" =~ "$HOME/.local/bin:$HOME/bin:" ]] then PATH="$HOME/.local/bin:$HOME/bin:$PATH" fi export PATH # Set Prompt export PS1="[\u@localhost \W]\$ " # Change to home directory. cd $HOME # Uncomment the following line if you don't like systemctl's auto-paging feature: # export SYSTEMD_PAGER= # User specific aliases and functions # Set Oracle environment variables. export ORACLE_SID=XE export ORACLE_BASE=/opt/oracle export ORACLE_HOME=/opt/oracle/product/18c/dbhomeXE |
As the c##student user, you need to connect to the system schema and provision a c##student container database. You can connect to the system schema with the following syntax:
sqlplus system/cangetin@xe |
There are four steps required to provision a container database. These steps are different than the steps for previous non-container databases. In non-container databases, you could grant privileges directly to database users. Oracle now requires that you create database roles, which bundle privileges together. Then, you grant roles to users. The four provisioning steps are:
- Create a user, which must adhere to the following naming convention from Oracle Database 12c forward. The database user’s name must start with the letter
cand two#(pound) symbols followed by a character and then a string of letters and numbers. - Create a role, which must use the same naming convention as containerized users. Failure to use the correct naming convention raises an
ORA-65096error. - Grant database privileges to a role.
- Grant a database role to a user.
You create a c##student container database user with the following syntax:
CREATE USER c##student IDENTIFIED BY student DEFAULT TABLESPACE users QUOTA 100M ON users TEMPORARY TABLESPACE temp; |
Next, you create a c##studentrole container role with the following syntax:
CREATE ROLE c##studentrole CONTAINER = ALL; |
Then, you grant the following privileges to your newly created c##studentrole role:
GRANT CREATE CLUSTER, CREATE INDEXTYPE, CREATE PROCEDURE, CREATE SEQUENCE, CREATE SESSION, CREATE TABLE, CREATE TRIGGER, CREATE TYPE, CREATE VIEW TO c##studentrole; |
Finally, you grant a c##studentrole role (bundle of privileges) to a c##videodb user:
GRANT c##studentrole TO c##student; |
After completing these tasks, you should use the quit command to exit the SQL*Plus CLI. Please note that unlike some database CLIs, you do not need to add a semicolon to quit the connection. Oracle divides its CLI commands into SQL*Plus and SQL commands; and the quit command is a SQL*Plus command. SQL*Plus commands do not require the terminating semicolon. SQL commands do require the semicolon or a line return and forward slash, which dispatches the SQL command to the SQL engine.
You should confirm that the provisioning worked by reconnecting to the Oracle database as the c##student user with this syntax:
sqlplus c##student/student@xe |
You have now provisioned and verified the connection to a database container user. Use the quit command to disconnect from the Oracle database, and the exit command to return to your host operating system.
At this point you have a couple options for using the docker container. You can install a proprietary Integrated Development Environment (IDE), like Oracle’s free SQL Developer. There are several others and some support more than one database engine. Unfortunately, all the others have annual licensing costs.
Post Install: Access Tools
Oracle’s SQL Developer is a Java-based solution that runs on numerous platforms. You can download SQL Developer from Oracle’s OTN web site:
https://www.oracle.com/downloads/
Click on the Developer Tools link to find the current version of the SQL Developer. Before you install SQL Developer on your macOS, you will need to download and install the Java 8 Software Development Kit (SDK) from this web site:
http://www.oracle.com/technetwork/java/javase/downloads/
You configure a SQL Developer connection with the following values: use localhost as the host, c##student as the user, xe as the network service identifier, and 51521 as the port address. Click the plus button to add a connection where you enter these values, like shown below:
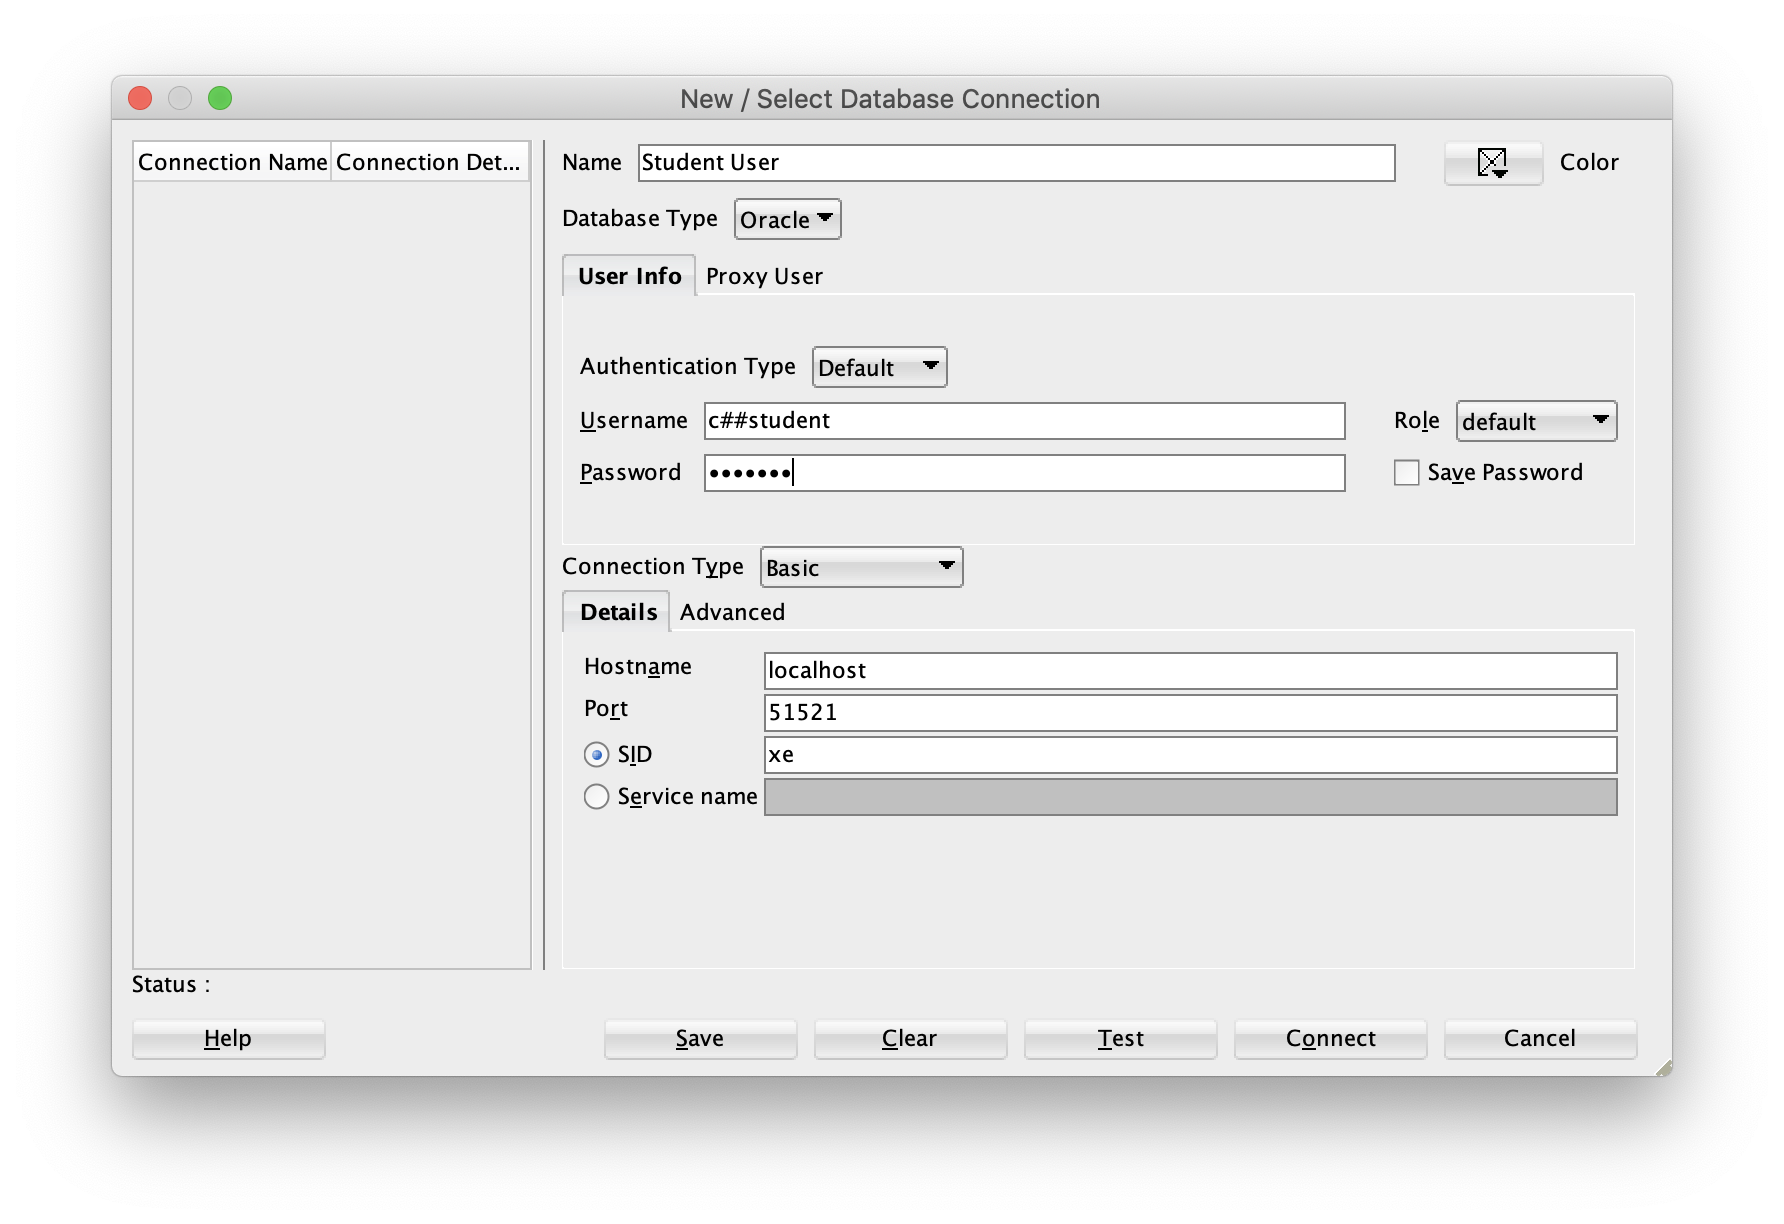
While the Java code in SQL Developer supports a port connection, Docker maps the port to the Oracle docker container. You don’t need to resolve the connection between SQL Developer and the Oracle Database listener through the network layer because this solution uses an Internal Process Control (IPC) model, based on socket to socket communication.
With virtualization you would need to install the Oracle Instant Client software on the hosting operating system. Then, you would configure your /etc/hosts file on both the hosting (macOS) and hosted (Oracle Linux) operating systems. Alternatively, you could add both IP addresses to a DNS server. The IP addresses let you map the connection between your physical macOS system and the Docker container running Oracle Linux. You can find further qualification of the connection mechanisms and repackaging in the Oracle Docker User Guide.
Containers map a local directory to operating system inside the container. Based on the earlier instructions the ~/oracle directory maps to the /home directory in the docker container. You have the ability to edit and move files within this portion of the file system’s hierarchy, which means you have complete control of the portion of the file system owned by the student user.
The next few steps help you verify the dual access to this portion of the docker container. Open a Terminal session and check your present working directory (with the pwd utility).
macName:~ username$ pwd |
It should return:
/Users/username |
During the installation, you created two subdirectories in the /Users/username directory. They were the oracle and docker-images subdirectories. In your host macOS, you should list (with the ls utility) the contents of your oracle subdirectory:
ls ~/oracle |
It should return the following:
oracle student |
As mentioned, your macOS /Users/username/oracle directory holds the contents of your docker container’s /home directory. That means that your /Users/username/oracle/student directory mirrors the /home/student directory in your docker container.
Assume your GitHub code repository for Oracle development is in a directory on your macOS side. The local mapping to the ~/oracle/student directly lets you put symbolic links in the hosted student user’s subdirectories. These symbolic links would point to the editable code on the macOS file system, which can be concurrently linked to your GitHub code repository.
Misleading Oracle Errors
It’s always interesting when you get in a hurry, have multiple terminal sessions open and type the wrong thing in the wrong terminal session. This is especially true when working with the Oracle database.
In this case, it was implementing a Docker Container of Oracle Database 18c on macOS. I typed the following to connect as the privileged system user:
sqlplus system/cangetin |
It generated the following error stack:
[student@localhost ~]$ sqlplus system/cangetin SQL*Plus: Release 18.0.0.0.0 - Production on Tue Sep 15 15:02:30 2020 Version 18.4.0.0.0 Copyright (c) 1982, 2018, Oracle. All rights reserved. ERROR: ORA-27140: attach to post/wait facility failed ORA-27300: OS system dependent operation:invalid_egid failed with status: 1 ORA-27301: OS failure message: Operation not permitted ORA-27302: failure occurred at: skgpwinit6 ORA-27303: additional information: startup egid = 54321 (oinstall), current egid = 54322 (dba) |
Really, that’s suppose to help an end-user or even an average DBA? Shouldn’t it really return an error that says the OS user isn’t the owner of the database? Naturally, there’s nothing wrong with connecting as the system privileged user when you’re OS account is not the owner provided you use the network service identifier, like
sqlplus system/cangetin@xe |
It works fine with the xe network service identifier. I hope this helps anybody confused by the error stack.
Correlated Updates
It’s always interesting when I answer questions. This question was how to you perform a correlated UPDATE statement. My answer was assuming you’re updating the rating_id foreign key column in the rating table with the value from an item_rating column in the item table where on or another column value in the rating table match the item_rating column value in the item table match, you would write a correlated UPDATE statement like:
UPDATE item i SET i.rating_id = r.rating_id WHERE EXISTS (SELECT NULL FROM rental r WHERE r.rating = i.item_rating OR r.description = i.item_rating); |
This works in Oracle, MySQL, MariaDB, and MS SQL Server. I thought my work was done but I was wrong. The individual was trying to write a correlated UPDATE statement for PostgreSQL. The statement returned the following error:
ERROR:  syntax error at or near "WHERE"
LINE 3: WHERE  EXISTS
^ |
I did didn’t find an article to point the individual to after quick Google and DuckDuckGo searches. So, I thought I’d provide how you do it in PostgreSQL:
UPDATE item i SET rating_id = r.rating_id FROM rating r WHERE r.rating = i.item_rating OR r.description = i.item_rating; |
In short, PostgreSQL doesn’t do what most expect because the UPDATE statement supports a FROM clause. Let’s give them the prize for different dialect. While I hope that I’m not a syntax bigot because I use MySQL more, I think the default syntax should always be supported in SQL dialects. After all, MySQL has a far superior named-notation INSERT statement alternative to the standard with the assignment method but MySQL also supports the standard syntax.
While I’ve shown you how to do it in PostgreSQL, what do you think? Should PostgreSQL be as responsible as MySQL is in maintaining standard SQL approaches?
