AJAX gone wrong, or the dynamic duo Blackboard & IE
We’ve got an implementation of Blackboard running on Oracle 10g. The new version has a grade book redesign that uses AJAX to eliminate the cumbersome nature of its predecessor. It was interesting figuring out why grades entered wouldn’t show without restarting Internet Explorer, while Firefox and Safari worked fine. Another heart found thank you to Microsoft for failing to optimize JavaScript execution in their browser (all the way through to 8). Read on if you must use IE.
The issue is that Internet Explorer reads JavaScript including all whitespace at initial page load. There’s no attempt to compress it, arghhh. Naturally, that makes performance crawl a bit on initial page load. That wouldn’t be bad but Blackboard’s JavaScript changes DOM values during product use. Those changes go unseen if you navigate from the Grade Book and return to it. At least, they do when you’re using default IE settings. Unlike Microsoft’s solution to the problem of suppressing Mac purchases (an advertising gem from Apple), Microsoft didn’t spend more on marketing (after all the Windows platform is more or less captured by IE). They simply set the default value for page refreshes to automatic, which means once per active IE load into memory for JavaScript files. Then, it is Blackboard’s fault for how it implemented AJAX, right?
You can fix this default by taking one step. Open IE, navigate to Tools, Internet Options, and then click the Settings button in the Browsing history section. The form looks like:

When you click on the Settings button, you’ll come to the following screen. Click the radio button for “Every time I visit the webpage,” which will ensure you get a working grade book in Blackboard.

Click the OK button. You’re not done yet. You must shut down all IE sessions and re-launch the product for the changes to occur. If you think that was tedious, here we need to do it every time our corporate governance folks push an update to Windows because they reset IE to an incompatible set of values for Blackboard’s AJAX implementation.
Inline views, fabrication, & the WITH clause
Sometimes working with a product like Oracle brings a surprise, like a new feature you failed to catch when it was released. I’ve seen a lot of entries using inline views through the WITH clause in the Oracle forums. It caught my eye because it is such a radical departure from portable SQL syntax of an inline view. I finally went searching to find the rationale for this approach.
The answer doesn’t lie with the Charlotte like National Treasure, but with simplifying the join syntax, as qualified in the Oracle Database 2 Day + Data Warehousing Guide 11g, Release 1. The following looks at this approach, and compares using the WITH clause instead of the inline view to perform table fabrication.
Oracle tells us to use the WITH clause when a query has multiple references to the same query block and there are joins and aggregations. The official name of the WITH clause is a subquery factoring clause. Basically, the WITH clause lets you name inline views and then reuse them inside other inline views. This behavior avoids having to call different copies of the same inline view in different parts of a query or DML statement, which reduces overhead and increases view response time for resolution.
Like local named PL/SQL blocks, subquery factoring clauses must be defined before they can be referenced. Unlike PL/SQL, they have no equivalent function and procedure stubs used for forward referencing in a PL/SQL program unit. They simply become available in sequence, the top most universally available and the next only available below to those statements below it.
The WITH clause (or subquery factoring clause) feature comes to us from the ANSI SQL:1999 specification. It is implemented in Oracle databases with the same syntax as it is in Microsoft SQL Server 2005. The only difference is Microsoft brands it as a Common Table Expression (CTE). It also happens to be the only way to implement a recursive query in Microsoft SQL Server.
The basic syntax is:

The first code block is assigned the subquery factoring clause’s name. You can then reuse the name in subsequent code blocks or the master query. The idea is that this syntax is simpler than the traditional inline view approach and more efficient.

The WITH clause is also capable of letting you create tables from literal values, which is known as table fabrication. The following syntax uses the with clause to fabricate a table of two columns (x and y) and two rows.
SQL> WITH fabricated AS 2 (SELECT 1 AS x, 2 AS y FROM dual 3 UNION ALL 4 SELECT 3 AS x, 4 AS y FROM dual) 5 SELECT x, y FROM fabricated; |
This produces the following results:
         X          Y
---------- ----------
         1          2
3 4 |
The next shows the traditional way of fabricating a table using an inline view:
SQL> SELECT x, y 2 FROM (SELECT 1 AS x, 2 AS y FROM dual 3 UNION ALL 4 SELECT 3 AS x, 4 AS y FROM dual) fabricated; |
This also produces the same results as before, two rows of X and Y variables.
You can also use this type of syntax in MySQL to fabricate a table. You can’t use the WITH clause in MySQL because it’s not supported. You’ll notice in the example that the FROM dual portion is omitted in MySQL. Wouldn’t it be nice if Oracle let that happen too?
SQL> SELECT x, y 2 FROM (SELECT 1 AS x, 2 AS y 3 UNION ALL 4 SELECT 3 AS x, 4 AS y) fabricated; |
A neat function that I picked up on the Oracle Technical Network is the NUMTODSINTERVAL (number to date-stamp interval) function, which can create intervals for qualifying sales by hour or quarter hour. More or less it is a way to fabricate timing intervals. Here’s a quick example:
SQL> SELECT TO_CHAR(SYSDATE - NUMTODSINTERVAL(dist,'HOUR') 2 ,'DD-MON-YYYY HH24:MI:SS') bracket 3 FROM (SELECT 1 AS dist FROM dual 4 UNION ALL 5 SELECT 2 AS dist FROM dual 6 UNION ALL 7 SELECT 3 AS dist FROM dual) fabricated; |
The output is:
BRACKET ------------------- 22-OCT-2008 23:07:15 22-OCT-2008 22:07:15 22-OCT-2008 21:07:15 |
This has been the syntax, now I’ll have to check whether there are any performance differences. I suspect that since the execution plan is the same that there aren’t any performance differences but you never know until you test it.
More or less they were but I tripped into a performance shortfall of the WITH clause. It was a complete accident when I was trying to convert a MySQL SQL syntax model into Oracle SQL. The smaller change to the code was to use a WITH clause but I found it didn’t work.
You can’t use the WITH clause inside a subquery for a multiple row insert. It raises an ORA-32034 error if you attempt it, which struck me as bizare. A normal inline view works fine but the WITH clause doesn’t.
Here’s a simple example of embedding an inline view into an INSERT statement. It works seamlessly in Oracle 11g:
INSERT INTO contact_copy ( SELECT contact_s1.nextval , 1001 , cl.contact_type , 'Doe' , 'John' , NULL , 3 , SYSDATE , 3 , SYSDATE FROM dual CROSS JOIN (SELECT common_lookup_id AS contact_type FROM common_lookup WHERE common_lookup_type LIKE '%DAY RENTAL') cl ); |
When I switched to what appeared as the equivalent syntax using a WITH clause, it failed and raised the ORA-32034: unsupported use of with clause error. The following shows you how the WITH would be used, if it could be used:
INSERT INTO contact_copy ( WITH cl AS (SELECT common_lookup_id AS contact_type FROM common_lookup WHERE common_lookup_type LIKE '%DAY RENTAL') SELECT contact_s1.nextval , 1001 , cl.contact_type , 'Doe' , 'John' , NULL , 3 , SYSDATE , 3 , SYSDATE FROM dual ); |
I thought that might be the reason why Oracle didn’t bother putting it in the SQL reference manual for Oracle Database 10g or 11g. However, Dominic Brooks provided the correct syntax. Very interesting that you simply start with the WITH clause and exclude the enclosing parentheses. Quite a departure from the normal syntax for a multiple row insert.
The correct syntax when the subquery cl returns only one row is like Dominic’s suggestion:
INSERT INTO contact_copy WITH cl AS (SELECT common_lookup_id AS contact_type FROM common_lookup WHERE common_lookup_type LIKE '%DAY RENTAL') SELECT contact_s1.nextval , 1001 , (SELECT cl.contact_type FROM cl) , 'Doe' , 'John' , NULL , 3 , SYSDATE , 3 , SYSDATE FROM dual; |
The correct syntax when the subquery cl subquery returns more than one row differs from Dominic’s. You need a CROSS JOIN to multiply the other static values by the number of rows returned by the subquery so that you have a multiple row insert statement.
INSERT INTO contact_copy WITH cl AS (SELECT common_lookup_id AS contact_type FROM common_lookup WHERE common_lookup_type LIKE '%DAY RENTAL') SELECT contact_s1.nextval , 1001 , cl.contact_type , 'Doe' , 'John' , NULL , 3 , SYSDATE , 3 , SYSDATE FROM dual CROSS JOIN cl; |
It turned into a longer discussion than I anticipated. Hope it helps solve problems and tune Oracle queries.
Reflecting on six months of blogg’n
It is nice to know that the entries I’ve made have readers. It’s surprising to see almost 22,000 direct hits and another 5,000 syndicated hits in the 6 months of blogg’n. The following table contains the list and links of the top blogs that have netted 5 or more hits per day.
| Blog Entry | Posted | Hits | Avg |
| How to configure Mac OS X as an Oracle Client | 9/2/2008 | 1,402 | 36 |
| How to convert XML to CSV and upload into Oracle | 6/22/2008 | 1,019 | 9 |
| Creating an external table that uses SQL*Loader | 6/19/2008 | 945 | 8 |
| Creating an external table that uses Oracle Data Pump | 6/19/2008 | 899 | 8 |
| Pipelined functions and PL/SQL Tables | 5/11/2008 | 859 | 5 |
| Reading an external directory from SQL or PL/SQL | 6/05/2008 | 667 | 5 |
I plan to move this to my own site shortly and will provide notice and pay WordPress to forward. Naturally, any comments are welcome.
Setting up a printer in VMWare Ubuntu instance
As I mentioned before, working in the virtual machine is a great solution when you need to work in multiple operating systems. Setting up printing is a step that goes with the operating system. It is very easy to configure in Ubuntu running in VMWare on a Mac OS X machine.
I found that the standard printer in the virtual machine wouldn’t work. I tried it in both VMWare 1.x and 2.x but without any luck. It did work ineffectively in VMWare 2.x but it embedded characters in simple documents that shouldn’t be there. Finally, I pursued this course. It has the benefit of working like you’d expect! It lets you print your native Ubuntu documents when you’ve configured the VMWare machine in NAT or bridged networking mode. The only difference is that a bridged network doesn’t require you to share the printer on the Mac OS because it directly accesses it.
The first step using a NAT network requires that you share you printer setup on the Mac OS. You do that by launching System Preferences, then click on Sharing. In Sharing, you enable print sharing by chosing the network printer …

After you’ve enabled sharing on the Mac OS, you can take the following steps in Ubuntu:
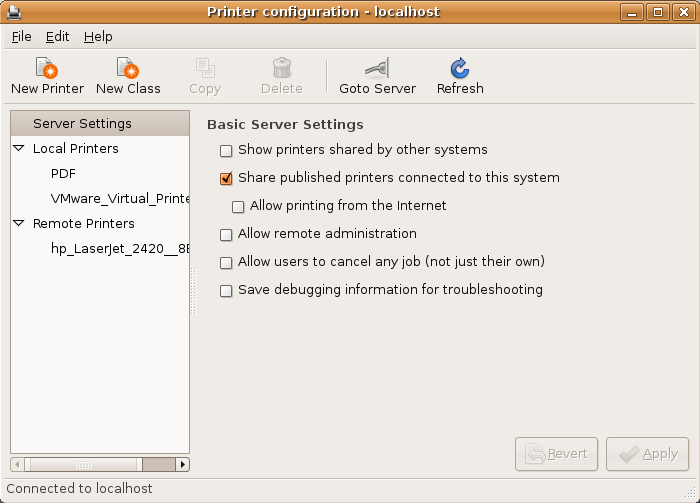
1. Click the System menu choice, choose Administration. and Printing, as shown in screen shot:

2. You’ll then see the following screen but not gray scaled. If you don’t, you’ll also see the following form. a gray scaled version indicates that you’ve run VMWare Tools before updating the Ubuntu OS CUPS service:

As mentioned, this means there’s a problem with a disabled service – typically cups (Common Unix Printing Service). You can click the Help, then Troubleshoot to further diagnose the problem. In the first screen click the Forward button to continue. In this screen, click the Not Listed (because it should be an empty list), and then click the Forward button to continue. You most likely will see the following dialog box, which tells you that the cups service is stopped (a general occurrence when you upgrade from VMWare Fusion 1.x to 2.x).

There’s a temptation to follow the instructions, and I yielded to it without a positive outcome. What you’ll find is that the cups (cupsys) service is enabled but if you use the VMWare Fusion menu, you’ll find that it isn’t, as shown:

If you stop here and check in a terminal session, you’ll see that life isn’t rosy after the upgrade. Even if you check it and restart the VM, the printing problem won’t resolve. This appears to be a part of the recompilation of cups by the VMWare Tools. It appears to happen when you opt to compile Ubuntu CUPS while running the VMWare Tools. You’re only prompted to compile these if you’re not on the most current CUPS release by Ubuntu.
You use the following command to check the status of the printer service:
# sudo /etc/init.d/cupsys status |
You will most likely get something like this if you have a problem:
Status of Common Unix Printing System: cupsd is not running but /var/run/cups/cupsd.pid exists. |
This is where it becomes obvious that the VMWare Fusion 2.x upgrade can introduce the problem. It is simple to avoid the problem by ensuring that the Ubuntu OS is patched to the most current CUPs version before running the VMWare Tools. I fixed the problem by reinstalling Ubuntu from scratch, and patching it to the current level. Then, you won’t have a failure of the CUPS process.
When you fix any errors from the upgrade or provided you’re on VMWare Fusion 2.x, you should click the Show printers shared by other systems check box, then click the Refresh button to display any network printers if they don’t refresh automatically.

3. You click on the desired network printer, which displays the following screen. Click the Make Default button after you click the Print Test Page button.

If you caught my post on doing this in a Microsoft Windows environment, isn’t it stuning how easy Ubuntu is compared to the “user-friendly” Windows interface (unless you’re upgrading). If you need the Windows instructions, you can find them here.
Reference Cursors – Why, when, and how?
A week or two ago, I noticed a discussion on the Oracle Technical Network forum that asked some questions about reference cursors. The discussion made me reflect if there were a couple simple rules for using reference cursors. This contains my take on the rules and some examples.
What are they …
There are two types of reference cursors. They are either weakly or strongly typed PL/SQL only data types. A weakly typed cursor doesn’t anchor the output of a query to a table or view, and implements the PL/SQL SYS_REFCURSOR type. A strongly typed cursor anchors the output of a query to a table or view, and typically anchors itself to a package or local user defined type (UDT) of a cursor.
They’re defined in the declaration block or a package specification, like this:
TYPE weak_cursor IS REF CURSOR; TYPE strong_cursor IS REF CURSOR RETURN table_name%ROWTYPE; |
When you opt to use a weakly typed cursor, you can anchor it to a PL/SQL structure that is a collection of a PL/SQL record structure. This is known as an associative array, and commonly called a PL/SQL table by folks who pre-date the Oraclei documentation that Oracle would prefer we forget. However, it seems politically insensitive to use that language even though Oracle published it as such in the Oracle 8 documentation because it isn’t really a table but an implementation of a list of record structures. That means the index is sparsely populated or may contain breaks in a numeric index sequence. You can also use character string indexes from Oracle 10g forward to index this type of collection.
Why should you use them …
They’re useful structures when you want to open a cursor with known output columns in one program unit and move it to another for processing. Strongly typed reference cursors are appropriate for this purpose when both the passing and calling program units are in PL/SQL. Weakly typed reference cursors can also be used passing and calling PL/SQL programs. Weakly typed reference cursors require the same structures as strong reference cursors. Specifically, you will need a record structure for row-by-row fetch and collection of a record structure for bulk fetch. Whether you define them as strong or weak, you’ll need these structures for use inside PL/SQL program units that read the cursor. As a rule of thumb, you should generally define them as strongly typed reference cursors when they’re used exclusively in PL/SQL.
The most effective use of weakly typed reference cursors is in external OCI programming languages. Actually, it appears that weakly typed cursors have little use anywhere but in an OCI program. In external programming languages, you can fetch associations and dynamically discover the structure of a weakly typed reference cursor. That’s why they’re useful in OCI programming languages. You can find an example of using a weakly typed cursor in a PHP program on this blog entry.
How you use them …
You can find an example of using a weakly typed reference cursor as an input parameter in this discussion of pipelined PL/SQL functions. You can return a weakly typed cursor from an NDS (Native Dynamic SQL) statement as follows:
-- Creates a function to dynamically open a cursor and return it as a return type. CREATE OR REPLACE FUNCTION weakly_typed_cursor (title_segment VARCHAR2) RETURN SYS_REFCURSOR IS weak_cursor SYS_REFCURSOR; stmt VARCHAR2(4000); BEGIN -- Create dynamic SQL statement. stmt := 'SELECT item_title, item_subtitle ' || 'FROM item ' || 'WHERE REGEXP_LIKE(item_title,:input)'; -- Explicit cursor structures are required for system reference cursors. OPEN weak_cursor FOR stmt USING title_segment; RETURN weak_cursor; END; / |
Outside of an OCI program, the only explicit way to query this is with a SQL statement like:
SQL> VARIABLE cursor REFCURSOR SQL> CALL weakly_typed_cursor('Harry') INTO :cursor SQL> SELECT :cursor FROM dual; |
Alternatively, you can do the following implicit call:
SQL> SELECT weakly_typed_cursor('Harry') FROM dual; |
If you tried to select it using the TABLE function, you’d get the following error:
SQL> SELECT * FROM TABLE(weakly_typed_cursor); * ERROR at line 2: ORA-22905: cannot access ROWS FROM a non-nested TABLE item |
You can return and query a weakly typed cursor as a strongly typed cursor by doing four things. Anchor the cursor statement to a table or view in the database catalog. Create a record structure to store rows of the reference cursor in an ordinary fetch, or a record structure and associative array collection data type to store a set of rows of the reference cursor. Then, explicitly open the reference cursor into the variable. Here is the detail to support those steps:
1. Create a package specification, that acts like an Object-oriented interface because all it contains are type definitions that you’ll implement in other code modules (provided they have the EXECUTE privilege on the package):
-- Create a structure declaration package, like an interface or abstract class. CREATE OR REPLACE PACKAGE pipeliner IS -- Declares a row structure that doesn't map to a catalog object. TYPE title_structure IS RECORD (item_title VARCHAR2(60) ,item_subtitle VARCHAR2(60)); -- Declares an associative array, or a collection of a PL/SQL row structure. TYPE title_collection IS TABLE OF title_structure; END pipeliner; / |
2. You use the WEAKLY_TYPED_CURSOR function presented earlier in this blog to create a weakly typed cursor as the return type of a stored function.
3. The last step creates a function that translates a weakly typed reference cursor into an aggregate table by using a pipelined function, as shown in the illustration.
-- A function that receives a cursor as an input and returns an aggregate table. CREATE OR REPLACE FUNCTION use_of_input_cursor (incoming_cursor SYS_REFCURSOR) RETURN pipeliner.title_collection PIPELINED IS counter NUMBER := 1; active_record PIPELINER.TITLE_STRUCTURE; active_collection PIPELINER.TITLE_COLLECTION:= pipeliner.title_collection(); BEGIN -- A simple loop allows you to fetch the already open cursor LOOP FETCH incoming_cursor INTO active_record; EXIT WHEN incoming_cursor%NOTFOUND; -- Extend collection, assign a value. active_collection.EXTEND; active_collection(counter) := active_record; -- Add a row to the aggregate return table. PIPE ROW(active_collection(counter)); counter := counter + 1; END LOOP; CLOSE incoming_cursor; RETURN; END; / |
The PIPE command transfers a scalar variable or record structure into a row of a target aggregate table, which can be read through the TABLE command in a SQL statement. A neat thing that happens in the example, is that it simply transfers the whole row returned by the cursor as an instance ACTIVE_RECORD into an indexed element of the ACTIVE_COLLECTION collection. The alternative would be syntax like the following:
active_collection(counter).item_title := active_record.item_title; active_collection(counter).item_title := active_record.item_subtitle; |
While those are neat features that may be copied from example code, they’re useless. The more direct way to create this translation program eliminates the collection entirely.
-- A function that receives a cursor as an input and returns an aggregate table. CREATE OR REPLACE FUNCTION use_of_input_cursor (incoming_cursor SYS_REFCURSOR) RETURN pipeliner.title_collection PIPELINED IS counter NUMBER := 1; active_record PIPELINER.TITLE_STRUCTURE; BEGIN -- A simple loop allows you to fetch the already open cursor LOOP FETCH incoming_cursor INTO active_record; EXIT WHEN incoming_cursor%NOTFOUND; -- Add a row to the aggregate return table. PIPE ROW(active_record); END LOOP; CLOSE incoming_cursor; RETURN; END; / |
Another alternative would be to do a BULK COLLECT directly into the collection. The next example demonstrates that but you should note that you can’t use a FORALL when assigning collection values to a PIPE for a pipelined function.
-- A function that receives a cursor as an input and returns an aggregate table. CREATE OR REPLACE FUNCTION use_of_bulk_cursor (incoming_cursor SYS_REFCURSOR) RETURN pipeliner.title_collection PIPELINED IS active_collection PIPELINER.TITLE_COLLECTION:= pipeliner.title_collection(); BEGIN -- A bulk collect fetch the already open cursor FETCH incoming_cursor BULK COLLECT INTO active_collection; FOR i IN 1..active_collection.COUNT LOOP -- Add a row to the aggregate return table. PIPE ROW(active_collection(i)); END LOOP; CLOSE incoming_cursor; RETURN; END; / |
4. In SQL, you can query the result from either the use_of_input_cursor using the following syntax:
-- Query the results. SELECT * FROM TABLE(use_of_input_cursor(weakly_typed_cursor('Harry'))) / |
… or use_of_bulk_cursor using the following syntax:
-- Query the results. SELECT * FROM TABLE(use_of_bulk_cursor(weakly_typed_cursor('Harry'))) / |
You can change the prior query to call the use_of_bulk_cursor function to test the bulk collect operation. It didn’t seem worth the effort of doing another screen shot.
More or less, the limitation exists because when operating exclusively inside of PL/SQL there is no way currently to support an Adapter OO pattern. You can implement an Adapter pattern if you use an OCI8 external programming language to read the cursor as a dynamic result set (really only a multi-dimensional array of strings – or technically because the index is sparse a list).
Alternatively in a PL/SQL only solution, you can simply use a strongly typed cursor and bundle all the components into a single program unit. Assuming you create a two column view from the ITEM table, you can use the following query (code base can be downloaded from McGraw-Hill for the Oracle Database 11g PL/SQL Programming book):
DECLARE TYPE cursor_record IS RECORD ( item_title item.item_title%TYPE , item_subtitle item.item_subtitle%TYPE ); t CURSOR_RECORD; TYPE strong_type IS REF CURSOR RETURN item_title%ROWTYPE; c STRONG_TYPE; BEGIN OPEN c FOR SELECT item_title, item_subtitle FROM item; LOOP FETCH c INTO t; EXIT WHEN c%NOTFOUND; DBMS_OUTPUT.put_line(t.item_title); END LOOP; CLOSE c; END; / |
If you like this, you should check out another wrapping technique here. If you’d like another system reference example, post a comment to let me know.
Is this the look of the new Mac Book Pro?
It’s amazing what my students discover on the Internet. Not wanting to spoil Apple’s Christmas next week, don’t click through to the full entry or you’ll see a photo and its source URL.
You can find where I found it here, and according to the web page this is what the new Mac Book Pro supposedly will look like:

The Oracle 11g patch … that’s 11.1.0.7.0
I think one annoying error that I’ve suffered with on Microsoft Vista with Oracle 11g is the nmefwmi.exe error. I got a message from Microsoft saying it’s fixed. They refer to Oracle Bug #6596234, but it’s really fixed in the Oracle 11g patch (11.1.0.7.0). Therefore, don’t waste your time looking for a one-off patch on metalink.
You can ignore this message on Vista that says refer to Bug #6596234 … by the way it’s actually under patch #6890831. Only the Linux and Solaris ports are available as of today.

Setting up a printer in VMWare Windows instance
Sometimes there are products that run in Windows that don’t have a clone on the Mac, like Microsoft Visio. Working in the virtual machine is the solution but printing is tedious to setup when you’re using a NAT network model. The following instructions show you how to setup a networked printer inside a VMWare instance that uses NAT networking. You can also use it when configuring it in a bridged network configuration. It is more or less the ordinary way for the Windows XP platform.
 I found that the standard printer in the virtual machine wouldn’t work. I tried it in both VMWare 1.x and 2.x but without any luck. It did work ineffectively in VMWare 2.x but it embedded characters in simple documents that shouldn’t be there. Finally, I pursued this course. It has the benefit of working like you’d expect! It lets you print your native Windows documents when you’ve configured the VMWare machine in NAT. The same steps work when you’re using a bridged networking. In a bridged network, you don’t have to share the printer on the Mac OS because it directly accesses it.
The first step requires that you share you printer setup on the Mac OS. You do that by launching System Preferences, then click on Sharing. In Sharing, you enable print sharing by chosing the network printer …
After you’ve enabled sharing on the Mac OS, you can take the following steps in Windows:
1. Click the Start button, then choose Printers and Faxes. You’ll get the following screen where you should click the link to Add a printer. It will launch the Add Print Wizard.

2. You should install the printer drivers if they’re not already installed before launching the Add Print Wizard. You click Next In the first screen.

3. The default radio button is for a locally attached printer. Click the network printer radio button before clicking the Next button.

4. Click the Next button because the default browses for a network connected printer.

5. You shuold see the Microsoft Windows Network, and the default workgroup. Click on the Workgroup to display the possible machine names. If your machine doesn’t show in the list, it’s most likely because your printer wasn’t known in when Windows XP was released. The solution here is to insert the HP disk when you’ve connected it to the virtual machine, and then you simply follow the prompts, as shown in this newer post.

6. Click the appropriate machine that represents the hosting Mac OS (your machine that’s running VMWare). After you click it, you’ll see the target printers that are available through the external Mac OS connectivity and sharing. Click the Next button to proceed.

7. The last activity triggers a warning error. It asks you to confirm that you can trust your Mac. Click the Yes button to proceed (it’s a boring message but click on it if you want to read it).
![]()
8. Choose the printer as a default printer by clicking the Yes button. You can choose the No button if you’ve got more than one network printer.

There are problems when you forget to install the hardware first, so make sure you get the hardware installed first.
Mac printer purgatory brought to you by HP …
If you’ve ever run into this error trying to install an HP Printer on a Mac, let me tell you how to fix it:
“Some of the software for the printer is missing.”
There’s actually a discussion on Apple’s forum without an answer. The answer is beware of HP Printer downloads. Not all are compatible with the current Leopard (10.5.x). A number are only current for Tiger (10.4.x). If you download them and install them, you should consider using a time machine recovery of the Operating System. At least, I found that deleting them and recreating them didn’t always fix the problem by itself.
If you haven’t installed them, don’t do it until you back up the /Library/printers/hp directory (typically about ~650 MB). It will enable you to recover without a full backup of the operating system. Open a terminal and run the following command:
# mv hp hpbackup |
If the HP drivers apply and things don’t work you can recover. You can simply do the following two command from a terminal session:
# rm -r hp # mv hpbackup hp |
If the HP drivers apply and things work you’re fine. You can delete the backup directory and its contents by using the following command in a terminal session:
# rm -r hpbackup |
How to avoid errors when querying external tables
Somebody got to my blog searching for how to find an external file. I thought about why they might be looking for that. Since the lack of a file raises an error stack, I concluded that they want to verify whether the file exists before querying it. That way, they avoid the annoying ORA-29913, ORA-29400, and KUP-04040 error stack.
I’ve added a page to describe the complete set of steps … The instructions let you avoid the error stack by verifying the existence of the file first.
