Using MySQL Workbench
I’ve been setting up a simplified lab environment to let my students learn use in class. This added content will show them how to do reverse engineering with MySQL Workbench.
It’s a complete Fedora image with MySQL and Oracle Database 11g for the course. The uncompressed image is 14GB and the compressed image is 5.3GB. I chose Fedora because it’s the smallest open source image that supports both environments, and Fedora is the closest to Red Hat and Oracle Unbreakable Linux. I’m inclined to make the instance available generally but haven’t figured out the best way to do that.
Here are the new instructions I’m adding and if you have any input leave it as a comment. 😉
You connect as the student user, which puts you in the /home/student directory. Once connected to the Fedora OS, you open a Terminal session by clicking on Activities in the upper right hand corner, and then you type terminal in the search box. When you’re in the Terminal session, use the following command to verify that the apply_mysql_lab1.sql file is correct:
cat Data/cit225/mysql/lab1/apply_mysql_lab1.sql |
It should display the following commands:
\. /home/student/Data/cit225/mysql/lib/cleanup.sql \. /home/student/Data/cit225/mysql/lib/create_mysql_store_ri.sql \. /home/student/Data/cit225/mysql/lib/seed_mysql_store_ri.sql |
You can run the apply_mysql_lab1.sql to create the tables in the studentdb database, and seed them with data. Assuming you’re in the same /home/student directory, you connect to the studentdb database with the following syntax:
mysql -ustudent -pstudent studentdb |
or, more securely:
mysql -ustudent studentdb -p |
Having connected to the studentdb database, you can run the following command:
\. /home/student/Data/cit225/mysql/lab1/apply_mysql_lab1.sql |
It creates a Video store image and seeds it with some basic data. You can use the show command to see the tables you’ve created, like:
show tables; |
It displays:
+---------------------+ | Tables_in_studentdb | +---------------------+ | address | | common_lookup | | contact | | contacts | | current_rental | | item | | member | | rental | | rental_item | | street_address | | system_user | | telephone | +---------------------+ 12 rows in set (0.00 sec) |
After successfully creating and seeding the studentdb database, you can run MySQL Workbench by launching it from the search field (recommended). Alternatively, you can open it from a terminal session with the following command. Unfortunately, a command-line launch links the terminal and the MySQL Workbench processes and closing the terminal will close the MySQL Workbench.
mysql-workbench |
Here are the instructions for the lab with MySQL Workbench:

- The first displayed page of MySQL Workbench is the home page (click on it or any of the others to see the full size image). Click the ⊕ symbol to the right of the MySQL Workbench title.

- After clicking the the ⊕ symbol, it launches the Startup New Connection dialog. Enter a name for your new connection. I recommend you enter MySQLConnection.

- Click the Test Connection button to see if it works.

- When you click the Test Connection button, MySQL Workbench prompts you for a password. After entering a password and verifying the connection, click the OK button to test the connection.
![]()
- Click the OK button to continue.

- Click the gray highlighted MySQLConnection connection icon below the MySQL Connection title to launch the MySQL Workbench application.
- When you click the gray highlighted MySQLConnection connection icon, MySQL Workbench prompts you for a password. After entering a password and verifying the connection, click the OK button to connect to the MySQL Workbench application.

- The MySQL Workbench launches in the default view.

- Click on the Database menu option and then the Reverse Engineering… option, as shown in the illustration.

- This displays the Set Parameters for Connecting to a DBMS dialog. Click the Stored Connection list of values. Choose the MySQLConnection (if you used my suggestion) or the one you created from the list of values of the Stored Connection element. Click the Next button to continue.
- Enter the password and click the OK button to connect to the MySQL database.

- This is an in-progress display, it runs waiting for the password and until the step of the wizard completes.

- This dialog displays when the MySQL Workbench application connects to the database, retrieves a schema (database) list from the database management system, and checks the common server configuration issues. Click the Next button to move to the next step of the wizard.

- This Select Schemas to Reverse Engineer dialog displays any available schemas. You check the schemas that you want. Click the Next button to move to the next step of the wizard.
- Enter the password and click the OK button to connect to the MySQL database to retrieve objects from the database management system.

- This dialog displays when the MySQL Workbench application retrieves objects from the database. Click the Next button to move to the next step of the wizard.

- This dialog displays when the MySQL Workbench application retrieves objects from the schemata and checks the result. Click the Next button to move to the next step of the wizard.

- This dialog displays the tables, views, and routines to import. Click the Execute button to move to the next step of the wizard.
- This dialog displays the tables, views, and routines to import. Click the Execute button to move to the next step of the wizard.

- This dialog displays shows the reverse engineering objects and puts them in the object image. Click the Next button to move to the next step of the wizard.

- This dialog displays a summary of reverse engineering objects. Click the Close button to move to the next step of the wizard.

- The MySQL Model dialog displays after you complete the reverse engineering process. Click the EER Diagram icon or EER Diagram tab to see visual depiction of the database objects.

- The EER Diagram is equivalent to the EER Diagram tab. The Navigator displays the tables as blue rectangles. You can scroll through the Canvas Panel to work with the display of tables and views.

- The next image shows EER Diagram with the tables moved for display purposes. Sometimes there are too many relationship lines, MySQL Workbench lets you split the lines so they don’t clutter the diagram.

- The next image shows you the Property tab of EER Diagram. You should see that the drawSplit checkbox is checked, which suppresses the bottom-most relationship line from displaying in the EER from display on the Canvas Panel.
You can now save the MySQL Workbench file in the Lab 3 directory.
Fedora PostgreSQL Install
Somebody asked how to put PostgreSQL on my Fedora image with Oracle Database 11g and MySQL. It’s fairly simple. You can check for the current download at yum.postgresql.org and then download it like this as the root user:
yum localinstall http://yum.postgresql.org/9.3/fedora/fedora-20-x86_64/pgdg-fedora93-9.3-1.noarch.rpm |
You should see the following output when the download is successful, don’t forget to type y to complete the download:
Loaded plugins: langpacks, refresh-packagekit pgdg-fedora93-9.3-1.noarch.rpm | 5.1 kB 00:00 Examining /var/tmp/yum-root-2EPf_J/pgdg-fedora93-9.3-1.noarch.rpm: pgdg-fedora93-9.3-1.noarch Marking /var/tmp/yum-root-2EPf_J/pgdg-fedora93-9.3-1.noarch.rpm to be installed Resolving Dependencies --> Running transaction check ---> Package pgdg-fedora93.noarch 0:9.3-1 will be installed --> Finished Dependency Resolution Dependencies Resolved ================================================================================ Package Arch Version Repository Size ================================================================================ Installing: pgdg-fedora93 noarch 9.3-1 /pgdg-fedora93-9.3-1.noarch 2.1 k Transaction Summary ================================================================================ Install 1 Package Total size: 2.1 k Installed size: 2.1 k Is this ok [y/d/N]: y Downloading packages: Running transaction check Running transaction test Transaction test succeeded Running transaction (shutdown inhibited) Installing : pgdg-fedora93-9.3-1.noarch 1/1 Verifying : pgdg-fedora93-9.3-1.noarch 1/1 Installed: pgdg-fedora93.noarch 0:9.3-1 Complete! |
After downloading the packages, you install with the following command:
yum install postgresql93-server |
You should see the following output when the installation is successful, don’t forget to type y to complete the installation:
Loaded plugins: langpacks, refresh-packagekit pgdg93 | 3.6 kB 00:00 (1/2): pgdg93/20/x86_64/group_gz | 332 B 00:00 (2/2): pgdg93/20/x86_64/primary_db | 84 kB 00:00 Resolving Dependencies --> Running transaction check ---> Package postgresql93-server.x86_64 0:9.3.5-1PGDG.f20 will be installed --> Processing Dependency: postgresql93-libs(x86-64) = 9.3.5-1PGDG.f20 for package: postgresql93-server-9.3.5-1PGDG.f20.x86_64 --> Processing Dependency: postgresql93(x86-64) = 9.3.5-1PGDG.f20 for package: postgresql93-server-9.3.5-1PGDG.f20.x86_64 --> Processing Dependency: postgresql93 = 9.3.5-1PGDG.f20 for package: postgresql93-server-9.3.5-1PGDG.f20.x86_64 --> Processing Dependency: libpq.so.5()(64bit) for package: postgresql93-server-9.3.5-1PGDG.f20.x86_64 --> Running transaction check ---> Package postgresql93.x86_64 0:9.3.5-1PGDG.f20 will be installed ---> Package postgresql93-libs.x86_64 0:9.3.5-1PGDG.f20 will be installed --> Finished Dependency Resolution Dependencies Resolved ================================================================================ Package Arch Version Repository Size ================================================================================ Installing: postgresql93-server x86_64 9.3.5-1PGDG.f20 pgdg93 3.6 M Installing for dependencies: postgresql93 x86_64 9.3.5-1PGDG.f20 pgdg93 1.0 M postgresql93-libs x86_64 9.3.5-1PGDG.f20 pgdg93 203 k Transaction Summary ================================================================================ Install 1 Package (+2 Dependent packages) Total download size: 4.8 M Installed size: 22 M Is this ok [y/d/N]: y Downloading packages: (1/3): postgresql93-libs-9.3.5-1PGDG.f20.x86_64.rpm | 203 kB 00:00 (2/3): postgresql93-9.3.5-1PGDG.f20.x86_64.rpm | 1.0 MB 00:01 (3/3): postgresql93-server-9.3.5-1PGDG.f20.x86_64.rpm | 3.6 MB 00:02 -------------------------------------------------------------------------------- Total 1.6 MB/s | 4.8 MB 00:02 Running transaction check Running transaction test Transaction test succeeded Running transaction (shutdown inhibited) Installing : postgresql93-libs-9.3.5-1PGDG.f20.x86_64 1/3 Installing : postgresql93-9.3.5-1PGDG.f20.x86_64 2/3 Installing : postgresql93-server-9.3.5-1PGDG.f20.x86_64 3/3 Verifying : postgresql93-server-9.3.5-1PGDG.f20.x86_64 1/3 Verifying : postgresql93-9.3.5-1PGDG.f20.x86_64 2/3 Verifying : postgresql93-libs-9.3.5-1PGDG.f20.x86_64 3/3 Installed: postgresql93-server.x86_64 0:9.3.5-1PGDG.f20 Dependency Installed: postgresql93.x86_64 0:9.3.5-1PGDG.f20 postgresql93-libs.x86_64 0:9.3.5-1PGDG.f20 Complete! |
You can confirm the installation with the following command:
rpm -qa | grep postgres |
It returns:
postgresql93-9.3.5-1PGDG.f20.x86_64 postgresql93-server-9.3.5-1PGDG.f20.x86_64 postgresql93-libs-9.3.5-1PGDG.f20.x86_64 |
You’ve now installed PostgreSQL but did you really? If you’re asking that questions you have other questions. Let me try to answer them quickly, here:
You have installed PostgreSQL and created a postgres user. postgres is the owner of the PostgreSQL database. You can connect to the database as the postgres user without credentials because that’s where you administer the database. However, you can’t connect using ssh as the postgres user. You must use sudo to assume the root user’s privileges and then use the su command to become the postgres user.
If you just completed the installation, you are the root user. You can verify that with a call to the whoami utility:
whoami |
It should return:
root |
You connect as the postgres user with the su utility like this:
su - postgres |
If you rerun the whoami command now, you should see:
postgres |
You can start the PostgreSQL command-line utility (psql), like this:
psql |
At the postgres (or psql) prompt, you can interactively confirm the setup of a database installation:
postgres=# SELECT setting as "Data Location" postgres-# FROM pg_settings postgres-# WHERE name = 'data_directory'; |
It should return the following:
Data Location ------------------------- /var/lib/pgsql/9.3/data (1 row) |
At this point, you should refer to this other blog post that shows you how to setup a new Database or Schema in PostgreSQL. You can find basic Postgres help files in this other blog post. As always, I hope this helps those timid about adding new software.
Add Color to VIM?
In Fedora 20, documents have no color coding when you edit them with vi or vim. That’s because Fedora installs vim-minimal by default. You can check what’s running with the following command at a shell prompt in the terminal:
rpm -qa | grep vim |
It should print the following to console:
vim-minimal-7.4.179-1.fc20.x86_64 |
You can download and install vim with the enhanced version by using the following syntax:
sudo yum install vim-enhanced |
Loaded plugins: langpacks, refresh-packagekit Resolving Dependencies --> Running transaction check ---> Package vim-enhanced.x86_64 2:7.4.417-1.fc20 will be installed --> Processing Dependency: vim-common = 2:7.4.417-1.fc20 for package: 2:vim-enhanced-7.4.417-1.fc20.x86_64 --> Processing Dependency: libgpm.so.2()(64bit) for package: 2:vim-enhanced-7.4.417-1.fc20.x86_64 --> Running transaction check ---> Package gpm-libs.x86_64 0:1.20.7-3.fc20 will be installed ---> Package vim-common.x86_64 2:7.4.417-1.fc20 will be installed --> Processing Dependency: vim-filesystem for package: 2:vim-common-7.4.417-1.fc20.x86_64 --> Running transaction check ---> Package vim-filesystem.x86_64 2:7.4.417-1.fc20 will be installed --> Finished Dependency Resolution Dependencies Resolved ================================================================================ Package Arch Version Repository Size ================================================================================ Installing: vim-enhanced x86_64 2:7.4.417-1.fc20 updates 1.0 M Installing for dependencies: gpm-libs x86_64 1.20.7-3.fc20 fedora 32 k vim-common x86_64 2:7.4.417-1.fc20 updates 5.9 M vim-filesystem x86_64 2:7.4.417-1.fc20 updates 11 k Transaction Summary ================================================================================ Install 1 Package (+3 Dependent packages) Total download size: 7.0 M Installed size: 23 M Is this ok [y/d/N]: y Downloading packages: (1/4): gpm-libs-1.20.7-3.fc20.x86_64.rpm | 32 kB 00:00 (2/4): vim-enhanced-7.4.417-1.fc20.x86_64.rpm | 1.0 MB 00:03 (3/4): vim-filesystem-7.4.417-1.fc20.x86_64.rpm | 11 kB 00:03 (4/4): vim-common-7.4.417-1.fc20.x86_64.rpm | 5.9 MB 00:05 -------------------------------------------------------------------------------- Total 1.3 MB/s | 7.0 MB 00:05 Running transaction check Running transaction test Transaction test succeeded Running transaction Installing : 2:vim-filesystem-7.4.417-1.fc20.x86_64 1/4 Installing : 2:vim-common-7.4.417-1.fc20.x86_64 2/4 Installing : gpm-libs-1.20.7-3.fc20.x86_64 3/4 Installing : 2:vim-enhanced-7.4.417-1.fc20.x86_64 4/4 Verifying : gpm-libs-1.20.7-3.fc20.x86_64 1/4 Verifying : 2:vim-common-7.4.417-1.fc20.x86_64 2/4 Verifying : 2:vim-enhanced-7.4.417-1.fc20.x86_64 3/4 Verifying : 2:vim-filesystem-7.4.417-1.fc20.x86_64 4/4 Installed: vim-enhanced.x86_64 2:7.4.417-1.fc20 Dependency Installed: gpm-libs.x86_64 0:1.20.7-3.fc20 vim-common.x86_64 2:7.4.417-1.fc20 vim-filesystem.x86_64 2:7.4.417-1.fc20 Complete! |
You can now type vim to edit files in color but vi will still be in black and white.
MySQL Workbench on Fedora
The early release of Fedora 20 disallowed installation of MySQL Workbench but the current version allows it. Almost like Tom Cruise’s Edge of Tomorrow without the drama. All you need to do is follow my earlier instructions for installing MySQL on Fedora 20. I’d check your kernel to know whether it’s supported. You can check that with this command:
<shell> uname -r |
My Fedora is at the following version:
3.14.8-200.fc20.x86_64 |
Then, you can install MySQL Workbench with yum, like this:
<shell> sudo yum install mysql-workbench |
It generates the following log file, and if you have Oracle 11g XE installed you can ignore the mime-type error:
Loaded plugins: langpacks, refresh-packagekit
Resolving Dependencies
--> Running transaction check
---> Package mysql-workbench-community.x86_64 0:6.1.7-1.fc20 will be installed
--> Processing Dependency: libzip.so.2()(64bit) for package: mysql-workbench-community-6.1.7-1.fc20.x86_64
--> Processing Dependency: libvsqlitepp.so.3()(64bit) for package: mysql-workbench-community-6.1.7-1.fc20.x86_64
--> Processing Dependency: libtinyxml.so.0()(64bit) for package: mysql-workbench-community-6.1.7-1.fc20.x86_64
--> Processing Dependency: liblua-5.1.so()(64bit) for package: mysql-workbench-community-6.1.7-1.fc20.x86_64
--> Processing Dependency: libgtkmm-2.4.so.1()(64bit) for package: mysql-workbench-community-6.1.7-1.fc20.x86_64
--> Processing Dependency: libgdkmm-2.4.so.1()(64bit) for package: mysql-workbench-community-6.1.7-1.fc20.x86_64
--> Processing Dependency: libctemplate.so.2()(64bit) for package: mysql-workbench-community-6.1.7-1.fc20.x86_64
--> Running transaction check
---> Package compat-lua-libs.x86_64 0:5.1.5-1.fc20 will be installed
---> Package ctemplate.x86_64 0:2.2-5.fc20 will be installed
---> Package gtkmm24.x86_64 0:2.24.4-2.fc20 will be installed
---> Package libzip.x86_64 0:0.11.2-1.fc20 will be installed
---> Package tinyxml.x86_64 0:2.6.2-4.fc20 will be installed
---> Package vsqlite++.x86_64 0:0.3.13-3.fc20 will be installed
--> Finished Dependency Resolution

Dependencies Resolved

================================================================================
 Package                    Arch    Version        Repository              Size
================================================================================
Installing:
 mysql-workbench-community  x86_64  6.1.7-1.fc20   mysql-tools-community   24 M
Installing for dependencies:
 compat-lua-libs            x86_64  5.1.5-1.fc20   updates                158 k
 ctemplate                  x86_64  2.2-5.fc20     fedora                 174 k
 gtkmm24                    x86_64  2.24.4-2.fc20  fedora                 748 k
 libzip                     x86_64  0.11.2-1.fc20  updates                 59 k
 tinyxml                    x86_64  2.6.2-4.fc20   updates                 49 k
 vsqlite++                  x86_64  0.3.13-3.fc20  updates                 58 k

Transaction Summary
================================================================================
Install  1 Package (+6 Dependent packages)

Total download size: 26 M
Installed size: 119 M
Is this ok [y/d/N]: y
Downloading packages:
(1/7): compat-lua-libs-5.1.5-1.fc20.x86_64.rpm              | 158 kB  00:01
(2/7): ctemplate-2.2-5.fc20.x86_64.rpm                      | 174 kB  00:01
(3/7): tinyxml-2.6.2-4.fc20.x86_64.rpm                      |  49 kB  00:00
(4/7): gtkmm24-2.24.4-2.fc20.x86_64.rpm                     | 748 kB  00:01
(5/7): vsqlite++-0.3.13-3.fc20.x86_64.rpm                   |  58 kB  00:00
(6/7): libzip-0.11.2-1.fc20.x86_64.rpm                      |  59 kB  00:02
(7/7): mysql-workbench-community-6.1.7-1.fc20.x86_64.rpm    |  24 MB  00:08
--------------------------------------------------------------------------------
Total                                              2.9 MB/s |  26 MB  00:08
Running transaction check
Running transaction test
Transaction test succeeded
Running transaction
  Installing : gtkmm24-2.24.4-2.fc20.x86_64                                 1/7
  Installing : libzip-0.11.2-1.fc20.x86_64                                  2/7
  Installing : vsqlite++-0.3.13-3.fc20.x86_64                               3/7
  Installing : ctemplate-2.2-5.fc20.x86_64                                  4/7
  Installing : compat-lua-libs-5.1.5-1.fc20.x86_64                          5/7
  Installing : tinyxml-2.6.2-4.fc20.x86_64                                  6/7
  Installing : mysql-workbench-community-6.1.7-1.fc20.x86_64                7/7
Error in file "/usr/share/applications/oraclexe-startdb.desktop": "Application/database" is an invalid MIME type ("Application" is an unregistered media type)
  Verifying  : tinyxml-2.6.2-4.fc20.x86_64                                  1/7
  Verifying  : compat-lua-libs-5.1.5-1.fc20.x86_64                          2/7
  Verifying  : ctemplate-2.2-5.fc20.x86_64                                  3/7
  Verifying  : vsqlite++-0.3.13-3.fc20.x86_64                               4/7
  Verifying  : mysql-workbench-community-6.1.7-1.fc20.x86_64                5/7
  Verifying  : libzip-0.11.2-1.fc20.x86_64                                  6/7
  Verifying  : gtkmm24-2.24.4-2.fc20.x86_64                                 7/7

Installed:
  mysql-workbench-community.x86_64 0:6.1.7-1.fc20

Dependency Installed:
  compat-lua-libs.x86_64 0:5.1.5-1.fc20     ctemplate.x86_64 0:2.2-5.fc20
  gtkmm24.x86_64 0:2.24.4-2.fc20            libzip.x86_64 0:0.11.2-1.fc20
  tinyxml.x86_64 0:2.6.2-4.fc20             vsqlite++.x86_64 0:0.3.13-3.fc20

Complete! |
After successfully installing MySQL Workbench, you can launch it with the following command:
<shell> mysql-workbench |
It should launch the following MySQL Workbench home page (click on it to see the full size image):
E-Business Customers
It seems the Oracle E-Business Suite stymies newbies. Naturally, it’s complex and requires some research before you try to develop any customization.
Having recently fielded a question about how to manage, search, create and update customers for a third party order entry system, I’m always surprised by how little people know about Oracle’s Trading Community Architecture (TCA). They likewise frequently don’t know that there is already a documented process, like the one defined in the Oracle Trading Community Architecture User Guide:
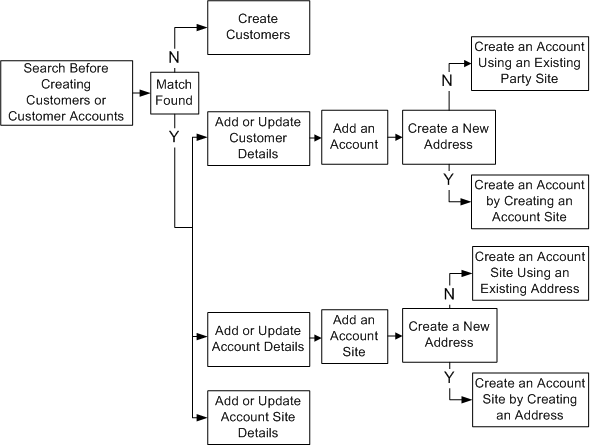
You also have the Oracle Trading Community Architecture Reference Guide, which provides more detailed information. I strongly recommend you read these before trying to Google a solution that may or may not meet your needs. Naturally, good PL/SQL coding skills make this type of activity straightforward. That’s why Oracle staff should master PL/SQL.
Wrapping SQL*Plus
One annoying thing from installing Oracle Database 11g on Fedora, was that the up arrows for command history didn’t work. I decided to fix that today after seeing Lutz Hartmann’s article on rlwrap. Unfortunately, the epel (Extra Packages for Enterprise Linux) package he recommended doesn’t run on Fedora 20. You can read my tale of woe, or skip to the .bashrc function that fixed it when I installed only rlwrap.
Attempting it on yum, gave me these errors:
# yum install http://www.mirrorservice.org/sites/dl.fedoraproject.org/pub/epel/6/i386/epel-release-6-8.noarch.rpm Loaded plugins: langpacks, refresh-packagekit epel-release-6-8.noarch.rpm | 14 kB 00:00 Examining /var/tmp/yum-root-5CLTPa/epel-release-6-8.noarch.rpm: epel-release-6-8.noarch Marking /var/tmp/yum-root-5CLTPa/epel-release-6-8.noarch.rpm to be installed Resolving Dependencies --> Running transaction check ---> Package epel-release.noarch 0:6-8 will be installed --> Processing Conflict: epel-release-6-8.noarch conflicts fedora-release No package matched to upgrade: epel-release --> Finished Dependency Resolution Error: epel-release conflicts with fedora-release-20-3.noarch You could try using --skip-broken to work around the problem You could try running: rpm -Va --nofiles –nodigest |
Poking around for an epel fix wasn’t successful, so I chose to install only the rlwrap package. Here’s that command and log file:
[root@localhost ~]# yum install rlwrap Loaded plugins: langpacks, protectbase, refresh-packagekit 0 packages excluded due to repository protections Resolving Dependencies --> Running transaction check ---> Package rlwrap.x86_64 0:0.41-1.fc20 will be installed --> Finished Dependency Resolution Dependencies Resolved ================================================================================ Package Arch Version Repository Size ================================================================================ Installing: rlwrap x86_64 0.41-1.fc20 updates 95 k Transaction Summary ================================================================================ Install 1 Package Total download size: 95 k Installed size: 204 k Is this ok [y/d/N]: y Downloading packages: rlwrap-0.41-1.fc20.x86_64.rpm | 95 kB 00:00 Running transaction check Running transaction test Transaction test succeeded Running transaction (shutdown inhibited) Installing : rlwrap-0.41-1.fc20.x86_64 1/1 Verifying : rlwrap-0.41-1.fc20.x86_64 1/1 Installed: rlwrap.x86_64 0:0.41-1.fc20 Complete! |
The next step was getting it to work. A sqlplus function wrapper inside the .bashrc file seemed the easiest. Here’s the code to the .bashrc file:
# .bashrc # Source global definitions if [ -f /etc/bashrc ]; then . /etc/bashrc fi # Uncomment the following line if you don't like systemctl's auto-paging feature: # export SYSTEMD_PAGER= # User specific aliases and functions . /u01/app/oracle/product/11.2.0/xe/bin/oracle_env.sh # Wrap sqlplus with rlwrap to edit prior lines. sqlplus() { if [ "$RLWRAP" = "0" ]; then sqlplus "$@" else rlwrap sqlplus "$@" fi } # Set vi as a command line editor. set -o vi |
As always, I hope this helps some folks.
Excel EOMONTH Function
I fielded a question from blog reader on a three year old post about the EOMONTH (End Of Month) function in Excel. The reader want to write a mega-function (a term for putting two or more functions together to solve a problem, according to Mr. Excel). The function would return the first day of any month for the first day of the month and the first day of the next month for any day after the first day of the last month.
I wrote a quick little solution for the user, as shown below:
=IF(A1=EOMONTH(A1,-1)+1,EOMONTH(A1,-1)+1,EOMONTH(A1,0)+1) |
The results would look like:
![]()
The user ran into a problem with the example because the date was being calculated and not an integer value. The formula returned the first day of the next month when it should have returned the first day of the current month. That meant the source value in the cell wasn’t an integer. It was a real number. Integer values in Excel are numeric values for 12:00:00 A.M. of any day, and real numbers can be any time of the day.
Unfortunately, the EOMONTH function is a pseudo-overloaded function, and the EOMONTH function takes an int or double (integer or real number) as it’s parameter. That’s because Excel only supports a NUMBER data type, which can be an integer or real number.
The EOMONTH function always returns an integer. The IF function I provided was designed to compare an integer-based date cell value against the result of the EOMONTH function. It wasn’t robust enough to support a comparison of 11/1/13 at 12:01 A.M. against the result of the EOMONTH function (11/1/13 at 12:00 A.M.). That’s why it returned the first of the next month instead of the first of the current month.
The more complete solution requires using the TRUNC function around the source date (B4 or C4 in the following example) to ensure the IF statement compares dates not time-stamps.
=IF(TRUNC(B4)=EOMONTH(B4,-1)+1,EOMONTH(B4,-1)+1,EOMONTH(B4,0)+1) |

You should note that the TRUNC function effectively rounds down to the integer and removes the fractional portion of the real number before making a comparison. It’s an explicit casting process when we take proactive measures to ensure the value before the IF function compares it.
PostgreSQL New Database
How time flies, last March I explained how to install and configure PostgreSQL on Windows. It was my intent to start posting more content on PostgreSQL but I was distracted by another writing commitment on Oracle Database 12c PL/SQL Advanced Programming Techniques, which should be available in November. It tempted me away from PostgreSQL because I got to write about how to use Java inside Oracle Database 12c, which was fun. Having completed that, I’m back on task. Here’s the second entry on PostgreSQL. It shows you howto create your own database, database administrator role, user, and how to connect with psql CLI (Command Line Interface) as the new user.
- Create a user-defined
video_dbtablespace for your database. This requires that you know where the physical files where created when you installed PostgreSQL. You can discover the directory with the following query:
SELECT setting AS "Data Location" FROM pg_settings WHERE name = 'data_directory'; |
Data Location -------------------------------------- C:/Program Files/PostgreSQL/9.3/data (1 row) |
You create the video_db tablespace with the following syntax:
CREATE TABLESPACE video_db OWNER postgres LOCATION 'C:\Program Files\PostgreSQL\9.3\data'; |
You can check the presence of the video_db tablespace after creating it with the following query:
SELECT * FROM pg_tablespace; |
It should print:
spcname | spcowner | spcacl | spcoptions ------------+----------+--------+------------ pg_default | 10 | | pg_global | 10 | | video_db | 10 | | (3 rows) |
It’s important to note for those new to PostgreSQL that the pg_global and pg_default tablespaces are creating when initializing the database. The pg_global holds shared tables and the pg_default holds everything else.
- Create a database that uses your user-defined
video_dbtablespace with the following two commands:
CREATE DATABASE videodb WITH OWNER = postgres ENCODING = 'UTF8' TABLESPACE = video_db LC_COLLATE = 'English_United States.1252' LC_CTYPE = 'English_United States.1252' CONNECTION LIMIT = -1; COMMENT ON DATABASE videodb IS 'VideoDB'; |
- Create a database role, grant the super user privileges to the role, and create a user with the role. You can do that with the following three commands:
CREATE ROLE dba WITH SUPERUSER; GRANT ALL PRIVILEGES ON DATABASE videodb TO dba; CREATE USER video WITH ROLE dba PASSWORD 'video'; |
- Connect to the new
videodbdatabase with thepsqlCLI as thevideouser. You can do that with the following OS command:
psql -d videodb -U video |
- Once connected as the new
videouser, you can use a system information function to determine the current database:
SELECT current_database(); |
It should display:
current_database ------------------ videodb (1 row) |
There are many privilege options, and you should choose wisely which ones you use. As always, I hope this answers questions for other users.
Hiding Java Source Code
The ability to deploy Java inside the Oracle database led somebody to conclude that the source isn’t visible in the data catalog. Then, that person found that they were wrong because the Java source is visible when you use a DDL command to CREATE, REPLACE, and COMPILE the Java source. This post discloses how to find the Java source and how to prevent it from being stored in the data catalog.
You can verify that the Java class and source files exist with the following query:
1 2 3 4 5 6 7 8 | COLUMN object_name FORMAT A20 HEADING "Object Name" COLUMN object_type FORMAT A12 HEADING "Object Type" COLUMN status FORMAT A14 HEADING "Object Status" SELECT object_name , object_type , status FROM user_objects WHERE object_name = 'ReadFile'; |
It displays:
Object Name Object Type Object Status -------------------- ------------ -------------- ReadFile JAVA SOURCE VALID ReadFile JAVA CLASS VALID 2 rows selected. |
Then, you can use the following query to discovery a Java library created by a SQL command:
1 2 3 4 5 6 | COLUMN line FORMAT 9999 HEADING "Line|#" COLUMN text FORMAT A66 HEADING "Text" SELECT line , text FROM user_source WHERE name = 'ReadFile'; |
It displays the following:
Line # Text ------- ------------------------------------------------------------------ 1 // Java library imports. 2 import java.io.File; 3 import java.io.BufferedReader; 4 import java.io.FileNotFoundException; 5 import java.io.IOException; 6 import java.io.FileReader; 7 import java.security.AccessControlException; 8 9 // Class definition. 10 public class ReadFile { 11 // Define class variables. 12 private static File file; 13 private static FileReader inTextFile; 14 private static BufferedReader inTextReader; 15 private static StringBuffer output = new StringBuffer(); 16 private static String outLine, outText; 17 18 // Define readText() method. 19 public static String readText(String fromFile) 20 throws AccessControlException, IOException { 21 // Read file. 22 try { 23 // Initialize File. 24 file = new File(fromFile); 25 26 // Check for valid file. 27 if (file.exists()) { 28 29 // Assign file to a stream. 30 inTextFile = new FileReader(file); 31 inTextReader = new BufferedReader(inTextFile); 32 33 // Read character-by-character. 34 while ((outLine = inTextReader.readLine()) != null) { 35 output.append(outLine + "\n"); } 36 37 // Assing the StringBuffer to a String. 38 outText = Integer.toString(output.toString().length()); 39 40 // Close File. 41 inTextFile.close(); } 42 else { 43 outText = new String("Empty"); }} 44 catch (IOException e) { 45 outText = new String(""); 46 return outText; } 47 return outText; }} 47 rows selected. |
You can eliminate the source by compiling the Java library outside the database. Then, you use the loadjava utility to load the only the class file into the data catalog. The syntax would be the following command for an importer user in a video Pluggable Database (PDB):
loadjava -r -f -o -user importer/importer@video ReadFile.class |
You should know that this syntax is disallowed by the loadjava utility, notwithstanding it’s found in the Oracle Database 12c documentation:
loadjava -r -f -o -user importer@video/importer ReadFile.class |
You can verify that only the Java class file exists with the following query:
1 2 3 4 5 6 7 8 | COLUMN object_name FORMAT A20 HEADING "Object Name" COLUMN object_type FORMAT A12 HEADING "Object Type" COLUMN status FORMAT A14 HEADING "Object Status" SELECT object_name , object_type , status FROM user_objects WHERE object_name = 'ReadFile'; |
It displays:
Object Name Object Type Object Status -------------------- ------------ -------------- ReadFile JAVA CLASS VALID 1 row selected. |
Hope this helps those who want to hide the Java source files.
Visual Studio Freedom
Some of my students want to learn to write C++ on a Windows OS. At some point, you simply surrender to the fact that many people prefer the Windows OS as a starting point. Traditionally, I’d recommend the Microsoft Visual Studio as their learning vehicle because it’s free to our students because of our relationship with Microsoft. It’s not free to graduates. When a graduate contacts me I recommend Code::Blocks. Just recently, one ask for more than a recommendation. He wanted instructions. These are the instructions.
Download and Install Code::Blocks
Here are the instructions to install and download Code::Blocks 13.12.

- You can download Download and Install Code::Blocks from the web site. Then, you can install Code::Blocks from download folder.

- You launch the
codeblocks-12.12mingw-setup.exefile from the download folder.

- This is the first screen of the Code::Blocks wizard. Click the Next button to continue.

- This is the license agreement. Click the I Agree button to continue.

- This screen shows the components to install. The default has all of them checked. I recommend you keep the default. Click the Next button to continue.

- This screen lets you accept the default install location or to chose another install location. I recommend you keep the default install location. Click the Install button to continue.

- This screen shows you the extracting and deployment of files. Click the Next button to continue.

- This indicates that you’ve installed the product, and it now prompts you to run Code::Blocks programscreen shows you the extracting and deployment of files. Click the Yes button to continue.

- This indicates that the installer detects a GNU GCC Compiler. Click the OK button to continue.

- This acknowledges the completion of the installation. Click the OK button to continue.

- This dialog tells you the installation has completed. Click the Next button to continue.

- This dialog completes the installation. Click the Finish button to end the installation.
Configure Code::Blocks

- This is the main menu of Code::Blocks application. You need to click the Create a new project link to continue.

- You should choose a Console application for this example. Double click the Console application icon to continue.

- This dialog launches the Console page. Check the Skip this page next time and then click the Next button to continue.

- This dialog lets you choose whether you want to write a C and C++ program. Click the Next button to continue.

- This dialog lets you choose whether you want to write a C and C++ program. Click the Next button to continue.

- This dialog lets you choose the compiler, debug, and release configurations. Click the Finish button to continue.
Create and run a program in Code::Blocks

- This dialog gives you an empty project. Click the Sources item in the list of the Project tab.

- This dialog adds a main.cpp to the list of the Management console. Click the main.cpp item in the list of the Project tab.

- After clicking the main.cpp item in the Project list, the Code::Blocks IDE generates the content of the main.cpp file. Click the Green Arrow to run (compile and execute) the main.cpp file. The
endlis a defined instd, and like a\nline terminator.

- A new file hasn’t been compiled (or built), which means you get the following dialog. It wants to know if you want to build the program. Click the Yes button to build the program.

- After making the file, the Build Log tells you whether the code compiles or not. Click the Run green arrow to run the program.

- After running a Console application, you’ll see the output of your program in a console window like the following. You can close it by clicking the console window’s close button.

- After executing the compiled file, the Build Log tells you whether the program compiles successfully or not.
As always, I hope this helps those who read it. Good luck learning to write C/C++ programs.
