Archive for the ‘DBA’ Category
Troubleshoot Oracle Errors
It’s always a bit difficult to trap errors in SQL*Developer when you’re running scripts that do multiple things. As old as it is, using the SQL*Plus utility and spooling to log files is generally the fastest way to localize errors across multiple elements of scripts. Unfortunately, you must break up you components into local components, like a when you create a type, procedure, function, or package.
This is part of my solution to leverage in-depth testing of the Oracle Database 23ai Free container from an Ubuntu native platform. You can find this prior post shows you how to setup Oracle*Client for Ubuntu and connect to the Oracle Database 23ai Free container.
After you’ve done that, put the following oracle_errors Bash shell function into your testing context, or into your .bashrc file:
# Troubleshooting errors utility function. oracle_errors () { # Oracle Error prefixes qualify groups of error types, like # this subset of error prefixes used in the Bash function. # ============================================================ # JMS - Java Messaging Errors # JZN - JSON Errors # KUP - External Table Access Errors # LGI - File I/O Errors # OCI - Oracle Call Interface Errors # ORA - Oracle Database Errors # PCC - Oracle Precompiler Errors # PLS - Oracle PL/SQL Errors # PLW - Oracle PL/SQL Warnings # SP2 - Oracle SQL*Plus Errors # SQL - SQL Library Errors # TNS - SQL*Net (networking) Errors # ============================================================ # Define a array of Oracle error prefixes. prefixes=("jms" "jzn" "kup" "lgi" "oci" "ora" "pcc" "pls" "plw" "sp2" "sql" "tns") # Prepend the -e for the grep utility to use regular expression pattern matching; and # use the ^before the Oracle error prefixes to avoid returning lines that may # contain the prefix in a comment, like the word lookup contains the prefix kup. for str in ${prefixes[@]}; do patterns+=" -e ^${str}" done # Display output from a SQL*Plus show errors command written to a log file when # a procedure, function, object type, or package body fails to compile. This # prints the warning message followed by the line number displayed. patterns+=" -e ^warning" patterns+=" -e ^[0-9]/[0-9]" # Assign any file filter to the ext variable. ext=${1} # Assign the extension or simply use a wildcard for all files. if [ ! -z ${ext} ]; then ext="*.${ext}" else ext="*" fi # Assign the number of qualifying files to a variable. fileNum=$(ls -l ${ext} 2>/dev/null | grep -v ^l | wc -l) # Evaluate the number of qualifying files and process. if [ ${fileNum} -eq "0" ]; then echo "[0] files exist." elif [ ${fileNum} -eq "1" ]; then fileName=$(ls ${ext}) find `pwd` -type f | grep -in ${ext} ${patterns} | while IFS='\n' read list; do echo "${fileName}:${list}" done else find `pwd` -type f | grep -in ${ext} ${patterns} | while IFS='\n' read list; do echo "${list}" done fi # Clear ${patterns} variable. patterns="" } |
Now, let’s create a debug.txt test file to demonstrate how to use the oracle_errors, like:
ORA-12704: character SET mismatch PLS-00124: name OF EXCEPTION expected FOR FIRST arg IN exception_init PRAGMA SP2-00200: Environment error JMS-00402: Class NOT found JZN-00001: END OF input |
You can navigate to your logging directory and call the oracle_errors function, like:
oracle_errors txt |
It’ll return the following, which is file number, line number, and error code:
debug.txt:1:ORA-12704: character set mismatch debug.txt:2:PLS-00124: name of exception expected for first arg in exception_init pragma debug.txt:3:SP2-00200: Environment error debug.txt:4:JMS-00402: Class not found debug.txt:5:JZN-00001: End of input |
There are other Oracle error prefixes but the ones I’ve selected are the more common errors for Java, JavaScript, PL/SQL, Python, and SQL testing. You can add others if your use cases require them to the prefixes array. Just a note for those new to Bash shell scripting the “${variable_name}” is required for arrays.
For a more complete example, I created the following files for a trivial example of procedure overloading in PL/SQL:
- tables.sql – that creates two tables.
- spec.sql – that creates a package specification.
- body.sql – that implements a package specification.
- test.sql – that implements a test case using the package.
- integration.sql – that calls the the scripts in proper order.
The tables.sql, spec.sql, body.sql, and test.sql use the SQL*Plus spool command to write log files, like:
SPOOL spec.txt

-- Insert code here ...

SPOOL OFF |
The body.sql file includes SQL*Plus list and show errors commands, like:
SPOOL spec.txt

-- Insert code here ...

LIST
SHOW ERRORS

SPOOL OFF |
The integration.sql script calls the tables.sql, spec.sql, body.sql, and test.sql in order. Corrupting the spec.sql file by adding a stray “x” to one of the parameter names causes a cascade of errors. After running the integration.sql file with the introduced error, the Bash oracle_errors function returns:
body.txt:2:Warning: Package Body created with compilation errors. body.txt:148:4/13 PLS-00323: subprogram or cursor 'WARNER_BROTHER' is declared in a test.txt:4:ORA-06550: line 2, column 3: test.txt:5:PLS-00306: wrong number or types of arguments in call to 'WARNER_BROTHER' test.txt:6:ORA-06550: line 2, column 3: |
I hope that helps those learning how to program and perform integration testing in an Oracle Database.
Oracle 23c Free SQL*Plus
It’s always frustrated me when using the sqlplus command-line interface (CLI) that you can’t just “up arrow” to through the history. At least, that’s the default case unless you wrap the sqlplus executable.
I like to do my development work as close to the database as possible. The delay from SQL Developer to the database or VSCode to the database is just too long. Therefore, I like the native sqlplus to be as efficient as possible. This post shows you how to install the rlwarp utility to wrap sqlplus and create a sandboxed student user for a local development account inside the Oracle 23c Free container. You should note that the Docker or Podman Container is using Oracle Unbreakable Linux 8 as it’s native OS.
You can connect to your Docker version of Oracle Database 23c Free with the following command:
docker exec -it -u root oracle23c bash |
You can’t just use dnf to install rlwrap and get it to magically install all the dependencies. That would be too easy, eh?
Attempting to do so will lock your base OS and eventually force you to kill with prejudice the hung dnf process (at least it forced me to do so). You need to determine the rlwrap dependencies and then install them first. In that process, I noticed that the which utility program wasn’t installed in the container.
Naturally, I installed the which utility first with this command:
dnf install -y which |
Display detailed console log →
Last metadata expiration check: 0:26:00 ago on Thu Dec 21 05:18:09 2023. Dependencies resolved. ================================================================================ Package Architecture Version Repository Size ================================================================================ Installing: which x86_64 2.21-20.el8 ol8_baseos_latest 50 k Transaction Summary ================================================================================ Install 1 Package Total download size: 50 k Installed size: 81 k Downloading Packages: which-2.21-20.el8.x86_64.rpm 80 kB/s | 50 kB 00:00 -------------------------------------------------------------------------------- Total 80 kB/s | 50 kB 00:00 Running transaction check Transaction check succeeded. Running transaction test Transaction test succeeded. Running transaction Preparing : 1/1 Installing : which-2.21-20.el8.x86_64 1/1 Running scriptlet: which-2.21-20.el8.x86_64 1/1 Verifying : which-2.21-20.el8.x86_64 1/1 Installed: which-2.21-20.el8.x86_64 Complete! |
The rlwrap dependencies are: glibc, ncurses, perl, readline, python, and git. Only the perl, python, and git are missing from the list of formal dependencies but there’s another dependency the epel-release package.
If you want to verify whether a package is installed, you can use the rpm command like this:
rpm -qa | grep package_name |
I installed the perl programming environment (a big install) with this command:
dnf install -y perl |
Display detailed console log →
Last metadata expiration check: 0:28:29 ago on Thu Dec 21 05:18:09 2023.
Dependencies resolved.
================================================================================
Package Arch Version Repository Size
================================================================================
Installing:
perl x86_64 4:5.26.3-422.el8 ol8_appstream 73 k
Installing dependencies:
dwz x86_64 0.12-10.el8 ol8_appstream 109 k
efi-srpm-macros noarch 3-3.0.1.el8 ol8_appstream 22 k
file x86_64 5.33-24.el8 ol8_baseos_latest 77 k
ghc-srpm-macros noarch 1.4.2-7.el8 ol8_appstream 9.3 k
glibc-gconv-extra x86_64 2.28-225.0.3.el8 ol8_baseos_latest 1.5 M
go-srpm-macros noarch 2-17.el8 ol8_appstream 13 k
groff-base x86_64 1.22.3-18.el8 ol8_baseos_latest 1.0 M
ocaml-srpm-macros noarch 5-4.el8 ol8_appstream 9.3 k
openblas-srpm-macros noarch 2-2.el8 ol8_appstream 7.9 k
perl-Algorithm-Diff noarch 1.1903-9.el8 ol8_baseos_latest 52 k
perl-Archive-Tar noarch 2.30-1.el8 ol8_baseos_latest 79 k
perl-Archive-Zip noarch 1.60-3.el8 ol8_appstream 108 k
perl-Attribute-Handlers noarch 0.99-422.el8 ol8_appstream 89 k
perl-B-Debug noarch 1.26-2.el8 ol8_appstream 26 k
perl-CPAN noarch 2.18-397.el8 ol8_appstream 554 k
perl-CPAN-Meta noarch 2.150010-396.el8 ol8_appstream 191 k
perl-CPAN-Meta-Requirements noarch 2.140-396.el8 ol8_appstream 37 k
perl-CPAN-Meta-YAML noarch 0.018-397.el8 ol8_appstream 34 k
perl-Carp noarch 1.42-396.el8 ol8_baseos_latest 30 k
perl-Compress-Bzip2 x86_64 2.26-6.el8 ol8_appstream 72 k
perl-Compress-Raw-Bzip2 x86_64 2.081-1.el8 ol8_baseos_latest 40 k
perl-Compress-Raw-Zlib x86_64 2.081-1.el8 ol8_baseos_latest 68 k
perl-Config-Perl-V noarch 0.30-1.el8 ol8_appstream 22 k
perl-DB_File x86_64 1.842-1.el8 ol8_appstream 83 k
perl-Data-Dumper x86_64 2.167-399.el8 ol8_baseos_latest 58 k
perl-Data-OptList noarch 0.110-6.el8 ol8_appstream 31 k
perl-Data-Section noarch 0.200007-3.el8 ol8_appstream 30 k
perl-Devel-PPPort x86_64 3.36-5.el8 ol8_appstream 118 k
perl-Devel-Peek x86_64 1.26-422.el8 ol8_appstream 94 k
perl-Devel-SelfStubber noarch 1.06-422.el8 ol8_appstream 76 k
perl-Devel-Size x86_64 0.81-2.el8 ol8_appstream 34 k
perl-Digest noarch 1.17-395.el8 ol8_baseos_latest 27 k
perl-Digest-MD5 x86_64 2.55-396.el8 ol8_baseos_latest 37 k
perl-Digest-SHA x86_64 1:6.02-1.el8 ol8_appstream 66 k
perl-Encode x86_64 4:2.97-3.el8 ol8_baseos_latest 1.5 M
perl-Encode-devel x86_64 4:2.97-3.el8 ol8_appstream 39 k
perl-Env noarch 1.04-395.el8 ol8_appstream 21 k
perl-Errno x86_64 1.28-422.el8 ol8_baseos_latest 76 k
perl-Exporter noarch 5.72-396.el8 ol8_baseos_latest 34 k
perl-ExtUtils-CBuilder noarch 1:0.280230-2.el8 ol8_appstream 48 k
perl-ExtUtils-Command noarch 1:7.34-1.el8 ol8_appstream 19 k
perl-ExtUtils-Embed noarch 1.34-422.el8 ol8_appstream 79 k
perl-ExtUtils-Install noarch 2.14-4.el8 ol8_appstream 46 k
perl-ExtUtils-MM-Utils noarch 1:7.34-1.el8 ol8_appstream 16 k
perl-ExtUtils-MakeMaker noarch 1:7.34-1.el8 ol8_appstream 300 k
perl-ExtUtils-Manifest noarch 1.70-395.el8 ol8_appstream 36 k
perl-ExtUtils-Miniperl noarch 1.06-422.el8 ol8_appstream 77 k
perl-ExtUtils-ParseXS noarch 1:3.35-2.el8 ol8_appstream 83 k
perl-File-Fetch noarch 0.56-2.el8 ol8_appstream 33 k
perl-File-HomeDir noarch 1.002-4.el8 ol8_appstream 61 k
perl-File-Path noarch 2.15-2.el8 ol8_baseos_latest 38 k
perl-File-Temp noarch 0.230.600-1.el8 ol8_baseos_latest 63 k
perl-File-Which noarch 1.22-2.el8 ol8_appstream 23 k
perl-Filter x86_64 2:1.58-2.el8 ol8_appstream 82 k
perl-Filter-Simple noarch 0.94-2.el8 ol8_appstream 29 k
perl-Getopt-Long noarch 1:2.50-4.el8 ol8_baseos_latest 63 k
perl-HTTP-Tiny noarch 0.074-2.el8 ol8_baseos_latest 57 k
perl-IO x86_64 1.38-422.el8 ol8_baseos_latest 142 k
perl-IO-Compress noarch 2.081-1.el8 ol8_baseos_latest 258 k
perl-IO-Socket-IP noarch 0.39-5.el8 ol8_baseos_latest 47 k
perl-IO-Socket-SSL noarch 2.066-4.module+el8.6.0+20623+f0897f98
ol8_appstream 298 k
perl-IO-Zlib noarch 1:1.10-422.el8 ol8_baseos_latest 81 k
perl-IPC-Cmd noarch 2:1.02-1.el8 ol8_appstream 43 k
perl-IPC-SysV x86_64 2.07-397.el8 ol8_appstream 43 k
perl-IPC-System-Simple noarch 1.25-17.el8 ol8_appstream 43 k
perl-JSON-PP noarch 1:2.97.001-3.el8 ol8_appstream 68 k
perl-Locale-Codes noarch 3.57-1.el8 ol8_appstream 310 k
perl-Locale-Maketext noarch 1.28-396.el8 ol8_appstream 99 k
perl-Locale-Maketext-Simple noarch 1:0.21-422.el8 ol8_appstream 79 k
perl-MIME-Base64 x86_64 3.15-396.el8 ol8_baseos_latest 31 k
perl-MRO-Compat noarch 0.13-4.el8 ol8_appstream 24 k
perl-Math-BigInt noarch 1:1.9998.11-7.el8 ol8_baseos_latest 196 k
perl-Math-BigInt-FastCalc x86_64 0.500.600-6.el8 ol8_appstream 27 k
perl-Math-BigRat noarch 0.2614-1.el8 ol8_appstream 40 k
perl-Math-Complex noarch 1.59-422.el8 ol8_baseos_latest 109 k
perl-Memoize noarch 1.03-422.el8 ol8_appstream 119 k
perl-Module-Build noarch 2:0.42.24-5.el8 ol8_appstream 273 k
perl-Module-CoreList noarch 1:5.20181130-1.el8 ol8_appstream 87 k
perl-Module-CoreList-tools noarch 1:5.20181130-1.el8 ol8_appstream 22 k
perl-Module-Load noarch 1:0.32-395.el8 ol8_appstream 19 k
perl-Module-Load-Conditional noarch 0.68-395.el8 ol8_appstream 24 k
perl-Module-Loaded noarch 1:0.08-422.el8 ol8_appstream 75 k
perl-Module-Metadata noarch 1.000033-395.el8 ol8_appstream 44 k
perl-Mozilla-CA noarch 20160104-7.0.1.module+el8.3.0+21136+b437fca9
ol8_appstream 15 k
perl-Net-Ping noarch 2.55-422.el8 ol8_appstream 102 k
perl-Net-SSLeay x86_64 1.88-2.module+el8.6.0+20623+f0897f98
ol8_appstream 379 k
perl-Package-Generator noarch 1.106-11.el8 ol8_appstream 27 k
perl-Params-Check noarch 1:0.38-395.el8 ol8_appstream 24 k
perl-Params-Util x86_64 1.07-22.el8 ol8_appstream 44 k
perl-PathTools x86_64 3.74-1.el8 ol8_baseos_latest 90 k
perl-Perl-OSType noarch 1.010-396.el8 ol8_appstream 29 k
perl-PerlIO-via-QuotedPrint noarch 0.08-395.el8 ol8_appstream 13 k
perl-Pod-Checker noarch 4:1.73-395.el8 ol8_appstream 33 k
perl-Pod-Escapes noarch 1:1.07-395.el8 ol8_baseos_latest 20 k
perl-Pod-Html noarch 1.22.02-422.el8 ol8_appstream 88 k
perl-Pod-Parser noarch 1.63-396.el8 ol8_appstream 108 k
perl-Pod-Perldoc noarch 3.28-396.el8 ol8_baseos_latest 88 k
perl-Pod-Simple noarch 1:3.35-395.el8 ol8_baseos_latest 213 k
perl-Pod-Usage noarch 4:1.69-395.el8 ol8_baseos_latest 34 k
perl-Scalar-List-Utils x86_64 3:1.49-2.el8 ol8_baseos_latest 68 k
perl-SelfLoader noarch 1.23-422.el8 ol8_appstream 83 k
perl-Socket x86_64 4:2.027-3.el8 ol8_baseos_latest 59 k
perl-Software-License noarch 0.103013-2.el8 ol8_appstream 137 k
perl-Storable x86_64 1:3.11-3.el8 ol8_baseos_latest 98 k
perl-Sub-Exporter noarch 0.987-15.el8 ol8_appstream 73 k
perl-Sub-Install noarch 0.928-14.el8 ol8_appstream 27 k
perl-Sys-Syslog x86_64 0.35-397.el8 ol8_appstream 50 k
perl-Term-ANSIColor noarch 4.06-396.el8 ol8_baseos_latest 46 k
perl-Term-Cap noarch 1.17-395.el8 ol8_baseos_latest 23 k
perl-Test noarch 1.30-422.el8 ol8_appstream 90 k
perl-Test-Harness noarch 1:3.42-1.el8 ol8_appstream 279 k
perl-Test-Simple noarch 1:1.302135-1.el8 ol8_appstream 516 k
perl-Text-Balanced noarch 2.03-395.el8 ol8_appstream 58 k
perl-Text-Diff noarch 1.45-2.el8 ol8_baseos_latest 45 k
perl-Text-Glob noarch 0.11-4.el8 ol8_appstream 17 k
perl-Text-ParseWords noarch 3.30-395.el8 ol8_baseos_latest 18 k
perl-Text-Tabs+Wrap noarch 2013.0523-395.el8 ol8_baseos_latest 24 k
perl-Text-Template noarch 1.51-1.el8 ol8_appstream 64 k
perl-Thread-Queue noarch 3.13-1.el8 ol8_appstream 24 k
perl-Time-HiRes x86_64 4:1.9758-2.el8 ol8_appstream 61 k
perl-Time-Local noarch 1:1.280-1.el8 ol8_baseos_latest 33 k
perl-Time-Piece x86_64 1.31-422.el8 ol8_appstream 98 k
perl-URI noarch 1.73-3.el8 ol8_baseos_latest 116 k
perl-Unicode-Collate x86_64 1.25-2.el8 ol8_appstream 686 k
perl-Unicode-Normalize x86_64 1.25-396.el8 ol8_baseos_latest 82 k
perl-autodie noarch 2.29-396.el8 ol8_appstream 98 k
perl-bignum noarch 0.49-2.el8 ol8_appstream 43 k
perl-constant noarch 1.33-396.el8 ol8_baseos_latest 25 k
perl-devel x86_64 4:5.26.3-422.el8 ol8_appstream 600 k
perl-encoding x86_64 4:2.22-3.el8 ol8_appstream 68 k
perl-experimental noarch 0.019-2.el8 ol8_appstream 24 k
perl-inc-latest noarch 2:0.500-9.el8 ol8_appstream 25 k
perl-interpreter x86_64 4:5.26.3-422.el8 ol8_baseos_latest 6.3 M
perl-libnet noarch 3.11-3.el8 ol8_baseos_latest 121 k
perl-libnetcfg noarch 4:5.26.3-422.el8 ol8_appstream 78 k
perl-libs x86_64 4:5.26.3-422.el8 ol8_baseos_latest 1.6 M
perl-local-lib noarch 2.000024-2.el8 ol8_appstream 74 k
perl-macros x86_64 4:5.26.3-422.el8 ol8_baseos_latest 72 k
perl-open noarch 1.11-422.el8 ol8_appstream 78 k
perl-parent noarch 1:0.237-1.el8 ol8_baseos_latest 20 k
perl-perlfaq noarch 5.20180605-1.el8 ol8_appstream 386 k
perl-podlators noarch 4.11-1.el8 ol8_baseos_latest 118 k
perl-srpm-macros noarch 1-25.el8 ol8_appstream 11 k
perl-threads x86_64 1:2.21-2.el8 ol8_baseos_latest 61 k
perl-threads-shared x86_64 1.58-2.el8 ol8_baseos_latest 48 k
perl-utils noarch 5.26.3-422.el8 ol8_appstream 129 k
perl-version x86_64 6:0.99.24-1.el8 ol8_appstream 67 k
python-rpm-macros noarch 3-45.el8 ol8_appstream 16 k
python-srpm-macros noarch 3-45.el8 ol8_appstream 16 k
python3-pyparsing noarch 2.1.10-7.el8 ol8_baseos_latest 142 k
python3-rpm-macros noarch 3-45.el8 ol8_appstream 15 k
qt5-srpm-macros noarch 5.15.3-1.el8 ol8_appstream 11 k
redhat-rpm-config noarch 131-1.0.1.el8 ol8_appstream 91 k
rust-srpm-macros noarch 5-2.el8 ol8_appstream 9.2 k
systemtap-sdt-devel x86_64 4.9-3.0.1.el8 ol8_appstream 88 k
zip x86_64 3.0-23.el8 ol8_baseos_latest 270 k
Installing weak dependencies:
perl-Encode-Locale noarch 1.05-10.module+el8.3.0+7692+542c56f9
ol8_appstream 22 k
perl-TermReadKey x86_64 2.37-7.el8 ol8_appstream 40 k
Enabling module streams:
perl 5.26
perl-IO-Socket-SSL 2.066
perl-libwww-perl 6.34
Transaction Summary
================================================================================
Install 159 Packages
Total download size: 25 M
Installed size: 73 M
Downloading Packages:
(1/159): file-5.33-24.el8.x86_64.rpm 163 kB/s | 77 kB 00:00
(2/159): perl-Algorithm-Diff-1.1903-9.el8.noarc 531 kB/s | 52 kB 00:00
(3/159): groff-base-1.22.3-18.el8.x86_64.rpm 1.5 MB/s | 1.0 MB 00:00
(4/159): perl-Archive-Tar-2.30-1.el8.noarch.rpm 642 kB/s | 79 kB 00:00
(5/159): perl-Carp-1.42-396.el8.noarch.rpm 449 kB/s | 30 kB 00:00
(6/159): perl-Compress-Raw-Bzip2-2.081-1.el8.x8 452 kB/s | 40 kB 00:00
(7/159): perl-Compress-Raw-Zlib-2.081-1.el8.x86 968 kB/s | 68 kB 00:00
(8/159): perl-Data-Dumper-2.167-399.el8.x86_64. 734 kB/s | 58 kB 00:00
(9/159): perl-Digest-1.17-395.el8.noarch.rpm 391 kB/s | 27 kB 00:00
(10/159): perl-Digest-MD5-2.55-396.el8.x86_64.r 481 kB/s | 37 kB 00:00
(11/159): perl-Errno-1.28-422.el8.x86_64.rpm 811 kB/s | 76 kB 00:00
(12/159): perl-Encode-2.97-3.el8.x86_64.rpm 9.4 MB/s | 1.5 MB 00:00
(13/159): perl-File-Path-2.15-2.el8.noarch.rpm 627 kB/s | 38 kB 00:00
(14/159): perl-Exporter-5.72-396.el8.noarch.rpm 466 kB/s | 34 kB 00:00
(15/159): perl-Getopt-Long-2.50-4.el8.noarch.rp 867 kB/s | 63 kB 00:00
(16/159): perl-File-Temp-0.230.600-1.el8.noarch 648 kB/s | 63 kB 00:00
(17/159): perl-HTTP-Tiny-0.074-2.el8.noarch.rpm 847 kB/s | 57 kB 00:00
(18/159): perl-IO-Compress-2.081-1.el8.noarch.r 3.5 MB/s | 258 kB 00:00
(19/159): perl-IO-1.38-422.el8.x86_64.rpm 1.2 MB/s | 142 kB 00:00
(20/159): perl-IO-Socket-IP-0.39-5.el8.noarch.r 614 kB/s | 47 kB 00:00
(21/159): perl-IO-Zlib-1.10-422.el8.noarch.rpm 881 kB/s | 81 kB 00:00
(22/159): perl-MIME-Base64-3.15-396.el8.x86_64. 425 kB/s | 31 kB 00:00
(23/159): perl-Math-BigInt-1.9998.11-7.el8.noar 1.5 MB/s | 196 kB 00:00
(24/159): perl-Math-Complex-1.59-422.el8.noarch 1.5 MB/s | 109 kB 00:00
(25/159): perl-Pod-Escapes-1.07-395.el8.noarch. 300 kB/s | 20 kB 00:00
(26/159): perl-PathTools-3.74-1.el8.x86_64.rpm 1.2 MB/s | 90 kB 00:00
(27/159): perl-Pod-Perldoc-3.28-396.el8.noarch. 1.2 MB/s | 88 kB 00:00
(28/159): perl-Pod-Simple-3.35-395.el8.noarch.r 2.2 MB/s | 213 kB 00:00
(29/159): perl-Pod-Usage-1.69-395.el8.noarch.rp 499 kB/s | 34 kB 00:00
(30/159): perl-Scalar-List-Utils-1.49-2.el8.x86 947 kB/s | 68 kB 00:00
(31/159): perl-Socket-2.027-3.el8.x86_64.rpm 864 kB/s | 59 kB 00:00
(32/159): perl-Storable-3.11-3.el8.x86_64.rpm 1.2 MB/s | 98 kB 00:00
(33/159): perl-Term-ANSIColor-4.06-396.el8.noar 677 kB/s | 46 kB 00:00
(34/159): perl-Term-Cap-1.17-395.el8.noarch.rpm 321 kB/s | 23 kB 00:00
(35/159): perl-Text-Diff-1.45-2.el8.noarch.rpm 596 kB/s | 45 kB 00:00
(36/159): perl-Text-ParseWords-3.30-395.el8.noa 257 kB/s | 18 kB 00:00
(37/159): perl-Text-Tabs+Wrap-2013.0523-395.el8 351 kB/s | 24 kB 00:00
(38/159): perl-Time-Local-1.280-1.el8.noarch.rp 440 kB/s | 33 kB 00:00
(39/159): perl-URI-1.73-3.el8.noarch.rpm 1.6 MB/s | 116 kB 00:00
(40/159): perl-Unicode-Normalize-1.25-396.el8.x 1.1 MB/s | 82 kB 00:00
(41/159): perl-constant-1.33-396.el8.noarch.rpm 395 kB/s | 25 kB 00:00
(42/159): perl-libnet-3.11-3.el8.noarch.rpm 1.8 MB/s | 121 kB 00:00
(43/159): perl-libs-5.26.3-422.el8.x86_64.rpm 13 MB/s | 1.6 MB 00:00
(44/159): perl-macros-5.26.3-422.el8.x86_64.rpm 1.1 MB/s | 72 kB 00:00
(45/159): perl-parent-0.237-1.el8.noarch.rpm 279 kB/s | 20 kB 00:00
(46/159): perl-podlators-4.11-1.el8.noarch.rpm 1.3 MB/s | 118 kB 00:00
(47/159): perl-interpreter-5.26.3-422.el8.x86_6 14 MB/s | 6.3 MB 00:00
(48/159): glibc-gconv-extra-2.28-225.0.3.el8.x8 601 kB/s | 1.5 MB 00:02
(49/159): perl-threads-2.21-2.el8.x86_64.rpm 876 kB/s | 61 kB 00:00
(50/159): perl-threads-shared-1.58-2.el8.x86_64 657 kB/s | 48 kB 00:00
(51/159): python3-pyparsing-2.1.10-7.el8.noarch 2.0 MB/s | 142 kB 00:00
(52/159): zip-3.0-23.el8.x86_64.rpm 3.7 MB/s | 270 kB 00:00
(53/159): dwz-0.12-10.el8.x86_64.rpm 1.6 MB/s | 109 kB 00:00
(54/159): efi-srpm-macros-3-3.0.1.el8.noarch.rp 350 kB/s | 22 kB 00:00
(55/159): ghc-srpm-macros-1.4.2-7.el8.noarch.rp 125 kB/s | 9.3 kB 00:00
(56/159): go-srpm-macros-2-17.el8.noarch.rpm 198 kB/s | 13 kB 00:00
(57/159): ocaml-srpm-macros-5-4.el8.noarch.rpm 154 kB/s | 9.3 kB 00:00
(58/159): openblas-srpm-macros-2-2.el8.noarch.r 116 kB/s | 7.9 kB 00:00
(59/159): perl-5.26.3-422.el8.x86_64.rpm 921 kB/s | 73 kB 00:00
(60/159): perl-Archive-Zip-1.60-3.el8.noarch.rp 1.4 MB/s | 108 kB 00:00
(61/159): perl-Attribute-Handlers-0.99-422.el8. 1.2 MB/s | 89 kB 00:00
(62/159): perl-B-Debug-1.26-2.el8.noarch.rpm 356 kB/s | 26 kB 00:00
(63/159): perl-CPAN-2.18-397.el8.noarch.rpm 5.3 MB/s | 554 kB 00:00
(64/159): perl-CPAN-Meta-2.150010-396.el8.noarc 2.3 MB/s | 191 kB 00:00
(65/159): perl-CPAN-Meta-Requirements-2.140-396 512 kB/s | 37 kB 00:00
(66/159): perl-CPAN-Meta-YAML-0.018-397.el8.noa 508 kB/s | 34 kB 00:00
(67/159): perl-Compress-Bzip2-2.26-6.el8.x86_64 990 kB/s | 72 kB 00:00
(68/159): perl-Config-Perl-V-0.30-1.el8.noarch. 337 kB/s | 22 kB 00:00
(69/159): perl-DB_File-1.842-1.el8.x86_64.rpm 1.2 MB/s | 83 kB 00:00
(70/159): perl-Data-OptList-0.110-6.el8.noarch. 457 kB/s | 31 kB 00:00
(71/159): perl-Data-Section-0.200007-3.el8.noar 423 kB/s | 30 kB 00:00
(72/159): perl-Devel-PPPort-3.36-5.el8.x86_64.r 1.6 MB/s | 118 kB 00:00
(73/159): perl-Devel-Peek-1.26-422.el8.x86_64.r 960 kB/s | 94 kB 00:00
(74/159): perl-Devel-SelfStubber-1.06-422.el8.n 831 kB/s | 76 kB 00:00
(75/159): perl-Devel-Size-0.81-2.el8.x86_64.rpm 510 kB/s | 34 kB 00:00
(76/159): perl-Digest-SHA-6.02-1.el8.x86_64.rpm 859 kB/s | 66 kB 00:00
(77/159): perl-Encode-Locale-1.05-10.module+el8 285 kB/s | 22 kB 00:00
(78/159): perl-Encode-devel-2.97-3.el8.x86_64.r 510 kB/s | 39 kB 00:00
(79/159): perl-Env-1.04-395.el8.noarch.rpm 321 kB/s | 21 kB 00:00
(80/159): perl-ExtUtils-CBuilder-0.280230-2.el8 730 kB/s | 48 kB 00:00
(81/159): perl-ExtUtils-Command-7.34-1.el8.noar 248 kB/s | 19 kB 00:00
(82/159): perl-ExtUtils-Embed-1.34-422.el8.noar 1.1 MB/s | 79 kB 00:00
(83/159): perl-ExtUtils-Install-2.14-4.el8.noar 661 kB/s | 46 kB 00:00
(84/159): perl-ExtUtils-MM-Utils-7.34-1.el8.noa 243 kB/s | 16 kB 00:00
(85/159): perl-ExtUtils-MakeMaker-7.34-1.el8.no 4.0 MB/s | 300 kB 00:00
(86/159): perl-ExtUtils-Manifest-1.70-395.el8.n 500 kB/s | 36 kB 00:00
(87/159): perl-ExtUtils-Miniperl-1.06-422.el8.n 1.1 MB/s | 77 kB 00:00
(88/159): perl-File-HomeDir-1.002-4.el8.noarch. 980 kB/s | 61 kB 00:00
(89/159): perl-File-Fetch-0.56-2.el8.noarch.rpm 483 kB/s | 33 kB 00:00
(90/159): perl-ExtUtils-ParseXS-3.35-2.el8.noar 1.1 MB/s | 83 kB 00:00
(91/159): perl-Filter-Simple-0.94-2.el8.noarch. 417 kB/s | 29 kB 00:00
(92/159): perl-File-Which-1.22-2.el8.noarch.rpm 312 kB/s | 23 kB 00:00
(93/159): perl-Filter-1.58-2.el8.x86_64.rpm 1.1 MB/s | 82 kB 00:00
(94/159): perl-IO-Socket-SSL-2.066-4.module+el8 3.6 MB/s | 298 kB 00:00
(95/159): perl-IPC-Cmd-1.02-1.el8.noarch.rpm 545 kB/s | 43 kB 00:00
(96/159): perl-IPC-SysV-2.07-397.el8.x86_64.rpm 544 kB/s | 43 kB 00:00
(97/159): perl-IPC-System-Simple-1.25-17.el8.no 535 kB/s | 43 kB 00:00
(98/159): perl-JSON-PP-2.97.001-3.el8.noarch.rp 853 kB/s | 68 kB 00:00
(99/159): perl-Locale-Codes-3.57-1.el8.noarch.r 3.7 MB/s | 310 kB 00:00
(100/159): perl-MRO-Compat-0.13-4.el8.noarch.rp 399 kB/s | 24 kB 00:00
(101/159): perl-Locale-Maketext-1.28-396.el8.no 1.4 MB/s | 99 kB 00:00
(102/159): perl-Locale-Maketext-Simple-0.21-422 1.1 MB/s | 79 kB 00:00
(103/159): perl-Math-BigInt-FastCalc-0.500.600- 371 kB/s | 27 kB 00:00
(104/159): perl-Math-BigRat-0.2614-1.el8.noarch 560 kB/s | 40 kB 00:00
(105/159): perl-Memoize-1.03-422.el8.noarch.rpm 1.6 MB/s | 119 kB 00:00
(106/159): perl-Module-Build-0.42.24-5.el8.noar 3.4 MB/s | 273 kB 00:00
(107/159): perl-Module-CoreList-tools-5.2018113 297 kB/s | 22 kB 00:00
(108/159): perl-Module-CoreList-5.20181130-1.el 1.1 MB/s | 87 kB 00:00
(109/159): perl-Module-Load-0.32-395.el8.noarch 242 kB/s | 19 kB 00:00
(110/159): perl-Module-Load-Conditional-0.68-39 316 kB/s | 24 kB 00:00
(111/159): perl-Module-Loaded-0.08-422.el8.noar 972 kB/s | 75 kB 00:00
(112/159): perl-Module-Metadata-1.000033-395.el 664 kB/s | 44 kB 00:00
(113/159): perl-Mozilla-CA-20160104-7.0.1.modul 229 kB/s | 15 kB 00:00
(114/159): perl-Net-Ping-2.55-422.el8.noarch.rp 1.5 MB/s | 102 kB 00:00
(115/159): perl-Package-Generator-1.106-11.el8. 386 kB/s | 27 kB 00:00
(116/159): perl-Params-Check-0.38-395.el8.noarc 333 kB/s | 24 kB 00:00
(117/159): perl-Net-SSLeay-1.88-2.module+el8.6. 4.4 MB/s | 379 kB 00:00
(118/159): perl-Perl-OSType-1.010-396.el8.noarc 459 kB/s | 29 kB 00:00
(119/159): perl-Params-Util-1.07-22.el8.x86_64. 656 kB/s | 44 kB 00:00
(120/159): perl-PerlIO-via-QuotedPrint-0.08-395 206 kB/s | 13 kB 00:00
(121/159): perl-Pod-Checker-1.73-395.el8.noarch 449 kB/s | 33 kB 00:00
(122/159): perl-Pod-Parser-1.63-396.el8.noarch. 1.6 MB/s | 108 kB 00:00
(123/159): perl-Pod-Html-1.22.02-422.el8.noarch 1.1 MB/s | 88 kB 00:00
(124/159): perl-SelfLoader-1.23-422.el8.noarch. 1.1 MB/s | 83 kB 00:00
(125/159): perl-Software-License-0.103013-2.el8 1.8 MB/s | 137 kB 00:00
(126/159): perl-Sub-Exporter-0.987-15.el8.noarc 1.0 MB/s | 73 kB 00:00
(127/159): perl-Sub-Install-0.928-14.el8.noarch 383 kB/s | 27 kB 00:00
(128/159): perl-Sys-Syslog-0.35-397.el8.x86_64. 734 kB/s | 50 kB 00:00
(129/159): perl-TermReadKey-2.37-7.el8.x86_64.r 536 kB/s | 40 kB 00:00
(130/159): perl-Test-1.30-422.el8.noarch.rpm 1.2 MB/s | 90 kB 00:00
(131/159): perl-Test-Harness-3.42-1.el8.noarch. 3.4 MB/s | 279 kB 00:00
(132/159): perl-Test-Simple-1.302135-1.el8.noar 5.2 MB/s | 516 kB 00:00
(133/159): perl-Text-Glob-0.11-4.el8.noarch.rpm 272 kB/s | 17 kB 00:00
(134/159): perl-Text-Balanced-2.03-395.el8.noar 807 kB/s | 58 kB 00:00
(135/159): perl-Text-Template-1.51-1.el8.noarch 841 kB/s | 64 kB 00:00
(136/159): perl-Time-HiRes-1.9758-2.el8.x86_64. 855 kB/s | 61 kB 00:00
(137/159): perl-Thread-Queue-3.13-1.el8.noarch. 319 kB/s | 24 kB 00:00
(138/159): perl-Time-Piece-1.31-422.el8.x86_64. 1.3 MB/s | 98 kB 00:00
(139/159): perl-autodie-2.29-396.el8.noarch.rpm 1.3 MB/s | 98 kB 00:00
(140/159): perl-Unicode-Collate-1.25-2.el8.x86_ 7.2 MB/s | 686 kB 00:00
(141/159): perl-bignum-0.49-2.el8.noarch.rpm 620 kB/s | 43 kB 00:00
(142/159): perl-encoding-2.22-3.el8.x86_64.rpm 934 kB/s | 68 kB 00:00
(143/159): perl-devel-5.26.3-422.el8.x86_64.rpm 6.5 MB/s | 600 kB 00:00
(144/159): perl-experimental-0.019-2.el8.noarch 327 kB/s | 24 kB 00:00
(145/159): perl-inc-latest-0.500-9.el8.noarch.r 331 kB/s | 25 kB 00:00
(146/159): perl-libnetcfg-5.26.3-422.el8.noarch 1.0 MB/s | 78 kB 00:00
(147/159): perl-local-lib-2.000024-2.el8.noarch 1.1 MB/s | 74 kB 00:00
(148/159): perl-srpm-macros-1-25.el8.noarch.rpm 157 kB/s | 11 kB 00:00
(149/159): perl-open-1.11-422.el8.noarch.rpm 1.0 MB/s | 78 kB 00:00
(150/159): perl-perlfaq-5.20180605-1.el8.noarch 4.7 MB/s | 386 kB 00:00
(151/159): perl-version-0.99.24-1.el8.x86_64.rp 1.0 MB/s | 67 kB 00:00
(152/159): perl-utils-5.26.3-422.el8.noarch.rpm 1.7 MB/s | 129 kB 00:00
(153/159): python-rpm-macros-3-45.el8.noarch.rp 219 kB/s | 16 kB 00:00
(154/159): python3-rpm-macros-3-45.el8.noarch.r 243 kB/s | 15 kB 00:00
(155/159): python-srpm-macros-3-45.el8.noarch.r 239 kB/s | 16 kB 00:00
(156/159): qt5-srpm-macros-5.15.3-1.el8.noarch. 132 kB/s | 11 kB 00:00
(157/159): rust-srpm-macros-5-2.el8.noarch.rpm 128 kB/s | 9.2 kB 00:00
(158/159): redhat-rpm-config-131-1.0.1.el8.noar 1.2 MB/s | 91 kB 00:00
(159/159): systemtap-sdt-devel-4.9-3.0.1.el8.x8 1.2 MB/s | 88 kB 00:00
--------------------------------------------------------------------------------
Total 4.6 MB/s | 25 MB 00:05
Running transaction check
Transaction check succeeded.
Running transaction test
Transaction test succeeded.
Running transaction
Preparing : 1/1
Installing : python-srpm-macros-3-45.el8.noarch 1/159
Installing : python-rpm-macros-3-45.el8.noarch 2/159
Installing : python3-rpm-macros-3-45.el8.noarch 3/159
Installing : rust-srpm-macros-5-2.el8.noarch 4/159
Installing : qt5-srpm-macros-5.15.3-1.el8.noarch 5/159
Installing : perl-srpm-macros-1-25.el8.noarch 6/159
Installing : openblas-srpm-macros-2-2.el8.noarch 7/159
Installing : ocaml-srpm-macros-5-4.el8.noarch 8/159
Installing : go-srpm-macros-2-17.el8.noarch 9/159
Installing : ghc-srpm-macros-1.4.2-7.el8.noarch 10/159
Installing : efi-srpm-macros-3-3.0.1.el8.noarch 11/159
Installing : dwz-0.12-10.el8.x86_64 12/159
Installing : zip-3.0-23.el8.x86_64 13/159
Installing : python3-pyparsing-2.1.10-7.el8.noarch 14/159
Installing : systemtap-sdt-devel-4.9-3.0.1.el8.x86_64 15/159
Installing : groff-base-1.22.3-18.el8.x86_64 16/159
Installing : perl-Digest-1.17-395.el8.noarch 17/159
Installing : perl-Digest-MD5-2.55-396.el8.x86_64 18/159
Installing : perl-Data-Dumper-2.167-399.el8.x86_64 19/159
Installing : perl-libnet-3.11-3.el8.noarch 20/159
Installing : perl-URI-1.73-3.el8.noarch 21/159
Installing : perl-Pod-Escapes-1:1.07-395.el8.noarch 22/159
Installing : perl-IO-Socket-IP-0.39-5.el8.noarch 23/159
Installing : perl-Time-Local-1:1.280-1.el8.noarch 24/159
Installing : perl-Mozilla-CA-20160104-7.0.1.module+el8.3.0+21 25/159
Installing : perl-IO-Socket-SSL-2.066-4.module+el8.6.0+20623+ 26/159
Installing : perl-Net-SSLeay-1.88-2.module+el8.6.0+20623+f089 27/159
Installing : perl-Term-ANSIColor-4.06-396.el8.noarch 28/159
Installing : perl-Term-Cap-1.17-395.el8.noarch 29/159
Installing : perl-File-Temp-0.230.600-1.el8.noarch 30/159
Installing : perl-HTTP-Tiny-0.074-2.el8.noarch 31/159
Installing : perl-Pod-Simple-1:3.35-395.el8.noarch 32/159
Installing : perl-podlators-4.11-1.el8.noarch 33/159
Installing : perl-Pod-Perldoc-3.28-396.el8.noarch 34/159
Installing : perl-Text-ParseWords-3.30-395.el8.noarch 35/159
Installing : perl-Pod-Usage-4:1.69-395.el8.noarch 36/159
Installing : perl-MIME-Base64-3.15-396.el8.x86_64 37/159
Installing : perl-Storable-1:3.11-3.el8.x86_64 38/159
Installing : perl-Getopt-Long-1:2.50-4.el8.noarch 39/159
Installing : perl-Errno-1.28-422.el8.x86_64 40/159
Installing : perl-Socket-4:2.027-3.el8.x86_64 41/159
Installing : perl-Encode-4:2.97-3.el8.x86_64 42/159
Installing : perl-Carp-1.42-396.el8.noarch 43/159
Installing : perl-Exporter-5.72-396.el8.noarch 44/159
Installing : perl-libs-4:5.26.3-422.el8.x86_64 45/159
Installing : perl-Scalar-List-Utils-3:1.49-2.el8.x86_64 46/159
Installing : perl-parent-1:0.237-1.el8.noarch 47/159
Installing : perl-macros-4:5.26.3-422.el8.x86_64 48/159
Installing : perl-Text-Tabs+Wrap-2013.0523-395.el8.noarch 49/159
Installing : perl-Unicode-Normalize-1.25-396.el8.x86_64 50/159
Installing : perl-File-Path-2.15-2.el8.noarch 51/159
Installing : perl-IO-1.38-422.el8.x86_64 52/159
Installing : perl-PathTools-3.74-1.el8.x86_64 53/159
Installing : perl-constant-1.33-396.el8.noarch 54/159
Installing : perl-threads-1:2.21-2.el8.x86_64 55/159
Installing : perl-threads-shared-1.58-2.el8.x86_64 56/159
Installing : perl-interpreter-4:5.26.3-422.el8.x86_64 57/159
Installing : perl-version-6:0.99.24-1.el8.x86_64 58/159
Installing : perl-Time-HiRes-4:1.9758-2.el8.x86_64 59/159
Installing : perl-CPAN-Meta-Requirements-2.140-396.el8.noarch 60/159
Installing : perl-ExtUtils-Manifest-1.70-395.el8.noarch 61/159
Installing : perl-ExtUtils-ParseXS-1:3.35-2.el8.noarch 62/159
Installing : perl-Test-Harness-1:3.42-1.el8.noarch 63/159
Installing : perl-Module-CoreList-1:5.20181130-1.el8.noarch 64/159
Installing : perl-Module-Metadata-1.000033-395.el8.noarch 65/159
Installing : perl-Compress-Raw-Zlib-2.081-1.el8.x86_64 66/159
Installing : perl-Filter-2:1.58-2.el8.x86_64 67/159
Installing : perl-SelfLoader-1.23-422.el8.noarch 68/159
Installing : perl-Module-Load-1:0.32-395.el8.noarch 69/159
Installing : perl-Perl-OSType-1.010-396.el8.noarch 70/159
Installing : perl-Text-Balanced-2.03-395.el8.noarch 71/159
Installing : perl-encoding-4:2.22-3.el8.x86_64 72/159
Installing : perl-Net-Ping-2.55-422.el8.noarch 73/159
Installing : perl-Compress-Raw-Bzip2-2.081-1.el8.x86_64 74/159
Installing : perl-IO-Compress-2.081-1.el8.noarch 75/159
Installing : perl-IO-Zlib-1:1.10-422.el8.noarch 76/159
Installing : perl-Math-Complex-1.59-422.el8.noarch 77/159
Installing : perl-Math-BigInt-1:1.9998.11-7.el8.noarch 78/159
Installing : perl-JSON-PP-1:2.97.001-3.el8.noarch 79/159
Installing : perl-Math-BigRat-0.2614-1.el8.noarch 80/159
Installing : perl-CPAN-Meta-YAML-0.018-397.el8.noarch 81/159
Installing : perl-CPAN-Meta-2.150010-396.el8.noarch 82/159
Installing : perl-Digest-SHA-1:6.02-1.el8.x86_64 83/159
Installing : perl-ExtUtils-Command-1:7.34-1.el8.noarch 84/159
Installing : perl-Locale-Maketext-1.28-396.el8.noarch 85/159
Installing : perl-Locale-Maketext-Simple-1:0.21-422.el8.noarc 86/159
Installing : perl-Params-Check-1:0.38-395.el8.noarch 87/159
Installing : perl-Module-Load-Conditional-0.68-395.el8.noarch 88/159
Installing : perl-Params-Util-1.07-22.el8.x86_64 89/159
Installing : perl-Pod-Html-1.22.02-422.el8.noarch 90/159
Installing : perl-Sub-Install-0.928-14.el8.noarch 91/159
Installing : perl-Data-OptList-0.110-6.el8.noarch 92/159
Installing : perl-bignum-0.49-2.el8.noarch 93/159
Installing : perl-Math-BigInt-FastCalc-0.500.600-6.el8.x86_64 94/159
Installing : perl-open-1.11-422.el8.noarch 95/159
Installing : perl-Filter-Simple-0.94-2.el8.noarch 96/159
Installing : perl-Devel-SelfStubber-1.06-422.el8.noarch 97/159
Installing : perl-Archive-Zip-1.60-3.el8.noarch 98/159
Installing : perl-Module-CoreList-tools-1:5.20181130-1.el8.no 99/159
Installing : perl-experimental-0.019-2.el8.noarch 100/159
Installing : perl-Algorithm-Diff-1.1903-9.el8.noarch 101/159
Installing : perl-Text-Diff-1.45-2.el8.noarch 102/159
Installing : perl-Archive-Tar-2.30-1.el8.noarch 103/159
Installing : perl-Attribute-Handlers-0.99-422.el8.noarch 104/159
Installing : perl-B-Debug-1.26-2.el8.noarch 105/159
Installing : perl-Compress-Bzip2-2.26-6.el8.x86_64 106/159
Installing : perl-Config-Perl-V-0.30-1.el8.noarch 107/159
Installing : perl-DB_File-1.842-1.el8.x86_64 108/159
Installing : perl-Devel-PPPort-3.36-5.el8.x86_64 109/159
Installing : perl-Devel-Size-0.81-2.el8.x86_64 110/159
Installing : perl-Encode-Locale-1.05-10.module+el8.3.0+7692+5 111/159
Installing : perl-Env-1.04-395.el8.noarch 112/159
Installing : perl-ExtUtils-MM-Utils-1:7.34-1.el8.noarch 113/159
Installing : perl-IPC-Cmd-2:1.02-1.el8.noarch 114/159
Installing : perl-File-Fetch-0.56-2.el8.noarch 115/159
Installing : perl-IPC-SysV-2.07-397.el8.x86_64 116/159
Installing : perl-IPC-System-Simple-1.25-17.el8.noarch 117/159
Installing : perl-autodie-2.29-396.el8.noarch 118/159
Installing : perl-Locale-Codes-3.57-1.el8.noarch 119/159
Installing : perl-Memoize-1.03-422.el8.noarch 120/159
Installing : perl-Module-Loaded-1:0.08-422.el8.noarch 121/159
Installing : perl-Package-Generator-1.106-11.el8.noarch 122/159
Installing : perl-Sub-Exporter-0.987-15.el8.noarch 123/159
Installing : perl-Pod-Checker-4:1.73-395.el8.noarch 124/159
Installing : perl-Pod-Parser-1.63-396.el8.noarch 125/159
Installing : perl-Sys-Syslog-0.35-397.el8.x86_64 126/159
Installing : perl-TermReadKey-2.37-7.el8.x86_64 127/159
Installing : perl-Test-1.30-422.el8.noarch 128/159
Installing : perl-Test-Simple-1:1.302135-1.el8.noarch 129/159
Installing : perl-Text-Glob-0.11-4.el8.noarch 130/159
Installing : perl-Text-Template-1.51-1.el8.noarch 131/159
Installing : perl-Time-Piece-1.31-422.el8.x86_64 132/159
Installing : perl-Unicode-Collate-1.25-2.el8.x86_64 133/159
Installing : perl-local-lib-2.000024-2.el8.noarch 134/159
Installing : perl-utils-5.26.3-422.el8.noarch 135/159
Installing : perl-Thread-Queue-3.13-1.el8.noarch 136/159
Installing : perl-File-Which-1.22-2.el8.noarch 137/159
Installing : perl-File-HomeDir-1.002-4.el8.noarch 138/159
Installing : perl-Devel-Peek-1.26-422.el8.x86_64 139/159
Installing : perl-MRO-Compat-0.13-4.el8.noarch 140/159
Installing : perl-Data-Section-0.200007-3.el8.noarch 141/159
Installing : perl-Software-License-0.103013-2.el8.noarch 142/159
Installing : perl-PerlIO-via-QuotedPrint-0.08-395.el8.noarch 143/159
Installing : perl-perlfaq-5.20180605-1.el8.noarch 144/159
Installing : glibc-gconv-extra-2.28-225.0.3.el8.x86_64 145/159
Running scriptlet: glibc-gconv-extra-2.28-225.0.3.el8.x86_64 145/159
Installing : file-5.33-24.el8.x86_64 146/159
Installing : redhat-rpm-config-131-1.0.1.el8.noarch 147/159
Installing : perl-ExtUtils-Install-2.14-4.el8.noarch 148/159
Installing : perl-devel-4:5.26.3-422.el8.x86_64 149/159
Installing : perl-ExtUtils-MakeMaker-1:7.34-1.el8.noarch 150/159
Installing : perl-ExtUtils-CBuilder-1:0.280230-2.el8.noarch 151/159
Installing : perl-ExtUtils-Embed-1.34-422.el8.noarch 152/159
Installing : perl-ExtUtils-Miniperl-1.06-422.el8.noarch 153/159
Installing : perl-libnetcfg-4:5.26.3-422.el8.noarch 154/159
Installing : perl-Encode-devel-4:2.97-3.el8.x86_64 155/159
Installing : perl-inc-latest-2:0.500-9.el8.noarch 156/159
Installing : perl-Module-Build-2:0.42.24-5.el8.noarch 157/159
Installing : perl-CPAN-2.18-397.el8.noarch 158/159
Installing : perl-4:5.26.3-422.el8.x86_64 159/159
Running scriptlet: perl-4:5.26.3-422.el8.x86_64 159/159
Verifying : file-5.33-24.el8.x86_64 1/159
Verifying : glibc-gconv-extra-2.28-225.0.3.el8.x86_64 2/159
Verifying : groff-base-1.22.3-18.el8.x86_64 3/159
Verifying : perl-Algorithm-Diff-1.1903-9.el8.noarch 4/159
Verifying : perl-Archive-Tar-2.30-1.el8.noarch 5/159
Verifying : perl-Carp-1.42-396.el8.noarch 6/159
Verifying : perl-Compress-Raw-Bzip2-2.081-1.el8.x86_64 7/159
Verifying : perl-Compress-Raw-Zlib-2.081-1.el8.x86_64 8/159
Verifying : perl-Data-Dumper-2.167-399.el8.x86_64 9/159
Verifying : perl-Digest-1.17-395.el8.noarch 10/159
Verifying : perl-Digest-MD5-2.55-396.el8.x86_64 11/159
Verifying : perl-Encode-4:2.97-3.el8.x86_64 12/159
Verifying : perl-Errno-1.28-422.el8.x86_64 13/159
Verifying : perl-Exporter-5.72-396.el8.noarch 14/159
Verifying : perl-File-Path-2.15-2.el8.noarch 15/159
Verifying : perl-File-Temp-0.230.600-1.el8.noarch 16/159
Verifying : perl-Getopt-Long-1:2.50-4.el8.noarch 17/159
Verifying : perl-HTTP-Tiny-0.074-2.el8.noarch 18/159
Verifying : perl-IO-1.38-422.el8.x86_64 19/159
Verifying : perl-IO-Compress-2.081-1.el8.noarch 20/159
Verifying : perl-IO-Socket-IP-0.39-5.el8.noarch 21/159
Verifying : perl-IO-Zlib-1:1.10-422.el8.noarch 22/159
Verifying : perl-MIME-Base64-3.15-396.el8.x86_64 23/159
Verifying : perl-Math-BigInt-1:1.9998.11-7.el8.noarch 24/159
Verifying : perl-Math-Complex-1.59-422.el8.noarch 25/159
Verifying : perl-PathTools-3.74-1.el8.x86_64 26/159
Verifying : perl-Pod-Escapes-1:1.07-395.el8.noarch 27/159
Verifying : perl-Pod-Perldoc-3.28-396.el8.noarch 28/159
Verifying : perl-Pod-Simple-1:3.35-395.el8.noarch 29/159
Verifying : perl-Pod-Usage-4:1.69-395.el8.noarch 30/159
Verifying : perl-Scalar-List-Utils-3:1.49-2.el8.x86_64 31/159
Verifying : perl-Socket-4:2.027-3.el8.x86_64 32/159
Verifying : perl-Storable-1:3.11-3.el8.x86_64 33/159
Verifying : perl-Term-ANSIColor-4.06-396.el8.noarch 34/159
Verifying : perl-Term-Cap-1.17-395.el8.noarch 35/159
Verifying : perl-Text-Diff-1.45-2.el8.noarch 36/159
Verifying : perl-Text-ParseWords-3.30-395.el8.noarch 37/159
Verifying : perl-Text-Tabs+Wrap-2013.0523-395.el8.noarch 38/159
Verifying : perl-Time-Local-1:1.280-1.el8.noarch 39/159
Verifying : perl-URI-1.73-3.el8.noarch 40/159
Verifying : perl-Unicode-Normalize-1.25-396.el8.x86_64 41/159
Verifying : perl-constant-1.33-396.el8.noarch 42/159
Verifying : perl-interpreter-4:5.26.3-422.el8.x86_64 43/159
Verifying : perl-libnet-3.11-3.el8.noarch 44/159
Verifying : perl-libs-4:5.26.3-422.el8.x86_64 45/159
Verifying : perl-macros-4:5.26.3-422.el8.x86_64 46/159
Verifying : perl-parent-1:0.237-1.el8.noarch 47/159
Verifying : perl-podlators-4.11-1.el8.noarch 48/159
Verifying : perl-threads-1:2.21-2.el8.x86_64 49/159
Verifying : perl-threads-shared-1.58-2.el8.x86_64 50/159
Verifying : python3-pyparsing-2.1.10-7.el8.noarch 51/159
Verifying : zip-3.0-23.el8.x86_64 52/159
Verifying : dwz-0.12-10.el8.x86_64 53/159
Verifying : efi-srpm-macros-3-3.0.1.el8.noarch 54/159
Verifying : ghc-srpm-macros-1.4.2-7.el8.noarch 55/159
Verifying : go-srpm-macros-2-17.el8.noarch 56/159
Verifying : ocaml-srpm-macros-5-4.el8.noarch 57/159
Verifying : openblas-srpm-macros-2-2.el8.noarch 58/159
Verifying : perl-4:5.26.3-422.el8.x86_64 59/159
Verifying : perl-Archive-Zip-1.60-3.el8.noarch 60/159
Verifying : perl-Attribute-Handlers-0.99-422.el8.noarch 61/159
Verifying : perl-B-Debug-1.26-2.el8.noarch 62/159
Verifying : perl-CPAN-2.18-397.el8.noarch 63/159
Verifying : perl-CPAN-Meta-2.150010-396.el8.noarch 64/159
Verifying : perl-CPAN-Meta-Requirements-2.140-396.el8.noarch 65/159
Verifying : perl-CPAN-Meta-YAML-0.018-397.el8.noarch 66/159
Verifying : perl-Compress-Bzip2-2.26-6.el8.x86_64 67/159
Verifying : perl-Config-Perl-V-0.30-1.el8.noarch 68/159
Verifying : perl-DB_File-1.842-1.el8.x86_64 69/159
Verifying : perl-Data-OptList-0.110-6.el8.noarch 70/159
Verifying : perl-Data-Section-0.200007-3.el8.noarch 71/159
Verifying : perl-Devel-PPPort-3.36-5.el8.x86_64 72/159
Verifying : perl-Devel-Peek-1.26-422.el8.x86_64 73/159
Verifying : perl-Devel-SelfStubber-1.06-422.el8.noarch 74/159
Verifying : perl-Devel-Size-0.81-2.el8.x86_64 75/159
Verifying : perl-Digest-SHA-1:6.02-1.el8.x86_64 76/159
Verifying : perl-Encode-Locale-1.05-10.module+el8.3.0+7692+5 77/159
Verifying : perl-Encode-devel-4:2.97-3.el8.x86_64 78/159
Verifying : perl-Env-1.04-395.el8.noarch 79/159
Verifying : perl-ExtUtils-CBuilder-1:0.280230-2.el8.noarch 80/159
Verifying : perl-ExtUtils-Command-1:7.34-1.el8.noarch 81/159
Verifying : perl-ExtUtils-Embed-1.34-422.el8.noarch 82/159
Verifying : perl-ExtUtils-Install-2.14-4.el8.noarch 83/159
Verifying : perl-ExtUtils-MM-Utils-1:7.34-1.el8.noarch 84/159
Verifying : perl-ExtUtils-MakeMaker-1:7.34-1.el8.noarch 85/159
Verifying : perl-ExtUtils-Manifest-1.70-395.el8.noarch 86/159
Verifying : perl-ExtUtils-Miniperl-1.06-422.el8.noarch 87/159
Verifying : perl-ExtUtils-ParseXS-1:3.35-2.el8.noarch 88/159
Verifying : perl-File-Fetch-0.56-2.el8.noarch 89/159
Verifying : perl-File-HomeDir-1.002-4.el8.noarch 90/159
Verifying : perl-File-Which-1.22-2.el8.noarch 91/159
Verifying : perl-Filter-2:1.58-2.el8.x86_64 92/159
Verifying : perl-Filter-Simple-0.94-2.el8.noarch 93/159
Verifying : perl-IO-Socket-SSL-2.066-4.module+el8.6.0+20623+ 94/159
Verifying : perl-IPC-Cmd-2:1.02-1.el8.noarch 95/159
Verifying : perl-IPC-SysV-2.07-397.el8.x86_64 96/159
Verifying : perl-IPC-System-Simple-1.25-17.el8.noarch 97/159
Verifying : perl-JSON-PP-1:2.97.001-3.el8.noarch 98/159
Verifying : perl-Locale-Codes-3.57-1.el8.noarch 99/159
Verifying : perl-Locale-Maketext-1.28-396.el8.noarch 100/159
Verifying : perl-Locale-Maketext-Simple-1:0.21-422.el8.noarc 101/159
Verifying : perl-MRO-Compat-0.13-4.el8.noarch 102/159
Verifying : perl-Math-BigInt-FastCalc-0.500.600-6.el8.x86_64 103/159
Verifying : perl-Math-BigRat-0.2614-1.el8.noarch 104/159
Verifying : perl-Memoize-1.03-422.el8.noarch 105/159
Verifying : perl-Module-Build-2:0.42.24-5.el8.noarch 106/159
Verifying : perl-Module-CoreList-1:5.20181130-1.el8.noarch 107/159
Verifying : perl-Module-CoreList-tools-1:5.20181130-1.el8.no 108/159
Verifying : perl-Module-Load-1:0.32-395.el8.noarch 109/159
Verifying : perl-Module-Load-Conditional-0.68-395.el8.noarch 110/159
Verifying : perl-Module-Loaded-1:0.08-422.el8.noarch 111/159
Verifying : perl-Module-Metadata-1.000033-395.el8.noarch 112/159
Verifying : perl-Mozilla-CA-20160104-7.0.1.module+el8.3.0+21 113/159
Verifying : perl-Net-Ping-2.55-422.el8.noarch 114/159
Verifying : perl-Net-SSLeay-1.88-2.module+el8.6.0+20623+f089 115/159
Verifying : perl-Package-Generator-1.106-11.el8.noarch 116/159
Verifying : perl-Params-Check-1:0.38-395.el8.noarch 117/159
Verifying : perl-Params-Util-1.07-22.el8.x86_64 118/159
Verifying : perl-Perl-OSType-1.010-396.el8.noarch 119/159
Verifying : perl-PerlIO-via-QuotedPrint-0.08-395.el8.noarch 120/159
Verifying : perl-Pod-Checker-4:1.73-395.el8.noarch 121/159
Verifying : perl-Pod-Html-1.22.02-422.el8.noarch 122/159
Verifying : perl-Pod-Parser-1.63-396.el8.noarch 123/159
Verifying : perl-SelfLoader-1.23-422.el8.noarch 124/159
Verifying : perl-Software-License-0.103013-2.el8.noarch 125/159
Verifying : perl-Sub-Exporter-0.987-15.el8.noarch 126/159
Verifying : perl-Sub-Install-0.928-14.el8.noarch 127/159
Verifying : perl-Sys-Syslog-0.35-397.el8.x86_64 128/159
Verifying : perl-TermReadKey-2.37-7.el8.x86_64 129/159
Verifying : perl-Test-1.30-422.el8.noarch 130/159
Verifying : perl-Test-Harness-1:3.42-1.el8.noarch 131/159
Verifying : perl-Test-Simple-1:1.302135-1.el8.noarch 132/159
Verifying : perl-Text-Balanced-2.03-395.el8.noarch 133/159
Verifying : perl-Text-Glob-0.11-4.el8.noarch 134/159
Verifying : perl-Text-Template-1.51-1.el8.noarch 135/159
Verifying : perl-Thread-Queue-3.13-1.el8.noarch 136/159
Verifying : perl-Time-HiRes-4:1.9758-2.el8.x86_64 137/159
Verifying : perl-Time-Piece-1.31-422.el8.x86_64 138/159
Verifying : perl-Unicode-Collate-1.25-2.el8.x86_64 139/159
Verifying : perl-autodie-2.29-396.el8.noarch 140/159
Verifying : perl-bignum-0.49-2.el8.noarch 141/159
Verifying : perl-devel-4:5.26.3-422.el8.x86_64 142/159
Verifying : perl-encoding-4:2.22-3.el8.x86_64 143/159
Verifying : perl-experimental-0.019-2.el8.noarch 144/159
Verifying : perl-inc-latest-2:0.500-9.el8.noarch 145/159
Verifying : perl-libnetcfg-4:5.26.3-422.el8.noarch 146/159
Verifying : perl-local-lib-2.000024-2.el8.noarch 147/159
Verifying : perl-open-1.11-422.el8.noarch 148/159
Verifying : perl-perlfaq-5.20180605-1.el8.noarch 149/159
Verifying : perl-srpm-macros-1-25.el8.noarch 150/159
Verifying : perl-utils-5.26.3-422.el8.noarch 151/159
Verifying : perl-version-6:0.99.24-1.el8.x86_64 152/159
Verifying : python-rpm-macros-3-45.el8.noarch 153/159
Verifying : python-srpm-macros-3-45.el8.noarch 154/159
Verifying : python3-rpm-macros-3-45.el8.noarch 155/159
Verifying : qt5-srpm-macros-5.15.3-1.el8.noarch 156/159
Verifying : redhat-rpm-config-131-1.0.1.el8.noarch 157/159
Verifying : rust-srpm-macros-5-2.el8.noarch 158/159
Verifying : systemtap-sdt-devel-4.9-3.0.1.el8.x86_64 159/159
Installed:
dwz-0.12-10.el8.x86_64
efi-srpm-macros-3-3.0.1.el8.noarch
file-5.33-24.el8.x86_64
ghc-srpm-macros-1.4.2-7.el8.noarch
glibc-gconv-extra-2.28-225.0.3.el8.x86_64
go-srpm-macros-2-17.el8.noarch
groff-base-1.22.3-18.el8.x86_64
ocaml-srpm-macros-5-4.el8.noarch
openblas-srpm-macros-2-2.el8.noarch
perl-4:5.26.3-422.el8.x86_64
perl-Algorithm-Diff-1.1903-9.el8.noarch
perl-Archive-Tar-2.30-1.el8.noarch
perl-Archive-Zip-1.60-3.el8.noarch
perl-Attribute-Handlers-0.99-422.el8.noarch
perl-B-Debug-1.26-2.el8.noarch
perl-CPAN-2.18-397.el8.noarch
perl-CPAN-Meta-2.150010-396.el8.noarch
perl-CPAN-Meta-Requirements-2.140-396.el8.noarch
perl-CPAN-Meta-YAML-0.018-397.el8.noarch
perl-Carp-1.42-396.el8.noarch
perl-Compress-Bzip2-2.26-6.el8.x86_64
perl-Compress-Raw-Bzip2-2.081-1.el8.x86_64
perl-Compress-Raw-Zlib-2.081-1.el8.x86_64
perl-Config-Perl-V-0.30-1.el8.noarch
perl-DB_File-1.842-1.el8.x86_64
perl-Data-Dumper-2.167-399.el8.x86_64
perl-Data-OptList-0.110-6.el8.noarch
perl-Data-Section-0.200007-3.el8.noarch
perl-Devel-PPPort-3.36-5.el8.x86_64
perl-Devel-Peek-1.26-422.el8.x86_64
perl-Devel-SelfStubber-1.06-422.el8.noarch
perl-Devel-Size-0.81-2.el8.x86_64
perl-Digest-1.17-395.el8.noarch
perl-Digest-MD5-2.55-396.el8.x86_64
perl-Digest-SHA-1:6.02-1.el8.x86_64
perl-Encode-4:2.97-3.el8.x86_64
perl-Encode-Locale-1.05-10.module+el8.3.0+7692+542c56f9.noarch
perl-Encode-devel-4:2.97-3.el8.x86_64
perl-Env-1.04-395.el8.noarch
perl-Errno-1.28-422.el8.x86_64
perl-Exporter-5.72-396.el8.noarch
perl-ExtUtils-CBuilder-1:0.280230-2.el8.noarch
perl-ExtUtils-Command-1:7.34-1.el8.noarch
perl-ExtUtils-Embed-1.34-422.el8.noarch
perl-ExtUtils-Install-2.14-4.el8.noarch
perl-ExtUtils-MM-Utils-1:7.34-1.el8.noarch
perl-ExtUtils-MakeMaker-1:7.34-1.el8.noarch
perl-ExtUtils-Manifest-1.70-395.el8.noarch
perl-ExtUtils-Miniperl-1.06-422.el8.noarch
perl-ExtUtils-ParseXS-1:3.35-2.el8.noarch
perl-File-Fetch-0.56-2.el8.noarch
perl-File-HomeDir-1.002-4.el8.noarch
perl-File-Path-2.15-2.el8.noarch
perl-File-Temp-0.230.600-1.el8.noarch
perl-File-Which-1.22-2.el8.noarch
perl-Filter-2:1.58-2.el8.x86_64
perl-Filter-Simple-0.94-2.el8.noarch
perl-Getopt-Long-1:2.50-4.el8.noarch
perl-HTTP-Tiny-0.074-2.el8.noarch
perl-IO-1.38-422.el8.x86_64
perl-IO-Compress-2.081-1.el8.noarch
perl-IO-Socket-IP-0.39-5.el8.noarch
perl-IO-Socket-SSL-2.066-4.module+el8.6.0+20623+f0897f98.noarch
perl-IO-Zlib-1:1.10-422.el8.noarch
perl-IPC-Cmd-2:1.02-1.el8.noarch
perl-IPC-SysV-2.07-397.el8.x86_64
perl-IPC-System-Simple-1.25-17.el8.noarch
perl-JSON-PP-1:2.97.001-3.el8.noarch
perl-Locale-Codes-3.57-1.el8.noarch
perl-Locale-Maketext-1.28-396.el8.noarch
perl-Locale-Maketext-Simple-1:0.21-422.el8.noarch
perl-MIME-Base64-3.15-396.el8.x86_64
perl-MRO-Compat-0.13-4.el8.noarch
perl-Math-BigInt-1:1.9998.11-7.el8.noarch
perl-Math-BigInt-FastCalc-0.500.600-6.el8.x86_64
perl-Math-BigRat-0.2614-1.el8.noarch
perl-Math-Complex-1.59-422.el8.noarch
perl-Memoize-1.03-422.el8.noarch
perl-Module-Build-2:0.42.24-5.el8.noarch
perl-Module-CoreList-1:5.20181130-1.el8.noarch
perl-Module-CoreList-tools-1:5.20181130-1.el8.noarch
perl-Module-Load-1:0.32-395.el8.noarch
perl-Module-Load-Conditional-0.68-395.el8.noarch
perl-Module-Loaded-1:0.08-422.el8.noarch
perl-Module-Metadata-1.000033-395.el8.noarch
perl-Mozilla-CA-20160104-7.0.1.module+el8.3.0+21136+b437fca9.noarch
perl-Net-Ping-2.55-422.el8.noarch
perl-Net-SSLeay-1.88-2.module+el8.6.0+20623+f0897f98.x86_64
perl-Package-Generator-1.106-11.el8.noarch
perl-Params-Check-1:0.38-395.el8.noarch
perl-Params-Util-1.07-22.el8.x86_64
perl-PathTools-3.74-1.el8.x86_64
perl-Perl-OSType-1.010-396.el8.noarch
perl-PerlIO-via-QuotedPrint-0.08-395.el8.noarch
perl-Pod-Checker-4:1.73-395.el8.noarch
perl-Pod-Escapes-1:1.07-395.el8.noarch
perl-Pod-Html-1.22.02-422.el8.noarch
perl-Pod-Parser-1.63-396.el8.noarch
perl-Pod-Perldoc-3.28-396.el8.noarch
perl-Pod-Simple-1:3.35-395.el8.noarch
perl-Pod-Usage-4:1.69-395.el8.noarch
perl-Scalar-List-Utils-3:1.49-2.el8.x86_64
perl-SelfLoader-1.23-422.el8.noarch
perl-Socket-4:2.027-3.el8.x86_64
perl-Software-License-0.103013-2.el8.noarch
perl-Storable-1:3.11-3.el8.x86_64
perl-Sub-Exporter-0.987-15.el8.noarch
perl-Sub-Install-0.928-14.el8.noarch
perl-Sys-Syslog-0.35-397.el8.x86_64
perl-Term-ANSIColor-4.06-396.el8.noarch
perl-Term-Cap-1.17-395.el8.noarch
perl-TermReadKey-2.37-7.el8.x86_64
perl-Test-1.30-422.el8.noarch
perl-Test-Harness-1:3.42-1.el8.noarch
perl-Test-Simple-1:1.302135-1.el8.noarch
perl-Text-Balanced-2.03-395.el8.noarch
perl-Text-Diff-1.45-2.el8.noarch
perl-Text-Glob-0.11-4.el8.noarch
perl-Text-ParseWords-3.30-395.el8.noarch
perl-Text-Tabs+Wrap-2013.0523-395.el8.noarch
perl-Text-Template-1.51-1.el8.noarch
perl-Thread-Queue-3.13-1.el8.noarch
perl-Time-HiRes-4:1.9758-2.el8.x86_64
perl-Time-Local-1:1.280-1.el8.noarch
perl-Time-Piece-1.31-422.el8.x86_64
perl-URI-1.73-3.el8.noarch
perl-Unicode-Collate-1.25-2.el8.x86_64
perl-Unicode-Normalize-1.25-396.el8.x86_64
perl-autodie-2.29-396.el8.noarch
perl-bignum-0.49-2.el8.noarch
perl-constant-1.33-396.el8.noarch
perl-devel-4:5.26.3-422.el8.x86_64
perl-encoding-4:2.22-3.el8.x86_64
perl-experimental-0.019-2.el8.noarch
perl-inc-latest-2:0.500-9.el8.noarch
perl-interpreter-4:5.26.3-422.el8.x86_64
perl-libnet-3.11-3.el8.noarch
perl-libnetcfg-4:5.26.3-422.el8.noarch
perl-libs-4:5.26.3-422.el8.x86_64
perl-local-lib-2.000024-2.el8.noarch
perl-macros-4:5.26.3-422.el8.x86_64
perl-open-1.11-422.el8.noarch
perl-parent-1:0.237-1.el8.noarch
perl-perlfaq-5.20180605-1.el8.noarch
perl-podlators-4.11-1.el8.noarch
perl-srpm-macros-1-25.el8.noarch
perl-threads-1:2.21-2.el8.x86_64
perl-threads-shared-1.58-2.el8.x86_64
perl-utils-5.26.3-422.el8.noarch
perl-version-6:0.99.24-1.el8.x86_64
python-rpm-macros-3-45.el8.noarch
python-srpm-macros-3-45.el8.noarch
python3-pyparsing-2.1.10-7.el8.noarch
python3-rpm-macros-3-45.el8.noarch
qt5-srpm-macros-5.15.3-1.el8.noarch
redhat-rpm-config-131-1.0.1.el8.noarch
rust-srpm-macros-5-2.el8.noarch
systemtap-sdt-devel-4.9-3.0.1.el8.x86_64
zip-3.0-23.el8.x86_64
Complete! |
I installed the python3 with this command:
dnf install -y python3 |
Display detailed console log →
Last metadata expiration check: 0:31:49 ago on Thu Dec 21 05:18:09 2023.
Dependencies resolved.
================================================================================
 Package             Arch   Version                     Repository         Size
================================================================================
Installing:
 python36            x86_64 3.6.8-38.module+el8.9.0+90104+968a3e84
                                                        ol8_appstream      18 k
Installing dependencies:
 platform-python-pip noarch 9.0.3-23.el8                ol8_baseos_latest 1.6 M
 python3-pip         noarch 9.0.3-23.el8                ol8_appstream      20 k
 python3-setuptools  noarch 39.2.0-7.el8                ol8_baseos_latest 163 k
Enabling module streams:
 python36                   3.6

Transaction Summary
================================================================================
Install  4 Packages

Total download size: 1.8 M
Installed size: 7.0 M
Downloading Packages:
(1/4): python3-pip-9.0.3-23.el8.noarch.rpm       61 kB/s |  20 kB     00:00
(2/4): python36-3.6.8-38.module+el8.9.0+90104+9 229 kB/s |  18 kB     00:00
(3/4): python3-setuptools-39.2.0-7.el8.noarch.r 335 kB/s | 163 kB     00:00
(4/4): platform-python-pip-9.0.3-23.el8.noarch. 1.9 MB/s | 1.6 MB     00:00
--------------------------------------------------------------------------------
Total                                           2.2 MB/s | 1.8 MB     00:00
Running transaction check
Transaction check succeeded.
Running transaction test
Transaction test succeeded.
Running transaction
  Preparing        :                                                        1/1
  Installing       : python3-setuptools-39.2.0-7.el8.noarch                 1/4
  Installing       : platform-python-pip-9.0.3-23.el8.noarch                2/4
  Installing       : python36-3.6.8-38.module+el8.9.0+90104+968a3e84.x86_   3/4
  Running scriptlet: python36-3.6.8-38.module+el8.9.0+90104+968a3e84.x86_   3/4
  Installing       : python3-pip-9.0.3-23.el8.noarch                        4/4
  Running scriptlet: python3-pip-9.0.3-23.el8.noarch                        4/4
  Verifying        : platform-python-pip-9.0.3-23.el8.noarch                1/4
  Verifying        : python3-setuptools-39.2.0-7.el8.noarch                 2/4
  Verifying        : python3-pip-9.0.3-23.el8.noarch                        3/4
  Verifying        : python36-3.6.8-38.module+el8.9.0+90104+968a3e84.x86_   4/4

Installed:
  platform-python-pip-9.0.3-23.el8.noarch
  python3-pip-9.0.3-23.el8.noarch
  python3-setuptools-39.2.0-7.el8.noarch
  python36-3.6.8-38.module+el8.9.0+90104+968a3e84.x86_64

Complete! |
I installed the git module with this command:
dnf install -y git |
Display detailed console log →
Last metadata expiration check: 0:33:00 ago on Thu Dec 21 05:18:09 2023. Dependencies resolved. ================================================================================ Package Arch Version Repository Size ================================================================================ Installing: git x86_64 2.39.3-1.el8_8 ol8_appstream 104 k Installing dependencies: emacs-filesystem noarch 1:26.1-11.el8 ol8_baseos_latest 70 k git-core x86_64 2.39.3-1.el8_8 ol8_appstream 11 M git-core-doc noarch 2.39.3-1.el8_8 ol8_appstream 3.0 M less x86_64 530-1.el8 ol8_baseos_latest 164 k perl-Error noarch 1:0.17025-2.el8 ol8_appstream 46 k perl-Git noarch 2.39.3-1.el8_8 ol8_appstream 79 k Transaction Summary ================================================================================ Install 7 Packages Total download size: 14 M Installed size: 45 M Downloading Packages: (1/7): git-2.39.3-1.el8_8.x86_64.rpm 233 kB/s | 104 kB 00:00 (2/7): emacs-filesystem-26.1-11.el8.noarch.rpm 155 kB/s | 70 kB 00:00 (3/7): less-530-1.el8.x86_64.rpm 309 kB/s | 164 kB 00:00 (4/7): perl-Error-0.17025-2.el8.noarch.rpm 519 kB/s | 46 kB 00:00 (5/7): perl-Git-2.39.3-1.el8_8.noarch.rpm 722 kB/s | 79 kB 00:00 (6/7): git-core-doc-2.39.3-1.el8_8.noarch.rpm 5.1 MB/s | 3.0 MB 00:00 (7/7): git-core-2.39.3-1.el8_8.x86_64.rpm 12 MB/s | 11 MB 00:00 -------------------------------------------------------------------------------- Total 11 MB/s | 14 MB 00:01 Running transaction check Transaction check succeeded. Running transaction test Transaction test succeeded. Running transaction Preparing : 1/1 Installing : perl-Error-1:0.17025-2.el8.noarch 1/7 Installing : less-530-1.el8.x86_64 2/7 Installing : git-core-2.39.3-1.el8_8.x86_64 3/7 Installing : git-core-doc-2.39.3-1.el8_8.noarch 4/7 Installing : emacs-filesystem-1:26.1-11.el8.noarch 5/7 Installing : perl-Git-2.39.3-1.el8_8.noarch 6/7 Installing : git-2.39.3-1.el8_8.x86_64 7/7 Running scriptlet: git-2.39.3-1.el8_8.x86_64 7/7 Verifying : emacs-filesystem-1:26.1-11.el8.noarch 1/7 Verifying : less-530-1.el8.x86_64 2/7 Verifying : git-2.39.3-1.el8_8.x86_64 3/7 Verifying : git-core-2.39.3-1.el8_8.x86_64 4/7 Verifying : git-core-doc-2.39.3-1.el8_8.noarch 5/7 Verifying : perl-Error-1:0.17025-2.el8.noarch 6/7 Verifying : perl-Git-2.39.3-1.el8_8.noarch 7/7 Installed: emacs-filesystem-1:26.1-11.el8.noarch git-2.39.3-1.el8_8.x86_64 git-core-2.39.3-1.el8_8.x86_64 git-core-doc-2.39.3-1.el8_8.noarch less-530-1.el8.x86_64 perl-Error-1:0.17025-2.el8.noarch perl-Git-2.39.3-1.el8_8.noarch Complete! |
I installed the epel-release container with this command:
dnf install -y epel-release |
Display detailed console log →
Last metadata expiration check: 0:40:34 ago on Thu Dec 21 05:18:09 2023. Dependencies resolved. ================================================================================ Package Arch Version Repository Size ================================================================================ Installing: oracle-epel-release-el8 x86_64 1.0-5.el8 ol8_baseos_latest 15 k Transaction Summary ================================================================================ Install 1 Package Total download size: 15 k Installed size: 18 k Downloading Packages: oracle-epel-release-el8-1.0-5.el8.x86_64.rpm 49 kB/s | 15 kB 00:00 -------------------------------------------------------------------------------- Total 49 kB/s | 15 kB 00:00 Running transaction check Transaction check succeeded. Running transaction test Transaction test succeeded. Running transaction Preparing : 1/1 Installing : oracle-epel-release-el8-1.0-5.el8.x86_64 1/1 Verifying : oracle-epel-release-el8-1.0-5.el8.x86_64 1/1 Installed: oracle-epel-release-el8-1.0-5.el8.x86_64 Complete! |
After installing all of these, you’re now ready to install the core rlwrap utility program. Like the other installations, you use:
dnf install -y rlwrap |
Display detailed console log →
Oracle Linux 8 EPEL Packages for Development (x 15 MB/s | 58 MB 00:03 Oracle Linux 8 EPEL Modular Packages for Develo 404 kB/s | 322 kB 00:00 Dependencies resolved. ================================================================================ Package Arch Version Repository Size ================================================================================ Installing: rlwrap x86_64 0.46.1-1.el8 ol8_developer_EPEL 140 k Installing dependencies: perl-File-Slurp noarch 9999.19-19.el8 ol8_appstream 47 k Transaction Summary ================================================================================ Install 2 Packages Total download size: 186 k Installed size: 426 k Downloading Packages: (1/2): perl-File-Slurp-9999.19-19.el8.noarch.rp 94 kB/s | 47 kB 00:00 (2/2): rlwrap-0.46.1-1.el8.x86_64.rpm 242 kB/s | 140 kB 00:00 -------------------------------------------------------------------------------- Total 321 kB/s | 186 kB 00:00 Running transaction check Transaction check succeeded. Running transaction test Transaction test succeeded. Running transaction Preparing : 1/1 Installing : perl-File-Slurp-9999.19-19.el8.noarch 1/2 Installing : rlwrap-0.46.1-1.el8.x86_64 2/2 Running scriptlet: rlwrap-0.46.1-1.el8.x86_64 2/2 Verifying : rlwrap-0.46.1-1.el8.x86_64 1/2 Verifying : perl-File-Slurp-9999.19-19.el8.noarch 2/2 Installed: perl-File-Slurp-9999.19-19.el8.noarch rlwrap-0.46.1-1.el8.x86_64 Complete! |
At this point, you need to create a sandboxed user account for the Docker instance because as a developer using the root user for simple tasks is a bad idea. While you could do this with a Docker command, the Oracle 23c Free edition raised a lock on the /etc/group file when I tried it. Naturally, that’s not a problem because you can connect as the root user with this syntax:
docker exec -it -u root oracle23c bash |
As the root user, create a student account as a developer account in the Oracle 23c Free container:
useradd -u 501 -g dba -G users -d /home/student -s /bin/bash/ -c "Student" -n student |
You’ll be unable to leverage the tnsnames.ora file unless you alter the prior command to replace dba with oinstall or add the following command:
usermod -a -G oinstall student |
Exit the Oracle 23c Free container as the root user and reconnect as the student user with this syntax:
docker exec -it --user student oracle23c bash |
While you’re connected as the root user, you should create an upload directory as a subdirectory of the $ORACLE_BASE directory. The $ORACLE_BASE directory in the Oracle Database 23c Free Docker image is the /opt/oracle directory.
You should use the following syntax to create the upload directory and change its permission to that of the Oracle Database 23c Free installation (for a future blog post on developing external table deployment on the Docker image):
mkdir /opt/oracle chown -R oracle:install /opt/oracle/upload |
You also can add the following student function to the Ubuntu student user’s .bashrc file. It means all you need to type to connect to the Oracle Database 23c Free Docker instance is “student“. I like shortcuts like this one, which let you leverage one-line Python commands.
student () { # Discover the fully qualified program name. path=`which docker 2>/dev/null` file='' # Parse the program name from the path. if [ -n ${path} ]; then file=${path##/*/} fi # Wrap when there is a file and it is rewrap. if [ -n ${file} ] && [[ ${file} = "docker" ]]; then python -c "import subprocess; subprocess.run(['docker exec -it --user student oracle23c bash'], shell=True)" else echo "Docker is unavailable: Install the docker package." fi } |
Open a Ubuntu Terminal shell and type a student function name to connect to the Docker Oracle Database 23c Free instance where you can now test things like external tables with the SQL*Plus command line without installing it on the Ubuntu local operating system.
student@student-virtual-machine:~$ student [student@d28375f0c43f ~]$ sqlplus c##student/student@free SQL*Plus: Release 23.0.0.0.0 - Production on Wed Jan 3 02:14:22 2024 Version 23.3.0.23.09 Copyright (c) 1982, 2023, Oracle. All rights reserved. Last Successful login time: Wed Jan 03 2024 01:56:44 +00:00 Connected to: Oracle Database 23c Free Release 23.0.0.0.0 - Develop, Learn, and Run for Free Version 23.3.0.23.09 SQL> |
Then, I added this sqlplus function to the /home/student/.bashrc file, which is owned by the student user. However, I also added the instruction to change to the student user’s home directory because the Oracle 23c Free container will connect you to the /home/oracle directory by default. I also added the default long list (ll) alias to the .bashrc file.
sqlplus () { # Discover the fully qualified program name. path=`which rlwrap 2>/dev/null` file='' # Parse the program name from the path. if [ -n ${path} ]; then file=${path##/*/} fi; # Wrap when there is a file and it is rewrap. if [ -n ${file} ] && [[ ${file} = "rlwrap" ]]; then rlwrap sqlplus "${@}" else echo "Command-line history unavailable: Install the rlwrap package." $ORACLE_HOME/bin/sqlplus "${@}" fi } # Change to the user's home directory. cd ${HOME} # Create a long list alias: alias ll='ls -l --color=auto' |
After you’ve configured your student user, you can configure the oracle user account to work like a regular server. Exit the Docker Oracle Database 23c Free as the student user, then connect as the root user with this command:
docker exec -it -u root oracle23c bash |
As the root user you can become the oracle user with the following command:
su - oracle |
Now, add the following .bashrc shell in the /home/oracle directory:
# The oracle user's .bashrc # Source global definitions if [ -f /etc/bashrc ]; then . /etc/bashrc fi # User specific environment if ! [[ "$PATH" =~ "$HOME/.local/bin:$HOME/bin:" ]] then PATH="$HOME/.local/bin:$HOME/bin:$PATH" fi export PATH # Uncomment the following line if you don't like systemctl's auto-paging feature: # export SYSTEMD_PAGER= # User specific aliases and functions export ORACLE_SID=FREE export ORACLE_BASE=/opt/oracle export ORACLE_HOME=/opt/oracle/product/23c/dbhomeFree export PATH=$PATH:/$ORACLE_HOME/bin # Change to the user's home directory. cd ${HOME} # Create a long list alias: alias ll='ls -l --color=auto' sqlplus () { # Discover the fully qualified program name. path=`which rlwrap 2>/dev/null` file='' # Parse the program name from the path. if [ -n ${path} ]; then file=${path##/*/} fi; # Wrap when there is a file and it is rewrap. if [ -n ${file} ] && [[ ${file} = "rlwrap" ]]; then rlwrap sqlplus "${@}" else echo "Command-line history unavailable: Install the rlwrap package." $ORACLE_HOME/bin/sqlplus "${@}" fi } |
You need to manually source the .bashrc for the oracle user because it’s not an externally available user. Use this syntax to connect as the internal user:
sqlplus / as sysdba |
It’ll display:
SQL*Plus: RELEASE 23.0.0.0.0 - Production ON Wed Jan 3 07:08:11 2024 Version 23.3.0.23.09 Copyright (c) 1982, 2023, Oracle. ALL rights reserved. Connected TO: Oracle DATABASE 23c Free RELEASE 23.0.0.0.0 - Develop, Learn, AND Run FOR Free Version 23.3.0.23.09 SQL> |
After all this, I can now click the “up arrow” to edit any of the sqlplus command history. If you like to work inside sqlplus natively, this should help you.
Disk Space Allocation
It’s necessary to check for adequate disk space on your Virtual Machine (VM) before installing Oracle 23c Free in a Docker container or as a podman service. Either way, it requires about 13 GB of disk space. On Ubuntu, the typical install of a VM allocates 20 GB and a 500 MB swap. You need to create a 2 GB swap when you install Ubuntu or plan to change the swap, as qualified in this excellent DigitalOcean article. Assuming you installed it with the correct swap or extended your swap area, you can confirm it with the following command:
sudo swapon --show |
It should return something like this:
NAME TYPE SIZE USED PRIO /swapfile file 2.1G 1.2G -2 |
Next, check your disk space allocation and availability with this command:
df -h |
This is what was in my instance with MySQL and PostgreSQL databases already installed and configured with sandboxed schemas:
Filesystem Size Used Avail Use% Mounted on tmpfs 388M 2.1M 386M 1% /run /dev/sda3 20G 14G 4.6G 75% / tmpfs 1.9G 28K 1.9G 1% /dev/shm tmpfs 5.0M 4.0K 5.0M 1% /run/lock /dev/sda2 512M 6.1M 506M 2% /boot/efi tmpfs 388M 108K 388M 1% /run/user/1000 |
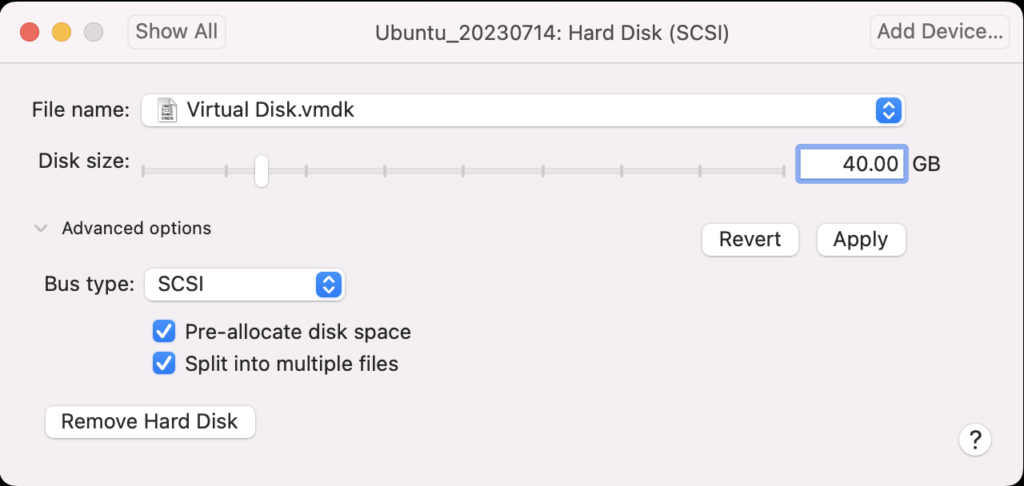
Using VMware Fusion on my Mac (Intel-based i9), I changed the allocated space from 20 GB to 40 GB by navigating to Virtual Machine, Settings…, Hard Disk. I entered 40.00 as the disk size and clicked the Pre-allocate disk space checkbox before clicking the Apply button, as shown in below. This added space is necessary because Oracle Database 23c Free as a Docker instance requires almost 10 GB of local space.
After clicking the Apply button, I checked Ubuntu with the “df -h” command and found there was no change. That’s unlike doing the same thing on AlmaLinux or a RedHat distribution, which was surprising.
The next set of steps required that I manually add the space to the Ubuntu instance:
- Start the Ubuntu VM and check the instance’s disk information with fdisk:
sudo fdisk -l
The log file for this is:
Display detailed console log →
Disk /dev/loop0: 238.77 MiB, 250372096 bytes, 489008 sectors
Units: sectors of 1 * 512 = 512 bytes
Sector size (logical/physical): 512 bytes / 512 bytes
I/O size (minimum/optimal): 512 bytes / 512 bytes


Disk /dev/loop1: 73.86 MiB, 77443072 bytes, 151256 sectors
Units: sectors of 1 * 512 = 512 bytes
Sector size (logical/physical): 512 bytes / 512 bytes
I/O size (minimum/optimal): 512 bytes / 512 bytes


Disk /dev/loop2: 349.7 MiB, 366682112 bytes, 716176 sectors
Units: sectors of 1 * 512 = 512 bytes
Sector size (logical/physical): 512 bytes / 512 bytes
I/O size (minimum/optimal): 512 bytes / 512 bytes


Disk /dev/loop3: 91.69 MiB, 96141312 bytes, 187776 sectors
Units: sectors of 1 * 512 = 512 bytes
Sector size (logical/physical): 512 bytes / 512 bytes
I/O size (minimum/optimal): 512 bytes / 512 bytes


Disk /dev/loop4: 496.98 MiB, 521121792 bytes, 1017816 sectors
Units: sectors of 1 * 512 = 512 bytes
Sector size (logical/physical): 512 bytes / 512 bytes
I/O size (minimum/optimal): 512 bytes / 512 bytes


Disk /dev/loop5: 45.93 MiB, 48160768 bytes, 94064 sectors
Units: sectors of 1 * 512 = 512 bytes
Sector size (logical/physical): 512 bytes / 512 bytes
I/O size (minimum/optimal): 512 bytes / 512 bytes


Disk /dev/loop6: 128.92 MiB, 135184384 bytes, 264032 sectors
Units: sectors of 1 * 512 = 512 bytes
Sector size (logical/physical): 512 bytes / 512 bytes
I/O size (minimum/optimal): 512 bytes / 512 bytes


Disk /dev/loop7: 63.45 MiB, 66531328 bytes, 129944 sectors
Units: sectors of 1 * 512 = 512 bytes
Sector size (logical/physical): 512 bytes / 512 bytes
I/O size (minimum/optimal): 512 bytes / 512 bytes


Disk /dev/fd0: 1.41 MiB, 1474560 bytes, 2880 sectors
Units: sectors of 1 * 512 = 512 bytes
Sector size (logical/physical): 512 bytes / 512 bytes
I/O size (minimum/optimal): 512 bytes / 512 bytes
Disklabel type: dos
Disk identifier: 0x90909090

Device     Boot      Start        End    Sectors  Size Id Type
/dev/fd0p1      2425393296 4850786591 2425393296  1.1T 90 unknown
/dev/fd0p2      2425393296 4850786591 2425393296  1.1T 90 unknown
/dev/fd0p3      2425393296 4850786591 2425393296  1.1T 90 unknown
/dev/fd0p4      2425393296 4850786591 2425393296  1.1T 90 unknown
GPT PMBR size mismatch (41943039 != 83886079) will be corrected by write.


Disk /dev/sda: 40 GiB, 42949672960 bytes, 83886080 sectors
Disk model: VMware Virtual S
Units: sectors of 1 * 512 = 512 bytes
Sector size (logical/physical): 512 bytes / 512 bytes
I/O size (minimum/optimal): 512 bytes / 512 bytes
Disklabel type: gpt
Disk identifier: 7906AE0B-498C-4FE4-8B45-9CD1B2265197

Device       Start      End  Sectors  Size Type
/dev/sda1     2048     4095     2048    1M BIOS boot
/dev/sda2     4096  1054719  1050624  513M EFI System
/dev/sda3  1054720 41940991 40886272 19.5G Linux filesystem


Disk /dev/loop8: 40.84 MiB, 42827776 bytes, 83648 sectors
Units: sectors of 1 * 512 = 512 bytes
Sector size (logical/physical): 512 bytes / 512 bytes
I/O size (minimum/optimal): 512 bytes / 512 bytes


Disk /dev/loop9: 304 KiB, 311296 bytes, 608 sectors
Units: sectors of 1 * 512 = 512 bytes
Sector size (logical/physical): 512 bytes / 512 bytes
I/O size (minimum/optimal): 512 bytes / 512 bytes


Disk /dev/loop10: 452 KiB, 462848 bytes, 904 sectors
Units: sectors of 1 * 512 = 512 bytes
Sector size (logical/physical): 512 bytes / 512 bytes
I/O size (minimum/optimal): 512 bytes / 512 bytes


Disk /dev/loop13: 496.88 MiB, 521015296 bytes, 1017608 sectors
Units: sectors of 1 * 512 = 512 bytes
Sector size (logical/physical): 512 bytes / 512 bytes
I/O size (minimum/optimal): 512 bytes / 512 bytes


Disk /dev/loop12: 240.05 MiB, 251707392 bytes, 491616 sectors
Units: sectors of 1 * 512 = 512 bytes
Sector size (logical/physical): 512 bytes / 512 bytes
I/O size (minimum/optimal): 512 bytes / 512 bytes


Disk /dev/loop11: 4 KiB, 4096 bytes, 8 sectors
Units: sectors of 1 * 512 = 512 bytes
Sector size (logical/physical): 512 bytes / 512 bytes
I/O size (minimum/optimal): 512 bytes / 512 bytes


Disk /dev/loop14: 346.33 MiB, 363151360 bytes, 709280 sectors
Units: sectors of 1 * 512 = 512 bytes
Sector size (logical/physical): 512 bytes / 512 bytes
I/O size (minimum/optimal): 512 bytes / 512 bytes


Disk /dev/loop16: 12.32 MiB, 12922880 bytes, 25240 sectors
Units: sectors of 1 * 512 = 512 bytes
Sector size (logical/physical): 512 bytes / 512 bytes
I/O size (minimum/optimal): 512 bytes / 512 bytes


Disk /dev/loop17: 73.9 MiB, 77492224 bytes, 151352 sectors
Units: sectors of 1 * 512 = 512 bytes
Sector size (logical/physical): 512 bytes / 512 bytes
I/O size (minimum/optimal): 512 bytes / 512 bytes


Disk /dev/loop15: 175.83 MiB, 184373248 bytes, 360104 sectors
Units: sectors of 1 * 512 = 512 bytes
Sector size (logical/physical): 512 bytes / 512 bytes
I/O size (minimum/optimal): 512 bytes / 512 bytes


Disk /dev/loop18: 63.46 MiB, 66547712 bytes, 129976 sectors
Units: sectors of 1 * 512 = 512 bytes
Sector size (logical/physical): 512 bytes / 512 bytes
I/O size (minimum/optimal): 512 bytes / 512 bytes


Disk /dev/loop19: 40.86 MiB, 42840064 bytes, 83672 sectors
Units: sectors of 1 * 512 = 512 bytes
Sector size (logical/physical): 512 bytes / 512 bytes
I/O size (minimum/optimal): 512 bytes / 512 bytes
After running fdisk, I rechecked disk allocation with df -h and saw no change:
Filesystem      Size  Used Avail Use% Mounted on
tmpfs           388M  2.1M  386M   1% /run
/dev/sda3        20G   14G  4.6G  75% /
tmpfs           1.9G   28K  1.9G   1% /dev/shm
tmpfs           5.0M  4.0K  5.0M   1% /run/lock
/dev/sda2       512M  6.1M  506M   2% /boot/efi
tmpfs           388M  108K  388M   1% /run/user/1000
- So, I installed Ubuntu’s user space utility gparted:
sudo apt install gparted
The log file for this is:
Display detailed console log →
Reading package lists... Done
Building dependency tree... Done
Reading state information... Done
The following additional packages will be installed:
  gparted-common
Suggested packages:
  dmraid gpart jfsutils kpartx mtools reiser4progs reiserfsprogs udftools
  xfsprogs exfatprogs
The following NEW packages will be installed:
  gparted gparted-common
0 upgraded, 2 newly installed, 0 to remove and 4 not upgraded.
Need to get 490 kB of archives.
After this operation, 2,128 kB of additional disk space will be used.
Do you want to continue? [Y/n] Y
Get:1 http://us.archive.ubuntu.com/ubuntu jammy/main amd64 gparted-common all 1.3.1-1ubuntu1 [71.9 kB]
Get:2 http://us.archive.ubuntu.com/ubuntu jammy/main amd64 gparted amd64 1.3.1-1ubuntu1 [418 kB]
Fetched 490 kB in 2s (211 kB/s)
Selecting previously unselected package gparted-common.
(Reading database ... 203026 files and directories currently installed.)
Preparing to unpack .../gparted-common_1.3.1-1ubuntu1_all.deb ...
Unpacking gparted-common (1.3.1-1ubuntu1) ...
Selecting previously unselected package gparted.
Preparing to unpack .../gparted_1.3.1-1ubuntu1_amd64.deb ...
Unpacking gparted (1.3.1-1ubuntu1) ...
Setting up gparted-common (1.3.1-1ubuntu1) ...
Setting up gparted (1.3.1-1ubuntu1) ...
Processing triggers for mailcap (3.70+nmu1ubuntu1) ...
Processing triggers for desktop-file-utils (0.26-1ubuntu3) ...
Processing triggers for hicolor-icon-theme (0.17-2) ...
Processing triggers for gnome-menus (3.36.0-1ubuntu3) ...
Processing triggers for man-db (2.10.2-1) ...
- After installing the gparted utility (manual can be found here), you can launch it with the following syntax:
sudo gpartedYou’ll see the following in the console, which you can ignore.
GParted 1.3.1
configuration --enable-libparted-dmraid --enable-online-resize
libparted 3.4
It launches a GUI interface that should look something like the following:
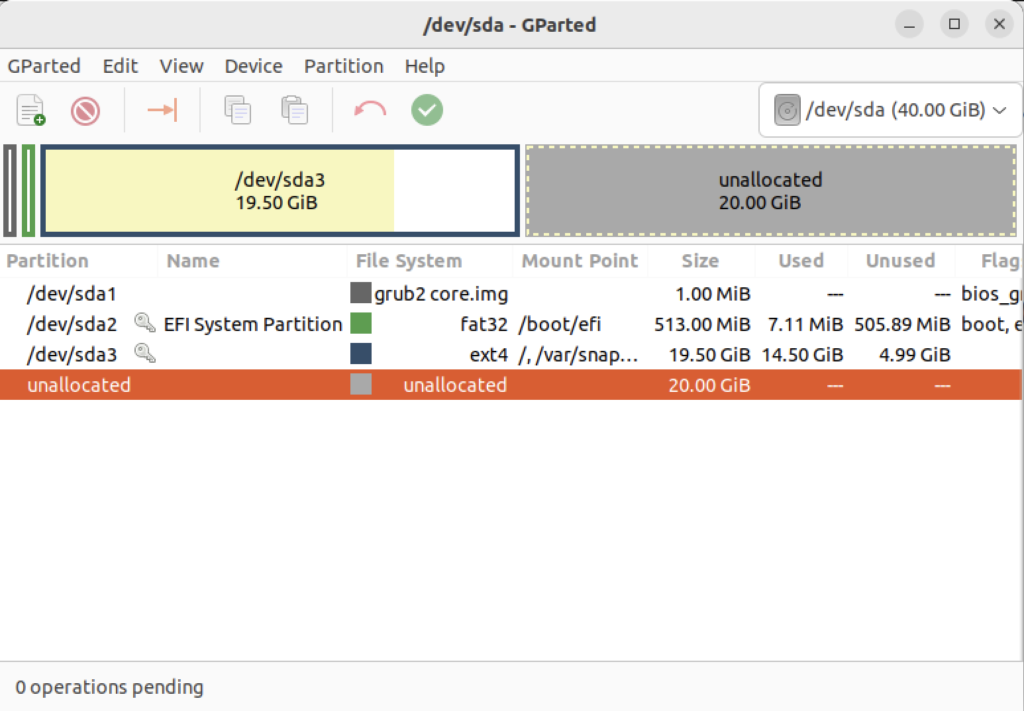
Right-click on the /dev/sda3 Partition and the GParted application will present the following context popup menu. Click the Resize/Move menu option.

The attempt to resize the disk at this point GParted will raise a read-only exception like the following:
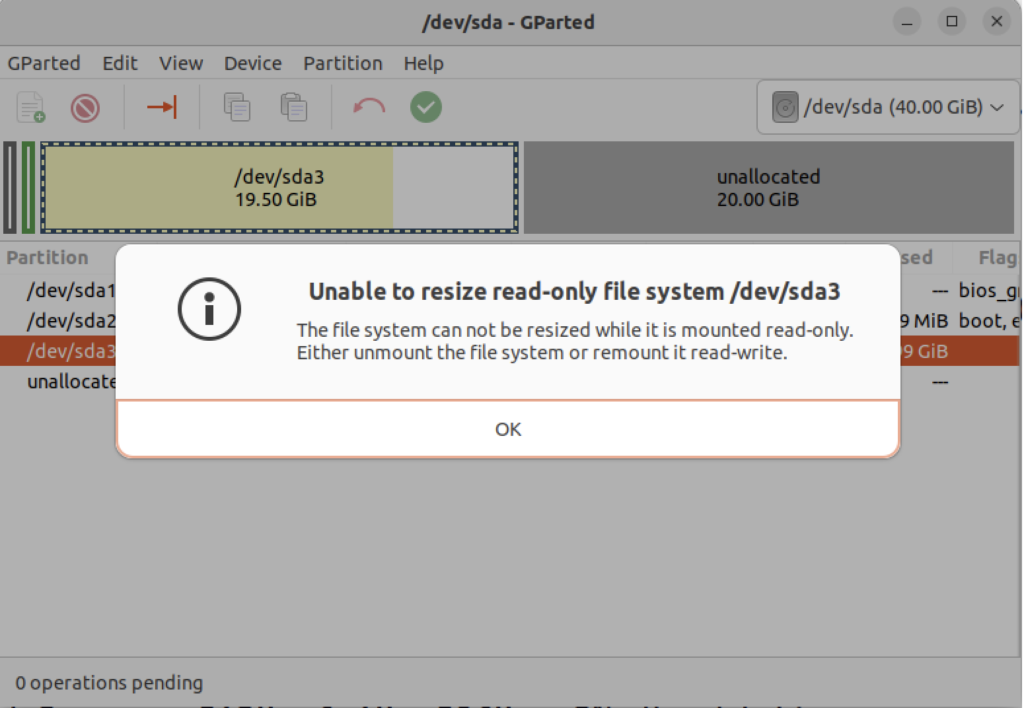
You might open a new shell and fix the disk at the command-line but you’ll need to relaunch gparted regardless. So, you should close gparted and run the following commands:
sudo mount -o remount -rw /
sudo mount -o remount -rw /var/snap/firefox/common/host-hunspell
When you relaunch GParted, you see that the graphic depiction has changed when you right-click on the /dev/sda3 Partition as follows:
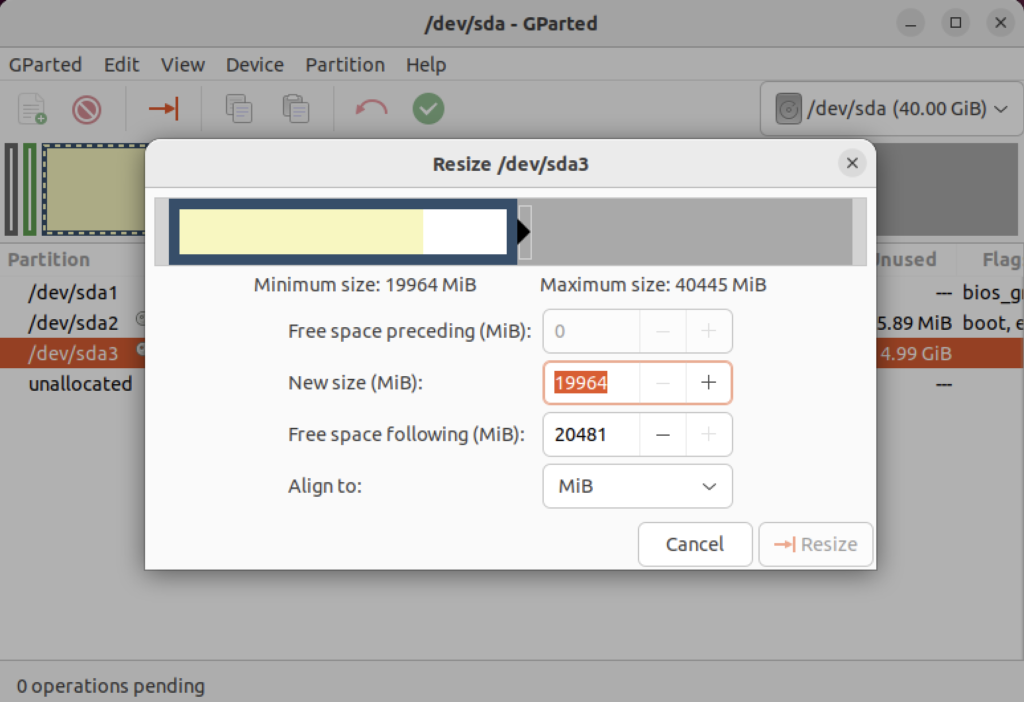
Click on the highlighted box with the arrow and drag it all the way to the right. It will then show you something like the following.

Click the Resize button to make the change and add the space to the Ubuntu file system and see something like the following in Gparted:
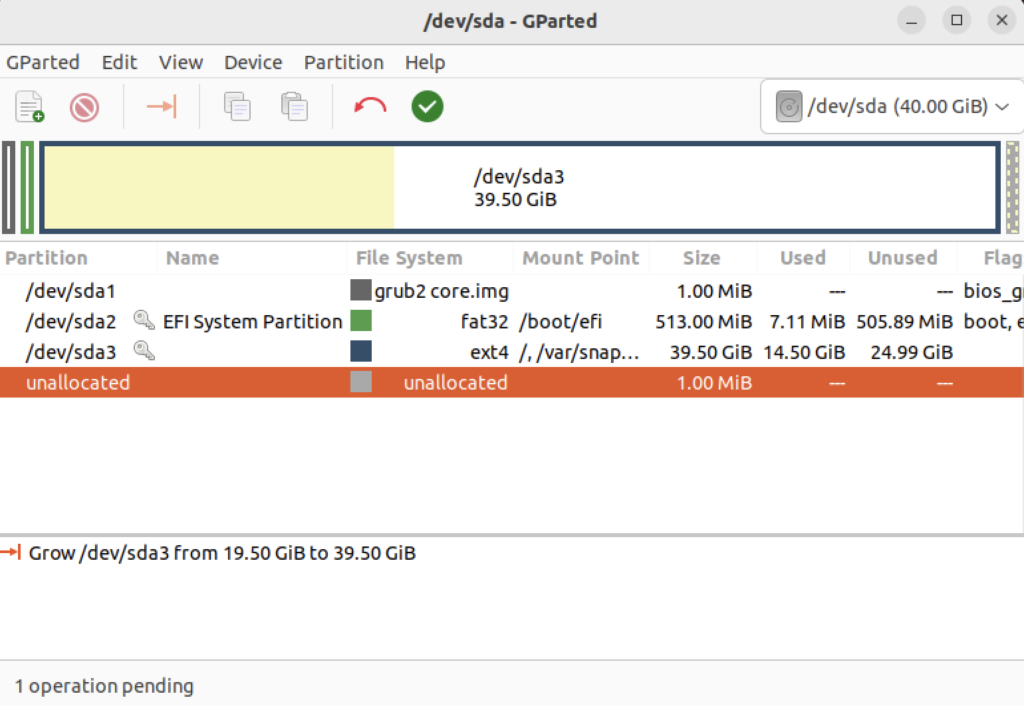
Choose Edit in the menu bar and then Apply All Operations to effect the change in the disk allocation. The last dialog will require you to verify you want to make the changes. Click the Apply button to make the changes.
Click the close for the GParted application and then you can rerun the following command:
df -h
You will see that you now have 19.5 GB of additional space:
Filesystem      Size  Used Avail Use% Mounted on
tmpfs           388M  2.2M  386M   1% /run
/dev/sda3        39G 19.5G   23G  39% /
tmpfs           1.9G   28K  1.9G   1% /dev/shm
tmpfs           5.0M  4.0K  5.0M   1% /run/lock
/dev/sda2       512M  6.1M  506M   2% /boot/efi
tmpfs           388M  116K  388M   1% /run/user/1000
- Finally, you can now successfully download the latest Docker version of Oracle Database 23c Free with the following command:
docker run --name oracle23c -p 1521:1521 -p 5500:5500 -e ORACLE_PWD=cangetin container-registry.oracle.com/database/free:latest
Since you haven’t downloaded the container, you’ll get a warning that it is unable to find the image before it discovers it and downloads it. This will take several minutes. At the conclusion, it will start the Oracle Database Net Listener and begin updating files. the updates may take quite a while to complete.
The basic download console output looks like the following and if you check your disk space you’ve downloaded about 14 GB in the completed container.
Unable to find image 'container-registry.oracle.com/database/free:latest' locally
latest: Pulling from database/free
089fdfcd47b7: Pull complete
43c899d88edc: Pull complete
47aa6f1886a1: Pull complete
f8d07bb55995: Pull complete
c31c8c658c1e: Pull complete
b7d28faa08b4: Pull complete
1d0d5c628f6f: Pull complete
db82a695dad3: Pull complete
25a185515793: Pull complete
Digest: sha256:5ac0efa9896962f6e0e91c54e23c03ae8f140cf6ed43ca09ef4354268a942882
Status: Downloaded newer image for container-registry.oracle.com/database/free:latest
My detailed log file for the complete recovery operation is:
Display detailed console log →
Starting Oracle Net Listener.
Oracle Net Listener started.
Starting Oracle Database instance FREE.
Oracle Database instance FREE started.

The Oracle base remains unchanged with value /opt/oracle

SQL*Plus: Release 23.0.0.0.0 - Production on Thu Nov 30 22:40:55 2023
Version 23.3.0.23.09

Copyright (c) 1982, 2023, Oracle.  All rights reserved.


Connected to:
Oracle Database 23c Free Release 23.0.0.0.0 - Develop, Learn, and Run for Free
Version 23.3.0.23.09

SQL>
User altered.

SQL>
User altered.

SQL>
Session altered.

SQL>
User altered.

SQL> Disconnected from Oracle Database 23c Free Release 23.0.0.0.0 - Develop, Learn, and Run for Free
Version 23.3.0.23.09
The Oracle base remains unchanged with value /opt/oracle
#########################
DATABASE IS READY TO USE!
#########################
The following output is now a tail of the alert.log:
Completed: Pluggable database FREEPDB1 opened read write
Completed: ALTER DATABASE OPEN
2023-11-30T22:40:55.538359+00:00
===========================================================
Dumping current patch information
===========================================================
No patches have been applied
===========================================================
2023-11-30T22:40:57.521629+00:00
FREEPDB1(3):TABLE AUDSYS.AUD$UNIFIED: ADDED INTERVAL PARTITION SYS_P342 (3440) VALUES LESS THAN (TIMESTAMP' 2023-12-01 00:00:00')
2023-11-30T22:41:00.565540+00:00
TABLE SYS.WRP$_REPORTS: ADDED AUTOLIST FRAGMENT SYS_P413 (3) VALUES (( 1418518649, TO_DATE(' 2023-11-27 00:00:00', 'syyyy-mm-dd hh24:mi:ss', 'nls_calendar=gregorian') ))
TABLE SYS.WRP$_REPORTS_DETAILS: ADDED AUTOLIST FRAGMENT SYS_P414 (3) VALUES (( 1418518649, TO_DATE(' 2023-11-27 00:00:00', 'syyyy-mm-dd hh24:mi:ss', 'nls_calendar=gregorian') ))
TABLE SYS.WRP$_REPORTS_TIME_BANDS: ADDED AUTOLIST FRAGMENT SYS_P417 (3) VALUES (( 1418518649, TO_DATE(' 2023-11-27 00:00:00', 'syyyy-mm-dd hh24:mi:ss', 'nls_calendar=gregorian') ))
2023-11-30T22:41:45.639208+00:00
FREEPDB1(3):Resize operation completed for file# 13, fname /opt/oracle/oradata/FREE/FREEPDB1/sysaux01.dbf, old size 317440K, new size 327680K
2023-11-30T22:41:45.663044+00:00
FREEPDB1(3):Resize operation completed for file# 13, fname /opt/oracle/oradata/FREE/FREEPDB1/sysaux01.dbf, old size 327680K, new size 337920K
2023-11-30T22:46:51.616417+00:00
Resize operation completed for file# 201, fname /opt/oracle/oradata/FREE/temp01.dbf, old size 20480K, new size 86016K
Resize operation completed for file# 201, fname /opt/oracle/oradata/FREE/temp01.dbf, old size 86016K, new size 151552K
Resize operation completed for file# 201, fname /opt/oracle/oradata/FREE/temp01.dbf, old size 151552K, new size 217088K
2023-11-30T22:46:53.024736+00:00
Resize operation completed for file# 201, fname /opt/oracle/oradata/FREE/temp01.dbf, old size 217088K, new size 282624K
Resize operation completed for file# 201, fname /opt/oracle/oradata/FREE/temp01.dbf, old size 282624K, new size 348160K
2023-11-30T22:50:45.816010+00:00
Resize operation completed for file# 3, fname /opt/oracle/oradata/FREE/sysaux01.dbf, old size 573440K, new size 593920K
2023-11-30T23:00:46.159283+00:00
Resize operation completed for file# 3, fname /opt/oracle/oradata/FREE/sysaux01.dbf, old size 593920K, new size 604160K
2023-11-30T23:00:46.228087+00:00
FREEPDB1(3):Resize operation completed for file# 13, fname /opt/oracle/oradata/FREE/FREEPDB1/sysaux01.dbf, old size 337920K, new size 358400K
2023-12-01T00:30:43.494249+00:00
--ATTENTION--
Heavy swapping observed on system
WARNING: Heavy swapping observed on system in last 5 mins.
Heavy swapping can lead to timeouts, poor performance, and instance eviction.
2023-12-01T12:40:07.820678+00:00
Warning: VKTM detected a forward time drift.
Please see the VKTM trace file for more details:
/opt/oracle/diag/rdbms/free/FREE/trace/FREE_vktm_46.trc
2023-12-01T16:09:32.702179+00:00
Warning: VKTM detected a forward time drift.
Time drifts can result in unexpected behavior such as time-outs.
Please see the VKTM trace file for more details:
/opt/oracle/diag/rdbms/free/FREE/trace/FREE_vktm_46.trc
2023-12-01T18:02:02.658867+00:00
FREEPDB1(3):Resize operation completed for file# 13, fname /opt/oracle/oradata/FREE/FREEPDB1/sysaux01.dbf, old size 358400K, new size 368640K
2023-12-01T18:22:03.858970+00:00
Resize operation completed for file# 3, fname /opt/oracle/oradata/FREE/sysaux01.dbf, old size 604160K, new size 624640K
2023-12-01T20:31:39.671144+00:00
Warning: VKTM detected a forward time drift.
Time drifts can result in unexpected behavior such as time-outs.
Please see the VKTM trace file for more details:
/opt/oracle/diag/rdbms/free/FREE/trace/FREE_vktm_46.trc
2023-12-01T22:16:50.007797+00:00
Warning: VKTM detected a forward time drift.
Time drifts can result in unexpected behavior such as time-outs.
Please see the VKTM trace file for more details:
/opt/oracle/diag/rdbms/free/FREE/trace/FREE_vktm_46.trc
2023-12-01T23:11:39.776733+00:00
Resize operation completed for file# 3, fname /opt/oracle/oradata/FREE/sysaux01.dbf, old size 624640K, new size 634880K
2023-12-01T23:11:39.920882+00:00
FREEPDB1(3):Resize operation completed for file# 13, fname /opt/oracle/oradata/FREE/FREEPDB1/sysaux01.dbf, old size 368640K, new size 378880K
2023-12-01T23:11:45.530407+00:00
Begin automatic SQL Tuning Advisor run for special tuning task "SYS_AUTO_SQL_TUNING_TASK".
2023-12-01T23:11:46.626668+00:00
End automatic SQL Tuning Advisor run for special tuning task "SYS_AUTO_SQL_TUNING_TASK".
2023-12-01T23:11:56.518724+00:00
TABLE SYS.WRI$_OPTSTAT_HISTHEAD_HISTORY: ADDED INTERVAL PARTITION SYS_P473 (45260) VALUES LESS THAN (TO_DATE(' 2023-12-02 00:00:00', 'SYYYY-MM-DD HH24:MI:SS', 'NLS_CALENDAR=GREGORIAN'))
TABLE SYS.WRI$_OPTSTAT_HISTGRM_HISTORY: ADDED INTERVAL PARTITION SYS_P476 (45260) VALUES LESS THAN (TO_DATE(' 2023-12-02 00:00:00', 'SYYYY-MM-DD HH24:MI:SS', 'NLS_CALENDAR=GREGORIAN'))
2023-12-01T23:13:58.659641+00:00
Resize operation completed for file# 1, fname /opt/oracle/oradata/FREE/system01.dbf, old size 1085440K, new size 1095680K
2023-12-01T23:14:27.016016+00:00
Thread 1 advanced to log sequence 3 (LGWR switch),  current SCN: 3248652
  Current log# 3 seq# 3 mem# 0: /opt/oracle/oradata/FREE/redo03.log
2023-12-01T23:14:47.256059+00:00
cellip.ora not found.
2023-12-01T23:14:54.365395+00:00
Resize operation completed for file# 11, fname /opt/oracle/oradata/FREE/undotbs01.dbf, old size 40960K, new size 46080K
Resize operation completed for file# 11, fname /opt/oracle/oradata/FREE/undotbs01.dbf, old size 46080K, new size 51200K
2023-12-01T23:16:40.460917+00:00
--ATTENTION--
Heavy swapping observed on system
WARNING: Heavy swapping observed on system in last 5 mins.
Heavy swapping can lead to timeouts, poor performance, and instance eviction.
2023-12-02T11:40:23.802013+00:00
Warning: VKTM detected a forward time drift.
Please see the VKTM trace file for more details:
/opt/oracle/diag/rdbms/free/FREE/trace/FREE_vktm_46.trc
2023-12-02T11:40:24.917287+00:00
Warning: VKTM detected a forward time drift.
Time drifts can result in unexpected behavior such as time-outs.
Please see the VKTM trace file for more details:
/opt/oracle/diag/rdbms/free/FREE/trace/FREE_vktm_46.trc
2023-12-02T11:40:34.601396+00:00
TABLE SYS.ACTIVITY_TABLE$: ADDED INTERVAL PARTITION SYS_P493 (2) VALUES LESS THAN (202)
2023-12-02T19:35:06.380899+00:00
Warning: VKTM detected a forward time drift.
Time drifts can result in unexpected behavior such as time-outs.
Please see the VKTM trace file for more details:
/opt/oracle/diag/rdbms/free/FREE/trace/FREE_vktm_46.trc
2023-12-02T19:35:11.094760+00:00
Begin automatic SQL Tuning Advisor run for special tuning task "SYS_AUTO_SQL_TUNING_TASK".
2023-12-02T19:35:11.913190+00:00
FREEPDB1(3):TABLE SYS.WRI$_OPTSTAT_HISTHEAD_HISTORY: ADDED INTERVAL PARTITION SYS_P442 (45261) VALUES LESS THAN (TO_DATE(' 2023-12-03 00:00:00', 'SYYYY-MM-DD HH24:MI:SS', 'NLS_CALENDAR=GREGORIAN'))
FREEPDB1(3):TABLE SYS.WRI$_OPTSTAT_HISTGRM_HISTORY: ADDED INTERVAL PARTITION SYS_P445 (45261) VALUES LESS THAN (TO_DATE(' 2023-12-03 00:00:00', 'SYYYY-MM-DD HH24:MI:SS', 'NLS_CALENDAR=GREGORIAN'))
2023-12-02T19:35:12.623823+00:00
FREEPDB1(3):TABLE SYS.ACTIVITY_TABLE$: ADDED INTERVAL PARTITION SYS_P446 (2) VALUES LESS THAN (202)
2023-12-02T19:35:15.630900+00:00
End automatic SQL Tuning Advisor run for special tuning task "SYS_AUTO_SQL_TUNING_TASK".
2023-12-02T19:35:26.656198+00:00
TABLE SYS.WRI$_OPTSTAT_HISTHEAD_HISTORY: ADDED INTERVAL PARTITION SYS_P513 (45261) VALUES LESS THAN (TO_DATE(' 2023-12-03 00:00:00', 'SYYYY-MM-DD HH24:MI:SS', 'NLS_CALENDAR=GREGORIAN'))
TABLE SYS.WRI$_OPTSTAT_HISTGRM_HISTORY: ADDED INTERVAL PARTITION SYS_P516 (45261) VALUES LESS THAN (TO_DATE(' 2023-12-03 00:00:00', 'SYYYY-MM-DD HH24:MI:SS', 'NLS_CALENDAR=GREGORIAN'))
2023-12-02T19:36:00.842540+00:00
FREEPDB1(3):TABLE SYS.WRP$_REPORTS: ADDED AUTOLIST FRAGMENT SYS_P482 (2) VALUES (( 2054829351, TO_DATE(' 2023-11-27 00:00:00', 'syyyy-mm-dd hh24:mi:ss', 'nls_calendar=gregorian') ))
FREEPDB1(3):TABLE SYS.WRP$_REPORTS_DETAILS: ADDED AUTOLIST FRAGMENT SYS_P483 (2) VALUES (( 2054829351, TO_DATE(' 2023-11-27 00:00:00', 'syyyy-mm-dd hh24:mi:ss', 'nls_calendar=gregorian') ))
FREEPDB1(3):TABLE SYS.WRP$_REPORTS_TIME_BANDS: ADDED AUTOLIST FRAGMENT SYS_P486 (2) VALUES (( 2054829351, TO_DATE(' 2023-11-27 00:00:00', 'syyyy-mm-dd hh24:mi:ss', 'nls_calendar=gregorian') ))
2023-12-02T19:36:49.488283+00:00
cellip.ora not found.
2023-12-02T19:36:59.941785+00:00
FREEPDB1(3):Resize operation completed for file# 12, fname /opt/oracle/oradata/FREE/FREEPDB1/system01.dbf, old size 286720K, new size 296960K
2023-12-02T19:38:11.214065+00:00
FREEPDB1(3):cellip.ora not found.
2023-12-02T19:39:38.144241+00:00
Resize operation completed for file# 3, fname /opt/oracle/oradata/FREE/sysaux01.dbf, old size 634880K, new size 645120K
2023-12-02T19:39:38.254317+00:00
FREEPDB1(3):Resize operation completed for file# 13, fname /opt/oracle/oradata/FREE/FREEPDB1/sysaux01.dbf, old size 378880K, new size 389120K
2023-12-02T19:39:45.971914+00:00
--ATTENTION--
Heavy swapping observed on system
WARNING: Heavy swapping observed on system in last 5 mins.
Heavy swapping can lead to timeouts, poor performance, and instance eviction.
2023-12-02T19:49:39.226372+00:00
Resize operation completed for file# 3, fname /opt/oracle/oradata/FREE/sysaux01.dbf, old size 645120K, new size 655360K
2023-12-02T19:49:55.006771+00:00
Thread 1 cannot allocate new log, sequence 4
Private strand flush not complete
  Current log# 3 seq# 3 mem# 0: /opt/oracle/oradata/FREE/redo03.log
2023-12-02T19:49:58.006305+00:00
Thread 1 advanced to log sequence 4 (LGWR switch),  current SCN: 3327607
  Current log# 1 seq# 4 mem# 0: /opt/oracle/oradata/FREE/redo01.log
2023-12-02T19:51:10.096706+00:00
cellip.ora not found.
2023-12-02T19:59:39.923548+00:00
Resize operation completed for file# 3, fname /opt/oracle/oradata/FREE/sysaux01.dbf, old size 655360K, new size 665600K
2023-12-02T23:44:23.322751+00:00
Warning: VKTM detected a forward time drift.
Time drifts can result in unexpected behavior such as time-outs.
Please see the VKTM trace file for more details:
/opt/oracle/diag/rdbms/free/FREE/trace/FREE_vktm_46.trc
2023-12-03T01:20:19.592589+00:00
Warning: VKTM detected a forward time drift.
Time drifts can result in unexpected behavior such as time-outs.
Please see the VKTM trace file for more details:
/opt/oracle/diag/rdbms/free/FREE/trace/FREE_vktm_46.trc
2023-12-03T01:25:01.817094+00:00
FREEPDB1(3):Resize operation completed for file# 13, fname /opt/oracle/oradata/FREE/FREEPDB1/sysaux01.dbf, old size 389120K, new size 399360K
2023-12-03T01:25:11.199280+00:00
TABLE SYS.WRI$_OPTSTAT_HISTHEAD_HISTORY: ADDED INTERVAL PARTITION SYS_P553 (45262) VALUES LESS THAN (TO_DATE(' 2023-12-04 00:00:00', 'SYYYY-MM-DD HH24:MI:SS', 'NLS_CALENDAR=GREGORIAN'))
TABLE SYS.WRI$_OPTSTAT_HISTGRM_HISTORY: ADDED INTERVAL PARTITION SYS_P556 (45262) VALUES LESS THAN (TO_DATE(' 2023-12-04 00:00:00', 'SYYYY-MM-DD HH24:MI:SS', 'NLS_CALENDAR=GREGORIAN'))
2023-12-03T01:25:13.434023+00:00
FREEPDB1(3):TABLE SYS.WRI$_OPTSTAT_HISTHEAD_HISTORY: ADDED INTERVAL PARTITION SYS_P502 (45262) VALUES LESS THAN (TO_DATE(' 2023-12-04 00:00:00', 'SYYYY-MM-DD HH24:MI:SS', 'NLS_CALENDAR=GREGORIAN'))
FREEPDB1(3):TABLE SYS.WRI$_OPTSTAT_HISTGRM_HISTORY: ADDED INTERVAL PARTITION SYS_P505 (45262) VALUES LESS THAN (TO_DATE(' 2023-12-04 00:00:00', 'SYYYY-MM-DD HH24:MI:SS', 'NLS_CALENDAR=GREGORIAN'))
2023-12-03T01:26:29.620704+00:00
FREEPDB1(3):cellip.ora not found.
2023-12-03T01:26:36.758289+00:00
cellip.ora not found.
2023-12-03T02:25:52.946809+00:00
Warning: VKTM detected a forward time drift.
Time drifts can result in unexpected behavior such as time-outs.
Please see the VKTM trace file for more details:
/opt/oracle/diag/rdbms/free/FREE/trace/FREE_vktm_46.trc
2023-12-03T02:27:56.055089+00:00
--ATTENTION--
Heavy swapping observed on system
WARNING: Heavy swapping observed on system in last 5 mins.
Heavy swapping can lead to timeouts, poor performance, and instance eviction.
2023-12-03T02:32:47.996105+00:00
Resize operation completed for file# 3, fname /opt/oracle/oradata/FREE/sysaux01.dbf, old size 665600K, new size 675840K
You can connect to the Oracle Database 23c Free container with the following syntax:
docker exec -it -u root oracle23c bash |
At the command-line, you connect to the Oracle Database 23c Free container with the following syntax:
sqlplus system/cangetin@free |
You have arrived at the Oracle SQL prompt:
SQL*Plus: Release 23.0.0.0.0 - Production on Fri Dec 1 00:13:55 2023 Version 23.3.0.23.09 Copyright (c) 1982, 2023, Oracle. All rights reserved. Last Successful login time: Thu Nov 30 2023 23:27:54 +00:00 Connected to: Oracle Database 23c Free Release 23.0.0.0.0 - Develop, Learn, and Run for Free Version 23.3.0.23.09 SQL> |
As always, I hope this helps those trying to work with the newest Oracle stack.
Listener for APEX
Unless dbca lets us build the listener.ora file, we often leave off some component. For example, running listener control program the following status indicates an incorrectly configured listener.ora file.
lsnrctl status |
It returns the following, which displays an endpoint for the XDB Server (I’m using Oracle Database 11g XE because it’s pre-containerized and has a small testing footprint):
LSNRCTL for Linux: Version 11.2.0.2.0 - Production on 24-MAR-2023 00:59:06 Copyright (c) 1991, 2011, Oracle. All rights reserved. Connecting to (DESCRIPTION=(ADDRESS=(PROTOCOL=IPC)(KEY=EXTPROC_FOR_XE))) STATUS of the LISTENER ------------------------ Alias LISTENER Version TNSLSNR for Linux: Version 11.2.0.2.0 - Production Start Date 21-MAR-2023 21:17:37 Uptime 2 days 3 hr. 41 min. 29 sec Trace Level off Security ON: Local OS Authentication SNMP OFF Default Service XE Listener Parameter File /u01/app/oracle/product/11.2.0/xe/network/admin/listener.ora Listener Log File /u01/app/oracle/diag/tnslsnr/localhost/listener/alert/log.xml Listening Endpoints Summary... (DESCRIPTION=(ADDRESS=(PROTOCOL=ipc)(KEY=EXTPROC_FOR_XE))) (DESCRIPTION=(ADDRESS=(PROTOCOL=tcp)(HOST=localhost)(PORT=1521))) (DESCRIPTION=(ADDRESS=(PROTOCOL=tcp)(HOST=localhost)(PORT=8080))(Presentation=HTTP)(Session=RAW)) Services Summary... Service "PLSExtProc" has 1 instance(s). Instance "PLSExtProc", status UNKNOWN, has 1 handler(s) for this service... Service "XE" has 1 instance(s). Instance "XE", status READY, has 1 handler(s) for this service... Service "XEXDB" has 1 instance(s). Instance "XE", status READY, has 1 handler(s) for this service... The command completed successfully |
The listener is missing the second SID_LIST_LISTENER value of CLRExtProc value. A complete listener.ora file should be as follows for the Oracle Database XE:
# listener.ora Network Configuration FILE: SID_LIST_LISTENER = (SID_LIST = (SID_DESC = (SID_NAME = PLSExtProc) (ORACLE_HOME = /u01/app/oracle/product/11.2.0/xe) (PROGRAM = extproc) ) (SID_DESC = (SID_NAME = CLRExtProc) (ORACLE_HOME = /u01/app/oracle/product/11.2.0/xe) (PROGRAM = extproc) ) ) LISTENER = (DESCRIPTION_LIST = (DESCRIPTION = (ADDRESS = (PROTOCOL = IPC)(KEY = EXTPROC_FOR_XE)) (ADDRESS = (PROTOCOL = TCP)(HOST = localhost.localdomain)(PORT = 1521)) ) ) DEFAULT_SERVICE_LISTENER = (XE) |
With this listener.ora file, the Oracle listener control utility will return the following correct status, which hides the XDB Server’s endpoint:
LSNRCTL for Linux: Version 11.2.0.2.0 - Production on 24-MAR-2023 02:38:57 Copyright (c) 1991, 2011, Oracle. All rights reserved. Connecting to (DESCRIPTION=(ADDRESS=(PROTOCOL=IPC)(KEY=EXTPROC_FOR_XE))) STATUS of the LISTENER ------------------------ Alias LISTENER Version TNSLSNR for Linux: Version 11.2.0.2.0 - Production Start Date 24-MAR-2023 02:38:15 Uptime 0 days 0 hr. 0 min. 42 sec Trace Level off Security ON: Local OS Authentication SNMP OFF Default Service XE Listener Parameter File /u01/app/oracle/product/11.2.0/xe/network/admin/listener.ora Listener Log File /u01/app/oracle/product/11.2.0/xe/log/diag/tnslsnr/localhost/listener/alert/log.xml Listening Endpoints Summary... (DESCRIPTION=(ADDRESS=(PROTOCOL=ipc)(KEY=EXTPROC_FOR_XE))) (DESCRIPTION=(ADDRESS=(PROTOCOL=tcp)(HOST=localhost)(PORT=1521))) Services Summary... Service "CLRExtProc" has 1 instance(s). Instance "CLRExtProc", status UNKNOWN, has 1 handler(s) for this service... Service "PLSExtProc" has 1 instance(s). Instance "PLSExtProc", status UNKNOWN, has 1 handler(s) for this service... The command completed successfully |
It seems a number of examples on the web left the SID_LIST_LISTENER value of CLRExtProc value out of the listener.ora file. As always, I hope this helps those looking for a complete solution rather than generic instructions without a concrete example.
AWS EC2 TNS Listener
Having configured an AlmaLinux 8.6 with Oracle Database 11g XE, MySQL 8.0.30, and PostgreSQL 15, we migrated it to AWS EC2 and provisioned it. We used the older and de-supported Oracle Database 11g XE because it didn’t require any kernel modifications and had a much smaller footprint.
I had to address why attempting to connect with the sqlplus utility raised the following error after provisioning a copy with a new static IP address:
ERROR: ORA-12514: TNS:listener does NOT currently know OF service requested IN CONNECT descriptor |
A connection from SQL Developer raises a more addressable error, like:
ORA-17069 |
I immediately tried to check the connection with the tnsping utility and found that tnsping worked fine. However, when I tried to connect with the sqlplus utility it raised an ORA-12514 connection error.
There were no diagnostic steps beyond checking the tnsping utility. So, I had to experiment with what might block communication.
I changed the host name from ip-172-58-65-82.us-west-2.compute.internal to a localhost string in both the listener.ora and tnsnames.ora. The listener.ora file:
# listener.ora Network Configuration FILE: SID_LIST_LISTENER = (SID_LIST = (SID_DESC = (SID_NAME = PLSExtProc) (ORACLE_HOME = /u01/app/oracle/product/11.2.0/xe) (PROGRAM = extproc) ) ) LISTENER = (DESCRIPTION_LIST = (DESCRIPTION = (ADDRESS = (PROTOCOL = IPC)(KEY = EXTPROC_FOR_XE)) (ADDRESS = (PROTOCOL = TCP)(HOST = localhost)(PORT = 1521)) ) ) DEFAULT_SERVICE_LISTENER = (XE) |
The tnsnames.ora file:
# tnsnames.ora Network Configuration FILE: XE = (DESCRIPTION = (ADDRESS = (PROTOCOL = TCP)(HOST = localhost)(PORT = 1521)) (CONNECT_DATA = (SERVER = DEDICATED) (SERVICE_NAME = XE) ) ) EXTPROC_CONNECTION_DATA = (DESCRIPTION = (ADDRESS_LIST = (ADDRESS = (PROTOCOL = IPC)(KEY = EXTPROC_FOR_XE)) ) (CONNECT_DATA = (SID = PLSExtProc) (PRESENTATION = RO) ) ) |
I suspected that it might be related to the localhost value. So, I checked the /etc/hostname and /etc/hosts files.
Then, I modified /etc/hostname file by removing the AWS EC2 damain address. I did it on a memory that Oracle’s TNS raises errors for dots or periods in some addresses.
The /etc/hostname file:
ip-172-58-65-82 |
The /etc/hosts file:
127.0.0.1 localhost localhost.localdomain localhost4 localhost4.localdomain4 ip-172-58-65-82 ::1 localhost localhost.localdomain localhost6 localhost6.localdomain6 ip-172-58-65-82 |
Now, we can connect to the Oracle Database 11g XE instance with the sqlplus utility. I believe this type of solution will work for other AWS EC2 provisioned Oracle databases.
DML Event Management
Data Manipulation Language (DML)
DML statements add data to, change data in, and remove data from tables. This section examines four DML statements—the INSERT, UPDATE, DELETE, and MERGE statements—and builds on concepts of data transactions. The INSERT statement adds new data, the UPDATE statement changes data, the DELETE statement removes data from the database, and the MERGE statement either adds new data or changes existing data.
Any INSERT, UPDATE, MERGE, or DELETE SQL statement that adds, updates, or deletes rows in a table locks rows in a table and hides the information until the change is committed or undone (that is, rolled back). This is the nature of ACID-compliant SQL statements. Locks prevent other sessions from making a change while a current session is working with the data. Locks also restrict other sessions from seeing any changes until they’re made permanent. The database keeps two copies of rows that are undergoing change. One copy of the rows with pending changes is visible to the current session, while the other displays committed changes only.
ACID Compliant Transactions
ACID compliance relies on a two-phase commit (2PC) protocol and ensures that the current session is the only one that can see new inserts, updated column values, and the absence of deleted rows. Other sessions run by the same or different users can’t see the changes until you commit them.
ACID Compliant INSERT Statements
The INSERT statement adds rows to existing tables and uses a 2PC protocol to implement ACID- compliant guarantees. The SQL INSERT statement is a DML statement that adds one or more rows to a table. Oracle supports a VALUES clause when adding a single-row, and support a subquery when adding one to many rows.
The figure below shows a flow chart depicting an INSERT statement. The process of adding one or more rows to a table occurs during the first phase of an INSERT statement. Adding the rows exhibits both atomic and consistent properties. Atomic means all or nothing: it adds one or more rows and succeeds, or it doesn’t add any rows and fails. Consistent means that the addition of rows is guaranteed whether the database engine adds them sequentially or concurrently in threads.
Concurrent behaviors happen when the database parallelizes DML statements. This is similar to the concept of threads as lightweight processes that work under the direction of a single process. The parallel actions of a single SQL statement delegate and manage work sent to separate threads. Oracle supports all ACID properties and implements threaded execution as parallel operations. All tables support parallelization.

After adding the rows to a table, the isolation property prevents any other session from seeing the new rows—that means another session started by the same user or by another user with access to the same table. The atomic, consistent, and isolation properties occur in the first phase of any INSERT statement. The durable property is exclusively part of the second phase of an INSERT statement, and rows become durable when the COMMIT statement ratifies the insertion of the new data.
ACID Compliant UPDATE Statements
An UPDATE statement changes column values in one-to-many rows. With a WHERE clause, you update only rows of interest, but if you forget the WHERE clause, an UPDATE statement would run against all rows in a table. Although you can update any column in a row, it’s generally bad practice to update a primary or foreign key column because you can break referential integrity. You should only update non-key data in tables—that is, the data that doesn’t make a row unique within a table.
Changes to column values are atomic when they work. For scalability reasons, the database implementation of updates to many rows is often concurrent, in threads through parallelization. This process can span multiple process threads and uses a transaction paradigm that coordinates changes across the threads. The entire UPDATE statement fails when any one thread fails.
Similar to the INSERT statement, UPDATE statement changes to column values are also hidden until they are made permanent with the application of the isolation property. The changes are hidden from other sessions, including sessions begun by the same database user.
It’s possible that another session might attempt to lock or change data in a modified but uncommitted row. When this happens, the second DML statement encounters a lock and goes into a wait state until the row becomes available for changes. If you neglected to set a timeout value for the wait state, such as this clause, the FOR UPDATE clause waits until the target rows are unlocked:
WAIT n |
As the figure below shows, actual updates are first-phase commit elements. While an UPDATE statement changes data, it changes only the current session values until it is made permanent by a COMMIT statement. Like the INSERT statement, the atomic, consistent, and isolation properties of an UPDATE statement occur during the first phase of a 2PC process. Changes to column values are atomic when they work. Any column changes are hidden from other sessions until the UPDATE statement is made permanent by a COMMIT or ROLLBACK statement, which is an example of the isolation property.
Any changes to column values can be modified by an ON UPDATE trigger before a COMMIT statement. ON UPDATE triggers run inside the first phase of the 2PC process. A COMMIT or ROLLBACK statement ends the transaction scope of the UPDATE statement.
The Oracle database engine can dispatch changes to many threads when an UPDATE statement works against many rows. UPDATE statements are consistent when these changes work in a single thread-of-control or across multiple threads with the same results.

As with the INSERT statement, the atomic, consistent, and isolation properties occur during the first phase of any UPDATE statement, and the COMMIT statement is the sole activity of the second phase. Column value changes become durable only with the execution of a COMMIT statement.
ACID Compliant DELETE Statements
A DELETE statement removes rows from a table. Like an UPDATE statement, the absence of a WHERE clause in a DELETE statement deletes all rows in a table. Deleted rows remain visible outside of the transaction scope where it has been removed. However, any attempts to UPDATE those deleted rows are held in a pending status until they are committed or rolled back.
You delete rows when they’re no longer useful. Deleting rows can be problematic when rows in another table have a dependency on the deleted rows. Consider, for example, a customer table that contains a list of cell phone contacts and an address table that contains the addresses for some but not all of the contacts. If you delete a row from the customer table that still has related rows in the address table, those address table rows are now orphaned and useless.
As a rule, you delete data from the most dependent table to the least dependent table, which is the opposite of the insertion process. Basically, you delete the child record before you delete the parent record. The parent record holds the primary key value, and the child record holds the foreign key value. You drop the foreign key value, which is a copy of the primary key, before you drop the primary key record. For example, you would insert a row in the customer table before you insert a row in the address table, and you delete rows from the address table before you delete rows in the customer table.
The figure below shows the logic behind a DELETE statement. Like the INSERT and UPDATE statements, acid, consistency, and isolation properties of the ACID-compliant transaction are managed during the first phase of a 2PC. The durability property is managed by the COMMIT or ROLLBACK statement.

There’s no discussion or diagrams for the MERGE statement because it does either an INSERT or UPDATE statement based on it’s internal logic. That means a MERGE statement is ACID compliant like an INSERT or UPDATE statement.
AlmaLinux Install & Configuration

This is a collection of blog posts for installing and configuring AlmaLinux with the Oracle, PostgreSQL, MySQL databases and several programming languages. Sample programs show how to connect PHP and Python to the MySQL database.
- Installing AlmaLinux operating system
- Installing and configuring MySQL
- Installing Python-MySQL connector and provide sample programs
- Configuring Flask for Python on AlmaLinux with a complete software router instruction set.
- Installing Rust programming language and writing a sample program
- Installing and configuring LAMP stack with PHP and MySQL and a self-signed security key
- MySQL PNG Images in LAMP with PHP Programming
- Demonstration of how to write Perl that connects to MySQL
- Installing and configuring MySQL Workbench
- Installing and configuring PostgreSQL and pgAdmin4
- Identifying the required libnsl2-devel packages for SQL*Plus
- Writing and deploying a sqlplus function to use a read line wrapper
- Installing and configuring Visual Studio Code Editor
- Installing and configuring Java with connectivity to MySQL
- Installing and configuring Oracle SQL Developer
I used Oracle Database 11g XE in this instance to keep the footprint as small as possible. It required a few tricks and discovering the missing library that caused folks grief eleven years ago. I build another with a current Oracle Database XE after the new year.
If you see something that I missed or you’d like me to add, let me know. As time allows, I’ll try to do that. Naturally, the post will get updates as things are added later.
AlmaLinux MySQL Workbench
AlmaLinux doesn’t natively support MySQL Workbench but these notes will help you install it. The great news is that MySQL Workbench works perfectly once you’ve installed all the dependent libraries. It’ll look like the following:
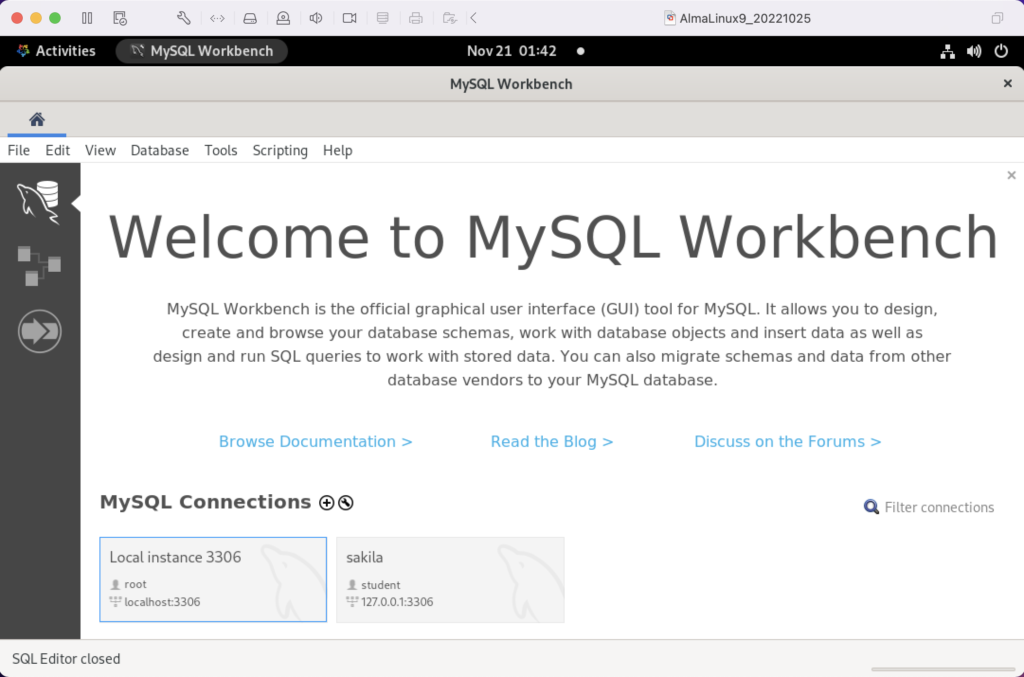
Disclaimer of sorts:
AlmaLinux is an open-source, community-driven project that intends to fill the gap left by the demise of the CentOS stable release. AlmaLinux is a 1:1 binary compatible fork of RHEL® 9 and it is built by the AlmaLinux OS Foundation as a standalone, completely free OS. The AlmaLinux OS Foundation will support future RHEL® releases by updating AlmaLinux. Ongoing development efforts are governed by the members of the community.
You can download MySQL Workbench from the following website:
https://dev.mysql.com/downloads/workbench |
When you open this page, select the Red Hat Enterprise Linux 9 / Oracle Linux 9 (x86, 64-bit), RPM Package from the dropdown menu. Then, click the Download button. You may be prompted for your credentials or to create new credentials, but you can skip that by clicking on the No thanks, just start my download link.
When the download completes, open a terminal session as the student user. Navigate to the Downloads directory with the following command:
cd $HOME/Downloads |
List the files in the $HOME/Downloads directory and you should see:
mysql-workbench-community-8.0.31-1.el9.x86_64.rpm |
As the sudoer user or root, run the following command (naturally, exclude sudo if you’re the root user):
sudo dnf install -y mysql-workbench-community-8.0.31-1.el9.x86_64.rpm |
It will most likely fail with an error message like this:
Last metadata expiration check: 2:50:04 ago on Thu 17 Nov 2022 09:33:15 AM EST. Error: Problem: conflicting requests - nothing provides gtkmm30-devel needed by mysql-workbench-community-8.0.31-1.el9.src - nothing provides libzip-devel needed by mysql-workbench-community-8.0.31-1.el9.src - nothing provides proj-devel needed by mysql-workbench-community-8.0.31-1.el9.src - nothing provides swig >= 3.0 needed by mysql-workbench-community-8.0.31-1.el9.src (try to add '--skip-broken' to skip uninstallable packages or '--nobest' to use not only best candidate packages) |
AlmaLinux doesn’t install these prerequisite packages. You’ll need to resolve these dependencies by installing them in the right order and groups before you can run the MySQL Workbench packages.
You can discover missing packages at the pkgs.org website. You need to resolve all four prerequisites before installing MySQL Workbench.
- Let’s start with the gtkmm30-devel package, which has eight separate dependencies. Assuming you’re still in your $HOME/Downloads directory, you can run the following command to get the gtkmm30-devel for AlmaLinux 9:
wget https://repo.almalinux.org/almalinux/9/CRB/x86_64/os/Packages/gtkmm30-devel-3.24.5-1.el9.x86_64.rpm
It downloads the following package:
gtkmm30-devel-3.24.5-1.el9.x86_64.rpm
If you attempt to run it, the gtkmm30-devel package raises the following errors:
sudo dnf install -y gtkmm30-devel-3.24.5-1.el9.x86_64.rpm
Last metadata expiration check: 0:41:13 ago on Thu 17 Nov 2022 02:39:59 PM EST.
Error:
 Problem: conflicting requests
  - nothing provides pkgconfig(atkmm-1.6) >= 2.24.2 needed by gtkmm30-devel-3.24.5-1.el9.x86_64
  - nothing provides pkgconfig(cairomm-1.0) >= 1.12.0 needed by gtkmm30-devel-3.24.5-1.el9.x86_64
  - nothing provides pkgconfig(giomm-2.4) >= 2.54.0 needed by gtkmm30-devel-3.24.5-1.el9.x86_64
  - nothing provides pkgconfig(pangomm-1.4) >= 1.12.0 needed by gtkmm30-devel-3.24.5-1.el9.x86_64
(try to add '--skip-broken' to skip uninstallable packages or '--nobest' to use not only best candidate packages)
While you only get four errors, there are more packages required. You need to use the wget utility to download these packages. I would recommend you create a temporary gtkmm30 subdirectory inside your $HOME/Downloads directory and change to that directory before downloading these files.
wget https://repo.almalinux.org/almalinux/9/CRB/x86_64/os/Packages/atkmm-devel-2.28.2-2.el9.x86_64.rpm
wget https://repo.almalinux.org/almalinux/9/CRB/x86_64/os/Packages/cairomm-devel-1.14.2-10.el9.x86_64.rpm
wget https://repo.almalinux.org/almalinux/9/AppStream/x86_64/os/Packages/gdk-pixbuf2-devel-2.42.6-2.el9.x86_64.rpm
wget https://repo.almalinux.org/almalinux/9/CRB/x86_64/os/Packages/glibmm24-devel-2.66.1-1.el9.x86_64.rpm
wget https://repo.almalinux.org/almalinux/9/AppStream/x86_64/os/Packages/gtk3-devel-3.24.31-2.el9.x86_64.rpm
wget https://repo.almalinux.org/almalinux/9/CRB/x86_64/os/Packages/pangomm-devel-2.46.1-1.el9.x86_64.rpm
wget https://repo.almalinux.org/almalinux/9/CRB/x86_64/os/Packages/libsigc++20-devel-2.10.7-2.el9.x86_64.rpm
You need to run these as a set of prerequisites, so from your gtkmm30 subdirectory use the following dnf command as the sudoer user:
sudo dnf install -y *.rpm
The log file for this is:
Display detailed console log →
Last metadata expiration check: 0:09:20 ago on Sun 20 Nov 2022 12:52:28 AM EST. Dependencies resolved. ================================================================================ Package Arch Version Repository Size ================================================================================ Installing: atkmm-devel x86_64 2.28.2-2.el9 @commandline 45 k cairomm-devel x86_64 1.14.2-10.el9 @commandline 62 k gdk-pixbuf2-devel x86_64 2.42.6-2.el9 @commandline 64 k glibmm24-devel x86_64 2.66.1-1.el9 @commandline 497 k gtk3-devel x86_64 3.24.31-2.el9 @commandline 4.1 M libsigc++20-devel x86_64 2.10.7-2.el9 @commandline 67 k pangomm-devel x86_64 2.46.1-1.el9 @commandline 65 k Upgrading: dbus-common noarch 1:1.12.20-6.el9 baseos 14 k dbus-daemon x86_64 1:1.12.20-6.el9 appstream 196 k dbus-libs x86_64 1:1.12.20-6.el9 baseos 151 k dbus-tools x86_64 1:1.12.20-6.el9 baseos 50 k fontconfig x86_64 2.14.0-1.el9 appstream 274 k freetype x86_64 2.10.4-9.el9 baseos 387 k fribidi x86_64 1.0.10-6.el9.2 appstream 84 k harfbuzz x86_64 2.7.4-8.el9 baseos 624 k harfbuzz-icu x86_64 2.7.4-8.el9 appstream 14 k libblkid x86_64 2.37.4-9.el9 baseos 107 k libfdisk x86_64 2.37.4-9.el9 baseos 154 k libmount x86_64 2.37.4-9.el9 baseos 133 k libselinux x86_64 3.4-3.el9 baseos 85 k libselinux-utils x86_64 3.4-3.el9 baseos 158 k libsepol x86_64 3.4-1.1.el9 baseos 315 k libsmartcols x86_64 2.37.4-9.el9 baseos 63 k libtiff x86_64 4.4.0-2.el9 appstream 195 k libuuid x86_64 2.37.4-9.el9 baseos 27 k libxml2 x86_64 2.9.13-2.el9 baseos 746 k pcre2 x86_64 10.40-2.el9 baseos 236 k pcre2-syntax noarch 10.40-2.el9 baseos 143 k pcre2-utf16 x86_64 10.40-2.el9 appstream 216 k pcre2-utf32 x86_64 10.40-2.el9 appstream 205 k python3-libselinux x86_64 3.4-3.el9 appstream 185 k python3-libxml2 x86_64 2.9.13-2.el9 baseos 226 k util-linux x86_64 2.37.4-9.el9 baseos 2.2 M util-linux-core x86_64 2.37.4-9.el9 baseos 434 k util-linux-user x86_64 2.37.4-9.el9 baseos 30 k Installing dependencies: at-spi2-atk-devel x86_64 2.38.0-4.el9 appstream 9.5 k at-spi2-core-devel x86_64 2.40.3-1.el9 appstream 134 k atk-devel x86_64 2.36.0-5.el9 appstream 172 k brotli x86_64 1.0.9-6.el9 appstream 313 k brotli-devel x86_64 1.0.9-6.el9 appstream 31 k bzip2-devel x86_64 1.0.8-8.el9 appstream 213 k cairo-devel x86_64 1.17.4-7.el9 appstream 190 k cairo-gobject-devel x86_64 1.17.4-7.el9 appstream 10 k dbus-devel x86_64 1:1.12.20-6.el9 appstream 33 k fontconfig-devel x86_64 2.14.0-1.el9 appstream 128 k freetype-devel x86_64 2.10.4-9.el9 appstream 1.1 M fribidi-devel x86_64 1.0.10-6.el9.2 appstream 25 k glib2-devel x86_64 2.68.4-5.el9 appstream 475 k graphite2-devel x86_64 1.3.14-9.el9 appstream 21 k harfbuzz-devel x86_64 2.7.4-8.el9 appstream 305 k libX11-devel x86_64 1.7.0-7.el9 appstream 940 k libXau-devel x86_64 1.0.9-8.el9 appstream 13 k libXcomposite-devel x86_64 0.4.5-7.el9 appstream 15 k libXcursor-devel x86_64 1.2.0-7.el9 appstream 21 k libXdamage-devel x86_64 1.1.5-7.el9 appstream 9.3 k libXext-devel x86_64 1.3.4-8.el9 appstream 72 k libXfixes-devel x86_64 5.0.3-16.el9 appstream 12 k libXft-devel x86_64 2.3.3-8.el9 appstream 18 k libXi-devel x86_64 1.7.10-8.el9 appstream 99 k libXinerama-devel x86_64 1.1.4-10.el9 appstream 13 k libXrandr-devel x86_64 1.5.2-8.el9 appstream 19 k libXrender-devel x86_64 0.9.10-16.el9 appstream 16 k libXtst-devel x86_64 1.2.3-16.el9 appstream 15 k libblkid-devel x86_64 2.37.4-9.el9 appstream 17 k libdatrie-devel x86_64 0.2.13-4.el9 appstream 132 k libepoxy-devel x86_64 1.5.5-4.el9 appstream 133 k libffi-devel x86_64 3.4.2-7.el9 appstream 29 k libglvnd-core-devel x86_64 1:1.3.4-1.el9 appstream 17 k libglvnd-devel x86_64 1:1.3.4-1.el9 appstream 155 k libicu-devel x86_64 67.1-9.el9 appstream 830 k libmount-devel x86_64 2.37.4-9.el9 appstream 18 k libpng-devel x86_64 2:1.6.37-12.el9 appstream 290 k libselinux-devel x86_64 3.4-3.el9 appstream 113 k libsepol-devel x86_64 3.4-1.1.el9 appstream 40 k libthai-devel x86_64 0.1.28-8.el9 appstream 117 k libtiff-devel x86_64 4.4.0-2.el9 appstream 513 k libxcb-devel x86_64 1.13.1-9.el9 appstream 1.0 M libxkbcommon-devel x86_64 1.0.3-4.el9 appstream 61 k libxml2-devel x86_64 2.9.13-2.el9 appstream 828 k pango-devel x86_64 1.48.7-2.el9 appstream 141 k pcre-cpp x86_64 8.44-3.el9.3 appstream 26 k pcre-devel x86_64 8.44-3.el9.3 appstream 470 k pcre-utf16 x86_64 8.44-3.el9.3 appstream 184 k pcre-utf32 x86_64 8.44-3.el9.3 appstream 174 k pcre2-devel x86_64 10.40-2.el9 appstream 474 k perl-Filter x86_64 2:1.60-4.el9 appstream 81 k perl-encoding x86_64 4:3.00-462.el9 appstream 62 k perl-open noarch 1.12-479.el9 appstream 25 k pixman-devel x86_64 0.40.0-5.el9 appstream 17 k sysprof-capture-devel x86_64 3.40.1-3.el9 appstream 59 k wayland-devel x86_64 1.19.0-4.el9 appstream 132 k xorg-x11-proto-devel noarch 2021.4-2.el9 appstream 262 k Transaction Summary ================================================================================ Install 64 Packages Upgrade 28 Packages Total size: 23 M Total download size: 18 M Downloading Packages: (1/85): at-spi2-atk-devel-2.38.0-4.el9.x86_64.r 38 kB/s | 9.5 kB 00:00 (2/85): atk-devel-2.36.0-5.el9.x86_64.rpm 334 kB/s | 172 kB 00:00 (3/85): brotli-devel-1.0.9-6.el9.x86_64.rpm 354 kB/s | 31 kB 00:00 (4/85): at-spi2-core-devel-2.40.3-1.el9.x86_64. 167 kB/s | 134 kB 00:00 (5/85): cairo-devel-1.17.4-7.el9.x86_64.rpm 1.9 MB/s | 190 kB 00:00 (6/85): cairo-gobject-devel-1.17.4-7.el9.x86_64 179 kB/s | 10 kB 00:00 (7/85): brotli-1.0.9-6.el9.x86_64.rpm 413 kB/s | 313 kB 00:00 (8/85): dbus-devel-1.12.20-6.el9.x86_64.rpm 549 kB/s | 33 kB 00:00 (9/85): bzip2-devel-1.0.8-8.el9.x86_64.rpm 505 kB/s | 213 kB 00:00 (10/85): fribidi-devel-1.0.10-6.el9.2.x86_64.rp 492 kB/s | 25 kB 00:00 (11/85): fontconfig-devel-2.14.0-1.el9.x86_64.r 891 kB/s | 128 kB 00:00 (12/85): graphite2-devel-1.3.14-9.el9.x86_64.rp 316 kB/s | 21 kB 00:00 (13/85): glib2-devel-2.68.4-5.el9.x86_64.rpm 1.1 MB/s | 475 kB 00:00 (14/85): harfbuzz-devel-2.7.4-8.el9.x86_64.rpm 850 kB/s | 305 kB 00:00 (15/85): freetype-devel-2.10.4-9.el9.x86_64.rpm 1.7 MB/s | 1.1 MB 00:00 (16/85): libXau-devel-1.0.9-8.el9.x86_64.rpm 170 kB/s | 13 kB 00:00 (17/85): libXcomposite-devel-0.4.5-7.el9.x86_64 273 kB/s | 15 kB 00:00 (18/85): libXcursor-devel-1.2.0-7.el9.x86_64.rp 344 kB/s | 21 kB 00:00 (19/85): libXdamage-devel-1.1.5-7.el9.x86_64.rp 133 kB/s | 9.3 kB 00:00 (20/85): libXfixes-devel-5.0.3-16.el9.x86_64.rp 256 kB/s | 12 kB 00:00 (21/85): libXext-devel-1.3.4-8.el9.x86_64.rpm 768 kB/s | 72 kB 00:00 (22/85): libXft-devel-2.3.3-8.el9.x86_64.rpm 324 kB/s | 18 kB 00:00 (23/85): libXinerama-devel-1.1.4-10.el9.x86_64. 205 kB/s | 13 kB 00:00 (24/85): libXi-devel-1.7.10-8.el9.x86_64.rpm 913 kB/s | 99 kB 00:00 (25/85): libXrender-devel-0.9.10-16.el9.x86_64. 295 kB/s | 16 kB 00:00 (26/85): libXrandr-devel-1.5.2-8.el9.x86_64.rpm 289 kB/s | 19 kB 00:00 (27/85): libXtst-devel-1.2.3-16.el9.x86_64.rpm 261 kB/s | 15 kB 00:00 (28/85): libblkid-devel-2.37.4-9.el9.x86_64.rpm 284 kB/s | 17 kB 00:00 (29/85): libX11-devel-1.7.0-7.el9.x86_64.rpm 1.4 MB/s | 940 kB 00:00 (30/85): libepoxy-devel-1.5.5-4.el9.x86_64.rpm 1.2 MB/s | 133 kB 00:00 (31/85): libdatrie-devel-0.2.13-4.el9.x86_64.rp 876 kB/s | 132 kB 00:00 (32/85): libffi-devel-3.4.2-7.el9.x86_64.rpm 426 kB/s | 29 kB 00:00 (33/85): libglvnd-core-devel-1.3.4-1.el9.x86_64 233 kB/s | 17 kB 00:00 (34/85): libmount-devel-2.37.4-9.el9.x86_64.rpm 280 kB/s | 18 kB 00:00 (35/85): libglvnd-devel-1.3.4-1.el9.x86_64.rpm 976 kB/s | 155 kB 00:00 (36/85): libpng-devel-1.6.37-12.el9.x86_64.rpm 1.9 MB/s | 290 kB 00:00 (37/85): libselinux-devel-3.4-3.el9.x86_64.rpm 801 kB/s | 113 kB 00:00 (38/85): libsepol-devel-3.4-1.1.el9.x86_64.rpm 636 kB/s | 40 kB 00:00 (39/85): libthai-devel-0.1.28-8.el9.x86_64.rpm 630 kB/s | 117 kB 00:00 (40/85): libicu-devel-67.1-9.el9.x86_64.rpm 1.3 MB/s | 830 kB 00:00 (41/85): libtiff-devel-4.4.0-2.el9.x86_64.rpm 1.6 MB/s | 513 kB 00:00 (42/85): libxkbcommon-devel-1.0.3-4.el9.x86_64. 710 kB/s | 61 kB 00:00 (43/85): pango-devel-1.48.7-2.el9.x86_64.rpm 914 kB/s | 141 kB 00:00 (44/85): pcre-cpp-8.44-3.el9.3.x86_64.rpm 425 kB/s | 26 kB 00:00 (45/85): pcre-devel-8.44-3.el9.3.x86_64.rpm 1.8 MB/s | 470 kB 00:00 (46/85): pcre-utf16-8.44-3.el9.3.x86_64.rpm 1.5 MB/s | 184 kB 00:00 (47/85): libxml2-devel-2.9.13-2.el9.x86_64.rpm 1.2 MB/s | 828 kB 00:00 (48/85): libxcb-devel-1.13.1-9.el9.x86_64.rpm 1.2 MB/s | 1.0 MB 00:00 (49/85): pcre-utf32-8.44-3.el9.3.x86_64.rpm 1.4 MB/s | 174 kB 00:00 (50/85): perl-Filter-1.60-4.el9.x86_64.rpm 704 kB/s | 81 kB 00:00 (51/85): perl-encoding-3.00-462.el9.x86_64.rpm 916 kB/s | 62 kB 00:00 (52/85): perl-open-1.12-479.el9.noarch.rpm 476 kB/s | 25 kB 00:00 (53/85): pixman-devel-0.40.0-5.el9.x86_64.rpm 272 kB/s | 17 kB 00:00 (54/85): sysprof-capture-devel-3.40.1-3.el9.x86 797 kB/s | 59 kB 00:00 (55/85): pcre2-devel-10.40-2.el9.x86_64.rpm 1.3 MB/s | 474 kB 00:00 (56/85): wayland-devel-1.19.0-4.el9.x86_64.rpm 1.0 MB/s | 132 kB 00:00 (57/85): xorg-x11-proto-devel-2021.4-2.el9.noar 1.3 MB/s | 262 kB 00:00 (58/85): dbus-daemon-1.12.20-6.el9.x86_64.rpm 1.3 MB/s | 196 kB 00:00 (59/85): fontconfig-2.14.0-1.el9.x86_64.rpm 1.7 MB/s | 274 kB 00:00 (60/85): harfbuzz-icu-2.7.4-8.el9.x86_64.rpm 217 kB/s | 14 kB 00:00 (61/85): fribidi-1.0.10-6.el9.2.x86_64.rpm 700 kB/s | 84 kB 00:00 (62/85): libtiff-4.4.0-2.el9.x86_64.rpm 1.5 MB/s | 195 kB 00:00 (63/85): pcre2-utf32-10.40-2.el9.x86_64.rpm 1.2 MB/s | 205 kB 00:00 (64/85): python3-libselinux-3.4-3.el9.x86_64.rp 1.5 MB/s | 185 kB 00:00 (65/85): pcre2-utf16-10.40-2.el9.x86_64.rpm 995 kB/s | 216 kB 00:00 (66/85): dbus-common-1.12.20-6.el9.noarch.rpm 203 kB/s | 14 kB 00:00 (67/85): dbus-tools-1.12.20-6.el9.x86_64.rpm 856 kB/s | 50 kB 00:00 (68/85): dbus-libs-1.12.20-6.el9.x86_64.rpm 1.3 MB/s | 151 kB 00:00 (69/85): libblkid-2.37.4-9.el9.x86_64.rpm 1.6 MB/s | 107 kB 00:00 (70/85): libfdisk-2.37.4-9.el9.x86_64.rpm 1.6 MB/s | 154 kB 00:00 (71/85): freetype-2.10.4-9.el9.x86_64.rpm 1.5 MB/s | 387 kB 00:00 (72/85): libmount-2.37.4-9.el9.x86_64.rpm 1.3 MB/s | 133 kB 00:00 (73/85): libselinux-3.4-3.el9.x86_64.rpm 820 kB/s | 85 kB 00:00 (74/85): harfbuzz-2.7.4-8.el9.x86_64.rpm 1.4 MB/s | 624 kB 00:00 (75/85): libselinux-utils-3.4-3.el9.x86_64.rpm 1.4 MB/s | 158 kB 00:00 (76/85): libuuid-2.37.4-9.el9.x86_64.rpm 448 kB/s | 27 kB 00:00 (77/85): libsmartcols-2.37.4-9.el9.x86_64.rpm 793 kB/s | 63 kB 00:00 (78/85): libsepol-3.4-1.1.el9.x86_64.rpm 1.6 MB/s | 315 kB 00:00 (79/85): pcre2-syntax-10.40-2.el9.noarch.rpm 1.2 MB/s | 143 kB 00:00 (80/85): pcre2-10.40-2.el9.x86_64.rpm 1.6 MB/s | 236 kB 00:00 (81/85): python3-libxml2-2.9.13-2.el9.x86_64.rp 1.4 MB/s | 226 kB 00:00 (82/85): libxml2-2.9.13-2.el9.x86_64.rpm 1.5 MB/s | 746 kB 00:00 (83/85): util-linux-user-2.37.4-9.el9.x86_64.rp 618 kB/s | 30 kB 00:00 (84/85): util-linux-core-2.37.4-9.el9.x86_64.rp 1.1 MB/s | 434 kB 00:00 (85/85): util-linux-2.37.4-9.el9.x86_64.rpm 1.9 MB/s | 2.2 MB 00:01 -------------------------------------------------------------------------------- Total 2.4 MB/s | 18 MB 00:07 Running transaction check Transaction check succeeded. Running transaction test Transaction test succeeded. Running transaction Preparing : 1/1 Installing : xorg-x11-proto-devel-2021.4-2.el9.noarch 1/120 Upgrading : libuuid-2.37.4-9.el9.x86_64 2/120 Upgrading : libblkid-2.37.4-9.el9.x86_64 3/120 Running scriptlet: libblkid-2.37.4-9.el9.x86_64 3/120 Upgrading : harfbuzz-2.7.4-8.el9.x86_64 4/120 Upgrading : freetype-2.10.4-9.el9.x86_64 5/120 Upgrading : libxml2-2.9.13-2.el9.x86_64 6/120 Upgrading : pcre2-syntax-10.40-2.el9.noarch 7/120 Upgrading : pcre2-10.40-2.el9.x86_64 8/120 Upgrading : libsepol-3.4-1.1.el9.x86_64 9/120 Upgrading : libselinux-3.4-3.el9.x86_64 10/120 Running scriptlet: libselinux-3.4-3.el9.x86_64 10/120 Upgrading : libmount-2.37.4-9.el9.x86_64 11/120 Upgrading : dbus-libs-1:1.12.20-6.el9.x86_64 12/120 Installing : libpng-devel-2:1.6.37-12.el9.x86_64 13/120 Installing : dbus-devel-1:1.12.20-6.el9.x86_64 14/120 Installing : libxml2-devel-2.9.13-2.el9.x86_64 15/120 Upgrading : libsmartcols-2.37.4-9.el9.x86_64 16/120 Installing : libsigc++20-devel-2.10.7-2.el9.x86_64 17/120 Installing : libffi-devel-3.4.2-7.el9.x86_64 18/120 Installing : wayland-devel-1.19.0-4.el9.x86_64 19/120 Upgrading : util-linux-core-2.37.4-9.el9.x86_64 20/120 Running scriptlet: util-linux-core-2.37.4-9.el9.x86_64 20/120 Installing : libxkbcommon-devel-1.0.3-4.el9.x86_64 21/120 Upgrading : dbus-tools-1:1.12.20-6.el9.x86_64 22/120 Installing : libsepol-devel-3.4-1.1.el9.x86_64 23/120 Upgrading : pcre2-utf16-10.40-2.el9.x86_64 24/120 Upgrading : pcre2-utf32-10.40-2.el9.x86_64 25/120 Installing : pcre2-devel-10.40-2.el9.x86_64 26/120 Installing : libselinux-devel-3.4-3.el9.x86_64 27/120 Upgrading : fontconfig-2.14.0-1.el9.x86_64 28/120 Running scriptlet: fontconfig-2.14.0-1.el9.x86_64 28/120 Upgrading : harfbuzz-icu-2.7.4-8.el9.x86_64 29/120 Installing : libblkid-devel-2.37.4-9.el9.x86_64 30/120 Installing : libmount-devel-2.37.4-9.el9.x86_64 31/120 Upgrading : libfdisk-2.37.4-9.el9.x86_64 32/120 Upgrading : util-linux-2.37.4-9.el9.x86_64 33/120 Installing : libXau-devel-1.0.9-8.el9.x86_64 34/120 Installing : libxcb-devel-1.13.1-9.el9.x86_64 35/120 Installing : libX11-devel-1.7.0-7.el9.x86_64 36/120 Installing : libXext-devel-1.3.4-8.el9.x86_64 37/120 Installing : libXfixes-devel-5.0.3-16.el9.x86_64 38/120 Installing : libXrender-devel-0.9.10-16.el9.x86_64 39/120 Installing : libXi-devel-1.7.10-8.el9.x86_64 40/120 Installing : libXtst-devel-1.2.3-16.el9.x86_64 41/120 Installing : libXcursor-devel-1.2.0-7.el9.x86_64 42/120 Installing : libXrandr-devel-1.5.2-8.el9.x86_64 43/120 Installing : libXcomposite-devel-0.4.5-7.el9.x86_64 44/120 Installing : libXdamage-devel-1.1.5-7.el9.x86_64 45/120 Installing : libXinerama-devel-1.1.4-10.el9.x86_64 46/120 Upgrading : dbus-common-1:1.12.20-6.el9.noarch 47/120 Running scriptlet: dbus-common-1:1.12.20-6.el9.noarch 47/120 Upgrading : libtiff-4.4.0-2.el9.x86_64 48/120 Installing : libtiff-devel-4.4.0-2.el9.x86_64 49/120 Upgrading : fribidi-1.0.10-6.el9.2.x86_64 50/120 Installing : fribidi-devel-1.0.10-6.el9.2.x86_64 51/120 Installing : sysprof-capture-devel-3.40.1-3.el9.x86_64 52/120 Installing : pixman-devel-0.40.0-5.el9.x86_64 53/120 Installing : perl-Filter-2:1.60-4.el9.x86_64 54/120 Installing : perl-encoding-4:3.00-462.el9.x86_64 55/120 Installing : perl-open-1.12-479.el9.noarch 56/120 Installing : pcre-utf32-8.44-3.el9.3.x86_64 57/120 Installing : pcre-utf16-8.44-3.el9.3.x86_64 58/120 Installing : pcre-cpp-8.44-3.el9.3.x86_64 59/120 Installing : pcre-devel-8.44-3.el9.3.x86_64 60/120 Installing : glib2-devel-2.68.4-5.el9.x86_64 61/120 Installing : atk-devel-2.36.0-5.el9.x86_64 62/120 Installing : glibmm24-devel-2.66.1-1.el9.x86_64 63/120 Installing : at-spi2-core-devel-2.40.3-1.el9.x86_64 64/120 Installing : at-spi2-atk-devel-2.38.0-4.el9.x86_64 65/120 Installing : gdk-pixbuf2-devel-2.42.6-2.el9.x86_64 66/120 Installing : libicu-devel-67.1-9.el9.x86_64 67/120 Installing : libglvnd-core-devel-1:1.3.4-1.el9.x86_64 68/120 Installing : libglvnd-devel-1:1.3.4-1.el9.x86_64 69/120 Installing : libepoxy-devel-1.5.5-4.el9.x86_64 70/120 Installing : libdatrie-devel-0.2.13-4.el9.x86_64 71/120 Installing : libthai-devel-0.1.28-8.el9.x86_64 72/120 Installing : graphite2-devel-1.3.14-9.el9.x86_64 73/120 Installing : bzip2-devel-1.0.8-8.el9.x86_64 74/120 Installing : brotli-1.0.9-6.el9.x86_64 75/120 Installing : brotli-devel-1.0.9-6.el9.x86_64 76/120 Installing : harfbuzz-devel-2.7.4-8.el9.x86_64 77/120 Installing : freetype-devel-2.10.4-9.el9.x86_64 78/120 Installing : fontconfig-devel-2.14.0-1.el9.x86_64 79/120 Installing : cairo-devel-1.17.4-7.el9.x86_64 80/120 Installing : cairo-gobject-devel-1.17.4-7.el9.x86_64 81/120 Installing : cairomm-devel-1.14.2-10.el9.x86_64 82/120 Installing : libXft-devel-2.3.3-8.el9.x86_64 83/120 Installing : pango-devel-1.48.7-2.el9.x86_64 84/120 Installing : gtk3-devel-3.24.31-2.el9.x86_64 85/120 Installing : pangomm-devel-2.46.1-1.el9.x86_64 86/120 Installing : atkmm-devel-2.28.2-2.el9.x86_64 87/120 Running scriptlet: dbus-daemon-1:1.12.20-6.el9.x86_64 88/120 Upgrading : dbus-daemon-1:1.12.20-6.el9.x86_64 88/120 Running scriptlet: dbus-daemon-1:1.12.20-6.el9.x86_64 88/120 Upgrading : util-linux-user-2.37.4-9.el9.x86_64 89/120 Upgrading : python3-libselinux-3.4-3.el9.x86_64 90/120 Upgrading : libselinux-utils-3.4-3.el9.x86_64 91/120 Upgrading : python3-libxml2-2.9.13-2.el9.x86_64 92/120 Cleanup : python3-libxml2-2.9.13-1.el9_0.1.x86_64 93/120 Running scriptlet: dbus-daemon-1:1.12.20-5.el9.x86_64 94/120 Cleanup : dbus-daemon-1:1.12.20-5.el9.x86_64 94/120 Running scriptlet: dbus-daemon-1:1.12.20-5.el9.x86_64 94/120 Cleanup : libselinux-utils-3.3-2.el9.x86_64 95/120 Cleanup : fontconfig-2.13.94-2.el9.x86_64 96/120 Running scriptlet: fontconfig-2.13.94-2.el9.x86_64 96/120 Cleanup : dbus-tools-1:1.12.20-5.el9.x86_64 97/120 Cleanup : python3-libselinux-3.3-2.el9.x86_64 98/120 Cleanup : util-linux-user-2.37.4-3.el9.x86_64 99/120 Cleanup : util-linux-2.37.4-3.el9.x86_64 100/120 Cleanup : util-linux-core-2.37.4-3.el9.x86_64 101/120 Cleanup : libmount-2.37.4-3.el9.x86_64 102/120 Cleanup : libfdisk-2.37.4-3.el9.x86_64 103/120 Cleanup : libselinux-3.3-2.el9.x86_64 104/120 Cleanup : harfbuzz-icu-2.7.4-5.el9.x86_64 105/120 Cleanup : pcre2-10.37-5.el9_0.x86_64 106/120 Cleanup : libblkid-2.37.4-3.el9.x86_64 107/120 Cleanup : freetype-2.10.4-6.el9.x86_64 108/120 Cleanup : pcre2-utf32-10.37-5.el9_0.x86_64 109/120 Cleanup : pcre2-utf16-10.37-5.el9_0.x86_64 110/120 Cleanup : pcre2-syntax-10.37-5.el9_0.noarch 111/120 Running scriptlet: dbus-common-1:1.12.20-5.el9.noarch 112/120 Cleanup : dbus-common-1:1.12.20-5.el9.noarch 112/120 Running scriptlet: dbus-common-1:1.12.20-5.el9.noarch 112/120 Cleanup : harfbuzz-2.7.4-5.el9.x86_64 113/120 Cleanup : libuuid-2.37.4-3.el9.x86_64 114/120 Cleanup : libsepol-3.3-2.el9.x86_64 115/120 Cleanup : libsmartcols-2.37.4-3.el9.x86_64 116/120 Cleanup : dbus-libs-1:1.12.20-5.el9.x86_64 117/120 Cleanup : libxml2-2.9.13-1.el9_0.1.x86_64 118/120 Cleanup : libtiff-4.2.0-3.el9.x86_64 119/120 Cleanup : fribidi-1.0.10-6.el9.x86_64 120/120 Running scriptlet: fontconfig-2.14.0-1.el9.x86_64 120/120 Running scriptlet: fribidi-1.0.10-6.el9.x86_64 120/120 Regex version mismatch, expected: 10.40 2022-04-14 actual: 10.37 2021-05-26 Regex version mismatch, expected: 10.40 2022-04-14 actual: 10.37 2021-05-26 Regex version mismatch, expected: 10.40 2022-04-14 actual: 10.37 2021-05-26 Regex version mismatch, expected: 10.40 2022-04-14 actual: 10.37 2021-05-26 Verifying : at-spi2-atk-devel-2.38.0-4.el9.x86_64 1/120 Verifying : at-spi2-core-devel-2.40.3-1.el9.x86_64 2/120 Verifying : atk-devel-2.36.0-5.el9.x86_64 3/120 Verifying : brotli-1.0.9-6.el9.x86_64 4/120 Verifying : brotli-devel-1.0.9-6.el9.x86_64 5/120 Verifying : bzip2-devel-1.0.8-8.el9.x86_64 6/120 Verifying : cairo-devel-1.17.4-7.el9.x86_64 7/120 Verifying : cairo-gobject-devel-1.17.4-7.el9.x86_64 8/120 Verifying : dbus-devel-1:1.12.20-6.el9.x86_64 9/120 Verifying : fontconfig-devel-2.14.0-1.el9.x86_64 10/120 Verifying : freetype-devel-2.10.4-9.el9.x86_64 11/120 Verifying : fribidi-devel-1.0.10-6.el9.2.x86_64 12/120 Verifying : glib2-devel-2.68.4-5.el9.x86_64 13/120 Verifying : graphite2-devel-1.3.14-9.el9.x86_64 14/120 Verifying : harfbuzz-devel-2.7.4-8.el9.x86_64 15/120 Verifying : libX11-devel-1.7.0-7.el9.x86_64 16/120 Verifying : libXau-devel-1.0.9-8.el9.x86_64 17/120 Verifying : libXcomposite-devel-0.4.5-7.el9.x86_64 18/120 Verifying : libXcursor-devel-1.2.0-7.el9.x86_64 19/120 Verifying : libXdamage-devel-1.1.5-7.el9.x86_64 20/120 Verifying : libXext-devel-1.3.4-8.el9.x86_64 21/120 Verifying : libXfixes-devel-5.0.3-16.el9.x86_64 22/120 Verifying : libXft-devel-2.3.3-8.el9.x86_64 23/120 Verifying : libXi-devel-1.7.10-8.el9.x86_64 24/120 Verifying : libXinerama-devel-1.1.4-10.el9.x86_64 25/120 Verifying : libXrandr-devel-1.5.2-8.el9.x86_64 26/120 Verifying : libXrender-devel-0.9.10-16.el9.x86_64 27/120 Verifying : libXtst-devel-1.2.3-16.el9.x86_64 28/120 Verifying : libblkid-devel-2.37.4-9.el9.x86_64 29/120 Verifying : libdatrie-devel-0.2.13-4.el9.x86_64 30/120 Verifying : libepoxy-devel-1.5.5-4.el9.x86_64 31/120 Verifying : libffi-devel-3.4.2-7.el9.x86_64 32/120 Verifying : libglvnd-core-devel-1:1.3.4-1.el9.x86_64 33/120 Verifying : libglvnd-devel-1:1.3.4-1.el9.x86_64 34/120 Verifying : libicu-devel-67.1-9.el9.x86_64 35/120 Verifying : libmount-devel-2.37.4-9.el9.x86_64 36/120 Verifying : libpng-devel-2:1.6.37-12.el9.x86_64 37/120 Verifying : libselinux-devel-3.4-3.el9.x86_64 38/120 Verifying : libsepol-devel-3.4-1.1.el9.x86_64 39/120 Verifying : libthai-devel-0.1.28-8.el9.x86_64 40/120 Verifying : libtiff-devel-4.4.0-2.el9.x86_64 41/120 Verifying : libxcb-devel-1.13.1-9.el9.x86_64 42/120 Verifying : libxkbcommon-devel-1.0.3-4.el9.x86_64 43/120 Verifying : libxml2-devel-2.9.13-2.el9.x86_64 44/120 Verifying : pango-devel-1.48.7-2.el9.x86_64 45/120 Verifying : pcre-cpp-8.44-3.el9.3.x86_64 46/120 Verifying : pcre-devel-8.44-3.el9.3.x86_64 47/120 Verifying : pcre-utf16-8.44-3.el9.3.x86_64 48/120 Verifying : pcre-utf32-8.44-3.el9.3.x86_64 49/120 Verifying : pcre2-devel-10.40-2.el9.x86_64 50/120 Verifying : perl-Filter-2:1.60-4.el9.x86_64 51/120 Verifying : perl-encoding-4:3.00-462.el9.x86_64 52/120 Verifying : perl-open-1.12-479.el9.noarch 53/120 Verifying : pixman-devel-0.40.0-5.el9.x86_64 54/120 Verifying : sysprof-capture-devel-3.40.1-3.el9.x86_64 55/120 Verifying : wayland-devel-1.19.0-4.el9.x86_64 56/120 Verifying : xorg-x11-proto-devel-2021.4-2.el9.noarch 57/120 Verifying : atkmm-devel-2.28.2-2.el9.x86_64 58/120 Verifying : cairomm-devel-1.14.2-10.el9.x86_64 59/120 Verifying : gdk-pixbuf2-devel-2.42.6-2.el9.x86_64 60/120 Verifying : glibmm24-devel-2.66.1-1.el9.x86_64 61/120 Verifying : gtk3-devel-3.24.31-2.el9.x86_64 62/120 Verifying : libsigc++20-devel-2.10.7-2.el9.x86_64 63/120 Verifying : pangomm-devel-2.46.1-1.el9.x86_64 64/120 Verifying : dbus-daemon-1:1.12.20-6.el9.x86_64 65/120 Verifying : dbus-daemon-1:1.12.20-5.el9.x86_64 66/120 Verifying : fontconfig-2.14.0-1.el9.x86_64 67/120 Verifying : fontconfig-2.13.94-2.el9.x86_64 68/120 Verifying : fribidi-1.0.10-6.el9.2.x86_64 69/120 Verifying : fribidi-1.0.10-6.el9.x86_64 70/120 Verifying : harfbuzz-icu-2.7.4-8.el9.x86_64 71/120 Verifying : harfbuzz-icu-2.7.4-5.el9.x86_64 72/120 Verifying : libtiff-4.4.0-2.el9.x86_64 73/120 Verifying : libtiff-4.2.0-3.el9.x86_64 74/120 Verifying : pcre2-utf16-10.40-2.el9.x86_64 75/120 Verifying : pcre2-utf16-10.37-5.el9_0.x86_64 76/120 Verifying : pcre2-utf32-10.40-2.el9.x86_64 77/120 Verifying : pcre2-utf32-10.37-5.el9_0.x86_64 78/120 Verifying : python3-libselinux-3.4-3.el9.x86_64 79/120 Verifying : python3-libselinux-3.3-2.el9.x86_64 80/120 Verifying : dbus-common-1:1.12.20-6.el9.noarch 81/120 Verifying : dbus-common-1:1.12.20-5.el9.noarch 82/120 Verifying : dbus-libs-1:1.12.20-6.el9.x86_64 83/120 Verifying : dbus-libs-1:1.12.20-5.el9.x86_64 84/120 Verifying : dbus-tools-1:1.12.20-6.el9.x86_64 85/120 Verifying : dbus-tools-1:1.12.20-5.el9.x86_64 86/120 Verifying : freetype-2.10.4-9.el9.x86_64 87/120 Verifying : freetype-2.10.4-6.el9.x86_64 88/120 Verifying : harfbuzz-2.7.4-8.el9.x86_64 89/120 Verifying : harfbuzz-2.7.4-5.el9.x86_64 90/120 Verifying : libblkid-2.37.4-9.el9.x86_64 91/120 Verifying : libblkid-2.37.4-3.el9.x86_64 92/120 Verifying : libfdisk-2.37.4-9.el9.x86_64 93/120 Verifying : libfdisk-2.37.4-3.el9.x86_64 94/120 Verifying : libmount-2.37.4-9.el9.x86_64 95/120 Verifying : libmount-2.37.4-3.el9.x86_64 96/120 Verifying : libselinux-3.4-3.el9.x86_64 97/120 Verifying : libselinux-3.3-2.el9.x86_64 98/120 Verifying : libselinux-utils-3.4-3.el9.x86_64 99/120 Verifying : libselinux-utils-3.3-2.el9.x86_64 100/120 Verifying : libsepol-3.4-1.1.el9.x86_64 101/120 Verifying : libsepol-3.3-2.el9.x86_64 102/120 Verifying : libsmartcols-2.37.4-9.el9.x86_64 103/120 Verifying : libsmartcols-2.37.4-3.el9.x86_64 104/120 Verifying : libuuid-2.37.4-9.el9.x86_64 105/120 Verifying : libuuid-2.37.4-3.el9.x86_64 106/120 Verifying : libxml2-2.9.13-2.el9.x86_64 107/120 Verifying : libxml2-2.9.13-1.el9_0.1.x86_64 108/120 Verifying : pcre2-10.40-2.el9.x86_64 109/120 Verifying : pcre2-10.37-5.el9_0.x86_64 110/120 Verifying : pcre2-syntax-10.40-2.el9.noarch 111/120 Verifying : pcre2-syntax-10.37-5.el9_0.noarch 112/120 Verifying : python3-libxml2-2.9.13-2.el9.x86_64 113/120 Verifying : python3-libxml2-2.9.13-1.el9_0.1.x86_64 114/120 Verifying : util-linux-2.37.4-9.el9.x86_64 115/120 Verifying : util-linux-2.37.4-3.el9.x86_64 116/120 Verifying : util-linux-core-2.37.4-9.el9.x86_64 117/120 Verifying : util-linux-core-2.37.4-3.el9.x86_64 118/120 Verifying : util-linux-user-2.37.4-9.el9.x86_64 119/120 Verifying : util-linux-user-2.37.4-3.el9.x86_64 120/120 Upgraded: dbus-common-1:1.12.20-6.el9.noarch dbus-daemon-1:1.12.20-6.el9.x86_64 dbus-libs-1:1.12.20-6.el9.x86_64 dbus-tools-1:1.12.20-6.el9.x86_64 fontconfig-2.14.0-1.el9.x86_64 freetype-2.10.4-9.el9.x86_64 fribidi-1.0.10-6.el9.2.x86_64 harfbuzz-2.7.4-8.el9.x86_64 harfbuzz-icu-2.7.4-8.el9.x86_64 libblkid-2.37.4-9.el9.x86_64 libfdisk-2.37.4-9.el9.x86_64 libmount-2.37.4-9.el9.x86_64 libselinux-3.4-3.el9.x86_64 libselinux-utils-3.4-3.el9.x86_64 libsepol-3.4-1.1.el9.x86_64 libsmartcols-2.37.4-9.el9.x86_64 libtiff-4.4.0-2.el9.x86_64 libuuid-2.37.4-9.el9.x86_64 libxml2-2.9.13-2.el9.x86_64 pcre2-10.40-2.el9.x86_64 pcre2-syntax-10.40-2.el9.noarch pcre2-utf16-10.40-2.el9.x86_64 pcre2-utf32-10.40-2.el9.x86_64 python3-libselinux-3.4-3.el9.x86_64 python3-libxml2-2.9.13-2.el9.x86_64 util-linux-2.37.4-9.el9.x86_64 util-linux-core-2.37.4-9.el9.x86_64 util-linux-user-2.37.4-9.el9.x86_64 Installed: at-spi2-atk-devel-2.38.0-4.el9.x86_64 at-spi2-core-devel-2.40.3-1.el9.x86_64 atk-devel-2.36.0-5.el9.x86_64 atkmm-devel-2.28.2-2.el9.x86_64 brotli-1.0.9-6.el9.x86_64 brotli-devel-1.0.9-6.el9.x86_64 bzip2-devel-1.0.8-8.el9.x86_64 cairo-devel-1.17.4-7.el9.x86_64 cairo-gobject-devel-1.17.4-7.el9.x86_64 cairomm-devel-1.14.2-10.el9.x86_64 dbus-devel-1:1.12.20-6.el9.x86_64 fontconfig-devel-2.14.0-1.el9.x86_64 freetype-devel-2.10.4-9.el9.x86_64 fribidi-devel-1.0.10-6.el9.2.x86_64 gdk-pixbuf2-devel-2.42.6-2.el9.x86_64 glib2-devel-2.68.4-5.el9.x86_64 glibmm24-devel-2.66.1-1.el9.x86_64 graphite2-devel-1.3.14-9.el9.x86_64 gtk3-devel-3.24.31-2.el9.x86_64 harfbuzz-devel-2.7.4-8.el9.x86_64 libX11-devel-1.7.0-7.el9.x86_64 libXau-devel-1.0.9-8.el9.x86_64 libXcomposite-devel-0.4.5-7.el9.x86_64 libXcursor-devel-1.2.0-7.el9.x86_64 libXdamage-devel-1.1.5-7.el9.x86_64 libXext-devel-1.3.4-8.el9.x86_64 libXfixes-devel-5.0.3-16.el9.x86_64 libXft-devel-2.3.3-8.el9.x86_64 libXi-devel-1.7.10-8.el9.x86_64 libXinerama-devel-1.1.4-10.el9.x86_64 libXrandr-devel-1.5.2-8.el9.x86_64 libXrender-devel-0.9.10-16.el9.x86_64 libXtst-devel-1.2.3-16.el9.x86_64 libblkid-devel-2.37.4-9.el9.x86_64 libdatrie-devel-0.2.13-4.el9.x86_64 libepoxy-devel-1.5.5-4.el9.x86_64 libffi-devel-3.4.2-7.el9.x86_64 libglvnd-core-devel-1:1.3.4-1.el9.x86_64 libglvnd-devel-1:1.3.4-1.el9.x86_64 libicu-devel-67.1-9.el9.x86_64 libmount-devel-2.37.4-9.el9.x86_64 libpng-devel-2:1.6.37-12.el9.x86_64 libselinux-devel-3.4-3.el9.x86_64 libsepol-devel-3.4-1.1.el9.x86_64 libsigc++20-devel-2.10.7-2.el9.x86_64 libthai-devel-0.1.28-8.el9.x86_64 libtiff-devel-4.4.0-2.el9.x86_64 libxcb-devel-1.13.1-9.el9.x86_64 libxkbcommon-devel-1.0.3-4.el9.x86_64 libxml2-devel-2.9.13-2.el9.x86_64 pango-devel-1.48.7-2.el9.x86_64 pangomm-devel-2.46.1-1.el9.x86_64 pcre-cpp-8.44-3.el9.3.x86_64 pcre-devel-8.44-3.el9.3.x86_64 pcre-utf16-8.44-3.el9.3.x86_64 pcre-utf32-8.44-3.el9.3.x86_64 pcre2-devel-10.40-2.el9.x86_64 perl-Filter-2:1.60-4.el9.x86_64 perl-encoding-4:3.00-462.el9.x86_64 perl-open-1.12-479.el9.noarch pixman-devel-0.40.0-5.el9.x86_64 sysprof-capture-devel-3.40.1-3.el9.x86_64 wayland-devel-1.19.0-4.el9.x86_64 xorg-x11-proto-devel-2021.4-2.el9.noarch Complete!
Now return to your $HOME/Downloads directory and run the following command. You’ll notice that it installs and upgrades many more packages than you might expect.
sudo dnf install -y gtkmm30-devel-3.24.5-1.el9.x86_64.rpm
The log file for this is:
Display detailed console log →
Last metadata expiration check: 1:22:32 ago on Sun 20 Nov 2022 12:52:28 AM EST.
Dependencies resolved.
================================================================================
 Package             Architecture Version              Repository          Size
================================================================================
Installing:
 gtkmm30-devel       x86_64       3.24.5-1.el9         @commandline       605 k

Transaction Summary
================================================================================
Install  1 Package

Total size: 605 k
Installed size: 4.7 M
Downloading Packages:
Running transaction check
Transaction check succeeded.
Running transaction test
Transaction test succeeded.
Running transaction
Regex version mismatch, expected: 10.40 2022-04-14 actual: 10.37 2021-05-26
Regex version mismatch, expected: 10.40 2022-04-14 actual: 10.37 2021-05-26
  Preparing        :                                                        1/1
  Installing       : gtkmm30-devel-3.24.5-1.el9.x86_64                      1/1
  Running scriptlet: gtkmm30-devel-3.24.5-1.el9.x86_64                      1/1
  Verifying        : gtkmm30-devel-3.24.5-1.el9.x86_64                      1/1

Installed:
  gtkmm30-devel-3.24.5-1.el9.x86_64

Complete!
All that done and you’ve only got the first of four dependencies resovled.
- Next, start with the libzip-devel package, which has a couple dependencies. Assuming you’re still in your $HOME/Downloads directory, you can run the following command to get the libzip-devel and its prerequisite packages for AlmaLinux 9:
wget https://repo.almalinux.org/almalinux/9/CRB/x86_64/os/Packages/libzip-devel-1.7.3-7.el9.x86_64.rpm
wget https://repo.almalinux.org/almalinux/9/AppStream/x86_64/os/Packages/cmake-filesystem-3.20.2-7.el9.x86_64.rpm
wget https://repo.almalinux.org/almalinux/9/AppStream/x86_64/os/Packages/libzip-1.7.3-7.el9.x86_64.rpm
You can run the prerequisites with the following command:
sudo dnf install -y cmake*.rpm libzip-1.7.3*.rpm
Now, you can run the libzip-devel package with this syntax:
sudo dnf install -y libzip-devel*.rpm
Having resolved the two dependencies, you can install the compression development kit. This completes the second step.
-
Next, you need to apply the proj_devel package for AlmaLinux 9:
wget https://download-ib01.fedoraproject.org/pub/epel/9/Everything/x86_64/Packages/p/proj-devel-8.2.0-1.el9.x86_64.rpm
Now, you can run the proj-devel package with this syntax:
sudo dnf install -y proj-devel-8.2.0-1.el9.x86_64.rpm
-
Next, you need to apply the swig packages for AlmaLinux 9:
wget https://repo.almalinux.org/almalinux/9/CRB/x86_64/os/Packages/swig-4.0.2-8.el9.x86_64.rpm
wget https://repo.almalinux.org/almalinux/9/CRB/x86_64/os/Packages/swig-doc-4.0.2-8.el9.noarch.rpm
wget https://repo.almalinux.org/almalinux/9/CRB/x86_64/os/Packages/swig-gdb-4.0.2-8.el9.x86_64.rpm
sudo dnf install -y swig*.rpm
-
Next, you need to apply the mysql-community-workbench packages for AlmaLinux 9. The download instructions where provided above. You apply the packages with the following command.
sudo dnf install -y mysql-workbench-community-8.0.31-1.el9.x86_64.rpm
Display detailed console log →
Last metadata expiration check: 1:06:04 ago on Sun 20 Nov 2022 03:28:30 PM EST.
Dependencies resolved.
================================================================================
 Package                      Arch      Version           Repository       Size
================================================================================
Installing:
 mysql-workbench-community    x86_64    8.0.31-1.el9      @commandline     39 M
Upgrading:
 proj                         x86_64    8.2.0-1.el9       epel            2.5 M

Transaction Summary
================================================================================
Install  1 Package
Upgrade  1 Package

Total size: 41 M
Total download size: 2.5 M
Downloading Packages:
proj-8.2.0-1.el9.x86_64.rpm                     388 kB/s | 2.5 MB     00:06
--------------------------------------------------------------------------------
Total                                           354 kB/s | 2.5 MB     00:07
Extra Packages for Enterprise Linux 9 - x86_64  1.6 MB/s | 1.6 kB     00:00
Importing GPG key 0x3228467C:
 Userid     : "Fedora (epel9) <epel@fedoraproject.org>"
 Fingerprint: FF8A D134 4597 106E CE81 3B91 8A38 72BF 3228 467C
 From       : /etc/pki/rpm-gpg/RPM-GPG-KEY-EPEL-9
Key imported successfully
Running transaction check
Transaction check succeeded.
Running transaction test
Transaction test succeeded.
Running transaction
Regex version mismatch, expected: 10.40 2022-04-14 actual: 10.37 2021-05-26
Regex version mismatch, expected: 10.40 2022-04-14 actual: 10.37 2021-05-26
  Preparing        :                                                        1/1
  Upgrading        : proj-8.2.0-1.el9.x86_64                                1/3
  Installing       : mysql-workbench-community-8.0.31-1.el9.x86_64          2/3
  Running scriptlet: mysql-workbench-community-8.0.31-1.el9.x86_64          2/3
  Cleanup          : proj-4.8.0-4.el7.x86_64                                3/3
  Running scriptlet: proj-4.8.0-4.el7.x86_64                                3/3
  Verifying        : mysql-workbench-community-8.0.31-1.el9.x86_64          1/3
  Verifying        : proj-8.2.0-1.el9.x86_64                                2/3
  Verifying        : proj-4.8.0-4.el7.x86_64                                3/3

Upgraded:
  proj-8.2.0-1.el9.x86_64
Installed:
  mysql-workbench-community-8.0.31-1.el9.x86_64

Complete!
After applying the dependent and mysql-community-workbench packages, you can launch MySQL Workbench by clicking the Activities symbol in the upper left hand corner. That displays the nine-dots for Show Applications icon. Click the Show Applications icon and choose the MySQL Workbench icon to launch MySQL Workbench.
You’ll be prompted with the following dialog. Just click Don’t show this message again checkbox and the OK button to launch MySQL Workbench.
As always, I hope this helps those looking to solve a real problem.
AlmaLinux MySQL+Perl
A quick primer on Perl programs connecting to the MySQL database. It’s another set of coding examples for the AlmaLinux instance that I’m building for students. This one demonstrates basic Perl programs, connecting to MySQL, returning data sets by reference and position, dynamic queries, and input parameters to dynamic queries.
- Naturally, a hello.pl is a great place to start:
#!/usr/bin/perl

# Hello World program.
print "Hello World!\n";
After setting the permissions to -rwxr-xr-x. with this command:
chmod 755 hello.pl
You call it like this from the Command-Line Interface (CLI):
./hello.pl
It prints:
Hello World! - Next, a connect.pl program lets us test the Perl::DBI connection to the MySQL database.
#!/usr/bin/perl

# Import libraries.
use strict;
use warnings;
use v5.10;     # for say() function
use DBI;

# Print with say() function message.
say "Perl MySQL Connect Attempt.";

# MySQL data source name should have a valid database as the
# third argument; this uses the sakila demo database.
my $dsn = "DBI:mysql:sakila";

# Local variables to build the connection string.
my $username = "student";
my $password = "student";

# Set arguments for MySQL database error management.
my %attr = ( PrintError=>0,  # turn off error reporting via warn()
             RaiseError=>1);   # turn on error reporting via die()

# Create connction with a data source name, user name and password.
my $dbh  = DBI->connect($dsn,$username,$password, \%attr);

# Print with say() function valid connection message.
say "Connected to the MySQL database.";
After setting the permissions to -rwxr-xr-x. you call it with this CLI command:
./connect.pl
It prints:
Perl MySQL Connect Attempt.
Connected to the MySQL database.
- After connecting to the database lets query a couple columns by reference notation in a static.pl program. This one just returns the result of the MySQL version() and database() functions.
#!/usr/bin/perl

# Import libraries.
use strict;
use warnings;
use v5.10;     # for say() function
use DBI;

# Print with say() function message.
say "Perl MySQL Connect Attempt.";

# MySQL data source name must have a valid database as the
# third argument; this uses the sakila demo database.
my $dsn = "DBI:mysql:sakila";

# Local variables to build the connection string.
my $username = "student";
my $password = "student";

# Set arguments for MySQL database error management.
my %attr = ( PrintError=>0,  # turn off error reporting via warn()
             RaiseError=>1); # turn on error reporting via die()

# Create connction with a data source name, user name and password.
my $dbh  = DBI->connect($dsn,$username,$password, \%attr);

# Creaet a static SQL statement or query.
my $sth = $dbh->prepare("SELECT version() AS version \
	                 ,      database() AS db_name");

# Execute the static statement.
$sth->execute() or die "Execution failed: $dbh->errstr()";

# Read data and print by reference.
print "----------------------------------------\n";
while (my $ref = $sth->fetchrow_hashref()) {
  print "MySQL Version:  $ref->{'version'}\nMySQL Database: $ref->{'db_name'}\n";
}
print "----------------------------------------\n";

# Close the statement.
$sth->finish;

# Disconnect from database connection.
$dbh->disconnect();

# Print with say() function valid connection message.
say "Connected to the MySQL database.";
After setting the permissions to -rwxr-xr-x. you call it with this CLI command:
./static.pl
It prints:
Perl MySQL Connect Attempt.
----------------------------------------
MySQL Version:  8.0.30
MySQL Database: sakila
----------------------------------------
Connected to the MySQL database.
- After connecting to the database and securing variables by reference notation, lets return the value as an array of rows in a columns.pl program. This one just returns data from the film table of the sakila database. It is a static query because all the values are contained inside the SQL statement.
#!/usr/bin/perl

# Import libraries.
use strict;
use warnings;
use v5.10;     # for say() function
use DBI;

# Print with say() function message.
say "Perl MySQL Connect Attempt.";

# MySQL data source name must have a valid database as the
# third argument; this uses the sakila demo database.
my $dsn = "DBI:mysql:sakila";

# Local variables to build the connection string.
my $username = "student";
my $password = "student";

# Set arguments for MySQL database error management.
my %attr = ( PrintError=>0,  # turn off error reporting via warn()
             RaiseError=>1); # turn on error reporting via die()

# Create connction with a data source name, user name and password.
my $dbh  = DBI->connect($dsn,$username,$password, \%attr);

# Creaet a static SQL statement or query.
my $sth = $dbh->prepare("SELECT title         \
	                 ,      release_year  \
			 ,      rating        \
			 FROM   film          \
			 WHERE  title LIKE 'roc%'");

# Execute the static statement.
$sth->execute() or die "Execution failed: $dbh->errstr()";

# Read data and print by comma-delimited row position.
print "----------------------------------------\n";
while (my @row = $sth->fetchrow_array()) {
  print join(", ", @row), "\n";
}
print "----------------------------------------\n";

# Close the statement.
$sth->finish;

# Disconnect from database connection.
$dbh->disconnect();

# Print with say() function valid connection message.
say "Connected to the MySQL database.";
After setting the permissions to -rwxr-xr-x. you call it with this CLI command:
./columns.pl
It prints:
Perl MySQL Connect Attempt.
----------------------------------------
ROCK INSTINCT, 2006, G
ROCKETEER MOTHER, 2006, PG-13
ROCKY WAR, 2006, PG-13
----------------------------------------
Connected to the MySQL database.
- After connecting to the database and securing variables by reference notation, lets return the value as an array of rows in a dynamic.pl program. This one just returns data from the film table of the sakila database. It is a dynamic query because a string passed to the execute method and that value is bound to a ? placeholder in the SQL statement.
#!/usr/bin/perl

# Import libraries.
use strict;
use warnings;
use v5.10;     # for say() function
use DBI;

# Print with say() function message.
say "Perl MySQL Connect Attempt.";

# MySQL data source name must have a valid database as the
# third argument; this uses the sakila demo database.
my $dsn = "DBI:mysql:sakila";

# Local variables to build the connection string.
my $username = "student";
my $password = "student";

# Set arguments for MySQL database error management.
my %attr = ( PrintError=>0,  # turn off error reporting via warn()
             RaiseError=>1); # turn on error reporting via die()

# Create connction with a data source name, user name and password.
my $dbh  = DBI->connect($dsn,$username,$password, \%attr);

# Creaet a static SQL statement or query.
my $sth = $dbh->prepare("SELECT title         \
	                 ,      release_year  \
			 ,      rating        \
			 FROM   film          \
			 WHERE  title LIKE CONCAT(?,'%')");

# Execute the dynamic statement by providing an input parameter.
$sth->execute('roc') or die "Execution failed: $dbh->errstr()";

# Read data and print by comma-delimited row position.
print "----------------------------------------\n";
while (my @row = $sth->fetchrow_array()) {
  print join(", ", @row), "\n";
}
print "----------------------------------------\n";

# Close the statement.
$sth->finish;

# Disconnect from database connection.
$dbh->disconnect();

# Print with say() function valid connection message.
say "Connected to the MySQL database.";
After setting the permissions to -rwxr-xr-x. you call it with this CLI command:
./dynamic.pl
It prints:
Perl MySQL Connect Attempt.
----------------------------------------
ROCK INSTINCT, 2006, G
ROCKETEER MOTHER, 2006, PG-13
ROCKY WAR, 2006, PG-13
----------------------------------------
Connected to the MySQL database.
- After connecting to the database and securing variables by reference notation, lets return the value as an array of rows in a input.pl program. This one just returns data from the film table of the sakila database. It is a dynamic query because an input parameter is passed to a local variable and the local variable is bound to a ? placeholder in the SQL statement.
#!/usr/bin/perl

# Import libraries.
use strict;
use warnings;
use v5.10;     # for say() function
use DBI;

# Get the index value of the maximum argument in the
# argument.
my $argc = $#ARGV;

# Accept first argument value as parameter.
my $param = $ARGV[$argc];

# Verify variable value assigned.
if (not defined $param) {
  die "Need parameter value.\n";
}

# Print with say() function message.
say "Perl MySQL Connect Attempt.";

# MySQL data source name must have a valid database as the
# third argument; this uses the sakila demo database.
my $dsn = "DBI:mysql:sakila";

# Local variables to build the connection string.
my $username = "student";
my $password = "student";

# Set arguments for MySQL database error management.
my %attr = ( PrintError=>0,  # turn off error reporting via warn()
             RaiseError=>1); # turn on error reporting via die()

# Create connction with a data source name, user name and password.
my $dbh  = DBI->connect($dsn,$username,$password, \%attr);

# Creaet a static SQL statement or query.
my $sth = $dbh->prepare("SELECT title         \
	                 ,      release_year  \
			 ,      rating        \
			 FROM   film          \
			 WHERE  title LIKE CONCAT(?,'%')");

# Execute the static statement.
$sth->execute($param) or die "Execution failed: $dbh->errstr()";

# Read data and print by comma-delimited row position.
print "----------------------------------------\n";
while (my @row = $sth->fetchrow_array()) {
  print join(", ", @row), "\n";
}
print "----------------------------------------\n";

# Close the statement.
$sth->finish;

# Disconnect from database connection.
$dbh->disconnect();

# Print with say() function valid connection message.
say "Connected to the MySQL database.";
After setting the permissions to -rwxr-xr-x. you call it with this CLI command:
./input.pl ta
It prints:
Perl MySQL Connect Attempt.
----------------------------------------
TADPOLE PARK, 2006, PG
TALENTED HOMICIDE, 2006, PG
TARZAN VIDEOTAPE, 2006, PG-13
TAXI KICK, 2006, PG-13
----------------------------------------
Connected to the MySQL database.
I think these examples cover most of the basic elements of writing Perl against the MySQL database. If I missed something you think would be useful, please advise. As always, I hope this helps those working with the MySQL and Perl products.
Oracle PLS-00103 Gotcha
Teaching PL/SQL can be fun and sometimes challenging when you need to troubleshoot a student error. Take the Oracle PLS-00103 error can be very annoying when it return like this:
24/5 PLS-00103: Encountered the symbol "LV_CURRENT_DATE" WHEN expecting one OF the following: language |
Then, you look at the code and see:
22 23 24 25 | , pv_user_id NUMBER ) IS /* Declare local constants. */ lv_current_date DATE := TRUNC(SYSDATE); |
Obviously, there’s nothing wrong on the line number that the error message pointed. Now, here’s where it gets interesting because of a natural human failing. The student thought they had something wrong with declaring the variable and tested as stand alone procedure and anonymous block. Naturally, they were second guessing what they knew about the PL/SQL.
That’s when years of experience with PL/SQL kicks in to solve the problem. The trick is recognizing two things:
- The error message points to the first line of code in a package body.
- The error is pointing to the first character on the line after the error.
That meant that the package body was incorrectly defined. A quick check to the beginning of the package body showed:
1 2 3 4 5 6 | CREATE OR REPLACE PACKAGE account_creation AS PROCEDURE insert_contact ( pv_first_name VARCHAR2 , pv_middle_name VARCHAR2 := NULL |
The student failed to designate the package as an implementation by omitting the keyword BODY from line 2. The proper definition of the package body should be:
1 2 3 4 5 6 | CREATE OR REPLACE PACKAGE BODY account_creation AS PROCEDURE insert_contact ( pv_first_name VARCHAR2 , pv_middle_name VARCHAR2 := NULL |
That’s the resolution for the error message. I wrote this because I checked if they should have been able to find a helpful article with a google search. I discovered that there wasn’t an answer like this that came up after 10 minutes of various searches.
As always, I hope this helps those writing PL/SQL.
