Archive for the ‘Java’ Category
Fedora SQL*Developer
After you download SQL Developer 18 on Fedora 27, you can install it with the yum utility, like
yum install -y sqldeveloper-18.2.0.183.1748-1.noarch.rpm |
The installation should generate the following log file:
Last metadata expiration check: 2:26:23 ago on Sat 25 Aug 2018 07:10:16 PM MDT. Dependencies resolved. ================================================================================================ Package Arch Version Repository Size ================================================================================================ Installing: sqldeveloper noarch 18.2.0.183.1748-1 @commandline 338 M Transaction Summary ================================================================================================ Install 1 Package Total size: 338 M Installed size: 420 M Downloading Packages: Running transaction check Transaction check succeeded. Running transaction test Transaction test succeeded. Running transaction Preparing : 1/1 Installing : sqldeveloper-18.2.0.183.1748-1.noarch 1/1 Running scriptlet: sqldeveloper-18.2.0.183.1748-1.noarch 1/1 Verifying : sqldeveloper-18.2.0.183.1748-1.noarch 1/1 Installed: sqldeveloper.noarch 18.2.0.183.1748-1 Complete! |
After you install SQL Developer, you won’t be able to launch it. Attempts to launch it won’t raise an error message either. The problem is that there is a post-installation step, which requires you to configure the product.conf file.
You can see the error by navigating to the /opt/sqldeveloper directory. You will find the sqldeveloper.sh file in that directory. You will see the error when you run the command as the root user from the command-line interface (CLI), as follows:
/opt/sqldeveloper/sqldeveloper.sh |
Oracle SQL Developer Copyright (c) 2005, 2018, Oracle and/or its affiliates. All rights reserved. Type the full pathname of a JDK installation (or Ctrl-C to quit), the path will be stored in /root/.sqldeveloper/18.2.0/product.conf |
You can find the Oracle home by searching for the rt.jar file as the root user. You use the following find command syntax from the / topmost directory.
find . -name rt.jar |
On Fedora 27, you should see the following absolute file name:
./usr/lib/jvm/java-1.8.0-openjdk-1.8.0.171-1.b10.fc27.x86_64/jre/lib/rt.jar |
You discard the /jre/lib portion of the directory path and the rt.jar file name to get the Java home’s fully qualified path. This should update the product.conf file but if you have to change it manually you should edit the following file:
/root/.sqldeveloper/18.2.0/product.conf |
You need to configure the SetJavaHome parameter value in the product.conf file. The SetJavaHome parameter needs to point to the Java home directory on your Fedora instance. It should look like this:
# # By default, the product launcher will search for a JDK to use, and if none # can be found, it will ask for the location of a JDK and store its location # in this file. If a particular JDK should be used instead, uncomment the # line below and set the path to your preferred JDK. # SetJavaHome /usr/lib/jvm/java-1.8.0-openjdk-1.8.0.171-1.b10.fc27.x86_64 |
It’s possible that an attempt to launch SQL Developer by another user may have copied the product.conf file into a local directory. You should change those manually by editing their respective product.conf files. Assuming you attempted to launch SQL Developer by a student user before you changed the root user’s copy of the SQL Developer’s product.conf file.
Oracle EBS 12.2 & Languages
As does seem to occur from time-to-time, I’m out there in the weeds again and sorting out a solution that fits a customer’s need. They wanted to know if they could write Oracle EBS 12.2 Concurrent Manager Programs in Ruby. They don’t want to write Java, which is fully supported.
I checked the documentation, which as is too common, didn’t answer the question. I’m sure if I downloaded the PDF and searched it for one of the languages I knew Oracle supported, I would have found the list of supported languages.
It was simply quicker to query the Oracle EBS 12.2 FND_LOOKUPS table like so:
SELECT lookup_type , lookup_code , SUBSTR(meaning,1,30) AS meaning FROM fnd_lookups WHERE lookup_type = 'CP_EXECUTION_METHOD_CODE' ORDER BY meaning; |
It returns the list of possible types of Oracle EBS 12.2 Concurrent Manager Programs:
LOOKUP_TYPE LOOKUP_CODE MEANING -------------------------- ------------ ------------------------------ CP_EXECUTION_METHOD_CODE X FlexRpt CP_EXECUTION_METHOD_CODE F FlexSql CP_EXECUTION_METHOD_CODE H Host CP_EXECUTION_METHOD_CODE S Immediate CP_EXECUTION_METHOD_CODE K Java Concurrent Program CP_EXECUTION_METHOD_CODE J Java Stored Procedure CP_EXECUTION_METHOD_CODE M Multi Language Function CP_EXECUTION_METHOD_CODE P Oracle Reports CP_EXECUTION_METHOD_CODE I PL/SQL Stored Procedure CP_EXECUTION_METHOD_CODE E Perl Concurrent Program CP_EXECUTION_METHOD_CODE B Request Set Stage Function CP_EXECUTION_METHOD_CODE L SQL*Loader CP_EXECUTION_METHOD_CODE Q SQL*Plus CP_EXECUTION_METHOD_CODE R SQL*Report CP_EXECUTION_METHOD_CODE Z Shutdown Callback CP_EXECUTION_METHOD_CODE A Spawned |
That gave me some of the answer. You can’t call Ruby programs directly. However, Perl lets you use Inline::Ruby. You can use Inline:Ruby to call your Ruby programs. So, if you use Perl to wrap Ruby you don’t have to use Java.
IT Salary Thought
During the holidays, I check salaries for my students and the IT industry overall. I’m never surprised by the reality, after all salaries pay for return on skills and effort. Here’s my annual look, which some may find unkind but reality is seldom kind.
Before looking at IT salaries, it seems like a good opportunity to first look at the overall job market for Millennials in the United States. AOL provides a great graphic of the median income for Millennials (those born between 1981 and 1997), which is $18,000 to $43,000 a year:

That’s a stark contrast to Forbes’ statistics on the top college baccalaureate degrees. In fact, the top five with the highest salary are between $58 to $67 thousand a year. They are:
- Computer Science ………… $66,800
- Engineering ………………… $65,000
- Mathematics & Statistics … $60,300
- Economics ………………….. $58,600
- Finance ……………………… $58,000
Computer science, applied computer science, and information technology are probably lumped into the first category. Information systems, exposure without real skills, is a management degree and probably opens positions equivalent to the business degree at $50 thousand a year. More or less, that’s a nine thousand dollar difference between having real skills and being able to talk the game and supervise technical resources. (The 10 hottest IT skills for 2015 are listed in Computerworld.)
There’s no surprise that Ruby, Objective C (iPhone, iPad, Mac OS X), Python, Java, C++ are at the top of the pyramid. Starting salaries in the Salt Lake area are higher for programmers college than they are for other computer science skill sets. In fact, my informal contacts peg them as starting at $70+ thousand. That’s higher than Forbes average for computer science. Here’s a visual on experienced programmers by language:

It seems fair to say that a computer science, applied computer science, and information technology degree with an emphasis in real programming skills is the best bet to pay off student loans. However, some will wait for politicians to do that for them, but really that’s quite unlikely, isn’t it?
Reality is always blunt. Reality also seems to frequently differs from what politicians say. After all, politicians pander to audiences, which generally means they say a great deal of nonsense. Nonsense like economics doesn’t matter, everyone should earn the same regardless of their education, skills, or work ethic. Aldous Huxley said it more elegantly when he said, “That all men are equal is a proposition to which, at ordinary times, no sane human being has ever given his assent.”
Eclipse, Java, MySQL
While I previously blogged about installing Netbeans 8, some of my students would prefer to use the Eclipse IDE. This post shows how to install and configure Eclipse IDE, include the mysql-connector-java.jar, and write Java to access the MySQL.
You can download Eclipse IDE and then open it in Fedora’s Archive Manager. You can use the Archive Manager to Extract the Eclipse IDE to a directory of your choice. I opted to extract it into my student user’s home directory, which is /home/student.
After extracting the Eclipse IDE, you can check the contents of the eclipse directory with the following command:
ls -al eclipse |
You should see the following:
drwxrwxr-x. 8 student student 4096 May 8 22:16 . drwx------. 33 student student 4096 May 8 21:57 .. -rw-rw-r--. 1 student student 119194 Mar 20 07:10 artifacts.xml drwxrwxr-x. 11 student student 4096 May 8 22:16 configuration drwxrwxr-x. 2 student student 4096 Mar 20 07:10 dropins -rwxr-xr-x. 1 student student 78782 Mar 20 07:08 eclipse -rw-rw-r--. 1 student student 315 Mar 20 07:10 eclipse.ini -rw-rw-r--. 1 student student 60 Mar 17 15:11 .eclipseproduct drwxrwxr-x. 41 student student 4096 Mar 20 07:10 features -rwxr-xr-x. 1 student student 140566 Mar 20 07:08 icon.xpm drwxrwxr-x. 4 student student 4096 Mar 20 07:09 p2 drwxrwxr-x. 12 student student 40960 Mar 20 07:10 plugins drwxrwxr-x. 2 student student 4096 Mar 20 07:10 readme |
You can launch the Eclipse IDE with the following command-line from the eclipse directory:
./eclipse & |
While you can run this from the /home/student/eclipse directory, it’s best to create an alias for the Eclipse IDE in the student user’s .bashrc file:
# Set alias for Eclipse IDE tool. alias eclipse="/home/student/eclipse/eclipse" |
The next time you start the student user account, you can launch the Eclipse IDE by entering eclipse in the search box opened by clicking on the Activities menu.
The following steps take you through installing Eclipse on Fedora Linux, which is more or less the same as any Linux distribution. It’s very similar on Windows platforms too.
Eclipse Installation

- Navigate to eclipse.org/downloads web page to download the current version of the Eclipse software. Click the Linux 32 Bit or Linux 64 Bit link, as required for your operating system.

- Click the Green Arrow to download the Eclipse software.

- The next dialog gives you an option to open or save the software. Click the Open with radio button to open the archive file.

- This the Linux Archive Manager. Click the Extract button from the menu tab to open the archive file.

- This extract button on file chooser dialog to install Eclipse into the /home/student/eclipse directory. Click the Extract button to let the Archive Manager create a copy of those files.

- The Archive Manager presents a completion dialog. Click the Close button to close the Archive Manager.
After installing the Eclipse software, you can configure Eclipse. There are sixteen steps to setup the Eclipse product. You can launch the product with the
Eclipse Setup
You need to launch the Eclipse application to perform the following steps. The syntax is the following when you did create the alias mentioned earlier in the blog post:
eclipse & |
The following steps cover setting up your workspace, project, and adding the MySQL JDBC Java archive.

- The branding dialog may display for 30 or more seconds before the Eclipse software application launches.

- The Workspace Launcher opens first on a new installation. You need to designate a starting folder. I’m using /home/student/workspace as my Workspace. Click the OK button when you enter a confirmed workspace.

- After setting the Workspace Launcher, you open to the Eclipse Welcome page. Click second of the two icons on the left to open a working Eclipse environment. Alternatively, you can connect to Tutorials on the same page.

- From the developer view, click on the File menu option, the New option on the list, and the Java Project option on the floating menu. Eclipse will now create a new Java project.

- The New Java Project dialog lets you enter a project name and it also gives you the ability to set some basic configuration details. As a rule, you simply enter the Project Name and accept the defaults before clicking the Finish button.

- After creating the new Java project, Eclipse returns you to the Welcome page. Click second of the two icons on the left to open a working Eclipse environment.

- Now you should see the working environment. Sometimes it takes the full screen but initially it doesn’t. Navigate to the lower right hand side, and expand the window to full size.

- Now you should see the full screen view of the Eclipse working environment.

- Now you create a new Java class by navigating to the File menu options, then the New menu option, and finally choosing the Class floating menu.

- The New Java Class dialog requires you to provide some information about the Java object you’re creating. The most important thing is the Java class name.

- The only difference in this copy of the New Java Class dialog is that I’ve entered HelloWorld as the Java Class’s name. Click the Finish button when you’re done.

- Eclipse should show you the following
HelloWorld.javafile. It’s missing a main() method. Add a static main() method to theHelloWorld.javaclass source file.

- This form shows the changes to the
HelloWorld.javafile. Specifically, it adds the It’s missing a >main() method. Add a static main() method to the HelloWorld.java class source file.

- You can click the green arrow from the tool panel or you can click the Run menu option and Run submenu choice to test your program.
1
2
3
4
// Class definition.
public class HelloWorld {
  public static void main(String args[]) {
    System.out.println("Hello World."); }}

- The Save and Launch dialog tells you that you’re ready to test creating a copy of the Java class file. Click the OK button to continue.

- The results from your program are written to the Console portion of the Eclipse IDE. This concludes the setup of a workspace, project, and deployment of actual Java classes.
Hello World.
Add MySQL JDBC Library
The following instructions add the MySQL Library and demonstrate how to write Java programs that connect to the MySQL database. They also use the mysql project.

- Navigate to the Project menu and choose the Properties menu option.

- The Properties menu option opens the Properties for the mysql project on the Order and Export tab. Click the Libraries tab to add an external library.

- In the Libraries tab click the Add Library… button on the right to add an external library.

- In the JAR Selection dialog, click on Computer in the Places list, then click on usr, click on share, and click on java. The Name list should now include mysql-connector-java.jar file, and you should click on it before clicking on the OK button.

- You create new Java class file by clicking on the File menu. Then, you choose the New menu option and the Class menu option from the floating menu.

- Enter MysqlConnector as the name of the new Java class file and click the Finish button to continue.

- Eclipse generates the shell of the MysqlConnector class as shown in the illustration to the left.

- You should replace the MysqlConnector class shell with the code below. Then, click the green arrow or the Run menu and Run menu option to compile and run the new MysqlConnector Java class file.
1
2
3
4
5
6
7
8
9
10
11
12
13
14
15
16
17
18
19
20
21
22
23
24
25
import java.sql.Connection;
import java.sql.DriverManager;
import java.sql.SQLException;

public class MysqlConnector extends Object {
  public static void main(String[] args) {
    try {
      /* The newInstance() call is a work around for some
         broken Java implementations. */
      Class.forName("com.mysql.jdbc.Driver").newInstance();

      /* Verify the Java class path. */
      System.out.println("====================");
      System.out.println("CLASSPATH [" + System.getProperty("java.class.path") + "]");
      System.out.println("====================");

    } catch (Exception e) {}
    finally {
      /* Verify the Java class path. */
      System.out.println("====================");
      System.out.println("CLASSPATH [" + System.getProperty("java.class.path") + "]");
      System.out.println("====================");
    }
  }
}

- The Save and Launch dialog informs you are saving a
MysqlConnector.javafile to yourmysqlproject. Click the OK button to continue.

- The next screen shows that the program successfully connected to the MySQL database by printing the following information to the Console output tab.
====================
CLASSPATH [/home/student/Code/workspace/MySQL/bin:/usr/share/java/mysql-connector-java.jar]
====================
====================
CLASSPATH [/home/student/Code/workspace/MySQL/bin:/usr/share/java/mysql-connector-java.jar]
====================

- Instead of repeating steps #5 through #10, the image displays the testing of the MysqlResults class file. The code follows below:
1
2
3
4
5
6
7
8
9
10
11
12
13
14
15
16
17
18
19
20
21
22
23
24
25
26
27
28
29
30
31
32
33
34
35
36
37
38
39
40
41
42
43
44
45
46
47
48
49
50
51
52
53
54
55
56
57
58
59
60
61
62
63
64
65
66
67
68
69
70
71
72
73
74
75
76
/* Import the java.sql.* package. */
import java.sql.*;

/* You can't include the following on Linux without raising an exception. */
// import com.mysql.jdbc.Driver;

public class MySQLResult {
  public MySQLResult() {
    /* Declare variables that require explicit assignments because
       they're addressed in the finally block. */
    Connection conn = null;
    Statement stmt = null;
    ResultSet rset = null;

    /* Declare other variables. */
    String url;
    String username = "student";
    String password = "student";
    String database = "studentdb";
    String hostname = "localhost";
    String port = "3306";
    String sql;

    /* Attempt a connection. */
    try {
      // Set URL.
      url = "jdbc:mysql://" + hostname + ":" + port + "/" + database;

      // Create instance of MySQL.
      Class.forName ("com.mysql.jdbc.Driver").newInstance();
      conn = DriverManager.getConnection (url, username, password);

      // Query the version of the database, relies on *_ri2.sql scripts.
      sql = "SELECT i.item_title, ra.rating FROM item i INNER JOIN rating_agency ra ON i.item_rating_id = ra.rating_agency_id";
      stmt = conn.createStatement();
      rset = stmt.executeQuery(sql);

      System.out.println ("Database connection established");

      // Read row returns for one column.
      while (rset.next()) {
        System.out.println(rset.getString(1) + ", " + rset.getString(2)); }

    }
    catch (SQLException e) {
      System.err.println ("Cannot connect to database server (SQLException):");
      System.out.println(e.getMessage());
    }
    catch (ClassNotFoundException e) {
      System.err.println ("Cannot connect to database server (ClassNotFoundException)");
      System.out.println(e.getMessage());
    }
    catch (InstantiationException e) {
      System.err.println ("Cannot connect to database server (InstantiationException)");
      System.out.println(e.getMessage());
    }
    catch (IllegalAccessException e) {
      System.err.println ("Cannot connect to database server (IllegalAccesException)");
      System.out.println(e.getMessage());
    }
    finally {
      if (conn != null) {
        try {
          rset.close();
          stmt.close();
          conn.close();
          System.out.println ("Database connection terminated");
        }
        catch (Exception e) { /* ignore close errors */ }
      }
    }
  }
  /* Unit test. */
  public static void main(String args[]) {
    new MySQLResult(); }
}
After you click the green arrow or the Run menu and Run menu option to compile and run the program, you should see the following output. That is if you’re using my create_mysql_store_ri2.sql and >seed_mysql_store_ri2.sql files.
Database connection established
I Remember Mama, NR
Tora! Tora! Tora!, G
A Man for All Seasons, G
Around the World in 80 Days, G
Camelot, G
Christmas Carol, G
I Remember Mama, G
The Hunt for Red October, PG
Star Wars I, PG
Star Wars II, PG
Star Wars II, PG
The Chronicles of Narnia, PG
Beau Geste, PG
Hook, PG
Harry Potter and the Sorcerer's Stone, PG
Scrooge, PG
Harry Potter and the Sorcer's Stone, PG
Harry Potter and the Sorcer's Stone, PG
Harry Potter and the Chamber of Secrets, PG
Harry Potter and the Chamber of Secrets, PG
Harry Potter and the Prisoner of Azkaban, PG
Harry Potter and the Prisoner of Azkaban, PG
Harry Potter and the Half Blood Prince, PG
Star Wars III, PG-13
Casino Royale, PG-13
Casino Royale, PG-13
Die Another Day, PG-13
Die Another Day, PG-13
Die Another Day, PG-13
Golden Eye, PG-13
Golden Eye, PG-13
Tomorrow Never Dies, PG-13
Tomorrow Never Dies, PG-13
The World Is Not Enough, PG-13
Clear and Present Danger, PG-13
Clear and Present Danger, PG-13
Harry Potter and the Goblet of Fire, PG-13
Harry Potter and the Goblet of Fire, PG-13
Harry Potter and the Goblet of Fire, PG-13
Harry Potter and the Order of the Phoenix, PG-13
Harry Potter and the Deathly Hallows, Part 1, PG-13
Harry Potter and the Deathly Hallows, Part 2, PG-13
Brave Heart, R
The Chronicles of Narnia, E
MarioKart, E
Need for Speed, E
Cars, E
RoboCop, M
Pirates of the Caribbean, T
Splinter Cell, T
The DaVinci Code, T
Database connection terminated
As always, I hope the note helps those trying to work with the Eclipse product.
Netbeans 8 – Fedora
Some of my students want to use the Fedora image that I built for my database classes in my Java software development life cycle course. As a result, they wanted a Java development environment installed. I examined JDeveloper 11g (11.1.1.7.0) and 12c (12.1.3) but resolved on the more generic Netbeans 8 (8.0.2) IDE.
JDK 7 with Netbeans 8 Download
You can download the generic Netbeans 8 IDE or the JDK 8 with Netbeans for the Linux installation. After you download the executable program, you should follow these instructions to install the Netbeans 8 IDE on Fedora.
As the student user, you can download the file to your ~student/Downloads directory and then run these two commands:
chmod +x ./jdk-7u80-nb-8_0_2-linux-x64.sh sudo ./jdk-7u80-nb-8_0_2-linux-x64.sh |
It produces the following output log:
Configuring the installer... Searching for JVM on the system... Preparing bundled JVM ... Extracting installation data... Running the installer wizard... |
Then, it launches the installer. These screens show you how to install and create your first Java project.
JDK 7 with Netbeans 8 Installation

- The first installation dialog welcomes you to the JDK 7 Update and NetBeans 8 Installer. Click the Next button to proceed.

- The second installation dialog asks you to accept the terms in the license agreement. Click the Next button to proceed.

- The third installation dialog asks you to install Netbeans 8. Click the Browse button if you would like to install it in a different area. Click the Next button to proceed.

- The fourth installation dialog asks you to install another Java JDK 7 that supports the current release of Netbeans 8. Click the Browse button if you would like to install it in a different area. Click the Next button to proceed.

- The fifth installation dialog shows you the progress bar for installing Java JDK 7 that supports the current release of Netbeans 8. You may not need to click the Next button to proceed because it should progress to the Netbeans progress dialog. Click the Next button to proceed when it doesn’t do it automatically.
- The sixth installation dialog shows you the progress bar for installing Netbeans 8. Click the Next button to proceed when it doesn’t do it automatically.

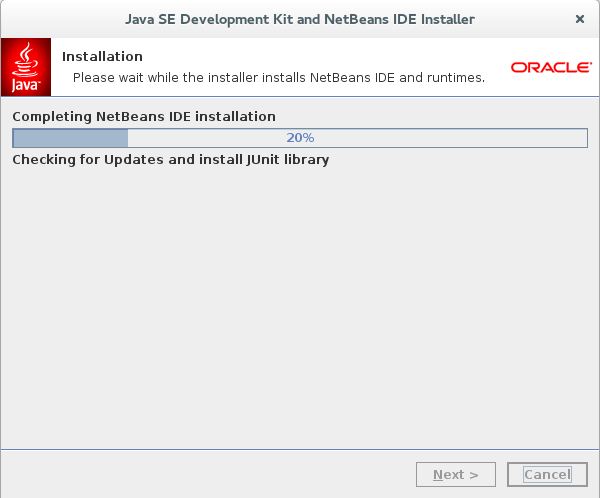
- The next screen is the final screen of the Java SE Development Kit and NetBeans IDE Installer. Click the Finish button to complete the installation.
After the installation, you need to check if the netbeans program can be found by users. It shouldn’t be found at this point because it isn’t in the default $PATH environment variable.
Configuring the student user
You can set the $PATH variable dynamically like this:
export PATH=$PATH:/usr/local/netbeans-8.0.2/bin |
The netbeans program location was set in Step #4 of the Netbeans installation. After setting the $PATH environment variable, you can run netbeans with this syntax:
./netbeans & |
However, the better approach is to put the following lines in your .bashrc file. This change ensures that you can access the netbeans program anytime you launch a Terminal session.
# Add netbeans to the user's PATH variable. export PATH=$PATH:/usr/local/netbeans-8.0.2/bin |
After you have configured the student user’s .bashrc file, you can now use Netbeans to create a Java project.
Create a new Netbeans project

- The next screen is the Netbeans 8 Start Page. This is where you can create your first Java development project.

- You click the File menu and then the New Project menu option to open a new project.

- It launches the New Project dialog at Step #1 – Choose Project, where you choose Java from your Categories list and Java Application from the Projects list. You click the Next button to continue.

- It launches the New Project dialog at Step #2 – Name and Location, where you enter a Project Name. The example uses
MySQLJavaas the project name. You click the Next button to continue.

- It launches the
MySQLJava.javatab in the Netbeans 8 application. This is where you can enter your code.
You should download JDK 8 with Netbeans 8. When you install JDK 8 with Netbeans 8 into an environment with a preinstalled JDK 7 (old as it is) with Netbeans 8, the installer only adds the JDK 8.
The following segments of the post show you how to download and install JDK 8 with Netbeans 8, and how to configure Netbeans to work with the JDK 7 and JDK 8 as interchangeable libraries.
JDK 8 with Netbeans 8 Download
You can now download the JDK 8 with Netbeans for the Linux installation. After you download the executable program, you should follow these instructions to install it on Fedora.
As the student user, you can download the file to your ~student/Downloads directory and then run these two commands:
chmod +x ./jdk-8u45-nb-8_0_2-linux-x64.sh sudo ./jdk-8u45-nb-8_0_2-linux-x64.sh |
It produces the following output log:
Configuring the installer... Searching for JVM on the system... Preparing bundled JVM ... Extracting installation data... Running the installer wizard... |
Then, it launches the installer, which will be very similar to the steps you went through earlier. There are differences. There are only five screens that you navigate as opposed to the seven from the earlier JDK 7 with Netbeans 8 installation, as you’ll see below.
JDK 8 with Netbeans 8 Installation

- The first installation dialog welcomes you to the JDK 8 Update and NetBeans 8 Installer. Click the Next button to proceed.

- The second installation dialog installs the JDK 8. Click the Next button to proceed.

- The third installation dialog is a summary of what you’ll install. Click the Install button to proceed.

- The fourth installation dialog shows you a progress bar. You don’t need to do anything but watch the progress.

- The fifth installation dialog shows you the installation is complete. Click the Finish button to proceed when it doesn’t do it automatically.
After you have installed the JDK 8 SE, you can use Netbeans to add the JDK 8 platform.
Add the JDK 8 Platform to Netbeans 8
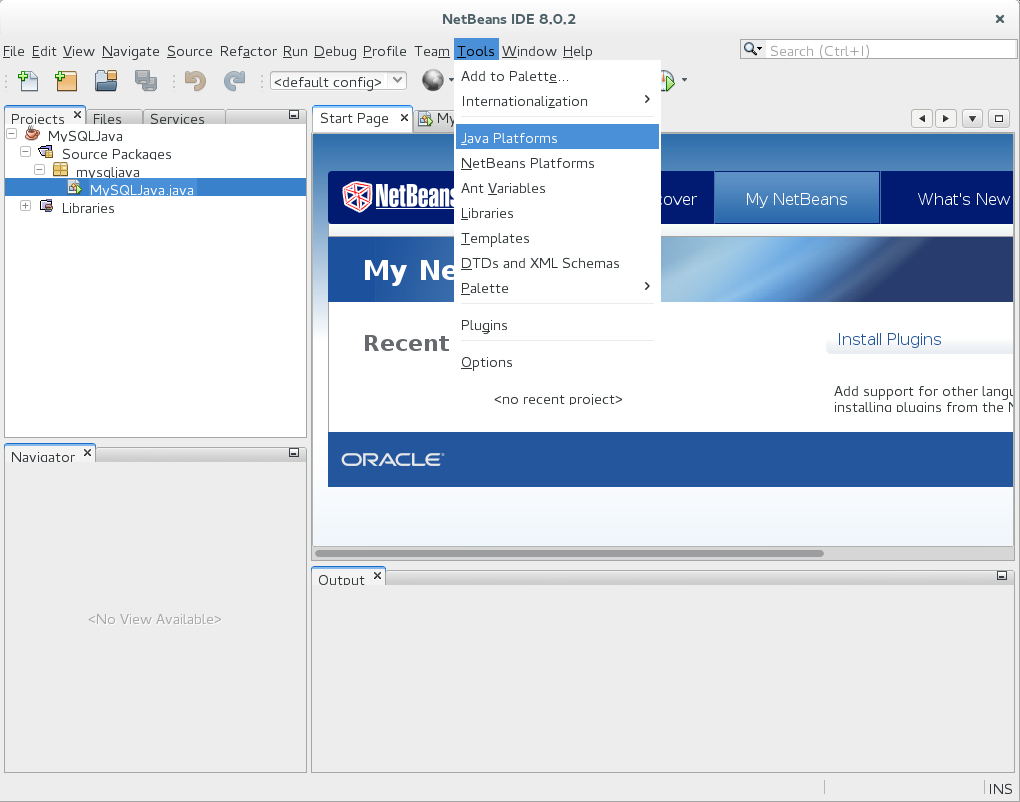
- After you open Netbeans 8, you choose the Tools menu choice. Then, you select the Java Platforms menu option.

- It launches the Java Platform Manager dialog. You click the Add Platform button to add the JDK 8 platform.

- It launches the Add Java Platform dialog. Leave the Java Standard Edition radio button checked. You click the Next button to proceed.

- It launches the Add Java Platform file chooser dialog. Here you navigate to find the JDK 8 software, which is located in
/usr/local/jdk1.8.0_45directory.

- After selecting the
/usr/local/jdk1.8.0_45directory as the platform folder, click the Next button to proceed.

- After setting the directory, you’re asked to verify the Java Platform information. If it’s correct, click the Finish button to proceed.

- After finishing the installation, you’ll see that you have two installed Java Platforms. Unfortunately, the first one installed is the default unless you modify the
netbeans.conffile. You click the Close button to complete the process.
Set JDK 8 Platform as the Default Java Platform for Netbeans 8
After adding the JDK 8 Java Platform, you can change the default setting my manually editing the /usr/local/netbeans-8.0.2/etc/netbeans.conf file. You simply remark out the line for JDK 7 and replace it with one for JDK 8, as shown below. The next time you boot the Netbeans application it uses Java 1.8.
netbeans_jdkhome="/usr/local/jdk1.8.0_45" |
The next time you launch Netbeans 8, it will use JDK 8 because you set that as the default Java Platform
As always, I hope this helps those looking for information like this.
Java-MySQL Program
It turns out that configuring Perl wasn’t the last step for my student instance. It appears that I neglected to configure my student instance to support Java connectivity to MySQL. This post reviews the configuration of Java to run programs against MySQL. It also covers the new syntax on how you register a DriverManager, and avoid Java compilation errors with the older syntax.
In prior posts, I’ve shown how to use Perl , PHP, Python, and Ruby languages to query a MySQL database on Linux.
You need to install the Open JDK libraries with the yum utility command:
yum install -y java-1.7.0-openjdk* |
It should generate the following log output:
Loaded plugins: langpacks, refresh-packagekit Package 1:java-1.7.0-openjdk-1.7.0.75-2.5.4.2.fc20.x86_64 already installed and latest version Package 1:java-1.7.0-openjdk-headless-1.7.0.75-2.5.4.2.fc20.x86_64 already installed and latest version Resolving Dependencies --> Running transaction check ---> Package java-1.7.0-openjdk-accessibility.x86_64 1:1.7.0.75-2.5.4.2.fc20 will be installed --> Processing Dependency: java-atk-wrapper for package: 1:java-1.7.0-openjdk-accessibility-1.7.0.75-2.5.4.2.fc20.x86_64 ---> Package java-1.7.0-openjdk-demo.x86_64 1:1.7.0.75-2.5.4.2.fc20 will be installed ---> Package java-1.7.0-openjdk-devel.x86_64 1:1.7.0.75-2.5.4.2.fc20 will be installed ---> Package java-1.7.0-openjdk-javadoc.noarch 1:1.7.0.75-2.5.4.2.fc20 will be installed ---> Package java-1.7.0-openjdk-src.x86_64 1:1.7.0.75-2.5.4.2.fc20 will be installed --> Running transaction check ---> Package java-atk-wrapper.x86_64 0:0.30.4-4.fc20 will be installed --> Finished Dependency Resolution Dependencies Resolved ================================================================================ Package Arch Version Repository Size ================================================================================ Installing: java-1.7.0-openjdk-accessibility x86_64 1:1.7.0.75-2.5.4.2.fc20 updates 32 k java-1.7.0-openjdk-demo x86_64 1:1.7.0.75-2.5.4.2.fc20 updates 1.9 M java-1.7.0-openjdk-devel x86_64 1:1.7.0.75-2.5.4.2.fc20 updates 9.2 M java-1.7.0-openjdk-javadoc noarch 1:1.7.0.75-2.5.4.2.fc20 updates 14 M java-1.7.0-openjdk-src x86_64 1:1.7.0.75-2.5.4.2.fc20 updates 39 M Installing for dependencies: java-atk-wrapper x86_64 0.30.4-4.fc20 fedora 71 k Transaction Summary ================================================================================ Install 12 Packages (+1 Dependent package) Total download size: 163 M Installed size: 765 M Downloading packages: (1/6): java-1.7.0-openjdk-accessibility-1.7.0.75-2.5.4.2.f | 32 kB 00:00 (2/6): java-1.7.0-openjdk-demo-1.7.0.75-2.5.4.2.fc20.x86_6 | 1.9 MB 00:02 (3/6): java-1.7.0-openjdk-devel-1.7.0.75-2.5.4.2.fc20.x86_ | 9.2 MB 00:05 (4/6): java-1.7.0-openjdk-javadoc-1.7.0.75-2.5.4.2.fc20.no | 14 MB 00:04 (5/6): java-atk-wrapper-0.30.4-4.fc20.x86_64.rpm | 71 kB 00:00 (6/6): java-1.7.0-openjdk-src-1.7.0.75-2.5.4.2.fc20.x86_6 | 39 MB 00:23 -------------------------------------------------------------------------------- Total 4.5 MB/s | 163 MB 00:36 Running transaction check Running transaction test Transaction test succeeded Running transaction (shutdown inhibited) Installing : java-atk-wrapper-0.30.4-4.fc20.x86_64 3/13 Installing : 1:java-1.7.0-openjdk-accessibility-1.7.0.75-2.5.4.2.fc20 4/13 Installing : 1:java-1.7.0-openjdk-devel-1.7.0.75-2.5.4.2.fc20.x86_64 9/13 Installing : 1:java-1.7.0-openjdk-src-1.7.0.75-2.5.4.2.fc20.x86_64 10/13 Installing : 1:java-1.7.0-openjdk-javadoc-1.7.0.75-2.5.4.2.fc20.noarc 12/13 Installing : 1:java-1.7.0-openjdk-demo-1.7.0.75-2.5.4.2.fc20.x86_64 13/13 Verifying : 1:java-1.7.0-openjdk-demo-1.7.0.75-2.5.4.2.fc20.x86_64 2/13 Verifying : 1:java-1.7.0-openjdk-javadoc-1.7.0.75-2.5.4.2.fc20.noarc 3/13 Verifying : java-atk-wrapper-0.30.4-4.fc20.x86_64 5/13 Verifying : 1:java-1.7.0-openjdk-accessibility-1.7.0.75-2.5.4.2.fc20 6/13 Verifying : 1:java-1.7.0-openjdk-devel-1.7.0.75-2.5.4.2.fc20.x86_64 8/13 Verifying : 1:java-1.7.0-openjdk-src-1.7.0.75-2.5.4.2.fc20.x86_64 12/13 Installed: java-1.7.0-openjdk-accessibility.x86_64 1:1.7.0.75-2.5.4.2.fc20 java-1.7.0-openjdk-demo.x86_64 1:1.7.0.75-2.5.4.2.fc20 java-1.7.0-openjdk-devel.x86_64 1:1.7.0.75-2.5.4.2.fc20 java-1.7.0-openjdk-javadoc.noarch 1:1.7.0.75-2.5.4.2.fc20 java-1.7.0-openjdk-src.x86_64 1:1.7.0.75-2.5.4.2.fc20 Dependency Installed: java-atk-wrapper.x86_64 0:0.30.4-4.fc20 Complete! |
You can find the Java compiler’s version with the following command:
javac -version |
It should show you the following Java version:
javac 1.7.0_75 |
Next, you need to install the mysql-connector-java library with yum like this:
yum install -y mysql-connector-java |
It should generate the following installation output:
Loaded plugins: langpacks, refresh-packagekit mysql-connectors-community | 2.5 kB 00:00 mysql-tools-community | 2.5 kB 00:00 mysql56-community | 2.5 kB 00:00 pgdg93 | 3.6 kB 00:00 updates/20/x86_64/metalink | 15 kB 00:00 Resolving Dependencies --> Running transaction check ---> Package mysql-connector-java.noarch 1:5.1.28-1.fc20 will be installed --> Processing Dependency: jta >= 1.0 for package: 1:mysql-connector-java-5.1.28-1.fc20.noarch --> Processing Dependency: slf4j for package: 1:mysql-connector-java-5.1.28-1.fc20.noarch --> Running transaction check ---> Package geronimo-jta.noarch 0:1.1.1-15.fc20 will be installed ---> Package slf4j.noarch 0:1.7.5-3.fc20 will be installed --> Processing Dependency: mvn(log4j:log4j) for package: slf4j-1.7.5-3.fc20.noarch --> Processing Dependency: mvn(javassist:javassist) for package: slf4j-1.7.5-3.fc20.noarch --> Processing Dependency: mvn(commons-logging:commons-logging) for package: slf4j-1.7.5-3.fc20.noarch --> Processing Dependency: mvn(commons-lang:commons-lang) for package: slf4j-1.7.5-3.fc20.noarch --> Processing Dependency: mvn(ch.qos.cal10n:cal10n-api) for package: slf4j-1.7.5-3.fc20.noarch --> Running transaction check ---> Package apache-commons-lang.noarch 0:2.6-13.fc20 will be installed ---> Package apache-commons-logging.noarch 0:1.1.3-8.fc20 will be installed --> Processing Dependency: mvn(logkit:logkit) for package: apache-commons-logging-1.1.3-8.fc20.noarch --> Processing Dependency: mvn(avalon-framework:avalon-framework-api) for package: apache-commons-logging-1.1.3-8.fc20.noarch ---> Package cal10n.noarch 0:0.7.7-3.fc20 will be installed ---> Package javassist.noarch 0:3.16.1-6.fc20 will be installed ---> Package log4j.noarch 0:1.2.17-14.fc20 will be installed --> Processing Dependency: mvn(org.apache.geronimo.specs:geronimo-jms_1.1_spec) for package: log4j-1.2.17-14.fc20.noarch --> Processing Dependency: mvn(javax.mail:mail) for package: log4j-1.2.17-14.fc20.noarch --> Running transaction check ---> Package avalon-framework.noarch 0:4.3-9.fc20 will be installed --> Processing Dependency: xalan-j2 for package: avalon-framework-4.3-9.fc20.noarch ---> Package avalon-logkit.noarch 0:2.1-13.fc20 will be installed --> Processing Dependency: tomcat-servlet-3.0-api for package: avalon-logkit-2.1-13.fc20.noarch ---> Package geronimo-jms.noarch 0:1.1.1-17.fc20 will be installed ---> Package javamail.noarch 0:1.5.0-6.fc20 will be installed --> Running transaction check ---> Package tomcat-servlet-3.0-api.noarch 0:7.0.52-2.fc20 will be installed ---> Package xalan-j2.noarch 0:2.7.1-22.fc20 will be installed --> Processing Dependency: xerces-j2 for package: xalan-j2-2.7.1-22.fc20.noarch --> Processing Dependency: osgi(org.apache.xerces) for package: xalan-j2-2.7.1-22.fc20.noarch --> Running transaction check ---> Package xerces-j2.noarch 0:2.11.0-17.fc20 will be installed --> Processing Dependency: xml-commons-resolver >= 1.2 for package: xerces-j2-2.11.0-17.fc20.noarch --> Processing Dependency: xml-commons-apis >= 1.4.01 for package: xerces-j2-2.11.0-17.fc20.noarch --> Processing Dependency: osgi(org.apache.xml.resolver) for package: xerces-j2-2.11.0-17.fc20.noarch --> Processing Dependency: osgi(javax.xml) for package: xerces-j2-2.11.0-17.fc20.noarch --> Running transaction check ---> Package xml-commons-apis.noarch 0:1.4.01-14.fc20 will be installed ---> Package xml-commons-resolver.noarch 0:1.2-14.fc20 will be installed --> Finished Dependency Resolution Dependencies Resolved ================================================================================ Package Arch Version Repository Size ================================================================================ Installing: mysql-connector-java noarch 1:5.1.28-1.fc20 updates 1.3 M Installing for dependencies: apache-commons-lang noarch 2.6-13.fc20 fedora 281 k apache-commons-logging noarch 1.1.3-8.fc20 updates 78 k avalon-framework noarch 4.3-9.fc20 fedora 87 k avalon-logkit noarch 2.1-13.fc20 fedora 87 k cal10n noarch 0.7.7-3.fc20 fedora 37 k geronimo-jms noarch 1.1.1-17.fc20 fedora 32 k geronimo-jta noarch 1.1.1-15.fc20 fedora 21 k javamail noarch 1.5.0-6.fc20 fedora 606 k javassist noarch 3.16.1-6.fc20 fedora 626 k log4j noarch 1.2.17-14.fc20 fedora 449 k slf4j noarch 1.7.5-3.fc20 fedora 173 k tomcat-servlet-3.0-api noarch 7.0.52-2.fc20 updates 207 k xalan-j2 noarch 2.7.1-22.fc20 updates 1.9 M xerces-j2 noarch 2.11.0-17.fc20 updates 1.1 M xml-commons-apis noarch 1.4.01-14.fc20 fedora 227 k xml-commons-resolver noarch 1.2-14.fc20 fedora 108 k Transaction Summary ================================================================================ Install 1 Package (+16 Dependent packages) Total download size: 7.3 M Installed size: 10 M Downloading packages: (1/17): apache-commons-logging-1.1.3-8.fc20.noarch.rpm | 78 kB 00:00 (2/17): apache-commons-lang-2.6-13.fc20.noarch.rpm | 281 kB 00:00 (3/17): avalon-framework-4.3-9.fc20.noarch.rpm | 87 kB 00:00 (4/17): avalon-logkit-2.1-13.fc20.noarch.rpm | 87 kB 00:00 (5/17): cal10n-0.7.7-3.fc20.noarch.rpm | 37 kB 00:00 (6/17): geronimo-jms-1.1.1-17.fc20.noarch.rpm | 32 kB 00:00 (7/17): geronimo-jta-1.1.1-15.fc20.noarch.rpm | 21 kB 00:00 (8/17): javamail-1.5.0-6.fc20.noarch.rpm | 606 kB 00:00 (9/17): javassist-3.16.1-6.fc20.noarch.rpm | 626 kB 00:00 (10/17): log4j-1.2.17-14.fc20.noarch.rpm | 449 kB 00:00 (11/17): slf4j-1.7.5-3.fc20.noarch.rpm | 173 kB 00:00 (12/17): mysql-connector-java-5.1.28-1.fc20.noarch.rpm | 1.3 MB 00:01 (13/17): tomcat-servlet-3.0-api-7.0.52-2.fc20.noarch.rpm | 207 kB 00:00 (14/17): xalan-j2-2.7.1-22.fc20.noarch.rpm | 1.9 MB 00:00 (15/17): xerces-j2-2.11.0-17.fc20.noarch.rpm | 1.1 MB 00:00 (16/17): xml-commons-apis-1.4.01-14.fc20.noarch.rpm | 227 kB 00:00 (17/17): xml-commons-resolver-1.2-14.fc20.noarch.rpm | 108 kB 00:00 -------------------------------------------------------------------------------- Total 1.3 MB/s | 7.3 MB 00:05 Running transaction check Running transaction test Transaction test succeeded Running transaction (shutdown inhibited) Installing : xml-commons-apis-1.4.01-14.fc20.noarch 1/17 Installing : geronimo-jms-1.1.1-17.fc20.noarch 2/17 Installing : xml-commons-resolver-1.2-14.fc20.noarch 3/17 Installing : xerces-j2-2.11.0-17.fc20.noarch 4/17 Installing : xalan-j2-2.7.1-22.fc20.noarch 5/17 Installing : javamail-1.5.0-6.fc20.noarch 6/17 Installing : log4j-1.2.17-14.fc20.noarch 7/17 Installing : tomcat-servlet-3.0-api-7.0.52-2.fc20.noarch 8/17 Installing : avalon-framework-4.3-9.fc20.noarch 9/17 Installing : avalon-logkit-2.1-13.fc20.noarch 10/17 Installing : apache-commons-logging-1.1.3-8.fc20.noarch 11/17 Installing : javassist-3.16.1-6.fc20.noarch 12/17 Installing : cal10n-0.7.7-3.fc20.noarch 13/17 Installing : apache-commons-lang-2.6-13.fc20.noarch 14/17 Installing : slf4j-1.7.5-3.fc20.noarch 15/17 Installing : geronimo-jta-1.1.1-15.fc20.noarch 16/17 Installing : 1:mysql-connector-java-5.1.28-1.fc20.noarch 17/17 Verifying : geronimo-jta-1.1.1-15.fc20.noarch 1/17 Verifying : geronimo-jms-1.1.1-17.fc20.noarch 2/17 Verifying : xalan-j2-2.7.1-22.fc20.noarch 3/17 Verifying : apache-commons-lang-2.6-13.fc20.noarch 4/17 Verifying : slf4j-1.7.5-3.fc20.noarch 5/17 Verifying : log4j-1.2.17-14.fc20.noarch 6/17 Verifying : avalon-framework-4.3-9.fc20.noarch 7/17 Verifying : xerces-j2-2.11.0-17.fc20.noarch 8/17 Verifying : cal10n-0.7.7-3.fc20.noarch 9/17 Verifying : avalon-logkit-2.1-13.fc20.noarch 10/17 Verifying : 1:mysql-connector-java-5.1.28-1.fc20.noarch 11/17 Verifying : xml-commons-resolver-1.2-14.fc20.noarch 12/17 Verifying : xml-commons-apis-1.4.01-14.fc20.noarch 13/17 Verifying : javassist-3.16.1-6.fc20.noarch 14/17 Verifying : tomcat-servlet-3.0-api-7.0.52-2.fc20.noarch 15/17 Verifying : javamail-1.5.0-6.fc20.noarch 16/17 Verifying : apache-commons-logging-1.1.3-8.fc20.noarch 17/17 Installed: mysql-connector-java.noarch 1:5.1.28-1.fc20 Dependency Installed: apache-commons-lang.noarch 0:2.6-13.fc20 apache-commons-logging.noarch 0:1.1.3-8.fc20 avalon-framework.noarch 0:4.3-9.fc20 avalon-logkit.noarch 0:2.1-13.fc20 cal10n.noarch 0:0.7.7-3.fc20 geronimo-jms.noarch 0:1.1.1-17.fc20 geronimo-jta.noarch 0:1.1.1-15.fc20 javamail.noarch 0:1.5.0-6.fc20 javassist.noarch 0:3.16.1-6.fc20 log4j.noarch 0:1.2.17-14.fc20 slf4j.noarch 0:1.7.5-3.fc20 tomcat-servlet-3.0-api.noarch 0:7.0.52-2.fc20 xalan-j2.noarch 0:2.7.1-22.fc20 xerces-j2.noarch 0:2.11.0-17.fc20 xml-commons-apis.noarch 0:1.4.01-14.fc20 xml-commons-resolver.noarch 0:1.2-14.fc20 Complete! |
I must write too much Java code for the Windows platform because I didn’t notice the change in how the DriverManager should be instantiated. Initially, I wrote the program using the following declaration for the DriverManager class:
30 | DriverManager.registerDriver(new com.mysql.jdbc.Driver()); |
While it worked on Windows, the same syntax in the MySQL.java program raised two errors on the Linux server. One for the declaration of the com.mysql.jdbc.Driver class and another trying to declare an instance of Driver class.
These are the two errors:
MySQL.java:5: error: package com.mysql.jdbc does not exist import com.mysql.jdbc.Driver; ^ MySQL.java:31: error: package com.mysql.jdbc does not exist DriverManager.registerDriver(new com.mysql.jdbc.Driver()); ^ |
I rewrote the MySQL.java program as follows, and it works on both implementations:
1 2 3 4 5 6 7 8 9 10 11 12 13 14 15 16 17 18 19 20 21 22 23 24 25 26 27 28 29 30 31 32 33 34 35 36 37 38 39 40 41 42 43 44 45 46 47 48 49 50 51 52 53 54 55 56 57 58 59 60 61 62 63 64 65 66 67 68 69 70 71 72 73 74 75 76 77 | // Import classes. import java.sql.*; /* You can't include the following on Linux without raising an exception. */ // import com.mysql.jdbc.Driver; public class MySQL { public MySQL() { /* Declare variables that require explicit assignments because they're addressed in the finally block. */ Connection conn = null; Statement stmt = null; ResultSet rset = null; /* Declare other variables. */ String url; String username = "student"; String password = "student"; String database = "studentdb"; String hostname = "localhost"; String port = "3306"; String sql; /* Attempt a connection. */ try { // Set URL. url = "jdbc:mysql://" + hostname + ":" + port + "/" + database; // Create instance of MySQL. Class.forName ("com.mysql.jdbc.Driver").newInstance(); conn = DriverManager.getConnection (url, username, password); // Query the version of the database. sql = "SELECT version()"; stmt = conn.createStatement(); rset = stmt.executeQuery(sql); System.out.println ("Database connection established"); // Read row returns for one column. while (rset.next()) { System.out.println("MySQL Version [" + rset.getString(1) + "]"); } } catch (SQLException e) { System.err.println ("Cannot connect to database server:"); System.out.println(e.getMessage()); } catch (ClassNotFoundException e) { System.err.println ("Cannot connect to database server:"); System.out.println(e.getMessage()); } catch (InstantiationException e) { System.err.println ("Cannot connect to database server:"); System.out.println(e.getMessage()); } catch (IllegalAccessException e) { System.err.println ("Cannot connect to database server:"); System.out.println(e.getMessage()); } finally { if (conn != null) { try { rset.close(); stmt.close(); conn.close(); System.out.println ("Database connection terminated"); } catch (Exception e) { /* ignore close errors */ } } } } /* Unit test. */ public static void main(String args[]) { new MySQL(); } } |
The old approach to the DriverManager and Driver classes disallows the use of three of the exceptions in the sample code: ClassNotFoundException, InstantiationException, and IllegalAccessException classes. The new syntax works on Linux, Mac OS X, and Windows. If you’re running on Mac OS X, you need to import the following additional library in the MySQL.java program:
import com.apple.eawt.*; |
Before you compile the MySQL.java program, you need to put the mysql-connector-java.jar and your present working directory into your environment’s $CLASSPATH variable. You can set the $CLASSPATH variable at the command-line or embed the following in your .bashrc file:
export CLASSPATH=/usr/share/java/mysql-connector-java.jar:. |
If you embedded it in the .bashrc file, you need to source that file or restart your terminal session, which resources the .bashrc for you. You can source your .bashrc file from an active Terminal session in your home directory with this syntax:
. ./.bashrc |
If you’re new to Java and the MySQL Connector/J, you compile the MySQL.java program with the following syntax. At least, it works when you have the MySQL.java source file in the present working directory and want to create the class file in the same directory. You can find more about the javac command-line at the www.tutorialpoint.com web site>
javac -verbose -cp . MySQL.java |
Then, you can run it with the class file with this syntax:
java MySQL |
It should return the following:
Database connection established MySQL Version [5.6.24] Database connection terminated |
If you’d prefer to return data, you can replace line 34 in the MySQL.java program with a query against a table, like:
34 | sql = "SELECT item_title, item_rating FROM item"; |
Then, change line 42 in the MySQL.java program with syntax to manage the output, like:
42 | System.out.println(rset.getString(1) + ", " + rset.getString(2)); } |
Recompile it, and rerun the MySQL class file with this syntax:
java MySQL |
It should return the following:
Database connection established The Hunt for Red October, PG Star Wars I, PG Star Wars II, PG Star Wars II, PG Star Wars III, PG13 The Chronicles of Narnia, PG RoboCop, Mature Pirates of the Caribbean, Teen The Chronicles of Narnia, Everyone MarioKart, Everyone Splinter Cell, Teen Need for Speed, Everyone The DaVinci Code, Teen Cars, Everyone Beau Geste, PG I Remember Mama, NR Tora! Tora! Tora!, G A Man for All Seasons, G Hook, PG Around the World in 80 Days, G Harry Potter and the Chamber of Secrets, PG Camelot, G Database connection terminated |
As always, I hope this helps those looking for a solution.
Popular Programming Languages
First of all, Happy New Year!
IEEE Spectrum published a ranking of the most popular programming languages. Computational journalist Nick Diakopoulos wrote the article. While it may surprise some, I wasn’t surprised to find SQL in the top ten.
 Nick weighted and combined 12 metrics from 10 sources (including IEEE Xplore, Google, and GitHub) to rank the most popular programming languages.
- Compiled programming languages (Java [#1], C [#2], C++ [#3], C# [#4], Objective-C [#16])
- Interpreted programming languages (Python [#5], JavaScript [#6], PHP [#7], Ruby [#8], Perl [#11], HTML [#12])
- Data languages (SQL [#9], MATLAB [#10], R [#13])
I couldn’t resist including Objective-C because it shows how the iPhone, iPad, and Mac OS impact our daily lives. At the same time, Assembly [#15] is actually more popular than Objective-C. Shell [#17] follows Objective-C. While the Visual Basic [#14] programming language still remains very popular.
There are many “why” questions raised by this list of popular programming languages. The “why” from my perspective deals with what are the market drivers for their popularity. The money drivers I see are as follows:
- Business software: Java, C++, C#, and AIDE – Android IDE (works with Java and C++ source code)
- OS X and iOS Development: Objective-C
- Development Tools: Java, C, C++, and Python
- System Admin/Utilities Tools: C, Perl, and Shell
- Web Development: Python, PHP, Ruby, and Perl
- Data Analysis: SQL, MATLAB, and R
Business Intelligence (BI) software manages most high-level data analysis tools and they’ll continue to get better over time. However, if SQL has shown us anything over 30 years it’s that ultimately we revert to it to solve problems. The conclusion from the reality of BI probably means the programming languages that develop those tools will continue to rise and so will the underlying data languages.
It’s also interesting to note that nine out of ten of the popular programming languages work with databases, like Oracle, MySQL, PostgreSQL, or SQL Server. While JavaScript doesn’t access the database typically, it’s JSON (JavaScript Object Notation) is supported in all the databases.
Hiding Java Source Code
The ability to deploy Java inside the Oracle database led somebody to conclude that the source isn’t visible in the data catalog. Then, that person found that they were wrong because the Java source is visible when you use a DDL command to CREATE, REPLACE, and COMPILE the Java source. This post discloses how to find the Java source and how to prevent it from being stored in the data catalog.
You can verify that the Java class and source files exist with the following query:
1 2 3 4 5 6 7 8 | COLUMN object_name FORMAT A20 HEADING "Object Name" COLUMN object_type FORMAT A12 HEADING "Object Type" COLUMN status FORMAT A14 HEADING "Object Status" SELECT object_name , object_type , status FROM user_objects WHERE object_name = 'ReadFile'; |
It displays:
Object Name Object Type Object Status -------------------- ------------ -------------- ReadFile JAVA SOURCE VALID ReadFile JAVA CLASS VALID 2 rows selected. |
Then, you can use the following query to discovery a Java library created by a SQL command:
1 2 3 4 5 6 | COLUMN line FORMAT 9999 HEADING "Line|#" COLUMN text FORMAT A66 HEADING "Text" SELECT line , text FROM user_source WHERE name = 'ReadFile'; |
It displays the following:
Line # Text ------- ------------------------------------------------------------------ 1 // Java library imports. 2 import java.io.File; 3 import java.io.BufferedReader; 4 import java.io.FileNotFoundException; 5 import java.io.IOException; 6 import java.io.FileReader; 7 import java.security.AccessControlException; 8 9 // Class definition. 10 public class ReadFile { 11 // Define class variables. 12 private static File file; 13 private static FileReader inTextFile; 14 private static BufferedReader inTextReader; 15 private static StringBuffer output = new StringBuffer(); 16 private static String outLine, outText; 17 18 // Define readText() method. 19 public static String readText(String fromFile) 20 throws AccessControlException, IOException { 21 // Read file. 22 try { 23 // Initialize File. 24 file = new File(fromFile); 25 26 // Check for valid file. 27 if (file.exists()) { 28 29 // Assign file to a stream. 30 inTextFile = new FileReader(file); 31 inTextReader = new BufferedReader(inTextFile); 32 33 // Read character-by-character. 34 while ((outLine = inTextReader.readLine()) != null) { 35 output.append(outLine + "\n"); } 36 37 // Assing the StringBuffer to a String. 38 outText = Integer.toString(output.toString().length()); 39 40 // Close File. 41 inTextFile.close(); } 42 else { 43 outText = new String("Empty"); }} 44 catch (IOException e) { 45 outText = new String(""); 46 return outText; } 47 return outText; }} 47 rows selected. |
You can eliminate the source by compiling the Java library outside the database. Then, you use the loadjava utility to load the only the class file into the data catalog. The syntax would be the following command for an importer user in a video Pluggable Database (PDB):
loadjava -r -f -o -user importer/importer@video ReadFile.class |
You should know that this syntax is disallowed by the loadjava utility, notwithstanding it’s found in the Oracle Database 12c documentation:
loadjava -r -f -o -user importer@video/importer ReadFile.class |
You can verify that only the Java class file exists with the following query:
1 2 3 4 5 6 7 8 | COLUMN object_name FORMAT A20 HEADING "Object Name" COLUMN object_type FORMAT A12 HEADING "Object Type" COLUMN status FORMAT A14 HEADING "Object Status" SELECT object_name , object_type , status FROM user_objects WHERE object_name = 'ReadFile'; |
It displays:
Object Name Object Type Object Status -------------------- ------------ -------------- ReadFile JAVA CLASS VALID 1 row selected. |
Hope this helps those who want to hide the Java source files.
Java File IO & NIO2
Java 6, or the java.io.* package which has been around a long time has known limits. There are some noted issues with the Java 6 java.io.* package, and why I wrote the FileIO.java file back in 2002. The FileIO.java class creates a series of static methods that let you read, write, copy, and move files both locally and across the network.
- Many methods fail to throw exceptions
- A number of simple methods are missing, like the copy and move methods
- There isn’t any support for symbolic links
- Many methods fail to scale with large files
The Java 7 introduces the java.nio.file.* package, and it does the following:
- Works more consistently across platforms
- Provides improved access to more file attributes
- Provides improved exception handling
- Supports non-native file systems
A student asked me to post the FileIO.java file. So, I posted it on the github.com site. I hope it helps simplifies the use of File IO operations. Admittedly, it’s easier to read and write a file with Java 7. The following provides a complete example class:
import java.awt.Dimension; import java.awt.Font; import java.io.*; import java.nio.file.*; import java.nio.charset.Charset; import javax.swing.JOptionPane; import javax.swing.JScrollPane; import javax.swing.JTextArea; public class ReadWriteFile { // Constructor for objects of class ReadFile public ReadWriteFile() {} // Write a file. public static void writeFile(String fileName, String fileText) { // Declare a file path. Path p = Paths.get(fileName); // Write a file. try { BufferedWriter bw = Files.newBufferedWriter( p, Charset.forName("ISO-8859-1") , StandardOpenOption.CREATE, StandardOpenOption.APPEND ); bw.write(fileText, 0, fileText.length()); bw.close(); } catch(IOException ioe) { System.out.println("Error writing a file."); System.exit(0); }} // Read a file. public static String readFile(String fileName) { // Declare a String to hold the file. String text = "", line = ""; // Declare a file path. Path p = Paths.get(fileName); // Write a file. try { // Read the file. BufferedReader fileInput = Files.newBufferedReader(p,Charset.forName("ISO-8859-1")); // Read and process first line. line = fileInput.readLine(); text = line + "\n"; // Read and process second thru last lines. while (line != null) { line = fileInput.readLine(); if (line != null) text += line + "\n"; } // Close the file input. fileInput.close(); } catch(EOFException eofe) { System.out.println("No more lines to read."); System.exit(0); } catch(IOException ioe) { System.out.println("Error reading file."); System.exit(0); } // Return a String value. return text; } // Declare a static main to read a text file. public static void main(String[] args) { // Declare local object types. JOptionPane op = new JOptionPane(); JScrollPane sp; JTextArea ta; Object[] options = {}; // Instantiate a test class. ReadWriteFile rwf = new ReadWriteFile(); // Text the readFile method. if (args.length > 0) { // Set the value and formatting of the text area. ta = new JTextArea(rwf.readFile(args[0])); ta.setFont(new Font(Font.SANS_SERIF,Font.PLAIN,14)); ta.setLineWrap(true); ta.setWrapStyleWord(true); // Assign the text area to a scroll pane. sp = new JScrollPane(ta); sp.setPreferredSize(new Dimension(400,200)); // Invoke a generic option pane. op.showOptionDialog(null, sp, "File Content", JOptionPane.DEFAULT_OPTION, JOptionPane.PLAIN_MESSAGE, null, options, null); } // Test the writeFile method. if (args.length > 1) { rwf.writeFile(args[1],rwf.readFile(args[0])); } } } |
You can call it like this to read and write an output.txt file from any directory:
java ReadWriteFile Fellowship.txt output.txt |
It will display a JOptionDialog like this:

Any suggestions or improvements are welcome.
Oracle 12c VARCHAR2?
The Oracle Database 12c documentation says you can set the maximum size of a VARCHAR2 to 32,767 bytes. That’s true except when you’re trying to map a large Java string to a VARCHAR2. It fails when the physical size of the Java string is greater than 4,000 bytes with an ORA-01002 or fetch out of sequence error.
SELECT read_text_file('C:\Data\loader\Hobbit1.txt')
*
ERROR at line 1:
ORA-24345: A Truncation or null fetch error occurred

ERROR:
ORA-01002: fetch out of sequence |
You need to grant privileges before you can test this code. You can grant privileges by connecting as the SYS user of a CDB (or non-multitenant database) or as the ADMIN user of a PDB with the AS SYSDBA clause. Then, you run the following command to grant external file access to the JVM inside Oracle Database 12c:
BEGIN DBMS_JAVA.GRANT_PERMISSION('IMPORTER' ,'SYS:java.io.FilePermission' ,'C:\Data\Loader\Hobbit1.txt' ,'read'); END; / |
The IMPORTER is a PDB user name, or a non-multitenant database user name. Please note that permissions must be granted on each physical file.
Here’s the code that raises the error when the external file is greater than 4,000 bytes:
1 2 3 4 5 6 7 8 9 10 11 12 13 14 15 16 17 18 19 20 21 22 23 24 25 26 27 28 29 30 31 32 33 34 35 36 37 38 39 40 41 42 43 44 45 46 47 48 49 | CREATE OR REPLACE AND COMPILE JAVA SOURCE NAMED "ReadFile" AS // Java library imports. import java.io.File; import java.io.BufferedReader; import java.io.FileNotFoundException; import java.io.IOException; import java.io.FileReader; import java.security.AccessControlException; // Class definition. public class ReadFile { // Define class variables. private static File file; private static FileReader inTextFile; private static BufferedReader inTextReader; private static StringBuffer output = new StringBuffer(); private static String outLine, outText; // Define readText() method. public static String readText(String fromFile) throws AccessControlException, IOException { // Read file. try { // Initialize File. file = new File(fromFile); // Check for valid file. if (file.exists()) { // Assign file to a stream. inTextFile = new FileReader(file); inTextReader = new BufferedReader(inTextFile); // Read character-by-character. while ((outLine = inTextReader.readLine()) != null) { output.append(outLine + "\n"); } // Assing the StringBuffer to a String. outText = output.toString(); // Close File. inTextFile.close(); } else { outText = new String("Empty"); }} catch (IOException e) { outText = new String(""); return outText; } return outText; }} / |
The PL/SQL wrapper should look like this:
1 2 3 4 5 | CREATE OR REPLACE FUNCTION read_text_file (from_file VARCHAR2) RETURN VARCHAR2 IS LANGUAGE JAVA NAME 'ReadFile.readText(java.lang.String) return java.lang.String'; / |
Then, you can query it like so:
SELECT read_text_file('C:\Data\loader\Hobbit1.txt') FROM dual; |
You can avoid the error by returning the Java file size as a CLOB data type with the following Java source code.
1 2 3 4 5 6 7 8 9 10 11 12 13 14 15 16 17 18 19 20 21 22 23 24 25 26 27 28 29 30 31 32 33 34 35 36 37 38 39 40 41 42 43 44 45 46 47 48 49 50 51 52 53 54 55 56 57 58 59 60 61 | CREATE OR REPLACE AND COMPILE JAVA SOURCE NAMED "ReadFile" AS // Java library imports. import java.io.File; import java.io.BufferedReader; import java.io.FileNotFoundException; import java.io.IOException; import java.io.FileReader; import java.security.AccessControlException; import java.sql.*; import oracle.sql.driver.*; import oracle.sql.*; // Class definition. public class ReadFile { // Define class variables. private static int i; private static File file; private static FileReader inTextFile; private static BufferedReader inTextReader; private static StringBuffer output = new StringBuffer(); private static String outLine, outText; private static CLOB outCLOB; // Define readText() method. public static oracle.sql.CLOB readText(String fromFile) throws AccessControlException, IOException, SQLException { // Read file. try { // Initialize File. file = new File(fromFile); // Check for valid file. if (file.exists()) { // Assign file to a stream. inTextFile = new FileReader(file); inTextReader = new BufferedReader(inTextFile); // Read character-by-character. while ((outLine = inTextReader.readLine()) != null) { output.append(outLine + "\n"); } // Assing the StringBuffer to a String. outText = output.toString(); // Declare an Oracle connection. Connection conn = DriverManager.getConnection("jdbc:default:connection:"); // Transfer the String to CLOB. outCLOB = CLOB.createTemporary((oracle.jdbc.OracleConnectionWrapper) conn, true, CLOB.DURATION_SESSION); i = outCLOB.setString(1,outText); // Close File. inTextFile.close(); } else { i = outCLOB.setString(1,"Empty"); }} catch (IOException e) { i = outCLOB.setString(1,""); return outCLOB; } return outCLOB; }} / |
The wrapper changes to return a CLOB and map a java.sql.CLOB as the return type of the Java library. This command works:
1 2 3 4 5 | CREATE OR REPLACE FUNCTION read_clob_file (from_file VARCHAR2) RETURN CLOB IS LANGUAGE JAVA NAME 'ReadFile.readText(java.lang.String) return oracle.sql.CLOB'; / |
You now query the PL/SQL wrapper with this type of effective SQL*Plus command-line command:
COLUMN atext FORMAT A60 HEADING "Text" COLUMN asize FORMAT 99,999 HEADING "Size" SELECT read_clob_file('C:\Data\loader\Hobbit1.txt') AS AText , LENGTH(read_clob_file('C:\Data\loader\Hobbit1.txt')) AS ASize FROM dual; |
As always, I hope this helps somebody.
