Archive for the ‘Oracle’ Category
Oracle 12c Pre-requisites
Installing any Oracle database is tedious, but the installing the prerequisites can be especially tedious. This post tries to simplify the process by creating a single prereq.sh file for all the prerequisite libraries, except for the oracle-rdbms-server-12cR1-preinstall, which you should run after the prerequisite file.
The prerequisite file should contain the following:
yum install -y binutils \ compat-libstdc++-33 \ compat-libstdc++-33.i686 \ gcc \ gcc-c++ \ glibc \ glibc.i686 \ glibc-devel \ glibc-devel.i686 \ ksh \ libgcc \ libgcc.i686 \ libstdc++ \ libstdc++.i686 \ libstdc++-devel \ libstdc++-devel.i686 \ libaio \ libaio.i686 \ libaio-devel \ libaio-devel.i686 \ libXext \ libXext.i686 \ libXtst \ libXtst.i686 \ libX11 \ libX11.i686 \ libXau \ libXau.i686 \ libxcb \ libxcb.i686 \ libXi \ libXi.i686 \ make \ sysstat \ unixODBC \ unixODBC-devel \ zlib-devel \ zlib-devel.i686 |
You can run the prereq.sh script as the root user like you would source an environment file:
. ./prereq.sh |
Dependent upon what you installed when creating the Oracle Linux 7.1 operating system, you should see something like this in the output console:
sh-4.2# . ./prereq.sh Loaded plugins: langpacks Package compat-libstdc++-33-3.2.3-72.el7.x86_64 already installed and latest version Package libXtst-1.2.2-2.1.el7.x86_64 already installed and latest version Package libXau-1.0.8-2.1.el7.x86_64 already installed and latest version Package 1:make-3.82-21.el7.x86_64 already installed and latest version Package sysstat-10.1.5-7.el7.x86_64 already installed and latest version Resolving Dependencies --> Running transaction check ---> Package binutils.x86_64 0:2.23.52.0.1-30.el7_1.2 will be updated ---> Package binutils.x86_64 0:2.23.52.0.1-55.el7 will be an update ---> Package compat-libstdc++-33.i686 0:3.2.3-72.el7 will be installed ---> Package gcc.x86_64 0:4.8.3-9.el7 will be updated --> Processing Dependency: gcc = 4.8.3-9.el7 for package: gcc-gfortran-4.8.3-9.el7.x86_64 --> Processing Dependency: gcc = 4.8.3-9.el7 for package: libquadmath-devel-4.8.3-9.el7.x86_64 ---> Package gcc.x86_64 0:4.8.5-4.el7 will be an update --> Processing Dependency: cpp = 4.8.5-4.el7 for package: gcc-4.8.5-4.el7.x86_64 --> Processing Dependency: libgomp = 4.8.5-4.el7 for package: gcc-4.8.5-4.el7.x86_64 ---> Package gcc-c++.x86_64 0:4.8.3-9.el7 will be updated ---> Package gcc-c++.x86_64 0:4.8.5-4.el7 will be an update ---> Package glibc.x86_64 0:2.17-78.0.1.el7 will be updated --> Processing Dependency: glibc = 2.17-78.0.1.el7 for package: glibc-headers-2.17-78.0.1.el7.x86_64 --> Processing Dependency: glibc = 2.17-78.0.1.el7 for package: glibc-common-2.17-78.0.1.el7.x86_64 ---> Package glibc.i686 0:2.17-106.0.1.el7_2.6 will be installed --> Processing Dependency: libfreebl3.so for package: glibc-2.17-106.0.1.el7_2.6.i686 --> Processing Dependency: libfreebl3.so(NSSRAWHASH_3.12.3) for package: glibc-2.17-106.0.1.el7_2.6.i686 ---> Package glibc.x86_64 0:2.17-106.0.1.el7_2.6 will be an update ---> Package glibc-devel.x86_64 0:2.17-78.0.1.el7 will be updated ---> Package glibc-devel.i686 0:2.17-106.0.1.el7_2.6 will be installed ---> Package glibc-devel.x86_64 0:2.17-106.0.1.el7_2.6 will be an update ---> Package ksh.x86_64 0:20120801-22.el7_1.3 will be installed ---> Package libX11.x86_64 0:1.6.0-2.1.el7 will be updated ---> Package libX11.i686 0:1.6.3-2.el7 will be installed --> Processing Dependency: libX11-common >= 1.6.3-2.el7 for package: libX11-1.6.3-2.el7.i686 ---> Package libX11.x86_64 0:1.6.3-2.el7 will be an update ---> Package libXau.i686 0:1.0.8-2.1.el7 will be installed ---> Package libXext.x86_64 0:1.3.2-2.1.el7 will be updated ---> Package libXext.i686 0:1.3.3-3.el7 will be installed ---> Package libXext.x86_64 0:1.3.3-3.el7 will be an update ---> Package libXi.x86_64 0:1.7.2-2.1.el7 will be updated ---> Package libXi.i686 0:1.7.4-2.el7 will be installed ---> Package libXi.x86_64 0:1.7.4-2.el7 will be an update ---> Package libXtst.i686 0:1.2.2-2.1.el7 will be installed ---> Package libaio.x86_64 0:0.3.109-12.el7 will be updated ---> Package libaio.i686 0:0.3.109-13.el7 will be installed ---> Package libaio.x86_64 0:0.3.109-13.el7 will be an update ---> Package libaio-devel.i686 0:0.3.109-13.el7 will be installed ---> Package libaio-devel.x86_64 0:0.3.109-13.el7 will be installed ---> Package libgcc.x86_64 0:4.8.3-9.el7 will be updated ---> Package libgcc.i686 0:4.8.5-4.el7 will be installed ---> Package libgcc.x86_64 0:4.8.5-4.el7 will be an update ---> Package libstdc++.x86_64 0:4.8.3-9.el7 will be updated ---> Package libstdc++.i686 0:4.8.5-4.el7 will be installed ---> Package libstdc++.x86_64 0:4.8.5-4.el7 will be an update ---> Package libstdc++-devel.x86_64 0:4.8.3-9.el7 will be updated ---> Package libstdc++-devel.i686 0:4.8.5-4.el7 will be installed ---> Package libstdc++-devel.x86_64 0:4.8.5-4.el7 will be an update ---> Package libxcb.x86_64 0:1.9-5.el7 will be updated ---> Package libxcb.i686 0:1.11-4.el7 will be installed ---> Package libxcb.x86_64 0:1.11-4.el7 will be an update ---> Package unixODBC.x86_64 0:2.3.1-11.el7 will be installed ---> Package unixODBC-devel.x86_64 0:2.3.1-11.el7 will be installed ---> Package zlib-devel.i686 0:1.2.7-15.el7 will be installed --> Processing Dependency: zlib = 1.2.7-15.el7 for package: zlib-devel-1.2.7-15.el7.i686 --> Processing Dependency: libz.so.1 for package: zlib-devel-1.2.7-15.el7.i686 ---> Package zlib-devel.x86_64 0:1.2.7-15.el7 will be installed --> Running transaction check ---> Package cpp.x86_64 0:4.8.3-9.el7 will be updated ---> Package cpp.x86_64 0:4.8.5-4.el7 will be an update ---> Package gcc-gfortran.x86_64 0:4.8.3-9.el7 will be updated ---> Package gcc-gfortran.x86_64 0:4.8.5-4.el7 will be an update --> Processing Dependency: libgfortran = 4.8.5-4.el7 for package: gcc-gfortran-4.8.5-4.el7.x86_64 --> Processing Dependency: libquadmath = 4.8.5-4.el7 for package: gcc-gfortran-4.8.5-4.el7.x86_64 ---> Package glibc-common.x86_64 0:2.17-78.0.1.el7 will be updated ---> Package glibc-common.x86_64 0:2.17-106.0.1.el7_2.6 will be an update ---> Package glibc-headers.x86_64 0:2.17-78.0.1.el7 will be updated ---> Package glibc-headers.x86_64 0:2.17-106.0.1.el7_2.6 will be an update ---> Package libX11-common.noarch 0:1.6.0-2.1.el7 will be updated ---> Package libX11-common.noarch 0:1.6.3-2.el7 will be an update ---> Package libgomp.x86_64 0:4.8.3-9.el7 will be updated ---> Package libgomp.x86_64 0:4.8.5-4.el7 will be an update ---> Package libquadmath-devel.x86_64 0:4.8.3-9.el7 will be updated ---> Package libquadmath-devel.x86_64 0:4.8.5-4.el7 will be an update ---> Package nss-softokn-freebl.x86_64 0:3.16.2.3-12.el7_1 will be updated ---> Package nss-softokn-freebl.i686 0:3.16.2.3-14.2.el7_2 will be installed ---> Package nss-softokn-freebl.x86_64 0:3.16.2.3-14.2.el7_2 will be an update ---> Package zlib.x86_64 0:1.2.7-13.el7 will be updated ---> Package zlib.i686 0:1.2.7-15.el7 will be installed ---> Package zlib.x86_64 0:1.2.7-15.el7 will be an update --> Running transaction check ---> Package libgfortran.x86_64 0:4.8.3-9.el7 will be updated ---> Package libgfortran.x86_64 0:4.8.5-4.el7 will be an update ---> Package libquadmath.x86_64 0:4.8.3-9.el7 will be updated ---> Package libquadmath.x86_64 0:4.8.5-4.el7 will be an update --> Finished Dependency Resolution Dependencies Resolved ================================================================================ Package Arch Version Repository Size ================================================================================ Installing: compat-libstdc++-33 i686 3.2.3-72.el7 ol7_latest 196 k glibc i686 2.17-106.0.1.el7_2.6 ol7_latest 4.2 M glibc-devel i686 2.17-106.0.1.el7_2.6 ol7_latest 1.0 M ksh x86_64 20120801-22.el7_1.3 ol7_latest 880 k libX11 i686 1.6.3-2.el7 ol7_latest 609 k libXau i686 1.0.8-2.1.el7 ol7_latest 28 k libXext i686 1.3.3-3.el7 ol7_latest 38 k libXi i686 1.7.4-2.el7 ol7_latest 39 k libXtst i686 1.2.2-2.1.el7 ol7_latest 19 k libaio i686 0.3.109-13.el7 ol7_latest 24 k libaio-devel i686 0.3.109-13.el7 ol7_latest 12 k libaio-devel x86_64 0.3.109-13.el7 ol7_latest 12 k libgcc i686 4.8.5-4.el7 ol7_latest 102 k libstdc++ i686 4.8.5-4.el7 ol7_latest 310 k libstdc++-devel i686 4.8.5-4.el7 ol7_latest 1.5 M libxcb i686 1.11-4.el7 ol7_latest 201 k unixODBC x86_64 2.3.1-11.el7 ol7_latest 412 k unixODBC-devel x86_64 2.3.1-11.el7 ol7_latest 54 k zlib-devel i686 1.2.7-15.el7 ol7_latest 49 k zlib-devel x86_64 1.2.7-15.el7 ol7_latest 49 k Updating: binutils x86_64 2.23.52.0.1-55.el7 ol7_latest 5.0 M gcc x86_64 4.8.5-4.el7 ol7_latest 16 M gcc-c++ x86_64 4.8.5-4.el7 ol7_latest 7.2 M glibc x86_64 2.17-106.0.1.el7_2.6 ol7_latest 3.6 M glibc-devel x86_64 2.17-106.0.1.el7_2.6 ol7_latest 1.0 M libX11 x86_64 1.6.3-2.el7 ol7_latest 605 k libXext x86_64 1.3.3-3.el7 ol7_latest 38 k libXi x86_64 1.7.4-2.el7 ol7_latest 39 k libaio x86_64 0.3.109-13.el7 ol7_latest 24 k libgcc x86_64 4.8.5-4.el7 ol7_latest 94 k libstdc++ x86_64 4.8.5-4.el7 ol7_latest 297 k libstdc++-devel x86_64 4.8.5-4.el7 ol7_latest 1.5 M libxcb x86_64 1.11-4.el7 ol7_latest 189 k Installing for dependencies: nss-softokn-freebl i686 3.16.2.3-14.2.el7_2 ol7_latest 187 k zlib i686 1.2.7-15.el7 ol7_latest 90 k Updating for dependencies: cpp x86_64 4.8.5-4.el7 ol7_latest 5.9 M gcc-gfortran x86_64 4.8.5-4.el7 ol7_latest 6.6 M glibc-common x86_64 2.17-106.0.1.el7_2.6 ol7_latest 11 M glibc-headers x86_64 2.17-106.0.1.el7_2.6 ol7_latest 662 k libX11-common noarch 1.6.3-2.el7 ol7_latest 161 k libgfortran x86_64 4.8.5-4.el7 ol7_latest 292 k libgomp x86_64 4.8.5-4.el7 ol7_latest 130 k libquadmath x86_64 4.8.5-4.el7 ol7_latest 182 k libquadmath-devel x86_64 4.8.5-4.el7 ol7_latest 45 k nss-softokn-freebl x86_64 3.16.2.3-14.2.el7_2 ol7_latest 203 k zlib x86_64 1.2.7-15.el7 ol7_latest 89 k Transaction Summary ================================================================================ Install 20 Packages (+ 2 Dependent packages) Upgrade 13 Packages (+11 Dependent packages) Total download size: 71 M Downloading packages: No Presto metadata available for ol7_latest (1/46): compat-libstdc++-33-3.2.3-72.el7.i686.rpm | 196 kB 00:00 (2/46): binutils-2.23.52.0.1-55.el7.x86_64.rpm | 5.0 MB 00:01 (3/46): cpp-4.8.5-4.el7.x86_64.rpm | 5.9 MB 00:01 (4/46): gcc-c++-4.8.5-4.el7.x86_64.rpm | 7.2 MB 00:02 (5/46): gcc-4.8.5-4.el7.x86_64.rpm | 16 MB 00:03 (6/46): glibc-2.17-106.0.1.el7_2.6.i686.rpm | 4.2 MB 00:01 (7/46): gcc-gfortran-4.8.5-4.el7.x86_64.rpm | 6.6 MB 00:02 (8/46): glibc-2.17-106.0.1.el7_2.6.x86_64.rpm | 3.6 MB 00:01 (9/46): glibc-devel-2.17-106.0.1.el7_2.6.i686.rpm | 1.0 MB 00:00 (10/46): glibc-devel-2.17-106.0.1.el7_2.6.x86_64.rpm | 1.0 MB 00:00 (11/46): glibc-headers-2.17-106.0.1.el7_2.6.x86_64.rpm | 662 kB 00:00 (12/46): ksh-20120801-22.el7_1.3.x86_64.rpm | 880 kB 00:00 (13/46): libX11-1.6.3-2.el7.i686.rpm | 609 kB 00:00 (14/46): libX11-1.6.3-2.el7.x86_64.rpm | 605 kB 00:00 (15/46): libX11-common-1.6.3-2.el7.noarch.rpm | 161 kB 00:00 (16/46): libXau-1.0.8-2.1.el7.i686.rpm | 28 kB 00:00 (17/46): libXext-1.3.3-3.el7.i686.rpm | 38 kB 00:00 (18/46): libXext-1.3.3-3.el7.x86_64.rpm | 38 kB 00:00 (19/46): libXi-1.7.4-2.el7.i686.rpm | 39 kB 00:00 (20/46): libXi-1.7.4-2.el7.x86_64.rpm | 39 kB 00:00 (21/46): libXtst-1.2.2-2.1.el7.i686.rpm | 19 kB 00:00 (22/46): libaio-0.3.109-13.el7.i686.rpm | 24 kB 00:00 (23/46): libaio-0.3.109-13.el7.x86_64.rpm | 24 kB 00:00 (24/46): libaio-devel-0.3.109-13.el7.i686.rpm | 12 kB 00:00 (25/46): glibc-common-2.17-106.0.1.el7_2.6.x86_64.rpm | 11 MB 00:04 (26/46): libaio-devel-0.3.109-13.el7.x86_64.rpm | 12 kB 00:00 (27/46): libgcc-4.8.5-4.el7.i686.rpm | 102 kB 00:00 (28/46): libgfortran-4.8.5-4.el7.x86_64.rpm | 292 kB 00:00 (29/46): libgomp-4.8.5-4.el7.x86_64.rpm | 130 kB 00:00 (30/46): libgcc-4.8.5-4.el7.x86_64.rpm | 94 kB 00:00 (31/46): libquadmath-4.8.5-4.el7.x86_64.rpm | 182 kB 00:00 (32/46): libquadmath-devel-4.8.5-4.el7.x86_64.rpm | 45 kB 00:00 (33/46): libstdc++-4.8.5-4.el7.i686.rpm | 310 kB 00:00 (34/46): libstdc++-4.8.5-4.el7.x86_64.rpm | 297 kB 00:00 (35/46): libstdc++-devel-4.8.5-4.el7.i686.rpm | 1.5 MB 00:00 (36/46): libstdc++-devel-4.8.5-4.el7.x86_64.rpm | 1.5 MB 00:00 (37/46): libxcb-1.11-4.el7.x86_64.rpm | 189 kB 00:00 (38/46): libxcb-1.11-4.el7.i686.rpm | 201 kB 00:00 (39/46): nss-softokn-freebl-3.16.2.3-14.2.el7_2.x86_64.rpm | 203 kB 00:00 (40/46): nss-softokn-freebl-3.16.2.3-14.2.el7_2.i686.rpm | 187 kB 00:00 (41/46): unixODBC-devel-2.3.1-11.el7.x86_64.rpm | 54 kB 00:00 (42/46): unixODBC-2.3.1-11.el7.x86_64.rpm | 412 kB 00:00 (43/46): zlib-1.2.7-15.el7.i686.rpm | 90 kB 00:00 (44/46): zlib-1.2.7-15.el7.x86_64.rpm | 89 kB 00:00 (45/46): zlib-devel-1.2.7-15.el7.x86_64.rpm | 49 kB 00:00 (46/46): zlib-devel-1.2.7-15.el7.i686.rpm | 49 kB 00:00 -------------------------------------------------------------------------------- Total 5.2 MB/s | 71 MB 00:13 Running transaction check Running transaction test Transaction test succeeded Running transaction Updating : libgcc-4.8.5-4.el7.x86_64 1/70 Updating : glibc-common-2.17-106.0.1.el7_2.6.x86_64 2/70 Updating : nss-softokn-freebl-3.16.2.3-14.2.el7_2.x86_64 3/70 Updating : glibc-2.17-106.0.1.el7_2.6.x86_64 4/70 Updating : zlib-1.2.7-15.el7.x86_64 5/70 Updating : libquadmath-4.8.5-4.el7.x86_64 6/70 Updating : libstdc++-4.8.5-4.el7.x86_64 7/70 Updating : glibc-headers-2.17-106.0.1.el7_2.6.x86_64 8/70 Updating : libX11-common-1.6.3-2.el7.noarch 9/70 Installing : nss-softokn-freebl-3.16.2.3-14.2.el7_2.i686 10/70 Installing : glibc-2.17-106.0.1.el7_2.6.i686 11/70 Installing : libgcc-4.8.5-4.el7.i686 12/70 Installing : glibc-devel-2.17-106.0.1.el7_2.6.i686 13/70 Updating : libgfortran-4.8.5-4.el7.x86_64 14/70 Updating : cpp-4.8.5-4.el7.x86_64 15/70 Updating : binutils-2.23.52.0.1-55.el7.x86_64 16/70 Updating : libaio-0.3.109-13.el7.x86_64 17/70 Installing : unixODBC-2.3.1-11.el7.x86_64 18/70 Updating : libgomp-4.8.5-4.el7.x86_64 19/70 Updating : gcc-4.8.5-4.el7.x86_64 20/70 Updating : libquadmath-devel-4.8.5-4.el7.x86_64 21/70 Updating : libxcb-1.11-4.el7.x86_64 22/70 Updating : libX11-1.6.3-2.el7.x86_64 23/70 Updating : libXext-1.3.3-3.el7.x86_64 24/70 Updating : libXi-1.7.4-2.el7.x86_64 25/70 Updating : gcc-gfortran-4.8.5-4.el7.x86_64 26/70 Installing : unixODBC-devel-2.3.1-11.el7.x86_64 27/70 Installing : libaio-devel-0.3.109-13.el7.x86_64 28/70 Updating : glibc-devel-2.17-106.0.1.el7_2.6.x86_64 29/70 Updating : libstdc++-devel-4.8.5-4.el7.x86_64 30/70 Installing : zlib-devel-1.2.7-15.el7.x86_64 31/70 Installing : ksh-20120801-22.el7_1.3.x86_64 32/70 Installing : libstdc++-4.8.5-4.el7.i686 33/70 Installing : libstdc++-devel-4.8.5-4.el7.i686 34/70 Installing : libXau-1.0.8-2.1.el7.i686 35/70 Installing : libxcb-1.11-4.el7.i686 36/70 Installing : libX11-1.6.3-2.el7.i686 37/70 Installing : libXext-1.3.3-3.el7.i686 38/70 Installing : libXi-1.7.4-2.el7.i686 39/70 Installing : libaio-0.3.109-13.el7.i686 40/70 Installing : zlib-1.2.7-15.el7.i686 41/70 Installing : zlib-devel-1.2.7-15.el7.i686 42/70 Installing : libaio-devel-0.3.109-13.el7.i686 43/70 Updating : gcc-c++-4.8.5-4.el7.x86_64 44/70 Installing : libXtst-1.2.2-2.1.el7.i686 45/70 Installing : compat-libstdc++-33-3.2.3-72.el7.i686 46/70 Cleanup : gcc-gfortran-4.8.3-9.el7.x86_64 47/70 Cleanup : gcc-c++-4.8.3-9.el7.x86_64 48/70 Cleanup : libgfortran-4.8.3-9.el7.x86_64 49/70 Cleanup : libXi-1.7.2-2.1.el7.x86_64 50/70 Cleanup : libquadmath-devel-4.8.3-9.el7.x86_64 51/70 Cleanup : libstdc++-devel-4.8.3-9.el7.x86_64 52/70 Cleanup : gcc-4.8.3-9.el7.x86_64 53/70 Cleanup : glibc-devel-2.17-78.0.1.el7.x86_64 54/70 Cleanup : binutils-2.23.52.0.1-30.el7_1.2.x86_64 55/70 Cleanup : cpp-4.8.3-9.el7.x86_64 56/70 Cleanup : libstdc++-4.8.3-9.el7.x86_64 57/70 Cleanup : libXext-1.3.2-2.1.el7.x86_64 58/70 Cleanup : glibc-headers-2.17-78.0.1.el7.x86_64 59/70 Cleanup : libX11-1.6.0-2.1.el7.x86_64 60/70 Cleanup : libxcb-1.9-5.el7.x86_64 61/70 Cleanup : zlib-1.2.7-13.el7.x86_64 62/70 Cleanup : libgomp-4.8.3-9.el7.x86_64 63/70 Cleanup : libquadmath-4.8.3-9.el7.x86_64 64/70 Cleanup : libaio-0.3.109-12.el7.x86_64 65/70 Cleanup : libX11-common-1.6.0-2.1.el7.noarch 66/70 Cleanup : glibc-common-2.17-78.0.1.el7.x86_64 67/70 Cleanup : nss-softokn-freebl-3.16.2.3-12.el7_1.x86_64 68/70 Cleanup : glibc-2.17-78.0.1.el7.x86_64 69/70 Cleanup : libgcc-4.8.3-9.el7.x86_64 70/70 Verifying : libXext-1.3.3-3.el7.x86_64 1/70 Verifying : libgcc-4.8.5-4.el7.i686 2/70 Verifying : gcc-4.8.5-4.el7.x86_64 3/70 Verifying : glibc-devel-2.17-106.0.1.el7_2.6.i686 4/70 Verifying : libXext-1.3.3-3.el7.i686 5/70 Verifying : libstdc++-4.8.5-4.el7.i686 6/70 Verifying : glibc-2.17-106.0.1.el7_2.6.x86_64 7/70 Verifying : libxcb-1.11-4.el7.i686 8/70 Verifying : gcc-c++-4.8.5-4.el7.x86_64 9/70 Verifying : zlib-devel-1.2.7-15.el7.x86_64 10/70 Verifying : libaio-devel-0.3.109-13.el7.i686 11/70 Verifying : libX11-1.6.3-2.el7.x86_64 12/70 Verifying : glibc-common-2.17-106.0.1.el7_2.6.x86_64 13/70 Verifying : unixODBC-devel-2.3.1-11.el7.x86_64 14/70 Verifying : libXau-1.0.8-2.1.el7.i686 15/70 Verifying : libaio-0.3.109-13.el7.i686 16/70 Verifying : zlib-1.2.7-15.el7.x86_64 17/70 Verifying : ksh-20120801-22.el7_1.3.x86_64 18/70 Verifying : libaio-0.3.109-13.el7.x86_64 19/70 Verifying : libXtst-1.2.2-2.1.el7.i686 20/70 Verifying : glibc-2.17-106.0.1.el7_2.6.i686 21/70 Verifying : libstdc++-4.8.5-4.el7.x86_64 22/70 Verifying : libX11-common-1.6.3-2.el7.noarch 23/70 Verifying : zlib-devel-1.2.7-15.el7.i686 24/70 Verifying : unixODBC-2.3.1-11.el7.x86_64 25/70 Verifying : libgfortran-4.8.5-4.el7.x86_64 26/70 Verifying : libstdc++-devel-4.8.5-4.el7.i686 27/70 Verifying : gcc-gfortran-4.8.5-4.el7.x86_64 28/70 Verifying : libaio-devel-0.3.109-13.el7.x86_64 29/70 Verifying : nss-softokn-freebl-3.16.2.3-14.2.el7_2.x86_64 30/70 Verifying : glibc-headers-2.17-106.0.1.el7_2.6.x86_64 31/70 Verifying : zlib-1.2.7-15.el7.i686 32/70 Verifying : libstdc++-devel-4.8.5-4.el7.x86_64 33/70 Verifying : libXi-1.7.4-2.el7.x86_64 34/70 Verifying : cpp-4.8.5-4.el7.x86_64 35/70 Verifying : compat-libstdc++-33-3.2.3-72.el7.i686 36/70 Verifying : libX11-1.6.3-2.el7.i686 37/70 Verifying : libgomp-4.8.5-4.el7.x86_64 38/70 Verifying : libgcc-4.8.5-4.el7.x86_64 39/70 Verifying : binutils-2.23.52.0.1-55.el7.x86_64 40/70 Verifying : libquadmath-devel-4.8.5-4.el7.x86_64 41/70 Verifying : libXi-1.7.4-2.el7.i686 42/70 Verifying : glibc-devel-2.17-106.0.1.el7_2.6.x86_64 43/70 Verifying : nss-softokn-freebl-3.16.2.3-14.2.el7_2.i686 44/70 Verifying : libquadmath-4.8.5-4.el7.x86_64 45/70 Verifying : libxcb-1.11-4.el7.x86_64 46/70 Verifying : glibc-common-2.17-78.0.1.el7.x86_64 47/70 Verifying : libX11-common-1.6.0-2.1.el7.noarch 48/70 Verifying : libxcb-1.9-5.el7.x86_64 49/70 Verifying : libgfortran-4.8.3-9.el7.x86_64 50/70 Verifying : glibc-2.17-78.0.1.el7.x86_64 51/70 Verifying : libaio-0.3.109-12.el7.x86_64 52/70 Verifying : cpp-4.8.3-9.el7.x86_64 53/70 Verifying : libstdc++-devel-4.8.3-9.el7.x86_64 54/70 Verifying : libX11-1.6.0-2.1.el7.x86_64 55/70 Verifying : gcc-gfortran-4.8.3-9.el7.x86_64 56/70 Verifying : libquadmath-devel-4.8.3-9.el7.x86_64 57/70 Verifying : libXi-1.7.2-2.1.el7.x86_64 58/70 Verifying : glibc-devel-2.17-78.0.1.el7.x86_64 59/70 Verifying : gcc-c++-4.8.3-9.el7.x86_64 60/70 Verifying : nss-softokn-freebl-3.16.2.3-12.el7_1.x86_64 61/70 Verifying : libgcc-4.8.3-9.el7.x86_64 62/70 Verifying : binutils-2.23.52.0.1-30.el7_1.2.x86_64 63/70 Verifying : glibc-headers-2.17-78.0.1.el7.x86_64 64/70 Verifying : gcc-4.8.3-9.el7.x86_64 65/70 Verifying : zlib-1.2.7-13.el7.x86_64 66/70 Verifying : libXext-1.3.2-2.1.el7.x86_64 67/70 Verifying : libstdc++-4.8.3-9.el7.x86_64 68/70 Verifying : libgomp-4.8.3-9.el7.x86_64 69/70 Verifying : libquadmath-4.8.3-9.el7.x86_64 70/70 Installed: compat-libstdc++-33.i686 0:3.2.3-72.el7 glibc.i686 0:2.17-106.0.1.el7_2.6 glibc-devel.i686 0:2.17-106.0.1.el7_2.6 ksh.x86_64 0:20120801-22.el7_1.3 libX11.i686 0:1.6.3-2.el7 libXau.i686 0:1.0.8-2.1.el7 libXext.i686 0:1.3.3-3.el7 libXi.i686 0:1.7.4-2.el7 libXtst.i686 0:1.2.2-2.1.el7 libaio.i686 0:0.3.109-13.el7 libaio-devel.i686 0:0.3.109-13.el7 libaio-devel.x86_64 0:0.3.109-13.el7 libgcc.i686 0:4.8.5-4.el7 libstdc++.i686 0:4.8.5-4.el7 libstdc++-devel.i686 0:4.8.5-4.el7 libxcb.i686 0:1.11-4.el7 unixODBC.x86_64 0:2.3.1-11.el7 unixODBC-devel.x86_64 0:2.3.1-11.el7 zlib-devel.i686 0:1.2.7-15.el7 zlib-devel.x86_64 0:1.2.7-15.el7 Dependency Installed: nss-softokn-freebl.i686 0:3.16.2.3-14.2.el7_2 zlib.i686 0:1.2.7-15.el7 Updated: binutils.x86_64 0:2.23.52.0.1-55.el7 gcc.x86_64 0:4.8.5-4.el7 gcc-c++.x86_64 0:4.8.5-4.el7 glibc.x86_64 0:2.17-106.0.1.el7_2.6 glibc-devel.x86_64 0:2.17-106.0.1.el7_2.6 libX11.x86_64 0:1.6.3-2.el7 libXext.x86_64 0:1.3.3-3.el7 libXi.x86_64 0:1.7.4-2.el7 libaio.x86_64 0:0.3.109-13.el7 libgcc.x86_64 0:4.8.5-4.el7 libstdc++.x86_64 0:4.8.5-4.el7 libstdc++-devel.x86_64 0:4.8.5-4.el7 libxcb.x86_64 0:1.11-4.el7 Dependency Updated: cpp.x86_64 0:4.8.5-4.el7 gcc-gfortran.x86_64 0:4.8.5-4.el7 glibc-common.x86_64 0:2.17-106.0.1.el7_2.6 glibc-headers.x86_64 0:2.17-106.0.1.el7_2.6 libX11-common.noarch 0:1.6.3-2.el7 libgfortran.x86_64 0:4.8.5-4.el7 libgomp.x86_64 0:4.8.5-4.el7 libquadmath.x86_64 0:4.8.5-4.el7 libquadmath-devel.x86_64 0:4.8.5-4.el7 nss-softokn-freebl.x86_64 0:3.16.2.3-14.2.el7_2 zlib.x86_64 0:1.2.7-15.el7 Complete! |
After you have installed the prerequisites, you install the oracle-dbms-server-12cR1-preinstall library as the root user. You run the command as the root user like this:
yum install -y oracle-dbms-server-12cR1-preinstall |
You should see the following when it’s successful:
Loaded plugins: langpacks adobe-linux-x86_64 | 951 B 00:00 ol7_UEKR3 | 1.2 kB 00:00 ol7_latest | 1.4 kB 00:00 (1/2): ol7_latest/x86_64/updateinfo | 829 kB 00:00 (2/2): ol7_latest/x86_64/primary | 16 MB 00:02 ol7_latest 14500/14500 Resolving Dependencies --> Running transaction check ---> Package oracle-rdbms-server-12cR1-preinstall.x86_64 0:1.0-4.el7 will be installed --> Finished Dependency Resolution Dependencies Resolved ================================================================================ Package Arch Version Repository Size ================================================================================ Installing: oracle-rdbms-server-12cR1-preinstall x86_64 1.0-4.el7 ol7_latest 18 k Transaction Summary ================================================================================ Install 1 Package Total download size: 18 k Installed size: 43 k Downloading packages: oracle-rdbms-server-12cR1-preinstall-1.0-4.el7.x86_64.rpm | 18 kB 00:00 Running transaction check Running transaction test Transaction test succeeded Running transaction Installing : oracle-rdbms-server-12cR1-preinstall-1.0-4.el7.x86_64 1/1 Verifying : oracle-rdbms-server-12cR1-preinstall-1.0-4.el7.x86_64 1/1 Installed: oracle-rdbms-server-12cR1-preinstall.x86_64 0:1.0-4.el7 Complete! |
After running the oracle-dbms-server-12cR1-preinstall library, you can navigate through the Applications, Sundry, and Users and Groups to see the following dialog:

It’s hard to tell from the GUI the oracle user’s group. You can find oracle primary user’s group by checking the /etc/passwd file. You will find that oinstall is the primary user’s group.
As always, I hope this helps those trying to install an Oracle Database 12c instance. Please post a comment if you have a better way to load the pre-requisite packages.
Linux User-Group Console
This post shows you how to add the menu option and GUI to set users and groups. It’s quite a bit easier than mastering all the command-line syntax. It makes setting up the required user and group accounts for an Oracle Enterprise or MySQL database solution much easier.
You add the utility by calling the yum (Yellowdog Updater, Modified) utility like this:
yum installed -y system-config_users |
You should see the following:
Loaded plugins: langpacks adobe-linux-x86_64 | 951 B 00:00 ol7_UEKR3 | 1.2 kB 00:00 ol7_latest | 1.4 kB 00:00 Resolving Dependencies --> Running transaction check ---> Package system-config-users.noarch 0:1.3.5-2.el7 will be installed --> Processing Dependency: system-config-users-docs for package: system-config-users-1.3.5-2.el7.noarch --> Running transaction check ---> Package system-config-users-docs.noarch 0:1.0.9-6.el7 will be installed --> Processing Dependency: rarian-compat for package: system-config-users-docs-1.0.9-6.el7.noarch --> Running transaction check ---> Package rarian-compat.x86_64 0:0.8.1-11.el7 will be installed --> Processing Dependency: rarian = 0.8.1-11.el7 for package: rarian-compat-0.8.1-11.el7.x86_64 --> Processing Dependency: rarian for package: rarian-compat-0.8.1-11.el7.x86_64 --> Processing Dependency: librarian.so.0()(64bit) for package: rarian-compat-0.8.1-11.el7.x86_64 --> Running transaction check ---> Package rarian.x86_64 0:0.8.1-11.el7 will be installed --> Finished Dependency Resolution Dependencies Resolved ================================================================================ Package Arch Version Repository Size ================================================================================ Installing: system-config-users noarch 1.3.5-2.el7 ol7_latest 337 k Installing for dependencies: rarian x86_64 0.8.1-11.el7 ol7_latest 97 k rarian-compat x86_64 0.8.1-11.el7 ol7_latest 65 k system-config-users-docs noarch 1.0.9-6.el7 ol7_latest 307 k Transaction Summary ================================================================================ Install 1 Package (+3 Dependent packages) Total download size: 805 k Installed size: 3.9 M Downloading packages: (1/4): rarian-0.8.1-11.el7.x86_64.rpm | 97 kB 00:00 (2/4): rarian-compat-0.8.1-11.el7.x86_64.rpm | 65 kB 00:00 (3/4): system-config-users-1.3.5-2.el7.noarch.rpm | 337 kB 00:00 (4/4): system-config-users-docs-1.0.9-6.el7.noarch.rpm | 307 kB 00:00 -------------------------------------------------------------------------------- Total 830 kB/s | 805 kB 00:00 Running transaction check Running transaction test Transaction test succeeded Running transaction Installing : rarian-0.8.1-11.el7.x86_64 1/4 Installing : rarian-compat-0.8.1-11.el7.x86_64 2/4 Installing : system-config-users-1.3.5-2.el7.noarch 3/4 Installing : system-config-users-docs-1.0.9-6.el7.noarch 4/4 Verifying : rarian-compat-0.8.1-11.el7.x86_64 1/4 Verifying : system-config-users-1.3.5-2.el7.noarch 2/4 Verifying : rarian-0.8.1-11.el7.x86_64 3/4 Verifying : system-config-users-docs-1.0.9-6.el7.noarch 4/4 Installed: system-config-users.noarch 0:1.3.5-2.el7 Dependency Installed: rarian.x86_64 0:0.8.1-11.el7 rarian-compat.x86_64 0:0.8.1-11.el7 system-config-users-docs.noarch 0:1.0.9-6.el7 Complete! |
After successfully installing the radian, rarian-compat, system-config-users, and system-config-users-docs packages, you will find that there’s now a Users and Groups option when you navigate by clicking on Applications and then clicking on Sundry from the menu.
Menu Instructions

- You navigate to the Applications menu, and choose Sundry from the menu list and Users and Groups from the menu item to continue.

- You will be prompted for the sudoer’s password in this dialog.

- At this point, you can use the GUI interface to set users and groups.
As always, I hope this helps those trying to set users and passwords without mastering the command-line syntax.
Debug PL/SQL Web Pages
What happens when you can’t get a PL/SQL Web Toolkit to work because it only prints to a web page? That’s more tedious because any dbms_output.put_line command you embed only prints to a SQL*Plus session. The answer is quite simple, you create a test case and test it inside a SQL*Plus environment.
Here’s a sample web page that fails to run successfully …
1 2 3 4 5 6 7 8 9 10 11 12 13 14 15 16 17 18 19 20 21 22 23 24 | CREATE OR REPLACE PROCEDURE html_table_values ( name_array OWA_UTIL.VC_ARR , value_array OWA_UTIL.VC_ARR ) IS BEGIN /* Print debug to SQL*Plus session. */ FOR i IN 1..name_array.COUNT LOOP DBMS_OUTPUT.put_line('Value ['||name_array(i)||'='||value_array(i)||']'); END LOOP; /* Open HTML page with the PL/SQL toolkit. */ htp.print('<!DOCTYPE html>'); htp.htmlopen; htp.headopen; htp.htitle('Test'); htp.headclose; htp.bodyopen; htp.line; htp.print('Test'); htp.line; htp.bodyclose; htp.htmlclose; END; / |
You can test the program with the following anonymous block as the SYSTEM user, which is equivalent to the following URL:
http://localhost:8080/db/html_table_values?begin=1004&end=1012 |
The following test program lets you work:
1 2 3 4 5 6 7 8 9 10 11 12 13 14 15 16 | DECLARE x OWA_UTIL.VC_ARR; y OWA_UTIL.VC_ARR; BEGIN /* Insert first row element. */ x(1) := 'begin'; y(1) := '1004'; /* Insert second row element. */ x(2) := 'end'; y(2) := '1012'; /* Call the anonymous schema's web page. */ anonymous.html_table_values(x,y); END; / |
It should print:
Value [begin=1004] Value [end=1012] |
I hope this helps those looking for a solution.
SQL Developer & PL/SQL
While SQL Developer installs with a dbms_output view, some organizations close it before they distribute images or virtual machine (VM) instances. This post shows you how to re-enable the Dbms Output view for SQL Developer.
SQL Developer DBMS_OUTPUT Configuration
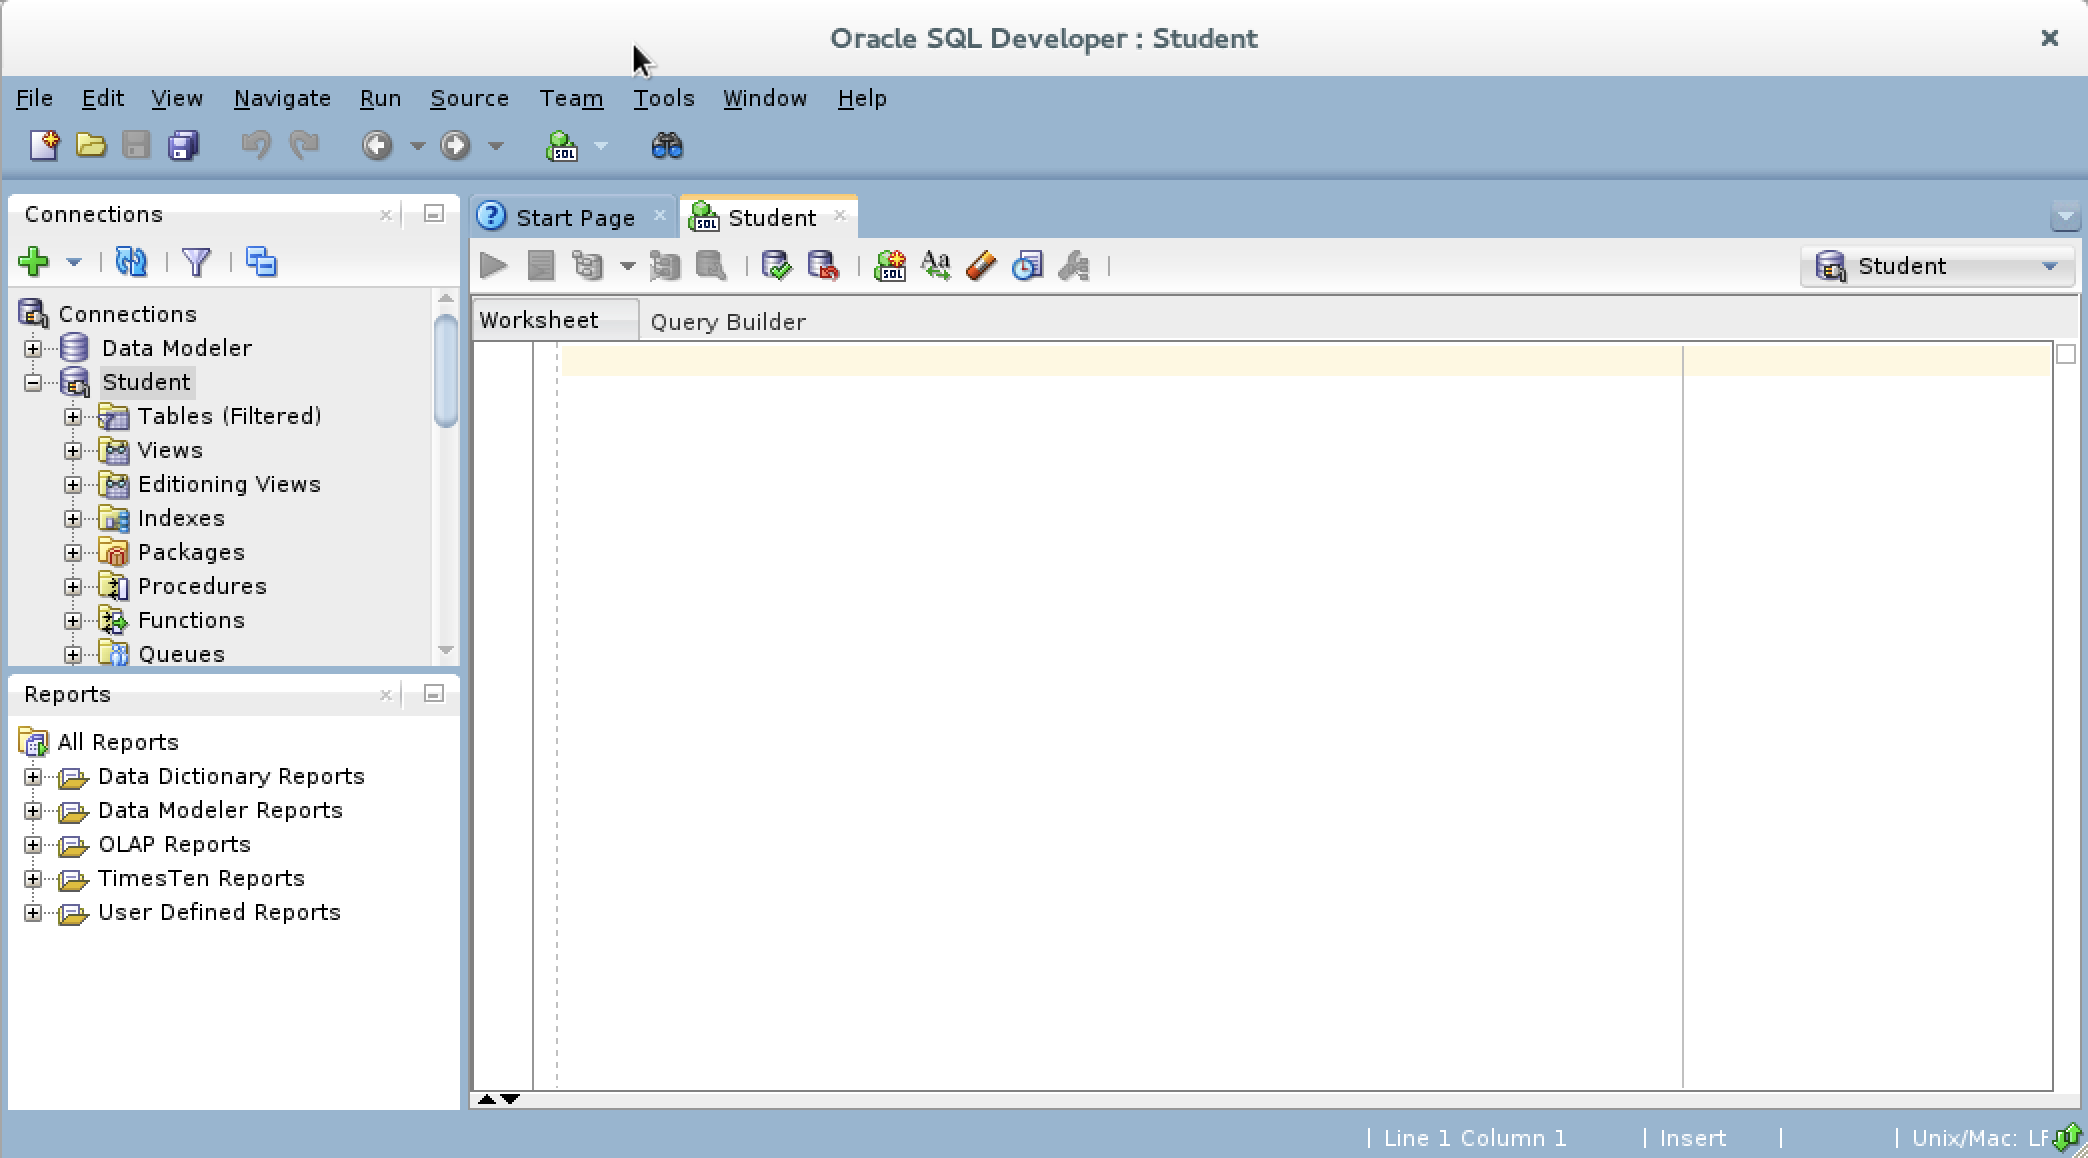
- You need to open SQL Developer, which may look like this when the
DBMS_OUTPUTview isn’t visible.
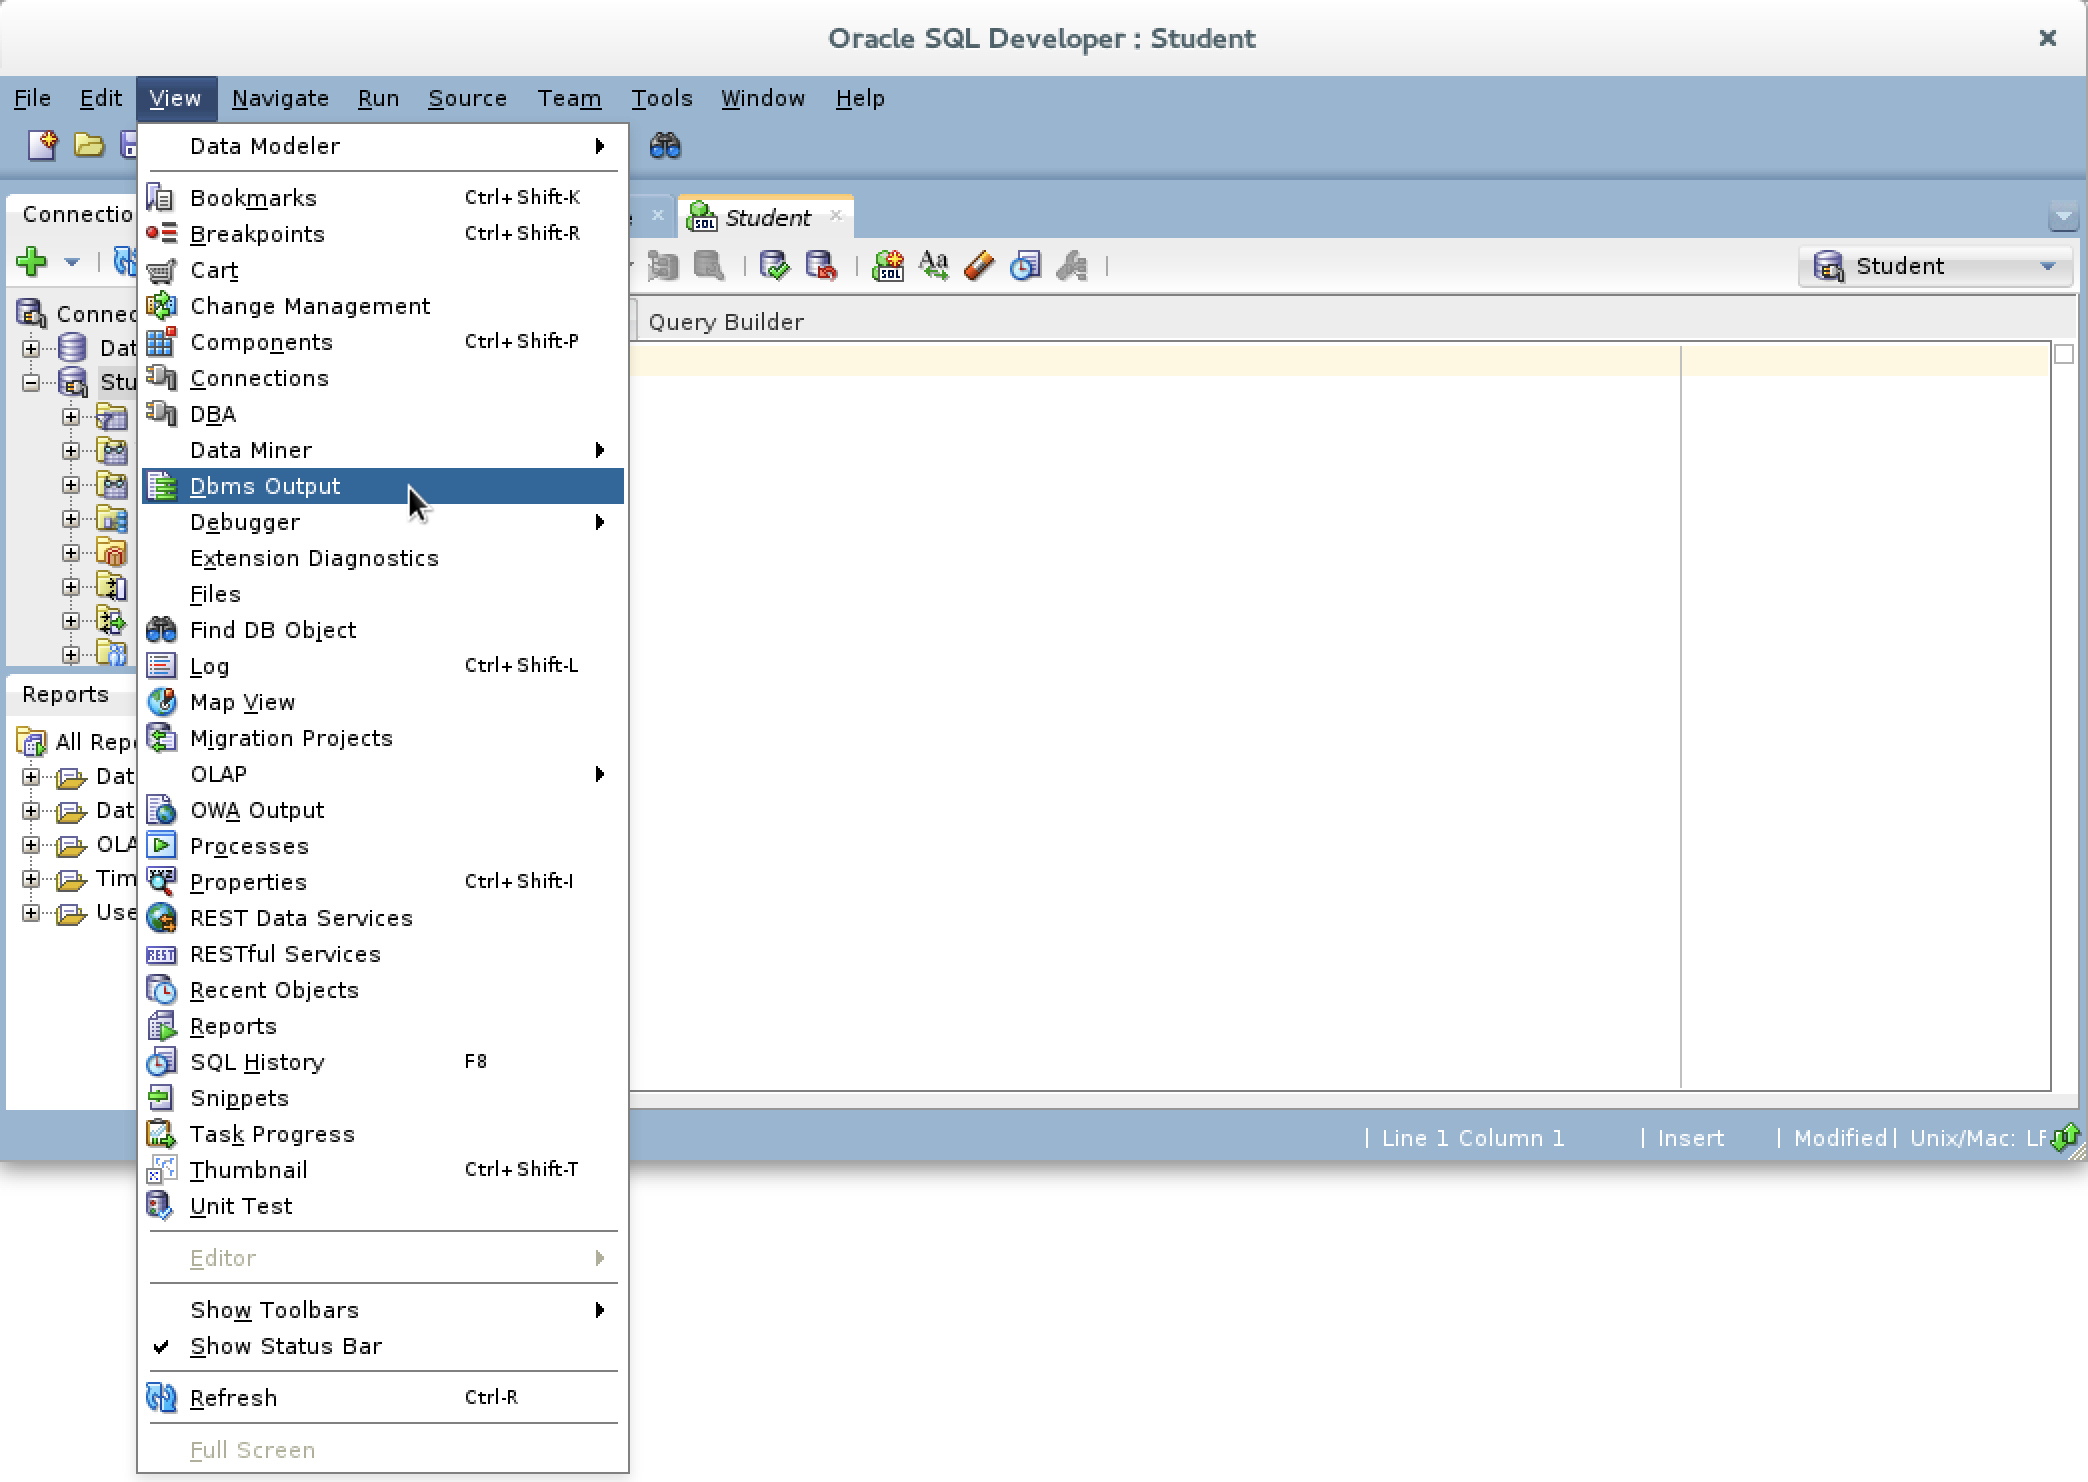
- You need to click on the View menu option in SQL Developer and choose the Dbms Output dropdown menu element.
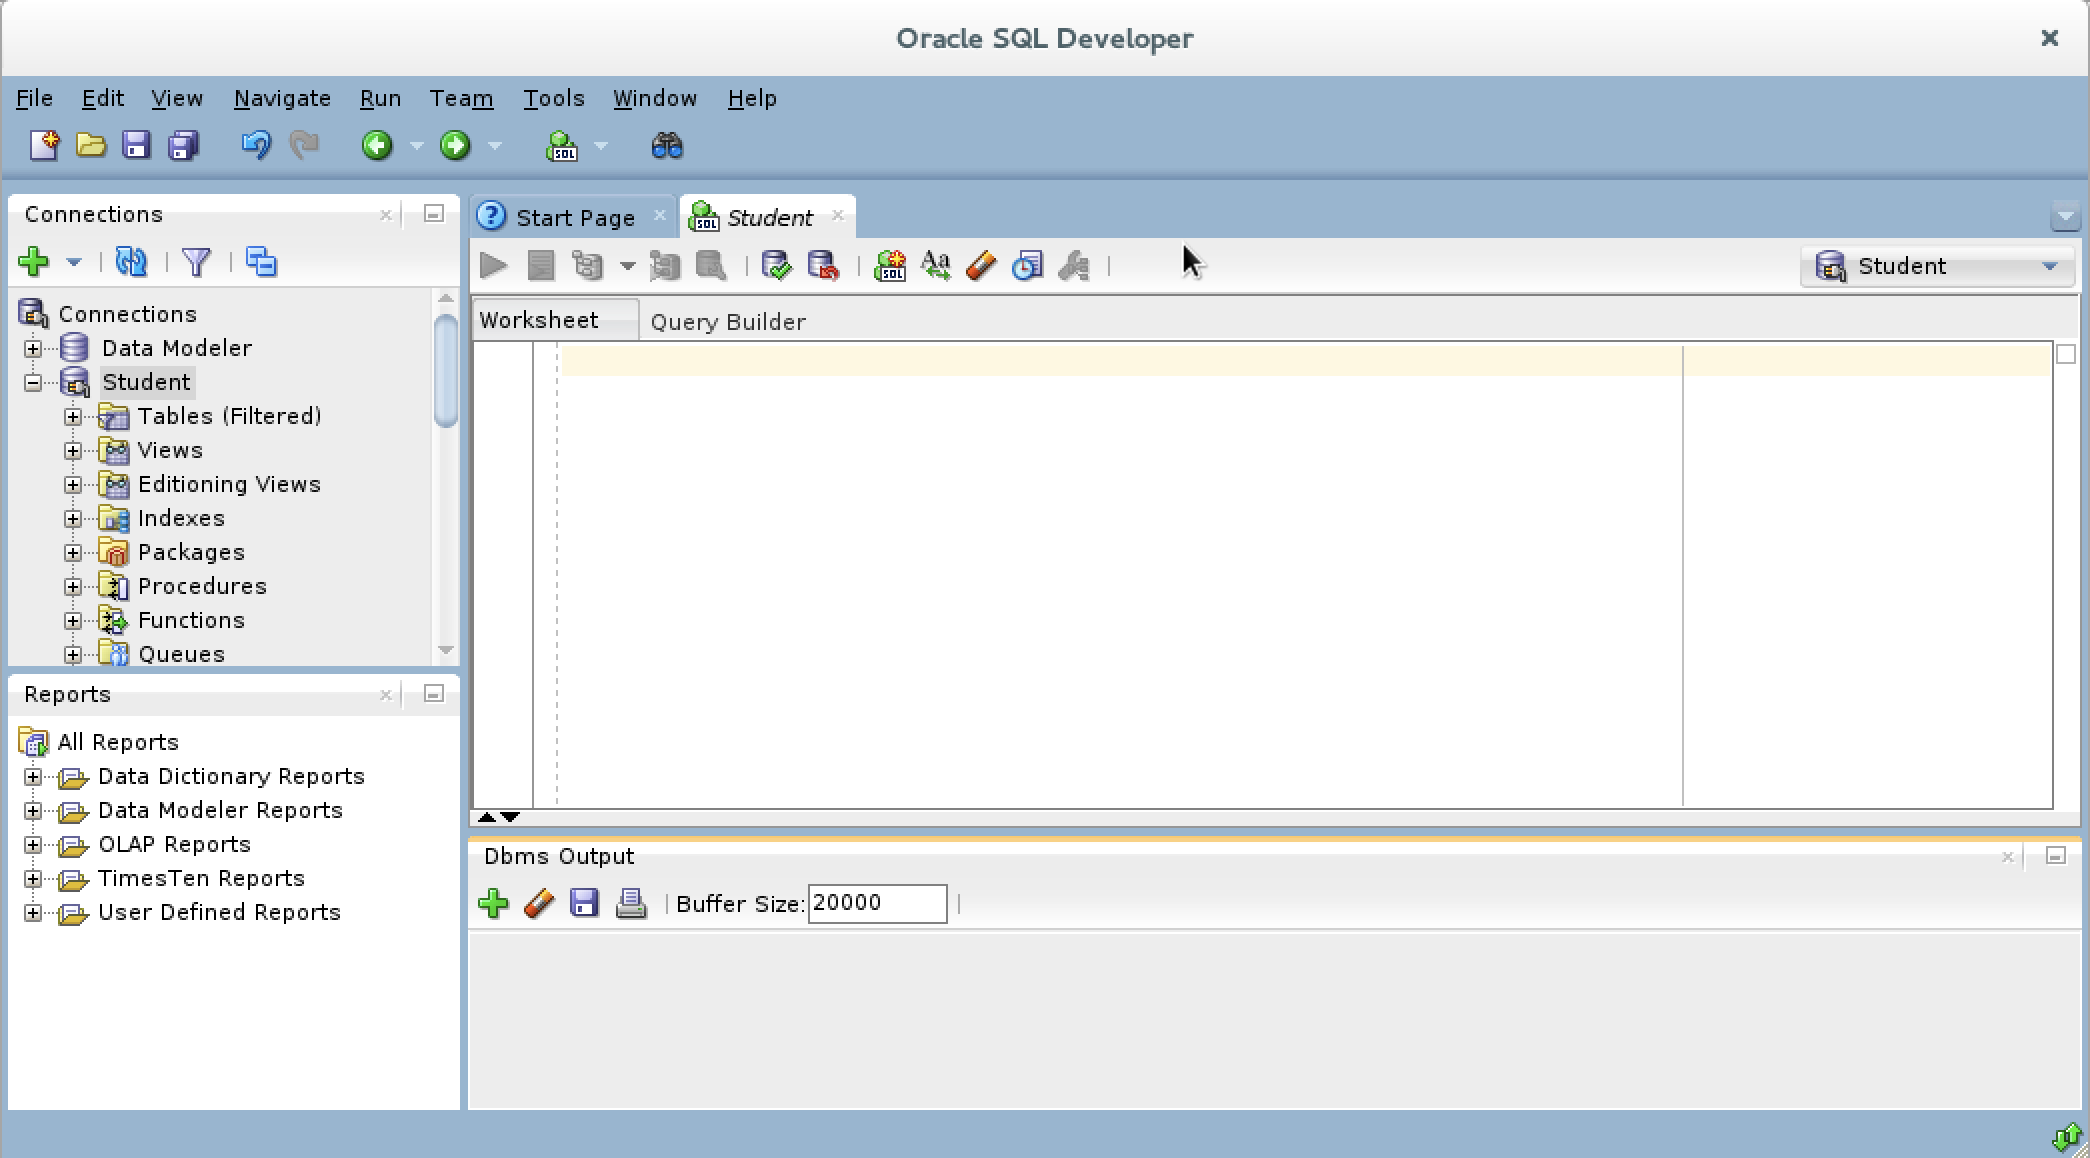
- You should see a grayed-out Dbms Output view.
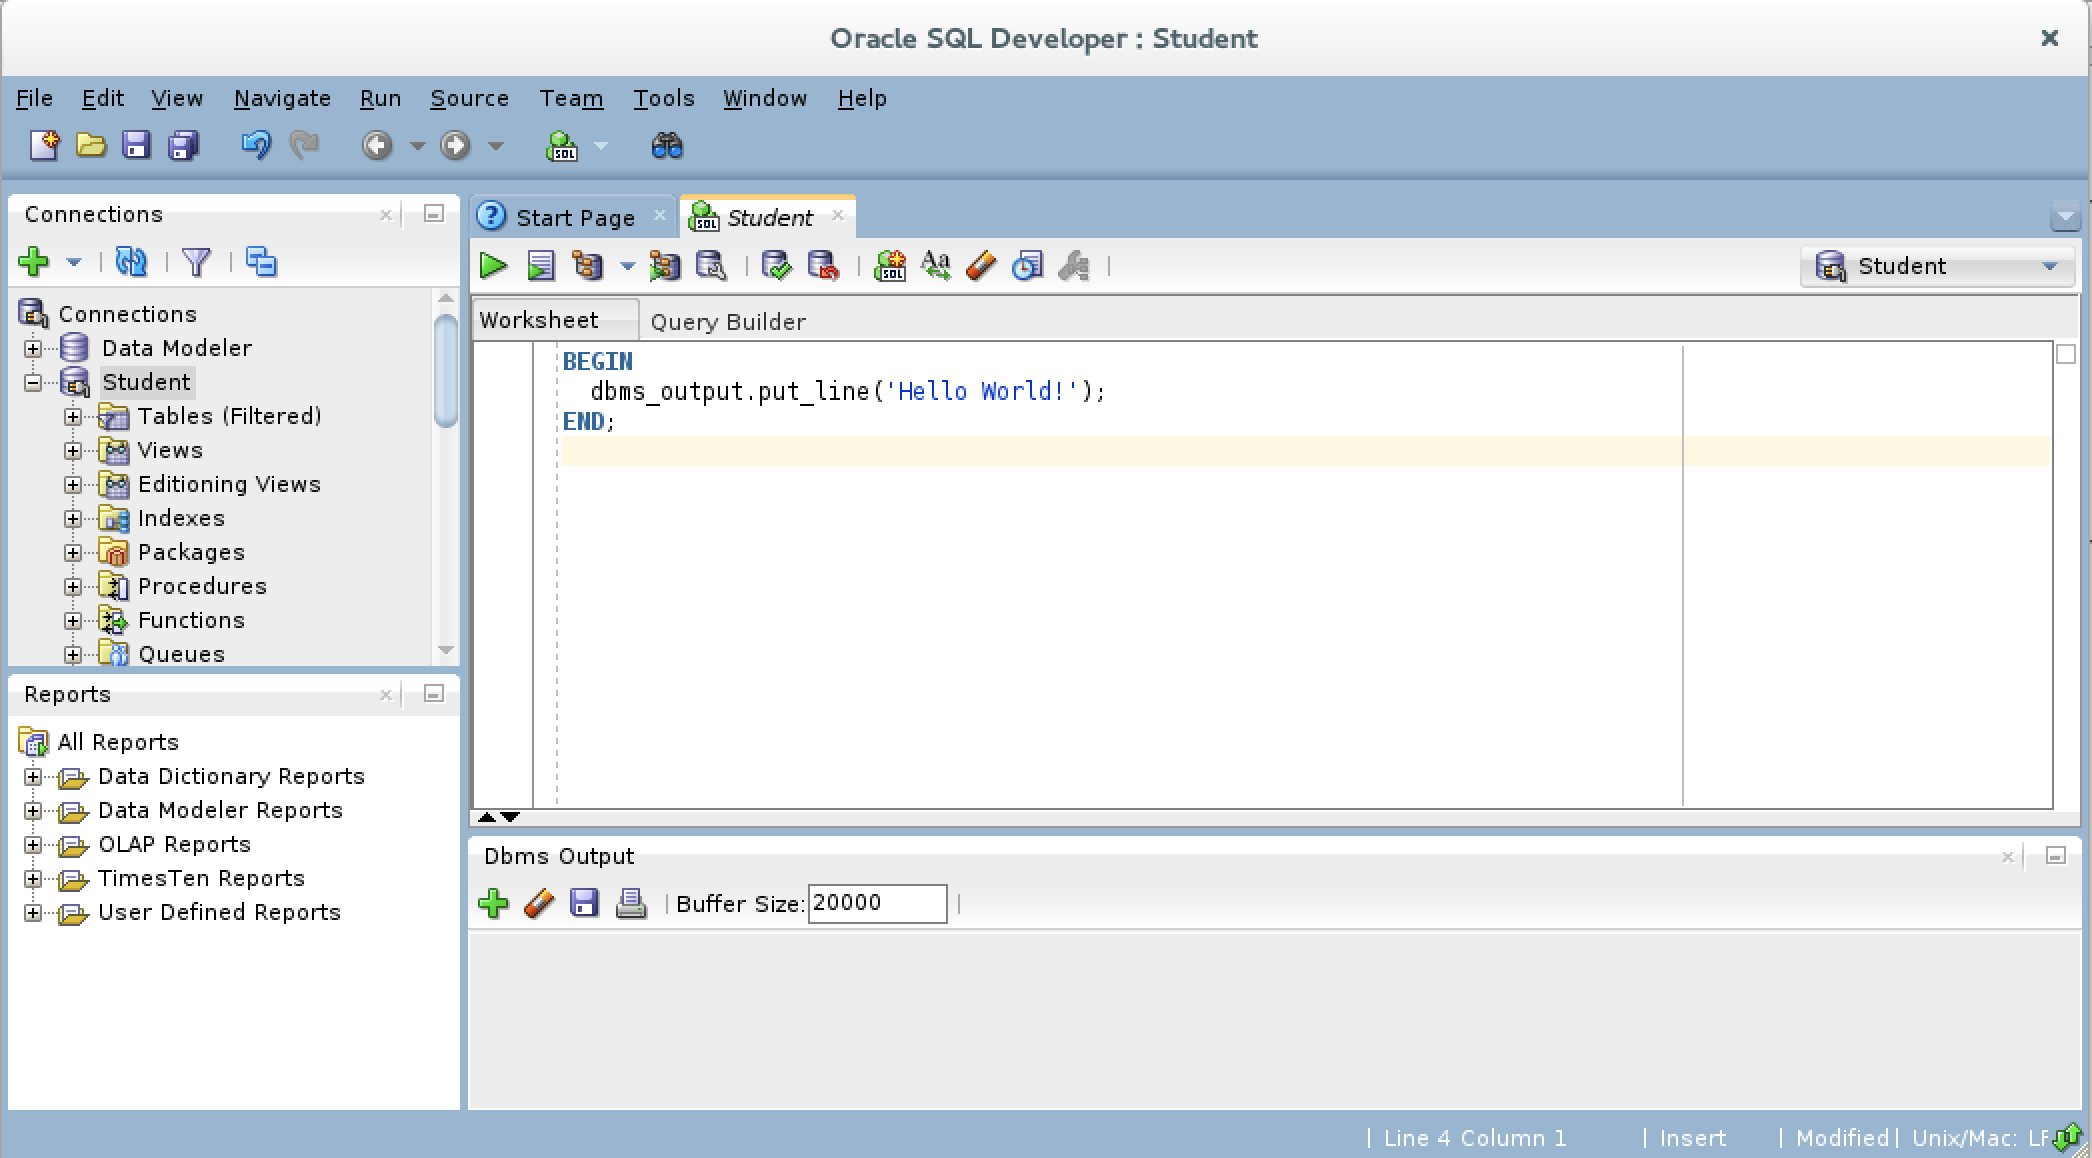
- You should type a simply “Hello World!” anonymous block program in PL/SQL, like the one shown in the drawing.
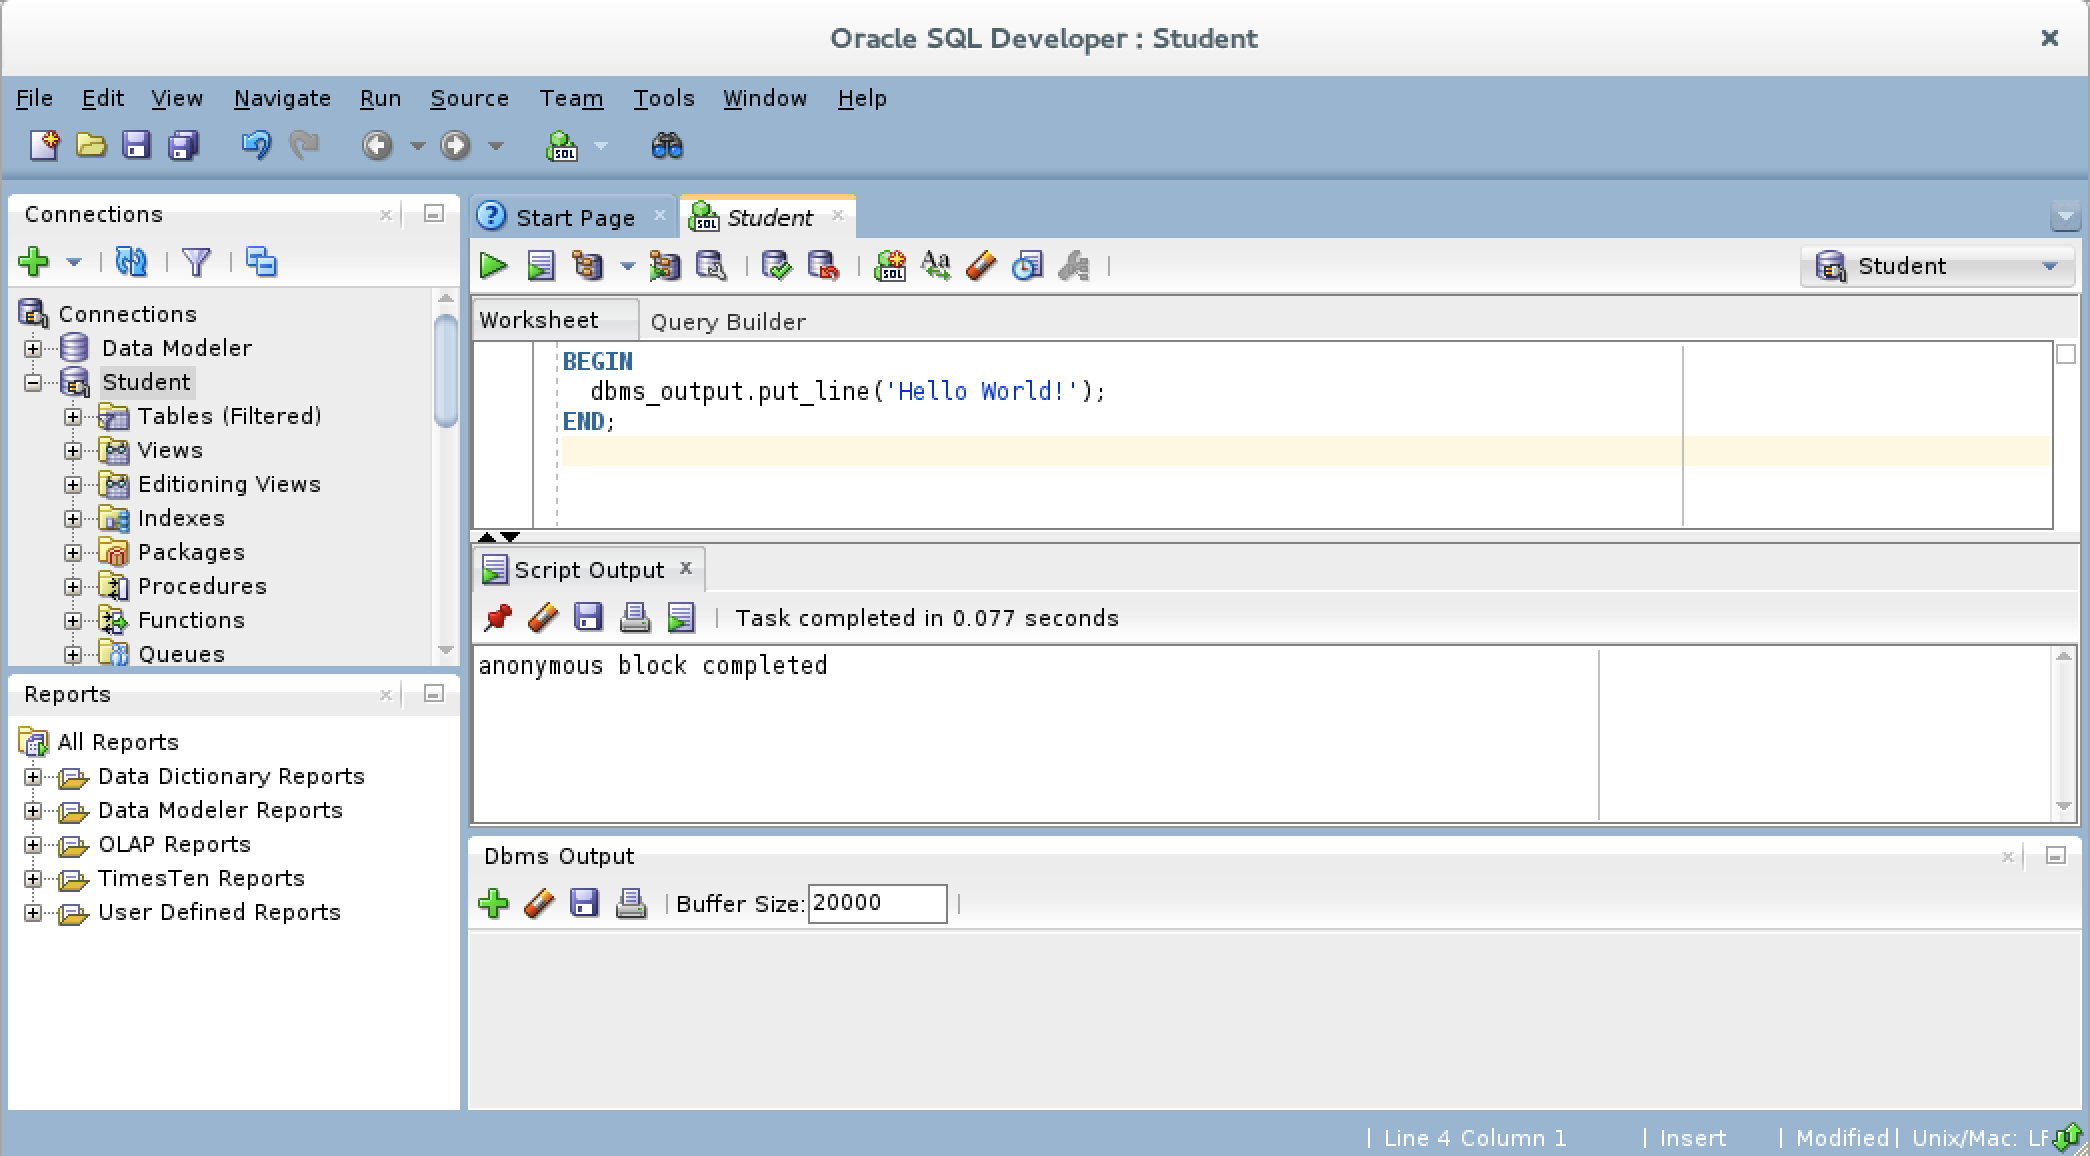
- After writing the “Hello World!” anonymous block program in PL/SQL, click the green arrow to start the statement and you will see two things. There is now a Script Output view between your console and Dbms Output views, and it should say “anonymous block completed.” Unfortunately, none of your output is displayed in the Dbms Output view because you need to enable it.
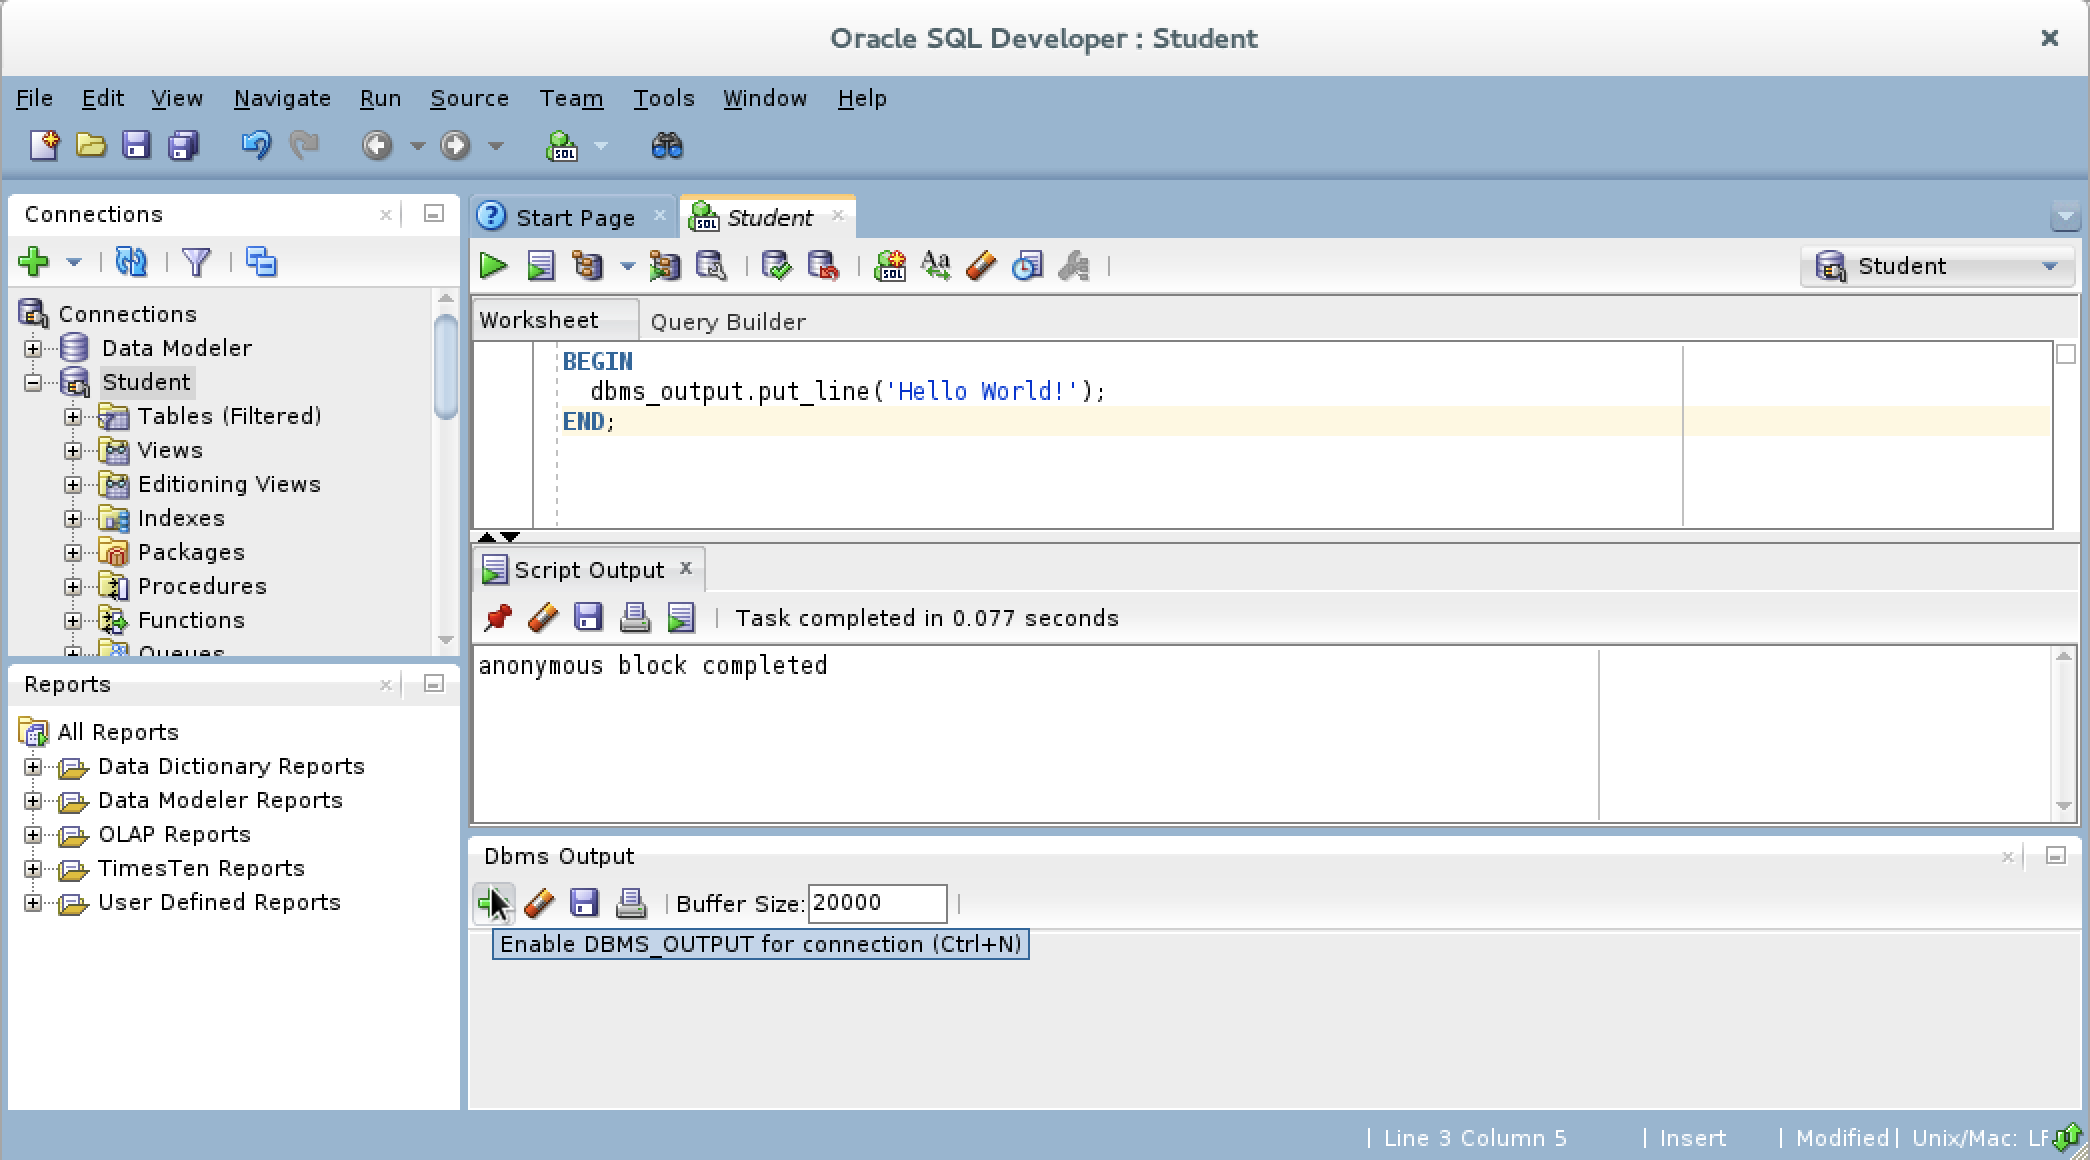
- If you hover over the Dbms Output view’s green arrow, you see the help message that describes the behavior of the green arrow. The Dbms Output green arrow lets you enable the Dbms Output view for output.

- After you click the Dbms Output view’s green arrow, you receive a Select Connection prompt for the view. Make sure you have the right user, and click the OK button to continue.
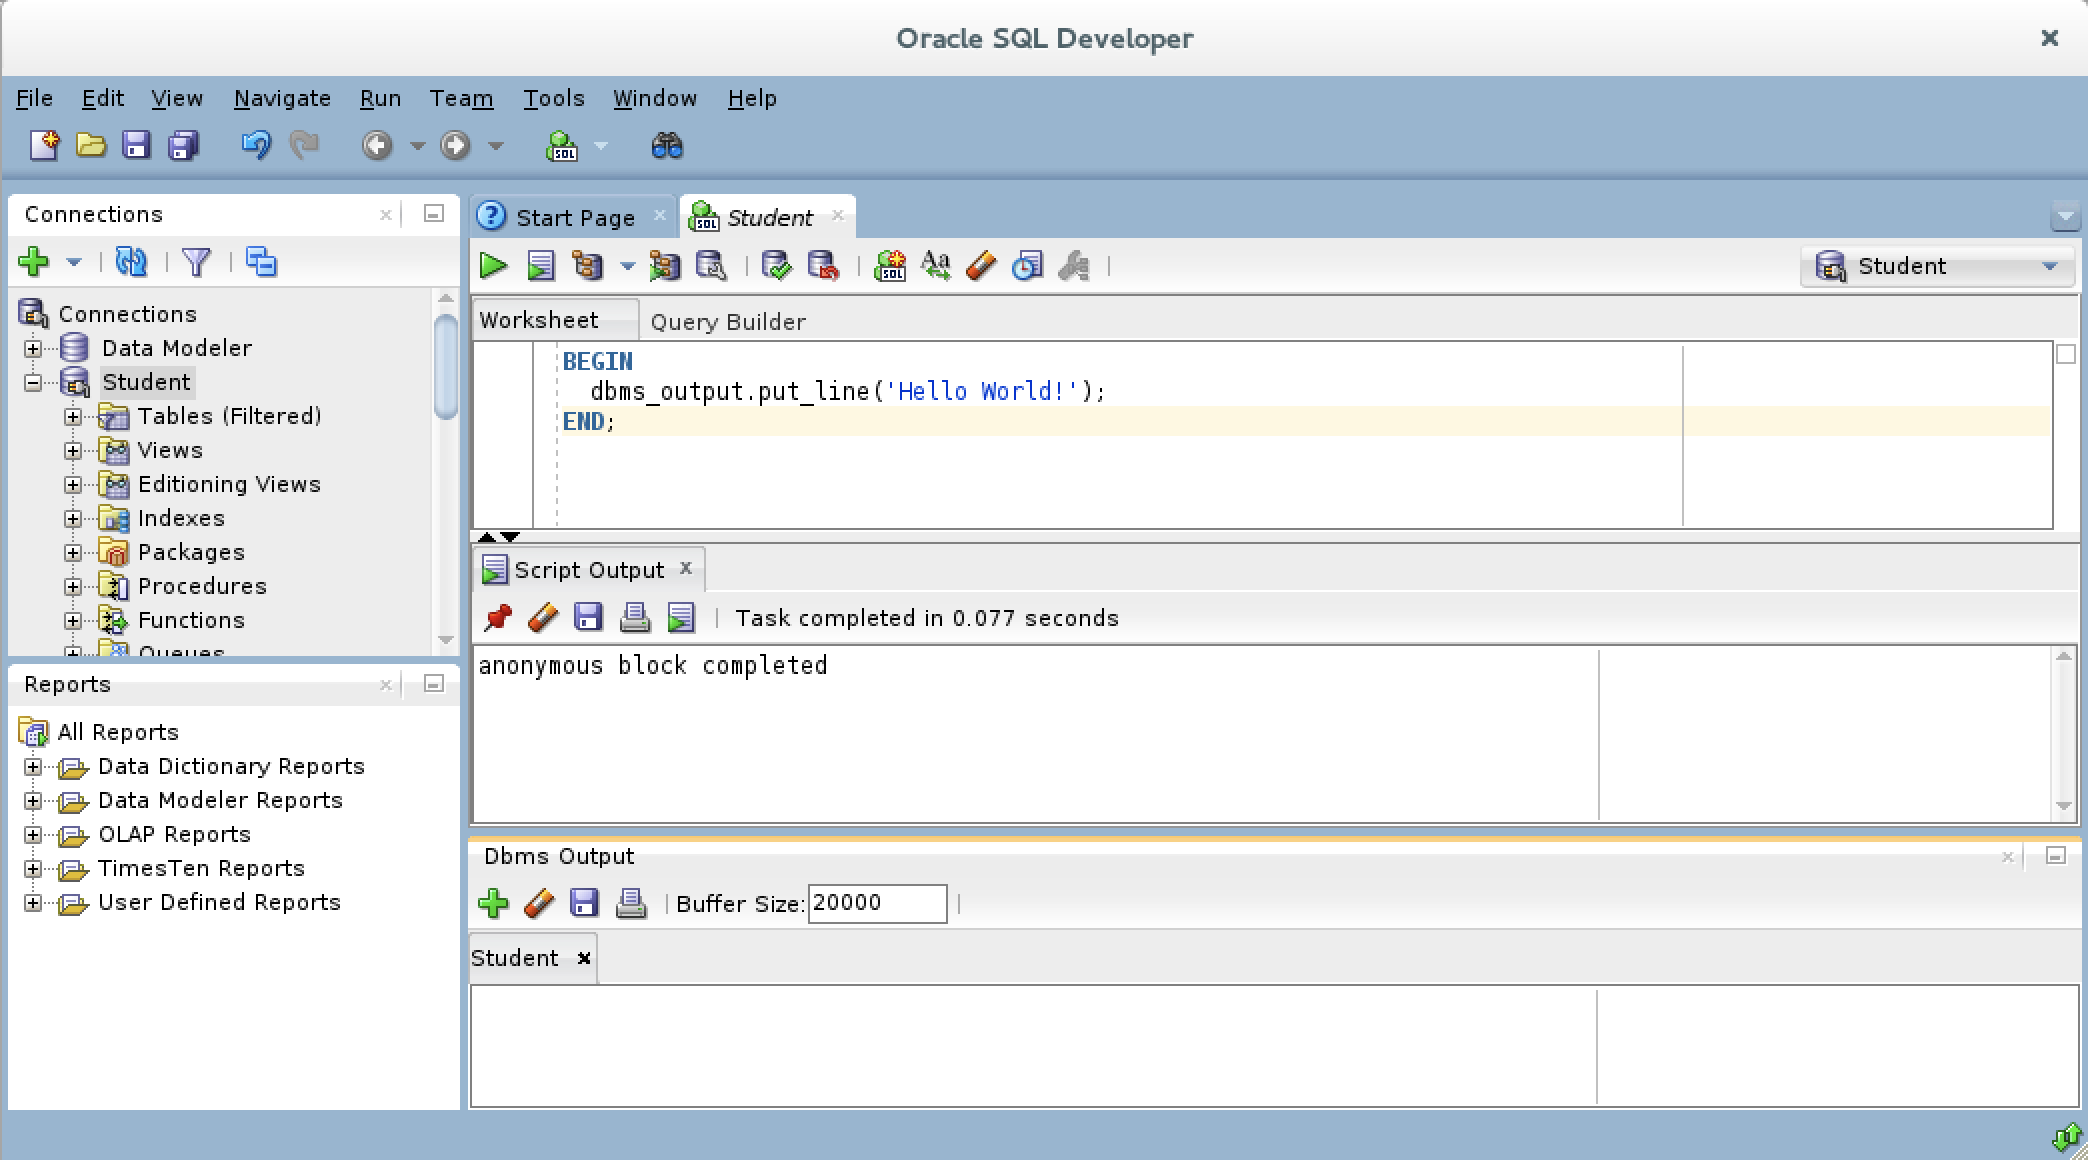
- After you create the connection for the Dbms Output stream, the view area becomes white rather than gray.
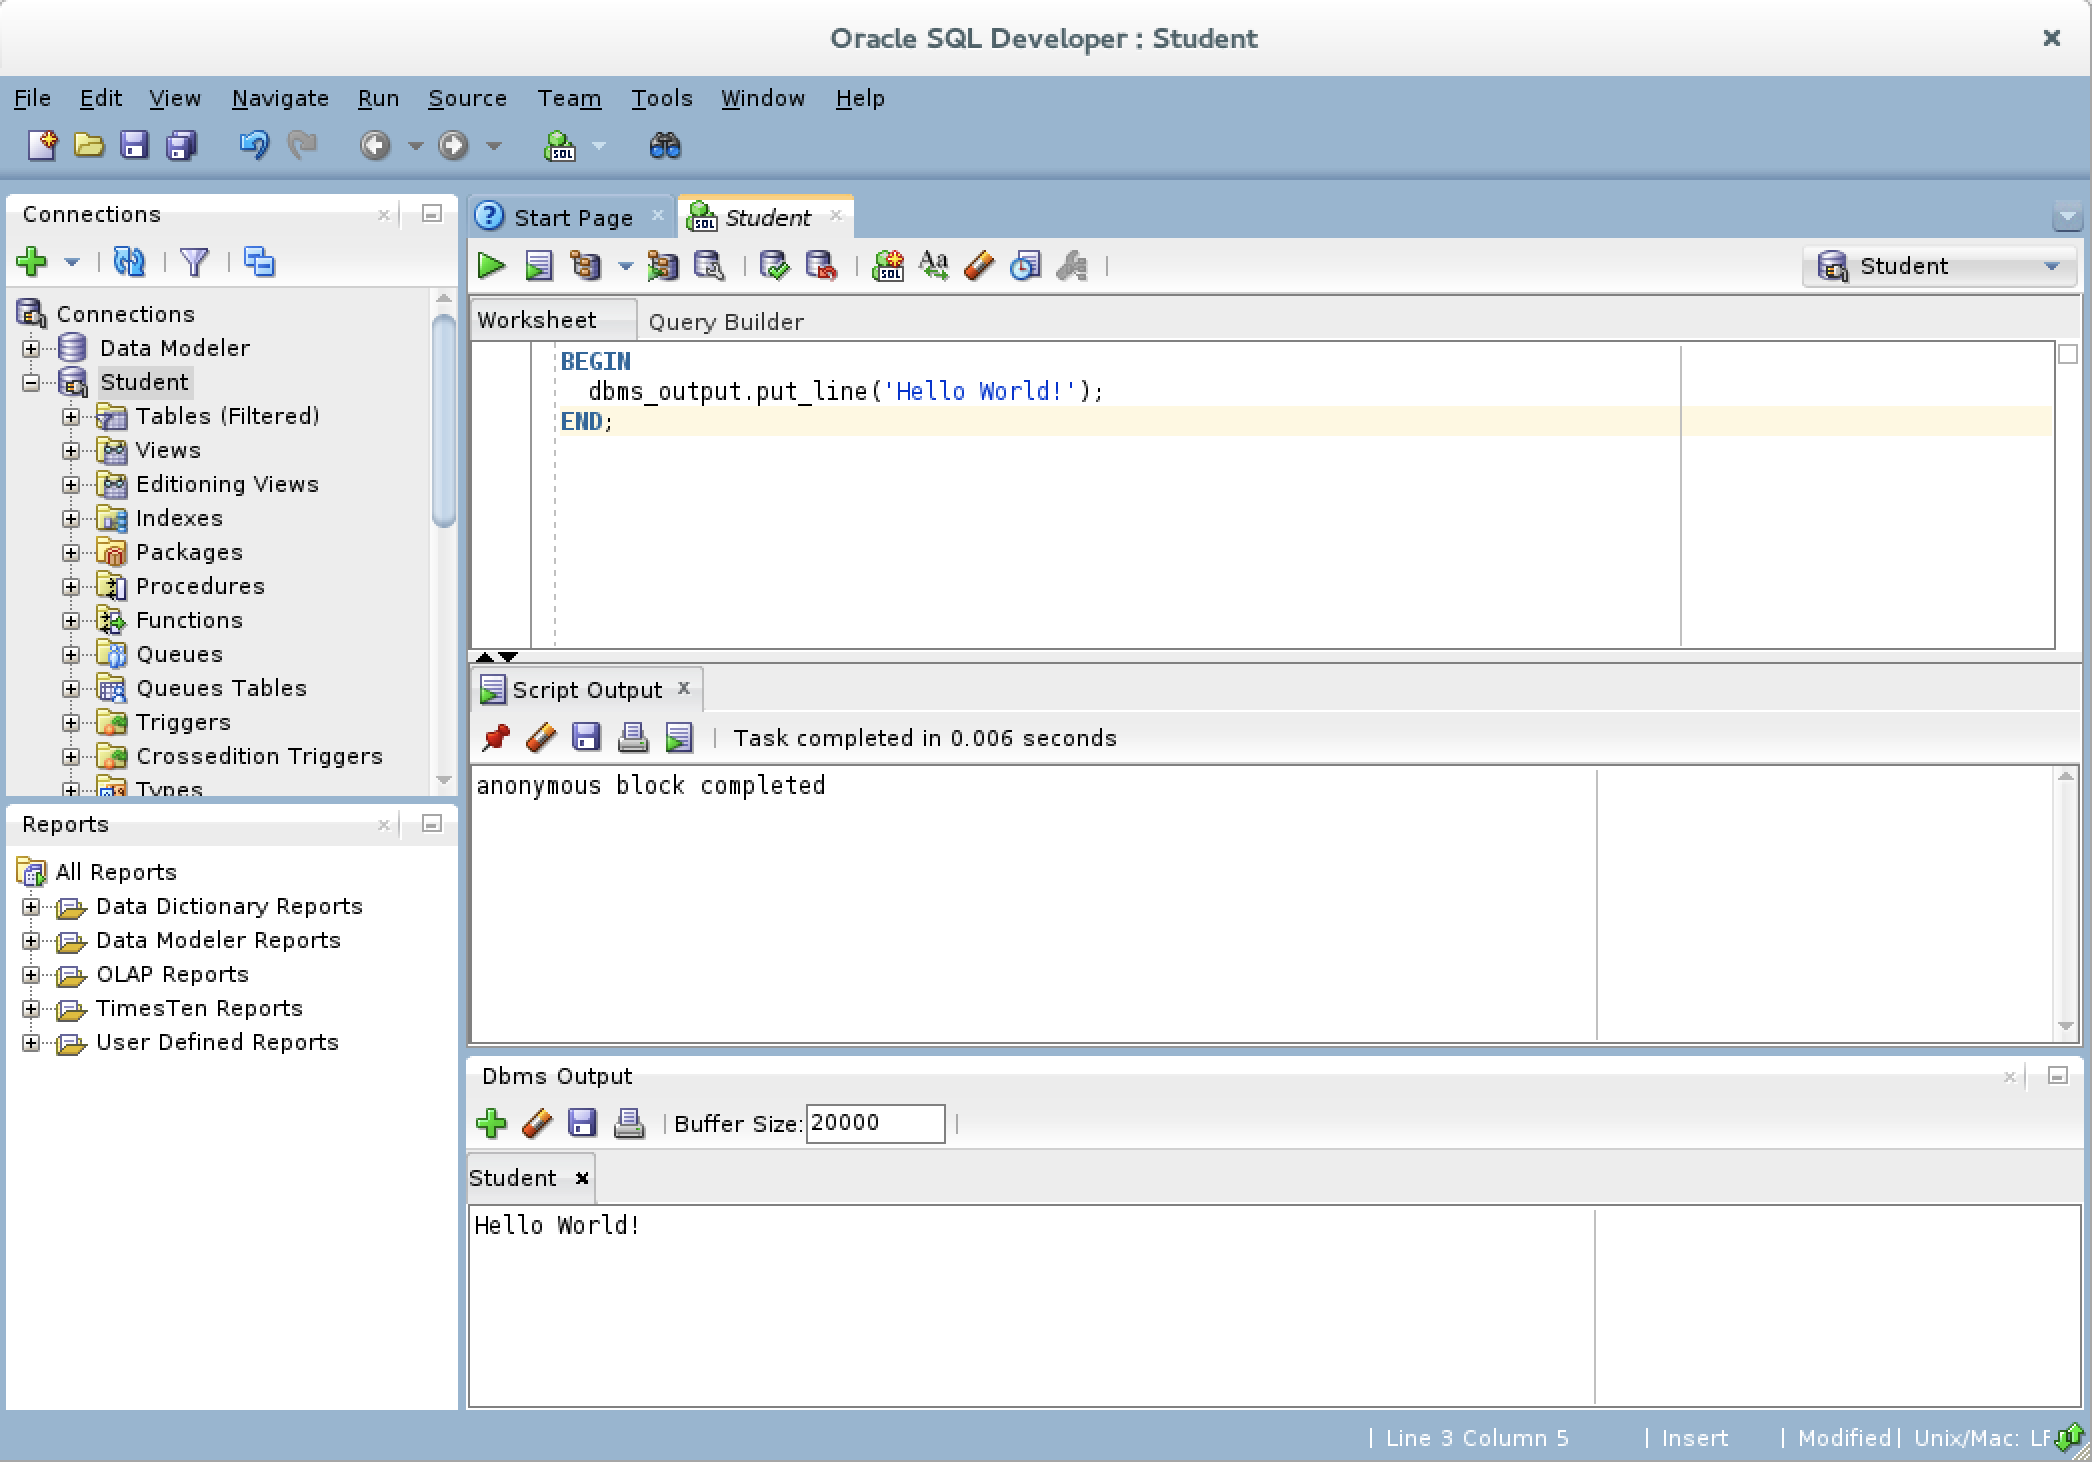
- Click the green arrow to start the statement and you will see the “Hello World!” string in the Dbms Output view.”
As always, I hope this helps those looking for a solution.
REGEXP_LIKE Behavior
Often, the biggest problem with regular expressions is that those who use them sometimes don’t use them correctly. A great example occurs in the Oracle Database with the REGEXP_LIKE function. For example, some developer use the following to validate whether a string is a number but it only validates whether the first character is a number.
1 2 3 4 5 6 7 8 9 10 11 12 13 14 | DECLARE lv_input VARCHAR2(100); BEGIN /* Assign input value. */ lv_input := '&input'; /* Check for numeric string. */ IF REGEXP_LIKE(lv_input,'[[:digit:]]') THEN dbms_output.put_line('It''s a number.'); ELSE dbms_output.put_line('It''s a string.'); END IF; END; / |
When they test numbers it appears to works, it even appears to work when the test string start with number, but it fails with any string that starts with a character. That’s because the REGEXP_LIKE function on line 8 only checks the first character, but the following checks all the characters in the string.
8 | IF REGEXP_LIKE(lv_inputs(i),'[[:digit:]]{'||LENGTH(lv_inputs(i))||'}') THEN |
You can also fix it with the following non-Posix solution:
8 | IF REGEXP_LIKE(lv_input,'[[0-9]]') THEN |
You can add a collection to the program and use it to test single-digit, double-digit, and string with a leading integer. Save the program as test.sql and you can test three conditions with one call.
1 2 3 4 5 6 7 8 9 10 11 12 13 14 15 16 17 18 19 20 | DECLARE /* Declare the local collection type. */ TYPE inputs IS TABLE OF VARCHAR2(100); /* Declare a local variable of the collection type. */ lv_inputs INPUTS; BEGIN /* Assign the inputs to the collection variable. */ lv_inputs := inputs('&1','&2','&3'); /* Read through the collection and print whether it's an number or string. */ FOR i IN 1..lv_inputs.COUNT LOOP IF REGEXP_LIKE(lv_inputs(i),'[[:digit:]]{'||LENGTH(lv_inputs(i))||',}') THEN dbms_output.put_line('It''s a number.'); ELSE dbms_output.put_line('It''s a string.'); END IF; END LOOP; END; / |
You can run the test.sql program like this:
SQL> @test.sql 1 12 1a |
It prints:
It's a number. It's a number. It's a string. |
As always, I hope this helps those looking for a solution.
SQL*Plus Tricks
Have you ever wondered how to leverage substitution variables in anonymous block programs? There are several tricks that you can use beyond passing numeric and string values to local variable. The generic default appears to take a number unless you cast it as a string but that’s not really the whole story. The first two are standard examples of how to use numeric and string substitution values.
The following accept a numeric substitution value:
1 2 3 4 5 6 7 8 9 10 | DECLARE lv_input NUMBER; BEGIN /* Assign substitution value to local variable. */ lv_input := &input; /* Print the local variable. */ dbms_output.put_line('['||lv_input||']'); END; / |
The following accept a string substitution value, casts the input as a string, assigns the string value to a 4,000 character length local variable, checks whether the 4,000 character length is greater than 10, and assigns the first 10 characters to the lv_parse_input variable:
1 2 3 4 5 6 7 8 9 10 11 12 13 14 15 16 | DECLARE lv_unparsed_input VARCHAR2(4000); lv_parsed_input VARCHAR2(10); BEGIN /* Assign substitution value to local variable. */ lv_unparsed_input := '&input'; /* Check size of input value. */ IF LENGTH(lv_unparsed_input) > 10 THEN lv_parsed_input := SUBSTR(lv_unparsed_input,1,10); END IF; /* Print the local variable. */ dbms_output.put_line('Print {lv_parsed_input}: ['||lv_parsed_input||']'); END; / |
Next, let’s examine two tricks. The first passes a case insensitive variable name and the second passes a case sensitive variable name as a parameter to an anonymous block program.
This declares an anonymous block program that uses a substitution value as a variable name:
1 2 3 4 5 6 7 | DECLARE mine VARCHAR2(10) := 'Default'; BEGIN /* Print the local variable's value. */ dbms_output.put_line('Print {mine} variable value: ['||&input||']'); END; / |
When you run the anonymous block, you’re prompted for an input variable. You provide a case insensitive variable name as the input value:
Enter value for input: MINE
old   5:   dbms_output.put_line('['||&input||']');
new   5:   dbms_output.put_line('['||MINE||']');
Print {mine} variable value: [Default] |
The downside of this approach, yields an ORA-06550 and PLS-00201 exception. Neither of these can be caught because Oracle raises the errors during parsing when the variable name isn’t a 100% case insensitive match. The same type of problem occurs in the next example when the input variable isn’t a 100% case sensitive match.
You can rewrite the program to handle case insensitive variables like this:
1 2 3 4 5 6 7 | DECLARE "Mine" VARCHAR2(10) := 'Default'; BEGIN /* Print the local variable's value. */ dbms_output.put_line('Print {mine} variable value: ['||"&input"||']'); END; / |
When you run the anonymous block, you’re prompted for an input variable. You provide a case sensitive variable name as the input value:
Enter value for input: Mine
old   5:   dbms_output.put_line('['||&input||']');
new   5:   dbms_output.put_line('['||"Mine"||']');
Print {Mine} variable value: [Default] |
Hope this helps those looking for a solution.
Using CALIBRATE_IO
Using Oracle’s Resource Manager requires you to understand the IO dynamics. The first step requires you to run the CALIBRATE_IO procedure from the DBMS_RESOURCE_MANAGER package.
Oracle provides some great examples about how to use the CALIBRATE_IO procedure of the DBMS_RESOURCE_MANAGER package in the Oracle Database Database PL/SQL Packages and Types Reference. The CALIBRATE_IO procedure returns the best answer when you provide a valid number of files, which you can capture by querying the V$ASM_DISK view.
The following code queries the view and assigns the value to a session level variable:
CLEAR BREAKS CLEAR COLUMNS CLEAR COMPUTES VARIABLE files NUMBER BEGIN SELECT COUNT(DISTINCT name) disks INTO :files FROM v$asm_disk; END; / |
When you have the number of files, you can calibrate the IO with the following anonymous block. The query should always work but just in case the NVL function on line 9 assigns the default number of files.
1 2 3 4 5 6 7 8 9 10 11 12 13 14 15 16 17 18 19 | DECLARE lv_num_physical_disks BINARY_INTEGER; — v$asm_disk lv_max_latency BINARY_INTEGER := 10; lv_max_iops BINARY_INTEGER; lv_max_mbps BINARY_INTEGER; lv_actual_latency BINARY_INTEGER; BEGIN /* Assign actual files to anonymous block variable. */ lv_num_physical_disks := NVL(:files,2); /* Run the calibrate_io procedure. */ DBMS_RESOURCE_MANAGER.CALIBRATE_IO( num_physical_disks => lv_num_physical_disks , max_latency => lv_max_latency , max_iops => lv_max_iops , max_mbps => lv_max_mbps , actual_latency => lv_actual_latency); END; / |
You can query the results like this:
SELECT max_iops , max_mbps , max_pmbps , latency , num_physical_disks FROM dba_rsrc_io_calibrate; |
It should show results like these:
MAX_IOPS MAX_MBPS MAX_PMBPS LATENCY NUM_PHYSICAL_DISKS
-------- -------- --------- ------- ------------------
8894 443 294 9 18 |
Hope this helps those using the CALIBRATE_IO procedure of the DBMS_RESOURCE_MANAGER package.
Free Oracle Tuning Book
 Who can resist a free Rich Nimeiec book on SQL Tuning? O.K., those who know everything can resist. If you’re like me, this is an opportunity to learn from Rich. Click on the book image or this link to get a free copy, or if you want to pay $10 for a copy click here to buy Quick Start Guide to Oracle Query Tuning: Tips for DBAs and Developers
 from Amazon.com.
The book is four chapters long, is a 129 pages in length, and is in a PDF format. The outline is:
- Query Tuning: Developer and Beginning DBA
- Query Tuning: Basics for DBAs and Developers
- Advanced Performance Tuning
- Tips for Tuning When You Have Everything Tuned
Enjoy reading it. His more comprehensive book is Oracle Database 11g Release 2 Performance Tuning Tips & Techniques (Oracle Press) and it’s $30, but it’s written for an advanced audience (more or less OCA or higher).
Use an object in a query?
Using an Oracle object type’s instance in a query is a powerful capability. Unfortunately, Oracle’s SQL syntax doesn’t make it immediately obvious how to do it. Most get far enough to put it in a runtime view (a subquery in the FROM clause), but then they get errors like this:
SELECT instance.get_type() * ERROR AT line 4: ORA-00904: "INSTANCE"."GET_TYPE": invalid identifier |
The problem is how Oracle treats runtime views, which appears to me as a casting error. Somewhat like the ORDER BY clause irregularity that I noted in July, the trick is complete versus incomplete syntax. The following query fails and generates the foregoing error:
1 2 3 4 | SELECT instance.get_type() AS object_type , instance.to_string() AS object_content FROM (SELECT dependent()AS instance FROM dual); |
If you add a table alias, or name, to the runtime view on line 4, it works fine:
1 2 3 4 | SELECT cte.instance.get_type() AS object_type , cte.instance.to_string() AS object_content FROM (SELECT dependent() AS instance FROM dual) cte; |
That is the trick. You use an alias for the query, which assigns the alias like a table reference. The reference lets you access instance methods in the scope of a query. Different columns in the query’s SELECT-list may return different results from different methods from the same instance of the object type.
You can also raise an exception if you forget the open and close parentheses for a method call to a UDT, which differs from how Oracle treats no argument functions and procedures. That type of error would look like this:
SELECT cte.instance.get_type AS object_type * ERROR AT line 1: ORA-00904: : invalid identifier |
It is an invalid identifier because there’s no public variable get_type, and a method is only found by using the parenthesis and a list of parameters where they’re required.
The object source code is visible by clicking on the expandable label below.
Setup Object Types ↓
1 2 3 4 5 6 7 8 9 10 11 12 13 14 15 16 17 18 19 20 21 22 23 24 25 26 27 28 29 30 31 32 33 34 35 36 37 38 39 40 41 42 43 44 45 46 47 48 49 50 51 52 53 54 55 56 57 58 59 60 61 62 63 64 65 66 67 68 69 70 71 | DROP TYPE dependent_t; DROP TYPE base_t; SET SERVEROUTPUT ON SIZE UNLIMITED -- Create an object. CREATE OR REPLACE TYPE base_t IS OBJECT ( TYPE VARCHAR2(20) , CONSTRUCTOR FUNCTION base_t RETURN SELF AS RESULT , MEMBER FUNCTION get_type RETURN VARCHAR2 , MEMBER FUNCTION to_string RETURN VARCHAR2) INSTANTIABLE NOT FINAL; / -- Create an object body. CREATE OR REPLACE TYPE BODY base_t IS CONSTRUCTOR FUNCTION base_t RETURN SELF AS RESULT IS BEGIN RETURN; END base_t; MEMBER FUNCTION get_type RETURN VARCHAR2 IS BEGIN RETURN self.TYPE; END; MEMBER FUNCTION to_string RETURN VARCHAR2 IS BEGIN RETURN self.TYPE; END to_string; END; / -- Create a subtype. CREATE OR REPLACE TYPE dependent UNDER base_t ( child VARCHAR2(40) , CONSTRUCTOR FUNCTION dependent RETURN SELF AS RESULT , CONSTRUCTOR FUNCTION dependent ( child VARCHAR2 ) RETURN SELF AS RESULT , OVERRIDING MEMBER FUNCTION get_type RETURN VARCHAR2 , OVERRIDING MEMBER FUNCTION to_string RETURN VARCHAR2) INSTANTIABLE NOT FINAL; / -- Create a subtype body. CREATE OR REPLACE TYPE BODY dependent IS CONSTRUCTOR FUNCTION dependent RETURN SELF AS RESULT IS BEGIN /* Assign subtype name to type. */ self.TYPE := 'DEPENDENT'; RETURN; END dependent; CONSTRUCTOR FUNCTION dependent ( child VARCHAR2 ) RETURN SELF AS RESULT IS lv_dependent DEPENDENT := dependent(); BEGIN /* Assign default constructor to self instance. */ self := lv_dependent; /* Assign parameters to object instance. */ self.TYPE := 'DEPENDENT'; self.child := child; RETURN; END dependent; OVERRIDING MEMBER FUNCTION get_type RETURN VARCHAR2 IS BEGIN RETURN self.TYPE; END; OVERRIDING MEMBER FUNCTION to_string RETURN VARCHAR2 IS BEGIN RETURN self.TYPE; END to_string; END; / |
As always, I hope this helps those solving problems.
ORDER BY CASE
Sometimes I give parts of a solution to increase the play time to solve a problem. I didn’t anticipate a problem when showing how to perform a sort operation with a CASE statement. It’s a sweet solution when you need to sort something differently than a traditional ascending or descending sort.
I gave my students this ORDER BY clause as an example:
CASE WHEN filter = 'Debit' THEN 1 WHEN filter = 'Credit' THEN 2 WHEN filter = 'Total' THEN 3 END; |
It raises the following error in MySQL for students:
ERROR 1064 (42000): You have an error in your SQL syntax; check the manual that corresponds to your MySQL server version for the right syntax to use near 'ORDER BY CASE WHEN filter = 'Debit' THEN 1 WHEN filter = 'Credit' THEN' at line 6 |
It raises the following error in Oracle for some students:
CASE * ERROR AT line 7: ORA-01785: ORDER BY item must be the NUMBER OF a SELECT-list expression |
So, I built a little test case to replicate the problem and error message they encountered:
SQL> SELECT 'Debit' AS filter FROM dual 2 UNION ALL 3 SELECT 'Credit' AS filter FROM dual 4 UNION ALL 5 SELECT 'Total' AS filter FROM dual 6 ORDER BY 7 CASE 8 WHEN filter = 'Debit' THEN 1 9 WHEN filter = 'Credit' THEN 2 10 WHEN filter = 'Total' THEN 3 11 END; |
They said, great but how can you fix it? That’s simple, with a Common Table Expression (CTE) in Oracle or with an inline view in MySQL. The Oracle CTE solution is:
1 WITH results AS 2 (SELECT 'Debit' AS filter FROM dual 3 UNION ALL 4 SELECT 'Credit' AS filter FROM dual 5 UNION ALL 6 SELECT 'Total' AS filter FROM dual) 7 SELECT filter 8 FROM results 9 ORDER BY 10 CASE 11 WHEN filter = 'Debit' THEN 1 12 WHEN filter = 'Credit' THEN 2 13 WHEN filter = 'Total' THEN 3 14 END; |
There are two MySQL solutions. One simply removes the FROM dual clauses from the query components and the other uses an inline view in the FROM clause. This is the inline view:
SELECT filter FROM (SELECT 'Debit' AS filter FROM dual UNION ALL SELECT 'Credit' AS filter FROM dual UNION ALL SELECT 'Total' AS filter FROM dual) resultset ORDER BY CASE WHEN filter = 'Debit' THEN 1 WHEN filter = 'Credit' THEN 2 WHEN filter = 'Total' THEN 3 END; |
This is the solution without the FROM dual clauses:
SELECT 'Debit' AS filter UNION ALL SELECT 'Credit' AS filter UNION ALL SELECT 'Total' AS filter ORDER BY CASE WHEN filter = 'Debit' THEN 1 WHEN filter = 'Credit' THEN 2 WHEN filter = 'Total' THEN 3 END; |
Both MySQL solutions yield the following:
+--------+ | filter | +--------+ | Debit | | Credit | | Total | +--------+ 3 rows in set (0.00 sec) |
It puts the fabricating query inside a result set, and then lets you use the column alias to filter the set. If you have a better approach, please share it.
