Archive for the ‘Mac OS X’ Category
What’s up on M1 Chip?
I’ve been trying to sort out what’s up on Oracle’s support of Apple’s M1 (arm64) chip. It really is a niche area. It only applies to those of us who work on a macOS machines with Oracle Database technology; and then only when we want to install a version of Oracle Database 21c or newer in Windows OS for testing. Since bootcamp is now gone, these are only virtualized solutions through a full virtualization product or containerized with Docker of Kubernetes.
The Best Virtual Machine Software for Mac 2022 (4/11/2022) article lets us know that only Parallels fully supports Windows virtualization on the ARM64 chip. Then, there’s the restriction that you must use Monterey or Big Sur (macOS) and Windows 11 arm64.
Instructions were published on On how to run Windows 11 on an Apple M1 a couple weeks ago. They use the free UTM App from the Apple Store and provide the download site for the Windows Insider Program. You can’t get a copy of Windows 11 arm64 without becoming part of the Windows Insider Program.
The next step would be to try and install Oracle Database 21c on Windows 11 arm64, which may or may not work. At least, I haven’t tested it yet and can’t make the promise that it works. After all, I doubt it will work because the Oracle Database 21c documentation says it only supports x64 (or Intel) architecture.
If anybody knows what Oracle has decided, will decide or even their current thinking on the issue, please make a comment.
Multidimension Arrays
Picking up where I left off on yesterday’s post on PostgreSQL arrays, you can also write multidimensional arrays provided all the nested arrays are equal in size. You can’t use the CARDINALITY function to determine the length of nested arrays, you must use the ARRAY_LENGTH to determine the length of subordinate arrays.
Here’s an example file with a multidimensional array of integers:
DO $$ DECLARE /* Declare an array of integers with a subordinate array of integers. */ list int[][] = array[array[1,2,3,4] ,array[1,2,3,4] ,array[1,2,3,4] ,array[1,2,3,4] ,array[1,2,3,4]]; row varchar(20) = ''; BEGIN /* Loop through the first dimension of integers. */ <<Outer>> FOR i IN 1..ARRAY_LENGTH(list,1) LOOP row = ''; /* Loop through the second dimension of integers. */ <<Inner>> FOR j IN 1..ARRAY_LENGTH(list,2) LOOP IF LENGTH(row) = 0 THEN row = row || list[i][j]; ELSE row = row || ',' || list[i][j]; END IF; END LOOP; /* Exit outer loop. */ RAISE NOTICE 'Row [%][%]', i, row; END LOOP; END; $$; |
It prints:
NOTICE: Row [1][1,2,3,4] NOTICE: Row [2][1,2,3,4] NOTICE: Row [3][1,2,3,4] NOTICE: Row [4][1,2,3,4] NOTICE: Row [5][1,2,3,4] DO |
Multidimensional arrays are unique to PostgreSQL but you can have nested lists of tables or varrays inside an Oracle database. Oracle also supports nested lists that are asynchronous.
As always, I hope this helps those trying sort out the syntax.
Docker on macOS
I finally got on the current release of macOS, Monterey, and found that my tedious Docker error still existed. When the computer boots, I get the following Fatal Error message:

Open a Terminal session and issue the following command:
killall Docker |
Then, restart Docker and everything is fine.
MongoDB on macOS
It’s important to document things before I ask my students to do them. This walks through a native installation of MongoDB on the macOS. At least, it does when you’ve already installed Xcode. If you installed Xcode sometime ago, you should update it otherwise you may get an installation error like the following:
==> Installing mongodb-community from mongodb/brew Error: Your Xcode (11.1) is too outdated. Please update to Xcode 13.1 (or delete it). Xcode can be updated from the App Store. |
The core MongoDB installation document is in the MongoDB 5.0 installation manual. The following is a step-by-step set of instructions for those new to installing something like MongoDB without using the macOS standard package management software.
- The first step requires you install Home Brew, as qualified by the Home Brew Installation page. Before you can install Home Brew, you need to install Xcode on your macOS. After installing Xcode, you need to launch a Terminal session on your macOS and run the following command from the macOS command-line interface (CLI):
/bin/bash -c "$(curl -fsSL https://raw.githubusercontent.com/Homebrew/install/HEAD/install.sh)"
After the installation, which may take several minutes, you should see this final message on the console:
==> Next steps: - Run brew help to get started - Further documentation: https://docs.brew.sh - Now that Home Brew is installed, the next step requires you to update the Homebrew formulat for MongoDB. You use the following command to do that for MongoDB 5:
brew tap mongodb/brewYou should see something like the following on your console when you update the Homebrew formula:
Running `brew update --preinstall`...
==> Homebrew is run entirely by unpaid volunteers. Please consider donating:
  https://github.com/Homebrew/brew#donations
==> Auto-updated Homebrew!
Updated 1 tap (homebrew/core).
==> Updated Formulae
Updated 5 formulae.

==> Tapping mongodb/brew
Cloning into '/usr/local/Homebrew/Library/Taps/mongodb/homebrew-brew'...
remote: Enumerating objects: 825, done.
remote: Counting objects: 100% (322/322), done.
remote: Compressing objects: 100% (236/236), done.
remote: Total 825 (delta 165), reused 140 (delta 83), pack-reused 503
Receiving objects: 100% (825/825), 180.91 KiB | 0 bytes/s, done.
Resolving deltas: 100% (403/403), done.
Tapped 14 formulae (30 files, 246.8KB).
- Assuming your Xcode is curent, you now install MongoDB with the necessary supporting packages:
brew install mongodb-community@5.0
You should see something like the following on your console after you install MongoDB 5:
==> Summary
  /usr/local/Cellar/mongodb-community/5.0.5: 11 files, 181.5MB, built in 6 seconds
==> Running `brew cleanup mongodb-community`...
Disable this behaviour by setting HOMEBREW_NO_INSTALL_CLEANUP.
Hide these hints with HOMEBREW_NO_ENV_HINTS (see `man brew`).
==> Caveats
==> mongodb-community
To start mongodb/brew/mongodb-community now and restart at login:
  brew services start mongodb/brew/mongodb-community
Or, if you don't want/need a background service you can just run:
  mongod --config /usr/local/etc/mongod.conf
- MongoDB really requires a background service, so I suggest you use the following to create the service:
brew services start mongodb/brew/mongodb-community
You should see something like the following on your console after you install MongoDB 5:
==> Successfully started `mongodb-community` (label: homebrew.mxcl.mongodb-community)
The installation gave you three key binaries:
- The MongoDB Server Daemon – mongod
- The MongoDB sharded cluster query router – mongos
- The MongoDB Shell – mongosh
The installation also creates configuration, data, and log files based on physical CPU-Chip hardware:
- Intel Processor
- Configuration File: /usr/local/etc/mongodb.conf
- Log Directory: /usr/local/var/log/mongodb
- Data Directory: /usr/local/var/mongodb
- Apple M1 Processor
- Configuration File: /opt/homebrew/etc/mongodb.conf
- Log Directory: /opt/homebrew/var/log/mongodb
- Data Directory: /opt/homebrew/var/mongodb
- You can now start the MongoDB Shell with the following command in a Terminal window:
mongosh
You should see the following when you connect to the MongoDB Shell
Current Mongosh Log ID:	61e4e2c98f023c2b5fc5a905
Connecting to:		mongodb://127.0.0.1:27017/?directConnection=true&serverSelectionTimeoutMS=2000
Using MongoDB:		5.0.5
Using Mongosh:		1.1.8

For mongosh info see: https://docs.mongodb.com/mongodb-shell/


To help improve our products, anonymous usage data is collected and sent to MongoDB periodically (https://www.mongodb.com/legal/privacy-policy).
You can opt-out by running the disableTelemetry() command.

------
   The server generated these startup warnings when booting:
   2022-01-16T20:26:18.320-07:00: Access control is not enabled for the database. Read and write access to data and configuration is unrestricted
------

test>
As always, I hope the instructions are helpful and clear. If you find an issue let em know about it.
MySQL macOS Docker
While you can download MySQL as a DMG package, a number of users would prefer to install it as a Docker instance. You won’t find the macOS downloads on the same web site as other downloads. You can use the following macOS download site.

After installing Docker on your macOS, you can pull a copy of the current MySQL Server with the following command:
docker pull mysql/mysql-server |
You should create a mysql directory inside your ~/Documents directory with this command:
mkdir ~/Documents/mysql |
Then, you should use the cd command to change into the ~/Documents/mysql directory and run this command:
pwd |
It should return the following directory:
/Users/<user_name>/Documents/mysql |
Use the /Users/<user_name>/Documents/mysql as the
docker run --name=mysql1 --volume=<path_to_folder>:/var/lib/mysql -p 33060:3306/tcp -d mysql/mysql-server |
The --name option value is mysql1 and it becomes the container value. Docker mounts the column in the ~/Documents/mysql folder. All data from the Docker container under the /var/lib/mysql directory will persist in this directory. This directory will still contain the database when the container is shut down.
The docker run command maps the localhost’s 33060 port to the 3306 port on the Docker container. You will use the 33060 port to connect to the Docker instance of MySQL. It raises a dialog box asking for permission to access the directory. You need to allow Docker to write to the ~/Documents/mysql directory.
You can verify that the Docker container is running with the following command:
docker ps |
It should return:
CONTAINER ID IMAGE COMMAND CREATED STATUS PORTS NAMES 142b5c491cd8 mysql/mysql-server "/entrypoint.sh mysq…" 7 minutes ago Up 6 minutes (healthy) 33060-33061/tcp, 0.0.0.0:33060->3306/tcp mysql1 |
You can get the MySQL generated root password with this Docker command:
docker logs mysql1 2>&1 | grep GENERATED |
It returns something like the following:
[Entrypoint] GENERATED ROOT PASSWORD: vop#3GNYqK3nC@S@N3haf3nox5E |
Use the following Docker command to connect to the Docker container:
docker exec -it mysql1 /bin/bash |
It launches a Bash shell inside the Docker container:
bash-4.2# |
Start the mysql Command-Line Interface (CLI):
mysql -uroot -p |
You are then prompted for a password:
Enter password: |
After successfully entering the password, you’ll see the following:
Welcome to the MySQL monitor. Commands end with ; or \g. Your MySQL connection id is 55 Server version: 8.0.22 Copyright (c) 2000, 2020, Oracle and/or its affiliates. All rights reserved. Oracle is a registered trademark of Oracle Corporation and/or its affiliates. Other names may be trademarks of their respective owners. Type 'help;' or '\h' for help. Type '\c' to clear the current input statement. mysql> |
Unless you want to remember that hugely complex root password, you should consider changing it to something simple like, 'cangetin' with the following command:
ALTER USER 'root'@'localhost' IDENTIFIED WITH MYSQL_NATIVE_PASSWORD BY 'cangetin'; |
Next, you should check for the installed databases with this command:
show databases; |
It will return:
+--------------------+ | Database | +--------------------+ | information_schema | | mysql | | performance_schema | | sys | +--------------------+ 4 rows in set (0.01 sec) |
Exiting mysql, you can see the contents of the root user’s directory with this list command:
ls -al |
It should return:
total 84 drwxr-xr-x 1 root root 4096 Jan 12 03:41 . drwxr-xr-x 1 root root 4096 Jan 12 03:41 .. -rwxr-xr-x 1 root root 0 Jan 12 03:41 .dockerenv lrwxrwxrwx 1 root root 7 Oct 12 22:06 bin -> usr/bin dr-xr-xr-x 2 root root 4096 Apr 11 2018 boot drwxr-xr-x 5 root root 340 Jan 12 03:41 dev drwxr-xr-x 2 root root 4096 Oct 19 05:47 docker-entrypoint-initdb.d -rwxr-xr-x 1 root root 7496 Oct 19 05:37 entrypoint.sh drwxr-xr-x 1 root root 4096 Jan 12 03:41 etc -rw-r--r-- 1 root root 86 Jan 12 03:41 healthcheck.cnf -rwxr-xr-x 1 root root 1073 Oct 19 05:37 healthcheck.sh drwxr-xr-x 2 root root 4096 Apr 11 2018 home lrwxrwxrwx 1 root root 7 Oct 12 22:06 lib -> usr/lib lrwxrwxrwx 1 root root 9 Oct 12 22:06 lib64 -> usr/lib64 drwxr-xr-x 2 root root 4096 Apr 11 2018 media drwxr-xr-x 2 root root 4096 Apr 11 2018 mnt -rw-r--r-- 1 root root 0 Jan 12 03:41 mysql-init-complete drwxr-xr-x 2 root root 4096 Apr 11 2018 opt dr-xr-xr-x 127 root root 0 Jan 12 03:41 proc dr-xr-x--- 1 root root 4096 Jan 12 04:21 root drwxr-xr-x 1 root root 4096 Oct 19 05:47 run lrwxrwxrwx 1 root root 8 Oct 12 22:06 sbin -> usr/sbin drwxr-xr-x 2 root root 4096 Apr 11 2018 srv dr-xr-xr-x 13 root root 0 Jan 12 03:41 sys drwxrwxrwt 1 root root 4096 Jan 12 03:41 tmp drwxr-xr-x 1 root root 4096 Oct 12 22:06 usr drwxr-xr-x 1 root root 4096 Oct 12 22:06 var |
At this point, you have to make a choice about how you will access the MySQL database. You have a couple options:
- Create an individual
studentuser that can access the MySQL-Server as a micro-service, which would only be a MySQL user connecting through MySQL workbench. At least, that’s the only connection option unless you likewise install themysqlclient on your host macOS. Themysqlclient lets you connect from the host operating system through the Command-Line Interface (CLI). - Create a local
studentuser account inside the Docker container. It will have access to the container file system and mimic the behavior of a non-rootuser on a server.
Let’s create both for this demonstration. Reconnect as the root user and issue the following two commands:
CREATE USER 'student'@'localhost' IDENTIFIED WITH MYSQL_NATIVE_PASSWORD BY 'student'; CREATE USER 'student'@'%.%.%.%' IDENTIFIED WITH MYSQL_NATIVE_PASSWORD BY 'student'; |
The first version of the student user lets you access the database from inside the Docker container. The second version of the student user lets you access the database from MySQL Workbench deployed on your base macOS.
You can add a sakila database and grant all privileges to the student user with the following command as the root user:
CREATE DATABASE sakila; GRANT ALL ON sakila.* TO 'student'@'localhost'; GRANT ALL ON sakila.* TO 'student'@'%.%.%.%'; |
You need to get the sakila database from the Internet within the Docker container. Exit the mysql client with the following command:
quit; |
As the root user, install the wget and tar Linux utilities with this command:
yum install -y wget tar |
As the student user, you can use the wget command to grab a copy of the sakila database and store the database locally. Use the cd command to get to your ${HOME} directory, like:
cd |
Use this syntax to get a copy of the sakila database:
wget http://downloads.mysql.com/docs/sakila-db.tar.gz |
Use the ls command to verify the download, then run the following set of Linux commands from the Linux CLI:
tar -xzf sakila-db.tar.gz cd sakila-db |
Run the following two commands from the sakila-db directory:
mysql -ustudent -p < sakila-schema.sql mysql -ustudent -p < sakila-data.sql |
or, you can connect as the student user to the MySQL client and run them there:
source sakila-schema.sql source sakila-data.sql |
You create a non-root student user for the Docker container from the macOS host opearting system. Which means you need to quit; the mysql client, and exit the root user’s session with the Docker container.
At the terminal in your macOS, issue the following Docker command to create a student account in the mysql1 container:
docker exec mysql1 bash -c "useradd -u 501 -g mysql -G users \ > -d /home/student -s /bin/bash -c "Student" -n student" |
Now, you can connect as the student user to the mysql1 container, with the following Docker command:
docker exec -it --user student mysql1 bash |
The first time you connect, you will be a the / (root) directory. Use the following cd command to go to the student user’s home directory:
cd |
Then, type the following command to set the student user’s home directory as the default. You need to use this command because vim isn’t installed in the default Docker container, which would let you interactively edit files. It appends the necessary Bash shell command to the end of the .bashrc file.
echo 'cd ${HOME}' >> .bashrc |
With this change, the student user will always be available form its home directory next time you connect to the mysql1 container. You can use scp to move files into the student user’s home (/home/student) directory. However, you can create a quick test.sql file like this:
echo "select user();" > test.sql |
Connect to the mysql CLI with as the student user:
mysql -ustudent -p |
Call your test.sql file from the Linux CLI, like:
mysql -ustudent -p < test.sql |
or, you can run the test.sql program as follows form the MySQL command-line:
source test.sql |
It will return:
+-------------------+ | user() | +-------------------+ | student@localhost | +-------------------+ 1 row in set (0.00 sec) |
That’s the basic setup of the Docker MySQL Container on the macOS. You can do much more once you’ve configured it like this. For example, you can add vim to your library repository as the root user with the following command:
yum install -y vim |
It just takes a minute or a bit more. Adding vim opens up so much flexibility for you inside the Docker container, it’s impossible for me to resist. 😉
Oracle External Table
Supporting my student labs requires the ability to use external tables. I didn’t have a chance to test external tables when I adopted Oracle’s 18c Docker installations. The following are the instructions for the macOS version, which work. Unfortunately, I couldn’t sort out a way to implement external tables in the Windows version of Oracle’s 18c Docker installation. If somebody knows the way to do that, feel free to drop me a note or a URL to where the information may be found.
These two blog posts explain Oracle’s external tables:
External Tables
External Tables with Preprocessing
These instructions build on my base macOS instructions, which you can find in this earlier Install, configure, and use an Oracle Docker Container blog post. You can find the existing Oracle virtual directories when you connect as the system user and query the dba_directories view. I used the following SQL*Plus formatting commands for the query:
SET PAGESIZE 99 COL directory_name FORMAT A24 COL directory_path FORMAT A54 |
and the following SQL query:
SELECT directory_name , directory_path FROM dba_directories; |
It returns the following results:
DIRECTORY_NAME DIRECTORY_PATH ------------------------ ------------------------------------------------------ ORA_DBMS_FCP_LOGDIR /opt/oracle/product/18c/dbhomeXE/cfgtoollogs SDO_DIR_WORK /ade/b/2794046351/oracle/work SDO_DIR_ADMIN /ade/b/2794046351/oracle/md/admin ORA_DBMS_FCP_ADMINDIR /opt/oracle/product/18c/dbhomeXE/rdbms/admin XMLDIR /opt/oracle/product/18c/dbhomeXE/rdbms/xml XSDDIR /opt/oracle/product/18c/dbhomeXE/rdbms/xml/schema ORACLE_OCM_CONFIG_DIR2 /opt/oracle/product/18c/dbhomeXE/ccr/state ORACLE_OCM_CONFIG_DIR /opt/oracle/product/18c/dbhomeXE/ccr/state OPATCH_INST_DIR /opt/oracle/product/18c/dbhomeXE/OPatch DATA_PUMP_DIR /opt/oracle/admin/XE/dpdump/ OPATCH_SCRIPT_DIR /opt/oracle/product/18c/dbhomeXE/QOpatch OPATCH_LOG_DIR /opt/oracle/product/18c/dbhomeXE/rdbms/log ORACLE_BASE /opt/oracle ORACLE_HOME /opt/oracle/product/18c/dbhomeXE 14 rows selected. |
In that prior post, you will find instructions for creating an environment file. The following instructions leverage the $ORACLE_BASE environment variable, which points to the /opt/oracle directory in the Docker environment.
Here are the steps to complete the external file setup, including how to position the physical comma-separated value (CSV) files in the available but otherwise hidden Docker directories. Hidden might be the wrong word choice but they’re not visible from the host macOS operating system. You have to connect to the Docker instance as the root user.
The following Docker command, used in the prior blog post, connects as the root user:
docker exec -it videodb bash |
The instructions start before connecting to and after connecting to the Docker instance:
- Put the
transaction_upload.csvandtransaction_upload2.csvfiles into the following macOS host directory:/Users/<installuser>/oracle/student
which matches to the following internal Docker directory:
/home/student
- As the connected
rootuser, change directory to the$ORACLE_BASE(/opt/oracle) directory with the following command:cd $ORACLE_BASE
- As the connected
rootuser, make anuploaddirectory inside the$ORACLE_BASE(/opt/oracle) directory with the following command:mkdir uploadAs the
rootuser, change the ownership of theuploaddirector fromrootas the owner and primary group tooracleas the owner andoinstallas the primary group with the following command:chown oracle:oinstall upload - As the connected
rootuser, copy thetransaction_upload.csvandtransaction_upload2.csvfiles from the/home/studentdirectory to the$ORACLE_BASE(/opt/oracle) directory with the following command:cp ~student/transaction_upload*.csv $ORACLE_BASE/upload/.
- As the connected
rootuser, change from the$ORACLE_BASE(/opt/oracle) directory to theuploadsubdirectory with the following command:cd uploadAs the
rootuser, change the ownership of thetransaction_upload.csvandtransaction_upload2.csvfiles fromrootas the owner and primary group tooracleas the owner andoinstallas the primary group with the following command:chown oracle:oinstall transaction_upload*.csv - As the connected Oracle
systemuser, create theuploadvirtual directory with the following command:CREATE DIRECTORY upload AS '/opt/oracle/upload';
As the connected Oracle
systemuser, grantreadandwriteprivileges to the Oraclec##studentuser with the following command:GRANT READ, WRITE ON DIRECTORY upload TO c##student;
- As the connected Oracle
c##studentuser, create thetransaction_uploadexternally managed table with the following command:CREATE TABLE transaction_upload ( account_number VARCHAR2(10) , first_name VARCHAR2(20) , middle_name VARCHAR2(20) , last_name VARCHAR2(20) , check_out_date DATE , return_date DATE , rental_item_type VARCHAR2(12) , transaction_type VARCHAR2(14) , transaction_amount NUMBER , transaction_date DATE , item_id NUMBER , payment_method_type VARCHAR2(14) , payment_account_number VARCHAR2(19)) ORGANIZATION EXTERNAL ( TYPE oracle_loader DEFAULT DIRECTORY upload ACCESS PARAMETERS ( RECORDS DELIMITED BY NEWLINE CHARACTERSET US7ASCII BADFILE 'UPLOAD':'transaction_upload.bad' DISCARDFILE 'UPLOAD':'transaction_upload.dis' LOGFILE 'UPLOAD':'transaction_upload.log' FIELDS TERMINATED BY ',' OPTIONALLY ENCLOSED BY "'" MISSING FIELD VALUES ARE NULL ) LOCATION ('transaction_upload.csv')) REJECT LIMIT UNLIMITED;
As the connected Oracle
c##studentuser, query thetransaction_uploadtable to verify that you can read the external file source through the virtualuploaddirectory.COL record FORMAT 99,999 HEADING "Record|Count" SELECT TO_CHAR(COUNT(*),'99,999') AS record FROM transaction_upload;
It should return the following value:
Record
Count
-------
 11,520
- As the connected Oracle
c##studentuser, create thetransaction_reversalexternally managed table with the following command:CREATE TABLE transaction_reversal ( transaction_id NUMBER , transaction_account VARCHAR2(15) , transaction_type VARCHAR2(30) , transaction_date DATE , transaction_amount NUMBER , rental_id NUMBER , payment_method_type NUMBER , payment_account_number VARCHAR2(20) , created_by NUMBER , creation_date DATE , last_updated_by NUMBER , last_update_date DATE) ORGANIZATION EXTERNAL ( TYPE oracle_loader DEFAULT DIRECTORY upload ACCESS PARAMETERS ( RECORDS DELIMITED BY NEWLINE CHARACTERSET US7ASCII BADFILE 'UPLOAD':'transaction_upload2.bad' DISCARDFILE 'UPLOAD':'transaction_upload2.dis' LOGFILE 'UPLOAD':'transaction_upload2.log' FIELDS TERMINATED BY ',' OPTIONALLY ENCLOSED BY "'" MISSING FIELD VALUES ARE NULL ) LOCATION ('transaction_upload2.csv')) REJECT LIMIT UNLIMITED;
As the connected Oracle
c##studentuser, query thetransaction_reversaltable to verify that you can read the external file source through the virtualuploaddirectory.COL record FORMAT 99,999 HEADING "Record|Count" SELECT TO_CHAR(COUNT(*),'99,999') AS record FROM transaction_reversal;
It should return the following value:
Record
Count
-------
  1,170
Unfortunately, the file permission on the Windows version of the Oracle Docker 18c installation make it more difficult to install.
Oracle Docker Container
Install, configure, and use an Oracle Docker Container
Installing a Docker instance isn’t quite straightforward nor is it terribly difficult. It can be quite overwhelming if you’re unfamiliar with the technology of virtualization and containerization. This essay shows you how to create, configure, and manage an Oracle Database 18c XE Docker instance on the macOS. There are some slight differences when you install it on Windows OS.
Installation
You need to download the Oracle Database 18c XE file for Linux. You will find it on Oracle’s OTN website at https://www.oracle.com/downloads/. Click the Database link under the Developer Downloads banner. You want to download the Oracle Database Express Edition (XE), Release 18.4.0.0.0 (18c) file.
The file is a Linux Red Hat Package Manager (rpm) file. The file is approximately 2.5 GB in size, which means you may want to take a break while downloading it. Whether you take a break or not, this step may take more time than you like.
While downloading the Oracle database, you want to work on the two other tasks concurrently. You need to download and install Docker and Homebrew software, which aren’t installed from Apple’s Application Store. Many macOS systems disallow by default software from outside the comfy boundaries and inspections of the Apps Store. You may need to change your system preferences to install Docker and Homebrew.
You can download Docker for the macOS from the following website:
https://docs.docker.com/docker-for-mac/install/
The Homebrew (the missing package manager for macOS) website will tell you to install it from the macOS Command Line Interface (CLI). Please note that you must already have the Xcode Command Line Tools installed before you install Homebrew. The following Homebrew installation will update your Command Line Tools to macOS Mojave Version 10.14.
Open a Terminal session from your finder and run this command:
bash -c "$(curl -fsSL https://raw.githubusercontent.com/Homebrew/install/master/install.sh)" |
After you install Homebrew in the Terminal, type the following to go to your user’s home folder (or directory):
cd |
In your home directory (/Users/username [~]), create the docker-images directory from the available GitHub docker containers with these two commands (separated by the semicolon):
cd ~/; git clone https://github.com/oracle/docker-images.git |
Move the Oracle Database XE 18c rpm file from your Downloads folder to the target docker-images subfolder with the following command:
mv ~/Downloads/oracle-database-xe-18c-1.0-1.x86_64-2.rpm \ ~/docker-images/OracleDatabase/SingleInstance/dockerfiles/18.4.0/. |
Change your present working directory with the following cd command:
cd docker-images/OracleDatabase/SingleInstance/dockerfiles |
Build the Docker image with the following command (from the directory where the buildDockerImage.sh shell script is found):
./buildDockerImage.sh -v 18.4.0 -x |
The Docker image build takes quite some time. It may take more than 10 minutes on some macOS computers. After it completes, you should see that it was successfully built and tagged in the Terminal. You can confirm the image build with this command:
docker images |
It should return something like this:
REPOSITORY TAG IMAGE ID CREATED SIZE oracle/database 18.4.0-xe 926f4349b277 12 minutes ago 5.89GB oraclelinux 7-slim 153f8d73287e 8 weeks ago 131MB |
Before you start your Docker container, you need to open a Terminal session. You will be in your home directory, which should give you a prompt like:
machine_name:~ username$ |
If you issue a pwd command, you should see the following:
/Users/username |
Create an oracle directory as subdirectory:
mkdir oracle |
While you might wonder about the oracle directory at this point, it’s to help keep straight Docker containers on the macOS file system. For example, when you install Docker instances for MySQL and PostgreSQL, you can see the Docker file systems as:
/Users/username/mysql /Users/username/oracle /Users/username/postgres |
Now, you start the Docker container with the following command:
sudo \ docker run --name videodb -d -p 51521:1521 -p 55500:5500 -e ORACLE_PWD=cangetin \ -e ORACLE_CHARACTERSET=AL32UTF8 -v ~/oracle:/home oracle/database:18.4.0-xe |
After starting the Docker container, you check the container’s status the following command:
docker ps |
Congratulations, you have successfully installed the Docker container.
Configure
The standard docker container prepares a base platform for you. It doesn’t create a schema or containerized user. It simply installs the Oracle Database Management System (DBMS) and Oracle Listener. You need to configure your Linux environment and your database.
You connect to the container as the root user, like:
docker exec -it videodb bash |
You should update any of the older packages with the following command:
yum update |
Next, you should install the openssh-server and vim packages. They’re not installed as part of the docker container’s default configuration. You’ll need them when you create non-root users and edit configuration files. This command installs them both:
yum openssh-server vim |
There are a number of things for you to do at this point. They don’t all have to be done in the order that this essay takes. Like any other installation of Oracle on Linux, there is an oracle user who owns the installation. The oracle user is a non-login user. A non-login user doesn’t have a password and disallows a ssh connection. You need to first become the root user before you can use the su (substitute user) command to become the oracle user. Only superuser accounts hold the privileges to su without credentials because they’re trusted users.
The easiest thing to do while you’re the root user is test your ability to connect to the Oracle database’s system schema. You set the system schema’s password to cangetin when you ran the docker run command. At the command prompt, type the following to connect to the database:
sqlplus system/cangetin@xe |
You should see the following when you connect as the system user:
SQL*Plus: Release 18.0.0.0.0 - Production on Sun Sep 13 02:48:44 2020 Version 18.4.0.0.0 Copyright (c) 1982, 2018, Oracle. All rights reserved. Last Successful login time: Sat Sep 12 2020 21:13:33 +00:00 Connected to: Oracle Database 18c Express Edition Release 18.0.0.0.0 - Production Version 18.4.0.0.0 SQL> |
Please note that only the oracle user can connect without referencing the @xe service identifier, which is defined in the $ORACLE_HOME/network/admin/tnsnames.ora file. You can read more about the SQL*Net configuration in the documentation. The quit command exits the SQL*Plus Command Line Interface. At this point, as root, lets you create a missing vi symbolic link to the vim utility you installed earlier.
ln -s /usr/bin/vim /usr/bin/vi |
With vi configured, let’s su to the oracle user and create an .bashrc file for it. You should note that a non-login user doesn’t have a .bashrc file by default. You become the oracle user with the following command:
su oracle |
You may notice that you’re not in the oracle user’s home directory. Let’s change that by moving to the correct home directory.
The home directory for any user is configured in the /etc/passwd file and available by using the echo command to see the $HOME environment variable’s value. This is true for Red Hat, Oracle Unbreakable Linux, CentOS, and Fedora distributions. They create users’ home directories as subdirectories in the /home directory.
The .bashrc file is a hidden file. Hidden files have no file name before the period and are not visible with an ls (list) command. You can find them by using a -al flag value with the ls command
ls -al |
You can use the vi editor to create a .bashrc file like this:
vi .bashrc |
A minimal oracle .bashrc (bash resource) file should look like this:
# Source global definitions if [ -f /etc/bashrc ]; then . /etc/bashrc fi # User specific environment if ! [[ "$PATH" =~ "$HOME/.local/bin:$HOME/bin:" ]] then PATH="$HOME/.local/bin:$HOME/bin:$PATH" fi export PATH # Set Prompt export PS1="[\u@localhost \W]\$ " # Change to home directory. cd $HOME # Uncomment the following line if you don't like systemctl's auto-paging feature: # export SYSTEMD_PAGER= # User specific aliases and functions |
If you know about the Linux CLI prompt, the localhost string may seem odd. It’s there to suppress the random string otherwise provided by the docker container.
A number of other Oracle environment parameters have already been set. You can see them with this command:
env | grep -i oracle |
You can connect as the privileged sysdba role, once known as the internal user, to start and stop the database instance without stopping the docker container. That command syntax is:
sqlplus / as sysdba |
Only the oracle user has privileges to connect with the sysdba role by default. That’s because the oracle user is the owner of the Oracle database installation.
While connected as the oracle user, you should make three changes. One change to oracle executable file permissions and two changes to the glogin.sql default configuration file.
The initial permissions on the $ORACLE_HOME/bin/oracle executable file in the docker container are shown below.
-rwxr-x--x 1 oracle oinstall 437755981 Oct 18 2018 oracle |
The setuid bit is disabled when the user’s permissions are rwx. The oracle executable should always run with the permissions and ownership of the oracle user. That only happens when the setuid bit is enabled. You set the setuid. bit with the following syntax as the oracle user or privileged root superuser (from the $ORACLE_HOME/bin directory):
chmod u+s oracle |
Relisting the file in a long list view (ls -al) after the change, you should see the following:
-rwsr-x--x 1 oracle oinstall 437755981 Oct 18 2018 oracle |
The setuid bit is enabled when the user permissions are rws. Connections to the database by non-privileged Oracle users may raise ORA-01017 and ORA-12547 errors when the setuid bit is unset.
The glogin.sql file is read and processed with every connection to the database. Therefore, you should put little in there, and some would argue nothing in there. You’re going to enter the command that lets you interactively launch vi from a SQL> command prompt and set a SQL*Plus environment variable. The SQL*Plus environment variable lets you see debug messages raised by your PL/SQL programs.
To edit the glogin.sql file, change your terminal directory as follows:
cd $ORACLE_HOME/sqlplus/admin |
Add the following two lines at the bottom of the glogin.sql file:
define _editor=vi SET SERVEROUTPUT ON SIZE UNLIMITED |
That’s it for configuring the oracle user’s account. Type exit to return to the root user shell. Type exit again, this time to leave the root user’s account and return to your hosting macOS.
The next configuration step sets up a non-privileged student account in Linux. You setup the student user with the following Docker command (for reference, it can’t be done from within the docker container):
sudo \ docker exec -it videodb bash -c "useradd -u 501 -g dba -G users \ -d /home/student -s /bin/bash -c "Student" -n student" |
You will be prompted for a password when this command runs. Try to keep the password simple. Using a password like cangetin is recommended when it’s a development instance. You can connect with the following docker command:
docker exec -it --user student videodb bash |
After logging in to the docker container as the student user, you need to configure the .bashrc file. You should use the following minimal .bashrc file in the /home/student directory, which you can create with the vi editor.
# Source global definitions if [ -f /etc/bashrc ]; then . /etc/bashrc fi # User specific environment if ! [[ "$PATH" =~ "$HOME/.local/bin:$HOME/bin:" ]] then PATH="$HOME/.local/bin:$HOME/bin:$PATH" fi export PATH # Set Prompt export PS1="[\u@localhost \W]\$ " # Change to home directory. cd $HOME # Uncomment the following line if you don't like systemctl's auto-paging feature: # export SYSTEMD_PAGER= # User specific aliases and functions # Set Oracle environment variables. export ORACLE_SID=XE export ORACLE_BASE=/opt/oracle export ORACLE_HOME=/opt/oracle/product/18c/dbhomeXE |
As the c##student user, you need to connect to the system schema and provision a c##student container database. You can connect to the system schema with the following syntax:
sqlplus system/cangetin@xe |
There are four steps required to provision a container database. These steps are different than the steps for previous non-container databases. In non-container databases, you could grant privileges directly to database users. Oracle now requires that you create database roles, which bundle privileges together. Then, you grant roles to users. The four provisioning steps are:
- Create a user, which must adhere to the following naming convention from Oracle Database 12c forward. The database user’s name must start with the letter
cand two#(pound) symbols followed by a character and then a string of letters and numbers. - Create a role, which must use the same naming convention as containerized users. Failure to use the correct naming convention raises an
ORA-65096error. - Grant database privileges to a role.
- Grant a database role to a user.
You create a c##student container database user with the following syntax:
CREATE USER c##student IDENTIFIED BY student DEFAULT TABLESPACE users QUOTA 100M ON users TEMPORARY TABLESPACE temp; |
Next, you create a c##studentrole container role with the following syntax:
CREATE ROLE c##studentrole CONTAINER = ALL; |
Then, you grant the following privileges to your newly created c##studentrole role:
GRANT CREATE CLUSTER, CREATE INDEXTYPE, CREATE PROCEDURE, CREATE SEQUENCE, CREATE SESSION, CREATE TABLE, CREATE TRIGGER, CREATE TYPE, CREATE VIEW TO c##studentrole; |
Finally, you grant a c##studentrole role (bundle of privileges) to a c##videodb user:
GRANT c##studentrole TO c##student; |
After completing these tasks, you should use the quit command to exit the SQL*Plus CLI. Please note that unlike some database CLIs, you do not need to add a semicolon to quit the connection. Oracle divides its CLI commands into SQL*Plus and SQL commands; and the quit command is a SQL*Plus command. SQL*Plus commands do not require the terminating semicolon. SQL commands do require the semicolon or a line return and forward slash, which dispatches the SQL command to the SQL engine.
You should confirm that the provisioning worked by reconnecting to the Oracle database as the c##student user with this syntax:
sqlplus c##student/student@xe |
You have now provisioned and verified the connection to a database container user. Use the quit command to disconnect from the Oracle database, and the exit command to return to your host operating system.
At this point you have a couple options for using the docker container. You can install a proprietary Integrated Development Environment (IDE), like Oracle’s free SQL Developer. There are several others and some support more than one database engine. Unfortunately, all the others have annual licensing costs.
Post Install: Access Tools
Oracle’s SQL Developer is a Java-based solution that runs on numerous platforms. You can download SQL Developer from Oracle’s OTN web site:
https://www.oracle.com/downloads/
Click on the Developer Tools link to find the current version of the SQL Developer. Before you install SQL Developer on your macOS, you will need to download and install the Java 8 Software Development Kit (SDK) from this web site:
http://www.oracle.com/technetwork/java/javase/downloads/
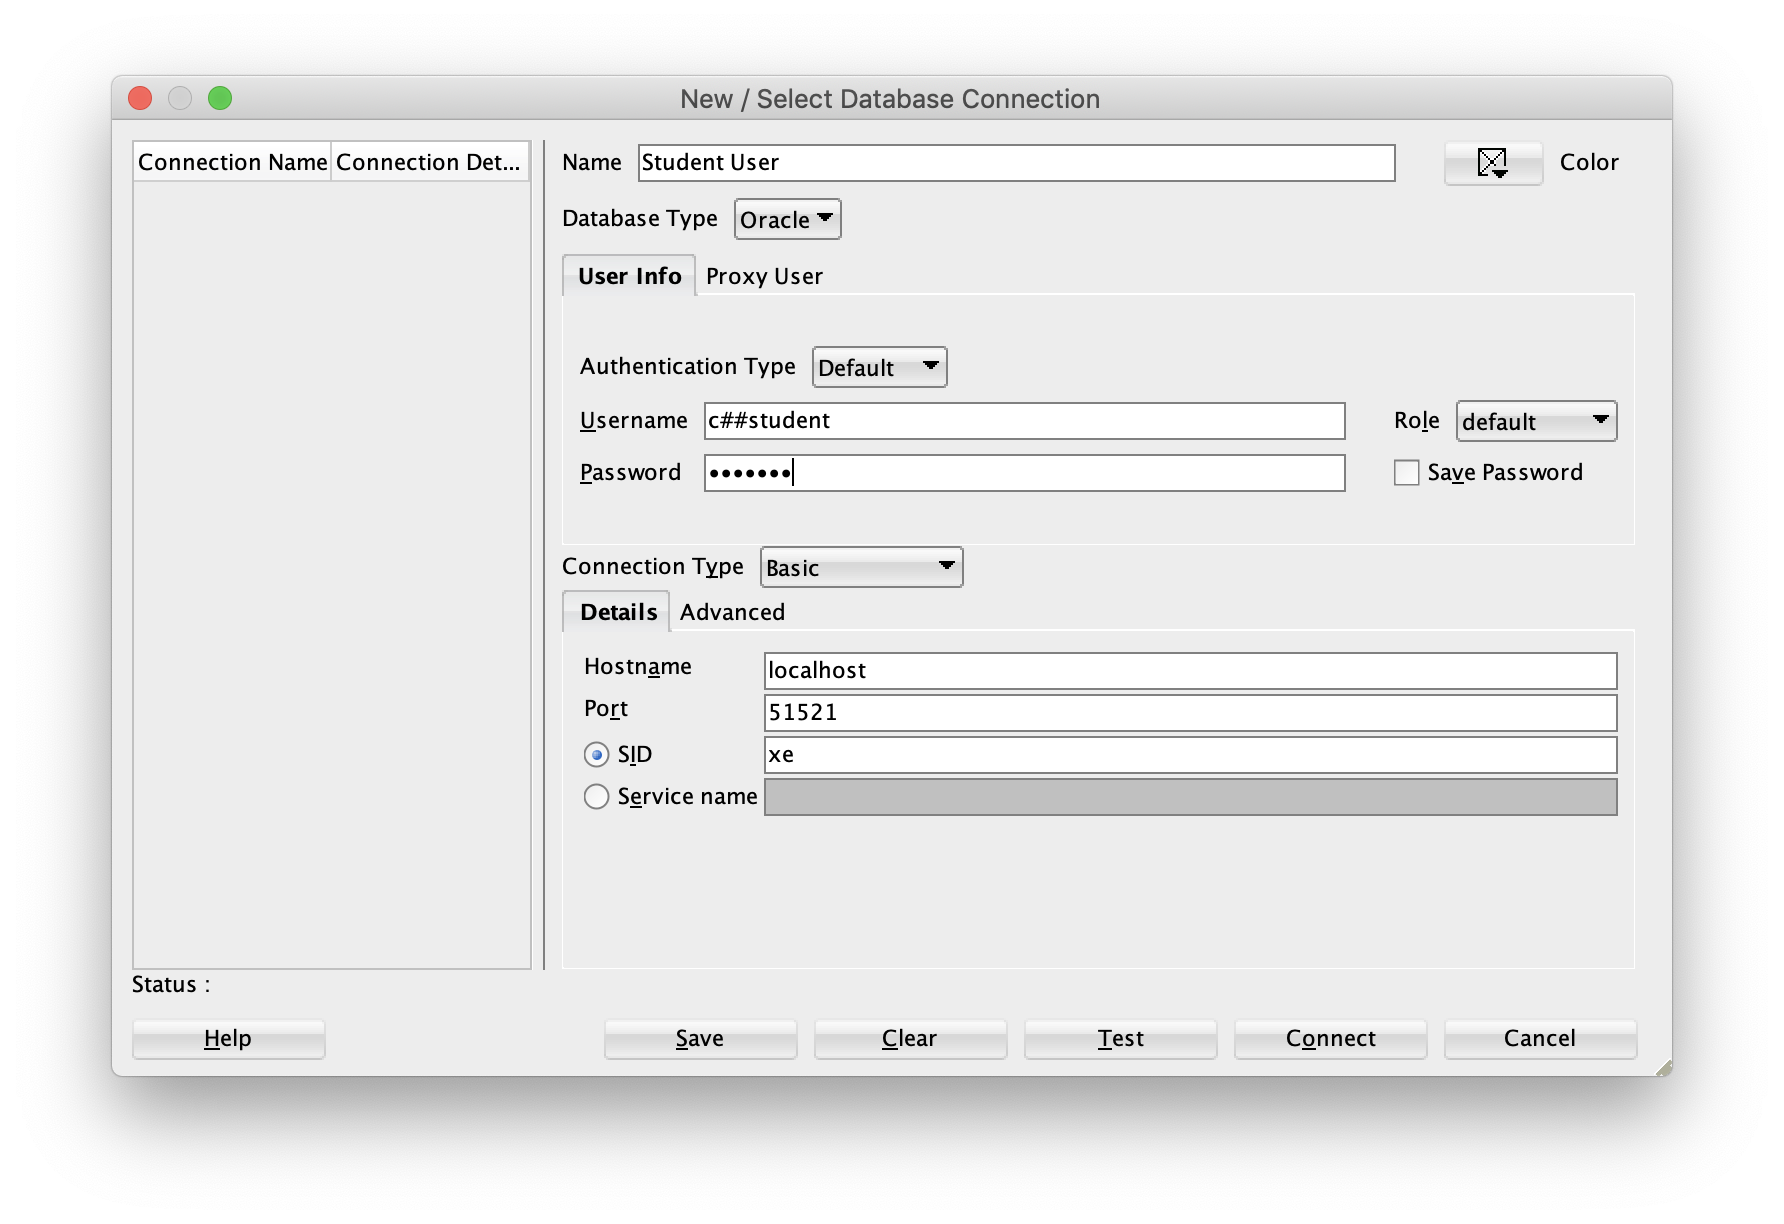
You configure a SQL Developer connection with the following values: use localhost as the host, c##student as the user, xe as the network service identifier, and 51521 as the port address. Click the plus button to add a connection where you enter these values, like shown below:
While the Java code in SQL Developer supports a port connection, Docker maps the port to the Oracle docker container. You don’t need to resolve the connection between SQL Developer and the Oracle Database listener through the network layer because this solution uses an Internal Process Control (IPC) model, based on socket to socket communication.
With virtualization you would need to install the Oracle Instant Client software on the hosting operating system. Then, you would configure your /etc/hosts file on both the hosting (macOS) and hosted (Oracle Linux) operating systems. Alternatively, you could add both IP addresses to a DNS server. The IP addresses let you map the connection between your physical macOS system and the Docker container running Oracle Linux. You can find further qualification of the connection mechanisms and repackaging in the Oracle Docker User Guide.
Containers map a local directory to operating system inside the container. Based on the earlier instructions the ~/oracle directory maps to the /home directory in the docker container. You have the ability to edit and move files within this portion of the file system’s hierarchy, which means you have complete control of the portion of the file system owned by the student user.
The next few steps help you verify the dual access to this portion of the docker container. Open a Terminal session and check your present working directory (with the pwd utility).
macName:~ username$ pwd |
It should return:
/Users/username |
During the installation, you created two subdirectories in the /Users/username directory. They were the oracle and docker-images subdirectories. In your host macOS, you should list (with the ls utility) the contents of your oracle subdirectory:
ls ~/oracle |
It should return the following:
oracle student |
As mentioned, your macOS /Users/username/oracle directory holds the contents of your docker container’s /home directory. That means that your /Users/username/oracle/student directory mirrors the /home/student directory in your docker container.
Assume your GitHub code repository for Oracle development is in a directory on your macOS side. The local mapping to the ~/oracle/student directly lets you put symbolic links in the hosted student user’s subdirectories. These symbolic links would point to the editable code on the macOS file system, which can be concurrently linked to your GitHub code repository.
DBeaver for PostgreSQL
I’m migrating my database classes from the Oracle database to the PostgreSQL database. Using the Oracle Express Edition has always required a virtualized image because students use Windows and Mac OS. Also, the university doesn’t like my use of a virtualized image. Virtualization imposes incremental cost on students to have high end laptops.
The available Docker images don’t typically support the Oracle Express Edition. That means there are licensing implications tied to Oracle.
As a committee, we decided to use PostgreSQL as our new database platform. We opted to use PostgreSQL over MySQL because it supports arrays and stored procedures. PostgreSQL PL/pgSQL are a solid implementation of stored procedures. While MySQL supports a stored procedure language, it effectively discourages using it.
We use sqlplus, mysql, or psql Command-Line Interface (CLI) as the primary interface. That’s because CLI supports production-oriented deployment and DevOps practices. The Open Source DBeaver project provides a clean native GUI management console for PostgreSQL. DBeaver also supports other databases, which pgAdmin doesn’t.
You click the Download button from the DBeaver home page. It support Windows, Mac OS, and Linux distributions. I downloaded the Linux RPM package to my Downloads directory. You can run the RPM with the following syntax:
rpm -ivh dbeaver-ce-6.2.3-stable.x86_64.rpm |
It doesn’t check for dependencies. The installation is quick. You can verify that it’s installed with the following command:
which dbeaver |
It installs here:
/usr/bin/dbeaver |
If you failed to install the PostgreSQL JAR file, you’ll see the following error message:

It will look like the following on Linux:

You should have a user in the pg_hba.conf file, like the following:
host all all 127.0.0.1/32 trust |
As always, I hope this helps those solving problems.
Mac SQL Developer Install
This how you install SQL Developer on Mac OS Yosemite. The first thing you need to do is download and install Java 8, not Java 7 on your Mac OS Yosemite as suggested on some web sites. You can determine whether or not Java is installed by running the following command:
Mac-Pro-3:~ username$ java -version No Java runtime present, requesting install. |
You must accept the Java license to install Java 8 on the Mac OS X operating system:

You have the option of installing the Java SDK or JDK. I’ve opted to install Netbeans 8 with JDK 8u45, as you can tell from the screen capture after you launched the file:

It is a standard Mac OS installation, which is why I didn’t bother showing any dialog messages. After installing the Java JDK or SDK, you should download SQL Developer 4.1 from Oracle’s web site. Below is a screen shot of the Oracle download web page where I’ve accepted the license agreement:

If you attempt to launch the installation and you’ve set your Mac Security to the “Mac App Store and identified developers” setting, you should raise the following exception:

If you reset the Mac Security to an “Anywhere” setting, you can install Oracle SQL Developer on Yosemite. Just make sure you reset it to the “Mac App Store and identified developers” setting after you install SQL Developer.
If you launch SQL Developer with the Security “Anywhere” setting, it displays the following dialog:

After you launch the program, you will see the following progress dialog:

The last step of the installation launches SQL Developer, as shown below:

Click the Connections icon to create an initial connection, like the following:

After connecting to the database, you can write and execute a query as shown in the next screen capture:

As always, I hope that this helps those who require an example to install SQL Server on a Mac OS.
Run X11 Apps on Mac
It’s possible folks didn’t notice but Mac OS X no longer includes XQuartz by default from Maverick forward. You need to download XQuartz and install it. I’d recommend after you install Xcode.
Launch XQuartz and then either use the bash shell it opens or open a Terminal bash shell session. Inside the shell, you might start Secure Shell (ssh) like this:
Mac-Pro-3:~ michaelmclaughlin$ ssh student@192.168.2.170 student@192.168.2.170's password: Last login: Thu Jun 4 14:33:37 2015 [student@localhost ~]$ xclock & [1] 10422 [student@localhost ~]$ Error: Can't open display: |
Granted that’s a trivial error and running the xclock X11 applications isn’t crucial, an error that makes it more important is the following from Oracle’s old Designer/2000 application:
FRM-91111: Internal Error: window system startup failure. FRM-10039: Unable to start up the Form Builder. |
This is the desired behavior. Secure shell (ssh) can’t run it unless you make the connection with the -Y flag. You should use the following syntax:
Mac-Pro-3:~ michaelmclaughlin$ ssh -Y student@192.168.2.170 student@192.168.2.170's password: Last login: Tue Jun 9 14:56:55 2015 from 192.168.2.1 /usr/bin/xauth: file /home/student/.Xauthority does not exist [student@localhost ~]$ xclock & [1] 10760 |
You can safely ignore the .Xauthority does not exist warning message because it’ll create a .Xauthority file and store the magic cookie after the warning message. You should see the xclock program running in the upper left hand corner of your console, like:

It’s terrific that you don’t get a font warning like you typically would using UTF-8 on Linux. Nice that the Mac OS fonts are so well done that there isn’t a raised exception.
Using xclock or xeyes isn’t very useful as a rule, but this method also lets you run any of the Linux GUI applications. For example, the following gedit command lets you run the gedit utility from a Mac OS console. If you’ve installed the gedit plug-ins, you also can use the Terminal console on the remote system.

The process sequence for the command-line is shown below:
1030 1 /usr/sbin/sshd -D - The root process launches the ssh daemon 3145 1030 sshd: student [priv] - The sshd launches a ssh session to manage a student ssh session 3152 3145 sshd: student@pts/1 - The ssh session launched to manage the ssh session 3166 3152 -bash - The bash shell launched by connecting through the ssh session 3240 3166 gedit - The gedit command issued inside a ssh session 3166 3240 gnome-pty-helper - Launching the gedit session across X11 3169 3240 /bin/bash - Launching the Terminal session inside the gedit session across X11 3269 3884 ps -ef - Command run inside the gedit Terminal session |
Hope that helps those who want to use X11 applications on the Mac OS.
