Archive for the ‘SQL Developer’ Category
SQL Developer & PL/SQL
While SQL Developer installs with a dbms_output view, some organizations close it before they distribute images or virtual machine (VM) instances. This post shows you how to re-enable the Dbms Output view for SQL Developer.
SQL Developer DBMS_OUTPUT Configuration
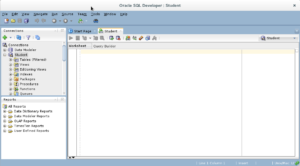
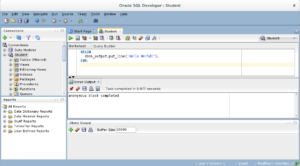
- You need to open SQL Developer, which may look like this when the
DBMS_OUTPUTview isn’t visible.
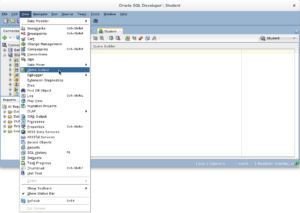
- You need to click on the View menu option in SQL Developer and choose the Dbms Output dropdown menu element.
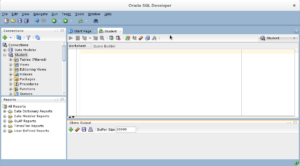
- You should see a grayed-out Dbms Output view.
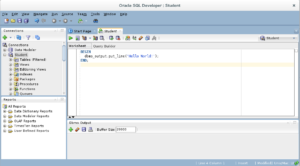
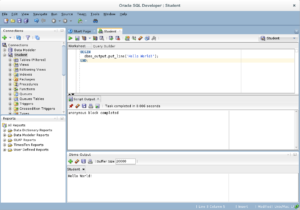
- You should type a simply “Hello World!” anonymous block program in PL/SQL, like the one shown in the drawing.
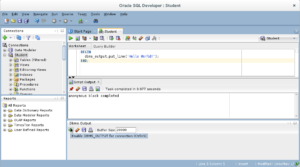
- After writing the “Hello World!” anonymous block program in PL/SQL, click the green arrow to start the statement and you will see two things. There is now a Script Output view between your console and Dbms Output views, and it should say “anonymous block completed.” Unfortunately, none of your output is displayed in the Dbms Output view because you need to enable it.
- If you hover over the Dbms Output view’s green arrow, you see the help message that describes the behavior of the green arrow. The Dbms Output green arrow lets you enable the Dbms Output view for output.
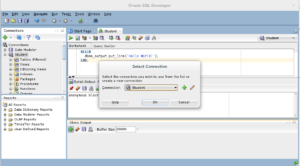
- After you click the Dbms Output view’s green arrow, you receive a Select Connection prompt for the view. Make sure you have the right user, and click the OK button to continue.
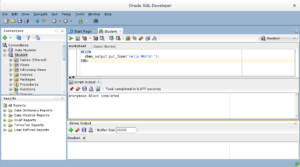
- After you create the connection for the Dbms Output stream, the view area becomes white rather than gray.
- Click the green arrow to start the statement and you will see the “Hello World!” string in the Dbms Output view.”
As always, I hope this helps those looking for a solution.
Mac SQL Developer Install
This how you install SQL Developer on Mac OS Yosemite. The first thing you need to do is download and install Java 8, not Java 7 on your Mac OS Yosemite as suggested on some web sites. You can determine whether or not Java is installed by running the following command:
Mac-Pro-3:~ username$ java -version No Java runtime present, requesting install. |
You must accept the Java license to install Java 8 on the Mac OS X operating system:
You have the option of installing the Java SDK or JDK. I’ve opted to install Netbeans 8 with JDK 8u45, as you can tell from the screen capture after you launched the file:
It is a standard Mac OS installation, which is why I didn’t bother showing any dialog messages. After installing the Java JDK or SDK, you should download SQL Developer 4.1 from Oracle’s web site. Below is a screen shot of the Oracle download web page where I’ve accepted the license agreement:
If you attempt to launch the installation and you’ve set your Mac Security to the “Mac App Store and identified developers” setting, you should raise the following exception:
If you reset the Mac Security to an “Anywhere” setting, you can install Oracle SQL Developer on Yosemite. Just make sure you reset it to the “Mac App Store and identified developers” setting after you install SQL Developer.
If you launch SQL Developer with the Security “Anywhere” setting, it displays the following dialog:
After you launch the program, you will see the following progress dialog:
The last step of the installation launches SQL Developer, as shown below:
Click the Connections icon to create an initial connection, like the following:
After connecting to the database, you can write and execute a query as shown in the next screen capture:
As always, I hope that this helps those who require an example to install SQL Server on a Mac OS.
SQL Developer – Fedora
This is the continuation of my efforts to stage an awesome Fedora developer’s instance. It shows you how to install Java 1.8 software development kit, which is nice to have. Though you can’t use Java 1.8 officially with Oracle SQL Developer 4.0.3 it is required for Oracle SQL Developer 4.1. Fortunately, the Oracle Product Manager, Jeff Smith has advised us that you can use Java 1.8 JDK with Oracle SQL Developer 4.0.3, and he’s written a comment to the blog post that it runs better with the Java 1.8 SDK.
After you install Oracle SQL Developer 4.0.3 or Oracle SQL Developer 4.1, you can watch Jeff Smith’s YouTube Video on SQL Developer 3.1 to learn how to use the basics of SQL Developer. I couldn’t find an updated version of the video for SQL Developer 4 but I didn’t try too hard.
You use yum as the root user to install Java SDK 1.8, much like my earlier Installing the Java SDK 1.7 and Java-MySQL Sample Program. The following command installs Java 8:
yum install -y java-1.8* |
It produces the following output:
Loaded plugins: langpacks, refresh-packagekit
fedora/20/x86_64/metalink                                   |  18 kB  00:00
mysql-connectors-community                                  | 2.5 kB  00:00
mysql-tools-community                                       | 2.5 kB  00:00
mysql56-community                                           | 2.5 kB  00:00
pgdg93                                                      | 3.6 kB  00:00
updates/20/x86_64/metalink                                  |  16 kB  00:00
updates                                                     | 4.9 kB  00:00
(1/2): mysql-tools-community/20/x86_64/primary_db           |  21 kB  00:00
(2/2): updates/20/x86_64/primary_db                         |  13 MB  00:09
updates/20/x86_64/pkgtags
updates
(1/2): updates/20/x86_64/pkgtags                            | 1.4 MB  00:02
(2/2): updates/20/x86_64/updateinfo                         | 1.9 MB  00:04
Package 1:java-1.8.0-openjdk-headless-1.8.0.31-1.b13.fc20.x86_64 already installed and latest version
Package 1:java-1.8.0-openjdk-javadoc-1.8.0.31-1.b13.fc20.noarch already installed and latest version
Resolving Dependencies
--> Running transaction check
---> Package java-1.8.0-openjdk.x86_64 1:1.8.0.31-1.b13.fc20 will be installed
---> Package java-1.8.0-openjdk-accessibility.x86_64 1:1.8.0.31-1.b13.fc20 will be installed
---> Package java-1.8.0-openjdk-demo.x86_64 1:1.8.0.31-1.b13.fc20 will be installed
---> Package java-1.8.0-openjdk-devel.x86_64 1:1.8.0.31-1.b13.fc20 will be installed
---> Package java-1.8.0-openjdk-src.x86_64 1:1.8.0.31-1.b13.fc20 will be installed
--> Finished Dependency Resolution

Dependencies Resolved

================================================================================
 Package                          Arch   Version                  Repository
                                                                           Size
================================================================================
Installing:
 java-1.8.0-openjdk               x86_64 1:1.8.0.31-1.b13.fc20    updates 201 k
 java-1.8.0-openjdk-accessibility x86_64 1:1.8.0.31-1.b13.fc20    updates  12 k
 java-1.8.0-openjdk-demo          x86_64 1:1.8.0.31-1.b13.fc20    updates 1.9 M
 java-1.8.0-openjdk-devel         x86_64 1:1.8.0.31-1.b13.fc20    updates 9.2 M
 java-1.8.0-openjdk-src           x86_64 1:1.8.0.31-1.b13.fc20    updates  45 M

Transaction Summary
================================================================================
Install  5 Packages

Total download size: 56 M
Installed size: 92 M
Downloading packages:
(1/5): java-1.8.0-openjdk-accessibility-1.8.0.31-1.b13.fc20 |  12 kB  00:00
(2/5): java-1.8.0-openjdk-1.8.0.31-1.b13.fc20.x86_64.rpm    | 201 kB  00:02
(3/5): java-1.8.0-openjdk-demo-1.8.0.31-1.b13.fc20.x86_64.r | 1.9 MB  00:03
(4/5): java-1.8.0-openjdk-devel-1.8.0.31-1.b13.fc20.x86_64. | 9.2 MB  00:07
(5/5): java-1.8.0-openjdk-src-1.8.0.31-1.b13.fc20.x86_64.rp |  45 MB  05:05
--------------------------------------------------------------------------------
Total                                              187 kB/s |  56 MB  05:05
Running transaction check
Running transaction test
Transaction test succeeded
Running transaction (shutdown inhibited)
  Installing : 1:java-1.8.0-openjdk-1.8.0.31-1.b13.fc20.x86_64              1/5
  Installing : 1:java-1.8.0-openjdk-devel-1.8.0.31-1.b13.fc20.x86_64        2/5
  Installing : 1:java-1.8.0-openjdk-demo-1.8.0.31-1.b13.fc20.x86_64         3/5
  Installing : 1:java-1.8.0-openjdk-accessibility-1.8.0.31-1.b13.fc20.x86   4/5
  Installing : 1:java-1.8.0-openjdk-src-1.8.0.31-1.b13.fc20.x86_64          5/5
  Verifying  : 1:java-1.8.0-openjdk-devel-1.8.0.31-1.b13.fc20.x86_64        1/5
  Verifying  : 1:java-1.8.0-openjdk-demo-1.8.0.31-1.b13.fc20.x86_64         2/5
  Verifying  : 1:java-1.8.0-openjdk-1.8.0.31-1.b13.fc20.x86_64              3/5
  Verifying  : 1:java-1.8.0-openjdk-accessibility-1.8.0.31-1.b13.fc20.x86   4/5
  Verifying  : 1:java-1.8.0-openjdk-src-1.8.0.31-1.b13.fc20.x86_64          5/5

Installed:
  java-1.8.0-openjdk.x86_64 1:1.8.0.31-1.b13.fc20
  java-1.8.0-openjdk-accessibility.x86_64 1:1.8.0.31-1.b13.fc20
  java-1.8.0-openjdk-demo.x86_64 1:1.8.0.31-1.b13.fc20
  java-1.8.0-openjdk-devel.x86_64 1:1.8.0.31-1.b13.fc20
  java-1.8.0-openjdk-src.x86_64 1:1.8.0.31-1.b13.fc20

Complete! |
Then, you go to Oracle’s SQL Developer 4.0.3 web page or Oracle’s Beta SQL Developer 4.1 web page and download the SQL Developer RPM. At the time of writing, you download the following SQL Developer 4.0.3 RPM:
sqldeveloper-4.0.3.16.84-1.noarch.rpm |
Assuming you download the sqldeveloper-4.0.3.16.84-1.noarch.rpm file to the student user’s account. It will download into the /home/student/Downloads directory. You run the SQL Developer RPM file with the following syntax as the root user:
rpm -Uhv /home/student/Downloads/sqldeveloper-4.0.3.16.84-1.noarch.rpm |
Running the SQL Developer RPM produces the following output:
Preparing... ################################# [100%] Updating / installing... 1:sqldeveloper-4.0.3.16.84-1 ################################# [100%] |
You can now run the sqldeveloper.sh file as the root user with the following syntax:
/opt/sqldeveloper/sqldeveloper.sh |
At this point, it’s important to note that my download from the Oracle SQL Developer 4.1 page turned out to be SQL Developer 4.0.3. It prompts you for the correct Java JDK, as shown below. You may opt to enter the path to the Java JDK 1.8 for SQL Developer 4.1 because until today you downloaded the Oracle SQL Developer 4.0.3 version from the Oracle SQL Developer 4.1 page. Naturally, the Oracle SQL Developer 4.1 instructions say to use the Java 1.8 JDK on the RPM for Linux Installation Notes web page, as shown below:
If you assume from the instructions on the Oracle instruction page above that Oracle SQL Developer 4.0.3 and Oracle SQL Developer 4.1 support Java 1.8 JDK, you may enter the location for the Java JDK 1.8 when prompted. Jeff Smith, the Product Manager wrote this blog post on Oracle SQL Developer 4: Windows and the JDK. Unfortunately, you’ll see the following message if you attempt to run Oracle SQL Developer 4.0.3 with the Java 1.8 SDK at the command-line:
Oracle SQL Developer Copyright (c) 1997, 2014, Oracle and/or its affiliates. All rights reserved. Type the full pathname of a JDK installation (or Ctrl-C to quit), the path will be stored in /root/.sqldeveloper/4.0.0/product.conf /usr/lib/jvm/java-1.8.0-openjdk-1.8.0.31.x86_64 OpenJDK 64-Bit Server VM warning: ignoring option MaxPermSize=256M; support was removed in 8.0 |
It also raises the following error message dialog:
Text version of Unsupported JDK Version error message:
Running this product is supported with a minimum Java version of 1.7.0_51 and a maximum version less than 1.8.
Update the SetJavaHome in “/root/.sqldeveloper/4.0.0/product.conf” to point to another Java.
This produce will not be supported, and may not run correctly if you proceed. Continue anyway?
The error dialog message tells us that the instructions on the RPM for Linux Installation Notes web page can be misleading. You really need to use the Java JDK 1.7 to be supported officially, but you can safely ignore the error.
If you want a certified component, leave the “Skip This Message Next Time” checkbox unchecked and click the “No” button to continue. At this point, there’s no automatic recovery. You need to open the following file:
/root/.sqldeveloper/4.0.0/product.conf |
You need to change the SetJavaHome parameter in the file to the following:
# SetJavaHome /path/jdk SetJavaHome /usr/lib/jvm/java-1.7.0-openjdk-1.7.0.79-2.5.5.0.fc20.x86_64 |
After making the change, you can re-run the sqldeveloper.sh shell as follows:
/opt/sqldeveloper/sqldeveloper.sh |
It launches the following dialog message:
The installation pauses to ask you if you want to transfer an existing SQL Developer configuration by raising the following dialog. Assuming this is a new installation, the installer won’t find a prior configuration file. You need to click the “No” button to proceed.
The installation continues and launches SQL Developer. The first time launch shows you the following Oracle Usage Tracking dialog. If you don’t want your use monitored, uncheck the “Allow automated usage reporting to Oracle” checkbox. Click the “OK” button to continue.
After dismissing the Oracle Usage Tracking dialog, you see the SQL Developer environment:
After installing SQL Developer in the root account, you can install it as the student user. You use this command as the student user:
/opt/sqldeveloper/sqldeveloper.sh |
It returns the following error because it’s the second installation and SQL Developer doesn’t prompt you to configure the user’s product.conf file with the working JDK location:
Oracle SQL Developer Copyright (c) 1997, 2014, Oracle and/or its affiliates. All rights reserved. Type the full pathname of a JDK installation (or Ctrl-C to quit), the path will be stored in /home/student/.sqldeveloper/4.0.0/product.conf Error: Unable to get APP_JAVA_HOME input from stdin after 10 tries |
You need to edit the /home/student/.sqldeveloper/4.0.0/product.conf file, and add the following line to the file:
# SetJavaHome /path/jdk SetJavaHome /usr/lib/jvm/java-1.7.0-openjdk-1.7.0.79-2.5.5.0.fc20.x86_64 |
Now, you can launch SQL Developer with the following command:
/opt/sqldeveloper/sqldeveloper.sh |
Alternatively, you can add the following alias to the student user’s .bashrc file:
# Set alias for SQL Developer tool. alias sqldeveloper="/opt/sqldeveloper/sqldeveloper.sh" |
You can now launch the SQL Developer tool, like this as the student user:
sqldeveloper |
You see the following when SQL Developer launches:
As always, I hope this helps those trying to sort out installing SQL Developer on a Fedora server.
SQL Developer batch file?
It’s amazing to me that there is yet another outcome from installing Oracle Database 11g on Windows 7. This one installs without an error but then raises the following error message dialog when you try to launch SQL Developer from the menu. Naturally, it seems to depend on having more than one Java JVM installed when you run the Oracle Universal Installer (OUI) without setting the %JAVA_HOME% environment variable.
Text of error message from image:
Windows is searching for SQLSERVER.BAT. To located the file yourself, click Browse. |
While the installation release notes (E10842-02) that download or ship with the product don’t mention the %JAVA_HOME% or %DEV_TOOLS% environment variables, it appears you should set them before the installation. You can discover this by double clicking on the SQL Developer menu option, and then choose Properties. You should see the following in the dialog.
Windows 7 searches for the sqldeveloper.bat file when the OUI installation fails to configure the SetJavaHome parameter in the sqldeveloper.conf file. OUI does configure the SetJavaHome parameter when OUI resolves the JVM address.
You should put this in the Target field:
C:\app\<user_name>\product\11.2.0\dbhome_1\sqldeveloper\sqldeveloper\bin\sqldeveloperW.exe |
Although, that may be a simplifying assumption of what causes the problem, I didn’t go through all the Oracle Universal Installer (OUI) background tasks to discover the actual code element. Also, I didn’t take the time to retest by setting those parameters. I solved this problem by replacing the sqldeveloper.bat value with a sqldeveloperw.exe value in the menu link, applying the change, and saving it. If you’ve a better solution, please share it.
The configuration file is found here:
C:\> app\<user_name>\product\11.2.0\dbhome_1\sqldeveloper\sqldeveloper\bin\sqldeveloper.conf |
While you can provide a sqldeveloper.bat file, it’s much simpler to simply put the JVM physical address in the sqldeveloper.conf file. That’s what I did to solve the problem and what I think the development team expects.
A valid SetJavaHome value points to a 32-bi JVM, and in my testing environment that is:
SetJavaHome C:\Program Files (x86)\Java\jdk1.6.0_34 |
Another post on this topic can be found here. As always, I hope this saves somebody time working with the Oracle product stack.
SQL Developer JVM Fix
It’s amazing the moving parts in Oracle Database 11g, and the ones that I don’t use after installation for a while often reach out to teach me something new. That’s what happened when I went to launch SQL Developer on my Windows 7 Professional 64-bit installation.
I got the message Unable to find a Java Virtual Machine, as shown in the image below. It really means unable to find a 32-bit Java 5 or Java 6 (1.6.0_4+) SDK home. Although the installation appeared fine, it pointed the SQL Developer configuration file to an incompatible 64-bit Java 7 SDK.
You fix this error by following these steps:
- Open the
sqldeveloper.conffile and check theSetJavaHomeparameter value. You find thesqldeveloper.conffile in the following directory:
%ORACLE_HOME\sqldeveloper\sqldeveloper\bin |
- Install the 32-bit Java 6 (1.6.0_4+) SDK on the operating system if not installed already. You can check whether it’s installed by looking for it in the Program Files (x86) folder.
- Change the value of the
SetJavaHomeparameter to point to the new 32-bit Java 6 home directory (or folder). The following change to line 18 in thesqldeveloper.conffile should fix it on your installation (provided that’s your version of the JVM).
18 | SetJavaHome C:\Program Files (x86)\Java\jdk1.6.0_34 |
Hope this helps those who run into the same issue.
