Archive for the ‘VMWare’ Category
What a VMWare Thrill …
I’d upgraded from VMWare Fusion 2 to 3 and taken care of most instances. A NASTY surprise awaited me when I tried to upgrade my Linux installations this morning.
You MUST to uninstall VMWare tools from your repository of Linux operating systems before upgrading your VMWare Fusion or ESX server. If you don’t, you can’t access the console because the drivers make the console look like this:
Perhaps I missed this note when, as an early adopted I opted to move straight to VMWare Fusion 3. I would have complied with these instructions to avoid this headache.
All that’s required now, is that: (a) I export 500 GBs worth of virtual machines to another machine running VMWare Fusion 2; (b) Individually start each machine and run the uninstall VMWare Tools command individually; and, (c) Shutdown and reposition all virtual machines on the original server.
As stated in the note, the command to remove it is:
/usr/bin/vmware-tools-uninstall.pl |
Click on the note in the event the link fails to resolve, which would mean the note vanishes into oblivion some day in the future …
While I’ve another machine that’s not yet upgraded, this is a major inconvenience. It’s a shame that the Linux components don’t install automatically. It’s a shame that the install didn’t say something like, “Don’t do this if you’ve Linux virtual machines, unless you’ve removed their VMWare Tools installation.”
Another word to the wise, you don’t get the Linux Tools automatically when you download the product. The software prompts you to download the additional components when you attempt to launch a Linux environment. A cruel irony since by the time you see the prompt, you can’t! This is a change from the prior upgrade process.
Yes, haste makes waste but now I know. In the future, treat all VMWare upgrades like those from Microsoft test, re-test, re-authenticate in a small way before upgrading. Do you think VMWare really want to send that message to its customer base?
![]() I got back to this tonight, and thanks to Red Hat’s Session Manager I was able to fix the Red Hat VMs. Launching it, I simply switched to the Failsafe Terminal and ran the following command, as per the note:
I got back to this tonight, and thanks to Red Hat’s Session Manager I was able to fix the Red Hat VMs. Launching it, I simply switched to the Failsafe Terminal and ran the following command, as per the note:
# /usr/bin/vmware-uninstall.pl |
After that, I rebooted. Then, installed (mounted the VMWare Tools disk) from the VMWare Fusion menu. Opening a terminal as root, I then re-installed and configured VMWare Fusion. Those are done. As more time allows, I’ll update about the others.
I’m now reconfiguring the network since the VMWare Fusion 2 bridged at a 172.16.153 subdomain and VMWare Fusion 3 bridges at a 172.16.123 subdomain.
VMWare nabs me again …
When I run into failures on VMWare Fusion, they’re always a bit tedious. This one happened on my iMac (OS X Leopard) running VMWare 2 (both constrained to old releases by university governance policies). The VM is Microsoft Vista in an IDE partition, it hung after running too long. I had to force quit the application. On reboot the socket file was still there, and it gave the following error message when trying to start it.
Here’s the error in plain text, so search engines can find it for others.
Virtual device serial0: File "/var/folders/Sf/SfvoJITAHMq1Vp8bNI7QZU+++TM/-Tmp-//vmware-mmclaugh/thnuclnt-641/socket" exists, but no server is listening to it. There are three possible causes for this: - The server is alive but not ready yet, and you can retry later. - The server is busy communicating with another client, so you cannot run this client at the same time. - A previous server exited abruptly, and you can remove the file and try again. The device will be disconnected. |
How to fix it?
Delete the file, right? Yes, but there’s a trick. Navigating through the -Tmp- directory required a Unix shell trick because the - (dash) is a switch and backquoting it with a \ (backslash) didn’t work. Jeff Yoder, told me the trick to change directory into a dash leading directory name. It was this:
cd -- -Tmp- |
The -- is how most shells mark the end of options to a command. After a -- all - (dashes) are treated as ordinary characters.
Mark Olaveson reminded me that using the present working directory before the directory name also worked. It demotes the dash to an ordinary character too.
cd ./-Tmp- |
When I got to the directory, there was the socket file. I deleted it and everything worked like a charm.
srwxrwxrwx 1 mmclaugh staff 0 Dec 8 13:04 socket |
Windows 7 Static IP
There are some subtle changes between Windows 7 and either Windows XP and Windows Vista. Since I use virtualization (with VMWare Fusion) extensively to test environments, I seem to go through this drill too often. By the way, I upgraded to VMWare Fusion 3 before testing the production releases of Windows 7.
The easiest Windows 7 installation uses DHCP. That’s what I did before patching the OS, installing virus protection software, and installing a few tools and program. Then, I change from a dynamic IP to static IP address and add a meaningful name to the C:\Windows\System32\Drivers\etc\hosts file. Here are the steps to set a static IP address on Windows 7:
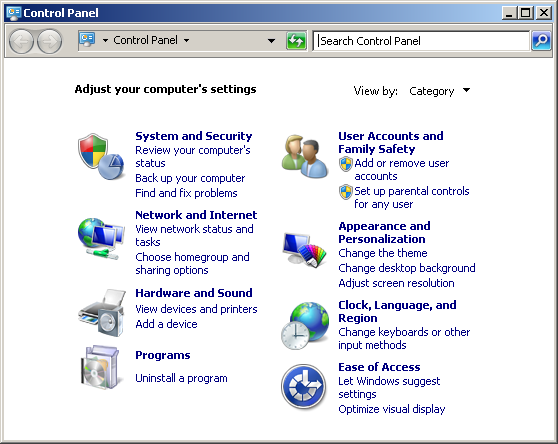
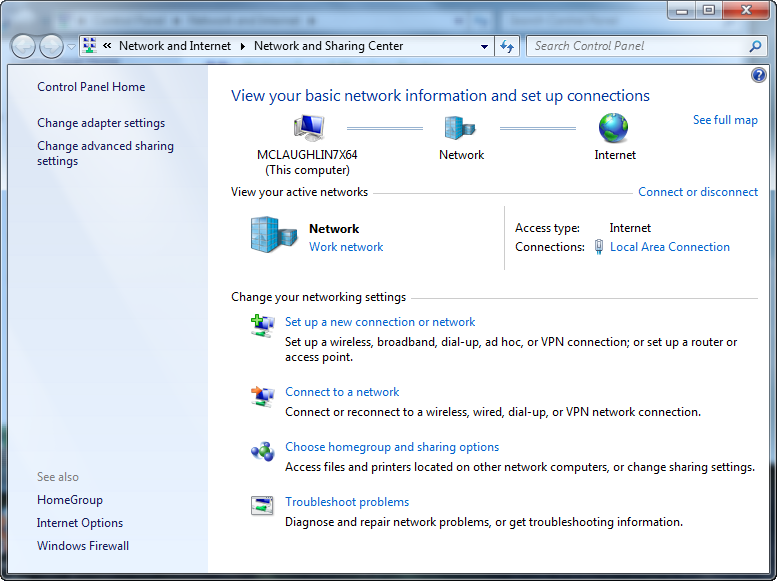
- Assuming that you’re in the Category view, you should navigate to the Control Panel, choose Network and Internet, and then click Network and Sharing Center. This is the window that you should see (click image to enlarge it):
- Click the Local Area Connection to begin configuring your static IP address.
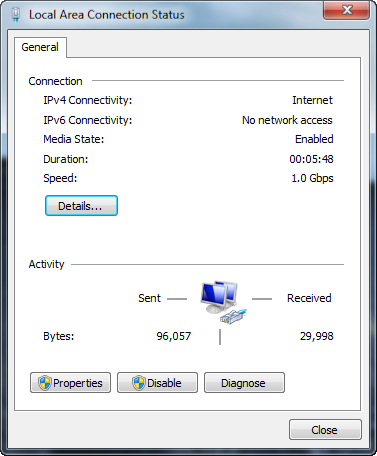
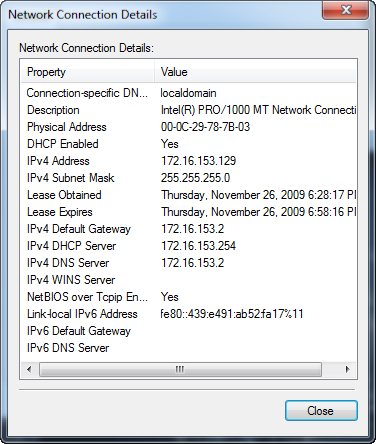
- From the Local Area Connection Status window, click the Details button to see your existing connection details (most likely DHCP). If you’re running this in VMWare Fusion, the
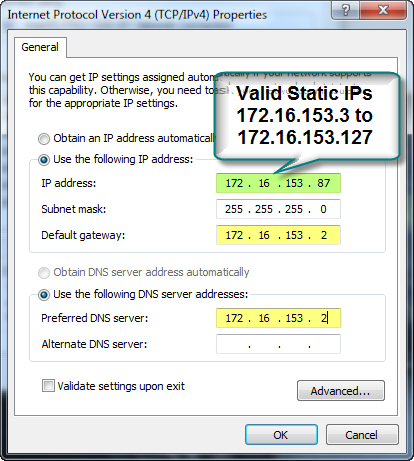
172.16.153.129is the first IP address allocated. You should note the default gateway and DNS server IP address, which should always be172.16.153.2. Click the Close button when you’ve made note of those IP addresses for subsequent steps.
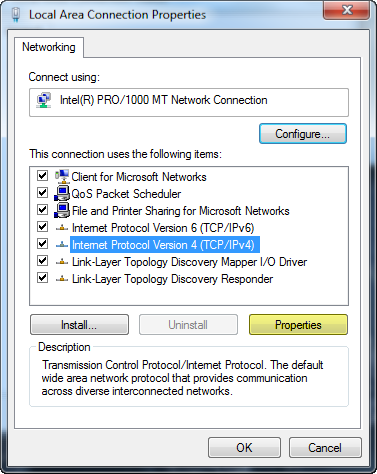
- Back at the Local Area Connection Status window, click the Properties button. It will show you the Local Area Connection Properties dialog. Click on the Internet Protocol Version 4 (TCP/IPv4) in the item box of the dialog window.
- Click the Use the following IP address radio button and enter the appropriate values for your static IP address. The default gateway and DNS server are generally different but are the same when you’re using NAT addressing inside VMWare.
You should be completed now. If you test the connection, Windows 7 raises and error but everything works after you reboot the operating system.
VMWare Locked Files
Working on my stuff today, and the Belkin Flip DVI KVM Switch (product discontinued as of 2012) went nuts. First, I lost the keyboard, and then video. After a couple fruitless minutes, I did the unthinkable and opted for the 7 second to oblivion restart while two VMWare instances were up and running. By the way, I disconnected the Belkin Flip DVI KVM Switch because that was the last straw. For those looking at the product, I’d advise against it because infrequently the device transmits haze or golden flashing pixels. Also, this wasn’t the first time the keyboard disconnected itself without rhyme or reason.
All my VMs were locked when I rebooted. It didn’t matter whether they were running or not when I did the forced shutdown. This is not the image you want to see when you’re short on time against a fixed deadline.
The fix was simple. You go to the directory where each VM is located and find if you have locked files. You can run this command to find them:
$ ls *.lck |
If they’re locked you’ll see something this:
564df021-1de5-dec0-942a-37635b35361b.vmem.lck: M00680.lck Windows XP Professional 32-bit.vmdk.lck: M25400.lck Windows XP Professional 32-bit.vmx.lck: M47433.lck |
You need to delete all three files, I used this command:
$ rm -rf *.lck |
When you restart VMWare Fusion, everything will be fine. Hope this helps a few folks.
Reluctant Print Sharing
About 8 months ago I published how to set up a shared network printer in Windows XP, using VMWare Fusion on a Mac OS X. Recently, I went to follow my own instructions and found they failed with an older Windows XP media – OUCH!
When I checked whether or not the version of Windows XP knew about my much newer printer, the problem became clear. If you want to set up a newer printer than Windows recognizes, you’ll need the vendors media.
Here are the steps to install a printer when Windows can’t recognize the network printer:
1. First make sure you navigate to Virtual Machine on the VMWare Fusion menu, choose CD/DVD and then Connect CD/DVD to proceed.

2. Insert the disk that came with your printer. My disk is for my HP 2420 duplex printer on Windows XP, 32-bit. If you’re installing to a 64-bit version of Windows, the installer will die and the complexity rises as you download the media from HP and manually install the driver files.
The screen shots are those for configuring a printer because I neglected to capture the driver install shots earlier and didn’t have the time to do so. When I have to setup another similar version, I’ll add those. The first screen shot after the welcome screen and choosing your language follows. Click the Next button to continue.

3. Choose the Add an additional printer on printer driver radio button, then click the Next button to proceed.

4. Choose the Connected via the network radio button, and then click the Next button to continue.

5. Choose the Basic network setup for a PC or server (recommended) radio button, and then click Next button to continue.

6. Choose a method to search by enabling the Search from a list of detected printers (recommended). This choice fails from the normal process that adds a printer because it can’t detect newer printers. Click the Next button to continue.

7. This next screen is a progress bar, and it takes enough time that you’ll notice it. Click the Next button to continue.

8. Hopefully, you’ll find your printer. Click the Yes, install this printer. Click the Next button to continue.

9. The following confirms the settings. Unless you’ve manually assigned the Network Interface Card for the printer to a fixed IP address, I’d leave these settings alone. Click the Next button to continue.

10. If you’ve manually installed the Post Script driver you may want to enable it here. As to the HP LaserJet Toolbox, I would definitely leave it alone. Click the Next button to continue.

11. This is where you can rename your printer if you have a desired name. Enter any change from the default, and then click Next to continue.

12. Generally, it’s a very bad idea to share a printer from a virtual machine instance. The only time I’d even think about it would be if I were trying to replicate a problem with a nested virtual machine. Therefore, I’d suggest you choose Not Shared, and then click Next to continue.

13. Here you can put a location in for the printer and any comment you’d like to have for it. Click the Next button to continue.

14. Everything to here as been choosing the configuration. Click the Install button to install the printer.

15. This progress bar fills four times, so take a break. When it is done, click Next to continue. Don’t click that Cancel button when it hangs for bit because it may do that. You’ll need to be patient, after all it is Microsoft’s operating system and most likely an HP driver.

16. You’ve now completed the installation, click the Finish button to complete the process.

Hopefully, this helps a couple folks that are configuring a Windows XP printer inside a 32-bit Windows XP installation.
VMWare, Spaces, and F8
Starting writing with the new publisher’s template and found that I couldn’t use Word 2007 or Word 2008. I ran into a neat twist with the F8 key when building a Windows XP virtual machine for Word 2003. Whether inside or outside the virtual machine, the focus for the F8 key always stayed with Mac OS X. That meant F8 launches Spaces instead of letting the Windows XP install proceed.
The fix was simple enough, I disabled F8 as the launch key for Spaces. Then, it let the Windows XP install work.
Should that work around be there? It’s probably a bug in VMWare Fusion, Version 2.0 (116369). If you know for sure, let me and other readers know.
VMWare and Fedora 10
It sometimes gets tiresome to sort the VMWare compatibility issues with Linux release-by-release but at the end of the cycle it’s fine. I downloaded the current Fedora 10 Live release because it is so much smaller than the install disk. It uses a kernel of 2.6.27.5-117.fc10.i686. I encountered a critical errors when I tried to install the VMWare Toolkit from VMWare Fusion, version 2.0.3 (156731). The only error guidance you’ll get is that there isn’t any make file.
There’s a twist here if you’re most familiar with Ubuntu and sudo command execution. You need to su to the root account and run everything as root user. An alternative would be to edit the /etc/inittab file to allow the root user to boot the instance. The default is 5 (X11). You enable the root user by changing it to 3 (full multiuser mode). Don’t forget to change it back, you really shouldn’t log in as the root user. Anyway, you’ll have to do it to run the VMWare Toolkit successfully as shown later in the post.
You fix the incompatibility of the VMWare Fusion Toolkit by downloading the following two missing RPMs. You should be able to find them here. As to why they’re not in the Live DVD distribution, who knows.
binutils-2.18.50.0.9-8.fc10.i386.rpm gcc-4.3.2-7.i386.rpm glibc-2.9-2.i686.rpm glibc-devel-2.9-2.i386.rpm glibc-headers-2.9-2.i386.rpm kernel-devel-2.6.27.5-117.fc10.i686.rpm kernel-headers-2.6.27.5-117.fc10.i386.rpm libgomp-4.3.2-7.i386.rpm |
You can’t run some of them through the RPM utility, so you should probably run them all at the command line. The command line syntax and sequence for these packages is:
rpm -ivh kernel-headers-2.6.27.5-117.fc10.i386.rpm rpm -ivh kernel-devel-2.6.27.5-117.fc10.i686.rpm rpm -ivh binutils-2.18.50.0.9-8.fc10.i386.rpm rpm -ivh libgomp-4.3.2-7.i386.rpm rpm -ivh glibc-headers-2.9-2.i386.rpm rpm -ivh glibc-devel-2.9-2.i386.rpm rpm -ivh glibc-2.9-2.i686.rpm rpm -ivh gcc-4.3.2-7.i386.rpm |
As the root user, you can now install the VMWare Toolkit. While running the installation, you’ll receive a prompt to confirm the /usr/src/linux/include. Don’t accept the default path because it won’t work unless you created a symbolic link. The kernel header files require you to enter the following path:
/usr/src/kernels/2.6.27.5-117.fc10.i686/include |
Everything should work finxs e when you compile the modules. Hope this helps a couple folks.
Aborting hung VMWare
Customizing the toolbar is one of the things that I’ve found important in using VMWare Fusion to test various Linux distributions. It’s nice they put Suspend by default on the toolbar but it would be nicer still if they put Shut Down. I got tired of looking for the PID to manually kill the virtualization from the Terminal command line. It is so much easier to add a Shut Down widget before trying to install VMWare Tools because that’s where some distributions hang.
Here are the steps to customize the toolbar:
1. Right click on the toolbar before running the VMWare instance, and you’ll see this context menu. Choose the Customize Toolbar… choice from the list.

2. The prior step lets you customize the toolbar though the following menu option dialog. Just click on the icon you want and drag it on to the toolbar. I’d suggest dragging Shut Down and Full Screen on to the toolbar.

I prefer putting the Shut Down to the left of the Suspend button, like this:

Hope this helps somebody.
VMWare Fusion 2.0.1 & Ubuntu 8.10, oops …
It seemed like a good day to test VMWare Fusion 2.0.1 on my Mac, but while it works well with Microsoft Windows XP VM, it doesn’t work as well with Ubuntu 8.04.1 or 8.10 VM. It wasn’t too surprising to see that VMWare Tools (VMwareTools-7.9.3-128865.tar.gz) don’t work with Ubuntu 8.04.1. There’s a mismatch between the gcc compiler and the kernel. You need gcc 4.2.3 to compile the kernel but gcc 4.2.4 to compile the modules for VMWare Tools.
You see it right away when the VMWare Tools script prompts you to compile the vmmemctl modules, like this:
None of the pre-built vmmemctl modules for VMware Tools is suitable for your running kernel. Do you want this program to try to build the vmmemctl module for your system (you need to have a C compiler installed on your system)? [yes] Using compiler "/usr/bin/gcc". Use environment variable CC to override. Your kernel was built with "gcc" version "4.2.3", while you are trying to use "/usr/bin/gcc" version "4.2.4". This configuration is not recommended and VMware Tools may crash if you'll continue. Please try to use exactly same compiler as one used for building your kernel. Do you want to go with compiler "/usr/bin/gcc" version "4.2.4" anyway? [no] |
At this point, upgrading Ubuntu appears ideal. Upgrading was tedious, and resulted in two failures. The first failure requires you shut down the instance by using the VMWare Fusion menu – Virtual Machine, Shut Down Guest. Don’t expect it to work as fast as it did in 2.0.0, at least with Ubuntu.
The second failure is that vsock.o can’t be made due to missing header files. That’s really as good as it gets because a fresh install produces the same error. The failure shown is:
Using 2.6.x kernel build system. make: Entering directory `/tmp/vmware-config0/vsock-only' make -C /lib/modules/2.6.27-7-generic/build/include/.. SUBDIRS=$PWD SRCROOT=$PWD/. modules make[1]: Entering directory `/usr/src/linux-headers-2.6.27-7-generic' CC [M] /tmp/vmware-config0/vsock-only/linuxaf_vsock.o CC [M] /tmp/vmware-config0/vsock-only/driverLog.o CC [M] /tmp/vmware-config0/vsock-only/util.o /tmp/vmware-config0/vsock-only/linux/util.c: In function 'VSockVmciLogPkt': /tmp/vmware-config0/vsock-only/linux/util.c:157: warning: format not a string literal and no format arguments CC [M] /tmp/vmware-config0/vsock-only/linuxaf_vsock.o LD [M] /tmp/vmware-config0/vsock-only/vsock.o MODPOST 1 modules WARNING: "VMCIDatagram_CreateHnd" [/tmp/vmware-config0/vsock-only/vsock.ko] undefinied! WARNING: "VMCIDatagram_DestroyHnd" [/tmp/vmware-config0/vsock-only/vsock.ko] undefinied! WARNING: "VMCIEvent_Subscribe" [/tmp/vmware-config0/vsock-only/vsock.ko] undefinied! WARNING: "VMCI_DeviceGet" [/tmp/vmware-config0/vsock-only/vsock.ko] undefinied! WARNING: "VMCIEvent_Subscribe" [/tmp/vmware-config0/vsock-only/vsock.ko] undefinied! WARNING: "VMCIDevice_Get" [/tmp/vmware-config0/vsock-only/vsock.ko] undefinied! WARNING: "VMCIMemcpyFromQueueV" [/tmp/vmware-config0/vsock-only/vsock.ko] undefinied! WARNING: "VMCIQueuePair_Detach" [/tmp/vmware-config0/vsock-only/vsock.ko] undefinied! WARNING: "VMCI_GetConextID" [/tmp/vmware-config0/vsock-only/vsock.ko] undefinied! WARNING: "VMCIDatagram_Send" [/tmp/vmware-config0/vsock-only/vsock.ko] undefinied! WARNING: "VMCIQueuePair_Alloc" [/tmp/vmware-config0/vsock-only/vsock.ko] undefinied! WARNING: "VMCIEvent_Unsubscribe" [/tmp/vmware-config0/vsock-only/vsock.ko] undefinied! WARNING: "VMCIMemcpyToQueueV" [/tmp/vmware-config0/vsock-only/vsock.ko] undefinied! CC /tmp/vmware-config0/vsock-only/vsock.mod.o LD [M] /tmp/vmware-config0/vsock-only/vsock.ko make[1]: Leaving directory `/usr/src/linux-headers-2.6.27-7-generic' cp -f vsock.ko ./../vsock.o make: Leaving directory `/tmp/vmware-config0/vsock-only' Unable to make a vsock module that can be loaded in the running kernel: insmod: error inserting '/tmp/vmware-config0/vsock.o': -1 Unknown symbol in module There is probably a slight difference in the kernel configuration beetween the set of C header files you specified and your running kernel. You may want to rebuild a kernel based on that directory, or specify another directory. The VM communication interface socket family is used in conjunction with the VM communication interface to provide a new communication path among guests and host. The rest of this software provided by VMWare Tools is designed to work independently of this feature. If you with to have the VSOCK feature you can install the driver by running the vmware-config-tools.pl again after making sure that gcc, binutils, make and the kernel sources for your running kernel are installed on your machine. These packages are available on your distribution's installation CD. [ Press the Enter key to continue.] |
Wouldn’t it be nice if they pointed to a specific file. It didn’t take much effort to find them, after all it’s Linux. I found that they’re defined in the vmci_queue_pair.h and vmciGuestKernelAPI.h files. Those files are found inside the vsock-only.tar file. You can find the vsock-only.tar file in the vmware-tools-distrib/lib/modules/source directory. You can read more about the Virtual Machine Communication Interface on VMWare’s web site.
The only pre-built VMWare Fusion 2.0.1 pre-built tool modules for Ubuntu are compatible with the listed kernels. Unfortunately, as noted above they don’t work because of a gcc difference.
bld-2.6.24-16-i386generic-Ubuntu8.04 bld-2.6.24-16-i386server-Ubuntu8.04 bld-2.6.24-16-i386virtual-Ubuntu8.04 bld-2.6.24-16-x86_64generic-Ubuntu8.04 bld-2.6.24-16-x86_64server-Ubuntu8.04 bld-2.6.24-19-i386generic-Ubuntu8.04.1 bld-2.6.24-19-i386server-Ubuntu8.04.1 bld-2.6.24-19-i386virtual-Ubuntu8.04.1 bld-2.6.24-19-x86_64generic-Ubuntu8.04.1 bld-2.6.24-19-x86_64server-Ubuntu8.04.1 |
The only question I’m left with is do I troubleshoot this or downgrade VMWare back to 2.0.0? I’m inclined to the latter given the lack of energy in the VMWare forum.
Ultimately, this was fixed with the next release of VMWare. They simply lag a bit in getting the libraries straight. In fact, I ran into a similar problem with Ubuntu 9.04 and the page.c file. I hacked it and got everything working but really, you should probably just use the last release of Ubuntu a little longer because VMWare looks to lag release by about 4 months.
Creating a custom virtual machine for Oracle 11g
Now that I’ve organized the blog a bit, I can start posting new information. VMWare Fusion is a great tool but I fat fingered a few installs before i mastered it. You need a customized set of settings to create an effective virtual machine to run Oracle 11g. You need to allocate enough memory and pre-allocate disk space before you do the install or it takes much longer. You may also fragment a base operating system unless you setup a separate mount point (true also for VMWare Workstation for Linux).
You’ll find the steps to create a customized virtual machine for a Red Hat AS 4 installation in the Configure Custom VM blog page. It’s more or less the same thing for Oracle 10g or the Oracle eBusiness suite, except you’ll need to pre-allocate more disk space.


