Archive for the ‘Red Hat’ Category
User/Group Setups
The following are samples of creating, changing, and removing users and groups in Linux. These are the command-line options in the event you don’t have access to the GUI tools.
Managing Users:
Adding a user:
The prototype is:
# useradd [-u uid] [-g initial_group] [-G group[,...]] \ > [-d home_directory] [-s shell] [-c comment] \ > [-m [-k skeleton_directory]] [-f inactive_time] \ > [-e expire_date] -n username |
A sample implementation of the prototype is:
# useradd -u 502 -g dba -G users,root \ > -d /u02/oracle -s /bin/tcsh -c "Oracle Account" \ > -f 7 -e 12/31/03 -n jdoe |
Modifying a user:
The prototype is:
# usermod [-u uid] [-g initial_group] [-G group[,...]] \ > [-d home_directory] [-s shell] [-c comment] \ > [-l new_username ] [-f inactive_time] [-e expire_date] > username |
A sample implementation of the prototype is:
# usermod -u 502 -g dba -G users,root > -d /u02/oracle -s /bin/bash -c "Senior DBA" > -l sdba -f 7 -e 12/31/03 jdoe |
Removing a user:
The prototype is:
# userdel [-r] username |
A sample implementation of the prototype is:
# userdel -r jdoe |
Managing Groups:
Adding a group:
The prototype is:
# groupadd [-g gid] [-rf] groupname |
A sample implementation of the prototype is:
# groupadd -g 500 dba |
Modifying a group:
The prototype is:
# groupmod [-g gid] [-n new_group_name] groupname |
A sample implementation of the prototype is:
# groupmod -g 500 -n dba oinstall |
Deleting a group:
The prototype is:
# groupdel groupname |
A sample implementation of the prototype is:
# groupdel dba |
Installing a GUI Manager for Users and Groups:
If you’re the root user or enjoy sudoer privileges, you can install the following GUI package for these tasks:
yum install -y system-config-users |
You can verify the GUI user management tool is present with the following command:
which system-config-users |
It should return this:
/bin/system-config-users |
You can run the GUI user management tool from the root user account or any sudoer account. The following shows how to launch the GUI User Manager from a sudoer account:
sudo system-config-users |
As always, I hope this helps those trying to figure out the proper syntax.
Listener for APEX
Unless dbca lets us build the listener.ora file, we often leave off some component. For example, running listener control program the following status indicates an incorrectly configured listener.ora file.
lsnrctl status |
It returns the following, which displays an endpoint for the XDB Server (I’m using Oracle Database 11g XE because it’s pre-containerized and has a small testing footprint):
LSNRCTL for Linux: Version 11.2.0.2.0 - Production on 24-MAR-2023 00:59:06 Copyright (c) 1991, 2011, Oracle. All rights reserved. Connecting to (DESCRIPTION=(ADDRESS=(PROTOCOL=IPC)(KEY=EXTPROC_FOR_XE))) STATUS of the LISTENER ------------------------ Alias LISTENER Version TNSLSNR for Linux: Version 11.2.0.2.0 - Production Start Date 21-MAR-2023 21:17:37 Uptime 2 days 3 hr. 41 min. 29 sec Trace Level off Security ON: Local OS Authentication SNMP OFF Default Service XE Listener Parameter File /u01/app/oracle/product/11.2.0/xe/network/admin/listener.ora Listener Log File /u01/app/oracle/diag/tnslsnr/localhost/listener/alert/log.xml Listening Endpoints Summary... (DESCRIPTION=(ADDRESS=(PROTOCOL=ipc)(KEY=EXTPROC_FOR_XE))) (DESCRIPTION=(ADDRESS=(PROTOCOL=tcp)(HOST=localhost)(PORT=1521))) (DESCRIPTION=(ADDRESS=(PROTOCOL=tcp)(HOST=localhost)(PORT=8080))(Presentation=HTTP)(Session=RAW)) Services Summary... Service "PLSExtProc" has 1 instance(s). Instance "PLSExtProc", status UNKNOWN, has 1 handler(s) for this service... Service "XE" has 1 instance(s). Instance "XE", status READY, has 1 handler(s) for this service... Service "XEXDB" has 1 instance(s). Instance "XE", status READY, has 1 handler(s) for this service... The command completed successfully |
The listener is missing the second SID_LIST_LISTENER value of CLRExtProc value. A complete listener.ora file should be as follows for the Oracle Database XE:
# listener.ora Network Configuration FILE: SID_LIST_LISTENER = (SID_LIST = (SID_DESC = (SID_NAME = PLSExtProc) (ORACLE_HOME = /u01/app/oracle/product/11.2.0/xe) (PROGRAM = extproc) ) (SID_DESC = (SID_NAME = CLRExtProc) (ORACLE_HOME = /u01/app/oracle/product/11.2.0/xe) (PROGRAM = extproc) ) ) LISTENER = (DESCRIPTION_LIST = (DESCRIPTION = (ADDRESS = (PROTOCOL = IPC)(KEY = EXTPROC_FOR_XE)) (ADDRESS = (PROTOCOL = TCP)(HOST = localhost.localdomain)(PORT = 1521)) ) ) DEFAULT_SERVICE_LISTENER = (XE) |
With this listener.ora file, the Oracle listener control utility will return the following correct status, which hides the XDB Server’s endpoint:
LSNRCTL for Linux: Version 11.2.0.2.0 - Production on 24-MAR-2023 02:38:57 Copyright (c) 1991, 2011, Oracle. All rights reserved. Connecting to (DESCRIPTION=(ADDRESS=(PROTOCOL=IPC)(KEY=EXTPROC_FOR_XE))) STATUS of the LISTENER ------------------------ Alias LISTENER Version TNSLSNR for Linux: Version 11.2.0.2.0 - Production Start Date 24-MAR-2023 02:38:15 Uptime 0 days 0 hr. 0 min. 42 sec Trace Level off Security ON: Local OS Authentication SNMP OFF Default Service XE Listener Parameter File /u01/app/oracle/product/11.2.0/xe/network/admin/listener.ora Listener Log File /u01/app/oracle/product/11.2.0/xe/log/diag/tnslsnr/localhost/listener/alert/log.xml Listening Endpoints Summary... (DESCRIPTION=(ADDRESS=(PROTOCOL=ipc)(KEY=EXTPROC_FOR_XE))) (DESCRIPTION=(ADDRESS=(PROTOCOL=tcp)(HOST=localhost)(PORT=1521))) Services Summary... Service "CLRExtProc" has 1 instance(s). Instance "CLRExtProc", status UNKNOWN, has 1 handler(s) for this service... Service "PLSExtProc" has 1 instance(s). Instance "PLSExtProc", status UNKNOWN, has 1 handler(s) for this service... The command completed successfully |
It seems a number of examples on the web left the SID_LIST_LISTENER value of CLRExtProc value out of the listener.ora file. As always, I hope this helps those looking for a complete solution rather than generic instructions without a concrete example.
AlmaLinux+PostgreSQL
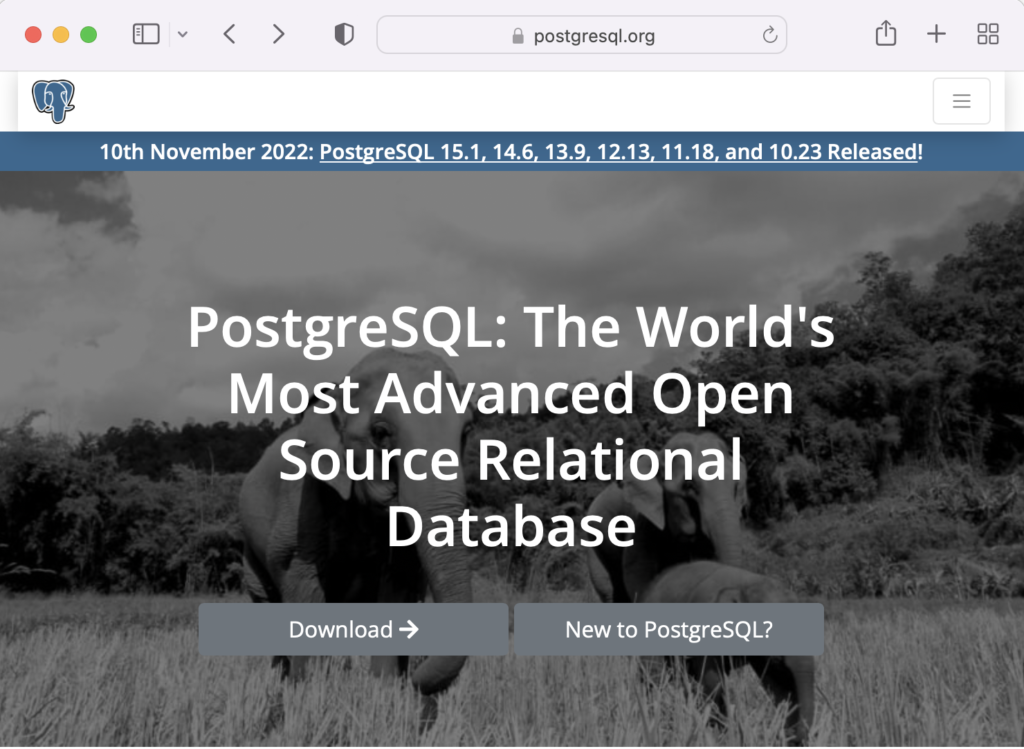
This installs PostgreSQL 15 on AlmaLinux 9 (don’t forget the PostgreSQL 15 Documentation site). The executable is available in the script that the postgresql.org provides; however, it seems appropriate to show how to find that script for any platform.
When you launch the postgres.org web site, you will see the following dialog. Click the Download-> button to choose an operating system.
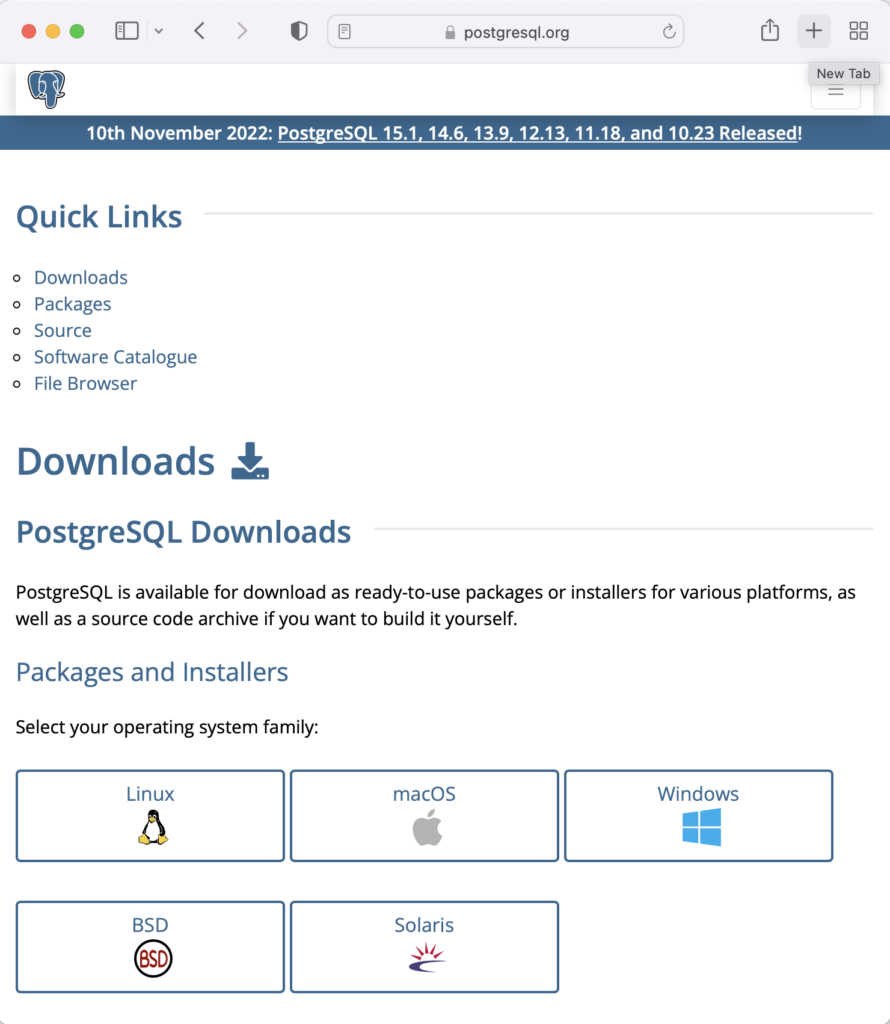
On the next webpage, click on the Linux icon button to proceed.
This page expands for you to choose a Linux distribution. Click on the Red Hat/Rocky/CentOS button to proceed.
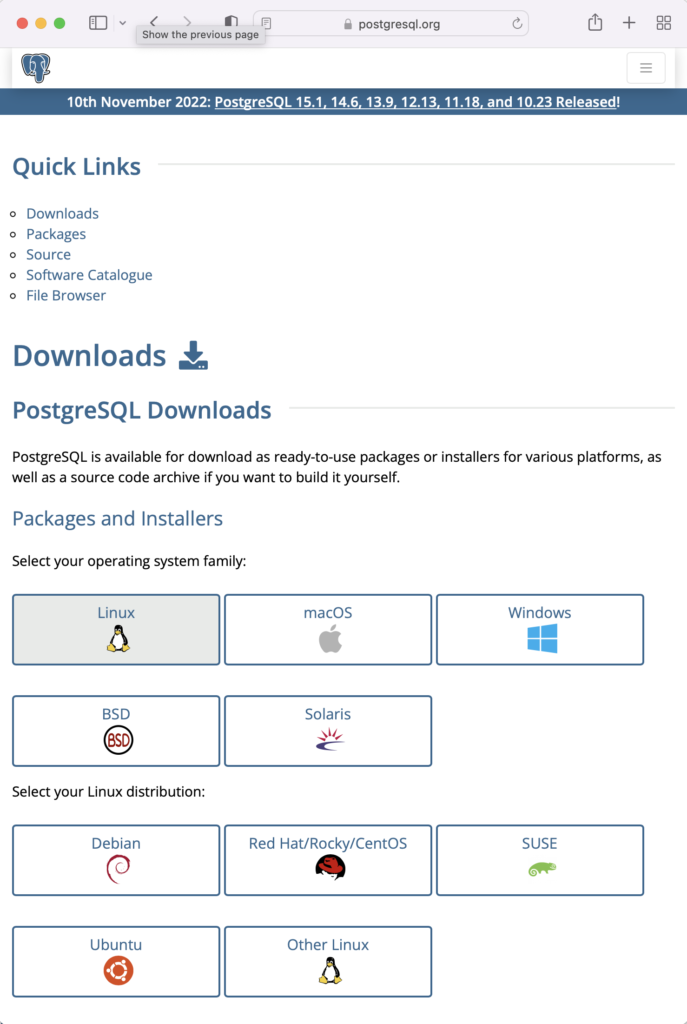
This web page lets you choose a platform, which should be Red Hat Enterprise, Rocky, or Oracle version 9.
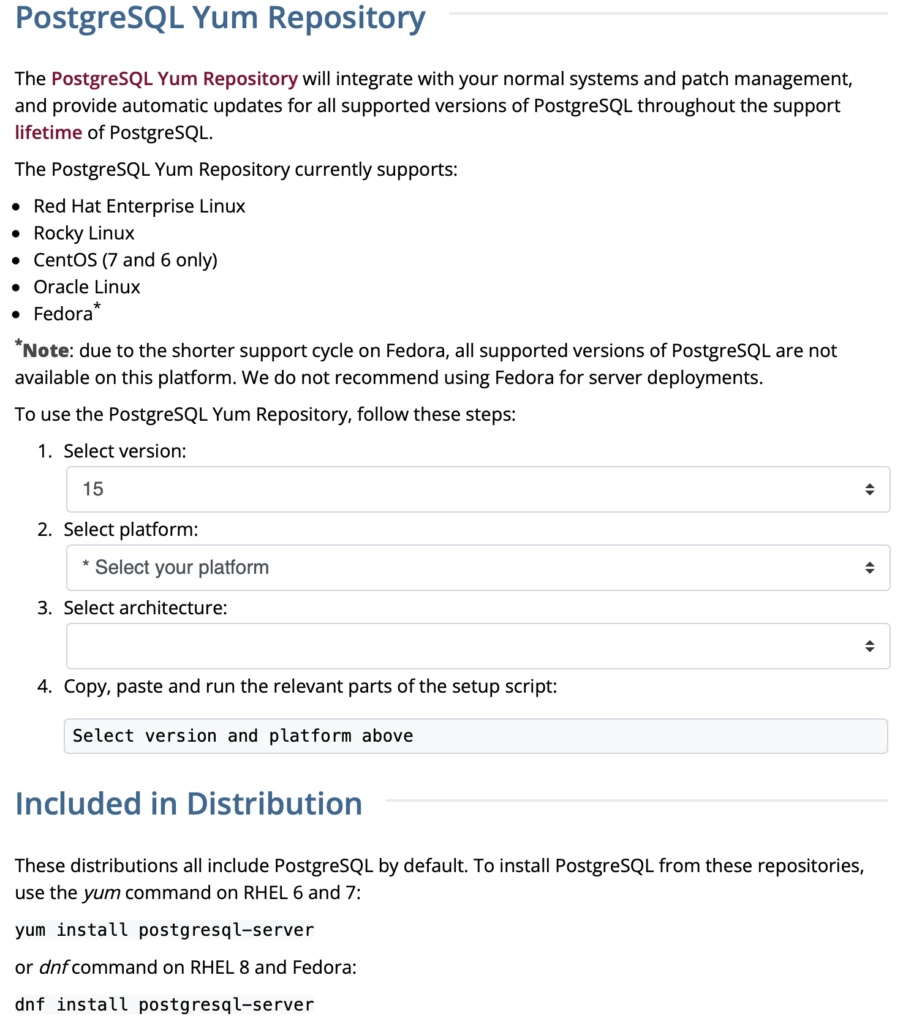
The selection fills out the web page and provides a setup script. The script installs the PostgreSQL packages, disables the built-in PostgreSQL module, installs PostgreSQL 15 Server, initialize, enable, and start PostgreSQL Server.
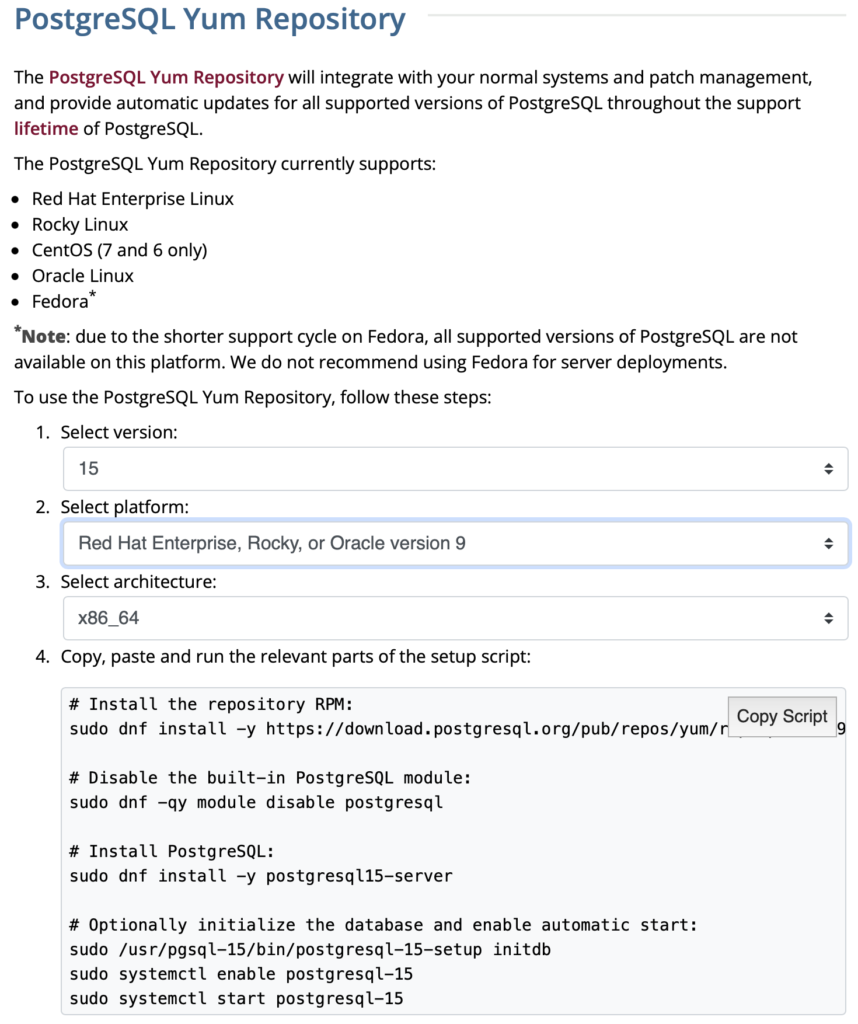
Here are the detailed steps:
- Install the PostgreSQL by updating dependent packages before installing it with the script provided by the PostgreSQL download web site:
# Install the repository RPM:
sudo dnf install -y https://download.postgresql.org/pub/repos/yum/reporpms/EL-9-x86_64/pgdg-redhat-repo-latest.noarch.rpm

# Disable the built-in PostgreSQL module:
sudo dnf -qy module disable postgresql

# Install PostgreSQL:
sudo dnf install -y postgresql15-server

# Optionally initialize the database and enable automatic start:
sudo /usr/pgsql-15/bin/postgresql-15-setup initdb
sudo systemctl enable postgresql-15
sudo systemctl start postgresql-15
Display detailed console log →
Last metadata expiration check: 20:38:10 ago on Mon 21 Nov 2022 02:07:25 AM EST.
pgdg-redhat-repo-latest.noarch.rpm              3.6 kB/s |  12 kB     00:03
Dependencies resolved.
================================================================================
 Package                 Architecture  Version        Repository           Size
================================================================================
Installing:
 pgdg-redhat-repo        noarch        42.0-28        @commandline         12 k

Transaction Summary
================================================================================
Install  1 Package

Total size: 12 k
Installed size: 14 k
Downloading Packages:
Running transaction check
Transaction check succeeded.
Running transaction test
Transaction test succeeded.
Running transaction
Regex version mismatch, expected: 10.40 2022-04-14 actual: 10.37 2021-05-26
Regex version mismatch, expected: 10.40 2022-04-14 actual: 10.37 2021-05-26
  Preparing        :                                                        1/1
  Installing       : pgdg-redhat-repo-42.0-28.noarch                        1/1
  Verifying        : pgdg-redhat-repo-42.0-28.noarch                        1/1

Installed:
  pgdg-redhat-repo-42.0-28.noarch

Complete!
Importing GPG key 0x442DF0F8:
 Userid     : "PostgreSQL RPM Building Project <pgsql-pkg-yum@postgresql.org>"
 Fingerprint: 68C9 E2B9 1A37 D136 FE74 D176 1F16 D2E1 442D F0F8
 From       : /etc/pki/rpm-gpg/RPM-GPG-KEY-PGDG
Importing GPG key 0x442DF0F8:
 Userid     : "PostgreSQL RPM Building Project <pgsql-pkg-yum@postgresql.org>"
 Fingerprint: 68C9 E2B9 1A37 D136 FE74 D176 1F16 D2E1 442D F0F8
 From       : /etc/pki/rpm-gpg/RPM-GPG-KEY-PGDG
Importing GPG key 0x442DF0F8:
 Userid     : "PostgreSQL RPM Building Project <pgsql-pkg-yum@postgresql.org>"
 Fingerprint: 68C9 E2B9 1A37 D136 FE74 D176 1F16 D2E1 442D F0F8
 From       : /etc/pki/rpm-gpg/RPM-GPG-KEY-PGDG
Importing GPG key 0x442DF0F8:
 Userid     : "PostgreSQL RPM Building Project <pgsql-pkg-yum@postgresql.org>"
 Fingerprint: 68C9 E2B9 1A37 D136 FE74 D176 1F16 D2E1 442D F0F8
 From       : /etc/pki/rpm-gpg/RPM-GPG-KEY-PGDG
Importing GPG key 0x442DF0F8:
 Userid     : "PostgreSQL RPM Building Project <pgsql-pkg-yum@postgresql.org>"
 Fingerprint: 68C9 E2B9 1A37 D136 FE74 D176 1F16 D2E1 442D F0F8
 From       : /etc/pki/rpm-gpg/RPM-GPG-KEY-PGDG
Importing GPG key 0x442DF0F8:
 Userid     : "PostgreSQL RPM Building Project <pgsql-pkg-yum@postgresql.org>"
 Fingerprint: 68C9 E2B9 1A37 D136 FE74 D176 1F16 D2E1 442D F0F8
 From       : /etc/pki/rpm-gpg/RPM-GPG-KEY-PGDG
Importing GPG key 0x442DF0F8:
 Userid     : "PostgreSQL RPM Building Project <pgsql-pkg-yum@postgresql.org>"
 Fingerprint: 68C9 E2B9 1A37 D136 FE74 D176 1F16 D2E1 442D F0F8
 From       : /etc/pki/rpm-gpg/RPM-GPG-KEY-PGDG
Unable to resolve argument postgresql
Error: Problems in request:
missing groups or modules: postgresql
Last metadata expiration check: 0:00:02 ago on Mon 21 Nov 2022 10:46:16 PM EST.
Dependencies resolved.
================================================================================
 Package                  Arch        Version                 Repository   Size
================================================================================
Installing:
 postgresql15-server      x86_64      15.1-1PGDG.rhel9        pgdg15      6.0 M
Installing dependencies:
 lz4                      x86_64      1.9.3-5.el9             baseos       58 k
 postgresql15             x86_64      15.1-1PGDG.rhel9        pgdg15      1.5 M
 postgresql15-libs        x86_64      15.1-1PGDG.rhel9        pgdg15      296 k

Transaction Summary
================================================================================
Install  4 Packages

Total download size: 7.8 M
Installed size: 33 M
Downloading Packages:
(1/4): lz4-1.9.3-5.el9.x86_64.rpm                91 kB/s |  58 kB     00:00
(2/4): postgresql15-libs-15.1-1PGDG.rhel9.x86_6  97 kB/s | 296 kB     00:03
(3/4): postgresql15-15.1-1PGDG.rhel9.x86_64.rpm 214 kB/s | 1.5 MB     00:07
(4/4): postgresql15-server-15.1-1PGDG.rhel9.x86 371 kB/s | 6.0 MB     00:16
--------------------------------------------------------------------------------
Total                                           446 kB/s | 7.8 MB     00:17
PostgreSQL 15 for RHEL / Rocky 9 - x86_64       1.4 MB/s | 1.7 kB     00:00
Importing GPG key 0x442DF0F8:
 Userid     : "PostgreSQL RPM Building Project <pgsql-pkg-yum@postgresql.org>"
 Fingerprint: 68C9 E2B9 1A37 D136 FE74 D176 1F16 D2E1 442D F0F8
 From       : /etc/pki/rpm-gpg/RPM-GPG-KEY-PGDG
Key imported successfully
Running transaction check
Transaction check succeeded.
Running transaction test
Transaction test succeeded.
Running transaction
Regex version mismatch, expected: 10.40 2022-04-14 actual: 10.37 2021-05-26
Regex version mismatch, expected: 10.40 2022-04-14 actual: 10.37 2021-05-26
  Preparing        :                                                        1/1
  Installing       : postgresql15-libs-15.1-1PGDG.rhel9.x86_64              1/4
  Running scriptlet: postgresql15-libs-15.1-1PGDG.rhel9.x86_64              1/4
  Installing       : lz4-1.9.3-5.el9.x86_64                                 2/4
  Installing       : postgresql15-15.1-1PGDG.rhel9.x86_64                   3/4
  Running scriptlet: postgresql15-15.1-1PGDG.rhel9.x86_64                   3/4
  Running scriptlet: postgresql15-server-15.1-1PGDG.rhel9.x86_64            4/4
  Installing       : postgresql15-server-15.1-1PGDG.rhel9.x86_64            4/4
  Running scriptlet: postgresql15-server-15.1-1PGDG.rhel9.x86_64            4/4
Regex version mismatch, expected: 10.40 2022-04-14 actual: 10.37 2021-05-26
Regex version mismatch, expected: 10.40 2022-04-14 actual: 10.37 2021-05-26

  Verifying        : lz4-1.9.3-5.el9.x86_64                                 1/4
  Verifying        : postgresql15-15.1-1PGDG.rhel9.x86_64                   2/4
  Verifying        : postgresql15-libs-15.1-1PGDG.rhel9.x86_64              3/4
  Verifying        : postgresql15-server-15.1-1PGDG.rhel9.x86_64            4/4

Installed:
  lz4-1.9.3-5.el9.x86_64
  postgresql15-15.1-1PGDG.rhel9.x86_64
  postgresql15-libs-15.1-1PGDG.rhel9.x86_64
  postgresql15-server-15.1-1PGDG.rhel9.x86_64

Complete!
Initializing database ... /sbin/restorecon: Regex version mismatch, expected: 10.40 2022-04-14 actual: 10.37 2021-05-26
/sbin/restorecon: Regex version mismatch, expected: 10.40 2022-04-14 actual: 10.37 2021-05-26
/sbin/restorecon: Regex version mismatch, expected: 10.40 2022-04-14 actual: 10.37 2021-05-26
/sbin/restorecon: Regex version mismatch, expected: 10.40 2022-04-14 actual: 10.37 2021-05-26
/sbin/restorecon: Regex version mismatch, expected: 10.40 2022-04-14 actual: 10.37 2021-05-26
/sbin/restorecon: Regex version mismatch, expected: 10.40 2022-04-14 actual: 10.37 2021-05-26
OK

Created symlink /etc/systemd/system/multi-user.target.wants/postgresql-15.service → /usr/lib/systemd/system/postgresql-15.service.
- The simpmlest way to verify the installation is to check for the psql executable. You can do that with this command:
which psqlIt should return:
/usr/bin/psql
- Attempt to login with the following command-line interface (CLI) syntax:
psql -U postgres -W
It should fail and return the following:
psql: error: connection to server on socket "/var/run/postgresql/.s.PGSQL.5432" failed: FATAL: Peer authentication failed for user "postgres"
This error occurs because you’re not the postgres user, and all other users must designate that they’re connecting to an account with a password. The following steps let you configure the Operating System (OS).
-
You must shell out to the root superuser’s account, and then shell out to the postgres user’s account to test your connection because postgres user’s account disallows direct connection.
su - root
su - postgres
You can verify the current postgres user with this command:
whoamiIt should return the following:
postgres
As the postgres user, you connect to the database without a password. You use the following syntax:
psql -U postgresIt should display the following:
psql (15.1)
Type "help" for help.
-
At this point, you have some operating system (OS) stuff to setup before configuring a PostgreSQL sandboxed videodb database and student user. Exit psql with the following command:
postgres=# \q
Navigate to the PostgreSQL home database directory as the postgres user with this command:
cd /var/lib/pgsql/15/data
Edit the pg_hba.conf file to add lines for the postgres and student users:
# TYPE  DATABASE        USER            ADDRESS                 METHOD

# "local" is for Unix domain socket connections only
local   all             all                                     peer
local   all             postgres                                peer
local   all             student                                 peer

# IPv4 local connections:
host    all             all             127.0.0.1/32            scram-sha-256
# IPv6 local connections:
host    all             all             ::1/128                 scram-sha-256
# Allow replication connections from localhost, by a user with the
# replication privilege.
local   replication     all                                     scram-sha-256
host    replication     all             127.0.0.1/32            scram-sha-256
host    replication     all             ::1/128                 scram-sha-256
Navigate up the directory tree from the /var/lib/pgsql/15/data directory, which is also the data dictionary, to the following /var/lib/pgsql/15 base directory:
cd /var/lib/pgsql/15
Create a new video_db directory. This is where you will deploy the video_db tablespace. You create this directory with the following command:
mkdir video_dbChange the video_db permissions to read, write, and execute for only the owner with this syntax as the postgres user:
chmod 700 video_db
-
Exit the postgres user with the exit command and open PostgreSQL’s 5432 listener port as the root user. You can use the following command, as the root user:
firewall-cmd --zone=public --add-port 5432/tcp --permanent
-
You must shell out from the root user to the postgres user with the following command:
su - postgres
-
You must shell out to the root superuser’s account, and then shell out to the postgres user’s account to test your connection because postgres user’s account disallows direct connection.
- Connect to the postgres account and perform the following commands:
- After connecting as the postgres superuser, you can create a video_db tablespace with the following syntax:
CREATE TABLESPACE video_db
  OWNER postgres
  LOCATION 'C:\Users\username\video_db';
This will return the following:
CREATE TABLESPACE
You can query whether you successfully create the video_db tablespace with the following:
SELECT * FROM pg_tablespace;
It should return the following:
  oid  |  spcname   | spcowner | spcacl | spcoptions
-------+------------+----------+--------+------------
  1663 | pg_default |       10 |        |
  1664 | pg_global  |       10 |        |
 16389 | video_db   |       10 |        |
(3 rows)
-
You need to know the PostgreSQL default collation before you create a new database. You can write the following query to determine the default correlation:
postgres=# SELECT datname, datcollate FROM pg_database WHERE datname = 'postgres';
It should return something like this:
 datname  | datcollate
----------+-------------
 postgres | en_US.UTF-8
(1 row)
The datcollate value of the postgres database needs to the same value for the LC_COLLATE and LC_CTYPE parameters when you create a database. You can create a videodb database with the following syntax provided you’ve made appropriate substitutions for the LC_COLLATE and LC_CTYPE values below:
CREATE DATABASE videodb
  WITH OWNER = postgres
  ENCODING = 'UTF8'
  TABLESPACE = video_db
  LC_COLLATE = 'en_US.UTF-8'
  LC_CTYPE = 'en_US.UTF-8'
  CONNECTION LIMIT = -1;
You can verify the creation of the videodb with the following command:
postgres# \l
It should show you a display like the following:
List of databases Name | Owner | Encoding | Collate | Ctype | ICU Locale | Locale Provider | Access privileges -----------+----------+----------+-------------+-------------+------------+-----------------+----------------------- postgres | postgres | UTF8 | en_US.UTF-8 | en_US.UTF-8 | | libc | template0 | postgres | UTF8 | en_US.UTF-8 | en_US.UTF-8 | | libc | =c/postgres + | | | | | | | postgres=CTc/postgres template1 | postgres | UTF8 | en_US.UTF-8 | en_US.UTF-8 | | libc | =c/postgres + | | | | | | | postgres=CTc/postgres videodb | postgres | UTF8 | en_US.UTF-8 | en_US.UTF-8 | | libc | (4 rows)Then, you can assign comment to the database with the following syntax:
COMMENT ON DATABASE videodb IS 'Video Store Database';
- After connecting as the postgres superuser, you can create a video_db tablespace with the following syntax:
- Create a Role, Grant, and User:
In this section you create a dba role, grant privileges on a videodb database to a role, and create a user with the role that you created previously with the following three statements. There are three steps in this sections.
- The first step creates a dba role:
CREATE ROLE dba WITH SUPERUSER;
- The second step grants all privileges on the videodb database to both the postgres superuser and the dba role:
GRANT TEMPORARY, CONNECT ON DATABASE videodb TO PUBLIC;
GRANT ALL PRIVILEGES ON DATABASE videodb TO postgres;
GRANT ALL PRIVILEGES ON DATABASE videodb TO dba;
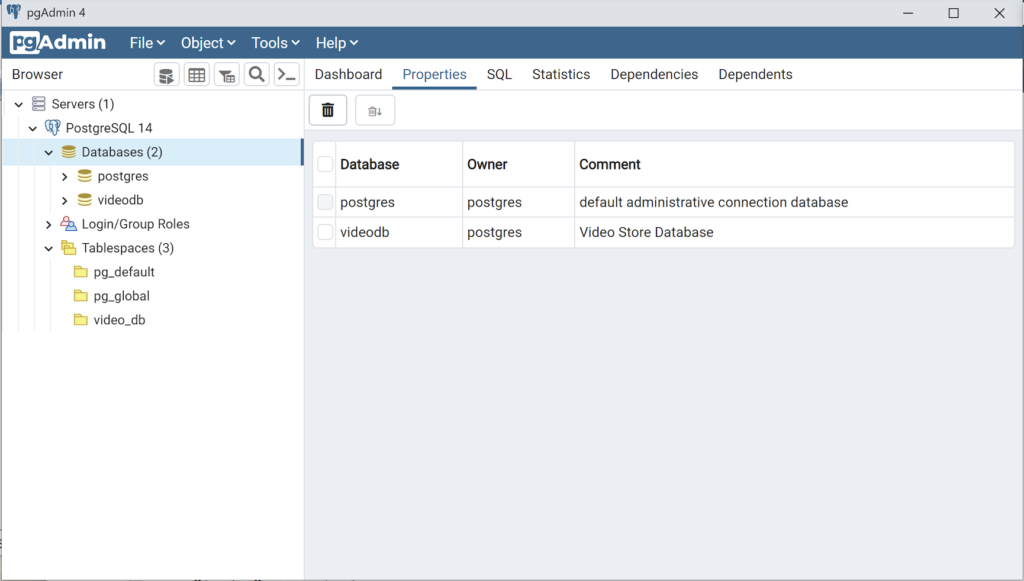
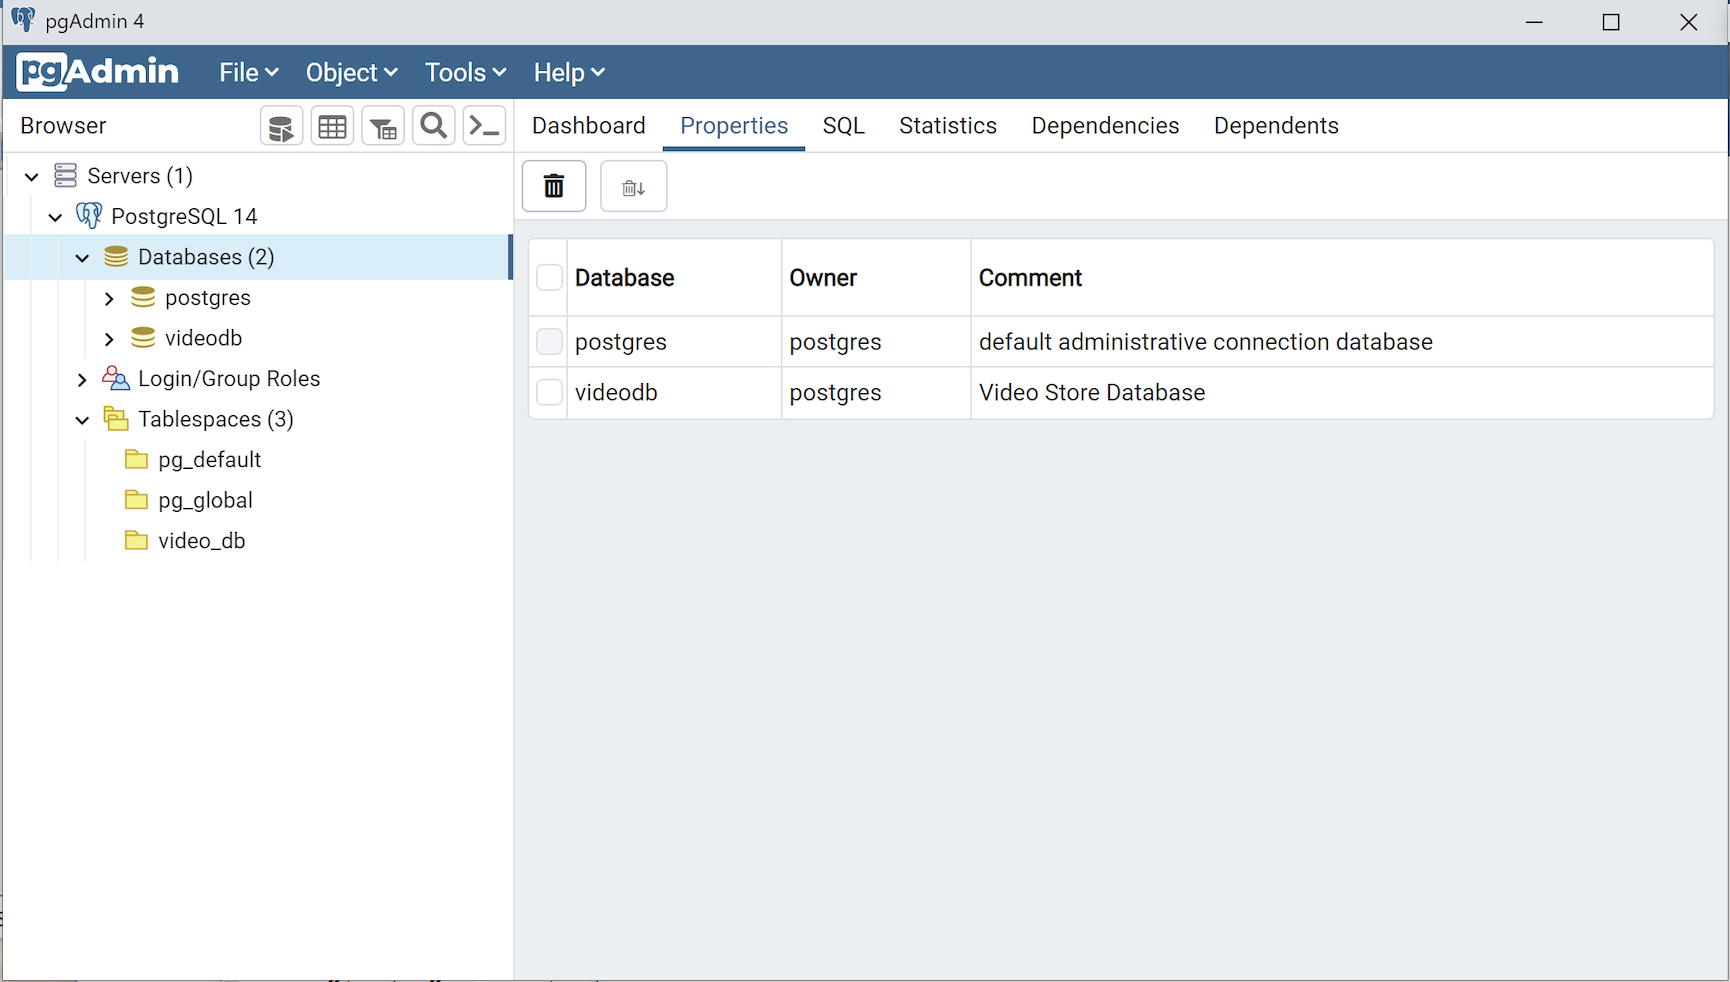
Any work in pgAdmin4 requires a grant on the videodb database to the postgres superuser. The grant enables visibility of the videodb database in the pgAdmin4 console as shown in the following image.
- The third step changes the ownership of the videodb database to the student user:
ALTER DATABASE videodb OWNER TO student;
You can verify the change of ownership for the videodb from the postgres user to student user with the following command:
postgres# \l
It should show you a display like the following:
List of databases Name | Owner | Encoding | Collate | Ctype | ICU Locale | Locale Provider | Access privileges -----------+----------+----------+-------------+-------------+------------+-----------------+----------------------- postgres | postgres | UTF8 | en_US.UTF-8 | en_US.UTF-8 | | libc | template0 | postgres | UTF8 | en_US.UTF-8 | en_US.UTF-8 | | libc | =c/postgres + | | | | | | | postgres=CTc/postgres template1 | postgres | UTF8 | en_US.UTF-8 | en_US.UTF-8 | | libc | =c/postgres + | | | | | | | postgres=CTc/postgres videodb | student | UTF8 | en_US.UTF-8 | en_US.UTF-8 | | libc | =Tc/student + | | | | | | | student=CTc/student + | | | | | | | dba=CTc/student (4 rows) - The fourth step creates a student user with the dba role:
CREATE USER student
  WITH ROLE dba
       ENCRYPTED PASSWORD 'student';
After this step, you need to disconnect as the postgres superuser with the following command:
\q
- The first step creates a dba role:
- Connect to the videodb database as the student user with the PostgreSQL CLI, create a new_hire table and quit the database.
The following syntax lets you connect to a videodb database as the student user. You should note that the Linux OS student user name should match the database user name.
psql -Ustudent -W -dvideodb
You create the new_hire table in the public schema of the videodb database with the following syntax:
CREATE TABLE new_hire
( new_hire_id  SERIAL        CONSTRAINT new_hire_pk PRIMARY KEY
, first_name   VARCHAR(20)   NOT NULL
, middle_name  VARCHAR(20)
, last_name    VARCHAR(20)   NOT NULL
, hire_date    DATE          NOT NULL
, UNIQUE(first_name, middle_name, hire_date));
You can describe the new_hire table with the following command:
\d new_hire
You quit the psql connection with a quit; or \q, like so
quit;
- Installing, configuring, and launching pgadmin4 (don’t forget the pgAdmin 4 Documentation site):
- You need to install three sets of packages. They’re the pgadmin-server, policycoreutils-python-utils, and pgadmin4-desktop.
- Apply the pgadmin-server package:
sudo yum install https://ftp.postgresql.org/pub/pgadmin/pgadmin4/yum/redhat/rhel-9Server-x86_64/pgadmin4-server-6.16-1.el9.x86_64.rpm
Display detailed console log →
Last metadata expiration check: 0:36:13 ago on Mon 28 Nov 2022 12:59:07 AM EST.
pgadmin4-server-6.16-1.el9.x86_64.rpm                                                           1.9 MB/s |  73 MB     00:38
Dependencies resolved.
================================================================================================================================
 Package                           Architecture             Version                        Repository                      Size
================================================================================================================================
Installing:
 pgadmin4-server                   x86_64                   6.16-1.el9                     @commandline                    73 M

Transaction Summary
================================================================================================================================
Install  1 Package

Total size: 73 M
Installed size: 265 M
Is this ok [y/N]: y
Downloading Packages:
Running transaction check
Transaction check succeeded.
Running transaction test
Transaction test succeeded.
Running transaction
Regex version mismatch, expected: 10.40 2022-04-14 actual: 10.37 2021-05-26
Regex version mismatch, expected: 10.40 2022-04-14 actual: 10.37 2021-05-26
  Preparing        :                                                                                                        1/1
  Installing       : pgadmin4-server-6.16-1.el9.x86_64                                                                      1/1
  Verifying        : pgadmin4-server-6.16-1.el9.x86_64                                                                      1/1

Installed:
  pgadmin4-server-6.16-1.el9.x86_64

Complete!
- Apply or upgrade (which is the default at this point) the policycoreutils-python-utils package:
sudo dnf install policycoreutils-python-utils
Display detailed console log →
Last metadata expiration check: 0:50:44 ago on Mon 28 Nov 2022 12:59:07 AM EST.
Package policycoreutils-python-utils-3.3-6.el9_0.noarch is already installed.
Dependencies resolved.
================================================================================================================================
 Package                                      Architecture           Version                    Repository                 Size
================================================================================================================================
Upgrading:
 libsemanage                                  x86_64                 3.4-2.el9                  baseos                    118 k
 policycoreutils                              x86_64                 3.4-4.el9                  baseos                    202 k
 policycoreutils-devel                        x86_64                 3.4-4.el9                  appstream                 139 k
 policycoreutils-python-utils                 noarch                 3.4-4.el9                  appstream                  69 k
 python3-libsemanage                          x86_64                 3.4-2.el9                  appstream                  80 k
 python3-policycoreutils                      noarch                 3.4-4.el9                  appstream                 2.0 M

Transaction Summary
================================================================================================================================
Upgrade  6 Packages

Total download size: 2.6 M
Is this ok [y/N]: y
Downloading Packages:
(1/6): policycoreutils-python-utils-3.4-4.el9.noarch.rpm                                         28 kB/s |  69 kB     00:02
(2/6): python3-libsemanage-3.4-2.el9.x86_64.rpm                                                  32 kB/s |  80 kB     00:02
(3/6): policycoreutils-devel-3.4-4.el9.x86_64.rpm                                                55 kB/s | 139 kB     00:02
(4/6): libsemanage-3.4-2.el9.x86_64.rpm                                                         189 kB/s | 118 kB     00:00
(5/6): python3-policycoreutils-3.4-4.el9.noarch.rpm                                             2.8 MB/s | 2.0 MB     00:00
(6/6): policycoreutils-3.4-4.el9.x86_64.rpm                                                     302 kB/s | 202 kB     00:00
--------------------------------------------------------------------------------------------------------------------------------
Total                                                                                           521 kB/s | 2.6 MB     00:05
Running transaction check
Transaction check succeeded.
Running transaction test
Transaction test succeeded.
Running transaction
Regex version mismatch, expected: 10.40 2022-04-14 actual: 10.37 2021-05-26
Regex version mismatch, expected: 10.40 2022-04-14 actual: 10.37 2021-05-26
  Preparing        :                                                                                                        1/1
  Upgrading        : libsemanage-3.4-2.el9.x86_64                                                                          1/12
  Upgrading        : python3-libsemanage-3.4-2.el9.x86_64                                                                  2/12
  Upgrading        : policycoreutils-3.4-4.el9.x86_64                                                                      3/12
  Running scriptlet: policycoreutils-3.4-4.el9.x86_64                                                                      3/12
  Upgrading        : python3-policycoreutils-3.4-4.el9.noarch                                                              4/12
  Upgrading        : policycoreutils-python-utils-3.4-4.el9.noarch                                                         5/12
  Upgrading        : policycoreutils-devel-3.4-4.el9.x86_64                                                                6/12
  Cleanup          : policycoreutils-devel-3.3-6.el9_0.x86_64                                                              7/12
  Cleanup          : policycoreutils-python-utils-3.3-6.el9_0.noarch                                                       8/12
  Cleanup          : python3-policycoreutils-3.3-6.el9_0.noarch                                                            9/12
  Cleanup          : python3-libsemanage-3.3-2.el9.x86_64                                                                 10/12
  Running scriptlet: policycoreutils-3.3-6.el9_0.x86_64                                                                   11/12
  Cleanup          : policycoreutils-3.3-6.el9_0.x86_64                                                                   11/12
  Cleanup          : libsemanage-3.3-2.el9.x86_64                                                                         12/12
  Running scriptlet: libsemanage-3.3-2.el9.x86_64                                                                         12/12
  Verifying        : policycoreutils-devel-3.4-4.el9.x86_64                                                                1/12
  Verifying        : policycoreutils-devel-3.3-6.el9_0.x86_64                                                              2/12
  Verifying        : policycoreutils-python-utils-3.4-4.el9.noarch                                                         3/12
  Verifying        : policycoreutils-python-utils-3.3-6.el9_0.noarch                                                       4/12
  Verifying        : python3-libsemanage-3.4-2.el9.x86_64                                                                  5/12
  Verifying        : python3-libsemanage-3.3-2.el9.x86_64                                                                  6/12
  Verifying        : python3-policycoreutils-3.4-4.el9.noarch                                                              7/12
  Verifying        : python3-policycoreutils-3.3-6.el9_0.noarch                                                            8/12
  Verifying        : libsemanage-3.4-2.el9.x86_64                                                                          9/12
  Verifying        : libsemanage-3.3-2.el9.x86_64                                                                         10/12
  Verifying        : policycoreutils-3.4-4.el9.x86_64                                                                     11/12
  Verifying        : policycoreutils-3.3-6.el9_0.x86_64                                                                   12/12

Upgraded:
  libsemanage-3.4-2.el9.x86_64                   policycoreutils-3.4-4.el9.x86_64      policycoreutils-devel-3.4-4.el9.x86_64
  policycoreutils-python-utils-3.4-4.el9.noarch  python3-libsemanage-3.4-2.el9.x86_64  python3-policycoreutils-3.4-4.el9.noarch

Complete!
- Apply the pgadmin4-desktop package:
sudo dnf install -y https://ftp.postgresql.org/pub/pgadmin/pgadmin4/yum/redhat/rhel-9Server-x86_64/pgadmin4-desktop-6.16-1.el9.x86_64.rpm
Display detailed console log →
Last metadata expiration check: 1:14:02 ago on Mon 28 Nov 2022 12:59:07 AM EST.
pgadmin4-desktop-6.16-1.el9.x86_64.rpm                                                          3.1 MB/s |  88 MB     00:28
Dependencies resolved.
================================================================================================================================
 Package                          Architecture           Version                             Repository                    Size
================================================================================================================================
Installing:
 pgadmin4-desktop                 x86_64                 6.16-1.el9                          @commandline                  88 M
Installing dependencies:
 libatomic                        x86_64                 11.3.1-2.1.el9.alma                 baseos                        56 k

Transaction Summary
================================================================================================================================
Install  2 Packages

Total size: 88 M
Total download size: 56 k
Installed size: 341 M
Downloading Packages:
libatomic-11.3.1-2.1.el9.alma.x86_64.rpm                                                         83 kB/s |  56 kB     00:00
--------------------------------------------------------------------------------------------------------------------------------
Total                                                                                            39 kB/s |  56 kB     00:01
Running transaction check
Transaction check succeeded.
Running transaction test
Transaction test succeeded.
Running transaction
Regex version mismatch, expected: 10.40 2022-04-14 actual: 10.37 2021-05-26
Regex version mismatch, expected: 10.40 2022-04-14 actual: 10.37 2021-05-26
  Preparing        :                                                                                                        1/1
  Installing       : libatomic-11.3.1-2.1.el9.alma.x86_64                                                                   1/2
  Installing       : pgadmin4-desktop-6.16-1.el9.x86_64                                                                     2/2
  Running scriptlet: pgadmin4-desktop-6.16-1.el9.x86_64                                                                     2/2
  Verifying        : libatomic-11.3.1-2.1.el9.alma.x86_64                                                                   1/2
  Verifying        : pgadmin4-desktop-6.16-1.el9.x86_64                                                                     2/2

Installed:
  libatomic-11.3.1-2.1.el9.alma.x86_64                            pgadmin4-desktop-6.16-1.el9.x86_64

Complete!
- Apply the pgadmin-server package:
- You configure your .bashrc file to add the pgadmin4 directory to your $PATH environment variable.
# Add the pgadmin4 executable to the $PATH.
export set PATH=$PATH:/usr/pgadmin4/bin
You also configure your .bashrc file to add a pgadmin4 function, which simplifies how you call the pgadmin4 executable.
# Function to ensure pgadmin4 call is simplified and without warnings.
pgadmin4 ()
{
  # Call the pgadmin4 executable.
  if [[ `type -t pgadmin4` = 'function' ]]; then
    if [ -f "/usr/pgadmin4/bin/pgadmin4" ]; then
      /usr/pgadmin4/bin/pgadmin4 2>/dev/null &
    else
      echo "[/usr/pgadmin4/bin/pgadmin4] is not found."
    fi
  else
    echo "[pgadmin4] is not a function"
  fi
}
You can launch your pgadmin4 program file now with the following syntax as the student user:
pgadmin4
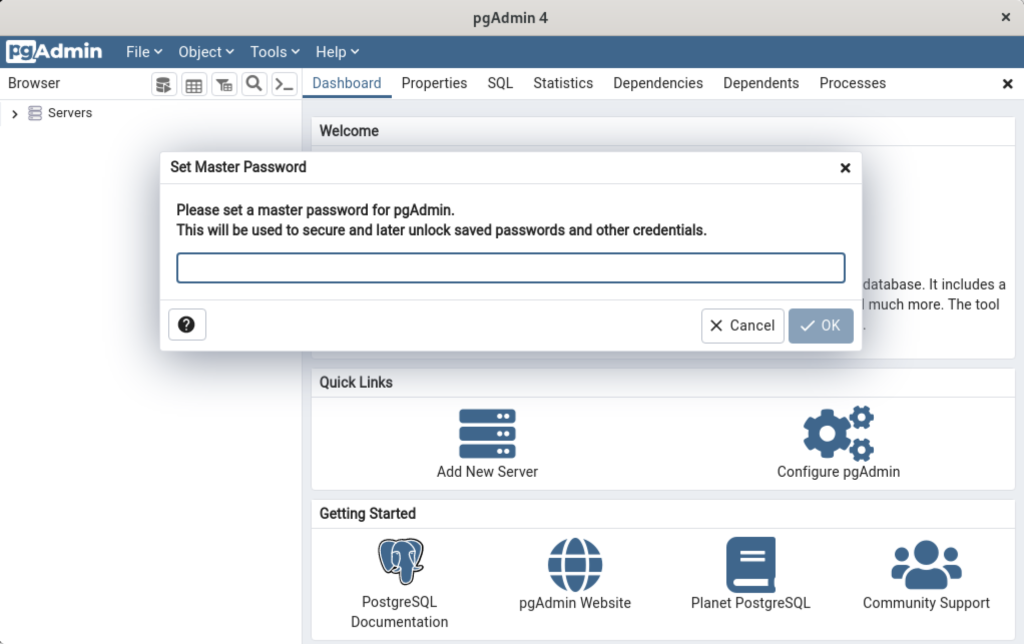
It takes a couple moments to launch the pgadmin4 desktop. The initial screen will look like:

After pgadmin4 launches, you’re prompted for a master password. Enter the password and click the OK button to proceed.
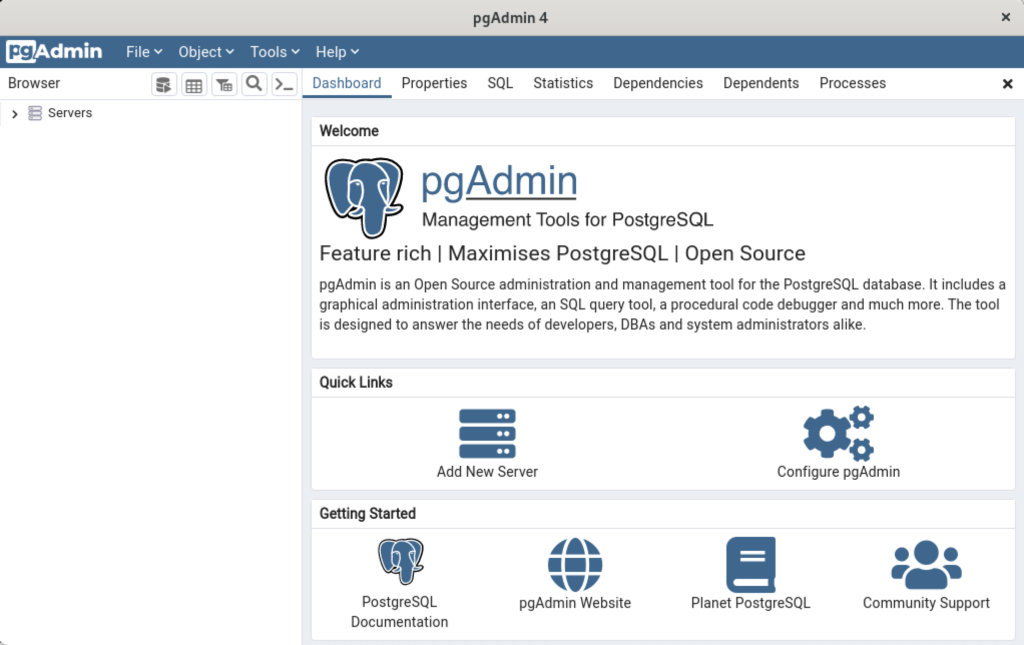
After entering the password, you arrive at the base dialog, as shown.
Click the Add New Server link, which prompts you to register your database. Enter videodb in the Name field and click the Connection tab to the right of the General tab.
In the Connection dialog, enter the following values:
- Host name/address: localhost
- Port: 5432
- Maintenance database: postgres
- Username: student
- Password: student

Enter a name for your database. In this example, videodb is the Server Name. Click the Save button to proceed.

- You need to install three sets of packages. They’re the pgadmin-server, policycoreutils-python-utils, and pgadmin4-desktop.
This completes the instructions for installing, configuring, and using PostgreSQL on AlmaLinux. As always, I hope it helps those looking for instructions.
Fedora User Manager
As one of my students pointed out, Fedora doesn’t install a GUI user management tool installed by default. That’s true. It’s easy to install. You can install it as the root user, like:
yum install -y system-config-users |
It should generate a screen console output like this when successfully installed:
Loaded plugins: langpacks, refresh-packagekit http://yum.postgresql.org/9.3/fedora/fedora-20-x86_64/repodata/repomd.xml: [Errno 14] HTTP Error 404 - Not Found Trying other mirror. Resolving Dependencies --> Running transaction check ---> Package system-config-users.noarch 0:1.3.6-1.fc20 will be installed --> Processing Dependency: libuser-python >= 0.56 for package: system-config-users-1.3.6-1.fc20.noarch --> Processing Dependency: python-pwquality for package: system-config-users-1.3.6-1.fc20.noarch --> Running transaction check ---> Package libuser-python.x86_64 0:0.60-3.fc20 will be installed ---> Package python-pwquality.x86_64 0:1.2.3-1.fc20 will be installed --> Finished Dependency Resolution Dependencies Resolved ================================================================================ Package Arch Version Repository Size ================================================================================ Installing: system-config-users noarch 1.3.6-1.fc20 updates 332 k Installing for dependencies: libuser-python x86_64 0.60-3.fc20 fedora 51 k python-pwquality x86_64 1.2.3-1.fc20 fedora 11 k Transaction Summary ================================================================================ Install 1 Package (+2 Dependent packages) Total download size: 395 k Installed size: 1.9 M Downloading packages: (1/3): libuser-python-0.60-3.fc20.x86_64.rpm | 51 kB 00:00 (2/3): python-pwquality-1.2.3-1.fc20.x86_64.rpm | 11 kB 00:00 (3/3): system-config-users-1.3.6-1.fc20.noarch.rpm | 332 kB 00:00 -------------------------------------------------------------------------------- Total 212 kB/s | 395 kB 00:01 Running transaction check Running transaction test Transaction test succeeded Running transaction (shutdown inhibited) Installing : python-pwquality-1.2.3-1.fc20.x86_64 1/3 Installing : libuser-python-0.60-3.fc20.x86_64 2/3 Installing : system-config-users-1.3.6-1.fc20.noarch 3/3 Verifying : system-config-users-1.3.6-1.fc20.noarch 1/3 Verifying : libuser-python-0.60-3.fc20.x86_64 2/3 Verifying : python-pwquality-1.2.3-1.fc20.x86_64 3/3 Installed: system-config-users.noarch 0:1.3.6-1.fc20 Dependency Installed: libuser-python.x86_64 0:0.60-3.fc20 python-pwquality.x86_64 0:1.2.3-1.fc20 Complete! |
You can verify the GUI user management tool is present with the following command:
which system-config-users |
It should return this:
/bin/system-config-users |
You can run the GUI user management tool from the root user account or any sudoer account. The following shows how to launch the GUI User Manager from a sudoer account:
sudo system-config-users |
It will generate the following GUI User Manager screen:

As always, I hope this helps those trying to do some that should be a basic task that seems to get lost form the books and manuals beginners use.
Fedora Install unixODBC
Encountered a problem while running the RODBC library from the R prompt as the root user, as follows:
> install.packages('RODBC') |
It failed with the following library dependency:
checking for unistd.h... yes
checking sql.h usability... no
checking sql.h presence... no
checking for sql.h... no
checking sqlext.h usability... no
checking sqlext.h presence... no
checking for sqlext.h... no
configure: error: "ODBC headers sql.h and sqlext.h not found"
ERROR: configuration failed for package ‘RODBC’
* removing ‘/usr/lib64/R/library/RODBC’

The downloaded source packages are in
	‘/tmp/RtmpdT1gay/downloaded_packages’
Updating HTML index of packages in '.Library'
Making 'packages.html' ... done
Warning message:
In install.packages("RODBC") :
installation of package ‘RODBC’ had non-zero exit status |
I installed unixODBC-devel and unixODBC-gui-qt libraries to fix the library dependencies with the following command as the root user:
yum install -y unixODBC* |
It should show you the following when it installs the unixODBC-devel and unixODBC-gui-qt libraries:
Loaded plugins: langpacks, refresh-packagekit You need to be root to perform this command. [student@localhost ~]$ su - root Password: Last login: Fri Apr 20 21:18:56 PDT 2018 on pts/1 [root@localhost ~]# yum install -y unixODBC* Loaded plugins: langpacks, refresh-packagekit cassandra/signature | 819 B 00:00 cassandra/signature | 2.9 kB 00:00 !!! fedora/20/x86_64/metalink | 3.3 kB 00:00 mysql-connectors-community | 2.5 kB 00:00 mysql-tools-community | 2.5 kB 00:00 mysql56-community | 2.5 kB 00:00 http://yum.postgresql.org/9.3/fedora/fedora-20-x86_64/repodata/repomd.xml: [Errno 14] HTTP Error 404 - Not Found Trying other mirror. updates/20/x86_64/metalink | 3.1 kB 00:00 Package unixODBC-2.3.2-4.fc20.x86_64 already installed and latest version Resolving Dependencies --> Running transaction check ---> Package unixODBC-devel.x86_64 0:2.3.2-4.fc20 will be installed ---> Package unixODBC-gui-qt.x86_64 0:0-0.8.20120105svn98.fc20 will be installed --> Processing Dependency: libQtNetwork.so.4()(64bit) for package: unixODBC-gui-qt-0-0.8.20120105svn98.fc20.x86_64 --> Processing Dependency: libQtGui.so.4()(64bit) for package: unixODBC-gui-qt-0-0.8.20120105svn98.fc20.x86_64 --> Processing Dependency: libQtCore.so.4()(64bit) for package: unixODBC-gui-qt-0-0.8.20120105svn98.fc20.x86_64 --> Processing Dependency: libQtAssistantClient.so.4()(64bit) for package: unixODBC-gui-qt-0-0.8.20120105svn98.fc20.x86_64 --> Running transaction check ---> Package qt.x86_64 1:4.8.6-30.fc20 will be installed --> Processing Dependency: qt-common = 1:4.8.6-30.fc20 for package: 1:qt-4.8.6-30.fc20.x86_64 --> Processing Dependency: qt-settings for package: 1:qt-4.8.6-30.fc20.x86_64 ---> Package qt-assistant-adp.x86_64 0:4.6.3-6.fc20 will be installed ---> Package qt-x11.x86_64 1:4.8.6-30.fc20 will be installed --> Processing Dependency: libmng.so.1()(64bit) for package: 1:qt-x11-4.8.6-30.fc20.x86_64 --> Processing Dependency: libclucene.so.3()(64bit) for package: 1:qt-x11-4.8.6-30.fc20.x86_64 --> Running transaction check ---> Package clucene09-core.x86_64 0:0.9.21b-13.fc20 will be installed ---> Package libmng.x86_64 0:1.0.10-12.fc20 will be installed ---> Package qt-common.noarch 1:4.8.6-30.fc20 will be installed ---> Package qt-settings.noarch 0:20-18.fc20 will be installed --> Finished Dependency Resolution Dependencies Resolved ================================================================================ Package Arch Version Repository Size ================================================================================ Installing: unixODBC-devel x86_64 2.3.2-4.fc20 updates 55 k unixODBC-gui-qt x86_64 0-0.8.20120105svn98.fc20 fedora 624 k Installing for dependencies: clucene09-core x86_64 0.9.21b-13.fc20 updates 300 k libmng x86_64 1.0.10-12.fc20 fedora 166 k qt x86_64 1:4.8.6-30.fc20 updates 4.7 M qt-assistant-adp x86_64 4.6.3-6.fc20 fedora 257 k qt-common noarch 1:4.8.6-30.fc20 updates 5.8 k qt-settings noarch 20-18.fc20 updates 19 k qt-x11 x86_64 1:4.8.6-30.fc20 updates 12 M Transaction Summary ================================================================================ Install 2 Packages (+7 Dependent packages) Total download size: 18 M Installed size: 56 M Downloading packages: (1/9): libmng-1.0.10-12.fc20.x86_64.rpm | 166 kB 00:01 (2/9): clucene09-core-0.9.21b-13.fc20.x86_64.rpm | 300 kB 00:01 (3/9): qt-4.8.6-30.fc20.x86_64.rpm | 4.7 MB 00:00 (4/9): qt-common-4.8.6-30.fc20.noarch.rpm | 5.8 kB 00:00 (5/9): qt-settings-20-18.fc20.noarch.rpm | 19 kB 00:00 (6/9): qt-assistant-adp-4.6.3-6.fc20.x86_64.rpm | 257 kB 00:00 (7/9): qt-x11-4.8.6-30.fc20.x86_64.rpm | 12 MB 00:01 (8/9): unixODBC-devel-2.3.2-4.fc20.x86_64.rpm | 55 kB 00:00 (9/9): unixODBC-gui-qt-0-0.8.20120105svn98.fc20.x86_64.rpm | 624 kB 00:01 -------------------------------------------------------------------------------- Total 4.1 MB/s | 18 MB 00:04 Running transaction check Running transaction test Transaction test succeeded Running transaction (shutdown inhibited) Installing : libmng-1.0.10-12.fc20.x86_64 1/9 Installing : qt-settings-20-18.fc20.noarch 2/9 Installing : 1:qt-common-4.8.6-30.fc20.noarch 3/9 Installing : 1:qt-4.8.6-30.fc20.x86_64 4/9 Installing : clucene09-core-0.9.21b-13.fc20.x86_64 5/9 Installing : 1:qt-x11-4.8.6-30.fc20.x86_64 6/9 Installing : qt-assistant-adp-4.6.3-6.fc20.x86_64 7/9 Installing : unixODBC-gui-qt-0-0.8.20120105svn98.fc20.x86_64 8/9 Installing : unixODBC-devel-2.3.2-4.fc20.x86_64 9/9 Verifying : clucene09-core-0.9.21b-13.fc20.x86_64 1/9 Verifying : unixODBC-gui-qt-0-0.8.20120105svn98.fc20.x86_64 2/9 Verifying : 1:qt-x11-4.8.6-30.fc20.x86_64 3/9 Verifying : 1:qt-4.8.6-30.fc20.x86_64 4/9 Verifying : qt-settings-20-18.fc20.noarch 5/9 Verifying : 1:qt-common-4.8.6-30.fc20.noarch 6/9 Verifying : unixODBC-devel-2.3.2-4.fc20.x86_64 7/9 Verifying : qt-assistant-adp-4.6.3-6.fc20.x86_64 8/9 Verifying : libmng-1.0.10-12.fc20.x86_64 9/9 Installed: unixODBC-devel.x86_64 0:2.3.2-4.fc20 unixODBC-gui-qt.x86_64 0:0-0.8.20120105svn98.fc20 Dependency Installed: clucene09-core.x86_64 0:0.9.21b-13.fc20 libmng.x86_64 0:1.0.10-12.fc20 qt.x86_64 1:4.8.6-30.fc20 qt-assistant-adp.x86_64 0:4.6.3-6.fc20 qt-common.noarch 1:4.8.6-30.fc20 qt-settings.noarch 0:20-18.fc20 qt-x11.x86_64 1:4.8.6-30.fc20 Complete! |
After installing the unixODBC-devel and unixODBC-gui-qt libraries, I installed the RODBC library from the R prompt, having launched the R environment as the root user:
> install.packages('RODBC') |
Installing the RODBC library should install cleanly and generate the following output:
Installing package into ‘/usr/lib64/R/library’ (as ‘lib’ is unspecified) trying URL 'http://cran.cnr.berkeley.edu/src/contrib/RODBC_1.3-15.tar.gz' Content type 'application/x-gzip' length 1163967 bytes (1.1 MB) ================================================== downloaded 1.1 MB * installing *source* package ‘RODBC’ ... ** package ‘RODBC’ successfully unpacked and MD5 sums checked checking for gcc... gcc -m64 -std=gnu99 checking whether the C compiler works... yes checking for C compiler default output file name... a.out checking for suffix of executables... checking whether we are cross compiling... no checking for suffix of object files... o checking whether we are using the GNU C compiler... yes checking whether gcc -m64 -std=gnu99 accepts -g... yes checking for gcc -m64 -std=gnu99 option to accept ISO C89... none needed checking how to run the C preprocessor... gcc -m64 -std=gnu99 -E checking for grep that handles long lines and -e... /bin/grep checking for egrep... /bin/grep -E checking for ANSI C header files... yes checking for sys/types.h... yes checking for sys/stat.h... yes checking for stdlib.h... yes checking for string.h... yes checking for memory.h... yes checking for strings.h... yes checking for inttypes.h... yes checking for stdint.h... yes checking for unistd.h... yes checking sql.h usability... yes checking sql.h presence... yes checking for sql.h... yes checking sqlext.h usability... yes checking sqlext.h presence... yes checking for sqlext.h... yes checking for library containing SQLTables... -lodbc checking for SQLLEN... yes checking for SQLULEN... yes checking size of long... 8 configure: creating ./config.status config.status: creating src/Makevars config.status: creating src/config.h ** libs gcc -m64 -std=gnu99 -I/usr/include/R -DNDEBUG -I. -I/usr/local/include -fpic -O2 -g -pipe -Wall -Wp,-D_FORTIFY_SOURCE=2 -fexceptions -fstack-protector-strong --param=ssp-buffer-size=4 -grecord-gcc-switches -m64 -mtune=generic -c RODBC.c -o RODBC.o gcc -m64 -std=gnu99 -shared -L/usr/lib64/R/lib -Wl,-z,relro -o RODBC.so RODBC.o -lodbc -L/usr/lib64/R/lib -lR installing to /usr/lib64/R/library/RODBC/libs ** R ** inst ** preparing package for lazy loading ** help *** installing help indices converting help for package ‘RODBC’ finding HTML links ... done RODBC-internal html RODBC-package html odbc html odbcClose html odbcConnect html odbcDataSources html odbcGetInfo html odbcSetAutoCommit html setSqlTypeInfo html sqlColumns html sqlCopy html sqlDrop html sqlFetch html sqlQuery html sqlSave html sqlTables html sqlTypeInfo html ** building package indices ** installing vignettes ** testing if installed package can be loaded * DONE (RODBC) Making 'packages.html' ... done The downloaded source packages are in ‘/tmp/RtmpdT1gay/downloaded_packages’ Updating HTML index of packages in '.Library' Making 'packages.html' ... done |
I hope that helps anybody who runs into the library dependency problems.
Can’t Display 256 Colors
If you’re reading this post, you most likely are trying to run the Oracle Database 11g or 12c runInstaller program, and it’s failing a critical dependency check and displaying an error like the one below. If so, choose n because if you choose y it won’t launch the Oracle Installer.
Starting Oracle Universal Installer...

Checking Temp space: must be greater than 500 MB.   Actual 30824 MB    Passed
Checking swap space: must be greater than 150 MB.   Actual 3967 MB    Passed
Checking monitor: must be configured to display at least 256 colors
    >>> Could not execute auto check for display colors using command /usr/bin/xdpyinfo. Check if the DISPLAY variable is set.    Failed <<<<

Some requirement checks failed. You must fulfill these requirements before

continuing with the installation,

Continue? (y/n) [n] n |
The first thing to check is whether you’ve the $TERM environment variable. It’ll be set in your env list but may not be set in your .bashrc file. You can see whether it’s set by running the following command:
echo $TERM |
It should return a value, like this:
xterm-256color |
If you didn’t get that value, use the env command to lookup the $TERM. The correct value can be found by running the env command like this:
env | grep -i term |
Add $TERM environment variable to your .bashrc file and source it after the change or reboot the user’s session:
export TERM=xterm-256color |
If it still doesn’t work, some posts ask you to run xclock but you don’t generally install the xhost clients. Those articles assumes you’ve installed the xorg-x11-apps package library. That’s more or less a choice you made when installing the Linux OS. You can check for the presence of the library with the following command as the root user:
rpm -qa xorg-x11-apps |
If the command fails to return a result from the search of Red Hat Package Manager (RPM) libraries, you haven’t installed it. You can install it as the root superuser with this syntax:
yum install -y xorg-x11-apps |
It should display the following result when successful:
Loaded plugins: langpacks Resolving Dependencies --> Running transaction check ---> Package xorg-x11-apps.x86_64 0:7.7-6.el7 will be installed --> Processing Dependency: libXaw.so.7()(64bit) for package: xorg-x11-apps-7.7-6.el7.x86_64 --> Running transaction check ---> Package libXaw.x86_64 0:1.0.12-5.el7 will be installed --> Finished Dependency Resolution Dependencies Resolved ================================================================================= Package Arch Version Repository Size ================================================================================= Installing: xorg-x11-apps x86_64 7.7-6.el7 ol7_latest 304 k Installing for dependencies: libXaw x86_64 1.0.12-5.el7 ol7_latest 190 k Transaction Summary ================================================================================= Install 1 Package (+1 Dependent package) Total download size: 494 k Installed size: 1.2 M Downloading packages: (1/2): libXaw-1.0.12-5.el7.x86_64.rpm | 190 kB 00:00:00 (2/2): xorg-x11-apps-7.7-6.el7.x86_64.rpm | 304 kB 00:00:00 --------------------------------------------------------------------------------- Total 690 kB/s | 494 kB 00:00:00 Running transaction check Running transaction test Transaction test succeeded Running transaction Installing : libXaw-1.0.12-5.el7.x86_64 1/2 Installing : xorg-x11-apps-7.7-6.el7.x86_64 2/2 Verifying : libXaw-1.0.12-5.el7.x86_64 1/2 Verifying : xorg-x11-apps-7.7-6.el7.x86_64 2/2 Installed: xorg-x11-apps.x86_64 0:7.7-6.el7 Dependency Installed: libXaw.x86_64 0:1.0.12-5.el7 Complete! |
After installing the xorg-x11-apps library packages, you can retry running the Oracle installer. You should now see the following successful message set:
Starting Oracle Universal Installer... Checking Temp space: must be greater than 500 MB. Actual 30809 MB Passed Checking swap space: must be greater than 150 MB. Actual 3967 MB Passed Checking monitor: must be configured to display at least 256 colors. Actual 16777216 Passed Preparing to launch Oracle Universal Installer from /tmp/OraInstall2016-06-01_01-50-54AM. Please wait ... |
As always, I hope this helps my students and anybody looking for a solution to a less than explicit error message.
Linux User-Group Console
This post shows you how to add the menu option and GUI to set users and groups. It’s quite a bit easier than mastering all the command-line syntax. It makes setting up the required user and group accounts for an Oracle Enterprise or MySQL database solution much easier.
You add the utility by calling the yum (Yellowdog Updater, Modified) utility like this:
yum installed -y system-config_users |
You should see the following:
Loaded plugins: langpacks adobe-linux-x86_64 | 951 B 00:00 ol7_UEKR3 | 1.2 kB 00:00 ol7_latest | 1.4 kB 00:00 Resolving Dependencies --> Running transaction check ---> Package system-config-users.noarch 0:1.3.5-2.el7 will be installed --> Processing Dependency: system-config-users-docs for package: system-config-users-1.3.5-2.el7.noarch --> Running transaction check ---> Package system-config-users-docs.noarch 0:1.0.9-6.el7 will be installed --> Processing Dependency: rarian-compat for package: system-config-users-docs-1.0.9-6.el7.noarch --> Running transaction check ---> Package rarian-compat.x86_64 0:0.8.1-11.el7 will be installed --> Processing Dependency: rarian = 0.8.1-11.el7 for package: rarian-compat-0.8.1-11.el7.x86_64 --> Processing Dependency: rarian for package: rarian-compat-0.8.1-11.el7.x86_64 --> Processing Dependency: librarian.so.0()(64bit) for package: rarian-compat-0.8.1-11.el7.x86_64 --> Running transaction check ---> Package rarian.x86_64 0:0.8.1-11.el7 will be installed --> Finished Dependency Resolution Dependencies Resolved ================================================================================ Package Arch Version Repository Size ================================================================================ Installing: system-config-users noarch 1.3.5-2.el7 ol7_latest 337 k Installing for dependencies: rarian x86_64 0.8.1-11.el7 ol7_latest 97 k rarian-compat x86_64 0.8.1-11.el7 ol7_latest 65 k system-config-users-docs noarch 1.0.9-6.el7 ol7_latest 307 k Transaction Summary ================================================================================ Install 1 Package (+3 Dependent packages) Total download size: 805 k Installed size: 3.9 M Downloading packages: (1/4): rarian-0.8.1-11.el7.x86_64.rpm | 97 kB 00:00 (2/4): rarian-compat-0.8.1-11.el7.x86_64.rpm | 65 kB 00:00 (3/4): system-config-users-1.3.5-2.el7.noarch.rpm | 337 kB 00:00 (4/4): system-config-users-docs-1.0.9-6.el7.noarch.rpm | 307 kB 00:00 -------------------------------------------------------------------------------- Total 830 kB/s | 805 kB 00:00 Running transaction check Running transaction test Transaction test succeeded Running transaction Installing : rarian-0.8.1-11.el7.x86_64 1/4 Installing : rarian-compat-0.8.1-11.el7.x86_64 2/4 Installing : system-config-users-1.3.5-2.el7.noarch 3/4 Installing : system-config-users-docs-1.0.9-6.el7.noarch 4/4 Verifying : rarian-compat-0.8.1-11.el7.x86_64 1/4 Verifying : system-config-users-1.3.5-2.el7.noarch 2/4 Verifying : rarian-0.8.1-11.el7.x86_64 3/4 Verifying : system-config-users-docs-1.0.9-6.el7.noarch 4/4 Installed: system-config-users.noarch 0:1.3.5-2.el7 Dependency Installed: rarian.x86_64 0:0.8.1-11.el7 rarian-compat.x86_64 0:0.8.1-11.el7 system-config-users-docs.noarch 0:1.0.9-6.el7 Complete! |
After successfully installing the radian, rarian-compat, system-config-users, and system-config-users-docs packages, you will find that there’s now a Users and Groups option when you navigate by clicking on Applications and then clicking on Sundry from the menu.
Menu Instructions

- You navigate to the Applications menu, and choose Sundry from the menu list and Users and Groups from the menu item to continue.

- You will be prompted for the sudoer’s password in this dialog.

- At this point, you can use the GUI interface to set users and groups.
As always, I hope this helps those trying to set users and passwords without mastering the command-line syntax.
A/UX, NeXTSTEP, & OS X
One thing that gets tedious in the IT community and Oracle community is the penchant for Windows only solutions. While Microsoft does an excellent job in certain domains, I remain a loyal Apple customer. By the way, you can install Oracle Client software on Mac OS X and run SQL Developer against any Oracle Database server. You can even run MySQL Workbench and MySQL server natively on the Mac OS X platform, which creates a robust development platform and gives you more testing options with the MySQL monitor (the client software).
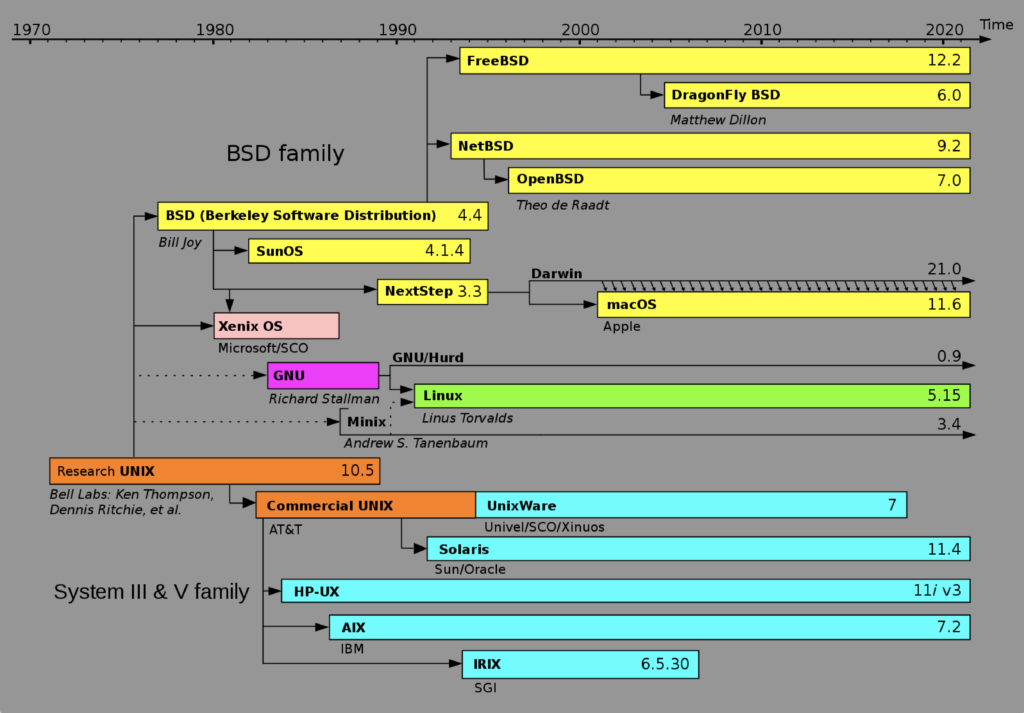
Notwithstanding, some Windows users appear to malign Apple and the Mac OS X on compatibility, but they don’t understand that it’s a derivative of the Research Unix, through BSD (Berkeley Software Distribution). This Unix lineage chart illustrates it well:
I’m probably loyal to Apple because in the early 1990’s I worked on Mac OS 6, Mac OS 7, A/UX, NeXTSTEP, and AIX/6000 (Version 3) while working at APL (American President Lines) in Oakland, California. Back then, my desktop was a pricey Macintosh Quadra 950 and today I work on a pricey Mac Pro desktop. The Mac Pro lets me use VMware virtualize development environments for Oracle Linux, Red Hat Enterprise Linux, Fedora, and as you might guess Windows 7/8. My question to those dyed in the wool Microsoft users is simple, why would you choose a single user OS like Windows over a multi-user OS like Mac OS X?
Mac Mini to the rescue
In teaching, I had a problem because my students have different base operating systems, like Windows 7, Windows 8, Linux, and Mac OS X. I needed a teaching and lecture platform that would let me teach it all (not to mention support their environments). That meant it had to virtualize any of the following with a portable device:
- Windows 7 or 8 hosting natively an Oracle Database 11g XE, 11g, or 12c and MySQL Database 5.6
- Windows 7 or 8 hosting a Fedora or Oracle Unbreakable Linux VM (3 or 4 GB) with Oracle Database 11g XE, 11g, or 12c and MySQL Database 5.6
- Mac OS X hosting a Fedora or Oracle Unbreakable Linux VM (3 or 4 GB) with Oracle Database 11g XE, 11g, or 12c and MySQL Database 5.6
- Ubuntu hosting a Fedora or Oracle Unbreakable Linux VM (3 or 4 GB) with Oracle Database 11g XE, 11g, or 12c and MySQL Database 5.6
I never considered a manufacturer other than Apple for a laptop since they adopted the Intel chip. Too many of the others sell non-hyperthreaded laptop machines that they market as i5 or i7 64-bit OS machines when they’re not. Some of those vendors disable the hyperthreading facility while others provide motherboards that can’t support hyperthreading. The ones I dislike the most provide a BIOS setting that gives the impression you can enable hyperthreading when you can’t. All Apple devices, MacBook, MacBook Pro, Mac Mini, and Mac Pro do fully support a 64-bit OS and their virtualization.
A MacBook Pro came to mind but the disk space requirements were 1 TB, and that’s too pricey. I went with the Mac Mini because with 16 GB of memory and a 1 TB drive it was only $1,200. Add a wireless keyboard and mighty mouse, and an HDMI and mini-DVI connections, and I had my solution. Naturally, my desktop is a one generation old Mac Pro with 64 GB of memory and 12 TB of disk space, which supports all the virtual machines used for testing. Note to Apple marketing staff: The prior version of the Mac Pro let you pay reasonable (3rd party) prices for the additional memory and disk drives.
The Mac Mini means I can travel anywhere and plug into the console and demo tools and techniques from a myriad set of platforms without the hassle of moving on and off to frequently VM images. It’s a great solution with only one downside, HDMI to DVI sometimes creates purple toned screens. It’s unfortunate because some venues have monitors that don’t support HDMI).
Gnome Menu Editing Fix
Fedora 16 is clearly better than Fedora 15 but I found Menu Editing (Alacarte package) was broken in it because of a missing library dependency, and I’ve updated Fedora Bug 734442 with the work around. Here’s what’s wrong and how to fix it.
Update on Status of Bug 734442
Download Site Change
After installing the Menu Editing (Alacarte) package, you’ll encounter this error when trying to launch the menu editor:
MainWindow.py:19:<module>:Import Error: No module named gmenu |
That error occurs because the gnome-menus-3.2.0.1-1.fc16.x86_64 is missing the /usr/lib64/python2.7/site-packages/gmenu.so library. So, I copied the version of gmenu.so from a Fedora 15 release as the root user. Naturally, at this point you’d test if it was fixed, I did. It wasn’t, and I got a new error:
MainWindow.py:19:<module>:Import Error: libgnome-menu.so.2: cannot open shared object file: No such file or directory |
That error occurs because the gnome-menus-3.2.0.1-1.fc16.x86_64 is missing the /usr/lib64/libgnome-menu.so.2 symbolic link to the /usr/lib64/libgnome-menu.so.2.4.13 library. While the package meets the dependency check, the libraries fail the run time validation.
If digging in like this is all new to you, I’d recommend UNIX and Linux System Administration Handbook (4th Edition) (University of Colorado at Bolder folks) for the Linux stuff and The Quick Python Book, Second Edition for Python basics.
You can get a copy of the Fedora 15 package with the following command, which you should connect as the root user in navigate to the /tmp directory. Then, create a copy directory and change the /tmp/copy directory before running either of the next two commands.
Use this for 32-bit Installs
# wget http://archive.fedoraproject.org/pub/fedora/linux/releases/15/Fedora/i386/os/Packages/gnome-menus-3.0.1-1.fc15.i686.rpm |
Use this for 64-bit Installs
# wget http://archive.fedoraproject.org/pub/fedora/linux/releases/15/Fedora/x86_64/os/Packages/gnome-menus-3.0.1-1.fc15.x86_64.rpm |
That command only a copy of the RPM file, but the following converts it into an exploded directory. Assuming you created a copy directory in the /tmp directory, execute the following command from within the /tmp/copy directory. It will create a directory tree with the required files. After you copy the files, you can remove (rm) the copy directory from the /tmp directory.
Use this for 32-bit Installs
# rpm2cpio http://archive.fedoraproject.org/pub/fedora/linux/releases/15/Fedora/i386/os/Packages/gnome-menus-3.0.1-1.fc15.i686.rpm | cpio -ivd |
Use this for 64-bit Installs
# rpm2cpio http://archive.fedoraproject.org/pub/fedora/linux/releases/15/Fedora/x86_64/os/Packages/gnome-menus-3.0.1-1.fc15.x86_64.rpm | cpio -ivd |
You can now copy the files with these files. The target location differs between the 32-bit and 64-bit versions of the operating system.
Use this for 32-bit Installs
# cp /tmp/copy/usr/lib/libgnome-menu.so.2* /usr/lib # cp /tmp/copy/usr/lib/python2.7/site-packages/gmenu.so /usr/lib/python2.7/site-packages |
Alternatively, you can copy the following two files from any valid 32-bit Fedora 15 instance into a Fedora 16 instance, and manually create the symbolic link.
# /usr/lib/libgnome-menu.so.2.4.13 # /usr/lib/python2.7/site-packages/gmenu.so |
Use this for 64-bit Installs
# cp /tmp/copy/usr/lib64/libgnome-menu.so.2* /usr/lib64 # cp /tmp/copy/usr/lib64/python2.7/site-packages/gmenu.so /usr/lib64/python2.7/site-packages |
Alternatively, you can copy the following two files from any valid Fedora 64-bit 15 instance into a Fedora 16 instance, and manually create the symbolic link.
/usr/lib64/libgnome-menu.so.2.4.13 /usr/lib64/python2.7/site-packages/gmenu.so |
After you copy the two files into the right directories as root, you can create the necessary symbolic link with the following command (this isn’t necessary with the wildcard instruction provided earlier in the post). You need to ensure that you’re in the /usr/lib directory when you run the ln command, as noted by Gavin’s comment:
Use this for 32-bit Installs
# ln -s /usr/lib/libgnome-menu.so.2.4.13 libgnome-menu.so.2 |
Use this for 64-bit Installs
# ln -s /usr/lib64/libgnome-menu.so.2.4.13 libgnome-menu.so.2 |
As mentioned by Darr247, don’t forget to remove the /tmp/copy directory when you’re done making the changes.
Somebody asked me to add the Red Hat Package Manager (RPM) commands that let me find these dependencies. That seemed like a good idea, here they are:
rpm -qa search_stringgrep to filter the list.rpm -qf file_namerpm -q package_namerpm -qi package_namerpm -qR package_namerpm -ql package_namerpm -qd package_namerpm -qc package_name
If you want to set a menu item up manually, check this blog post. You also have the LXMenuEditor that’s available in beta as an alternative. Hope this helps those in need, as always.
