The Good, Bad, & Ugly
My take on the good, the bad, and the ugly of our Winter season, beside all the snow I’ve shoveled and blown to get in and out of my driveway, is:
The Good?
February brought us MySQL 5.6 GA (General Availability) and Ruby 2.0.0-p0. Mega thanks to the MySQL and Ruby teams! By the way, if you’ve always wanted to know a little about Ruby without a great deal of effort, you should check this awesome little 20 minute Ruby tutorial. Naturally, the best Ruby Programming book is a bit dated, and maybe there will be a new one later in the year. If anybody knows whether there’s a new edition forthcoming, I’d appreciate hearing about it! Another more current, Ruby 1.9, book is Programming Ruby 1.9: The Pragmatic Programmers’ Guide
.
The Bad?
It seems like a lot of folks who implemented Microsoft SharePoint are rapidly preparing to migrate from SharePoint 2010 to 2013, but what’s unclear is whether they’re upgrading for the features or bug fixes. It does seem many are opting for the Microsoft cloud services, and rumor has it that’s because a little collaboration requires a lot of hardware in the data center. It’s probably a good idea to do some research before implementing Microsoft SharePoint.
The Ugly?
If NBC got the quote right today, President Obama disappointed me by saying, “… I should somehow do a Jedi mind meld with these (republican) folks …” How can the President not know that Star Trek Vulcan’s aren’t in the Star Wars universe? Worse yet, my disappointment with Peter Jackson returns because he is releasing the theatrical version The Hobbit: An Unexpected Journey Bluray and DVD on March 19th and then an extended version later in the year. Ouch!!! He’s getting into my wallet again.
Spring starts later this month and the rumor is that Oracle will release Oracle Database 12c soon. Then, we get Iron Man 3, Star Trek into Darkness, and the Lone Ranger, along with warm weather.
A T-SQL Table Function
I had an interesting conversation about table functions in Oracle’s PL/SQL; and the fact that they’re not available in MySQL. When I explained they’re available in Microsoft T-SQL User-Defined Functions (UDFs), my students wanted a small example. One of them said they’d tried to do it but couldn’t get it to work because they found the Microsoft web pages difficult to read and use. Specifically, they didn’t like the sparseness of this one on how to create a function.
Here’s a quick definition of a UDF table function that runs in the studentdb schema (created in this post for migrating SQL Server into a MySQL database). The following getConquistador function takes a single string, which acts to filter the result set from a query positioned as the return value of the function. You should note that this is an implementation of Microsoft’s Common Language Infrastructure (CLI).
CREATE FUNCTION studentdb.getConquistador (@nationality AS VARCHAR(30)) RETURNS TABLE RETURN SELECT * FROM studentdb.conquistador WHERE nationality = @nationality; |
Unlike Oracle SQL, where you need to use the TABLE function to read the content of a table result from a function, you don’t need anything other than the function call in the FROM clause of a T-SQL query. Here’s an example of calling the table function:
SELECT * FROM studentdb.getConquistador('German'); |
The complete result from the query would produce these results when run from the sqlcmd command-line interface:
conquistador_id conquistador          actual_name          nationality
--------------- --------------------- -------------------- ------------
             11 Nicolas de Federman   Nikolaus Federmann   German
             13 Jorge de la Espira    George von Speyer    German

(2 rows affected) |
However, you also have the ability to query only rows of interest without any specialized syntax, like this:
1> USE studentdb; 2> SELECT conquistador AS "Conquistador" 3> , actual_name AS "Name" 4> FROM studentdb.getConquistador('German'); 5> GO |
This produces the following two-column result set:
Conquistador Name --------------------- -------------------- Nicolas de Federman Nikolaus Federmann Jorge de la Espira George von Speyer (2 rows affected) |
Hope this helps those interested in T-SQL UDFs.
Embedding Gists
Several years ago, I decided hosting my own blogs made sense because WordPress didn’t allow me to leverage plug-ins to format code blocks with GeSHi formatting. That was fine to a point. Although, the GeSHi formatting plug-in had some limits that I didn’t like and didn’t want to take the time to fix. The future was moving reusable code artifacts to a GitHub Gist repository.
I created this https://gist.github.com/maclochlainn Gist repository for the blog and implemented in this Common Lookup post from yesterday. As time allows, I’ll start shifting the reusable artifacts to the Gist repository from my blog. The change will be virtually unnoticeable because I’m leveraging a sweet piece of JQuery written by my son Joseph that lets you embed Gists in a web page.
There was just a little housekeeping to get Joseph’s JQuery to work smoothly with my WP-Syntax (contributed by Ryan McGeary – kudos for great work). More or less, beyond Jospeh’s instructions, I needed to add these into the WordPress theme’s style.css file when it was a relative reference. The JSON no longer requires this CSS modification, and it’s here in case somebody wants to do something different on their own.
/* Added for Gist code highlighting */ .gist{color:#000; font-size:13px} .gist .gist-file{border:1px solid #dedede;font-family:"Menlo", Consolas, "Liberation Mono", Courier, monospace;margin-bottom:1em} .gist .gist-file .gist-data{overflow:auto;word-wrap:normal;background-color:#f8f8ff;border-bottom:1px solid #ddd;font-size:100%} .gist .gist-file .gist-data .line_data{padding:.5em !important} .gist .gist-file .gist-data pre{font-family:Consolas, "Liberation Mono", Courier, monospace;background:transparent !important;border:none !important;margin:0 !important;padding:0 !important} .gist .gist-file .gist-data .gist-highlight{background:transparent !important} .gist .gist-file .gist-data .line_numbers{background-color:#ececec;color:#aaa;border-right:1px solid #ddd;text-align:right;padding:.5em} .gist .gist-file .gist-data .line_numbers span{clear:right;display:block} .gist .gist-file .gist-data .gist-line-numbers span{clear:right;display:block} .gist-syntax{background:#ffffff} .gist-syntax .c{color:#999988;font-style:italic} .gist-syntax .err{color:#a61717;background-color:#e3d2d2} .gist-syntax .k{color:#000000;font-weight:bold} .gist-syntax .o{color:#000000;font-weight:bold} .gist-syntax .cm{color:#999988;font-style:italic} .gist-syntax .cp{color:#999999;font-weight:bold} .gist-syntax .c1{color:#999988;font-style:italic} .gist-syntax .cs{color:#999999;font-weight:bold;font-style:italic} .gist-syntax .gd{color:#000000;background-color:#ffdddd} .gist-syntax .gd .x{color:#000000;background-color:#ffaaaa} .gist-syntax .ge{color:#000000;font-style:italic} .gist-syntax .gr{color:#aa0000} .gist-syntax .gh{color:#999999} .gist-syntax .gi{color:#000000;background-color:#ddffdd} .gist-syntax .gi .x{color:#000000;background-color:#aaffaa} .gist-syntax .go{color:#888888} .gist-syntax .gp{color:#555555} .gist-syntax .gs{font-weight:bold} .gist-syntax .gu{color:#aaaaaa} .gist-syntax .gt{color:#aa0000} .gist-syntax .kc{color:#000000;font-weight:bold} .gist-syntax .kd{color:#000000;font-weight:bold} .gist-syntax .kp{color:#000000;font-weight:bold} .gist-syntax .kr{color:#000000;font-weight:bold} .gist-syntax .kt{color:#445588;font-weight:bold} .gist-syntax .m{color:#009999} .gist-syntax .s{color:#d14} .gist-syntax .na{color:#008080} .gist-syntax .nb{color:#0086B3} .gist-syntax .nc{color:#445588;font-weight:bold} .gist-syntax .no{color:#008080} .gist-syntax .ni{color:#800080} .gist-syntax .ne{color:#990000;font-weight:bold} .gist-syntax .nf{color:#990000;font-weight:bold} .gist-syntax .nn{color:#555555} .gist-syntax .nt{color:#000080} .gist-syntax .nv{color:#008080} .gist-syntax .ow{color:#000000;font-weight:bold} .gist-syntax .w{color:#bbbbbb} .gist-syntax .mf{color:#009999} .gist-syntax .mh{color:#009999} .gist-syntax .mi{color:#009999} .gist-syntax .mo{color:#009999} .gist-syntax .sb{color:#d14} .gist-syntax .sc{color:#d14} .gist-syntax .sd{color:#d14} .gist-syntax .s2{color:#d14} .gist-syntax .se{color:#d14} .gist-syntax .sh{color:#d14} .gist-syntax .si{color:#d14} .gist-syntax .sx{color:#d14} .gist-syntax .sr{color:#009926} .gist-syntax .s1{color:#d14} .gist-syntax .ss{color:#990073} .gist-syntax .bp{color:#999999} .gist-syntax .vc{color:#008080} .gist-syntax .vg{color:#008080} .gist-syntax .vi{color:#008080} .gist-syntax .il{color:#009999} /* End gist highlighting */ /* To resolve Geshi plug-in conflict. */ td.line-numbers {background:rgb(236,236,236)!important; border-right: 1px solid rgb(170,170,170)!important;text-align:right!important;padding:6px!important;color:rgb(170,170,170)!important;} td.line-data {padding:6px!important;} |
Also, Joseph and I discovered that there was a problem with changing style sheets on the github.com site. Joseph added the following but may not update his blog right away, so here’s the JavaScript for your WordPress header:
After completing this, I noticed that there’s a WordPress Plugin for embedding gists. Naturally, it’s probably simple to use it but I like the control and performance of this solution. I hope this make the pages load a bit faster, and readers use code that they’d like to test.
Common Lookup Tables 2
Last October I posted an example and description of a common_lookup table. It was intended to show how common_lookup tables support drop down selections in web forms. However, it wasn’t adequate to show how they work with existing data, and the function only supported fresh queries.
This post goes to the next level, and shows how to use foreign keys to preselect values for display in web forms. It also rewrites the prior function so that it supports querying existing data and inserting new data.
Let’s start with data stored in join between two tables – the member and contact tables. The internal lookup uses the customers name from the contact table to find the membership account information in the member table.
1 2 3 4 5 6 7 8 9 10 11 12 13 | SELECT m.account_number , m.member_type -- A fk to common_lookup table. , m.credit_card_number , m.credit_card_type -- A fk to common_lookup table. , c.first_name , c.middle_name , c.last_name , c.contact_type -- A fk to common_lookup table. FROM member m INNER JOIN contact c ON m.member_id = c.member_id WHERE c.first_name = 'Harry' AND c.middle_name = 'James' AND c.last_name = 'Potter'\G |
It returns the results on the left, while a set of joins against the common_lookup table returns the results on the right (both use the \G in SQL Monitor to display the data vertically).

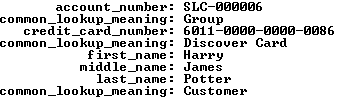
The member_type, credit_card_type, and contact_type columns in the data set on the left hold foreign key values. They’re copies of values found in the primary key column of the common_lookup table. You have the option of using these values to connect the data through a join or through function calls. A join requires three copies of the common_lookup table and yields the data displayed on the right above. The query to get the meaningful business information from the common_lookup table is:
1 2 3 4 5 6 7 8 9 10 11 12 13 14 15 16 | SELECT m.account_number , cl1.common_lookup_meaning , m.credit_card_number , cl2.common_lookup_meaning , c.first_name , c.middle_name , c.last_name , cl3.common_lookup_meaning FROM member m INNER JOIN contact c ON m.member_id = c.member_id INNER JOIN common_lookup cl1 ON cl1.common_lookup_id = m.member_type INNER JOIN common_lookup cl2 ON cl2.common_lookup_id = m.credit_card_type INNER JOIN common_lookup cl3 ON cl3.common_lookup_id = c.contact_type WHERE c.first_name = 'Harry' AND c.middle_name = 'James' AND c.last_name = 'Potter'\G |
The data returned from any query is symmetrical, which means all columns return the same number of rows. The results of the preceding query are the business results. Although, they’re not what you’d want to display in a web form that presents the ability to change values, like the member, credit card, or contact types. You need to get that information by using the foreign key as a parameter to a function call, and in this case three function calls. One for each of the foreign keys from the original query results. The result is an asymmetric collection of data would look like the following conceptually with Lily Luna Potter as the customer (note the green row is the symmetrical return set from the preceding query):
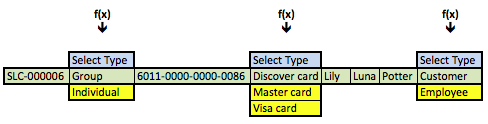
The f(x) represents a generic function call where the x substitutes for the foreign key value as a lookup key to the primary key value of the common_lookup table. The function in this case is a query that returns a two column list. One column holds the primary key value of the (common_lookup_id) and the other holds the customer facing description (from the common_lookup_meaning column).
These steps describe the process:
- Use the natural key (the user name) to find the data in the
contacttable. - Use the
member_idforeign key column in thecontacttable to link to the same name column primary key in themembertable by joining the two rows. - Use the foreign keys in the new row (combining columns from the
contactandmembertables) as call parameters to a PHP function that returns all possible foreign key values and their business descriptions in a web form.
The vertical choices displayed above map to OPTION tag elements of an HTML SELECT tag. The blue highlighted value contains an instruction, Select Type, in the display of an HTML OPTION tag, and it holds a null as the value of the VALUE attribute for the OPTION tag. The other displayed rows are the possible values. The green highlighted value is the currently selected value and the yellow highlighted values are alternate possibilities for an end-user to select. The logic for that process is in the PHP get_common_lookup function below.
Having discussed the structure of the data and problem, we’ll present the result in a dynamically constructed web form below. The display form shows a member account with customer information.
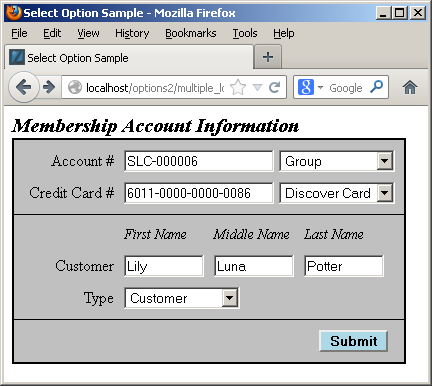
You should note that the primary and foreign keys aren’t displayed because they’re irrelevant to the business process. Primary and foreign keys only serve to support relationships when we use surrogate keys as the primary key of a table. Only the meaningful information from the common_lookup table are displayed in the preceding form. Behind the web form, the primary and foreign key values are critical to maintaining anomaly free table data.
Each of the drop downs contains the full selection of possibilities from the common_lookup table, and an end-user could choose a new value by clicking on any of the drop down fields. For example, the following displays the selection of a type of credit card:
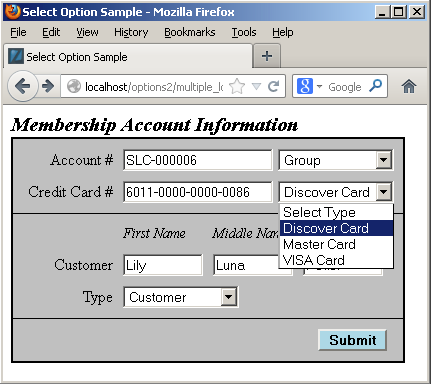
The user can click on the drop down, and then navigate from the selection to a new selection. Assuming we don’t change anything, submitting the form should transmit the foreign key column values. The following shows that’s exactly what it does:
As you can see from the screen shot it works easily. Below is the PHP code for a MySQL credentials file and the get_lookup function. The function lets you find an existing value or returns a set of unique values for you to choose from.
You should rename the following credentials.php file as MySQLCredentials.inc for it to work in the file below it.
Assuming you’ve implemented the credentials.php file as the MySQLCredentials.inc file, you can now implement the following file. The get_common_lookup function returns a <SELECT> tag with a list embedded of <OPTION> tags with values; one <OPTION> tag is selected when the foreign key matches a valid primary key value in the common_lookup table; and no <OPTION> tag is selected when the foreign key doesn’t match a a valid primary key value in the common_lookup table. The last possibility means a user must choose a new valid value for the foreign key column when the foreign key column is constrained as a mandatory or not null column.
The code for the web form is a bit more complex, as shown below. It contains three separate calls to the modified get_common_lookup function (on lines 104, 111, and 126). Each call to the get_common_lookup function selects the list of possible values and highlights the value associated with the foreign key value.
Here’s the web form code. You should note that it only returns a single row of data from the query by using a natural key from the contact table.
1 2 3 4 5 6 7 8 9 10 11 12 13 14 15 16 17 18 19 20 21 22 23 24 25 26 27 28 29 30 31 32 33 34 35 36 37 38 39 40 41 42 43 44 45 46 47 48 49 50 51 52 53 54 55 56 57 58 59 60 61 62 63 64 65 66 67 68 69 70 71 72 73 74 75 76 77 78 79 80 81 82 83 84 85 86 87 88 89 90 91 92 93 94 95 96 97 98 99 100 101 102 103 104 105 106 107 108 109 110 111 112 113 114 115 116 117 118 119 120 121 122 123 124 125 126 127 128 129 130 131 132 133 134 135 136 137 138 139 140 | <html>
<header>
<title>Select Option Sample</title>
<style type="text/css">
/* Class tag element styles. */
.box {border:1px solid;padding:0px;width:392px;background-color:silver;}
.bottomBox {border-left:1px solid;border-right:1px solid;border-bottom:1px solid;padding:5px;width:380px;background-color:silver;}
.middleBox {border:1px solid;padding:5px;width:380px;background-color:silver;}
.topBox {border-left:1px solid;border-right:1px solid;border-top:1px solid;padding:5px;width:380px;background-color:silver;}
.button {margin:5px;background-color:lightblue;font-weight:bold;align:right;}
.clear {clear:left;}
.dropDown {min-width:50px;display:block;float:left;text-align:left;color:black;}
.formDownLabel {width:90px;display:block;float:left;margin:5px;text-align:right;vertical-align:bottom;color:black;}
.formAcrossLabel {width:80px;display:block;float:left;padding-bottom:0px;margin:5px 5px 0px;text-align:left;vertical-align:bottom;font-style:italic;font-size:90%;color:black;}
.formInput {min-width:150px;margin:5px;text-align:left;}
.formShortInput {width:80px;margin:5px;text-align:left;}
.title1 {margin-left:0px;font-weight:bold;font-style:italic;font-size:125%;color:black;}
.title2 {margin-left:5px;font-weight:bold;font-style:italic;font-size:105%;color:black;}
</style>
</header>
<body>
<?php
// Include libraries.
include_once("MySQLCredentials.inc");
include_once("library.inc");
// Define a HTML page string.
$out = '';
// Declare input variables.
$first_name = (isset($_GET['first_name'])) ? $_GET['first_name'] : $first_name = "Harry";
$middle_name = (isset($_GET['middle_name'])) ? $_GET['middle_name'] : $middle_name = "James";
$last_name = (isset($_GET['last_name'])) ? $_GET['last_name'] : $last_name = "Potter";
// Declare output variables.
$member_account_number = null;
$credit_card_number = null;
// Declare lookup input and output (initialized as nulls to suppress warnings) variables.
$member_table = 'member';
$member_type = 'member_type';
$member_type_id = null;
$credit_card_type = 'credit_card_type';
$credit_card_type_id = null;
$contact_table = 'contact';
$contact_type = 'contact_type';
$contact_type_id = null;
// Assign credentials to connection.
$mysqli = new mysqli(HOSTNAME, USERNAME, PASSWORD, DATABASE);
// Check for connection error and print message.
if ($mysqli->connect_errno) {
print $mysqli->connect_error."<br />";
print "Connection not established ...<br />";
}
else {
// Initial statement.
$stmt = $mysqli->stmt_init();
// Declare a static query.
$sql = "SELECT m.account_number\n"
. ", m.member_type\n"
. ", m.credit_card_number\n"
. ", m.credit_card_type\n"
. ", c.first_name\n"
. ", c.middle_name\n"
. ", c.last_name\n"
. ", c.contact_type\n"
. "FROM member m INNER JOIN contact c\n"
. "ON m.member_id = c.member_id\n"
. "WHERE c.first_name = ?\n"
. "AND c.middle_name = ?\n"
. "AND c.last_name = ?\n";
// Prepare statement.
if ($stmt->prepare($sql)) {
$stmt->bind_param("sss",$first_name,$middle_name,$last_name); }
// Attempt query and exit with failure before processing.
if (!$stmt->execute()) {
// Print failure to resolve query message.
print $mysqli->error."<br />";
print "Failed to resolve query ...<br />";
}
else {
// This query only returns one row, and an empty block follows the while logic.
$stmt->bind_result($member_account_number, $member_type_id, $credit_card_number, $credit_card_type_id, $first_name, $middle_name, $last_name, $contact_type_id);
while ($stmt->fetch()) {}
}
}
// Print the query form.
$out .= '<form method="post" name="myForm" action="submitItemType.php">';
$out .= '<label class="title1">Membership Account Information</label><br />';
$out .= '<div class="box">';
$out .= '<div class="topBox">';
$out .= '<label class="formDownLabel">Account #</label><input class="formInput" type="text" value="'.$member_account_number.'" />';
$out .= '<select name="member_type" size="1" onChange="change(this.form.member_type)">';
// Get dynamic membership type lookup string fragment.
$out .= get_common_lookup($member_table, $member_type, $member_type_id);
$out .= '</select><br />';
$out .= '<label class="formDownLabel">Credit Card #</label><input class="formInput" type="text" value="'.$credit_card_number.'" />';
$out .= '<select name="credit_card_type" size="1" onChange="change(this.form.credit_card_type)">';
// Get dynamic credit card type lookup string fragment.
$out .= get_common_lookup($member_table, $credit_card_type, $credit_card_type_id);
// Print the closing HTML table tag.
$out .= '</select><br />';
$out .= '</div>';
$out .= '<div class="middleBox">';
$out .= '<label class="formDownLabel"> </label>';
$out .= '<label class="formAcrossLabel">First Name</label><label class="formAcrossLabel">Middle Name</label><label class="formAcrossLabel">Last Name</label><br class="clear" />';
$out .= '<label class="formDownLabel">Customer</label><input class="formShortInput" type="text" value="'.$first_name.'" />';
$out .= '<input class="formShortInput" type="text" value="'.$middle_name.'" />';
$out .= '<input class="formShortInput" type="text" value="'.$last_name.'" /><br />';
$out .= '<label class="formDownLabel">Type</label>';
$out .= '<select style="margin:5px" name="contact_type" size="1" onChange="change(this.form.contact_type)">';
// Get dynamic membership type lookup string fragment.
$out .= get_common_lookup($contact_table, $contact_type, $contact_type_id);
$out .= '</select><br />';
$out .= '</div>';
$out .= '<div class="bottomBox">';
$out .= '<input class="button" style="margin-left:300px" name="submit" type="submit" value="Submit">';
$out .= '</div>';
$out .= '</form>';
$out .= '</body>';
$out .= '</html>';
print $out;
?>
</body>
</html> |
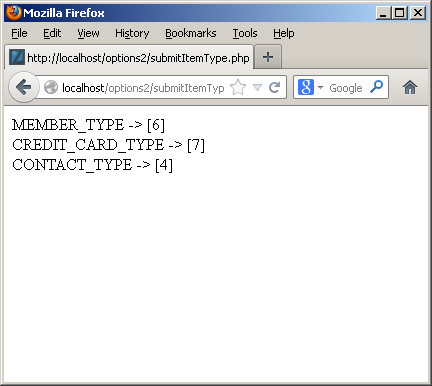
The submit button simply runs another web page that prints the actual values for the drop down selections. Here’s the code to print that:
1 2 3 4 5 6 7 8 9 10 11 12 | <html> <head> </head> <body> <?php // Print the surrogate key values for the common_lookup_id column. print "MEMBER_TYPE -> [".$_POST['member_type']."]<br />"; print "CREDIT_CARD_TYPE -> [".$_POST['credit_card_type']."]<br />"; print "CONTACT_TYPE -> [".$_POST['contact_type']."]<br />"; ?> </body> </html> |
I hope this helps those who are interested in sorting how to implement a common_lookup table.
MySQL Auto Increment
Somebody ran into a problem after reading about the MySQL CREATE statement and the AUTO_INCREMENT option. They couldn’t get a CREATE statement to work with an AUTO_INCREMENT value other than the default of 1. The problem was they were using this incorrect syntax:
CREATE TABLE elvira ( elvira_id int unsigned PRIMARY KEY AUTO_INCREMENT=1001 , movie_title varchar(60)) ENGINE=InnoDB CHARSET=utf8; |
It raises this error:
ERROR 1064 (42000): You have an error in your SQL syntax; check the manual that corresponds to your MySQL server version for the right syntax to use near '=1001 , movie_title varchar(60)) ENGINE=InnoDB CHARSET=utf8' at line 2 |
They concluded that MySQL requires you to assign a default value of 1 as the initial automatic numbering value; then you use the ALTER statement to change the initial sequence value. That assumption is incorrect. The problem was with their assignment of an overriding AUTO_INCREMENT value inside the parenthetical list of columns. That assignment needs to occur after the list of columns and constraints, like
CREATE TABLE elvira ( elvira_id int unsigned PRIMARY KEY AUTO_INCREMENT , movie_title varchar(60)) ENGINE=InnoDB AUTO_INCREMENT=1001 CHARSET=utf8; |
It’s not an unlikely mistake since there’s no clear example on either of the referenced web pages (at the time of writing). It would be nice if they were added but I’m of the opinion some of the reference manual pages are too sparse.
After creating the table, you have the generic fix that seems to appear most often as an answer to setting or re-setting the auto numbering sequence of a MySQL table:
ALTER TABLE elvira AUTO_INCREMENT=1001; |
Why would you set the auto numbering sequence to something other than 1? Some designers consider it a best practice to increment from a set point like 101 or 1,001 for your Application Programming Interface (API) and they leave a readily identifiable sequence number set for pre- or post-seeded data in tables. The region of preallocated numbers are typically only used in a few of the tables, in any application, but consistently managing sequences across all tables does sometimes simplifies data diagnostics.
Hope this helps somebody looking for a syntax fix. By the way, you can find it on Page 162 of the Oracle Database 11g & MySQL 5.6 Developer Handbook.
Excel: Navigate a range
Somebody posted a comment on my Excel UDF Tutorial, and on reflection it appears he’d like to navigate a range in VBA. While I don’t see a purpose in that because it duplicates either the VLOOKUP or HLOOKUP function (depending on whether you’re navigating a column or row).
Anyway, here’s how you’d do it in VBA:
Function Finding(lookupWord As String, lookupRange As Range, lookupColumn As Integer) As Integer ' Define variables. Dim lookupIndex As Integer Dim lookupMax As Integer Dim returnValue As Integer ' Assign values to variables. lookupIndex = 1 lookupMax = lookupRange.Rows.Count returnValue = 1 ' Print starting and ending index values. MsgBox ("[" + CStr(lookupIndex) + "][" + CStr(lookupMax) + "]") ' Loop until found, but exit when not found. Do Until lookupRange.Cells(lookupIndex, 1).Value = lookupWord ' Print diagnostic value to determine what's evaluated. MsgBox ("[" + CStr(lookupIndex) + "] [" + CStr(lookupRange.Cells(lookupIndex, 1).Value) + "]") ' Fail safe exit when no matching value is found. If lookupIndex = (lookupMax + 1) Then ' Assign a 0 (zero) as a false return flag value. returnValue = 0 Exit Do End If ' Increment counting index value. lookupIndex = lookupIndex + 1 Loop 'Return a 1 when the value is found and zero when it isn't. Finding = returnValue End Function |
I only chose a DO UNTIL loop because that was in the comment. It would be more appropriate to, from my perspective, use a FOR range loop, like this:
For lookupIndex = 1 To lookupMax ' Loop contents. Next lookupIndex |
Hope this helps.
Excel: How-to-use SUMIF
Debbie asked a question about why a comparison wasn’t working in the Microsoft Excel SUMIF function when the initial array value was empty. This post answers that question.
The SUMIF function takes a lookup range, which anticipates a one column with a lookup value and another column with a value. The SUMIFS function works along the same line but accepts multiple lookups against a series of lookup list columns.
This shows a simple model of the SUMIF function:

The formula in cell G3 is:
=SUMIF(B$3:B$5,"<"&$E$3,C$3:C$5) |
If you left off the $ symbol and made the comparison "<"&E3, you could add the sums for any number of values that are less than a value in the same row (or counting index with named ranges). You could also make the inequality symbol a parameter with this modified formula:
=SUMIF(B$3:B$5,$E$5&$E$3,C$3:C$5) |

Now, your analysis model lets you choose whether you want to look for the sum greater than or less than a specific number in the lookup range. Named ranges compare index values between the lookup range and comparison range values, which allows them to be in different rows or spreadsheets. The only problem is that the label has an inverted inequality sign. You can fix that by constantly editing the description or by simply replace the text of the label with a dynamic text string, like this:
=CONCATENATE("Comparison """,$E$5,""" Value") |
After applying the fix to the label, it looks like:

When the lookup column contains all nulls, the same formula returns a zero, as shown in the illustration.

You'll also get an error flag, unless you unchecked the Flag formulas that refer to empty cells in the error checking options. The IFERROR function can't be used to suppress this type of error.
Why doesn't the error return a null value? That's because an equality operator compares values in the array against a static or dynamic lookup value. While equality operators don't implicit cast values for comparison, they also don't compare null values. Only the ISBLANK function lets you find an empty cell and it can't be used inside a SUMIF function call.
DSL Internet Light is off
It was a surreal experience this weekend because CenturyLink took my DSL-based Internet offline. Calling their 24 hours support yielded 1st level support, who could do nothing but repeatedly ask me to re-enter my user ID and password. They wouldn’t listen to the simple fact that my Internet light was off, which means the problem is on CenturyLink’s part.
First level support said my DSL-Modem was broken. Naturally, it was the one they provided and charge me $5/month for. I explained that if the DSL light was green one moment and not lit another and the internal Intranet continued to work, it wasn’t the DSL-Modem/Router’s logic board. However, I even went and bought a new DSL-Modem to verify that it would have the same problem symtoms.
With the new modem, the same problem existed. When I contacted the support, the support person said, “Your new Actiontec DSL-model isn’t supported.” Then, they wanted me to call Actiontec. Immediately recognizing their attempt to dodge ownership and close the request (supporting their job metrics), I reconnected the DSL-Modem/Router and said,
“Your supported device is now reconnected and failing to connect to your server. The Internet light is not lit, which means it doesn’t fail or succeed to connect, it simply can’t get recognized to validate a connection on your server.”
Naturally, by this time it was the weekend. The support representative then said, I’d have to call back on Monday during normal business hours because nobody held privileges to reset the server. They said, “Ask for 3rd level support. That’s so interesting because CenturyLink boast 7×24 hour service while it appears that their support model is 5×8, 5×9, or 5×10 hour service.
When I finally got a support person online Monday to escalate to the next level, or beyond, this support person wouldn’t acknowledge that the issue required 3rd level support. They had only 2nd level support. Who knows what’s true at this point, eh? When they did escalate, 35 minutes later the service was reconnected without any action on my DSL-Modem/Router. The light went from unlit, to red, and then after less than a minute to green. This proved exactly what I tried to explain on Thursday last week, which yielded nothing. Unfortunately, I had to travel to Utah Thursday evening and couldn’t get back to the problem on my end until Saturday. Then, the support limits of CenturyLink kicked in and Internet couldn’t be restored until Monday.
CenturyLink has taught me they don’t care about customer service, and that they’re support model is broken. Unfortunately, there are few options in Rexburg, Idaho. It strikes me there needs to be a Federal law if there isn’t already one to mandate the support staffing hours of Internet providers. Next step, I should ask my Congressman if there is a law, and if there isn’t a law start a public driven initiative to create one. By the way, I waited 26 minutes for them to find a duty manager – apparently another broken process or staffing glitch. When he got online, I asked for an email stating what they had broken on their level. That manager represented that they don’t have access to email, like their 1st support analyst, and now I’m waiting for a manager at the next level. I wonder how many levels are required to find somebody with email? Apparently, nobody can send the email because of their security concerns. It makes me wonder if nobody can send an email to acknowledge their mistake. 😉
Bottom-line, when the Internet light goes dark (unlit), escalate and don’t bother with 1st level support. It’s a waste of your time.
By the way, when I looked into a Cable connection it was the same price and it’s twice as fast. Yes, I’m switching now. So much for the ad copy of 99.9% up time, it doesn’t factor in their downtime windows when the Internet goes unlit. That happens for hours on the weekend several months a year, that appears to be their unpublished service window. Wouldn’t it be interesting to see what their real customer up-time is?
The plus side, is that CableOne’s Internet is 6 times faster and the same cost (provided you have a dedicated phone line), as you can see in my speed comparisons using http://speedtest.net (also in my comment replying to CenturyLink below).
| Service | Download | Upload |
|---|---|---|
| CenturyLink | 5.69 Mbps | 0.95 Mbps |
| CableOne | 30.34 Mbps | 1.60 Mbps |
My only regret is that I didn’t change sooner. Thanks to CenturyLink’s classic example of aggravating customer support, non-transparent outages, and tirelessly trying to maintain image through a 1st level support team for helping me make the change.
Mountain Lion Pre-MySQL
While I try to contain everything about installing MySQL in a single post that I update from time-to-time, Mac OS X, Mountain Lion (10.8.x), requires some pre-steps. You must install XCode, and the Command Line Tools. This post provides the screen shots and step-by-step instructions.
Before you can do any of these steps, you must connect to the Apple Store and download XCode. Dependent on your internet speed this may take some time. Generally, it’s an hour or less.
- After installing XCode, click the Rocket Spaceship in the Mac Dock to launch a view of your Applications. Launch XCode by clicking on the hammer overlaying the blue background XCode icon shown below.

- After launching XCode, click the Install button on the lower right of the System Component Installation screen shown below.

- You’re prompted for your default user (actually a sudoer authorized user) password. Enter it in the dialog and click the OK button to continue.

- After entering the valid credentials and a couple minutes, you should see the System Component Installation screen shown below. Click the Start Using XCode button to continue.

- Inside XCode, click on the XCode menu option and select the Preferences menu option, as shown below.

- You should be on the General tab of XCode’s Preferences dialog. Click on the Downloads tab.

- You should see three choices (at the time of writing) in the Downloads tab. As shown, select the Command Line Tools item. It should take only a couple minutes to download. Click the Install button to continue.

- The Install button disappears and is replaced by an Installed label when the Command Line Tools are installed. You should see the following screen shot.

After completing these steps, return to the other post to install and configure MySQL. While it seems this exists already as content on Apple’s site, it seems some folks wanted me to add it with the step-by-step screen shots.
Mac Disk Failure & Recovery
The first time I had a major failure on my Mac Pro, I lost a 1 TB Seagate drive and ten key virtual machines. It taught me to apply the principles from my production life to my private life. Swapping the fault-prone Seagate drives for Hitachi drives, I began the slow process of rebuilding those virtual environments.
 My solution to minimize risk was two fold. First, I put the main 320 GB disk on a time machine backup. Second, I began weekly backups of my virtual machines to two external 2 TB disk drives. After all, I wanted to contain cost.
Paying more attention paid off this week, when I got the flashing drive folder error. It’s the equivalent on the Mac OS X to Microsoft’s Blue Screen of death. This error means the machine can’t find a healthy OS. The problem is that there a number of posts out there, and some aren’t as effective as they appear in solving the problem. More or less, when you see this screen you have two tests before getting a new disk and restoring the image from your time machine.
The first step requires you to reboot the machine that’s stuck looking for an operating system.  You can do that by pushing the power button until a reset occurs while simultaneously holding down the Option and key. You’ll know it works if you don’t see the blinking file folder icon and you see a mouse arrow displayed in the screen. It should occur within 5 to no more than 10 seconds after you reboot.
Insert a valid Mac Operating System (OS) disk into the optical drive. It should launch the installation program within 30 to 60 seconds. Click the first proceed button and on the next screen launch the Disk Utility from the displayed menu. In the Disk Utility, click the First Aid tab. Look at the Total Capacity value in the bottom right of the screen. If it provides a numeric value, there’s a hope for your disk recovery. Click on the First Aid tab to try and recover the disk drive. If it provides a zero numeric value, there’s virtually no hope for your disk recovery.
Since the likelihood of recovering the disk at this point is low, buying a new disk is probably the best step. After you’ve ordered the replacement disk, you can boot your Mac in target mode.  Target mode allows you to use another Mac and it’s operating system to run your disks (on a Mac Pro, there can be up to 4 disks).
Remove the CD copy of the operating system from the optical drive and push the power button to turn off your non-working Mac. Start the remote Mac and connect the two using a FireWire cable. After the new target machine has finished booting its copy of the OS, push the power button on the machine that can’t find the OS and hold down the T key. In the target machine, open the Finder and inspect which disks are found. If the base disk drive is excluded from the list, as it is in the screen capture on the right, your disk has failed.
At this point, you should definitely buy a new disk unless you’re covered by AppleCare. If the latter, log a ticket and let them fix it. It’s even possible they may be able to recover something from your failed disk. Although, it is unlikely your get any data back if the Mac OS X software can’t recognize the disk.
 Your best bet is to recover the image from a time machine restoration. Hopefully, you had an active time machine image not too far before the failure. I did, and it fully recovered everything smoothly. The new disk arrived this morning, and I’m less than 30 minutes from a full recovery. Though that’s unimportant unless I tell you how.
Once you physically install the disk, you reboot the machine that’s stuck looking for an operating system. You push the power button while simultaneously holding down the Option key. Insert a valid Mac Operating System disk into the optical drive. It should launch the installation program within 30 to 60 seconds. Click the first proceed button and on the next screen launch the Disk Utility from the displayed menu. In the Disk Utility, click the Partition tab to partition the new disk. Then, choose to restore from a time machine in the installation program.
Bottom-line: I’m so happy that time machine works so well!!!
