Archive for the ‘MySQL Techniques’ tag
MySQL with CTEs
As an example for my class on the usefulness of Common Table Expressions (CTEs), I created three examples with Python. They extend an exercise in Chapter 9 on subqueries from Learning SQL by Alan Beaulieu. All of the examples work with the sakila sample database.
These bullets describe the examples:
- Uses local variables and a range for loop and if statement that uses the variables to evaluate and add an element to the derived table (or query result set) from MySQL.
- Uses a CTE with substitution variables from the Python program, which eliminates the need to evaluate and add an element to the query result set because the query does that.
- Uses a table to hold the variables necessary to evaluate and add the element to the query result set.
This is the first Python program:
1 2 3 4 5 6 7 8 9 10 11 12 13 14 15 16 17 18 19 20 21 22 23 24 25 26 27 28 29 30 31 32 33 34 35 36 37 38 39 40 41 42 43 44 45 46 47 48 49 50 51 52 53 54 55 56 57 58 59 60 61 62 63 64 65 | # Import the library. import sys import mysql.connector from mysql.connector import errorcode # Declare a list of tuples. dict = [{'level':'Hollywood Star','min_roles':30,'max_roles':99999} ,{'level':'Prolific Actor','min_roles':20,'max_roles':29} ,{'level':'Newcomer','min_roles':1,'max_roles':19}] # Attempt the query. # ============================================================ # Use a try-catch block to manage the connection. # ============================================================ try: # Open connection. cnx = mysql.connector.connect(user='student', password='student', host='127.0.0.1', database='sakila') # Create cursor. cursor = cnx.cursor() # Set the query statement. query = ("SELECT a.actor_id " ", a.first_name " ", a.last_name " ", COUNT(fa.actor_id) AS films " "FROM actor a INNER JOIN film_actor fa " "ON a.actor_id = fa.actor_id " "GROUP BY a.actor_id " ", a.first_name " ", a.last_name " "ORDER BY a.last_name " ", a.first_name") # Execute cursor. cursor.execute(query) # Display the rows returned by the query. for (actor_id, first_name, last_name, films) in cursor: for i in range(len(dict)): if films >= dict[i]["min_roles"] and films <= dict[i]["max_roles"]: print('{0} {1} is a {2} with {3} films.'.format( first_name.title() , last_name.title() , dict[i]["level"] , films)) # Close cursor. cursor.close() # ------------------------------------------------------------ # Handle exception and close connection. except mysql.connector.Error as e: if e.errno == errorcode.ER_ACCESS_DENIED_ERROR: print("Something is wrong with your user name or password") elif e.errno == errorcode.ER_BAD_DB_ERROR: print("Database does not exist") else: print("Error code:", e.errno) # error number print("SQLSTATE value:", e.sqlstate) # SQLSTATE value print("Error message:", e.msg) # error message # Close the connection when the try block completes. else: cnx.close() |
The Python dictionary on lines 7 thru 9 and range for loop and if statement on lines 41 and 42 can be eliminated by putting the literal values in a Common Table Expression (CTE). That’s because a CROSS JOIN matches all rows in the CTE against the base table before filtering them.
The match of all rows in the CTE against the base table effectively replaces the range for loop in the original code. The WHERE clause replaces the if statement in the original code.
Another optimization for readability of the final query puts the grouped query into a CTE as well. That way the final query simply demonstrates the filtering process.
This is the second Python program, and it converts the Python dictionary to a list of lists and assigns the lists to param tuple:
1 2 3 4 5 6 7 8 9 10 11 12 13 14 15 16 17 18 19 20 21 22 23 24 25 26 27 28 29 30 31 32 33 34 35 36 37 38 39 40 41 42 43 44 45 46 47 48 49 50 51 52 53 54 55 56 57 58 59 60 61 62 63 64 65 66 67 68 69 70 71 72 73 74 75 76 77 78 79 80 81 82 83 84 85 | # Import the library. import sys import mysql.connector from mysql.connector import errorcode # Declare a list of lists. list = [['Hollywood Star',30,99999] ,['Prolific Actor',20,29] ,['Newcomer',1,19]] # Declare a tuple of the set of lists. param = (list[0] + list[1] + list[2]) # Attempt the query. # ============================================================ # Use a try-catch block to manage the connection. # ============================================================ try: # Open connection. cnx = mysql.connector.connect(user='student', password='student', host='127.0.0.1', database='sakila') # Create cursor. cursor = cnx.cursor() # Set the query statement. query = ("WITH actors AS " "(SELECT a.actor_id " " , a.first_name " " , a.last_name " " , COUNT(fa.actor_id) AS num_roles " " FROM actor a INNER JOIN film_actor fa " " ON a.actor_id = fa.actor_id " " GROUP BY a.actor_id " " , a.first_name " " , a.last_name ) " " , levels AS " "(SELECT %s AS level " " , %s AS min_roles " " , %s AS max_roles " " UNION ALL " " SELECT %s AS level " " , %s AS min_roles " " , %s AS max_roles " " UNION ALL " " SELECT %s AS level " " , %s AS min_roles " " , %s AS max_roles) " " SELECT a.first_name " " , a.last_name " " , l.level " " , a.num_roles " " FROM actors a CROSS JOIN levels l " " WHERE a.num_roles BETWEEN l.min_roles AND l.max_roles " " ORDER BY a.last_name " " , a.first_name") # Execute cursor. cursor.execute(query, param) # Display the rows returned by the query. for (first_name, last_name, level, num_roles) in cursor: print('{0} {1} is a {2} with {3} films.'.format( first_name.title() , last_name.title() , level.title() , num_roles)) # Close cursor. cursor.close() # ------------------------------------------------------------ # Handle exception and close connection. except mysql.connector.Error as e: if e.errno == errorcode.ER_ACCESS_DENIED_ERROR: print("Something is wrong with your user name or password") elif e.errno == errorcode.ER_BAD_DB_ERROR: print("Database does not exist") else: print("Error code:", e.errno) # error number print("SQLSTATE value:", e.sqlstate) # SQLSTATE value print("Error message:", e.msg) # error message # Close the connection when the try block completes. else: cnx.close() |
This is the third Python program requires some SQL setup. You should run this script inside the sakila database first. It basically takes the variables out of the code and stores them in a table. This is more likely what you would do to ensure maintainability of ever changing range values like these if you built a solution like this in a real application. It leaves the aggregation process inside a CTE and simplifies the final query.
-- Conditionally drop the levels table. DROP TABLE IF EXISTS levels; -- Create the levels list. CREATE TABLE levels ( level VARCHAR(16) , min_roles INT , max_roles INT ); -- Insert values into the list table. INSERT INTO levels ( level, min_roles, max_roles ) VALUES ('Hollywood Star', 30, 99999) ,('Prolific Actor', 20, 29) ,('Newcommer',1,19); |
After seeding the data in the levels table, you can test the query natively in MySQL, like this:
1 2 3 4 5 6 7 8 9 10 11 12 13 14 15 16 17 | -- Query the data. WITH actors AS (SELECT a.actor_id , a.first_name , a.last_name , COUNT(*) AS num_roles FROM actor a INNER JOIN film_actor fa ON a.actor_id = fa.actor_id GROUP BY actor_id) SELECT a.first_name , a.last_name , l.level , a.num_roles FROM actors a CROSS JOIN levels l WHERE a.num_roles BETWEEN l.min_roles AND l.max_roles ORDER BY a.last_name , a.first_name; |
There’s also a syntax that makes this type of query appear to be an INNER JOIN when it’s actually a filtered CROSS JOIN. If you adopt that syntax, you would rewrite lines 14 and 15:
14 15 | FROM actors a INNER JOIN levels l WHERE a.num_roles BETWEEN l.min_roles AND l.max_roles; |
Then, you can run this version without the second CTE element:
1 2 3 4 5 6 7 8 9 10 11 12 13 14 15 16 17 18 19 20 21 22 23 24 25 26 27 28 29 30 31 32 33 34 35 36 37 38 39 40 41 42 43 44 45 46 47 48 49 50 51 52 53 54 55 56 57 58 59 60 61 62 63 64 65 | # Import the library. import sys import mysql.connector from mysql.connector import errorcode # Attempt the query. # ============================================================ # Use a try-catch block to manage the connection. # ============================================================ try: # Open connection. cnx = mysql.connector.connect(user='student', password='student', host='127.0.0.1', database='sakila') # Create cursor. cursor = cnx.cursor() # Set the query statement. query = ("WITH actors AS " "(SELECT a.actor_id " " , a.first_name " " , a.last_name " " , COUNT(fa.actor_id) AS num_roles " " FROM actor a INNER JOIN film_actor fa " " ON a.actor_id = fa.actor_id " " GROUP BY a.actor_id " " , a.first_name " " , a.last_name ) " " SELECT a.first_name " " , a.last_name " " , l.level " " , a.num_roles " " FROM actors a CROSS JOIN levels l " " WHERE a.num_roles BETWEEN l.min_roles AND l.max_roles " " ORDER BY a.last_name " " , a.first_name") # Execute cursor. cursor.execute(query) # Display the rows returned by the query. for (first_name, last_name, level, num_roles) in cursor: print('{0} {1} is a {2} with {3} films.'.format( first_name.title() , last_name.title() , level.title() , num_roles)) # Close cursor. cursor.close() # ------------------------------------------------------------ # Handle exception and close connection. except mysql.connector.Error as e: if e.errno == errorcode.ER_ACCESS_DENIED_ERROR: print("Something is wrong with your user name or password") elif e.errno == errorcode.ER_BAD_DB_ERROR: print("Database does not exist") else: print("Error code:", e.errno) # error number print("SQLSTATE value:", e.sqlstate) # SQLSTATE value print("Error message:", e.msg) # error message # Close the connection when the try block completes. else: cnx.close() |
As always, I hope this helps those trying to understand how CTEs can solve problems that would otherwise be coded in external imperative languages like Python.
MySQL and JavaScript
Sometimes students truly amaze me with their curiosity. The question was simple from their perspective while we were discussing MySQL’s builtin string functions. How would you do something like this JavaScript logic without using literals or session variables?
// Declare a string and substring. var myStr = 'Get me from the string.' var mySubstr = 'me' // Assign the substring to variable by rescuing it from the larger string. var rescued = myStr.substring(myStr.indexOf(mySubstr),myStr.indexOf(mySubstr) + mySubstr.length) // Print the result. print(rescued) |
tested with MongoDB, like
mongo --nodb --norc < parsing.js |
returning:
MongoDB shell version v4.0.20 me bye |
They thought the question would show SQL’s limits as a problem solving and programming language because they didn’t see how MySQL could assign a variable for evaluation in the builtin functions.
They were surprised to see how I showed them that they could do it. Since they disallowed session variables, I built a sample table and inserted the string value in a text column before writing a query with a Common Table Expression (CTE).
The MySQL steps are:
-- Stable testing scenario with table values requires a test table. DROP TABLE IF EXISTS sample; CREATE TABLE sample ( text VARCHAR(100) ); -- Insert the literal string into the testing table. INSERT INTO sample ( text ) VALUES ('Get me from the string.'); -- Test using a WITH clause to place a variable in context for use -- in the query, relying on the fact that a Cartesian set of one -- column and row becomes a new column in all rows of the other -- table's set. WITH struct AS (SELECT 'me' AS result) SELECT SUBSTR(text,INSTR(text,struct.result),LENGTH(struct.result)) AS rescued FROM sample CROSS JOIN struct; |
It returns the following:
+---------+ | rescued | +---------+ | me | +---------+ 1 row in set (0.00 sec) |
Wow, SQL works like a programming language was the response of the class. It’s like anything else in technology, new stuff isn’t as cool as old stuff until you learn how to use it.
MySQL INSERT-SET
I found myself explaining the nuances of INSERT statements and whether you should use named or positional notation. While the class was on Zoom, I could imagine the blank stares in the silence of my headphones. Then, I had to remind them about mandatory (NOT NULL constrained) and optional (nullable) columns in tables and how an INSERT statement requires an explicit NULL value for optional columns when the INSERT statement isn’t inserting a value into that column.
Then, I asked if somebody could qualify the different types of INSERT statements; and what would happen if a table with a first_name and last_name column order evolves when a new DBA decides to restructure the table and uses a last_name and first_name column order in the new table structure. Only a couple of the students recalled using a column-list between the table name and VALUES clause but none could remember how to write an INSERT-SET statement.
Below is a quick example of inserting data with column-lists and the SET clause. It builds an actor table with an actor_id column as a surrogate key and primary key column and a unique natural key composed of the first and last name columns (not a real world solution for uniqueness).
CREATE TABLE actor ( actor_id int unsigned primary key auto_increment , first_name varchar(30) not null , last_name varchar(30) not null , CONSTRAINT actor_uq UNIQUE (first_name, last_name)); |
Next, let’s insert a couple rows with a column-list approach. The column-list is a comma-delimited list of column values that must contain all mandatory columns and may contain optional columns.
INSERT INTO actor ( first_name , last_name ) VALUES ('Harrison','Ford') ,('Carrie','Fisher') ,('Mark','Hamill') ,('Alec','Guinness'); |
Now, let’s validate the unique constraint on the composite value of first and last name by trying to insert a second Harrison Ford into the actor table.
INSERT INTO actor (first_name, last_name) VALUES ('Harrison','Ford'); |
it fails and raises the following error:
ERROR 1062 (23000): Duplicate entry 'Harrison-Ford' for key 'actor.actor_uq' |
The following uses the INSERT-SET statement to add Tom Hanks to the actor table:
INSERT INTO actor SET first_name = 'Tom' , last_name = 'Hanks'; |
I believe the INSERT-SET is the best approach to a name-value model for INSERT statements. It’s a shame that only MySQL supports it. Query the actor table with the following:
SELECT * FROM actor ORDER BY actor_id; |
it returns:
+----------+------------+-----------+ | actor_id | first_name | last_name | +----------+------------+-----------+ | 1 | Harrison | Ford | | 2 | Carrie | Fisher | | 3 | Mark | Hamill | | 4 | Alec | Guinness | | 6 | Tom | Hanks | +----------+------------+-----------+ 5 rows in set (0.01 sec) |
There’s now a gap when you query the data because the second attempt at adding Harrison Ford consumed a sequence value from the internally managed list. That list is a property of the table when you create or alter a table to include an autoincrementing column, like actor_id. Anytime you attempt to insert a row that violates the table constraints, you consume a value from the internally managed sequence. While you can restore it and eliminate the gaps, I strongly recommend against it.
As always, I hope this helps those trying to learn and experiment with syntax.
MySQL+Credentials
The first tutorial supplementing the MySQL Connector/NET Developer Guide showed you how to connect and run static INSERT statement. It was a barebones PowerShell script with the MySQL Connector. This post shows you how to run a PowerShell script that uses a dynamic form to gather the MySQL credentials and then run a static query. Below is the MySQL Credentials form.

You enter the correct user name, password, hostname (or IP address), port, and database, like this:

Here’s the complete code for this staticQuery.ps1 PowerShell script:
# Add libraries for form components. Add-Type -AssemblyName System.Windows.Forms Add-Type -AssemblyName System.Drawing # Define a user credential form. $form = New-Object System.Windows.Forms.Form $form.Text = 'User Credential Form' $form.Size = New-Object System.Drawing.Size(300,240) $form.StartPosition = 'CenterScreen' # Define a button and assign it and its controls to a form. $loginButton = New-Object System.Windows.Forms.Button $loginButton.Location = New-Object System.Drawing.Point(60,160) $loginButton.Size = New-Object System.Drawing.Size(75,23) $loginButton.Text = 'Login' $loginButton.DialogResult = [System.Windows.Forms.DialogResult]::OK $form.AcceptButton = $loginButton $form.Controls.Add($loginButton) # Define a button and assign it and its controls to a form. $cancelButton = New-Object System.Windows.Forms.Button $cancelButton.Location = New-Object System.Drawing.Point(155,160) $cancelButton.Size = New-Object System.Drawing.Size(75,23) $cancelButton.Text = 'Cancel' $cancelButton.DialogResult = [System.Windows.Forms.DialogResult]::Cancel $form.CancelButton = $cancelButton $form.Controls.Add($cancelButton) # Define a label and assign it and its controls to a form. $userLabel = New-Object System.Windows.Forms.Label $userLabel.Location = New-Object System.Drawing.Point(30,15) $userLabel.Size = New-Object System.Drawing.Size(100,20) $userLabel.Text = 'Enter User Name:' $form.Controls.Add($userLabel) # Define a TextBox and assign it and its controls to a form. $userTextBox = New-Object System.Windows.Forms.TextBox $userTextBox.Location = New-Object System.Drawing.Point(140,15) $userTextBox.Size = New-Object System.Drawing.Size(100,20) $form.Controls.Add($userTextBox) # Define a label and assign it and its controls to a form. $pwdLabel = New-Object System.Windows.Forms.Label $pwdLabel.Location = New-Object System.Drawing.Point(30,40) $pwdLabel.Size = New-Object System.Drawing.Size(100,20) $pwdLabel.Text = 'Enter Password:' $form.Controls.Add($pwdLabel) # Define a TextBox and assign it and its controls to a form. $pwdTextBox = New-Object System.Windows.Forms.TextBox $pwdTextBox.Location = New-Object System.Drawing.Point(140,40) $pwdTextBox.Size = New-Object System.Drawing.Size(100,20) $pwdTextBox.PasswordChar = "*" $form.Controls.Add($pwdTextBox) # Define a label and assign it and its controls to a form. $hostLabel = New-Object System.Windows.Forms.Label $hostLabel.Location = New-Object System.Drawing.Point(30,65) $hostLabel.Size = New-Object System.Drawing.Size(100,20) $hostLabel.Text = 'Enter Hostname:' $form.Controls.Add($hostLabel) # Define a TextBox and assign it and its controls to a form. $hostTextBox = New-Object System.Windows.Forms.TextBox $hostTextBox.Location = New-Object System.Drawing.Point(140,65) $hostTextBox.Size = New-Object System.Drawing.Size(100,20) $form.Controls.Add($hostTextBox) # Define a label and assign it and its controls to a form. $portLabel = New-Object System.Windows.Forms.Label $portLabel.Location = New-Object System.Drawing.Point(30,90) $portLabel.Size = New-Object System.Drawing.Size(100,20) $portLabel.Text = 'Enter Port #:' $form.Controls.Add($portLabel) # Define a TextBox and assign it and its controls to a form. $portTextBox = New-Object System.Windows.Forms.TextBox $portTextBox.Location = New-Object System.Drawing.Point(140,90) $portTextBox.Size = New-Object System.Drawing.Size(100,20) $form.Controls.Add($portTextBox) # Define a label and assign it and its controls to a form. $dbLabel = New-Object System.Windows.Forms.Label $dbLabel.Location = New-Object System.Drawing.Point(30,115) $dbLabel.Size = New-Object System.Drawing.Size(100,20) $dbLabel.Text = 'Enter DB Name:' $form.Controls.Add($dbLabel) # Define a TextBox and assign it and its controls to a form. $dbTextBox = New-Object System.Windows.Forms.TextBox $dbTextBox.Location = New-Object System.Drawing.Point(140,115) $dbTextBox.Size = New-Object System.Drawing.Size(100,20) $form.Controls.Add($dbTextBox) $form.Topmost = $true $form.Add_Shown({$userTextBox.Select()}) $result = $form.ShowDialog() if ($result -eq [System.Windows.Forms.DialogResult]::OK) { # Assign inputs to connection variables. $uid = $userTextBox.Text $pwd = $pwdTextBox.Text $server = $hostTextBox.Text $port= $portTextBox.Text $dbName = $dbTextBox.Text # Declare connection string. $credentials = 'server=' + $server + ';port=' + $port + ';uid=' + $uid + ';pwd=' + $pwd + ';database=' + $dbName # Connect to the libaray MySQL.Data.dll Add-Type -Path 'C:\Program Files (x86)\MySQL\Connector NET 8.0\Assemblies\v4.5.2\MySql.Data.dll' # Create a MySQL Database connection variable that qualifies: # [Driver]@ConnectionString # ============================================================ # You can assign the connection string before using it or # while using it, which is what we do below by assigning # literal values for the following names: # - server=<ip_address> or 127.0.0.1 for localhost # - port=<port #> # - uid=<user_name> # - pwd=<password> # - database=<database_name> # ============================================================ $Connection = [MySql.Data.MySqlClient.MySqlConnection]@{ConnectionString=$credentials} $Connection.Open() # Define a MySQL Command Object for a non-query. $sqlCommand = New-Object MySql.Data.MySqlClient.MySqlCommand $sqlDataAdapter = New-Object MySql.Data.MySqlClient.MySqlDataAdapter $sqlDataSet = New-Object System.Data.DataSet # Assign the connection and command text to the MySQL command object. $sqlCommand.Connection = $Connection $sqlCommand.CommandText = 'SELECT CONCAT(first_name," ",last_name) AS full_name ' + ', avenger ' + 'FROM avenger' # Assign the connection and command text to the query method of # the data adapter object. $sqlDataAdapter.SelectCommand=$sqlCommand # Assign the tuples of data to a data set and return the number of rows fetched. $rowsFetched=$sqlDataAdapter.Fill($sqlDataSet, "data") # Print to console the data returned from the query. foreach($row in $sqlDataSet.tables[0]) { write-host "Avenger:" $row.avenger "is" $row.full_name } # Close the MySQL connection. $Connection.Close() } |
I created an avenger table and populated it with six rows of data:
-- Create the avenger table. CREATE TABLE db_connect ( db_connect_id INT UNSIGNED PRIMARY KEY AUTO_INCREMENT , version VARCHAR(10) , user VARCHAR(24) , db_name VARCHAR(10)); -- Seed the avenger table with data. INSERT INTO avenger ( first_name, last_name, avenger ) VALUES ('Anthony', 'Stark', 'Iron Man') ,('Thor', 'Odinson', 'God of Thunder') ,('Steven', 'Rogers', 'Captain America') ,('Bruce', 'Banner', 'Hulk') ,('Clinton', 'Barton', 'Hawkeye') ,('Natasha', 'Romanoff', 'Black Widow'); |
You run the staticQuery.ps1 PowerShell script from the Windows command shell with the following syntax:
powershell .\staticQuery.ps1 |
After running the staticQuery.ps1 PowerShell script, it writes the following to the local console but with minimal effort you can redirect it to a file:
Avenger: Iron Man is Anthony Stark Avenger: God of Thunder is Thor Odinson Avenger: Captain America is Steven Rogers Avenger: Hulk is Bruce Banner Avenger: Hawkeye is Clinton Barton Avenger: Black Widow is Natasha Romanoff |
As always, I hope this helps those looking to use this technology. My guess is the principal uses will be DevOps and Data Engineers.
MySQL Provisioning
I’ve been using MySQL 8 on Linux for a couple years but the Linux repository version didn’t install the new MySQL Shell. So, I discovered the new MySQL Shell when I installed MySQL 8 (8.0.21) on Windows to teach my student how to use it to learn SQL commands. I encourage you to read the full MySQL Shell document.
The following is a tutorial to provision a student user and studentdb database in MySQL. It uses the MySQL Shell (mysqlsh) and stages for uploads of comma-separated values files.
After installing MySQL on the Windows 10 OS, open the Window OS Command Line Interface (CLI) shell by entering the following in the search field at the bottom left:
cmd |
It launches a CLI interface to the Windows OS. The cmd (command) utility opens the CLI in the following directory (where you substitute your user’s name for the username placeholder below):
C:\Users\username |
At the command prompt, you would enter mysql to launch the old MySQL CLI. Instead of that, you enter mysqlsh to launch the new MySQL CLI as the root user. The command to launch the MySQL Shell as the root user is:
mysqlsh -uroot -p |
It should return the following and prompt you for a single character entry to save the password for the Operating System user. As a rule, in a development instance that’s a good idea and practice.
MySQL Shell 8.0.21 Copyright (c) 2016, 2020, Oracle and/or its affiliates. All rights reserved. Oracle is a registered trademark of Oracle Corporation and/or its affiliates. Other names may be trademarks of their respective owners. Type '\help' or '\?' for help; '\quit' to exit. Creating a session to 'root@localhost' Please provide the password for 'root@localhost:33060': ******** Save password for 'root@localhost:33060'? [Y]es/[N]o/Ne[v]er (default No): y Fetching schema names for autocompletion... Press ^C to stop. Your MySQL connection id is 9 (X protocol) Server version: 8.0.21 MySQL Community Server - GPL No default schema selected; type \use <schema> to set one. MySQL localhost:33060+ ssl JS > |
The prompt will not accept SQL commands because it always initializes in the JavaScript (JS) context. The MySQL Shell supports three interactive interfaces: JavaScript, Python, and SQL.
You can verify the integrity of the shell from the JavaScript (JS) context as the root user with the following command:
MySQL localhost:33060+ ssl JS > shell.status() |
As the root user, it should return something like this:
MySQL Shell version 8.0.21 Connection Id: 9 Default schema: Current schema: Current user: root@localhost SSL: Cipher in use: TLS_AES_256_GCM_SHA384 TLSv1.3 Using delimiter: ; Server version: 8.0.21 MySQL Community Server - GPL Protocol version: X protocol Client library: 8.0.21 Connection: localhost via TCP/IP TCP port: 33060 Server characterset: utf8mb4 Schema characterset: utf8mb4 Client characterset: utf8mb4 Conn. characterset: utf8mb4 Result characterset: utf8mb4 Compression: Enabled (DEFLATE_STREAM) Uptime: 20 hours 4 min 19.0000 sec |
You can switch to the SQL context as the root or any other user with this command. The switch only changes your form of interaction with the server and you remain connected as the root user:
MySQL localhost:33060+ ssl JS > \sql |
You can verify that your session is still owned by the root user with the following SELECT statement:
MySQL localhost:33060+ ssl SQL > SELECT user(); |
It returns:
+----------------+ | user() | +----------------+ | root@localhost | +----------------+ 1 row in set (0.0005 sec) |
The next step shows you how to setup a sample studentdb database. Some syntax has changed from prior MySQL releases. Here are the three steps:
- Create the
studentdbdatabase with the following command as the MySQLrootuser:MySQL localhost:33060+ ssl SQL > CREATE DATABASE studentdb;
- Grant the
rootuser the privilege to grant to others, which root does not have by default. You use the following syntax as the MySQLrootuser:MySQL localhost:33060+ ssl SQL > GRANT ALL ON *.* TO 'root'@'localhost';
- Create the user with a clear English password and grant the user
studentfull privileges on thestudentdbdatabase:MySQL localhost:33060+ ssl SQL > CREATE USER 'student'@'localhost' IDENTIFIED WITH mysql_native_password BY 'student'; MySQL localhost:33060+ ssl SQL > GRANT ALL ON studentdb.* TO 'student'@'localhost';
- Our sample database uses large file uploads with MySQL’s LOAD command, which means you need to grant one additional global privilege:
MySQL localhost:33060+ ssl SQL > GRANT FILE ON *.* TO 'student'@'localhost';
The MySQL FILE privilege is a global privilege to read and write files on the local server. MySQL 8 installation on Windows 10 sets the following directory as the target for uploading files in the my.ini file:
# Secure File Priv. secure-file-priv="C:/ProgramData/MySQL/MySQL Server 8.0/Uploads" |
You can find the setting in the C:\ProgramData\MySQL\MySQL Server 8.0\my.ini file. You can find this value without referencing the my.ini file by querying the data:
show variables like 'secure_file_priv'; |
A new installation should return:
+------------------+------------------------------------------------+ | Variable_name | Value | +------------------+------------------------------------------------+ | secure_file_priv | C:\ProgramData\MySQL\MySQL Server 8.0\Uploads\ | +------------------+------------------------------------------------+ 1 row in set (0.2253 sec) |
You can test the ability to use the LOAD command with the following avenger.csv test file. Copy it into the C:\ProgramData\MySQL\MySQL Server 8.0\Uploads directory and make sure the directory permissions are set to read-only for Everyone (check the Microsoft OS documentation if these concepts are new to you).
1,'Anthony','Stark','Iron Man' 2,'Thor','Odinson','God of Thunder' 3,'Steven','Rogers','Captain America' 4,'Bruce','Banner','Hulk' 5,'Clinton','Barton','Hawkeye' 6,'Natasha','Romanoff','Black Widow' |
Open another cmd (command) CLI and put the following code into a file that you save as avenger.sql in the C:\Users\username directory.
-- Conditionally drop objects. SELECT 'AVENGER' AS "Drop Table"; DROP TABLE IF EXISTS avenger; -- Create an avenger table. CREATE TABLE avenger ( avenger_id INT UNSIGNED PRIMARY KEY AUTO_INCREMENT , first_name VARCHAR(20) , last_name VARCHAR(20) , character_name VARCHAR(20)) ENGINE=InnoDB DEFAULT=utf8; -- Load the data from a file, don't forget the \n after the \r on Windows or it won't work. LOAD DATA INFILE 'C:/ProgramData/MySQL/MySQL Server 8.0/Uploads/avenger.csv' -- LOAD DATA INFILE 'avenger.csv' INTO TABLE avenger FIELDS TERMINATED BY ',' ENCLOSED BY '"' ESCAPED BY '/' LINES TERMINATED BY '\r\n'; -- Select the uploaded records. SELECT * FROM avenger; |
From the cmd (command) shell, launch the MySQL Shell as the student user with the following syntax:
mysqlsh -ustudent -p -Dstudentdb |
At the MySQL Shell (mysqlsh) prompt switch from the default JavaScript (JS) context to SQL context and run the following query:
MySQL localhost:33060+ ssl studentdb SQL > \sql MySQL localhost:33060+ ssl studentdb SQL > SELECT user(), database(); |
If you did everything above correctly, it should return:
+-------------------+------------+ | user() | database() | +-------------------+------------+ | student@localhost | studentdb | +-------------------+------------+ 1 row in set (0.0003 sec) |
Again, assuming you did everything above correctly, you should be able to run your avenger.sql script file from the MySQL Shell (mysqlsh) prompt, like:
MySQL localhost:33060+ ssl studentdb SQL > source avenger.sql |
It should return output like the following:
Query OK, 0 rows affected (0.0003 sec) +------------+ | Drop Table | +------------+ | AVENGER | +------------+ 1 row in set (0.0003 sec) Query OK, 0 rows affected (0.0595 sec) Query OK, 0 rows affected (0.0002 sec) Query OK, 0 rows affected (0.1293 sec) Query OK, 0 rows affected (0.0002 sec) Query OK, 6 rows affected (0.0046 sec) Records: 6 Deleted: 0 Skipped: 0 Warnings: 0 Query OK, 0 rows affected (0.0004 sec) +------------+------------+------------+-------------------+ | avenger_id | first_name | last_name | character_name | +------------+------------+------------+-------------------+ | 1 | 'Anthony' | 'Stark' | 'Iron Man' | | 2 | 'Thor' | 'Odinson' | 'God of Thunder' | | 3 | 'Steven' | 'Rogers' | 'Captain America' | | 4 | 'Bruce' | 'Banner' | 'Hulk' | | 5 | 'Clinton' | 'Barton' | 'Hawkeye' | | 6 | 'Natasha' | 'Romanoff' | 'Black Widow' | +------------+------------+------------+-------------------+ 6 rows in set (0.0005 sec) |
You now have a student user and studentdb database like my students. I hope it was fun to build.
You can find the my.ini file in the C:\ProgramData\MySQL\MySQL Server 8.0 directory of a standard Windows 10 file system. Its a good idea not to change anything unless you know what you’re doing, and remember you need to restart the Microsoft MySQL80 Service for any change to be made effective in your database operations.
Node.js & MySQL
These are my notes for creating a small Node.js application that queries a MySQL database. The post will show you how to:
- Configure your Node.js development directory.
- Build a small application to test a MySQL connection.
- Build a small application that connects to the MySQL database and queries data.
This blog post assumes you’ve performed a global install of Node.js on a Linux server. If you’re unfamiliar with how to perform a global Node.js installation, I cover how to do it in this earlier blog post.
Before you write the Node.js applicaiton, you need to setup a db developer directory. Then, create a node_modules symbolic link to the /usr/local/lib/node_modules directory in the db directory. You can use the following command from the db directory:
ln -s /usr/local/lib/node_modules `pwd`/node_modules |
After creating the node_modules symbolic link, you need to run the following two npm commands:
npm init --y npm install --save mysql |
The first command sets up a generic package.json file, and the second adds the mysql package and supporting packages to the package.json file. These two steps configure the Node.js side of these examples.
They both require that you create the student user with a native password, like so:
CREATE USER 'student'@'localhost' IDENTIFIED WITH 'mysql_native_password' BY 'student'; GRANT ALL PRIVILEGES ON studentdb.* TO 'student'@'localhost'; FLUSH PRIVILEGES; |
The following example shows you how to check a connection to the MySQL database:
const mysql = require('mysql') const connection = mysql.createConnection({ host: 'localhost', user: 'student', password: 'student', database: 'studentdb' }) connection.connect((err) => { if (err) throw err else console.log('Connected to MySQL Server!\n') console.log('User configured wiht mysql_native_password.\n'); console.log('Press Ctrl-C to terminate ...') }) |
You extend the previous example by adding a query component and returning the query result value to the console’s log (leveraging the w3school’s Node.js and MySQL tutorial example):
const mysql = require('mysql') const connection = mysql.createConnection({ host: 'localhost', user: 'student', password: 'student', database: 'studentdb' }) connection.connect((err) => { if (err) throw err else { console.log('Connected to MySQL Server!\n') connection.query('SELECT DISTINCT item_title FROM item', function (err, result) { if (err) throw err else console.log(result) console.log('Press Ctrl-C to terminate ...') }) } }) |
It should display the following:
Connected to MySQL Server!

[ RowDataPacket { item_title: 'The Hunt for Red October' },
 RowDataPacket { item_title: 'Star Wars I' },
 RowDataPacket { item_title: 'Star Wars II' },
 RowDataPacket { item_title: 'Star Wars III' },
 RowDataPacket { item_title: 'The Chronicles of Narnia' },
 RowDataPacket { item_title: 'RoboCop' },
 RowDataPacket { item_title: 'Pirates of the Caribbean' },
 RowDataPacket { item_title: 'MarioKart' },
 RowDataPacket { item_title: 'Splinter Cell' },
 RowDataPacket { item_title: 'Need for Speed' },
 RowDataPacket { item_title: 'The DaVinci Code' },
 RowDataPacket { item_title: 'Cars' },
 RowDataPacket { item_title: 'Beau Geste' },
 RowDataPacket { item_title: 'I Remember Mama' },
 RowDataPacket { item_title: 'Tora! Tora! Tora!' },
 RowDataPacket { item_title: 'A Man for All Seasons' },
 RowDataPacket { item_title: 'Hook' },
 RowDataPacket { item_title: 'Around the World in 80 Days' },
 RowDataPacket { item_title: 'Harry Potter and the Sorcerer\'s Stone' },
 RowDataPacket { item_title: 'Camelot' },
 RowDataPacket { item_title: 'Casino Royale' },
 RowDataPacket { item_title: 'Die Another Day' },
 RowDataPacket { item_title: 'Golden Eye' },
 RowDataPacket { item_title: 'Tomorrow Never Dies' },
 RowDataPacket { item_title: 'The World Is Not Enough' },
 RowDataPacket { item_title: 'Brave Heart' },
 RowDataPacket { item_title: 'Christmas Carol' },
 RowDataPacket { item_title: 'Scrooge' },
 RowDataPacket { item_title: 'Clear and Present Danger' },
 RowDataPacket { item_title: 'Harry Potter and the Chamber of Secrets' },
 RowDataPacket { item_title: 'Harry Potter and the Prisoner of Azkaban' },
 RowDataPacket { item_title: 'Harry Potter and the Goblet of Fire' },
 RowDataPacket { item_title: 'Harry Potter and the Order of the Phoenix' },
 RowDataPacket { item_title: 'Harry Potter and the Half Blood Prince' },
 RowDataPacket { item_title: 'Harry Potter and the Deathly Hallows, Part 1' },
 RowDataPacket { item_title: 'Harry Potter and the Deathly Hallows, Part 2' },
 RowDataPacket { item_title: 'Tron' },
 RowDataPacket { item_title: 'The Avengers' },
 RowDataPacket { item_title: 'Thor: The Dark World' } ]
Press Ctrl-C to terminate ... |
As always, I hope this helps those looking to learn
Lowercase Table Names
A student posed the question about why table names are case sensitive. That’s because case sensitive table names are the default installation, as qualified in the MySQL documentation. You can verify that with the following query:
SELECT CASE WHEN @@lower_case_table_names = 1 THEN 'Case insensitive tables' ELSE 'Case sensitive tables.' END AS "Table Name Status"; |
The default value returned on Linux is:
+------------------------+ | Table Name Status | +------------------------+ | Case sensitive tables. | +------------------------+ 1 row in set (0.00 sec) |
The default value for the lower_case_table_names value on the Windows OS is 1 not 0 because you can inadvertently create a lowercase and case sensitive table when you write an INSERT statement and use a lowercase table name. I’ve provided that detail in a reply comment to this blog post.
You can change the default by adding the following parameter in the my.cnf file on Linux or the my.ini file on Windows:
# Make all tables case insensitive. lower_case_table_names=1 |
This lets you enter tables in upper or mixed case, and stores them in the data catalog as lowercase table names.
MySQL Non-unique Indexes
Somebody wanted to know how to find any non-unique indexes in information_schema of the MySQL. The query takes a session variable with the table name and returns the non-unique indexes by column names. It uses a correlated subquery to exclude the table constraints. A similar query lets you find unique indexes in MySQL. Both queries are in this post.
You set the session variable like this:
SET @sv_table_name := 'member_lab'; |
You can query the indexes result with the following query:
SELECT s.table_name , s.index_name , s.seq_in_index , s.column_name FROM information_schema.statistics s WHERE s.table_name = @sv_table_name AND s.non_unique = TRUE AND NOT EXISTS (SELECT null FROM information_schema.table_constraints tc WHERE s.table_name = tc.table_name AND s.index_name = tc.constraint_name) ORDER BY s.table_name , s.seq_in_index; |
You can also reverse the logic and exclude implicit unique indexes on auto incrementing columns, like
SELECT s.table_name , s.index_name , s.seq_in_index , s.column_name FROM information_schema.statistics s WHERE s.table_name = @sv_table_name AND s.non_unique = FALSE AND NOT s.index_name = 'primary' AND EXISTS (SELECT null FROM information_schema.table_constraints tc WHERE s.table_name = tc.table_name AND s.index_name = tc.constraint_name) ORDER BY s.index_name , s.seq_in_index; |
Hope this helps those trying to find non-unique indexes for a table in MySQL.
Common Lookup Tables 2
Last October I posted an example and description of a common_lookup table. It was intended to show how common_lookup tables support drop down selections in web forms. However, it wasn’t adequate to show how they work with existing data, and the function only supported fresh queries.
This post goes to the next level, and shows how to use foreign keys to preselect values for display in web forms. It also rewrites the prior function so that it supports querying existing data and inserting new data.
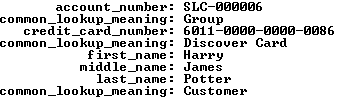
Let’s start with data stored in join between two tables – the member and contact tables. The internal lookup uses the customers name from the contact table to find the membership account information in the member table.
1 2 3 4 5 6 7 8 9 10 11 12 13 | SELECT m.account_number , m.member_type -- A fk to common_lookup table. , m.credit_card_number , m.credit_card_type -- A fk to common_lookup table. , c.first_name , c.middle_name , c.last_name , c.contact_type -- A fk to common_lookup table. FROM member m INNER JOIN contact c ON m.member_id = c.member_id WHERE c.first_name = 'Harry' AND c.middle_name = 'James' AND c.last_name = 'Potter'\G |
It returns the results on the left, while a set of joins against the common_lookup table returns the results on the right (both use the \G in SQL Monitor to display the data vertically).

The member_type, credit_card_type, and contact_type columns in the data set on the left hold foreign key values. They’re copies of values found in the primary key column of the common_lookup table. You have the option of using these values to connect the data through a join or through function calls. A join requires three copies of the common_lookup table and yields the data displayed on the right above. The query to get the meaningful business information from the common_lookup table is:
1 2 3 4 5 6 7 8 9 10 11 12 13 14 15 16 | SELECT m.account_number , cl1.common_lookup_meaning , m.credit_card_number , cl2.common_lookup_meaning , c.first_name , c.middle_name , c.last_name , cl3.common_lookup_meaning FROM member m INNER JOIN contact c ON m.member_id = c.member_id INNER JOIN common_lookup cl1 ON cl1.common_lookup_id = m.member_type INNER JOIN common_lookup cl2 ON cl2.common_lookup_id = m.credit_card_type INNER JOIN common_lookup cl3 ON cl3.common_lookup_id = c.contact_type WHERE c.first_name = 'Harry' AND c.middle_name = 'James' AND c.last_name = 'Potter'\G |
The data returned from any query is symmetrical, which means all columns return the same number of rows. The results of the preceding query are the business results. Although, they’re not what you’d want to display in a web form that presents the ability to change values, like the member, credit card, or contact types. You need to get that information by using the foreign key as a parameter to a function call, and in this case three function calls. One for each of the foreign keys from the original query results. The result is an asymmetric collection of data would look like the following conceptually with Lily Luna Potter as the customer (note the green row is the symmetrical return set from the preceding query):
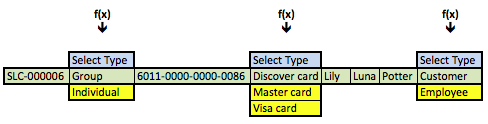
The f(x) represents a generic function call where the x substitutes for the foreign key value as a lookup key to the primary key value of the common_lookup table. The function in this case is a query that returns a two column list. One column holds the primary key value of the (common_lookup_id) and the other holds the customer facing description (from the common_lookup_meaning column).
These steps describe the process:
- Use the natural key (the user name) to find the data in the
contacttable. - Use the
member_idforeign key column in thecontacttable to link to the same name column primary key in themembertable by joining the two rows. - Use the foreign keys in the new row (combining columns from the
contactandmembertables) as call parameters to a PHP function that returns all possible foreign key values and their business descriptions in a web form.
The vertical choices displayed above map to OPTION tag elements of an HTML SELECT tag. The blue highlighted value contains an instruction, Select Type, in the display of an HTML OPTION tag, and it holds a null as the value of the VALUE attribute for the OPTION tag. The other displayed rows are the possible values. The green highlighted value is the currently selected value and the yellow highlighted values are alternate possibilities for an end-user to select. The logic for that process is in the PHP get_common_lookup function below.
Having discussed the structure of the data and problem, we’ll present the result in a dynamically constructed web form below. The display form shows a member account with customer information.
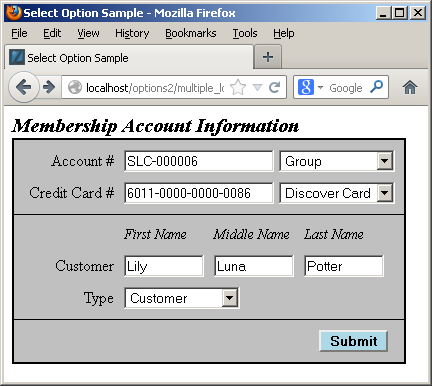
You should note that the primary and foreign keys aren’t displayed because they’re irrelevant to the business process. Primary and foreign keys only serve to support relationships when we use surrogate keys as the primary key of a table. Only the meaningful information from the common_lookup table are displayed in the preceding form. Behind the web form, the primary and foreign key values are critical to maintaining anomaly free table data.
Each of the drop downs contains the full selection of possibilities from the common_lookup table, and an end-user could choose a new value by clicking on any of the drop down fields. For example, the following displays the selection of a type of credit card:
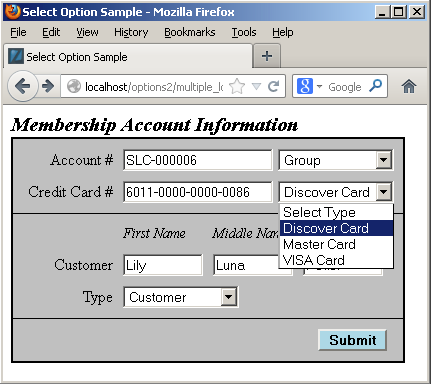
The user can click on the drop down, and then navigate from the selection to a new selection. Assuming we don’t change anything, submitting the form should transmit the foreign key column values. The following shows that’s exactly what it does:
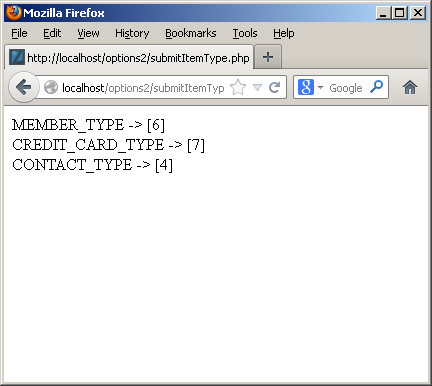
As you can see from the screen shot it works easily. Below is the PHP code for a MySQL credentials file and the get_lookup function. The function lets you find an existing value or returns a set of unique values for you to choose from.
You should rename the following credentials.php file as MySQLCredentials.inc for it to work in the file below it.
Assuming you’ve implemented the credentials.php file as the MySQLCredentials.inc file, you can now implement the following file. The get_common_lookup function returns a <SELECT> tag with a list embedded of <OPTION> tags with values; one <OPTION> tag is selected when the foreign key matches a valid primary key value in the common_lookup table; and no <OPTION> tag is selected when the foreign key doesn’t match a a valid primary key value in the common_lookup table. The last possibility means a user must choose a new valid value for the foreign key column when the foreign key column is constrained as a mandatory or not null column.
The code for the web form is a bit more complex, as shown below. It contains three separate calls to the modified get_common_lookup function (on lines 104, 111, and 126). Each call to the get_common_lookup function selects the list of possible values and highlights the value associated with the foreign key value.
Here’s the web form code. You should note that it only returns a single row of data from the query by using a natural key from the contact table.
1 2 3 4 5 6 7 8 9 10 11 12 13 14 15 16 17 18 19 20 21 22 23 24 25 26 27 28 29 30 31 32 33 34 35 36 37 38 39 40 41 42 43 44 45 46 47 48 49 50 51 52 53 54 55 56 57 58 59 60 61 62 63 64 65 66 67 68 69 70 71 72 73 74 75 76 77 78 79 80 81 82 83 84 85 86 87 88 89 90 91 92 93 94 95 96 97 98 99 100 101 102 103 104 105 106 107 108 109 110 111 112 113 114 115 116 117 118 119 120 121 122 123 124 125 126 127 128 129 130 131 132 133 134 135 136 137 138 139 140 | <html>
<header>
<title>Select Option Sample</title>
<style type="text/css">
/* Class tag element styles. */
.box {border:1px solid;padding:0px;width:392px;background-color:silver;}
.bottomBox {border-left:1px solid;border-right:1px solid;border-bottom:1px solid;padding:5px;width:380px;background-color:silver;}
.middleBox {border:1px solid;padding:5px;width:380px;background-color:silver;}
.topBox {border-left:1px solid;border-right:1px solid;border-top:1px solid;padding:5px;width:380px;background-color:silver;}
.button {margin:5px;background-color:lightblue;font-weight:bold;align:right;}
.clear {clear:left;}
.dropDown {min-width:50px;display:block;float:left;text-align:left;color:black;}
.formDownLabel {width:90px;display:block;float:left;margin:5px;text-align:right;vertical-align:bottom;color:black;}
.formAcrossLabel {width:80px;display:block;float:left;padding-bottom:0px;margin:5px 5px 0px;text-align:left;vertical-align:bottom;font-style:italic;font-size:90%;color:black;}
.formInput {min-width:150px;margin:5px;text-align:left;}
.formShortInput {width:80px;margin:5px;text-align:left;}
.title1 {margin-left:0px;font-weight:bold;font-style:italic;font-size:125%;color:black;}
.title2 {margin-left:5px;font-weight:bold;font-style:italic;font-size:105%;color:black;}
</style>
</header>
<body>
<?php
// Include libraries.
include_once("MySQLCredentials.inc");
include_once("library.inc");
// Define a HTML page string.
$out = '';
// Declare input variables.
$first_name = (isset($_GET['first_name'])) ? $_GET['first_name'] : $first_name = "Harry";
$middle_name = (isset($_GET['middle_name'])) ? $_GET['middle_name'] : $middle_name = "James";
$last_name = (isset($_GET['last_name'])) ? $_GET['last_name'] : $last_name = "Potter";
// Declare output variables.
$member_account_number = null;
$credit_card_number = null;
// Declare lookup input and output (initialized as nulls to suppress warnings) variables.
$member_table = 'member';
$member_type = 'member_type';
$member_type_id = null;
$credit_card_type = 'credit_card_type';
$credit_card_type_id = null;
$contact_table = 'contact';
$contact_type = 'contact_type';
$contact_type_id = null;
// Assign credentials to connection.
$mysqli = new mysqli(HOSTNAME, USERNAME, PASSWORD, DATABASE);
// Check for connection error and print message.
if ($mysqli->connect_errno) {
print $mysqli->connect_error."<br />";
print "Connection not established ...<br />";
}
else {
// Initial statement.
$stmt = $mysqli->stmt_init();
// Declare a static query.
$sql = "SELECT m.account_number\n"
. ", m.member_type\n"
. ", m.credit_card_number\n"
. ", m.credit_card_type\n"
. ", c.first_name\n"
. ", c.middle_name\n"
. ", c.last_name\n"
. ", c.contact_type\n"
. "FROM member m INNER JOIN contact c\n"
. "ON m.member_id = c.member_id\n"
. "WHERE c.first_name = ?\n"
. "AND c.middle_name = ?\n"
. "AND c.last_name = ?\n";
// Prepare statement.
if ($stmt->prepare($sql)) {
$stmt->bind_param("sss",$first_name,$middle_name,$last_name); }
// Attempt query and exit with failure before processing.
if (!$stmt->execute()) {
// Print failure to resolve query message.
print $mysqli->error."<br />";
print "Failed to resolve query ...<br />";
}
else {
// This query only returns one row, and an empty block follows the while logic.
$stmt->bind_result($member_account_number, $member_type_id, $credit_card_number, $credit_card_type_id, $first_name, $middle_name, $last_name, $contact_type_id);
while ($stmt->fetch()) {}
}
}
// Print the query form.
$out .= '<form method="post" name="myForm" action="submitItemType.php">';
$out .= '<label class="title1">Membership Account Information</label><br />';
$out .= '<div class="box">';
$out .= '<div class="topBox">';
$out .= '<label class="formDownLabel">Account #</label><input class="formInput" type="text" value="'.$member_account_number.'" />';
$out .= '<select name="member_type" size="1" onChange="change(this.form.member_type)">';
// Get dynamic membership type lookup string fragment.
$out .= get_common_lookup($member_table, $member_type, $member_type_id);
$out .= '</select><br />';
$out .= '<label class="formDownLabel">Credit Card #</label><input class="formInput" type="text" value="'.$credit_card_number.'" />';
$out .= '<select name="credit_card_type" size="1" onChange="change(this.form.credit_card_type)">';
// Get dynamic credit card type lookup string fragment.
$out .= get_common_lookup($member_table, $credit_card_type, $credit_card_type_id);
// Print the closing HTML table tag.
$out .= '</select><br />';
$out .= '</div>';
$out .= '<div class="middleBox">';
$out .= '<label class="formDownLabel"> </label>';
$out .= '<label class="formAcrossLabel">First Name</label><label class="formAcrossLabel">Middle Name</label><label class="formAcrossLabel">Last Name</label><br class="clear" />';
$out .= '<label class="formDownLabel">Customer</label><input class="formShortInput" type="text" value="'.$first_name.'" />';
$out .= '<input class="formShortInput" type="text" value="'.$middle_name.'" />';
$out .= '<input class="formShortInput" type="text" value="'.$last_name.'" /><br />';
$out .= '<label class="formDownLabel">Type</label>';
$out .= '<select style="margin:5px" name="contact_type" size="1" onChange="change(this.form.contact_type)">';
// Get dynamic membership type lookup string fragment.
$out .= get_common_lookup($contact_table, $contact_type, $contact_type_id);
$out .= '</select><br />';
$out .= '</div>';
$out .= '<div class="bottomBox">';
$out .= '<input class="button" style="margin-left:300px" name="submit" type="submit" value="Submit">';
$out .= '</div>';
$out .= '</form>';
$out .= '</body>';
$out .= '</html>';
print $out;
?>
</body>
</html> |
The submit button simply runs another web page that prints the actual values for the drop down selections. Here’s the code to print that:
1 2 3 4 5 6 7 8 9 10 11 12 | <html> <head> </head> <body> <?php // Print the surrogate key values for the common_lookup_id column. print "MEMBER_TYPE -> [".$_POST['member_type']."]<br />"; print "CREDIT_CARD_TYPE -> [".$_POST['credit_card_type']."]<br />"; print "CONTACT_TYPE -> [".$_POST['contact_type']."]<br />"; ?> </body> </html> |
I hope this helps those who are interested in sorting how to implement a common_lookup table.
