Archive for the ‘MySQL 8’ Category
SQL Calculations #1
This was principally written for my SQL students but I thought it might be useful to others. SQL calculation are performed row-by-row in the SELECT-list. In its simplest form without even touching a table, you can add two literal numbers like this:
1 | SELECT 2 + 2 AS result; |
It will display the result of the addition to the column alias result as a derived table, or the following result:
+--------+ | result | +--------+ | 4 | +--------+ 1 row in set (0.00 sec) |
Unfortunately, the use of literal values as shown above doesn’t really let you see how the calculation is made row-by-row because it only returns one row. You can rewrite the two literal values into one variable by using a Common Table Expressions (CTEs). The CTE creates an struct tuple with only one x element. Another way to describe what the CTE does would say, it creates a derived table named struct with a single x column in the SELECT-list.
The CTE runs first, then a subsequent query may use the CTE’s derived table results. Below is a query that uses the value in the struct.x derived table (or references the struct tuple’s x element) twice while assigning the value to a new column alias, labelled result. The FROM clause places the struct tuple in the queries namespace, which lets you reference it in the SELECT-list.
1 2 3 4 | WITH struct AS (SELECT 2 AS x) SELECT struct.x + struct.x AS result FROM struct; |
Like the literal example, it will display the result of the addition to the column alias result as a derived table of one row:
+--------+ | result | +--------+ | 4 | +--------+ 1 row in set (0.00 sec) |
Having laid a basis for a simple calculation in one row, let’s expand the example and demonstrate how to perform row-by-row calculations. The example requires introducing some new concepts. One uses the UNION ALL set operator to fabricate a CTE derived table with three rows. Another uses a comma within the WITH clause to create two derived tables or CTEs. The last uses the CROSS JOIN to add the single row CTE’s single y column to each of the rows returned by the multiple row CTE.
The CROSS JOIN is a Cartesian product, which multiplies the rows in one table against the rows in another table while adding the columns from each table. That means fabricating a table of one column and one row lets you put a variable into all the rows of another table or set of tables combined through an equijoin or non-equijoin operation.
The query below takes a struct1 derived table of one column and three rows and a struct2 derived table of one column and one row, then uses a CROSS JOIN to create a new derived table, which would be a table of two columns and three rows. The Cartesian product only provides the two columns that we will multiply to create new data.
The SELECT-list lets us fabricate a new column where we multiply the values of column x and column y to create a set of new results in column result.
1 2 3 4 5 6 7 8 9 10 | WITH struct1 AS (SELECT 1 AS x UNION ALL SELECT 2 AS x UNION ALL SELECT 3 AS x) , struct2 AS (SELECT 10 AS y) SELECT struct1.x AS x , struct2.y AS y , struct1.x * struct2.y AS result FROM struct1 CROSS JOIN struct2; |
The query returns the following results, which show the values used to calculate the result and the result:
+---+----+--------+ | x | y | result | +---+----+--------+ | 1 | 10 | 10 | | 2 | 10 | 20 | | 3 | 10 | 30 | +---+----+--------+ 3 rows in set (0.00 sec) |
As a rule, the columns x and y would not be displayed in the final derived table. You would only see the result columns’ values.
Let’s use an example from Alan Bwaulieu’s Learning SQL book with a twist. Rather than manually fabricating the ordinal numbers twice, let’s use the scope reference of a subsequent CTE to reference an earlier CTE. That would create two ten row tables of one column each, or a Cartesian product of a 100 row table with two columns. Then, let’s use the SELECT-list lets us fabricate only a new column, which will add 1 to the numbers 0 to 99 to give us the numbers 1 to a 100.
1 2 3 4 5 6 7 8 9 10 11 12 13 14 15 16 | WITH ones AS (SELECT 0 AS x UNION ALL SELECT 1 AS x UNION ALL SELECT 2 AS x UNION ALL SELECT 3 AS x UNION ALL SELECT 4 AS x UNION ALL SELECT 5 AS x UNION ALL SELECT 6 AS x UNION ALL SELECT 7 AS x UNION ALL SELECT 8 AS x UNION ALL SELECT 9 AS x ) , tens AS (SELECT x * 10 AS x FROM ones) SELECT ones.x + tens.x + 1 AS ordinal FROM ones CROSS JOIN tens ORDER BY ordinal; |
It returns the following result set:
+---------+ | ordinal | +---------+ | 1 | | 2 | | 3 | | 4 | | 5 | | 6 | | 7 | | 8 | | 9 | | 10 | | 11 | ... | 98 | | 99 | | 100 | +---------+ 100 rows in set (0.00 sec) |
Moving on to more complex math, let’s create a numerals table with the result from our prior query. It will enable calculating the factors of exponents. The easiest way to create the table is shown below (only caveat is that it will build it with a biting rather than an int data type).
1 2 3 4 5 6 7 8 9 10 11 12 13 14 15 16 17 | CREATE TABLE numerals AS WITH ones AS (SELECT 0 AS x UNION ALL SELECT 1 AS x UNION ALL SELECT 2 AS x UNION ALL SELECT 3 AS x UNION ALL SELECT 4 AS x UNION ALL SELECT 5 AS x UNION ALL SELECT 6 AS x UNION ALL SELECT 7 AS x UNION ALL SELECT 8 AS x UNION ALL SELECT 9 AS x ) , tens AS (SELECT x * 10 AS x FROM ones) SELECT ones.x + tens.x + 1 AS ordinal FROM ones CROSS JOIN tens ORDER BY ordinal; |
Line #15 sets the column alias that determines the name of the column for the numerals table. It can be described after running the foregoing script in MySQL as:
+---------+--------+------+-----+---------+-------+ | Field | Type | Null | Key | Default | Extra | +---------+--------+------+-----+---------+-------+ | ordinal | bigint | NO | | 0 | | +---------+--------+------+-----+---------+-------+ 1 row in set (0.00 sec) |
The next query accepts a substitution variable into the WITH clause, which means an external program will call it. (Although, you could use a session level variable, which I would discourage.) This query returns the factors for any given exponent:
1 2 3 4 5 6 7 8 9 | WITH magic AS (SELECT %s AS vkey) SELECT CONCAT(magic.vkey,'^',LOG(magic.vkey,n.ordinal)) AS powers , n.ordinal AS result FROM numerals n CROSS JOIN magic WHERE MOD(n.ordinal,magic.vkey) = 0 AND LOG(magic.vkey,n.ordinal) REGEXP '^[0-9]*$' OR n.ordinal = 1 ORDER BY n.ordinal; |
FYI, in the WHERE clause the regular expression is guarantees only rows returning integer values, and the 1 returns the identity property of an exponent raised to the zero power.
Assuming you created the numerals table, put the foregoing query in a query.sql file (because I was to lazy to write the full parameter handling), and you run it in the same directory as this Python program, it’ll take any valid integer as a value.
1 2 3 4 5 6 7 8 9 10 11 12 13 14 15 16 17 18 19 20 21 22 23 24 25 26 27 28 29 30 31 32 33 34 35 36 37 38 39 40 41 42 43 44 45 46 47 48 49 50 51 52 53 54 55 56 57 58 59 60 61 62 63 64 65 66 67 68 69 70 71 72 73 74 75 76 77 78 79 80 81 82 83 84 85 86 87 88 89 90 91 92 93 94 95 96 97 98 99 100 101 102 103 104 105 106 107 108 109 110 111 112 113 114 | #!/usr/bin/python # ------------------------------------------------------------ # Name: power.py # Date: 19 Oct 2024 # ------------------------------------------------------------ # Purpose: # ------- # The program shows you how to provide a single agrument # to a query and print the formatted output. # # You can call the program: # # ./power.py 3 # # ------------------------------------------------------------ # Import libraries. import sys import mysql.connector from mysql.connector import errorcode # ============================================================ # Define a local padding function. # ============================================================ def pad(valueIn): # Define local variable. padding = '' # Convert single digit numbers to strings. if isinstance(valueIn,int) and len(str(valueIn)) == 1: padding = ' ' # Return padding space. return padding # ============================================================ # End local function defintion. # ============================================================ # Define any local variables. powerIn = 2 query = "" # ============================================================ # Capture argument list minus the program name. # ============================================================ arguments = sys.argv[1:] # ============================================================ # If one or more arguments exists and the first one is an # a string that can cast to an int, convert it to an int, # assign it to a variable, and ignore any other arguments # in the list. # ============================================================ if len(arguments) >= 1 and arguments[0].isdigit(): powerIn = int(arguments[0]) # ============================================================ # Use a try-catch block to read and parse a query from a # a file found in the same local directory as the Python # program. # ============================================================ try: file = open('query.sql','r') query = file.read().replace('\n',' ').replace(';','') file.close() except IOError: print("Could not read file:", fileName) # ============================================================ # Attempt connection in a try-catch block. # ============================================================ # -------------------------------------------------------- # Open connection, bind variable in query and format # query output before closing the cursor. # -------------------------------------------------------- try: # Open connection. cnx = mysql.connector.connect(user='student', password='student', host='127.0.0.1', database='studentdb') # Create cursor. cursor = cnx.cursor() # Execute cursor, and coerce string to tuple. cursor.execute(query, (powerIn,)) # Display the rows returned by the query. for (powers, result) in cursor: print((" {} is: {}").format(powers, pad(result) + str(result))) # Close cursor. cursor.close() # -------------------------------------------------------- # Handle MySQL exception # -------------------------------------------------------- except mysql.connector.Error as e: if e.errno == errorcode.ER_ACCESS_DENIED_ERROR: print("Something is wrong with your user name or password") elif e.errno == errorcode.ER_BAD_DB_ERROR: print("Database does not exist") else: print("Error code:", e.errno) # error number print("SQLSTATE value:", e.sqlstate) # SQLSTATE value print("Error message:", e.msg) # error message # -------------------------------------------------------- # Close connection after try-catch completes. # -------------------------------------------------------- # Close the connection when the try block completes. else: cnx.close() |
If you forget to call it with a numeric parameter, it uses 2 as the default. You would call it as follows from a Linux prompt from the local directory:
./power.py |
It returns:
2^0 is: 1 2^1 is: 2 2^2 is: 4 2^3 is: 8 2^4 is: 16 2^5 is: 32 2^6 is: 64 |
If you call it with a numeric parameter, it uses the numeric value. You would call it as follows from a Linux prompt from the local directory:
./power.py 3 |
It returns:
3^0 is: 1 3^1 is: 3 3^2 is: 9 3^3 is: 27 3^4 is: 81 |
As always, I hope the post helps folks sort out how and why things work.
SQL Statement Management
It’s very difficult explaining to students new to relational databases how SQL works. There are many parts that seem intuitive and then there are others that confuse and confound.
For beginners, the idea that a SQL statement is simply a text string that you must dispatch to a SQL statement processing engine is new. That’s because they use an Integrated Development Environment (IDE) that hides, or abstracts the complexity, of how SQL executes.
I start my core SQL class by demonstrating how to run a text literal query without a FROM clause in MySQL Workbench, like this:
SELECT 'Hello World!' AS "Output"; |
After writing the query, I highlight everything except the semicolon and click the lightening bolt that dispatches the static string to the SQL statement engine. They see this result:

Then, I launch a mysql Monitor session and write the query with a semicolon to dispatch the SQL static string to the SQL statement engine:
SELECT 'Hello World!' AS "Output"; |
and, with a \g to dispatch the SQL static string to the SQL statement engine:
SELECT 'Hello World!' AS "Output"\g |
Both queries return the same output, as shown below:
+--------------+
| output       |
+--------------+
| Hello World! |
+--------------+
1 row in set (0.00 sec)
Rewriting the query with a \G to dispatch the SQL static string to the SQL statement engine:
SELECT 'Hello World!' AS "Output"\G |
Both queries return the following output:
*************************** 1. row ***************************
output: Hello World!
1 row in set (0.00 sec)
The next step requires removing the MySQL Workbench and MySQL Monitor from the demonstration. Without either of those tools, a Python program can demonstrate how to run a static SQL string.
The query is now a string literal into a query.sql file. The Python program reads the query.sql file, dispatches the embedded query, and displays the query results.
This is the query.sql file is:
SELECT 'Hello World!' AS "output"; |
This is the query.py file is:
#!/usr/bin/python # Import libraries. import sys import mysql.connector from mysql.connector import errorcode # ============================================================ # Use a try-catch block to read and parse a query from a # a file found in the same local directory as the Python # program. # ============================================================ try: file = open('query.sql','r') query = file.read().replace('\n',' ').replace(';','') file.close() except IOError: print("Could not read file:", fileName) # ============================================================ # Attempt connection in a try-catch block. # ============================================================ # -------------------------------------------------------- # Open connection, bind variable in query and format # query output before closing the cursor. # -------------------------------------------------------- try: # Open connection. cnx = mysql.connector.connect(user='student', password='student', host='127.0.0.1', database='studentdb') # Create cursor. cursor = cnx.cursor() # Execute cursor, and coerce string to tuple. cursor.execute(query) # Display the rows returned by the query. for row in cursor: print(row[0]) # Close cursor. cursor.close() # -------------------------------------------------------- # Handle MySQL exception # -------------------------------------------------------- except mysql.connector.Error as e: if e.errno == errorcode.ER_ACCESS_DENIED_ERROR: print("Something is wrong with your user name or password") elif e.errno == errorcode.ER_BAD_DB_ERROR: print("Database does not exist") else: print("Error code:", e.errno) # error number print("SQLSTATE value:", e.sqlstate) # SQLSTATE value print("Error message:", e.msg) # error message # -------------------------------------------------------- # Close connection after try-catch completes. # -------------------------------------------------------- # Close the connection when the try block completes. else: cnx.close() |
In Linux or Unix from the relative directory where both the query.sql and query.py files are located:
./query.py |
It returns:
Hello World!
These examples demonstrate that a query without variable substitution is only a static string. In all the cases, the static SQL strings are dispatched to the SQL engine by a terminator like a semicolon or through an ODBC library call that executes the static SQL string.
Learning SQL Exercise
I’ve been using Alan Beaulieu’s Learning SQL to teach my SQL Development class with MySQL 8. It’s a great book overall but Chapter 12 lacks a complete exercise. Here’s all that the author provides to the reader. This is inadequate for most readers to work with to solve the concept of a transaction.
Exercise 12-1
Generate a unit of work to transfer $50 from account 123 to account 789. You will need to insert two rows into the transaction table and update two rows in the account table. Use the following table definitions/data:
                      Account:
account_id     avail_balance    last_activity_date
-----------    --------------   ------------------
       123               450    2019-07-10 20:53:27
       789               125    2019-06-22 15:18:35

                      Transaction:
txn_id    txn_date      account_id    txn_type_cd    amount
------    ----------    -------+--    -----------    ------
  1001    2019-05-15           123    C                 500
1002 2019-06-01 789 C 75 |
Use txn_type_cd = ‘C” to indicate a credit (addition), and use txn_type_cd = ‘D’ to indicate a debit (substraction).
New Exercise 12-1
The problem with the exercise description is that the sakila database, which is used for most of the book, doesn’t have transaction or account tables. Nor, are there any instructions about general accounting practices or principles. These missing components make it hard for students to understand how to build the transaction.
The first thing the exercise’s problem defintion should qualify is how to create the account and transaction tables, like:
- Create the account table, like this with an initial auto incrementing value of 1001:
-- +--------------------+--------------+------+-----+---------+----------------+
-- | Field              | Type         | Null | Key | Default | Extra          |
-- +--------------------+--------------+------+-----+---------+----------------+
-- | account_id         | int unsigned | NO   | PRI | NULL    | auto_increment |
-- | avail_balance      | double       | NO   |     | NULL    |                |
-- | last_activity_date | datetime     | NO   |     | NULL    |                |
-- +--------------------+--------------+------+-----+---------+----------------+
- Create the transaction table, like this with an initial auto incrementing value of 1001:
-- +----------------+--------------+------+-----+---------+----------------+
-- | Field          | Type         | Null | Key | Default | Extra          |
-- +----------------+--------------+------+-----+---------+----------------+
-- | txn_id         | int unsigned | NO   | PRI | NULL    | auto_increment |
-- | txn_date       | datetime     | YES  |     | NULL    |                |
-- | account_id     | int unsigned | YES  |     | NULL    |                |
-- | txn_type_cd    | varchar(1)   | NO   |     | NULL    |                |
-- | amount         | double       | YES  |     | NULL    |                |
-- +----------------+--------------+------+-----+---------+----------------+
Checking accounts are liabilities to banks, which means you credit a liability account to increase its value and debit a liability to decrease its value. You should insert the initial rows into the account table with a zero avail_balance. Then, make these iniitial deposits:
- Credit transaction table with an account_id column value of 123 with $500 and a txn_type_cd column value of ‘C’.
- Credit transaction table with an account_id column value of 789 with $75 and a txn_type_cd column value of ‘C’.
Write an update statement to set the avail_balance column values equal to the aggregate sum of the transaction table’s rows, which treats credit transacctions (those with a ‘C’ in the txn_type_cd column as a positive number and thos with a ‘D’ in the txn_type_cd column as a negative number).
Generate a unit of work to transfer $50 from account 123 to account 789. You will need to insert two rows into the transaction table and update two rows in the account table. Use the following table definitions/data:
- Debit transaction table with an account_id column value of 123 with $50 and a txn_type_cd column value of ‘D’.
- Credit transaction table with an account_id column value of 789 with $50 and a txn_type_cd column value of ‘C’.
Apply the prior update statement to set the avail_balance column values equal to the aggregate sum of the transaction table’s rows, which treats credit transacctions (those with a ‘C’ in the txn_type_cd column as a positive number and thos with a ‘D’ in the txn_type_cd column as a negative number).
Here’s the solution to the problem:
-- +--------------------+--------------+------+-----+---------+----------------+ -- | Field | Type | Null | Key | Default | Extra | -- +--------------------+--------------+------+-----+---------+----------------+ -- | account_id | int unsigned | NO | PRI | NULL | auto_increment | -- | avail_balance | double | NO | | NULL | | -- | last_activity_date | datetime | NO | | NULL | | -- +--------------------+--------------+------+-----+---------+----------------+ DROP TABLE IF EXISTS account, transaction; CREATE TABLE account ( account_id int unsigned PRIMARY KEY AUTO_INCREMENT , avail_balance double NOT NULL , last_activity_date datetime NOT NULL ) ENGINE=InnoDB AUTO_INCREMENT=1001 DEFAULT CHARSET=utf8mb4 COLLATE=utf8mb4_0900_ai_ci; -- +----------------+--------------+------+-----+---------+----------------+ -- | Field | Type | Null | Key | Default | Extra | -- +----------------+--------------+------+-----+---------+----------------+ -- | txn_id | int unsigned | NO | PRI | NULL | auto_increment | -- | txn_date | datetime | YES | | NULL | | -- | account_id | int unsigned | YES | | NULL | | -- | txn_type_cd | varchar(1) | NO | | NULL | | -- | amount | double | YES | | NULL | | -- +----------------+--------------+------+-----+---------+----------------+ CREATE TABLE transaction ( txn_id int unsigned PRIMARY KEY AUTO_INCREMENT , txn_date datetime NOT NULL , account_id int unsigned NOT NULL , txn_type_cd varchar(1) , amount double , CONSTRAINT transaction_fk1 FOREIGN KEY (account_id) REFERENCES account(account_id)) ENGINE=InnoDB AUTO_INCREMENT=1001 DEFAULT CHARSET=utf8mb4 COLLATE=utf8mb4_0900_ai_ci; -- Insert initial accounts. INSERT INTO account ( account_id , avail_balance , last_activity_date ) VALUES ( 123 , 0 ,'2019-07-10 20:53:27'); INSERT INTO account ( account_id , avail_balance , last_activity_date ) VALUES ( 789 , 0 ,'2019-06-22 15:18:35'); -- Insert initial deposits. INSERT INTO transaction ( txn_date , account_id , txn_type_cd , amount ) VALUES ( CAST(NOW() AS DATE) , 123 ,'C' , 500 ); INSERT INTO transaction ( txn_date , account_id , txn_type_cd , amount ) VALUES ( CAST(NOW() AS DATE) , 789 ,'C' , 75 ); UPDATE account a SET a.avail_balance = (SELECT SUM( CASE WHEN t.txn_type_cd = 'C' THEN amount WHEN t.txn_type_cd = 'D' THEN amount * -1 END) AS amount FROM transaction t WHERE t.account_id = a.account_id AND t.account_id IN (123,789) GROUP BY t.account_id); SELECT * FROM account; SELECT * FROM transaction; -- Insert initial deposits. INSERT INTO transaction ( txn_date , account_id , txn_type_cd , amount ) VALUES ( CAST(NOW() AS DATE) , 123 ,'D' , 50 ); INSERT INTO transaction ( txn_date , account_id , txn_type_cd , amount ) VALUES ( CAST(NOW() AS DATE) , 789 ,'C' , 50 ); UPDATE account a SET a.avail_balance = (SELECT SUM( CASE WHEN t.txn_type_cd = 'C' THEN amount WHEN t.txn_type_cd = 'D' THEN amount * -1 END) AS amount FROM transaction t WHERE t.account_id = a.account_id AND t.account_id IN (123,789) GROUP BY t.account_id); SELECT * FROM account; SELECT * FROM transaction; |
The results are:
+------------+---------------+---------------------+ | account_id | avail_balance | last_activity_date | +------------+---------------+---------------------+ | 123 | 450 | 2019-07-10 20:53:27 | | 789 | 125 | 2019-06-22 15:18:35 | +------------+---------------+---------------------+ 2 rows in set (0.00 sec) +--------+---------------------+------------+-------------+--------+ | txn_id | txn_date | account_id | txn_type_cd | amount | +--------+---------------------+------------+-------------+--------+ | 1001 | 2024-04-01 00:00:00 | 123 | C | 500 | | 1002 | 2024-04-01 00:00:00 | 789 | C | 75 | | 1003 | 2024-04-01 00:00:00 | 123 | D | 50 | | 1004 | 2024-04-01 00:00:00 | 789 | C | 50 | +--------+---------------------+------------+-------------+--------+ 4 rows in set (0.00 sec) |
As always, I hope this helps those trying to understand how CTEs can solve problems that would otherwise be coded in external imperative languages like Python.
Parametric Queries
In 2021, I wrote a MySQL example for my class on the usefulness of Common Table Expressions (CTEs). When discussing the original post, I would comment on how you could extend the last example to build a parametric reporting table.
Somebody finally asked for a concrete example. So, this explains how to build a sample MySQL parametric query by leveraging a filter cross join and tests the parameter use with a Python script.
You can build this in any database you prefer but I used a studentdb database with the sakila sample database installed. I’ve granted privileges to both databases to the student user. The following SQL is required for the example:
-- Conditionally drop the levels table. DROP TABLE IF EXISTS levels; -- Create the levels list. CREATE TABLE levels ( level_id int unsigned primary key auto_increment , parameter_set enum('Three','Five') , description varchar(20) , min_roles int , max_roles int ); -- Insert values into the list table. INSERT INTO levels ( parameter_set , description , min_roles , max_roles ) VALUES ('Three','Hollywood Star', 30, 99999) ,('Three','Prolific Actor', 20, 29) ,('Three','Newcommer',1,19) ,('Five','Newcommer',1,9) ,('Five','Junior Actor',10,19) ,('Five','Professional Actor',20,29) ,('Five','Major Actor',30,39) ,('Five','Hollywood Star',40,99999); |
The sample lets you use the three or five value labels while filtering on any partial full_name value as the result of the query below:
1 2 3 4 5 6 7 8 9 10 11 12 13 14 15 16 17 18 | -- Query the data. WITH actors AS (SELECT a.actor_id , a.first_name , a.last_name , COUNT(*) AS num_roles FROM sakila.actor a INNER JOIN sakila.film_actor fa ON a.actor_id = fa.actor_id GROUP BY actor_id) SELECT CONCAT(a.last_name,', ',a.first_name) full_name , l.description , a.num_roles FROM actors a CROSS JOIN levels l WHERE a.num_roles BETWEEN l.min_roles AND l.max_roles AND l.parameter_set = 'Five' AND a.last_name LIKE CONCAT('H','%') ORDER BY a.last_name , a.first_name; |
They extends a concept exercise found in Chapter 9 on subqueries in Alan Beaulieu’s Learning SQL book.
This is the parametric Python program, which embeds the function locally (to make it easier for those who don’t write a lot of Python). You could set the PYTHONPATH to a relative src directory and import your function if you prefer.
1 2 3 4 5 6 7 8 9 10 11 12 13 14 15 16 17 18 19 20 21 22 23 24 25 26 27 28 29 30 31 32 33 34 35 36 37 38 39 40 41 42 43 44 45 46 47 48 49 50 51 52 53 54 55 56 57 58 59 60 61 62 63 64 65 66 67 68 69 70 71 72 73 74 75 76 77 78 79 80 81 82 83 84 85 86 87 88 89 90 91 92 93 94 95 96 97 98 99 100 101 102 103 104 105 106 107 108 109 110 111 112 113 114 115 116 117 118 119 120 121 122 123 | #!/usr/bin/python # Import the libraries. import sys import mysql.connector from mysql.connector import errorcode # ============================================================ # Define function to check and replace arguments. def check_replace(argv): # Set defaults for incorrect parameter values. defaults = ("Three","_") # Declare empty list variables. inputs = [] args = () # Check whether or not parameters exist after file name. if isinstance(argv,list) and len(argv) != 0: # Check whether there are at least two parameters. if len(argv) >= 2: # Loop through available command-line arguments. for element in argv: # Check first of two parameter values and substitute # default value if input value is an invalid option. if len(inputs) == 0 and (element in ('Three','Five')) or \ len(inputs) == 1 and (isinstance(element,str)): inputs.append(element) elif len(inputs) == 0: inputs.append(defaults[0]) elif len(inputs) == 1: inputs.append(defaults[1]) # Assign arguments to parameters. args = (inputs) # Check whether only one parameter value exists. elif len(argv) == 1 and (argv[0] in ('Three','Five')): args = (argv[0],"_") # Assume only one parameter is valid and substitute an # empty string as the second parameter. else: args = (defaults[0],"_") # Substitute defaults when missing parameters. else: args = defaults # Return parameters as a tuple. return args # ============================================================ # Assign command-line argument list to variable by removing # the program file name. # ============================================================ params = check_replace(sys.argv[1:]) # ============================================================ # Attempt the query. # ============================================================ # Use a try-catch block to manage the connection. # ============================================================ try: # Open connection. cnx = mysql.connector.connect(user='student', password='student', host='127.0.0.1', database='studentdb') # Create cursor. cursor = cnx.cursor() # Set the query statement. query = ("WITH actors AS " "(SELECT a.first_name " " , a.last_name " " , COUNT(*) AS num_roles " " FROM sakila.actor a INNER JOIN sakila.film_actor fa " " ON a.actor_id = fa.actor_id " " GROUP BY a.first_name " " , a.last_name ) " " SELECT CONCAT(a.last_name,', ',a.first_name) AS full_name " " , l.description " " , a.num_roles " " FROM actors a CROSS JOIN levels l " " WHERE a.num_roles BETWEEN l.min_roles AND l.max_roles " " AND l.parameter_set = %s " " AND a.last_name LIKE CONCAT(%s,'%') " " ORDER BY a.last_name " " , a.first_name") # Execute cursor. cursor.execute(query, params) # Display the rows returned by the query. for (full_name, description, num_roles) in cursor: print('{0} is a {1} with {2} films.'.format( full_name.title() , description.title() , num_roles)) # Close cursor. cursor.close() # ------------------------------------------------------------ # Handle exception and close connection. except mysql.connector.Error as e: if e.errno == errorcode.ER_ACCESS_DENIED_ERROR: print("Something is wrong with your user name or password") elif e.errno == errorcode.ER_BAD_DB_ERROR: print("Database does not exist") else: print("Error code:", e.errno) # error number print("SQLSTATE value:", e.sqlstate) # SQLSTATE value print("Error message:", e.msg) # error message # Close the connection when the try block completes. else: cnx.close() |
As always, I hope this helps those trying to understand how CTEs can solve problems that would otherwise be coded in external imperative languages like Python.
Ruby+MySQL on Ubuntu
This post goes through installing and configuring Ruby and Ruby on Rails for MySQL. The first step requires updating the Ubuntu OS:
sudo apt-get update |
Interestingly, I found that the man-db service had inadvertently stopped. It raised the following error:
E: dpkg was interrupted, you must manually run 'sudo dpkg --configure -a' to correct the problem. |
You run this command to find the problem with the dpkg utility:
sudo dpkg --configure -a |
It returned:
Setting up man-db (2.10.2-1) ... Updating database of manual pages ... man-db.service is a disabled or a static unit not running, not starting it. |
The following command started the man-db service:
sudo systemctl start man-db.service |
Next, you install the prerequisite packages with this command:
sudo apt-get install -y git-core zlib1g-dev build-essential libssl-dev libreadline-dev libyaml-dev libsqlite3-dev sqlite3 libxml2-dev libxslt1-dev libcurl4-openssl-dev software-properties-common libffi-dev |
Display detailed console log →
Reading package lists... Done Building dependency tree... Done Reading state information... Done Note, selecting 'git' instead of 'git-core' build-essential is already the newest version (12.9ubuntu3). build-essential set to manually installed. libreadline-dev is already the newest version (8.1.2-1). libreadline-dev set to manually installed. git is already the newest version (1:2.34.1-1ubuntu1.10). git set to manually installed. software-properties-common is already the newest version (0.99.22.9). zlib1g-dev is already the newest version (1:1.2.11.dfsg-2ubuntu9.2). zlib1g-dev set to manually installed. The following additional packages will be installed: libssl3 Suggested packages: libcurl4-doc libidn11-dev libkrb5-dev libldap2-dev librtmp-dev libssh2-1-dev sqlite3-doc libssl-doc libyaml-doc The following NEW packages will be installed: libcurl4-openssl-dev libffi-dev libsqlite3-dev libxml2-dev libxslt1-dev libyaml-dev sqlite3 The following packages will be upgraded: libssl-dev libssl3 2 upgraded, 7 newly installed, 0 to remove and 18 not upgraded. Need to get 7,426 kB of archives. After this operation, 12.8 MB of additional disk space will be used. Get:1 http://us.archive.ubuntu.com/ubuntu jammy-updates/main amd64 libssl-dev amd64 3.0.2-0ubuntu1.13 [2,374 kB] Get:2 http://us.archive.ubuntu.com/ubuntu jammy-updates/main amd64 libssl3 amd64 3.0.2-0ubuntu1.13 [1,902 kB] Get:3 http://us.archive.ubuntu.com/ubuntu jammy-updates/main amd64 libcurl4-openssl-dev amd64 7.81.0-1ubuntu1.15 [386 kB] Get:4 http://us.archive.ubuntu.com/ubuntu jammy-updates/main amd64 libsqlite3-dev amd64 3.37.2-2ubuntu0.3 [846 kB] Get:5 http://us.archive.ubuntu.com/ubuntu jammy-updates/main amd64 libxml2-dev amd64 2.9.13+dfsg-1ubuntu0.3 [804 kB] Get:6 http://us.archive.ubuntu.com/ubuntu jammy-updates/main amd64 libxslt1-dev amd64 1.1.34-4ubuntu0.22.04.1 [219 kB] Get:7 http://us.archive.ubuntu.com/ubuntu jammy-updates/main amd64 sqlite3 amd64 3.37.2-2ubuntu0.3 [768 kB] Get:8 http://us.archive.ubuntu.com/ubuntu jammy/main amd64 libffi-dev amd64 3.4.2-4 [63.7 kB] Get:9 http://us.archive.ubuntu.com/ubuntu jammy/main amd64 libyaml-dev amd64 0.2.2-1build2 [62.8 kB] Fetched 7,426 kB in 1s (5,467 kB/s) Preconfiguring packages ... (Reading database ... 246735 files and directories currently installed.) Preparing to unpack .../libssl-dev_3.0.2-0ubuntu1.13_amd64.deb ... Unpacking libssl-dev:amd64 (3.0.2-0ubuntu1.13) over (3.0.2-0ubuntu1.12) ... Preparing to unpack .../libssl3_3.0.2-0ubuntu1.13_amd64.deb ... Unpacking libssl3:amd64 (3.0.2-0ubuntu1.13) over (3.0.2-0ubuntu1.12) ... Setting up libssl3:amd64 (3.0.2-0ubuntu1.13) ... Selecting previously unselected package libcurl4-openssl-dev:amd64. (Reading database ... 246735 files and directories currently installed.) Preparing to unpack .../0-libcurl4-openssl-dev_7.81.0-1ubuntu1.15_amd64.deb ... Unpacking libcurl4-openssl-dev:amd64 (7.81.0-1ubuntu1.15) ... Selecting previously unselected package libsqlite3-dev:amd64. Preparing to unpack .../1-libsqlite3-dev_3.37.2-2ubuntu0.3_amd64.deb ... Unpacking libsqlite3-dev:amd64 (3.37.2-2ubuntu0.3) ... Selecting previously unselected package libxml2-dev:amd64. Preparing to unpack .../2-libxml2-dev_2.9.13+dfsg-1ubuntu0.3_amd64.deb ... Unpacking libxml2-dev:amd64 (2.9.13+dfsg-1ubuntu0.3) ... Selecting previously unselected package libxslt1-dev:amd64. Preparing to unpack .../3-libxslt1-dev_1.1.34-4ubuntu0.22.04.1_amd64.deb ... Unpacking libxslt1-dev:amd64 (1.1.34-4ubuntu0.22.04.1) ... Selecting previously unselected package sqlite3. Preparing to unpack .../4-sqlite3_3.37.2-2ubuntu0.3_amd64.deb ... Unpacking sqlite3 (3.37.2-2ubuntu0.3) ... Selecting previously unselected package libffi-dev:amd64. Preparing to unpack .../5-libffi-dev_3.4.2-4_amd64.deb ... Unpacking libffi-dev:amd64 (3.4.2-4) ... Selecting previously unselected package libyaml-dev:amd64. Preparing to unpack .../6-libyaml-dev_0.2.2-1build2_amd64.deb ... Unpacking libyaml-dev:amd64 (0.2.2-1build2) ... Setting up libyaml-dev:amd64 (0.2.2-1build2) ... Setting up libffi-dev:amd64 (3.4.2-4) ... Setting up libxml2-dev:amd64 (2.9.13+dfsg-1ubuntu0.3) ... Setting up libsqlite3-dev:amd64 (3.37.2-2ubuntu0.3) ... Setting up libcurl4-openssl-dev:amd64 (7.81.0-1ubuntu1.15) ... Setting up libssl-dev:amd64 (3.0.2-0ubuntu1.13) ... Setting up sqlite3 (3.37.2-2ubuntu0.3) ... Setting up libxslt1-dev:amd64 (1.1.34-4ubuntu0.22.04.1) ... Processing triggers for man-db (2.10.2-1) ... Processing triggers for install-info (6.8-4build1) ... Processing triggers for libc-bin (2.35-0ubuntu3.6) ... |
Use the cd command to change to the student home directory. Clone the asdf as the multiple runtime version manager with this command:
git clone https://github.com/excid3/asdf.git ~/.asdf |
The following is the output of the git clone command:
Cloning into '/home/student/.asdf'... remote: Enumerating objects: 8756, done. remote: Counting objects: 100% (829/829), done. remote: Compressing objects: 100% (476/476), done. remote: Total 8756 (delta 428), reused 657 (delta 334), pack-reused 7927 Receiving objects: 100% (8756/8756), 3.10 MiB | 4.29 MiB/s, done. Resolving deltas: 100% (5148/5148), done. |
Next, you fix your .bashrc file by adding the following components:
echo '. "$HOME/.asdf/asdf.sh"' >> ~/.bashrc echo '. "$HOME/.asdf/completions/asdf.bash"' >> ~/.bashrc echo 'legacy_version_file = yes' >> ~/.asdfrc echo 'export EDITOR="code --wait"' >> ~/.bashrc |
Source the modifies shell, which you can do like this:
exec $SHELL |
or, like:
. ${HOME}/.bashrc |
Add the following asdf plug-ins:
asdf plugin add ruby asdf plugin add nodejs |
Install Ruby with the following command:
asdf install ruby 3.3.0 |
Display detailed console log →
Downloading ruby-build...
==> Downloading ruby-3.3.0.tar.gz...
-> curl -q -fL -o ruby-3.3.0.tar.gz https://cache.ruby-lang.org/pub/ruby/3.3/ruby-3.3.0.tar.gz
  % Total    % Received % Xferd  Average Speed   Time    Time     Time  Current
                                 Dload  Upload   Total   Spent    Left  Speed
100 21.0M  100 21.0M    0     0  10.1M      0  0:00:02  0:00:02 --:--:-- 10.1M
==> Installing ruby-3.3.0...
-> ./configure "--prefix=$HOME/.asdf/installs/ruby/3.3.0" --enable-shared --with-ext=openssl,psych,+
-> make -j 2
-> make install
==> Installed ruby-3.3.0 to /home/student/.asdf/installs/ruby/3.3.0
asdf: Warn: You have configured asdf to preserve downloaded files (with always_keep_download=yes or --keep-download). But
asdf: Warn: the current plugin (ruby) does not support that. Downloaded files will not be preserved. |
Install Ruby Global with this syntax:
asdf global ruby 3.3.0 |
Update the Ruby Gems with this command:
gem update --system |
Display detailed console log →
Updating rubygems-update Fetching rubygems-update-3.5.5.gem Successfully installed rubygems-update-3.5.5 Parsing documentation for rubygems-update-3.5.5 Installing ri documentation for rubygems-update-3.5.5 Done installing documentation for rubygems-update after 1 seconds Parsing documentation for rubygems-update-3.5.5 Done installing documentation for rubygems-update after 0 seconds Installing RubyGems 3.5.5 Successfully built RubyGem Name: bundler Version: 2.5.5 File: bundler-2.5.5.gem Bundler 2.5.5 installed RubyGems 3.5.5 installed Regenerating binstubs Regenerating plugins Parsing documentation for rubygems-3.5.5 Installing ri documentation for rubygems-3.5.5 # 3.5.5 / 2024-01-18 ## Enhancements: * Installs bundler 2.5.5 as a default gem. ## Bug fixes: * Fix `require` activation conflicts when requiring default gems under some situations. Pull request [#7379](https://github.com/rubygems/rubygems/pull/7379) by deivid-rodriguez * Use cache_home instead of data_home in default_spec_cache_dir. Pull request [#7331](https://github.com/rubygems/rubygems/pull/7331) by mrkn ## Documentation: * Use squiggly heredocs in `Gem::Specification#description` documentation, so it doesn't add leading whitespace. Pull request [#7373](https://github.com/rubygems/rubygems/pull/7373) by bravehager # 3.5.4 / 2024-01-04 ## Enhancements: * Always avoid "Updating rubygems-update" message. Pull request [#7335](https://github.com/rubygems/rubygems/pull/7335) by deivid-rodriguez * Installs bundler 2.5.4 as a default gem. ## Bug fixes: * Make `gem update --system` respect ruby version constraints. Pull request [#7334](https://github.com/rubygems/rubygems/pull/7334) by deivid-rodriguez ------------------------------------------------------------------------------ RubyGems installed the following executables: /home/student/.asdf/installs/ruby/3.3.0/bin/gem /home/student/.asdf/installs/ruby/3.3.0/bin/bundle /home/student/.asdf/installs/ruby/3.3.0/bin/bundler Ruby Interactive (ri) documentation was installed. ri is kind of like man pages for Ruby libraries. You may access it like this: ri Classname ri Classname.class_method ri Classname#instance_method If you do not wish to install this documentation in the future, use the --no-document flag, or set it as the default in your ~/.gemrc file. See 'gem help env' for details. RubyGems system software updated |
You can confirm your Ruby install with two commands. First, use the which utility to check the Ruby install:
which -a ruby |
It should return:
/home/student/.asdf/shims/ruby |
Then, check the Ruby version:
ruby -v |
It should return:
ruby 3.3.0 (2023-12-25 revision 5124f9ac75) [x86_64-linux] |
Assuming you’ve installed and configured MySQL 8 on Ubuntu, you need this additional library to support the necessary Ruby Gem:
sudo apt-get install -y libmysqlclient-dev |
Now, you can install the current MySQL Ruby Gem:
gem install mysql2 |
You can now write a mysql_connection.rb program to verify a connection to the MySQL 8 database, like:
# Include Ruby Gem libraries. require 'rubygems' require 'mysql2' begin # Create new database connection. db = Mysql2::Client.new( :host => 'localhost' \ , :username => 'student' \ , :password => 'student' \ , :database => 'studentdb') # Create a result set. stmt = db.query('SELECT version() AS version') # Read through the result set hash. stmt.each do | row | puts "#{row['version']}" end # Release the result set resources. stmt.free rescue Mysql2::Error => e # Print the error. puts "ERROR #{e.errno} (#{e.sqlstate}): #{e.error}" puts "Can't connect to the MySQL database specified." # Signal an error. exit 1 ensure # Close the connection when it is open. db.close if db end |
Call the program with this syntax:
ruby mysql_connection.rb |
It should return:
Connected to the MySQL database server. |
You can verify the version with this mysql_version.rb program:
# Include Ruby Gem libraries. require 'rubygems' require 'mysql2' begin # Create new database connection. db = Mysql2::Client.new( :host => 'localhost' \ , :username => 'student' \ , :password => 'student' \ , :database => 'studentdb') # Create a result set. rs = db.query('SELECT version() AS version') # Read through the result set hash. rs.each do | row | puts "#{row['version']}" end # Release the result set resources. rs.free rescue Mysql2::Error => e # Print the error. puts "ERROR #{e.errno} (#{e.sqlstate}): #{e.error}" puts "Can't connect to the MySQL database specified." # Signal an error. exit 1 ensure # Close the connection when it is open. db.close if db end |
On Ubuntu, it should return:
8.0.35-0ubuntu0.22.04.1 |
If you don’t know anything about the mysql2 Ruby Gem, you should read the documentation. It’s very concise and requires a basic understanding of Ruby programming. The two specific pages who may want to check for the next examples are:
- The Mysql2 Statement Class list.
- The Mysql2 Result Class List
The mysql_version.rb version uses the known string literal for columns or column aliases returned by the SQL statement, which becomes the stmt (or statement) in the program. The next program eliminates the need to enumerate with the text-based columns from the query by using the Statement#fields array values by use of a numeric index. The numeric index returns the field names from the Statement#fields class to use in as the name for values in the Result#fields value found in the row variable of the for loop.
# Include Ruby Gem libraries. require 'rubygems' require 'mysql2' # Begin block. begin # Create a new connection resource. db = Mysql2::Client.new( :host => 'localhost' \ , :username => 'student' \ , :password => 'student' \ , :database => 'studentdb') # Create a result set. stmt = db.query("SELECT DISTINCT i.item_title, ra.rating " + \ "FROM item i INNER JOIN rating_agency ra " + \ "ON i.item_rating_id = ra.rating_agency_id " + \ "WHERE ra.rating_agency = 'MPAA'" + \ "ORDER BY 1") # Read through the result set hash. stmt.each do | row | out = "" i = 0 while i < stmt.fields.count() # Check when not last column and use the: # - Hash returned by the result set for the value, and # - String array value returned by the statement object # as the name value of the hash by leveraging its # numeric index. if i < stmt.fields.count() - 1 out += "#{row[stmt.fields[i]]}" out += ", " else out += "#{row[stmt.fields[i]]}" end i += 1 end puts "#{out}" end # Release the result set resources. stmt.free rescue Mysql2::Error => e # Print the error. puts "ERROR #{e.errno} (#{e.sqlstate}): #{e.error}" puts "Can't connect to MySQL database specified." # Signal an error. exit 1 ensure # Close the connection when it is open. db.close if db end |
It returns the select two columns from the query:
A Man for All Seasons, G Around the World in 80 Days, G Beau Geste, PG Brave Heart, R Camelot, G Casino Royale, PG-13 ... Tomorrow Never Dies, PG-13 Tora! Tora! Tora!, G Tron, PG |
The following mysql_query_params.rb Ruby example accepts a single argument to leverage a wild card query in MySQL:
require 'rubygems' require 'mysql2' # Input external arguments. arguments = ARGV # Check for one input parameter and substitute an empty string # when one isn't found. if arguments.length == 1 argument = arguments[0] else argument = "" end # Begin block. begin # Create a new connection resource. db = Mysql2::Client.new( :host => 'localhost' \ , :username => 'student' \ , :password => 'student' \ , :database => 'studentdb') # Create a result set. stmt = db.prepare("SELECT DISTINCT i.item_title, ra.rating " + \ "FROM item i INNER JOIN rating_agency ra " + \ "ON i.item_rating_id = ra.rating_agency_id " + \ "WHERE ra.rating_agency = 'MPAA'" + \ "AND i.item_title LIKE CONCAT(?,'%')" + \ "ORDER BY 1") # Bind the variable into the query. rs = stmt.execute(argument) # Read through the result set hash. rs.each do | row | out = "" i = 0 while i < rs.fields.count() # Check when not last column and use the: # - Hash returned by the result set for the value, and # - String array value returned by the statement object # as the name value of the hash by leveraging its # numeric index. if i < rs.fields.count() - 1 out += "#{row[rs.fields[i]]}" out += ", " else out += "#{row[rs.fields[i]]}" end i += 1 end puts "#{out}" end # Release the result set resources. rs.free rescue Mysql2::Error => e # Print the error. puts "ERROR #{e.errno} (#{e.sqlstate}): #{e.error}" puts "Can't connect to MySQL database specified." # Signal an error. exit 1 ensure # Close the connection when it is open. db.close if db end |
If you call the mysql_query_params.rb program with this syntax:
ruby mysql_aquery_params.rb Harry |
It’ll return the following from the studentdb database:
Harry Potter and the Chamber of Secrets, PG Harry Potter and the Deathly Hallows, Part 1, PG-13 Harry Potter and the Deathly Hallows, Part 2, PG-13 Harry Potter and the Goblet of Fire, PG-13 Harry Potter and the Half Blood Prince, PG Harry Potter and the Order of the Phoenix, PG-13 Harry Potter and the Prisoner of Azkaban, PG Harry Potter and the Sorcerer's Stone, PG |
After that, you should install Rails (check for current version beyond 1/2024). Install Ruby Global with this syntax:
gem install rails -v 7.1.3 |
Check the version installed:
rails -v |
It should return:
Rails 7.1.3 |
Run this command to enable Rails for MySQL 8:
rails new myapp -d mysql |
If you want to configure a username and password for MySQL, edit the config/database.yml file.
As always, I hope this helps somebody looking for step-by-step guide.
Ubuntu, Perl & MySQL
Configuring Perl to work with MySQL is straight forward. While Perl is installed generally, you may need to install the libdbd-mysql-perl library.
You install it as a sudoer user with this syntax:
sudo apt install -y libdbd-mysql-perl |
Display detailed console log →
Reading package lists... Done Building dependency tree... Done Reading state information... Done The following additional packages will be installed: libmysqlclient21 The following NEW packages will be installed: libdbd-mysql-perl libmysqlclient21 0 upgraded, 2 newly installed, 0 to remove and 12 not upgraded. Need to get 1,389 kB of archives. After this operation, 7,143 kB of additional disk space will be used. Get:1 http://us.archive.ubuntu.com/ubuntu jammy-updates/main amd64 libmysqlclient21 amd64 8.0.35-0ubuntu0.22.04.1 [1,301 kB] Get:2 http://us.archive.ubuntu.com/ubuntu jammy-updates/universe amd64 libdbd-mysql-perl amd64 4.050-5ubuntu0.22.04.1 [87.6 kB] Fetched 1,389 kB in 1s (1,213 kB/s) Selecting previously unselected package libmysqlclient21:amd64. (Reading database ... 235085 files and directories currently installed.) Preparing to unpack .../libmysqlclient21_8.0.35-0ubuntu0.22.04.1_amd64.deb ... Unpacking libmysqlclient21:amd64 (8.0.35-0ubuntu0.22.04.1) ... Selecting previously unselected package libdbd-mysql-perl:amd64. Preparing to unpack .../libdbd-mysql-perl_4.050-5ubuntu0.22.04.1_amd64.deb ... Unpacking libdbd-mysql-perl:amd64 (4.050-5ubuntu0.22.04.1) ... Setting up libmysqlclient21:amd64 (8.0.35-0ubuntu0.22.04.1) ... Setting up libdbd-mysql-perl:amd64 (4.050-5ubuntu0.22.04.1) ... Processing triggers for man-db (2.10.2-1) ... Processing triggers for libc-bin (2.35-0ubuntu3.5) ... |
You can find the Perl version with the following version.pl program:
1 2 3 4 | #!/usr/bin/perl -w # Print the version. print "Perl ".$]."\n"; |
The first line lets you call the program without prefacing the program name with perl. The first line invokes a subshell of perl by default. You just need to ensure the file has read and execute privileges to run by using the
chmod 755 version.pl |
You call it with this:
./version.pl |
It prints:
Perl 5.034000 |
The following static_query.pl Perl program uses the Perl DBI library to query and return a data set based on a static query.
1 2 3 4 5 6 7 8 9 10 11 12 13 14 15 16 17 18 19 20 21 22 23 24 25 26 27 28 29 30 31 32 33 34 35 36 37 | #!/usr/bin/perl -w # Use the DBI library. use DBI; use strict; use warnings; # Create a connection. my $dbh = DBI->connect("DBI:mysql:database=studentdb;host=localhost:3306" ,"student","student",{'RaiseError' => 1}); # Create SQL statement. my $sql = "SELECT i.item_title , ra.rating , cl.common_lookup_meaning FROM item i INNER JOIN common_lookup cl ON i.item_type = cl.common_lookup_id INNER JOIN rating_agency ra ON i.item_rating_id = ra.rating_agency_id WHERE i.item_title LIKE 'Harry%' AND cl.common_lookup_type = 'BLU-RAY'"; # Prepare SQL statement. my $sth = $dbh->prepare($sql); # Execute statement and read result set. $sth->execute() or die $DBI::errstr; # Read through returned rows, assign elements explicitly to match SELECT-list. while (my @row = $sth->fetchrow_array()) { my $item_title = $row[0]; my $rating = $row[1]; my $lookup_meaning = $row[2]; print "$item_title, $rating, $lookup_meaning\n"; } # Close resources. $sth->finish(); |
It returns the following rows from the sample database:
Harry Potter and the Sorcerer's Stone, PG, Blu-ray Harry Potter and the Chamber of Secrets, PG, Blu-ray Harry Potter and the Prisoner of Azkaban, PG, Blu-ray Harry Potter and the Goblet of Fire, PG-13, Blu-ray |
The following dynamic_query.pl Perl program uses the Perl DBI library to prepare a query, bind a local variable into the query, and return a data set based on a dynamic query.
1 2 3 4 5 6 7 8 9 10 11 12 13 14 15 16 17 18 19 20 21 22 23 24 25 26 27 28 29 30 31 32 33 34 35 36 37 38 39 40 41 42 43 | #!/usr/bin/perl -w # Use the DBI library. use DBI; use strict; use warnings; # Mimic a function parameter by using a local variable. my $item_title_in = 'Star'; # Create a connection. my $dbh = DBI->connect("DBI:mysql:database=studentdb;host=localhost:3306" ,"student","student",{'RaiseError' => 1}); # Create SQL statement. my $sql = "SELECT i.item_title , ra.rating , cl.common_lookup_meaning FROM item i INNER JOIN common_lookup cl ON i.item_type = cl.common_lookup_id INNER JOIN rating_agency ra ON i.item_rating_id = ra.rating_agency_id WHERE i.item_title LIKE CONCAT(?,'%') AND cl.common_lookup_type = 'BLU-RAY'"; # Prepare SQL statement. my $sth = $dbh->prepare($sql); # Bind a variable to first parameter in the query string. $sth->bind_param(1, $item_title_in); # Execute statement and read result set. $sth->execute() or die $DBI::errstr; # Read through returned rows, assign elements explicitly to match SELECT-list. while (my @row = $sth->fetchrow_array()) { my $item_title = $row[0]; my $rating = $row[1]; my $lookup_meaning = $row[2]; print "$item_title, $rating, $lookup_meaning\n"; } # Close resources. $sth->finish(); |
It returns the following rows from the sample database:
Star Wars II, PG, Blu-ray |
You can replace lines 34 through 40 with the following to read any number of columns into a comma-delimited row return:
34 35 36 37 38 39 40 41 42 43 44 45 46 47 48 | # Read through returned rows, assign elements explicitly to match SELECT-list. while (my @row = $sth->fetchrow_array()) { # Read through a dynamic column list for column separated display. my $result = ''; foreach(@row) { if (length($result) == 0) { $result = $_; } else { $result .= ", " . $_; } } # Print comma-separted values by row. print $result . "\n" } |
It returns the following rows from the sample database:
Star Wars II, PG, Blu-ray |
As always, I hope this helps the reader solve a problem.
Ubuntu DaaS VM

Completed the build of my new Ubuntu Virtual Machine (VM) with Oracle 23c installed in a Docker instance, and MySQL and PostgreSQL installed locally. The VM image also provides a LAMP stack with Apache2, PHP 8.1 with MySQLi and PDO modules. Since the original post, I’ve added a number of items to support our program courses and the Data Science degrees.
There are lots of tricks and techniques in the blog associated with creating the build. I took the background photograph of Chapel Bridge early on Sunday morning August 30, 1987 in Lucerne Switzerland (with a Canon A1 and ASA 64 slide film that subsequently digitized well).
Next step: roll it out into an AWS image for the students to use for their courses.
Related blog posts:
- Installing and configuring Apache2 and PHP 8.1 on Ubuntu 22.04
- Installing and configuring Docker on Ubuntu 22.04
- Installing and configuring MySQL 8 on Ubuntu 22.04
- Installing Oracle Database 23c Free in a Docker container with space allocation techniques
- Installing and configuring PostgreSQL on Ubuntu 22.04
- Installing and configuring pgAdmin4
- Installing and configuring Python for MySQL 8
- Installing and configuring Python for PostgreSQL driver on Ubuntu 22.04
- Installing and configuring SQL Developer on Ubuntu 22.04
- Installing the rlwrap utility to access command history in SQL*Plus (sqlplus) inside Docker container.
- How to add PostGIS to an existing PostgreSQL 14 Install on Ubuntu 22.0.4
- How to create a sandboxed user and wrap sqlplus inside the Docker version of Oracle 23c Free
- How to install, configure, and create a persistent SQLite 3 database and access it with Python.
As always, I hope the post and information helps others.
Apache2 on Ubuntu
It’s always interesting when I build new instances. Ubuntu 22.0.4 was no different but I ran into an issue with installing Apache2 and eventually loading the mysqli module.
The Apache2 error was an issue with an unsupported module or hidden prerequisite. The MySQLi required an Apache reload after installation. Contrary to some erroneous posts the mysqli driver is supported on PHP 8.1.
Apache2 installation starts first and the mysqli module reload and verification script follows. On Ubuntu, you install Apache2 if you’re unaware of the hidden pre-requisite, otherwise install the pre-requisite first and avoid the error.
This is the command to install the apache2 module:
sudo apt-get install -y apache2 |
It generated the following error message:
apache2: Syntax error on line 146 of /etc/apache2/apache2.conf: Syntax error on line 1 of /etc/apache2/mods-enabled/wsgi.load: Cannot load /usr/lib/apache2/modules/mod_wsgi.so into server: /usr/lib/apache2/modules/mod_wsgi.so: cannot open shared object file: No such file or directory Action 'start' failed. The Apache error log may have more information. |
Line 146 in the /etc/apache2/apache2.conf file contains the instruction to load modules. The error says it can’t find the mod_wsgi.so library, which was originally part of the deprecated Python 2.7 release.
IncludeOptional mods-enabled/*.load |
The first step I pursued was finding the missing library, which appeared to be in the libapache2-mod-wsgi package. However, it became clear there is no installation candidate for that module, which supported Python 3.x. A little more research led me to find the appropriate library version for Python 3, which is found in the libapache2-mod-wsgi-py3 package.
I installed the libapache2-mod-wsgi-py3 package with the following syntax:
sudo apt-get install -y libapache2-mod-wsgi-py3 |
Display detailed console log →
Reading package lists... Done Building dependency tree... Done Reading state information... Done The following NEW packages will be installed: libapache2-mod-wsgi-py3 0 upgraded, 1 newly installed, 0 to remove and 10 not upgraded. Need to get 106 kB of archives. After this operation, 304 kB of additional disk space will be used. Get:1 http://us.archive.ubuntu.com/ubuntu jammy-updates/main amd64 libapache2-mod-wsgi-py3 amd64 4.9.0-1ubuntu0.1 [106 kB] Fetched 106 kB in 1s (135 kB/s) Selecting previously unselected package libapache2-mod-wsgi-py3. (Reading database ... 228859 files and directories currently installed.) Preparing to unpack .../libapache2-mod-wsgi-py3_4.9.0-1ubuntu0.1_amd64.deb ... Unpacking libapache2-mod-wsgi-py3 (4.9.0-1ubuntu0.1) ... Setting up libapache2-mod-wsgi-py3 (4.9.0-1ubuntu0.1) ... apache2_invoke wsgi: already enabled |
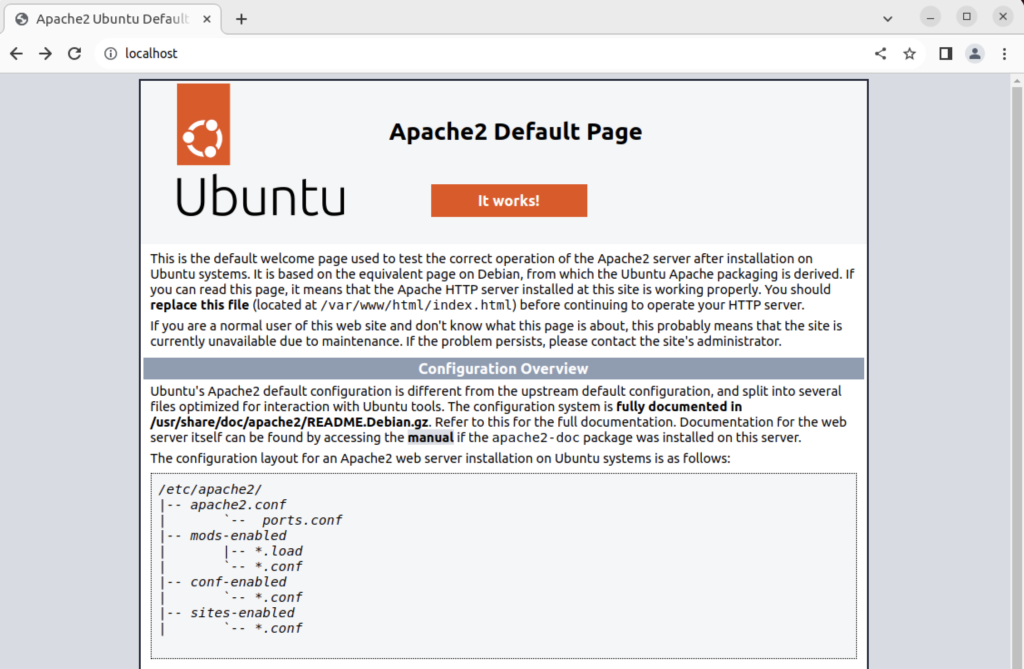
After applying it, I was able to start Apache2. Then, typing in localhost returns the Apache2 index.htm page, like:
After creating the following file in the default directory:
<?php phpinfo(); ?> |
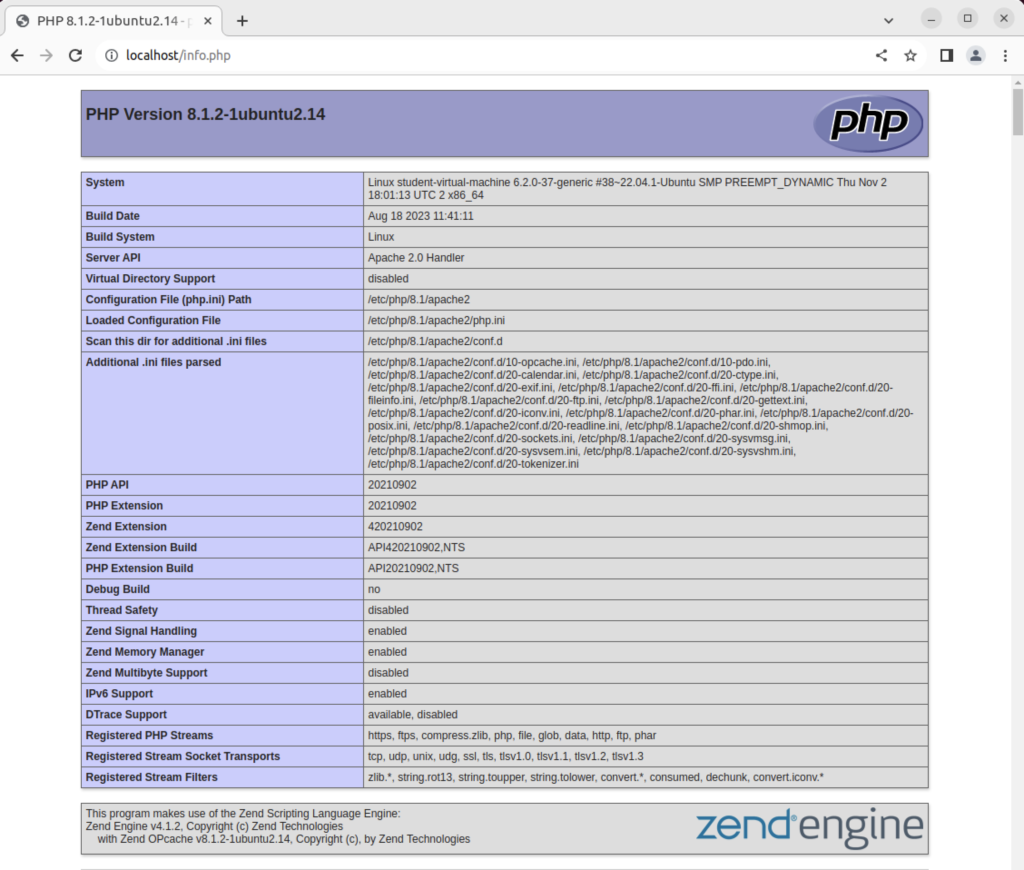
Typing in localhost/infophp returns the Apache2 info.php page, like:
After the basics for PHP, the next step is the mysqli module for the MySQL database. This can be done in two steps on Ubuntu.
- Install the MySQLi software with the following syntax on Ubuntu:
sudo apt-get install -y php8.1-mysql
If you forget and use the old php-mysqli, it will redirect to the new PHP 8.1 MySQL module.
- You need to reload the Apache configuration with the following syntax:
sudo systemctl reload apache2
Now, you can use the following PHP program to verify that the mysqli and pdo drivers are installed:
<html>
<header>
<title>Module Verification</title>
</header>
<body>
<?php
  if (!function_exists('mysqli_init') && !extension_loaded('mysqli')) {
    print 'mysqli not installed.'; }
  else {
    print 'mysqli installed.'; }
  if (!function_exists('pdo_init') && !extension_loaded('pdo')) {
    print '<p>pdo not installed.</p>'; }
  else {
    print '<p>pdo installed.</p>'; }
?>
</script>
</body>
</html> |
If everything is correct, it should return the following in a browser when you query it from localhost/the-file-name and the file is in the /var/www/html directory:
mysqli installed. pdo installed. |
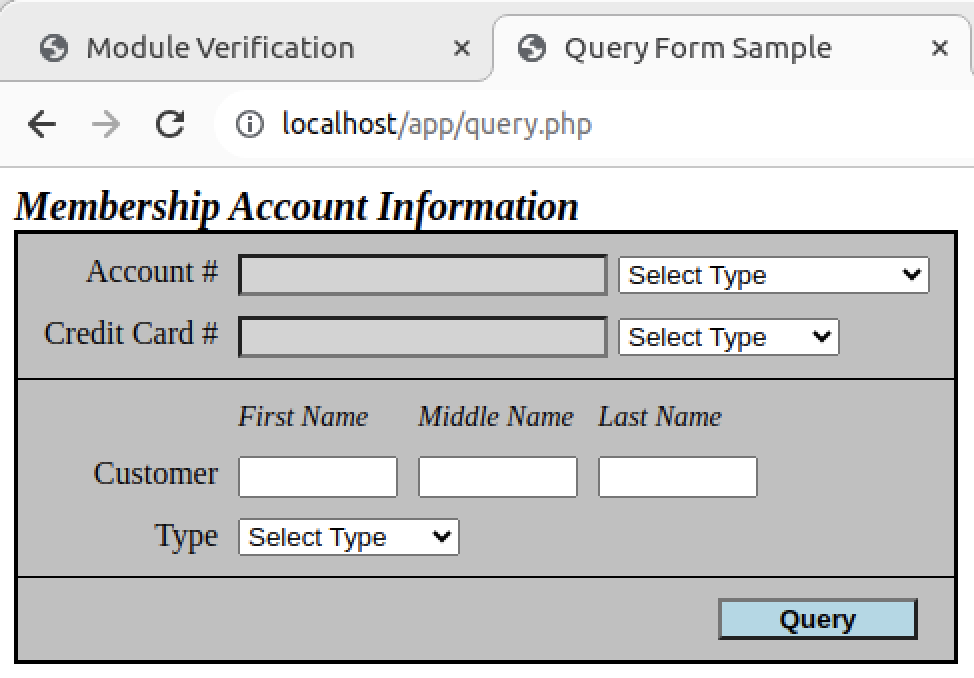
This means you can now write PHP applications, like the following example for my students:
I also have some demonstration programs that upload PNG files. As usual, I forgot about that while building the Ubuntu installation with MySQL 8, PHP 8.1 and Apache2. Fortunately, I solved it back in the day when moving from PHP 5.7 to 7.1 and here are the equivalent steps for Ubuntu:
I installed the libapache2-mod-wsgi-py3 package with the following syntax:
sudo apt-get install -y php-gd |
Display detailed console log →
Reading package lists... Done Building dependency tree... Done Reading state information... Done The following additional packages will be installed: php8.1-gd The following NEW packages will be installed: php-gd php8.1-gd 0 upgraded, 2 newly installed, 0 to remove and 13 not upgraded. Need to get 34.7 kB of archives. After this operation, 158 kB of additional disk space will be used. Get:1 http://us.archive.ubuntu.com/ubuntu jammy-updates/main amd64 php8.1-gd amd64 8.1.2-1ubuntu2.14 [32.9 kB] Get:2 http://us.archive.ubuntu.com/ubuntu jammy/main amd64 php-gd all 2:8.1+92ubuntu1 [1,828 B] Fetched 34.7 kB in 1s (39.3 kB/s) sh: 0: getcwd() failed: No such file or directory sh: 0: getcwd() failed: No such file or directory sh: 0: getcwd() failed: No such file or directory sh: 0: getcwd() failed: No such file or directory Selecting previously unselected package php8.1-gd. (Reading database ... 228928 files and directories currently installed.) Preparing to unpack .../php8.1-gd_8.1.2-1ubuntu2.14_amd64.deb ... Unpacking php8.1-gd (8.1.2-1ubuntu2.14) ... Selecting previously unselected package php-gd. Preparing to unpack .../php-gd_2%3a8.1+92ubuntu1_all.deb ... Unpacking php-gd (2:8.1+92ubuntu1) ... Setting up php8.1-gd (8.1.2-1ubuntu2.14) ... Creating config file /etc/php/8.1/mods-available/gd.ini with new version Setting up php-gd (2:8.1+92ubuntu1) ... Processing triggers for libapache2-mod-php8.1 (8.1.2-1ubuntu2.14) ... Processing triggers for php8.1-cli (8.1.2-1ubuntu2.14) ... |
Then, I restarted the Apache2 server to incorporate the php-gd library in my PHP module with this syntax:
sudo systemctl restart apache2.service |
Retesting the PHP form to upload and render a PNG image file with this code (note that the only thing you can display is the html header and converted image, as shown on lines 64 and 65):
1 2 3 4 5 6 7 8 9 10 11 12 13 14 15 16 17 18 19 20 21 22 23 24 25 26 27 28 29 30 31 32 33 34 35 36 37 38 39 40 41 42 43 44 45 46 47 48 49 50 51 52 53 54 55 56 57 58 59 60 61 62 63 64 65 66 67 | <?php /* ConvertBlobToImage.php * by Michael McLaughlin * * This script queries an image from a BLOB column and * converts it to a PNG image. * * ALERT: * * The header must be inside the PHP script tag because nothing * can be rendered before the header() function call that signals * this is a PNG file. */ // Database credentials must be set manually because an include_once() function // call puts something ahead of the header, which causes a failure when rendering // an image. // Include the credential library. include_once("MySQLCredentials.inc"); // Return successful attempt to connect to the database. if (!$c = @mysqli_connect(HOSTNAME,USERNAME,PASSWORD,DATABASE)) { // Print user message. print "Sorry! The connection to the database failed. Please try again later."; // Assign the OCI error and format double and single quotes. print mysqli_error(); // Kill the resource. die(); } else { // Declare input variables. $id = (isset($_GET['id'])) ? (int) $_GET['id'] : 1023; // Initialize a statement in the scope of the connection. $stmt = mysqli_stmt_init($c); // Declare a SQL SELECT statement returning a MediumBLOB. $sql = "SELECT item_blob FROM item WHERE item_id = ?"; // Prepare statement and link it to a connection. if (mysqli_stmt_prepare($stmt,$sql)) { mysqli_stmt_bind_param($stmt,"i",$id); // Execute the PL/SQL statement. if (mysqli_stmt_execute($stmt)) { // Bind result to local variable. mysqli_stmt_bind_result($stmt, $image); // Read result. mysqli_stmt_fetch($stmt); } } // Disconnect from database. mysqli_close($c); // Print the header first. header('Content-type: image/png'); imagepng(imagecreatefromstring($image)); } ?> |
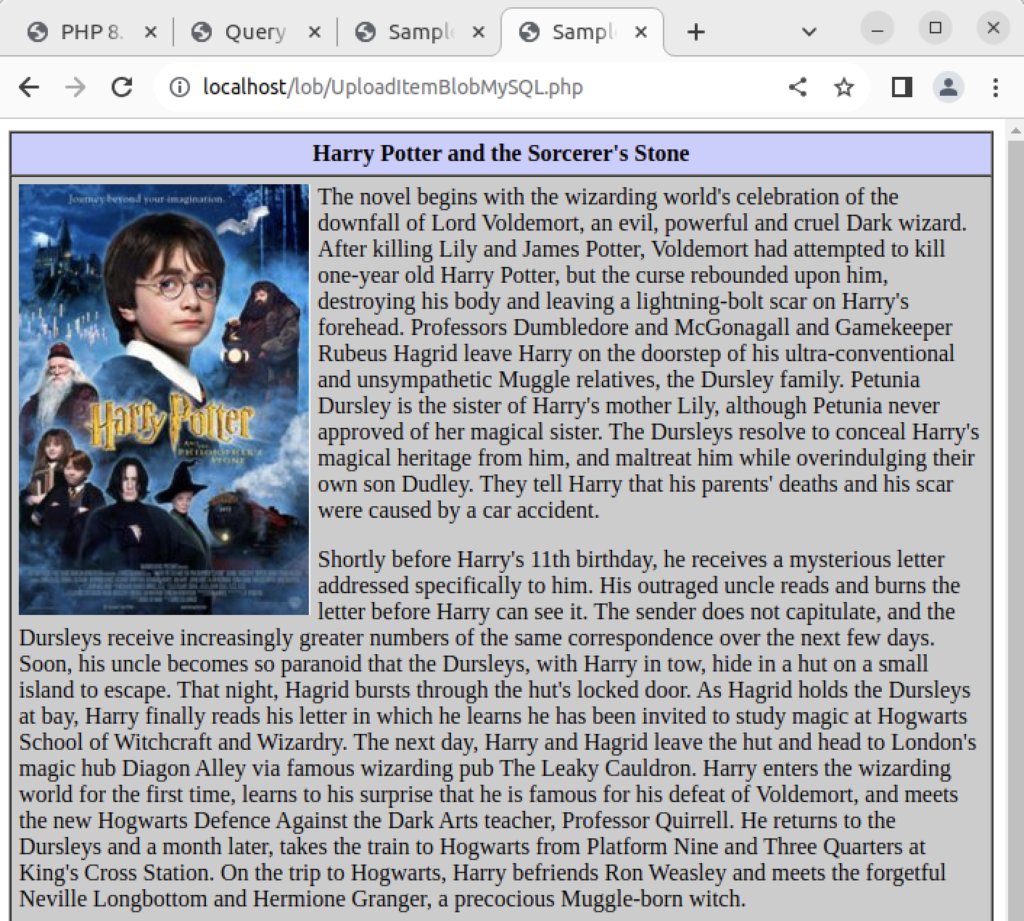
The call to the ConvertMySQLBlobToImage.php is handled in an image tag, as shown:
<img src="ConvertMySQLBlobToImage.php?id='.$id.'"> |
Rendering a web page, like:
As always, I hope this explains something worthwhile.
SQL 1 v.s. SQL 3
In Alan Beaulieu’s wonderful book Learning SQL: Generate, Manipulate, and Retrieve Data, he uses a SQL 1 to demonstrates a CROSS JOIN in MySQL counting from 1 to 100. My students always find it difficult to read because the subqueries take so much space it makes it difficult to see the process, for example he gives this SQL 1 solution:
SELECT ones.x + tens.x + 1 AS counter FROM (SELECT 0 AS x UNION ALL SELECT 1 AS x UNION ALL SELECT 2 AS x UNION ALL SELECT 3 AS x UNION ALL SELECT 4 AS x UNION ALL SELECT 5 AS x UNION ALL SELECT 6 AS x UNION ALL SELECT 7 AS x UNION ALL SELECT 8 AS x UNION ALL SELECT 9 AS x ) ones CROSS JOIN (SELECT 0 AS x UNION ALL SELECT 10 AS x UNION ALL SELECT 20 AS x UNION ALL SELECT 30 AS x UNION ALL SELECT 40 AS x UNION ALL SELECT 50 AS x UNION ALL SELECT 60 AS x UNION ALL SELECT 70 AS x UNION ALL SELECT 80 AS x UNION ALL SELECT 90 AS x ) tens ORDER BY counter; |
While anybody with a command of SQL should be able to see how it works, for those new to SQL it’s difficult. It’s more effective to use a Common Table Expression with the WITH clause because the derived tables become variables in the scope of the WITH clause and the final query works more like a CROSS JOIN between two tables:
WITH ones AS (SELECT 0 AS x UNION ALL SELECT 1 AS x UNION ALL SELECT 2 AS x UNION ALL SELECT 3 AS x UNION ALL SELECT 4 AS x UNION ALL SELECT 5 AS x UNION ALL SELECT 6 AS x UNION ALL SELECT 7 AS x UNION ALL SELECT 8 AS x UNION ALL SELECT 9 AS x ) , tens AS (SELECT 0 AS x UNION ALL SELECT 10 AS x UNION ALL SELECT 20 AS x UNION ALL SELECT 30 AS x UNION ALL SELECT 40 AS x UNION ALL SELECT 50 AS x UNION ALL SELECT 60 AS x UNION ALL SELECT 70 AS x UNION ALL SELECT 80 AS x UNION ALL SELECT 90 AS x ) SELECT ones.x + tens.x + 1 AS counter FROM ones CROSS JOIN tens ORDER BY counter; |
As always, I hope this helps somebody trying to sort out the syntax and workflow.
MySQL on Ubuntu
Working with my students to create an Ubuntu virtual environment for Python development with the MySQL database. After completing the general provisioning covered in this older post, I’d recommend you create a python symbolic link before installing the MySQL-Python driver.
sudo ln -s /usr/bin/python3 /usr/bin/python |
You install the Python development driver with the following:
sudo apt-get -y install python3-mysql.connector |
Create a python_connect.py file to test your Python deployment’s ability to connect to the MySQL database:
#!/usr/bin/python # Import the library. import mysql.connector from mysql.connector import errorcode try: # Open connection. cnx = mysql.connector.connect(user='student', password='student', host='localhost', database='sakila') # Print the value. print("Database connection resolved.") # Handle exception and close connection. except mysql.connector.Error as e: if e.errno == errorcode.ER_ACCESS_DENIED_ERROR: print("Something is wrong with your user name or password") elif e.errno == errorcode.ER_BAD_DB_ERROR: print("Database does not exist") else: print(e) # Close the connection when the try block completes. else: cnx.close() |
You should change the file permissions of the python_connect.py to read-write-execute as owner, and read-execute as group and other with the following command:
chmod 755 python_connect.py |
Then, you can test your python_connect.py program from the local directory with the following command:
./python_connect.py |
You see the following output if it works:
Database connection resolved. |
As alway, I hope those looking for a code complete solutionk
