Archive for the ‘Unix’ Category
Using Python’s getopt
A couple of my students wanted me to write a switch and parameter handler for Python scripts. I wrote it just to show them it’s possible but I also show them how to do it correctly with the Python getopt library, which was soft-deprecated in Python 3.13 and replaced by the Python argparse library. The debate is which one I show you first in the blog.
This is the getops.py script that uses Python’s getopt library. There is a small trick to the options and long options values. You append a colon (:) to the option when it has a value, and append an equal (=) to the long option when it has a value.
1 2 3 4 5 6 7 8 9 10 11 12 13 14 15 16 17 18 19 20 21 22 23 24 25 26 27 28 29 30 31 32 33 34 35 36 37 38 39 40 41 42 43 44 45 46 47 48 49 50 51 52 53 54 55 56 57 58 59 60 61 62 63 64 65 66 67 68 69 70 | #!/usr/bin/python # Import libraries. import getopt, sys import mysql.connector from mysql.connector import errorcode # Define local function. def help(): # Declare display string. display = \ """ Program Help +---------------+-------------+-------------------+ | -h --help | | Help switch. | | -o --output | output_file | Output file name. | | -q --query | query_file | Query file name. | | -v --verbose | | Verbose switch. | +---------------+-------------+-------------------+""" # Return string. return display # ============================================================ # Set local variables for switch and parameter placeholders. # ============================================================ display = False log = [] output_file = '' query_file = '' verbose = False opts = "ho:q:v" long_opts = ["help","output=","query=","verbose"] # ============================================================ # Capture argument list minus the program name. # ============================================================ args = sys.argv[1:] # ============================================================ # Use a try-except block. # ============================================================ try: # Assign the results of the getopt function. params, values = getopt.getopt(args, opts, long_opts) # Loop through the parameters. for curr_param, curr_value in params: if curr_param in ("-h","--help"): print(help()) elif curr_param in ("-o","--output"): output_file = curr_value elif curr_param in ("-q","--query"): query_file = curr_value elif curr_param in ("-v","--verbose"): verbose = True # Append entry to log. log.append('[' + curr_param + '][' + curr_value + ']') # Print verbose parameter handling. if verbose: print(" Parameter Diagnostics\n-------------------------") for i in log: print(i) # Exception block. except getopt.GetoptError as e: # output error, and return with an error code print (str(e)) |
You can run the program in Linux or Unix with the following syntax provided that you’ve already set the parameters to 755. That means granting the file owner with read, write, and execute privileges, and group and other with read and execute privileges.
./getopts.py -h -o output.txt -q query.sql -v |
It would return the following:
Program Help +---------------+-------------+-------------------+ | -h --help | | Help switch. | | -o --output | output_file | Output file name. | | -q --query | query_file | Query file name. | | -v --verbose | | Verbose switch. | +---------------+-------------+-------------------+ Parameter Diagnostics ------------------------- [-h][] [-o][output.txt] [-q][query.sql] [-v][] |
If you didn’t notice, I also took the opportunity to write the help display in such a way that a maintenance programmer could add another switch or parameter easily. This way the programmer only needs to add a new row of text and add an elif statement with the new switch or parameter.
I think using Python’s getopt library is the cleanest and simplest way to implement switch and parameter handling, after all it’s the basis for so many C derived libraries. However, if you must write your own, below is an approach that would work:
1 2 3 4 5 6 7 8 9 10 11 12 13 14 15 16 17 18 19 20 21 22 23 24 25 26 27 28 29 30 31 32 33 34 35 36 37 38 39 40 41 42 43 44 45 46 47 48 49 50 51 52 53 54 55 56 57 58 59 60 61 62 63 64 65 66 67 68 69 70 71 72 73 74 75 76 77 78 79 80 81 | #!/usr/bin/python # Import libraries. import sys import mysql.connector from mysql.connector import errorcode # ============================================================ # Set local variables for switch and parameter placeholders. # ============================================================ help = False display = \ """ Program Help +---------------+-------------+-------------------+ | -h --help | | Help switch. | | -o --output | output_file | Output file name. | | -q --query | query_file | Query file name. | | -v --verbose | | Verbose switch. | +---------------+-------------+-------------------+""" log = [] output = '' query = '' verbose = False # ============================================================ # Capture argument list minus the program name. # ============================================================ args = sys.argv[1:] # ============================================================ # If one or more args exists and the first one is an # a string that can cast to an int, convert it to an int, # assign it to a variable, and ignore any other args # in the list. # ============================================================ if len(args) > 1 and args[0].isdigit(): powerIn = int(args[0]) # Check for switches and parameters. if isinstance(args,list) and len(args) >= 1: # Set the limit of switches and parameters. argc = len(args) # Enumerate through switches first and then parameters. for i in range(argc): if args[i][0] == '-': # Evaluate switches and ignore any parameter value. if args[i] in ['-h','--help']: help = True # Append entry to log. log.append('[' + str(args[i]) + ']') elif args[i] in ['-v','--verbose']: verbose = True # Append entry to log. log.append('[' + str(args[i]) + ']') # Evaluate parameters. elif i < argc and not args[i+1][0] == '-': if args[i] in ['-q','--query']: query = args[i+1] elif args[i] in ['-o','--output']: output = args[i+1] # Append entry to log. log.append('[' + str(args[i]) + '][' + args[i+1] + ']') else: continue continue # Print the help display when if help: print(display) # Print the parameter handling collected in the log variable. if verbose: for i in log: print(i) |
As you can see from the example, I didn’t give it too much effort. I think it should prove you should use the approach adopted by the general Python community.
Troubleshoot Oracle Errors
It’s always a bit difficult to trap errors in SQL*Developer when you’re running scripts that do multiple things. As old as it is, using the SQL*Plus utility and spooling to log files is generally the fastest way to localize errors across multiple elements of scripts. Unfortunately, you must break up you components into local components, like a when you create a type, procedure, function, or package.
This is part of my solution to leverage in-depth testing of the Oracle Database 23ai Free container from an Ubuntu native platform. You can find this prior post shows you how to setup Oracle*Client for Ubuntu and connect to the Oracle Database 23ai Free container.
After you’ve done that, put the following oracle_errors Bash shell function into your testing context, or into your .bashrc file:
# Troubleshooting errors utility function. oracle_errors () { # Oracle Error prefixes qualify groups of error types, like # this subset of error prefixes used in the Bash function. # ============================================================ # JMS - Java Messaging Errors # JZN - JSON Errors # KUP - External Table Access Errors # LGI - File I/O Errors # OCI - Oracle Call Interface Errors # ORA - Oracle Database Errors # PCC - Oracle Precompiler Errors # PLS - Oracle PL/SQL Errors # PLW - Oracle PL/SQL Warnings # SP2 - Oracle SQL*Plus Errors # SQL - SQL Library Errors # TNS - SQL*Net (networking) Errors # ============================================================ # Define a array of Oracle error prefixes. prefixes=("jms" "jzn" "kup" "lgi" "oci" "ora" "pcc" "pls" "plw" "sp2" "sql" "tns") # Prepend the -e for the grep utility to use regular expression pattern matching; and # use the ^before the Oracle error prefixes to avoid returning lines that may # contain the prefix in a comment, like the word lookup contains the prefix kup. for str in ${prefixes[@]}; do patterns+=" -e ^${str}" done # Display output from a SQL*Plus show errors command written to a log file when # a procedure, function, object type, or package body fails to compile. This # prints the warning message followed by the line number displayed. patterns+=" -e ^warning" patterns+=" -e ^[0-9]/[0-9]" # Assign any file filter to the ext variable. ext=${1} # Assign the extension or simply use a wildcard for all files. if [ ! -z ${ext} ]; then ext="*.${ext}" else ext="*" fi # Assign the number of qualifying files to a variable. fileNum=$(ls -l ${ext} 2>/dev/null | grep -v ^l | wc -l) # Evaluate the number of qualifying files and process. if [ ${fileNum} -eq "0" ]; then echo "[0] files exist." elif [ ${fileNum} -eq "1" ]; then fileName=$(ls ${ext}) find `pwd` -type f | grep -in ${ext} ${patterns} | while IFS='\n' read list; do echo "${fileName}:${list}" done else find `pwd` -type f | grep -in ${ext} ${patterns} | while IFS='\n' read list; do echo "${list}" done fi # Clear ${patterns} variable. patterns="" } |
Now, let’s create a debug.txt test file to demonstrate how to use the oracle_errors, like:
ORA-12704: character SET mismatch PLS-00124: name OF EXCEPTION expected FOR FIRST arg IN exception_init PRAGMA SP2-00200: Environment error JMS-00402: Class NOT found JZN-00001: END OF input |
You can navigate to your logging directory and call the oracle_errors function, like:
oracle_errors txt |
It’ll return the following, which is file number, line number, and error code:
debug.txt:1:ORA-12704: character set mismatch debug.txt:2:PLS-00124: name of exception expected for first arg in exception_init pragma debug.txt:3:SP2-00200: Environment error debug.txt:4:JMS-00402: Class not found debug.txt:5:JZN-00001: End of input |
There are other Oracle error prefixes but the ones I’ve selected are the more common errors for Java, JavaScript, PL/SQL, Python, and SQL testing. You can add others if your use cases require them to the prefixes array. Just a note for those new to Bash shell scripting the “${variable_name}” is required for arrays.
For a more complete example, I created the following files for a trivial example of procedure overloading in PL/SQL:
- tables.sql – that creates two tables.
- spec.sql – that creates a package specification.
- body.sql – that implements a package specification.
- test.sql – that implements a test case using the package.
- integration.sql – that calls the the scripts in proper order.
The tables.sql, spec.sql, body.sql, and test.sql use the SQL*Plus spool command to write log files, like:
SPOOL spec.txt

-- Insert code here ...

SPOOL OFF |
The body.sql file includes SQL*Plus list and show errors commands, like:
SPOOL spec.txt

-- Insert code here ...

LIST
SHOW ERRORS

SPOOL OFF |
The integration.sql script calls the tables.sql, spec.sql, body.sql, and test.sql in order. Corrupting the spec.sql file by adding a stray “x” to one of the parameter names causes a cascade of errors. After running the integration.sql file with the introduced error, the Bash oracle_errors function returns:
body.txt:2:Warning: Package Body created with compilation errors. body.txt:148:4/13 PLS-00323: subprogram or cursor 'WARNER_BROTHER' is declared in a test.txt:4:ORA-06550: line 2, column 3: test.txt:5:PLS-00306: wrong number or types of arguments in call to 'WARNER_BROTHER' test.txt:6:ORA-06550: line 2, column 3: |
I hope that helps those learning how to program and perform integration testing in an Oracle Database.
MongoDB on Ubuntu
This post shows how to install, configure, and use MongoDB with JavaScript programs. You need to complete each section in the order provided (based on Cherry Server post).
Step #1: MongoDB Installation
Install the prerequisite packages with the following command:
sudo apt install -y software-properties-common gnupg apt-transport-https ca-certificates |
Display detailed console log →
Reading package lists... Done Building dependency tree... Done Reading state information... Done ca-certificates is already the newest version (20230311ubuntu0.22.04.1). ca-certificates set to manually installed. gnupg is already the newest version (2.2.27-3ubuntu2.1). gnupg set to manually installed. software-properties-common is already the newest version (0.99.22.9). apt-transport-https is already the newest version (2.4.11). 0 upgraded, 0 newly installed, 0 to remove and 22 not upgraded. |
Import the public key for MongoDB on your system using the curl command:
curl -fsSL https://pgp.mongodb.com/server-7.0.asc | sudo gpg -o /usr/share/keyrings/mongodb-server-7.0.gpg --dearmor |
Add MongoDB 7.0 APT repository to the /etc/apt/sources.list.d directory:
echo "deb [ arch=amd64,arm64 signed-by=/usr/share/keyrings/mongodb-server-7.0.gpg ] https://repo.mongodb.org/apt/ubuntu jammy/mongodb-org/7.0 multiverse" | sudo tee /etc/apt/sources.list.d/mongodb-org-7.0.list |
Reload the local package index, which refreshes the local repositories and makes Ubuntu aware of the newly added MongoDB repository:
sudo apt update |
Display detailed console log →
Hit:1 http://us.archive.ubuntu.com/ubuntu jammy InRelease Get:2 http://us.archive.ubuntu.com/ubuntu jammy-updates InRelease [119 kB] Get:3 http://security.ubuntu.com/ubuntu jammy-security InRelease [110 kB] Hit:4 https://dl.google.com/linux/chrome/deb stable InRelease Hit:5 https://download.vscodium.com/debs vscodium InRelease Hit:6 http://us.archive.ubuntu.com/ubuntu jammy-backports InRelease Hit:7 https://ftp.postgresql.org/pub/pgadmin/pgadmin4/apt/jammy pgadmin4 InRelease Ign:8 https://repo.mongodb.org/apt/ubuntu jammy/mongodb-org/7.0 InRelease Get:9 https://repo.mongodb.org/apt/ubuntu jammy/mongodb-org/7.0 Release [2,090 B] Get:10 https://repo.mongodb.org/apt/ubuntu jammy/mongodb-org/7.0 Release.gpg [866 B] Get:11 https://repo.mongodb.org/apt/ubuntu jammy/mongodb-org/7.0/multiverse arm64 Packages [27.6 kB] Get:12 https://repo.mongodb.org/apt/ubuntu jammy/mongodb-org/7.0/multiverse amd64 Packages [28.6 kB] Fetched 288 kB in 4s (72.8 kB/s) Reading package lists... Done Building dependency tree... Done Reading state information... Done 22 packages can be upgraded. Run 'apt list --upgradable' to see them. |
Install the mongodb-org meta-package:
sudo apt install -y mongodb-org |
Display detailed console log →
Reading package lists... Done Building dependency tree... Done Reading state information... Done The following additional packages will be installed: mongodb-database-tools mongodb-mongosh mongodb-org-database mongodb-org-database-tools-extra mongodb-org-mongos mongodb-org-server mongodb-org-shell mongodb-org-tools The following NEW packages will be installed: mongodb-database-tools mongodb-mongosh mongodb-org mongodb-org-database mongodb-org-database-tools-extra mongodb-org-mongos mongodb-org-server mongodb-org-shell mongodb-org-tools 0 upgraded, 9 newly installed, 0 to remove and 22 not upgraded. Need to get 163 MB of archives. After this operation, 537 MB of additional disk space will be used. Get:1 https://repo.mongodb.org/apt/ubuntu jammy/mongodb-org/7.0/multiverse amd64 mongodb-database-tools amd64 100.9.4 [51.9 MB] Get:2 https://repo.mongodb.org/apt/ubuntu jammy/mongodb-org/7.0/multiverse amd64 mongodb-mongosh amd64 2.1.5 [48.7 MB] Get:3 https://repo.mongodb.org/apt/ubuntu jammy/mongodb-org/7.0/multiverse amd64 mongodb-org-shell amd64 7.0.6 [2,986 B] Get:4 https://repo.mongodb.org/apt/ubuntu jammy/mongodb-org/7.0/multiverse amd64 mongodb-org-server amd64 7.0.6 [36.7 MB] Get:5 https://repo.mongodb.org/apt/ubuntu jammy/mongodb-org/7.0/multiverse amd64 mongodb-org-mongos amd64 7.0.6 [25.6 MB] Get:6 https://repo.mongodb.org/apt/ubuntu jammy/mongodb-org/7.0/multiverse amd64 mongodb-org-database-tools-extra amd64 7.0.6 [7,786 B] Get:7 https://repo.mongodb.org/apt/ubuntu jammy/mongodb-org/7.0/multiverse amd64 mongodb-org-database amd64 7.0.6 [3,422 B] Get:8 https://repo.mongodb.org/apt/ubuntu jammy/mongodb-org/7.0/multiverse amd64 mongodb-org-tools amd64 7.0.6 [2,770 B] Get:9 https://repo.mongodb.org/apt/ubuntu jammy/mongodb-org/7.0/multiverse amd64 mongodb-org amd64 7.0.6 [2,804 B] Fetched 163 MB in 8s (20.2 MB/s) Selecting previously unselected package mongodb-database-tools. (Reading database ... 250115 files and directories currently installed.) Preparing to unpack .../0-mongodb-database-tools_100.9.4_amd64.deb ... Unpacking mongodb-database-tools (100.9.4) ... Selecting previously unselected package mongodb-mongosh. Preparing to unpack .../1-mongodb-mongosh_2.1.5_amd64.deb ... Unpacking mongodb-mongosh (2.1.5) ... Selecting previously unselected package mongodb-org-shell. Preparing to unpack .../2-mongodb-org-shell_7.0.6_amd64.deb ... Unpacking mongodb-org-shell (7.0.6) ... Selecting previously unselected package mongodb-org-server. Preparing to unpack .../3-mongodb-org-server_7.0.6_amd64.deb ... Unpacking mongodb-org-server (7.0.6) ... Selecting previously unselected package mongodb-org-mongos. Preparing to unpack .../4-mongodb-org-mongos_7.0.6_amd64.deb ... Unpacking mongodb-org-mongos (7.0.6) ... Selecting previously unselected package mongodb-org-database-tools-extra. Preparing to unpack .../5-mongodb-org-database-tools-extra_7.0.6_amd64.deb ... Unpacking mongodb-org-database-tools-extra (7.0.6) ... Selecting previously unselected package mongodb-org-database. Preparing to unpack .../6-mongodb-org-database_7.0.6_amd64.deb ... Unpacking mongodb-org-database (7.0.6) ... Selecting previously unselected package mongodb-org-tools. Preparing to unpack .../7-mongodb-org-tools_7.0.6_amd64.deb ... Unpacking mongodb-org-tools (7.0.6) ... Selecting previously unselected package mongodb-org. Preparing to unpack .../8-mongodb-org_7.0.6_amd64.deb ... Unpacking mongodb-org (7.0.6) ... Setting up mongodb-mongosh (2.1.5) ... Setting up mongodb-org-server (7.0.6) ... Adding system user `mongodb' (UID 132) ... Adding new user `mongodb' (UID 132) with group `nogroup' ... Not creating home directory `/home/mongodb'. Adding group `mongodb' (GID 140) ... Done. Adding user `mongodb' to group `mongodb' ... Adding user mongodb to group mongodb Done. Setting up mongodb-org-shell (7.0.6) ... Setting up mongodb-database-tools (100.9.4) ... Setting up mongodb-org-mongos (7.0.6) ... Setting up mongodb-org-database-tools-extra (7.0.6) ... Setting up mongodb-org-database (7.0.6) ... Setting up mongodb-org-tools (7.0.6) ... Setting up mongodb-org (7.0.6) ... Processing triggers for man-db (2.10.2-1) ... |
Verify the installed version of MongoDB with this command:
mongod --version |
It should display:
db version v7.0.6
Build Info: {
    "version": "7.0.6",
    "gitVersion": "66cdc1f28172cb33ff68263050d73d4ade73b9a4",
    "openSSLVersion": "OpenSSL 3.0.2 15 Mar 2022",
    "modules": [],
    "allocator": "tcmalloc",
    "environment": {
        "distmod": "ubuntu2204",
        "distarch": "x86_64",
        "target_arch": "x86_64"
    }
} |
Step #2: Start MongoDB Service & Shell
You can verify that the installed mongodb is disabled after initial installation with this command:
sudo systemctl status mongod |
It should display:
○ mongod.service - MongoDB Database Server
     Loaded: loaded (/lib/systemd/system/mongod.service; disabled; vendor preset: enabled)
     Active: inactive (dead)
Docs: https://docs.mongodb.org/manual |
Exit the output display from the systemctl utility by typing the escape key, a colon (:) and a q in sequence.
You can start the MongoDB service with this command:
sudo systemctl start mongod |
Then, check the MongoDB service:
sudo systemctl status mongod |
It displays:
● mongod.service - MongoDB Database Server
     Loaded: loaded (/lib/systemd/system/mongod.service; disabled; vendor preset: enabled)
     Active: active (running) since Thu 2024-03-07 16:38:17 MST; 2s ago
       Docs: https://docs.mongodb.org/manual
   Main PID: 33795 (mongod)
     Memory: 79.2M
        CPU: 706ms
     CGroup: /system.slice/mongod.service
             └─33795 /usr/bin/mongod --config /etc/mongod.conf
Mar 07 16:38:17 student-virtual-machine systemd[1]: Started MongoDB Database Server.
Mar 07 16:38:17 student-virtual-machine mongod[33795]: {"t":{"$date":"2024-03-07T23:38:17.642Z"},"s"> |
You can confirm that the database is up and running by checking if the server is listening on its default port, which is port 27017. Run the ss command to check the port number.
sudo ss -pnltu | grep 27017 |
It will display:
tcp LISTEN 0 4096 127.0.0.1:27017 0.0.0.0:* users:(("mongod",pid=33795,fd=14)) |
You can enable the mongodb service at startup with the following command:
sudo systemctl enable mongod |
It raised the following error:
Created symlink /etc/systemd/system/multi-user.target.wants/mongod.service → /lib/systemd/system/mongod.service. |
Now, start the MongoDB Shell (mongosh) by typing either the explicit or implicit MongoDB Shell command. The explicit one uses the port and database path, which are unnecessary when you’ve successfully started the mongosh service. (Please note that at the time of writing this blog post there is erroneous, or obsolete, content on the MongoDB Documentation Enable Access Control web page.
Explicit connection:
mongosh --port 27017 --db /var/lib/mongodb --help |
This version of the command will display most of the options available in MongoDB but it will suppress warning messages.
$ mongosh [options] [db address] [file names (ending in .js or .mongodb)] Options: -h, --help Show this usage information -f, --file [arg] Load the specified mongosh script --host [arg] Server to connect to --port [arg] Port to connect to --build-info Show build information --version Show version information --quiet Silence output from the shell during the connection process --shell Run the shell after executing files --nodb Don't connect to mongod on startup - no 'db address' [arg] expected --norc Will not run the '.mongoshrc.js' file on start up --eval [arg] Evaluate javascript --json[=canonical|relaxed] Print result of --eval as Extended JSON, including errors --retryWrites[=true|false] Automatically retry write operations upon transient network errors (Default: true) Authentication Options: -u, --username [arg] Username for authentication -p, --password [arg] Password for authentication --authenticationDatabase [arg] User source (defaults to dbname) --authenticationMechanism [arg] Authentication mechanism --awsIamSessionToken [arg] AWS IAM Temporary Session Token ID --gssapiServiceName [arg] Service name to use when authenticating using GSSAPI/Kerberos --sspiHostnameCanonicalization [arg] Specify the SSPI hostname canonicalization (none or forward, available on Windows) --sspiRealmOverride [arg] Specify the SSPI server realm (available on Windows) TLS Options: --tls Use TLS for all connections --tlsCertificateKeyFile [arg] PEM certificate/key file for TLS --tlsCertificateKeyFilePassword [arg] Password for key in PEM file for TLS --tlsCAFile [arg] Certificate Authority file for TLS --tlsAllowInvalidHostnames Allow connections to servers with non-matching hostnames --tlsAllowInvalidCertificates Allow connections to servers with invalid certificates --tlsCertificateSelector [arg] TLS Certificate in system store (Windows and macOS only) --tlsCRLFile [arg] Specifies the .pem file that contains the Certificate Revocation List --tlsDisabledProtocols [arg] Comma separated list of TLS protocols to disable [TLS1_0,TLS1_1,TLS1_2] --tlsUseSystemCA Load the operating system trusted certificate list --tlsFIPSMode Enable the system TLS library's FIPS mode API version options: --apiVersion [arg] Specifies the API version to connect with --apiStrict Use strict API version mode --apiDeprecationErrors Fail deprecated commands for the specified API version FLE Options: --awsAccessKeyId [arg] AWS Access Key for FLE Amazon KMS --awsSecretAccessKey [arg] AWS Secret Key for FLE Amazon KMS --awsSessionToken [arg] Optional AWS Session Token ID --keyVaultNamespace [arg] database.collection to store encrypted FLE parameters --kmsURL [arg] Test parameter to override the URL of the KMS endpoint DB Address Examples: foo Foo database on local machine 192.168.0.5/foo Foo database on 192.168.0.5 machine 192.168.0.5:9999/foo Foo database on 192.168.0.5 machine on port 9999 mongodb://192.168.0.5:9999/foo Connection string URI can also be used File Names: A list of files to run. Files must end in .js and will exit after unless --shell is specified. Examples: Start mongosh using 'ships' database on specified connection string: $ mongosh mongodb://192.168.0.5:9999/ships For more information on usage: https://docs.mongodb.com/mongodb-shell. |
Implicit connection:
mongosh |
You should see the following message with any warning messages:
Current Mongosh Log ID: 65ea502a97f4c1e2b7e12af4 Connecting to: mongodb://127.0.0.1:27017/?directConnection=true&serverSelectionTimeoutMS=2000&appName=mongosh+2.1.5 Using MongoDB: 7.0.6 Using Mongosh: 2.1.5 For mongosh info see: https://docs.mongodb.com/mongodb-shell/ To help improve our products, anonymous usage data is collected and sent to MongoDB periodically (https://www.mongodb.com/legal/privacy-policy). You can opt-out by running the disableTelemetry() command. ------ The server generated these startup warnings when booting 2024-03-07T16:38:17.818-07:00: Using the XFS filesystem is strongly recommended with the WiredTiger storage engine. See http://dochub.mongodb.org/core/prodnotes-filesystem 2024-03-07T16:38:18.350-07:00: Access control is not enabled for the database. Read and write access to data and configuration is unrestricted 2024-03-07T16:38:18.350-07:00: vm.max_map_count is too low ------ |
You can run opt out of the data collection by running the disableTelemetry() command from the Linux command line. Use the following command (a broader explanation is in the MongoDB Telemetry documentation):
mongosh --nodb --eval "disableTelemetry()" |
It should return:
Current Mongosh Log ID: 65eab2df3e663bde3711fa2f Using Mongosh: 2.1.5 For mongosh info see: https://docs.mongodb.com/mongodb-shell/ Telemetry is now disabled. |
You still have three warning messages to deal with at this point. You should fix the vm.max_map_count warning first. This is a Linux kernel issue. You can determine the current value of the vm.max_map_count value with this command:
cat /proc/sys/vm/max_map_count |
It should return the system default value:
65530 |
You can change it at runtime with this command:
sudo sysctl -w vm.max_map_count=262144 |
However, you must restart the mongod service to see the change in the mongosh shell. There won’t be a warning message for the kernel parameter value being too low until you reboot your operating system. You can restart your mongod service with this command:
sudo service mongod restart |
You can make a change to the /etc/sysctl.conf file to ensure the parameter is set to the correct value each time the system reboots. Simply add the following line as the root user or by using the sudo prefacing a text editor or your choice (like vim or nano) to your /etc/sysctl.conf file:
# Adding vm.max_map_count to sysctl.conf defaults. vm.max_map_count=262144 |
At this point, you’ve eliminated two of the warning messages. The next step shows you how to enable Access Control. If you want to check the general server status, run the following command from the Linux Command-Line Interface (CLI):
mongosh --eval "db.serverStatus()" > server_status.log |
You can inspect the log file, which should be slightly less than 2,000 lines of output with MongoDB a 7.0.6 installation. Using the command from the Linux CLI is generally the easiest way to inspect the output from the db.serverStatus() function, which is just too long to scroll from the console output.
Step #3: MongoDB Enabling Access Control
Connect to the mongosh …
Step #4: MongoDB Installing Node.js and React.js
Install Node.js with the following command:
sudo apt install -y nodejs |
Display detailed console log →
Reading package lists... Done Building dependency tree... Done Reading state information... Done The following additional packages will be installed: libc-ares2 libjs-highlight.js libnode72 nodejs-doc Suggested packages: npm The following NEW packages will be installed: libc-ares2 libjs-highlight.js libnode72 nodejs nodejs-doc 0 upgraded, 5 newly installed, 0 to remove and 23 not upgraded. Need to get 13.7 MB of archives. After this operation, 53.9 MB of additional disk space will be used. Do you want to continue? [Y/n] y Get:1 http://us.archive.ubuntu.com/ubuntu jammy/universe amd64 libjs-highlight.js all 9.18.5+dfsg1-1 [367 kB] Get:2 http://us.archive.ubuntu.com/ubuntu jammy-updates/main amd64 libc-ares2 amd64 1.18.1-1ubuntu0.22.04.3 [45.1 kB] Get:3 http://us.archive.ubuntu.com/ubuntu jammy-updates/universe amd64 libnode72 amd64 12.22.9~dfsg-1ubuntu3.4 [10.8 MB] Get:4 http://us.archive.ubuntu.com/ubuntu jammy-updates/universe amd64 nodejs-doc all 12.22.9~dfsg-1ubuntu3.4 [2,410 kB] Get:5 http://us.archive.ubuntu.com/ubuntu jammy-updates/universe amd64 nodejs amd64 12.22.9~dfsg-1ubuntu3.4 [122 kB] Fetched 13.7 MB in 3s (4,006 kB/s) Selecting previously unselected package libjs-highlight.js. (Reading database ... 250172 files and directories currently installed.) Preparing to unpack .../libjs-highlight.js_9.18.5+dfsg1-1_all.deb ... Unpacking libjs-highlight.js (9.18.5+dfsg1-1) ... Selecting previously unselected package libc-ares2:amd64. Preparing to unpack .../libc-ares2_1.18.1-1ubuntu0.22.04.3_amd64.deb ... Unpacking libc-ares2:amd64 (1.18.1-1ubuntu0.22.04.3) ... Selecting previously unselected package libnode72:amd64. Preparing to unpack .../libnode72_12.22.9~dfsg-1ubuntu3.4_amd64.deb ... Unpacking libnode72:amd64 (12.22.9~dfsg-1ubuntu3.4) ... Selecting previously unselected package nodejs-doc. Preparing to unpack .../nodejs-doc_12.22.9~dfsg-1ubuntu3.4_all.deb ... Unpacking nodejs-doc (12.22.9~dfsg-1ubuntu3.4) ... Selecting previously unselected package nodejs. Preparing to unpack .../nodejs_12.22.9~dfsg-1ubuntu3.4_amd64.deb ... Unpacking nodejs (12.22.9~dfsg-1ubuntu3.4) ... Setting up libc-ares2:amd64 (1.18.1-1ubuntu0.22.04.3) ... Setting up libnode72:amd64 (12.22.9~dfsg-1ubuntu3.4) ... Setting up libjs-highlight.js (9.18.5+dfsg1-1) ... Setting up nodejs (12.22.9~dfsg-1ubuntu3.4) ... update-alternatives: using /usr/bin/nodejs to provide /usr/bin/js (js) in auto m ode Setting up nodejs-doc (12.22.9~dfsg-1ubuntu3.4) ... Processing triggers for man-db (2.10.2-1) ... Processing triggers for libc-bin (2.35-0ubuntu3.6) ... |
You can check the Node.js version with this command:
node -v |
v12.22.9 |
Install the Node.js package manager npm with the following command:
sudo apt install -y npm |
Display detailed console log →
Reading package lists... Done Building dependency tree... Done Reading state information... Done The following additional packages will be installed: gyp libjs-events libjs-inherits libjs-is-typedarray libjs-psl libjs-source-map libjs-sprintf-js libjs-typedarray-to-buffer libnode-dev libuv1-dev node-abab node-abbrev node-agent-base node-ansi-regex node-ansi-styles node-ansistyles node-aproba node-archy node-are-we-there-yet node-argparse node-arrify node-asap node-asynckit node-balanced-match node-brace-expansion node-builtins node-cacache node-chalk node-chownr node-clean-yaml-object node-cli-table node-clone node-color-convert node-color-name node-colors node-columnify node-combined-stream node-commander node-console-control-strings node-copy-concurrently node-core-util-is node-coveralls node-cssom node-cssstyle node-debug node-decompress-response node-defaults node-delayed-stream node-delegates node-depd node-diff node-encoding node-end-of-stream node-err-code node-escape-string-regexp node-esprima node-events node-fancy-log node-fetch node-foreground-child node-form-data node-fs-write-stream-atomic node-fs.realpath node-function-bind node-gauge node-get-stream node-glob node-got node-graceful-fs node-growl node-gyp node-has-flag node-has-unicode node-hosted-git-info node-https-proxy-agent node-iconv-lite node-iferr node-imurmurhash node-indent-string node-inflight node-inherits node-ini node-ip node-ip-regex node-is-buffer node-is-plain-obj node-is-typedarray node-isarray node-isexe node-js-yaml node-jsdom node-json-buffer node-json-parse-better-errors node-jsonparse node-kind-of node-lcov-parse node-lodash-packages node-log-driver node-lowercase-keys node-lru-cache node-mime node-mime-types node-mimic-response node-minimatch node-minimist node-minipass node-mkdirp node-move-concurrently node-ms node-mute-stream node-negotiator node-nopt node-normalize-package-data node-npm-bundled node-npm-package-arg node-npmlog node-object-assign node-once node-opener node-osenv node-p-cancelable node-p-map node-path-is-absolute node-process-nextick-args node-promise-inflight node-promise-retry node-promzard node-psl node-pump node-punycode node-quick-lru node-read node-read-package-json node-readable-stream node-resolve node-retry node-rimraf node-run-queue node-safe-buffer node-semver node-set-blocking node-signal-exit node-slash node-slice-ansi node-source-map node-source-map-support node-spdx-correct node-spdx-exceptions node-spdx-expression-parse node-spdx-license-ids node-sprintf-js node-ssri node-stack-utils node-stealthy-require node-string-decoder node-string-width node-strip-ansi node-supports-color node-tap node-tap-mocha-reporter node-tap-parser node-tar node-text-table node-time-stamp node-tmatch node-tough-cookie node-typedarray-to-buffer node-unique-filename node-universalify node-util-deprecate node-validate-npm-package-license node-validate-npm-package-name node-wcwidth.js node-webidl-conversions node-whatwg-fetch node-which node-wide-align node-wrappy node-write-file-atomic node-ws node-yallist Suggested packages: libjs-angularjs node-nyc The following NEW packages will be installed: gyp libjs-events libjs-inherits libjs-is-typedarray libjs-psl libjs-source-map libjs-sprintf-js libjs-typedarray-to-buffer libnode-dev libuv1-dev node-abab node-abbrev node-agent-base node-ansi-regex node-ansi-styles node-ansistyles node-aproba node-archy node-are-we-there-yet node-argparse node-arrify node-asap node-asynckit node-balanced-match node-brace-expansion node-builtins node-cacache node-chalk node-chownr node-clean-yaml-object node-cli-table node-clone node-color-convert node-color-name node-colors node-columnify node-combined-stream node-commander node-console-control-strings node-copy-concurrently node-core-util-is node-coveralls node-cssom node-cssstyle node-debug node-decompress-response node-defaults node-delayed-stream node-delegates node-depd node-diff node-encoding node-end-of-stream node-err-code node-escape-string-regexp node-esprima node-events node-fancy-log node-fetch node-foreground-child node-form-data node-fs-write-stream-atomic node-fs.realpath node-function-bind node-gauge node-get-stream node-glob node-got node-graceful-fs node-growl node-gyp node-has-flag node-has-unicode node-hosted-git-info node-https-proxy-agent node-iconv-lite node-iferr node-imurmurhash node-indent-string node-inflight node-inherits node-ini node-ip node-ip-regex node-is-buffer node-is-plain-obj node-is-typedarray node-isarray node-isexe node-js-yaml node-jsdom node-json-buffer node-json-parse-better-errors node-jsonparse node-kind-of node-lcov-parse node-lodash-packages node-log-driver node-lowercase-keys node-lru-cache node-mime node-mime-types node-mimic-response node-minimatch node-minimist node-minipass node-mkdirp node-move-concurrently node-ms node-mute-stream node-negotiator node-nopt node-normalize-package-data node-npm-bundled node-npm-package-arg node-npmlog node-object-assign node-once node-opener node-osenv node-p-cancelable node-p-map node-path-is-absolute node-process-nextick-args node-promise-inflight node-promise-retry node-promzard node-psl node-pump node-punycode node-quick-lru node-read node-read-package-json node-readable-stream node-resolve node-retry node-rimraf node-run-queue node-safe-buffer node-semver node-set-blocking node-signal-exit node-slash node-slice-ansi node-source-map node-source-map-support node-spdx-correct node-spdx-exceptions node-spdx-expression-parse node-spdx-license-ids node-sprintf-js node-ssri node-stack-utils node-stealthy-require node-string-decoder node-string-width node-strip-ansi node-supports-color node-tap node-tap-mocha-reporter node-tap-parser node-tar node-text-table node-time-stamp node-tmatch node-tough-cookie node-typedarray-to-buffer node-unique-filename node-universalify node-util-deprecate node-validate-npm-package-license node-validate-npm-package-name node-wcwidth.js node-webidl-conversions node-whatwg-fetch node-which node-wide-align node-wrappy node-write-file-atomic node-ws node-yallist npm 0 upgraded, 182 newly installed, 0 to remove and 23 not upgraded. Need to get 5,075 kB of archives. After this operation, 36.3 MB of additional disk space will be used. Get:1 http://us.archive.ubuntu.com/ubuntu jammy/universe amd64 gyp all 0.1+20210831gitd6c5dd5-5 [238 kB] Get:2 http://us.archive.ubuntu.com/ubuntu jammy/universe amd64 libjs-events all 3.3.0+~3.0.0-2 [9,734 B] Get:3 http://us.archive.ubuntu.com/ubuntu jammy/universe amd64 libjs-is-typedarray all 1.0.0-4 [3,804 B] Get:4 http://us.archive.ubuntu.com/ubuntu jammy/universe amd64 libjs-psl all 1.8.0+ds-6 [76.3 kB] Get:5 http://us.archive.ubuntu.com/ubuntu jammy/universe amd64 libjs-sprintf-js all 1.1.2+ds1+~1.1.2-1 [12.8 kB] Get:6 http://us.archive.ubuntu.com/ubuntu jammy/universe amd64 libjs-typedarray-to-buffer all 4.0.0-2 [4,658 B] Get:7 http://us.archive.ubuntu.com/ubuntu jammy-updates/main amd64 libuv1-dev amd64 1.43.0-1ubuntu0.1 [130 kB] Get:8 http://us.archive.ubuntu.com/ubuntu jammy-updates/universe amd64 libnode-dev amd64 12.22.9~dfsg-1ubuntu3.4 [609 kB] Get:9 http://us.archive.ubuntu.com/ubuntu jammy/universe amd64 node-abab all 2.0.5-2 [6,578 B] Get:10 http://us.archive.ubuntu.com/ubuntu jammy/universe amd64 node-ms all 2.1.3+~cs0.7.31-2 [5,782 B] Get:11 http://us.archive.ubuntu.com/ubuntu jammy/universe amd64 node-debug all 4.3.2+~cs4.1.7-1 [17.6 kB] Get:12 http://us.archive.ubuntu.com/ubuntu jammy/universe amd64 node-yallist all 4.0.0+~4.0.1-1 [8,322 B] Get:13 http://us.archive.ubuntu.com/ubuntu jammy/universe amd64 node-lru-cache all 6.0.0+~5.1.1-1 [11.3 kB] Get:14 http://us.archive.ubuntu.com/ubuntu jammy/universe amd64 node-semver all 7.3.5+~7.3.8-1 [41.5 kB] Get:15 http://us.archive.ubuntu.com/ubuntu jammy/universe amd64 node-agent-base all 6.0.2+~cs5.4.2-1 [17.9 kB] Get:16 http://us.archive.ubuntu.com/ubuntu jammy/universe amd64 node-ansi-regex all 5.0.1-1 [4,984 B] Get:17 http://us.archive.ubuntu.com/ubuntu jammy/universe amd64 node-ansistyles all 0.1.3-5 [4,546 B] Get:18 http://us.archive.ubuntu.com/ubuntu jammy/universe amd64 node-aproba all 2.0.0-2 [5,620 B] Get:19 http://us.archive.ubuntu.com/ubuntu jammy/universe amd64 node-delegates all 1.0.0-3 [4,280 B] Get:20 http://us.archive.ubuntu.com/ubuntu jammy/universe amd64 libjs-inherits all 2.0.4-4 [3,468 B] Get:21 http://us.archive.ubuntu.com/ubuntu jammy/universe amd64 node-inherits all 2.0.4-4 [3,010 B] Get:22 http://us.archive.ubuntu.com/ubuntu jammy/universe amd64 node-core-util-is all 1.0.3-1 [4,066 B] Get:23 http://us.archive.ubuntu.com/ubuntu jammy/universe amd64 node-safe-buffer all 5.2.1+~cs2.1.2-2 [15.7 kB] Get:24 http://us.archive.ubuntu.com/ubuntu jammy/universe amd64 node-string-decoder all 1.3.0-5 [7,046 B] Get:25 http://us.archive.ubuntu.com/ubuntu jammy/universe amd64 node-process-nextick-args all 2.0.1-2 [3,730 B] Get:26 http://us.archive.ubuntu.com/ubuntu jammy/universe amd64 node-util-deprecate all 1.0.2-3 [4,202 B] Get:27 http://us.archive.ubuntu.com/ubuntu jammy/universe amd64 node-isarray all 2.0.5-3 [3,934 B] Get:28 http://us.archive.ubuntu.com/ubuntu jammy/universe amd64 node-readable-stream all 3.6.0+~cs3.0.0-1 [32.6 kB] Get:29 http://us.archive.ubuntu.com/ubuntu jammy/universe amd64 node-are-we-there-yet all 3.0.0+~1.1.0-1 [8,920 B] Get:30 http://us.archive.ubuntu.com/ubuntu jammy/universe amd64 node-arrify all 2.0.1-2 [3,610 B] Get:31 http://us.archive.ubuntu.com/ubuntu jammy/universe amd64 node-asap all 2.0.6+~2.0.0-1 [14.4 kB] Get:32 http://us.archive.ubuntu.com/ubuntu jammy/universe amd64 node-asynckit all 0.4.0-4 [10.6 kB] Get:33 http://us.archive.ubuntu.com/ubuntu jammy/universe amd64 node-builtins all 4.0.0-1 [3,860 B] Get:34 http://us.archive.ubuntu.com/ubuntu jammy/universe amd64 node-chownr all 2.0.0-1 [4,404 B] Get:35 http://us.archive.ubuntu.com/ubuntu jammy/universe amd64 node-fs.realpath all 1.0.0-2 [6,106 B] Get:36 http://us.archive.ubuntu.com/ubuntu jammy/universe amd64 node-wrappy all 1.0.2-2 [3,658 B] Get:37 http://us.archive.ubuntu.com/ubuntu jammy/universe amd64 node-once all 1.4.0-4 [4,708 B] Get:38 http://us.archive.ubuntu.com/ubuntu jammy/universe amd64 node-inflight all 1.0.6-2 [3,940 B] Get:39 http://us.archive.ubuntu.com/ubuntu jammy/universe amd64 node-balanced-match all 2.0.0-1 [4,910 B] Get:40 http://us.archive.ubuntu.com/ubuntu jammy/universe amd64 node-brace-expansion all 2.0.1-1 [7,458 B] Get:41 http://us.archive.ubuntu.com/ubuntu jammy/universe amd64 node-minimatch all 3.1.1+~3.0.5-1 [16.9 kB] Get:42 http://us.archive.ubuntu.com/ubuntu jammy/universe amd64 node-path-is-absolute all 2.0.0-2 [4,062 B] Get:43 http://us.archive.ubuntu.com/ubuntu jammy/universe amd64 node-glob all 7.2.1+~cs7.6.15-1 [131 kB] Get:44 http://us.archive.ubuntu.com/ubuntu jammy/universe amd64 node-graceful-fs all 4.2.4+repack-1 [12.5 kB] Get:45 http://us.archive.ubuntu.com/ubuntu jammy/universe amd64 node-mkdirp all 1.0.4+~1.0.2-1 [11.4 kB] Get:46 http://us.archive.ubuntu.com/ubuntu jammy/universe amd64 node-iferr all 1.0.2+~1.0.2-1 [4,610 B] Get:47 http://us.archive.ubuntu.com/ubuntu jammy/universe amd64 node-imurmurhash all 0.1.4+dfsg+~0.1.1-1 [8,510 B] Get:48 http://us.archive.ubuntu.com/ubuntu jammy/universe amd64 node-fs-write-stream-atomic all 1.0.10-5 [5,256 B] Get:49 http://us.archive.ubuntu.com/ubuntu jammy/universe amd64 node-rimraf all 3.0.2-1 [10.1 kB] Get:50 http://us.archive.ubuntu.com/ubuntu jammy/universe amd64 node-run-queue all 2.0.0-2 [5,092 B] Get:51 http://us.archive.ubuntu.com/ubuntu jammy/universe amd64 node-copy-concurrently all 1.0.5-8 [7,118 B] Get:52 http://us.archive.ubuntu.com/ubuntu jammy/universe amd64 node-move-concurrently all 1.0.1-4 [5,120 B] Get:53 http://us.archive.ubuntu.com/ubuntu jammy/universe amd64 node-escape-string-regexp all 4.0.0-2 [4,328 B] Get:54 http://us.archive.ubuntu.com/ubuntu jammy/universe amd64 node-indent-string all 4.0.0-2 [4,122 B] Get:55 http://us.archive.ubuntu.com/ubuntu jammy/universe amd64 node-p-map all 4.0.0+~3.1.0+~3.0.1-1 [8,058 B] Get:56 http://us.archive.ubuntu.com/ubuntu jammy/universe amd64 node-promise-inflight all 1.0.1+~1.0.0-1 [4,896 B] Get:57 http://us.archive.ubuntu.com/ubuntu jammy/universe amd64 node-ssri all 8.0.1-2 [19.6 kB] Get:58 http://us.archive.ubuntu.com/ubuntu jammy/universe amd64 node-unique-filename all 1.1.1+ds-1 [3,832 B] Get:59 http://us.archive.ubuntu.com/ubuntu jammy/universe amd64 node-cacache all 15.0.5+~cs13.9.21-3 [34.9 kB] Get:60 http://us.archive.ubuntu.com/ubuntu jammy/universe amd64 node-clean-yaml-object all 0.1.0-5 [4,718 B] Get:61 http://us.archive.ubuntu.com/ubuntu jammy/universe amd64 node-clone all 2.1.2-3 [8,344 B] Get:62 http://us.archive.ubuntu.com/ubuntu jammy/universe amd64 node-color-name all 1.1.4+~1.1.1-2 [6,076 B] Get:63 http://us.archive.ubuntu.com/ubuntu jammy/universe amd64 node-color-convert all 2.0.1-1 [10.2 kB] Get:64 http://us.archive.ubuntu.com/ubuntu jammy/universe amd64 node-colors all 1.4.0-3 [12.3 kB] Get:65 http://us.archive.ubuntu.com/ubuntu jammy/universe amd64 node-strip-ansi all 6.0.1-1 [4,184 B] Get:66 http://us.archive.ubuntu.com/ubuntu jammy/universe amd64 node-defaults all 1.0.3+~1.0.3-1 [4,288 B] Get:67 http://us.archive.ubuntu.com/ubuntu jammy/universe amd64 node-wcwidth.js all 1.0.2-1 [7,278 B] Get:68 http://us.archive.ubuntu.com/ubuntu jammy/universe amd64 node-columnify all 1.5.4+~1.5.1-1 [12.6 kB] Get:69 http://us.archive.ubuntu.com/ubuntu jammy/universe amd64 node-console-control-strings all 1.1.0-2 [5,428 B] Get:70 http://us.archive.ubuntu.com/ubuntu jammy/universe amd64 node-growl all 1.10.5-4 [7,064 B] Get:71 http://us.archive.ubuntu.com/ubuntu jammy/universe amd64 node-sprintf-js all 1.1.2+ds1+~1.1.2-1 [3,916 B] Get:72 http://us.archive.ubuntu.com/ubuntu jammy/universe amd64 node-argparse all 2.0.1-2 [33.2 kB] Get:73 http://us.archive.ubuntu.com/ubuntu jammy/universe amd64 node-esprima all 4.0.1+ds+~4.0.3-2 [69.3 kB] Get:74 http://us.archive.ubuntu.com/ubuntu jammy/universe amd64 node-js-yaml all 4.1.0+dfsg+~4.0.5-6 [62.7 kB] Get:75 http://us.archive.ubuntu.com/ubuntu jammy/universe amd64 node-lcov-parse all 1.0.0+20170612git80d039574ed9-5 [5,084 B] Get:76 http://us.archive.ubuntu.com/ubuntu jammy/universe amd64 node-log-driver all 1.2.7+git+20180219+bba1761737-7 [5,436 B] Get:77 http://us.archive.ubuntu.com/ubuntu jammy/universe amd64 node-is-plain-obj all 3.0.0-2 [3,994 B] Get:78 http://us.archive.ubuntu.com/ubuntu jammy/universe amd64 node-is-buffer all 2.0.5-2 [4,128 B] Get:79 http://us.archive.ubuntu.com/ubuntu jammy/universe amd64 node-kind-of all 6.0.3+dfsg-2 [8,628 B] Get:80 http://us.archive.ubuntu.com/ubuntu jammy/universe amd64 node-minimist all 1.2.5+~cs5.3.2-1 [9,434 B] Get:81 http://us.archive.ubuntu.com/ubuntu jammy/universe amd64 node-cssom all 0.4.4-3 [14.1 kB] Get:82 http://us.archive.ubuntu.com/ubuntu jammy/universe amd64 node-cssstyle all 2.3.0-2 [30.3 kB] Get:83 http://us.archive.ubuntu.com/ubuntu jammy/universe amd64 node-delayed-stream all 1.0.0-5 [5,464 B] Get:84 http://us.archive.ubuntu.com/ubuntu jammy/universe amd64 node-combined-stream all 1.0.8+~1.0.3-1 [7,432 B] Get:85 http://us.archive.ubuntu.com/ubuntu jammy/universe amd64 node-mime all 3.0.0+dfsg+~cs3.96.1-1 [38.1 kB] Get:86 http://us.archive.ubuntu.com/ubuntu jammy/universe amd64 node-mime-types all 2.1.33-1 [6,944 B] Get:87 http://us.archive.ubuntu.com/ubuntu jammy/universe amd64 node-form-data all 3.0.1-1 [13.4 kB] Get:88 http://us.archive.ubuntu.com/ubuntu jammy/universe amd64 node-events all 3.3.0+~3.0.0-2 [3,090 B] Get:89 http://us.archive.ubuntu.com/ubuntu jammy/universe amd64 node-https-proxy-agent all 5.0.0+~cs8.0.0-3 [16.4 kB] Get:90 http://us.archive.ubuntu.com/ubuntu jammy/universe amd64 node-iconv-lite all 0.6.3-2 [167 kB] Get:91 http://us.archive.ubuntu.com/ubuntu jammy/universe amd64 node-lodash-packages all 4.17.21+dfsg+~cs8.31.198.20210220-5 [166 kB] Get:92 http://us.archive.ubuntu.com/ubuntu jammy/universe amd64 node-stealthy-require all 1.1.1-5 [7,176 B] Get:93 http://us.archive.ubuntu.com/ubuntu jammy/universe amd64 node-punycode all 2.1.1-5 [9,902 B] Get:94 http://us.archive.ubuntu.com/ubuntu jammy/universe amd64 node-psl all 1.8.0+ds-6 [39.6 kB] Get:95 http://us.archive.ubuntu.com/ubuntu jammy/universe amd64 node-universalify all 2.0.0-3 [4,266 B] Get:96 http://us.archive.ubuntu.com/ubuntu jammy/universe amd64 node-tough-cookie all 4.0.0-2 [31.7 kB] Get:97 http://us.archive.ubuntu.com/ubuntu jammy/universe amd64 node-webidl-conversions all 7.0.0~1.1.0+~cs15.1.20180823-2 [27.5 kB] Get:98 http://us.archive.ubuntu.com/ubuntu jammy/universe amd64 node-commander all 9.0.0-2 [48.0 kB] Get:99 http://us.archive.ubuntu.com/ubuntu jammy/universe amd64 node-mute-stream all 0.0.8+~0.0.1-1 [6,448 B] Get:100 http://us.archive.ubuntu.com/ubuntu jammy/universe amd64 node-read all 1.0.7-3 [5,478 B] Get:101 http://us.archive.ubuntu.com/ubuntu jammy/universe amd64 node-ws all 8.5.0+~cs13.3.3-2 [49.5 kB] Get:102 http://us.archive.ubuntu.com/ubuntu jammy/universe amd64 node-jsdom all 19.0.0+~cs90.11.27-1 [446 kB] Get:103 http://us.archive.ubuntu.com/ubuntu jammy/universe amd64 node-fetch all 2.6.7+~2.5.12-1 [27.1 kB] Get:104 http://us.archive.ubuntu.com/ubuntu jammy/universe amd64 node-coveralls all 3.1.1-1 [14.2 kB] Get:105 http://us.archive.ubuntu.com/ubuntu jammy/universe amd64 node-mimic-response all 3.1.0-7 [5,430 B] Get:106 http://us.archive.ubuntu.com/ubuntu jammy/universe amd64 node-decompress-response all 6.0.0-2 [4,656 B] Get:107 http://us.archive.ubuntu.com/ubuntu jammy/universe amd64 node-diff all 5.0.0~dfsg+~5.0.1-3 [77.4 kB] Get:108 http://us.archive.ubuntu.com/ubuntu jammy/universe amd64 node-err-code all 2.0.3+dfsg-3 [4,918 B] Get:109 http://us.archive.ubuntu.com/ubuntu jammy/universe amd64 node-time-stamp all 2.2.0-1 [5,984 B] Get:110 http://us.archive.ubuntu.com/ubuntu jammy/universe amd64 node-fancy-log all 1.3.3+~cs1.3.1-2 [8,102 B] Get:111 http://us.archive.ubuntu.com/ubuntu jammy/universe amd64 node-signal-exit all 3.0.6+~3.0.1-1 [7,000 B] Get:112 http://us.archive.ubuntu.com/ubuntu jammy/universe amd64 node-foreground-child all 2.0.0-3 [5,542 B] Get:113 http://us.archive.ubuntu.com/ubuntu jammy/universe amd64 node-function-bind all 1.1.1+repacked+~1.0.3-1 [5,244 B] Get:114 http://us.archive.ubuntu.com/ubuntu jammy/universe amd64 node-has-unicode all 2.0.1-4 [3,948 B] Get:115 http://us.archive.ubuntu.com/ubuntu jammy/universe amd64 node-ansi-styles all 4.3.0+~4.2.0-1 [8,968 B] Get:116 http://us.archive.ubuntu.com/ubuntu jammy/universe amd64 node-slice-ansi all 5.0.0+~cs9.0.0-4 [8,044 B] Get:117 http://us.archive.ubuntu.com/ubuntu jammy/universe amd64 node-string-width all 4.2.3+~cs13.2.3-1 [11.4 kB] Get:118 http://us.archive.ubuntu.com/ubuntu jammy/universe amd64 node-wide-align all 1.1.3-4 [4,228 B] Get:119 http://us.archive.ubuntu.com/ubuntu jammy/universe amd64 node-gauge all 4.0.2-1 [16.3 kB] Get:120 http://us.archive.ubuntu.com/ubuntu jammy/universe amd64 node-end-of-stream all 1.4.4+~1.4.1-1 [5,340 B] Get:121 http://us.archive.ubuntu.com/ubuntu jammy/universe amd64 node-pump all 3.0.0-5 [5,160 B] Get:122 http://us.archive.ubuntu.com/ubuntu jammy/universe amd64 node-get-stream all 6.0.1-1 [7,324 B] Get:123 http://us.archive.ubuntu.com/ubuntu jammy/universe amd64 node-lowercase-keys all 2.0.0-2 [3,754 B] Get:124 http://us.archive.ubuntu.com/ubuntu jammy/universe amd64 node-json-buffer all 3.0.1-1 [3,812 B] Get:125 http://us.archive.ubuntu.com/ubuntu jammy/universe amd64 node-p-cancelable all 2.1.1-1 [7,358 B] Get:126 http://us.archive.ubuntu.com/ubuntu jammy/universe amd64 node-quick-lru all 5.1.1-1 [5,532 B] Get:127 http://us.archive.ubuntu.com/ubuntu jammy/universe amd64 node-got all 11.8.3+~cs58.7.37-1 [122 kB] Get:128 http://us.archive.ubuntu.com/ubuntu jammy/universe amd64 node-has-flag all 4.0.0-2 [4,228 B] Get:129 http://us.archive.ubuntu.com/ubuntu jammy/universe amd64 node-hosted-git-info all 4.0.2-1 [9,006 B] Get:130 http://us.archive.ubuntu.com/ubuntu jammy/universe amd64 node-ip all 1.1.5+~1.1.0-1 [8,140 B] Get:131 http://us.archive.ubuntu.com/ubuntu jammy/universe amd64 node-ip-regex all 4.3.0+~4.1.1-1 [5,254 B] Get:132 http://us.archive.ubuntu.com/ubuntu jammy/universe amd64 node-is-typedarray all 1.0.0-4 [2,072 B] Get:133 http://us.archive.ubuntu.com/ubuntu jammy/universe amd64 node-isexe all 2.0.0+~2.0.1-4 [6,102 B] Get:134 http://us.archive.ubuntu.com/ubuntu jammy/universe amd64 node-json-parse-better-errors all 1.0.2+~cs3.3.1-1 [7,328 B] Get:135 http://us.archive.ubuntu.com/ubuntu jammy/universe amd64 node-encoding all 0.1.13-2 [4,366 B] Get:136 http://us.archive.ubuntu.com/ubuntu jammy/universe amd64 node-jsonparse all 1.3.1-10 [8,060 B] Get:137 http://us.archive.ubuntu.com/ubuntu jammy/universe amd64 node-minipass all 3.1.6+~cs8.7.18-1 [32.9 kB] Get:138 http://us.archive.ubuntu.com/ubuntu jammy/universe amd64 node-npm-bundled all 1.1.2-1 [6,228 B] Get:139 http://us.archive.ubuntu.com/ubuntu jammy/universe amd64 node-osenv all 0.1.5+~0.1.0-1 [5,896 B] Get:140 http://us.archive.ubuntu.com/ubuntu jammy/universe amd64 node-validate-npm-package-name all 3.0.0-4 [5,058 B] Get:141 http://us.archive.ubuntu.com/ubuntu jammy/universe amd64 node-npm-package-arg all 8.1.5-1 [8,132 B] Get:142 http://us.archive.ubuntu.com/ubuntu jammy/universe amd64 node-object-assign all 4.1.1-6 [4,754 B] Get:143 http://us.archive.ubuntu.com/ubuntu jammy/universe amd64 node-opener all 1.5.2+~1.4.0-1 [6,000 B] Get:144 http://us.archive.ubuntu.com/ubuntu jammy/universe amd64 node-retry all 0.13.1+~0.12.1-1 [11.5 kB] Get:145 http://us.archive.ubuntu.com/ubuntu jammy/universe amd64 node-promise-retry all 2.0.1-2 [5,010 B] Get:146 http://us.archive.ubuntu.com/ubuntu jammy/universe amd64 node-promzard all 0.3.0-2 [6,888 B] Get:147 http://us.archive.ubuntu.com/ubuntu jammy/universe amd64 node-set-blocking all 2.0.0-2 [3,766 B] Get:148 http://us.archive.ubuntu.com/ubuntu jammy/universe amd64 node-slash all 3.0.0-2 [3,922 B] Get:149 http://us.archive.ubuntu.com/ubuntu jammy/universe amd64 libjs-source-map all 0.7.0++dfsg2+really.0.6.1-9 [93.9 kB] Get:150 http://us.archive.ubuntu.com/ubuntu jammy/universe amd64 node-source-map all 0.7.0++dfsg2+really.0.6.1-9 [33.6 kB] Get:151 http://us.archive.ubuntu.com/ubuntu jammy/universe amd64 node-source-map-support all 0.5.21+ds+~0.5.4-1 [14.2 kB] Get:152 http://us.archive.ubuntu.com/ubuntu jammy/universe amd64 node-spdx-license-ids all 3.0.11-1 [7,306 B] Get:153 http://us.archive.ubuntu.com/ubuntu jammy/universe amd64 node-spdx-exceptions all 2.3.0-2 [3,978 B] Get:154 http://us.archive.ubuntu.com/ubuntu jammy/universe amd64 node-spdx-expression-parse all 3.0.1+~3.0.1-1 [7,658 B] Get:155 http://us.archive.ubuntu.com/ubuntu jammy/universe amd64 node-spdx-correct all 3.1.1-2 [5,476 B] Get:156 http://us.archive.ubuntu.com/ubuntu jammy/universe amd64 node-stack-utils all 2.0.5+~2.0.1-1 [9,368 B] Get:157 http://us.archive.ubuntu.com/ubuntu jammy/universe amd64 node-supports-color all 8.1.1+~8.1.1-1 [7,048 B] Get:158 http://us.archive.ubuntu.com/ubuntu jammy/universe amd64 node-tap-parser all 7.0.0+ds1-6 [19.4 kB] Get:159 http://us.archive.ubuntu.com/ubuntu jammy/universe amd64 node-tap-mocha-reporter all 3.0.7+ds-2 [39.2 kB] Get:160 http://us.archive.ubuntu.com/ubuntu jammy/universe amd64 node-text-table all 0.2.0-4 [4,762 B] Get:161 http://us.archive.ubuntu.com/ubuntu jammy/universe amd64 node-tmatch all 5.0.0-4 [6,002 B] Get:162 http://us.archive.ubuntu.com/ubuntu jammy/universe amd64 node-typedarray-to-buffer all 4.0.0-2 [2,242 B] Get:163 http://us.archive.ubuntu.com/ubuntu jammy/universe amd64 node-validate-npm-package-license all 3.0.4-2 [4,252 B] Get:164 http://us.archive.ubuntu.com/ubuntu jammy/universe amd64 node-whatwg-fetch all 3.6.2-5 [15.0 kB] Get:165 http://us.archive.ubuntu.com/ubuntu jammy/universe amd64 node-write-file-atomic all 3.0.3+~3.0.2-1 [7,690 B] Get:166 http://us.archive.ubuntu.com/ubuntu jammy/universe amd64 node-abbrev all 1.1.1+~1.1.2-1 [5,784 B] Get:167 http://us.archive.ubuntu.com/ubuntu jammy/universe amd64 node-archy all 1.0.0-4 [4,728 B] Get:168 http://us.archive.ubuntu.com/ubuntu jammy/universe amd64 node-chalk all 4.1.2-1 [15.9 kB] Get:169 http://us.archive.ubuntu.com/ubuntu jammy/universe amd64 node-cli-table all 0.3.11+~cs0.13.3-1 [23.2 kB] Get:170 http://us.archive.ubuntu.com/ubuntu jammy/universe amd64 node-depd all 2.0.0-2 [10.5 kB] Get:171 http://us.archive.ubuntu.com/ubuntu jammy/universe amd64 node-nopt all 5.0.0-2 [11.3 kB] Get:172 http://us.archive.ubuntu.com/ubuntu jammy/universe amd64 node-npmlog all 6.0.1+~4.1.4-1 [9,968 B] Get:173 http://us.archive.ubuntu.com/ubuntu jammy/universe amd64 node-tar all 6.1.11+ds1+~cs6.0.6-1 [38.8 kB] Get:174 http://us.archive.ubuntu.com/ubuntu jammy/universe amd64 node-which all 2.0.2+~cs1.3.2-2 [7,374 B] Get:175 http://us.archive.ubuntu.com/ubuntu jammy/universe amd64 node-gyp all 8.4.1-1 [34.7 kB] Get:176 http://us.archive.ubuntu.com/ubuntu jammy/universe amd64 node-ini all 2.0.1-1 [6,528 B] Get:177 http://us.archive.ubuntu.com/ubuntu jammy/universe amd64 node-negotiator all 0.6.2+~0.6.1-1 [10.3 kB] Get:178 http://us.archive.ubuntu.com/ubuntu jammy/universe amd64 node-resolve all 1.20.0+~cs5.27.9-1 [20.7 kB] Get:179 http://us.archive.ubuntu.com/ubuntu jammy/universe amd64 node-normalize-package-data all 3.0.3+~2.4.1-1 [12.8 kB] Get:180 http://us.archive.ubuntu.com/ubuntu jammy/universe amd64 node-read-package-json all 4.1.1-1 [10.4 kB] Get:181 http://us.archive.ubuntu.com/ubuntu jammy/universe amd64 node-tap all 12.0.1+ds-4 [43.6 kB] Get:182 http://us.archive.ubuntu.com/ubuntu jammy/universe amd64 npm all 8.5.1~ds-1 [894 kB] Fetched 5,075 kB in 19s (272 kB/s) Extracting templates from packages: 100% Selecting previously unselected package gyp. (Reading database ... 250530 files and directories currently installed.) Preparing to unpack .../000-gyp_0.1+20210831gitd6c5dd5-5_all.deb ... Unpacking gyp (0.1+20210831gitd6c5dd5-5) ... Selecting previously unselected package libjs-events. Preparing to unpack .../001-libjs-events_3.3.0+~3.0.0-2_all.deb ... Unpacking libjs-events (3.3.0+~3.0.0-2) ... Selecting previously unselected package libjs-is-typedarray. Preparing to unpack .../002-libjs-is-typedarray_1.0.0-4_all.deb ... Unpacking libjs-is-typedarray (1.0.0-4) ... Selecting previously unselected package libjs-psl. Preparing to unpack .../003-libjs-psl_1.8.0+ds-6_all.deb ... Unpacking libjs-psl (1.8.0+ds-6) ... Selecting previously unselected package libjs-sprintf-js. Preparing to unpack .../004-libjs-sprintf-js_1.1.2+ds1+~1.1.2-1_all.deb ... Unpacking libjs-sprintf-js (1.1.2+ds1+~1.1.2-1) ... Selecting previously unselected package libjs-typedarray-to-buffer. Preparing to unpack .../005-libjs-typedarray-to-buffer_4.0.0-2_all.deb ... Unpacking libjs-typedarray-to-buffer (4.0.0-2) ... Selecting previously unselected package libuv1-dev:amd64. Preparing to unpack .../006-libuv1-dev_1.43.0-1ubuntu0.1_amd64.deb ... Unpacking libuv1-dev:amd64 (1.43.0-1ubuntu0.1) ... Selecting previously unselected package libnode-dev. Preparing to unpack .../007-libnode-dev_12.22.9~dfsg-1ubuntu3.4_amd64.deb ... Unpacking libnode-dev (12.22.9~dfsg-1ubuntu3.4) ... Selecting previously unselected package node-abab. Preparing to unpack .../008-node-abab_2.0.5-2_all.deb ... Unpacking node-abab (2.0.5-2) ... Selecting previously unselected package node-ms. Preparing to unpack .../009-node-ms_2.1.3+~cs0.7.31-2_all.deb ... Unpacking node-ms (2.1.3+~cs0.7.31-2) ... Selecting previously unselected package node-debug. Preparing to unpack .../010-node-debug_4.3.2+~cs4.1.7-1_all.deb ... Unpacking node-debug (4.3.2+~cs4.1.7-1) ... Selecting previously unselected package node-yallist. Preparing to unpack .../011-node-yallist_4.0.0+~4.0.1-1_all.deb ... Unpacking node-yallist (4.0.0+~4.0.1-1) ... Selecting previously unselected package node-lru-cache. Preparing to unpack .../012-node-lru-cache_6.0.0+~5.1.1-1_all.deb ... Unpacking node-lru-cache (6.0.0+~5.1.1-1) ... Selecting previously unselected package node-semver. Preparing to unpack .../013-node-semver_7.3.5+~7.3.8-1_all.deb ... Unpacking node-semver (7.3.5+~7.3.8-1) ... Selecting previously unselected package node-agent-base. Preparing to unpack .../014-node-agent-base_6.0.2+~cs5.4.2-1_all.deb ... Unpacking node-agent-base (6.0.2+~cs5.4.2-1) ... Selecting previously unselected package node-ansi-regex. Preparing to unpack .../015-node-ansi-regex_5.0.1-1_all.deb ... Unpacking node-ansi-regex (5.0.1-1) ... Selecting previously unselected package node-ansistyles. Preparing to unpack .../016-node-ansistyles_0.1.3-5_all.deb ... Unpacking node-ansistyles (0.1.3-5) ... Selecting previously unselected package node-aproba. Preparing to unpack .../017-node-aproba_2.0.0-2_all.deb ... Unpacking node-aproba (2.0.0-2) ... Selecting previously unselected package node-delegates. Preparing to unpack .../018-node-delegates_1.0.0-3_all.deb ... Unpacking node-delegates (1.0.0-3) ... Selecting previously unselected package libjs-inherits. Preparing to unpack .../019-libjs-inherits_2.0.4-4_all.deb ... Unpacking libjs-inherits (2.0.4-4) ... Selecting previously unselected package node-inherits. Preparing to unpack .../020-node-inherits_2.0.4-4_all.deb ... Unpacking node-inherits (2.0.4-4) ... Selecting previously unselected package node-core-util-is. Preparing to unpack .../021-node-core-util-is_1.0.3-1_all.deb ... Unpacking node-core-util-is (1.0.3-1) ... Selecting previously unselected package node-safe-buffer. Preparing to unpack .../022-node-safe-buffer_5.2.1+~cs2.1.2-2_all.deb ... Unpacking node-safe-buffer (5.2.1+~cs2.1.2-2) ... Selecting previously unselected package node-string-decoder. Preparing to unpack .../023-node-string-decoder_1.3.0-5_all.deb ... Unpacking node-string-decoder (1.3.0-5) ... Selecting previously unselected package node-process-nextick-args. Preparing to unpack .../024-node-process-nextick-args_2.0.1-2_all.deb ... Unpacking node-process-nextick-args (2.0.1-2) ... Selecting previously unselected package node-util-deprecate. Preparing to unpack .../025-node-util-deprecate_1.0.2-3_all.deb ... Unpacking node-util-deprecate (1.0.2-3) ... Selecting previously unselected package node-isarray. Preparing to unpack .../026-node-isarray_2.0.5-3_all.deb ... Unpacking node-isarray (2.0.5-3) ... Selecting previously unselected package node-readable-stream. Preparing to unpack .../027-node-readable-stream_3.6.0+~cs3.0.0-1_all.deb ... Unpacking node-readable-stream (3.6.0+~cs3.0.0-1) ... Selecting previously unselected package node-are-we-there-yet. Preparing to unpack .../028-node-are-we-there-yet_3.0.0+~1.1.0-1_all.deb ... Unpacking node-are-we-there-yet (3.0.0+~1.1.0-1) ... Selecting previously unselected package node-arrify. Preparing to unpack .../029-node-arrify_2.0.1-2_all.deb ... Unpacking node-arrify (2.0.1-2) ... Selecting previously unselected package node-asap. Preparing to unpack .../030-node-asap_2.0.6+~2.0.0-1_all.deb ... Unpacking node-asap (2.0.6+~2.0.0-1) ... Selecting previously unselected package node-asynckit. Preparing to unpack .../031-node-asynckit_0.4.0-4_all.deb ... Unpacking node-asynckit (0.4.0-4) ... Selecting previously unselected package node-builtins. Preparing to unpack .../032-node-builtins_4.0.0-1_all.deb ... Unpacking node-builtins (4.0.0-1) ... Selecting previously unselected package node-chownr. Preparing to unpack .../033-node-chownr_2.0.0-1_all.deb ... Unpacking node-chownr (2.0.0-1) ... Selecting previously unselected package node-fs.realpath. Preparing to unpack .../034-node-fs.realpath_1.0.0-2_all.deb ... Unpacking node-fs.realpath (1.0.0-2) ... Selecting previously unselected package node-wrappy. Preparing to unpack .../035-node-wrappy_1.0.2-2_all.deb ... Unpacking node-wrappy (1.0.2-2) ... Selecting previously unselected package node-once. Preparing to unpack .../036-node-once_1.4.0-4_all.deb ... Unpacking node-once (1.4.0-4) ... Selecting previously unselected package node-inflight. Preparing to unpack .../037-node-inflight_1.0.6-2_all.deb ... Unpacking node-inflight (1.0.6-2) ... Selecting previously unselected package node-balanced-match. Preparing to unpack .../038-node-balanced-match_2.0.0-1_all.deb ... Unpacking node-balanced-match (2.0.0-1) ... Selecting previously unselected package node-brace-expansion. Preparing to unpack .../039-node-brace-expansion_2.0.1-1_all.deb ... Unpacking node-brace-expansion (2.0.1-1) ... Selecting previously unselected package node-minimatch. Preparing to unpack .../040-node-minimatch_3.1.1+~3.0.5-1_all.deb ... Unpacking node-minimatch (3.1.1+~3.0.5-1) ... Selecting previously unselected package node-path-is-absolute. Preparing to unpack .../041-node-path-is-absolute_2.0.0-2_all.deb ... Unpacking node-path-is-absolute (2.0.0-2) ... Selecting previously unselected package node-glob. Preparing to unpack .../042-node-glob_7.2.1+~cs7.6.15-1_all.deb ... Unpacking node-glob (7.2.1+~cs7.6.15-1) ... Selecting previously unselected package node-graceful-fs. Preparing to unpack .../043-node-graceful-fs_4.2.4+repack-1_all.deb ... Unpacking node-graceful-fs (4.2.4+repack-1) ... Selecting previously unselected package node-mkdirp. Preparing to unpack .../044-node-mkdirp_1.0.4+~1.0.2-1_all.deb ... Unpacking node-mkdirp (1.0.4+~1.0.2-1) ... Selecting previously unselected package node-iferr. Preparing to unpack .../045-node-iferr_1.0.2+~1.0.2-1_all.deb ... Unpacking node-iferr (1.0.2+~1.0.2-1) ... Selecting previously unselected package node-imurmurhash. Preparing to unpack .../046-node-imurmurhash_0.1.4+dfsg+~0.1.1-1_all.deb ... Unpacking node-imurmurhash (0.1.4+dfsg+~0.1.1-1) ... Selecting previously unselected package node-fs-write-stream-atomic. Preparing to unpack .../047-node-fs-write-stream-atomic_1.0.10-5_all.deb ... Unpacking node-fs-write-stream-atomic (1.0.10-5) ... Selecting previously unselected package node-rimraf. Preparing to unpack .../048-node-rimraf_3.0.2-1_all.deb ... Unpacking node-rimraf (3.0.2-1) ... Selecting previously unselected package node-run-queue. Preparing to unpack .../049-node-run-queue_2.0.0-2_all.deb ... Unpacking node-run-queue (2.0.0-2) ... Selecting previously unselected package node-copy-concurrently. Preparing to unpack .../050-node-copy-concurrently_1.0.5-8_all.deb ... Unpacking node-copy-concurrently (1.0.5-8) ... Selecting previously unselected package node-move-concurrently. Preparing to unpack .../051-node-move-concurrently_1.0.1-4_all.deb ... Unpacking node-move-concurrently (1.0.1-4) ... Selecting previously unselected package node-escape-string-regexp. Preparing to unpack .../052-node-escape-string-regexp_4.0.0-2_all.deb ... Unpacking node-escape-string-regexp (4.0.0-2) ... Selecting previously unselected package node-indent-string. Preparing to unpack .../053-node-indent-string_4.0.0-2_all.deb ... Unpacking node-indent-string (4.0.0-2) ... Selecting previously unselected package node-p-map. Preparing to unpack .../054-node-p-map_4.0.0+~3.1.0+~3.0.1-1_all.deb ... Unpacking node-p-map (4.0.0+~3.1.0+~3.0.1-1) ... Selecting previously unselected package node-promise-inflight. Preparing to unpack .../055-node-promise-inflight_1.0.1+~1.0.0-1_all.deb ... Unpacking node-promise-inflight (1.0.1+~1.0.0-1) ... Selecting previously unselected package node-ssri. Preparing to unpack .../056-node-ssri_8.0.1-2_all.deb ... Unpacking node-ssri (8.0.1-2) ... Selecting previously unselected package node-unique-filename. Preparing to unpack .../057-node-unique-filename_1.1.1+ds-1_all.deb ... Unpacking node-unique-filename (1.1.1+ds-1) ... Selecting previously unselected package node-cacache. Preparing to unpack .../058-node-cacache_15.0.5+~cs13.9.21-3_all.deb ... Unpacking node-cacache (15.0.5+~cs13.9.21-3) ... Selecting previously unselected package node-clean-yaml-object. Preparing to unpack .../059-node-clean-yaml-object_0.1.0-5_all.deb ... Unpacking node-clean-yaml-object (0.1.0-5) ... Selecting previously unselected package node-clone. Preparing to unpack .../060-node-clone_2.1.2-3_all.deb ... Unpacking node-clone (2.1.2-3) ... Selecting previously unselected package node-color-name. Preparing to unpack .../061-node-color-name_1.1.4+~1.1.1-2_all.deb ... Unpacking node-color-name (1.1.4+~1.1.1-2) ... Selecting previously unselected package node-color-convert. Preparing to unpack .../062-node-color-convert_2.0.1-1_all.deb ... Unpacking node-color-convert (2.0.1-1) ... Selecting previously unselected package node-colors. Preparing to unpack .../063-node-colors_1.4.0-3_all.deb ... Unpacking node-colors (1.4.0-3) ... Selecting previously unselected package node-strip-ansi. Preparing to unpack .../064-node-strip-ansi_6.0.1-1_all.deb ... Unpacking node-strip-ansi (6.0.1-1) ... Selecting previously unselected package node-defaults. Preparing to unpack .../065-node-defaults_1.0.3+~1.0.3-1_all.deb ... Unpacking node-defaults (1.0.3+~1.0.3-1) ... Selecting previously unselected package node-wcwidth.js. Preparing to unpack .../066-node-wcwidth.js_1.0.2-1_all.deb ... Unpacking node-wcwidth.js (1.0.2-1) ... Selecting previously unselected package node-columnify. Preparing to unpack .../067-node-columnify_1.5.4+~1.5.1-1_all.deb ... Unpacking node-columnify (1.5.4+~1.5.1-1) ... Selecting previously unselected package node-console-control-strings. Preparing to unpack .../068-node-console-control-strings_1.1.0-2_all.deb ... Unpacking node-console-control-strings (1.1.0-2) ... Selecting previously unselected package node-growl. Preparing to unpack .../069-node-growl_1.10.5-4_all.deb ... Unpacking node-growl (1.10.5-4) ... Selecting previously unselected package node-sprintf-js. Preparing to unpack .../070-node-sprintf-js_1.1.2+ds1+~1.1.2-1_all.deb ... Unpacking node-sprintf-js (1.1.2+ds1+~1.1.2-1) ... Selecting previously unselected package node-argparse. Preparing to unpack .../071-node-argparse_2.0.1-2_all.deb ... Unpacking node-argparse (2.0.1-2) ... Selecting previously unselected package node-esprima. Preparing to unpack .../072-node-esprima_4.0.1+ds+~4.0.3-2_all.deb ... Unpacking node-esprima (4.0.1+ds+~4.0.3-2) ... Selecting previously unselected package node-js-yaml. Preparing to unpack .../073-node-js-yaml_4.1.0+dfsg+~4.0.5-6_all.deb ... Unpacking node-js-yaml (4.1.0+dfsg+~4.0.5-6) ... Selecting previously unselected package node-lcov-parse. Preparing to unpack .../074-node-lcov-parse_1.0.0+20170612git80d039574ed9-5_all. deb ... Unpacking node-lcov-parse (1.0.0+20170612git80d039574ed9-5) ... Selecting previously unselected package node-log-driver. Preparing to unpack .../075-node-log-driver_1.2.7+git+20180219+bba1761737-7_all. deb ... Unpacking node-log-driver (1.2.7+git+20180219+bba1761737-7) ... Selecting previously unselected package node-is-plain-obj. Preparing to unpack .../076-node-is-plain-obj_3.0.0-2_all.deb ... Unpacking node-is-plain-obj (3.0.0-2) ... Selecting previously unselected package node-is-buffer. Preparing to unpack .../077-node-is-buffer_2.0.5-2_all.deb ... Unpacking node-is-buffer (2.0.5-2) ... Selecting previously unselected package node-kind-of. Preparing to unpack .../078-node-kind-of_6.0.3+dfsg-2_all.deb ... Unpacking node-kind-of (6.0.3+dfsg-2) ... Selecting previously unselected package node-minimist. Preparing to unpack .../079-node-minimist_1.2.5+~cs5.3.2-1_all.deb ... Unpacking node-minimist (1.2.5+~cs5.3.2-1) ... Selecting previously unselected package node-cssom. Preparing to unpack .../080-node-cssom_0.4.4-3_all.deb ... Unpacking node-cssom (0.4.4-3) ... Selecting previously unselected package node-cssstyle. Preparing to unpack .../081-node-cssstyle_2.3.0-2_all.deb ... Unpacking node-cssstyle (2.3.0-2) ... Selecting previously unselected package node-delayed-stream. Preparing to unpack .../082-node-delayed-stream_1.0.0-5_all.deb ... Unpacking node-delayed-stream (1.0.0-5) ... Selecting previously unselected package node-combined-stream. Preparing to unpack .../083-node-combined-stream_1.0.8+~1.0.3-1_all.deb ... Unpacking node-combined-stream (1.0.8+~1.0.3-1) ... Selecting previously unselected package node-mime. Preparing to unpack .../084-node-mime_3.0.0+dfsg+~cs3.96.1-1_all.deb ... Unpacking node-mime (3.0.0+dfsg+~cs3.96.1-1) ... Selecting previously unselected package node-mime-types. Preparing to unpack .../085-node-mime-types_2.1.33-1_all.deb ... Unpacking node-mime-types (2.1.33-1) ... Selecting previously unselected package node-form-data. Preparing to unpack .../086-node-form-data_3.0.1-1_all.deb ... Unpacking node-form-data (3.0.1-1) ... Selecting previously unselected package node-events. Preparing to unpack .../087-node-events_3.3.0+~3.0.0-2_all.deb ... Unpacking node-events (3.3.0+~3.0.0-2) ... Selecting previously unselected package node-https-proxy-agent. Preparing to unpack .../088-node-https-proxy-agent_5.0.0+~cs8.0.0-3_all.deb ... Unpacking node-https-proxy-agent (5.0.0+~cs8.0.0-3) ... Selecting previously unselected package node-iconv-lite. Preparing to unpack .../089-node-iconv-lite_0.6.3-2_all.deb ... Unpacking node-iconv-lite (0.6.3-2) ... Selecting previously unselected package node-lodash-packages. Preparing to unpack .../090-node-lodash-packages_4.17.21+dfsg+~cs8.31.198.202102 20-5_all.deb ... Unpacking node-lodash-packages (4.17.21+dfsg+~cs8.31.198.20210220-5) ... Selecting previously unselected package node-stealthy-require. Preparing to unpack .../091-node-stealthy-require_1.1.1-5_all.deb ... Unpacking node-stealthy-require (1.1.1-5) ... Selecting previously unselected package node-punycode. Preparing to unpack .../092-node-punycode_2.1.1-5_all.deb ... Unpacking node-punycode (2.1.1-5) ... Selecting previously unselected package node-psl. Preparing to unpack .../093-node-psl_1.8.0+ds-6_all.deb ... Unpacking node-psl (1.8.0+ds-6) ... Selecting previously unselected package node-universalify. Preparing to unpack .../094-node-universalify_2.0.0-3_all.deb ... Unpacking node-universalify (2.0.0-3) ... Selecting previously unselected package node-tough-cookie. Preparing to unpack .../095-node-tough-cookie_4.0.0-2_all.deb ... Unpacking node-tough-cookie (4.0.0-2) ... Selecting previously unselected package node-webidl-conversions. Preparing to unpack .../096-node-webidl-conversions_7.0.0~1.1.0+~cs15.1.20180823 -2_all.deb ... Unpacking node-webidl-conversions (7.0.0~1.1.0+~cs15.1.20180823-2) ... Selecting previously unselected package node-commander. Preparing to unpack .../097-node-commander_9.0.0-2_all.deb ... Unpacking node-commander (9.0.0-2) ... Selecting previously unselected package node-mute-stream. Preparing to unpack .../098-node-mute-stream_0.0.8+~0.0.1-1_all.deb ... Unpacking node-mute-stream (0.0.8+~0.0.1-1) ... Selecting previously unselected package node-read. Preparing to unpack .../099-node-read_1.0.7-3_all.deb ... Unpacking node-read (1.0.7-3) ... Selecting previously unselected package node-ws. Preparing to unpack .../100-node-ws_8.5.0+~cs13.3.3-2_all.deb ... Unpacking node-ws (8.5.0+~cs13.3.3-2) ... Selecting previously unselected package node-jsdom. Preparing to unpack .../101-node-jsdom_19.0.0+~cs90.11.27-1_all.deb ... Unpacking node-jsdom (19.0.0+~cs90.11.27-1) ... Selecting previously unselected package node-fetch. Preparing to unpack .../102-node-fetch_2.6.7+~2.5.12-1_all.deb ... Unpacking node-fetch (2.6.7+~2.5.12-1) ... Selecting previously unselected package node-coveralls. Preparing to unpack .../103-node-coveralls_3.1.1-1_all.deb ... Unpacking node-coveralls (3.1.1-1) ... Selecting previously unselected package node-mimic-response. Preparing to unpack .../104-node-mimic-response_3.1.0-7_all.deb ... Unpacking node-mimic-response (3.1.0-7) ... Selecting previously unselected package node-decompress-response. Preparing to unpack .../105-node-decompress-response_6.0.0-2_all.deb ... Unpacking node-decompress-response (6.0.0-2) ... Selecting previously unselected package node-diff. Preparing to unpack .../106-node-diff_5.0.0~dfsg+~5.0.1-3_all.deb ... Unpacking node-diff (5.0.0~dfsg+~5.0.1-3) ... Selecting previously unselected package node-err-code. Preparing to unpack .../107-node-err-code_2.0.3+dfsg-3_all.deb ... Unpacking node-err-code (2.0.3+dfsg-3) ... Selecting previously unselected package node-time-stamp. Preparing to unpack .../108-node-time-stamp_2.2.0-1_all.deb ... Unpacking node-time-stamp (2.2.0-1) ... Selecting previously unselected package node-fancy-log. Preparing to unpack .../109-node-fancy-log_1.3.3+~cs1.3.1-2_all.deb ... Unpacking node-fancy-log (1.3.3+~cs1.3.1-2) ... Selecting previously unselected package node-signal-exit. Preparing to unpack .../110-node-signal-exit_3.0.6+~3.0.1-1_all.deb ... Unpacking node-signal-exit (3.0.6+~3.0.1-1) ... Selecting previously unselected package node-foreground-child. Preparing to unpack .../111-node-foreground-child_2.0.0-3_all.deb ... Unpacking node-foreground-child (2.0.0-3) ... Selecting previously unselected package node-function-bind. Preparing to unpack .../112-node-function-bind_1.1.1+repacked+~1.0.3-1_all.deb . .. Unpacking node-function-bind (1.1.1+repacked+~1.0.3-1) ... Selecting previously unselected package node-has-unicode. Preparing to unpack .../113-node-has-unicode_2.0.1-4_all.deb ... Unpacking node-has-unicode (2.0.1-4) ... Selecting previously unselected package node-ansi-styles. Preparing to unpack .../114-node-ansi-styles_4.3.0+~4.2.0-1_all.deb ... Unpacking node-ansi-styles (4.3.0+~4.2.0-1) ... Selecting previously unselected package node-slice-ansi. Preparing to unpack .../115-node-slice-ansi_5.0.0+~cs9.0.0-4_all.deb ... Unpacking node-slice-ansi (5.0.0+~cs9.0.0-4) ... Selecting previously unselected package node-string-width. Preparing to unpack .../116-node-string-width_4.2.3+~cs13.2.3-1_all.deb ... Unpacking node-string-width (4.2.3+~cs13.2.3-1) ... Selecting previously unselected package node-wide-align. Preparing to unpack .../117-node-wide-align_1.1.3-4_all.deb ... Unpacking node-wide-align (1.1.3-4) ... Selecting previously unselected package node-gauge. Preparing to unpack .../118-node-gauge_4.0.2-1_all.deb ... Unpacking node-gauge (4.0.2-1) ... Selecting previously unselected package node-end-of-stream. Preparing to unpack .../119-node-end-of-stream_1.4.4+~1.4.1-1_all.deb ... Unpacking node-end-of-stream (1.4.4+~1.4.1-1) ... Selecting previously unselected package node-pump. Preparing to unpack .../120-node-pump_3.0.0-5_all.deb ... Unpacking node-pump (3.0.0-5) ... Selecting previously unselected package node-get-stream. Preparing to unpack .../121-node-get-stream_6.0.1-1_all.deb ... Unpacking node-get-stream (6.0.1-1) ... Selecting previously unselected package node-lowercase-keys. Preparing to unpack .../122-node-lowercase-keys_2.0.0-2_all.deb ... Unpacking node-lowercase-keys (2.0.0-2) ... Selecting previously unselected package node-json-buffer. Preparing to unpack .../123-node-json-buffer_3.0.1-1_all.deb ... Unpacking node-json-buffer (3.0.1-1) ... Selecting previously unselected package node-p-cancelable. Preparing to unpack .../124-node-p-cancelable_2.1.1-1_all.deb ... Unpacking node-p-cancelable (2.1.1-1) ... Selecting previously unselected package node-quick-lru. Preparing to unpack .../125-node-quick-lru_5.1.1-1_all.deb ... Unpacking node-quick-lru (5.1.1-1) ... Selecting previously unselected package node-got. Preparing to unpack .../126-node-got_11.8.3+~cs58.7.37-1_all.deb ... Unpacking node-got (11.8.3+~cs58.7.37-1) ... Selecting previously unselected package node-has-flag. Preparing to unpack .../127-node-has-flag_4.0.0-2_all.deb ... Unpacking node-has-flag (4.0.0-2) ... Selecting previously unselected package node-hosted-git-info. Preparing to unpack .../128-node-hosted-git-info_4.0.2-1_all.deb ... Unpacking node-hosted-git-info (4.0.2-1) ... Selecting previously unselected package node-ip. Preparing to unpack .../129-node-ip_1.1.5+~1.1.0-1_all.deb ... Unpacking node-ip (1.1.5+~1.1.0-1) ... Selecting previously unselected package node-ip-regex. Preparing to unpack .../130-node-ip-regex_4.3.0+~4.1.1-1_all.deb ... Unpacking node-ip-regex (4.3.0+~4.1.1-1) ... Selecting previously unselected package node-is-typedarray. Preparing to unpack .../131-node-is-typedarray_1.0.0-4_all.deb ... Unpacking node-is-typedarray (1.0.0-4) ... Selecting previously unselected package node-isexe. Preparing to unpack .../132-node-isexe_2.0.0+~2.0.1-4_all.deb ... Unpacking node-isexe (2.0.0+~2.0.1-4) ... Selecting previously unselected package node-json-parse-better-errors. Preparing to unpack .../133-node-json-parse-better-errors_1.0.2+~cs3.3.1-1_all.d eb ... Unpacking node-json-parse-better-errors (1.0.2+~cs3.3.1-1) ... Selecting previously unselected package node-encoding. Preparing to unpack .../134-node-encoding_0.1.13-2_all.deb ... Unpacking node-encoding (0.1.13-2) ... Selecting previously unselected package node-jsonparse. Preparing to unpack .../135-node-jsonparse_1.3.1-10_all.deb ... Unpacking node-jsonparse (1.3.1-10) ... Selecting previously unselected package node-minipass. Preparing to unpack .../136-node-minipass_3.1.6+~cs8.7.18-1_all.deb ... Unpacking node-minipass (3.1.6+~cs8.7.18-1) ... Selecting previously unselected package node-npm-bundled. Preparing to unpack .../137-node-npm-bundled_1.1.2-1_all.deb ... Unpacking node-npm-bundled (1.1.2-1) ... Selecting previously unselected package node-osenv. Preparing to unpack .../138-node-osenv_0.1.5+~0.1.0-1_all.deb ... Unpacking node-osenv (0.1.5+~0.1.0-1) ... Selecting previously unselected package node-validate-npm-package-name. Preparing to unpack .../139-node-validate-npm-package-name_3.0.0-4_all.deb ... Unpacking node-validate-npm-package-name (3.0.0-4) ... Selecting previously unselected package node-npm-package-arg. Preparing to unpack .../140-node-npm-package-arg_8.1.5-1_all.deb ... Unpacking node-npm-package-arg (8.1.5-1) ... Selecting previously unselected package node-object-assign. Preparing to unpack .../141-node-object-assign_4.1.1-6_all.deb ... Unpacking node-object-assign (4.1.1-6) ... Selecting previously unselected package node-opener. Preparing to unpack .../142-node-opener_1.5.2+~1.4.0-1_all.deb ... Unpacking node-opener (1.5.2+~1.4.0-1) ... Selecting previously unselected package node-retry. Preparing to unpack .../143-node-retry_0.13.1+~0.12.1-1_all.deb ... Unpacking node-retry (0.13.1+~0.12.1-1) ... Selecting previously unselected package node-promise-retry. Preparing to unpack .../144-node-promise-retry_2.0.1-2_all.deb ... Unpacking node-promise-retry (2.0.1-2) ... Selecting previously unselected package node-promzard. Preparing to unpack .../145-node-promzard_0.3.0-2_all.deb ... Unpacking node-promzard (0.3.0-2) ... Selecting previously unselected package node-set-blocking. Preparing to unpack .../146-node-set-blocking_2.0.0-2_all.deb ... Unpacking node-set-blocking (2.0.0-2) ... Selecting previously unselected package node-slash. Preparing to unpack .../147-node-slash_3.0.0-2_all.deb ... Unpacking node-slash (3.0.0-2) ... Selecting previously unselected package libjs-source-map. Preparing to unpack .../148-libjs-source-map_0.7.0++dfsg2+really.0.6.1-9_all.deb ... Unpacking libjs-source-map (0.7.0++dfsg2+really.0.6.1-9) ... Selecting previously unselected package node-source-map. Preparing to unpack .../149-node-source-map_0.7.0++dfsg2+really.0.6.1-9_all.deb ... Unpacking node-source-map (0.7.0++dfsg2+really.0.6.1-9) ... Selecting previously unselected package node-source-map-support. Preparing to unpack .../150-node-source-map-support_0.5.21+ds+~0.5.4-1_all.deb . .. Unpacking node-source-map-support (0.5.21+ds+~0.5.4-1) ... Selecting previously unselected package node-spdx-license-ids. Preparing to unpack .../151-node-spdx-license-ids_3.0.11-1_all.deb ... Unpacking node-spdx-license-ids (3.0.11-1) ... Selecting previously unselected package node-spdx-exceptions. Preparing to unpack .../152-node-spdx-exceptions_2.3.0-2_all.deb ... Unpacking node-spdx-exceptions (2.3.0-2) ... Selecting previously unselected package node-spdx-expression-parse. Preparing to unpack .../153-node-spdx-expression-parse_3.0.1+~3.0.1-1_all.deb .. . Unpacking node-spdx-expression-parse (3.0.1+~3.0.1-1) ... Selecting previously unselected package node-spdx-correct. Preparing to unpack .../154-node-spdx-correct_3.1.1-2_all.deb ... Unpacking node-spdx-correct (3.1.1-2) ... Selecting previously unselected package node-stack-utils. Preparing to unpack .../155-node-stack-utils_2.0.5+~2.0.1-1_all.deb ... Unpacking node-stack-utils (2.0.5+~2.0.1-1) ... Selecting previously unselected package node-supports-color. Preparing to unpack .../156-node-supports-color_8.1.1+~8.1.1-1_all.deb ... Unpacking node-supports-color (8.1.1+~8.1.1-1) ... Selecting previously unselected package node-tap-parser. Preparing to unpack .../157-node-tap-parser_7.0.0+ds1-6_all.deb ... Unpacking node-tap-parser (7.0.0+ds1-6) ... Selecting previously unselected package node-tap-mocha-reporter. Preparing to unpack .../158-node-tap-mocha-reporter_3.0.7+ds-2_all.deb ... Unpacking node-tap-mocha-reporter (3.0.7+ds-2) ... Selecting previously unselected package node-text-table. Preparing to unpack .../159-node-text-table_0.2.0-4_all.deb ... Unpacking node-text-table (0.2.0-4) ... Selecting previously unselected package node-tmatch. Preparing to unpack .../160-node-tmatch_5.0.0-4_all.deb ... Unpacking node-tmatch (5.0.0-4) ... Selecting previously unselected package node-typedarray-to-buffer. Preparing to unpack .../161-node-typedarray-to-buffer_4.0.0-2_all.deb ... Unpacking node-typedarray-to-buffer (4.0.0-2) ... Selecting previously unselected package node-validate-npm-package-license. Preparing to unpack .../162-node-validate-npm-package-license_3.0.4-2_all.deb .. . Unpacking node-validate-npm-package-license (3.0.4-2) ... Selecting previously unselected package node-whatwg-fetch. Preparing to unpack .../163-node-whatwg-fetch_3.6.2-5_all.deb ... Unpacking node-whatwg-fetch (3.6.2-5) ... Selecting previously unselected package node-write-file-atomic. Preparing to unpack .../164-node-write-file-atomic_3.0.3+~3.0.2-1_all.deb ... Unpacking node-write-file-atomic (3.0.3+~3.0.2-1) ... Selecting previously unselected package node-abbrev. Preparing to unpack .../165-node-abbrev_1.1.1+~1.1.2-1_all.deb ... Unpacking node-abbrev (1.1.1+~1.1.2-1) ... Selecting previously unselected package node-archy. Preparing to unpack .../166-node-archy_1.0.0-4_all.deb ... Unpacking node-archy (1.0.0-4) ... Selecting previously unselected package node-chalk. Preparing to unpack .../167-node-chalk_4.1.2-1_all.deb ... Unpacking node-chalk (4.1.2-1) ... Selecting previously unselected package node-cli-table. Preparing to unpack .../168-node-cli-table_0.3.11+~cs0.13.3-1_all.deb ... Unpacking node-cli-table (0.3.11+~cs0.13.3-1) ... Selecting previously unselected package node-depd. Preparing to unpack .../169-node-depd_2.0.0-2_all.deb ... Unpacking node-depd (2.0.0-2) ... Selecting previously unselected package node-nopt. Preparing to unpack .../170-node-nopt_5.0.0-2_all.deb ... Unpacking node-nopt (5.0.0-2) ... Selecting previously unselected package node-npmlog. Preparing to unpack .../171-node-npmlog_6.0.1+~4.1.4-1_all.deb ... Unpacking node-npmlog (6.0.1+~4.1.4-1) ... Selecting previously unselected package node-tar. Preparing to unpack .../172-node-tar_6.1.11+ds1+~cs6.0.6-1_all.deb ... Unpacking node-tar (6.1.11+ds1+~cs6.0.6-1) ... Selecting previously unselected package node-which. Preparing to unpack .../173-node-which_2.0.2+~cs1.3.2-2_all.deb ... Unpacking node-which (2.0.2+~cs1.3.2-2) ... Selecting previously unselected package node-gyp. Preparing to unpack .../174-node-gyp_8.4.1-1_all.deb ... Unpacking node-gyp (8.4.1-1) ... Selecting previously unselected package node-ini. Preparing to unpack .../175-node-ini_2.0.1-1_all.deb ... Unpacking node-ini (2.0.1-1) ... Selecting previously unselected package node-negotiator. Preparing to unpack .../176-node-negotiator_0.6.2+~0.6.1-1_all.deb ... Unpacking node-negotiator (0.6.2+~0.6.1-1) ... Selecting previously unselected package node-resolve. Preparing to unpack .../177-node-resolve_1.20.0+~cs5.27.9-1_all.deb ... Unpacking node-resolve (1.20.0+~cs5.27.9-1) ... Selecting previously unselected package node-normalize-package-data. Preparing to unpack .../178-node-normalize-package-data_3.0.3+~2.4.1-1_all.deb . .. Unpacking node-normalize-package-data (3.0.3+~2.4.1-1) ... Selecting previously unselected package node-read-package-json. Preparing to unpack .../179-node-read-package-json_4.1.1-1_all.deb ... Unpacking node-read-package-json (4.1.1-1) ... Selecting previously unselected package node-tap. Preparing to unpack .../180-node-tap_12.0.1+ds-4_all.deb ... Unpacking node-tap (12.0.1+ds-4) ... Selecting previously unselected package npm. Preparing to unpack .../181-npm_8.5.1~ds-1_all.deb ... Unpacking npm (8.5.1~ds-1) ... Setting up node-delayed-stream (1.0.0-5) ... Setting up libuv1-dev:amd64 (1.43.0-1ubuntu0.1) ... Setting up node-colors (1.4.0-3) ... Setting up node-log-driver (1.2.7+git+20180219+bba1761737-7) ... Setting up node-fs.realpath (1.0.0-2) ... Setting up node-diff (5.0.0~dfsg+~5.0.1-3) ... Setting up node-object-assign (4.1.1-6) ... Setting up node-abbrev (1.1.1+~1.1.2-1) ... Setting up libjs-sprintf-js (1.1.2+ds1+~1.1.2-1) ... Setting up node-yallist (4.0.0+~4.0.1-1) ... Setting up libjs-inherits (2.0.4-4) ... Setting up node-p-cancelable (2.1.1-1) ... Setting up node-ansi-regex (5.0.1-1) ... Setting up libnode-dev (12.22.9~dfsg-1ubuntu3.4) ... Setting up node-slash (3.0.0-2) ... Setting up node-util-deprecate (1.0.2-3) ... Setting up node-retry (0.13.1+~0.12.1-1) ... Setting up node-arrify (2.0.1-2) ... Setting up node-ansistyles (0.1.3-5) ... Setting up node-delegates (1.0.0-3) ... Setting up node-depd (2.0.0-2) ... Setting up node-isexe (2.0.0+~2.0.1-4) ... Setting up node-jsonparse (1.3.1-10) ... Setting up node-escape-string-regexp (4.0.0-2) ... Setting up libjs-source-map (0.7.0++dfsg2+really.0.6.1-9) ... Setting up node-negotiator (0.6.2+~0.6.1-1) ... Setting up node-stack-utils (2.0.5+~2.0.1-1) ... Setting up node-color-name (1.1.4+~1.1.1-2) ... Setting up node-growl (1.10.5-4) ... Setting up node-json-buffer (3.0.1-1) ... Setting up node-console-control-strings (1.1.0-2) ... Setting up node-abab (2.0.5-2) ... Setting up node-indent-string (4.0.0-2) ... Setting up node-function-bind (1.1.1+repacked+~1.0.3-1) ... Setting up node-clone (2.1.2-3) ... Setting up node-p-map (4.0.0+~3.1.0+~3.0.1-1) ... Setting up node-iferr (1.0.2+~1.0.2-1) ... Setting up node-chownr (2.0.0-1) ... Setting up node-has-flag (4.0.0-2) ... Setting up node-lodash-packages (4.17.21+dfsg+~cs8.31.198.20210220-5) ... Setting up libjs-psl (1.8.0+ds-6) ... Setting up node-asap (2.0.6+~2.0.0-1) ... Setting up node-mime (3.0.0+dfsg+~cs3.96.1-1) ... Setting up node-inherits (2.0.4-4) ... Setting up node-path-is-absolute (2.0.0-2) ... Setting up node-universalify (2.0.0-3) ... Setting up node-ini (2.0.1-1) ... Setting up node-safe-buffer (5.2.1+~cs2.1.2-2) ... Setting up node-promise-inflight (1.0.1+~1.0.0-1) ... Setting up node-combined-stream (1.0.8+~1.0.3-1) ... Setting up node-json-parse-better-errors (1.0.2+~cs3.3.1-1) ... Setting up node-sprintf-js (1.1.2+ds1+~1.1.2-1) ... Setting up node-tmatch (5.0.0-4) ... Setting up node-mime-types (2.1.33-1) ... Setting up node-err-code (2.0.3+dfsg-3) ... Setting up node-balanced-match (2.0.0-1) ... Setting up node-brace-expansion (2.0.1-1) ... Setting up node-spdx-exceptions (2.3.0-2) ... Setting up node-lcov-parse (1.0.0+20170612git80d039574ed9-5) ... Setting up node-cssom (0.4.4-3) ... Setting up node-strip-ansi (6.0.1-1) ... Setting up node-set-blocking (2.0.0-2) ... Setting up node-npm-bundled (1.1.2-1) ... Setting up node-signal-exit (3.0.6+~3.0.1-1) ... Setting up node-which (2.0.2+~cs1.3.2-2) ... Setting up node-source-map (0.7.0++dfsg2+really.0.6.1-9) ... Setting up node-wrappy (1.0.2-2) ... Setting up node-text-table (0.2.0-4) ... Setting up node-asynckit (0.4.0-4) ... Setting up node-ip (1.1.5+~1.1.0-1) ... Setting up node-quick-lru (5.1.1-1) ... Setting up node-punycode (2.1.1-5) ... Setting up node-defaults (1.0.3+~1.0.3-1) ... Setting up node-mute-stream (0.0.8+~0.0.1-1) ... Setting up node-mimic-response (3.1.0-7) ... Setting up node-commander (9.0.0-2) ... Setting up node-whatwg-fetch (3.6.2-5) ... Setting up libjs-typedarray-to-buffer (4.0.0-2) ... Setting up node-graceful-fs (4.2.4+repack-1) ... Setting up node-clean-yaml-object (0.1.0-5) ... Setting up node-aproba (2.0.0-2) ... Setting up node-esprima (4.0.1+ds+~4.0.3-2) ... Setting up node-ip-regex (4.3.0+~4.1.1-1) ... Setting up node-stealthy-require (1.1.1-5) ... Setting up node-spdx-license-ids (3.0.11-1) ... Setting up node-string-decoder (1.3.0-5) ... Setting up node-time-stamp (2.2.0-1) ... Setting up libjs-events (3.3.0+~3.0.0-2) ... Setting up node-mkdirp (1.0.4+~1.0.2-1) ... Setting up node-run-queue (2.0.0-2) ... Setting up node-core-util-is (1.0.3-1) ... Setting up node-minimatch (3.1.1+~3.0.5-1) ... Setting up node-opener (1.5.2+~1.4.0-1) ... Setting up node-archy (1.0.0-4) ... Setting up node-imurmurhash (0.1.4+dfsg+~0.1.1-1) ... Setting up node-foreground-child (2.0.0-3) ... Setting up node-read (1.0.7-3) ... Setting up node-nopt (5.0.0-2) ... Setting up node-is-buffer (2.0.5-2) ... Setting up node-color-convert (2.0.1-1) ... Setting up node-webidl-conversions (7.0.0~1.1.0+~cs15.1.20180823-2) ... Setting up node-isarray (2.0.5-3) ... Setting up node-osenv (0.1.5+~0.1.0-1) ... Setting up node-is-plain-obj (3.0.0-2) ... Setting up node-ms (2.1.3+~cs0.7.31-2) ... Setting up libjs-is-typedarray (1.0.0-4) ... Setting up node-lowercase-keys (2.0.0-2) ... Setting up node-decompress-response (6.0.0-2) ... Setting up node-process-nextick-args (2.0.1-2) ... Setting up node-has-unicode (2.0.1-4) ... Setting up node-fs-write-stream-atomic (1.0.10-5) ... Setting up gyp (0.1+20210831gitd6c5dd5-5) ... Setting up node-readable-stream (3.6.0+~cs3.0.0-1) ... Setting up node-ssri (8.0.1-2) ... Setting up node-lru-cache (6.0.0+~5.1.1-1) ... Setting up node-promise-retry (2.0.1-2) ... Setting up node-supports-color (8.1.1+~8.1.1-1) ... Setting up node-once (1.4.0-4) ... Setting up node-psl (1.8.0+ds-6) ... Setting up node-resolve (1.20.0+~cs5.27.9-1) ... Setting up node-are-we-there-yet (3.0.0+~1.1.0-1) ... Setting up node-kind-of (6.0.3+dfsg-2) ... Setting up node-debug (4.3.2+~cs4.1.7-1) ... Setting up node-events (3.3.0+~3.0.0-2) ... Setting up node-minimist (1.2.5+~cs5.3.2-1) ... Setting up node-argparse (2.0.1-2) ... Setting up node-fancy-log (1.3.3+~cs1.3.1-2) ... Setting up node-promzard (0.3.0-2) ... Setting up node-wcwidth.js (1.0.2-1) ... Setting up node-cssstyle (2.3.0-2) ... Setting up node-source-map-support (0.5.21+ds+~0.5.4-1) ... Setting up node-iconv-lite (0.6.3-2) ... Setting up node-unique-filename (1.1.1+ds-1) ... Setting up node-ansi-styles (4.3.0+~4.2.0-1) ... Setting up node-form-data (3.0.1-1) ... Setting up node-chalk (4.1.2-1) ... Setting up node-spdx-expression-parse (3.0.1+~3.0.1-1) ... Setting up node-is-typedarray (1.0.0-4) ... Setting up node-inflight (1.0.6-2) ... Setting up node-hosted-git-info (4.0.2-1) ... Setting up node-tough-cookie (4.0.0-2) ... Setting up node-encoding (0.1.13-2) ... Setting up node-js-yaml (4.1.0+dfsg+~4.0.5-6) ... Setting up node-slice-ansi (5.0.0+~cs9.0.0-4) ... Setting up node-string-width (4.2.3+~cs13.2.3-1) ... Setting up node-semver (7.3.5+~7.3.8-1) ... Setting up node-builtins (4.0.0-1) ... Setting up node-end-of-stream (1.4.4+~1.4.1-1) ... Setting up node-pump (3.0.0-5) ... Setting up node-columnify (1.5.4+~1.5.1-1) ... Setting up node-agent-base (6.0.2+~cs5.4.2-1) ... Setting up node-validate-npm-package-name (3.0.0-4) ... Setting up node-spdx-correct (3.1.1-2) ... Setting up node-glob (7.2.1+~cs7.6.15-1) ... Setting up node-get-stream (6.0.1-1) ... Setting up node-got (11.8.3+~cs58.7.37-1) ... Setting up node-typedarray-to-buffer (4.0.0-2) ... Setting up node-cli-table (0.3.11+~cs0.13.3-1) ... Setting up node-tap-parser (7.0.0+ds1-6) ... Setting up node-minipass (3.1.6+~cs8.7.18-1) ... Setting up node-wide-align (1.1.3-4) ... Setting up node-npm-package-arg (8.1.5-1) ... Setting up node-https-proxy-agent (5.0.0+~cs8.0.0-3) ... Setting up node-rimraf (3.0.2-1) ... Setting up node-validate-npm-package-license (3.0.4-2) ... Setting up node-write-file-atomic (3.0.3+~3.0.2-1) ... Setting up node-copy-concurrently (1.0.5-8) ... Setting up node-move-concurrently (1.0.1-4) ... Setting up node-gauge (4.0.2-1) ... Setting up node-tap-mocha-reporter (3.0.7+ds-2) ... Setting up node-normalize-package-data (3.0.3+~2.4.1-1) ... Setting up node-ws (8.5.0+~cs13.3.3-2) ... Setting up node-jsdom (19.0.0+~cs90.11.27-1) ... Setting up node-tar (6.1.11+ds1+~cs6.0.6-1) ... Setting up node-tap (12.0.1+ds-4) ... Setting up node-npmlog (6.0.1+~4.1.4-1) ... Setting up node-cacache (15.0.5+~cs13.9.21-3) ... Setting up node-read-package-json (4.1.1-1) ... Setting up node-fetch (2.6.7+~2.5.12-1) ... Setting up node-gyp (8.4.1-1) ... Setting up npm (8.5.1~ds-1) ... Setting up node-coveralls (3.1.1-1) ... Processing triggers for man-db (2.10.2-1) ... |
You can check the Node.js version with this command:
npm -v |
8.5.1 |
As always, I hope this helps those looking for concise and complete free answer.
Sqlite on Ubuntu
We decided to include some existing Sqlite databases in our AWS Ubuntu learning lab because they’re used by the Data Science courses (specifically, DS 250). Installing Sqlite is quite simple:
sudo apt install -y sqlite |
You can check the install by using the which utility, like:
which -a sqlite3 |
On Ubuntu, it should return:
/usr/bin/sqlite3 |
There is a friendly help document online that can provide insight in how to use Sqlite. You can create a new student.db database with the following syntax from the Ubuntu CLI (Command-Line Interface):
sqlite3 student.db |
It would return the following:
SQLite version 3.37.2 2022-01-06 13:25:41 Enter ".help" FOR usage hints. sqlite> |
A little warning about the simple example and how it opens only a transient in-memory database. If you want a persistent database, you must open sqlite3 without any arguments. Then, you must use the .open method to open a persistent student.db database create a file in the relative directory path where you launched sqlite3 executable. You can read more about persistent in Sqlite in the documentation.
.open student.db |
The alternative opens the student.db file in a fully qualified path:
.open /home/student/Code/sqlite/db/student.db |
If you type .databases at the sqlite> prompt it would return:
sqlite> .databases main: /home/student/Code/sqlite/db/student.db r/w |
Let’s create a script file that creates two tables, a foreign key reference from one of the tables to the other, and some data with the following create_sample.sql script:
-- Drop knight table if exists. DROP TABLE IF EXISTS knight; -- Drop kingdom table if exists. DROP TABLE IF EXISTS kingdom; -- Create normalized table kingdom CREATE TABLE kingdom ( kingdom_id INTEGER PRIMARY KEY , kingdom_name VARCHAR(20) , population INTEGER , book VARCHAR(40)); -- Insert kingdom into table. INSERT INTO kingdom ( kingdom_id , kingdom_name , population , book ) VALUES ( 1, 'Narnia', 42100, 'Prince Caspian' ) ,( 2, 'Narnia', 77600, 'The Lion, The Witch and The Wardrobe' ) ,( 3, 'Camelot', 15200, 'The Once and Future King' ); -- Create normalized knight table. CREATE TABLE knight ( knight_id INTEGER PRIMARY KEY , knight_name VARCHAR(22) , kingdom_allegiance_id INTEGER , allegiance_start_date text , allegiance_end_date text , book VARCHAR(40) , FOREIGN KEY (kingdom_allegiance_id) REFERENCES kingdom(kingdom_id)); -- Insert knights into table. INSERT INTO knight ( knight_id , knight_name , kingdom_allegiance_id , allegiance_start_date , allegiance_end_date , book ) VALUES ( 1, 'Peter the Magnificent', 2, '1272-03-20', '1292-06-19', 'The Lion, The Witch and The Wardrobe' ) ,( 2, 'Edmund the Just', 2, '1272-03-20', '1292-06-19', 'The Lion, The Witch and The Wardrobe' ) ,( 3, 'Susan the Gentle', 2, '1272-03-20', '1292-06-19', 'The Lion, The Witch and The Wardrobe' ) ,( 4, 'Lucy the Valiant', 2, '1272-03-20', '1292-06-19', 'The Lion, The Witch and The Wardrobe' ) ,( 5, 'Peter the Magnificent', 1, '1531-04-12', '1328-05-31', 'Prince Caspian' ) ,( 6, 'Edmund the Just', 1, '1531-04-12', '1328-05-31', 'Prince Caspian' ) ,( 7, 'Susan the Gentle', 1, '1531-04-12', '1328-05-31', 'Prince Caspian' ) ,( 8, 'Lucy the Valiant', 1, '1531-04-12', '1328-05-31', 'Prince Caspian' ) ,( 9, 'King Arthur', 3, '0631-03-10', '0686-12-12', 'The Once and Future King' ) ,( 10, 'Sir Lionel', 3, '0631-03-10', '0686-12-12', 'The Once and Future King' ) ,( 11, 'Sir Bors', 3, '0631-03-10', '0686-12-12', 'The Once and Future King' ) ,( 12, 'Sir Bors', 3, '0631-03-10', '0686-12-12', 'The Once and Future King' ) ,( 13, 'Sir Galahad', 3, '0631-03-10', '0686-12-12', 'The Once and Future King' ) ,( 14, 'Sir Gawain', 3, '0631-03-10', '0686-12-12', 'The Once and Future King' ) ,( 15, 'Sir Tristram', 3, '0631-03-10', '0686-12-12', 'The Once and Future King' ) ,( 16, 'Sir Percival', 3, '0631-03-10', '0686-12-12', 'The Once and Future King' ) ,( 17, 'Sir Lancelot', 3, '0631-03-10', '0686-12-12', 'The Once and Future King' ); |
You can run the create_sample.sql script with the following syntax using an absolute path:
sqlite> .read /home/student/Code/sqlite/create_tables.sql |
Then, you can write a query like this to retrieve the data from two tables:
SELECT k.kingdom_name , kn.knight_name FROM kingdom k INNER JOIN knight kn ON k.kingdom_id = kn.kingdom_allegiance_id WHERE k.book = 'Prince Caspian'; |
It will return the following:
Narnia|Peter the Magnificent Narnia|Edmund the Just Narnia|Susan the Gentle Narnia|Lucy the Valiant |
You can exit sqlite3 by entering .quit or Control+D (the system End-Of-File character). If you can determine whether you have a transient or persistent student.db database file with the long list (ll) command.
The following command:
ll /home/student/Code/sqlite/db/student.db |
should return the following:
-rw-r--r-- 1 student student 12288 Feb 9 23:01 /home/student/Code/sqlite/db/student.db |
If the command returned a 0 sized student.db database file, you created a transient Sqlite table. You’ll need to redo the creation of the student.db database file with the .open command as qualified above.
If you want to detach a database from your active Sqlite session, you can issue the following command to remove it:
sqlite> DETACH DATABASE student.db |
Let’s jazz it up a bit with some Python. The first example verifies the ODBC driver’s ability to connect to Sqlite. Please note that it returns the same result for a transient and persistent database file. You can refer to the following documentation for Python examples.
#!/usr/bin/python # Import sqlite3 ODBC library. import sqlite3 try: # Open a connection to the student.db database db = sqlite3.connect('/home/student/Code/sqlite/db/student.db') # Print a string to say you've connected to the student.db database. print("Sqlite database connection success.") except sqlite3.Error as e: print('SQLite error: %s' % (' '.join(e.args))) print("Exception class is: ", e.__class__) print('SQLite traceback: ') exc_type, exc_value, exc_tb = sys.exc_info() print(traceback.format_exception(exc_type, exc_value, exc_tb)) sys.exit(1) finally: # Close the connection when it is open. if db: db.close() |
You can run the sqlite_connection.py script with the following syntax from its local directory:
Sqlite database connection success. |
Assuming you have created a persistent Sqlite database, as qualified above with the .open command and fully qualified file name. A fully qualified file name as a path from a Linux mount point to the file.
You must use the fully qualified file name for a persistent Sqlite student.db database as the database parameter for the sqlite3.connect() method, as shown on line #9 of the sqlite_query.py program below.
1 2 3 4 5 6 7 8 9 10 11 12 13 14 15 16 17 18 19 20 21 22 23 24 25 26 27 28 29 30 31 32 33 34 35 36 37 38 39 40 | #!/usr/bin/python # Import sys library. import sqlite3 try: # Open a connection to a persistent database, which should use # a fully qualified file name, but may use a relative file # name when the Python code is in the same directory as a # persistent student.db sqlite3 database. db = sqlite3.connect('/home/student/Code/sqlite/db/student.db') # Create a cursor. cursor = db.cursor() # Define a query. query = "SELECT k.kingdom_name " \ ", kn.knight_name " \ "FROM kingdom k INNER JOIN knight kn " \ "ON k.kingdom_id = kn.kingdom_allegiance_id " \ "WHERE k.book = 'Prince Caspian'" # Execute the cursor with the query. cursor.execute( query ) # Display the rows returned by the query. for (kingdom_name, knight_name) in cursor: print('{0} has {1}'.format( kingdom_name.title(), knight_name.title())) except sqlite3.Error as e: print('SQLite error: %s' % (' '.join(e.args))) print("Exception class is: ", e.__class__) print('SQLite traceback: ') exc_type, exc_value, exc_tb = sys.exc_info() print(traceback.format_exception(exc_type, exc_value, exc_tb)) sys.exit(1) finally: # Close the connection when it is open. if db: db.close() |
As always, I hope this helps those trying to get up and running with Sqlite.
VSCode Package Error
While running an update on Ubuntu 22.0.4 with the following syntax I got an error on finding the VSCode Package. I ran this to update before adding Ruby and Rails to an Ubuntu virtual machine instance.
sudo apt-get update |
Display detailed console log →
Hit:1 http://us.archive.ubuntu.com/ubuntu jammy InRelease Get:2 http://security.ubuntu.com/ubuntu jammy-security InRelease [110 kB] Get:3 http://us.archive.ubuntu.com/ubuntu jammy-updates InRelease [119 kB] Hit:4 https://dl.google.com/linux/chrome/deb stable InRelease Ign:5 https://packages.microsoft.com/repos/vscode/dists stable InRelease Err:6 https://packages.microsoft.com/repos/vscode/dists stable Release 404 Not Found [IP: 13.90.56.68 443] Hit:7 https://download.vscodium.com/debs vscodium InRelease Hit:8 http://us.archive.ubuntu.com/ubuntu jammy-backports InRelease Hit:9 https://ftp.postgresql.org/pub/pgadmin/pgadmin4/apt/jammy pgadmin4 InRelease Reading package lists... Done E: The repository 'https://packages.microsoft.com/repos/vscode/dists stable Release' does not have a Release file. N: Updating from such a repository can't be done securely, and is therefore disabled by default. N: See apt-secure(8) manpage for repository creation and user configuration details. |
I manually moved the vscode.list file to my student user’s home directory and removed the file from /etc/apt/sources.list.d directory. This allowed me to update all other packages.
Don’t forget to replace the vscode.list file in the /etc/apt/sources.list.d directory.
VSCode & $PYTHONPATH
About 4 years ago, I demonstrated how to develop Python functions with a relative src directory in this old blog post. I thought it might be possible to do with VSCode. Doing a bit of research, it appeared all that was required was adding the PythonPath to VSCode’s Python settings in:
/home/student/.vscode/extensions/ms-python.python-2023.22.0/pythonFiles/.vscode/settings.json |
It contained:
{"files.exclude":{"**/__pycache__/**":true,"**/**/*.pyc":true},"python.formatting.provider":"black"} |
I added a configuration for the PYTHONPATH, as shown:
{"files.exclude":{"**/__pycache__/**":true,"**/**/*.pyc":true},"python.formatting.provider":"black","python.pythonPath": "/home/student/Lib"} |
As you can tell from the embedded VSCode Terminal output below, the PYTHONPATH is not found. You can manually enter it and retest your code successfully. There is no way to use a relative PYTHONPATH like the one you can use from an shell environment file.
This is the hello_whom5.py code:
#!/usr/bin/python # Import the basic sys library. import sys from input import parse_input # Assign command-line argument list to variable. whom = parse_input(sys.argv) # Check if string isn't empty and use dynamic input. if len(whom) > 0: # Print dynamic hello salutation. print("Hello " + whom + "!\n") else: # Print default saluation. print("Hello World!") |
This is the input.py library module:
# Parse a list and return a whitespace delimited string. def parse_input(input_list): # Assign command-line argument list to variable. cmd_list = input_list[1:] # Declare return variable. result = "" # Check whether or not their are parameters beyond the file name. if isinstance(input_list,list) and len(input_list) != 0: # Loop through the command-line argument list and print it. for element in cmd_list: if len(result) == 0: result = element else: result = result + " " + element # Return result variable as string. return result |
This is the Terminal output from VSCode:
student@student-virtual-machine:~$ /bin/python /home/student/Code/python/hello_whom5.py Traceback (most recent call last): File "/home/student/Code/python/hello_whom5.py", line 5, in <module> from input import parse_input ModuleNotFoundError: No module named 'input' student@student-virtual-machine:~$ export set PYTHONPATH=/home/student/Lib student@student-virtual-machine:~$ /bin/python /home/student/Code/python/hello_whom5.py Hello World! student@student-virtual-machine:~$ /bin/python /home/student/Code/python/hello_whom5.py Katniss Everdeen Hello Katniss Everdeen! student@student-virtual-machine:~$ |
The VSCode image for the test follows below:

As always, I hope this helps somebody working the same issue. However, if somebody has a better solution, please let me know.
Ubuntu, Perl & MySQL
Configuring Perl to work with MySQL is straight forward. While Perl is installed generally, you may need to install the libdbd-mysql-perl library.
You install it as a sudoer user with this syntax:
sudo apt install -y libdbd-mysql-perl |
Display detailed console log →
Reading package lists... Done Building dependency tree... Done Reading state information... Done The following additional packages will be installed: libmysqlclient21 The following NEW packages will be installed: libdbd-mysql-perl libmysqlclient21 0 upgraded, 2 newly installed, 0 to remove and 12 not upgraded. Need to get 1,389 kB of archives. After this operation, 7,143 kB of additional disk space will be used. Get:1 http://us.archive.ubuntu.com/ubuntu jammy-updates/main amd64 libmysqlclient21 amd64 8.0.35-0ubuntu0.22.04.1 [1,301 kB] Get:2 http://us.archive.ubuntu.com/ubuntu jammy-updates/universe amd64 libdbd-mysql-perl amd64 4.050-5ubuntu0.22.04.1 [87.6 kB] Fetched 1,389 kB in 1s (1,213 kB/s) Selecting previously unselected package libmysqlclient21:amd64. (Reading database ... 235085 files and directories currently installed.) Preparing to unpack .../libmysqlclient21_8.0.35-0ubuntu0.22.04.1_amd64.deb ... Unpacking libmysqlclient21:amd64 (8.0.35-0ubuntu0.22.04.1) ... Selecting previously unselected package libdbd-mysql-perl:amd64. Preparing to unpack .../libdbd-mysql-perl_4.050-5ubuntu0.22.04.1_amd64.deb ... Unpacking libdbd-mysql-perl:amd64 (4.050-5ubuntu0.22.04.1) ... Setting up libmysqlclient21:amd64 (8.0.35-0ubuntu0.22.04.1) ... Setting up libdbd-mysql-perl:amd64 (4.050-5ubuntu0.22.04.1) ... Processing triggers for man-db (2.10.2-1) ... Processing triggers for libc-bin (2.35-0ubuntu3.5) ... |
You can find the Perl version with the following version.pl program:
1 2 3 4 | #!/usr/bin/perl -w # Print the version. print "Perl ".$]."\n"; |
The first line lets you call the program without prefacing the program name with perl. The first line invokes a subshell of perl by default. You just need to ensure the file has read and execute privileges to run by using the
chmod 755 version.pl |
You call it with this:
./version.pl |
It prints:
Perl 5.034000 |
The following static_query.pl Perl program uses the Perl DBI library to query and return a data set based on a static query.
1 2 3 4 5 6 7 8 9 10 11 12 13 14 15 16 17 18 19 20 21 22 23 24 25 26 27 28 29 30 31 32 33 34 35 36 37 | #!/usr/bin/perl -w # Use the DBI library. use DBI; use strict; use warnings; # Create a connection. my $dbh = DBI->connect("DBI:mysql:database=studentdb;host=localhost:3306" ,"student","student",{'RaiseError' => 1}); # Create SQL statement. my $sql = "SELECT i.item_title , ra.rating , cl.common_lookup_meaning FROM item i INNER JOIN common_lookup cl ON i.item_type = cl.common_lookup_id INNER JOIN rating_agency ra ON i.item_rating_id = ra.rating_agency_id WHERE i.item_title LIKE 'Harry%' AND cl.common_lookup_type = 'BLU-RAY'"; # Prepare SQL statement. my $sth = $dbh->prepare($sql); # Execute statement and read result set. $sth->execute() or die $DBI::errstr; # Read through returned rows, assign elements explicitly to match SELECT-list. while (my @row = $sth->fetchrow_array()) { my $item_title = $row[0]; my $rating = $row[1]; my $lookup_meaning = $row[2]; print "$item_title, $rating, $lookup_meaning\n"; } # Close resources. $sth->finish(); |
It returns the following rows from the sample database:
Harry Potter and the Sorcerer's Stone, PG, Blu-ray Harry Potter and the Chamber of Secrets, PG, Blu-ray Harry Potter and the Prisoner of Azkaban, PG, Blu-ray Harry Potter and the Goblet of Fire, PG-13, Blu-ray |
The following dynamic_query.pl Perl program uses the Perl DBI library to prepare a query, bind a local variable into the query, and return a data set based on a dynamic query.
1 2 3 4 5 6 7 8 9 10 11 12 13 14 15 16 17 18 19 20 21 22 23 24 25 26 27 28 29 30 31 32 33 34 35 36 37 38 39 40 41 42 43 | #!/usr/bin/perl -w # Use the DBI library. use DBI; use strict; use warnings; # Mimic a function parameter by using a local variable. my $item_title_in = 'Star'; # Create a connection. my $dbh = DBI->connect("DBI:mysql:database=studentdb;host=localhost:3306" ,"student","student",{'RaiseError' => 1}); # Create SQL statement. my $sql = "SELECT i.item_title , ra.rating , cl.common_lookup_meaning FROM item i INNER JOIN common_lookup cl ON i.item_type = cl.common_lookup_id INNER JOIN rating_agency ra ON i.item_rating_id = ra.rating_agency_id WHERE i.item_title LIKE CONCAT(?,'%') AND cl.common_lookup_type = 'BLU-RAY'"; # Prepare SQL statement. my $sth = $dbh->prepare($sql); # Bind a variable to first parameter in the query string. $sth->bind_param(1, $item_title_in); # Execute statement and read result set. $sth->execute() or die $DBI::errstr; # Read through returned rows, assign elements explicitly to match SELECT-list. while (my @row = $sth->fetchrow_array()) { my $item_title = $row[0]; my $rating = $row[1]; my $lookup_meaning = $row[2]; print "$item_title, $rating, $lookup_meaning\n"; } # Close resources. $sth->finish(); |
It returns the following rows from the sample database:
Star Wars II, PG, Blu-ray |
You can replace lines 34 through 40 with the following to read any number of columns into a comma-delimited row return:
34 35 36 37 38 39 40 41 42 43 44 45 46 47 48 | # Read through returned rows, assign elements explicitly to match SELECT-list. while (my @row = $sth->fetchrow_array()) { # Read through a dynamic column list for column separated display. my $result = ''; foreach(@row) { if (length($result) == 0) { $result = $_; } else { $result .= ", " . $_; } } # Print comma-separted values by row. print $result . "\n" } |
It returns the following rows from the sample database:
Star Wars II, PG, Blu-ray |
As always, I hope this helps the reader solve a problem.
Oracle 23c Free Ext Files
This is an example of how you would upload data from a flat file, or Comma Separated Value (CSV) file inside Docker Oracle Database 23c Free. It’s important to note that in the file upload you are transferring information that doesn’t have surrogate key values by leveraing joins inside a MERGE statement.
Step #1 : Create a virtual directory
You can create a virtual directory without a physical directory but it won’t work when you try to access it. Therefore, you should create the physical directory first. Assuming you’ve created the Docker Oracle Database 23c Free instance, you should put the code in subdirectories of the /opt/oracle file directory.
- Connect as the root user with the following Docker command:
docker exec -it --user root oracle23c bash
Issue the following commands as the oracle user inside the Docker container to create the necessary physical directories. You may need to refer to my earlier blog post if you haven’t setup the oracle user inside the Docker instance. While this blog post will only use the /opt/oracle/upload/text and /opt/oracle/upload/log directories, a subsequent post will demonstrate the preprocessing module for the external tables.
mkdir /opt/oracle/upload
mkdir /opt/oracle/upload/text
mkdir /opt/oracle/upload/log
mkdir /opt/oracle/upload/preproc
- Connect to the Oracle Database 23c Free inside the container as the system user to create a c##studentrole, and do the following three things:
- Grant privileges to the c##studentrole, and grant the c##studentrole to the c##student user.
-- Create the role.
CREATE ROLE c##studentrole;

-- Grant privileges to the role.
GRANT CREATE CLUSTER, CREATE INDEXTYPE, CREATE PROCEDURE,
CREATE SEQUENCE, CREATE SESSION, CREATE TABLE, CREATE TRIGGER,
CREATE TYPE, CREATE VIEW TO c##studentrole;

-- Grant privileges to the user.
GRANT c##studentrole TO c##student;
- As the system user, create the necessary virtual directories that map to the physical directories inside the Docker container:
CREATE DIRECTORY upload AS '/opt/oracle/upload/text';
CREATE DIRECTORY preproc AS '/opt/oracle/upload/preproc';
CREATE DIRECTORY LOG AS '/opt/oracle/upload/log';
- As the system user, grant the necessary privileges on the virtual directories to the c##studentrole role:
GRANT read ON DIRECTORY upload TO c##studentrole;
GRANT read, WRITE ON DIRECTORY LOG TO c##studentrole;
GRANT read, EXECUTE ON DIRECTORY preproc TO c##studentrole;
- Grant privileges to the c##studentrole, and grant the c##studentrole to the c##student user.
Step #2 : Position your CSV file in the physical directory
After creating the virtual directory, copy the following contents into a file named kingdom_import.csv in the /opt/oracle/upload/texgt directory or folder. If you attempt to do this in Windows, you need to disable Windows UAC before performing this step.
Place the following in the kingdom_import.csv file. The trailing commas aren’t too meaningful in Oracle but they’re very helpful if you use the file in MySQL. A key element in creating this files requires that you avoid trailing line returns at the bottom of the file because they’re inserted as null values. There should be no lines after the last row of data.
'Narnia',77600,'Peter the Magnificent','20-MAR-1272','19-JUN-1292','The Lion, The Witch and The Wardrobe', 'Narnia',77600,'Edmund the Just','20-MAR-1272','19-JUN-1292','The Lion, The Witch and The Wardrobe', 'Narnia',77600,'Susan the Gentle','20-MAR-1272','19-JUN-1292','The Lion, The Witch and The Wardrobe', 'Narnia',77600,'Lucy the Valiant','20-MAR-1272','19-JUN-1292','The Lion, The Witch and The Wardrobe', 'Narnia',42100,'Peter the Magnificent','12-APR-1531','31-MAY-1328','Prince Caspian', 'Narnia',42100,'Edmund the Just','12-APR-1531','31-MAY-1328','Prince Caspian', 'Narnia',42100,'Susan the Gentle','12-APR-1531','31-MAY-1328','Prince Caspian', 'Narnia',42100,'Lucy the Valiant','12-APR-1531','31-MAY-1328','Prince Caspian', 'Camelot',15200,'King Arthur','10-MAR-0631','12-DEC-0686','The Once and Future King', 'Camelot',15200,'Sir Lionel','10-MAR-0631','12-DEC-0686','The Once and Future King', 'Camelot',15200,'Sir Bors','10-MAR-0631','12-DEC-0635','The Once and Future King', 'Camelot',15200,'Sir Bors','10-MAR-0640','12-DEC-0686','The Once and Future King', 'Camelot',15200,'Sir Galahad','10-MAR-0631','12-DEC-0686','The Once and Future King', 'Camelot',15200,'Sir Gawain','10-MAR-0631','12-DEC-0686','The Once and Future King', 'Camelot',15200,'Sir Tristram','10-MAR-0631','12-DEC-0686','The Once and Future King', 'Camelot',15200,'Sir Percival','10-MAR-0631','12-DEC-0686','The Once and Future King', 'Camelot',15200,'Sir Lancelot','30-SEP-0670','12-DEC-0686','The Once and Future King', |
Step #3 : Reconnect as the student user
Disconnect and connect as the c##student user, or reconnect as the c##student user. The reconnect syntax that protects your password is:
CONNECT c##student@free |
Step #4 : Run the script that creates tables and sequences
Copy the following into a create_kingdom_upload.sql file within a directory of your choice. I use varchar as the data type because it’s an alias for varchar2 and highlights appropriately with the GeSHi formatting. Then, run it as the student account.
1 2 3 4 5 6 7 8 9 10 11 12 13 14 15 16 17 18 19 20 21 22 23 24 25 26 27 28 29 30 31 32 33 34 35 36 37 38 39 40 41 42 43 44 45 46 47 48 49 50 51 52 | -- Conditionally drop tables. DROP TABLE IF EXISTS kingdom; DROP TABLE IF EXISTS knight; DROP TABLE IF EXISTS kingdom_knight_import; -- Conditionally drop sequences. DROP SEQUENCE IF EXISTS kingdom_s1; DROP SEQUENCE IF EXISTS knight_s1; -- Create normalized kingdom table. CREATE TABLE kingdom ( kingdom_id NUMBER , kingdom_name VARCHAR(20) , population NUMBER , book VARCHAR(40)); -- Create a sequence for the kingdom table. CREATE SEQUENCE kingdom_s1; -- Create normalized knight table. CREATE TABLE knight ( knight_id NUMBER , knight_name VARCHAR(22) , kingdom_allegiance_id NUMBER , allegiance_start_date DATE , allegiance_end_date DATE , book VARCHAR(40)); -- Create a sequence for the knight table. CREATE SEQUENCE knight_s1; -- Create external import table. CREATE TABLE kingdom_knight_import ( kingdom_name VARCHAR(20) , population NUMBER , knight_name VARCHAR(22) , allegiance_start_date DATE , allegiance_end_date DATE , book VARCHAR(40)) ORGANIZATION EXTERNAL ( TYPE oracle_loader DEFAULT DIRECTORY upload ACCESS PARAMETERS ( RECORDS DELIMITED BY NEWLINE CHARACTERSET US7ASCII BADFILE 'LOG':'kingdom_import.bad' DISCARDFILE 'LOG':'kingdom_import.dis' LOGFILE 'LOG':'kingdom_import.log' FIELDS TERMINATED BY ',' OPTIONALLY ENCLOSED BY "'" MISSING FIELD VALUES ARE NULL ) LOCATION ('kingdom_import.csv')) REJECT LIMIT UNLIMITED; |
Step #5 : Test your access to the external table
There a number of things that could go wrong with setting up an external table, such as file permissions. Before moving on to the balance of the steps, you should test what you’ve done. Run the following query from the student account to check whether or not you can access the kingdom_import.csv file.
1 2 3 4 5 6 7 8 9 10 11 12 | SET PAGESIZE 999 COL kingdom_name FORMAT A7 HEADING "Kingdom|Name" COL folks FORMAT 99999 HEADING "Folks" COL knight_name FORMAT A21 HEADING "Knight Name" COL dates FORMAT A11 HEADING "Start Date" COL source_book FORMAT A38 HEADING "Book" SELECT kingdom_name , knight_name , TO_CHAR(allegiance_start_date,'DD-MON-YYYY') || TO_CHAR(allegiance_end_date,'DD-MON-YYYY') AS dates , book FROM kingdom_knight_import; |
Step #6 : Create the upload procedure
Copy the following into a create_upload_procedure.sql file within a virtual directory of your choice. As noted above in the external table definition writes only occur in the log virtual directory. This is important because there are articles out there on the Internet that could misdirect you when you get the following error message on the upload virtual directory.
ORA-06564: Object UPLOAD does not exist or is not accessible to the user. |
By the way, you’ll only see that error if you fail to:
- Designate the procedure as AUTH_ID CURRENT, and
- Enabled SERVEROUTPUT inside the SQL*Plus command-line interface (CLI) session or inside the glogin.sql file for the Oracle Database 23c Free Docker instance.
Then, run it as the student account.
1 2 3 4 5 6 7 8 9 10 11 12 13 14 15 16 17 18 19 20 21 22 23 24 25 26 27 28 29 30 31 32 33 34 35 36 37 38 39 40 41 42 43 44 45 46 47 48 49 50 51 52 53 54 55 56 57 58 59 60 61 62 63 64 65 66 67 68 | -- Create a procedure to wrap the transaction. CREATE OR REPLACE PROCEDURE upload_kingdom AUTHID CURRENT_USER IS BEGIN -- Set save point for an all or nothing transaction. SAVEPOINT starting_point; -- Insert or update the table, which makes this rerunnable when the file hasn't been updated. MERGE INTO kingdom target USING (SELECT DISTINCT k.kingdom_id , kki.kingdom_name , kki.population , kki.book FROM kingdom_knight_import kki LEFT JOIN kingdom k ON kki.kingdom_name = k.kingdom_name AND kki.population = k.population AND kki.book = k.book) SOURCE ON (target.kingdom_id = SOURCE.kingdom_id) WHEN MATCHED THEN UPDATE SET kingdom_name = SOURCE.kingdom_name WHEN NOT MATCHED THEN INSERT VALUES ( kingdom_s1.nextval , SOURCE.kingdom_name , SOURCE.population , SOURCE.book); -- Insert or update the table, which makes this rerunnable when the file hasn't been updated. MERGE INTO knight target USING (SELECT kn.knight_id , kki.knight_name , k.kingdom_id , kki.allegiance_start_date AS start_date , kki.allegiance_end_date AS end_date , kki.book FROM kingdom_knight_import kki INNER JOIN kingdom k ON kki.kingdom_name = k.kingdom_name AND kki.population = k.population LEFT JOIN knight kn ON k.kingdom_id = kn.kingdom_allegiance_id AND kki.knight_name = kn.knight_name AND kki.allegiance_start_date = kn.allegiance_start_date AND kki.allegiance_end_date = kn.allegiance_end_date AND kki.book = kn.book) SOURCE ON (target.kingdom_allegiance_id = SOURCE.kingdom_id) WHEN MATCHED THEN UPDATE SET allegiance_start_date = SOURCE.start_date , allegiance_end_date = SOURCE.end_date , book = SOURCE.book WHEN NOT MATCHED THEN INSERT VALUES ( knight_s1.nextval , SOURCE.knight_name , SOURCE.kingdom_id , SOURCE.start_date , SOURCE.end_date , SOURCE.book); -- Save the changes. COMMIT; EXCEPTION WHEN OTHERS THEN dbms_output.put_line(SQLERRM); ROLLBACK TO starting_point; RETURN; END; / |
Step #7 : Run the upload procedure
You can run the file by calling the script above. The procedure ensures that records are inserted or updated into their respective tables.
EXECUTE upload_kingdom; |
Step #8 : Test the results of the upload procedure
You can test whether or not it worked by running the following queries.
1 2 3 4 5 6 7 8 9 10 11 12 13 14 15 16 17 18 19 20 21 22 23 24 | -- Format Oracle output. COLUMN kingdom_id FORMAT 999 HEADING "Kingdom|ID #" COLUMN kingdom_name FORMAT A14 HEADING "Kingdom|Name" COLUMN population FORMAT 999,999 HEADING "Population" COLUMN book FORMAT A40 HEADING "Source Book" -- Check the kingdom table. SELECT * FROM kingdom; -- Format Oracle output. SET PAGESIZE 999 COLUMN knight_id FORMAT 999 HEADING "Knight|ID #" COLUMN knight_name FORMAT A23 HEADING "Knight|Name" COLUMN kingdom_allegiance_id FORMAT 999 HEADING "Kingdom|ID #" COLUMN allegiance_start_date FORMAT A11 HEADING "Allegiance|Start Date" COLUMN allegiance_end_date FORMAT A11 HEADING "Allegiance|End Date" -- Check the knight table. SELECT knight_id , knight_name , kingdom_allegiance_id , TO_CHAR(allegiance_start_date,'DD-MON-YYYY') AS allegiance_start_date , TO_CHAR(allegiance_end_date,'DD-MON-YYYY') AS allegiance_end_date FROM knight; |
It should display the following information:
Kingdom Kingdom
   ID # Name	       Population Source Book
------- -------------- ---------- ----------------------------------------
      1 Narnia		   42,100 Prince Caspian
      2 Narnia		   77,600 The Lion, The Witch and The Wardrobe
      3 Camelot 	   15,200 The Once and Future King


Knight Knight		       Kingdom Allegiance  Allegiance
  ID # Name			  ID # Start Date  End Date
------ ----------------------- ------- ----------- -----------
     1 Peter the Magnificent	     2 20-MAR-1272 19-JUN-1292
     2 Edmund the Just		     2 20-MAR-1272 19-JUN-1292
     3 Susan the Gentle 	     2 20-MAR-1272 19-JUN-1292
     4 Lucy the Valiant 	     2 20-MAR-1272 19-JUN-1292
     5 Peter the Magnificent	     1 12-APR-1531 31-MAY-1328
     6 Edmund the Just		     1 12-APR-1531 31-MAY-1328
     7 Susan the Gentle 	     1 12-APR-1531 31-MAY-1328
     8 Lucy the Valiant 	     1 12-APR-1531 31-MAY-1328
     9 King Arthur		     3 10-MAR-0631 12-DEC-0686
    10 Sir Lionel		     3 10-MAR-0631 12-DEC-0686
    11 Sir Bors 		     3 10-MAR-0631 12-DEC-0635
    12 Sir Bors 		     3 10-MAR-0640 12-DEC-0686
    13 Sir Galahad		     3 10-MAR-0631 12-DEC-0686
    14 Sir Gawain		     3 10-MAR-0631 12-DEC-0686
    15 Sir Tristram		     3 10-MAR-0631 12-DEC-0686
    16 Sir Percival		     3 10-MAR-0631 12-DEC-0686
17 Sir Lancelot 3 30-SEP-0670 12-DEC-0686 |
You can rerun the procedure to check that it doesn’t alter any information, then you could add a new knight to test the insertion portion.
Native sqlplus editing
I have to remind myself from time to time that Ubuntu is a Desktop or Workstation and by default can go missing key server software, like ssh. This became evident when I wanted to check whether I could run sqlplus from my Mac OS terminal through my Ubuntu VM and internally embedded Oracle Database 23c Free docker instance.
If like me you forgot to add it, you can add the ssh service with the following commands to your Ubuntu VM:
sudo apt update sudo apt install -y openssh-server sudo systemctl start ssh.service |
Then, you can test the installation with an ssh call to localhost, like:
ssh localhost |
You should see the following, where you need to enter the sudoer’s password to continue. Your localhost target causes an authenticity check, like:
The authenticity of host 'localhost (127.0.0.1)' can't be established. ED25519 key fingerprint is SHA256:js8knEf/lOE1rSss3u8lP4Ii634Y0CkUz+oJM5dt3w4. This key is not known by any other names Are you sure you want to continue connecting (yes/no/[fingerprint])? |
Enter yes to continue:
Are you sure you want to continue connecting (yes/no/[fingerprint])? yes |
It will now add localhost to the list of known hosts provide standard messages, as shown below.
Warning: Permanently added 'localhost' (ED25519) to the list of known hosts. student@localhost's password: Welcome to Ubuntu 22.04.3 LTS (GNU/Linux 6.2.0-39-generic x86_64) * Documentation: https://help.ubuntu.com * Management: https://landscape.canonical.com * Support: https://ubuntu.com/advantage Expanded Security Maintenance for Applications is not enabled. 9 updates can be applied immediately. 5 of these updates are standard security updates. To see these additional updates run: apt list --upgradable Enable ESM Apps to receive additional future security updates. See https://ubuntu.com/esm or run: sudo pro status The programs included with the Ubuntu system are free software; the exact distribution terms for each program are described in the individual files in /usr/share/doc/*/copyright. Ubuntu comes with ABSOLUTELY NO WARRANTY, to the extent permitted by applicable law. |
Having verified the installation and functionality of ssh in the Ubuntu VM. Then, I launched a Terminal session on my MacBookPro base operating system. Using the Ubuntu instance ssh and a customized Bash function, I discovered its IP address.
The following is the get_ip() user-defined function in the Ubuntu instance’s student user’s customized .bashrc file:
# Return the local instance's IP address. get_ip () { echo `hostname -I | cut -f1 -d' '` } |
In this instance, it returned:
192.168.195.155 |
With the IP address, I secured shelled into my Ubuntu sudoer student user like this:
ssh student@192.168.195.155 |
It’ll prompt you for the remote server’s student password, like:
student@192.168.195.155's password: |
After entering the correct password, I got the standard reply of a valid connection:
Welcome to Ubuntu 22.04.3 LTS (GNU/Linux 6.2.0-39-generic x86_64) * Documentation: https://help.ubuntu.com * Management: https://landscape.canonical.com * Support: https://ubuntu.com/advantage Expanded Security Maintenance for Applications is not enabled. 9 updates can be applied immediately. 5 of these updates are standard security updates. To see these additional updates run: apt list --upgradable Enable ESM Apps to receive additional future security updates. See https://ubuntu.com/esm or run: sudo pro status Last login: Fri Jan 5 18:13:21 2024 from 127.0.0.1 |
Next, I connected to the Ubuntu Docker Oracle Database 23c Free instance with this syntax:
docker exec -it --user student oracle23c bash |
At the prompt for the Docker instance of Oracle Database 23c Free, you can type sqlplus to work directly against the Oracle Database 23c Free instance with a pluggable c##student database user.
sqlplus c##student/student SQL*Plus: Release 23.0.0.0.0 - Production on Sat Jan 6 01:38:06 2024 Version 23.3.0.23.09 Copyright (c) 1982, 2023, Oracle. All rights reserved. Last Successful login time: Sat Dec 23 2023 04:30:00 +00:00 Connected to: Oracle Database 23c Free Release 23.0.0.0.0 - Develop, Learn, and Run for Free Version 23.3.0.23.09 |
Now, I can interactively edit my files with vi in the Docker Oracle Database 23c Free directory. The following demonstrates using the sandboxed student() function from my earlier Oracle 23c Free SQL*Plus blog post and connects as a sandboxed student user in the Docker Oracle 23c Free container. The image uses a different Mac OS and different Ubuntu VM from the earlier entries in this blog post from the earlier examples.
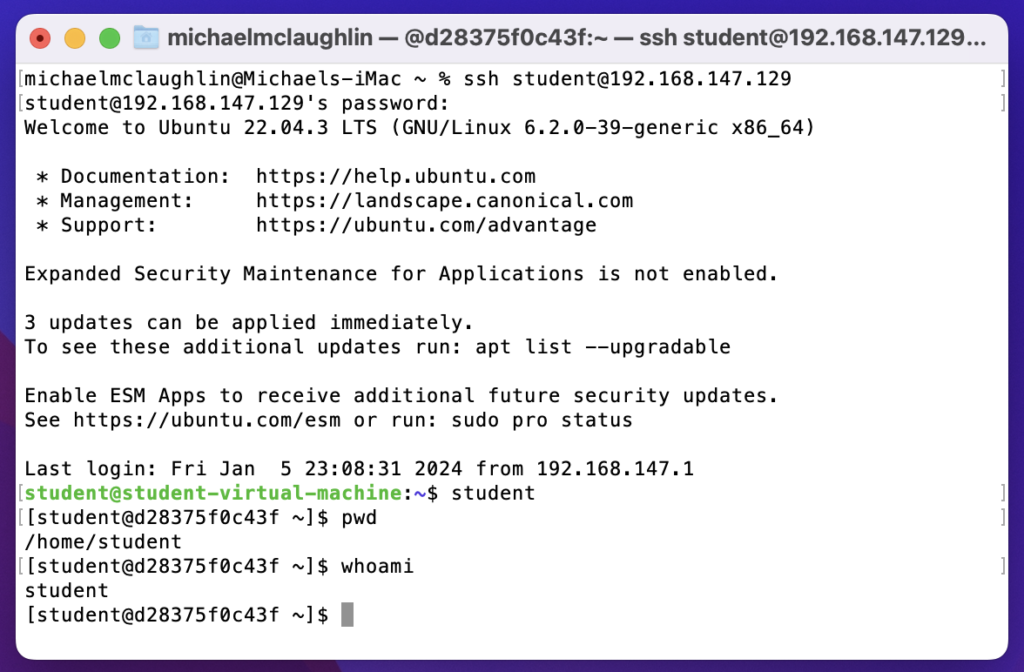
You can edit and test the files in the Docker Oracle 23c Free instance through the command-line interface (CLI). You can further automate the ssh connection by making the Ubuntu instance’s IP address a static address instead of a DCHP-assigned address; and then you can put it in the Mac OS’s /etc/hosts file which lets you resolve it by name (through file versus DNS resolution).
As always, I hope this helps those looking for a solution.
Disk Space Allocation
It’s necessary to check for adequate disk space on your Virtual Machine (VM) before installing Oracle 23c Free in a Docker container or as a podman service. Either way, it requires about 13 GB of disk space. On Ubuntu, the typical install of a VM allocates 20 GB and a 500 MB swap. You need to create a 2 GB swap when you install Ubuntu or plan to change the swap, as qualified in this excellent DigitalOcean article. Assuming you installed it with the correct swap or extended your swap area, you can confirm it with the following command:
sudo swapon --show |
It should return something like this:
NAME TYPE SIZE USED PRIO /swapfile file 2.1G 1.2G -2 |
Next, check your disk space allocation and availability with this command:
df -h |
This is what was in my instance with MySQL and PostgreSQL databases already installed and configured with sandboxed schemas:
Filesystem Size Used Avail Use% Mounted on tmpfs 388M 2.1M 386M 1% /run /dev/sda3 20G 14G 4.6G 75% / tmpfs 1.9G 28K 1.9G 1% /dev/shm tmpfs 5.0M 4.0K 5.0M 1% /run/lock /dev/sda2 512M 6.1M 506M 2% /boot/efi tmpfs 388M 108K 388M 1% /run/user/1000 |
Using VMware Fusion on my Mac (Intel-based i9), I changed the allocated space from 20 GB to 40 GB by navigating to Virtual Machine, Settings…, Hard Disk. I entered 40.00 as the disk size and clicked the Pre-allocate disk space checkbox before clicking the Apply button, as shown in below. This added space is necessary because Oracle Database 23c Free as a Docker instance requires almost 10 GB of local space.
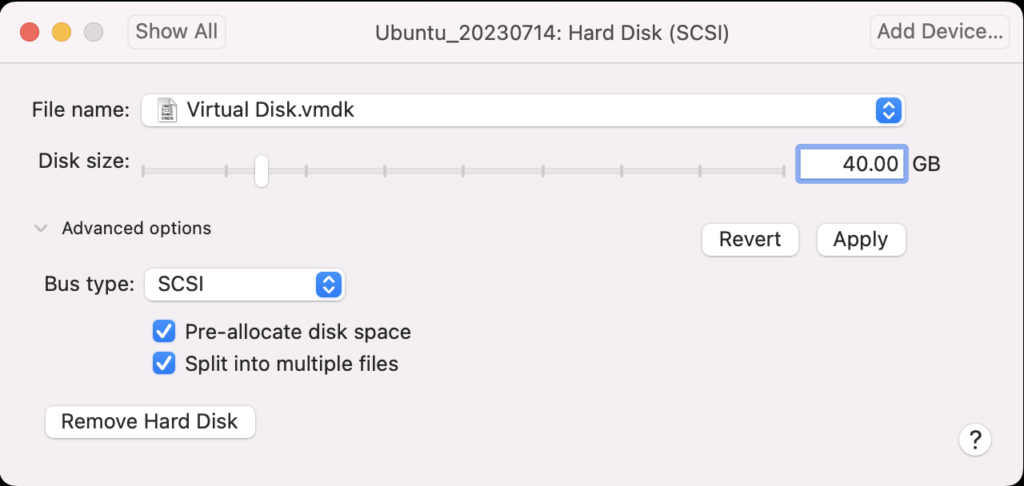
After clicking the Apply button, I checked Ubuntu with the “df -h” command and found there was no change. That’s unlike doing the same thing on AlmaLinux or a RedHat distribution, which was surprising.
The next set of steps required that I manually add the space to the Ubuntu instance:
- Start the Ubuntu VM and check the instance’s disk information with fdisk:
sudo fdisk -l
The log file for this is:
Display detailed console log →
Disk /dev/loop0: 238.77 MiB, 250372096 bytes, 489008 sectors
Units: sectors of 1 * 512 = 512 bytes
Sector size (logical/physical): 512 bytes / 512 bytes
I/O size (minimum/optimal): 512 bytes / 512 bytes


Disk /dev/loop1: 73.86 MiB, 77443072 bytes, 151256 sectors
Units: sectors of 1 * 512 = 512 bytes
Sector size (logical/physical): 512 bytes / 512 bytes
I/O size (minimum/optimal): 512 bytes / 512 bytes


Disk /dev/loop2: 349.7 MiB, 366682112 bytes, 716176 sectors
Units: sectors of 1 * 512 = 512 bytes
Sector size (logical/physical): 512 bytes / 512 bytes
I/O size (minimum/optimal): 512 bytes / 512 bytes


Disk /dev/loop3: 91.69 MiB, 96141312 bytes, 187776 sectors
Units: sectors of 1 * 512 = 512 bytes
Sector size (logical/physical): 512 bytes / 512 bytes
I/O size (minimum/optimal): 512 bytes / 512 bytes


Disk /dev/loop4: 496.98 MiB, 521121792 bytes, 1017816 sectors
Units: sectors of 1 * 512 = 512 bytes
Sector size (logical/physical): 512 bytes / 512 bytes
I/O size (minimum/optimal): 512 bytes / 512 bytes


Disk /dev/loop5: 45.93 MiB, 48160768 bytes, 94064 sectors
Units: sectors of 1 * 512 = 512 bytes
Sector size (logical/physical): 512 bytes / 512 bytes
I/O size (minimum/optimal): 512 bytes / 512 bytes


Disk /dev/loop6: 128.92 MiB, 135184384 bytes, 264032 sectors
Units: sectors of 1 * 512 = 512 bytes
Sector size (logical/physical): 512 bytes / 512 bytes
I/O size (minimum/optimal): 512 bytes / 512 bytes


Disk /dev/loop7: 63.45 MiB, 66531328 bytes, 129944 sectors
Units: sectors of 1 * 512 = 512 bytes
Sector size (logical/physical): 512 bytes / 512 bytes
I/O size (minimum/optimal): 512 bytes / 512 bytes


Disk /dev/fd0: 1.41 MiB, 1474560 bytes, 2880 sectors
Units: sectors of 1 * 512 = 512 bytes
Sector size (logical/physical): 512 bytes / 512 bytes
I/O size (minimum/optimal): 512 bytes / 512 bytes
Disklabel type: dos
Disk identifier: 0x90909090

Device     Boot      Start        End    Sectors  Size Id Type
/dev/fd0p1      2425393296 4850786591 2425393296  1.1T 90 unknown
/dev/fd0p2      2425393296 4850786591 2425393296  1.1T 90 unknown
/dev/fd0p3      2425393296 4850786591 2425393296  1.1T 90 unknown
/dev/fd0p4      2425393296 4850786591 2425393296  1.1T 90 unknown
GPT PMBR size mismatch (41943039 != 83886079) will be corrected by write.


Disk /dev/sda: 40 GiB, 42949672960 bytes, 83886080 sectors
Disk model: VMware Virtual S
Units: sectors of 1 * 512 = 512 bytes
Sector size (logical/physical): 512 bytes / 512 bytes
I/O size (minimum/optimal): 512 bytes / 512 bytes
Disklabel type: gpt
Disk identifier: 7906AE0B-498C-4FE4-8B45-9CD1B2265197

Device       Start      End  Sectors  Size Type
/dev/sda1     2048     4095     2048    1M BIOS boot
/dev/sda2     4096  1054719  1050624  513M EFI System
/dev/sda3  1054720 41940991 40886272 19.5G Linux filesystem


Disk /dev/loop8: 40.84 MiB, 42827776 bytes, 83648 sectors
Units: sectors of 1 * 512 = 512 bytes
Sector size (logical/physical): 512 bytes / 512 bytes
I/O size (minimum/optimal): 512 bytes / 512 bytes


Disk /dev/loop9: 304 KiB, 311296 bytes, 608 sectors
Units: sectors of 1 * 512 = 512 bytes
Sector size (logical/physical): 512 bytes / 512 bytes
I/O size (minimum/optimal): 512 bytes / 512 bytes


Disk /dev/loop10: 452 KiB, 462848 bytes, 904 sectors
Units: sectors of 1 * 512 = 512 bytes
Sector size (logical/physical): 512 bytes / 512 bytes
I/O size (minimum/optimal): 512 bytes / 512 bytes


Disk /dev/loop13: 496.88 MiB, 521015296 bytes, 1017608 sectors
Units: sectors of 1 * 512 = 512 bytes
Sector size (logical/physical): 512 bytes / 512 bytes
I/O size (minimum/optimal): 512 bytes / 512 bytes


Disk /dev/loop12: 240.05 MiB, 251707392 bytes, 491616 sectors
Units: sectors of 1 * 512 = 512 bytes
Sector size (logical/physical): 512 bytes / 512 bytes
I/O size (minimum/optimal): 512 bytes / 512 bytes


Disk /dev/loop11: 4 KiB, 4096 bytes, 8 sectors
Units: sectors of 1 * 512 = 512 bytes
Sector size (logical/physical): 512 bytes / 512 bytes
I/O size (minimum/optimal): 512 bytes / 512 bytes


Disk /dev/loop14: 346.33 MiB, 363151360 bytes, 709280 sectors
Units: sectors of 1 * 512 = 512 bytes
Sector size (logical/physical): 512 bytes / 512 bytes
I/O size (minimum/optimal): 512 bytes / 512 bytes


Disk /dev/loop16: 12.32 MiB, 12922880 bytes, 25240 sectors
Units: sectors of 1 * 512 = 512 bytes
Sector size (logical/physical): 512 bytes / 512 bytes
I/O size (minimum/optimal): 512 bytes / 512 bytes


Disk /dev/loop17: 73.9 MiB, 77492224 bytes, 151352 sectors
Units: sectors of 1 * 512 = 512 bytes
Sector size (logical/physical): 512 bytes / 512 bytes
I/O size (minimum/optimal): 512 bytes / 512 bytes


Disk /dev/loop15: 175.83 MiB, 184373248 bytes, 360104 sectors
Units: sectors of 1 * 512 = 512 bytes
Sector size (logical/physical): 512 bytes / 512 bytes
I/O size (minimum/optimal): 512 bytes / 512 bytes


Disk /dev/loop18: 63.46 MiB, 66547712 bytes, 129976 sectors
Units: sectors of 1 * 512 = 512 bytes
Sector size (logical/physical): 512 bytes / 512 bytes
I/O size (minimum/optimal): 512 bytes / 512 bytes


Disk /dev/loop19: 40.86 MiB, 42840064 bytes, 83672 sectors
Units: sectors of 1 * 512 = 512 bytes
Sector size (logical/physical): 512 bytes / 512 bytes
I/O size (minimum/optimal): 512 bytes / 512 bytes
After running fdisk, I rechecked disk allocation with df -h and saw no change:
Filesystem      Size  Used Avail Use% Mounted on
tmpfs           388M  2.1M  386M   1% /run
/dev/sda3        20G   14G  4.6G  75% /
tmpfs           1.9G   28K  1.9G   1% /dev/shm
tmpfs           5.0M  4.0K  5.0M   1% /run/lock
/dev/sda2       512M  6.1M  506M   2% /boot/efi
tmpfs           388M  108K  388M   1% /run/user/1000
- So, I installed Ubuntu’s user space utility gparted:
sudo apt install gparted
The log file for this is:
Display detailed console log →
Reading package lists... Done
Building dependency tree... Done
Reading state information... Done
The following additional packages will be installed:
  gparted-common
Suggested packages:
  dmraid gpart jfsutils kpartx mtools reiser4progs reiserfsprogs udftools
  xfsprogs exfatprogs
The following NEW packages will be installed:
  gparted gparted-common
0 upgraded, 2 newly installed, 0 to remove and 4 not upgraded.
Need to get 490 kB of archives.
After this operation, 2,128 kB of additional disk space will be used.
Do you want to continue? [Y/n] Y
Get:1 http://us.archive.ubuntu.com/ubuntu jammy/main amd64 gparted-common all 1.3.1-1ubuntu1 [71.9 kB]
Get:2 http://us.archive.ubuntu.com/ubuntu jammy/main amd64 gparted amd64 1.3.1-1ubuntu1 [418 kB]
Fetched 490 kB in 2s (211 kB/s)
Selecting previously unselected package gparted-common.
(Reading database ... 203026 files and directories currently installed.)
Preparing to unpack .../gparted-common_1.3.1-1ubuntu1_all.deb ...
Unpacking gparted-common (1.3.1-1ubuntu1) ...
Selecting previously unselected package gparted.
Preparing to unpack .../gparted_1.3.1-1ubuntu1_amd64.deb ...
Unpacking gparted (1.3.1-1ubuntu1) ...
Setting up gparted-common (1.3.1-1ubuntu1) ...
Setting up gparted (1.3.1-1ubuntu1) ...
Processing triggers for mailcap (3.70+nmu1ubuntu1) ...
Processing triggers for desktop-file-utils (0.26-1ubuntu3) ...
Processing triggers for hicolor-icon-theme (0.17-2) ...
Processing triggers for gnome-menus (3.36.0-1ubuntu3) ...
Processing triggers for man-db (2.10.2-1) ...
- After installing the gparted utility (manual can be found here), you can launch it with the following syntax:
sudo gpartedYou’ll see the following in the console, which you can ignore.
GParted 1.3.1
configuration --enable-libparted-dmraid --enable-online-resize
libparted 3.4
It launches a GUI interface that should look something like the following:
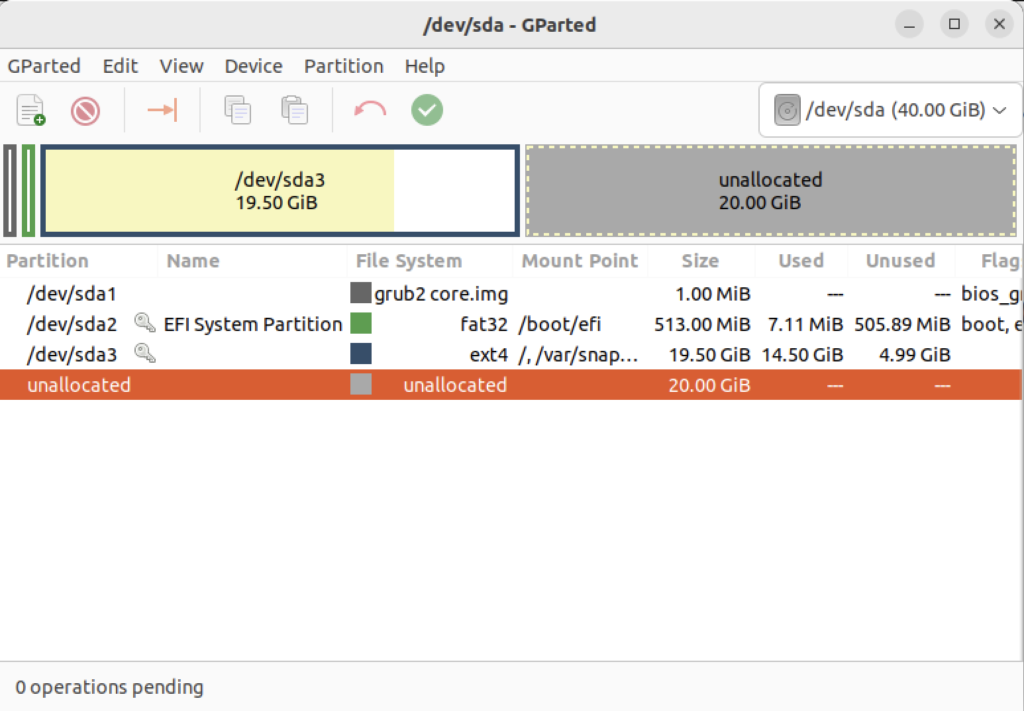
Right-click on the /dev/sda3 Partition and the GParted application will present the following context popup menu. Click the Resize/Move menu option.

The attempt to resize the disk at this point GParted will raise a read-only exception like the following:
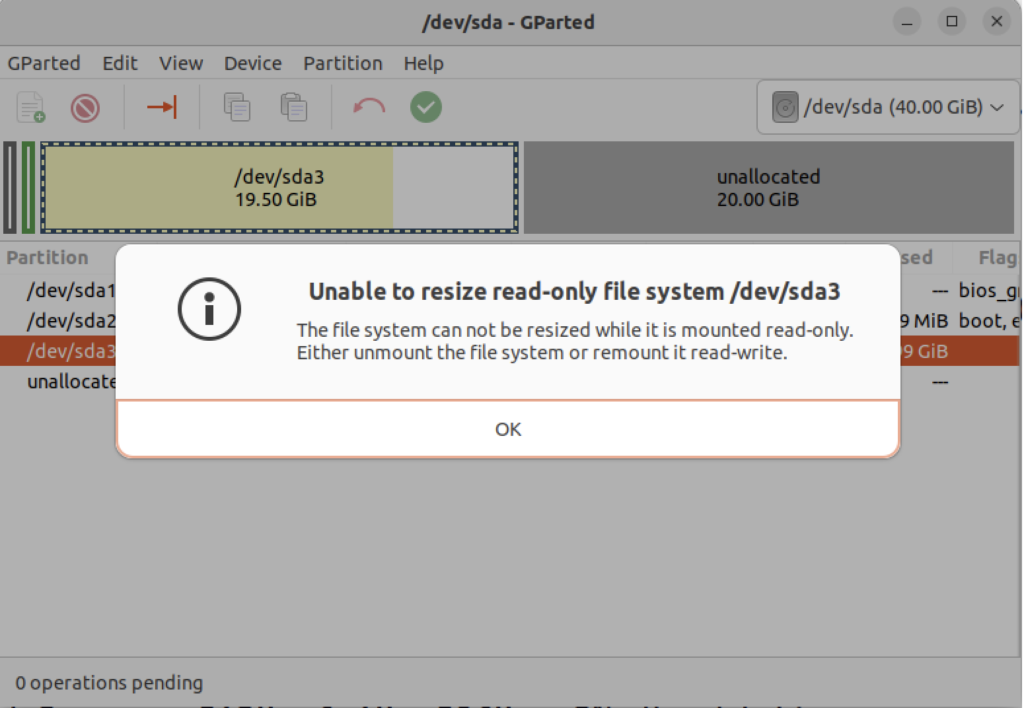
You might open a new shell and fix the disk at the command-line but you’ll need to relaunch gparted regardless. So, you should close gparted and run the following commands:
sudo mount -o remount -rw /
sudo mount -o remount -rw /var/snap/firefox/common/host-hunspell
When you relaunch GParted, you see that the graphic depiction has changed when you right-click on the /dev/sda3 Partition as follows:
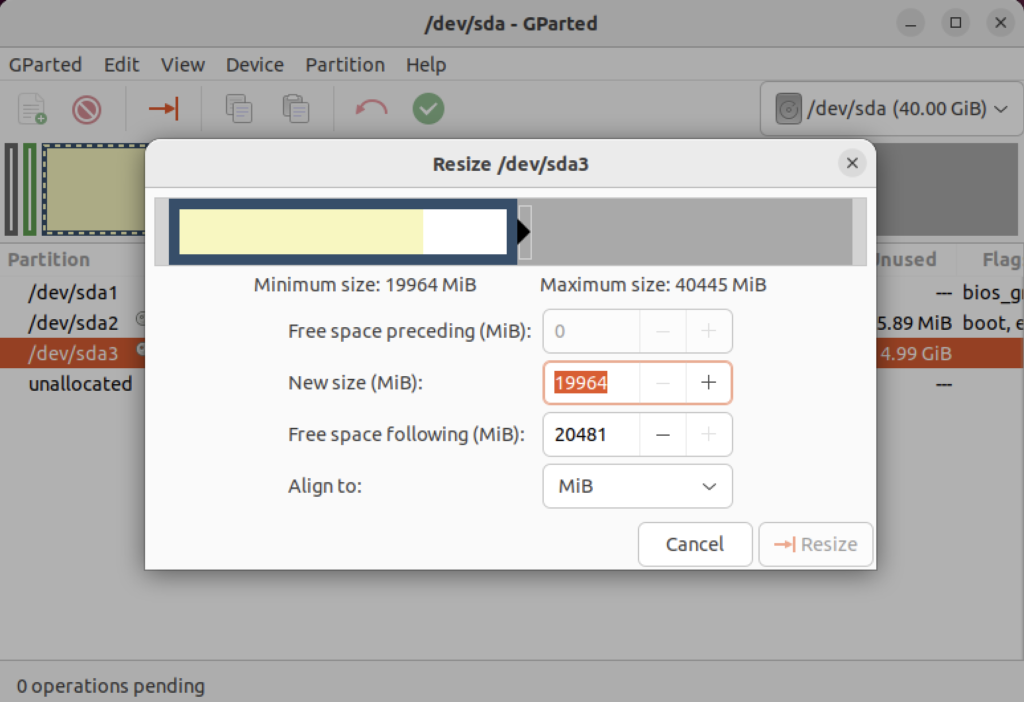
Click on the highlighted box with the arrow and drag it all the way to the right. It will then show you something like the following.

Click the Resize button to make the change and add the space to the Ubuntu file system and see something like the following in Gparted:
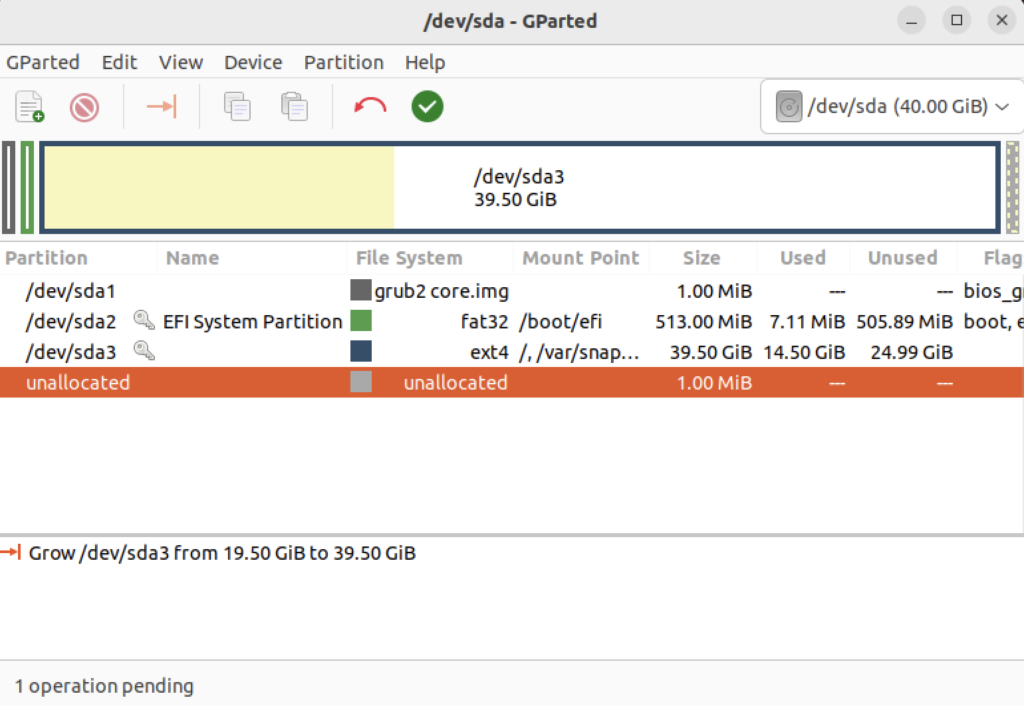
Choose Edit in the menu bar and then Apply All Operations to effect the change in the disk allocation. The last dialog will require you to verify you want to make the changes. Click the Apply button to make the changes.
Click the close for the GParted application and then you can rerun the following command:
df -h
You will see that you now have 19.5 GB of additional space:
Filesystem      Size  Used Avail Use% Mounted on
tmpfs           388M  2.2M  386M   1% /run
/dev/sda3        39G 19.5G   23G  39% /
tmpfs           1.9G   28K  1.9G   1% /dev/shm
tmpfs           5.0M  4.0K  5.0M   1% /run/lock
/dev/sda2       512M  6.1M  506M   2% /boot/efi
tmpfs           388M  116K  388M   1% /run/user/1000
- Finally, you can now successfully download the latest Docker version of Oracle Database 23c Free with the following command:
docker run --name oracle23c -p 1521:1521 -p 5500:5500 -e ORACLE_PWD=cangetin container-registry.oracle.com/database/free:latest
Since you haven’t downloaded the container, you’ll get a warning that it is unable to find the image before it discovers it and downloads it. This will take several minutes. At the conclusion, it will start the Oracle Database Net Listener and begin updating files. the updates may take quite a while to complete.
The basic download console output looks like the following and if you check your disk space you’ve downloaded about 14 GB in the completed container.
Unable to find image 'container-registry.oracle.com/database/free:latest' locally
latest: Pulling from database/free
089fdfcd47b7: Pull complete
43c899d88edc: Pull complete
47aa6f1886a1: Pull complete
f8d07bb55995: Pull complete
c31c8c658c1e: Pull complete
b7d28faa08b4: Pull complete
1d0d5c628f6f: Pull complete
db82a695dad3: Pull complete
25a185515793: Pull complete
Digest: sha256:5ac0efa9896962f6e0e91c54e23c03ae8f140cf6ed43ca09ef4354268a942882
Status: Downloaded newer image for container-registry.oracle.com/database/free:latest
My detailed log file for the complete recovery operation is:
Display detailed console log →
Starting Oracle Net Listener.
Oracle Net Listener started.
Starting Oracle Database instance FREE.
Oracle Database instance FREE started.

The Oracle base remains unchanged with value /opt/oracle

SQL*Plus: Release 23.0.0.0.0 - Production on Thu Nov 30 22:40:55 2023
Version 23.3.0.23.09

Copyright (c) 1982, 2023, Oracle.  All rights reserved.


Connected to:
Oracle Database 23c Free Release 23.0.0.0.0 - Develop, Learn, and Run for Free
Version 23.3.0.23.09

SQL>
User altered.

SQL>
User altered.

SQL>
Session altered.

SQL>
User altered.

SQL> Disconnected from Oracle Database 23c Free Release 23.0.0.0.0 - Develop, Learn, and Run for Free
Version 23.3.0.23.09
The Oracle base remains unchanged with value /opt/oracle
#########################
DATABASE IS READY TO USE!
#########################
The following output is now a tail of the alert.log:
Completed: Pluggable database FREEPDB1 opened read write
Completed: ALTER DATABASE OPEN
2023-11-30T22:40:55.538359+00:00
===========================================================
Dumping current patch information
===========================================================
No patches have been applied
===========================================================
2023-11-30T22:40:57.521629+00:00
FREEPDB1(3):TABLE AUDSYS.AUD$UNIFIED: ADDED INTERVAL PARTITION SYS_P342 (3440) VALUES LESS THAN (TIMESTAMP' 2023-12-01 00:00:00')
2023-11-30T22:41:00.565540+00:00
TABLE SYS.WRP$_REPORTS: ADDED AUTOLIST FRAGMENT SYS_P413 (3) VALUES (( 1418518649, TO_DATE(' 2023-11-27 00:00:00', 'syyyy-mm-dd hh24:mi:ss', 'nls_calendar=gregorian') ))
TABLE SYS.WRP$_REPORTS_DETAILS: ADDED AUTOLIST FRAGMENT SYS_P414 (3) VALUES (( 1418518649, TO_DATE(' 2023-11-27 00:00:00', 'syyyy-mm-dd hh24:mi:ss', 'nls_calendar=gregorian') ))
TABLE SYS.WRP$_REPORTS_TIME_BANDS: ADDED AUTOLIST FRAGMENT SYS_P417 (3) VALUES (( 1418518649, TO_DATE(' 2023-11-27 00:00:00', 'syyyy-mm-dd hh24:mi:ss', 'nls_calendar=gregorian') ))
2023-11-30T22:41:45.639208+00:00
FREEPDB1(3):Resize operation completed for file# 13, fname /opt/oracle/oradata/FREE/FREEPDB1/sysaux01.dbf, old size 317440K, new size 327680K
2023-11-30T22:41:45.663044+00:00
FREEPDB1(3):Resize operation completed for file# 13, fname /opt/oracle/oradata/FREE/FREEPDB1/sysaux01.dbf, old size 327680K, new size 337920K
2023-11-30T22:46:51.616417+00:00
Resize operation completed for file# 201, fname /opt/oracle/oradata/FREE/temp01.dbf, old size 20480K, new size 86016K
Resize operation completed for file# 201, fname /opt/oracle/oradata/FREE/temp01.dbf, old size 86016K, new size 151552K
Resize operation completed for file# 201, fname /opt/oracle/oradata/FREE/temp01.dbf, old size 151552K, new size 217088K
2023-11-30T22:46:53.024736+00:00
Resize operation completed for file# 201, fname /opt/oracle/oradata/FREE/temp01.dbf, old size 217088K, new size 282624K
Resize operation completed for file# 201, fname /opt/oracle/oradata/FREE/temp01.dbf, old size 282624K, new size 348160K
2023-11-30T22:50:45.816010+00:00
Resize operation completed for file# 3, fname /opt/oracle/oradata/FREE/sysaux01.dbf, old size 573440K, new size 593920K
2023-11-30T23:00:46.159283+00:00
Resize operation completed for file# 3, fname /opt/oracle/oradata/FREE/sysaux01.dbf, old size 593920K, new size 604160K
2023-11-30T23:00:46.228087+00:00
FREEPDB1(3):Resize operation completed for file# 13, fname /opt/oracle/oradata/FREE/FREEPDB1/sysaux01.dbf, old size 337920K, new size 358400K
2023-12-01T00:30:43.494249+00:00
--ATTENTION--
Heavy swapping observed on system
WARNING: Heavy swapping observed on system in last 5 mins.
Heavy swapping can lead to timeouts, poor performance, and instance eviction.
2023-12-01T12:40:07.820678+00:00
Warning: VKTM detected a forward time drift.
Please see the VKTM trace file for more details:
/opt/oracle/diag/rdbms/free/FREE/trace/FREE_vktm_46.trc
2023-12-01T16:09:32.702179+00:00
Warning: VKTM detected a forward time drift.
Time drifts can result in unexpected behavior such as time-outs.
Please see the VKTM trace file for more details:
/opt/oracle/diag/rdbms/free/FREE/trace/FREE_vktm_46.trc
2023-12-01T18:02:02.658867+00:00
FREEPDB1(3):Resize operation completed for file# 13, fname /opt/oracle/oradata/FREE/FREEPDB1/sysaux01.dbf, old size 358400K, new size 368640K
2023-12-01T18:22:03.858970+00:00
Resize operation completed for file# 3, fname /opt/oracle/oradata/FREE/sysaux01.dbf, old size 604160K, new size 624640K
2023-12-01T20:31:39.671144+00:00
Warning: VKTM detected a forward time drift.
Time drifts can result in unexpected behavior such as time-outs.
Please see the VKTM trace file for more details:
/opt/oracle/diag/rdbms/free/FREE/trace/FREE_vktm_46.trc
2023-12-01T22:16:50.007797+00:00
Warning: VKTM detected a forward time drift.
Time drifts can result in unexpected behavior such as time-outs.
Please see the VKTM trace file for more details:
/opt/oracle/diag/rdbms/free/FREE/trace/FREE_vktm_46.trc
2023-12-01T23:11:39.776733+00:00
Resize operation completed for file# 3, fname /opt/oracle/oradata/FREE/sysaux01.dbf, old size 624640K, new size 634880K
2023-12-01T23:11:39.920882+00:00
FREEPDB1(3):Resize operation completed for file# 13, fname /opt/oracle/oradata/FREE/FREEPDB1/sysaux01.dbf, old size 368640K, new size 378880K
2023-12-01T23:11:45.530407+00:00
Begin automatic SQL Tuning Advisor run for special tuning task "SYS_AUTO_SQL_TUNING_TASK".
2023-12-01T23:11:46.626668+00:00
End automatic SQL Tuning Advisor run for special tuning task "SYS_AUTO_SQL_TUNING_TASK".
2023-12-01T23:11:56.518724+00:00
TABLE SYS.WRI$_OPTSTAT_HISTHEAD_HISTORY: ADDED INTERVAL PARTITION SYS_P473 (45260) VALUES LESS THAN (TO_DATE(' 2023-12-02 00:00:00', 'SYYYY-MM-DD HH24:MI:SS', 'NLS_CALENDAR=GREGORIAN'))
TABLE SYS.WRI$_OPTSTAT_HISTGRM_HISTORY: ADDED INTERVAL PARTITION SYS_P476 (45260) VALUES LESS THAN (TO_DATE(' 2023-12-02 00:00:00', 'SYYYY-MM-DD HH24:MI:SS', 'NLS_CALENDAR=GREGORIAN'))
2023-12-01T23:13:58.659641+00:00
Resize operation completed for file# 1, fname /opt/oracle/oradata/FREE/system01.dbf, old size 1085440K, new size 1095680K
2023-12-01T23:14:27.016016+00:00
Thread 1 advanced to log sequence 3 (LGWR switch),  current SCN: 3248652
  Current log# 3 seq# 3 mem# 0: /opt/oracle/oradata/FREE/redo03.log
2023-12-01T23:14:47.256059+00:00
cellip.ora not found.
2023-12-01T23:14:54.365395+00:00
Resize operation completed for file# 11, fname /opt/oracle/oradata/FREE/undotbs01.dbf, old size 40960K, new size 46080K
Resize operation completed for file# 11, fname /opt/oracle/oradata/FREE/undotbs01.dbf, old size 46080K, new size 51200K
2023-12-01T23:16:40.460917+00:00
--ATTENTION--
Heavy swapping observed on system
WARNING: Heavy swapping observed on system in last 5 mins.
Heavy swapping can lead to timeouts, poor performance, and instance eviction.
2023-12-02T11:40:23.802013+00:00
Warning: VKTM detected a forward time drift.
Please see the VKTM trace file for more details:
/opt/oracle/diag/rdbms/free/FREE/trace/FREE_vktm_46.trc
2023-12-02T11:40:24.917287+00:00
Warning: VKTM detected a forward time drift.
Time drifts can result in unexpected behavior such as time-outs.
Please see the VKTM trace file for more details:
/opt/oracle/diag/rdbms/free/FREE/trace/FREE_vktm_46.trc
2023-12-02T11:40:34.601396+00:00
TABLE SYS.ACTIVITY_TABLE$: ADDED INTERVAL PARTITION SYS_P493 (2) VALUES LESS THAN (202)
2023-12-02T19:35:06.380899+00:00
Warning: VKTM detected a forward time drift.
Time drifts can result in unexpected behavior such as time-outs.
Please see the VKTM trace file for more details:
/opt/oracle/diag/rdbms/free/FREE/trace/FREE_vktm_46.trc
2023-12-02T19:35:11.094760+00:00
Begin automatic SQL Tuning Advisor run for special tuning task "SYS_AUTO_SQL_TUNING_TASK".
2023-12-02T19:35:11.913190+00:00
FREEPDB1(3):TABLE SYS.WRI$_OPTSTAT_HISTHEAD_HISTORY: ADDED INTERVAL PARTITION SYS_P442 (45261) VALUES LESS THAN (TO_DATE(' 2023-12-03 00:00:00', 'SYYYY-MM-DD HH24:MI:SS', 'NLS_CALENDAR=GREGORIAN'))
FREEPDB1(3):TABLE SYS.WRI$_OPTSTAT_HISTGRM_HISTORY: ADDED INTERVAL PARTITION SYS_P445 (45261) VALUES LESS THAN (TO_DATE(' 2023-12-03 00:00:00', 'SYYYY-MM-DD HH24:MI:SS', 'NLS_CALENDAR=GREGORIAN'))
2023-12-02T19:35:12.623823+00:00
FREEPDB1(3):TABLE SYS.ACTIVITY_TABLE$: ADDED INTERVAL PARTITION SYS_P446 (2) VALUES LESS THAN (202)
2023-12-02T19:35:15.630900+00:00
End automatic SQL Tuning Advisor run for special tuning task "SYS_AUTO_SQL_TUNING_TASK".
2023-12-02T19:35:26.656198+00:00
TABLE SYS.WRI$_OPTSTAT_HISTHEAD_HISTORY: ADDED INTERVAL PARTITION SYS_P513 (45261) VALUES LESS THAN (TO_DATE(' 2023-12-03 00:00:00', 'SYYYY-MM-DD HH24:MI:SS', 'NLS_CALENDAR=GREGORIAN'))
TABLE SYS.WRI$_OPTSTAT_HISTGRM_HISTORY: ADDED INTERVAL PARTITION SYS_P516 (45261) VALUES LESS THAN (TO_DATE(' 2023-12-03 00:00:00', 'SYYYY-MM-DD HH24:MI:SS', 'NLS_CALENDAR=GREGORIAN'))
2023-12-02T19:36:00.842540+00:00
FREEPDB1(3):TABLE SYS.WRP$_REPORTS: ADDED AUTOLIST FRAGMENT SYS_P482 (2) VALUES (( 2054829351, TO_DATE(' 2023-11-27 00:00:00', 'syyyy-mm-dd hh24:mi:ss', 'nls_calendar=gregorian') ))
FREEPDB1(3):TABLE SYS.WRP$_REPORTS_DETAILS: ADDED AUTOLIST FRAGMENT SYS_P483 (2) VALUES (( 2054829351, TO_DATE(' 2023-11-27 00:00:00', 'syyyy-mm-dd hh24:mi:ss', 'nls_calendar=gregorian') ))
FREEPDB1(3):TABLE SYS.WRP$_REPORTS_TIME_BANDS: ADDED AUTOLIST FRAGMENT SYS_P486 (2) VALUES (( 2054829351, TO_DATE(' 2023-11-27 00:00:00', 'syyyy-mm-dd hh24:mi:ss', 'nls_calendar=gregorian') ))
2023-12-02T19:36:49.488283+00:00
cellip.ora not found.
2023-12-02T19:36:59.941785+00:00
FREEPDB1(3):Resize operation completed for file# 12, fname /opt/oracle/oradata/FREE/FREEPDB1/system01.dbf, old size 286720K, new size 296960K
2023-12-02T19:38:11.214065+00:00
FREEPDB1(3):cellip.ora not found.
2023-12-02T19:39:38.144241+00:00
Resize operation completed for file# 3, fname /opt/oracle/oradata/FREE/sysaux01.dbf, old size 634880K, new size 645120K
2023-12-02T19:39:38.254317+00:00
FREEPDB1(3):Resize operation completed for file# 13, fname /opt/oracle/oradata/FREE/FREEPDB1/sysaux01.dbf, old size 378880K, new size 389120K
2023-12-02T19:39:45.971914+00:00
--ATTENTION--
Heavy swapping observed on system
WARNING: Heavy swapping observed on system in last 5 mins.
Heavy swapping can lead to timeouts, poor performance, and instance eviction.
2023-12-02T19:49:39.226372+00:00
Resize operation completed for file# 3, fname /opt/oracle/oradata/FREE/sysaux01.dbf, old size 645120K, new size 655360K
2023-12-02T19:49:55.006771+00:00
Thread 1 cannot allocate new log, sequence 4
Private strand flush not complete
  Current log# 3 seq# 3 mem# 0: /opt/oracle/oradata/FREE/redo03.log
2023-12-02T19:49:58.006305+00:00
Thread 1 advanced to log sequence 4 (LGWR switch),  current SCN: 3327607
  Current log# 1 seq# 4 mem# 0: /opt/oracle/oradata/FREE/redo01.log
2023-12-02T19:51:10.096706+00:00
cellip.ora not found.
2023-12-02T19:59:39.923548+00:00
Resize operation completed for file# 3, fname /opt/oracle/oradata/FREE/sysaux01.dbf, old size 655360K, new size 665600K
2023-12-02T23:44:23.322751+00:00
Warning: VKTM detected a forward time drift.
Time drifts can result in unexpected behavior such as time-outs.
Please see the VKTM trace file for more details:
/opt/oracle/diag/rdbms/free/FREE/trace/FREE_vktm_46.trc
2023-12-03T01:20:19.592589+00:00
Warning: VKTM detected a forward time drift.
Time drifts can result in unexpected behavior such as time-outs.
Please see the VKTM trace file for more details:
/opt/oracle/diag/rdbms/free/FREE/trace/FREE_vktm_46.trc
2023-12-03T01:25:01.817094+00:00
FREEPDB1(3):Resize operation completed for file# 13, fname /opt/oracle/oradata/FREE/FREEPDB1/sysaux01.dbf, old size 389120K, new size 399360K
2023-12-03T01:25:11.199280+00:00
TABLE SYS.WRI$_OPTSTAT_HISTHEAD_HISTORY: ADDED INTERVAL PARTITION SYS_P553 (45262) VALUES LESS THAN (TO_DATE(' 2023-12-04 00:00:00', 'SYYYY-MM-DD HH24:MI:SS', 'NLS_CALENDAR=GREGORIAN'))
TABLE SYS.WRI$_OPTSTAT_HISTGRM_HISTORY: ADDED INTERVAL PARTITION SYS_P556 (45262) VALUES LESS THAN (TO_DATE(' 2023-12-04 00:00:00', 'SYYYY-MM-DD HH24:MI:SS', 'NLS_CALENDAR=GREGORIAN'))
2023-12-03T01:25:13.434023+00:00
FREEPDB1(3):TABLE SYS.WRI$_OPTSTAT_HISTHEAD_HISTORY: ADDED INTERVAL PARTITION SYS_P502 (45262) VALUES LESS THAN (TO_DATE(' 2023-12-04 00:00:00', 'SYYYY-MM-DD HH24:MI:SS', 'NLS_CALENDAR=GREGORIAN'))
FREEPDB1(3):TABLE SYS.WRI$_OPTSTAT_HISTGRM_HISTORY: ADDED INTERVAL PARTITION SYS_P505 (45262) VALUES LESS THAN (TO_DATE(' 2023-12-04 00:00:00', 'SYYYY-MM-DD HH24:MI:SS', 'NLS_CALENDAR=GREGORIAN'))
2023-12-03T01:26:29.620704+00:00
FREEPDB1(3):cellip.ora not found.
2023-12-03T01:26:36.758289+00:00
cellip.ora not found.
2023-12-03T02:25:52.946809+00:00
Warning: VKTM detected a forward time drift.
Time drifts can result in unexpected behavior such as time-outs.
Please see the VKTM trace file for more details:
/opt/oracle/diag/rdbms/free/FREE/trace/FREE_vktm_46.trc
2023-12-03T02:27:56.055089+00:00
--ATTENTION--
Heavy swapping observed on system
WARNING: Heavy swapping observed on system in last 5 mins.
Heavy swapping can lead to timeouts, poor performance, and instance eviction.
2023-12-03T02:32:47.996105+00:00
Resize operation completed for file# 3, fname /opt/oracle/oradata/FREE/sysaux01.dbf, old size 665600K, new size 675840K
You can connect to the Oracle Database 23c Free container with the following syntax:
docker exec -it -u root oracle23c bash |
At the command-line, you connect to the Oracle Database 23c Free container with the following syntax:
sqlplus system/cangetin@free |
You have arrived at the Oracle SQL prompt:
SQL*Plus: Release 23.0.0.0.0 - Production on Fri Dec 1 00:13:55 2023 Version 23.3.0.23.09 Copyright (c) 1982, 2023, Oracle. All rights reserved. Last Successful login time: Thu Nov 30 2023 23:27:54 +00:00 Connected to: Oracle Database 23c Free Release 23.0.0.0.0 - Develop, Learn, and Run for Free Version 23.3.0.23.09 SQL> |
As always, I hope this helps those trying to work with the newest Oracle stack.
