Archive for the ‘Mac OS X’ Category
C Shared Libraries
I wrote a shared C library example to demonstrate external procedures in the Oracle Database 11g PL/SQL Programming book. I also reused the same example to demonstrate Oracle’s external procedures in the Oracle Database 12c PL/SQL Advanced Programming Techniques book last year. The example uses a C Shared Library but a PL/SQL wrapper and PL/SQL test case.
One of my students asked me to simplify the unit test case example by writing the complete unit test in the C Progamming Language. The student request seemed like a good idea, and while poking around on the web it appears there’s a strong case for a set of simple shared C library examples. This blog post isn’t meant to replace the C Programming web site and C Programming Tutorial web site, which I recommend as a great reference point.
Like most things, the best place to start is with basics of C programming because some readers may be very new to C programming. I’ll start with basic standalone programs and how to use the gcc compiler before showing you how to use shared C libraries.
The most basic program is a hello.c program that serves as a “Hello World!” program:
1 2 3 4 5 | #include <stdio.h> int main() { printf("Hello World!\n"); return(0); } |
Assuming you put the C source files in a src subdirectory and the executable files in a bin subdirectory. You compile the program with the gcc program from the parent directory of the src and bin subdirectories, as follows:
gcc -o bin/hello src/hello.c |
Then, you execute the hello executable program from the parent directory as follows:
bin/hello |
It prints:
Hello World! |
You can modify the basic Hello World! program to accept a single input word, like this hello_whom.c program:
1 2 3 4 5 6 7 8 9 10 11 12 | #include <stdio.h> /* The executable main method. */ int main() { // Declare a character array to hold an input value. char whom[30]; /* Print a question and read a string input. */ printf("Who are you? "); scanf("%s", whom); printf("Hello %s!\n", whom); return(0); } |
You can compile the hello_whom.c program as follows:
gcc -o bin/hello_whom src/hello_whom.c |
Then, you execute the hello_whom executable program from the parent directory as follows:
bin/hello_whom
Who are you? Stuart |
It prints:
Hello Stuart! |
Alternatively, you can modify the hello_whom.c program to accept a stream of text, like the following hello_string.c program:
1 2 3 4 5 6 7 8 9 10 11 12 | #include <stdio.h> /* The executable main method. */ int main() { // Declare a character array to hold an input name. char phrase[4000]; /* Print a question and read a string input. */ printf("Hello? "); scanf("%[^\n]%*c", phrase); printf("Hello %s!\n", phrase); return(0); } |
The [] is the scan set character. The [^\n] on line 10 defines the input as not a newline with a white space, and the %*c reads the newline character from the input buffer. After you compile the program you can call it like this:
bin/hello_string
Hello? there, it reads like a C++ stream |
It would print:
Hello there, it reads like a C++ stream! |
These example, like the previous examples, assume the source files are in a src subdirectory and the executable files are in the bin subdirectory. All compilation commands are run from the parent directory of the src and bin subdirectories.
The first example puts everything into a single writingstr.c file. It defines a writestr() function prototype before the main() function and the writestr() function after the main() function.
The code follows below:
1 2 3 4 5 6 7 8 9 10 11 12 13 14 15 16 17 18 19 20 21 22 | #include <stdio.h> /* Declare two integer variables. */ char path[255], message[4000]; /* Define a prototype for the writestr() function. */ void writestr(char *path, char *message); /* The executable main method. */ int main() { printf("Enter file name and message: "); scanf("%s %[^\n]%*c", &path, &message); printf("File name: %s\n", path); printf("File content: %s\n", message); writestr(path, message); return(0); } void writestr(char *path, char *message) { FILE *file_name; file_name = fopen(path,"w"); fprintf(file_name,"%s\n",message); fclose(file_name); } |
You can compile the writingstr.c function with the following syntax:
gcc -o bin/writingstr src/writingstr.c |
You can run the writingstr executable file with the following syntax:
bin/writingstr Enter file name and message: /home/student/Code/c/test.txt A string for a file. File name: /home/student/Code/c/test.txt File content: A string for a file. |
You’ll find a test.txt file written to the /home/student/Code/C directory. The file contains only the single sentence fragment entered above.
Now, let’s create a writestr.h header file, a writestr.c shared object file, and a main.c testing file. You should note a pattern between the self-contained code and the approach for using shared libraries. The prototype of the writestr() function becomes the definition of the writestr.h file, and the implementation of the writestr() function becomes the writestr.so shared library.
The main.c file contains the only the main() function from the writingstr.c file. The main() function uses the standard scanf() function to read a fully qualified file name (also known as a path) as a string and then a text stream for the content of the file.
You define the writestr.h header file as:
1 2 3 4 5 6 | #ifndef writestr_h__ #define writestr_h__ extern void writestr(char *path, char *message); #endif |
You define the writestr.c shared library, which differs from the example in the book. The difference is the #include statement of the writestr.h header file. The source code follows:
1 2 3 4 5 6 7 8 | #include <stdio.h> #include "writestr.h" void writestr(char *path, char *message) { FILE *file_name; file_name = fopen(path,"w"); fprintf(file_name,"%s\n",message); fclose(file_name); } |
You define the main.c testing program as:
1 2 3 4 5 6 7 8 9 10 11 12 | #include <stdio.h> #include "writestr.h" /* Declare two integer variables. */ char path[255], message[4000]; /* The executable main method. */ int main() { printf("Enter file name and message: "); scanf("%s %[^\n]%*c", &path, &message); writestr(path, message); return(0); } |
Before you begin the process to compile these, you should create an environment file that sets the $LD_LIBRARY_PATH environment variable or add it to your .bashrc file. You should point the $LD_LIBRARY_PATH variable to the directory where you’ve put your shared libraries.
# Set the LD_LIBRARY_PATH environment variable. export LD_LIBRARY_PATH=/home/student/Code/c/trylib/libfile |
With programs defined, you need to first compile the writestr.c shared library first. You use the following syntax from the parent directory of the src and bin subdirectories.
gcc -shared -fPIC -o bin/writestr.so src/writestr.c |
If you haven’t set the $LD_LIBRARY_PATH, you may raise an exception. There’s also an alternative to setting the $LD_LIBRARY_PATH before you call the gcc executable. You can use the -L option set the $LD_LIBRARY_PATH for a given all to the gcc executable, like:
gcc -L /home/student/Code/c/trylib/libfile -shared -fPIC -o bin/writestr.so src/writestr.c |
Then, you compile the main.c program. You must put the writestr.so shared library before you designate the main target object and main.c source files, like this:
gcc bin/writestr.so -o bin/main src/main.c |
Now, you can perform a C-only unit test case by calling the main executable. However, you must have set the $LD_LIBRARY_PATH environment variable at runtime too. You see the following reply to the “Enter file name and message” question when you run the main program unit:
bin/main Enter file name and message: /home/student/Code/c/trylib/libfile/test.txt A long native string is the second input to this C program. |
You can now see that the a new test.txt file has been written to the target directory, and that it contains the following string:
A long native string is the second input to this C program. |
As always, I hope this helps those you want to write shared libraries in the C programming language.
Find a string in files
From time to time, folks ask questions about how to solve common problems in Linux or Unix. Today, the question is: “How do I find a list of files that contain a specific string?” There are two alternatives with the find command, and the following sample searches look for files that contain a sqlite3 string literal.
- Search for only the file names:
find . -type f | xargs grep -li sqlite3 |
Or, the more verbose:
find . -type f -exec grep -li sqlite3 /dev/null {} + |
- Search for the file names and text line:
find . -type f | xargs grep -i sqlite3 |
Or, the more verbose:
find . -type f -exec grep -i sqlite3 /dev/null {} + |
Don’t exclude the /dev/null from the verbose syntax or you’ll get the things you lack permissions to inspect or that raise other errors. I don’t post a lot of Linux or Unix tips and techniques, and you may find this site more useful to answer these types of questions:
Unix & Linux Stack Exchange web site
As always, I hope this helps those you land on the blog page.
VMware 7 Upgrade
 I finally upgraded from VMware Fusion 6 to VMware Fusion 7 to take advantage of the new features. It was interesting to upgrade the Windows 7 virtual machine because of the unique failure message it raised.
The message said it was incompatible, and that I should navigate to:
Virtual Machine -> Settings -> Compatibility -> Upgrade
The Upgrade button checks the Allow upgrading the virtual hardware for this virtual machine checkbox. You will get prompted with the Would you like to upgrade this virtual machine? dialog for the next virtual machine.
iPhoto movie export
What happens when iPhoto doesn’t export movies? One of two things, you re-install iPhoto and risk losing the movies and photos; or you drop down to the Terminal level and move the files manually before re-installing iPhoto.
Option one is easy, you open iPhoto, choose File from menu, and Export… from the File menu list. When you get to the dialog, change it Kind value to original. If everything is working, you should be able to double click the exported file in a Finder window and launch the program with QuickTime Player.

It’s important to know how to use option two when you’ve copied the movies from your iPhone, iPad, or iPod, and then deleted them. At this point, all you have is a recovery option from your local MacBook, MacBook Pro, or iMac to a safe folder (or command-line directory) before updating iPhoto.
This is how you perform option two:
- Open Finder and navigate to your user’s home directory, left click on Pictures, and then right click on iPhoto Library and choose Open With option from the first floating menu then Terminal on the context (or second) floating menu.
- In the Terminal window, a
pwdcommand will show you the following directory for a user with the namesomeuser:
/Users/someuser/Pictures/iPhoto Library |
- Again in the Terminal window, type a
lscommand will show you the following directory structure:
AlbumData.xml Info.plist Projects.db Attachments Library.data ThemeCache Auto Import Library.iPhoto Thumbnails Backup Library6.iPhoto iLifeShared Caches Masters iPhotoAux.db Contents Modified iPhotoLock.data Data Originals iPhotoMain.db Data.noindex Previews Database ProjectDBVersion.plist |
- In the Terminal window, change directory to the
Originalsdirectory with this syntax from the previous directory:
cd Originals |
- The directory structure can differ because of changes over time. The following is a snapshot example from 2012:
Jun 15, 2012 Jun 21, 2012 Jun 24, 2012 Jul 21, 2012 Sep 3, 2012 Jun 18, 2012 Jun 22, 2012 Jul 4, 2012 Aug 14, 2012 Oct 20, 2012 Jun 19, 2012 Jun 23, 2012 Jul 7, 2012 Aug 24, 2012 Nov 21, 2012 |
- Change to any of the preceding directories, and copy the
*.MOVfiles to new directory. I’ve elected to copy the files to the following directory or thesomeuserhome directory (you can make the directory using the GUI Finder interface):
/Users/someuser/MovieBackup |
While the directory structure can differ because of changes in iPhone versions over time. Once you change into one of subdirectories of the Originals directory, you can move all of the movie files from one of the subdirectories with this command to the MovieBackup directory:
cp *.MOV ~someuser/MovieBackup |
It’s possible to move all your files by scripting a more elegant Bash file. As always, I hope this helps those who encounter the problem.
A/UX, NeXTSTEP, & OS X
One thing that gets tedious in the IT community and Oracle community is the penchant for Windows only solutions. While Microsoft does an excellent job in certain domains, I remain a loyal Apple customer. By the way, you can install Oracle Client software on Mac OS X and run SQL Developer against any Oracle Database server. You can even run MySQL Workbench and MySQL server natively on the Mac OS X platform, which creates a robust development platform and gives you more testing options with the MySQL monitor (the client software).
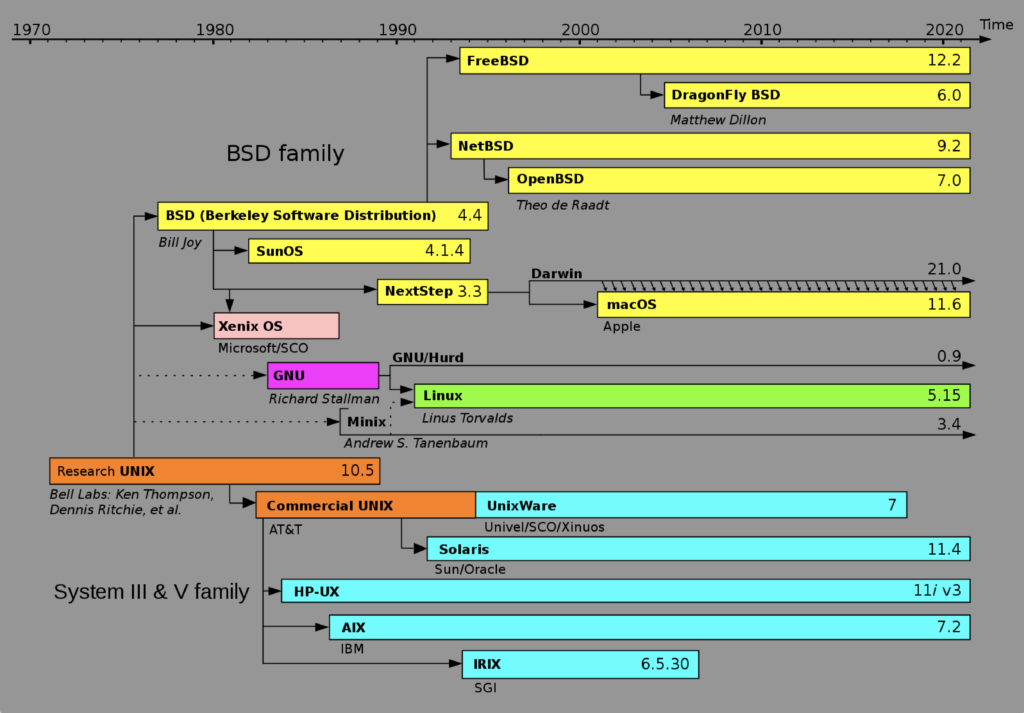
Notwithstanding, some Windows users appear to malign Apple and the Mac OS X on compatibility, but they don’t understand that it’s a derivative of the Research Unix, through BSD (Berkeley Software Distribution). This Unix lineage chart illustrates it well:
I’m probably loyal to Apple because in the early 1990’s I worked on Mac OS 6, Mac OS 7, A/UX, NeXTSTEP, and AIX/6000 (Version 3) while working at APL (American President Lines) in Oakland, California. Back then, my desktop was a pricey Macintosh Quadra 950 and today I work on a pricey Mac Pro desktop. The Mac Pro lets me use VMware virtualize development environments for Oracle Linux, Red Hat Enterprise Linux, Fedora, and as you might guess Windows 7/8. My question to those dyed in the wool Microsoft users is simple, why would you choose a single user OS like Windows over a multi-user OS like Mac OS X?
Mac Mini to the rescue
In teaching, I had a problem because my students have different base operating systems, like Windows 7, Windows 8, Linux, and Mac OS X. I needed a teaching and lecture platform that would let me teach it all (not to mention support their environments). That meant it had to virtualize any of the following with a portable device:
- Windows 7 or 8 hosting natively an Oracle Database 11g XE, 11g, or 12c and MySQL Database 5.6
- Windows 7 or 8 hosting a Fedora or Oracle Unbreakable Linux VM (3 or 4 GB) with Oracle Database 11g XE, 11g, or 12c and MySQL Database 5.6
- Mac OS X hosting a Fedora or Oracle Unbreakable Linux VM (3 or 4 GB) with Oracle Database 11g XE, 11g, or 12c and MySQL Database 5.6
- Ubuntu hosting a Fedora or Oracle Unbreakable Linux VM (3 or 4 GB) with Oracle Database 11g XE, 11g, or 12c and MySQL Database 5.6
I never considered a manufacturer other than Apple for a laptop since they adopted the Intel chip. Too many of the others sell non-hyperthreaded laptop machines that they market as i5 or i7 64-bit OS machines when they’re not. Some of those vendors disable the hyperthreading facility while others provide motherboards that can’t support hyperthreading. The ones I dislike the most provide a BIOS setting that gives the impression you can enable hyperthreading when you can’t. All Apple devices, MacBook, MacBook Pro, Mac Mini, and Mac Pro do fully support a 64-bit OS and their virtualization.
A MacBook Pro came to mind but the disk space requirements were 1 TB, and that’s too pricey. I went with the Mac Mini because with 16 GB of memory and a 1 TB drive it was only $1,200. Add a wireless keyboard and mighty mouse, and an HDMI and mini-DVI connections, and I had my solution. Naturally, my desktop is a one generation old Mac Pro with 64 GB of memory and 12 TB of disk space, which supports all the virtual machines used for testing. Note to Apple marketing staff: The prior version of the Mac Pro let you pay reasonable (3rd party) prices for the additional memory and disk drives.
The Mac Mini means I can travel anywhere and plug into the console and demo tools and techniques from a myriad set of platforms without the hassle of moving on and off to frequently VM images. It’s a great solution with only one downside, HDMI to DVI sometimes creates purple toned screens. It’s unfortunate because some venues have monitors that don’t support HDMI).
Mountain Lion Pre-MySQL
While I try to contain everything about installing MySQL in a single post that I update from time-to-time, Mac OS X, Mountain Lion (10.8.x), requires some pre-steps. You must install XCode, and the Command Line Tools. This post provides the screen shots and step-by-step instructions.
Before you can do any of these steps, you must connect to the Apple Store and download XCode. Dependent on your internet speed this may take some time. Generally, it’s an hour or less.
- After installing XCode, click the Rocket Spaceship in the Mac Dock to launch a view of your Applications. Launch XCode by clicking on the hammer overlaying the blue background XCode icon shown below.

- After launching XCode, click the Install button on the lower right of the System Component Installation screen shown below.

- You’re prompted for your default user (actually a sudoer authorized user) password. Enter it in the dialog and click the OK button to continue.

- After entering the valid credentials and a couple minutes, you should see the System Component Installation screen shown below. Click the Start Using XCode button to continue.

- Inside XCode, click on the XCode menu option and select the Preferences menu option, as shown below.

- You should be on the General tab of XCode’s Preferences dialog. Click on the Downloads tab.

- You should see three choices (at the time of writing) in the Downloads tab. As shown, select the Command Line Tools item. It should take only a couple minutes to download. Click the Install button to continue.

- The Install button disappears and is replaced by an Installed label when the Command Line Tools are installed. You should see the following screen shot.

After completing these steps, return to the other post to install and configure MySQL. While it seems this exists already as content on Apple’s site, it seems some folks wanted me to add it with the step-by-step screen shots.
Mac Disk Failure & Recovery
The first time I had a major failure on my Mac Pro, I lost a 1 TB Seagate drive and ten key virtual machines. It taught me to apply the principles from my production life to my private life. Swapping the fault-prone Seagate drives for Hitachi drives, I began the slow process of rebuilding those virtual environments.
 My solution to minimize risk was two fold. First, I put the main 320 GB disk on a time machine backup. Second, I began weekly backups of my virtual machines to two external 2 TB disk drives. After all, I wanted to contain cost.
Paying more attention paid off this week, when I got the flashing drive folder error. It’s the equivalent on the Mac OS X to Microsoft’s Blue Screen of death. This error means the machine can’t find a healthy OS. The problem is that there a number of posts out there, and some aren’t as effective as they appear in solving the problem. More or less, when you see this screen you have two tests before getting a new disk and restoring the image from your time machine.
The first step requires you to reboot the machine that’s stuck looking for an operating system.  You can do that by pushing the power button until a reset occurs while simultaneously holding down the Option and key. You’ll know it works if you don’t see the blinking file folder icon and you see a mouse arrow displayed in the screen. It should occur within 5 to no more than 10 seconds after you reboot.
Insert a valid Mac Operating System (OS) disk into the optical drive. It should launch the installation program within 30 to 60 seconds. Click the first proceed button and on the next screen launch the Disk Utility from the displayed menu. In the Disk Utility, click the First Aid tab. Look at the Total Capacity value in the bottom right of the screen. If it provides a numeric value, there’s a hope for your disk recovery. Click on the First Aid tab to try and recover the disk drive. If it provides a zero numeric value, there’s virtually no hope for your disk recovery.
Since the likelihood of recovering the disk at this point is low, buying a new disk is probably the best step. After you’ve ordered the replacement disk, you can boot your Mac in target mode.  Target mode allows you to use another Mac and it’s operating system to run your disks (on a Mac Pro, there can be up to 4 disks).
Remove the CD copy of the operating system from the optical drive and push the power button to turn off your non-working Mac. Start the remote Mac and connect the two using a FireWire cable. After the new target machine has finished booting its copy of the OS, push the power button on the machine that can’t find the OS and hold down the T key. In the target machine, open the Finder and inspect which disks are found. If the base disk drive is excluded from the list, as it is in the screen capture on the right, your disk has failed.
At this point, you should definitely buy a new disk unless you’re covered by AppleCare. If the latter, log a ticket and let them fix it. It’s even possible they may be able to recover something from your failed disk. Although, it is unlikely your get any data back if the Mac OS X software can’t recognize the disk.
 Your best bet is to recover the image from a time machine restoration. Hopefully, you had an active time machine image not too far before the failure. I did, and it fully recovered everything smoothly. The new disk arrived this morning, and I’m less than 30 minutes from a full recovery. Though that’s unimportant unless I tell you how.
Once you physically install the disk, you reboot the machine that’s stuck looking for an operating system. You push the power button while simultaneously holding down the Option key. Insert a valid Mac Operating System disk into the optical drive. It should launch the installation program within 30 to 60 seconds. Click the first proceed button and on the next screen launch the Disk Utility from the displayed menu. In the Disk Utility, click the Partition tab to partition the new disk. Then, choose to restore from a time machine in the installation program.
Bottom-line: I’m so happy that time machine works so well!!!
Delay or synchronize it?
A couple students in one of my classes ran into a problem when competing Java threads tried to insert new rows in a table. They raised an error when they tried the DELAY keyword to avoid the race (collision) condition in an INSERT statement. It was simple to explain to them that the DELAY keyword doesn’t work with an InnoDB table. Any attempt throws the following error:
ERROR 1616 (HY000): DELAYED OPTION NOT supported FOR TABLE 'message' |
Important Update: INSERT DELAYED is gone in MySQL 5.6.6 (announcement) and the whole issue comes down to synchronizing threads (some dislike the solution) or using the ON DUPLICATE KEY clause.
They retested their Java application after redefining the target table using the MyISAM engine. They found it worked but that’s a bad fix in Java (a brief Java/MySQL tutorial post). They really needed to synchronize the Java thread (line #22), leave out the DELAY keyword, and manage the table with the InnoDB engine. Here’s the modified Java code (by the way, they named their project VulcanTech if you’re wondering about the packages in the import statement):
1 2 3 4 5 6 7 8 9 10 11 12 13 14 15 16 17 18 19 20 21 22 23 24 25 26 27 28 29 30 31 32 33 | package vulcantech.vth.server.commands; import java.io.IOException; import java.net.Socket; import vulcantech.vth.server.combeans.MessageBean; public class MessageHandler implements Handler { @Override public void handleIt(Object... args) { MessageBean message = (MessageBean) args[0]; Socket sock = (Socket) args[1]; DatabaseConnection dbconnection = new DatabaseConnection(); String update = new String("INSERT INTO message(message_timestamp, sender, recipient, message, checked) VALUES(\'" + message.getTimeStamp() + "\', \'" + message.getSender() + "\', \'" + message.getRecipient() + "\', \'" + message.getMessage() + "\', b\'0\')"); synchronized (this) { dbconnection.executeUpdate(update); } try { sock.getOutputStream().write(1); } catch (IOException e) { e.printStackTrace(); } dbconnection.close(); } } |
Hope this helps those who encounter race conditions against MySQL when you’re writing Enterprise Java Beans (EJBs).
Add Image Comment – VBA
Quite some time ago, summer 2008, I wrote a post about how you could embed an image in a cell comment. It was for the then current version of the product – Excel 2007. Here’s a User-Defined Function (UDF) in VBA to perform that trick that works in Excel 2010/2011. A comment on that older post fed my disappointment that Excel 2011 doesn’t even support the navigation but it does perform it with VBA. This includes the UDF to add an image and an ordinary Excel Macro to remove the image when you want to preserve the text.
Let’s assume you have a list of image files in a directory and that you’ve entered their fully qualified or absolute path values column B of your worksheet. Now you want to load them as comment images in Column A and insert a value in each column A cell that describes the comment image.
Unfortunately, as I’ve explained before you can’t assign the image as a property of the cell (or more precisely, I’ve never found a way to do it). If this is wrong, please post the magic here for all to enjoy without a fee or registration. 😉
The following UDF takes a string value to describe the image and a cell reference that holds a string value that holds an absolute file name, which is a logical drive letter (C:\), a file path, and file name.
Function InsertCommentImage(title As String, cellAddress As Range) Dim commentBox As comment ' Clear any comments before attempting to add them. Application.ActiveCell.ClearComments ' Define the comment as a local variable and assign the file name from the ' cellAddress input parameter to the comment of a cell. Set commentBox = Application.ActiveCell.AddComment With commentBox .Text Text:="" With .Shape .Fill.UserPicture (cellAddress.Value) .ScaleHeight 3#, msoFalse, msoScaleFormTopLeft .ScaleWidth 2.4, msoFalse, msoScaleFromTopLeft End With ' Set the visible to True when you always want the image displayed, and ' to False when you want it displayed only when you click on the cell. .Visible = False End With InsertCommentImage = title End Function |
A fully qualified address for the cellAddress parameter on a PC would look like this in let’s say cell B1:
C:\Data\Images\WizardChess.png |
While it would be like this for the cellAddress parameter on a Mac OS X installation in cell B1:
Macintosh HD:Users:mclaughlinm:Desktop:WizardChess.png |
You would call this from a cell like this when the text is provided as a string and fully qualified file name is in cell B1 of a worksheet named ImageSource:
=InsertCommentImage("Wizard Chess",B1) |
Alternatively, you rewrite InsertCommentImage() as follows, which takes a string for the cell value and a string for the absolute file name:
Function InsertCommentImage(title As String, absoluteFileName As String) Dim commentBox As Comment ' Clear any comments before attempting to add them. Application.ActiveCell.ClearComments ' Define the comment as a local variable and assign the file name from the ' cellAddress input parameter to the comment of a cell. Set commentBox = Application.ActiveCell.AddComment With commentBox .Text Text:="" With .Shape .Fill.UserPicture (absoluteFileName) .ScaleHeight 3#, msoFalse, msoScaleFormTopLeft .ScaleWidth 2.4, msoFalse, msoScaleFromTopLeft End With ' Set the visible to True when you always want the image displayed, and ' to False when you want it displayed only when you click on the cell. .Visible = False End With InsertCommentImage = title End Function |
With the change of the second parameter, you would call the InsertCommentImage() function with two strings, like:
=InsertCommentImage("Wizard Chess","C:\Data\Images\WizardChess.png") |
Here’s how it would look if you’d put the formula in cell A1:

This is a simple Excel macro for which you could create a button. You run it when you want to delete only the image comment from a cell. The macro works by highlighting the cell and running it. Naturally, you could wrap it in another Excel macro to navigate through the list and clean up a bunch of comment images at one time.
Sub RemoveComment() Application.ActiveCell.ClearComments End Sub |
If you want to allow the macro to detach all comments for a range, you would rewrite it this way:
Sub RemoveComment() Application.Selection.ClearComments End Sub |
As always, I hope this helps and furthers sharing information.
