Archive for the ‘MySQL’ Category
SQL Handling Nulls
Interesting questions always come via my students. For example, “Why does the selective aggregation sample return null values as totals from the SUM() function in MySQL?”
First, here’s the code to build the sample table for the problem:
DROP TABLE IF EXISTS transaction; CREATE TABLE transaction ( transaction_id int unsigned primary key auto_increment , transaction_date date , transaction_amount double ); INSERT INTO transaction ( transaction_date, transaction_amount ) VALUES ('2021-01-10', 56) ,('2021-02-14',23.02) ,('2021-03-31',31.06) ,('2021-01-01',.25) ,('2020-01-02', 52) ,('2020-02-08',22.02) ,('2020-03-26',32.06) ,('2020-01-12',.75);; |
Now, here’s the selective aggregation query:
SELECT EXTRACT(YEAR FROM transaction_date) AS "Year" , SUM( CASE WHEN EXTRACT(MONTH FROM transaction_date) = 1 THEN transaction_amount END) AS "Jan" , SUM( CASE WHEN EXTRACT(MONTH FROM transaction_date) = 2 THEN transaction_amount END) AS "Feb" , SUM( CASE WHEN EXTRACT(MONTH FROM transaction_date) = 3 THEN transaction_amount END) AS "Mar" , SUM( CASE WHEN EXTRACT(MONTH FROM transaction_date) IN (1,2,3) THEN transaction_amount END) AS "1FQ" FROM transaction WHERE transaction_date BETWEEN '2020-01-15' AND '2021-03-15' GROUP BY EXTRACT(YEAR FROM transaction_date) ORDER BY 1; |
It produces the following correct results (at least in response to the query above):
+------+-------+-------+-------+-------+ | Year | Jan | Feb | Mar | 1FQ | +------+-------+-------+-------+-------+ | 2020 | NULL | 22.02 | 32.06 | 54.08 | | 2021 | 56.25 | 23.02 | NULL | 79.27 | +------+-------+-------+-------+-------+ 2 rows in set (0.02 sec) |
Why do you get null values for January 2020 and March 2021? That’s because the query returns null values when the conditions in the SELECT-list aren’t met for a row return. This happens:
- When a row is returned for the month of February or March a null is returned in the January column.
- When a row is returned for the month of January or March a null is returned in the February column.
- When a row is returned for the month of January or February a null is returned in the March column.
That means there needs to be an ELSE clause in each of the CASE statements that sets the return value to zero. For example, the following query includes the ELSE clause and some nice formatting tricks:
SELECT EXTRACT(YEAR FROM transaction_date) AS "Year" , CONCAT('$',LPAD(FORMAT(SUM( CASE WHEN EXTRACT(MONTH FROM transaction_date) = 1 THEN transaction_amount ELSE 0 END),2),8,' ')) AS "Jan" , LPAD(FORMAT(SUM( CASE WHEN EXTRACT(MONTH FROM transaction_date) = 2 THEN transaction_amount ELSE 0 END),2),8,' ') AS "Feb" , LPAD(FORMAT(SUM( CASE WHEN EXTRACT(MONTH FROM transaction_date) = 3 THEN transaction_amount ELSE 0 END),2),8,' ') AS "Mar" , LPAD(FORMAT(SUM( CASE WHEN EXTRACT(MONTH FROM transaction_date) IN (1,2,3) THEN transaction_amount ELSE 0 END),2),8,' ') AS "1FQ" FROM transaction WHERE transaction_date BETWEEN '2020-01-15' AND '2021-03-15' GROUP BY EXTRACT(YEAR FROM transaction_date) ORDER BY 1; |
It returns:
+------+-----------+----------+----------+----------+ | Year | Jan | Feb | Mar | 1FQ | +------+-----------+----------+----------+----------+ | 2020 | $ 0.00 | 22.02 | 32.06 | 54.08 | | 2021 | $ 56.25 | 23.02 | 0.00 | 79.27 | +------+-----------+----------+----------+----------+ 2 rows in set (0.01 sec) |
As always, I hope this helps answer a question that somebody is trying to sort out.
MySQL Outer Joins
The students needed yet another example of LEFT JOIN, RIGHT JOIN, and FULL JOIN syntax (by combining a left and right join with the UNION set operator). To that end, I put this set of examples together.
The example also shows how to order the result set from a derived table with the UNION operator. It uses the WITH clause to build a Common Table Expression (CTE), which allows the query to order the UNION set operator’s product based on the left and right join queries. It uses a CASE statement to order the result sets. The left_table is the parent table and the right_table is the child table in the relationship, which means the right_table holds a left_id foreign key column that lets you connect matching rows in the left_table.
You build the little model with the following script:
-- ----------------------------------------------------------------- -- Drop the demonstration tables. -- ----------------------------------------------------------------- DROP TABLE IF EXISTS left_table, right_table; -- ----------------------------------------------------------------- -- Create left_table. -- ----------------------------------------------------------------- CREATE TABLE left_table ( left_id int unsigned primary key auto_increment , leftstring varchar(10)); -- ----------------------------------------------------------------- -- Create left_table. -- ----------------------------------------------------------------- CREATE TABLE right_table ( right_id int unsigned primary key auto_increment , left_id int unsigned , rightstring varchar(10)); -- ----------------------------------------------------------------- -- Insert five rows to the left table, which holds a -- left_id primary key column. -- ----------------------------------------------------------------- INSERT INTO left_table (leftstring) values ('One'); INSERT INTO left_table (leftstring) values ('Two'); INSERT INTO left_table (leftstring) values ('Three'); INSERT INTO left_table (leftstring) values ('Four'); INSERT INTO left_table (leftstring) values ('Five'); -- ----------------------------------------------------------------- -- Delete row four to create a gap. -- ----------------------------------------------------------------- DELETE FROM left_table where left_id = 4; -- ----------------------------------------------------------------- -- Insert four rows, skipping a foreign key value for the -- left_id primary key value of 2. -- ----------------------------------------------------------------- INSERT INTO right_table (rightstring,left_id) values ('One',1); INSERT INTO right_table (rightstring,left_id) values ('Three',3); INSERT INTO right_table (rightstring,left_id) values ('Four',4); INSERT INTO right_table (rightstring,left_id) values ('Five',5); |
Here are the join statements:
INNER JOIN
The INNER JOIN only returns those rows that match between a primary and foreign key column or set of columns.
SELECT l.left_id , l.leftstring , r.left_id , r.right_id , r.rightstring FROM left_table l INNER JOIN right_table r ON l.left_id = r.left_id; |
It produces the following result set:
+---------+------------+---------+----------+-------------+ | left_id | leftstring | left_id | right_id | rightstring | +---------+------------+---------+----------+-------------+ | 1 | One | 1 | 1 | One | | 3 | Three | 3 | 2 | Three | | 5 | Five | 5 | 4 | Five | +---------+------------+---------+----------+-------------+ 3 rows in set (0.00 sec) |
LEFT OUTER JOIN
The LEFT OUTER JOIN only returns those rows that match between a primary and foreign key column or set of columns and any rows in the table on the lefthand side of the join that fail to match with any row on the righthand side of the join. The non-matching rows are also known as the right complement of the join.
1 2 3 4 5 6 7 | SELECT l.left_id , l.leftstring , r.left_id , r.right_id , r.rightstring FROM left_table l LEFT JOIN right_table r ON l.left_id = r.left_id; |
It produces the following result set:
+---------+------------+---------+----------+-------------+ | left_id | leftstring | left_id | right_id | rightstring | +---------+------------+---------+----------+-------------+ | 1 | One | 1 | 1 | One | | 2 | Two | NULL | NULL | NULL | | 3 | Three | 3 | 2 | Three | | 5 | Five | 5 | 4 | Five | +---------+------------+---------+----------+-------------+ 4 rows in set (0.00 sec) |
Add the following line 8 to the query and you get only those rows in the lefthand table that have no child-related rows in the righthand table. These rows are sometimes called childless parent rows. More or less, the use case for this type of query is to find order headers without order lines.
6 7 8 | FROM left_table l LEFT JOIN right_table r ON l.left_id = r.left_id WHERE r.left_id IS NULL; |
It produces the following result set:
+---------+------------+---------+----------+-------------+ | left_id | leftstring | left_id | right_id | rightstring | +---------+------------+---------+----------+-------------+ | 2 | Two | NULL | NULL | NULL | +---------+------------+---------+----------+-------------+ 1 row in set (0.00 sec) |
RIGHT OUTER JOIN
1 2 3 4 5 6 7 | SELECT l.left_id , l.leftstring , r.left_id , r.right_id , r.rightstring FROM left_table l RIGHT JOIN right_table r ON l.left_id = r.left_id; |
It produces the following result set:
+---------+------------+---------+----------+-------------+ | left_id | leftstring | left_id | right_id | rightstring | +---------+------------+---------+----------+-------------+ | 1 | One | 1 | 1 | One | | 3 | Three | 3 | 2 | Three | | NULL | NULL | 4 | 3 | Four | | 5 | Five | 5 | 4 | Five | +---------+------------+---------+----------+-------------+ 4 rows in set (0.00 sec) |
Add the following line 8 to the query and you get only those rows in the righthand table that have no parent-related rows in the lefthand table. These rows are sometimes called orphans because they have no parent row. More or less, the use case for this type of query is to find latent order lines after deleting the order header.
6 7 8 | FROM left_table l LEFT JOIN right_table r ON l.left_id = r.left_id WHERE l.left_id IS NULL; |
It produces the following result set:
+---------+------------+---------+----------+-------------+ | left_id | leftstring | left_id | right_id | rightstring | +---------+------------+---------+----------+-------------+ | NULL | NULL | 4 | 3 | Four | +---------+------------+---------+----------+-------------+ 1 row in set (0.00 sec) |
FULL OUTER JOIN
The full outer join doesn’t exist in MySQL, so you combine a LEFT OUTER JOIN and RIGHT OUTER JOIN with the UNION operator. The UNION operator eliminates the duplicate row from the intersection of the joins.
Here’s the full query:
1 2 3 4 5 6 7 8 9 10 11 12 13 14 15 16 17 18 19 20 21 22 23 24 25 | WITH cte AS (SELECT l.left_id AS primary_left_id , l.leftstring , r.left_id AS foreign_left_id , r.right_id , r.rightstring FROM left_table l LEFT JOIN right_table r ON l.left_id = r.left_id UNION SELECT l.left_id AS primary_left_id , l.leftstring , r.left_id AS foreign_left_id , r.right_id , r.rightstring FROM left_table l RIGHT JOIN right_table r ON l.left_id = r.left_id) SELECT * FROM cte ORDER BY CASE WHEN 'One' IN (leftstring, rightstring) THEN 1 WHEN 'Two' IN (leftstring, rightstring) THEN 2 WHEN 'Three' IN (leftstring, rightstring) THEN 3 WHEN 'Four' IN (leftstring, rightstring) THEN 4 WHEN 'Five' IN (leftstring, rightstring) THEN 5 END; |
It produces the following result set:
+-----------------+------------+-----------------+----------+-------------+ | primary_left_id | leftstring | foreign_left_id | right_id | rightstring | +-----------------+------------+-----------------+----------+-------------+ | 1 | One | 1 | 1 | One | | 2 | Two | NULL | NULL | NULL | | 3 | Three | 3 | 2 | Three | | NULL | NULL | 4 | 3 | Four | | 5 | Five | 5 | 4 | Five | +-----------------+------------+-----------------+----------+-------------+ 5 rows in set (0.00 sec) |
Add the following lines 18 and 19 to the query and you get only those rows that are childless parent rows or orphaned child rows. More or less, the use case for this type of query is to find both order headers without order lines and order lines abandoned by deleted order headers.
17 18 19 | SELECT * FROM cte WHERE primary_left_id IS NULL OR foreign_left_id IS NULL |
It produces the following result set:
+-----------------+------------+-----------------+----------+-------------+ | primary_left_id | leftstring | foreign_left_id | right_id | rightstring | +-----------------+------------+-----------------+----------+-------------+ | 2 | Two | NULL | NULL | NULL | | NULL | NULL | 4 | 3 | Four | +-----------------+------------+-----------------+----------+-------------+ 2 rows in set (0.00 sec) |
The ORDER BY clause used is a variation on the more common choice of:
WHEN leftstring = 'One' OR rightstring = 'One' THEN 1 |
The position of two string literals in any statement is a bad idea. Inverting the literal on the right and using a IN operator gives you a better and clearer WHEN statement:
WHEN 'One' IN (leftstring, rightstring) THEN 1 |
As always, I hope this helps those looking for syntax examples.
MySQL INSERT-SET
I found myself explaining the nuances of INSERT statements and whether you should use named or positional notation. While the class was on Zoom, I could imagine the blank stares in the silence of my headphones. Then, I had to remind them about mandatory (NOT NULL constrained) and optional (nullable) columns in tables and how an INSERT statement requires an explicit NULL value for optional columns when the INSERT statement isn’t inserting a value into that column.
Then, I asked if somebody could qualify the different types of INSERT statements; and what would happen if a table with a first_name and last_name column order evolves when a new DBA decides to restructure the table and uses a last_name and first_name column order in the new table structure. Only a couple of the students recalled using a column-list between the table name and VALUES clause but none could remember how to write an INSERT-SET statement.
Below is a quick example of inserting data with column-lists and the SET clause. It builds an actor table with an actor_id column as a surrogate key and primary key column and a unique natural key composed of the first and last name columns (not a real world solution for uniqueness).
CREATE TABLE actor ( actor_id int unsigned primary key auto_increment , first_name varchar(30) not null , last_name varchar(30) not null , CONSTRAINT actor_uq UNIQUE (first_name, last_name)); |
Next, let’s insert a couple rows with a column-list approach. The column-list is a comma-delimited list of column values that must contain all mandatory columns and may contain optional columns.
INSERT INTO actor ( first_name , last_name ) VALUES ('Harrison','Ford') ,('Carrie','Fisher') ,('Mark','Hamill') ,('Alec','Guinness'); |
Now, let’s validate the unique constraint on the composite value of first and last name by trying to insert a second Harrison Ford into the actor table.
INSERT INTO actor (first_name, last_name) VALUES ('Harrison','Ford'); |
it fails and raises the following error:
ERROR 1062 (23000): Duplicate entry 'Harrison-Ford' for key 'actor.actor_uq' |
The following uses the INSERT-SET statement to add Tom Hanks to the actor table:
INSERT INTO actor SET first_name = 'Tom' , last_name = 'Hanks'; |
I believe the INSERT-SET is the best approach to a name-value model for INSERT statements. It’s a shame that only MySQL supports it. Query the actor table with the following:
SELECT * FROM actor ORDER BY actor_id; |
it returns:
+----------+------------+-----------+ | actor_id | first_name | last_name | +----------+------------+-----------+ | 1 | Harrison | Ford | | 2 | Carrie | Fisher | | 3 | Mark | Hamill | | 4 | Alec | Guinness | | 6 | Tom | Hanks | +----------+------------+-----------+ 5 rows in set (0.01 sec) |
There’s now a gap when you query the data because the second attempt at adding Harrison Ford consumed a sequence value from the internally managed list. That list is a property of the table when you create or alter a table to include an autoincrementing column, like actor_id. Anytime you attempt to insert a row that violates the table constraints, you consume a value from the internally managed sequence. While you can restore it and eliminate the gaps, I strongly recommend against it.
As always, I hope this helps those trying to learn and experiment with syntax.
MySQL Connect Dialog
About a month ago, I published how you can connect to MySQL with a small form. One suggestion, or lets promote it to a request, from that post was: “Nice, but how do you create a reusable library for the MySQL Connection Dialog box?”
That was a good question but I couldn’t get back until now to write a new blog post. This reusable MySQL connection dialog lets you remove MySQL connection data from the command-line history. This post also shows you how to create and test a Powershell Module.

The first step to create a module requires that you set the proper %PSModulePath% environment variable. If you fail to do that, you can put it into a default PowerShell module location but that’s not too effective for testing. You launch the System Properties dialog and click the Environment Variables button:
Then, you edit the PSModulePath environment variable in the bottom list of environment variables and add a new path to the PSModulePath. My development path in this example is:
C:\Data\cit225\mysql\ps\mod |
I named the file the same as the function Get-Credentials.psm1 consistent with the Microsoft instructions for creating a PowerShell module and their instructions for Pascal case name with an approved verb and singular noun.
Below is the code for the Get-Credentials.psm1 file:
function Get-Credentials { # Add libraries for form components. Add-Type -AssemblyName System.Windows.Forms Add-Type -AssemblyName System.Drawing # Define a user credential form. $form = New-Object System.Windows.Forms.Form $form.Text = 'User Credential Form' $form.Size = New-Object System.Drawing.Size(300,240) $form.StartPosition = 'CenterScreen' # Define a button and assign it and its controls to a form. $loginButton = New-Object System.Windows.Forms.Button $loginButton.Location = New-Object System.Drawing.Point(60,160) $loginButton.Size = New-Object System.Drawing.Size(75,23) $loginButton.Text = 'Login' $loginButton.DialogResult = [System.Windows.Forms.DialogResult]::OK $form.AcceptButton = $loginButton $form.Controls.Add($loginButton) # Define a button and assign it and its controls to a form. $cancelButton = New-Object System.Windows.Forms.Button $cancelButton.Location = New-Object System.Drawing.Point(155,160) $cancelButton.Size = New-Object System.Drawing.Size(75,23) $cancelButton.Text = 'Cancel' $cancelButton.DialogResult = [System.Windows.Forms.DialogResult]::Cancel $form.CancelButton = $cancelButton $form.Controls.Add($cancelButton) # Define a label and assign it and its controls to a form. $userLabel = New-Object System.Windows.Forms.Label $userLabel.Location = New-Object System.Drawing.Point(30,15) $userLabel.Size = New-Object System.Drawing.Size(100,20) $userLabel.Text = 'Enter User Name:' $form.Controls.Add($userLabel) # Define a TextBox and assign it and its controls to a form. $userTextBox = New-Object System.Windows.Forms.TextBox $userTextBox.Location = New-Object System.Drawing.Point(140,15) $userTextBox.Size = New-Object System.Drawing.Size(100,20) $form.Controls.Add($userTextBox) # Define a label and assign it and its controls to a form. $pwdLabel = New-Object System.Windows.Forms.Label $pwdLabel.Location = New-Object System.Drawing.Point(30,40) $pwdLabel.Size = New-Object System.Drawing.Size(100,20) $pwdLabel.Text = 'Enter Password:' $form.Controls.Add($pwdLabel) # Define a TextBox and assign it and its controls to a form. $pwdTextBox = New-Object System.Windows.Forms.TextBox $pwdTextBox.Location = New-Object System.Drawing.Point(140,40) $pwdTextBox.Size = New-Object System.Drawing.Size(100,20) $pwdTextBox.PasswordChar = "*" $form.Controls.Add($pwdTextBox) # Define a label and assign it and its controls to a form. $hostLabel = New-Object System.Windows.Forms.Label $hostLabel.Location = New-Object System.Drawing.Point(30,65) $hostLabel.Size = New-Object System.Drawing.Size(100,20) $hostLabel.Text = 'Enter Hostname:' $form.Controls.Add($hostLabel) # Define a TextBox and assign it and its controls to a form. $hostTextBox = New-Object System.Windows.Forms.TextBox $hostTextBox.Location = New-Object System.Drawing.Point(140,65) $hostTextBox.Size = New-Object System.Drawing.Size(100,20) $form.Controls.Add($hostTextBox) # Define a label and assign it and its controls to a form. $portLabel = New-Object System.Windows.Forms.Label $portLabel.Location = New-Object System.Drawing.Point(30,90) $portLabel.Size = New-Object System.Drawing.Size(100,20) $portLabel.Text = 'Enter Port #:' $form.Controls.Add($portLabel) # Define a TextBox and assign it and its controls to a form. $portTextBox = New-Object System.Windows.Forms.TextBox $portTextBox.Location = New-Object System.Drawing.Point(140,90) $portTextBox.Size = New-Object System.Drawing.Size(100,20) $form.Controls.Add($portTextBox) # Define a label and assign it and its controls to a form. $dbLabel = New-Object System.Windows.Forms.Label $dbLabel.Location = New-Object System.Drawing.Point(30,115) $dbLabel.Size = New-Object System.Drawing.Size(100,20) $dbLabel.Text = 'Enter DB Name:' $form.Controls.Add($dbLabel) # Define a TextBox and assign it and its controls to a form. $dbTextBox = New-Object System.Windows.Forms.TextBox $dbTextBox.Location = New-Object System.Drawing.Point(140,115) $dbTextBox.Size = New-Object System.Drawing.Size(100,20) $form.Controls.Add($dbTextBox) $form.Topmost = $true $form.Add_Shown({$userTextBox.Select()}) $result = $form.ShowDialog() if ($result -eq [System.Windows.Forms.DialogResult]::OK) { # Assign inputs to connection variables. $uid = $userTextBox.Text $pwd = $pwdTextBox.Text $server = $hostTextBox.Text $port= $portTextBox.Text $dbName = $dbTextBox.Text # Declare connection string. $credentials = 'server=' + $server + ';port=' + $port + ';uid=' + $uid + ';pwd=' + $pwd + ';database=' + $dbName } else { $credentials = $null } return $credentials } |
You must create a Get-Connection directory in your C:\Data\cit225\mysql\ps\mod directory that you added to the PSModulePath. Then, you must put your module code in the Get-Connection subdirectory as the Get-Connection.psm1 module file.
The test.ps1 script imports the Get-Credentials.psm1 PowerShell module, launches the MySQL Connection Dialog form and returns the connection string. The test.ps1 code is:
# Import your custom module. Import-Module Get-Credentials # Test the Get-Credentials function. if (($credentials = Get-Credentials) -ne $undefinedVariable) { Write-Host($credentials) } |
You can test it from the local any directory with the following command-line:
powershell .\test.ps1 |
It should print something like this to the console:
server=localhost;port=3306;uid=student;pwd=student;database=studentdb |
If you got this far, that’s great! You’re ready to test a connection to the MySQL database. Before you do that, you should create the same avenger table I used in the initial post and insert the same or some additional data. Connect to the any of your test databases and rung the following code to create the avenger table and nine rows of data.
-- Create the avenger table. CREATE TABLE db_connect ( db_connect_id INT UNSIGNED PRIMARY KEY AUTO_INCREMENT , version VARCHAR(10) , user VARCHAR(24) , db_name VARCHAR(10)); -- Seed the avenger table with data. INSERT INTO avenger ( first_name, last_name, avenger ) VALUES ('Anthony', 'Stark', 'Iron Man') ,('Thor', 'Odinson', 'God of Thunder') ,('Steven', 'Rogers', 'Captain America') ,('Bruce', 'Banner', 'Hulk') ,('Clinton', 'Barton', 'Hawkeye') ,('Natasha', 'Romanoff', 'Black Widow') ,('Peter', 'Parker', 'Spiderman') ,('Steven', 'Strange', 'Dr. Strange') ,('Scott', 'Lange', 'Ant-man'); |
Now, let’s promote our use-case test.ps1 script to a testQuery.ps1 script, like:
# Import your custom module. Import-Module Get-Credentials # Test the Get-Credentials function. if (($credentials = Get-Credentials) -ne $undefinedVariable) { # Connect to the libaray MySQL.Data.dll Add-Type -Path 'C:\Program Files (x86)\MySQL\Connector NET 8.0\Assemblies\v4.5.2\MySql.Data.dll' # Create a MySQL Database connection variable that qualifies: # [Driver]@ConnectionString # ============================================================ # You can assign the connection string before using it or # while using it, which is what we do below by assigning # literal values for the following names: # - server=<ip_address> or 127.0.0.1 for localhost # - uid=<user_name> # - pwd=<password> # - port=<port#> or 3306 for default port # - database=<database_name> # ============================================================ $Connection = [MySql.Data.MySqlClient.MySqlConnection]@{ConnectionString=$credentials} $Connection.Open() # Define a MySQL Command Object for a non-query. $sqlCommand = New-Object MySql.Data.MySqlClient.MySqlCommand $sqlDataAdapter = New-Object MySql.Data.MySqlClient.MySqlDataAdapter $sqlDataSet = New-Object System.Data.DataSet # Assign the connection and command text to the MySQL command object. $sqlCommand.Connection = $Connection $sqlCommand.CommandText = 'SELECT CONCAT(first_name," ",last_name) AS full_name ' + ', avenger ' + 'FROM avenger' # Assign the connection and command text to the query method of # the data adapter object. $sqlDataAdapter.SelectCommand=$sqlCommand # Assign the tuples of data to a data set and return the number of rows fetched. $rowsFetched=$sqlDataAdapter.Fill($sqlDataSet, "data") # Print to console the data returned from the query. foreach($row in $sqlDataSet.tables[0]) { write-host "Avenger:" $row.avenger "is" $row.full_name } # Close the MySQL connection. $Connection.Close() } |
It should give you the MySQL Connection Dialog and with the correct credentials print the following to your console:
Avenger: Iron Man is Anthony Stark Avenger: God of Thunder is Thor Odinson Avenger: Captain America is Steven Rogers Avenger: Hulk is Bruce Banner Avenger: Hawkeye is Clinton Barton Avenger: Black Widow is Natasha Romanoff Avenger: Spiderman is Peter Parker Avenger: Dr. Strange is Steven Strange Avenger: Ant-man is Scott Lange |
As always, I hope this helps those looking to exploit technology.
MySQL Transaction Unit
Many of my students wanted to know how to write a simple PSM (Persistent Stored Module) for MySQL that saved the writes to all table as a group. So, to that end here’s simple example.
- Create four sample tables in a re-runnable script file:
/* Drop and create four tables. */
DROP TABLE IF EXISTS one, two, three, four;
CREATE TABLE one   ( id int primary key auto_increment, msg varchar(10));
CREATE TABLE two   ( id int primary key auto_increment, msg varchar(10));
CREATE TABLE three ( id int primary key auto_increment, msg varchar(10));
CREATE TABLE four  ( id int primary key auto_increment, msg varchar(10));
- Create a locking PSM across the four tables:
/* Conditionally drop procedure. */
DROP PROCEDURE IF EXISTS locking;

/* Set delimiter to $$ to allow ; inside the procedure. */
DELIMITER $$

/* Create a transaction procedure. */
CREATE PROCEDURE locking(IN pv_one   varchar(10)
                        ,IN pv_two   varchar(10)
			,IN pv_three varchar(10)
			,IN pv_four  varchar(10))
  BEGIN
    /* Declare an EXIT Handler when a string is too long
	   for a column. Undo all prior writes with a ROLLBACK
	   statement. */
    DECLARE EXIT HANDLER FOR 1406
      BEGIN
        ROLLBACK;
      END;

    /* Start transaction scope. */
    START TRANSACTION;

    /* A series of INSERT statement. */
    INSERT INTO one   (msg) VALUES (pv_one);
    INSERT INTO two   (msg) VALUES (pv_two);
    INSERT INTO three (msg) VALUES (pv_three);
    INSERT INTO four  (msg) VALUES (pv_four);

    /* Commit transaction set. */
    COMMIT;
  END;
$$

/* Reset delimiter to ; for SQL statements. */
DELIMITER ;
- Test program for inserting the data:
/* Call locking procedure. */
CALL locking('Donald','Goofy','Mickey','Pluto');
CALL locking('Squirrel','Chipmunk','Monkey business','Raccoon');
CALL locking('Curly','Larry','Moe','Shemp');
- Verify the test results:
/* Select from tables, which should be empty. */
SELECT * FROM one;
SELECT * FROM two;
SELECT * FROM three;
SELECT * FROM four;
As always, I hope this code complete example helps those trying to figure things out.
Customer ERD
Now that we’ve migrated to MySQL for our core database course, I’m building MySQL Workbench analysis problems. We start with a lecture trying to flush out a simple address, and then ask them to figure out how to link it to a customer table.

Designing it, I emphasized how it resolves the issue of a city occurring in multiple counties and states, like Fremont. Fremont occurs 17 times in the US and once in Haiti:

Naturally, I left two other design issues in the problem. I’m working through it for the first time with classes tomorrow. I hope it works well. Any comments?
MySQL+Credentials
The first tutorial supplementing the MySQL Connector/NET Developer Guide showed you how to connect and run static INSERT statement. It was a barebones PowerShell script with the MySQL Connector. This post shows you how to run a PowerShell script that uses a dynamic form to gather the MySQL credentials and then run a static query. Below is the MySQL Credentials form.

You enter the correct user name, password, hostname (or IP address), port, and database, like this:

Here’s the complete code for this staticQuery.ps1 PowerShell script:
# Add libraries for form components. Add-Type -AssemblyName System.Windows.Forms Add-Type -AssemblyName System.Drawing # Define a user credential form. $form = New-Object System.Windows.Forms.Form $form.Text = 'User Credential Form' $form.Size = New-Object System.Drawing.Size(300,240) $form.StartPosition = 'CenterScreen' # Define a button and assign it and its controls to a form. $loginButton = New-Object System.Windows.Forms.Button $loginButton.Location = New-Object System.Drawing.Point(60,160) $loginButton.Size = New-Object System.Drawing.Size(75,23) $loginButton.Text = 'Login' $loginButton.DialogResult = [System.Windows.Forms.DialogResult]::OK $form.AcceptButton = $loginButton $form.Controls.Add($loginButton) # Define a button and assign it and its controls to a form. $cancelButton = New-Object System.Windows.Forms.Button $cancelButton.Location = New-Object System.Drawing.Point(155,160) $cancelButton.Size = New-Object System.Drawing.Size(75,23) $cancelButton.Text = 'Cancel' $cancelButton.DialogResult = [System.Windows.Forms.DialogResult]::Cancel $form.CancelButton = $cancelButton $form.Controls.Add($cancelButton) # Define a label and assign it and its controls to a form. $userLabel = New-Object System.Windows.Forms.Label $userLabel.Location = New-Object System.Drawing.Point(30,15) $userLabel.Size = New-Object System.Drawing.Size(100,20) $userLabel.Text = 'Enter User Name:' $form.Controls.Add($userLabel) # Define a TextBox and assign it and its controls to a form. $userTextBox = New-Object System.Windows.Forms.TextBox $userTextBox.Location = New-Object System.Drawing.Point(140,15) $userTextBox.Size = New-Object System.Drawing.Size(100,20) $form.Controls.Add($userTextBox) # Define a label and assign it and its controls to a form. $pwdLabel = New-Object System.Windows.Forms.Label $pwdLabel.Location = New-Object System.Drawing.Point(30,40) $pwdLabel.Size = New-Object System.Drawing.Size(100,20) $pwdLabel.Text = 'Enter Password:' $form.Controls.Add($pwdLabel) # Define a TextBox and assign it and its controls to a form. $pwdTextBox = New-Object System.Windows.Forms.TextBox $pwdTextBox.Location = New-Object System.Drawing.Point(140,40) $pwdTextBox.Size = New-Object System.Drawing.Size(100,20) $pwdTextBox.PasswordChar = "*" $form.Controls.Add($pwdTextBox) # Define a label and assign it and its controls to a form. $hostLabel = New-Object System.Windows.Forms.Label $hostLabel.Location = New-Object System.Drawing.Point(30,65) $hostLabel.Size = New-Object System.Drawing.Size(100,20) $hostLabel.Text = 'Enter Hostname:' $form.Controls.Add($hostLabel) # Define a TextBox and assign it and its controls to a form. $hostTextBox = New-Object System.Windows.Forms.TextBox $hostTextBox.Location = New-Object System.Drawing.Point(140,65) $hostTextBox.Size = New-Object System.Drawing.Size(100,20) $form.Controls.Add($hostTextBox) # Define a label and assign it and its controls to a form. $portLabel = New-Object System.Windows.Forms.Label $portLabel.Location = New-Object System.Drawing.Point(30,90) $portLabel.Size = New-Object System.Drawing.Size(100,20) $portLabel.Text = 'Enter Port #:' $form.Controls.Add($portLabel) # Define a TextBox and assign it and its controls to a form. $portTextBox = New-Object System.Windows.Forms.TextBox $portTextBox.Location = New-Object System.Drawing.Point(140,90) $portTextBox.Size = New-Object System.Drawing.Size(100,20) $form.Controls.Add($portTextBox) # Define a label and assign it and its controls to a form. $dbLabel = New-Object System.Windows.Forms.Label $dbLabel.Location = New-Object System.Drawing.Point(30,115) $dbLabel.Size = New-Object System.Drawing.Size(100,20) $dbLabel.Text = 'Enter DB Name:' $form.Controls.Add($dbLabel) # Define a TextBox and assign it and its controls to a form. $dbTextBox = New-Object System.Windows.Forms.TextBox $dbTextBox.Location = New-Object System.Drawing.Point(140,115) $dbTextBox.Size = New-Object System.Drawing.Size(100,20) $form.Controls.Add($dbTextBox) $form.Topmost = $true $form.Add_Shown({$userTextBox.Select()}) $result = $form.ShowDialog() if ($result -eq [System.Windows.Forms.DialogResult]::OK) { # Assign inputs to connection variables. $uid = $userTextBox.Text $pwd = $pwdTextBox.Text $server = $hostTextBox.Text $port= $portTextBox.Text $dbName = $dbTextBox.Text # Declare connection string. $credentials = 'server=' + $server + ';port=' + $port + ';uid=' + $uid + ';pwd=' + $pwd + ';database=' + $dbName # Connect to the libaray MySQL.Data.dll Add-Type -Path 'C:\Program Files (x86)\MySQL\Connector NET 8.0\Assemblies\v4.5.2\MySql.Data.dll' # Create a MySQL Database connection variable that qualifies: # [Driver]@ConnectionString # ============================================================ # You can assign the connection string before using it or # while using it, which is what we do below by assigning # literal values for the following names: # - server=<ip_address> or 127.0.0.1 for localhost # - port=<port #> # - uid=<user_name> # - pwd=<password> # - database=<database_name> # ============================================================ $Connection = [MySql.Data.MySqlClient.MySqlConnection]@{ConnectionString=$credentials} $Connection.Open() # Define a MySQL Command Object for a non-query. $sqlCommand = New-Object MySql.Data.MySqlClient.MySqlCommand $sqlDataAdapter = New-Object MySql.Data.MySqlClient.MySqlDataAdapter $sqlDataSet = New-Object System.Data.DataSet # Assign the connection and command text to the MySQL command object. $sqlCommand.Connection = $Connection $sqlCommand.CommandText = 'SELECT CONCAT(first_name," ",last_name) AS full_name ' + ', avenger ' + 'FROM avenger' # Assign the connection and command text to the query method of # the data adapter object. $sqlDataAdapter.SelectCommand=$sqlCommand # Assign the tuples of data to a data set and return the number of rows fetched. $rowsFetched=$sqlDataAdapter.Fill($sqlDataSet, "data") # Print to console the data returned from the query. foreach($row in $sqlDataSet.tables[0]) { write-host "Avenger:" $row.avenger "is" $row.full_name } # Close the MySQL connection. $Connection.Close() } |
I created an avenger table and populated it with six rows of data:
-- Create the avenger table. CREATE TABLE db_connect ( db_connect_id INT UNSIGNED PRIMARY KEY AUTO_INCREMENT , version VARCHAR(10) , user VARCHAR(24) , db_name VARCHAR(10)); -- Seed the avenger table with data. INSERT INTO avenger ( first_name, last_name, avenger ) VALUES ('Anthony', 'Stark', 'Iron Man') ,('Thor', 'Odinson', 'God of Thunder') ,('Steven', 'Rogers', 'Captain America') ,('Bruce', 'Banner', 'Hulk') ,('Clinton', 'Barton', 'Hawkeye') ,('Natasha', 'Romanoff', 'Black Widow'); |
You run the staticQuery.ps1 PowerShell script from the Windows command shell with the following syntax:
powershell .\staticQuery.ps1 |
After running the staticQuery.ps1 PowerShell script, it writes the following to the local console but with minimal effort you can redirect it to a file:
Avenger: Iron Man is Anthony Stark Avenger: God of Thunder is Thor Odinson Avenger: Captain America is Steven Rogers Avenger: Hulk is Bruce Banner Avenger: Hawkeye is Clinton Barton Avenger: Black Widow is Natasha Romanoff |
As always, I hope this helps those looking to use this technology. My guess is the principal uses will be DevOps and Data Engineers.
MySQL+PowerShell
It was interesting to note that the MySQL Connector/NET Developer Guide doesn’t have any instructions for connecting to the MySQL database from Microsoft Powershell. I thought it would be helpful to write a couple demonstrations scripts, especially when a quick search didn’t find a set of easy to follow samples.
The connection process to MySQL with Powershell is easiest with a non-query, so I created a db_connect table into which I could write a row of data:
CREATE TABLE db_connect ( db_connect_id INT UNSIGNED PRIMARY KEY AUTO_INCREMENT , version VARCHAR(10) , user VARCHAR(24) , db_name VARCHAR(10)); |
The following insert.ps1 PowerShell script connects to the MySQL database with the NET 8.0 Connector (check here for the newer DSN ODBC approach), and inserts one row into the db_connect table:
# Connect to the libaray MySQL.Data.dll Add-Type -Path 'C:\Program Files (x86)\MySQL\Connector NET 8.0\Assemblies\v4.5.2\MySql.Data.dll' # Create a MySQL Database connection variable that qualifies: # [Driver]@ConnectionString # ============================================================ # You can assign the connection string before using it or # while using it, which is what we do below by assigning # literal values for the following names: # - server=<ip_address> or 127.0.0.1 for localhost # - uid=<user_name> # - pwd=<password> # - database=<database_name> # ============================================================ $Connection = [MySql.Data.MySqlClient.MySqlConnection]@{ConnectionString='server=127.0.0.1;uid=student;pwd=student;database=studentdb'} $Connection.Open() # Define a MySQL Command Object for a non-query. $sql = New-Object MySql.Data.MySqlClient.MySqlCommand $sql.Connection = $Connection $sql.CommandText = 'INSERT INTO db_connect (version, user, db_name)(SELECT version(), user(), database())' $sql.ExecuteNonQuery() # Close the MySQL connection. $Connection.Close() |
The ConnectionString above uses the standard local 127.0.0.1 IP address as the server location. You could just as easily use localhost as the server location if you’re testing on your own machine.
You run the insert.ps1 PowerShell script from the Windows command shell:
powershell .\insert.ps1 |
After running the insert.ps1 PowerShell script, you can connect to the studentdb database. Then, run the following query:
SELECT version AS "Version" , user AS "User" , db_name AS "Database" FROM db_connect; |
It displays:
+---------+-------------------+-----------+ | Version | User | Database | +---------+-------------------+-----------+ | 8.0.21 | student@localhost | studentdb | +---------+-------------------+-----------+ 1 row in set (0.01 sec) |
If you’re interested in writing a Connection Prompt dialog for PowerShell, the complete code is in this other blog post of mine. It also provides the instructions to put the code into a reusable PowerShell library. Also, if you’re interested in how to pass option flags and parameters I put that in this new blog post.
As always, I hope this helps those trying to use PowerShell as a scripting tool to insert, update, or delete data.
Put MySQL in PATH
After downloading and installing MySQL 8.0.24 yesterday, I opened a command shell. In the command shell, I could access the MySQL Shell (mysqlsh.exe) but not the MySQL Client (mysql.exe). Typing in the following:
C:\WINDOWS\system32>mysql |
It returned:
'mysql' is not recognized as an internal or external command, operable program or batch file. |
The MySQL Client (mysql.exe) was installed because MySQL Workbench relies on it. However, the MySQL Microsoft Software Installer (MSI) does not put the mysql.exe file’s directory in the common Windows %PATH% environment variable. You can find the required %PATH% directory variable by opening the File Manager and searching for the mysql.exe file.
You should return several directories and programs but the directory you want is:
C:\Program Files\MySQL\MySQL Server 8.0\bin |
You can test it by using the SET command in the Microsoft Operating System, like this:
SET PATH=C:\Program Files\MySQL\MySQL Server 8.0\bin;%PATH% |
You can now call the mysql.exe program in your current shell session with the following syntax:
mysql -uroot -p |
You will be prompted for the password and then connected to the database as follows:
Welcome to the MySQL monitor. Commands end with ; or \g. Your MySQL connection id is 19 Server version: 8.0.24 MySQL Community Server - GPL Copyright (c) 2000, 2021, Oracle and/or its affiliates. Oracle is a registered trademark of Oracle Corporation and/or its affiliates. Other names may be trademarks of their respective owners. Type 'help;' or '\h' for help. Type '\c' to clear the current input statement. mysql> |
Unfortunately, the SET command only sets the %PATH% environment variable in the current session. You can set the system %PATH% environment variable globally by following these steps:
- In Search, search for and then select: System (Control Panel)
- In Settings dialog enter “Environment” in the search box and it will display:
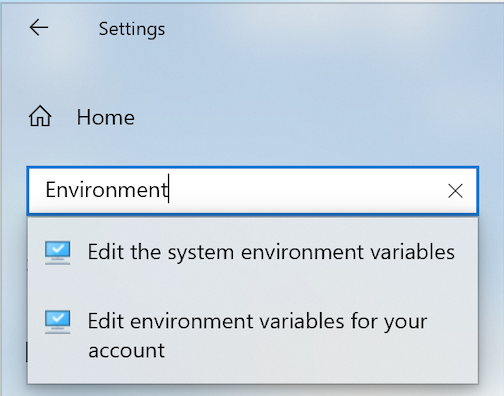
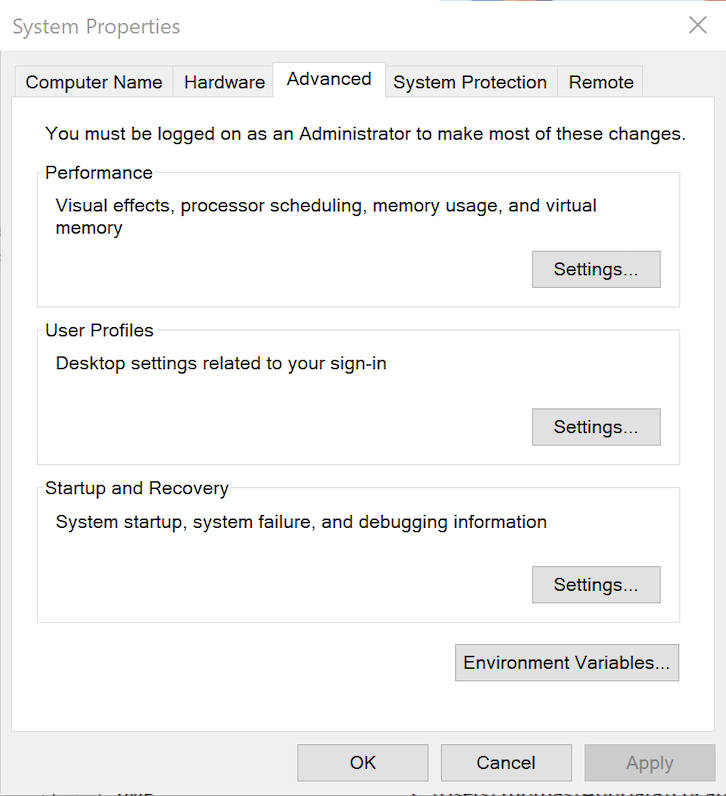
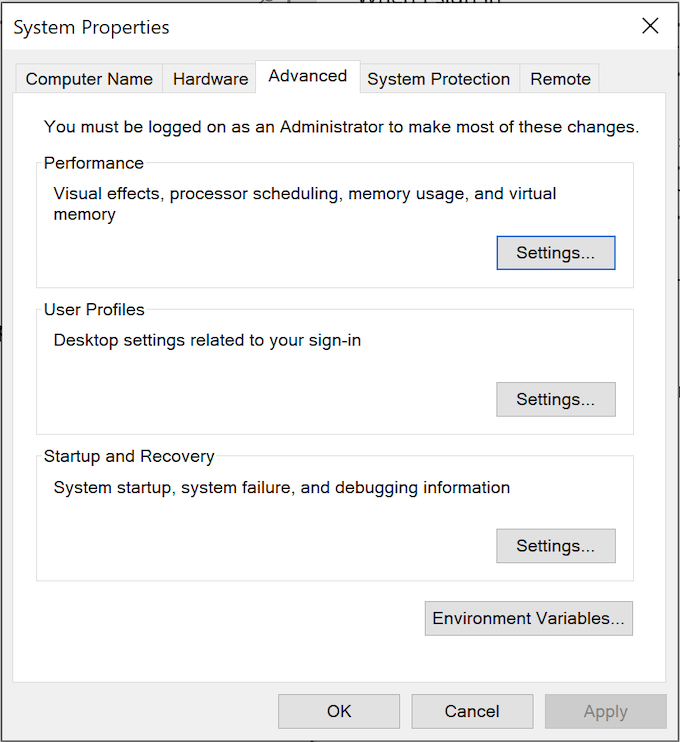
- Chose “Edit the system environment variables” option. You will see the following “System Properties” dialog:
- Click the “Environment Variable” button to display the “Environment Variables” dialog. Click on the Path system variable before clicking the Edit button beneath.
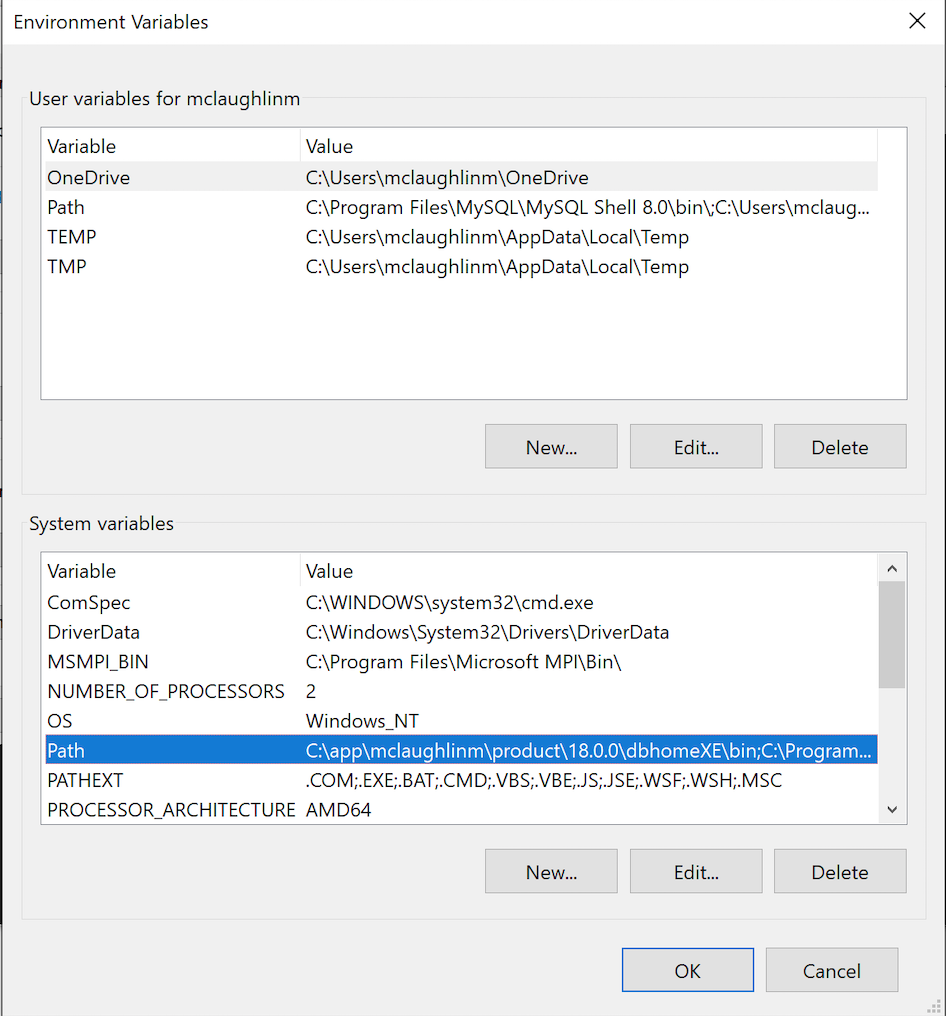
- Click the “New” button and enter “
C:\Program Files\MySQL\MySQL Server 8.0\bin, and click the “OK” button. The next time you query the computer system’s%PATH%environment variable, it will show you the list of path locations that the operating system looks at for command files. It’s actually stored as a semicolon-delimited list in Windows 10 (and, as a colon-delimited list in Linux or Unix).
The next time you open a command shell, the %PATH% environment variable will find the mysql.exe program. As always, I hope these instructions help the reader.
MySQL Script Test
There are many ways to test and edit files. A lot of developers only use their favorite Integrated Developer Environment (IDE) but I find testing script files within the scope of a pipelined set of scripts much faster.
The ability to edit a script from within the MySQL Command-Line Interface (CLI) or MySQL Shell would be nice but unfortunately, doesn’t exist. You can always subshell to edit a file or list files in the present working directory, like:
mysql> \! vi task.sql |
I prefer to test at the OS level while leveraging the up-arrow key for command history. Here’s my quick edit and test script technique from your present working directory:
- Assume you create a
task.sqltest file, like:SELECT user() AS "Current User"\G
- You can edit with
vioremacand test the script interactively from the present working directory.- You can edit the file with the following syntax:
vi task.sql -
then, you can test the
task.sqlfile:mysql -ustudent -p -Dstudentdb < task.sql
- It returns the following:
Enter password:
*************************** 1. row ***************************
Current User: student@localhost
- If you have the desired outcome, you’re done. However, if you need further change you repeat the process.
- You can edit the file with the following syntax:
As always, I hope this helps those looking for a quick way to accomplish a task.
