Archive for the ‘Windows 10’ Category
MySQL Connect Dialog
About a month ago, I published how you can connect to MySQL with a small form. One suggestion, or lets promote it to a request, from that post was: “Nice, but how do you create a reusable library for the MySQL Connection Dialog box?”
That was a good question but I couldn’t get back until now to write a new blog post. This reusable MySQL connection dialog lets you remove MySQL connection data from the command-line history. This post also shows you how to create and test a Powershell Module.

The first step to create a module requires that you set the proper %PSModulePath% environment variable. If you fail to do that, you can put it into a default PowerShell module location but that’s not too effective for testing. You launch the System Properties dialog and click the Environment Variables button:
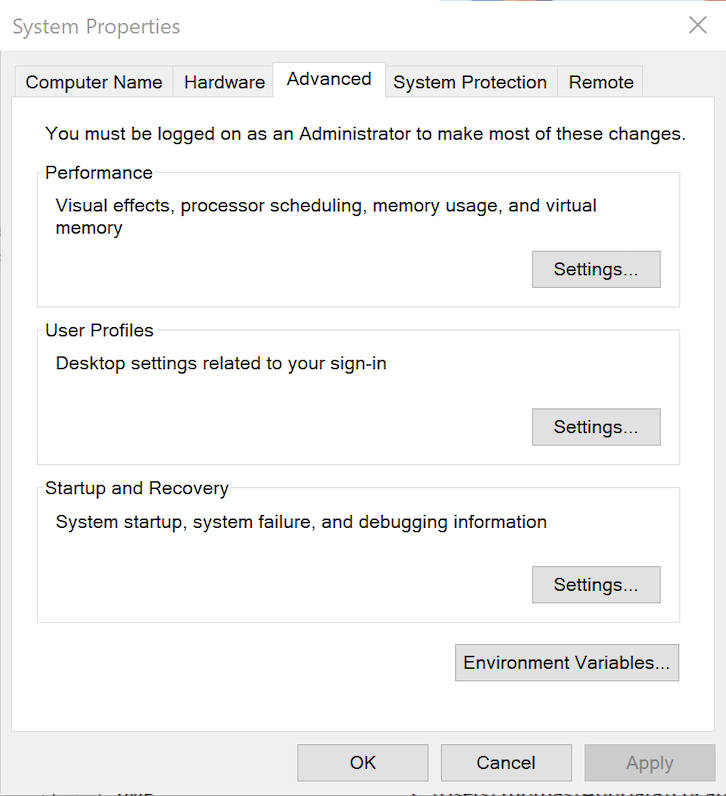
Then, you edit the PSModulePath environment variable in the bottom list of environment variables and add a new path to the PSModulePath. My development path in this example is:
C:\Data\cit225\mysql\ps\mod |
I named the file the same as the function Get-Credentials.psm1 consistent with the Microsoft instructions for creating a PowerShell module and their instructions for Pascal case name with an approved verb and singular noun.
Below is the code for the Get-Credentials.psm1 file:
function Get-Credentials { # Add libraries for form components. Add-Type -AssemblyName System.Windows.Forms Add-Type -AssemblyName System.Drawing # Define a user credential form. $form = New-Object System.Windows.Forms.Form $form.Text = 'User Credential Form' $form.Size = New-Object System.Drawing.Size(300,240) $form.StartPosition = 'CenterScreen' # Define a button and assign it and its controls to a form. $loginButton = New-Object System.Windows.Forms.Button $loginButton.Location = New-Object System.Drawing.Point(60,160) $loginButton.Size = New-Object System.Drawing.Size(75,23) $loginButton.Text = 'Login' $loginButton.DialogResult = [System.Windows.Forms.DialogResult]::OK $form.AcceptButton = $loginButton $form.Controls.Add($loginButton) # Define a button and assign it and its controls to a form. $cancelButton = New-Object System.Windows.Forms.Button $cancelButton.Location = New-Object System.Drawing.Point(155,160) $cancelButton.Size = New-Object System.Drawing.Size(75,23) $cancelButton.Text = 'Cancel' $cancelButton.DialogResult = [System.Windows.Forms.DialogResult]::Cancel $form.CancelButton = $cancelButton $form.Controls.Add($cancelButton) # Define a label and assign it and its controls to a form. $userLabel = New-Object System.Windows.Forms.Label $userLabel.Location = New-Object System.Drawing.Point(30,15) $userLabel.Size = New-Object System.Drawing.Size(100,20) $userLabel.Text = 'Enter User Name:' $form.Controls.Add($userLabel) # Define a TextBox and assign it and its controls to a form. $userTextBox = New-Object System.Windows.Forms.TextBox $userTextBox.Location = New-Object System.Drawing.Point(140,15) $userTextBox.Size = New-Object System.Drawing.Size(100,20) $form.Controls.Add($userTextBox) # Define a label and assign it and its controls to a form. $pwdLabel = New-Object System.Windows.Forms.Label $pwdLabel.Location = New-Object System.Drawing.Point(30,40) $pwdLabel.Size = New-Object System.Drawing.Size(100,20) $pwdLabel.Text = 'Enter Password:' $form.Controls.Add($pwdLabel) # Define a TextBox and assign it and its controls to a form. $pwdTextBox = New-Object System.Windows.Forms.TextBox $pwdTextBox.Location = New-Object System.Drawing.Point(140,40) $pwdTextBox.Size = New-Object System.Drawing.Size(100,20) $pwdTextBox.PasswordChar = "*" $form.Controls.Add($pwdTextBox) # Define a label and assign it and its controls to a form. $hostLabel = New-Object System.Windows.Forms.Label $hostLabel.Location = New-Object System.Drawing.Point(30,65) $hostLabel.Size = New-Object System.Drawing.Size(100,20) $hostLabel.Text = 'Enter Hostname:' $form.Controls.Add($hostLabel) # Define a TextBox and assign it and its controls to a form. $hostTextBox = New-Object System.Windows.Forms.TextBox $hostTextBox.Location = New-Object System.Drawing.Point(140,65) $hostTextBox.Size = New-Object System.Drawing.Size(100,20) $form.Controls.Add($hostTextBox) # Define a label and assign it and its controls to a form. $portLabel = New-Object System.Windows.Forms.Label $portLabel.Location = New-Object System.Drawing.Point(30,90) $portLabel.Size = New-Object System.Drawing.Size(100,20) $portLabel.Text = 'Enter Port #:' $form.Controls.Add($portLabel) # Define a TextBox and assign it and its controls to a form. $portTextBox = New-Object System.Windows.Forms.TextBox $portTextBox.Location = New-Object System.Drawing.Point(140,90) $portTextBox.Size = New-Object System.Drawing.Size(100,20) $form.Controls.Add($portTextBox) # Define a label and assign it and its controls to a form. $dbLabel = New-Object System.Windows.Forms.Label $dbLabel.Location = New-Object System.Drawing.Point(30,115) $dbLabel.Size = New-Object System.Drawing.Size(100,20) $dbLabel.Text = 'Enter DB Name:' $form.Controls.Add($dbLabel) # Define a TextBox and assign it and its controls to a form. $dbTextBox = New-Object System.Windows.Forms.TextBox $dbTextBox.Location = New-Object System.Drawing.Point(140,115) $dbTextBox.Size = New-Object System.Drawing.Size(100,20) $form.Controls.Add($dbTextBox) $form.Topmost = $true $form.Add_Shown({$userTextBox.Select()}) $result = $form.ShowDialog() if ($result -eq [System.Windows.Forms.DialogResult]::OK) { # Assign inputs to connection variables. $uid = $userTextBox.Text $pwd = $pwdTextBox.Text $server = $hostTextBox.Text $port= $portTextBox.Text $dbName = $dbTextBox.Text # Declare connection string. $credentials = 'server=' + $server + ';port=' + $port + ';uid=' + $uid + ';pwd=' + $pwd + ';database=' + $dbName } else { $credentials = $null } return $credentials } |
You must create a Get-Connection directory in your C:\Data\cit225\mysql\ps\mod directory that you added to the PSModulePath. Then, you must put your module code in the Get-Connection subdirectory as the Get-Connection.psm1 module file.
The test.ps1 script imports the Get-Credentials.psm1 PowerShell module, launches the MySQL Connection Dialog form and returns the connection string. The test.ps1 code is:
# Import your custom module. Import-Module Get-Credentials # Test the Get-Credentials function. if (($credentials = Get-Credentials) -ne $undefinedVariable) { Write-Host($credentials) } |
You can test it from the local any directory with the following command-line:
powershell .\test.ps1 |
It should print something like this to the console:
server=localhost;port=3306;uid=student;pwd=student;database=studentdb |
If you got this far, that’s great! You’re ready to test a connection to the MySQL database. Before you do that, you should create the same avenger table I used in the initial post and insert the same or some additional data. Connect to the any of your test databases and rung the following code to create the avenger table and nine rows of data.
-- Create the avenger table. CREATE TABLE db_connect ( db_connect_id INT UNSIGNED PRIMARY KEY AUTO_INCREMENT , version VARCHAR(10) , user VARCHAR(24) , db_name VARCHAR(10)); -- Seed the avenger table with data. INSERT INTO avenger ( first_name, last_name, avenger ) VALUES ('Anthony', 'Stark', 'Iron Man') ,('Thor', 'Odinson', 'God of Thunder') ,('Steven', 'Rogers', 'Captain America') ,('Bruce', 'Banner', 'Hulk') ,('Clinton', 'Barton', 'Hawkeye') ,('Natasha', 'Romanoff', 'Black Widow') ,('Peter', 'Parker', 'Spiderman') ,('Steven', 'Strange', 'Dr. Strange') ,('Scott', 'Lange', 'Ant-man'); |
Now, let’s promote our use-case test.ps1 script to a testQuery.ps1 script, like:
# Import your custom module. Import-Module Get-Credentials # Test the Get-Credentials function. if (($credentials = Get-Credentials) -ne $undefinedVariable) { # Connect to the libaray MySQL.Data.dll Add-Type -Path 'C:\Program Files (x86)\MySQL\Connector NET 8.0\Assemblies\v4.5.2\MySql.Data.dll' # Create a MySQL Database connection variable that qualifies: # [Driver]@ConnectionString # ============================================================ # You can assign the connection string before using it or # while using it, which is what we do below by assigning # literal values for the following names: # - server=<ip_address> or 127.0.0.1 for localhost # - uid=<user_name> # - pwd=<password> # - port=<port#> or 3306 for default port # - database=<database_name> # ============================================================ $Connection = [MySql.Data.MySqlClient.MySqlConnection]@{ConnectionString=$credentials} $Connection.Open() # Define a MySQL Command Object for a non-query. $sqlCommand = New-Object MySql.Data.MySqlClient.MySqlCommand $sqlDataAdapter = New-Object MySql.Data.MySqlClient.MySqlDataAdapter $sqlDataSet = New-Object System.Data.DataSet # Assign the connection and command text to the MySQL command object. $sqlCommand.Connection = $Connection $sqlCommand.CommandText = 'SELECT CONCAT(first_name," ",last_name) AS full_name ' + ', avenger ' + 'FROM avenger' # Assign the connection and command text to the query method of # the data adapter object. $sqlDataAdapter.SelectCommand=$sqlCommand # Assign the tuples of data to a data set and return the number of rows fetched. $rowsFetched=$sqlDataAdapter.Fill($sqlDataSet, "data") # Print to console the data returned from the query. foreach($row in $sqlDataSet.tables[0]) { write-host "Avenger:" $row.avenger "is" $row.full_name } # Close the MySQL connection. $Connection.Close() } |
It should give you the MySQL Connection Dialog and with the correct credentials print the following to your console:
Avenger: Iron Man is Anthony Stark Avenger: God of Thunder is Thor Odinson Avenger: Captain America is Steven Rogers Avenger: Hulk is Bruce Banner Avenger: Hawkeye is Clinton Barton Avenger: Black Widow is Natasha Romanoff Avenger: Spiderman is Peter Parker Avenger: Dr. Strange is Steven Strange Avenger: Ant-man is Scott Lange |
As always, I hope this helps those looking to exploit technology.
MySQL+Credentials
The first tutorial supplementing the MySQL Connector/NET Developer Guide showed you how to connect and run static INSERT statement. It was a barebones PowerShell script with the MySQL Connector. This post shows you how to run a PowerShell script that uses a dynamic form to gather the MySQL credentials and then run a static query. Below is the MySQL Credentials form.

You enter the correct user name, password, hostname (or IP address), port, and database, like this:

Here’s the complete code for this staticQuery.ps1 PowerShell script:
# Add libraries for form components. Add-Type -AssemblyName System.Windows.Forms Add-Type -AssemblyName System.Drawing # Define a user credential form. $form = New-Object System.Windows.Forms.Form $form.Text = 'User Credential Form' $form.Size = New-Object System.Drawing.Size(300,240) $form.StartPosition = 'CenterScreen' # Define a button and assign it and its controls to a form. $loginButton = New-Object System.Windows.Forms.Button $loginButton.Location = New-Object System.Drawing.Point(60,160) $loginButton.Size = New-Object System.Drawing.Size(75,23) $loginButton.Text = 'Login' $loginButton.DialogResult = [System.Windows.Forms.DialogResult]::OK $form.AcceptButton = $loginButton $form.Controls.Add($loginButton) # Define a button and assign it and its controls to a form. $cancelButton = New-Object System.Windows.Forms.Button $cancelButton.Location = New-Object System.Drawing.Point(155,160) $cancelButton.Size = New-Object System.Drawing.Size(75,23) $cancelButton.Text = 'Cancel' $cancelButton.DialogResult = [System.Windows.Forms.DialogResult]::Cancel $form.CancelButton = $cancelButton $form.Controls.Add($cancelButton) # Define a label and assign it and its controls to a form. $userLabel = New-Object System.Windows.Forms.Label $userLabel.Location = New-Object System.Drawing.Point(30,15) $userLabel.Size = New-Object System.Drawing.Size(100,20) $userLabel.Text = 'Enter User Name:' $form.Controls.Add($userLabel) # Define a TextBox and assign it and its controls to a form. $userTextBox = New-Object System.Windows.Forms.TextBox $userTextBox.Location = New-Object System.Drawing.Point(140,15) $userTextBox.Size = New-Object System.Drawing.Size(100,20) $form.Controls.Add($userTextBox) # Define a label and assign it and its controls to a form. $pwdLabel = New-Object System.Windows.Forms.Label $pwdLabel.Location = New-Object System.Drawing.Point(30,40) $pwdLabel.Size = New-Object System.Drawing.Size(100,20) $pwdLabel.Text = 'Enter Password:' $form.Controls.Add($pwdLabel) # Define a TextBox and assign it and its controls to a form. $pwdTextBox = New-Object System.Windows.Forms.TextBox $pwdTextBox.Location = New-Object System.Drawing.Point(140,40) $pwdTextBox.Size = New-Object System.Drawing.Size(100,20) $pwdTextBox.PasswordChar = "*" $form.Controls.Add($pwdTextBox) # Define a label and assign it and its controls to a form. $hostLabel = New-Object System.Windows.Forms.Label $hostLabel.Location = New-Object System.Drawing.Point(30,65) $hostLabel.Size = New-Object System.Drawing.Size(100,20) $hostLabel.Text = 'Enter Hostname:' $form.Controls.Add($hostLabel) # Define a TextBox and assign it and its controls to a form. $hostTextBox = New-Object System.Windows.Forms.TextBox $hostTextBox.Location = New-Object System.Drawing.Point(140,65) $hostTextBox.Size = New-Object System.Drawing.Size(100,20) $form.Controls.Add($hostTextBox) # Define a label and assign it and its controls to a form. $portLabel = New-Object System.Windows.Forms.Label $portLabel.Location = New-Object System.Drawing.Point(30,90) $portLabel.Size = New-Object System.Drawing.Size(100,20) $portLabel.Text = 'Enter Port #:' $form.Controls.Add($portLabel) # Define a TextBox and assign it and its controls to a form. $portTextBox = New-Object System.Windows.Forms.TextBox $portTextBox.Location = New-Object System.Drawing.Point(140,90) $portTextBox.Size = New-Object System.Drawing.Size(100,20) $form.Controls.Add($portTextBox) # Define a label and assign it and its controls to a form. $dbLabel = New-Object System.Windows.Forms.Label $dbLabel.Location = New-Object System.Drawing.Point(30,115) $dbLabel.Size = New-Object System.Drawing.Size(100,20) $dbLabel.Text = 'Enter DB Name:' $form.Controls.Add($dbLabel) # Define a TextBox and assign it and its controls to a form. $dbTextBox = New-Object System.Windows.Forms.TextBox $dbTextBox.Location = New-Object System.Drawing.Point(140,115) $dbTextBox.Size = New-Object System.Drawing.Size(100,20) $form.Controls.Add($dbTextBox) $form.Topmost = $true $form.Add_Shown({$userTextBox.Select()}) $result = $form.ShowDialog() if ($result -eq [System.Windows.Forms.DialogResult]::OK) { # Assign inputs to connection variables. $uid = $userTextBox.Text $pwd = $pwdTextBox.Text $server = $hostTextBox.Text $port= $portTextBox.Text $dbName = $dbTextBox.Text # Declare connection string. $credentials = 'server=' + $server + ';port=' + $port + ';uid=' + $uid + ';pwd=' + $pwd + ';database=' + $dbName # Connect to the libaray MySQL.Data.dll Add-Type -Path 'C:\Program Files (x86)\MySQL\Connector NET 8.0\Assemblies\v4.5.2\MySql.Data.dll' # Create a MySQL Database connection variable that qualifies: # [Driver]@ConnectionString # ============================================================ # You can assign the connection string before using it or # while using it, which is what we do below by assigning # literal values for the following names: # - server=<ip_address> or 127.0.0.1 for localhost # - port=<port #> # - uid=<user_name> # - pwd=<password> # - database=<database_name> # ============================================================ $Connection = [MySql.Data.MySqlClient.MySqlConnection]@{ConnectionString=$credentials} $Connection.Open() # Define a MySQL Command Object for a non-query. $sqlCommand = New-Object MySql.Data.MySqlClient.MySqlCommand $sqlDataAdapter = New-Object MySql.Data.MySqlClient.MySqlDataAdapter $sqlDataSet = New-Object System.Data.DataSet # Assign the connection and command text to the MySQL command object. $sqlCommand.Connection = $Connection $sqlCommand.CommandText = 'SELECT CONCAT(first_name," ",last_name) AS full_name ' + ', avenger ' + 'FROM avenger' # Assign the connection and command text to the query method of # the data adapter object. $sqlDataAdapter.SelectCommand=$sqlCommand # Assign the tuples of data to a data set and return the number of rows fetched. $rowsFetched=$sqlDataAdapter.Fill($sqlDataSet, "data") # Print to console the data returned from the query. foreach($row in $sqlDataSet.tables[0]) { write-host "Avenger:" $row.avenger "is" $row.full_name } # Close the MySQL connection. $Connection.Close() } |
I created an avenger table and populated it with six rows of data:
-- Create the avenger table. CREATE TABLE db_connect ( db_connect_id INT UNSIGNED PRIMARY KEY AUTO_INCREMENT , version VARCHAR(10) , user VARCHAR(24) , db_name VARCHAR(10)); -- Seed the avenger table with data. INSERT INTO avenger ( first_name, last_name, avenger ) VALUES ('Anthony', 'Stark', 'Iron Man') ,('Thor', 'Odinson', 'God of Thunder') ,('Steven', 'Rogers', 'Captain America') ,('Bruce', 'Banner', 'Hulk') ,('Clinton', 'Barton', 'Hawkeye') ,('Natasha', 'Romanoff', 'Black Widow'); |
You run the staticQuery.ps1 PowerShell script from the Windows command shell with the following syntax:
powershell .\staticQuery.ps1 |
After running the staticQuery.ps1 PowerShell script, it writes the following to the local console but with minimal effort you can redirect it to a file:
Avenger: Iron Man is Anthony Stark Avenger: God of Thunder is Thor Odinson Avenger: Captain America is Steven Rogers Avenger: Hulk is Bruce Banner Avenger: Hawkeye is Clinton Barton Avenger: Black Widow is Natasha Romanoff |
As always, I hope this helps those looking to use this technology. My guess is the principal uses will be DevOps and Data Engineers.
MySQL+PowerShell
It was interesting to note that the MySQL Connector/NET Developer Guide doesn’t have any instructions for connecting to the MySQL database from Microsoft Powershell. I thought it would be helpful to write a couple demonstrations scripts, especially when a quick search didn’t find a set of easy to follow samples.
The connection process to MySQL with Powershell is easiest with a non-query, so I created a db_connect table into which I could write a row of data:
CREATE TABLE db_connect ( db_connect_id INT UNSIGNED PRIMARY KEY AUTO_INCREMENT , version VARCHAR(10) , user VARCHAR(24) , db_name VARCHAR(10)); |
The following insert.ps1 PowerShell script connects to the MySQL database with the NET 8.0 Connector (check here for the newer DSN ODBC approach), and inserts one row into the db_connect table:
# Connect to the libaray MySQL.Data.dll Add-Type -Path 'C:\Program Files (x86)\MySQL\Connector NET 8.0\Assemblies\v4.5.2\MySql.Data.dll' # Create a MySQL Database connection variable that qualifies: # [Driver]@ConnectionString # ============================================================ # You can assign the connection string before using it or # while using it, which is what we do below by assigning # literal values for the following names: # - server=<ip_address> or 127.0.0.1 for localhost # - uid=<user_name> # - pwd=<password> # - database=<database_name> # ============================================================ $Connection = [MySql.Data.MySqlClient.MySqlConnection]@{ConnectionString='server=127.0.0.1;uid=student;pwd=student;database=studentdb'} $Connection.Open() # Define a MySQL Command Object for a non-query. $sql = New-Object MySql.Data.MySqlClient.MySqlCommand $sql.Connection = $Connection $sql.CommandText = 'INSERT INTO db_connect (version, user, db_name)(SELECT version(), user(), database())' $sql.ExecuteNonQuery() # Close the MySQL connection. $Connection.Close() |
The ConnectionString above uses the standard local 127.0.0.1 IP address as the server location. You could just as easily use localhost as the server location if you’re testing on your own machine.
You run the insert.ps1 PowerShell script from the Windows command shell:
powershell .\insert.ps1 |
After running the insert.ps1 PowerShell script, you can connect to the studentdb database. Then, run the following query:
SELECT version AS "Version" , user AS "User" , db_name AS "Database" FROM db_connect; |
It displays:
+---------+-------------------+-----------+ | Version | User | Database | +---------+-------------------+-----------+ | 8.0.21 | student@localhost | studentdb | +---------+-------------------+-----------+ 1 row in set (0.01 sec) |
If you’re interested in writing a Connection Prompt dialog for PowerShell, the complete code is in this other blog post of mine. It also provides the instructions to put the code into a reusable PowerShell library. Also, if you’re interested in how to pass option flags and parameters I put that in this new blog post.
As always, I hope this helps those trying to use PowerShell as a scripting tool to insert, update, or delete data.
What Identifier?
It’s always interesting to see students find the little nuances that SQL*Plus can generate. One of the first things we cover is the concept of calling PL/SQL interactively versus through an embedded call. The easiest and first exercise simply uses an insecure call like:
sqlplus -s student/student @call.sql |
to the call.sql program:
SQL> DECLARE 2 lv_input VARCHAR2(20); 3 BEGIN 4 lv_input := '&1'; 5 dbms_output.put_line('['||lv_input||']'); 6 END; 7 / |
It prints the following to console:
Enter value for 1: machine old 4: lv_input := '&1'; new 4: lv_input := 'machine'; [machine] PL/SQL procedure successfully completed. |
Then, we change the '&1' parameter variable to '&mystery' and retest the program, which prints the following to the console:
Enter value for mystery: machine old 4: lv_input := '&mystery'; new 4: lv_input := 'machine'; [machine] PL/SQL procedure successfully completed. |
After showing a numeric and string input parameter, we remove the quotation from the lv_input input parameter and raise the following error:
Enter value for mystery: machine
old   4:   lv_input := &mystery;
new   4:   lv_input := machine;
  lv_input := machine;
              *
ERROR at line 4:
ORA-06550: line 4, column 15:
PLS-00201: identifier 'MACHINE' must be declared
ORA-06550: line 4, column 3:
PL/SQL: Statement ignored |
The point of the exercise is to spell out that the default input value is numeric and that if you pass a string it becomes an identifier in the scope of the program. So, we rewrite the call.sql program file by adding a machine variable, like:
SQL> DECLARE 2 lv_input VARCHAR2(20); 3 machine VARCHAR2(20) := 'Mystery Machine'; 4 BEGIN 5 lv_input := &mystery; 6 dbms_output.put_line('['||lv_input||']'); 7 END; 8 / |
It prints the following:
Enter value for mystery: machine old 5: lv_input := &mystery; new 5: lv_input := machine; [Mystery Machine] PL/SQL procedure successfully completed. |
The parameter name becomes an identifier and maps to the variable machine. That mapping means it prints the value of the machine variable.
While this is what we’d call a terminal use case, it is a fun way to illustrate an odd PL/SQL behavior. As always, I hope its interesting for those who read it.
Put MySQL in PATH
After downloading and installing MySQL 8.0.24 yesterday, I opened a command shell. In the command shell, I could access the MySQL Shell (mysqlsh.exe) but not the MySQL Client (mysql.exe). Typing in the following:
C:\WINDOWS\system32>mysql |
It returned:
'mysql' is not recognized as an internal or external command, operable program or batch file. |
The MySQL Client (mysql.exe) was installed because MySQL Workbench relies on it. However, the MySQL Microsoft Software Installer (MSI) does not put the mysql.exe file’s directory in the common Windows %PATH% environment variable. You can find the required %PATH% directory variable by opening the File Manager and searching for the mysql.exe file.
You should return several directories and programs but the directory you want is:
C:\Program Files\MySQL\MySQL Server 8.0\bin |
You can test it by using the SET command in the Microsoft Operating System, like this:
SET PATH=C:\Program Files\MySQL\MySQL Server 8.0\bin;%PATH% |
You can now call the mysql.exe program in your current shell session with the following syntax:
mysql -uroot -p |
You will be prompted for the password and then connected to the database as follows:
Welcome to the MySQL monitor. Commands end with ; or \g. Your MySQL connection id is 19 Server version: 8.0.24 MySQL Community Server - GPL Copyright (c) 2000, 2021, Oracle and/or its affiliates. Oracle is a registered trademark of Oracle Corporation and/or its affiliates. Other names may be trademarks of their respective owners. Type 'help;' or '\h' for help. Type '\c' to clear the current input statement. mysql> |
Unfortunately, the SET command only sets the %PATH% environment variable in the current session. You can set the system %PATH% environment variable globally by following these steps:
- In Search, search for and then select: System (Control Panel)
- In Settings dialog enter “Environment” in the search box and it will display:
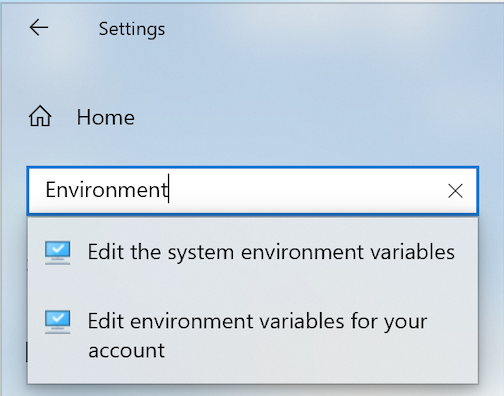
- Chose “Edit the system environment variables” option. You will see the following “System Properties” dialog:
- Click the “Environment Variable” button to display the “Environment Variables” dialog. Click on the Path system variable before clicking the Edit button beneath.
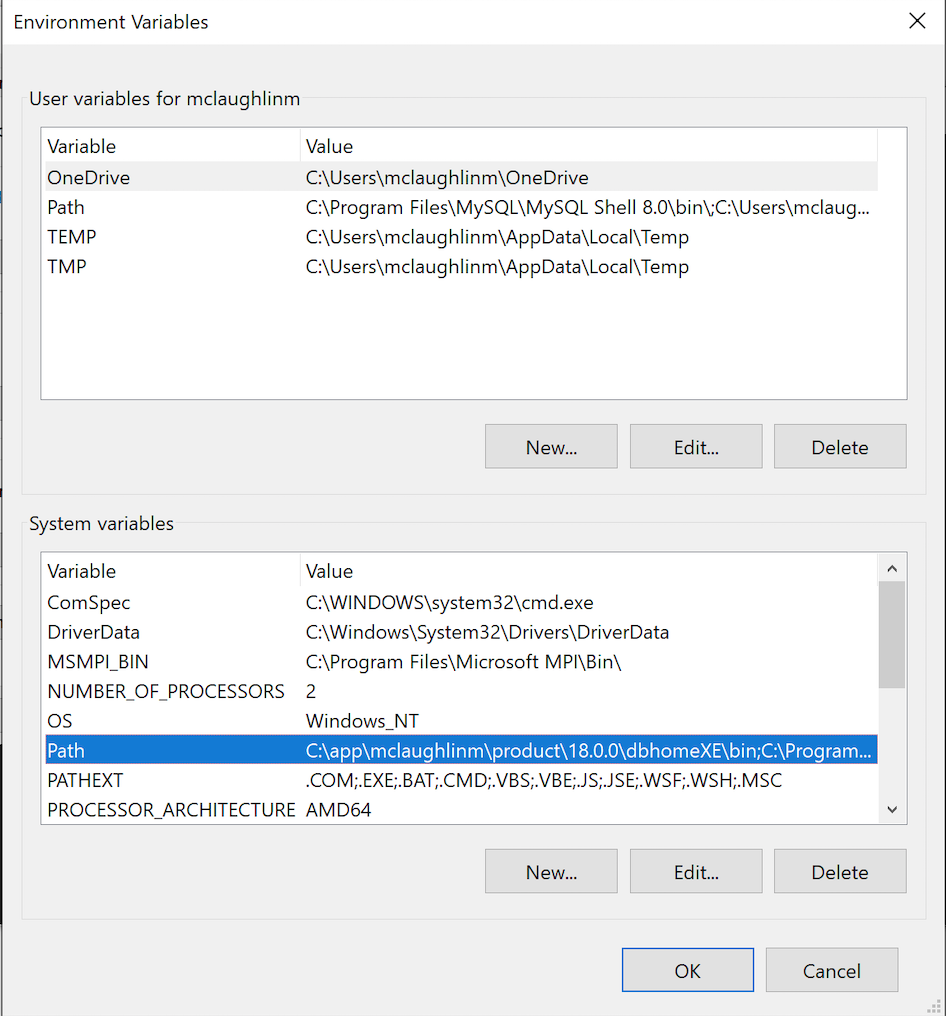
- Click the “New” button and enter “
C:\Program Files\MySQL\MySQL Server 8.0\bin, and click the “OK” button. The next time you query the computer system’s%PATH%environment variable, it will show you the list of path locations that the operating system looks at for command files. It’s actually stored as a semicolon-delimited list in Windows 10 (and, as a colon-delimited list in Linux or Unix).
The next time you open a command shell, the %PATH% environment variable will find the mysql.exe program. As always, I hope these instructions help the reader.
MySQL Transaction Scope
The idea of ACID transactions are a basic feature of SQL’s individual Data Manipulation Language (DML) commands, like the INSERT, UPDATE, and DELETE statements. Transactions across two or more tables are a natural extension of ACID compliance features provided by DML commands. However, they require a structured programming approach, like a store procedure or like API implemented in an imperative language.
Surprisingly, transaction management wasn’t covered well in Alan Beaulieu’s Learning SQL because he only provided pseudo code logic. While I thought troubleshoot some broken MySQL SQL/PSM logic would be a good learning experience for students, it wasn’t. So, I wrote this sample code to show how to achieve an all or nothing transaction across four tables.
The code for this example on transaction management lets you perform the important tasks necessary to effect transaction management:
- You must disable autocommit in the scope of the session.
- You must use an imperative programming language like SQL/PSM or Python, et cetera.
- You must identify an error thrown in a series of DML transactions, rollback all completed work, and exit the scope of the program unit.
This SQL defines the four tables:
/* Drop and create four tables. */ DROP TABLE IF EXISTS one, two, three, four; CREATE TABLE one ( id int primary key auto_increment, msg varchar(10)); CREATE TABLE two ( id int primary key auto_increment, msg varchar(10)); CREATE TABLE three ( id int primary key auto_increment, msg varchar(10)); CREATE TABLE four ( id int primary key auto_increment, msg varchar(10)); |
Unfortunately, there’s no way to simply transaction management from the MySQL Command-Line Interface (CLI) because you need to build the logic that manages success and failure. It requires that you create a procedure using MySQL’s SQL/PSM (Persistent Stored Module) or another imperative programming language. You might think why can’t you just write an anonymous block program, like you can do in other stored procedural languages. The answer is simple. You can’t write anonymous blocks in MySQL’s SQL/PSM because they adhere to ANSI SQL-2003 (or more accurately ISO/IEC 9075-4:2003).
The following code block does:
- Conditionally drops the locking() procedure.
- Sets the default semicolon (
;) delimiter to a double-dollar ($$), which lets you use the semicolon as statement and block terminators. - Declares a
locking()procedure with the following:- Sets a parameter list with four IN-mode parameters.
- Declares an
EXIThandler that undoes any writes before an error in a sequence of DDL commands, like theINSERT,UPDATE, orDELETEstatements. TheEXIThandler then aborts completion of the rest of the procedure. (MySQL 13.6.7.2 Declare … Handler Statement) - Disables autocommit in the scope of the session.
- Starts a transaction context and inserts data into four tables as a transaction. The continue handler picks up processing when one of the
INSERTstatements fails with a 1406 error code. The 1406 error code represents an error that occurs because the data is too long for a column’s width. - When all elements of the procedure complete, you commit the work.
/* Conditionally drop procedure. */ DROP PROCEDURE IF EXISTS locking; /* Set delimiter to $$ to allow ; inside the procedure. */ DELIMITER $$ /* Create a transaction procedure. */ CREATE PROCEDURE locking(IN pv_one varchar(10) ,IN pv_two varchar(10) ,IN pv_three varchar(10) ,IN pv_four varchar(10)) BEGIN /* Declare an EXIT Handler when a string is too long for a column. Undo all prior writes with a ROLLBACK statement. */ DECLARE EXIT HANDLER FOR 1406 BEGIN ROLLBACK; END; /* Disable autocommit. */ SET AUTOCOMMIT=0; /* Start transaction scope. */ START TRANSACTION; /* A series of INSERT statement. */ INSERT INTO one (msg) VALUES (pv_one); INSERT INTO two (msg) VALUES (pv_two); INSERT INTO three (msg) VALUES (pv_three); INSERT INTO four (msg) VALUES (pv_four); /* Commit transaction set. */ COMMIT; END; $$ /* Reset delimiter to ; for SQL statements. */ DELIMITER ; |
The next block tests the locking() procedure. The first and third calls are successful but the second one fails because the third parameter is too long for the msg column in the three table. The error triggers the EXIT handler in the locking() procedure.
/* Call locking procedure. */ CALL locking('Donald','Goofy','Mickey','Pluto'); CALL locking('Squirrel','Chipmunk','Monkey business','Raccoon'); CALL locking('Curly','Larry','Moe','Shemp'); |
The query block below:
/* Select from tables, which should be empty. */ SELECT * FROM one; SELECT * FROM two; SELECT * FROM three; SELECT * FROM four; |
Returns the following, which shows only the first and third test cases succeed:
+----+--------+ | id | msg | +----+--------+ | 1 | Donald | | 2 | Curly | +----+--------+ 2 rows in set (0.01 sec) +----+-------+ | id | msg | +----+-------+ | 1 | Goofy | | 2 | Larry | +----+-------+ 2 rows in set (0.00 sec) +----+--------+ | id | msg | +----+--------+ | 1 | Mickey | | 2 | Moe | +----+--------+ 2 rows in set (0.00 sec) +----+-------+ | id | msg | +----+-------+ | 1 | Pluto | | 2 | Shemp | +----+-------+ 2 rows in set (0.00 sec) |
As always, I hope this helps those trying to write transactions across multiple tables.
PL/SQL Inheritance Failure
PL/SQL is a great programming language as far as it goes but it lacks true type inheritance for its collections. While you can create an object type and subtype, you can’t work with collections of those types the same way. PL/SQL object type inheritance, unlike the Java class hierarchy and parallel array class hierarchy, only supports a class hierarchy. Effectively, that means:
- You can pass a subtype as a call parameter, or argument, to a parent data type in a function, procedure, or method signature, but
- You can’t pass a collection of a subtype as a call parameter, or argument, to a collection of parent type in a function, procedure, or method signature.
The limitation occurs because collections have their own data type, which is fixed when you create them. Worse yet, because Oracle has never seen fit to fix their two underlying code trees (23 years and counting since Oracle 8i), you have two types of collections using two distinct C/C++ libraries. You define collections of Attribute Data Types (ATDs) when you create a collection of a standard scalar data type, like NUMBER, VARCHAR2, or DATE. You define collection of User-Defined Data Types (UTDs) when you create a collection of a SQL UDT or PL/SQL-only RECORD data type. The former uses one C/C++ library and the latter another.
Now, Oracle even make the differences between Java and PL/SQL more complex because it treats collections known as tables, really lists in most programming languages, differently than varrays, or arrays. You create a TABLE collection, or list, when you create a table of a scalar or UDT data type. There are two options when you create these object types, and they are:
- You create an empty collection with a no element constructor, which means you’ll need to allocate memory before assigning element values later in your program.
- You create a populated collection with a comma-delimited list of elements.
Both approaches give you a list of elements with a densely populated index. A “densely populated index” is Oracle’s jargon for how they characterize a 1-based sequence of integers without any gaps (e.g., 1, 2, 3, …). The initial construction works the same way whether you create a TABLE or VARRAY collection type. Unfortunately, after you’ve built the collection behaviors change. If you use Oracle’s Collection API to delete one or more items from a TABLE collection type, you create gaps in the index’s sequence of values. That means you must use special logic to navigate across a TABLE collection type to ensure it doesn’t fail when encountering a gap in the numeric sequence.
For example, here’s a FOR-LOOP without the logic to vouchsafe a uninterrupted set of sequence values incrementing by a counter of 1 element at a time:
1 2 3 4 5 6 7 8 9 10 11 12 13 14 15 16 17 18 19 | DECLARE /* Create a local table collection. */ TYPE list IS TABLE OF VARCHAR2(10); /* Statically allocate memory and assign values to for elements. */ lv_list LIST := list('Moe','Shemp','Larry','Curly'); BEGIN /* Remove the second element, Shemp, from the collection of variable length strings. */ lv_list.DELETE(2); /* Loop through the target with a for loop, which depends on densely populated index values. */ FOR i IN 1..lv_list.COUNT LOOP dbms_output.put_line('['||lv_list(i)||']'); END LOOP; END; / |
The program fails when it tries to read the second element of the table collection, which was previously removed. It raises the following error message after print the first element of the table collection:
[Moe] DECLARE * ERROR at line 1: ORA-01403: no data found ORA-06512: at line 16 |
Conveniently, Oracle’s Collection API provides an EXISTS method that we can use to check for the presence of an index’s value. Modifying line 16 by wrapping it in an IF-statement fixes one problem but identifies another:
15 16 17 18 19 | FOR i IN 1..lv_list.COUNT LOOP IF lv_list.EXISTS(i) THEN dbms_output.put_line('['||lv_list(i)||']'); END IF; END LOOP; |
The program no longer fails on a missing index value, or index gap, but it returns fewer lines of output than you might expect.
That’s because the Oracle Collection API’s COUNT method returns the number of elements currently allocated in memory not the number of original elements. We learn that when we deleted the second element, Oracle deleted the memory allocated for it as well. This is the type of behavior you might expect for a singly linked list. It prints:
[Moe] [Larry] |
One more change is required to count past and to the highest index value. One line 15, change the COUNT method call to the LAST method call, which returns the highest index value.
15 16 17 18 19 | FOR i IN 1..lv_list.LAST LOOP IF lv_list.EXISTS(i) THEN dbms_output.put_line('['||lv_list(i)||']'); END IF; END LOOP; |
It now prints the three stooges we would expect to see:
[Moe] [Larry] [Curly] |
Realistically, a FOR-LOOP is not the best control structure for a collection. You should use a WHILE-LOOP and treat the incrementing value as an iterator rather than sequence index value. An iterator doesn’t worry about gaps in the sequence, it simply moves to the next element in the singly linked list. Here’s an example that uses the iterator approach with a WHILE-LOOP:
1 2 3 4 5 6 7 8 9 10 11 12 13 14 15 16 17 18 19 20 21 22 23 24 25 26 | DECLARE /* Create a local table collection. */ TYPE list IS TABLE OF VARCHAR2(10); /* Statically allocate memory and assign values to for elements. */ lv_list LIST := list('Moe','Shemp','Larry','Curly'); /* Declare a current index variable. */ CURRENT NUMBER; BEGIN /* Remove the second element, Shemp, from the collection of variable length strings. */ lv_list.DELETE(2); /* Loop through the target with a while loop, which doesn't depend on densely populated index values by setting the starting index value and increment as if with an iterator. */ CURRENT := lv_list.FIRST; WHILE NOT (CURRENT > lv_list.LAST) LOOP dbms_output.put_line('['||lv_list(CURRENT)||']'); CURRENT := lv_list.NEXT(CURRENT); END LOOP; END; / |
The iterator approach prints the elements as:
[Moe] [Larry] [Curly] |
You can reverse the process with the following changes to lines 20-24:
20 21 22 23 24 | CURRENT := lv_list.LAST; WHILE NOT (CURRENT < lv_list.FIRST) LOOP dbms_output.put_line('['||lv_list(CURRENT)||']'); CURRENT := lv_list.PRIOR(CURRENT); END LOOP; |
It prints the list backwards:
[Curly] [Larry] [Moe] |
After covering the issues with sparsely populated, those with gaps in the sequence of indexes values, table collections, let’s examine how you must work around PL/SQL’s lack of a parallel array class hierarchy. The solution lies in combining two programming concepts:
- A function to pack the sparsely populated table collection into a densely populated one, and
- A package with overloaded functions that pack different table collections.
To develop the test case, let’s use an ADT collection because it’s the simplest to work with. The following creates a table collection of a thirty character long scalar string:
1 2 3 | CREATE OR REPLACE TYPE list IS TABLE OF VARCHAR2(30); / |
The following pack function takes a table collection of the thirty character long scalar string, evaluates the string for missing elements, and packs the existing elements into a densely populated list:
1 2 3 4 5 6 7 8 9 10 11 12 13 14 15 16 17 | CREATE OR REPLACE FUNCTION pack ( pv_list LIST ) RETURN list IS /* Declare a new list. */ lv_new LIST := list(); BEGIN /* Read, check, and pack an old list into a new one. */ FOR i IN 1..pv_list.LAST LOOP IF pv_list.EXISTS(i) THEN lv_new.EXTEND; lv_new(lv_new.COUNT) := pv_list(i); END IF; END LOOP; RETURN lv_new; END; / |
This anonymous block tests the pack function:
1 2 3 4 5 6 7 8 9 10 11 12 13 14 15 16 | DECLARE /* Declare a list value. */ lv_test LIST := list('Moe','Shemp','Larry','Curly'); BEGIN /* Remove one element in the middle. */ lv_test.DELETE(2); /* Pack the list of elements into a sequence of values. */ lv_test := pack(lv_test); /* Print the list of elements from the packed list. */ FOR i IN 1..lv_test.COUNT LOOP dbms_output.put_line('['||lv_test(i)||']'); END LOOP; END; / |
It prints the expected three string values:
[Moe] [Larry] [Curly] |
Now, let’s expand the example to build an overloaded package. The first step requires building a base_t object type and a table collection of the object type, like:
1 2 3 4 5 6 7 8 9 | CREATE OR REPLACE TYPE base_t IS OBJECT ( oid NUMBER ) INSTANTIABLE NOT FINAL; / CREATE OR REPLACE TYPE base_list IS TABLE OF base_t; / |
Next, you create a book_t subtype of the base_t object type and a book_list table collection of the book_t subtype, like:
1 2 3 4 5 6 7 8 9 | CREATE OR REPLACE TYPE book_t UNDER base_t ( title VARCHAR2(30) , COST NUMBER); / CREATE OR REPLACE TYPE book_list IS TABLE OF book_t; / |
We can test the base_t and book_t default constructors with the following SQL*Plus formatting and SQL query:
COL oid FORMAT 999 COL title FORMAT A20 COL COST FORMAT 99.99 SELECT * FROM TABLE(book_list(book_t(1,'Neuromancer',15.30) ,book_t(2,'Count Zero',7.99) ,book_t(3,'Mona Lisa Overdrive',7.99) ,book_t(4,'Burning Chrome',8.89))); |
It prints the following output:
OID TITLE COST ---- -------------------- ------ 1 Neuromancer 15.30 2 Count Zero 7.99 3 Mona Lisa Overdrive 7.99 4 Burning Chrome 8.89 |
The following is an overloaded package specification:
1 2 3 4 5 6 7 8 9 10 11 12 13 14 15 16 17 | CREATE OR REPLACE PACKAGE packer IS /* A simple ADT list of strings. */ FUNCTION pack ( pv_list LIST ) RETURN list; /* A UDT list of base objects. */ FUNCTION pack ( pv_list BASE_LIST ) RETURN base_list; /* A UDT list of subtype objects. */ FUNCTION pack ( pv_list BOOK_LIST ) RETURN book_list; END; / |
After you create the package specification, you need to provide the implementation. This is typical in any programming language that supports Interface Description Language (IDL). A package body provides the implementation for the package specification. The package body follows:
1 2 3 4 5 6 7 8 9 10 11 12 13 14 15 16 17 18 19 20 21 22 23 24 25 26 27 28 29 30 31 32 33 34 35 36 37 38 39 40 41 42 43 44 45 46 47 48 49 50 51 52 53 54 55 56 | CREATE OR REPLACE PACKAGE BODY packer IS /* A simple ADT list of strings. */ FUNCTION pack ( pv_list LIST ) RETURN list IS /* Declare a new list. */ lv_new LIST := list(); BEGIN /* Read, check, and pack an old list into a new one. */ FOR i IN 1..pv_list.LAST LOOP IF pv_list.EXISTS(i) THEN lv_new.EXTEND; lv_new(lv_new.COUNT) := pv_list(i); END IF; END LOOP; RETURN lv_new; END pack; /* A simple ADT list of strings. */ FUNCTION pack ( pv_list BASE_LIST ) RETURN base_list IS /* Declare a new list. */ lv_new BASE_LIST := base_list(); BEGIN /* Read, check, and pack an old list into a new one. */ FOR i IN 1..pv_list.LAST LOOP IF pv_list.EXISTS(i) THEN lv_new.EXTEND; lv_new(lv_new.COUNT) := pv_list(i); END IF; END LOOP; RETURN lv_new; END pack; /* A simple ADT list of strings. */ FUNCTION pack ( pv_list BOOK_LIST ) RETURN book_list IS /* Declare a new list. */ lv_new BOOK_LIST := book_list(); BEGIN /* Read, check, and pack an old list into a new one. */ FOR i IN 1..pv_list.LAST LOOP IF pv_list.EXISTS(i) THEN lv_new.EXTEND; lv_new(lv_new.COUNT) := pv_list(i); END IF; END LOOP; RETURN lv_new; END pack; END packer; / |
The test case for the base_list object type is:
1 2 3 4 5 6 7 8 9 10 11 12 13 14 15 16 17 | DECLARE lv_test BASE_LIST := base_list(base_t(1),base_t(2) ,base_t(3),base_t(4)); BEGIN /* Remove one element in the middle. */ lv_test.DELETE(2); /* Pack the list of elements into a sequence of values. */ lv_test := packer.pack(lv_test); /* Print the list of elements from the packed list. */ FOR i IN 1..lv_test.LAST LOOP dbms_output.put_line('['||lv_test(i).oid||']'); END LOOP; END; / |
It prints the following output:
[1] [3] [4] |
The test case for the book_list object type is:
1 2 3 4 5 6 7 8 9 10 11 12 13 14 15 16 17 18 19 20 21 | DECLARE lv_test BOOK_LIST := book_list(book_t(1,'Neuromancer',15.30) ,book_t(2,'Count Zero',7.99) ,book_t(3,'Mona Lisa Overdrive',7.99) ,book_t(4,'Burning Chrome',8.89)); BEGIN /* Remove one element in the middle. */ lv_test.DELETE(2); /* Pack the list of elements into a sequence of values. */ lv_test := packer.pack(lv_test); /* Print the list of elements from the packed list. */ FOR i IN 1..lv_test.LAST LOOP dbms_output.put_line( '['||lv_test(i).oid||']' ||'['||lv_test(i).title||']' ||'['||lv_test(i).COST||']'); END LOOP; END; / |
It prints the following output:
[1][Neuromancer][15.3] [3][Mona Lisa Overdrive][7.99] [4][Burning Chrome][8.89] |
In conclusion, you would not have to write overloaded methods for every list if PL/SQL supported class hierarchy and parallel array class hierarchy like Java. Unfortunately, it doesn’t and likely won’t in the future. You can pack table collections as a safety measure when they’re passed as parameters to other functions, procedures, or methods with the code above.
As always, I hope this helps those looking for a solution.
PL/SQL Coupled Loops
The purpose of this example shows you how to navigate a list with a sparsely populated index. This can occur when one element has been removed after the list was initialized. Unlike Oracle’s VARRAY (array), removing an element from a TABLE or list does not re-index the elements of the list.
This example also shows you how to coupled lists. The outer loop increments, notwithstanding the gap in index values, while the inner loop decrements. The upper range of the inner loop is set by the index value of the outer loop.
The example program uses an abbreviated version of the Twelve Days of Christmas, and I’ve tried to put teaching notes throughout the example file.
DECLARE /* Create a single column collection that is a list strings less than 8 characters in length and another of strings less than 20 characters in length. */ TYPE DAY IS TABLE OF VARCHAR2(8); TYPE verse IS TABLE OF VARCHAR2(20); /* Create variables that use the user-defined types: || ================================================= || 1. We give the variable a name of lv_day and lv_verse. || 2. We assign a user-defined ADT (Attribute Data Type) collection. || 3. We assign a list of value to the constructor of the list, which || allocates memory for each item in the comma-delimited list of || string. */ lv_day DAY := DAY('first','second','third','fourth','fifth'); lv_verse VERSE := verse('Partridge','Turtle Doves','French Hen' ,'Calling Birds','Gold Rings'); BEGIN /* || Remove an element from each of the two lists, which makes the two || lists sparsely indexed. A sparsely indexed list has gaps in the || sequential index of the list. */ lv_day.DELETE(3); /* || Loop through the list of days: || ===================================================j || 1. A list created by a comma-delimited list is densely populated, || which means it has no gaps in the sequence of indexes. || 2. A list created by any means that is subsequently accessed || and has one or more items removed is sparsely populated, || which means it may have gaps in the sequence of indexes. || 3. A FOR loop anticipates densely populated indexes and fails || when trying to read a missing index, which is why you should || use an IF statement to check for the element of a list before || accessing it. || 4. A COUNT method returns the number of elements allocated memory || in a list of values and the LAST method returns the highest || index value. The index value is alway an integer for user-defined || ADT (Attribute Data Type) collections, but may be a string for || an associative array or a PL/SQL list indexed by a string. || 5. Removing an element from a list does not change the other || index values but does if you create an array (or varray), which || means COUNT OR LAST may cause the same type of error for a list || with a missing element. */ FOR i IN 1..lv_day.LAST LOOP /* || Verify the index is valid. || ==================================================== || You check whether the element is present in the || list. */ IF lv_day.EXISTS(i) THEN /* Print the beginning of the stanza. */ dbms_output.put_line('On the ['||lv_day(i)||'] of Christmas ...'); /* Print the song. */ FOR j IN REVERSE 1..i LOOP /* Check if the day exists. */ IF lv_verse.EXISTS(j) THEN /* All but first and last verses. */ IF j > 1 THEN dbms_output.put_line('- ['||lv_verse(j)||']'); /* The last verse. */ ELSIF i = j THEN dbms_output.put_line('- A ['||lv_verse(j)||']'||CHR(10)); /* Last verse. */ ELSE dbms_output.put_line('and a ['||lv_verse(j)||']'||CHR(10)); END IF; END IF; END LOOP; ELSE CONTINUE; END IF; END LOOP; END; / |
As always, I hope it helps you solve problems in the real world.
MySQL sakila Database
While I thought my instructions were clear, it appears there should have been more in my examples for using the MySQL MSI. A key thing that happened is that students opted not to install:
Samples and Examples 8.0.22 |
Unfortunately, they may not have read the Preface of Alan Beaulieu’s Learning SQL, 3rd Edition where he explains how to manually download the files from the MySQL web site. Here are those, very clear, instructions (pg. XV) with my additions in italics for the MySQL Shell:
First, you will need to launch the mysql command-line client or the mysqlsh command-line shell, and provide a password, and then perform the following steps:
- Go to https://dev.mysql.com/doc/index-other.html and download the files for the “
sakiladatabase” under the Example Database section. - Put the files in the local directory such as
C:\temp\sakila-db(used for the next two steps, but overwrite with your directory path). - Type
source c:\temp\sakila-db\sakila-schema.sql
and press enter.
- Type
source c:\temp\sakila-db\sakila-data.sql
and press enter.
These instructions let you create the sakila database without rerunning the MSI to add a product. Naturally, you can avoid these steps by using the GUI approach provided in the MySQL MSI file.
As always, I hope this helps those looking for how to solve problems.
MySQL Client in 8.0.21+
Having recently installed a fresh copy of MySQL 8.0.21 on Windows, I took careful note of parsing changes in the MySQL Shell. It was tedious that we lost multiple statement processing, which is supported in the MySQL Client and MySQL Workbench because it uses MySQL Client.
It was frustrating when I subsequently discovered that the MySQL Shell took away the ability to write log files by removing the TEE and NOTEE commands. I suspected that since MySQL Workbench was still using the MySQL Client that it should be in the code tree. In fact, the mysql.exe client is in this directory:
C:\Program Files\MySQL\MySQL Server 8.0\bin |
So, I immediately created a batch file to put the MySQL Client into my %PATH% environment variable when needed. I used this time tested DOS command:
copy con mysqlclient.bat set PATH=%PATH%;C:\Program Files\MySQL\MySQL Server 8.0\bin;. ^Z |
Now you can call the MySQL client with the following syntax if you have a student user and studentdb database:
mysql -ustudent -p -Dstudentdb |
This way, I can just call it in a PowerShell utility before running migration script files that should generate log files for review. It also leaves the MySQL Client out of general use.
