Archive for the ‘Ubuntu’ Category
Ubuntu, R, RScript & RStudio
Installed R, Rscript, and RStudio on my student Ubuntu instance. You use the following command to install R a
sudo apt install -y r-base-core |
Then, you can check the version with the following command:
R --version |
It should return:
R version 4.1.2 (2021-11-01) -- "Bird Hippie" Copyright (C) 2021 The R Foundation for Statistical Computing Platform: x86_64-pc-linux-gnu (64-bit) R is free software and comes with ABSOLUTELY NO WARRANTY. You are welcome to redistribute it under the terms of the GNU General Public License versions 2 or 3. For more information about these matters see https://www.gnu.org/licenses/. |
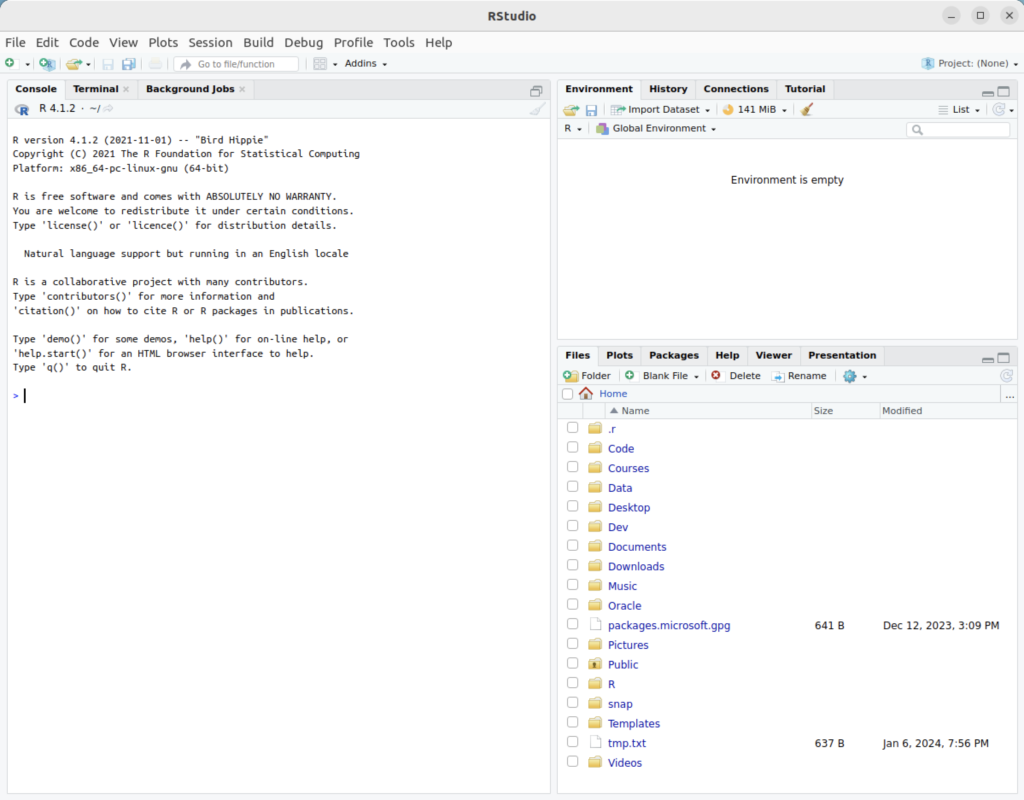
You also can run the interactive R environment by simply typing “R” at the command-line interface (CLI). It will display the following after entering the environment, quitting the environment, and discarding the workspace:
R version 4.1.2 (2021-11-01) -- "Bird Hippie" Copyright (C) 2021 The R Foundation for Statistical Computing Platform: x86_64-pc-linux-gnu (64-bit) R is free software and comes with ABSOLUTELY NO WARRANTY. You are welcome to redistribute it under certain conditions. Type 'license()' or 'licence()' for distribution details. Natural language support but running in an English locale R is a collaborative project with many contributors. Type 'contributors()' for more information and 'citation()' on how to cite R or R packages in publications. Type 'demo()' for some demos, 'help()' for on-line help, or 'help.start()' for an HTML browser interface to help. Type 'q()' to quit R. > q() Save workspace image? [y/n/c]: n |
You can write and run a hello.r script file as follows in a Linux environment:
#!/usr/bin/Rscript

# Print a string.
print("Hello World!") |
It prints what you would expect:
[1] "Hello World!" |
The RStudio comes in two versions. One is Free and the other costs money. These are not hosted in the Ubuntu repository, and you must download them manually to apply them. You can go to RStudio web site or run the following command to download RStudio Free edition:
wget https://download1.rstudio.org/electron/jammy/amd64/rstudio-2023.12.0-369-amd64.deb |
After downloading the package, you can’t quite install RStudio until you install two likely uninstalled dependencies, which are:
libclang-dev libclang-14-dev libclang1-14 libclang-common-14-dev lib32gcc-s1 lib32stdc++6 libc6-i386 libobjc4 libobjc-11-dev libssl-dev |
Therefore, the prestep is:
sudo apt install -y libssl-dev libclang-dev libclang-14-dev libobjc-11-dev libclang1-14 libclang-common-14-dev lib32gcc-s1 lib32stdc++6 libc6-i386 libobjc4 |
Display detailed console log →
Reading package lists... Done Building dependency tree... Done Reading state information... Done Suggested packages: libssl-doc The following NEW packages will be installed: lib32gcc-s1 lib32stdc++6 libc6-i386 libclang-14-dev libclang-common-14-dev libclang-dev libclang1-14 libobjc-11-dev libobjc4 libssl-dev 0 upgraded, 10 newly installed, 0 to remove and 14 not upgraded. 1 not fully installed or removed. Need to get 44.2 MB of archives. After this operation, 382 MB of additional disk space will be used. Get:1 http://us.archive.ubuntu.com/ubuntu jammy-updates/main amd64 libssl-dev amd64 3.0.2-0ubuntu1.12 [2,373 kB] Get:2 http://us.archive.ubuntu.com/ubuntu jammy-updates/universe amd64 libobjc4 amd64 12.3.0-1ubuntu1~22.04 [48.6 kB] Get:3 http://us.archive.ubuntu.com/ubuntu jammy-updates/universe amd64 libobjc-11-dev amd64 11.4.0-1ubuntu1~22.04 [196 kB] Get:4 http://us.archive.ubuntu.com/ubuntu jammy-updates/universe amd64 libclang1-14 amd64 1:14.0.0-1ubuntu1.1 [6,792 kB] Get:5 http://us.archive.ubuntu.com/ubuntu jammy-updates/main amd64 libc6-i386 amd64 2.35-0ubuntu3.5 [2,837 kB] Get:6 http://us.archive.ubuntu.com/ubuntu jammy-updates/main amd64 lib32gcc-s1 amd64 12.3.0-1ubuntu1~22.04 [63.9 kB] Get:7 http://us.archive.ubuntu.com/ubuntu jammy-updates/main amd64 lib32stdc++6 amd64 12.3.0-1ubuntu1~22.04 [740 kB] Get:8 http://us.archive.ubuntu.com/ubuntu jammy-updates/universe amd64 libclang-common-14-dev amd64 1:14.0.0-1ubuntu1.1 [5,975 kB] Get:9 http://us.archive.ubuntu.com/ubuntu jammy-updates/universe amd64 libclang-14-dev amd64 1:14.0.0-1ubuntu1.1 [25.2 MB] Get:10 http://us.archive.ubuntu.com/ubuntu jammy/universe amd64 libclang-dev amd64 1:14.0-55~exp2 [3,138 B] Fetched 44.2 MB in 3s (17.1 MB/s) Selecting previously unselected package libssl-dev:amd64. (Reading database ... 242640 files and directories currently installed.) Preparing to unpack .../0-libssl-dev_3.0.2-0ubuntu1.12_amd64.deb ... Unpacking libssl-dev:amd64 (3.0.2-0ubuntu1.12) ... Selecting previously unselected package libobjc4:amd64. Preparing to unpack .../1-libobjc4_12.3.0-1ubuntu1~22.04_amd64.deb ... Unpacking libobjc4:amd64 (12.3.0-1ubuntu1~22.04) ... Selecting previously unselected package libobjc-11-dev:amd64. Preparing to unpack .../2-libobjc-11-dev_11.4.0-1ubuntu1~22.04_amd64.deb ... Unpacking libobjc-11-dev:amd64 (11.4.0-1ubuntu1~22.04) ... Selecting previously unselected package libclang1-14. Preparing to unpack .../3-libclang1-14_1%3a14.0.0-1ubuntu1.1_amd64.deb ... Unpacking libclang1-14 (1:14.0.0-1ubuntu1.1) ... Selecting previously unselected package libc6-i386. Preparing to unpack .../4-libc6-i386_2.35-0ubuntu3.5_amd64.deb ... Unpacking libc6-i386 (2.35-0ubuntu3.5) ... Selecting previously unselected package lib32gcc-s1. Preparing to unpack .../5-lib32gcc-s1_12.3.0-1ubuntu1~22.04_amd64.deb ... Unpacking lib32gcc-s1 (12.3.0-1ubuntu1~22.04) ... Selecting previously unselected package lib32stdc++6. Preparing to unpack .../6-lib32stdc++6_12.3.0-1ubuntu1~22.04_amd64.deb ... Unpacking lib32stdc++6 (12.3.0-1ubuntu1~22.04) ... Selecting previously unselected package libclang-common-14-dev. Preparing to unpack .../7-libclang-common-14-dev_1%3a14.0.0-1ubuntu1.1_amd64.deb ... Unpacking libclang-common-14-dev (1:14.0.0-1ubuntu1.1) ... Selecting previously unselected package libclang-14-dev. Preparing to unpack .../8-libclang-14-dev_1%3a14.0.0-1ubuntu1.1_amd64.deb ... Unpacking libclang-14-dev (1:14.0.0-1ubuntu1.1) ... Selecting previously unselected package libclang-dev. Preparing to unpack .../9-libclang-dev_1%3a14.0-55~exp2_amd64.deb ... Unpacking libclang-dev (1:14.0-55~exp2) ... Setting up libclang1-14 (1:14.0.0-1ubuntu1.1) ... Setting up libobjc4:amd64 (12.3.0-1ubuntu1~22.04) ... Setting up libssl-dev:amd64 (3.0.2-0ubuntu1.12) ... Setting up libc6-i386 (2.35-0ubuntu3.5) ... Setting up libobjc-11-dev:amd64 (11.4.0-1ubuntu1~22.04) ... Setting up lib32gcc-s1 (12.3.0-1ubuntu1~22.04) ... Setting up lib32stdc++6 (12.3.0-1ubuntu1~22.04) ... Setting up libclang-common-14-dev (1:14.0.0-1ubuntu1.1) ... Setting up libclang-14-dev (1:14.0.0-1ubuntu1.1) ... Setting up libclang-dev (1:14.0-55~exp2) ... Setting up rstudio (2023.12.0+369) ... Processing triggers for libc-bin (2.35-0ubuntu3.5) ... |
Then, you can install RStudio with this command from the directory where you downloaded it:
sudo dpkg -i rstudio-2023.12.0-369-amd64.deb |
Display detailed console log →
Selecting previously unselected package rstudio. (Reading database ... 239285 files and directories currently installed.) Preparing to unpack rstudio-2023.12.0-369-amd64.deb ... Unpacking rstudio (2023.12.0+369) ... Setting up rstudio (2023.12.0+369) ... Processing triggers for mailcap (3.70+nmu1ubuntu1) ... Processing triggers for gnome-menus (3.36.0-1ubuntu3) ... Processing triggers for desktop-file-utils (0.26-1ubuntu3) ... Processing triggers for hicolor-icon-theme (0.17-2) ... Processing triggers for shared-mime-info (2.1-2) ... |
After a successful installation, you can launch RStudio with the following command:
rstudio |
You will get the following console:
As always, I hope this helps those trying to do something that should be simple but isn’t quite simple.
Ubuntu, Perl & MySQL
Configuring Perl to work with MySQL is straight forward. While Perl is installed generally, you may need to install the libdbd-mysql-perl library.
You install it as a sudoer user with this syntax:
sudo apt install -y libdbd-mysql-perl |
Display detailed console log →
Reading package lists... Done Building dependency tree... Done Reading state information... Done The following additional packages will be installed: libmysqlclient21 The following NEW packages will be installed: libdbd-mysql-perl libmysqlclient21 0 upgraded, 2 newly installed, 0 to remove and 12 not upgraded. Need to get 1,389 kB of archives. After this operation, 7,143 kB of additional disk space will be used. Get:1 http://us.archive.ubuntu.com/ubuntu jammy-updates/main amd64 libmysqlclient21 amd64 8.0.35-0ubuntu0.22.04.1 [1,301 kB] Get:2 http://us.archive.ubuntu.com/ubuntu jammy-updates/universe amd64 libdbd-mysql-perl amd64 4.050-5ubuntu0.22.04.1 [87.6 kB] Fetched 1,389 kB in 1s (1,213 kB/s) Selecting previously unselected package libmysqlclient21:amd64. (Reading database ... 235085 files and directories currently installed.) Preparing to unpack .../libmysqlclient21_8.0.35-0ubuntu0.22.04.1_amd64.deb ... Unpacking libmysqlclient21:amd64 (8.0.35-0ubuntu0.22.04.1) ... Selecting previously unselected package libdbd-mysql-perl:amd64. Preparing to unpack .../libdbd-mysql-perl_4.050-5ubuntu0.22.04.1_amd64.deb ... Unpacking libdbd-mysql-perl:amd64 (4.050-5ubuntu0.22.04.1) ... Setting up libmysqlclient21:amd64 (8.0.35-0ubuntu0.22.04.1) ... Setting up libdbd-mysql-perl:amd64 (4.050-5ubuntu0.22.04.1) ... Processing triggers for man-db (2.10.2-1) ... Processing triggers for libc-bin (2.35-0ubuntu3.5) ... |
You can find the Perl version with the following version.pl program:
1 2 3 4 | #!/usr/bin/perl -w # Print the version. print "Perl ".$]."\n"; |
The first line lets you call the program without prefacing the program name with perl. The first line invokes a subshell of perl by default. You just need to ensure the file has read and execute privileges to run by using the
chmod 755 version.pl |
You call it with this:
./version.pl |
It prints:
Perl 5.034000 |
The following static_query.pl Perl program uses the Perl DBI library to query and return a data set based on a static query.
1 2 3 4 5 6 7 8 9 10 11 12 13 14 15 16 17 18 19 20 21 22 23 24 25 26 27 28 29 30 31 32 33 34 35 36 37 | #!/usr/bin/perl -w # Use the DBI library. use DBI; use strict; use warnings; # Create a connection. my $dbh = DBI->connect("DBI:mysql:database=studentdb;host=localhost:3306" ,"student","student",{'RaiseError' => 1}); # Create SQL statement. my $sql = "SELECT i.item_title , ra.rating , cl.common_lookup_meaning FROM item i INNER JOIN common_lookup cl ON i.item_type = cl.common_lookup_id INNER JOIN rating_agency ra ON i.item_rating_id = ra.rating_agency_id WHERE i.item_title LIKE 'Harry%' AND cl.common_lookup_type = 'BLU-RAY'"; # Prepare SQL statement. my $sth = $dbh->prepare($sql); # Execute statement and read result set. $sth->execute() or die $DBI::errstr; # Read through returned rows, assign elements explicitly to match SELECT-list. while (my @row = $sth->fetchrow_array()) { my $item_title = $row[0]; my $rating = $row[1]; my $lookup_meaning = $row[2]; print "$item_title, $rating, $lookup_meaning\n"; } # Close resources. $sth->finish(); |
It returns the following rows from the sample database:
Harry Potter and the Sorcerer's Stone, PG, Blu-ray Harry Potter and the Chamber of Secrets, PG, Blu-ray Harry Potter and the Prisoner of Azkaban, PG, Blu-ray Harry Potter and the Goblet of Fire, PG-13, Blu-ray |
The following dynamic_query.pl Perl program uses the Perl DBI library to prepare a query, bind a local variable into the query, and return a data set based on a dynamic query.
1 2 3 4 5 6 7 8 9 10 11 12 13 14 15 16 17 18 19 20 21 22 23 24 25 26 27 28 29 30 31 32 33 34 35 36 37 38 39 40 41 42 43 | #!/usr/bin/perl -w # Use the DBI library. use DBI; use strict; use warnings; # Mimic a function parameter by using a local variable. my $item_title_in = 'Star'; # Create a connection. my $dbh = DBI->connect("DBI:mysql:database=studentdb;host=localhost:3306" ,"student","student",{'RaiseError' => 1}); # Create SQL statement. my $sql = "SELECT i.item_title , ra.rating , cl.common_lookup_meaning FROM item i INNER JOIN common_lookup cl ON i.item_type = cl.common_lookup_id INNER JOIN rating_agency ra ON i.item_rating_id = ra.rating_agency_id WHERE i.item_title LIKE CONCAT(?,'%') AND cl.common_lookup_type = 'BLU-RAY'"; # Prepare SQL statement. my $sth = $dbh->prepare($sql); # Bind a variable to first parameter in the query string. $sth->bind_param(1, $item_title_in); # Execute statement and read result set. $sth->execute() or die $DBI::errstr; # Read through returned rows, assign elements explicitly to match SELECT-list. while (my @row = $sth->fetchrow_array()) { my $item_title = $row[0]; my $rating = $row[1]; my $lookup_meaning = $row[2]; print "$item_title, $rating, $lookup_meaning\n"; } # Close resources. $sth->finish(); |
It returns the following rows from the sample database:
Star Wars II, PG, Blu-ray |
You can replace lines 34 through 40 with the following to read any number of columns into a comma-delimited row return:
34 35 36 37 38 39 40 41 42 43 44 45 46 47 48 | # Read through returned rows, assign elements explicitly to match SELECT-list. while (my @row = $sth->fetchrow_array()) { # Read through a dynamic column list for column separated display. my $result = ''; foreach(@row) { if (length($result) == 0) { $result = $_; } else { $result .= ", " . $_; } } # Print comma-separted values by row. print $result . "\n" } |
It returns the following rows from the sample database:
Star Wars II, PG, Blu-ray |
As always, I hope this helps the reader solve a problem.
Oracle 23c Free SQL*Plus
It’s always frustrated me when using the sqlplus command-line interface (CLI) that you can’t just “up arrow” to through the history. At least, that’s the default case unless you wrap the sqlplus executable.
I like to do my development work as close to the database as possible. The delay from SQL Developer to the database or VSCode to the database is just too long. Therefore, I like the native sqlplus to be as efficient as possible. This post shows you how to install the rlwarp utility to wrap sqlplus and create a sandboxed student user for a local development account inside the Oracle 23c Free container. You should note that the Docker or Podman Container is using Oracle Unbreakable Linux 8 as it’s native OS.
You can connect to your Docker version of Oracle Database 23c Free with the following command:
docker exec -it -u root oracle23c bash |
You can’t just use dnf to install rlwrap and get it to magically install all the dependencies. That would be too easy, eh?
Attempting to do so will lock your base OS and eventually force you to kill with prejudice the hung dnf process (at least it forced me to do so). You need to determine the rlwrap dependencies and then install them first. In that process, I noticed that the which utility program wasn’t installed in the container.
Naturally, I installed the which utility first with this command:
dnf install -y which |
Display detailed console log →
Last metadata expiration check: 0:26:00 ago on Thu Dec 21 05:18:09 2023. Dependencies resolved. ================================================================================ Package Architecture Version Repository Size ================================================================================ Installing: which x86_64 2.21-20.el8 ol8_baseos_latest 50 k Transaction Summary ================================================================================ Install 1 Package Total download size: 50 k Installed size: 81 k Downloading Packages: which-2.21-20.el8.x86_64.rpm 80 kB/s | 50 kB 00:00 -------------------------------------------------------------------------------- Total 80 kB/s | 50 kB 00:00 Running transaction check Transaction check succeeded. Running transaction test Transaction test succeeded. Running transaction Preparing : 1/1 Installing : which-2.21-20.el8.x86_64 1/1 Running scriptlet: which-2.21-20.el8.x86_64 1/1 Verifying : which-2.21-20.el8.x86_64 1/1 Installed: which-2.21-20.el8.x86_64 Complete! |
The rlwrap dependencies are: glibc, ncurses, perl, readline, python, and git. Only the perl, python, and git are missing from the list of formal dependencies but there’s another dependency the epel-release package.
If you want to verify whether a package is installed, you can use the rpm command like this:
rpm -qa | grep package_name |
I installed the perl programming environment (a big install) with this command:
dnf install -y perl |
Display detailed console log →
Last metadata expiration check: 0:28:29 ago on Thu Dec 21 05:18:09 2023.
Dependencies resolved.
================================================================================
Package Arch Version Repository Size
================================================================================
Installing:
perl x86_64 4:5.26.3-422.el8 ol8_appstream 73 k
Installing dependencies:
dwz x86_64 0.12-10.el8 ol8_appstream 109 k
efi-srpm-macros noarch 3-3.0.1.el8 ol8_appstream 22 k
file x86_64 5.33-24.el8 ol8_baseos_latest 77 k
ghc-srpm-macros noarch 1.4.2-7.el8 ol8_appstream 9.3 k
glibc-gconv-extra x86_64 2.28-225.0.3.el8 ol8_baseos_latest 1.5 M
go-srpm-macros noarch 2-17.el8 ol8_appstream 13 k
groff-base x86_64 1.22.3-18.el8 ol8_baseos_latest 1.0 M
ocaml-srpm-macros noarch 5-4.el8 ol8_appstream 9.3 k
openblas-srpm-macros noarch 2-2.el8 ol8_appstream 7.9 k
perl-Algorithm-Diff noarch 1.1903-9.el8 ol8_baseos_latest 52 k
perl-Archive-Tar noarch 2.30-1.el8 ol8_baseos_latest 79 k
perl-Archive-Zip noarch 1.60-3.el8 ol8_appstream 108 k
perl-Attribute-Handlers noarch 0.99-422.el8 ol8_appstream 89 k
perl-B-Debug noarch 1.26-2.el8 ol8_appstream 26 k
perl-CPAN noarch 2.18-397.el8 ol8_appstream 554 k
perl-CPAN-Meta noarch 2.150010-396.el8 ol8_appstream 191 k
perl-CPAN-Meta-Requirements noarch 2.140-396.el8 ol8_appstream 37 k
perl-CPAN-Meta-YAML noarch 0.018-397.el8 ol8_appstream 34 k
perl-Carp noarch 1.42-396.el8 ol8_baseos_latest 30 k
perl-Compress-Bzip2 x86_64 2.26-6.el8 ol8_appstream 72 k
perl-Compress-Raw-Bzip2 x86_64 2.081-1.el8 ol8_baseos_latest 40 k
perl-Compress-Raw-Zlib x86_64 2.081-1.el8 ol8_baseos_latest 68 k
perl-Config-Perl-V noarch 0.30-1.el8 ol8_appstream 22 k
perl-DB_File x86_64 1.842-1.el8 ol8_appstream 83 k
perl-Data-Dumper x86_64 2.167-399.el8 ol8_baseos_latest 58 k
perl-Data-OptList noarch 0.110-6.el8 ol8_appstream 31 k
perl-Data-Section noarch 0.200007-3.el8 ol8_appstream 30 k
perl-Devel-PPPort x86_64 3.36-5.el8 ol8_appstream 118 k
perl-Devel-Peek x86_64 1.26-422.el8 ol8_appstream 94 k
perl-Devel-SelfStubber noarch 1.06-422.el8 ol8_appstream 76 k
perl-Devel-Size x86_64 0.81-2.el8 ol8_appstream 34 k
perl-Digest noarch 1.17-395.el8 ol8_baseos_latest 27 k
perl-Digest-MD5 x86_64 2.55-396.el8 ol8_baseos_latest 37 k
perl-Digest-SHA x86_64 1:6.02-1.el8 ol8_appstream 66 k
perl-Encode x86_64 4:2.97-3.el8 ol8_baseos_latest 1.5 M
perl-Encode-devel x86_64 4:2.97-3.el8 ol8_appstream 39 k
perl-Env noarch 1.04-395.el8 ol8_appstream 21 k
perl-Errno x86_64 1.28-422.el8 ol8_baseos_latest 76 k
perl-Exporter noarch 5.72-396.el8 ol8_baseos_latest 34 k
perl-ExtUtils-CBuilder noarch 1:0.280230-2.el8 ol8_appstream 48 k
perl-ExtUtils-Command noarch 1:7.34-1.el8 ol8_appstream 19 k
perl-ExtUtils-Embed noarch 1.34-422.el8 ol8_appstream 79 k
perl-ExtUtils-Install noarch 2.14-4.el8 ol8_appstream 46 k
perl-ExtUtils-MM-Utils noarch 1:7.34-1.el8 ol8_appstream 16 k
perl-ExtUtils-MakeMaker noarch 1:7.34-1.el8 ol8_appstream 300 k
perl-ExtUtils-Manifest noarch 1.70-395.el8 ol8_appstream 36 k
perl-ExtUtils-Miniperl noarch 1.06-422.el8 ol8_appstream 77 k
perl-ExtUtils-ParseXS noarch 1:3.35-2.el8 ol8_appstream 83 k
perl-File-Fetch noarch 0.56-2.el8 ol8_appstream 33 k
perl-File-HomeDir noarch 1.002-4.el8 ol8_appstream 61 k
perl-File-Path noarch 2.15-2.el8 ol8_baseos_latest 38 k
perl-File-Temp noarch 0.230.600-1.el8 ol8_baseos_latest 63 k
perl-File-Which noarch 1.22-2.el8 ol8_appstream 23 k
perl-Filter x86_64 2:1.58-2.el8 ol8_appstream 82 k
perl-Filter-Simple noarch 0.94-2.el8 ol8_appstream 29 k
perl-Getopt-Long noarch 1:2.50-4.el8 ol8_baseos_latest 63 k
perl-HTTP-Tiny noarch 0.074-2.el8 ol8_baseos_latest 57 k
perl-IO x86_64 1.38-422.el8 ol8_baseos_latest 142 k
perl-IO-Compress noarch 2.081-1.el8 ol8_baseos_latest 258 k
perl-IO-Socket-IP noarch 0.39-5.el8 ol8_baseos_latest 47 k
perl-IO-Socket-SSL noarch 2.066-4.module+el8.6.0+20623+f0897f98
ol8_appstream 298 k
perl-IO-Zlib noarch 1:1.10-422.el8 ol8_baseos_latest 81 k
perl-IPC-Cmd noarch 2:1.02-1.el8 ol8_appstream 43 k
perl-IPC-SysV x86_64 2.07-397.el8 ol8_appstream 43 k
perl-IPC-System-Simple noarch 1.25-17.el8 ol8_appstream 43 k
perl-JSON-PP noarch 1:2.97.001-3.el8 ol8_appstream 68 k
perl-Locale-Codes noarch 3.57-1.el8 ol8_appstream 310 k
perl-Locale-Maketext noarch 1.28-396.el8 ol8_appstream 99 k
perl-Locale-Maketext-Simple noarch 1:0.21-422.el8 ol8_appstream 79 k
perl-MIME-Base64 x86_64 3.15-396.el8 ol8_baseos_latest 31 k
perl-MRO-Compat noarch 0.13-4.el8 ol8_appstream 24 k
perl-Math-BigInt noarch 1:1.9998.11-7.el8 ol8_baseos_latest 196 k
perl-Math-BigInt-FastCalc x86_64 0.500.600-6.el8 ol8_appstream 27 k
perl-Math-BigRat noarch 0.2614-1.el8 ol8_appstream 40 k
perl-Math-Complex noarch 1.59-422.el8 ol8_baseos_latest 109 k
perl-Memoize noarch 1.03-422.el8 ol8_appstream 119 k
perl-Module-Build noarch 2:0.42.24-5.el8 ol8_appstream 273 k
perl-Module-CoreList noarch 1:5.20181130-1.el8 ol8_appstream 87 k
perl-Module-CoreList-tools noarch 1:5.20181130-1.el8 ol8_appstream 22 k
perl-Module-Load noarch 1:0.32-395.el8 ol8_appstream 19 k
perl-Module-Load-Conditional noarch 0.68-395.el8 ol8_appstream 24 k
perl-Module-Loaded noarch 1:0.08-422.el8 ol8_appstream 75 k
perl-Module-Metadata noarch 1.000033-395.el8 ol8_appstream 44 k
perl-Mozilla-CA noarch 20160104-7.0.1.module+el8.3.0+21136+b437fca9
ol8_appstream 15 k
perl-Net-Ping noarch 2.55-422.el8 ol8_appstream 102 k
perl-Net-SSLeay x86_64 1.88-2.module+el8.6.0+20623+f0897f98
ol8_appstream 379 k
perl-Package-Generator noarch 1.106-11.el8 ol8_appstream 27 k
perl-Params-Check noarch 1:0.38-395.el8 ol8_appstream 24 k
perl-Params-Util x86_64 1.07-22.el8 ol8_appstream 44 k
perl-PathTools x86_64 3.74-1.el8 ol8_baseos_latest 90 k
perl-Perl-OSType noarch 1.010-396.el8 ol8_appstream 29 k
perl-PerlIO-via-QuotedPrint noarch 0.08-395.el8 ol8_appstream 13 k
perl-Pod-Checker noarch 4:1.73-395.el8 ol8_appstream 33 k
perl-Pod-Escapes noarch 1:1.07-395.el8 ol8_baseos_latest 20 k
perl-Pod-Html noarch 1.22.02-422.el8 ol8_appstream 88 k
perl-Pod-Parser noarch 1.63-396.el8 ol8_appstream 108 k
perl-Pod-Perldoc noarch 3.28-396.el8 ol8_baseos_latest 88 k
perl-Pod-Simple noarch 1:3.35-395.el8 ol8_baseos_latest 213 k
perl-Pod-Usage noarch 4:1.69-395.el8 ol8_baseos_latest 34 k
perl-Scalar-List-Utils x86_64 3:1.49-2.el8 ol8_baseos_latest 68 k
perl-SelfLoader noarch 1.23-422.el8 ol8_appstream 83 k
perl-Socket x86_64 4:2.027-3.el8 ol8_baseos_latest 59 k
perl-Software-License noarch 0.103013-2.el8 ol8_appstream 137 k
perl-Storable x86_64 1:3.11-3.el8 ol8_baseos_latest 98 k
perl-Sub-Exporter noarch 0.987-15.el8 ol8_appstream 73 k
perl-Sub-Install noarch 0.928-14.el8 ol8_appstream 27 k
perl-Sys-Syslog x86_64 0.35-397.el8 ol8_appstream 50 k
perl-Term-ANSIColor noarch 4.06-396.el8 ol8_baseos_latest 46 k
perl-Term-Cap noarch 1.17-395.el8 ol8_baseos_latest 23 k
perl-Test noarch 1.30-422.el8 ol8_appstream 90 k
perl-Test-Harness noarch 1:3.42-1.el8 ol8_appstream 279 k
perl-Test-Simple noarch 1:1.302135-1.el8 ol8_appstream 516 k
perl-Text-Balanced noarch 2.03-395.el8 ol8_appstream 58 k
perl-Text-Diff noarch 1.45-2.el8 ol8_baseos_latest 45 k
perl-Text-Glob noarch 0.11-4.el8 ol8_appstream 17 k
perl-Text-ParseWords noarch 3.30-395.el8 ol8_baseos_latest 18 k
perl-Text-Tabs+Wrap noarch 2013.0523-395.el8 ol8_baseos_latest 24 k
perl-Text-Template noarch 1.51-1.el8 ol8_appstream 64 k
perl-Thread-Queue noarch 3.13-1.el8 ol8_appstream 24 k
perl-Time-HiRes x86_64 4:1.9758-2.el8 ol8_appstream 61 k
perl-Time-Local noarch 1:1.280-1.el8 ol8_baseos_latest 33 k
perl-Time-Piece x86_64 1.31-422.el8 ol8_appstream 98 k
perl-URI noarch 1.73-3.el8 ol8_baseos_latest 116 k
perl-Unicode-Collate x86_64 1.25-2.el8 ol8_appstream 686 k
perl-Unicode-Normalize x86_64 1.25-396.el8 ol8_baseos_latest 82 k
perl-autodie noarch 2.29-396.el8 ol8_appstream 98 k
perl-bignum noarch 0.49-2.el8 ol8_appstream 43 k
perl-constant noarch 1.33-396.el8 ol8_baseos_latest 25 k
perl-devel x86_64 4:5.26.3-422.el8 ol8_appstream 600 k
perl-encoding x86_64 4:2.22-3.el8 ol8_appstream 68 k
perl-experimental noarch 0.019-2.el8 ol8_appstream 24 k
perl-inc-latest noarch 2:0.500-9.el8 ol8_appstream 25 k
perl-interpreter x86_64 4:5.26.3-422.el8 ol8_baseos_latest 6.3 M
perl-libnet noarch 3.11-3.el8 ol8_baseos_latest 121 k
perl-libnetcfg noarch 4:5.26.3-422.el8 ol8_appstream 78 k
perl-libs x86_64 4:5.26.3-422.el8 ol8_baseos_latest 1.6 M
perl-local-lib noarch 2.000024-2.el8 ol8_appstream 74 k
perl-macros x86_64 4:5.26.3-422.el8 ol8_baseos_latest 72 k
perl-open noarch 1.11-422.el8 ol8_appstream 78 k
perl-parent noarch 1:0.237-1.el8 ol8_baseos_latest 20 k
perl-perlfaq noarch 5.20180605-1.el8 ol8_appstream 386 k
perl-podlators noarch 4.11-1.el8 ol8_baseos_latest 118 k
perl-srpm-macros noarch 1-25.el8 ol8_appstream 11 k
perl-threads x86_64 1:2.21-2.el8 ol8_baseos_latest 61 k
perl-threads-shared x86_64 1.58-2.el8 ol8_baseos_latest 48 k
perl-utils noarch 5.26.3-422.el8 ol8_appstream 129 k
perl-version x86_64 6:0.99.24-1.el8 ol8_appstream 67 k
python-rpm-macros noarch 3-45.el8 ol8_appstream 16 k
python-srpm-macros noarch 3-45.el8 ol8_appstream 16 k
python3-pyparsing noarch 2.1.10-7.el8 ol8_baseos_latest 142 k
python3-rpm-macros noarch 3-45.el8 ol8_appstream 15 k
qt5-srpm-macros noarch 5.15.3-1.el8 ol8_appstream 11 k
redhat-rpm-config noarch 131-1.0.1.el8 ol8_appstream 91 k
rust-srpm-macros noarch 5-2.el8 ol8_appstream 9.2 k
systemtap-sdt-devel x86_64 4.9-3.0.1.el8 ol8_appstream 88 k
zip x86_64 3.0-23.el8 ol8_baseos_latest 270 k
Installing weak dependencies:
perl-Encode-Locale noarch 1.05-10.module+el8.3.0+7692+542c56f9
ol8_appstream 22 k
perl-TermReadKey x86_64 2.37-7.el8 ol8_appstream 40 k
Enabling module streams:
perl 5.26
perl-IO-Socket-SSL 2.066
perl-libwww-perl 6.34
Transaction Summary
================================================================================
Install 159 Packages
Total download size: 25 M
Installed size: 73 M
Downloading Packages:
(1/159): file-5.33-24.el8.x86_64.rpm 163 kB/s | 77 kB 00:00
(2/159): perl-Algorithm-Diff-1.1903-9.el8.noarc 531 kB/s | 52 kB 00:00
(3/159): groff-base-1.22.3-18.el8.x86_64.rpm 1.5 MB/s | 1.0 MB 00:00
(4/159): perl-Archive-Tar-2.30-1.el8.noarch.rpm 642 kB/s | 79 kB 00:00
(5/159): perl-Carp-1.42-396.el8.noarch.rpm 449 kB/s | 30 kB 00:00
(6/159): perl-Compress-Raw-Bzip2-2.081-1.el8.x8 452 kB/s | 40 kB 00:00
(7/159): perl-Compress-Raw-Zlib-2.081-1.el8.x86 968 kB/s | 68 kB 00:00
(8/159): perl-Data-Dumper-2.167-399.el8.x86_64. 734 kB/s | 58 kB 00:00
(9/159): perl-Digest-1.17-395.el8.noarch.rpm 391 kB/s | 27 kB 00:00
(10/159): perl-Digest-MD5-2.55-396.el8.x86_64.r 481 kB/s | 37 kB 00:00
(11/159): perl-Errno-1.28-422.el8.x86_64.rpm 811 kB/s | 76 kB 00:00
(12/159): perl-Encode-2.97-3.el8.x86_64.rpm 9.4 MB/s | 1.5 MB 00:00
(13/159): perl-File-Path-2.15-2.el8.noarch.rpm 627 kB/s | 38 kB 00:00
(14/159): perl-Exporter-5.72-396.el8.noarch.rpm 466 kB/s | 34 kB 00:00
(15/159): perl-Getopt-Long-2.50-4.el8.noarch.rp 867 kB/s | 63 kB 00:00
(16/159): perl-File-Temp-0.230.600-1.el8.noarch 648 kB/s | 63 kB 00:00
(17/159): perl-HTTP-Tiny-0.074-2.el8.noarch.rpm 847 kB/s | 57 kB 00:00
(18/159): perl-IO-Compress-2.081-1.el8.noarch.r 3.5 MB/s | 258 kB 00:00
(19/159): perl-IO-1.38-422.el8.x86_64.rpm 1.2 MB/s | 142 kB 00:00
(20/159): perl-IO-Socket-IP-0.39-5.el8.noarch.r 614 kB/s | 47 kB 00:00
(21/159): perl-IO-Zlib-1.10-422.el8.noarch.rpm 881 kB/s | 81 kB 00:00
(22/159): perl-MIME-Base64-3.15-396.el8.x86_64. 425 kB/s | 31 kB 00:00
(23/159): perl-Math-BigInt-1.9998.11-7.el8.noar 1.5 MB/s | 196 kB 00:00
(24/159): perl-Math-Complex-1.59-422.el8.noarch 1.5 MB/s | 109 kB 00:00
(25/159): perl-Pod-Escapes-1.07-395.el8.noarch. 300 kB/s | 20 kB 00:00
(26/159): perl-PathTools-3.74-1.el8.x86_64.rpm 1.2 MB/s | 90 kB 00:00
(27/159): perl-Pod-Perldoc-3.28-396.el8.noarch. 1.2 MB/s | 88 kB 00:00
(28/159): perl-Pod-Simple-3.35-395.el8.noarch.r 2.2 MB/s | 213 kB 00:00
(29/159): perl-Pod-Usage-1.69-395.el8.noarch.rp 499 kB/s | 34 kB 00:00
(30/159): perl-Scalar-List-Utils-1.49-2.el8.x86 947 kB/s | 68 kB 00:00
(31/159): perl-Socket-2.027-3.el8.x86_64.rpm 864 kB/s | 59 kB 00:00
(32/159): perl-Storable-3.11-3.el8.x86_64.rpm 1.2 MB/s | 98 kB 00:00
(33/159): perl-Term-ANSIColor-4.06-396.el8.noar 677 kB/s | 46 kB 00:00
(34/159): perl-Term-Cap-1.17-395.el8.noarch.rpm 321 kB/s | 23 kB 00:00
(35/159): perl-Text-Diff-1.45-2.el8.noarch.rpm 596 kB/s | 45 kB 00:00
(36/159): perl-Text-ParseWords-3.30-395.el8.noa 257 kB/s | 18 kB 00:00
(37/159): perl-Text-Tabs+Wrap-2013.0523-395.el8 351 kB/s | 24 kB 00:00
(38/159): perl-Time-Local-1.280-1.el8.noarch.rp 440 kB/s | 33 kB 00:00
(39/159): perl-URI-1.73-3.el8.noarch.rpm 1.6 MB/s | 116 kB 00:00
(40/159): perl-Unicode-Normalize-1.25-396.el8.x 1.1 MB/s | 82 kB 00:00
(41/159): perl-constant-1.33-396.el8.noarch.rpm 395 kB/s | 25 kB 00:00
(42/159): perl-libnet-3.11-3.el8.noarch.rpm 1.8 MB/s | 121 kB 00:00
(43/159): perl-libs-5.26.3-422.el8.x86_64.rpm 13 MB/s | 1.6 MB 00:00
(44/159): perl-macros-5.26.3-422.el8.x86_64.rpm 1.1 MB/s | 72 kB 00:00
(45/159): perl-parent-0.237-1.el8.noarch.rpm 279 kB/s | 20 kB 00:00
(46/159): perl-podlators-4.11-1.el8.noarch.rpm 1.3 MB/s | 118 kB 00:00
(47/159): perl-interpreter-5.26.3-422.el8.x86_6 14 MB/s | 6.3 MB 00:00
(48/159): glibc-gconv-extra-2.28-225.0.3.el8.x8 601 kB/s | 1.5 MB 00:02
(49/159): perl-threads-2.21-2.el8.x86_64.rpm 876 kB/s | 61 kB 00:00
(50/159): perl-threads-shared-1.58-2.el8.x86_64 657 kB/s | 48 kB 00:00
(51/159): python3-pyparsing-2.1.10-7.el8.noarch 2.0 MB/s | 142 kB 00:00
(52/159): zip-3.0-23.el8.x86_64.rpm 3.7 MB/s | 270 kB 00:00
(53/159): dwz-0.12-10.el8.x86_64.rpm 1.6 MB/s | 109 kB 00:00
(54/159): efi-srpm-macros-3-3.0.1.el8.noarch.rp 350 kB/s | 22 kB 00:00
(55/159): ghc-srpm-macros-1.4.2-7.el8.noarch.rp 125 kB/s | 9.3 kB 00:00
(56/159): go-srpm-macros-2-17.el8.noarch.rpm 198 kB/s | 13 kB 00:00
(57/159): ocaml-srpm-macros-5-4.el8.noarch.rpm 154 kB/s | 9.3 kB 00:00
(58/159): openblas-srpm-macros-2-2.el8.noarch.r 116 kB/s | 7.9 kB 00:00
(59/159): perl-5.26.3-422.el8.x86_64.rpm 921 kB/s | 73 kB 00:00
(60/159): perl-Archive-Zip-1.60-3.el8.noarch.rp 1.4 MB/s | 108 kB 00:00
(61/159): perl-Attribute-Handlers-0.99-422.el8. 1.2 MB/s | 89 kB 00:00
(62/159): perl-B-Debug-1.26-2.el8.noarch.rpm 356 kB/s | 26 kB 00:00
(63/159): perl-CPAN-2.18-397.el8.noarch.rpm 5.3 MB/s | 554 kB 00:00
(64/159): perl-CPAN-Meta-2.150010-396.el8.noarc 2.3 MB/s | 191 kB 00:00
(65/159): perl-CPAN-Meta-Requirements-2.140-396 512 kB/s | 37 kB 00:00
(66/159): perl-CPAN-Meta-YAML-0.018-397.el8.noa 508 kB/s | 34 kB 00:00
(67/159): perl-Compress-Bzip2-2.26-6.el8.x86_64 990 kB/s | 72 kB 00:00
(68/159): perl-Config-Perl-V-0.30-1.el8.noarch. 337 kB/s | 22 kB 00:00
(69/159): perl-DB_File-1.842-1.el8.x86_64.rpm 1.2 MB/s | 83 kB 00:00
(70/159): perl-Data-OptList-0.110-6.el8.noarch. 457 kB/s | 31 kB 00:00
(71/159): perl-Data-Section-0.200007-3.el8.noar 423 kB/s | 30 kB 00:00
(72/159): perl-Devel-PPPort-3.36-5.el8.x86_64.r 1.6 MB/s | 118 kB 00:00
(73/159): perl-Devel-Peek-1.26-422.el8.x86_64.r 960 kB/s | 94 kB 00:00
(74/159): perl-Devel-SelfStubber-1.06-422.el8.n 831 kB/s | 76 kB 00:00
(75/159): perl-Devel-Size-0.81-2.el8.x86_64.rpm 510 kB/s | 34 kB 00:00
(76/159): perl-Digest-SHA-6.02-1.el8.x86_64.rpm 859 kB/s | 66 kB 00:00
(77/159): perl-Encode-Locale-1.05-10.module+el8 285 kB/s | 22 kB 00:00
(78/159): perl-Encode-devel-2.97-3.el8.x86_64.r 510 kB/s | 39 kB 00:00
(79/159): perl-Env-1.04-395.el8.noarch.rpm 321 kB/s | 21 kB 00:00
(80/159): perl-ExtUtils-CBuilder-0.280230-2.el8 730 kB/s | 48 kB 00:00
(81/159): perl-ExtUtils-Command-7.34-1.el8.noar 248 kB/s | 19 kB 00:00
(82/159): perl-ExtUtils-Embed-1.34-422.el8.noar 1.1 MB/s | 79 kB 00:00
(83/159): perl-ExtUtils-Install-2.14-4.el8.noar 661 kB/s | 46 kB 00:00
(84/159): perl-ExtUtils-MM-Utils-7.34-1.el8.noa 243 kB/s | 16 kB 00:00
(85/159): perl-ExtUtils-MakeMaker-7.34-1.el8.no 4.0 MB/s | 300 kB 00:00
(86/159): perl-ExtUtils-Manifest-1.70-395.el8.n 500 kB/s | 36 kB 00:00
(87/159): perl-ExtUtils-Miniperl-1.06-422.el8.n 1.1 MB/s | 77 kB 00:00
(88/159): perl-File-HomeDir-1.002-4.el8.noarch. 980 kB/s | 61 kB 00:00
(89/159): perl-File-Fetch-0.56-2.el8.noarch.rpm 483 kB/s | 33 kB 00:00
(90/159): perl-ExtUtils-ParseXS-3.35-2.el8.noar 1.1 MB/s | 83 kB 00:00
(91/159): perl-Filter-Simple-0.94-2.el8.noarch. 417 kB/s | 29 kB 00:00
(92/159): perl-File-Which-1.22-2.el8.noarch.rpm 312 kB/s | 23 kB 00:00
(93/159): perl-Filter-1.58-2.el8.x86_64.rpm 1.1 MB/s | 82 kB 00:00
(94/159): perl-IO-Socket-SSL-2.066-4.module+el8 3.6 MB/s | 298 kB 00:00
(95/159): perl-IPC-Cmd-1.02-1.el8.noarch.rpm 545 kB/s | 43 kB 00:00
(96/159): perl-IPC-SysV-2.07-397.el8.x86_64.rpm 544 kB/s | 43 kB 00:00
(97/159): perl-IPC-System-Simple-1.25-17.el8.no 535 kB/s | 43 kB 00:00
(98/159): perl-JSON-PP-2.97.001-3.el8.noarch.rp 853 kB/s | 68 kB 00:00
(99/159): perl-Locale-Codes-3.57-1.el8.noarch.r 3.7 MB/s | 310 kB 00:00
(100/159): perl-MRO-Compat-0.13-4.el8.noarch.rp 399 kB/s | 24 kB 00:00
(101/159): perl-Locale-Maketext-1.28-396.el8.no 1.4 MB/s | 99 kB 00:00
(102/159): perl-Locale-Maketext-Simple-0.21-422 1.1 MB/s | 79 kB 00:00
(103/159): perl-Math-BigInt-FastCalc-0.500.600- 371 kB/s | 27 kB 00:00
(104/159): perl-Math-BigRat-0.2614-1.el8.noarch 560 kB/s | 40 kB 00:00
(105/159): perl-Memoize-1.03-422.el8.noarch.rpm 1.6 MB/s | 119 kB 00:00
(106/159): perl-Module-Build-0.42.24-5.el8.noar 3.4 MB/s | 273 kB 00:00
(107/159): perl-Module-CoreList-tools-5.2018113 297 kB/s | 22 kB 00:00
(108/159): perl-Module-CoreList-5.20181130-1.el 1.1 MB/s | 87 kB 00:00
(109/159): perl-Module-Load-0.32-395.el8.noarch 242 kB/s | 19 kB 00:00
(110/159): perl-Module-Load-Conditional-0.68-39 316 kB/s | 24 kB 00:00
(111/159): perl-Module-Loaded-0.08-422.el8.noar 972 kB/s | 75 kB 00:00
(112/159): perl-Module-Metadata-1.000033-395.el 664 kB/s | 44 kB 00:00
(113/159): perl-Mozilla-CA-20160104-7.0.1.modul 229 kB/s | 15 kB 00:00
(114/159): perl-Net-Ping-2.55-422.el8.noarch.rp 1.5 MB/s | 102 kB 00:00
(115/159): perl-Package-Generator-1.106-11.el8. 386 kB/s | 27 kB 00:00
(116/159): perl-Params-Check-0.38-395.el8.noarc 333 kB/s | 24 kB 00:00
(117/159): perl-Net-SSLeay-1.88-2.module+el8.6. 4.4 MB/s | 379 kB 00:00
(118/159): perl-Perl-OSType-1.010-396.el8.noarc 459 kB/s | 29 kB 00:00
(119/159): perl-Params-Util-1.07-22.el8.x86_64. 656 kB/s | 44 kB 00:00
(120/159): perl-PerlIO-via-QuotedPrint-0.08-395 206 kB/s | 13 kB 00:00
(121/159): perl-Pod-Checker-1.73-395.el8.noarch 449 kB/s | 33 kB 00:00
(122/159): perl-Pod-Parser-1.63-396.el8.noarch. 1.6 MB/s | 108 kB 00:00
(123/159): perl-Pod-Html-1.22.02-422.el8.noarch 1.1 MB/s | 88 kB 00:00
(124/159): perl-SelfLoader-1.23-422.el8.noarch. 1.1 MB/s | 83 kB 00:00
(125/159): perl-Software-License-0.103013-2.el8 1.8 MB/s | 137 kB 00:00
(126/159): perl-Sub-Exporter-0.987-15.el8.noarc 1.0 MB/s | 73 kB 00:00
(127/159): perl-Sub-Install-0.928-14.el8.noarch 383 kB/s | 27 kB 00:00
(128/159): perl-Sys-Syslog-0.35-397.el8.x86_64. 734 kB/s | 50 kB 00:00
(129/159): perl-TermReadKey-2.37-7.el8.x86_64.r 536 kB/s | 40 kB 00:00
(130/159): perl-Test-1.30-422.el8.noarch.rpm 1.2 MB/s | 90 kB 00:00
(131/159): perl-Test-Harness-3.42-1.el8.noarch. 3.4 MB/s | 279 kB 00:00
(132/159): perl-Test-Simple-1.302135-1.el8.noar 5.2 MB/s | 516 kB 00:00
(133/159): perl-Text-Glob-0.11-4.el8.noarch.rpm 272 kB/s | 17 kB 00:00
(134/159): perl-Text-Balanced-2.03-395.el8.noar 807 kB/s | 58 kB 00:00
(135/159): perl-Text-Template-1.51-1.el8.noarch 841 kB/s | 64 kB 00:00
(136/159): perl-Time-HiRes-1.9758-2.el8.x86_64. 855 kB/s | 61 kB 00:00
(137/159): perl-Thread-Queue-3.13-1.el8.noarch. 319 kB/s | 24 kB 00:00
(138/159): perl-Time-Piece-1.31-422.el8.x86_64. 1.3 MB/s | 98 kB 00:00
(139/159): perl-autodie-2.29-396.el8.noarch.rpm 1.3 MB/s | 98 kB 00:00
(140/159): perl-Unicode-Collate-1.25-2.el8.x86_ 7.2 MB/s | 686 kB 00:00
(141/159): perl-bignum-0.49-2.el8.noarch.rpm 620 kB/s | 43 kB 00:00
(142/159): perl-encoding-2.22-3.el8.x86_64.rpm 934 kB/s | 68 kB 00:00
(143/159): perl-devel-5.26.3-422.el8.x86_64.rpm 6.5 MB/s | 600 kB 00:00
(144/159): perl-experimental-0.019-2.el8.noarch 327 kB/s | 24 kB 00:00
(145/159): perl-inc-latest-0.500-9.el8.noarch.r 331 kB/s | 25 kB 00:00
(146/159): perl-libnetcfg-5.26.3-422.el8.noarch 1.0 MB/s | 78 kB 00:00
(147/159): perl-local-lib-2.000024-2.el8.noarch 1.1 MB/s | 74 kB 00:00
(148/159): perl-srpm-macros-1-25.el8.noarch.rpm 157 kB/s | 11 kB 00:00
(149/159): perl-open-1.11-422.el8.noarch.rpm 1.0 MB/s | 78 kB 00:00
(150/159): perl-perlfaq-5.20180605-1.el8.noarch 4.7 MB/s | 386 kB 00:00
(151/159): perl-version-0.99.24-1.el8.x86_64.rp 1.0 MB/s | 67 kB 00:00
(152/159): perl-utils-5.26.3-422.el8.noarch.rpm 1.7 MB/s | 129 kB 00:00
(153/159): python-rpm-macros-3-45.el8.noarch.rp 219 kB/s | 16 kB 00:00
(154/159): python3-rpm-macros-3-45.el8.noarch.r 243 kB/s | 15 kB 00:00
(155/159): python-srpm-macros-3-45.el8.noarch.r 239 kB/s | 16 kB 00:00
(156/159): qt5-srpm-macros-5.15.3-1.el8.noarch. 132 kB/s | 11 kB 00:00
(157/159): rust-srpm-macros-5-2.el8.noarch.rpm 128 kB/s | 9.2 kB 00:00
(158/159): redhat-rpm-config-131-1.0.1.el8.noar 1.2 MB/s | 91 kB 00:00
(159/159): systemtap-sdt-devel-4.9-3.0.1.el8.x8 1.2 MB/s | 88 kB 00:00
--------------------------------------------------------------------------------
Total 4.6 MB/s | 25 MB 00:05
Running transaction check
Transaction check succeeded.
Running transaction test
Transaction test succeeded.
Running transaction
Preparing : 1/1
Installing : python-srpm-macros-3-45.el8.noarch 1/159
Installing : python-rpm-macros-3-45.el8.noarch 2/159
Installing : python3-rpm-macros-3-45.el8.noarch 3/159
Installing : rust-srpm-macros-5-2.el8.noarch 4/159
Installing : qt5-srpm-macros-5.15.3-1.el8.noarch 5/159
Installing : perl-srpm-macros-1-25.el8.noarch 6/159
Installing : openblas-srpm-macros-2-2.el8.noarch 7/159
Installing : ocaml-srpm-macros-5-4.el8.noarch 8/159
Installing : go-srpm-macros-2-17.el8.noarch 9/159
Installing : ghc-srpm-macros-1.4.2-7.el8.noarch 10/159
Installing : efi-srpm-macros-3-3.0.1.el8.noarch 11/159
Installing : dwz-0.12-10.el8.x86_64 12/159
Installing : zip-3.0-23.el8.x86_64 13/159
Installing : python3-pyparsing-2.1.10-7.el8.noarch 14/159
Installing : systemtap-sdt-devel-4.9-3.0.1.el8.x86_64 15/159
Installing : groff-base-1.22.3-18.el8.x86_64 16/159
Installing : perl-Digest-1.17-395.el8.noarch 17/159
Installing : perl-Digest-MD5-2.55-396.el8.x86_64 18/159
Installing : perl-Data-Dumper-2.167-399.el8.x86_64 19/159
Installing : perl-libnet-3.11-3.el8.noarch 20/159
Installing : perl-URI-1.73-3.el8.noarch 21/159
Installing : perl-Pod-Escapes-1:1.07-395.el8.noarch 22/159
Installing : perl-IO-Socket-IP-0.39-5.el8.noarch 23/159
Installing : perl-Time-Local-1:1.280-1.el8.noarch 24/159
Installing : perl-Mozilla-CA-20160104-7.0.1.module+el8.3.0+21 25/159
Installing : perl-IO-Socket-SSL-2.066-4.module+el8.6.0+20623+ 26/159
Installing : perl-Net-SSLeay-1.88-2.module+el8.6.0+20623+f089 27/159
Installing : perl-Term-ANSIColor-4.06-396.el8.noarch 28/159
Installing : perl-Term-Cap-1.17-395.el8.noarch 29/159
Installing : perl-File-Temp-0.230.600-1.el8.noarch 30/159
Installing : perl-HTTP-Tiny-0.074-2.el8.noarch 31/159
Installing : perl-Pod-Simple-1:3.35-395.el8.noarch 32/159
Installing : perl-podlators-4.11-1.el8.noarch 33/159
Installing : perl-Pod-Perldoc-3.28-396.el8.noarch 34/159
Installing : perl-Text-ParseWords-3.30-395.el8.noarch 35/159
Installing : perl-Pod-Usage-4:1.69-395.el8.noarch 36/159
Installing : perl-MIME-Base64-3.15-396.el8.x86_64 37/159
Installing : perl-Storable-1:3.11-3.el8.x86_64 38/159
Installing : perl-Getopt-Long-1:2.50-4.el8.noarch 39/159
Installing : perl-Errno-1.28-422.el8.x86_64 40/159
Installing : perl-Socket-4:2.027-3.el8.x86_64 41/159
Installing : perl-Encode-4:2.97-3.el8.x86_64 42/159
Installing : perl-Carp-1.42-396.el8.noarch 43/159
Installing : perl-Exporter-5.72-396.el8.noarch 44/159
Installing : perl-libs-4:5.26.3-422.el8.x86_64 45/159
Installing : perl-Scalar-List-Utils-3:1.49-2.el8.x86_64 46/159
Installing : perl-parent-1:0.237-1.el8.noarch 47/159
Installing : perl-macros-4:5.26.3-422.el8.x86_64 48/159
Installing : perl-Text-Tabs+Wrap-2013.0523-395.el8.noarch 49/159
Installing : perl-Unicode-Normalize-1.25-396.el8.x86_64 50/159
Installing : perl-File-Path-2.15-2.el8.noarch 51/159
Installing : perl-IO-1.38-422.el8.x86_64 52/159
Installing : perl-PathTools-3.74-1.el8.x86_64 53/159
Installing : perl-constant-1.33-396.el8.noarch 54/159
Installing : perl-threads-1:2.21-2.el8.x86_64 55/159
Installing : perl-threads-shared-1.58-2.el8.x86_64 56/159
Installing : perl-interpreter-4:5.26.3-422.el8.x86_64 57/159
Installing : perl-version-6:0.99.24-1.el8.x86_64 58/159
Installing : perl-Time-HiRes-4:1.9758-2.el8.x86_64 59/159
Installing : perl-CPAN-Meta-Requirements-2.140-396.el8.noarch 60/159
Installing : perl-ExtUtils-Manifest-1.70-395.el8.noarch 61/159
Installing : perl-ExtUtils-ParseXS-1:3.35-2.el8.noarch 62/159
Installing : perl-Test-Harness-1:3.42-1.el8.noarch 63/159
Installing : perl-Module-CoreList-1:5.20181130-1.el8.noarch 64/159
Installing : perl-Module-Metadata-1.000033-395.el8.noarch 65/159
Installing : perl-Compress-Raw-Zlib-2.081-1.el8.x86_64 66/159
Installing : perl-Filter-2:1.58-2.el8.x86_64 67/159
Installing : perl-SelfLoader-1.23-422.el8.noarch 68/159
Installing : perl-Module-Load-1:0.32-395.el8.noarch 69/159
Installing : perl-Perl-OSType-1.010-396.el8.noarch 70/159
Installing : perl-Text-Balanced-2.03-395.el8.noarch 71/159
Installing : perl-encoding-4:2.22-3.el8.x86_64 72/159
Installing : perl-Net-Ping-2.55-422.el8.noarch 73/159
Installing : perl-Compress-Raw-Bzip2-2.081-1.el8.x86_64 74/159
Installing : perl-IO-Compress-2.081-1.el8.noarch 75/159
Installing : perl-IO-Zlib-1:1.10-422.el8.noarch 76/159
Installing : perl-Math-Complex-1.59-422.el8.noarch 77/159
Installing : perl-Math-BigInt-1:1.9998.11-7.el8.noarch 78/159
Installing : perl-JSON-PP-1:2.97.001-3.el8.noarch 79/159
Installing : perl-Math-BigRat-0.2614-1.el8.noarch 80/159
Installing : perl-CPAN-Meta-YAML-0.018-397.el8.noarch 81/159
Installing : perl-CPAN-Meta-2.150010-396.el8.noarch 82/159
Installing : perl-Digest-SHA-1:6.02-1.el8.x86_64 83/159
Installing : perl-ExtUtils-Command-1:7.34-1.el8.noarch 84/159
Installing : perl-Locale-Maketext-1.28-396.el8.noarch 85/159
Installing : perl-Locale-Maketext-Simple-1:0.21-422.el8.noarc 86/159
Installing : perl-Params-Check-1:0.38-395.el8.noarch 87/159
Installing : perl-Module-Load-Conditional-0.68-395.el8.noarch 88/159
Installing : perl-Params-Util-1.07-22.el8.x86_64 89/159
Installing : perl-Pod-Html-1.22.02-422.el8.noarch 90/159
Installing : perl-Sub-Install-0.928-14.el8.noarch 91/159
Installing : perl-Data-OptList-0.110-6.el8.noarch 92/159
Installing : perl-bignum-0.49-2.el8.noarch 93/159
Installing : perl-Math-BigInt-FastCalc-0.500.600-6.el8.x86_64 94/159
Installing : perl-open-1.11-422.el8.noarch 95/159
Installing : perl-Filter-Simple-0.94-2.el8.noarch 96/159
Installing : perl-Devel-SelfStubber-1.06-422.el8.noarch 97/159
Installing : perl-Archive-Zip-1.60-3.el8.noarch 98/159
Installing : perl-Module-CoreList-tools-1:5.20181130-1.el8.no 99/159
Installing : perl-experimental-0.019-2.el8.noarch 100/159
Installing : perl-Algorithm-Diff-1.1903-9.el8.noarch 101/159
Installing : perl-Text-Diff-1.45-2.el8.noarch 102/159
Installing : perl-Archive-Tar-2.30-1.el8.noarch 103/159
Installing : perl-Attribute-Handlers-0.99-422.el8.noarch 104/159
Installing : perl-B-Debug-1.26-2.el8.noarch 105/159
Installing : perl-Compress-Bzip2-2.26-6.el8.x86_64 106/159
Installing : perl-Config-Perl-V-0.30-1.el8.noarch 107/159
Installing : perl-DB_File-1.842-1.el8.x86_64 108/159
Installing : perl-Devel-PPPort-3.36-5.el8.x86_64 109/159
Installing : perl-Devel-Size-0.81-2.el8.x86_64 110/159
Installing : perl-Encode-Locale-1.05-10.module+el8.3.0+7692+5 111/159
Installing : perl-Env-1.04-395.el8.noarch 112/159
Installing : perl-ExtUtils-MM-Utils-1:7.34-1.el8.noarch 113/159
Installing : perl-IPC-Cmd-2:1.02-1.el8.noarch 114/159
Installing : perl-File-Fetch-0.56-2.el8.noarch 115/159
Installing : perl-IPC-SysV-2.07-397.el8.x86_64 116/159
Installing : perl-IPC-System-Simple-1.25-17.el8.noarch 117/159
Installing : perl-autodie-2.29-396.el8.noarch 118/159
Installing : perl-Locale-Codes-3.57-1.el8.noarch 119/159
Installing : perl-Memoize-1.03-422.el8.noarch 120/159
Installing : perl-Module-Loaded-1:0.08-422.el8.noarch 121/159
Installing : perl-Package-Generator-1.106-11.el8.noarch 122/159
Installing : perl-Sub-Exporter-0.987-15.el8.noarch 123/159
Installing : perl-Pod-Checker-4:1.73-395.el8.noarch 124/159
Installing : perl-Pod-Parser-1.63-396.el8.noarch 125/159
Installing : perl-Sys-Syslog-0.35-397.el8.x86_64 126/159
Installing : perl-TermReadKey-2.37-7.el8.x86_64 127/159
Installing : perl-Test-1.30-422.el8.noarch 128/159
Installing : perl-Test-Simple-1:1.302135-1.el8.noarch 129/159
Installing : perl-Text-Glob-0.11-4.el8.noarch 130/159
Installing : perl-Text-Template-1.51-1.el8.noarch 131/159
Installing : perl-Time-Piece-1.31-422.el8.x86_64 132/159
Installing : perl-Unicode-Collate-1.25-2.el8.x86_64 133/159
Installing : perl-local-lib-2.000024-2.el8.noarch 134/159
Installing : perl-utils-5.26.3-422.el8.noarch 135/159
Installing : perl-Thread-Queue-3.13-1.el8.noarch 136/159
Installing : perl-File-Which-1.22-2.el8.noarch 137/159
Installing : perl-File-HomeDir-1.002-4.el8.noarch 138/159
Installing : perl-Devel-Peek-1.26-422.el8.x86_64 139/159
Installing : perl-MRO-Compat-0.13-4.el8.noarch 140/159
Installing : perl-Data-Section-0.200007-3.el8.noarch 141/159
Installing : perl-Software-License-0.103013-2.el8.noarch 142/159
Installing : perl-PerlIO-via-QuotedPrint-0.08-395.el8.noarch 143/159
Installing : perl-perlfaq-5.20180605-1.el8.noarch 144/159
Installing : glibc-gconv-extra-2.28-225.0.3.el8.x86_64 145/159
Running scriptlet: glibc-gconv-extra-2.28-225.0.3.el8.x86_64 145/159
Installing : file-5.33-24.el8.x86_64 146/159
Installing : redhat-rpm-config-131-1.0.1.el8.noarch 147/159
Installing : perl-ExtUtils-Install-2.14-4.el8.noarch 148/159
Installing : perl-devel-4:5.26.3-422.el8.x86_64 149/159
Installing : perl-ExtUtils-MakeMaker-1:7.34-1.el8.noarch 150/159
Installing : perl-ExtUtils-CBuilder-1:0.280230-2.el8.noarch 151/159
Installing : perl-ExtUtils-Embed-1.34-422.el8.noarch 152/159
Installing : perl-ExtUtils-Miniperl-1.06-422.el8.noarch 153/159
Installing : perl-libnetcfg-4:5.26.3-422.el8.noarch 154/159
Installing : perl-Encode-devel-4:2.97-3.el8.x86_64 155/159
Installing : perl-inc-latest-2:0.500-9.el8.noarch 156/159
Installing : perl-Module-Build-2:0.42.24-5.el8.noarch 157/159
Installing : perl-CPAN-2.18-397.el8.noarch 158/159
Installing : perl-4:5.26.3-422.el8.x86_64 159/159
Running scriptlet: perl-4:5.26.3-422.el8.x86_64 159/159
Verifying : file-5.33-24.el8.x86_64 1/159
Verifying : glibc-gconv-extra-2.28-225.0.3.el8.x86_64 2/159
Verifying : groff-base-1.22.3-18.el8.x86_64 3/159
Verifying : perl-Algorithm-Diff-1.1903-9.el8.noarch 4/159
Verifying : perl-Archive-Tar-2.30-1.el8.noarch 5/159
Verifying : perl-Carp-1.42-396.el8.noarch 6/159
Verifying : perl-Compress-Raw-Bzip2-2.081-1.el8.x86_64 7/159
Verifying : perl-Compress-Raw-Zlib-2.081-1.el8.x86_64 8/159
Verifying : perl-Data-Dumper-2.167-399.el8.x86_64 9/159
Verifying : perl-Digest-1.17-395.el8.noarch 10/159
Verifying : perl-Digest-MD5-2.55-396.el8.x86_64 11/159
Verifying : perl-Encode-4:2.97-3.el8.x86_64 12/159
Verifying : perl-Errno-1.28-422.el8.x86_64 13/159
Verifying : perl-Exporter-5.72-396.el8.noarch 14/159
Verifying : perl-File-Path-2.15-2.el8.noarch 15/159
Verifying : perl-File-Temp-0.230.600-1.el8.noarch 16/159
Verifying : perl-Getopt-Long-1:2.50-4.el8.noarch 17/159
Verifying : perl-HTTP-Tiny-0.074-2.el8.noarch 18/159
Verifying : perl-IO-1.38-422.el8.x86_64 19/159
Verifying : perl-IO-Compress-2.081-1.el8.noarch 20/159
Verifying : perl-IO-Socket-IP-0.39-5.el8.noarch 21/159
Verifying : perl-IO-Zlib-1:1.10-422.el8.noarch 22/159
Verifying : perl-MIME-Base64-3.15-396.el8.x86_64 23/159
Verifying : perl-Math-BigInt-1:1.9998.11-7.el8.noarch 24/159
Verifying : perl-Math-Complex-1.59-422.el8.noarch 25/159
Verifying : perl-PathTools-3.74-1.el8.x86_64 26/159
Verifying : perl-Pod-Escapes-1:1.07-395.el8.noarch 27/159
Verifying : perl-Pod-Perldoc-3.28-396.el8.noarch 28/159
Verifying : perl-Pod-Simple-1:3.35-395.el8.noarch 29/159
Verifying : perl-Pod-Usage-4:1.69-395.el8.noarch 30/159
Verifying : perl-Scalar-List-Utils-3:1.49-2.el8.x86_64 31/159
Verifying : perl-Socket-4:2.027-3.el8.x86_64 32/159
Verifying : perl-Storable-1:3.11-3.el8.x86_64 33/159
Verifying : perl-Term-ANSIColor-4.06-396.el8.noarch 34/159
Verifying : perl-Term-Cap-1.17-395.el8.noarch 35/159
Verifying : perl-Text-Diff-1.45-2.el8.noarch 36/159
Verifying : perl-Text-ParseWords-3.30-395.el8.noarch 37/159
Verifying : perl-Text-Tabs+Wrap-2013.0523-395.el8.noarch 38/159
Verifying : perl-Time-Local-1:1.280-1.el8.noarch 39/159
Verifying : perl-URI-1.73-3.el8.noarch 40/159
Verifying : perl-Unicode-Normalize-1.25-396.el8.x86_64 41/159
Verifying : perl-constant-1.33-396.el8.noarch 42/159
Verifying : perl-interpreter-4:5.26.3-422.el8.x86_64 43/159
Verifying : perl-libnet-3.11-3.el8.noarch 44/159
Verifying : perl-libs-4:5.26.3-422.el8.x86_64 45/159
Verifying : perl-macros-4:5.26.3-422.el8.x86_64 46/159
Verifying : perl-parent-1:0.237-1.el8.noarch 47/159
Verifying : perl-podlators-4.11-1.el8.noarch 48/159
Verifying : perl-threads-1:2.21-2.el8.x86_64 49/159
Verifying : perl-threads-shared-1.58-2.el8.x86_64 50/159
Verifying : python3-pyparsing-2.1.10-7.el8.noarch 51/159
Verifying : zip-3.0-23.el8.x86_64 52/159
Verifying : dwz-0.12-10.el8.x86_64 53/159
Verifying : efi-srpm-macros-3-3.0.1.el8.noarch 54/159
Verifying : ghc-srpm-macros-1.4.2-7.el8.noarch 55/159
Verifying : go-srpm-macros-2-17.el8.noarch 56/159
Verifying : ocaml-srpm-macros-5-4.el8.noarch 57/159
Verifying : openblas-srpm-macros-2-2.el8.noarch 58/159
Verifying : perl-4:5.26.3-422.el8.x86_64 59/159
Verifying : perl-Archive-Zip-1.60-3.el8.noarch 60/159
Verifying : perl-Attribute-Handlers-0.99-422.el8.noarch 61/159
Verifying : perl-B-Debug-1.26-2.el8.noarch 62/159
Verifying : perl-CPAN-2.18-397.el8.noarch 63/159
Verifying : perl-CPAN-Meta-2.150010-396.el8.noarch 64/159
Verifying : perl-CPAN-Meta-Requirements-2.140-396.el8.noarch 65/159
Verifying : perl-CPAN-Meta-YAML-0.018-397.el8.noarch 66/159
Verifying : perl-Compress-Bzip2-2.26-6.el8.x86_64 67/159
Verifying : perl-Config-Perl-V-0.30-1.el8.noarch 68/159
Verifying : perl-DB_File-1.842-1.el8.x86_64 69/159
Verifying : perl-Data-OptList-0.110-6.el8.noarch 70/159
Verifying : perl-Data-Section-0.200007-3.el8.noarch 71/159
Verifying : perl-Devel-PPPort-3.36-5.el8.x86_64 72/159
Verifying : perl-Devel-Peek-1.26-422.el8.x86_64 73/159
Verifying : perl-Devel-SelfStubber-1.06-422.el8.noarch 74/159
Verifying : perl-Devel-Size-0.81-2.el8.x86_64 75/159
Verifying : perl-Digest-SHA-1:6.02-1.el8.x86_64 76/159
Verifying : perl-Encode-Locale-1.05-10.module+el8.3.0+7692+5 77/159
Verifying : perl-Encode-devel-4:2.97-3.el8.x86_64 78/159
Verifying : perl-Env-1.04-395.el8.noarch 79/159
Verifying : perl-ExtUtils-CBuilder-1:0.280230-2.el8.noarch 80/159
Verifying : perl-ExtUtils-Command-1:7.34-1.el8.noarch 81/159
Verifying : perl-ExtUtils-Embed-1.34-422.el8.noarch 82/159
Verifying : perl-ExtUtils-Install-2.14-4.el8.noarch 83/159
Verifying : perl-ExtUtils-MM-Utils-1:7.34-1.el8.noarch 84/159
Verifying : perl-ExtUtils-MakeMaker-1:7.34-1.el8.noarch 85/159
Verifying : perl-ExtUtils-Manifest-1.70-395.el8.noarch 86/159
Verifying : perl-ExtUtils-Miniperl-1.06-422.el8.noarch 87/159
Verifying : perl-ExtUtils-ParseXS-1:3.35-2.el8.noarch 88/159
Verifying : perl-File-Fetch-0.56-2.el8.noarch 89/159
Verifying : perl-File-HomeDir-1.002-4.el8.noarch 90/159
Verifying : perl-File-Which-1.22-2.el8.noarch 91/159
Verifying : perl-Filter-2:1.58-2.el8.x86_64 92/159
Verifying : perl-Filter-Simple-0.94-2.el8.noarch 93/159
Verifying : perl-IO-Socket-SSL-2.066-4.module+el8.6.0+20623+ 94/159
Verifying : perl-IPC-Cmd-2:1.02-1.el8.noarch 95/159
Verifying : perl-IPC-SysV-2.07-397.el8.x86_64 96/159
Verifying : perl-IPC-System-Simple-1.25-17.el8.noarch 97/159
Verifying : perl-JSON-PP-1:2.97.001-3.el8.noarch 98/159
Verifying : perl-Locale-Codes-3.57-1.el8.noarch 99/159
Verifying : perl-Locale-Maketext-1.28-396.el8.noarch 100/159
Verifying : perl-Locale-Maketext-Simple-1:0.21-422.el8.noarc 101/159
Verifying : perl-MRO-Compat-0.13-4.el8.noarch 102/159
Verifying : perl-Math-BigInt-FastCalc-0.500.600-6.el8.x86_64 103/159
Verifying : perl-Math-BigRat-0.2614-1.el8.noarch 104/159
Verifying : perl-Memoize-1.03-422.el8.noarch 105/159
Verifying : perl-Module-Build-2:0.42.24-5.el8.noarch 106/159
Verifying : perl-Module-CoreList-1:5.20181130-1.el8.noarch 107/159
Verifying : perl-Module-CoreList-tools-1:5.20181130-1.el8.no 108/159
Verifying : perl-Module-Load-1:0.32-395.el8.noarch 109/159
Verifying : perl-Module-Load-Conditional-0.68-395.el8.noarch 110/159
Verifying : perl-Module-Loaded-1:0.08-422.el8.noarch 111/159
Verifying : perl-Module-Metadata-1.000033-395.el8.noarch 112/159
Verifying : perl-Mozilla-CA-20160104-7.0.1.module+el8.3.0+21 113/159
Verifying : perl-Net-Ping-2.55-422.el8.noarch 114/159
Verifying : perl-Net-SSLeay-1.88-2.module+el8.6.0+20623+f089 115/159
Verifying : perl-Package-Generator-1.106-11.el8.noarch 116/159
Verifying : perl-Params-Check-1:0.38-395.el8.noarch 117/159
Verifying : perl-Params-Util-1.07-22.el8.x86_64 118/159
Verifying : perl-Perl-OSType-1.010-396.el8.noarch 119/159
Verifying : perl-PerlIO-via-QuotedPrint-0.08-395.el8.noarch 120/159
Verifying : perl-Pod-Checker-4:1.73-395.el8.noarch 121/159
Verifying : perl-Pod-Html-1.22.02-422.el8.noarch 122/159
Verifying : perl-Pod-Parser-1.63-396.el8.noarch 123/159
Verifying : perl-SelfLoader-1.23-422.el8.noarch 124/159
Verifying : perl-Software-License-0.103013-2.el8.noarch 125/159
Verifying : perl-Sub-Exporter-0.987-15.el8.noarch 126/159
Verifying : perl-Sub-Install-0.928-14.el8.noarch 127/159
Verifying : perl-Sys-Syslog-0.35-397.el8.x86_64 128/159
Verifying : perl-TermReadKey-2.37-7.el8.x86_64 129/159
Verifying : perl-Test-1.30-422.el8.noarch 130/159
Verifying : perl-Test-Harness-1:3.42-1.el8.noarch 131/159
Verifying : perl-Test-Simple-1:1.302135-1.el8.noarch 132/159
Verifying : perl-Text-Balanced-2.03-395.el8.noarch 133/159
Verifying : perl-Text-Glob-0.11-4.el8.noarch 134/159
Verifying : perl-Text-Template-1.51-1.el8.noarch 135/159
Verifying : perl-Thread-Queue-3.13-1.el8.noarch 136/159
Verifying : perl-Time-HiRes-4:1.9758-2.el8.x86_64 137/159
Verifying : perl-Time-Piece-1.31-422.el8.x86_64 138/159
Verifying : perl-Unicode-Collate-1.25-2.el8.x86_64 139/159
Verifying : perl-autodie-2.29-396.el8.noarch 140/159
Verifying : perl-bignum-0.49-2.el8.noarch 141/159
Verifying : perl-devel-4:5.26.3-422.el8.x86_64 142/159
Verifying : perl-encoding-4:2.22-3.el8.x86_64 143/159
Verifying : perl-experimental-0.019-2.el8.noarch 144/159
Verifying : perl-inc-latest-2:0.500-9.el8.noarch 145/159
Verifying : perl-libnetcfg-4:5.26.3-422.el8.noarch 146/159
Verifying : perl-local-lib-2.000024-2.el8.noarch 147/159
Verifying : perl-open-1.11-422.el8.noarch 148/159
Verifying : perl-perlfaq-5.20180605-1.el8.noarch 149/159
Verifying : perl-srpm-macros-1-25.el8.noarch 150/159
Verifying : perl-utils-5.26.3-422.el8.noarch 151/159
Verifying : perl-version-6:0.99.24-1.el8.x86_64 152/159
Verifying : python-rpm-macros-3-45.el8.noarch 153/159
Verifying : python-srpm-macros-3-45.el8.noarch 154/159
Verifying : python3-rpm-macros-3-45.el8.noarch 155/159
Verifying : qt5-srpm-macros-5.15.3-1.el8.noarch 156/159
Verifying : redhat-rpm-config-131-1.0.1.el8.noarch 157/159
Verifying : rust-srpm-macros-5-2.el8.noarch 158/159
Verifying : systemtap-sdt-devel-4.9-3.0.1.el8.x86_64 159/159
Installed:
dwz-0.12-10.el8.x86_64
efi-srpm-macros-3-3.0.1.el8.noarch
file-5.33-24.el8.x86_64
ghc-srpm-macros-1.4.2-7.el8.noarch
glibc-gconv-extra-2.28-225.0.3.el8.x86_64
go-srpm-macros-2-17.el8.noarch
groff-base-1.22.3-18.el8.x86_64
ocaml-srpm-macros-5-4.el8.noarch
openblas-srpm-macros-2-2.el8.noarch
perl-4:5.26.3-422.el8.x86_64
perl-Algorithm-Diff-1.1903-9.el8.noarch
perl-Archive-Tar-2.30-1.el8.noarch
perl-Archive-Zip-1.60-3.el8.noarch
perl-Attribute-Handlers-0.99-422.el8.noarch
perl-B-Debug-1.26-2.el8.noarch
perl-CPAN-2.18-397.el8.noarch
perl-CPAN-Meta-2.150010-396.el8.noarch
perl-CPAN-Meta-Requirements-2.140-396.el8.noarch
perl-CPAN-Meta-YAML-0.018-397.el8.noarch
perl-Carp-1.42-396.el8.noarch
perl-Compress-Bzip2-2.26-6.el8.x86_64
perl-Compress-Raw-Bzip2-2.081-1.el8.x86_64
perl-Compress-Raw-Zlib-2.081-1.el8.x86_64
perl-Config-Perl-V-0.30-1.el8.noarch
perl-DB_File-1.842-1.el8.x86_64
perl-Data-Dumper-2.167-399.el8.x86_64
perl-Data-OptList-0.110-6.el8.noarch
perl-Data-Section-0.200007-3.el8.noarch
perl-Devel-PPPort-3.36-5.el8.x86_64
perl-Devel-Peek-1.26-422.el8.x86_64
perl-Devel-SelfStubber-1.06-422.el8.noarch
perl-Devel-Size-0.81-2.el8.x86_64
perl-Digest-1.17-395.el8.noarch
perl-Digest-MD5-2.55-396.el8.x86_64
perl-Digest-SHA-1:6.02-1.el8.x86_64
perl-Encode-4:2.97-3.el8.x86_64
perl-Encode-Locale-1.05-10.module+el8.3.0+7692+542c56f9.noarch
perl-Encode-devel-4:2.97-3.el8.x86_64
perl-Env-1.04-395.el8.noarch
perl-Errno-1.28-422.el8.x86_64
perl-Exporter-5.72-396.el8.noarch
perl-ExtUtils-CBuilder-1:0.280230-2.el8.noarch
perl-ExtUtils-Command-1:7.34-1.el8.noarch
perl-ExtUtils-Embed-1.34-422.el8.noarch
perl-ExtUtils-Install-2.14-4.el8.noarch
perl-ExtUtils-MM-Utils-1:7.34-1.el8.noarch
perl-ExtUtils-MakeMaker-1:7.34-1.el8.noarch
perl-ExtUtils-Manifest-1.70-395.el8.noarch
perl-ExtUtils-Miniperl-1.06-422.el8.noarch
perl-ExtUtils-ParseXS-1:3.35-2.el8.noarch
perl-File-Fetch-0.56-2.el8.noarch
perl-File-HomeDir-1.002-4.el8.noarch
perl-File-Path-2.15-2.el8.noarch
perl-File-Temp-0.230.600-1.el8.noarch
perl-File-Which-1.22-2.el8.noarch
perl-Filter-2:1.58-2.el8.x86_64
perl-Filter-Simple-0.94-2.el8.noarch
perl-Getopt-Long-1:2.50-4.el8.noarch
perl-HTTP-Tiny-0.074-2.el8.noarch
perl-IO-1.38-422.el8.x86_64
perl-IO-Compress-2.081-1.el8.noarch
perl-IO-Socket-IP-0.39-5.el8.noarch
perl-IO-Socket-SSL-2.066-4.module+el8.6.0+20623+f0897f98.noarch
perl-IO-Zlib-1:1.10-422.el8.noarch
perl-IPC-Cmd-2:1.02-1.el8.noarch
perl-IPC-SysV-2.07-397.el8.x86_64
perl-IPC-System-Simple-1.25-17.el8.noarch
perl-JSON-PP-1:2.97.001-3.el8.noarch
perl-Locale-Codes-3.57-1.el8.noarch
perl-Locale-Maketext-1.28-396.el8.noarch
perl-Locale-Maketext-Simple-1:0.21-422.el8.noarch
perl-MIME-Base64-3.15-396.el8.x86_64
perl-MRO-Compat-0.13-4.el8.noarch
perl-Math-BigInt-1:1.9998.11-7.el8.noarch
perl-Math-BigInt-FastCalc-0.500.600-6.el8.x86_64
perl-Math-BigRat-0.2614-1.el8.noarch
perl-Math-Complex-1.59-422.el8.noarch
perl-Memoize-1.03-422.el8.noarch
perl-Module-Build-2:0.42.24-5.el8.noarch
perl-Module-CoreList-1:5.20181130-1.el8.noarch
perl-Module-CoreList-tools-1:5.20181130-1.el8.noarch
perl-Module-Load-1:0.32-395.el8.noarch
perl-Module-Load-Conditional-0.68-395.el8.noarch
perl-Module-Loaded-1:0.08-422.el8.noarch
perl-Module-Metadata-1.000033-395.el8.noarch
perl-Mozilla-CA-20160104-7.0.1.module+el8.3.0+21136+b437fca9.noarch
perl-Net-Ping-2.55-422.el8.noarch
perl-Net-SSLeay-1.88-2.module+el8.6.0+20623+f0897f98.x86_64
perl-Package-Generator-1.106-11.el8.noarch
perl-Params-Check-1:0.38-395.el8.noarch
perl-Params-Util-1.07-22.el8.x86_64
perl-PathTools-3.74-1.el8.x86_64
perl-Perl-OSType-1.010-396.el8.noarch
perl-PerlIO-via-QuotedPrint-0.08-395.el8.noarch
perl-Pod-Checker-4:1.73-395.el8.noarch
perl-Pod-Escapes-1:1.07-395.el8.noarch
perl-Pod-Html-1.22.02-422.el8.noarch
perl-Pod-Parser-1.63-396.el8.noarch
perl-Pod-Perldoc-3.28-396.el8.noarch
perl-Pod-Simple-1:3.35-395.el8.noarch
perl-Pod-Usage-4:1.69-395.el8.noarch
perl-Scalar-List-Utils-3:1.49-2.el8.x86_64
perl-SelfLoader-1.23-422.el8.noarch
perl-Socket-4:2.027-3.el8.x86_64
perl-Software-License-0.103013-2.el8.noarch
perl-Storable-1:3.11-3.el8.x86_64
perl-Sub-Exporter-0.987-15.el8.noarch
perl-Sub-Install-0.928-14.el8.noarch
perl-Sys-Syslog-0.35-397.el8.x86_64
perl-Term-ANSIColor-4.06-396.el8.noarch
perl-Term-Cap-1.17-395.el8.noarch
perl-TermReadKey-2.37-7.el8.x86_64
perl-Test-1.30-422.el8.noarch
perl-Test-Harness-1:3.42-1.el8.noarch
perl-Test-Simple-1:1.302135-1.el8.noarch
perl-Text-Balanced-2.03-395.el8.noarch
perl-Text-Diff-1.45-2.el8.noarch
perl-Text-Glob-0.11-4.el8.noarch
perl-Text-ParseWords-3.30-395.el8.noarch
perl-Text-Tabs+Wrap-2013.0523-395.el8.noarch
perl-Text-Template-1.51-1.el8.noarch
perl-Thread-Queue-3.13-1.el8.noarch
perl-Time-HiRes-4:1.9758-2.el8.x86_64
perl-Time-Local-1:1.280-1.el8.noarch
perl-Time-Piece-1.31-422.el8.x86_64
perl-URI-1.73-3.el8.noarch
perl-Unicode-Collate-1.25-2.el8.x86_64
perl-Unicode-Normalize-1.25-396.el8.x86_64
perl-autodie-2.29-396.el8.noarch
perl-bignum-0.49-2.el8.noarch
perl-constant-1.33-396.el8.noarch
perl-devel-4:5.26.3-422.el8.x86_64
perl-encoding-4:2.22-3.el8.x86_64
perl-experimental-0.019-2.el8.noarch
perl-inc-latest-2:0.500-9.el8.noarch
perl-interpreter-4:5.26.3-422.el8.x86_64
perl-libnet-3.11-3.el8.noarch
perl-libnetcfg-4:5.26.3-422.el8.noarch
perl-libs-4:5.26.3-422.el8.x86_64
perl-local-lib-2.000024-2.el8.noarch
perl-macros-4:5.26.3-422.el8.x86_64
perl-open-1.11-422.el8.noarch
perl-parent-1:0.237-1.el8.noarch
perl-perlfaq-5.20180605-1.el8.noarch
perl-podlators-4.11-1.el8.noarch
perl-srpm-macros-1-25.el8.noarch
perl-threads-1:2.21-2.el8.x86_64
perl-threads-shared-1.58-2.el8.x86_64
perl-utils-5.26.3-422.el8.noarch
perl-version-6:0.99.24-1.el8.x86_64
python-rpm-macros-3-45.el8.noarch
python-srpm-macros-3-45.el8.noarch
python3-pyparsing-2.1.10-7.el8.noarch
python3-rpm-macros-3-45.el8.noarch
qt5-srpm-macros-5.15.3-1.el8.noarch
redhat-rpm-config-131-1.0.1.el8.noarch
rust-srpm-macros-5-2.el8.noarch
systemtap-sdt-devel-4.9-3.0.1.el8.x86_64
zip-3.0-23.el8.x86_64
Complete! |
I installed the python3 with this command:
dnf install -y python3 |
Display detailed console log →
Last metadata expiration check: 0:31:49 ago on Thu Dec 21 05:18:09 2023.
Dependencies resolved.
================================================================================
 Package             Arch   Version                     Repository         Size
================================================================================
Installing:
 python36            x86_64 3.6.8-38.module+el8.9.0+90104+968a3e84
                                                        ol8_appstream      18 k
Installing dependencies:
 platform-python-pip noarch 9.0.3-23.el8                ol8_baseos_latest 1.6 M
 python3-pip         noarch 9.0.3-23.el8                ol8_appstream      20 k
 python3-setuptools  noarch 39.2.0-7.el8                ol8_baseos_latest 163 k
Enabling module streams:
 python36                   3.6

Transaction Summary
================================================================================
Install  4 Packages

Total download size: 1.8 M
Installed size: 7.0 M
Downloading Packages:
(1/4): python3-pip-9.0.3-23.el8.noarch.rpm       61 kB/s |  20 kB     00:00
(2/4): python36-3.6.8-38.module+el8.9.0+90104+9 229 kB/s |  18 kB     00:00
(3/4): python3-setuptools-39.2.0-7.el8.noarch.r 335 kB/s | 163 kB     00:00
(4/4): platform-python-pip-9.0.3-23.el8.noarch. 1.9 MB/s | 1.6 MB     00:00
--------------------------------------------------------------------------------
Total                                           2.2 MB/s | 1.8 MB     00:00
Running transaction check
Transaction check succeeded.
Running transaction test
Transaction test succeeded.
Running transaction
  Preparing        :                                                        1/1
  Installing       : python3-setuptools-39.2.0-7.el8.noarch                 1/4
  Installing       : platform-python-pip-9.0.3-23.el8.noarch                2/4
  Installing       : python36-3.6.8-38.module+el8.9.0+90104+968a3e84.x86_   3/4
  Running scriptlet: python36-3.6.8-38.module+el8.9.0+90104+968a3e84.x86_   3/4
  Installing       : python3-pip-9.0.3-23.el8.noarch                        4/4
  Running scriptlet: python3-pip-9.0.3-23.el8.noarch                        4/4
  Verifying        : platform-python-pip-9.0.3-23.el8.noarch                1/4
  Verifying        : python3-setuptools-39.2.0-7.el8.noarch                 2/4
  Verifying        : python3-pip-9.0.3-23.el8.noarch                        3/4
  Verifying        : python36-3.6.8-38.module+el8.9.0+90104+968a3e84.x86_   4/4

Installed:
  platform-python-pip-9.0.3-23.el8.noarch
  python3-pip-9.0.3-23.el8.noarch
  python3-setuptools-39.2.0-7.el8.noarch
  python36-3.6.8-38.module+el8.9.0+90104+968a3e84.x86_64

Complete! |
I installed the git module with this command:
dnf install -y git |
Display detailed console log →
Last metadata expiration check: 0:33:00 ago on Thu Dec 21 05:18:09 2023. Dependencies resolved. ================================================================================ Package Arch Version Repository Size ================================================================================ Installing: git x86_64 2.39.3-1.el8_8 ol8_appstream 104 k Installing dependencies: emacs-filesystem noarch 1:26.1-11.el8 ol8_baseos_latest 70 k git-core x86_64 2.39.3-1.el8_8 ol8_appstream 11 M git-core-doc noarch 2.39.3-1.el8_8 ol8_appstream 3.0 M less x86_64 530-1.el8 ol8_baseos_latest 164 k perl-Error noarch 1:0.17025-2.el8 ol8_appstream 46 k perl-Git noarch 2.39.3-1.el8_8 ol8_appstream 79 k Transaction Summary ================================================================================ Install 7 Packages Total download size: 14 M Installed size: 45 M Downloading Packages: (1/7): git-2.39.3-1.el8_8.x86_64.rpm 233 kB/s | 104 kB 00:00 (2/7): emacs-filesystem-26.1-11.el8.noarch.rpm 155 kB/s | 70 kB 00:00 (3/7): less-530-1.el8.x86_64.rpm 309 kB/s | 164 kB 00:00 (4/7): perl-Error-0.17025-2.el8.noarch.rpm 519 kB/s | 46 kB 00:00 (5/7): perl-Git-2.39.3-1.el8_8.noarch.rpm 722 kB/s | 79 kB 00:00 (6/7): git-core-doc-2.39.3-1.el8_8.noarch.rpm 5.1 MB/s | 3.0 MB 00:00 (7/7): git-core-2.39.3-1.el8_8.x86_64.rpm 12 MB/s | 11 MB 00:00 -------------------------------------------------------------------------------- Total 11 MB/s | 14 MB 00:01 Running transaction check Transaction check succeeded. Running transaction test Transaction test succeeded. Running transaction Preparing : 1/1 Installing : perl-Error-1:0.17025-2.el8.noarch 1/7 Installing : less-530-1.el8.x86_64 2/7 Installing : git-core-2.39.3-1.el8_8.x86_64 3/7 Installing : git-core-doc-2.39.3-1.el8_8.noarch 4/7 Installing : emacs-filesystem-1:26.1-11.el8.noarch 5/7 Installing : perl-Git-2.39.3-1.el8_8.noarch 6/7 Installing : git-2.39.3-1.el8_8.x86_64 7/7 Running scriptlet: git-2.39.3-1.el8_8.x86_64 7/7 Verifying : emacs-filesystem-1:26.1-11.el8.noarch 1/7 Verifying : less-530-1.el8.x86_64 2/7 Verifying : git-2.39.3-1.el8_8.x86_64 3/7 Verifying : git-core-2.39.3-1.el8_8.x86_64 4/7 Verifying : git-core-doc-2.39.3-1.el8_8.noarch 5/7 Verifying : perl-Error-1:0.17025-2.el8.noarch 6/7 Verifying : perl-Git-2.39.3-1.el8_8.noarch 7/7 Installed: emacs-filesystem-1:26.1-11.el8.noarch git-2.39.3-1.el8_8.x86_64 git-core-2.39.3-1.el8_8.x86_64 git-core-doc-2.39.3-1.el8_8.noarch less-530-1.el8.x86_64 perl-Error-1:0.17025-2.el8.noarch perl-Git-2.39.3-1.el8_8.noarch Complete! |
I installed the epel-release container with this command:
dnf install -y epel-release |
Display detailed console log →
Last metadata expiration check: 0:40:34 ago on Thu Dec 21 05:18:09 2023. Dependencies resolved. ================================================================================ Package Arch Version Repository Size ================================================================================ Installing: oracle-epel-release-el8 x86_64 1.0-5.el8 ol8_baseos_latest 15 k Transaction Summary ================================================================================ Install 1 Package Total download size: 15 k Installed size: 18 k Downloading Packages: oracle-epel-release-el8-1.0-5.el8.x86_64.rpm 49 kB/s | 15 kB 00:00 -------------------------------------------------------------------------------- Total 49 kB/s | 15 kB 00:00 Running transaction check Transaction check succeeded. Running transaction test Transaction test succeeded. Running transaction Preparing : 1/1 Installing : oracle-epel-release-el8-1.0-5.el8.x86_64 1/1 Verifying : oracle-epel-release-el8-1.0-5.el8.x86_64 1/1 Installed: oracle-epel-release-el8-1.0-5.el8.x86_64 Complete! |
After installing all of these, you’re now ready to install the core rlwrap utility program. Like the other installations, you use:
dnf install -y rlwrap |
Display detailed console log →
Oracle Linux 8 EPEL Packages for Development (x 15 MB/s | 58 MB 00:03 Oracle Linux 8 EPEL Modular Packages for Develo 404 kB/s | 322 kB 00:00 Dependencies resolved. ================================================================================ Package Arch Version Repository Size ================================================================================ Installing: rlwrap x86_64 0.46.1-1.el8 ol8_developer_EPEL 140 k Installing dependencies: perl-File-Slurp noarch 9999.19-19.el8 ol8_appstream 47 k Transaction Summary ================================================================================ Install 2 Packages Total download size: 186 k Installed size: 426 k Downloading Packages: (1/2): perl-File-Slurp-9999.19-19.el8.noarch.rp 94 kB/s | 47 kB 00:00 (2/2): rlwrap-0.46.1-1.el8.x86_64.rpm 242 kB/s | 140 kB 00:00 -------------------------------------------------------------------------------- Total 321 kB/s | 186 kB 00:00 Running transaction check Transaction check succeeded. Running transaction test Transaction test succeeded. Running transaction Preparing : 1/1 Installing : perl-File-Slurp-9999.19-19.el8.noarch 1/2 Installing : rlwrap-0.46.1-1.el8.x86_64 2/2 Running scriptlet: rlwrap-0.46.1-1.el8.x86_64 2/2 Verifying : rlwrap-0.46.1-1.el8.x86_64 1/2 Verifying : perl-File-Slurp-9999.19-19.el8.noarch 2/2 Installed: perl-File-Slurp-9999.19-19.el8.noarch rlwrap-0.46.1-1.el8.x86_64 Complete! |
At this point, you need to create a sandboxed user account for the Docker instance because as a developer using the root user for simple tasks is a bad idea. While you could do this with a Docker command, the Oracle 23c Free edition raised a lock on the /etc/group file when I tried it. Naturally, that’s not a problem because you can connect as the root user with this syntax:
docker exec -it -u root oracle23c bash |
As the root user, create a student account as a developer account in the Oracle 23c Free container:
useradd -u 501 -g dba -G users -d /home/student -s /bin/bash/ -c "Student" -n student |
You’ll be unable to leverage the tnsnames.ora file unless you alter the prior command to replace dba with oinstall or add the following command:
usermod -a -G oinstall student |
Exit the Oracle 23c Free container as the root user and reconnect as the student user with this syntax:
docker exec -it --user student oracle23c bash |
While you’re connected as the root user, you should create an upload directory as a subdirectory of the $ORACLE_BASE directory. The $ORACLE_BASE directory in the Oracle Database 23c Free Docker image is the /opt/oracle directory.
You should use the following syntax to create the upload directory and change its permission to that of the Oracle Database 23c Free installation (for a future blog post on developing external table deployment on the Docker image):
mkdir /opt/oracle chown -R oracle:install /opt/oracle/upload |
You also can add the following student function to the Ubuntu student user’s .bashrc file. It means all you need to type to connect to the Oracle Database 23c Free Docker instance is “student“. I like shortcuts like this one, which let you leverage one-line Python commands.
student () { # Discover the fully qualified program name. path=`which docker 2>/dev/null` file='' # Parse the program name from the path. if [ -n ${path} ]; then file=${path##/*/} fi # Wrap when there is a file and it is rewrap. if [ -n ${file} ] && [[ ${file} = "docker" ]]; then python -c "import subprocess; subprocess.run(['docker exec -it --user student oracle23c bash'], shell=True)" else echo "Docker is unavailable: Install the docker package." fi } |
Open a Ubuntu Terminal shell and type a student function name to connect to the Docker Oracle Database 23c Free instance where you can now test things like external tables with the SQL*Plus command line without installing it on the Ubuntu local operating system.
student@student-virtual-machine:~$ student [student@d28375f0c43f ~]$ sqlplus c##student/student@free SQL*Plus: Release 23.0.0.0.0 - Production on Wed Jan 3 02:14:22 2024 Version 23.3.0.23.09 Copyright (c) 1982, 2023, Oracle. All rights reserved. Last Successful login time: Wed Jan 03 2024 01:56:44 +00:00 Connected to: Oracle Database 23c Free Release 23.0.0.0.0 - Develop, Learn, and Run for Free Version 23.3.0.23.09 SQL> |
Then, I added this sqlplus function to the /home/student/.bashrc file, which is owned by the student user. However, I also added the instruction to change to the student user’s home directory because the Oracle 23c Free container will connect you to the /home/oracle directory by default. I also added the default long list (ll) alias to the .bashrc file.
sqlplus () { # Discover the fully qualified program name. path=`which rlwrap 2>/dev/null` file='' # Parse the program name from the path. if [ -n ${path} ]; then file=${path##/*/} fi; # Wrap when there is a file and it is rewrap. if [ -n ${file} ] && [[ ${file} = "rlwrap" ]]; then rlwrap sqlplus "${@}" else echo "Command-line history unavailable: Install the rlwrap package." $ORACLE_HOME/bin/sqlplus "${@}" fi } # Change to the user's home directory. cd ${HOME} # Create a long list alias: alias ll='ls -l --color=auto' |
After you’ve configured your student user, you can configure the oracle user account to work like a regular server. Exit the Docker Oracle Database 23c Free as the student user, then connect as the root user with this command:
docker exec -it -u root oracle23c bash |
As the root user you can become the oracle user with the following command:
su - oracle |
Now, add the following .bashrc shell in the /home/oracle directory:
# The oracle user's .bashrc # Source global definitions if [ -f /etc/bashrc ]; then . /etc/bashrc fi # User specific environment if ! [[ "$PATH" =~ "$HOME/.local/bin:$HOME/bin:" ]] then PATH="$HOME/.local/bin:$HOME/bin:$PATH" fi export PATH # Uncomment the following line if you don't like systemctl's auto-paging feature: # export SYSTEMD_PAGER= # User specific aliases and functions export ORACLE_SID=FREE export ORACLE_BASE=/opt/oracle export ORACLE_HOME=/opt/oracle/product/23c/dbhomeFree export PATH=$PATH:/$ORACLE_HOME/bin # Change to the user's home directory. cd ${HOME} # Create a long list alias: alias ll='ls -l --color=auto' sqlplus () { # Discover the fully qualified program name. path=`which rlwrap 2>/dev/null` file='' # Parse the program name from the path. if [ -n ${path} ]; then file=${path##/*/} fi; # Wrap when there is a file and it is rewrap. if [ -n ${file} ] && [[ ${file} = "rlwrap" ]]; then rlwrap sqlplus "${@}" else echo "Command-line history unavailable: Install the rlwrap package." $ORACLE_HOME/bin/sqlplus "${@}" fi } |
You need to manually source the .bashrc for the oracle user because it’s not an externally available user. Use this syntax to connect as the internal user:
sqlplus / as sysdba |
It’ll display:
SQL*Plus: RELEASE 23.0.0.0.0 - Production ON Wed Jan 3 07:08:11 2024 Version 23.3.0.23.09 Copyright (c) 1982, 2023, Oracle. ALL rights reserved. Connected TO: Oracle DATABASE 23c Free RELEASE 23.0.0.0.0 - Develop, Learn, AND Run FOR Free Version 23.3.0.23.09 SQL> |
After all this, I can now click the “up arrow” to edit any of the sqlplus command history. If you like to work inside sqlplus natively, this should help you.
Ubuntu DaaS VM
Completed the build of my new Ubuntu Virtual Machine (VM) with Oracle 23c installed in a Docker instance, and MySQL and PostgreSQL installed locally. The VM image also provides a LAMP stack with Apache2, PHP 8.1 with MySQLi and PDO modules. Since the original post, I’ve added a number of items to support our program courses and the Data Science degrees.
There are lots of tricks and techniques in the blog associated with creating the build. I took the background photograph of Chapel Bridge early on Sunday morning August 30, 1987 in Lucerne Switzerland (with a Canon A1 and ASA 64 slide film that subsequently digitized well).
Next step: roll it out into an AWS image for the students to use for their courses.
Related blog posts:
- Installing and configuring Apache2 and PHP 8.1 on Ubuntu 22.04
- Installing and configuring Docker on Ubuntu 22.04
- Installing and configuring MySQL 8 on Ubuntu 22.04
- Installing Oracle Database 23c Free in a Docker container with space allocation techniques
- Installing and configuring PostgreSQL on Ubuntu 22.04
- Installing and configuring pgAdmin4
- Installing and configuring Python for MySQL 8
- Installing and configuring Python for PostgreSQL driver on Ubuntu 22.04
- Installing and configuring SQL Developer on Ubuntu 22.04
- Installing the rlwrap utility to access command history in SQL*Plus (sqlplus) inside Docker container.
- How to add PostGIS to an existing PostgreSQL 14 Install on Ubuntu 22.0.4
- How to create a sandboxed user and wrap sqlplus inside the Docker version of Oracle 23c Free
- How to install, configure, and create a persistent SQLite 3 database and access it with Python.
As always, I hope the post and information helps others.
Apache2 on Ubuntu
It’s always interesting when I build new instances. Ubuntu 22.0.4 was no different but I ran into an issue with installing Apache2 and eventually loading the mysqli module.
The Apache2 error was an issue with an unsupported module or hidden prerequisite. The MySQLi required an Apache reload after installation. Contrary to some erroneous posts the mysqli driver is supported on PHP 8.1.
Apache2 installation starts first and the mysqli module reload and verification script follows. On Ubuntu, you install Apache2 if you’re unaware of the hidden pre-requisite, otherwise install the pre-requisite first and avoid the error.
This is the command to install the apache2 module:
sudo apt-get install -y apache2 |
It generated the following error message:
apache2: Syntax error on line 146 of /etc/apache2/apache2.conf: Syntax error on line 1 of /etc/apache2/mods-enabled/wsgi.load: Cannot load /usr/lib/apache2/modules/mod_wsgi.so into server: /usr/lib/apache2/modules/mod_wsgi.so: cannot open shared object file: No such file or directory Action 'start' failed. The Apache error log may have more information. |
Line 146 in the /etc/apache2/apache2.conf file contains the instruction to load modules. The error says it can’t find the mod_wsgi.so library, which was originally part of the deprecated Python 2.7 release.
IncludeOptional mods-enabled/*.load |
The first step I pursued was finding the missing library, which appeared to be in the libapache2-mod-wsgi package. However, it became clear there is no installation candidate for that module, which supported Python 3.x. A little more research led me to find the appropriate library version for Python 3, which is found in the libapache2-mod-wsgi-py3 package.
I installed the libapache2-mod-wsgi-py3 package with the following syntax:
sudo apt-get install -y libapache2-mod-wsgi-py3 |
Display detailed console log →
Reading package lists... Done Building dependency tree... Done Reading state information... Done The following NEW packages will be installed: libapache2-mod-wsgi-py3 0 upgraded, 1 newly installed, 0 to remove and 10 not upgraded. Need to get 106 kB of archives. After this operation, 304 kB of additional disk space will be used. Get:1 http://us.archive.ubuntu.com/ubuntu jammy-updates/main amd64 libapache2-mod-wsgi-py3 amd64 4.9.0-1ubuntu0.1 [106 kB] Fetched 106 kB in 1s (135 kB/s) Selecting previously unselected package libapache2-mod-wsgi-py3. (Reading database ... 228859 files and directories currently installed.) Preparing to unpack .../libapache2-mod-wsgi-py3_4.9.0-1ubuntu0.1_amd64.deb ... Unpacking libapache2-mod-wsgi-py3 (4.9.0-1ubuntu0.1) ... Setting up libapache2-mod-wsgi-py3 (4.9.0-1ubuntu0.1) ... apache2_invoke wsgi: already enabled |
After applying it, I was able to start Apache2. Then, typing in localhost returns the Apache2 index.htm page, like:
After creating the following file in the default directory:
<?php phpinfo(); ?> |
Typing in localhost/infophp returns the Apache2 info.php page, like:
After the basics for PHP, the next step is the mysqli module for the MySQL database. This can be done in two steps on Ubuntu.
- Install the MySQLi software with the following syntax on Ubuntu:
sudo apt-get install -y php8.1-mysql
If you forget and use the old php-mysqli, it will redirect to the new PHP 8.1 MySQL module.
- You need to reload the Apache configuration with the following syntax:
sudo systemctl reload apache2
Now, you can use the following PHP program to verify that the mysqli and pdo drivers are installed:
<html>
<header>
<title>Module Verification</title>
</header>
<body>
<?php
  if (!function_exists('mysqli_init') && !extension_loaded('mysqli')) {
    print 'mysqli not installed.'; }
  else {
    print 'mysqli installed.'; }
  if (!function_exists('pdo_init') && !extension_loaded('pdo')) {
    print '<p>pdo not installed.</p>'; }
  else {
    print '<p>pdo installed.</p>'; }
?>
</script>
</body>
</html> |
If everything is correct, it should return the following in a browser when you query it from localhost/the-file-name and the file is in the /var/www/html directory:
mysqli installed. pdo installed. |
This means you can now write PHP applications, like the following example for my students:
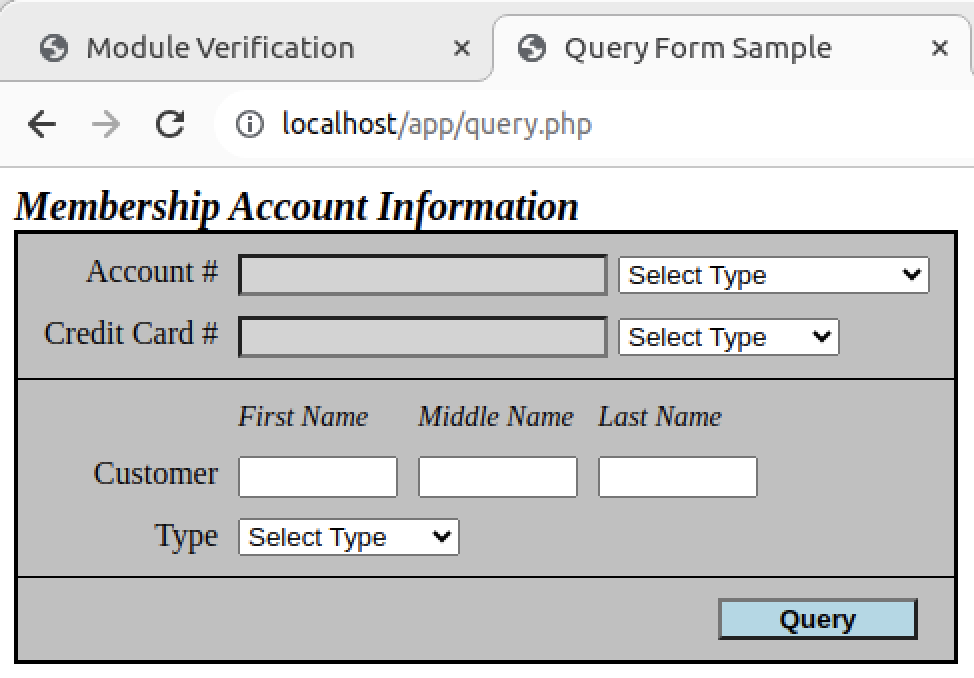
I also have some demonstration programs that upload PNG files. As usual, I forgot about that while building the Ubuntu installation with MySQL 8, PHP 8.1 and Apache2. Fortunately, I solved it back in the day when moving from PHP 5.7 to 7.1 and here are the equivalent steps for Ubuntu:
I installed the libapache2-mod-wsgi-py3 package with the following syntax:
sudo apt-get install -y php-gd |
Display detailed console log →
Reading package lists... Done Building dependency tree... Done Reading state information... Done The following additional packages will be installed: php8.1-gd The following NEW packages will be installed: php-gd php8.1-gd 0 upgraded, 2 newly installed, 0 to remove and 13 not upgraded. Need to get 34.7 kB of archives. After this operation, 158 kB of additional disk space will be used. Get:1 http://us.archive.ubuntu.com/ubuntu jammy-updates/main amd64 php8.1-gd amd64 8.1.2-1ubuntu2.14 [32.9 kB] Get:2 http://us.archive.ubuntu.com/ubuntu jammy/main amd64 php-gd all 2:8.1+92ubuntu1 [1,828 B] Fetched 34.7 kB in 1s (39.3 kB/s) sh: 0: getcwd() failed: No such file or directory sh: 0: getcwd() failed: No such file or directory sh: 0: getcwd() failed: No such file or directory sh: 0: getcwd() failed: No such file or directory Selecting previously unselected package php8.1-gd. (Reading database ... 228928 files and directories currently installed.) Preparing to unpack .../php8.1-gd_8.1.2-1ubuntu2.14_amd64.deb ... Unpacking php8.1-gd (8.1.2-1ubuntu2.14) ... Selecting previously unselected package php-gd. Preparing to unpack .../php-gd_2%3a8.1+92ubuntu1_all.deb ... Unpacking php-gd (2:8.1+92ubuntu1) ... Setting up php8.1-gd (8.1.2-1ubuntu2.14) ... Creating config file /etc/php/8.1/mods-available/gd.ini with new version Setting up php-gd (2:8.1+92ubuntu1) ... Processing triggers for libapache2-mod-php8.1 (8.1.2-1ubuntu2.14) ... Processing triggers for php8.1-cli (8.1.2-1ubuntu2.14) ... |
Then, I restarted the Apache2 server to incorporate the php-gd library in my PHP module with this syntax:
sudo systemctl restart apache2.service |
Retesting the PHP form to upload and render a PNG image file with this code (note that the only thing you can display is the html header and converted image, as shown on lines 64 and 65):
1 2 3 4 5 6 7 8 9 10 11 12 13 14 15 16 17 18 19 20 21 22 23 24 25 26 27 28 29 30 31 32 33 34 35 36 37 38 39 40 41 42 43 44 45 46 47 48 49 50 51 52 53 54 55 56 57 58 59 60 61 62 63 64 65 66 67 | <?php /* ConvertBlobToImage.php * by Michael McLaughlin * * This script queries an image from a BLOB column and * converts it to a PNG image. * * ALERT: * * The header must be inside the PHP script tag because nothing * can be rendered before the header() function call that signals * this is a PNG file. */ // Database credentials must be set manually because an include_once() function // call puts something ahead of the header, which causes a failure when rendering // an image. // Include the credential library. include_once("MySQLCredentials.inc"); // Return successful attempt to connect to the database. if (!$c = @mysqli_connect(HOSTNAME,USERNAME,PASSWORD,DATABASE)) { // Print user message. print "Sorry! The connection to the database failed. Please try again later."; // Assign the OCI error and format double and single quotes. print mysqli_error(); // Kill the resource. die(); } else { // Declare input variables. $id = (isset($_GET['id'])) ? (int) $_GET['id'] : 1023; // Initialize a statement in the scope of the connection. $stmt = mysqli_stmt_init($c); // Declare a SQL SELECT statement returning a MediumBLOB. $sql = "SELECT item_blob FROM item WHERE item_id = ?"; // Prepare statement and link it to a connection. if (mysqli_stmt_prepare($stmt,$sql)) { mysqli_stmt_bind_param($stmt,"i",$id); // Execute the PL/SQL statement. if (mysqli_stmt_execute($stmt)) { // Bind result to local variable. mysqli_stmt_bind_result($stmt, $image); // Read result. mysqli_stmt_fetch($stmt); } } // Disconnect from database. mysqli_close($c); // Print the header first. header('Content-type: image/png'); imagepng(imagecreatefromstring($image)); } ?> |
The call to the ConvertMySQLBlobToImage.php is handled in an image tag, as shown:
<img src="ConvertMySQLBlobToImage.php?id='.$id.'"> |
Rendering a web page, like:
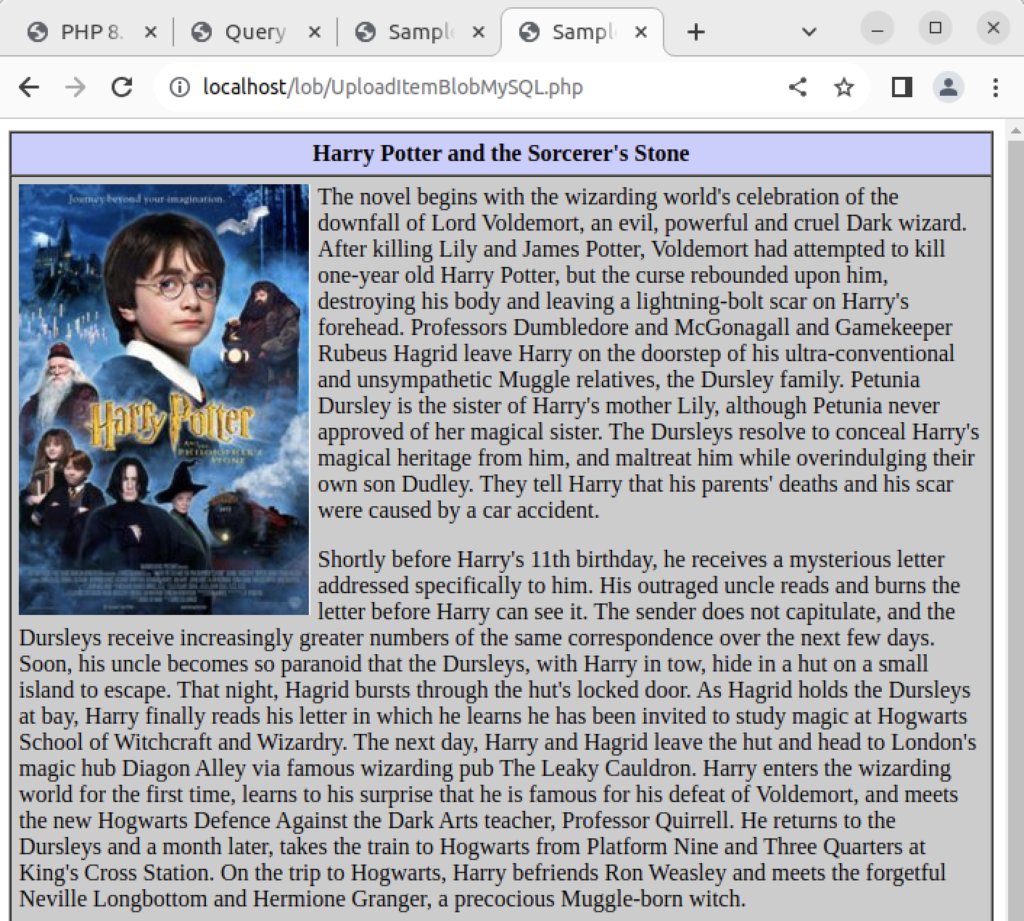
As always, I hope this explains something worthwhile.
pgAdmin4 on Ubuntu
Installing pgAdmin4 is qualified by the pgAdmin4 (APT) web page, which relies on the curl utility. Ubuntu doesn’t install curl by default, so you need to install it before you can download and install pgAdmin4:
- Download and install curl utility
sudo apt-get install -y curl
Display detailed console log →
Reading package lists... Done
Building dependency tree... Done
Reading state information... Done
The following NEW packages will be installed:
  curl
0 upgraded, 1 newly installed, 0 to remove and 5 not upgraded.
Need to get 194 kB of archives.
After this operation, 454 kB of additional disk space will be used.
Ign:1 http://us.archive.ubuntu.com/ubuntu jammy-updates/main amd64 curl amd64 7.81.0-1ubuntu1.14
Err:1 http://security.ubuntu.com/ubuntu jammy-updates/main amd64 curl amd64 7.81.0-1ubuntu1.14
  404  Not Found [IP: 91.189.91.38 80]
E: Failed to fetch http://security.ubuntu.com/ubuntu/pool/main/c/curl/curl_7.81.0-1ubuntu1.14_amd64.deb  404  Not Found [IP: 91.189.91.38 80]
E: Unable to fetch some archives, maybe run apt-get update or try with --fix-missing?
student@student-virtual-machine:~$ sudo apt-get update
Hit:1 http://us.archive.ubuntu.com/ubuntu jammy InRelease
Get:2 http://us.archive.ubuntu.com/ubuntu jammy-updates InRelease [119 kB]
Get:3 http://security.ubuntu.com/ubuntu jammy-security InRelease [110 kB]
Get:4 https://dl.google.com/linux/chrome/deb stable InRelease [1,825 B]
Get:5 http://us.archive.ubuntu.com/ubuntu jammy-backports InRelease [109 kB]
Get:6 http://security.ubuntu.com/ubuntu jammy-security/main i386 Packages [376 kB]
Get:7 https://dl.google.com/linux/chrome/deb stable/main amd64 Packages [1,081 B]
Get:8 http://us.archive.ubuntu.com/ubuntu jammy-updates/main amd64 Packages [1,244 kB]
Get:9 http://security.ubuntu.com/ubuntu jammy-security/main amd64 Packages [1,016 kB]
Get:10 http://security.ubuntu.com/ubuntu jammy-security/main Translation-en [195 kB]
Get:11 http://security.ubuntu.com/ubuntu jammy-security/restricted amd64 Packages [1,179 kB]
Get:12 http://security.ubuntu.com/ubuntu jammy-security/universe i386 Packages [577 kB]
Get:13 http://security.ubuntu.com/ubuntu jammy-security/universe amd64 Packages [815 kB]
Get:14 http://security.ubuntu.com/ubuntu jammy-security/universe Translation-en [152 kB]
Get:15 http://us.archive.ubuntu.com/ubuntu jammy-updates/main i386 Packages [543 kB]
Get:16 http://us.archive.ubuntu.com/ubuntu jammy-updates/main Translation-en [257 kB]
Get:17 http://us.archive.ubuntu.com/ubuntu jammy-updates/restricted amd64 Packages [1,226 kB]
Get:18 http://us.archive.ubuntu.com/ubuntu jammy-updates/restricted Translation-en [199 kB]
Get:19 http://us.archive.ubuntu.com/ubuntu jammy-updates/universe i386 Packages [675 kB]
Get:20 http://us.archive.ubuntu.com/ubuntu jammy-updates/universe amd64 Packages [1,018 kB]
Get:21 http://us.archive.ubuntu.com/ubuntu jammy-updates/universe Translation-en [226 kB]
Get:22 http://us.archive.ubuntu.com/ubuntu jammy-backports/universe amd64 Packages [27.8 kB]
Get:23 http://us.archive.ubuntu.com/ubuntu jammy-backports/universe i386 Packages [16.8 kB]
Fetched 10.1 MB in 26s (386 kB/s)
Reading package lists... Done
- Download and install the public key for the repository (if not done previously):
sudo curl -fsS https://www.pgadmin.org/static/packages_pgadmin_org.pub | sudo gpg --dearmor -o /usr/share/keyrings/packages-pgadmin-org.gpg
It may find an existing key and require you to confirm its replacement:
File '/usr/share/keyrings/packages-pgadmin-org.gpg' exists. Overwrite? (y/N) y
- Create the repository configuration file:
sudo sh -c 'echo "deb [signed-by=/usr/share/keyrings/packages-pgadmin-org.gpg] https://ftp.postgresql.org/pub/pgadmin/pgadmin4/apt/$(lsb_release -cs) pgadmin4 main" > /etc/apt/sources.list.d/pgadmin4.list && apt update'
Display detailed console log →
Hit:1 http://us.archive.ubuntu.com/ubuntu jammy InRelease
Hit:2 http://us.archive.ubuntu.com/ubuntu jammy-updates InRelease
Hit:3 http://security.ubuntu.com/ubuntu jammy-security InRelease
Hit:4 http://us.archive.ubuntu.com/ubuntu jammy-backports InRelease
Hit:5 https://dl.google.com/linux/chrome/deb stable InRelease
Get:6 https://ftp.postgresql.org/pub/pgadmin/pgadmin4/apt/jammy pgadmin4 InRelease [4,217 B]
Get:7 https://ftp.postgresql.org/pub/pgadmin/pgadmin4/apt/jammy pgadmin4/main all Packages [4,637 B]
Get:8 https://ftp.postgresql.org/pub/pgadmin/pgadmin4/apt/jammy pgadmin4/main amd64 Packages [7,693 B]
Fetched 16.5 kB in 2s (7,404 B/s)
Reading package lists... Done
Building dependency tree... Done
Reading state information... Done
21 packages can be upgraded. Run 'apt list --upgradable' to see them.
student@student-virtual-machine:~$ sudo apt-get update
Hit:1 http://security.ubuntu.com/ubuntu jammy-security InRelease
Hit:2 http://us.archive.ubuntu.com/ubuntu jammy InRelease
Hit:3 http://us.archive.ubuntu.com/ubuntu jammy-updates InRelease
Hit:4 https://dl.google.com/linux/chrome/deb stable InRelease
Hit:5 http://us.archive.ubuntu.com/ubuntu jammy-backports InRelease
Hit:6 https://ftp.postgresql.org/pub/pgadmin/pgadmin4/apt/jammy pgadmin4 InRelease
Reading package lists... Done
- Install the pgadmin4 Desktop:
sudo apt install pgadmin4-desktop
Display detailed console log →
Reading package lists... Done
Building dependency tree... Done
Reading state information... Done
The following additional packages will be installed:
 pgadmin4-server
The following NEW packages will be installed:
 pgadmin4-desktop pgadmin4-server
0 upgraded, 2 newly installed, 0 to remove and 21 not upgraded.
Need to get 203 MB of archives.
After this operation, 0 B of additional disk space will be used.
Do you want to continue? [Y/n] Y
Get:1 https://ftp.postgresql.org/pub/pgadmin/pgadmin4/apt/jammy pgadmin4/main amd64 pgadmin4-server amd64 8.0 [93.5 MB]
Get:2 https://ftp.postgresql.org/pub/pgadmin/pgadmin4/apt/jammy pgadmin4/main amd64 pgadmin4-desktop amd64 8.0 [110 MB]
Fetched 203 MB in 49s (4,163 kB/s)
Selecting previously unselected package pgadmin4-server.
(Reading database ... 204519 files and directories currently installed.)
Preparing to unpack .../pgadmin4-server_8.0_amd64.deb ...
Unpacking pgadmin4-server (8.0) ...
Selecting previously unselected package pgadmin4-desktop.
Preparing to unpack .../pgadmin4-desktop_8.0_amd64.deb ...
Unpacking pgadmin4-desktop (8.0) ...
Setting up pgadmin4-server (8.0) ...
Setting up pgadmin4-desktop (8.0) ...
Processing triggers for desktop-file-utils (0.26-1ubuntu3) ...
Processing triggers for hicolor-icon-theme (0.17-2) ...
Processing triggers for gnome-menus (3.36.0-1ubuntu3) ...
Processing triggers for mailcap (3.70+nmu1ubuntu1) ...
- You can launch your pgadmin4 program file or by clicking the pgAdmin4 icon in the other applications menu:

- It takes a couple moments to launch the pgadmin4 desktop. The initial screen will look like:

- After pgadmin4 launches, you’re prompted for a master password. Enter the password and click the OK button to proceed or simply let it sit for a couple minutes to avoid entering a password.
- After entering the password or skipping its entry you arrive at the base dialog, as shown.
- Click the Add New Server link, which prompts you to register your database. Enter videodb in the Name field and click the Connection tab to the right of the General tab.
- In the Connection dialog, enter the following values:
- Host name/address: localhost
- Port: 5432
- Maintenance database: postgres
- Username: student
- Password: student

Enter a name for your database. In this example, videodb is the Server Name. Click the Save button to proceed.
- Having completed the configuration, you now see the home page.

This completes the instructions for installing, configuring, and using PostgreSQL on AlmaLinux. As always, I hope it helps those looking for instructions.
Python3 on PostgreSQL
The necessary Python 3 driver for connections to the PostgreSQL database is python3-psycopg2, as qualified by this earlier post with full test examples for Red Hat distributions. You can install it on Ubuntu with the following command:
sudo apt-get install -y python3-psycopg2 |
Display detailed console log →
python3-psycopg2 Reading package lists... Done Building dependency tree... Done Reading state information... Done Suggested packages: python-psycopg2-doc The following NEW packages will be installed: python3-psycopg2 0 upgraded, 1 newly installed, 0 to remove and 4 not upgraded. Need to get 136 kB of archives. After this operation, 483 kB of additional disk space will be used. Get:1 http://us.archive.ubuntu.com/ubuntu jammy/main amd64 python3-psycopg2 amd64 2.9.2-1build2 [136 kB] Fetched 136 kB in 1s (146 kB/s) Selecting previously unselected package python3-psycopg2. (Reading database ... 204321 files and directories currently installed.) Preparing to unpack .../python3-psycopg2_2.9.2-1build2_amd64.deb ... Unpacking python3-psycopg2 (2.9.2-1build2) ... Setting up python3-psycopg2 (2.9.2-1build2) ... |
As always, I hope this helps those looking for a solution. Also, remember the referenced post above provides Linux distribution neutral full solutions.
SQL Developer on Ubuntu
The following steps show how to install and configure SQL Developer on Ubuntu 22.0.4 to work with Oracle Database 23c Free in a Docker container. The first steps are installing the Java Runtime Environment and Java Development Kit, and then downloading, installing and configuring SQL Developer. These are the required steps:
- Install the Java Runtime Environment:
sudo apt install default-jre
The log file for this is:
Display detailed console log →
Reading package lists... Done
Building dependency tree... Done
Reading state information... Done
The following additional packages will be installed:
 ca-certificates-java default-jre-headless fonts-dejavu-extra java-common
 libatk-wrapper-java libatk-wrapper-java-jni openjdk-11-jre
 openjdk-11-jre-headless
Suggested packages:
 fonts-ipafont-gothic fonts-ipafont-mincho fonts-wqy-microhei
 | fonts-wqy-zenhei
The following NEW packages will be installed:
 ca-certificates-java default-jre default-jre-headless fonts-dejavu-extra
 java-common libatk-wrapper-java libatk-wrapper-java-jni openjdk-11-jre
 openjdk-11-jre-headless
0 upgraded, 9 newly installed, 0 to remove and 4 not upgraded.
Need to get 44.9 MB of archives.
After this operation, 185 MB of additional disk space will be used.
Do you want to continue? [Y/n] Y
Get:1 http://us.archive.ubuntu.com/ubuntu jammy/main amd64 java-common all 0.72build2 [6,782 B]
Get:2 http://us.archive.ubuntu.com/ubuntu jammy-updates/main amd64 openjdk-11-jre-headless amd64 11.0.21+9-0ubuntu1~22.04 [42.5 MB]
Get:3 http://us.archive.ubuntu.com/ubuntu jammy/main amd64 default-jre-headless amd64 2:1.11-72build2 [3,042 B]
Get:4 http://us.archive.ubuntu.com/ubuntu jammy-updates/main amd64 ca-certificates-java all 20190909ubuntu1.2 [12.1 kB]
Get:5 http://us.archive.ubuntu.com/ubuntu jammy-updates/main amd64 openjdk-11-jre amd64 11.0.21+9-0ubuntu1~22.04 [214 kB]
Get:6 http://us.archive.ubuntu.com/ubuntu jammy/main amd64 default-jre amd64 2:1.11-72build2 [896 B]
Get:7 http://us.archive.ubuntu.com/ubuntu jammy/main amd64 fonts-dejavu-extra all 2.37-2build1 [2,041 kB]
Get:8 http://us.archive.ubuntu.com/ubuntu jammy/main amd64 libatk-wrapper-java all 0.38.0-5build1 [53.1 kB]
Get:9 http://us.archive.ubuntu.com/ubuntu jammy/main amd64 libatk-wrapper-java-jni amd64 0.38.0-5build1 [49.0 kB]
Fetched 44.9 MB in 14s (3,270 kB/s)
Selecting previously unselected package java-common.
(Reading database ... 203118 files and directories currently installed.)
Preparing to unpack .../0-java-common_0.72build2_all.deb ...
Unpacking java-common (0.72build2) ...
Selecting previously unselected package openjdk-11-jre-headless:amd64.
Preparing to unpack .../1-openjdk-11-jre-headless_11.0.21+9-0ubuntu1~22.04_amd64
.deb ...
Unpacking openjdk-11-jre-headless:amd64 (11.0.21+9-0ubuntu1~22.04) ...
Selecting previously unselected package default-jre-headless.
Preparing to unpack .../2-default-jre-headless_2%3a1.11-72build2_amd64.deb ...
Unpacking default-jre-headless (2:1.11-72build2) ...
Selecting previously unselected package ca-certificates-java.
Preparing to unpack .../3-ca-certificates-java_20190909ubuntu1.2_all.deb ...
Unpacking ca-certificates-java (20190909ubuntu1.2) ...
Selecting previously unselected package openjdk-11-jre:amd64.
Preparing to unpack .../4-openjdk-11-jre_11.0.21+9-0ubuntu1~22.04_amd64.deb ...
Unpacking openjdk-11-jre:amd64 (11.0.21+9-0ubuntu1~22.04) ...
Selecting previously unselected package default-jre.
Preparing to unpack .../5-default-jre_2%3a1.11-72build2_amd64.deb ...
Unpacking default-jre (2:1.11-72build2) ...
Selecting previously unselected package fonts-dejavu-extra.
Preparing to unpack .../6-fonts-dejavu-extra_2.37-2build1_all.deb ...
Unpacking fonts-dejavu-extra (2.37-2build1) ...
Selecting previously unselected package libatk-wrapper-java.
Preparing to unpack .../7-libatk-wrapper-java_0.38.0-5build1_all.deb ...
Unpacking libatk-wrapper-java (0.38.0-5build1) ...
Selecting previously unselected package libatk-wrapper-java-jni:amd64.
Preparing to unpack .../8-libatk-wrapper-java-jni_0.38.0-5build1_amd64.deb ...
Unpacking libatk-wrapper-java-jni:amd64 (0.38.0-5build1) ...
Setting up java-common (0.72build2) ...
Setting up fonts-dejavu-extra (2.37-2build1) ...
Setting up libatk-wrapper-java (0.38.0-5build1) ...
Setting up libatk-wrapper-java-jni:amd64 (0.38.0-5build1) ...
Setting up default-jre-headless (2:1.11-72build2) ...
Setting up openjdk-11-jre-headless:amd64 (11.0.21+9-0ubuntu1~22.04) ...
update-alternatives: using /usr/lib/jvm/java-11-openjdk-amd64/bin/java to provid
e /usr/bin/java (java) in auto mode
update-alternatives: using /usr/lib/jvm/java-11-openjdk-amd64/bin/jjs to provide
/usr/bin/jjs (jjs) in auto mode
update-alternatives: using /usr/lib/jvm/java-11-openjdk-amd64/bin/keytool to pro
vide /usr/bin/keytool (keytool) in auto mode
update-alternatives: using /usr/lib/jvm/java-11-openjdk-amd64/bin/rmid to provid
e /usr/bin/rmid (rmid) in auto mode
update-alternatives: using /usr/lib/jvm/java-11-openjdk-amd64/bin/rmiregistry to
provide /usr/bin/rmiregistry (rmiregistry) in auto mode
update-alternatives: using /usr/lib/jvm/java-11-openjdk-amd64/bin/pack200 to pro
vide /usr/bin/pack200 (pack200) in auto mode
update-alternatives: using /usr/lib/jvm/java-11-openjdk-amd64/bin/unpack200 to p
rovide /usr/bin/unpack200 (unpack200) in auto mode
update-alternatives: using /usr/lib/jvm/java-11-openjdk-amd64/lib/jexec to provi
de /usr/bin/jexec (jexec) in auto mode
Setting up openjdk-11-jre:amd64 (11.0.21+9-0ubuntu1~22.04) ...
Setting up default-jre (2:1.11-72build2) ...
Setting up ca-certificates-java (20190909ubuntu1.2) ...
head: cannot open '/etc/ssl/certs/java/cacerts' for reading: No such file or dir
ectory
Adding debian:QuoVadis_Root_CA_1_G3.pem
Adding debian:GlobalSign_Root_E46.pem
Adding debian:T-TeleSec_GlobalRoot_Class_3.pem
Adding debian:Certum_Trusted_Network_CA.pem
Adding debian:Buypass_Class_2_Root_CA.pem
Adding debian:NetLock_Arany_=Class_Gold=_Főtanúsítvány.pem
Adding debian:e-Szigno_Root_CA_2017.pem
Adding debian:emSign_Root_CA_-_G1.pem
Adding debian:D-TRUST_BR_Root_CA_1_2020.pem
Adding debian:Hongkong_Post_Root_CA_3.pem
Adding debian:GlobalSign_ECC_Root_CA_-_R4.pem
Adding debian:NAVER_Global_Root_Certification_Authority.pem
Adding debian:UCA_Extended_Validation_Root.pem
Adding debian:AffirmTrust_Premium.pem
Adding debian:Entrust_Root_Certification_Authority.pem
Adding debian:DigiCert_Trusted_Root_G4.pem
Adding debian:CFCA_EV_ROOT.pem
Adding debian:ePKI_Root_Certification_Authority.pem
Adding debian:Hellenic_Academic_and_Research_Institutions_ECC_RootCA_2015.pem
Adding debian:HARICA_TLS_RSA_Root_CA_2021.pem
Adding debian:GlobalSign_Root_CA_-_R6.pem
Adding debian:TWCA_Global_Root_CA.pem
Adding debian:Trustwave_Global_ECC_P384_Certification_Authority.pem
Adding debian:ISRG_Root_X1.pem
Adding debian:Starfield_Services_Root_Certificate_Authority_-_G2.pem
Adding debian:QuoVadis_Root_CA_3.pem
Adding debian:Security_Communication_Root_CA.pem
Adding debian:DigiCert_TLS_RSA4096_Root_G5.pem
Adding debian:Entrust_Root_Certification_Authority_-_EC1.pem
Adding debian:Security_Communication_RootCA3.pem
Adding debian:TeliaSonera_Root_CA_v1.pem
Adding debian:vTrus_ECC_Root_CA.pem
Adding debian:AC_RAIZ_FNMT-RCM_SERVIDORES_SEGUROS.pem
Adding debian:Certum_EC-384_CA.pem
Adding debian:Microsec_e-Szigno_Root_CA_2009.pem
Adding debian:ssl-cert-snakeoil.pem
Adding debian:USERTrust_ECC_Certification_Authority.pem
Adding debian:CA_Disig_Root_R2.pem
Adding debian:Certum_Trusted_Network_CA_2.pem
Adding debian:ACCVRAIZ1.pem
Adding debian:TunTrust_Root_CA.pem
Adding debian:Buypass_Class_3_Root_CA.pem
Adding debian:D-TRUST_Root_Class_3_CA_2_2009.pem
Adding debian:Security_Communication_ECC_RootCA1.pem
Adding debian:GTS_Root_R2.pem
Adding debian:Certigna.pem
Adding debian:SSL.com_EV_Root_Certification_Authority_RSA_R2.pem
Adding debian:Entrust.net_Premium_2048_Secure_Server_CA.pem
Adding debian:E-Tugra_Global_Root_CA_ECC_v3.pem
Adding debian:Hongkong_Post_Root_CA_1.pem
Adding debian:SZAFIR_ROOT_CA2.pem
Adding debian:TUBITAK_Kamu_SM_SSL_Kok_Sertifikasi_-_Surum_1.pem
Adding debian:Atos_TrustedRoot_2011.pem
Adding debian:DigiCert_High_Assurance_EV_Root_CA.pem
Adding debian:emSign_Root_CA_-_C1.pem
Adding debian:Go_Daddy_Root_Certificate_Authority_-_G2.pem
Adding debian:GDCA_TrustAUTH_R5_ROOT.pem
Adding debian:GlobalSign_Root_CA_-_R3.pem
Adding debian:DigiCert_Assured_ID_Root_G3.pem
Adding debian:Autoridad_de_Certificacion_Firmaprofesional_CIF_A62634068_2.pem
Adding debian:Certainly_Root_R1.pem
Adding debian:vTrus_Root_CA.pem
Adding debian:Certainly_Root_E1.pem
Adding debian:Autoridad_de_Certificacion_Firmaprofesional_CIF_A62634068.pem
Adding debian:TWCA_Root_Certification_Authority.pem
Adding debian:Starfield_Root_Certificate_Authority_-_G2.pem
Adding debian:Amazon_Root_CA_3.pem
Adding debian:GTS_Root_R1.pem
Adding debian:SwissSign_Gold_CA_-_G2.pem
Adding debian:Certum_Trusted_Root_CA.pem
Adding debian:Hellenic_Academic_and_Research_Institutions_RootCA_2015.pem
Adding debian:AffirmTrust_Networking.pem
Adding debian:emSign_ECC_Root_CA_-_G3.pem
Adding debian:HARICA_TLS_ECC_Root_CA_2021.pem
Adding debian:certSIGN_ROOT_CA.pem
Adding debian:Actalis_Authentication_Root_CA.pem
Adding debian:SSL.com_Root_Certification_Authority_RSA.pem
Adding debian:Certigna_Root_CA.pem
Adding debian:XRamp_Global_CA_Root.pem
Adding debian:Baltimore_CyberTrust_Root.pem
Adding debian:Trustwave_Global_ECC_P256_Certification_Authority.pem
Adding debian:QuoVadis_Root_CA_2_G3.pem
Adding debian:GTS_Root_R3.pem
Adding debian:COMODO_RSA_Certification_Authority.pem
Adding debian:ISRG_Root_X2.pem
Adding debian:SwissSign_Silver_CA_-_G2.pem
Adding debian:IdenTrust_Public_Sector_Root_CA_1.pem
Adding debian:Microsoft_ECC_Root_Certificate_Authority_2017.pem
Adding debian:UCA_Global_G2_Root.pem
Adding debian:DigiCert_Assured_ID_Root_CA.pem
Adding debian:Entrust_Root_Certification_Authority_-_G2.pem
Adding debian:QuoVadis_Root_CA_2.pem
Adding debian:Trustwave_Global_Certification_Authority.pem
Adding debian:OISTE_WISeKey_Global_Root_GB_CA.pem
Adding debian:HiPKI_Root_CA_-_G1.pem
Adding debian:E-Tugra_Certification_Authority.pem
Adding debian:GTS_Root_R4.pem
Adding debian:Amazon_Root_CA_2.pem
Adding debian:Amazon_Root_CA_1.pem
Adding debian:SecureTrust_CA.pem
Adding debian:GlobalSign_Root_R46.pem
Adding debian:IdenTrust_Commercial_Root_CA_1.pem
Adding debian:DigiCert_Global_Root_G2.pem
Adding debian:Comodo_AAA_Services_root.pem
Adding debian:SSL.com_Root_Certification_Authority_ECC.pem
Adding debian:T-TeleSec_GlobalRoot_Class_2.pem
Adding debian:Starfield_Class_2_CA.pem
Adding debian:DigiCert_Global_Root_CA.pem
Adding debian:SecureSign_RootCA11.pem
Adding debian:certSIGN_Root_CA_G2.pem
Adding debian:DigiCert_TLS_ECC_P384_Root_G5.pem
Adding debian:Entrust_Root_Certification_Authority_-_G4.pem
Adding debian:OISTE_WISeKey_Global_Root_GC_CA.pem
Adding debian:DigiCert_Global_Root_G3.pem
Adding debian:Secure_Global_CA.pem
Adding debian:Microsoft_RSA_Root_Certificate_Authority_2017.pem
Adding debian:DigiCert_Assured_ID_Root_G2.pem
Adding debian:Telia_Root_CA_v2.pem
Adding debian:emSign_ECC_Root_CA_-_C3.pem
Adding debian:COMODO_Certification_Authority.pem
Adding debian:AffirmTrust_Premium_ECC.pem
Adding debian:GLOBALTRUST_2020.pem
Adding debian:E-Tugra_Global_Root_CA_RSA_v3.pem
Adding debian:Amazon_Root_CA_4.pem
Adding debian:COMODO_ECC_Certification_Authority.pem
Adding debian:AffirmTrust_Commercial.pem
Adding debian:SSL.com_EV_Root_Certification_Authority_ECC.pem
Adding debian:AC_RAIZ_FNMT-RCM.pem
Adding debian:Go_Daddy_Class_2_CA.pem
Adding debian:QuoVadis_Root_CA_3_G3.pem
Adding debian:D-TRUST_EV_Root_CA_1_2020.pem
Adding debian:GlobalSign_Root_CA.pem
Adding debian:GlobalSign_ECC_Root_CA_-_R5.pem
Adding debian:USERTrust_RSA_Certification_Authority.pem
Adding debian:D-TRUST_Root_Class_3_CA_2_EV_2009.pem
Adding debian:Izenpe.com.pem
Adding debian:ANF_Secure_Server_Root_CA.pem
Adding debian:Security_Communication_RootCA2.pem
done.
Processing triggers for mailcap (3.70+nmu1ubuntu1) ...
Processing triggers for fontconfig (2.13.1-4.2ubuntu5) ...
Processing triggers for desktop-file-utils (0.26-1ubuntu3) ...
Processing triggers for hicolor-icon-theme (0.17-2) ...
Processing triggers for gnome-menus (3.36.0-1ubuntu3) ...
Processing triggers for man-db (2.10.2-1) ...
Processing triggers for ca-certificates (20230311ubuntu0.22.04.1) ...
Updating certificates in /etc/ssl/certs...
0 added, 0 removed; done.
Running hooks in /etc/ca-certificates/update.d...

done.
done.
- Install the Java Runtime Environment:
sudo apt install -y default-idk
The log file for this is:
Display detailed console log →
Reading package lists... Done
Building dependency tree... Done
Reading state information... Done
The following additional packages will be installed:
 default-jdk-headless libice-dev libpthread-stubs0-dev libsm-dev libx11-dev
 libxau-dev libxcb1-dev libxdmcp-dev libxt-dev openjdk-11-jdk
 openjdk-11-jdk-headless x11proto-dev xorg-sgml-doctools xtrans-dev
Suggested packages:
 libice-doc libsm-doc libx11-doc libxcb-doc libxt-doc openjdk-11-demo
 openjdk-11-source visualvm
The following NEW packages will be installed:
 default-jdk default-jdk-headless libice-dev libpthread-stubs0-dev libsm-dev
 libx11-dev libxau-dev libxcb1-dev libxdmcp-dev libxt-dev openjdk-11-jdk
 openjdk-11-jdk-headless x11proto-dev xorg-sgml-doctools xtrans-dev
0 upgraded, 15 newly installed, 0 to remove and 4 not upgraded.
Need to get 76.9 MB of archives.
After this operation, 90.6 MB of additional disk space will be used.
Get:1 http://us.archive.ubuntu.com/ubuntu jammy-updates/main amd64 openjdk-11-jdk-headless amd64 11.0.21+9-0ubuntu1~22.04 [73.5 MB]
Get:2 http://us.archive.ubuntu.com/ubuntu jammy/main amd64 default-jdk-headless amd64 2:1.11-72build2 [942 B]
Get:3 http://us.archive.ubuntu.com/ubuntu jammy-updates/main amd64 openjdk-11-jdk amd64 11.0.21+9-0ubuntu1~22.04 [1,327 kB]
Get:4 http://us.archive.ubuntu.com/ubuntu jammy/main amd64 default-jdk amd64 2:1.11-72build2 [908 B]
Get:5 http://us.archive.ubuntu.com/ubuntu jammy/main amd64 xorg-sgml-doctools all 1:1.11-1.1 [10.9 kB]
Get:6 http://us.archive.ubuntu.com/ubuntu jammy/main amd64 x11proto-dev all 2021.5-1 [604 kB]
Get:7 http://us.archive.ubuntu.com/ubuntu jammy/main amd64 libice-dev amd64 2:1.0.10-1build2 [51.4 kB]
Get:8 http://us.archive.ubuntu.com/ubuntu jammy/main amd64 libpthread-stubs0-dev amd64 0.4-1build2 [5,516 B]
Get:9 http://us.archive.ubuntu.com/ubuntu jammy/main amd64 libsm-dev amd64 2:1.2.3-1build2 [18.1 kB]
Get:10 http://us.archive.ubuntu.com/ubuntu jammy/main amd64 libxau-dev amd64 1:1.0.9-1build5 [9,724 B]
Get:11 http://us.archive.ubuntu.com/ubuntu jammy/main amd64 libxdmcp-dev amd64 1:1.1.3-0ubuntu5 [26.5 kB]
Get:12 http://us.archive.ubuntu.com/ubuntu jammy/main amd64 xtrans-dev all 1.4.0-1 [68.9 kB]
Get:13 http://us.archive.ubuntu.com/ubuntu jammy/main amd64 libxcb1-dev amd64 1.14-3ubuntu3 [86.5 kB]
Get:14 http://us.archive.ubuntu.com/ubuntu jammy-updates/main amd64 libx11-dev amd64 2:1.7.5-1ubuntu0.3 [744 kB]
Get:15 http://us.archive.ubuntu.com/ubuntu jammy/main amd64 libxt-dev amd64 1:1.2.1-1 [396 kB]
Fetched 76.9 MB in 6s (12.7 MB/s)
Selecting previously unselected package openjdk-11-jdk-headless:amd64.
(Reading database ... 203527 files and directories currently installed.)
Preparing to unpack .../00-openjdk-11-jdk-headless_11.0.21+9-0ubuntu1~22.04_amd6
4.deb ...
Unpacking openjdk-11-jdk-headless:amd64 (11.0.21+9-0ubuntu1~22.04) ...
Selecting previously unselected package default-jdk-headless.
Preparing to unpack .../01-default-jdk-headless_2%3a1.11-72build2_amd64.deb ...
Unpacking default-jdk-headless (2:1.11-72build2) ...
Selecting previously unselected package openjdk-11-jdk:amd64.
Preparing to unpack .../02-openjdk-11-jdk_11.0.21+9-0ubuntu1~22.04_amd64.deb ...
Unpacking openjdk-11-jdk:amd64 (11.0.21+9-0ubuntu1~22.04) ...
Selecting previously unselected package default-jdk.
Preparing to unpack .../03-default-jdk_2%3a1.11-72build2_amd64.deb ...
Unpacking default-jdk (2:1.11-72build2) ...
Selecting previously unselected package xorg-sgml-doctools.
Preparing to unpack .../04-xorg-sgml-doctools_1%3a1.11-1.1_all.deb ...
Unpacking xorg-sgml-doctools (1:1.11-1.1) ...
Selecting previously unselected package x11proto-dev.
Preparing to unpack .../05-x11proto-dev_2021.5-1_all.deb ...
Unpacking x11proto-dev (2021.5-1) ...
Selecting previously unselected package libice-dev:amd64.
Preparing to unpack .../06-libice-dev_2%3a1.0.10-1build2_amd64.deb ...
Unpacking libice-dev:amd64 (2:1.0.10-1build2) ...
Selecting previously unselected package libpthread-stubs0-dev:amd64.
Preparing to unpack .../07-libpthread-stubs0-dev_0.4-1build2_amd64.deb ...
Unpacking libpthread-stubs0-dev:amd64 (0.4-1build2) ...
Selecting previously unselected package libsm-dev:amd64.
Preparing to unpack .../08-libsm-dev_2%3a1.2.3-1build2_amd64.deb ...
Unpacking libsm-dev:amd64 (2:1.2.3-1build2) ...
Selecting previously unselected package libxau-dev:amd64.
Preparing to unpack .../09-libxau-dev_1%3a1.0.9-1build5_amd64.deb ...
Unpacking libxau-dev:amd64 (1:1.0.9-1build5) ...
Selecting previously unselected package libxdmcp-dev:amd64.
Preparing to unpack .../10-libxdmcp-dev_1%3a1.1.3-0ubuntu5_amd64.deb ...
Unpacking libxdmcp-dev:amd64 (1:1.1.3-0ubuntu5) ...
Selecting previously unselected package xtrans-dev.
Preparing to unpack .../11-xtrans-dev_1.4.0-1_all.deb ...
Unpacking xtrans-dev (1.4.0-1) ...
Selecting previously unselected package libxcb1-dev:amd64.
Preparing to unpack .../12-libxcb1-dev_1.14-3ubuntu3_amd64.deb ...
Unpacking libxcb1-dev:amd64 (1.14-3ubuntu3) ...
Selecting previously unselected package libx11-dev:amd64.
Preparing to unpack .../13-libx11-dev_2%3a1.7.5-1ubuntu0.3_amd64.deb ...
Unpacking libx11-dev:amd64 (2:1.7.5-1ubuntu0.3) ...
Selecting previously unselected package libxt-dev:amd64.
Preparing to unpack .../14-libxt-dev_1%3a1.2.1-1_amd64.deb ...
Unpacking libxt-dev:amd64 (1:1.2.1-1) ...
Setting up openjdk-11-jdk-headless:amd64 (11.0.21+9-0ubuntu1~22.04) ...
update-alternatives: using /usr/lib/jvm/java-11-openjdk-amd64/bin/jar to provide
/usr/bin/jar (jar) in auto mode
update-alternatives: using /usr/lib/jvm/java-11-openjdk-amd64/bin/jarsigner to p
rovide /usr/bin/jarsigner (jarsigner) in auto mode
update-alternatives: using /usr/lib/jvm/java-11-openjdk-amd64/bin/javac to provi
de /usr/bin/javac (javac) in auto mode
update-alternatives: using /usr/lib/jvm/java-11-openjdk-amd64/bin/javadoc to pro
vide /usr/bin/javadoc (javadoc) in auto mode
update-alternatives: using /usr/lib/jvm/java-11-openjdk-amd64/bin/javap to provi
de /usr/bin/javap (javap) in auto mode
update-alternatives: using /usr/lib/jvm/java-11-openjdk-amd64/bin/jcmd to provid
e /usr/bin/jcmd (jcmd) in auto mode
update-alternatives: using /usr/lib/jvm/java-11-openjdk-amd64/bin/jdb to provide
/usr/bin/jdb (jdb) in auto mode
update-alternatives: using /usr/lib/jvm/java-11-openjdk-amd64/bin/jdeprscan to p
rovide /usr/bin/jdeprscan (jdeprscan) in auto mode
update-alternatives: using /usr/lib/jvm/java-11-openjdk-amd64/bin/jdeps to provi
de /usr/bin/jdeps (jdeps) in auto mode
update-alternatives: using /usr/lib/jvm/java-11-openjdk-amd64/bin/jfr to provide
/usr/bin/jfr (jfr) in auto mode
update-alternatives: using /usr/lib/jvm/java-11-openjdk-amd64/bin/jimage to prov
ide /usr/bin/jimage (jimage) in auto mode
update-alternatives: using /usr/lib/jvm/java-11-openjdk-amd64/bin/jinfo to provi
de /usr/bin/jinfo (jinfo) in auto mode
update-alternatives: using /usr/lib/jvm/java-11-openjdk-amd64/bin/jlink to provi
de /usr/bin/jlink (jlink) in auto mode
update-alternatives: using /usr/lib/jvm/java-11-openjdk-amd64/bin/jmap to provid
e /usr/bin/jmap (jmap) in auto mode
update-alternatives: using /usr/lib/jvm/java-11-openjdk-amd64/bin/jmod to provid
e /usr/bin/jmod (jmod) in auto mode
update-alternatives: using /usr/lib/jvm/java-11-openjdk-amd64/bin/jps to provide
/usr/bin/jps (jps) in auto mode
update-alternatives: using /usr/lib/jvm/java-11-openjdk-amd64/bin/jrunscript to
provide /usr/bin/jrunscript (jrunscript) in auto mode
update-alternatives: using /usr/lib/jvm/java-11-openjdk-amd64/bin/jshell to prov
ide /usr/bin/jshell (jshell) in auto mode
update-alternatives: using /usr/lib/jvm/java-11-openjdk-amd64/bin/jstack to prov
ide /usr/bin/jstack (jstack) in auto mode
update-alternatives: using /usr/lib/jvm/java-11-openjdk-amd64/bin/jstat to provi
de /usr/bin/jstat (jstat) in auto mode
update-alternatives: using /usr/lib/jvm/java-11-openjdk-amd64/bin/jstatd to prov
ide /usr/bin/jstatd (jstatd) in auto mode
update-alternatives: using /usr/lib/jvm/java-11-openjdk-amd64/bin/rmic to provid
e /usr/bin/rmic (rmic) in auto mode
update-alternatives: using /usr/lib/jvm/java-11-openjdk-amd64/bin/serialver to p
rovide /usr/bin/serialver (serialver) in auto mode
update-alternatives: using /usr/lib/jvm/java-11-openjdk-amd64/bin/jaotc to provi
de /usr/bin/jaotc (jaotc) in auto mode
update-alternatives: using /usr/lib/jvm/java-11-openjdk-amd64/bin/jhsdb to provi
de /usr/bin/jhsdb (jhsdb) in auto mode
Setting up libpthread-stubs0-dev:amd64 (0.4-1build2) ...
Setting up xtrans-dev (1.4.0-1) ...
Setting up default-jdk-headless (2:1.11-72build2) ...
Setting up openjdk-11-jdk:amd64 (11.0.21+9-0ubuntu1~22.04) ...
update-alternatives: using /usr/lib/jvm/java-11-openjdk-amd64/bin/jconsole to pr
ovide /usr/bin/jconsole (jconsole) in auto mode
Setting up xorg-sgml-doctools (1:1.11-1.1) ...
Setting up default-jdk (2:1.11-72build2) ...
Processing triggers for sgml-base (1.30) ...
Setting up x11proto-dev (2021.5-1) ...
Setting up libxau-dev:amd64 (1:1.0.9-1build5) ...
Setting up libice-dev:amd64 (2:1.0.10-1build2) ...
Setting up libsm-dev:amd64 (2:1.2.3-1build2) ...
Processing triggers for man-db (2.10.2-1) ...
Setting up libxdmcp-dev:amd64 (1:1.1.3-0ubuntu5) ...
Setting up libxcb1-dev:amd64 (1.14-3ubuntu3) ...
Setting up libx11-dev:amd64 (2:1.7.5-1ubuntu0.3) ...
Setting up libxt-dev:amd64 (1:1.2.1-1) ...
- Download SQL Developer from here; and then install SQL Developer to the /opt directory on your Ubuntu local instance:
Use the following command to unzip the SQL Developer files to the /opt directory:
sudo unzip ~/Downloads/sqldeveloper-23.1.0.097.1607-no-jre.zip
- Create the following /usr/local/bin/sqldeveloper symbolic link:
sudo ln -s /opt/sqldeveloper/sqldeveloper.sh /usr/local/bin/sqldeveloper
- Edit the /opt/sqldeveloper/sqldeveloper.sh file by replacing the following line:
cd "`dirname $0`"/sqldeveloper/bin && bash sqldeveloper $*
with this version:
/opt/sqldeveloper/sqldeveloper/bin/sqldeveloper $*
- Now, you can launch SQL Developer from any location on your local Ubuntu operating system, like:
sqldeveloper
- You can now connect as the system user through SQL Developer to the Oracle Database 23c Free Docker instance with the following connection information:
- You can also create a Desktop shortcut by creating the sqldeveloper.desktop file in the /usr/share/applications directory. The SQL Developer icon is provided in the sqldeveloper base directory.
You should create the following sqldeveloper.desktop file to use a Desktop shortcut:
[Desktop Entry]
Name=Oracle SQL Developer
Comment=SQL Developer from Oracle
GenericName=SQL Tool
Exec=/usr/local/bin/sqldeveloper
Icon=/opt/sqldeveloper/icon.png
Type=Application
StartupNotify=true
Categories=Utility;Oracle;Development;SQL;
You can create a sandboxed container c##student user with the instructions from this earlier post on Oracle Database 18c, which remains the correct syntax.
As always, I hope this helps those trying to accomplish this task.
PostgreSQL User Password
Miraculous events happen on my students’ computers almost weekly. For example, one couldn’t remember their student user’s password, which I set by default. How did they change it? They don’t recall.
Assuming you have sudoer authority on a Linux operating system, you can change a PostgreSQL user’s password as follows:
- Assume the root user’s role with the following command:
sudo sh
- As the root user, assume the postgres user’s role with the following command:
su - postgres - As the postgres user, connect to the PostgreSQL database with the following command:
psql -U postgres - Assuming the user’s name is student and you want to set the password to a trivial value like student, use the following command:
ALTER USER student WITH ENCRYPTED PASSWORD 'student';
As always, I hope this helps somebody trying to sort out the syntax and workflow.
Parallels + Ubuntu
Installing Parallels on my iStudio (M2) was straightforward because I let it install Windows 11. Then, when I wanted to install Ubuntu it wasn’t quite that easy. You just need to understand that you click the Parallels’ Window menu option and Control Center option.
The Control Center option provides the following dialog.
Click the + symbol to create a new virtualization and you get the following dialog; and choose the Download Ubuntu with x86_64 emulation if you want to install a Docker image that’s not ported to ARM, like the Oracle Database 19c.
It’ll then explain in this dialog that is uses Apple’s Rosetta 2 technology, which means you should be able to install an Intel architecture Docker image with Oracle Database 23c.
As always, I hope this helps those trying to sort out how to leverage a new stack.
