Oracle23ai Ubuntu Install

What to do with a Late 2015 iMac with an i7 Quad CPU running at 3.4 GHz, 32 GB or RAM, a 5K Display and an almost warn out hybrid 1 TB hard disk? You could sell it to Apple for pennies, but why enrich them. I opted to upgrade it with an OWC kit that had a 2 TB SSD Disk. Then, I installed Ubuntu 22.0.4 and built a DaaS (Database as a Service) machine with Oracle Database 23ai in a Docker container, and MySQL 8 and PostgreSQL 14 natively.
I’ve posted on installing MySQL 8 and PostgreSQL 14 on Ubuntu before when I repurposed my late 2014 MacBook Pro. This post covers the installation of Docker and Oracle Database 23ai.
Install Docker
Contrary to the instructions, you should do the following as a sudoer user:
sudo apt install -y docker.io |
Install all dependency packages using the following command:
sudo snap install docker |
You should see the following:
docker 20.10.24 from Canonical✓ installed |
You can verify the Docker install with the following command:
sudo docker --version |
It should show something like this:
Docker version 24.0.5, build 24.0.5-0ubuntu1~22.04.1 |
You can check the pulled containers with the following command but at this point there should be no pulled containers.
sudo docker images |
At this point, a docker group already exists but you need to add your user to the docker group with the following command:
sudo usermod -aG docker $USER |
Using the Docker Commands:
- To activate the logging, utilize the -f parameter.
- To divide JSON, use Docker by default; to extract individual keys, use JQ.
- In your Container file, there are quite a few areas where commands may be specified.
- Posting to the volumes could be more effective while the picture is being built.
- Docker offers a highly efficient way to create an alias for its own built-in commands. This makes it easier to set up and handle lengthy and enormous orders. These alias values are stored in the directories /.bashrc or and /.bash_aliases.
- Docker offers further assistance to remove unused code fragments from the installation of the container.
- Docker always favors reading statements from the container file that have not changed. Therefore, time savings may be realized by arranging what is shown in the container file in a way that ensures the elements that are susceptible to change are shown towards the end of the document and those that are most likely to undergo change are shown at the top.
Install Oracle Database 23ai Free in a Docker container
Use the following command to pull and install the Oracle Database 23ai container:
sudo docker run --name oracle23ai -p 1521:1521 -p 5500:5500 -e ORACLE_PWD=cangetin container-registry.oracle.com/database/free:latest |
After installing the Oracle Database 23ai Free container, you can access it as the root user by default with this syntax:
docker exec -it -u root oracle23ai bash |
At the root prompt, you can connect to the system schema with the following command:
sqlplus system/cangetin@FREE |
You should see the following:
SQL*Plus: RELEASE 23.0.0.0.0 - Production ON Thu May 9 03:56:57 2024 Version 23.4.0.24.05 Copyright (c) 1982, 2024, Oracle. ALL rights reserved. LAST SUCCESSFUL login TIME: Wed Apr 24 2024 21:23:00 +00:00 Connected TO: Oracle DATABASE 23ai Free RELEASE 23.0.0.0.0 - Develop, Learn, AND Run FOR Free Version 23.4.0.24.05 SQL> |
Create a c##student as a sandbox user:
After you create and provision the Oracle Database 21ai Free, you can create a c##student sand-boxed user with the following two step process.
- Create a c##student Oracle user account with the following command as the system user:
CREATE USER c##student IDENTIFIED BY student
DEFAULT TABLESPACE users QUOTA 200M ON users
TEMPORARY TABLESPACE temp;
- Grant necessary privileges to the newly created c##student user:
GRANT CREATE CLUSTER, CREATE INDEXTYPE, CREATE OPERATOR
,     CREATE PROCEDURE, CREATE SEQUENCE, CREATE SESSION
,     CREATE TABLE, CREATE TRIGGER, CREATE TYPE
,     CREATE VIEW TO c##student;
- Connect to the sandboxed user with the following syntax (by the way it’s a pluggable user account as qualified in Oracle Database 12c forward):
SQL> CONNECT c##student/student@FREE
or, disconnect and reconnect with this syntax:
sqlplus system/cangetin@FREE
Set Docker Oracle 23ai to start always
Assuming that your container name was oracle23ai, as qualified above, you can run the following command to automatically restart the Docker container:
docker update --restart=always `docker ps -aqf "name=oracle23ai"` |
The docker command inside the backquotes uses the Docker instance’s name to return the Docker container_id value, which can also be seen when you run the following command:
docker ps |
which returns:
CONTAINER ID IMAGE COMMAND CREATED STATUS PORTS NAMES b211f494e692 container-registry.oracle.com/database/free:latest "/bin/bash -c $ORACL…" 13 days ago Up 18 minutes (healthy) 0.0.0.0:1521->1521/tcp, :::1521->1521/tcp, 0.0.0.0:5500->5500/tcp, :::5500->5500/tcp oracle23ai |
The Docker container_id value is required when you perform a Docker update operation.
Configuring your Docker Oracle 23ai environment
Unless you like memorizing the Docker command-line, you may automate connecting as the root user or add a sand boxed user. The root user typically has more power than you need to perform ordinary development and use-case testing tasks.
A sand boxed user has narrow access, can’t start and stop the database instance or perform Oracle Datasbase 23ai administration. In this segment, you’ll learn how to create a couple local Bash functions to simplify your use of the Oracle Database 23ai container; and how to extend the configuration of Oracle’s Docker container:
- Adding a student user to the Docker container and configuring it to access the Oracle Database 23ai locally from within the Docker container using a direct sqlplus connection.
- Configuring the Docker container to support external files and leverage a shared directory with your base operating system.
Automating Docker instance connections:
The following shows you how to add a local Bash function to automate access to the Docker container from the Linux command-line. You put the following Bash function in your base Linux operating system’s user .bashrc file:
- Create the following Bash function:
# User defined function to launch Oracle 23 ai container
# as the root user.
admin ()
{
    # Discover the fully qualified program name.
    path=`which docker 2>/dev/null`
    file=''

    # Parse the program name from the path.
    if [ -n ${path} ]; then
        file=${path##/*/}
    fi

    # Wrap when there is a file and it is rewrap.
    if [ -n ${file} ] && [[ ${file} = "docker" ]]; then
        python -c "import subprocess; subprocess.run(['docker exec -it --user root oracle23ai bash'], shell=True)"
    else
        echo "Docker is unavailable: Install the docker package."
    fi
}
- After you source the .bashrc file or simply reconnect as to the terminal as your user, which resources the .bashrc file, you can access the oracle23ai Docker instance with this command:
admin
It will display a new prompt with the root user and the Docker container_id value, like:
[root@b211f494e692 oracle]#
You can exit the Docker container by typing exit at the Linux command line. If you curious what version of Linux you’re using inside the Docker instance, you can’t use the uname command because it returns the hosting Linux distribution (distro). You must use the following when inside the Docker instance:
cat /etc/os-release
or, outside the Docker instance you can use the following docker command:
docker exec oracle23ai cat /etc/os-release
Either way, for an Oracle Database 23ai container, it should return:
NAME="Oracle Linux Server"
VERSION="8.9"
ID="ol"
ID_LIKE="fedora"
VARIANT="Server"
VARIANT_ID="server"
VERSION_ID="8.9"
PLATFORM_ID="platform:el8"
PRETTY_NAME="Oracle Linux Server 8.9"
ANSI_COLOR="0;31"
CPE_NAME="cpe:/o:oracle:linux:8:9:server"
HOME_URL="https://linux.oracle.com/"
BUG_REPORT_URL="https://github.com/oracle/oracle-linux"

ORACLE_BUGZILLA_PRODUCT="Oracle Linux 8"
ORACLE_BUGZILLA_PRODUCT_VERSION=8.9
ORACLE_SUPPORT_PRODUCT="Oracle Linux"
ORACLE_SUPPORT_PRODUCT_VERSION=8.9
Unfortunately, Oracle has appeared to block updates to the Oracle Unbreakable Linux 8 instance inside the container, which makes native SQL*Plus use more difficult. That’s because you’ll need to install the Oracle SQL*Plus client in the hosting Operating System.
I’ve written a separate blog post that instructs you on how to install and use Oracle SQL*Plus client on Ubuntu.
Install SQL Developer in the base Linux operating system
The first steps are installing the Java Runtime Environment and Java Development Kit, and then downloading, installing and configuring SQL Developer. These are the required steps:
- Install the Java Runtime Environment:
sudo apt install default-jre
The log file for this is:
Display detailed console log →
Reading package lists... Done
Building dependency tree... Done
Reading state information... Done
The following additional packages will be installed:
 ca-certificates-java default-jre-headless fonts-dejavu-extra java-common
 libatk-wrapper-java libatk-wrapper-java-jni openjdk-11-jre
 openjdk-11-jre-headless
Suggested packages:
 fonts-ipafont-gothic fonts-ipafont-mincho fonts-wqy-microhei
 | fonts-wqy-zenhei
The following NEW packages will be installed:
 ca-certificates-java default-jre default-jre-headless fonts-dejavu-extra
 java-common libatk-wrapper-java libatk-wrapper-java-jni openjdk-11-jre
 openjdk-11-jre-headless
0 upgraded, 9 newly installed, 0 to remove and 4 not upgraded.
Need to get 44.9 MB of archives.
After this operation, 185 MB of additional disk space will be used.
Do you want to continue? [Y/n] Y
Get:1 http://us.archive.ubuntu.com/ubuntu jammy/main amd64 java-common all 0.72build2 [6,782 B]
Get:2 http://us.archive.ubuntu.com/ubuntu jammy-updates/main amd64 openjdk-11-jre-headless amd64 11.0.21+9-0ubuntu1~22.04 [42.5 MB]
Get:3 http://us.archive.ubuntu.com/ubuntu jammy/main amd64 default-jre-headless amd64 2:1.11-72build2 [3,042 B]
Get:4 http://us.archive.ubuntu.com/ubuntu jammy-updates/main amd64 ca-certificates-java all 20190909ubuntu1.2 [12.1 kB]
Get:5 http://us.archive.ubuntu.com/ubuntu jammy-updates/main amd64 openjdk-11-jre amd64 11.0.21+9-0ubuntu1~22.04 [214 kB]
Get:6 http://us.archive.ubuntu.com/ubuntu jammy/main amd64 default-jre amd64 2:1.11-72build2 [896 B]
Get:7 http://us.archive.ubuntu.com/ubuntu jammy/main amd64 fonts-dejavu-extra all 2.37-2build1 [2,041 kB]
Get:8 http://us.archive.ubuntu.com/ubuntu jammy/main amd64 libatk-wrapper-java all 0.38.0-5build1 [53.1 kB]
Get:9 http://us.archive.ubuntu.com/ubuntu jammy/main amd64 libatk-wrapper-java-jni amd64 0.38.0-5build1 [49.0 kB]
Fetched 44.9 MB in 14s (3,270 kB/s)
Selecting previously unselected package java-common.
(Reading database ... 203118 files and directories currently installed.)
Preparing to unpack .../0-java-common_0.72build2_all.deb ...
Unpacking java-common (0.72build2) ...
Selecting previously unselected package openjdk-11-jre-headless:amd64.
Preparing to unpack .../1-openjdk-11-jre-headless_11.0.21+9-0ubuntu1~22.04_amd64
.deb ...
Unpacking openjdk-11-jre-headless:amd64 (11.0.21+9-0ubuntu1~22.04) ...
Selecting previously unselected package default-jre-headless.
Preparing to unpack .../2-default-jre-headless_2%3a1.11-72build2_amd64.deb ...
Unpacking default-jre-headless (2:1.11-72build2) ...
Selecting previously unselected package ca-certificates-java.
Preparing to unpack .../3-ca-certificates-java_20190909ubuntu1.2_all.deb ...
Unpacking ca-certificates-java (20190909ubuntu1.2) ...
Selecting previously unselected package openjdk-11-jre:amd64.
Preparing to unpack .../4-openjdk-11-jre_11.0.21+9-0ubuntu1~22.04_amd64.deb ...
Unpacking openjdk-11-jre:amd64 (11.0.21+9-0ubuntu1~22.04) ...
Selecting previously unselected package default-jre.
Preparing to unpack .../5-default-jre_2%3a1.11-72build2_amd64.deb ...
Unpacking default-jre (2:1.11-72build2) ...
Selecting previously unselected package fonts-dejavu-extra.
Preparing to unpack .../6-fonts-dejavu-extra_2.37-2build1_all.deb ...
Unpacking fonts-dejavu-extra (2.37-2build1) ...
Selecting previously unselected package libatk-wrapper-java.
Preparing to unpack .../7-libatk-wrapper-java_0.38.0-5build1_all.deb ...
Unpacking libatk-wrapper-java (0.38.0-5build1) ...
Selecting previously unselected package libatk-wrapper-java-jni:amd64.
Preparing to unpack .../8-libatk-wrapper-java-jni_0.38.0-5build1_amd64.deb ...
Unpacking libatk-wrapper-java-jni:amd64 (0.38.0-5build1) ...
Setting up java-common (0.72build2) ...
Setting up fonts-dejavu-extra (2.37-2build1) ...
Setting up libatk-wrapper-java (0.38.0-5build1) ...
Setting up libatk-wrapper-java-jni:amd64 (0.38.0-5build1) ...
Setting up default-jre-headless (2:1.11-72build2) ...
Setting up openjdk-11-jre-headless:amd64 (11.0.21+9-0ubuntu1~22.04) ...
update-alternatives: using /usr/lib/jvm/java-11-openjdk-amd64/bin/java to provid
e /usr/bin/java (java) in auto mode
update-alternatives: using /usr/lib/jvm/java-11-openjdk-amd64/bin/jjs to provide
/usr/bin/jjs (jjs) in auto mode
update-alternatives: using /usr/lib/jvm/java-11-openjdk-amd64/bin/keytool to pro
vide /usr/bin/keytool (keytool) in auto mode
update-alternatives: using /usr/lib/jvm/java-11-openjdk-amd64/bin/rmid to provid
e /usr/bin/rmid (rmid) in auto mode
update-alternatives: using /usr/lib/jvm/java-11-openjdk-amd64/bin/rmiregistry to
provide /usr/bin/rmiregistry (rmiregistry) in auto mode
update-alternatives: using /usr/lib/jvm/java-11-openjdk-amd64/bin/pack200 to pro
vide /usr/bin/pack200 (pack200) in auto mode
update-alternatives: using /usr/lib/jvm/java-11-openjdk-amd64/bin/unpack200 to p
rovide /usr/bin/unpack200 (unpack200) in auto mode
update-alternatives: using /usr/lib/jvm/java-11-openjdk-amd64/lib/jexec to provi
de /usr/bin/jexec (jexec) in auto mode
Setting up openjdk-11-jre:amd64 (11.0.21+9-0ubuntu1~22.04) ...
Setting up default-jre (2:1.11-72build2) ...
Setting up ca-certificates-java (20190909ubuntu1.2) ...
head: cannot open '/etc/ssl/certs/java/cacerts' for reading: No such file or dir
ectory
Adding debian:QuoVadis_Root_CA_1_G3.pem
Adding debian:GlobalSign_Root_E46.pem
Adding debian:T-TeleSec_GlobalRoot_Class_3.pem
Adding debian:Certum_Trusted_Network_CA.pem
Adding debian:Buypass_Class_2_Root_CA.pem
Adding debian:NetLock_Arany_=Class_Gold=_Főtanúsítvány.pem
Adding debian:e-Szigno_Root_CA_2017.pem
Adding debian:emSign_Root_CA_-_G1.pem
Adding debian:D-TRUST_BR_Root_CA_1_2020.pem
Adding debian:Hongkong_Post_Root_CA_3.pem
Adding debian:GlobalSign_ECC_Root_CA_-_R4.pem
Adding debian:NAVER_Global_Root_Certification_Authority.pem
Adding debian:UCA_Extended_Validation_Root.pem
Adding debian:AffirmTrust_Premium.pem
Adding debian:Entrust_Root_Certification_Authority.pem
Adding debian:DigiCert_Trusted_Root_G4.pem
Adding debian:CFCA_EV_ROOT.pem
Adding debian:ePKI_Root_Certification_Authority.pem
Adding debian:Hellenic_Academic_and_Research_Institutions_ECC_RootCA_2015.pem
Adding debian:HARICA_TLS_RSA_Root_CA_2021.pem
Adding debian:GlobalSign_Root_CA_-_R6.pem
Adding debian:TWCA_Global_Root_CA.pem
Adding debian:Trustwave_Global_ECC_P384_Certification_Authority.pem
Adding debian:ISRG_Root_X1.pem
Adding debian:Starfield_Services_Root_Certificate_Authority_-_G2.pem
Adding debian:QuoVadis_Root_CA_3.pem
Adding debian:Security_Communication_Root_CA.pem
Adding debian:DigiCert_TLS_RSA4096_Root_G5.pem
Adding debian:Entrust_Root_Certification_Authority_-_EC1.pem
Adding debian:Security_Communication_RootCA3.pem
Adding debian:TeliaSonera_Root_CA_v1.pem
Adding debian:vTrus_ECC_Root_CA.pem
Adding debian:AC_RAIZ_FNMT-RCM_SERVIDORES_SEGUROS.pem
Adding debian:Certum_EC-384_CA.pem
Adding debian:Microsec_e-Szigno_Root_CA_2009.pem
Adding debian:ssl-cert-snakeoil.pem
Adding debian:USERTrust_ECC_Certification_Authority.pem
Adding debian:CA_Disig_Root_R2.pem
Adding debian:Certum_Trusted_Network_CA_2.pem
Adding debian:ACCVRAIZ1.pem
Adding debian:TunTrust_Root_CA.pem
Adding debian:Buypass_Class_3_Root_CA.pem
Adding debian:D-TRUST_Root_Class_3_CA_2_2009.pem
Adding debian:Security_Communication_ECC_RootCA1.pem
Adding debian:GTS_Root_R2.pem
Adding debian:Certigna.pem
Adding debian:SSL.com_EV_Root_Certification_Authority_RSA_R2.pem
Adding debian:Entrust.net_Premium_2048_Secure_Server_CA.pem
Adding debian:E-Tugra_Global_Root_CA_ECC_v3.pem
Adding debian:Hongkong_Post_Root_CA_1.pem
Adding debian:SZAFIR_ROOT_CA2.pem
Adding debian:TUBITAK_Kamu_SM_SSL_Kok_Sertifikasi_-_Surum_1.pem
Adding debian:Atos_TrustedRoot_2011.pem
Adding debian:DigiCert_High_Assurance_EV_Root_CA.pem
Adding debian:emSign_Root_CA_-_C1.pem
Adding debian:Go_Daddy_Root_Certificate_Authority_-_G2.pem
Adding debian:GDCA_TrustAUTH_R5_ROOT.pem
Adding debian:GlobalSign_Root_CA_-_R3.pem
Adding debian:DigiCert_Assured_ID_Root_G3.pem
Adding debian:Autoridad_de_Certificacion_Firmaprofesional_CIF_A62634068_2.pem
Adding debian:Certainly_Root_R1.pem
Adding debian:vTrus_Root_CA.pem
Adding debian:Certainly_Root_E1.pem
Adding debian:Autoridad_de_Certificacion_Firmaprofesional_CIF_A62634068.pem
Adding debian:TWCA_Root_Certification_Authority.pem
Adding debian:Starfield_Root_Certificate_Authority_-_G2.pem
Adding debian:Amazon_Root_CA_3.pem
Adding debian:GTS_Root_R1.pem
Adding debian:SwissSign_Gold_CA_-_G2.pem
Adding debian:Certum_Trusted_Root_CA.pem
Adding debian:Hellenic_Academic_and_Research_Institutions_RootCA_2015.pem
Adding debian:AffirmTrust_Networking.pem
Adding debian:emSign_ECC_Root_CA_-_G3.pem
Adding debian:HARICA_TLS_ECC_Root_CA_2021.pem
Adding debian:certSIGN_ROOT_CA.pem
Adding debian:Actalis_Authentication_Root_CA.pem
Adding debian:SSL.com_Root_Certification_Authority_RSA.pem
Adding debian:Certigna_Root_CA.pem
Adding debian:XRamp_Global_CA_Root.pem
Adding debian:Baltimore_CyberTrust_Root.pem
Adding debian:Trustwave_Global_ECC_P256_Certification_Authority.pem
Adding debian:QuoVadis_Root_CA_2_G3.pem
Adding debian:GTS_Root_R3.pem
Adding debian:COMODO_RSA_Certification_Authority.pem
Adding debian:ISRG_Root_X2.pem
Adding debian:SwissSign_Silver_CA_-_G2.pem
Adding debian:IdenTrust_Public_Sector_Root_CA_1.pem
Adding debian:Microsoft_ECC_Root_Certificate_Authority_2017.pem
Adding debian:UCA_Global_G2_Root.pem
Adding debian:DigiCert_Assured_ID_Root_CA.pem
Adding debian:Entrust_Root_Certification_Authority_-_G2.pem
Adding debian:QuoVadis_Root_CA_2.pem
Adding debian:Trustwave_Global_Certification_Authority.pem
Adding debian:OISTE_WISeKey_Global_Root_GB_CA.pem
Adding debian:HiPKI_Root_CA_-_G1.pem
Adding debian:E-Tugra_Certification_Authority.pem
Adding debian:GTS_Root_R4.pem
Adding debian:Amazon_Root_CA_2.pem
Adding debian:Amazon_Root_CA_1.pem
Adding debian:SecureTrust_CA.pem
Adding debian:GlobalSign_Root_R46.pem
Adding debian:IdenTrust_Commercial_Root_CA_1.pem
Adding debian:DigiCert_Global_Root_G2.pem
Adding debian:Comodo_AAA_Services_root.pem
Adding debian:SSL.com_Root_Certification_Authority_ECC.pem
Adding debian:T-TeleSec_GlobalRoot_Class_2.pem
Adding debian:Starfield_Class_2_CA.pem
Adding debian:DigiCert_Global_Root_CA.pem
Adding debian:SecureSign_RootCA11.pem
Adding debian:certSIGN_Root_CA_G2.pem
Adding debian:DigiCert_TLS_ECC_P384_Root_G5.pem
Adding debian:Entrust_Root_Certification_Authority_-_G4.pem
Adding debian:OISTE_WISeKey_Global_Root_GC_CA.pem
Adding debian:DigiCert_Global_Root_G3.pem
Adding debian:Secure_Global_CA.pem
Adding debian:Microsoft_RSA_Root_Certificate_Authority_2017.pem
Adding debian:DigiCert_Assured_ID_Root_G2.pem
Adding debian:Telia_Root_CA_v2.pem
Adding debian:emSign_ECC_Root_CA_-_C3.pem
Adding debian:COMODO_Certification_Authority.pem
Adding debian:AffirmTrust_Premium_ECC.pem
Adding debian:GLOBALTRUST_2020.pem
Adding debian:E-Tugra_Global_Root_CA_RSA_v3.pem
Adding debian:Amazon_Root_CA_4.pem
Adding debian:COMODO_ECC_Certification_Authority.pem
Adding debian:AffirmTrust_Commercial.pem
Adding debian:SSL.com_EV_Root_Certification_Authority_ECC.pem
Adding debian:AC_RAIZ_FNMT-RCM.pem
Adding debian:Go_Daddy_Class_2_CA.pem
Adding debian:QuoVadis_Root_CA_3_G3.pem
Adding debian:D-TRUST_EV_Root_CA_1_2020.pem
Adding debian:GlobalSign_Root_CA.pem
Adding debian:GlobalSign_ECC_Root_CA_-_R5.pem
Adding debian:USERTrust_RSA_Certification_Authority.pem
Adding debian:D-TRUST_Root_Class_3_CA_2_EV_2009.pem
Adding debian:Izenpe.com.pem
Adding debian:ANF_Secure_Server_Root_CA.pem
Adding debian:Security_Communication_RootCA2.pem
done.
Processing triggers for mailcap (3.70+nmu1ubuntu1) ...
Processing triggers for fontconfig (2.13.1-4.2ubuntu5) ...
Processing triggers for desktop-file-utils (0.26-1ubuntu3) ...
Processing triggers for hicolor-icon-theme (0.17-2) ...
Processing triggers for gnome-menus (3.36.0-1ubuntu3) ...
Processing triggers for man-db (2.10.2-1) ...
Processing triggers for ca-certificates (20230311ubuntu0.22.04.1) ...
Updating certificates in /etc/ssl/certs...
0 added, 0 removed; done.
Running hooks in /etc/ca-certificates/update.d...

done.
done.
- Install the Java Runtime Environment:
sudo apt install -y default-idk
The log file for this is:
Display detailed console log →
Reading package lists... Done
Building dependency tree... Done
Reading state information... Done
The following additional packages will be installed:
 default-jdk-headless libice-dev libpthread-stubs0-dev libsm-dev libx11-dev
 libxau-dev libxcb1-dev libxdmcp-dev libxt-dev openjdk-11-jdk
 openjdk-11-jdk-headless x11proto-dev xorg-sgml-doctools xtrans-dev
Suggested packages:
 libice-doc libsm-doc libx11-doc libxcb-doc libxt-doc openjdk-11-demo
 openjdk-11-source visualvm
The following NEW packages will be installed:
 default-jdk default-jdk-headless libice-dev libpthread-stubs0-dev libsm-dev
 libx11-dev libxau-dev libxcb1-dev libxdmcp-dev libxt-dev openjdk-11-jdk
 openjdk-11-jdk-headless x11proto-dev xorg-sgml-doctools xtrans-dev
0 upgraded, 15 newly installed, 0 to remove and 4 not upgraded.
Need to get 76.9 MB of archives.
After this operation, 90.6 MB of additional disk space will be used.
Get:1 http://us.archive.ubuntu.com/ubuntu jammy-updates/main amd64 openjdk-11-jdk-headless amd64 11.0.21+9-0ubuntu1~22.04 [73.5 MB]
Get:2 http://us.archive.ubuntu.com/ubuntu jammy/main amd64 default-jdk-headless amd64 2:1.11-72build2 [942 B]
Get:3 http://us.archive.ubuntu.com/ubuntu jammy-updates/main amd64 openjdk-11-jdk amd64 11.0.21+9-0ubuntu1~22.04 [1,327 kB]
Get:4 http://us.archive.ubuntu.com/ubuntu jammy/main amd64 default-jdk amd64 2:1.11-72build2 [908 B]
Get:5 http://us.archive.ubuntu.com/ubuntu jammy/main amd64 xorg-sgml-doctools all 1:1.11-1.1 [10.9 kB]
Get:6 http://us.archive.ubuntu.com/ubuntu jammy/main amd64 x11proto-dev all 2021.5-1 [604 kB]
Get:7 http://us.archive.ubuntu.com/ubuntu jammy/main amd64 libice-dev amd64 2:1.0.10-1build2 [51.4 kB]
Get:8 http://us.archive.ubuntu.com/ubuntu jammy/main amd64 libpthread-stubs0-dev amd64 0.4-1build2 [5,516 B]
Get:9 http://us.archive.ubuntu.com/ubuntu jammy/main amd64 libsm-dev amd64 2:1.2.3-1build2 [18.1 kB]
Get:10 http://us.archive.ubuntu.com/ubuntu jammy/main amd64 libxau-dev amd64 1:1.0.9-1build5 [9,724 B]
Get:11 http://us.archive.ubuntu.com/ubuntu jammy/main amd64 libxdmcp-dev amd64 1:1.1.3-0ubuntu5 [26.5 kB]
Get:12 http://us.archive.ubuntu.com/ubuntu jammy/main amd64 xtrans-dev all 1.4.0-1 [68.9 kB]
Get:13 http://us.archive.ubuntu.com/ubuntu jammy/main amd64 libxcb1-dev amd64 1.14-3ubuntu3 [86.5 kB]
Get:14 http://us.archive.ubuntu.com/ubuntu jammy-updates/main amd64 libx11-dev amd64 2:1.7.5-1ubuntu0.3 [744 kB]
Get:15 http://us.archive.ubuntu.com/ubuntu jammy/main amd64 libxt-dev amd64 1:1.2.1-1 [396 kB]
Fetched 76.9 MB in 6s (12.7 MB/s)
Selecting previously unselected package openjdk-11-jdk-headless:amd64.
(Reading database ... 203527 files and directories currently installed.)
Preparing to unpack .../00-openjdk-11-jdk-headless_11.0.21+9-0ubuntu1~22.04_amd6
4.deb ...
Unpacking openjdk-11-jdk-headless:amd64 (11.0.21+9-0ubuntu1~22.04) ...
Selecting previously unselected package default-jdk-headless.
Preparing to unpack .../01-default-jdk-headless_2%3a1.11-72build2_amd64.deb ...
Unpacking default-jdk-headless (2:1.11-72build2) ...
Selecting previously unselected package openjdk-11-jdk:amd64.
Preparing to unpack .../02-openjdk-11-jdk_11.0.21+9-0ubuntu1~22.04_amd64.deb ...
Unpacking openjdk-11-jdk:amd64 (11.0.21+9-0ubuntu1~22.04) ...
Selecting previously unselected package default-jdk.
Preparing to unpack .../03-default-jdk_2%3a1.11-72build2_amd64.deb ...
Unpacking default-jdk (2:1.11-72build2) ...
Selecting previously unselected package xorg-sgml-doctools.
Preparing to unpack .../04-xorg-sgml-doctools_1%3a1.11-1.1_all.deb ...
Unpacking xorg-sgml-doctools (1:1.11-1.1) ...
Selecting previously unselected package x11proto-dev.
Preparing to unpack .../05-x11proto-dev_2021.5-1_all.deb ...
Unpacking x11proto-dev (2021.5-1) ...
Selecting previously unselected package libice-dev:amd64.
Preparing to unpack .../06-libice-dev_2%3a1.0.10-1build2_amd64.deb ...
Unpacking libice-dev:amd64 (2:1.0.10-1build2) ...
Selecting previously unselected package libpthread-stubs0-dev:amd64.
Preparing to unpack .../07-libpthread-stubs0-dev_0.4-1build2_amd64.deb ...
Unpacking libpthread-stubs0-dev:amd64 (0.4-1build2) ...
Selecting previously unselected package libsm-dev:amd64.
Preparing to unpack .../08-libsm-dev_2%3a1.2.3-1build2_amd64.deb ...
Unpacking libsm-dev:amd64 (2:1.2.3-1build2) ...
Selecting previously unselected package libxau-dev:amd64.
Preparing to unpack .../09-libxau-dev_1%3a1.0.9-1build5_amd64.deb ...
Unpacking libxau-dev:amd64 (1:1.0.9-1build5) ...
Selecting previously unselected package libxdmcp-dev:amd64.
Preparing to unpack .../10-libxdmcp-dev_1%3a1.1.3-0ubuntu5_amd64.deb ...
Unpacking libxdmcp-dev:amd64 (1:1.1.3-0ubuntu5) ...
Selecting previously unselected package xtrans-dev.
Preparing to unpack .../11-xtrans-dev_1.4.0-1_all.deb ...
Unpacking xtrans-dev (1.4.0-1) ...
Selecting previously unselected package libxcb1-dev:amd64.
Preparing to unpack .../12-libxcb1-dev_1.14-3ubuntu3_amd64.deb ...
Unpacking libxcb1-dev:amd64 (1.14-3ubuntu3) ...
Selecting previously unselected package libx11-dev:amd64.
Preparing to unpack .../13-libx11-dev_2%3a1.7.5-1ubuntu0.3_amd64.deb ...
Unpacking libx11-dev:amd64 (2:1.7.5-1ubuntu0.3) ...
Selecting previously unselected package libxt-dev:amd64.
Preparing to unpack .../14-libxt-dev_1%3a1.2.1-1_amd64.deb ...
Unpacking libxt-dev:amd64 (1:1.2.1-1) ...
Setting up openjdk-11-jdk-headless:amd64 (11.0.21+9-0ubuntu1~22.04) ...
update-alternatives: using /usr/lib/jvm/java-11-openjdk-amd64/bin/jar to provide
/usr/bin/jar (jar) in auto mode
update-alternatives: using /usr/lib/jvm/java-11-openjdk-amd64/bin/jarsigner to p
rovide /usr/bin/jarsigner (jarsigner) in auto mode
update-alternatives: using /usr/lib/jvm/java-11-openjdk-amd64/bin/javac to provi
de /usr/bin/javac (javac) in auto mode
update-alternatives: using /usr/lib/jvm/java-11-openjdk-amd64/bin/javadoc to pro
vide /usr/bin/javadoc (javadoc) in auto mode
update-alternatives: using /usr/lib/jvm/java-11-openjdk-amd64/bin/javap to provi
de /usr/bin/javap (javap) in auto mode
update-alternatives: using /usr/lib/jvm/java-11-openjdk-amd64/bin/jcmd to provid
e /usr/bin/jcmd (jcmd) in auto mode
update-alternatives: using /usr/lib/jvm/java-11-openjdk-amd64/bin/jdb to provide
/usr/bin/jdb (jdb) in auto mode
update-alternatives: using /usr/lib/jvm/java-11-openjdk-amd64/bin/jdeprscan to p
rovide /usr/bin/jdeprscan (jdeprscan) in auto mode
update-alternatives: using /usr/lib/jvm/java-11-openjdk-amd64/bin/jdeps to provi
de /usr/bin/jdeps (jdeps) in auto mode
update-alternatives: using /usr/lib/jvm/java-11-openjdk-amd64/bin/jfr to provide
/usr/bin/jfr (jfr) in auto mode
update-alternatives: using /usr/lib/jvm/java-11-openjdk-amd64/bin/jimage to prov
ide /usr/bin/jimage (jimage) in auto mode
update-alternatives: using /usr/lib/jvm/java-11-openjdk-amd64/bin/jinfo to provi
de /usr/bin/jinfo (jinfo) in auto mode
update-alternatives: using /usr/lib/jvm/java-11-openjdk-amd64/bin/jlink to provi
de /usr/bin/jlink (jlink) in auto mode
update-alternatives: using /usr/lib/jvm/java-11-openjdk-amd64/bin/jmap to provid
e /usr/bin/jmap (jmap) in auto mode
update-alternatives: using /usr/lib/jvm/java-11-openjdk-amd64/bin/jmod to provid
e /usr/bin/jmod (jmod) in auto mode
update-alternatives: using /usr/lib/jvm/java-11-openjdk-amd64/bin/jps to provide
/usr/bin/jps (jps) in auto mode
update-alternatives: using /usr/lib/jvm/java-11-openjdk-amd64/bin/jrunscript to
provide /usr/bin/jrunscript (jrunscript) in auto mode
update-alternatives: using /usr/lib/jvm/java-11-openjdk-amd64/bin/jshell to prov
ide /usr/bin/jshell (jshell) in auto mode
update-alternatives: using /usr/lib/jvm/java-11-openjdk-amd64/bin/jstack to prov
ide /usr/bin/jstack (jstack) in auto mode
update-alternatives: using /usr/lib/jvm/java-11-openjdk-amd64/bin/jstat to provi
de /usr/bin/jstat (jstat) in auto mode
update-alternatives: using /usr/lib/jvm/java-11-openjdk-amd64/bin/jstatd to prov
ide /usr/bin/jstatd (jstatd) in auto mode
update-alternatives: using /usr/lib/jvm/java-11-openjdk-amd64/bin/rmic to provid
e /usr/bin/rmic (rmic) in auto mode
update-alternatives: using /usr/lib/jvm/java-11-openjdk-amd64/bin/serialver to p
rovide /usr/bin/serialver (serialver) in auto mode
update-alternatives: using /usr/lib/jvm/java-11-openjdk-amd64/bin/jaotc to provi
de /usr/bin/jaotc (jaotc) in auto mode
update-alternatives: using /usr/lib/jvm/java-11-openjdk-amd64/bin/jhsdb to provi
de /usr/bin/jhsdb (jhsdb) in auto mode
Setting up libpthread-stubs0-dev:amd64 (0.4-1build2) ...
Setting up xtrans-dev (1.4.0-1) ...
Setting up default-jdk-headless (2:1.11-72build2) ...
Setting up openjdk-11-jdk:amd64 (11.0.21+9-0ubuntu1~22.04) ...
update-alternatives: using /usr/lib/jvm/java-11-openjdk-amd64/bin/jconsole to pr
ovide /usr/bin/jconsole (jconsole) in auto mode
Setting up xorg-sgml-doctools (1:1.11-1.1) ...
Setting up default-jdk (2:1.11-72build2) ...
Processing triggers for sgml-base (1.30) ...
Setting up x11proto-dev (2021.5-1) ...
Setting up libxau-dev:amd64 (1:1.0.9-1build5) ...
Setting up libice-dev:amd64 (2:1.0.10-1build2) ...
Setting up libsm-dev:amd64 (2:1.2.3-1build2) ...
Processing triggers for man-db (2.10.2-1) ...
Setting up libxdmcp-dev:amd64 (1:1.1.3-0ubuntu5) ...
Setting up libxcb1-dev:amd64 (1.14-3ubuntu3) ...
Setting up libx11-dev:amd64 (2:1.7.5-1ubuntu0.3) ...
Setting up libxt-dev:amd64 (1:1.2.1-1) ...
- Download SQL Developer from here; and then install SQL Developer to the /opt directory on your Ubuntu local instance:
Use the following command to unzip the SQL Developer files to the /opt directory:
sudo unzip ~/Downloads/sqldeveloper-23.1.0.097.1607-no-jre.zip
- Create the following /usr/local/bin/sqldeveloper symbolic link:
sudo ln -s /opt/sqldeveloper/sqldeveloper.sh /usr/local/bin/sqldeveloper
- Edit the /opt/sqldeveloper/sqldeveloper.sh file by replacing the following line:
cd "`dirname $0`"/sqldeveloper/bin && bash sqldeveloper $*
with this version:
/opt/sqldeveloper/sqldeveloper/bin/sqldeveloper $*
- Now, you can launch SQL Developer from any location on your local Ubuntu operating system, like:
sqldeveloper
- You can now connect as the system user through SQL Developer to the Oracle Database 23ai Free Docker instance with the following connection information:
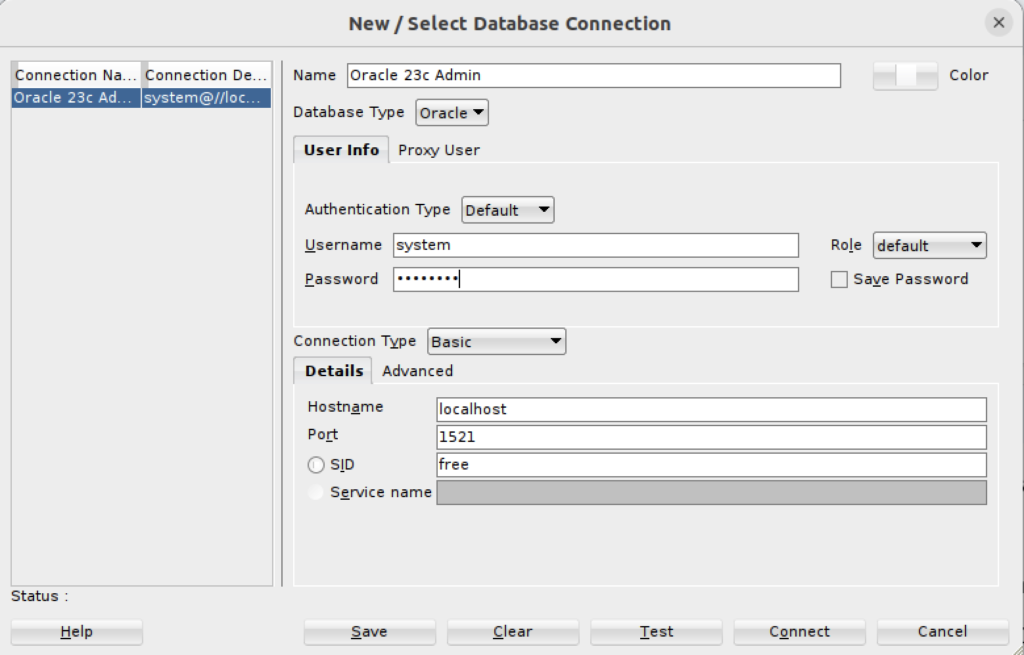
(Excuse recycling the version from 21c but I didn’t see any utility in making a new screen shot.)
- You can also create a Desktop shortcut by creating the sqldeveloper.desktop file in the /usr/share/applications directory. The SQL Developer icon is provided in the sqldeveloper base directory.

You should create the following sqldeveloper.desktop file to use a Desktop shortcut:
[Desktop Entry]
Name=Oracle SQL Developer
Comment=SQL Developer from Oracle
GenericName=SQL Tool
Exec=/usr/local/bin/sqldeveloper
Icon=/opt/sqldeveloper/icon.png
Type=Application
StartupNotify=true
Categories=Utility;Oracle;Development;SQL;
As always, I hope this helps those trying to accomplish this task.
Learning SQL Exercise
I’ve been using Alan Beaulieu’s Learning SQL to teach my SQL Development class with MySQL 8. It’s a great book overall but Chapter 12 lacks a complete exercise. Here’s all that the author provides to the reader. This is inadequate for most readers to work with to solve the concept of a transaction.
Exercise 12-1
Generate a unit of work to transfer $50 from account 123 to account 789. You will need to insert two rows into the transaction table and update two rows in the account table. Use the following table definitions/data:
                      Account:
account_id     avail_balance    last_activity_date
-----------    --------------   ------------------
       123               450    2019-07-10 20:53:27
       789               125    2019-06-22 15:18:35

                      Transaction:
txn_id    txn_date      account_id    txn_type_cd    amount
------    ----------    -------+--    -----------    ------
  1001    2019-05-15           123    C                 500
1002 2019-06-01 789 C 75 |
Use txn_type_cd = ‘C” to indicate a credit (addition), and use txn_type_cd = ‘D’ to indicate a debit (substraction).
New Exercise 12-1
The problem with the exercise description is that the sakila database, which is used for most of the book, doesn’t have transaction or account tables. Nor, are there any instructions about general accounting practices or principles. These missing components make it hard for students to understand how to build the transaction.
The first thing the exercise’s problem defintion should qualify is how to create the account and transaction tables, like:
- Create the account table, like this with an initial auto incrementing value of 1001:
-- +--------------------+--------------+------+-----+---------+----------------+
-- | Field              | Type         | Null | Key | Default | Extra          |
-- +--------------------+--------------+------+-----+---------+----------------+
-- | account_id         | int unsigned | NO   | PRI | NULL    | auto_increment |
-- | avail_balance      | double       | NO   |     | NULL    |                |
-- | last_activity_date | datetime     | NO   |     | NULL    |                |
-- +--------------------+--------------+------+-----+---------+----------------+
- Create the transaction table, like this with an initial auto incrementing value of 1001:
-- +----------------+--------------+------+-----+---------+----------------+
-- | Field          | Type         | Null | Key | Default | Extra          |
-- +----------------+--------------+------+-----+---------+----------------+
-- | txn_id         | int unsigned | NO   | PRI | NULL    | auto_increment |
-- | txn_date       | datetime     | YES  |     | NULL    |                |
-- | account_id     | int unsigned | YES  |     | NULL    |                |
-- | txn_type_cd    | varchar(1)   | NO   |     | NULL    |                |
-- | amount         | double       | YES  |     | NULL    |                |
-- +----------------+--------------+------+-----+---------+----------------+
Checking accounts are liabilities to banks, which means you credit a liability account to increase its value and debit a liability to decrease its value. You should insert the initial rows into the account table with a zero avail_balance. Then, make these iniitial deposits:
- Credit transaction table with an account_id column value of 123 with $500 and a txn_type_cd column value of ‘C’.
- Credit transaction table with an account_id column value of 789 with $75 and a txn_type_cd column value of ‘C’.
Write an update statement to set the avail_balance column values equal to the aggregate sum of the transaction table’s rows, which treats credit transacctions (those with a ‘C’ in the txn_type_cd column as a positive number and thos with a ‘D’ in the txn_type_cd column as a negative number).
Generate a unit of work to transfer $50 from account 123 to account 789. You will need to insert two rows into the transaction table and update two rows in the account table. Use the following table definitions/data:
- Debit transaction table with an account_id column value of 123 with $50 and a txn_type_cd column value of ‘D’.
- Credit transaction table with an account_id column value of 789 with $50 and a txn_type_cd column value of ‘C’.
Apply the prior update statement to set the avail_balance column values equal to the aggregate sum of the transaction table’s rows, which treats credit transacctions (those with a ‘C’ in the txn_type_cd column as a positive number and thos with a ‘D’ in the txn_type_cd column as a negative number).
Here’s the solution to the problem:
-- +--------------------+--------------+------+-----+---------+----------------+ -- | Field | Type | Null | Key | Default | Extra | -- +--------------------+--------------+------+-----+---------+----------------+ -- | account_id | int unsigned | NO | PRI | NULL | auto_increment | -- | avail_balance | double | NO | | NULL | | -- | last_activity_date | datetime | NO | | NULL | | -- +--------------------+--------------+------+-----+---------+----------------+ DROP TABLE IF EXISTS account, transaction; CREATE TABLE account ( account_id int unsigned PRIMARY KEY AUTO_INCREMENT , avail_balance double NOT NULL , last_activity_date datetime NOT NULL ) ENGINE=InnoDB AUTO_INCREMENT=1001 DEFAULT CHARSET=utf8mb4 COLLATE=utf8mb4_0900_ai_ci; -- +----------------+--------------+------+-----+---------+----------------+ -- | Field | Type | Null | Key | Default | Extra | -- +----------------+--------------+------+-----+---------+----------------+ -- | txn_id | int unsigned | NO | PRI | NULL | auto_increment | -- | txn_date | datetime | YES | | NULL | | -- | account_id | int unsigned | YES | | NULL | | -- | txn_type_cd | varchar(1) | NO | | NULL | | -- | amount | double | YES | | NULL | | -- +----------------+--------------+------+-----+---------+----------------+ CREATE TABLE transaction ( txn_id int unsigned PRIMARY KEY AUTO_INCREMENT , txn_date datetime NOT NULL , account_id int unsigned NOT NULL , txn_type_cd varchar(1) , amount double , CONSTRAINT transaction_fk1 FOREIGN KEY (account_id) REFERENCES account(account_id)) ENGINE=InnoDB AUTO_INCREMENT=1001 DEFAULT CHARSET=utf8mb4 COLLATE=utf8mb4_0900_ai_ci; -- Insert initial accounts. INSERT INTO account ( account_id , avail_balance , last_activity_date ) VALUES ( 123 , 0 ,'2019-07-10 20:53:27'); INSERT INTO account ( account_id , avail_balance , last_activity_date ) VALUES ( 789 , 0 ,'2019-06-22 15:18:35'); -- Insert initial deposits. INSERT INTO transaction ( txn_date , account_id , txn_type_cd , amount ) VALUES ( CAST(NOW() AS DATE) , 123 ,'C' , 500 ); INSERT INTO transaction ( txn_date , account_id , txn_type_cd , amount ) VALUES ( CAST(NOW() AS DATE) , 789 ,'C' , 75 ); UPDATE account a SET a.avail_balance = (SELECT SUM( CASE WHEN t.txn_type_cd = 'C' THEN amount WHEN t.txn_type_cd = 'D' THEN amount * -1 END) AS amount FROM transaction t WHERE t.account_id = a.account_id AND t.account_id IN (123,789) GROUP BY t.account_id); SELECT * FROM account; SELECT * FROM transaction; -- Insert initial deposits. INSERT INTO transaction ( txn_date , account_id , txn_type_cd , amount ) VALUES ( CAST(NOW() AS DATE) , 123 ,'D' , 50 ); INSERT INTO transaction ( txn_date , account_id , txn_type_cd , amount ) VALUES ( CAST(NOW() AS DATE) , 789 ,'C' , 50 ); UPDATE account a SET a.avail_balance = (SELECT SUM( CASE WHEN t.txn_type_cd = 'C' THEN amount WHEN t.txn_type_cd = 'D' THEN amount * -1 END) AS amount FROM transaction t WHERE t.account_id = a.account_id AND t.account_id IN (123,789) GROUP BY t.account_id); SELECT * FROM account; SELECT * FROM transaction; |
The results are:
+------------+---------------+---------------------+ | account_id | avail_balance | last_activity_date | +------------+---------------+---------------------+ | 123 | 450 | 2019-07-10 20:53:27 | | 789 | 125 | 2019-06-22 15:18:35 | +------------+---------------+---------------------+ 2 rows in set (0.00 sec) +--------+---------------------+------------+-------------+--------+ | txn_id | txn_date | account_id | txn_type_cd | amount | +--------+---------------------+------------+-------------+--------+ | 1001 | 2024-04-01 00:00:00 | 123 | C | 500 | | 1002 | 2024-04-01 00:00:00 | 789 | C | 75 | | 1003 | 2024-04-01 00:00:00 | 123 | D | 50 | | 1004 | 2024-04-01 00:00:00 | 789 | C | 50 | +--------+---------------------+------------+-------------+--------+ 4 rows in set (0.00 sec) |
As always, I hope this helps those trying to understand how CTEs can solve problems that would otherwise be coded in external imperative languages like Python.
Ubuntu Pro Upgrade?
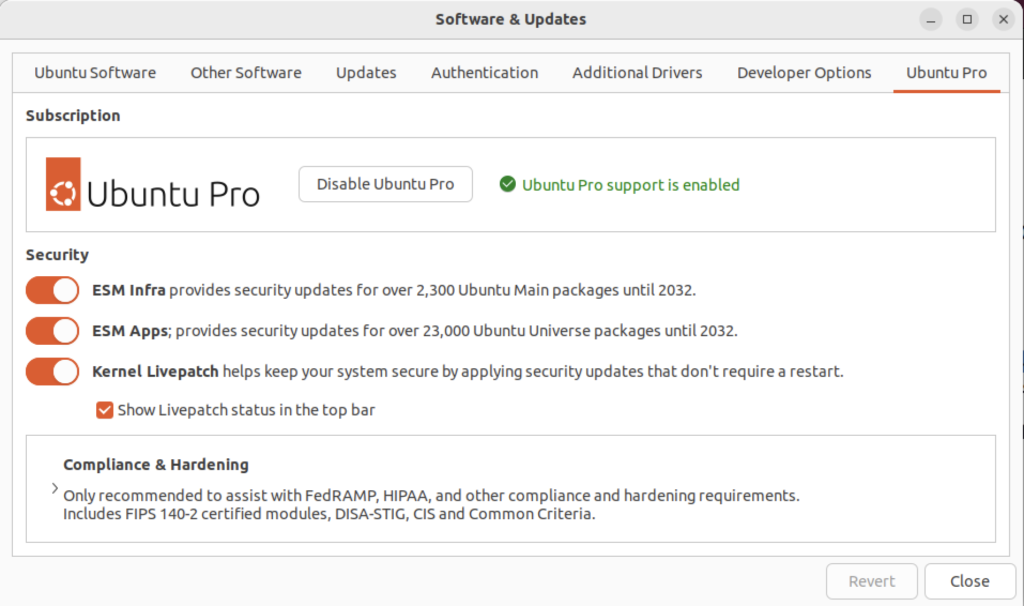
There wasn’t a choice when I chose to update the Ubuntu instance. I was compelled to upgrade to Ubuntu Pro. According to the upgrade I have five free installations. You can read more about Ubuntu Pro on this web page, and find their pricing schedule on this page.
MongoDB on Ubuntu
This post shows how to install, configure, and use MongoDB with JavaScript programs. You need to complete each section in the order provided (based on Cherry Server post).
Step #1: MongoDB Installation
Install the prerequisite packages with the following command:
sudo apt install -y software-properties-common gnupg apt-transport-https ca-certificates |
Display detailed console log →
Reading package lists... Done Building dependency tree... Done Reading state information... Done ca-certificates is already the newest version (20230311ubuntu0.22.04.1). ca-certificates set to manually installed. gnupg is already the newest version (2.2.27-3ubuntu2.1). gnupg set to manually installed. software-properties-common is already the newest version (0.99.22.9). apt-transport-https is already the newest version (2.4.11). 0 upgraded, 0 newly installed, 0 to remove and 22 not upgraded. |
Import the public key for MongoDB on your system using the curl command:
curl -fsSL https://pgp.mongodb.com/server-7.0.asc | sudo gpg -o /usr/share/keyrings/mongodb-server-7.0.gpg --dearmor |
Add MongoDB 7.0 APT repository to the /etc/apt/sources.list.d directory:
echo "deb [ arch=amd64,arm64 signed-by=/usr/share/keyrings/mongodb-server-7.0.gpg ] https://repo.mongodb.org/apt/ubuntu jammy/mongodb-org/7.0 multiverse" | sudo tee /etc/apt/sources.list.d/mongodb-org-7.0.list |
Reload the local package index, which refreshes the local repositories and makes Ubuntu aware of the newly added MongoDB repository:
sudo apt update |
Display detailed console log →
Hit:1 http://us.archive.ubuntu.com/ubuntu jammy InRelease Get:2 http://us.archive.ubuntu.com/ubuntu jammy-updates InRelease [119 kB] Get:3 http://security.ubuntu.com/ubuntu jammy-security InRelease [110 kB] Hit:4 https://dl.google.com/linux/chrome/deb stable InRelease Hit:5 https://download.vscodium.com/debs vscodium InRelease Hit:6 http://us.archive.ubuntu.com/ubuntu jammy-backports InRelease Hit:7 https://ftp.postgresql.org/pub/pgadmin/pgadmin4/apt/jammy pgadmin4 InRelease Ign:8 https://repo.mongodb.org/apt/ubuntu jammy/mongodb-org/7.0 InRelease Get:9 https://repo.mongodb.org/apt/ubuntu jammy/mongodb-org/7.0 Release [2,090 B] Get:10 https://repo.mongodb.org/apt/ubuntu jammy/mongodb-org/7.0 Release.gpg [866 B] Get:11 https://repo.mongodb.org/apt/ubuntu jammy/mongodb-org/7.0/multiverse arm64 Packages [27.6 kB] Get:12 https://repo.mongodb.org/apt/ubuntu jammy/mongodb-org/7.0/multiverse amd64 Packages [28.6 kB] Fetched 288 kB in 4s (72.8 kB/s) Reading package lists... Done Building dependency tree... Done Reading state information... Done 22 packages can be upgraded. Run 'apt list --upgradable' to see them. |
Install the mongodb-org meta-package:
sudo apt install -y mongodb-org |
Display detailed console log →
Reading package lists... Done Building dependency tree... Done Reading state information... Done The following additional packages will be installed: mongodb-database-tools mongodb-mongosh mongodb-org-database mongodb-org-database-tools-extra mongodb-org-mongos mongodb-org-server mongodb-org-shell mongodb-org-tools The following NEW packages will be installed: mongodb-database-tools mongodb-mongosh mongodb-org mongodb-org-database mongodb-org-database-tools-extra mongodb-org-mongos mongodb-org-server mongodb-org-shell mongodb-org-tools 0 upgraded, 9 newly installed, 0 to remove and 22 not upgraded. Need to get 163 MB of archives. After this operation, 537 MB of additional disk space will be used. Get:1 https://repo.mongodb.org/apt/ubuntu jammy/mongodb-org/7.0/multiverse amd64 mongodb-database-tools amd64 100.9.4 [51.9 MB] Get:2 https://repo.mongodb.org/apt/ubuntu jammy/mongodb-org/7.0/multiverse amd64 mongodb-mongosh amd64 2.1.5 [48.7 MB] Get:3 https://repo.mongodb.org/apt/ubuntu jammy/mongodb-org/7.0/multiverse amd64 mongodb-org-shell amd64 7.0.6 [2,986 B] Get:4 https://repo.mongodb.org/apt/ubuntu jammy/mongodb-org/7.0/multiverse amd64 mongodb-org-server amd64 7.0.6 [36.7 MB] Get:5 https://repo.mongodb.org/apt/ubuntu jammy/mongodb-org/7.0/multiverse amd64 mongodb-org-mongos amd64 7.0.6 [25.6 MB] Get:6 https://repo.mongodb.org/apt/ubuntu jammy/mongodb-org/7.0/multiverse amd64 mongodb-org-database-tools-extra amd64 7.0.6 [7,786 B] Get:7 https://repo.mongodb.org/apt/ubuntu jammy/mongodb-org/7.0/multiverse amd64 mongodb-org-database amd64 7.0.6 [3,422 B] Get:8 https://repo.mongodb.org/apt/ubuntu jammy/mongodb-org/7.0/multiverse amd64 mongodb-org-tools amd64 7.0.6 [2,770 B] Get:9 https://repo.mongodb.org/apt/ubuntu jammy/mongodb-org/7.0/multiverse amd64 mongodb-org amd64 7.0.6 [2,804 B] Fetched 163 MB in 8s (20.2 MB/s) Selecting previously unselected package mongodb-database-tools. (Reading database ... 250115 files and directories currently installed.) Preparing to unpack .../0-mongodb-database-tools_100.9.4_amd64.deb ... Unpacking mongodb-database-tools (100.9.4) ... Selecting previously unselected package mongodb-mongosh. Preparing to unpack .../1-mongodb-mongosh_2.1.5_amd64.deb ... Unpacking mongodb-mongosh (2.1.5) ... Selecting previously unselected package mongodb-org-shell. Preparing to unpack .../2-mongodb-org-shell_7.0.6_amd64.deb ... Unpacking mongodb-org-shell (7.0.6) ... Selecting previously unselected package mongodb-org-server. Preparing to unpack .../3-mongodb-org-server_7.0.6_amd64.deb ... Unpacking mongodb-org-server (7.0.6) ... Selecting previously unselected package mongodb-org-mongos. Preparing to unpack .../4-mongodb-org-mongos_7.0.6_amd64.deb ... Unpacking mongodb-org-mongos (7.0.6) ... Selecting previously unselected package mongodb-org-database-tools-extra. Preparing to unpack .../5-mongodb-org-database-tools-extra_7.0.6_amd64.deb ... Unpacking mongodb-org-database-tools-extra (7.0.6) ... Selecting previously unselected package mongodb-org-database. Preparing to unpack .../6-mongodb-org-database_7.0.6_amd64.deb ... Unpacking mongodb-org-database (7.0.6) ... Selecting previously unselected package mongodb-org-tools. Preparing to unpack .../7-mongodb-org-tools_7.0.6_amd64.deb ... Unpacking mongodb-org-tools (7.0.6) ... Selecting previously unselected package mongodb-org. Preparing to unpack .../8-mongodb-org_7.0.6_amd64.deb ... Unpacking mongodb-org (7.0.6) ... Setting up mongodb-mongosh (2.1.5) ... Setting up mongodb-org-server (7.0.6) ... Adding system user `mongodb' (UID 132) ... Adding new user `mongodb' (UID 132) with group `nogroup' ... Not creating home directory `/home/mongodb'. Adding group `mongodb' (GID 140) ... Done. Adding user `mongodb' to group `mongodb' ... Adding user mongodb to group mongodb Done. Setting up mongodb-org-shell (7.0.6) ... Setting up mongodb-database-tools (100.9.4) ... Setting up mongodb-org-mongos (7.0.6) ... Setting up mongodb-org-database-tools-extra (7.0.6) ... Setting up mongodb-org-database (7.0.6) ... Setting up mongodb-org-tools (7.0.6) ... Setting up mongodb-org (7.0.6) ... Processing triggers for man-db (2.10.2-1) ... |
Verify the installed version of MongoDB with this command:
mongod --version |
It should display:
db version v7.0.6
Build Info: {
    "version": "7.0.6",
    "gitVersion": "66cdc1f28172cb33ff68263050d73d4ade73b9a4",
    "openSSLVersion": "OpenSSL 3.0.2 15 Mar 2022",
    "modules": [],
    "allocator": "tcmalloc",
    "environment": {
        "distmod": "ubuntu2204",
        "distarch": "x86_64",
        "target_arch": "x86_64"
    }
} |
Step #2: Start MongoDB Service & Shell
You can verify that the installed mongodb is disabled after initial installation with this command:
sudo systemctl status mongod |
It should display:
○ mongod.service - MongoDB Database Server
     Loaded: loaded (/lib/systemd/system/mongod.service; disabled; vendor preset: enabled)
     Active: inactive (dead)
Docs: https://docs.mongodb.org/manual |
Exit the output display from the systemctl utility by typing the escape key, a colon (:) and a q in sequence.
You can start the MongoDB service with this command:
sudo systemctl start mongod |
Then, check the MongoDB service:
sudo systemctl status mongod |
It displays:
● mongod.service - MongoDB Database Server
     Loaded: loaded (/lib/systemd/system/mongod.service; disabled; vendor preset: enabled)
     Active: active (running) since Thu 2024-03-07 16:38:17 MST; 2s ago
       Docs: https://docs.mongodb.org/manual
   Main PID: 33795 (mongod)
     Memory: 79.2M
        CPU: 706ms
     CGroup: /system.slice/mongod.service
             └─33795 /usr/bin/mongod --config /etc/mongod.conf
Mar 07 16:38:17 student-virtual-machine systemd[1]: Started MongoDB Database Server.
Mar 07 16:38:17 student-virtual-machine mongod[33795]: {"t":{"$date":"2024-03-07T23:38:17.642Z"},"s"> |
You can confirm that the database is up and running by checking if the server is listening on its default port, which is port 27017. Run the ss command to check the port number.
sudo ss -pnltu | grep 27017 |
It will display:
tcp LISTEN 0 4096 127.0.0.1:27017 0.0.0.0:* users:(("mongod",pid=33795,fd=14)) |
You can enable the mongodb service at startup with the following command:
sudo systemctl enable mongod |
It raised the following error:
Created symlink /etc/systemd/system/multi-user.target.wants/mongod.service → /lib/systemd/system/mongod.service. |
Now, start the MongoDB Shell (mongosh) by typing either the explicit or implicit MongoDB Shell command. The explicit one uses the port and database path, which are unnecessary when you’ve successfully started the mongosh service. (Please note that at the time of writing this blog post there is erroneous, or obsolete, content on the MongoDB Documentation Enable Access Control web page.
Explicit connection:
mongosh --port 27017 --db /var/lib/mongodb --help |
This version of the command will display most of the options available in MongoDB but it will suppress warning messages.
$ mongosh [options] [db address] [file names (ending in .js or .mongodb)] Options: -h, --help Show this usage information -f, --file [arg] Load the specified mongosh script --host [arg] Server to connect to --port [arg] Port to connect to --build-info Show build information --version Show version information --quiet Silence output from the shell during the connection process --shell Run the shell after executing files --nodb Don't connect to mongod on startup - no 'db address' [arg] expected --norc Will not run the '.mongoshrc.js' file on start up --eval [arg] Evaluate javascript --json[=canonical|relaxed] Print result of --eval as Extended JSON, including errors --retryWrites[=true|false] Automatically retry write operations upon transient network errors (Default: true) Authentication Options: -u, --username [arg] Username for authentication -p, --password [arg] Password for authentication --authenticationDatabase [arg] User source (defaults to dbname) --authenticationMechanism [arg] Authentication mechanism --awsIamSessionToken [arg] AWS IAM Temporary Session Token ID --gssapiServiceName [arg] Service name to use when authenticating using GSSAPI/Kerberos --sspiHostnameCanonicalization [arg] Specify the SSPI hostname canonicalization (none or forward, available on Windows) --sspiRealmOverride [arg] Specify the SSPI server realm (available on Windows) TLS Options: --tls Use TLS for all connections --tlsCertificateKeyFile [arg] PEM certificate/key file for TLS --tlsCertificateKeyFilePassword [arg] Password for key in PEM file for TLS --tlsCAFile [arg] Certificate Authority file for TLS --tlsAllowInvalidHostnames Allow connections to servers with non-matching hostnames --tlsAllowInvalidCertificates Allow connections to servers with invalid certificates --tlsCertificateSelector [arg] TLS Certificate in system store (Windows and macOS only) --tlsCRLFile [arg] Specifies the .pem file that contains the Certificate Revocation List --tlsDisabledProtocols [arg] Comma separated list of TLS protocols to disable [TLS1_0,TLS1_1,TLS1_2] --tlsUseSystemCA Load the operating system trusted certificate list --tlsFIPSMode Enable the system TLS library's FIPS mode API version options: --apiVersion [arg] Specifies the API version to connect with --apiStrict Use strict API version mode --apiDeprecationErrors Fail deprecated commands for the specified API version FLE Options: --awsAccessKeyId [arg] AWS Access Key for FLE Amazon KMS --awsSecretAccessKey [arg] AWS Secret Key for FLE Amazon KMS --awsSessionToken [arg] Optional AWS Session Token ID --keyVaultNamespace [arg] database.collection to store encrypted FLE parameters --kmsURL [arg] Test parameter to override the URL of the KMS endpoint DB Address Examples: foo Foo database on local machine 192.168.0.5/foo Foo database on 192.168.0.5 machine 192.168.0.5:9999/foo Foo database on 192.168.0.5 machine on port 9999 mongodb://192.168.0.5:9999/foo Connection string URI can also be used File Names: A list of files to run. Files must end in .js and will exit after unless --shell is specified. Examples: Start mongosh using 'ships' database on specified connection string: $ mongosh mongodb://192.168.0.5:9999/ships For more information on usage: https://docs.mongodb.com/mongodb-shell. |
Implicit connection:
mongosh |
You should see the following message with any warning messages:
Current Mongosh Log ID: 65ea502a97f4c1e2b7e12af4 Connecting to: mongodb://127.0.0.1:27017/?directConnection=true&serverSelectionTimeoutMS=2000&appName=mongosh+2.1.5 Using MongoDB: 7.0.6 Using Mongosh: 2.1.5 For mongosh info see: https://docs.mongodb.com/mongodb-shell/ To help improve our products, anonymous usage data is collected and sent to MongoDB periodically (https://www.mongodb.com/legal/privacy-policy). You can opt-out by running the disableTelemetry() command. ------ The server generated these startup warnings when booting 2024-03-07T16:38:17.818-07:00: Using the XFS filesystem is strongly recommended with the WiredTiger storage engine. See http://dochub.mongodb.org/core/prodnotes-filesystem 2024-03-07T16:38:18.350-07:00: Access control is not enabled for the database. Read and write access to data and configuration is unrestricted 2024-03-07T16:38:18.350-07:00: vm.max_map_count is too low ------ |
You can run opt out of the data collection by running the disableTelemetry() command from the Linux command line. Use the following command (a broader explanation is in the MongoDB Telemetry documentation):
mongosh --nodb --eval "disableTelemetry()" |
It should return:
Current Mongosh Log ID: 65eab2df3e663bde3711fa2f Using Mongosh: 2.1.5 For mongosh info see: https://docs.mongodb.com/mongodb-shell/ Telemetry is now disabled. |
You still have three warning messages to deal with at this point. You should fix the vm.max_map_count warning first. This is a Linux kernel issue. You can determine the current value of the vm.max_map_count value with this command:
cat /proc/sys/vm/max_map_count |
It should return the system default value:
65530 |
You can change it at runtime with this command:
sudo sysctl -w vm.max_map_count=262144 |
However, you must restart the mongod service to see the change in the mongosh shell. There won’t be a warning message for the kernel parameter value being too low until you reboot your operating system. You can restart your mongod service with this command:
sudo service mongod restart |
You can make a change to the /etc/sysctl.conf file to ensure the parameter is set to the correct value each time the system reboots. Simply add the following line as the root user or by using the sudo prefacing a text editor or your choice (like vim or nano) to your /etc/sysctl.conf file:
# Adding vm.max_map_count to sysctl.conf defaults. vm.max_map_count=262144 |
At this point, you’ve eliminated two of the warning messages. The next step shows you how to enable Access Control. If you want to check the general server status, run the following command from the Linux Command-Line Interface (CLI):
mongosh --eval "db.serverStatus()" > server_status.log |
You can inspect the log file, which should be slightly less than 2,000 lines of output with MongoDB a 7.0.6 installation. Using the command from the Linux CLI is generally the easiest way to inspect the output from the db.serverStatus() function, which is just too long to scroll from the console output.
Step #3: MongoDB Enabling Access Control
Connect to the mongosh …
Step #4: MongoDB Installing Node.js and React.js
Install Node.js with the following command:
sudo apt install -y nodejs |
Display detailed console log →
Reading package lists... Done Building dependency tree... Done Reading state information... Done The following additional packages will be installed: libc-ares2 libjs-highlight.js libnode72 nodejs-doc Suggested packages: npm The following NEW packages will be installed: libc-ares2 libjs-highlight.js libnode72 nodejs nodejs-doc 0 upgraded, 5 newly installed, 0 to remove and 23 not upgraded. Need to get 13.7 MB of archives. After this operation, 53.9 MB of additional disk space will be used. Do you want to continue? [Y/n] y Get:1 http://us.archive.ubuntu.com/ubuntu jammy/universe amd64 libjs-highlight.js all 9.18.5+dfsg1-1 [367 kB] Get:2 http://us.archive.ubuntu.com/ubuntu jammy-updates/main amd64 libc-ares2 amd64 1.18.1-1ubuntu0.22.04.3 [45.1 kB] Get:3 http://us.archive.ubuntu.com/ubuntu jammy-updates/universe amd64 libnode72 amd64 12.22.9~dfsg-1ubuntu3.4 [10.8 MB] Get:4 http://us.archive.ubuntu.com/ubuntu jammy-updates/universe amd64 nodejs-doc all 12.22.9~dfsg-1ubuntu3.4 [2,410 kB] Get:5 http://us.archive.ubuntu.com/ubuntu jammy-updates/universe amd64 nodejs amd64 12.22.9~dfsg-1ubuntu3.4 [122 kB] Fetched 13.7 MB in 3s (4,006 kB/s) Selecting previously unselected package libjs-highlight.js. (Reading database ... 250172 files and directories currently installed.) Preparing to unpack .../libjs-highlight.js_9.18.5+dfsg1-1_all.deb ... Unpacking libjs-highlight.js (9.18.5+dfsg1-1) ... Selecting previously unselected package libc-ares2:amd64. Preparing to unpack .../libc-ares2_1.18.1-1ubuntu0.22.04.3_amd64.deb ... Unpacking libc-ares2:amd64 (1.18.1-1ubuntu0.22.04.3) ... Selecting previously unselected package libnode72:amd64. Preparing to unpack .../libnode72_12.22.9~dfsg-1ubuntu3.4_amd64.deb ... Unpacking libnode72:amd64 (12.22.9~dfsg-1ubuntu3.4) ... Selecting previously unselected package nodejs-doc. Preparing to unpack .../nodejs-doc_12.22.9~dfsg-1ubuntu3.4_all.deb ... Unpacking nodejs-doc (12.22.9~dfsg-1ubuntu3.4) ... Selecting previously unselected package nodejs. Preparing to unpack .../nodejs_12.22.9~dfsg-1ubuntu3.4_amd64.deb ... Unpacking nodejs (12.22.9~dfsg-1ubuntu3.4) ... Setting up libc-ares2:amd64 (1.18.1-1ubuntu0.22.04.3) ... Setting up libnode72:amd64 (12.22.9~dfsg-1ubuntu3.4) ... Setting up libjs-highlight.js (9.18.5+dfsg1-1) ... Setting up nodejs (12.22.9~dfsg-1ubuntu3.4) ... update-alternatives: using /usr/bin/nodejs to provide /usr/bin/js (js) in auto m ode Setting up nodejs-doc (12.22.9~dfsg-1ubuntu3.4) ... Processing triggers for man-db (2.10.2-1) ... Processing triggers for libc-bin (2.35-0ubuntu3.6) ... |
You can check the Node.js version with this command:
node -v |
v12.22.9 |
Install the Node.js package manager npm with the following command:
sudo apt install -y npm |
Display detailed console log →
Reading package lists... Done Building dependency tree... Done Reading state information... Done The following additional packages will be installed: gyp libjs-events libjs-inherits libjs-is-typedarray libjs-psl libjs-source-map libjs-sprintf-js libjs-typedarray-to-buffer libnode-dev libuv1-dev node-abab node-abbrev node-agent-base node-ansi-regex node-ansi-styles node-ansistyles node-aproba node-archy node-are-we-there-yet node-argparse node-arrify node-asap node-asynckit node-balanced-match node-brace-expansion node-builtins node-cacache node-chalk node-chownr node-clean-yaml-object node-cli-table node-clone node-color-convert node-color-name node-colors node-columnify node-combined-stream node-commander node-console-control-strings node-copy-concurrently node-core-util-is node-coveralls node-cssom node-cssstyle node-debug node-decompress-response node-defaults node-delayed-stream node-delegates node-depd node-diff node-encoding node-end-of-stream node-err-code node-escape-string-regexp node-esprima node-events node-fancy-log node-fetch node-foreground-child node-form-data node-fs-write-stream-atomic node-fs.realpath node-function-bind node-gauge node-get-stream node-glob node-got node-graceful-fs node-growl node-gyp node-has-flag node-has-unicode node-hosted-git-info node-https-proxy-agent node-iconv-lite node-iferr node-imurmurhash node-indent-string node-inflight node-inherits node-ini node-ip node-ip-regex node-is-buffer node-is-plain-obj node-is-typedarray node-isarray node-isexe node-js-yaml node-jsdom node-json-buffer node-json-parse-better-errors node-jsonparse node-kind-of node-lcov-parse node-lodash-packages node-log-driver node-lowercase-keys node-lru-cache node-mime node-mime-types node-mimic-response node-minimatch node-minimist node-minipass node-mkdirp node-move-concurrently node-ms node-mute-stream node-negotiator node-nopt node-normalize-package-data node-npm-bundled node-npm-package-arg node-npmlog node-object-assign node-once node-opener node-osenv node-p-cancelable node-p-map node-path-is-absolute node-process-nextick-args node-promise-inflight node-promise-retry node-promzard node-psl node-pump node-punycode node-quick-lru node-read node-read-package-json node-readable-stream node-resolve node-retry node-rimraf node-run-queue node-safe-buffer node-semver node-set-blocking node-signal-exit node-slash node-slice-ansi node-source-map node-source-map-support node-spdx-correct node-spdx-exceptions node-spdx-expression-parse node-spdx-license-ids node-sprintf-js node-ssri node-stack-utils node-stealthy-require node-string-decoder node-string-width node-strip-ansi node-supports-color node-tap node-tap-mocha-reporter node-tap-parser node-tar node-text-table node-time-stamp node-tmatch node-tough-cookie node-typedarray-to-buffer node-unique-filename node-universalify node-util-deprecate node-validate-npm-package-license node-validate-npm-package-name node-wcwidth.js node-webidl-conversions node-whatwg-fetch node-which node-wide-align node-wrappy node-write-file-atomic node-ws node-yallist Suggested packages: libjs-angularjs node-nyc The following NEW packages will be installed: gyp libjs-events libjs-inherits libjs-is-typedarray libjs-psl libjs-source-map libjs-sprintf-js libjs-typedarray-to-buffer libnode-dev libuv1-dev node-abab node-abbrev node-agent-base node-ansi-regex node-ansi-styles node-ansistyles node-aproba node-archy node-are-we-there-yet node-argparse node-arrify node-asap node-asynckit node-balanced-match node-brace-expansion node-builtins node-cacache node-chalk node-chownr node-clean-yaml-object node-cli-table node-clone node-color-convert node-color-name node-colors node-columnify node-combined-stream node-commander node-console-control-strings node-copy-concurrently node-core-util-is node-coveralls node-cssom node-cssstyle node-debug node-decompress-response node-defaults node-delayed-stream node-delegates node-depd node-diff node-encoding node-end-of-stream node-err-code node-escape-string-regexp node-esprima node-events node-fancy-log node-fetch node-foreground-child node-form-data node-fs-write-stream-atomic node-fs.realpath node-function-bind node-gauge node-get-stream node-glob node-got node-graceful-fs node-growl node-gyp node-has-flag node-has-unicode node-hosted-git-info node-https-proxy-agent node-iconv-lite node-iferr node-imurmurhash node-indent-string node-inflight node-inherits node-ini node-ip node-ip-regex node-is-buffer node-is-plain-obj node-is-typedarray node-isarray node-isexe node-js-yaml node-jsdom node-json-buffer node-json-parse-better-errors node-jsonparse node-kind-of node-lcov-parse node-lodash-packages node-log-driver node-lowercase-keys node-lru-cache node-mime node-mime-types node-mimic-response node-minimatch node-minimist node-minipass node-mkdirp node-move-concurrently node-ms node-mute-stream node-negotiator node-nopt node-normalize-package-data node-npm-bundled node-npm-package-arg node-npmlog node-object-assign node-once node-opener node-osenv node-p-cancelable node-p-map node-path-is-absolute node-process-nextick-args node-promise-inflight node-promise-retry node-promzard node-psl node-pump node-punycode node-quick-lru node-read node-read-package-json node-readable-stream node-resolve node-retry node-rimraf node-run-queue node-safe-buffer node-semver node-set-blocking node-signal-exit node-slash node-slice-ansi node-source-map node-source-map-support node-spdx-correct node-spdx-exceptions node-spdx-expression-parse node-spdx-license-ids node-sprintf-js node-ssri node-stack-utils node-stealthy-require node-string-decoder node-string-width node-strip-ansi node-supports-color node-tap node-tap-mocha-reporter node-tap-parser node-tar node-text-table node-time-stamp node-tmatch node-tough-cookie node-typedarray-to-buffer node-unique-filename node-universalify node-util-deprecate node-validate-npm-package-license node-validate-npm-package-name node-wcwidth.js node-webidl-conversions node-whatwg-fetch node-which node-wide-align node-wrappy node-write-file-atomic node-ws node-yallist npm 0 upgraded, 182 newly installed, 0 to remove and 23 not upgraded. Need to get 5,075 kB of archives. After this operation, 36.3 MB of additional disk space will be used. Get:1 http://us.archive.ubuntu.com/ubuntu jammy/universe amd64 gyp all 0.1+20210831gitd6c5dd5-5 [238 kB] Get:2 http://us.archive.ubuntu.com/ubuntu jammy/universe amd64 libjs-events all 3.3.0+~3.0.0-2 [9,734 B] Get:3 http://us.archive.ubuntu.com/ubuntu jammy/universe amd64 libjs-is-typedarray all 1.0.0-4 [3,804 B] Get:4 http://us.archive.ubuntu.com/ubuntu jammy/universe amd64 libjs-psl all 1.8.0+ds-6 [76.3 kB] Get:5 http://us.archive.ubuntu.com/ubuntu jammy/universe amd64 libjs-sprintf-js all 1.1.2+ds1+~1.1.2-1 [12.8 kB] Get:6 http://us.archive.ubuntu.com/ubuntu jammy/universe amd64 libjs-typedarray-to-buffer all 4.0.0-2 [4,658 B] Get:7 http://us.archive.ubuntu.com/ubuntu jammy-updates/main amd64 libuv1-dev amd64 1.43.0-1ubuntu0.1 [130 kB] Get:8 http://us.archive.ubuntu.com/ubuntu jammy-updates/universe amd64 libnode-dev amd64 12.22.9~dfsg-1ubuntu3.4 [609 kB] Get:9 http://us.archive.ubuntu.com/ubuntu jammy/universe amd64 node-abab all 2.0.5-2 [6,578 B] Get:10 http://us.archive.ubuntu.com/ubuntu jammy/universe amd64 node-ms all 2.1.3+~cs0.7.31-2 [5,782 B] Get:11 http://us.archive.ubuntu.com/ubuntu jammy/universe amd64 node-debug all 4.3.2+~cs4.1.7-1 [17.6 kB] Get:12 http://us.archive.ubuntu.com/ubuntu jammy/universe amd64 node-yallist all 4.0.0+~4.0.1-1 [8,322 B] Get:13 http://us.archive.ubuntu.com/ubuntu jammy/universe amd64 node-lru-cache all 6.0.0+~5.1.1-1 [11.3 kB] Get:14 http://us.archive.ubuntu.com/ubuntu jammy/universe amd64 node-semver all 7.3.5+~7.3.8-1 [41.5 kB] Get:15 http://us.archive.ubuntu.com/ubuntu jammy/universe amd64 node-agent-base all 6.0.2+~cs5.4.2-1 [17.9 kB] Get:16 http://us.archive.ubuntu.com/ubuntu jammy/universe amd64 node-ansi-regex all 5.0.1-1 [4,984 B] Get:17 http://us.archive.ubuntu.com/ubuntu jammy/universe amd64 node-ansistyles all 0.1.3-5 [4,546 B] Get:18 http://us.archive.ubuntu.com/ubuntu jammy/universe amd64 node-aproba all 2.0.0-2 [5,620 B] Get:19 http://us.archive.ubuntu.com/ubuntu jammy/universe amd64 node-delegates all 1.0.0-3 [4,280 B] Get:20 http://us.archive.ubuntu.com/ubuntu jammy/universe amd64 libjs-inherits all 2.0.4-4 [3,468 B] Get:21 http://us.archive.ubuntu.com/ubuntu jammy/universe amd64 node-inherits all 2.0.4-4 [3,010 B] Get:22 http://us.archive.ubuntu.com/ubuntu jammy/universe amd64 node-core-util-is all 1.0.3-1 [4,066 B] Get:23 http://us.archive.ubuntu.com/ubuntu jammy/universe amd64 node-safe-buffer all 5.2.1+~cs2.1.2-2 [15.7 kB] Get:24 http://us.archive.ubuntu.com/ubuntu jammy/universe amd64 node-string-decoder all 1.3.0-5 [7,046 B] Get:25 http://us.archive.ubuntu.com/ubuntu jammy/universe amd64 node-process-nextick-args all 2.0.1-2 [3,730 B] Get:26 http://us.archive.ubuntu.com/ubuntu jammy/universe amd64 node-util-deprecate all 1.0.2-3 [4,202 B] Get:27 http://us.archive.ubuntu.com/ubuntu jammy/universe amd64 node-isarray all 2.0.5-3 [3,934 B] Get:28 http://us.archive.ubuntu.com/ubuntu jammy/universe amd64 node-readable-stream all 3.6.0+~cs3.0.0-1 [32.6 kB] Get:29 http://us.archive.ubuntu.com/ubuntu jammy/universe amd64 node-are-we-there-yet all 3.0.0+~1.1.0-1 [8,920 B] Get:30 http://us.archive.ubuntu.com/ubuntu jammy/universe amd64 node-arrify all 2.0.1-2 [3,610 B] Get:31 http://us.archive.ubuntu.com/ubuntu jammy/universe amd64 node-asap all 2.0.6+~2.0.0-1 [14.4 kB] Get:32 http://us.archive.ubuntu.com/ubuntu jammy/universe amd64 node-asynckit all 0.4.0-4 [10.6 kB] Get:33 http://us.archive.ubuntu.com/ubuntu jammy/universe amd64 node-builtins all 4.0.0-1 [3,860 B] Get:34 http://us.archive.ubuntu.com/ubuntu jammy/universe amd64 node-chownr all 2.0.0-1 [4,404 B] Get:35 http://us.archive.ubuntu.com/ubuntu jammy/universe amd64 node-fs.realpath all 1.0.0-2 [6,106 B] Get:36 http://us.archive.ubuntu.com/ubuntu jammy/universe amd64 node-wrappy all 1.0.2-2 [3,658 B] Get:37 http://us.archive.ubuntu.com/ubuntu jammy/universe amd64 node-once all 1.4.0-4 [4,708 B] Get:38 http://us.archive.ubuntu.com/ubuntu jammy/universe amd64 node-inflight all 1.0.6-2 [3,940 B] Get:39 http://us.archive.ubuntu.com/ubuntu jammy/universe amd64 node-balanced-match all 2.0.0-1 [4,910 B] Get:40 http://us.archive.ubuntu.com/ubuntu jammy/universe amd64 node-brace-expansion all 2.0.1-1 [7,458 B] Get:41 http://us.archive.ubuntu.com/ubuntu jammy/universe amd64 node-minimatch all 3.1.1+~3.0.5-1 [16.9 kB] Get:42 http://us.archive.ubuntu.com/ubuntu jammy/universe amd64 node-path-is-absolute all 2.0.0-2 [4,062 B] Get:43 http://us.archive.ubuntu.com/ubuntu jammy/universe amd64 node-glob all 7.2.1+~cs7.6.15-1 [131 kB] Get:44 http://us.archive.ubuntu.com/ubuntu jammy/universe amd64 node-graceful-fs all 4.2.4+repack-1 [12.5 kB] Get:45 http://us.archive.ubuntu.com/ubuntu jammy/universe amd64 node-mkdirp all 1.0.4+~1.0.2-1 [11.4 kB] Get:46 http://us.archive.ubuntu.com/ubuntu jammy/universe amd64 node-iferr all 1.0.2+~1.0.2-1 [4,610 B] Get:47 http://us.archive.ubuntu.com/ubuntu jammy/universe amd64 node-imurmurhash all 0.1.4+dfsg+~0.1.1-1 [8,510 B] Get:48 http://us.archive.ubuntu.com/ubuntu jammy/universe amd64 node-fs-write-stream-atomic all 1.0.10-5 [5,256 B] Get:49 http://us.archive.ubuntu.com/ubuntu jammy/universe amd64 node-rimraf all 3.0.2-1 [10.1 kB] Get:50 http://us.archive.ubuntu.com/ubuntu jammy/universe amd64 node-run-queue all 2.0.0-2 [5,092 B] Get:51 http://us.archive.ubuntu.com/ubuntu jammy/universe amd64 node-copy-concurrently all 1.0.5-8 [7,118 B] Get:52 http://us.archive.ubuntu.com/ubuntu jammy/universe amd64 node-move-concurrently all 1.0.1-4 [5,120 B] Get:53 http://us.archive.ubuntu.com/ubuntu jammy/universe amd64 node-escape-string-regexp all 4.0.0-2 [4,328 B] Get:54 http://us.archive.ubuntu.com/ubuntu jammy/universe amd64 node-indent-string all 4.0.0-2 [4,122 B] Get:55 http://us.archive.ubuntu.com/ubuntu jammy/universe amd64 node-p-map all 4.0.0+~3.1.0+~3.0.1-1 [8,058 B] Get:56 http://us.archive.ubuntu.com/ubuntu jammy/universe amd64 node-promise-inflight all 1.0.1+~1.0.0-1 [4,896 B] Get:57 http://us.archive.ubuntu.com/ubuntu jammy/universe amd64 node-ssri all 8.0.1-2 [19.6 kB] Get:58 http://us.archive.ubuntu.com/ubuntu jammy/universe amd64 node-unique-filename all 1.1.1+ds-1 [3,832 B] Get:59 http://us.archive.ubuntu.com/ubuntu jammy/universe amd64 node-cacache all 15.0.5+~cs13.9.21-3 [34.9 kB] Get:60 http://us.archive.ubuntu.com/ubuntu jammy/universe amd64 node-clean-yaml-object all 0.1.0-5 [4,718 B] Get:61 http://us.archive.ubuntu.com/ubuntu jammy/universe amd64 node-clone all 2.1.2-3 [8,344 B] Get:62 http://us.archive.ubuntu.com/ubuntu jammy/universe amd64 node-color-name all 1.1.4+~1.1.1-2 [6,076 B] Get:63 http://us.archive.ubuntu.com/ubuntu jammy/universe amd64 node-color-convert all 2.0.1-1 [10.2 kB] Get:64 http://us.archive.ubuntu.com/ubuntu jammy/universe amd64 node-colors all 1.4.0-3 [12.3 kB] Get:65 http://us.archive.ubuntu.com/ubuntu jammy/universe amd64 node-strip-ansi all 6.0.1-1 [4,184 B] Get:66 http://us.archive.ubuntu.com/ubuntu jammy/universe amd64 node-defaults all 1.0.3+~1.0.3-1 [4,288 B] Get:67 http://us.archive.ubuntu.com/ubuntu jammy/universe amd64 node-wcwidth.js all 1.0.2-1 [7,278 B] Get:68 http://us.archive.ubuntu.com/ubuntu jammy/universe amd64 node-columnify all 1.5.4+~1.5.1-1 [12.6 kB] Get:69 http://us.archive.ubuntu.com/ubuntu jammy/universe amd64 node-console-control-strings all 1.1.0-2 [5,428 B] Get:70 http://us.archive.ubuntu.com/ubuntu jammy/universe amd64 node-growl all 1.10.5-4 [7,064 B] Get:71 http://us.archive.ubuntu.com/ubuntu jammy/universe amd64 node-sprintf-js all 1.1.2+ds1+~1.1.2-1 [3,916 B] Get:72 http://us.archive.ubuntu.com/ubuntu jammy/universe amd64 node-argparse all 2.0.1-2 [33.2 kB] Get:73 http://us.archive.ubuntu.com/ubuntu jammy/universe amd64 node-esprima all 4.0.1+ds+~4.0.3-2 [69.3 kB] Get:74 http://us.archive.ubuntu.com/ubuntu jammy/universe amd64 node-js-yaml all 4.1.0+dfsg+~4.0.5-6 [62.7 kB] Get:75 http://us.archive.ubuntu.com/ubuntu jammy/universe amd64 node-lcov-parse all 1.0.0+20170612git80d039574ed9-5 [5,084 B] Get:76 http://us.archive.ubuntu.com/ubuntu jammy/universe amd64 node-log-driver all 1.2.7+git+20180219+bba1761737-7 [5,436 B] Get:77 http://us.archive.ubuntu.com/ubuntu jammy/universe amd64 node-is-plain-obj all 3.0.0-2 [3,994 B] Get:78 http://us.archive.ubuntu.com/ubuntu jammy/universe amd64 node-is-buffer all 2.0.5-2 [4,128 B] Get:79 http://us.archive.ubuntu.com/ubuntu jammy/universe amd64 node-kind-of all 6.0.3+dfsg-2 [8,628 B] Get:80 http://us.archive.ubuntu.com/ubuntu jammy/universe amd64 node-minimist all 1.2.5+~cs5.3.2-1 [9,434 B] Get:81 http://us.archive.ubuntu.com/ubuntu jammy/universe amd64 node-cssom all 0.4.4-3 [14.1 kB] Get:82 http://us.archive.ubuntu.com/ubuntu jammy/universe amd64 node-cssstyle all 2.3.0-2 [30.3 kB] Get:83 http://us.archive.ubuntu.com/ubuntu jammy/universe amd64 node-delayed-stream all 1.0.0-5 [5,464 B] Get:84 http://us.archive.ubuntu.com/ubuntu jammy/universe amd64 node-combined-stream all 1.0.8+~1.0.3-1 [7,432 B] Get:85 http://us.archive.ubuntu.com/ubuntu jammy/universe amd64 node-mime all 3.0.0+dfsg+~cs3.96.1-1 [38.1 kB] Get:86 http://us.archive.ubuntu.com/ubuntu jammy/universe amd64 node-mime-types all 2.1.33-1 [6,944 B] Get:87 http://us.archive.ubuntu.com/ubuntu jammy/universe amd64 node-form-data all 3.0.1-1 [13.4 kB] Get:88 http://us.archive.ubuntu.com/ubuntu jammy/universe amd64 node-events all 3.3.0+~3.0.0-2 [3,090 B] Get:89 http://us.archive.ubuntu.com/ubuntu jammy/universe amd64 node-https-proxy-agent all 5.0.0+~cs8.0.0-3 [16.4 kB] Get:90 http://us.archive.ubuntu.com/ubuntu jammy/universe amd64 node-iconv-lite all 0.6.3-2 [167 kB] Get:91 http://us.archive.ubuntu.com/ubuntu jammy/universe amd64 node-lodash-packages all 4.17.21+dfsg+~cs8.31.198.20210220-5 [166 kB] Get:92 http://us.archive.ubuntu.com/ubuntu jammy/universe amd64 node-stealthy-require all 1.1.1-5 [7,176 B] Get:93 http://us.archive.ubuntu.com/ubuntu jammy/universe amd64 node-punycode all 2.1.1-5 [9,902 B] Get:94 http://us.archive.ubuntu.com/ubuntu jammy/universe amd64 node-psl all 1.8.0+ds-6 [39.6 kB] Get:95 http://us.archive.ubuntu.com/ubuntu jammy/universe amd64 node-universalify all 2.0.0-3 [4,266 B] Get:96 http://us.archive.ubuntu.com/ubuntu jammy/universe amd64 node-tough-cookie all 4.0.0-2 [31.7 kB] Get:97 http://us.archive.ubuntu.com/ubuntu jammy/universe amd64 node-webidl-conversions all 7.0.0~1.1.0+~cs15.1.20180823-2 [27.5 kB] Get:98 http://us.archive.ubuntu.com/ubuntu jammy/universe amd64 node-commander all 9.0.0-2 [48.0 kB] Get:99 http://us.archive.ubuntu.com/ubuntu jammy/universe amd64 node-mute-stream all 0.0.8+~0.0.1-1 [6,448 B] Get:100 http://us.archive.ubuntu.com/ubuntu jammy/universe amd64 node-read all 1.0.7-3 [5,478 B] Get:101 http://us.archive.ubuntu.com/ubuntu jammy/universe amd64 node-ws all 8.5.0+~cs13.3.3-2 [49.5 kB] Get:102 http://us.archive.ubuntu.com/ubuntu jammy/universe amd64 node-jsdom all 19.0.0+~cs90.11.27-1 [446 kB] Get:103 http://us.archive.ubuntu.com/ubuntu jammy/universe amd64 node-fetch all 2.6.7+~2.5.12-1 [27.1 kB] Get:104 http://us.archive.ubuntu.com/ubuntu jammy/universe amd64 node-coveralls all 3.1.1-1 [14.2 kB] Get:105 http://us.archive.ubuntu.com/ubuntu jammy/universe amd64 node-mimic-response all 3.1.0-7 [5,430 B] Get:106 http://us.archive.ubuntu.com/ubuntu jammy/universe amd64 node-decompress-response all 6.0.0-2 [4,656 B] Get:107 http://us.archive.ubuntu.com/ubuntu jammy/universe amd64 node-diff all 5.0.0~dfsg+~5.0.1-3 [77.4 kB] Get:108 http://us.archive.ubuntu.com/ubuntu jammy/universe amd64 node-err-code all 2.0.3+dfsg-3 [4,918 B] Get:109 http://us.archive.ubuntu.com/ubuntu jammy/universe amd64 node-time-stamp all 2.2.0-1 [5,984 B] Get:110 http://us.archive.ubuntu.com/ubuntu jammy/universe amd64 node-fancy-log all 1.3.3+~cs1.3.1-2 [8,102 B] Get:111 http://us.archive.ubuntu.com/ubuntu jammy/universe amd64 node-signal-exit all 3.0.6+~3.0.1-1 [7,000 B] Get:112 http://us.archive.ubuntu.com/ubuntu jammy/universe amd64 node-foreground-child all 2.0.0-3 [5,542 B] Get:113 http://us.archive.ubuntu.com/ubuntu jammy/universe amd64 node-function-bind all 1.1.1+repacked+~1.0.3-1 [5,244 B] Get:114 http://us.archive.ubuntu.com/ubuntu jammy/universe amd64 node-has-unicode all 2.0.1-4 [3,948 B] Get:115 http://us.archive.ubuntu.com/ubuntu jammy/universe amd64 node-ansi-styles all 4.3.0+~4.2.0-1 [8,968 B] Get:116 http://us.archive.ubuntu.com/ubuntu jammy/universe amd64 node-slice-ansi all 5.0.0+~cs9.0.0-4 [8,044 B] Get:117 http://us.archive.ubuntu.com/ubuntu jammy/universe amd64 node-string-width all 4.2.3+~cs13.2.3-1 [11.4 kB] Get:118 http://us.archive.ubuntu.com/ubuntu jammy/universe amd64 node-wide-align all 1.1.3-4 [4,228 B] Get:119 http://us.archive.ubuntu.com/ubuntu jammy/universe amd64 node-gauge all 4.0.2-1 [16.3 kB] Get:120 http://us.archive.ubuntu.com/ubuntu jammy/universe amd64 node-end-of-stream all 1.4.4+~1.4.1-1 [5,340 B] Get:121 http://us.archive.ubuntu.com/ubuntu jammy/universe amd64 node-pump all 3.0.0-5 [5,160 B] Get:122 http://us.archive.ubuntu.com/ubuntu jammy/universe amd64 node-get-stream all 6.0.1-1 [7,324 B] Get:123 http://us.archive.ubuntu.com/ubuntu jammy/universe amd64 node-lowercase-keys all 2.0.0-2 [3,754 B] Get:124 http://us.archive.ubuntu.com/ubuntu jammy/universe amd64 node-json-buffer all 3.0.1-1 [3,812 B] Get:125 http://us.archive.ubuntu.com/ubuntu jammy/universe amd64 node-p-cancelable all 2.1.1-1 [7,358 B] Get:126 http://us.archive.ubuntu.com/ubuntu jammy/universe amd64 node-quick-lru all 5.1.1-1 [5,532 B] Get:127 http://us.archive.ubuntu.com/ubuntu jammy/universe amd64 node-got all 11.8.3+~cs58.7.37-1 [122 kB] Get:128 http://us.archive.ubuntu.com/ubuntu jammy/universe amd64 node-has-flag all 4.0.0-2 [4,228 B] Get:129 http://us.archive.ubuntu.com/ubuntu jammy/universe amd64 node-hosted-git-info all 4.0.2-1 [9,006 B] Get:130 http://us.archive.ubuntu.com/ubuntu jammy/universe amd64 node-ip all 1.1.5+~1.1.0-1 [8,140 B] Get:131 http://us.archive.ubuntu.com/ubuntu jammy/universe amd64 node-ip-regex all 4.3.0+~4.1.1-1 [5,254 B] Get:132 http://us.archive.ubuntu.com/ubuntu jammy/universe amd64 node-is-typedarray all 1.0.0-4 [2,072 B] Get:133 http://us.archive.ubuntu.com/ubuntu jammy/universe amd64 node-isexe all 2.0.0+~2.0.1-4 [6,102 B] Get:134 http://us.archive.ubuntu.com/ubuntu jammy/universe amd64 node-json-parse-better-errors all 1.0.2+~cs3.3.1-1 [7,328 B] Get:135 http://us.archive.ubuntu.com/ubuntu jammy/universe amd64 node-encoding all 0.1.13-2 [4,366 B] Get:136 http://us.archive.ubuntu.com/ubuntu jammy/universe amd64 node-jsonparse all 1.3.1-10 [8,060 B] Get:137 http://us.archive.ubuntu.com/ubuntu jammy/universe amd64 node-minipass all 3.1.6+~cs8.7.18-1 [32.9 kB] Get:138 http://us.archive.ubuntu.com/ubuntu jammy/universe amd64 node-npm-bundled all 1.1.2-1 [6,228 B] Get:139 http://us.archive.ubuntu.com/ubuntu jammy/universe amd64 node-osenv all 0.1.5+~0.1.0-1 [5,896 B] Get:140 http://us.archive.ubuntu.com/ubuntu jammy/universe amd64 node-validate-npm-package-name all 3.0.0-4 [5,058 B] Get:141 http://us.archive.ubuntu.com/ubuntu jammy/universe amd64 node-npm-package-arg all 8.1.5-1 [8,132 B] Get:142 http://us.archive.ubuntu.com/ubuntu jammy/universe amd64 node-object-assign all 4.1.1-6 [4,754 B] Get:143 http://us.archive.ubuntu.com/ubuntu jammy/universe amd64 node-opener all 1.5.2+~1.4.0-1 [6,000 B] Get:144 http://us.archive.ubuntu.com/ubuntu jammy/universe amd64 node-retry all 0.13.1+~0.12.1-1 [11.5 kB] Get:145 http://us.archive.ubuntu.com/ubuntu jammy/universe amd64 node-promise-retry all 2.0.1-2 [5,010 B] Get:146 http://us.archive.ubuntu.com/ubuntu jammy/universe amd64 node-promzard all 0.3.0-2 [6,888 B] Get:147 http://us.archive.ubuntu.com/ubuntu jammy/universe amd64 node-set-blocking all 2.0.0-2 [3,766 B] Get:148 http://us.archive.ubuntu.com/ubuntu jammy/universe amd64 node-slash all 3.0.0-2 [3,922 B] Get:149 http://us.archive.ubuntu.com/ubuntu jammy/universe amd64 libjs-source-map all 0.7.0++dfsg2+really.0.6.1-9 [93.9 kB] Get:150 http://us.archive.ubuntu.com/ubuntu jammy/universe amd64 node-source-map all 0.7.0++dfsg2+really.0.6.1-9 [33.6 kB] Get:151 http://us.archive.ubuntu.com/ubuntu jammy/universe amd64 node-source-map-support all 0.5.21+ds+~0.5.4-1 [14.2 kB] Get:152 http://us.archive.ubuntu.com/ubuntu jammy/universe amd64 node-spdx-license-ids all 3.0.11-1 [7,306 B] Get:153 http://us.archive.ubuntu.com/ubuntu jammy/universe amd64 node-spdx-exceptions all 2.3.0-2 [3,978 B] Get:154 http://us.archive.ubuntu.com/ubuntu jammy/universe amd64 node-spdx-expression-parse all 3.0.1+~3.0.1-1 [7,658 B] Get:155 http://us.archive.ubuntu.com/ubuntu jammy/universe amd64 node-spdx-correct all 3.1.1-2 [5,476 B] Get:156 http://us.archive.ubuntu.com/ubuntu jammy/universe amd64 node-stack-utils all 2.0.5+~2.0.1-1 [9,368 B] Get:157 http://us.archive.ubuntu.com/ubuntu jammy/universe amd64 node-supports-color all 8.1.1+~8.1.1-1 [7,048 B] Get:158 http://us.archive.ubuntu.com/ubuntu jammy/universe amd64 node-tap-parser all 7.0.0+ds1-6 [19.4 kB] Get:159 http://us.archive.ubuntu.com/ubuntu jammy/universe amd64 node-tap-mocha-reporter all 3.0.7+ds-2 [39.2 kB] Get:160 http://us.archive.ubuntu.com/ubuntu jammy/universe amd64 node-text-table all 0.2.0-4 [4,762 B] Get:161 http://us.archive.ubuntu.com/ubuntu jammy/universe amd64 node-tmatch all 5.0.0-4 [6,002 B] Get:162 http://us.archive.ubuntu.com/ubuntu jammy/universe amd64 node-typedarray-to-buffer all 4.0.0-2 [2,242 B] Get:163 http://us.archive.ubuntu.com/ubuntu jammy/universe amd64 node-validate-npm-package-license all 3.0.4-2 [4,252 B] Get:164 http://us.archive.ubuntu.com/ubuntu jammy/universe amd64 node-whatwg-fetch all 3.6.2-5 [15.0 kB] Get:165 http://us.archive.ubuntu.com/ubuntu jammy/universe amd64 node-write-file-atomic all 3.0.3+~3.0.2-1 [7,690 B] Get:166 http://us.archive.ubuntu.com/ubuntu jammy/universe amd64 node-abbrev all 1.1.1+~1.1.2-1 [5,784 B] Get:167 http://us.archive.ubuntu.com/ubuntu jammy/universe amd64 node-archy all 1.0.0-4 [4,728 B] Get:168 http://us.archive.ubuntu.com/ubuntu jammy/universe amd64 node-chalk all 4.1.2-1 [15.9 kB] Get:169 http://us.archive.ubuntu.com/ubuntu jammy/universe amd64 node-cli-table all 0.3.11+~cs0.13.3-1 [23.2 kB] Get:170 http://us.archive.ubuntu.com/ubuntu jammy/universe amd64 node-depd all 2.0.0-2 [10.5 kB] Get:171 http://us.archive.ubuntu.com/ubuntu jammy/universe amd64 node-nopt all 5.0.0-2 [11.3 kB] Get:172 http://us.archive.ubuntu.com/ubuntu jammy/universe amd64 node-npmlog all 6.0.1+~4.1.4-1 [9,968 B] Get:173 http://us.archive.ubuntu.com/ubuntu jammy/universe amd64 node-tar all 6.1.11+ds1+~cs6.0.6-1 [38.8 kB] Get:174 http://us.archive.ubuntu.com/ubuntu jammy/universe amd64 node-which all 2.0.2+~cs1.3.2-2 [7,374 B] Get:175 http://us.archive.ubuntu.com/ubuntu jammy/universe amd64 node-gyp all 8.4.1-1 [34.7 kB] Get:176 http://us.archive.ubuntu.com/ubuntu jammy/universe amd64 node-ini all 2.0.1-1 [6,528 B] Get:177 http://us.archive.ubuntu.com/ubuntu jammy/universe amd64 node-negotiator all 0.6.2+~0.6.1-1 [10.3 kB] Get:178 http://us.archive.ubuntu.com/ubuntu jammy/universe amd64 node-resolve all 1.20.0+~cs5.27.9-1 [20.7 kB] Get:179 http://us.archive.ubuntu.com/ubuntu jammy/universe amd64 node-normalize-package-data all 3.0.3+~2.4.1-1 [12.8 kB] Get:180 http://us.archive.ubuntu.com/ubuntu jammy/universe amd64 node-read-package-json all 4.1.1-1 [10.4 kB] Get:181 http://us.archive.ubuntu.com/ubuntu jammy/universe amd64 node-tap all 12.0.1+ds-4 [43.6 kB] Get:182 http://us.archive.ubuntu.com/ubuntu jammy/universe amd64 npm all 8.5.1~ds-1 [894 kB] Fetched 5,075 kB in 19s (272 kB/s) Extracting templates from packages: 100% Selecting previously unselected package gyp. (Reading database ... 250530 files and directories currently installed.) Preparing to unpack .../000-gyp_0.1+20210831gitd6c5dd5-5_all.deb ... Unpacking gyp (0.1+20210831gitd6c5dd5-5) ... Selecting previously unselected package libjs-events. Preparing to unpack .../001-libjs-events_3.3.0+~3.0.0-2_all.deb ... Unpacking libjs-events (3.3.0+~3.0.0-2) ... Selecting previously unselected package libjs-is-typedarray. Preparing to unpack .../002-libjs-is-typedarray_1.0.0-4_all.deb ... Unpacking libjs-is-typedarray (1.0.0-4) ... Selecting previously unselected package libjs-psl. Preparing to unpack .../003-libjs-psl_1.8.0+ds-6_all.deb ... Unpacking libjs-psl (1.8.0+ds-6) ... Selecting previously unselected package libjs-sprintf-js. Preparing to unpack .../004-libjs-sprintf-js_1.1.2+ds1+~1.1.2-1_all.deb ... Unpacking libjs-sprintf-js (1.1.2+ds1+~1.1.2-1) ... Selecting previously unselected package libjs-typedarray-to-buffer. Preparing to unpack .../005-libjs-typedarray-to-buffer_4.0.0-2_all.deb ... Unpacking libjs-typedarray-to-buffer (4.0.0-2) ... Selecting previously unselected package libuv1-dev:amd64. Preparing to unpack .../006-libuv1-dev_1.43.0-1ubuntu0.1_amd64.deb ... Unpacking libuv1-dev:amd64 (1.43.0-1ubuntu0.1) ... Selecting previously unselected package libnode-dev. Preparing to unpack .../007-libnode-dev_12.22.9~dfsg-1ubuntu3.4_amd64.deb ... Unpacking libnode-dev (12.22.9~dfsg-1ubuntu3.4) ... Selecting previously unselected package node-abab. Preparing to unpack .../008-node-abab_2.0.5-2_all.deb ... Unpacking node-abab (2.0.5-2) ... Selecting previously unselected package node-ms. Preparing to unpack .../009-node-ms_2.1.3+~cs0.7.31-2_all.deb ... Unpacking node-ms (2.1.3+~cs0.7.31-2) ... Selecting previously unselected package node-debug. Preparing to unpack .../010-node-debug_4.3.2+~cs4.1.7-1_all.deb ... Unpacking node-debug (4.3.2+~cs4.1.7-1) ... Selecting previously unselected package node-yallist. Preparing to unpack .../011-node-yallist_4.0.0+~4.0.1-1_all.deb ... Unpacking node-yallist (4.0.0+~4.0.1-1) ... Selecting previously unselected package node-lru-cache. Preparing to unpack .../012-node-lru-cache_6.0.0+~5.1.1-1_all.deb ... Unpacking node-lru-cache (6.0.0+~5.1.1-1) ... Selecting previously unselected package node-semver. Preparing to unpack .../013-node-semver_7.3.5+~7.3.8-1_all.deb ... Unpacking node-semver (7.3.5+~7.3.8-1) ... Selecting previously unselected package node-agent-base. Preparing to unpack .../014-node-agent-base_6.0.2+~cs5.4.2-1_all.deb ... Unpacking node-agent-base (6.0.2+~cs5.4.2-1) ... Selecting previously unselected package node-ansi-regex. Preparing to unpack .../015-node-ansi-regex_5.0.1-1_all.deb ... Unpacking node-ansi-regex (5.0.1-1) ... Selecting previously unselected package node-ansistyles. Preparing to unpack .../016-node-ansistyles_0.1.3-5_all.deb ... Unpacking node-ansistyles (0.1.3-5) ... Selecting previously unselected package node-aproba. Preparing to unpack .../017-node-aproba_2.0.0-2_all.deb ... Unpacking node-aproba (2.0.0-2) ... Selecting previously unselected package node-delegates. Preparing to unpack .../018-node-delegates_1.0.0-3_all.deb ... Unpacking node-delegates (1.0.0-3) ... Selecting previously unselected package libjs-inherits. Preparing to unpack .../019-libjs-inherits_2.0.4-4_all.deb ... Unpacking libjs-inherits (2.0.4-4) ... Selecting previously unselected package node-inherits. Preparing to unpack .../020-node-inherits_2.0.4-4_all.deb ... Unpacking node-inherits (2.0.4-4) ... Selecting previously unselected package node-core-util-is. Preparing to unpack .../021-node-core-util-is_1.0.3-1_all.deb ... Unpacking node-core-util-is (1.0.3-1) ... Selecting previously unselected package node-safe-buffer. Preparing to unpack .../022-node-safe-buffer_5.2.1+~cs2.1.2-2_all.deb ... Unpacking node-safe-buffer (5.2.1+~cs2.1.2-2) ... Selecting previously unselected package node-string-decoder. Preparing to unpack .../023-node-string-decoder_1.3.0-5_all.deb ... Unpacking node-string-decoder (1.3.0-5) ... Selecting previously unselected package node-process-nextick-args. Preparing to unpack .../024-node-process-nextick-args_2.0.1-2_all.deb ... Unpacking node-process-nextick-args (2.0.1-2) ... Selecting previously unselected package node-util-deprecate. Preparing to unpack .../025-node-util-deprecate_1.0.2-3_all.deb ... Unpacking node-util-deprecate (1.0.2-3) ... Selecting previously unselected package node-isarray. Preparing to unpack .../026-node-isarray_2.0.5-3_all.deb ... Unpacking node-isarray (2.0.5-3) ... Selecting previously unselected package node-readable-stream. Preparing to unpack .../027-node-readable-stream_3.6.0+~cs3.0.0-1_all.deb ... Unpacking node-readable-stream (3.6.0+~cs3.0.0-1) ... Selecting previously unselected package node-are-we-there-yet. Preparing to unpack .../028-node-are-we-there-yet_3.0.0+~1.1.0-1_all.deb ... Unpacking node-are-we-there-yet (3.0.0+~1.1.0-1) ... Selecting previously unselected package node-arrify. Preparing to unpack .../029-node-arrify_2.0.1-2_all.deb ... Unpacking node-arrify (2.0.1-2) ... Selecting previously unselected package node-asap. Preparing to unpack .../030-node-asap_2.0.6+~2.0.0-1_all.deb ... Unpacking node-asap (2.0.6+~2.0.0-1) ... Selecting previously unselected package node-asynckit. Preparing to unpack .../031-node-asynckit_0.4.0-4_all.deb ... Unpacking node-asynckit (0.4.0-4) ... Selecting previously unselected package node-builtins. Preparing to unpack .../032-node-builtins_4.0.0-1_all.deb ... Unpacking node-builtins (4.0.0-1) ... Selecting previously unselected package node-chownr. Preparing to unpack .../033-node-chownr_2.0.0-1_all.deb ... Unpacking node-chownr (2.0.0-1) ... Selecting previously unselected package node-fs.realpath. Preparing to unpack .../034-node-fs.realpath_1.0.0-2_all.deb ... Unpacking node-fs.realpath (1.0.0-2) ... Selecting previously unselected package node-wrappy. Preparing to unpack .../035-node-wrappy_1.0.2-2_all.deb ... Unpacking node-wrappy (1.0.2-2) ... Selecting previously unselected package node-once. Preparing to unpack .../036-node-once_1.4.0-4_all.deb ... Unpacking node-once (1.4.0-4) ... Selecting previously unselected package node-inflight. Preparing to unpack .../037-node-inflight_1.0.6-2_all.deb ... Unpacking node-inflight (1.0.6-2) ... Selecting previously unselected package node-balanced-match. Preparing to unpack .../038-node-balanced-match_2.0.0-1_all.deb ... Unpacking node-balanced-match (2.0.0-1) ... Selecting previously unselected package node-brace-expansion. Preparing to unpack .../039-node-brace-expansion_2.0.1-1_all.deb ... Unpacking node-brace-expansion (2.0.1-1) ... Selecting previously unselected package node-minimatch. Preparing to unpack .../040-node-minimatch_3.1.1+~3.0.5-1_all.deb ... Unpacking node-minimatch (3.1.1+~3.0.5-1) ... Selecting previously unselected package node-path-is-absolute. Preparing to unpack .../041-node-path-is-absolute_2.0.0-2_all.deb ... Unpacking node-path-is-absolute (2.0.0-2) ... Selecting previously unselected package node-glob. Preparing to unpack .../042-node-glob_7.2.1+~cs7.6.15-1_all.deb ... Unpacking node-glob (7.2.1+~cs7.6.15-1) ... Selecting previously unselected package node-graceful-fs. Preparing to unpack .../043-node-graceful-fs_4.2.4+repack-1_all.deb ... Unpacking node-graceful-fs (4.2.4+repack-1) ... Selecting previously unselected package node-mkdirp. Preparing to unpack .../044-node-mkdirp_1.0.4+~1.0.2-1_all.deb ... Unpacking node-mkdirp (1.0.4+~1.0.2-1) ... Selecting previously unselected package node-iferr. Preparing to unpack .../045-node-iferr_1.0.2+~1.0.2-1_all.deb ... Unpacking node-iferr (1.0.2+~1.0.2-1) ... Selecting previously unselected package node-imurmurhash. Preparing to unpack .../046-node-imurmurhash_0.1.4+dfsg+~0.1.1-1_all.deb ... Unpacking node-imurmurhash (0.1.4+dfsg+~0.1.1-1) ... Selecting previously unselected package node-fs-write-stream-atomic. Preparing to unpack .../047-node-fs-write-stream-atomic_1.0.10-5_all.deb ... Unpacking node-fs-write-stream-atomic (1.0.10-5) ... Selecting previously unselected package node-rimraf. Preparing to unpack .../048-node-rimraf_3.0.2-1_all.deb ... Unpacking node-rimraf (3.0.2-1) ... Selecting previously unselected package node-run-queue. Preparing to unpack .../049-node-run-queue_2.0.0-2_all.deb ... Unpacking node-run-queue (2.0.0-2) ... Selecting previously unselected package node-copy-concurrently. Preparing to unpack .../050-node-copy-concurrently_1.0.5-8_all.deb ... Unpacking node-copy-concurrently (1.0.5-8) ... Selecting previously unselected package node-move-concurrently. Preparing to unpack .../051-node-move-concurrently_1.0.1-4_all.deb ... Unpacking node-move-concurrently (1.0.1-4) ... Selecting previously unselected package node-escape-string-regexp. Preparing to unpack .../052-node-escape-string-regexp_4.0.0-2_all.deb ... Unpacking node-escape-string-regexp (4.0.0-2) ... Selecting previously unselected package node-indent-string. Preparing to unpack .../053-node-indent-string_4.0.0-2_all.deb ... Unpacking node-indent-string (4.0.0-2) ... Selecting previously unselected package node-p-map. Preparing to unpack .../054-node-p-map_4.0.0+~3.1.0+~3.0.1-1_all.deb ... Unpacking node-p-map (4.0.0+~3.1.0+~3.0.1-1) ... Selecting previously unselected package node-promise-inflight. Preparing to unpack .../055-node-promise-inflight_1.0.1+~1.0.0-1_all.deb ... Unpacking node-promise-inflight (1.0.1+~1.0.0-1) ... Selecting previously unselected package node-ssri. Preparing to unpack .../056-node-ssri_8.0.1-2_all.deb ... Unpacking node-ssri (8.0.1-2) ... Selecting previously unselected package node-unique-filename. Preparing to unpack .../057-node-unique-filename_1.1.1+ds-1_all.deb ... Unpacking node-unique-filename (1.1.1+ds-1) ... Selecting previously unselected package node-cacache. Preparing to unpack .../058-node-cacache_15.0.5+~cs13.9.21-3_all.deb ... Unpacking node-cacache (15.0.5+~cs13.9.21-3) ... Selecting previously unselected package node-clean-yaml-object. Preparing to unpack .../059-node-clean-yaml-object_0.1.0-5_all.deb ... Unpacking node-clean-yaml-object (0.1.0-5) ... Selecting previously unselected package node-clone. Preparing to unpack .../060-node-clone_2.1.2-3_all.deb ... Unpacking node-clone (2.1.2-3) ... Selecting previously unselected package node-color-name. Preparing to unpack .../061-node-color-name_1.1.4+~1.1.1-2_all.deb ... Unpacking node-color-name (1.1.4+~1.1.1-2) ... Selecting previously unselected package node-color-convert. Preparing to unpack .../062-node-color-convert_2.0.1-1_all.deb ... Unpacking node-color-convert (2.0.1-1) ... Selecting previously unselected package node-colors. Preparing to unpack .../063-node-colors_1.4.0-3_all.deb ... Unpacking node-colors (1.4.0-3) ... Selecting previously unselected package node-strip-ansi. Preparing to unpack .../064-node-strip-ansi_6.0.1-1_all.deb ... Unpacking node-strip-ansi (6.0.1-1) ... Selecting previously unselected package node-defaults. Preparing to unpack .../065-node-defaults_1.0.3+~1.0.3-1_all.deb ... Unpacking node-defaults (1.0.3+~1.0.3-1) ... Selecting previously unselected package node-wcwidth.js. Preparing to unpack .../066-node-wcwidth.js_1.0.2-1_all.deb ... Unpacking node-wcwidth.js (1.0.2-1) ... Selecting previously unselected package node-columnify. Preparing to unpack .../067-node-columnify_1.5.4+~1.5.1-1_all.deb ... Unpacking node-columnify (1.5.4+~1.5.1-1) ... Selecting previously unselected package node-console-control-strings. Preparing to unpack .../068-node-console-control-strings_1.1.0-2_all.deb ... Unpacking node-console-control-strings (1.1.0-2) ... Selecting previously unselected package node-growl. Preparing to unpack .../069-node-growl_1.10.5-4_all.deb ... Unpacking node-growl (1.10.5-4) ... Selecting previously unselected package node-sprintf-js. Preparing to unpack .../070-node-sprintf-js_1.1.2+ds1+~1.1.2-1_all.deb ... Unpacking node-sprintf-js (1.1.2+ds1+~1.1.2-1) ... Selecting previously unselected package node-argparse. Preparing to unpack .../071-node-argparse_2.0.1-2_all.deb ... Unpacking node-argparse (2.0.1-2) ... Selecting previously unselected package node-esprima. Preparing to unpack .../072-node-esprima_4.0.1+ds+~4.0.3-2_all.deb ... Unpacking node-esprima (4.0.1+ds+~4.0.3-2) ... Selecting previously unselected package node-js-yaml. Preparing to unpack .../073-node-js-yaml_4.1.0+dfsg+~4.0.5-6_all.deb ... Unpacking node-js-yaml (4.1.0+dfsg+~4.0.5-6) ... Selecting previously unselected package node-lcov-parse. Preparing to unpack .../074-node-lcov-parse_1.0.0+20170612git80d039574ed9-5_all. deb ... Unpacking node-lcov-parse (1.0.0+20170612git80d039574ed9-5) ... Selecting previously unselected package node-log-driver. Preparing to unpack .../075-node-log-driver_1.2.7+git+20180219+bba1761737-7_all. deb ... Unpacking node-log-driver (1.2.7+git+20180219+bba1761737-7) ... Selecting previously unselected package node-is-plain-obj. Preparing to unpack .../076-node-is-plain-obj_3.0.0-2_all.deb ... Unpacking node-is-plain-obj (3.0.0-2) ... Selecting previously unselected package node-is-buffer. Preparing to unpack .../077-node-is-buffer_2.0.5-2_all.deb ... Unpacking node-is-buffer (2.0.5-2) ... Selecting previously unselected package node-kind-of. Preparing to unpack .../078-node-kind-of_6.0.3+dfsg-2_all.deb ... Unpacking node-kind-of (6.0.3+dfsg-2) ... Selecting previously unselected package node-minimist. Preparing to unpack .../079-node-minimist_1.2.5+~cs5.3.2-1_all.deb ... Unpacking node-minimist (1.2.5+~cs5.3.2-1) ... Selecting previously unselected package node-cssom. Preparing to unpack .../080-node-cssom_0.4.4-3_all.deb ... Unpacking node-cssom (0.4.4-3) ... Selecting previously unselected package node-cssstyle. Preparing to unpack .../081-node-cssstyle_2.3.0-2_all.deb ... Unpacking node-cssstyle (2.3.0-2) ... Selecting previously unselected package node-delayed-stream. Preparing to unpack .../082-node-delayed-stream_1.0.0-5_all.deb ... Unpacking node-delayed-stream (1.0.0-5) ... Selecting previously unselected package node-combined-stream. Preparing to unpack .../083-node-combined-stream_1.0.8+~1.0.3-1_all.deb ... Unpacking node-combined-stream (1.0.8+~1.0.3-1) ... Selecting previously unselected package node-mime. Preparing to unpack .../084-node-mime_3.0.0+dfsg+~cs3.96.1-1_all.deb ... Unpacking node-mime (3.0.0+dfsg+~cs3.96.1-1) ... Selecting previously unselected package node-mime-types. Preparing to unpack .../085-node-mime-types_2.1.33-1_all.deb ... Unpacking node-mime-types (2.1.33-1) ... Selecting previously unselected package node-form-data. Preparing to unpack .../086-node-form-data_3.0.1-1_all.deb ... Unpacking node-form-data (3.0.1-1) ... Selecting previously unselected package node-events. Preparing to unpack .../087-node-events_3.3.0+~3.0.0-2_all.deb ... Unpacking node-events (3.3.0+~3.0.0-2) ... Selecting previously unselected package node-https-proxy-agent. Preparing to unpack .../088-node-https-proxy-agent_5.0.0+~cs8.0.0-3_all.deb ... Unpacking node-https-proxy-agent (5.0.0+~cs8.0.0-3) ... Selecting previously unselected package node-iconv-lite. Preparing to unpack .../089-node-iconv-lite_0.6.3-2_all.deb ... Unpacking node-iconv-lite (0.6.3-2) ... Selecting previously unselected package node-lodash-packages. Preparing to unpack .../090-node-lodash-packages_4.17.21+dfsg+~cs8.31.198.202102 20-5_all.deb ... Unpacking node-lodash-packages (4.17.21+dfsg+~cs8.31.198.20210220-5) ... Selecting previously unselected package node-stealthy-require. Preparing to unpack .../091-node-stealthy-require_1.1.1-5_all.deb ... Unpacking node-stealthy-require (1.1.1-5) ... Selecting previously unselected package node-punycode. Preparing to unpack .../092-node-punycode_2.1.1-5_all.deb ... Unpacking node-punycode (2.1.1-5) ... Selecting previously unselected package node-psl. Preparing to unpack .../093-node-psl_1.8.0+ds-6_all.deb ... Unpacking node-psl (1.8.0+ds-6) ... Selecting previously unselected package node-universalify. Preparing to unpack .../094-node-universalify_2.0.0-3_all.deb ... Unpacking node-universalify (2.0.0-3) ... Selecting previously unselected package node-tough-cookie. Preparing to unpack .../095-node-tough-cookie_4.0.0-2_all.deb ... Unpacking node-tough-cookie (4.0.0-2) ... Selecting previously unselected package node-webidl-conversions. Preparing to unpack .../096-node-webidl-conversions_7.0.0~1.1.0+~cs15.1.20180823 -2_all.deb ... Unpacking node-webidl-conversions (7.0.0~1.1.0+~cs15.1.20180823-2) ... Selecting previously unselected package node-commander. Preparing to unpack .../097-node-commander_9.0.0-2_all.deb ... Unpacking node-commander (9.0.0-2) ... Selecting previously unselected package node-mute-stream. Preparing to unpack .../098-node-mute-stream_0.0.8+~0.0.1-1_all.deb ... Unpacking node-mute-stream (0.0.8+~0.0.1-1) ... Selecting previously unselected package node-read. Preparing to unpack .../099-node-read_1.0.7-3_all.deb ... Unpacking node-read (1.0.7-3) ... Selecting previously unselected package node-ws. Preparing to unpack .../100-node-ws_8.5.0+~cs13.3.3-2_all.deb ... Unpacking node-ws (8.5.0+~cs13.3.3-2) ... Selecting previously unselected package node-jsdom. Preparing to unpack .../101-node-jsdom_19.0.0+~cs90.11.27-1_all.deb ... Unpacking node-jsdom (19.0.0+~cs90.11.27-1) ... Selecting previously unselected package node-fetch. Preparing to unpack .../102-node-fetch_2.6.7+~2.5.12-1_all.deb ... Unpacking node-fetch (2.6.7+~2.5.12-1) ... Selecting previously unselected package node-coveralls. Preparing to unpack .../103-node-coveralls_3.1.1-1_all.deb ... Unpacking node-coveralls (3.1.1-1) ... Selecting previously unselected package node-mimic-response. Preparing to unpack .../104-node-mimic-response_3.1.0-7_all.deb ... Unpacking node-mimic-response (3.1.0-7) ... Selecting previously unselected package node-decompress-response. Preparing to unpack .../105-node-decompress-response_6.0.0-2_all.deb ... Unpacking node-decompress-response (6.0.0-2) ... Selecting previously unselected package node-diff. Preparing to unpack .../106-node-diff_5.0.0~dfsg+~5.0.1-3_all.deb ... Unpacking node-diff (5.0.0~dfsg+~5.0.1-3) ... Selecting previously unselected package node-err-code. Preparing to unpack .../107-node-err-code_2.0.3+dfsg-3_all.deb ... Unpacking node-err-code (2.0.3+dfsg-3) ... Selecting previously unselected package node-time-stamp. Preparing to unpack .../108-node-time-stamp_2.2.0-1_all.deb ... Unpacking node-time-stamp (2.2.0-1) ... Selecting previously unselected package node-fancy-log. Preparing to unpack .../109-node-fancy-log_1.3.3+~cs1.3.1-2_all.deb ... Unpacking node-fancy-log (1.3.3+~cs1.3.1-2) ... Selecting previously unselected package node-signal-exit. Preparing to unpack .../110-node-signal-exit_3.0.6+~3.0.1-1_all.deb ... Unpacking node-signal-exit (3.0.6+~3.0.1-1) ... Selecting previously unselected package node-foreground-child. Preparing to unpack .../111-node-foreground-child_2.0.0-3_all.deb ... Unpacking node-foreground-child (2.0.0-3) ... Selecting previously unselected package node-function-bind. Preparing to unpack .../112-node-function-bind_1.1.1+repacked+~1.0.3-1_all.deb . .. Unpacking node-function-bind (1.1.1+repacked+~1.0.3-1) ... Selecting previously unselected package node-has-unicode. Preparing to unpack .../113-node-has-unicode_2.0.1-4_all.deb ... Unpacking node-has-unicode (2.0.1-4) ... Selecting previously unselected package node-ansi-styles. Preparing to unpack .../114-node-ansi-styles_4.3.0+~4.2.0-1_all.deb ... Unpacking node-ansi-styles (4.3.0+~4.2.0-1) ... Selecting previously unselected package node-slice-ansi. Preparing to unpack .../115-node-slice-ansi_5.0.0+~cs9.0.0-4_all.deb ... Unpacking node-slice-ansi (5.0.0+~cs9.0.0-4) ... Selecting previously unselected package node-string-width. Preparing to unpack .../116-node-string-width_4.2.3+~cs13.2.3-1_all.deb ... Unpacking node-string-width (4.2.3+~cs13.2.3-1) ... Selecting previously unselected package node-wide-align. Preparing to unpack .../117-node-wide-align_1.1.3-4_all.deb ... Unpacking node-wide-align (1.1.3-4) ... Selecting previously unselected package node-gauge. Preparing to unpack .../118-node-gauge_4.0.2-1_all.deb ... Unpacking node-gauge (4.0.2-1) ... Selecting previously unselected package node-end-of-stream. Preparing to unpack .../119-node-end-of-stream_1.4.4+~1.4.1-1_all.deb ... Unpacking node-end-of-stream (1.4.4+~1.4.1-1) ... Selecting previously unselected package node-pump. Preparing to unpack .../120-node-pump_3.0.0-5_all.deb ... Unpacking node-pump (3.0.0-5) ... Selecting previously unselected package node-get-stream. Preparing to unpack .../121-node-get-stream_6.0.1-1_all.deb ... Unpacking node-get-stream (6.0.1-1) ... Selecting previously unselected package node-lowercase-keys. Preparing to unpack .../122-node-lowercase-keys_2.0.0-2_all.deb ... Unpacking node-lowercase-keys (2.0.0-2) ... Selecting previously unselected package node-json-buffer. Preparing to unpack .../123-node-json-buffer_3.0.1-1_all.deb ... Unpacking node-json-buffer (3.0.1-1) ... Selecting previously unselected package node-p-cancelable. Preparing to unpack .../124-node-p-cancelable_2.1.1-1_all.deb ... Unpacking node-p-cancelable (2.1.1-1) ... Selecting previously unselected package node-quick-lru. Preparing to unpack .../125-node-quick-lru_5.1.1-1_all.deb ... Unpacking node-quick-lru (5.1.1-1) ... Selecting previously unselected package node-got. Preparing to unpack .../126-node-got_11.8.3+~cs58.7.37-1_all.deb ... Unpacking node-got (11.8.3+~cs58.7.37-1) ... Selecting previously unselected package node-has-flag. Preparing to unpack .../127-node-has-flag_4.0.0-2_all.deb ... Unpacking node-has-flag (4.0.0-2) ... Selecting previously unselected package node-hosted-git-info. Preparing to unpack .../128-node-hosted-git-info_4.0.2-1_all.deb ... Unpacking node-hosted-git-info (4.0.2-1) ... Selecting previously unselected package node-ip. Preparing to unpack .../129-node-ip_1.1.5+~1.1.0-1_all.deb ... Unpacking node-ip (1.1.5+~1.1.0-1) ... Selecting previously unselected package node-ip-regex. Preparing to unpack .../130-node-ip-regex_4.3.0+~4.1.1-1_all.deb ... Unpacking node-ip-regex (4.3.0+~4.1.1-1) ... Selecting previously unselected package node-is-typedarray. Preparing to unpack .../131-node-is-typedarray_1.0.0-4_all.deb ... Unpacking node-is-typedarray (1.0.0-4) ... Selecting previously unselected package node-isexe. Preparing to unpack .../132-node-isexe_2.0.0+~2.0.1-4_all.deb ... Unpacking node-isexe (2.0.0+~2.0.1-4) ... Selecting previously unselected package node-json-parse-better-errors. Preparing to unpack .../133-node-json-parse-better-errors_1.0.2+~cs3.3.1-1_all.d eb ... Unpacking node-json-parse-better-errors (1.0.2+~cs3.3.1-1) ... Selecting previously unselected package node-encoding. Preparing to unpack .../134-node-encoding_0.1.13-2_all.deb ... Unpacking node-encoding (0.1.13-2) ... Selecting previously unselected package node-jsonparse. Preparing to unpack .../135-node-jsonparse_1.3.1-10_all.deb ... Unpacking node-jsonparse (1.3.1-10) ... Selecting previously unselected package node-minipass. Preparing to unpack .../136-node-minipass_3.1.6+~cs8.7.18-1_all.deb ... Unpacking node-minipass (3.1.6+~cs8.7.18-1) ... Selecting previously unselected package node-npm-bundled. Preparing to unpack .../137-node-npm-bundled_1.1.2-1_all.deb ... Unpacking node-npm-bundled (1.1.2-1) ... Selecting previously unselected package node-osenv. Preparing to unpack .../138-node-osenv_0.1.5+~0.1.0-1_all.deb ... Unpacking node-osenv (0.1.5+~0.1.0-1) ... Selecting previously unselected package node-validate-npm-package-name. Preparing to unpack .../139-node-validate-npm-package-name_3.0.0-4_all.deb ... Unpacking node-validate-npm-package-name (3.0.0-4) ... Selecting previously unselected package node-npm-package-arg. Preparing to unpack .../140-node-npm-package-arg_8.1.5-1_all.deb ... Unpacking node-npm-package-arg (8.1.5-1) ... Selecting previously unselected package node-object-assign. Preparing to unpack .../141-node-object-assign_4.1.1-6_all.deb ... Unpacking node-object-assign (4.1.1-6) ... Selecting previously unselected package node-opener. Preparing to unpack .../142-node-opener_1.5.2+~1.4.0-1_all.deb ... Unpacking node-opener (1.5.2+~1.4.0-1) ... Selecting previously unselected package node-retry. Preparing to unpack .../143-node-retry_0.13.1+~0.12.1-1_all.deb ... Unpacking node-retry (0.13.1+~0.12.1-1) ... Selecting previously unselected package node-promise-retry. Preparing to unpack .../144-node-promise-retry_2.0.1-2_all.deb ... Unpacking node-promise-retry (2.0.1-2) ... Selecting previously unselected package node-promzard. Preparing to unpack .../145-node-promzard_0.3.0-2_all.deb ... Unpacking node-promzard (0.3.0-2) ... Selecting previously unselected package node-set-blocking. Preparing to unpack .../146-node-set-blocking_2.0.0-2_all.deb ... Unpacking node-set-blocking (2.0.0-2) ... Selecting previously unselected package node-slash. Preparing to unpack .../147-node-slash_3.0.0-2_all.deb ... Unpacking node-slash (3.0.0-2) ... Selecting previously unselected package libjs-source-map. Preparing to unpack .../148-libjs-source-map_0.7.0++dfsg2+really.0.6.1-9_all.deb ... Unpacking libjs-source-map (0.7.0++dfsg2+really.0.6.1-9) ... Selecting previously unselected package node-source-map. Preparing to unpack .../149-node-source-map_0.7.0++dfsg2+really.0.6.1-9_all.deb ... Unpacking node-source-map (0.7.0++dfsg2+really.0.6.1-9) ... Selecting previously unselected package node-source-map-support. Preparing to unpack .../150-node-source-map-support_0.5.21+ds+~0.5.4-1_all.deb . .. Unpacking node-source-map-support (0.5.21+ds+~0.5.4-1) ... Selecting previously unselected package node-spdx-license-ids. Preparing to unpack .../151-node-spdx-license-ids_3.0.11-1_all.deb ... Unpacking node-spdx-license-ids (3.0.11-1) ... Selecting previously unselected package node-spdx-exceptions. Preparing to unpack .../152-node-spdx-exceptions_2.3.0-2_all.deb ... Unpacking node-spdx-exceptions (2.3.0-2) ... Selecting previously unselected package node-spdx-expression-parse. Preparing to unpack .../153-node-spdx-expression-parse_3.0.1+~3.0.1-1_all.deb .. . Unpacking node-spdx-expression-parse (3.0.1+~3.0.1-1) ... Selecting previously unselected package node-spdx-correct. Preparing to unpack .../154-node-spdx-correct_3.1.1-2_all.deb ... Unpacking node-spdx-correct (3.1.1-2) ... Selecting previously unselected package node-stack-utils. Preparing to unpack .../155-node-stack-utils_2.0.5+~2.0.1-1_all.deb ... Unpacking node-stack-utils (2.0.5+~2.0.1-1) ... Selecting previously unselected package node-supports-color. Preparing to unpack .../156-node-supports-color_8.1.1+~8.1.1-1_all.deb ... Unpacking node-supports-color (8.1.1+~8.1.1-1) ... Selecting previously unselected package node-tap-parser. Preparing to unpack .../157-node-tap-parser_7.0.0+ds1-6_all.deb ... Unpacking node-tap-parser (7.0.0+ds1-6) ... Selecting previously unselected package node-tap-mocha-reporter. Preparing to unpack .../158-node-tap-mocha-reporter_3.0.7+ds-2_all.deb ... Unpacking node-tap-mocha-reporter (3.0.7+ds-2) ... Selecting previously unselected package node-text-table. Preparing to unpack .../159-node-text-table_0.2.0-4_all.deb ... Unpacking node-text-table (0.2.0-4) ... Selecting previously unselected package node-tmatch. Preparing to unpack .../160-node-tmatch_5.0.0-4_all.deb ... Unpacking node-tmatch (5.0.0-4) ... Selecting previously unselected package node-typedarray-to-buffer. Preparing to unpack .../161-node-typedarray-to-buffer_4.0.0-2_all.deb ... Unpacking node-typedarray-to-buffer (4.0.0-2) ... Selecting previously unselected package node-validate-npm-package-license. Preparing to unpack .../162-node-validate-npm-package-license_3.0.4-2_all.deb .. . Unpacking node-validate-npm-package-license (3.0.4-2) ... Selecting previously unselected package node-whatwg-fetch. Preparing to unpack .../163-node-whatwg-fetch_3.6.2-5_all.deb ... Unpacking node-whatwg-fetch (3.6.2-5) ... Selecting previously unselected package node-write-file-atomic. Preparing to unpack .../164-node-write-file-atomic_3.0.3+~3.0.2-1_all.deb ... Unpacking node-write-file-atomic (3.0.3+~3.0.2-1) ... Selecting previously unselected package node-abbrev. Preparing to unpack .../165-node-abbrev_1.1.1+~1.1.2-1_all.deb ... Unpacking node-abbrev (1.1.1+~1.1.2-1) ... Selecting previously unselected package node-archy. Preparing to unpack .../166-node-archy_1.0.0-4_all.deb ... Unpacking node-archy (1.0.0-4) ... Selecting previously unselected package node-chalk. Preparing to unpack .../167-node-chalk_4.1.2-1_all.deb ... Unpacking node-chalk (4.1.2-1) ... Selecting previously unselected package node-cli-table. Preparing to unpack .../168-node-cli-table_0.3.11+~cs0.13.3-1_all.deb ... Unpacking node-cli-table (0.3.11+~cs0.13.3-1) ... Selecting previously unselected package node-depd. Preparing to unpack .../169-node-depd_2.0.0-2_all.deb ... Unpacking node-depd (2.0.0-2) ... Selecting previously unselected package node-nopt. Preparing to unpack .../170-node-nopt_5.0.0-2_all.deb ... Unpacking node-nopt (5.0.0-2) ... Selecting previously unselected package node-npmlog. Preparing to unpack .../171-node-npmlog_6.0.1+~4.1.4-1_all.deb ... Unpacking node-npmlog (6.0.1+~4.1.4-1) ... Selecting previously unselected package node-tar. Preparing to unpack .../172-node-tar_6.1.11+ds1+~cs6.0.6-1_all.deb ... Unpacking node-tar (6.1.11+ds1+~cs6.0.6-1) ... Selecting previously unselected package node-which. Preparing to unpack .../173-node-which_2.0.2+~cs1.3.2-2_all.deb ... Unpacking node-which (2.0.2+~cs1.3.2-2) ... Selecting previously unselected package node-gyp. Preparing to unpack .../174-node-gyp_8.4.1-1_all.deb ... Unpacking node-gyp (8.4.1-1) ... Selecting previously unselected package node-ini. Preparing to unpack .../175-node-ini_2.0.1-1_all.deb ... Unpacking node-ini (2.0.1-1) ... Selecting previously unselected package node-negotiator. Preparing to unpack .../176-node-negotiator_0.6.2+~0.6.1-1_all.deb ... Unpacking node-negotiator (0.6.2+~0.6.1-1) ... Selecting previously unselected package node-resolve. Preparing to unpack .../177-node-resolve_1.20.0+~cs5.27.9-1_all.deb ... Unpacking node-resolve (1.20.0+~cs5.27.9-1) ... Selecting previously unselected package node-normalize-package-data. Preparing to unpack .../178-node-normalize-package-data_3.0.3+~2.4.1-1_all.deb . .. Unpacking node-normalize-package-data (3.0.3+~2.4.1-1) ... Selecting previously unselected package node-read-package-json. Preparing to unpack .../179-node-read-package-json_4.1.1-1_all.deb ... Unpacking node-read-package-json (4.1.1-1) ... Selecting previously unselected package node-tap. Preparing to unpack .../180-node-tap_12.0.1+ds-4_all.deb ... Unpacking node-tap (12.0.1+ds-4) ... Selecting previously unselected package npm. Preparing to unpack .../181-npm_8.5.1~ds-1_all.deb ... Unpacking npm (8.5.1~ds-1) ... Setting up node-delayed-stream (1.0.0-5) ... Setting up libuv1-dev:amd64 (1.43.0-1ubuntu0.1) ... Setting up node-colors (1.4.0-3) ... Setting up node-log-driver (1.2.7+git+20180219+bba1761737-7) ... Setting up node-fs.realpath (1.0.0-2) ... Setting up node-diff (5.0.0~dfsg+~5.0.1-3) ... Setting up node-object-assign (4.1.1-6) ... Setting up node-abbrev (1.1.1+~1.1.2-1) ... Setting up libjs-sprintf-js (1.1.2+ds1+~1.1.2-1) ... Setting up node-yallist (4.0.0+~4.0.1-1) ... Setting up libjs-inherits (2.0.4-4) ... Setting up node-p-cancelable (2.1.1-1) ... Setting up node-ansi-regex (5.0.1-1) ... Setting up libnode-dev (12.22.9~dfsg-1ubuntu3.4) ... Setting up node-slash (3.0.0-2) ... Setting up node-util-deprecate (1.0.2-3) ... Setting up node-retry (0.13.1+~0.12.1-1) ... Setting up node-arrify (2.0.1-2) ... Setting up node-ansistyles (0.1.3-5) ... Setting up node-delegates (1.0.0-3) ... Setting up node-depd (2.0.0-2) ... Setting up node-isexe (2.0.0+~2.0.1-4) ... Setting up node-jsonparse (1.3.1-10) ... Setting up node-escape-string-regexp (4.0.0-2) ... Setting up libjs-source-map (0.7.0++dfsg2+really.0.6.1-9) ... Setting up node-negotiator (0.6.2+~0.6.1-1) ... Setting up node-stack-utils (2.0.5+~2.0.1-1) ... Setting up node-color-name (1.1.4+~1.1.1-2) ... Setting up node-growl (1.10.5-4) ... Setting up node-json-buffer (3.0.1-1) ... Setting up node-console-control-strings (1.1.0-2) ... Setting up node-abab (2.0.5-2) ... Setting up node-indent-string (4.0.0-2) ... Setting up node-function-bind (1.1.1+repacked+~1.0.3-1) ... Setting up node-clone (2.1.2-3) ... Setting up node-p-map (4.0.0+~3.1.0+~3.0.1-1) ... Setting up node-iferr (1.0.2+~1.0.2-1) ... Setting up node-chownr (2.0.0-1) ... Setting up node-has-flag (4.0.0-2) ... Setting up node-lodash-packages (4.17.21+dfsg+~cs8.31.198.20210220-5) ... Setting up libjs-psl (1.8.0+ds-6) ... Setting up node-asap (2.0.6+~2.0.0-1) ... Setting up node-mime (3.0.0+dfsg+~cs3.96.1-1) ... Setting up node-inherits (2.0.4-4) ... Setting up node-path-is-absolute (2.0.0-2) ... Setting up node-universalify (2.0.0-3) ... Setting up node-ini (2.0.1-1) ... Setting up node-safe-buffer (5.2.1+~cs2.1.2-2) ... Setting up node-promise-inflight (1.0.1+~1.0.0-1) ... Setting up node-combined-stream (1.0.8+~1.0.3-1) ... Setting up node-json-parse-better-errors (1.0.2+~cs3.3.1-1) ... Setting up node-sprintf-js (1.1.2+ds1+~1.1.2-1) ... Setting up node-tmatch (5.0.0-4) ... Setting up node-mime-types (2.1.33-1) ... Setting up node-err-code (2.0.3+dfsg-3) ... Setting up node-balanced-match (2.0.0-1) ... Setting up node-brace-expansion (2.0.1-1) ... Setting up node-spdx-exceptions (2.3.0-2) ... Setting up node-lcov-parse (1.0.0+20170612git80d039574ed9-5) ... Setting up node-cssom (0.4.4-3) ... Setting up node-strip-ansi (6.0.1-1) ... Setting up node-set-blocking (2.0.0-2) ... Setting up node-npm-bundled (1.1.2-1) ... Setting up node-signal-exit (3.0.6+~3.0.1-1) ... Setting up node-which (2.0.2+~cs1.3.2-2) ... Setting up node-source-map (0.7.0++dfsg2+really.0.6.1-9) ... Setting up node-wrappy (1.0.2-2) ... Setting up node-text-table (0.2.0-4) ... Setting up node-asynckit (0.4.0-4) ... Setting up node-ip (1.1.5+~1.1.0-1) ... Setting up node-quick-lru (5.1.1-1) ... Setting up node-punycode (2.1.1-5) ... Setting up node-defaults (1.0.3+~1.0.3-1) ... Setting up node-mute-stream (0.0.8+~0.0.1-1) ... Setting up node-mimic-response (3.1.0-7) ... Setting up node-commander (9.0.0-2) ... Setting up node-whatwg-fetch (3.6.2-5) ... Setting up libjs-typedarray-to-buffer (4.0.0-2) ... Setting up node-graceful-fs (4.2.4+repack-1) ... Setting up node-clean-yaml-object (0.1.0-5) ... Setting up node-aproba (2.0.0-2) ... Setting up node-esprima (4.0.1+ds+~4.0.3-2) ... Setting up node-ip-regex (4.3.0+~4.1.1-1) ... Setting up node-stealthy-require (1.1.1-5) ... Setting up node-spdx-license-ids (3.0.11-1) ... Setting up node-string-decoder (1.3.0-5) ... Setting up node-time-stamp (2.2.0-1) ... Setting up libjs-events (3.3.0+~3.0.0-2) ... Setting up node-mkdirp (1.0.4+~1.0.2-1) ... Setting up node-run-queue (2.0.0-2) ... Setting up node-core-util-is (1.0.3-1) ... Setting up node-minimatch (3.1.1+~3.0.5-1) ... Setting up node-opener (1.5.2+~1.4.0-1) ... Setting up node-archy (1.0.0-4) ... Setting up node-imurmurhash (0.1.4+dfsg+~0.1.1-1) ... Setting up node-foreground-child (2.0.0-3) ... Setting up node-read (1.0.7-3) ... Setting up node-nopt (5.0.0-2) ... Setting up node-is-buffer (2.0.5-2) ... Setting up node-color-convert (2.0.1-1) ... Setting up node-webidl-conversions (7.0.0~1.1.0+~cs15.1.20180823-2) ... Setting up node-isarray (2.0.5-3) ... Setting up node-osenv (0.1.5+~0.1.0-1) ... Setting up node-is-plain-obj (3.0.0-2) ... Setting up node-ms (2.1.3+~cs0.7.31-2) ... Setting up libjs-is-typedarray (1.0.0-4) ... Setting up node-lowercase-keys (2.0.0-2) ... Setting up node-decompress-response (6.0.0-2) ... Setting up node-process-nextick-args (2.0.1-2) ... Setting up node-has-unicode (2.0.1-4) ... Setting up node-fs-write-stream-atomic (1.0.10-5) ... Setting up gyp (0.1+20210831gitd6c5dd5-5) ... Setting up node-readable-stream (3.6.0+~cs3.0.0-1) ... Setting up node-ssri (8.0.1-2) ... Setting up node-lru-cache (6.0.0+~5.1.1-1) ... Setting up node-promise-retry (2.0.1-2) ... Setting up node-supports-color (8.1.1+~8.1.1-1) ... Setting up node-once (1.4.0-4) ... Setting up node-psl (1.8.0+ds-6) ... Setting up node-resolve (1.20.0+~cs5.27.9-1) ... Setting up node-are-we-there-yet (3.0.0+~1.1.0-1) ... Setting up node-kind-of (6.0.3+dfsg-2) ... Setting up node-debug (4.3.2+~cs4.1.7-1) ... Setting up node-events (3.3.0+~3.0.0-2) ... Setting up node-minimist (1.2.5+~cs5.3.2-1) ... Setting up node-argparse (2.0.1-2) ... Setting up node-fancy-log (1.3.3+~cs1.3.1-2) ... Setting up node-promzard (0.3.0-2) ... Setting up node-wcwidth.js (1.0.2-1) ... Setting up node-cssstyle (2.3.0-2) ... Setting up node-source-map-support (0.5.21+ds+~0.5.4-1) ... Setting up node-iconv-lite (0.6.3-2) ... Setting up node-unique-filename (1.1.1+ds-1) ... Setting up node-ansi-styles (4.3.0+~4.2.0-1) ... Setting up node-form-data (3.0.1-1) ... Setting up node-chalk (4.1.2-1) ... Setting up node-spdx-expression-parse (3.0.1+~3.0.1-1) ... Setting up node-is-typedarray (1.0.0-4) ... Setting up node-inflight (1.0.6-2) ... Setting up node-hosted-git-info (4.0.2-1) ... Setting up node-tough-cookie (4.0.0-2) ... Setting up node-encoding (0.1.13-2) ... Setting up node-js-yaml (4.1.0+dfsg+~4.0.5-6) ... Setting up node-slice-ansi (5.0.0+~cs9.0.0-4) ... Setting up node-string-width (4.2.3+~cs13.2.3-1) ... Setting up node-semver (7.3.5+~7.3.8-1) ... Setting up node-builtins (4.0.0-1) ... Setting up node-end-of-stream (1.4.4+~1.4.1-1) ... Setting up node-pump (3.0.0-5) ... Setting up node-columnify (1.5.4+~1.5.1-1) ... Setting up node-agent-base (6.0.2+~cs5.4.2-1) ... Setting up node-validate-npm-package-name (3.0.0-4) ... Setting up node-spdx-correct (3.1.1-2) ... Setting up node-glob (7.2.1+~cs7.6.15-1) ... Setting up node-get-stream (6.0.1-1) ... Setting up node-got (11.8.3+~cs58.7.37-1) ... Setting up node-typedarray-to-buffer (4.0.0-2) ... Setting up node-cli-table (0.3.11+~cs0.13.3-1) ... Setting up node-tap-parser (7.0.0+ds1-6) ... Setting up node-minipass (3.1.6+~cs8.7.18-1) ... Setting up node-wide-align (1.1.3-4) ... Setting up node-npm-package-arg (8.1.5-1) ... Setting up node-https-proxy-agent (5.0.0+~cs8.0.0-3) ... Setting up node-rimraf (3.0.2-1) ... Setting up node-validate-npm-package-license (3.0.4-2) ... Setting up node-write-file-atomic (3.0.3+~3.0.2-1) ... Setting up node-copy-concurrently (1.0.5-8) ... Setting up node-move-concurrently (1.0.1-4) ... Setting up node-gauge (4.0.2-1) ... Setting up node-tap-mocha-reporter (3.0.7+ds-2) ... Setting up node-normalize-package-data (3.0.3+~2.4.1-1) ... Setting up node-ws (8.5.0+~cs13.3.3-2) ... Setting up node-jsdom (19.0.0+~cs90.11.27-1) ... Setting up node-tar (6.1.11+ds1+~cs6.0.6-1) ... Setting up node-tap (12.0.1+ds-4) ... Setting up node-npmlog (6.0.1+~4.1.4-1) ... Setting up node-cacache (15.0.5+~cs13.9.21-3) ... Setting up node-read-package-json (4.1.1-1) ... Setting up node-fetch (2.6.7+~2.5.12-1) ... Setting up node-gyp (8.4.1-1) ... Setting up npm (8.5.1~ds-1) ... Setting up node-coveralls (3.1.1-1) ... Processing triggers for man-db (2.10.2-1) ... |
You can check the Node.js version with this command:
npm -v |
8.5.1 |
As always, I hope this helps those looking for concise and complete free answer.
Parametric Queries
In 2021, I wrote a MySQL example for my class on the usefulness of Common Table Expressions (CTEs). When discussing the original post, I would comment on how you could extend the last example to build a parametric reporting table.
Somebody finally asked for a concrete example. So, this explains how to build a sample MySQL parametric query by leveraging a filter cross join and tests the parameter use with a Python script.
You can build this in any database you prefer but I used a studentdb database with the sakila sample database installed. I’ve granted privileges to both databases to the student user. The following SQL is required for the example:
-- Conditionally drop the levels table. DROP TABLE IF EXISTS levels; -- Create the levels list. CREATE TABLE levels ( level_id int unsigned primary key auto_increment , parameter_set enum('Three','Five') , description varchar(20) , min_roles int , max_roles int ); -- Insert values into the list table. INSERT INTO levels ( parameter_set , description , min_roles , max_roles ) VALUES ('Three','Hollywood Star', 30, 99999) ,('Three','Prolific Actor', 20, 29) ,('Three','Newcommer',1,19) ,('Five','Newcommer',1,9) ,('Five','Junior Actor',10,19) ,('Five','Professional Actor',20,29) ,('Five','Major Actor',30,39) ,('Five','Hollywood Star',40,99999); |
The sample lets you use the three or five value labels while filtering on any partial full_name value as the result of the query below:
1 2 3 4 5 6 7 8 9 10 11 12 13 14 15 16 17 18 | -- Query the data. WITH actors AS (SELECT a.actor_id , a.first_name , a.last_name , COUNT(*) AS num_roles FROM sakila.actor a INNER JOIN sakila.film_actor fa ON a.actor_id = fa.actor_id GROUP BY actor_id) SELECT CONCAT(a.last_name,', ',a.first_name) full_name , l.description , a.num_roles FROM actors a CROSS JOIN levels l WHERE a.num_roles BETWEEN l.min_roles AND l.max_roles AND l.parameter_set = 'Five' AND a.last_name LIKE CONCAT('H','%') ORDER BY a.last_name , a.first_name; |
They extends a concept exercise found in Chapter 9 on subqueries in Alan Beaulieu’s Learning SQL book.
This is the parametric Python program, which embeds the function locally (to make it easier for those who don’t write a lot of Python). You could set the PYTHONPATH to a relative src directory and import your function if you prefer.
1 2 3 4 5 6 7 8 9 10 11 12 13 14 15 16 17 18 19 20 21 22 23 24 25 26 27 28 29 30 31 32 33 34 35 36 37 38 39 40 41 42 43 44 45 46 47 48 49 50 51 52 53 54 55 56 57 58 59 60 61 62 63 64 65 66 67 68 69 70 71 72 73 74 75 76 77 78 79 80 81 82 83 84 85 86 87 88 89 90 91 92 93 94 95 96 97 98 99 100 101 102 103 104 105 106 107 108 109 110 111 112 113 114 115 116 117 118 119 120 121 122 123 | #!/usr/bin/python # Import the libraries. import sys import mysql.connector from mysql.connector import errorcode # ============================================================ # Define function to check and replace arguments. def check_replace(argv): # Set defaults for incorrect parameter values. defaults = ("Three","_") # Declare empty list variables. inputs = [] args = () # Check whether or not parameters exist after file name. if isinstance(argv,list) and len(argv) != 0: # Check whether there are at least two parameters. if len(argv) >= 2: # Loop through available command-line arguments. for element in argv: # Check first of two parameter values and substitute # default value if input value is an invalid option. if len(inputs) == 0 and (element in ('Three','Five')) or \ len(inputs) == 1 and (isinstance(element,str)): inputs.append(element) elif len(inputs) == 0: inputs.append(defaults[0]) elif len(inputs) == 1: inputs.append(defaults[1]) # Assign arguments to parameters. args = (inputs) # Check whether only one parameter value exists. elif len(argv) == 1 and (argv[0] in ('Three','Five')): args = (argv[0],"_") # Assume only one parameter is valid and substitute an # empty string as the second parameter. else: args = (defaults[0],"_") # Substitute defaults when missing parameters. else: args = defaults # Return parameters as a tuple. return args # ============================================================ # Assign command-line argument list to variable by removing # the program file name. # ============================================================ params = check_replace(sys.argv[1:]) # ============================================================ # Attempt the query. # ============================================================ # Use a try-catch block to manage the connection. # ============================================================ try: # Open connection. cnx = mysql.connector.connect(user='student', password='student', host='127.0.0.1', database='studentdb') # Create cursor. cursor = cnx.cursor() # Set the query statement. query = ("WITH actors AS " "(SELECT a.first_name " " , a.last_name " " , COUNT(*) AS num_roles " " FROM sakila.actor a INNER JOIN sakila.film_actor fa " " ON a.actor_id = fa.actor_id " " GROUP BY a.first_name " " , a.last_name ) " " SELECT CONCAT(a.last_name,', ',a.first_name) AS full_name " " , l.description " " , a.num_roles " " FROM actors a CROSS JOIN levels l " " WHERE a.num_roles BETWEEN l.min_roles AND l.max_roles " " AND l.parameter_set = %s " " AND a.last_name LIKE CONCAT(%s,'%') " " ORDER BY a.last_name " " , a.first_name") # Execute cursor. cursor.execute(query, params) # Display the rows returned by the query. for (full_name, description, num_roles) in cursor: print('{0} is a {1} with {2} films.'.format( full_name.title() , description.title() , num_roles)) # Close cursor. cursor.close() # ------------------------------------------------------------ # Handle exception and close connection. except mysql.connector.Error as e: if e.errno == errorcode.ER_ACCESS_DENIED_ERROR: print("Something is wrong with your user name or password") elif e.errno == errorcode.ER_BAD_DB_ERROR: print("Database does not exist") else: print("Error code:", e.errno) # error number print("SQLSTATE value:", e.sqlstate) # SQLSTATE value print("Error message:", e.msg) # error message # Close the connection when the try block completes. else: cnx.close() |
As always, I hope this helps those trying to understand how CTEs can solve problems that would otherwise be coded in external imperative languages like Python.
Add PostGIS to PostgreSQL
The following blog post shows you how to add PostGIS and PgRouting to your existing install of PostgeSQL 14 on the Ubuntu Desktop, Version 22.0.4. This blog post relies on information in this earlier Install and Configure PostgreSQL on Ubuntu post. Generalized documentation on PostGIS exists at this URL.
You install the postgis libraries:
sudo apt install -y postgis |
Display detailed console log →
Reading package lists... Done Building dependency tree... Done Reading state information... Done The following additional packages will be installed: gdal-data libaec0 libaom3 libarmadillo10 libarpack2 libblosc1 libboost-serialization1.74.0 libcfitsio9 libcharls2 libdav1d5 libde265-0 libfreexl1 libfyba0 libgdal30 libgeos-c1v5 libgeos3.10.2 libgeotiff5 libgmpxx4ldbl libhdf4-0-alt libhdf5-103-1 libhdf5-hl-100 libheif1 libkmlbase1 libkmldom1 libkmlengine1 libminizip1 libnetcdf19 libodbc2 libodbcinst2 libogdi4.1 libproj22 libprotobuf-c1 libqhull-r8.0 librttopo1 libsfcgal1 libsnappy1v5 libspatialite7 libsuperlu5 libsz2 liburiparser1 libx265-199 libxerces-c3.2 postgis-doc postgresql-14-postgis-3 postgresql-14-postgis-3-scripts proj-bin proj-data unixodbc-common Suggested packages: geotiff-bin gdal-bin libgeotiff-epsg libhdf4-doc libhdf4-alt-dev hdf4-tools odbc-postgresql tdsodbc ogdi-bin The following NEW packages will be installed: gdal-data libaec0 libaom3 libarmadillo10 libarpack2 libblosc1 libboost-serialization1.74.0 libcfitsio9 libcharls2 libdav1d5 libde265-0 libfreexl1 libfyba0 libgdal30 libgeos-c1v5 libgeos3.10.2 libgeotiff5 libgmpxx4ldbl libhdf4-0-alt libhdf5-103-1 libhdf5-hl-100 libheif1 libkmlbase1 libkmldom1 libkmlengine1 libminizip1 libnetcdf19 libodbc2 libodbcinst2 libogdi4.1 libproj22 libprotobuf-c1 libqhull-r8.0 librttopo1 libsfcgal1 libsnappy1v5 libspatialite7 libsuperlu5 libsz2 liburiparser1 libx265-199 libxerces-c3.2 postgis postgis-doc postgresql-14-postgis-3 postgresql-14-postgis-3-scripts proj-bin proj-data unixodbc-common 0 upgraded, 49 newly installed, 0 to remove and 6 not upgraded. Need to get 42.0 MB of archives. After this operation, 173 MB of additional disk space will be used. Get:1 http://us.archive.ubuntu.com/ubuntu jammy/universe amd64 gdal-data all 3.4.1+dfsg-1build4 [216 kB] Get:2 http://us.archive.ubuntu.com/ubuntu jammy/universe amd64 libaec0 amd64 1.0.6-1 [20.1 kB] Get:3 http://us.archive.ubuntu.com/ubuntu jammy/universe amd64 libaom3 amd64 3.3.0-1 [1,748 kB] Get:4 http://us.archive.ubuntu.com/ubuntu jammy/universe amd64 libarpack2 amd64 3.8.0-1 [92.4 kB] Get:5 http://us.archive.ubuntu.com/ubuntu jammy/universe amd64 libsuperlu5 amd64 5.3.0+dfsg1-2 [183 kB] Get:6 http://us.archive.ubuntu.com/ubuntu jammy/universe amd64 libarmadillo10 amd64 1:10.8.2+dfsg-1 [105 kB] Get:7 http://us.archive.ubuntu.com/ubuntu jammy/main amd64 libsnappy1v5 amd64 1.1.8-1build3 [17.5 kB] Get:8 http://us.archive.ubuntu.com/ubuntu jammy/universe amd64 libblosc1 amd64 1.21.1+ds2-2 [35.8 kB] Get:9 http://us.archive.ubuntu.com/ubuntu jammy/main amd64 libboost-serialization1.74.0 amd64 1.74.0-14ubuntu3 [327 kB] Get:10 http://us.archive.ubuntu.com/ubuntu jammy/universe amd64 libcfitsio9 amd64 4.0.0-1 [519 kB] Get:11 http://us.archive.ubuntu.com/ubuntu jammy/universe amd64 libcharls2 amd64 2.3.4-1 [87.0 kB] Get:12 http://us.archive.ubuntu.com/ubuntu jammy/universe amd64 libdav1d5 amd64 0.9.2-1 [463 kB] Get:13 http://us.archive.ubuntu.com/ubuntu jammy-updates/universe amd64 libde265-0 amd64 1.0.8-1ubuntu0.1 [289 kB] Get:14 http://us.archive.ubuntu.com/ubuntu jammy/universe amd64 libfyba0 amd64 4.1.1-7 [113 kB] Get:15 http://us.archive.ubuntu.com/ubuntu jammy/universe amd64 libfreexl1 amd64 1.0.6-1 [33.5 kB] Get:16 http://us.archive.ubuntu.com/ubuntu jammy/universe amd64 libgeos3.10.2 amd64 3.10.2-1 [713 kB] Get:17 http://us.archive.ubuntu.com/ubuntu jammy/universe amd64 libgeos-c1v5 amd64 3.10.2-1 [82.5 kB] Get:18 http://us.archive.ubuntu.com/ubuntu jammy/universe amd64 proj-data all 8.2.1-1 [10.0 MB] Get:19 http://us.archive.ubuntu.com/ubuntu jammy/universe amd64 libproj22 amd64 8.2.1-1 [1,257 kB] Get:20 http://us.archive.ubuntu.com/ubuntu jammy/universe amd64 libgeotiff5 amd64 1.7.0-2build1 [67.1 kB] Get:21 http://us.archive.ubuntu.com/ubuntu jammy/universe amd64 libhdf4-0-alt amd64 4.2.15-4 [290 kB] Get:22 http://us.archive.ubuntu.com/ubuntu jammy/universe amd64 libsz2 amd64 1.0.6-1 [5,354 B] Get:23 http://us.archive.ubuntu.com/ubuntu jammy/universe amd64 libhdf5-103-1 amd64 1.10.7+repack-4ubuntu2 [1,295 kB] Get:24 http://us.archive.ubuntu.com/ubuntu jammy/universe amd64 libx265-199 amd64 3.5-2 [1,170 kB] Get:25 http://us.archive.ubuntu.com/ubuntu jammy/universe amd64 libheif1 amd64 1.12.0-2build1 [196 kB] Get:26 http://us.archive.ubuntu.com/ubuntu jammy/universe amd64 libminizip1 amd64 1.1-8build1 [20.2 kB] Get:27 http://us.archive.ubuntu.com/ubuntu jammy/universe amd64 liburiparser1 amd64 0.9.6+dfsg-1 [36.4 kB] Get:28 http://us.archive.ubuntu.com/ubuntu jammy/universe amd64 libkmlbase1 amd64 1.3.0-9 [45.0 kB] Get:29 http://us.archive.ubuntu.com/ubuntu jammy/universe amd64 libkmldom1 amd64 1.3.0-9 [150 kB] Get:30 http://us.archive.ubuntu.com/ubuntu jammy/universe amd64 libkmlengine1 amd64 1.3.0-9 [71.7 kB] Get:31 http://us.archive.ubuntu.com/ubuntu jammy/universe amd64 libhdf5-hl-100 amd64 1.10.7+repack-4ubuntu2 [59.1 kB] Get:32 http://us.archive.ubuntu.com/ubuntu jammy/universe amd64 libnetcdf19 amd64 1:4.8.1-1 [456 kB] Get:33 http://us.archive.ubuntu.com/ubuntu jammy/main amd64 libodbc2 amd64 2.3.9-5 [159 kB] Get:34 http://us.archive.ubuntu.com/ubuntu jammy/main amd64 unixodbc-common all 2.3.9-5 [9,228 B] Get:35 http://us.archive.ubuntu.com/ubuntu jammy/main amd64 libodbcinst2 amd64 2.3.9-5 [31.9 kB] Get:36 http://us.archive.ubuntu.com/ubuntu jammy/universe amd64 libogdi4.1 amd64 4.1.0+ds-5 [197 kB] Get:37 http://us.archive.ubuntu.com/ubuntu jammy/universe amd64 libqhull-r8.0 amd64 2020.2-4 [196 kB] Get:38 http://us.archive.ubuntu.com/ubuntu jammy/universe amd64 librttopo1 amd64 1.1.0-2 [178 kB] Get:39 http://us.archive.ubuntu.com/ubuntu jammy/universe amd64 libspatialite7 amd64 5.0.1-2build2 [2,092 kB] Get:40 http://us.archive.ubuntu.com/ubuntu jammy-updates/universe amd64 libxerces-c3.2 amd64 3.2.3+debian-3ubuntu0.1 [929 kB] Get:41 http://us.archive.ubuntu.com/ubuntu jammy/universe amd64 libgdal30 amd64 3.4.1+dfsg-1build4 [7,642 kB] Get:42 http://us.archive.ubuntu.com/ubuntu jammy/main amd64 libgmpxx4ldbl amd64 2:6.2.1+dfsg-3ubuntu1 [9,580 B] Get:43 http://us.archive.ubuntu.com/ubuntu jammy-updates/main amd64 libprotobuf-c1 amd64 1.3.3-1ubuntu2.1 [20.3 kB] Get:44 http://us.archive.ubuntu.com/ubuntu jammy/universe amd64 libsfcgal1 amd64 1.4.1-1 [2,179 kB] Get:45 http://us.archive.ubuntu.com/ubuntu jammy/universe amd64 postgis amd64 3.2.0+dfsg-1ubuntu1 [350 kB] Get:46 http://us.archive.ubuntu.com/ubuntu jammy/universe amd64 postgis-doc all 3.2.0+dfsg-1ubuntu1 [2,922 kB] Get:47 http://us.archive.ubuntu.com/ubuntu jammy/universe amd64 postgresql-14-postgis-3-scripts all 3.2.0+dfsg-1ubuntu1 [1,018 kB] Get:48 http://us.archive.ubuntu.com/ubuntu jammy/universe amd64 postgresql-14-postgis-3 amd64 3.2.0+dfsg-1ubuntu1 [3,696 kB] Get:49 http://us.archive.ubuntu.com/ubuntu jammy/universe amd64 proj-bin amd64 8.2.1-1 [154 kB] Fetched 42.0 MB in 7s (5,994 kB/s) Extracting templates from packages: 100% Selecting previously unselected package gdal-data. (Reading database ... 249055 files and directories currently installed.) Preparing to unpack .../00-gdal-data_3.4.1+dfsg-1build4_all.deb ... Unpacking gdal-data (3.4.1+dfsg-1build4) ... Selecting previously unselected package libaec0:amd64. Preparing to unpack .../01-libaec0_1.0.6-1_amd64.deb ... Unpacking libaec0:amd64 (1.0.6-1) ... Selecting previously unselected package libaom3:amd64. Preparing to unpack .../02-libaom3_3.3.0-1_amd64.deb ... Unpacking libaom3:amd64 (3.3.0-1) ... Selecting previously unselected package libarpack2:amd64. Preparing to unpack .../03-libarpack2_3.8.0-1_amd64.deb ... Unpacking libarpack2:amd64 (3.8.0-1) ... Selecting previously unselected package libsuperlu5:amd64. Preparing to unpack .../04-libsuperlu5_5.3.0+dfsg1-2_amd64.deb ... Unpacking libsuperlu5:amd64 (5.3.0+dfsg1-2) ... Selecting previously unselected package libarmadillo10. Preparing to unpack .../05-libarmadillo10_1%3a10.8.2+dfsg-1_amd64.deb ... Unpacking libarmadillo10 (1:10.8.2+dfsg-1) ... Selecting previously unselected package libsnappy1v5:amd64. Preparing to unpack .../06-libsnappy1v5_1.1.8-1build3_amd64.deb ... Unpacking libsnappy1v5:amd64 (1.1.8-1build3) ... Selecting previously unselected package libblosc1:amd64. Preparing to unpack .../07-libblosc1_1.21.1+ds2-2_amd64.deb ... Unpacking libblosc1:amd64 (1.21.1+ds2-2) ... Selecting previously unselected package libboost-serialization1.74.0:amd64. Preparing to unpack .../08-libboost-serialization1.74.0_1.74.0-14ubuntu3_amd64.deb ... Unpacking libboost-serialization1.74.0:amd64 (1.74.0-14ubuntu3) ... Selecting previously unselected package libcfitsio9:amd64. Preparing to unpack .../09-libcfitsio9_4.0.0-1_amd64.deb ... Unpacking libcfitsio9:amd64 (4.0.0-1) ... Selecting previously unselected package libcharls2:amd64. Preparing to unpack .../10-libcharls2_2.3.4-1_amd64.deb ... Unpacking libcharls2:amd64 (2.3.4-1) ... Selecting previously unselected package libdav1d5:amd64. Preparing to unpack .../11-libdav1d5_0.9.2-1_amd64.deb ... Unpacking libdav1d5:amd64 (0.9.2-1) ... Selecting previously unselected package libde265-0:amd64. Preparing to unpack .../12-libde265-0_1.0.8-1ubuntu0.1_amd64.deb ... Unpacking libde265-0:amd64 (1.0.8-1ubuntu0.1) ... Selecting previously unselected package libfyba0:amd64. Preparing to unpack .../13-libfyba0_4.1.1-7_amd64.deb ... Unpacking libfyba0:amd64 (4.1.1-7) ... Selecting previously unselected package libfreexl1:amd64. Preparing to unpack .../14-libfreexl1_1.0.6-1_amd64.deb ... Unpacking libfreexl1:amd64 (1.0.6-1) ... Selecting previously unselected package libgeos3.10.2:amd64. Preparing to unpack .../15-libgeos3.10.2_3.10.2-1_amd64.deb ... Unpacking libgeos3.10.2:amd64 (3.10.2-1) ... Selecting previously unselected package libgeos-c1v5:amd64. Preparing to unpack .../16-libgeos-c1v5_3.10.2-1_amd64.deb ... Unpacking libgeos-c1v5:amd64 (3.10.2-1) ... Selecting previously unselected package proj-data. Preparing to unpack .../17-proj-data_8.2.1-1_all.deb ... Unpacking proj-data (8.2.1-1) ... Selecting previously unselected package libproj22:amd64. Preparing to unpack .../18-libproj22_8.2.1-1_amd64.deb ... Unpacking libproj22:amd64 (8.2.1-1) ... Selecting previously unselected package libgeotiff5:amd64. Preparing to unpack .../19-libgeotiff5_1.7.0-2build1_amd64.deb ... Unpacking libgeotiff5:amd64 (1.7.0-2build1) ... Selecting previously unselected package libhdf4-0-alt. Preparing to unpack .../20-libhdf4-0-alt_4.2.15-4_amd64.deb ... Unpacking libhdf4-0-alt (4.2.15-4) ... Selecting previously unselected package libsz2:amd64. Preparing to unpack .../21-libsz2_1.0.6-1_amd64.deb ... Unpacking libsz2:amd64 (1.0.6-1) ... Selecting previously unselected package libhdf5-103-1:amd64. Preparing to unpack .../22-libhdf5-103-1_1.10.7+repack-4ubuntu2_amd64.deb ... Unpacking libhdf5-103-1:amd64 (1.10.7+repack-4ubuntu2) ... Selecting previously unselected package libx265-199:amd64. Preparing to unpack .../23-libx265-199_3.5-2_amd64.deb ... Unpacking libx265-199:amd64 (3.5-2) ... Selecting previously unselected package libheif1:amd64. Preparing to unpack .../24-libheif1_1.12.0-2build1_amd64.deb ... Unpacking libheif1:amd64 (1.12.0-2build1) ... Selecting previously unselected package libminizip1:amd64. Preparing to unpack .../25-libminizip1_1.1-8build1_amd64.deb ... Unpacking libminizip1:amd64 (1.1-8build1) ... Selecting previously unselected package liburiparser1:amd64. Preparing to unpack .../26-liburiparser1_0.9.6+dfsg-1_amd64.deb ... Unpacking liburiparser1:amd64 (0.9.6+dfsg-1) ... Selecting previously unselected package libkmlbase1:amd64. Preparing to unpack .../27-libkmlbase1_1.3.0-9_amd64.deb ... Unpacking libkmlbase1:amd64 (1.3.0-9) ... Selecting previously unselected package libkmldom1:amd64. Preparing to unpack .../28-libkmldom1_1.3.0-9_amd64.deb ... Unpacking libkmldom1:amd64 (1.3.0-9) ... Selecting previously unselected package libkmlengine1:amd64. Preparing to unpack .../29-libkmlengine1_1.3.0-9_amd64.deb ... Unpacking libkmlengine1:amd64 (1.3.0-9) ... Selecting previously unselected package libhdf5-hl-100:amd64. Preparing to unpack .../30-libhdf5-hl-100_1.10.7+repack-4ubuntu2_amd64.deb ... Unpacking libhdf5-hl-100:amd64 (1.10.7+repack-4ubuntu2) ... Selecting previously unselected package libnetcdf19:amd64. Preparing to unpack .../31-libnetcdf19_1%3a4.8.1-1_amd64.deb ... Unpacking libnetcdf19:amd64 (1:4.8.1-1) ... Selecting previously unselected package libodbc2:amd64. Preparing to unpack .../32-libodbc2_2.3.9-5_amd64.deb ... Unpacking libodbc2:amd64 (2.3.9-5) ... Selecting previously unselected package unixodbc-common. Preparing to unpack .../33-unixodbc-common_2.3.9-5_all.deb ... Unpacking unixodbc-common (2.3.9-5) ... Selecting previously unselected package libodbcinst2:amd64. Preparing to unpack .../34-libodbcinst2_2.3.9-5_amd64.deb ... Unpacking libodbcinst2:amd64 (2.3.9-5) ... Selecting previously unselected package libogdi4.1. Preparing to unpack .../35-libogdi4.1_4.1.0+ds-5_amd64.deb ... Unpacking libogdi4.1 (4.1.0+ds-5) ... Selecting previously unselected package libqhull-r8.0:amd64. Preparing to unpack .../36-libqhull-r8.0_2020.2-4_amd64.deb ... Unpacking libqhull-r8.0:amd64 (2020.2-4) ... Selecting previously unselected package librttopo1:amd64. Preparing to unpack .../37-librttopo1_1.1.0-2_amd64.deb ... Unpacking librttopo1:amd64 (1.1.0-2) ... Selecting previously unselected package libspatialite7:amd64. Preparing to unpack .../38-libspatialite7_5.0.1-2build2_amd64.deb ... Unpacking libspatialite7:amd64 (5.0.1-2build2) ... Selecting previously unselected package libxerces-c3.2:amd64. Preparing to unpack .../39-libxerces-c3.2_3.2.3+debian-3ubuntu0.1_amd64.deb ... Unpacking libxerces-c3.2:amd64 (3.2.3+debian-3ubuntu0.1) ... Selecting previously unselected package libgdal30. Preparing to unpack .../40-libgdal30_3.4.1+dfsg-1build4_amd64.deb ... Unpacking libgdal30 (3.4.1+dfsg-1build4) ... Selecting previously unselected package libgmpxx4ldbl:amd64. Preparing to unpack .../41-libgmpxx4ldbl_2%3a6.2.1+dfsg-3ubuntu1_amd64.deb ... Unpacking libgmpxx4ldbl:amd64 (2:6.2.1+dfsg-3ubuntu1) ... Selecting previously unselected package libprotobuf-c1:amd64. Preparing to unpack .../42-libprotobuf-c1_1.3.3-1ubuntu2.1_amd64.deb ... Unpacking libprotobuf-c1:amd64 (1.3.3-1ubuntu2.1) ... Selecting previously unselected package libsfcgal1. Preparing to unpack .../43-libsfcgal1_1.4.1-1_amd64.deb ... Unpacking libsfcgal1 (1.4.1-1) ... Selecting previously unselected package postgis. Preparing to unpack .../44-postgis_3.2.0+dfsg-1ubuntu1_amd64.deb ... Unpacking postgis (3.2.0+dfsg-1ubuntu1) ... Selecting previously unselected package postgis-doc. Preparing to unpack .../45-postgis-doc_3.2.0+dfsg-1ubuntu1_all.deb ... Unpacking postgis-doc (3.2.0+dfsg-1ubuntu1) ... Selecting previously unselected package postgresql-14-postgis-3-scripts. Preparing to unpack .../46-postgresql-14-postgis-3-scripts_3.2.0+dfsg-1ubuntu1_all.deb ... Unpacking postgresql-14-postgis-3-scripts (3.2.0+dfsg-1ubuntu1) ... Selecting previously unselected package postgresql-14-postgis-3. Preparing to unpack .../47-postgresql-14-postgis-3_3.2.0+dfsg-1ubuntu1_amd64.deb ... Unpacking postgresql-14-postgis-3 (3.2.0+dfsg-1ubuntu1) ... Selecting previously unselected package proj-bin. Preparing to unpack .../48-proj-bin_8.2.1-1_amd64.deb ... Unpacking proj-bin (8.2.1-1) ... Setting up libgeos3.10.2:amd64 (3.10.2-1) ... Setting up libaom3:amd64 (3.3.0-1) ... Setting up libxerces-c3.2:amd64 (3.2.3+debian-3ubuntu0.1) ... Setting up proj-data (8.2.1-1) ... Setting up libogdi4.1 (4.1.0+ds-5) ... Setting up libcharls2:amd64 (2.3.4-1) ... Setting up libminizip1:amd64 (1.1-8build1) ... Setting up libarpack2:amd64 (3.8.0-1) ... Setting up libsuperlu5:amd64 (5.3.0+dfsg1-2) ... Setting up libqhull-r8.0:amd64 (2020.2-4) ... Setting up libproj22:amd64 (8.2.1-1) ... Setting up postgresql-14-postgis-3-scripts (3.2.0+dfsg-1ubuntu1) ... update-alternatives: using /usr/share/postgresql/14/extension/postgis-3.control to provide /usr/share/postg resql/14/extension/postgis.control (postgresql-14-postgis.control) in auto mode Setting up libprotobuf-c1:amd64 (1.3.3-1ubuntu2.1) ... Setting up libaec0:amd64 (1.0.6-1) ... Setting up gdal-data (3.4.1+dfsg-1build4) ... Setting up libgeotiff5:amd64 (1.7.0-2build1) ... Setting up libsnappy1v5:amd64 (1.1.8-1build3) ... Setting up libcfitsio9:amd64 (4.0.0-1) ... Setting up postgis-doc (3.2.0+dfsg-1ubuntu1) ... Setting up libgmpxx4ldbl:amd64 (2:6.2.1+dfsg-3ubuntu1) ... Setting up libgeos-c1v5:amd64 (3.10.2-1) ... Setting up unixodbc-common (2.3.9-5) ... Setting up libhdf4-0-alt (4.2.15-4) ... Setting up libx265-199:amd64 (3.5-2) ... Setting up libboost-serialization1.74.0:amd64 (1.74.0-14ubuntu3) ... Setting up libodbc2:amd64 (2.3.9-5) ... Setting up liburiparser1:amd64 (0.9.6+dfsg-1) ... Setting up librttopo1:amd64 (1.1.0-2) ... Setting up libfreexl1:amd64 (1.0.6-1) ... Setting up libfyba0:amd64 (4.1.1-7) ... Setting up libkmlbase1:amd64 (1.3.0-9) ... Setting up libblosc1:amd64 (1.21.1+ds2-2) ... Setting up libsfcgal1 (1.4.1-1) ... Setting up libdav1d5:amd64 (0.9.2-1) ... Setting up libde265-0:amd64 (1.0.8-1ubuntu0.1) ... Setting up libsz2:amd64 (1.0.6-1) ... Setting up libkmldom1:amd64 (1.3.0-9) ... Setting up libspatialite7:amd64 (5.0.1-2build2) ... Setting up libodbcinst2:amd64 (2.3.9-5) ... Setting up libarmadillo10 (1:10.8.2+dfsg-1) ... Setting up libkmlengine1:amd64 (1.3.0-9) ... Setting up libheif1:amd64 (1.12.0-2build1) ... Setting up proj-bin (8.2.1-1) ... Setting up libhdf5-103-1:amd64 (1.10.7+repack-4ubuntu2) ... Setting up libhdf5-hl-100:amd64 (1.10.7+repack-4ubuntu2) ... Setting up libnetcdf19:amd64 (1:4.8.1-1) ... Setting up libgdal30 (3.4.1+dfsg-1build4) ... Setting up postgresql-14-postgis-3 (3.2.0+dfsg-1ubuntu1) ... Setting up postgis (3.2.0+dfsg-1ubuntu1) ... Processing triggers for postgresql-common (238) ... Building PostgreSQL dictionaries from installed myspell/hunspell packages... en_us Removing obsolete dictionary files: Processing triggers for libc-bin (2.35-0ubuntu3.6) ... Processing triggers for man-db (2.10.2-1) ... |
You install the postgresql-14-pgrouting libraries:
sudo apt install -y postgresql-14-pgrouting |
Display detailed console log →
Reading package lists... Done Building dependency tree... Done Reading state information... Done The following additional packages will be installed: postgresql-14-pgrouting-scripts Suggested packages: postgresql-14-pgrouting-doc The following NEW packages will be installed: postgresql-14-pgrouting postgresql-14-pgrouting-scripts 0 upgraded, 2 newly installed, 0 to remove and 6 not upgraded. Need to get 705 kB of archives. After this operation, 4,314 kB of additional disk space will be used. Get:1 http://us.archive.ubuntu.com/ubuntu jammy/universe amd64 postgresql-14-pgrouting-scripts all 3.3.0-2 [46.3 kB] Get:2 http://us.archive.ubuntu.com/ubuntu jammy/universe amd64 postgresql-14-pgrouting amd64 3.3.0-2 [659 kB] Fetched 705 kB in 1s (721 kB/s) Selecting previously unselected package postgresql-14-pgrouting-scripts. (Reading database ... 250431 files and directories currently installed.) Preparing to unpack .../postgresql-14-pgrouting-scripts_3.3.0-2_all.deb ... Unpacking postgresql-14-pgrouting-scripts (3.3.0-2) ... Selecting previously unselected package postgresql-14-pgrouting. Preparing to unpack .../postgresql-14-pgrouting_3.3.0-2_amd64.deb ... Unpacking postgresql-14-pgrouting (3.3.0-2) ... Setting up postgresql-14-pgrouting-scripts (3.3.0-2) ... Setting up postgresql-14-pgrouting (3.3.0-2) ... Processing triggers for postgresql-common (238) ... Building PostgreSQL dictionaries from installed myspell/hunspell packages... en_us Removing obsolete dictionary files: |
You should also install ogr2ogr program, which is a command-line utility for converting data between GIS data formats, including common file formats and common spatial databases. You install the ogr2ogr libraries:
sudo apt install -y gdal-bin |
Display detailed console log →
Reading package lists... Done Building dependency tree... Done Reading state information... Done The following additional packages will be installed: python3-gdal python3-numpy Suggested packages: libgdal-grass python-numpy-doc python3-pytest The following NEW packages will be installed: gdal-bin python3-gdal python3-numpy 0 upgraded, 3 newly installed, 0 to remove and 11 not upgraded. Need to get 4,381 kB of archives. After this operation, 24.9 MB of additional disk space will be used. Get:1 http://us.archive.ubuntu.com/ubuntu jammy-updates/main amd64 python3-numpy amd64 1:1.21.5-1ubuntu22.04.1 [3,467 kB] Get:2 http://us.archive.ubuntu.com/ubuntu jammy/universe amd64 python3-gdal amd64 3.4.1+dfsg-1build4 [673 kB] Get:3 http://us.archive.ubuntu.com/ubuntu jammy/universe amd64 gdal-bin amd64 3.4.1+dfsg-1build4 [241 kB] Fetched 4,381 kB in 1s (2,965 kB/s) Selecting previously unselected package python3-numpy. (Reading database ... 249006 files and directories currently installed.) Preparing to unpack .../python3-numpy_1%3a1.21.5-1ubuntu22.04.1_amd64.deb ... Unpacking python3-numpy (1:1.21.5-1ubuntu22.04.1) ... Selecting previously unselected package python3-gdal. Preparing to unpack .../python3-gdal_3.4.1+dfsg-1build4_amd64.deb ... Unpacking python3-gdal (3.4.1+dfsg-1build4) ... Selecting previously unselected package gdal-bin. Preparing to unpack .../gdal-bin_3.4.1+dfsg-1build4_amd64.deb ... Unpacking gdal-bin (3.4.1+dfsg-1build4) ... Setting up python3-numpy (1:1.21.5-1ubuntu22.04.1) ... Setting up python3-gdal (3.4.1+dfsg-1build4) ... Setting up gdal-bin (3.4.1+dfsg-1build4) ... Processing triggers for man-db (2.10.2-1) ... |
Verify the installation by using the which utility, like
which -a ogr2ogr |
It should return:
/usr/bin/ogr2ogr |
You can qualify the installed PostGIS packages with the following command:
dpkg -l | grep -i postgis |
It should display:
ii postgis 3.2.0+dfsg-1ubuntu1 amd64 Geographic objects support for PostgreSQL ii postgis-doc 3.2.0+dfsg-1ubuntu1 all Geographic objects support for PostgreSQL -- documentation ii postgresql-14-pgrouting 3.3.0-2 amd64 Routing functionality support for PostgreSQL/PostGIS ii postgresql-14-pgrouting-scripts 3.3.0-2 all Routing functionality support for PostgreSQL/PostGIS - SQL scripts ii postgresql-14-postgis-3 3.2.0+dfsg-1ubuntu1 amd64 Geographic objects support for PostgreSQL 14 ii postgresql-14-postgis-3-scripts 3.2.0+dfsg-1ubuntu1 all Geographic objects support for PostgreSQL 14 -- SQL scripts |
Connect as the postgres user by becoming the root user with this command:
sudo sh |
Then, assume the role of the postgres user with this command:
su - postgres |
Connect to the PostgreSQL database as the privileged postgres owner/user:
psql postgres |
You will see the following prompt after connecting to the PostgreSQL database:
postgres@student-virtual-machine:~$ psql psql (14.10 (Ubuntu 14.10-0ubuntu0.22.04.1)) Type "help" for help. postgres=# |
As the the privileged postgres owner/user issue the following commands to create the gisdb database and set a new search path for it:
CREATE DATABASE gisdb; ALTER DATABASE gisdb SET search_path=public,postgis,contrib,tiger; |
Connect to the gisdb database:
\connect gisdb |
You are now connected to database gisdb as the postgres user. You change to the postgis schema, and create the following extensions in this schema.
CREATE SCHEMA postgis; CREATE EXTENSION postgis SCHEMA postgis; CREATE EXTENSION postgis_raster SCHEMA postgis; CREATE EXTENSION fuzzystrmatch SCHEMA postgis; CREATE EXTENSION address_standardizer_data_us SCHEMA postgis; |
You query the modified catalog with this query:
SELECT n.nspname AS "Name" , pg_catalog.pg_get_userbyid(n.nspowner) AS "Owner" FROM pg_catalog.pg_namespace n WHERE n.nspname !~ '^pg_' AND n.nspname <> 'information_schema' ORDER BY 1; |
It should return:
Name | Owner ---------+---------- postgis | postgres public | postgres (2 rows) |
You must assign the postgis_tiger_geocoder and postgis_topology without a schema assignment. The
postgis_tiger_eeocoder must be assigned by default to the tiger schema, and the postgis_topology schema.
CREATE EXTENSION postgis_tiger_geocoder; CREATE EXTENSION postgis_topology; |
You reuse the same above referenced query to see the modified catalog with this query:
It should return:
Name | Owner ------------+---------- postgis | postgres public | postgres tiger | postgres tiger_data | postgres topology | postgres (5 rows) |
Connect as the gisdb database with this command:
\connect gisdb |
You can see the active PostGIS extension with this command:
\dx postgis |
It shows:
List of installed extensions Name | Version | Schema | Description ---------+---------+---------+------------------------------------------------------------ postgis | 3.2.0 | postgis | PostGIS geometry and geography spatial types and functions (1 row) |
Now, you can use this query:
SELECT postgis_full_version(); |
to discover what PostGIS version is installed:
postgis_full_version -------------------------------------------------------------------------------------------------------------------------------------------------------------------- POSTGIS="3.2.0 c3e3cc0" [EXTENSION] PGSQL="140" GEOS="3.10.2-CAPI-1.16.0" PROJ="8.2.1" LIBXML="2.9.12" LIBJSON="0.15" LIBPROTOBUF="1.3.3" WAGYU="0.5.0 (Internal)" (1 row) |
Connect back to as the privileged postgres owner/user with this command:
\connect postgres |
Next, check the available databases with this command:
\l |
It should display the following:
                                  List of databases
   Name    |  Owner   | Encoding |   Collate   |    Ctype    |   Access privileges
-----------+----------+----------+-------------+-------------+-----------------------
 gisdb     | postgres | UTF8     | en_US.UTF-8 | en_US.UTF-8 |
 postgres  | postgres | UTF8     | en_US.UTF-8 | en_US.UTF-8 |
 template0 | postgres | UTF8     | en_US.UTF-8 | en_US.UTF-8 | =c/postgres          +
           |          |          |             |             | postgres=CTc/postgres
 template1 | postgres | UTF8     | en_US.UTF-8 | en_US.UTF-8 | =c/postgres          +
           |          |          |             |             | postgres=CTc/postgres
 videodb   | student  | UTF8     | en_US.UTF-8 | en_US.UTF-8 | =Tc/student          +
           |          |          |             |             | student=CTc/student  +
           |          |          |             |             | dba=CTc/student
(5 rows) |
As the privileged postgres owner/user make the following grants with these commands:
GRANT TEMPORARY, CONNECT ON DATABASE gisdb TO PUBLIC; GRANT ALL PRIVILEGES ON DATABASE gisdb TO postgres; GRANT ALL PRIVILEGES ON DATABASE gisdb TO dba; |
After making the grants, check the available databases access with this \l command:
\l |
It should display the following:
                                  List of databases
   Name    |  Owner   | Encoding |   Collate   |    Ctype    |   Access privileges
-----------+----------+----------+-------------+-------------+-----------------------
 gisdb     | postgres | UTF8     | en_US.UTF-8 | en_US.UTF-8 | =Tc/postgres         +
           |          |          |             |             | postgres=CTc/postgres+
           |          |          |             |             | dba=CTc/postgres
 postgres  | postgres | UTF8     | en_US.UTF-8 | en_US.UTF-8 |
 template0 | postgres | UTF8     | en_US.UTF-8 | en_US.UTF-8 | =c/postgres          +
           |          |          |             |             | postgres=CTc/postgres
 template1 | postgres | UTF8     | en_US.UTF-8 | en_US.UTF-8 | =c/postgres          +
           |          |          |             |             | postgres=CTc/postgres
 videodb   | student  | UTF8     | en_US.UTF-8 | en_US.UTF-8 | =Tc/student          +
           |          |          |             |             | student=CTc/student  +
           |          |          |             |             | dba=CTc/student
(5 rows) |
At this point, you can exit psql, the postgres user’s account, and the root user’s account. This should return you to your sudoer account, which in my case is the student user.
Connect to the gisdb with the following command-line interface command:
psql -U student -W -d gisdb |
You can create the following, as per instructions in PostGIS Chapter 9 instructions:
-- Conditionally drop table. DROP TABLE IF EXISTS geometries; -- Create table with geometry column in table. CREATE TABLE geometries ( geometries_id INT , name VARCHAR , geometry_obj GEOMETRY); INSERT INTO geometries ( name , geometry_obj ) VALUES ('Point', 'POINT(0 0)') ,('Linestring', 'LINESTRING(0 0, 1 1, 2 1, 2 2)') ,('Polygon', 'POLYGON((0 0, 1 0, 1 1, 0 1, 0 0))') ,('PolygonWithHole', 'POLYGON((0 0, 10 0, 10 10, 0 10, 0 0),(1 1, 1 2, 2 2, 2 1, 1 1))') ,('Collection', 'GEOMETRYCOLLECTION(POINT(2 0),POLYGON((0 0, 1 0, 1 1, 0 1, 0 0)))'); SELECT name , ST_AsText(geometry_obj) FROM geometries; |
Unfortunately, it raises the following error when attempting to create the geometries table:
psql:/home/student/Code/postgis/geometry.sql:7: ERROR: type "geometry" does not exist LINE 4: , geometry_obj GEOMETRY); |
As always, I hope the solutions presented helps move forward implementations of the technology. You can also find an excellent tutorial to learning PostGIS in the Introduction to PostGIS tutorial.
Sqlite on Ubuntu
We decided to include some existing Sqlite databases in our AWS Ubuntu learning lab because they’re used by the Data Science courses (specifically, DS 250). Installing Sqlite is quite simple:
sudo apt install -y sqlite |
You can check the install by using the which utility, like:
which -a sqlite3 |
On Ubuntu, it should return:
/usr/bin/sqlite3 |
There is a friendly help document online that can provide insight in how to use Sqlite. You can create a new student.db database with the following syntax from the Ubuntu CLI (Command-Line Interface):
sqlite3 student.db |
It would return the following:
SQLite version 3.37.2 2022-01-06 13:25:41 Enter ".help" FOR usage hints. sqlite> |
A little warning about the simple example and how it opens only a transient in-memory database. If you want a persistent database, you must open sqlite3 without any arguments. Then, you must use the .open method to open a persistent student.db database create a file in the relative directory path where you launched sqlite3 executable. You can read more about persistent in Sqlite in the documentation.
.open student.db |
The alternative opens the student.db file in a fully qualified path:
.open /home/student/Code/sqlite/db/student.db |
If you type .databases at the sqlite> prompt it would return:
sqlite> .databases main: /home/student/Code/sqlite/db/student.db r/w |
Let’s create a script file that creates two tables, a foreign key reference from one of the tables to the other, and some data with the following create_sample.sql script:
-- Drop knight table if exists. DROP TABLE IF EXISTS knight; -- Drop kingdom table if exists. DROP TABLE IF EXISTS kingdom; -- Create normalized table kingdom CREATE TABLE kingdom ( kingdom_id INTEGER PRIMARY KEY , kingdom_name VARCHAR(20) , population INTEGER , book VARCHAR(40)); -- Insert kingdom into table. INSERT INTO kingdom ( kingdom_id , kingdom_name , population , book ) VALUES ( 1, 'Narnia', 42100, 'Prince Caspian' ) ,( 2, 'Narnia', 77600, 'The Lion, The Witch and The Wardrobe' ) ,( 3, 'Camelot', 15200, 'The Once and Future King' ); -- Create normalized knight table. CREATE TABLE knight ( knight_id INTEGER PRIMARY KEY , knight_name VARCHAR(22) , kingdom_allegiance_id INTEGER , allegiance_start_date text , allegiance_end_date text , book VARCHAR(40) , FOREIGN KEY (kingdom_allegiance_id) REFERENCES kingdom(kingdom_id)); -- Insert knights into table. INSERT INTO knight ( knight_id , knight_name , kingdom_allegiance_id , allegiance_start_date , allegiance_end_date , book ) VALUES ( 1, 'Peter the Magnificent', 2, '1272-03-20', '1292-06-19', 'The Lion, The Witch and The Wardrobe' ) ,( 2, 'Edmund the Just', 2, '1272-03-20', '1292-06-19', 'The Lion, The Witch and The Wardrobe' ) ,( 3, 'Susan the Gentle', 2, '1272-03-20', '1292-06-19', 'The Lion, The Witch and The Wardrobe' ) ,( 4, 'Lucy the Valiant', 2, '1272-03-20', '1292-06-19', 'The Lion, The Witch and The Wardrobe' ) ,( 5, 'Peter the Magnificent', 1, '1531-04-12', '1328-05-31', 'Prince Caspian' ) ,( 6, 'Edmund the Just', 1, '1531-04-12', '1328-05-31', 'Prince Caspian' ) ,( 7, 'Susan the Gentle', 1, '1531-04-12', '1328-05-31', 'Prince Caspian' ) ,( 8, 'Lucy the Valiant', 1, '1531-04-12', '1328-05-31', 'Prince Caspian' ) ,( 9, 'King Arthur', 3, '0631-03-10', '0686-12-12', 'The Once and Future King' ) ,( 10, 'Sir Lionel', 3, '0631-03-10', '0686-12-12', 'The Once and Future King' ) ,( 11, 'Sir Bors', 3, '0631-03-10', '0686-12-12', 'The Once and Future King' ) ,( 12, 'Sir Bors', 3, '0631-03-10', '0686-12-12', 'The Once and Future King' ) ,( 13, 'Sir Galahad', 3, '0631-03-10', '0686-12-12', 'The Once and Future King' ) ,( 14, 'Sir Gawain', 3, '0631-03-10', '0686-12-12', 'The Once and Future King' ) ,( 15, 'Sir Tristram', 3, '0631-03-10', '0686-12-12', 'The Once and Future King' ) ,( 16, 'Sir Percival', 3, '0631-03-10', '0686-12-12', 'The Once and Future King' ) ,( 17, 'Sir Lancelot', 3, '0631-03-10', '0686-12-12', 'The Once and Future King' ); |
You can run the create_sample.sql script with the following syntax using an absolute path:
sqlite> .read /home/student/Code/sqlite/create_tables.sql |
Then, you can write a query like this to retrieve the data from two tables:
SELECT k.kingdom_name , kn.knight_name FROM kingdom k INNER JOIN knight kn ON k.kingdom_id = kn.kingdom_allegiance_id WHERE k.book = 'Prince Caspian'; |
It will return the following:
Narnia|Peter the Magnificent Narnia|Edmund the Just Narnia|Susan the Gentle Narnia|Lucy the Valiant |
You can exit sqlite3 by entering .quit or Control+D (the system End-Of-File character). If you can determine whether you have a transient or persistent student.db database file with the long list (ll) command.
The following command:
ll /home/student/Code/sqlite/db/student.db |
should return the following:
-rw-r--r-- 1 student student 12288 Feb 9 23:01 /home/student/Code/sqlite/db/student.db |
If the command returned a 0 sized student.db database file, you created a transient Sqlite table. You’ll need to redo the creation of the student.db database file with the .open command as qualified above.
If you want to detach a database from your active Sqlite session, you can issue the following command to remove it:
sqlite> DETACH DATABASE student.db |
Let’s jazz it up a bit with some Python. The first example verifies the ODBC driver’s ability to connect to Sqlite. Please note that it returns the same result for a transient and persistent database file. You can refer to the following documentation for Python examples.
#!/usr/bin/python # Import sqlite3 ODBC library. import sqlite3 try: # Open a connection to the student.db database db = sqlite3.connect('/home/student/Code/sqlite/db/student.db') # Print a string to say you've connected to the student.db database. print("Sqlite database connection success.") except sqlite3.Error as e: print('SQLite error: %s' % (' '.join(e.args))) print("Exception class is: ", e.__class__) print('SQLite traceback: ') exc_type, exc_value, exc_tb = sys.exc_info() print(traceback.format_exception(exc_type, exc_value, exc_tb)) sys.exit(1) finally: # Close the connection when it is open. if db: db.close() |
You can run the sqlite_connection.py script with the following syntax from its local directory:
Sqlite database connection success. |
Assuming you have created a persistent Sqlite database, as qualified above with the .open command and fully qualified file name. A fully qualified file name as a path from a Linux mount point to the file.
You must use the fully qualified file name for a persistent Sqlite student.db database as the database parameter for the sqlite3.connect() method, as shown on line #9 of the sqlite_query.py program below.
1 2 3 4 5 6 7 8 9 10 11 12 13 14 15 16 17 18 19 20 21 22 23 24 25 26 27 28 29 30 31 32 33 34 35 36 37 38 39 40 | #!/usr/bin/python # Import sys library. import sqlite3 try: # Open a connection to a persistent database, which should use # a fully qualified file name, but may use a relative file # name when the Python code is in the same directory as a # persistent student.db sqlite3 database. db = sqlite3.connect('/home/student/Code/sqlite/db/student.db') # Create a cursor. cursor = db.cursor() # Define a query. query = "SELECT k.kingdom_name " \ ", kn.knight_name " \ "FROM kingdom k INNER JOIN knight kn " \ "ON k.kingdom_id = kn.kingdom_allegiance_id " \ "WHERE k.book = 'Prince Caspian'" # Execute the cursor with the query. cursor.execute( query ) # Display the rows returned by the query. for (kingdom_name, knight_name) in cursor: print('{0} has {1}'.format( kingdom_name.title(), knight_name.title())) except sqlite3.Error as e: print('SQLite error: %s' % (' '.join(e.args))) print("Exception class is: ", e.__class__) print('SQLite traceback: ') exc_type, exc_value, exc_tb = sys.exc_info() print(traceback.format_exception(exc_type, exc_value, exc_tb)) sys.exit(1) finally: # Close the connection when it is open. if db: db.close() |
As always, I hope this helps those trying to get up and running with Sqlite.
Git Hub Desktop on Ubuntu
I need to install Git Hub Desktop on Ubuntu. It was quite straightforward:
bash -c "$(curl -fsSL https://raw.githubusercontent.com/kontr0x/github-desktop-install/main/installGitHubDesktop.sh)" |
Display detailed console log →
Starting install script... Downloading GitHubDesktop-linux-amd64-3.3.8-linux2.deb ... ############################################################################################################### 100.0% Download complete! Should the package be installed? (y/n) y Installing package, this requires sudo privileges! Selecting previously unselected package github-desktop. (Reading database ... 245728 files and directories currently installed.) Preparing to unpack .../GitHubDesktop-linux-amd64-3.3.8-linux2.deb ... Unpacking github-desktop (3.3.8-linux2) ... Setting up github-desktop (3.3.8-linux2) ... Processing triggers for mailcap (3.70+nmu1ubuntu1) ... Processing triggers for gnome-menus (3.36.0-1ubuntu3) ... Processing triggers for desktop-file-utils (0.26-1ubuntu3) ... Processing triggers for hicolor-icon-theme (0.17-2) ... Package installed successfully Clean up downloaded file? (y/n) y File cleaned up! Thank you for using the script, have a nice day! |
You can find it in the 9-dot menu’s second page or launch it from the command line, like:
github-desktop |
Either will launch the GitHub Desktop, as shown below:

As always, I hope this helps those looking for concise and complete free answer on installing GitHub Desktop.
Ruby+PostgreSQL on Ubuntu
This extends the earlier post on installing and configuring Ruby 3.3.0 on Ubuntu 22.0.4. Please refer to that earlier post to install Ruby. This post shows you how to install the necessary libraries and Ruby Gems for PostgreSQL.
You need to install the libra-dev package, as shown:
sudo apt install postgresql libpq-dev |
Display detailed console log →
Reading package lists... Done Building dependency tree... Done Reading state information... Done postgresql is already the newest version (14+238). Suggested packages: postgresql-doc-16 The following NEW packages will be installed: libpq-dev 0 upgraded, 1 newly installed, 0 to remove and 6 not upgraded. Need to get 142 kB of archives. After this operation, 590 kB of additional disk space will be used. Do you want to continue? [Y/n] Y Get:1 https://ftp.postgresql.org/pub/pgadmin/pgadmin4/apt/jammy pgadmin4/main amd64 libpq-dev amd64 16.1-1.pgdg22.04+1 [142 kB] Fetched 142 kB in 7s (20.7 kB/s) Selecting previously unselected package libpq-dev. (Reading database ... 247065 files and directories currently installed.) Preparing to unpack .../libpq-dev_16.1-1.pgdg22.04+1_amd64.deb ... Unpacking libpq-dev (16.1-1.pgdg22.04+1) ... Setting up libpq-dev (16.1-1.pgdg22.04+1) ... Processing triggers for man-db (2.10.2-1) ... |
Next, you need to install the PG Gem:
gem install pg |
Display detailed console log →
Fetching pg-1.5.4.gem Building native extensions. This could take a while... Successfully installed pg-1.5.4 Parsing documentation for pg-1.5.4 Installing ri documentation for pg-1.5.4 Done installing documentation for pg after 3 seconds 1 gem installed |
You can now write a postgres_version.rb program to verify a connection to the PostgreSQL database, like:
# Include Ruby Gem libraries. require 'rubygems' require 'pg' # Begin block. begin # Create a new connection resource. db = PG::connect( 'localhost', 5432, '', '', 'videodb', 'student', 'student') # Create a result set. stmt = db.query('SELECT version() AS version') # Read through the result set hash. stmt.each do | row | puts "#{row['version']}" end # Release the result set resources. stmt.freeze rescue PG::Error => e # Print the error. puts "ERROR #{e.error} (#{e.sqlstate})" puts "Can't connect to the PostgreSQL database specified." # Signal an error. exit 1 ensure # Close the connection when it is open. db.close if db end |
Call the postgres_version.rb program with this syntax:
ruby mysql_version.rb |
It should return:
PostgreSQL 14.10 (Ubuntu 14.10-0ubuntu0.22.04.1) on x86_64-pc-linux-gnu, compiled by gcc (Ubuntu 11.4.0-1ubuntu1~22.04) 11.4.0, 64-bit |
The postgres_columns.rb script returns a couple columns concatenated into a single column:
# Include Ruby Gem libraries. require 'rubygems' require 'pg' # Begin block. begin # Create a new connection resource. db = PG::connect( 'localhost', 5432, '', '', 'videodb', 'student', 'student') # Create a result set. stmt = db.query("SELECT CONCAT(nh.last_name, ', ', nh.first_name) AS name " + \ "FROM new_hire nh " + \ "ORDER BY nh.last_name") # Read through the result set hash. stmt.each do | row | out = "" i = 0 while i < stmt.fields.count() # Check when not last column and use the: # - Hash returned by the result set for the value, and # - String array value returned by the statement object # as the name value of the hash by leveraging its # numeric index. if i < stmt.fields.count() - 1 out += "#{row[stmt.fields[i]]}" out += ", " else out += "#{row[stmt.fields[i]]}" end i += 1 end puts "#{out}" end # Release the result set resources. stmt.freeze rescue PG::Error => e # Print the error. puts "ERROR #{e.error} (#{e.sqlstate})" puts "Can't connect to PostgreSQL database specified." # Signal an error. exit 1 ensure # Close the connection when it is open. db.close if db end |
Call the postgres_columns.rb program with this syntax:
ruby mysql_columns.rb |
It should return:
Chabot, Henry Lewis, Malcolm |
As always, I hope this helps those looking to learn and solve a problem. You can find the PG Gem documentation here.
VSCode Package Error
While running an update on Ubuntu 22.0.4 with the following syntax I got an error on finding the VSCode Package. I ran this to update before adding Ruby and Rails to an Ubuntu virtual machine instance.
sudo apt-get update |
Display detailed console log →
Hit:1 http://us.archive.ubuntu.com/ubuntu jammy InRelease Get:2 http://security.ubuntu.com/ubuntu jammy-security InRelease [110 kB] Get:3 http://us.archive.ubuntu.com/ubuntu jammy-updates InRelease [119 kB] Hit:4 https://dl.google.com/linux/chrome/deb stable InRelease Ign:5 https://packages.microsoft.com/repos/vscode/dists stable InRelease Err:6 https://packages.microsoft.com/repos/vscode/dists stable Release 404 Not Found [IP: 13.90.56.68 443] Hit:7 https://download.vscodium.com/debs vscodium InRelease Hit:8 http://us.archive.ubuntu.com/ubuntu jammy-backports InRelease Hit:9 https://ftp.postgresql.org/pub/pgadmin/pgadmin4/apt/jammy pgadmin4 InRelease Reading package lists... Done E: The repository 'https://packages.microsoft.com/repos/vscode/dists stable Release' does not have a Release file. N: Updating from such a repository can't be done securely, and is therefore disabled by default. N: See apt-secure(8) manpage for repository creation and user configuration details. |
I manually moved the vscode.list file to my student user’s home directory and removed the file from /etc/apt/sources.list.d directory. This allowed me to update all other packages.
Don’t forget to replace the vscode.list file in the /etc/apt/sources.list.d directory.
