Archive for the ‘Oracle Developer’ tag
SQL*Plus Tutorial
SQL Interactive and Batch Processing
SQL*Plus provides an interactive and batch processing environment that dispatches commands to the SQL and PL/SQL engines. You can work either in the interactive SQL*Plus command-line interface (CLI) or in Oracle SQL Developer through a Java-based GUI. This section explains how to use these two primary interfaces to the SQL and PL/SQL engines. There are many other commercial products from other vendors that let you work with Oracle, but coverage of those products is beyond the scope of this book.
SQL*Plus Command-Line Interface
SQL*Plus is the client software for Oracle that runs SQL statements and anonymous block PL/SQL statements in an interactive and batch development environment. The statements are organized in the order that you generally encounter them as you start working with SQL*Plus or the MySQL Monitor.
Connecting to and Disconnecting from SQL*Plus
After installing the Oracle Database on the Linux OS, you access SQL*Plus from the command line. This works when the operating system finds the sqlplus executable in its path environment variable ($PATH on Linux). Linux installations require that you configure
When sqlplus is in the path environment variable, you can access it by typing the following:
sqlplus some_username/some_password |
The preceding connect string may use IPC or the network to connect to the Oracle database. You can connect through the network by specifying a valid net service name, like this:
sqlplus some_username/some_password@some_net_service_name |
While this works, and many people use it, you should simply enter your user name and let the database prompt you for the password. That way, it’s not displayed as clear text.
To avoid displaying your password, you should connect in the following way, which uses IPC:
sqlplus some_username |
Or you can connect using the network layer by using a net service name like this:
sqlplus some_username@some_tns_alias |
You’ll then see a password prompt. As you type your password, it is masked from prying eyes. The password also won’t be visible in the window of the command session.
The problem with either of these approaches is that you’ve disclosed your user account name at the operating system level. No matter how carefully you’ve host-hardened your operating system, there’s no reason to disclose unnecessary details. The recommended best practice for connecting at the command line is to use /nolog, like this:
sqlplus /nolog |
After you’re connected as an authenticated user, you can switch to work as another user by using the following syntax, which discloses your password to the screen but not the session window:
SQL> CONNECT some_otheruser/some_password |
Or you can connect through a net service name, like
SQL> CONNECT some_otheruser@net_service_name/some_password |
Alternatively, you can connect with or without a net service name to avoid displaying your password:
SQL> CONNECT some_otheruser |
As with the preceding initial authorization example, you are prompted for the password. Entering it in this way also protects it from prying eyes.
If you try to run the sqlplus executable and it fails with a message that it can’t find the sqlplus executable, you must correct that issue. Check whether the $ORACLE_HOME/bin is found in the respective $PATH environment variable. Like PATH, the ORACLE_HOME is also an operating system environment variable. ORACLE_HOME should point to where you installed the Oracle database.
You can use the following commands to check the contents of your path environment variable. Instructions for setting these are in the Oracle Database Installation Guide for your platform and release:
Linux or Unix:
echo $PATH |
When you’ve connected to SQL*Plus, you will see the SQL> prompt, like:
SQL> |
Working in the SQL*Plus Environment
Unlike other SQL environments, the SQL*Plus environment isn’t limited simply to running SQL statements. Originally, it was written as a SQL report writer. This means SQL*Plus contains a number of features to make it friendlier and more useful. (That’s why SQL*Plus was originally known as an Advanced Friendly Interface [AFI]). Examples of these friendlier and useful features include a set of well-designed formatting extensions that enables you to format and aggregate result set data. SQL*Plus also lets you interactively edit files from the command line.
This section explains how you can dynamically configure your environment to suit your needs for each connection, configure SQL*Plus to remember settings for every connection, discover features through the interactive help menus, and shell out of or exit the SQL*Plus environment.
Configuring SQL*Plus Environment You can configure your SQL*Plus environment in two ways. One requires that you configure it each time that you start a session (dynamically). The other requires that you configure the glogin.sql file, which is the first thing that runs after a user authenticates and establishes a connection with the database. The caveat to modifying the glogin.sql file is that any changes become universal for all users of the Oracle Database installation. Also, only the owner of the Oracle account can make these changes.
Dynamically Configuring SQL*Plus—
Every connection to SQL*Plus is configurable. Some developers choose to put these instructions inside their script files, while others prefer to type them as they go. Putting them in the script files means you have to know what options you have first. The SQL*Plus SHOW command lets you find all of them with the keyword ALL, like this:
SHOW ALL |
The SQL*Plus SHOW command also lets you see the status of a given environment variable.
The following command displays the default value for the FEEDBACK environment variable:
SHOW FEEDBACK |
It returns the default value unless you’ve altered the default by configuring it in the glogin.sql file. The oracle user has the rights to make any desired changes in this file, but they apply to all users who connect to the database.
The default value for FEEDBACK is
FEEDBACK ON FOR 6 OR more ROWS |
By default, an Oracle database shows the number of rows touched by a SQL command only when six or more rows are affected. If you also want to show feedback when five or fewer rows are affected, the following syntax resets the environment variable:
SET FEEDBACK ON |
It returns 0 or the number of rows affected by any SQL statement.
Setting these environment variables inside script files allows you to designate runtime behaviors, but you should also reset them to the default at the conclusion of the script. When they’re not reset at the end of a script, they can confuse a user expecting the default behaviors.
Configuring the Default SQL*Plus Environment File—The glogin.sql file is where you define override values for the environment variables. You might want to put many things beyond environment variable values into your glogin.sql configuration file. The most common is a setting for the default editor in Linux or Unix, because it’s undefined out of the box. You can set the default editor to the vi text editor in Linux by adding the following line to the glogin.sql file:
DEFINE _EDITOR=vi |
The DEFINE keyword has two specialized uses in SQL*Plus. One lets you define substitution variables (sometimes called user variables) that act as session-level variables. The other lets you enable or disable the ampersand (&) symbol as a substitution variable operator. It is enabled by default because the DEFINE environment variable is ON by default. You disable the specialized role by setting DEFINE to OFF. SQL*Plus treats the ampersand (&) as an ordinary text character when DEFINE is OFF. You can find more on this use of the DEFINE environment variable in the “When to Disable Substitution Variables” sidebar later in this appendix.
Substitution variables are placeholder variables in SQL statements or session-level variables in script files. They are placeholder variables when you precede them with one ampersand (&) and are session-level variables when you precede them with two ampersands. As placeholders, they are discarded after a single use. Including two ampersands (&&) makes the assigned value of a substitution variable reusable. You can set a session-level variable either with the DEFINE command, as shown previously with the _EDITOR variable, or by using a double ampersand (&&), as in the following:
SELECT '&&BART' FROM dual; |
With two ampersands, the query prompts the user for a value for the BART session-level variable and sets the value as a session-level variable. A single ampersand would simply prompt, use it, and discard it. Assuming you enter “Cartoon Character” as the response to the preceding query, you see the value by querying it with a single or double ampersand:
SELECT '&BART' AS "Session Variable" FROM dual; |
This displays the following:
SESSION Variable ----------------- Cartoon Character |
Or you can use the DEFINE command like this:
DEFINE BART |
This displays the following:
DEFINE BART = "Cartoon Character" (CHAR) |
The scope of the session variable lasts throughout the connection unless you undefine it with the following command:
UNDEFINE BART |
Although you can define substitution variables, you can use them only by preceding their name with an ampersand. That’s because a single ampersand also lets you read the contents of substitution variables when they’re set as session-level variables. Several user variables are reserved for use by Oracle Database. These user variables can contain letters, underscores, or numbers in any order. When reserved for use by Oracle, these variables all start with an underscore, as is the case with the _EDITOR variable. Any reference to these variables is case-insensitive.
SQL*Plus checks the contents of the _EDITOR user variable when you type the EDIT command, often abbreviated as ED. The EDIT command launches the executable stored in the _EDITOR user variable. The Windows version of Oracle Database comes preconfigured with Notepad as the default editor. It finds the Notepad utility because it’s in a directory found in the operating system path variable. If you choose another editor, you need to ensure that the executable is in your default path environment.
The DEFINE command also lets you display the contents of all session-level variables. There is no all option for the DEFINE command, as there is for the SHOW command. You simply type DEFINE without any arguments to get a list of the default values:
DEFINE _DATE = "09-AUG-18" (CHAR) DEFINE _CONNECT_IDENTIFIER = "XE" (CHAR) DEFINE _USER = "STUDENT" (CHAR) DEFINE _PRIVILEGE = "" (CHAR) DEFINE _SQLPLUS_RELEASE = "1102000200" (CHAR) DEFINE _EDITOR = "vim" (CHAR) DEFINE _O_VERSION = "Oracle Database 11g Express Edition Release 11.2.0.2.0 - 64bit Production" (CHAR) DEFINE _O_RELEASE = "1102000200" (CHAR) |
The preceding user variables are set by Oracle during a /nolog connection. When you connect as a container or pluggable user, the DEFINE command displays a different result. Shown next is the example after having connected as the student (a pluggable database user):
DEFINE _DATE = "09-AUG-18" (CHAR) DEFINE _CONNECT_IDENTIFIER = "" (CHAR) DEFINE _USER = "" (CHAR) DEFINE _PRIVILEGE = "" (CHAR) DEFINE _SQLPLUS_RELEASE = "1102000200" (CHAR) DEFINE _EDITOR = "vim" (CHAR) |
The last two lines are displayed only when you’re connected as a user to the Oracle Database 12c database. As previously explained, you can define the contents of other substitution variables.
Although substitution variables have many uses, their primary purpose is to support the SQL*Plus environment. For example, you can use them to reset the SQL> prompt. You can reset the default SQL*Plus prompt by using two predefined session-level variables, like this:
SET sqlprompt "'SQL:'_user at _connect_identifier>" |
This would change the default prompt to look like this when the _user name is system and the _connect_identifier is orcl:
SQL: SYSTEM AT orcl> |
This type of prompt takes more space, but it shows you your current user and schema at a glance. It’s a handy prompt to help you avoid making changes in the wrong schema or instance, which occurs too often in daily practice.
Using Interactive Help in the SQL*Plus Environment SQL*Plus also provides an interactive help console that contains an index of help commands. You can find the index of commands by typing the following in SQL*Plus:
SQL> help INDEX |
It displays the following:
Enter Help [topic] FOR help. @ COPY PAUSE SHUTDOWN @@ DEFINE PRINT SPOOL / DEL PROMPT SQLPLUS ACCEPT DESCRIBE QUIT START APPEND DISCONNECT RECOVER STARTUP ARCHIVE LOG EDIT REMARK STORE ATTRIBUTE EXECUTE REPFOOTER TIMING BREAK EXIT REPHEADER TTITLE BTITLE GET RESERVED WORDS (SQL) UNDEFINE CHANGE HELP RESERVED WORDS (PL/SQL) VARIABLE CLEAR HOST RUN WHENEVER OSERROR COLUMN INPUT SAVE WHENEVER SQLERROR COMPUTE LIST SET XQUERY CONNECT PASSWORD SHOW |
You can discover more about the commands by typing help with one of the index keywords. The following demonstrates the STORE command, which lets you store the current buffer contents as a file:
SQL> help store |
It displays the following:
STORE ----- Saves attributes OF the CURRENT SQL*Plus environment IN a script. STORE {SET} file_name[.ext] [CRE[ATE] | REP[LACE] | APP[END]] |
This is one way to save the contents of your current SQL statement into a file. You’ll see another, the SAVE command, shortly in this appendix. You might want to take a peek in the “Writing SQL*Plus Log Files” section later in this appendix if you’re experimenting with capturing the results of the HELP utility by spooling the information to a log file.
As discussed, the duration of any SQL*Plus environment variable is from the beginning to the end of any session. Define environment variables in the glogin.sql file when you want them to be available in all SQL*Plus sessions.
Shelling Out of the SQL*Plus Environment In cases where you don’t want to exit an interactive session of SQL*Plus, you can leave the session (known as shelling out) and run operating system commands. The HOST command lets you do that, like so:
SQL> HOST |
Anything that you do inside this operating system session other than modify files is lost when you leave it and return to the SQL*Plus session. The most frequent things that most developers do in a shelled-out session are check the listing of files and rename files. Sometimes, developers make small modifications to files, exit the subshell session, and rerun the file from SQL*Plus.
You exit the operating system shell environment and return to SQL*Plus by typing EXIT.
An alternative to shelling out is to run a single operating system command from SQL*Plus. For example, you can type the following in Windows to see the contents of the directory from which you entered SQL*Plus:
SQL> HOST dir |
Linux works with the HOST command, too. In Linux, you also have the option of a shorthand version of the HOST command—the exclamation mark (!). You use it like this:
SQL> ! ls -al |
The difference between the ! and HOST commands is that you can’t use substitution variables with !.
Exiting SQL*Plus Environment You use QUIT or EXIT to exit a session in the SQL*Plus program. Either command ends a SQL*Plus session and releases any session variables.
The next sections show you how to write, save, edit, rerun, edit, abort, call, run, and pass parameters to SQL statements. Then you’ll learn how to call PL/SQL programs and write SQL*Plus log files.
Writing SQL Statements with SQL*Plus
A simple and direct way to demonstrate how to write SQL statements in SQL*Plus is to write a short query. Queries use the SELECT keyword to list columns from a table and use the FROM keyword to designate a table or set of tables. The following query selects a string literal value (“Hello World!”) from thin air with the help of the pseudo table dual. The dual pseudo table is a structure that lets you query one or more columns of data without accessing a table, view, or stored program. Oracle lets you select any type of column except a large object (LOB) from the dual table. The dual table returns only one row of data.
SELECT 'Hello World!' FROM dual; |
Notice that Oracle requires single quotation marks as delimiters of string literal values. Any attempt to substitute double quotation marks raises an ORA-00904 error message, which means you’ve attempted to use an invalid identifier. For example, you’d generate the following error if you used double quotes around the string literal in the original statement:
SELECT "Hello World!" FROM dual * ERROR AT line 1: ORA-00904: "Hello World!": invalid identifier |
If you’re coming from the MySQL world to work in Oracle databases, this may seem a bit provincial. MySQL works with either single or double quotes as string delimiters, but Oracle doesn’t. No quote delimiters are required for numeric literals.
SQL*Plus places a query or other SQL statement in a special buffer when you run it. Sometimes you may want to save these queries in files. The next section shows you how to do that.
Saving SQL Statements with SQL*Plus
Sometimes you’ll want to save a SQL statement in a file. That’s actually a perfect activity for the SAVE or STORE command (rather than spooling a log file). Using the SAVE or STORE command lets you save your current statement to a file. Capturing these ad hoc SQL statements is generally important—after all, SQL statements ultimately get bundled into rerunnable script files before they ever move into production systems.
Use the following syntax to save a statement as a runnable file:
SAVE some_new_file_name.SQL |
If the file already exists, you can save the file with this syntax:
SAVE some_new_file_name.SQL REPLACE |
Editing SQL Statements with SQL*Plus
You can edit your current SQL statements from within SQL*Plus by using EDIT. SQL*Plus preconfigures itself to launch Notepad when you type EDIT or the shorthand ED in any Windows installation of Oracle Database.
Although the EDIT command points to Notepad when you’re working in Windows, it isn’t configured by default in Linux or Unix. You have to set the editor for SQL*Plus when running on Linux or Unix. Refer to the “Working in the SQL*Plus Environment” section earlier in the appendix for details about setting up the editor.
Assuming you’ve configured the editor, you can edit the last SQL statement by typing EDIT like this (or you can use ED):
SQL> EDIT |
The temporary contents of any SQL statement are stored in the afiedt.buf file by default. After you edit the file, you can save the modified statement into the buffer and rerun the statement. Alternatively, you can save the SQL statement as another file.
Rerunning SQL*Plus SQL Statements from the Buffer
After you edit a SQL statement, SQL*Plus automatically lists it for you and enables you to rerun it. Use a forward slash (/)to run the last SQL statement from the buffer. The semicolon at the end of your original SQL statement isn’t stored in the buffer; it’s replaced by a forward slash. If you add the semicolon back when you edited the SQL statement, you would see something like the following with the semicolon at the end of the last line of the statement:
SQL> EDIT Wrote FILE afiedt.buf 1* SELECT 'Hello World!' AS statement FROM dual; |
A forward slash can’t rerun this from the buffer because the semicolon is an illegal character. You would get an error like this:
SQL> / SELECT 'Hello World!' AS statement FROM dual; * ERROR AT line 1: ORA-00911: invalid character |
To fix this error, you should re-edit the buffer contents and remove the semicolon. The forward slash would then run the statement.
Some SQL statements have so many lines that they don’t fit on a single page in your terminal or shell session. In these cases, you can use the LIST command (or simply a lowercase l or uppercase L) to see only a portion of the current statement from the buffer. The LIST command by itself reads the buffer contents and displays them with line numbers at the SQL prompt.
If you’re working with a long PL/SQL block or SQL statement, you can inspect ranges of line numbers with the following syntax:
SQL> LIST 23 32 |
This will echo back to the console the inclusive set of lines from the buffer if they exist. Another command-line interface is used to edit line numbers. It’s very cumbersome and limited in its utility, so you should simply edit the SQL statement in a text editor.
Aborting Entry of SQL Statements in SQL*Plus
When you’re working at the command line, you can’t just point the mouse to the prior line and correct an error; instead, if your statement has an error, your must either abort the statement or run it and wait for it to fail. SQL*Plus lets you abort statements with errors.
To abort a SQL statement that you’re writing interactively, press ENTER, type a period (.) as the first character on the new line, and then press ENTER again. This aborts the statement but leaves it in the active buffer file in case you went to edit it.
After aborting a SQL statement, you can use the instructions in the previous “Editing SQL Statements with SQL*Plus” section to edit the statement with the ed utility—that is, if editing the statement is easier than retyping the whole thing.
Calling and Running SQL*Plus Script Files
Script (or batch) files are composed of related SQL statements and are the primary tool for implementing new software and patching old software. You use script files when you run installation or update programs in test, stage, and production environments. Quality and assurance departments want script files to ensure code integrity during predeployment testing. If errors are found in the script file, the script file is fixed by a new version. The final version of the script file is the one that a DBA runs when installing or upgrading an application or database system.
A script is rerunnable only if it can manage preexisting conditions in the production database without raising errors. You must eliminate all errors because administrators might not be able to judge which errors can be safely ignored. This means the script must perform conditional drops of tables and data migration processes.
Assuming you have a file named create_data.sql in a /Home/student/Data directory, you can run it with the @ (at) command in SQL*Plus. This script can be run from within SQL*Plus with either a relative filename or an absolute filename. A relative filename contains no path element because it assumes the present working path. An absolute filename requires a fully qualified path (also known as a canonical path) and filename.
The relative filename syntax depends on starting SQL*Plus from the directory where you have saved the script file. Here’s the syntax to run the create_data.sql file:
@create_data.SQL |
Although the relative filename is easy to use, it limits you to starting SQL*Plus from a specific directory, which is not always possible. The absolute filename syntax works regardless of where you start SQL*Plus. Here’s an example for Linux:
@/home/student/Data/create_data.SQL |
The @ command is also synonymous with the SQL*Plus START command. This means you can also run a script file based on its relative filename like this:
START create_data.SQL |
The @ command reads the script file into the active buffer and then runs the script file. You use two @@ symbols when you call one script file from another script file that exists in the same directory. Combining the @@ symbols instructs SQL*Plus to look in the directory specified by the command that ran the calling script. This means that a call such as the following runs a subordinate script file from the same directory:
@@some_subordinate.SQL |
If you need to run scripts delivered by Oracle and they reside in the ORACLE_HOME, you can use a handy shortcut: the question mark (?). The question mark maps to the ORACLE_HOME. This means you can run a library script from the \rdbms subdirectory of the ORACLE_HOME with this syntax in Linux:
?\rdbms\somescript.SQL |
The shortcuts and relative path syntax are attractive during development but should be avoided in production. Using fully qualified paths from a fixed environment variable such as the $ORACLE_HOME in Linux is generally the best approach.
Passing Parameters to SQL*Plus Script Files
Understanding how to write and run static SQL statements or script files is important, but understanding how to write and run SQL statements or script files that can solve dynamic problems is even more important. To write dynamic scripts, you use substitution variables, which act like placeholders in SQL statements or scripts. As mentioned earlier, SQL*Plus supports two modes of processing: interactive mode and call mode.
Interactive Mode Parameter Passing When you call a script that contains substitution variables, SQL*Plus prompts for values that you want to assign to the substitution variables. The standard prompt is the name of the substitution variable, but you can alter that behavior by using the ACCEPT SQL*Plus command.
For example, assume that you want to write a script that looks for a table with a name that’s some partial string, but you know that the search string will change. A static SQL statement wouldn’t work, but a dynamic one would. The following dynamic script enables you to query the database catalog for any table based on only the starting part of the table name. The placeholder variable is designated using an ampersand (&) or two. Using a single ampersand instructs SQL*Plus to make the substitution at runtime and forget the value immediately after the substitution. Using two ampersands (&&) instructs SQL*Plus to make the substitution, store the variable as a session-level variable, and undefine the substitution variable.
SQL> SELECT table_name 2 , column_id 3 , column_name 4 FROM user_tab_columns 5 WHERE TABLE LIKE UPPER('&input')||'%'; |
The UPPER function on line 5 promotes the input to uppercase letters because Oracle stores all metadata in uppercase and performs case-sensitive comparisons of strings by default. The query prompts as follows when run:
Enter VALUE FOR input: it |
When you press ENTER, it shows the substitution of the value for the placeholder, like so:
old 5: WHERE table_name LIKE UPPER('&input')||'%' NEW 5: WHERE table_name LIKE UPPER('it')||'%' |
At least this is the default behavior. The behavior depends on the value of the SQL*Plus VERIFY environment variable, which is set to ON by default. You can suppress that behavior by setting the value of VERIFY to OFF:
SET VERIFY OFF |
You can also configure the default prompt by using SQL*Plus formatting commands, like so:
ACCEPT input CHAR PROMPT 'Enter the beginning part of the table name:' |
This syntax acts like a double ampersand assignment and places the input substitution in memory as a session-level variable.
You can also format output through SQL*Plus. The COL[UMN] command qualifies the column name, the FORMAT command sets formatting to either numeric or alphanumeric string formatting, and the HEADING command lets you replace the column name with a reporting header. The following is an example of formatting for the preceding query:
SQL> COLUMN table_name FORMAT A20 HEADING "Table Name" SQL> COLUMN column_id FORMAT 9990 HEADING "Column|ID" SQL> COLUMN column_name FORMAT A20 HEADING "Column Name" |
The table_name column and column_name column now display the first 20 characters before wrapping to the next line because they are set to an alphanumeric size of 20 characters. The column_id column now displays the first four numeric values and would display a 0 when the column_id value is less than 1. Actually, this only illustrates the possibility of printing at least a 0 because a surrogate key value can’t have a value less than 1. The column headers for the table_name and column_name columns print in title case with an intervening whitespace, while the column_id column prints “Column” on one line and “ID” on the next.
Batch Mode Parameter Passing Batch mode operations typically involve a script file that contains more than a single SQL statement. The following example uses a file that contains a single SQL statement because it successfully shows the concept and conserves space.
The trick to batch submission is the -s option flag, or the silent option. Script files that run from the command line with this option flag are batch programs (those using the SQL*Plus call mode). They suppress a console session from being launched and run much like statements submitted through the JDBC API or ODBC API. Batch programs must include a QUIT or EXIT statement at the end of the file or they will hang in SQL*Plus. This technique lets you create a file that can run from an operating system script file, also commonly known as a shell script.
The following sample.sql file shows how you would pass a parameter to a dynamic SQL statement embedded in a script file:
-- Disable echoing substitution. SET VERIFY OFF -- Open log file. SPOOL demo.txt -- Query data based on an externally set parameter. SELECT table_name , column_id , column_name FROM user_tab_columns WHERE table_name LIKE UPPER('&1')||'%'; -- Close log file. SPOOL OFF -- End session connection. QUIT; |
You would call the program from a batch file in Windows or a shell script in Linux. The syntax would include the user name and password, which presents a security risk. Provided you’ve secured your local server and you routinely purge your command history, you would call a sample.sql script from the present working directory like this:
sqlplus -s student/student @sample.SQL |
You can also pass the user name and password as connection parameters, which is illustrated in the following sample:
SET VERIFY OFF SPOOL demo.txt CONNECT &1/&2 SELECT USER FROM dual; SPOOL OFF QUIT; |
The script depends on the /nolog option to start SQL*Plus without connecting to a schema.
You would call it like this, providing the user name and password:
sqlplus -s /nolog @create_data.sql student student |
As mentioned, there are risks to disclosing user names and passwords, because the information from the command line can be hacked from user history logs. Therefore, you should use anonymous login or operating system user validation when you want to run scripts like these.
Calling PL/SQL Programs
PL/SQL provides capabilities that don’t exist in SQL that are required by some database-centric applications. PL/SQL programs are stored programs that run inside a separate engine from the SQL statement engine. Their principal role is to group SQL statements and procedural logic to support transaction scopes across multiple SQL statements.
PL/SQL supports two types of stored programs: anonymous blocks and named blocks. Anonymous blocks are stored as trigger bodies and named blocks can be either stand-alone functions or procedures. PL/SQL also supports packages, which are groups of related functions and procedures. Packages support function and procedure overloading and provide many of the key utilities for Oracle databases. Oracle also supports object types and object bodies with the PL/SQL language. Object types support MEMBER and STATIC functions and procedures.
Oracle Database 12c PL/SQL Programming
Functions and procedures support pass-by-value and pass-by-reference methods available in other procedural programming languages. Functions return a value when they’re placed as right operands in an assignment and as calling parameters to other functions or procedures. Procedures don’t return a value or reference as a right operand and can’t be used as calling parameters to other functions or procedures.
Sometimes you’ll want to output diagnostic information to your console or formatted output from small PL/SQL programs to log files. This is easy to do in Oracle Database because PL/SQL supports anonymous block program units.
Before you can receive output from a PL/SQL block, you must open the buffer that separates the SQL*Plus environment from the PL/SQL engine. You do so with the following SQL*Plus command:
SET SERVEROUTPUT ON SIZE UNLIMITED |
You enable the buffer stream for display to the console by changing the status of the SERVEROUTPUT environment variable to ON. Although you can set the SIZE parameter to any value, the legacy parameter limit of 1 million bytes no longer exists. That limit made sense in earlier releases because of physical machine limits governing console speed and network bandwidth. Today, there’s really no reason to constrain the output size, and you should always use UNLIMITED when you open the buffer.
You now know how to call the various types of PL/SQL programs. Whether the programs are yours or built-ins provided by Oracle, much of the logic that supports features of Oracle databases rely on stored programs.
Executing an Anonymous Block Program The following example demonstrates a traditional “Hello World!” program in an anonymous PL/SQL block. It uses a specialized stored program known as a package. Packages contain data types, shared variables, and cursors, functions, and procedures. You use the package name, a dot (the component selector), and a function or procedure name when you call package components.
You print “Hello World!” with the following anonymous block program unit:
SQL> BEGIN 2 DBMS_OUTPUT.PUT_LINE('Hello World!'); 3 END; 4 / |
PL/SQL is a strongly typed language that uses declarative blocks rather than the curly braces you may know best from C, C#, C++, Java, Perl, or PHP. The execution block starts with the BEGIN keyword and ends with an EXCEPTION or END keyword. Since the preceding sample program doesn’t employ an exception block, the END keyword ends the program. All statements and blocks in PL/SQL end with a semicolon. The forward slash on line 4 executes the anonymous block program because the last semicolon ends the execution block. The program prints “Hello World!” to the console, provided you opened the buffer by enabling the SQL*Plus SERVEROUTPUT environment variable.
Anonymous block programs are very useful when you need one-time procedural processing and plan to execute it in the scope of a single batch or script file. Displaying results from the internals of the PL/SQL block is straightforward, as discussed earlier in this section: enable the SERVEROUTPUT environment variable.
Setting a Session Variable Inside PL/SQL Oracle databases also support session variables, which are not the same as session-level substitution variables. Session variables act like global variables in the scope and duration of your connection, as do session-level substitution variables, but the former differ from substitution variables in two ways. Substitution variables are limited to a string data type, while session variables may have any of the following data types: BINARY_DOUBLE, BINARY_FLOAT, CHAR, CLOB, NCHAR, NCLOB, NUMBER, NVARCHAR2, REFCURSOR, or VARCHAR2. Session variables, more commonly referred to as bind variables, can’t be assigned a value in SQL*Plus or SQL scope. You must assign values to session variables in an anonymous PL/SQL block.
Session variables, like session-level substitution variables, are very useful because you can share them across SQL statements. You must define session variables with the VARIABLE keyword, which gives them a name and data type but not a value. As an example, you can define a bind variable as a 20-character-length string like so:
VARIABLE whom VARCHAR2(20) |
You can assign a session variable with an anonymous PL/SQL block or a CALL to a stored function. Inside the anonymous block, you reference the variable with a colon preceding the variable name. The colon points to a session-level scope that is external to its local block scope:
BEGIN :whom := 'Sam'; END; / |
After assigning a value to the session variable, you can query it in a SQL statement or reuse it in another PL/SQL anonymous block program. The following query from the dual pseudo table concatenates string literals before and after the session variable:
SELECT 'Play it again, ' || :whom || '!' FROM dual; |
The colon appears in SQL statements, too. Both the anonymous block and SQL statement actually run in execution scopes that are equivalent to other subshells in operating system shell scripting. The query prints the following:
Play it again, Sam! |
The dual pseudo table is limited to a single row but can return one to many columns. You can actually display 999 columns, which is the same as the number of possible columns for a table in the Oracle Database.
Executing a Named Block Program Stored functions and procedures are known as named blocks, whether they’re stand-alone programs or part of a package. You can call a named function into a session variable or return the value in a query. Procedures are different because you execute them in the scope of a session or block and they have no return value (procedures are like functions that return a void data type).
The following is a “Hello World!” function that takes no parameters:
SQL> CREATE OR REPLACE FUNCTION hello_function RETURN VARCHAR2 IS 2 BEGIN 3 RETURN 'Hello World!'; 4 END hello_function; 5 / |
A query of the function uses the dual pseudo table, like so:
SELECT hello_function FROM dual; |
When you call in a query a function that doesn’t have defined parameters, you can omit the parentheses traditionally associated with function calls with no arguments. However, if you use the SQL*Plus CALL syntax, you must provide the opening and closing parentheses or you raise an ORA-06576 error message. Assuming that the return value of the function will be assigned to a bind variable of output, you need to define the session variable before calling the function value into the output variable.
The following defines a session variable as a 12-character, variable-length string:
VARIABLE my_output VARCHAR2(12) |
The following statement calls the function and puts the result in the session variable :my_output. Preceding the session variable with a colon is required to make it accessible from SQL statements or anonymous PL/SQL blocks.
CALL hello_world AS INTO :my_output; |
The lack of parentheses causes this statement to fail and raises an ORA-06576 error message.
Adding the parentheses to the CALL statement makes it work:
CALL hello_world() AS INTO :my_output; |
Procedures work differently and are run by the EXECUTE command. The following defines a stored procedure that echoes out the string "Hello World!" Procedures are easier to work with from SQL*Plus because you don’t need to define session variables to capture output. All you do is enable the SQL*Plus SERVEROUTPUT environment variable.
SQL> CREATE OR REPLACE PROCEDURE hello_procedure IS 2 BEGIN 3 dbms_output.put_line('Hello World!'); 4 END hello_procedure; 5 / |
You can execute the procedure successfully like so:
EXECUTE hello_procedure; |
Or you can execute the procedure with parentheses, like so:
EXECUTE hello_procedure(); |
You should see "Hello World!" using either form. If it isn’t displayed, enable the SQL*Plus SERVEROUTPUT environment variable. Remember that nothing returns to the console without enabling the SERVEROUTPUT environment variable.
All the examples dealing with calls to PL/SQL named blocks use a pass-by-value method, which means that values enter the program units, are consumed, and other values are returned.
Writing SQL*Plus Log Files
When you’re testing the idea of how a query should work and want to capture one that did work, you can write it directly to a file. You can also capture all the activity of a long script by writing it to a log file. You can write log files in either of two ways: capture only the feedback messages, such as “four rows updated,” or capture the statement executed and then the feedback message. The output of the latter method are called verbose log files.
You can write verbose log files by leveraging the SQL*Plus ECHO environment variable in SQL*Plus. You enable it with this command:
SET ECHO ON |
Enabling the ECHO command splits your SQL commands. It dispatches one to run against the server and echoes the other back to your console. This allows you to see statements in your log file before the feedback from their execution.
You open a log file with the following command:
SPOOL /home/student/Data/somefile.txt |
This logs all output from the script to the file /home/student/Data/somefile.txt until the SPOOL OFF command runs in the session. The output file’s extension is not required but defaults to .lst when not provided explicitly. As an extension, .lst doesn’t map to a default application in Windows or Linux environments. It’s a convention to use some file extension that maps to an editor as a text file.
You can append to an existing file with the following syntax:
SPOOL /home/student/Data/somefile.txt APPEND |
Both of the foregoing syntax examples use an absolute filename. You use a relative filename when you omit the qualified path, in which case the file is written to the directory where you launched sqlplus.
When using a relative path, you should know that it looks in the directory where you launched sqlplus. That directory is called the present working directory or, by some old csh (C Shell) folks, the current working directory.
You close a log file with the following command:
SPOOL OFF |
No file exists until you close the buffer stream. Only one open buffer stream can exist in any session. This means you can write only to one log file at a time from a given session. Therefore, you should spool only in script files that aren’t called by other script files that might also spool to a log file. You shouldn’t attempt to log from the topmost script because that makes triaging errors among the programming units more complex.
A pragmatic approach to development requires that you log work performed. Failure to log your work can have impacts on the integrity of data and processes.
Defrag Collections
One of the problems with Oracle’s Collection is there implementation of lists, which they call object tables. For example, you declare a collection like this:
CREATE OR REPLACE TYPE list IS TABLE OF VARCHAR2(10); / |
A table collection like the LIST table above is always initialized as a densely populated list. However, over time the list’s index may become sparse when an item is deleted from the collection. As a result, you have no guarantee of a dense index when you pass a table collection to a function. That leaves you with one of two options, and they are:
- Manage all collections as if they’re compromised in your PL/SQL blocks that receive a table collection as a parameter.
- Defrag indexes before passing them to other blocks.
The first option works but it means a bit more care must be taken with how your organization develops PL/SQL programs. The second option defrays a collection. It requires that you write a DEFRAG() function for each of your table collections. You should probably put them all in a package to keep track of them.
While one may think the function is as easy as assigning the old table collection to a new table collection, like:
1 2 3 4 5 6 7 8 9 10 11 12 13 | CREATE OR REPLACE FUNCTION defrag ( sparse LIST ) RETURN LIST IS /* Declare return collection. */ dense LIST := list(); BEGIN /* Mimic an iterator in the loop. */ dense := sparse; /* Return the densely populated collection. */ RETURN dense; END defrag; / |
Line 8 assign the sparse table collection to the dense table collection without any changes in the memory allocation or values of the table collection. Effectively, it does not defrag the contents of the table collection. The following DEFRAG() function does eliminate unused memory and reindexes the table collection:
1 2 3 4 5 6 7 8 9 10 11 12 13 14 15 16 17 18 19 20 | CREATE OR REPLACE FUNCTION defrag ( sparse LIST ) RETURN LIST IS /* Declare return collection. */ dense LIST := list(); /* Declare a current index variable. */ CURRENT NUMBER; BEGIN /* Mimic an iterator in the loop. */ CURRENT := sparse.FIRST; WHILE NOT (CURRENT > sparse.LAST) LOOP dense.EXTEND; dense(dense.COUNT) := sparse(CURRENT); CURRENT := sparse.NEXT(CURRENT); END LOOP; /* Return the densely populated collection. */ RETURN dense; END defrag; / |
You can test the DEFRAG() function with this anonymous PL/SQL block:
DECLARE /* Declare the collection. */ lv_list LIST := list('Moe','Shemp','Larry','Curly'); /* Declare a current index variable. */ CURRENT NUMBER; BEGIN /* Create a gap in the densely populated index. */ lv_list.DELETE(2); /* Mimic an iterator in the loop. */ CURRENT := lv_list.FIRST; WHILE NOT (CURRENT > lv_list.LAST) LOOP dbms_output.put_line('['||CURRENT||']['||lv_list(CURRENT)||']'); CURRENT := lv_list.NEXT(CURRENT); END LOOP; /* Print a line break. */ dbms_output.put_line('----------------------------------------'); /* Call defrag function. */ lv_list := defrag(lv_list); FOR i IN 1..lv_list.COUNT LOOP dbms_output.put_line('['||i||']['||lv_list(i)||']'); END LOOP; END; / |
which prints the before and after state of the defrayed table collection:
[1][Moe] [3][Larry] [4][Curly] ---------------------------------------- [1][Moe] [2][Larry] [3][Curly] |
As always, I hope this helps those trying to sort out a feature of PL/SQL. In this case, it’s a poorly documented feature of the language.
PL/SQL Mimic Iterator
There’s no formal iterator in PL/SQL but you do have the ability of navigating a list or array with Oracle’s Collection API. For example, the following navigates a sparsely indexed collection from the lowest to the highest index value while skipping a missing index value:
DECLARE /* Create a local table collection. */ TYPE list IS TABLE OF VARCHAR2(10); /* Declare the collection. */ lv_list LIST := list('Moe','Shemp','Larry','Curly'); /* Declare a current index variable. */ CURRENT NUMBER; BEGIN /* Create a gap in the densely populated index. */ lv_list.DELETE(2); /* Mimic an iterator in the loop. */ CURRENT := lv_list.FIRST; WHILE NOT (CURRENT > lv_list.LAST) LOOP dbms_output.put_line('['||CURRENT||']['||lv_list(CURRENT)||']'); CURRENT := lv_list.NEXT(CURRENT); END LOOP; END; / |
The next one, navigates a sparsely indexed collection from the highest to the lowest index value while skipping a missing index value:
DECLARE /* Create a local table collection. */ TYPE list IS TABLE OF VARCHAR2(10); /* Declare the collection. */ lv_list LIST := list('Moe','Shemp','Larry','Curly'); /* Declare a current index variable. */ CURRENT NUMBER; BEGIN /* Create a gap in the densely populated index. */ lv_list.DELETE(2); /* Mimic an iterator in the loop. */ CURRENT := lv_list.LAST; WHILE NOT (CURRENT < lv_list.FIRST) LOOP dbms_output.put_line('['||CURRENT||']['||lv_list(CURRENT)||']'); CURRENT := lv_list.PRIOR(CURRENT); END LOOP; END; / |
However, the next example is the most valuable because it applies to a PL/SQL associative array indexed by string values. You should note that the string indexes are organized in ascending order and assigned in the execution section of the program. This differs from the earlier examples where the values are assigned by constructors in the declaration section.
There’s no need to delete an element from the associative array because the string-based indexes are already sparsely constructed. A densely populated character index sequence is possible but not very useful, which is probably why there aren’t any examples of it.
Moreover, the following example is how you navigate a dictionary, which is known as an associative array in Oracle parlance (special words to describe PL/SQL structures). Unfortunately, associative arrays lack any utilities like Python’s key() method for dictionaries.
DECLARE /* Create a local associative array type. */ TYPE list IS TABLE OF VARCHAR2(10) INDEX BY VARCHAR2(10); /* Define a variable of the associative array type. */ lv_list LIST; -- := list('Moe','Shemp','Larry','Curly'); /* Declare a current index variable. */ CURRENT VARCHAR2(5); BEGIN /* Assign values to an associative array (PL/SQL structure). */ lv_list('One') := 'Moe'; lv_list('Two') := 'Shemp'; lv_list('Three') := 'Larry'; lv_list('Four') := 'Curly'; /* Mimic iterator. */ CURRENT := lv_list.FIRST; dbms_output.put_line('Debug '||CURRENT); WHILE NOT (CURRENT < lv_list.LAST) LOOP dbms_output.put_line('['||CURRENT||']['||lv_list(CURRENT)||']'); CURRENT := lv_list.NEXT(CURRENT); END LOOP; END; / |
As always, I hope this example helps somebody solve a real world problem.
What Identifier?
It’s always interesting to see students find the little nuances that SQL*Plus can generate. One of the first things we cover is the concept of calling PL/SQL interactively versus through an embedded call. The easiest and first exercise simply uses an insecure call like:
sqlplus -s student/student @call.sql |
to the call.sql program:
SQL> DECLARE 2 lv_input VARCHAR2(20); 3 BEGIN 4 lv_input := '&1'; 5 dbms_output.put_line('['||lv_input||']'); 6 END; 7 / |
It prints the following to console:
Enter value for 1: machine old 4: lv_input := '&1'; new 4: lv_input := 'machine'; [machine] PL/SQL procedure successfully completed. |
Then, we change the '&1' parameter variable to '&mystery' and retest the program, which prints the following to the console:
Enter value for mystery: machine old 4: lv_input := '&mystery'; new 4: lv_input := 'machine'; [machine] PL/SQL procedure successfully completed. |
After showing a numeric and string input parameter, we remove the quotation from the lv_input input parameter and raise the following error:
Enter value for mystery: machine
old   4:   lv_input := &mystery;
new   4:   lv_input := machine;
  lv_input := machine;
              *
ERROR at line 4:
ORA-06550: line 4, column 15:
PLS-00201: identifier 'MACHINE' must be declared
ORA-06550: line 4, column 3:
PL/SQL: Statement ignored |
The point of the exercise is to spell out that the default input value is numeric and that if you pass a string it becomes an identifier in the scope of the program. So, we rewrite the call.sql program file by adding a machine variable, like:
SQL> DECLARE 2 lv_input VARCHAR2(20); 3 machine VARCHAR2(20) := 'Mystery Machine'; 4 BEGIN 5 lv_input := &mystery; 6 dbms_output.put_line('['||lv_input||']'); 7 END; 8 / |
It prints the following:
Enter value for mystery: machine old 5: lv_input := &mystery; new 5: lv_input := machine; [Mystery Machine] PL/SQL procedure successfully completed. |
The parameter name becomes an identifier and maps to the variable machine. That mapping means it prints the value of the machine variable.
While this is what we’d call a terminal use case, it is a fun way to illustrate an odd PL/SQL behavior. As always, I hope its interesting for those who read it.
PL/SQL Inheritance Failure
PL/SQL is a great programming language as far as it goes but it lacks true type inheritance for its collections. While you can create an object type and subtype, you can’t work with collections of those types the same way. PL/SQL object type inheritance, unlike the Java class hierarchy and parallel array class hierarchy, only supports a class hierarchy. Effectively, that means:
- You can pass a subtype as a call parameter, or argument, to a parent data type in a function, procedure, or method signature, but
- You can’t pass a collection of a subtype as a call parameter, or argument, to a collection of parent type in a function, procedure, or method signature.
The limitation occurs because collections have their own data type, which is fixed when you create them. Worse yet, because Oracle has never seen fit to fix their two underlying code trees (23 years and counting since Oracle 8i), you have two types of collections using two distinct C/C++ libraries. You define collections of Attribute Data Types (ATDs) when you create a collection of a standard scalar data type, like NUMBER, VARCHAR2, or DATE. You define collection of User-Defined Data Types (UTDs) when you create a collection of a SQL UDT or PL/SQL-only RECORD data type. The former uses one C/C++ library and the latter another.
Now, Oracle even make the differences between Java and PL/SQL more complex because it treats collections known as tables, really lists in most programming languages, differently than varrays, or arrays. You create a TABLE collection, or list, when you create a table of a scalar or UDT data type. There are two options when you create these object types, and they are:
- You create an empty collection with a no element constructor, which means you’ll need to allocate memory before assigning element values later in your program.
- You create a populated collection with a comma-delimited list of elements.
Both approaches give you a list of elements with a densely populated index. A “densely populated index” is Oracle’s jargon for how they characterize a 1-based sequence of integers without any gaps (e.g., 1, 2, 3, …). The initial construction works the same way whether you create a TABLE or VARRAY collection type. Unfortunately, after you’ve built the collection behaviors change. If you use Oracle’s Collection API to delete one or more items from a TABLE collection type, you create gaps in the index’s sequence of values. That means you must use special logic to navigate across a TABLE collection type to ensure it doesn’t fail when encountering a gap in the numeric sequence.
For example, here’s a FOR-LOOP without the logic to vouchsafe a uninterrupted set of sequence values incrementing by a counter of 1 element at a time:
1 2 3 4 5 6 7 8 9 10 11 12 13 14 15 16 17 18 19 | DECLARE /* Create a local table collection. */ TYPE list IS TABLE OF VARCHAR2(10); /* Statically allocate memory and assign values to for elements. */ lv_list LIST := list('Moe','Shemp','Larry','Curly'); BEGIN /* Remove the second element, Shemp, from the collection of variable length strings. */ lv_list.DELETE(2); /* Loop through the target with a for loop, which depends on densely populated index values. */ FOR i IN 1..lv_list.COUNT LOOP dbms_output.put_line('['||lv_list(i)||']'); END LOOP; END; / |
The program fails when it tries to read the second element of the table collection, which was previously removed. It raises the following error message after print the first element of the table collection:
[Moe] DECLARE * ERROR at line 1: ORA-01403: no data found ORA-06512: at line 16 |
Conveniently, Oracle’s Collection API provides an EXISTS method that we can use to check for the presence of an index’s value. Modifying line 16 by wrapping it in an IF-statement fixes one problem but identifies another:
15 16 17 18 19 | FOR i IN 1..lv_list.COUNT LOOP IF lv_list.EXISTS(i) THEN dbms_output.put_line('['||lv_list(i)||']'); END IF; END LOOP; |
The program no longer fails on a missing index value, or index gap, but it returns fewer lines of output than you might expect.
That’s because the Oracle Collection API’s COUNT method returns the number of elements currently allocated in memory not the number of original elements. We learn that when we deleted the second element, Oracle deleted the memory allocated for it as well. This is the type of behavior you might expect for a singly linked list. It prints:
[Moe] [Larry] |
One more change is required to count past and to the highest index value. One line 15, change the COUNT method call to the LAST method call, which returns the highest index value.
15 16 17 18 19 | FOR i IN 1..lv_list.LAST LOOP IF lv_list.EXISTS(i) THEN dbms_output.put_line('['||lv_list(i)||']'); END IF; END LOOP; |
It now prints the three stooges we would expect to see:
[Moe] [Larry] [Curly] |
Realistically, a FOR-LOOP is not the best control structure for a collection. You should use a WHILE-LOOP and treat the incrementing value as an iterator rather than sequence index value. An iterator doesn’t worry about gaps in the sequence, it simply moves to the next element in the singly linked list. Here’s an example that uses the iterator approach with a WHILE-LOOP:
1 2 3 4 5 6 7 8 9 10 11 12 13 14 15 16 17 18 19 20 21 22 23 24 25 26 | DECLARE /* Create a local table collection. */ TYPE list IS TABLE OF VARCHAR2(10); /* Statically allocate memory and assign values to for elements. */ lv_list LIST := list('Moe','Shemp','Larry','Curly'); /* Declare a current index variable. */ CURRENT NUMBER; BEGIN /* Remove the second element, Shemp, from the collection of variable length strings. */ lv_list.DELETE(2); /* Loop through the target with a while loop, which doesn't depend on densely populated index values by setting the starting index value and increment as if with an iterator. */ CURRENT := lv_list.FIRST; WHILE NOT (CURRENT > lv_list.LAST) LOOP dbms_output.put_line('['||lv_list(CURRENT)||']'); CURRENT := lv_list.NEXT(CURRENT); END LOOP; END; / |
The iterator approach prints the elements as:
[Moe] [Larry] [Curly] |
You can reverse the process with the following changes to lines 20-24:
20 21 22 23 24 | CURRENT := lv_list.LAST; WHILE NOT (CURRENT < lv_list.FIRST) LOOP dbms_output.put_line('['||lv_list(CURRENT)||']'); CURRENT := lv_list.PRIOR(CURRENT); END LOOP; |
It prints the list backwards:
[Curly] [Larry] [Moe] |
After covering the issues with sparsely populated, those with gaps in the sequence of indexes values, table collections, let’s examine how you must work around PL/SQL’s lack of a parallel array class hierarchy. The solution lies in combining two programming concepts:
- A function to pack the sparsely populated table collection into a densely populated one, and
- A package with overloaded functions that pack different table collections.
To develop the test case, let’s use an ADT collection because it’s the simplest to work with. The following creates a table collection of a thirty character long scalar string:
1 2 3 | CREATE OR REPLACE TYPE list IS TABLE OF VARCHAR2(30); / |
The following pack function takes a table collection of the thirty character long scalar string, evaluates the string for missing elements, and packs the existing elements into a densely populated list:
1 2 3 4 5 6 7 8 9 10 11 12 13 14 15 16 17 | CREATE OR REPLACE FUNCTION pack ( pv_list LIST ) RETURN list IS /* Declare a new list. */ lv_new LIST := list(); BEGIN /* Read, check, and pack an old list into a new one. */ FOR i IN 1..pv_list.LAST LOOP IF pv_list.EXISTS(i) THEN lv_new.EXTEND; lv_new(lv_new.COUNT) := pv_list(i); END IF; END LOOP; RETURN lv_new; END; / |
This anonymous block tests the pack function:
1 2 3 4 5 6 7 8 9 10 11 12 13 14 15 16 | DECLARE /* Declare a list value. */ lv_test LIST := list('Moe','Shemp','Larry','Curly'); BEGIN /* Remove one element in the middle. */ lv_test.DELETE(2); /* Pack the list of elements into a sequence of values. */ lv_test := pack(lv_test); /* Print the list of elements from the packed list. */ FOR i IN 1..lv_test.COUNT LOOP dbms_output.put_line('['||lv_test(i)||']'); END LOOP; END; / |
It prints the expected three string values:
[Moe] [Larry] [Curly] |
Now, let’s expand the example to build an overloaded package. The first step requires building a base_t object type and a table collection of the object type, like:
1 2 3 4 5 6 7 8 9 | CREATE OR REPLACE TYPE base_t IS OBJECT ( oid NUMBER ) INSTANTIABLE NOT FINAL; / CREATE OR REPLACE TYPE base_list IS TABLE OF base_t; / |
Next, you create a book_t subtype of the base_t object type and a book_list table collection of the book_t subtype, like:
1 2 3 4 5 6 7 8 9 | CREATE OR REPLACE TYPE book_t UNDER base_t ( title VARCHAR2(30) , COST NUMBER); / CREATE OR REPLACE TYPE book_list IS TABLE OF book_t; / |
We can test the base_t and book_t default constructors with the following SQL*Plus formatting and SQL query:
COL oid FORMAT 999 COL title FORMAT A20 COL COST FORMAT 99.99 SELECT * FROM TABLE(book_list(book_t(1,'Neuromancer',15.30) ,book_t(2,'Count Zero',7.99) ,book_t(3,'Mona Lisa Overdrive',7.99) ,book_t(4,'Burning Chrome',8.89))); |
It prints the following output:
OID TITLE COST ---- -------------------- ------ 1 Neuromancer 15.30 2 Count Zero 7.99 3 Mona Lisa Overdrive 7.99 4 Burning Chrome 8.89 |
The following is an overloaded package specification:
1 2 3 4 5 6 7 8 9 10 11 12 13 14 15 16 17 | CREATE OR REPLACE PACKAGE packer IS /* A simple ADT list of strings. */ FUNCTION pack ( pv_list LIST ) RETURN list; /* A UDT list of base objects. */ FUNCTION pack ( pv_list BASE_LIST ) RETURN base_list; /* A UDT list of subtype objects. */ FUNCTION pack ( pv_list BOOK_LIST ) RETURN book_list; END; / |
After you create the package specification, you need to provide the implementation. This is typical in any programming language that supports Interface Description Language (IDL). A package body provides the implementation for the package specification. The package body follows:
1 2 3 4 5 6 7 8 9 10 11 12 13 14 15 16 17 18 19 20 21 22 23 24 25 26 27 28 29 30 31 32 33 34 35 36 37 38 39 40 41 42 43 44 45 46 47 48 49 50 51 52 53 54 55 56 | CREATE OR REPLACE PACKAGE BODY packer IS /* A simple ADT list of strings. */ FUNCTION pack ( pv_list LIST ) RETURN list IS /* Declare a new list. */ lv_new LIST := list(); BEGIN /* Read, check, and pack an old list into a new one. */ FOR i IN 1..pv_list.LAST LOOP IF pv_list.EXISTS(i) THEN lv_new.EXTEND; lv_new(lv_new.COUNT) := pv_list(i); END IF; END LOOP; RETURN lv_new; END pack; /* A simple ADT list of strings. */ FUNCTION pack ( pv_list BASE_LIST ) RETURN base_list IS /* Declare a new list. */ lv_new BASE_LIST := base_list(); BEGIN /* Read, check, and pack an old list into a new one. */ FOR i IN 1..pv_list.LAST LOOP IF pv_list.EXISTS(i) THEN lv_new.EXTEND; lv_new(lv_new.COUNT) := pv_list(i); END IF; END LOOP; RETURN lv_new; END pack; /* A simple ADT list of strings. */ FUNCTION pack ( pv_list BOOK_LIST ) RETURN book_list IS /* Declare a new list. */ lv_new BOOK_LIST := book_list(); BEGIN /* Read, check, and pack an old list into a new one. */ FOR i IN 1..pv_list.LAST LOOP IF pv_list.EXISTS(i) THEN lv_new.EXTEND; lv_new(lv_new.COUNT) := pv_list(i); END IF; END LOOP; RETURN lv_new; END pack; END packer; / |
The test case for the base_list object type is:
1 2 3 4 5 6 7 8 9 10 11 12 13 14 15 16 17 | DECLARE lv_test BASE_LIST := base_list(base_t(1),base_t(2) ,base_t(3),base_t(4)); BEGIN /* Remove one element in the middle. */ lv_test.DELETE(2); /* Pack the list of elements into a sequence of values. */ lv_test := packer.pack(lv_test); /* Print the list of elements from the packed list. */ FOR i IN 1..lv_test.LAST LOOP dbms_output.put_line('['||lv_test(i).oid||']'); END LOOP; END; / |
It prints the following output:
[1] [3] [4] |
The test case for the book_list object type is:
1 2 3 4 5 6 7 8 9 10 11 12 13 14 15 16 17 18 19 20 21 | DECLARE lv_test BOOK_LIST := book_list(book_t(1,'Neuromancer',15.30) ,book_t(2,'Count Zero',7.99) ,book_t(3,'Mona Lisa Overdrive',7.99) ,book_t(4,'Burning Chrome',8.89)); BEGIN /* Remove one element in the middle. */ lv_test.DELETE(2); /* Pack the list of elements into a sequence of values. */ lv_test := packer.pack(lv_test); /* Print the list of elements from the packed list. */ FOR i IN 1..lv_test.LAST LOOP dbms_output.put_line( '['||lv_test(i).oid||']' ||'['||lv_test(i).title||']' ||'['||lv_test(i).COST||']'); END LOOP; END; / |
It prints the following output:
[1][Neuromancer][15.3] [3][Mona Lisa Overdrive][7.99] [4][Burning Chrome][8.89] |
In conclusion, you would not have to write overloaded methods for every list if PL/SQL supported class hierarchy and parallel array class hierarchy like Java. Unfortunately, it doesn’t and likely won’t in the future. You can pack table collections as a safety measure when they’re passed as parameters to other functions, procedures, or methods with the code above.
As always, I hope this helps those looking for a solution.
PL/SQL Coupled Loops
The purpose of this example shows you how to navigate a list with a sparsely populated index. This can occur when one element has been removed after the list was initialized. Unlike Oracle’s VARRAY (array), removing an element from a TABLE or list does not re-index the elements of the list.
This example also shows you how to coupled lists. The outer loop increments, notwithstanding the gap in index values, while the inner loop decrements. The upper range of the inner loop is set by the index value of the outer loop.
The example program uses an abbreviated version of the Twelve Days of Christmas, and I’ve tried to put teaching notes throughout the example file.
DECLARE /* Create a single column collection that is a list strings less than 8 characters in length and another of strings less than 20 characters in length. */ TYPE DAY IS TABLE OF VARCHAR2(8); TYPE verse IS TABLE OF VARCHAR2(20); /* Create variables that use the user-defined types: || ================================================= || 1. We give the variable a name of lv_day and lv_verse. || 2. We assign a user-defined ADT (Attribute Data Type) collection. || 3. We assign a list of value to the constructor of the list, which || allocates memory for each item in the comma-delimited list of || string. */ lv_day DAY := DAY('first','second','third','fourth','fifth'); lv_verse VERSE := verse('Partridge','Turtle Doves','French Hen' ,'Calling Birds','Gold Rings'); BEGIN /* || Remove an element from each of the two lists, which makes the two || lists sparsely indexed. A sparsely indexed list has gaps in the || sequential index of the list. */ lv_day.DELETE(3); /* || Loop through the list of days: || ===================================================j || 1. A list created by a comma-delimited list is densely populated, || which means it has no gaps in the sequence of indexes. || 2. A list created by any means that is subsequently accessed || and has one or more items removed is sparsely populated, || which means it may have gaps in the sequence of indexes. || 3. A FOR loop anticipates densely populated indexes and fails || when trying to read a missing index, which is why you should || use an IF statement to check for the element of a list before || accessing it. || 4. A COUNT method returns the number of elements allocated memory || in a list of values and the LAST method returns the highest || index value. The index value is alway an integer for user-defined || ADT (Attribute Data Type) collections, but may be a string for || an associative array or a PL/SQL list indexed by a string. || 5. Removing an element from a list does not change the other || index values but does if you create an array (or varray), which || means COUNT OR LAST may cause the same type of error for a list || with a missing element. */ FOR i IN 1..lv_day.LAST LOOP /* || Verify the index is valid. || ==================================================== || You check whether the element is present in the || list. */ IF lv_day.EXISTS(i) THEN /* Print the beginning of the stanza. */ dbms_output.put_line('On the ['||lv_day(i)||'] of Christmas ...'); /* Print the song. */ FOR j IN REVERSE 1..i LOOP /* Check if the day exists. */ IF lv_verse.EXISTS(j) THEN /* All but first and last verses. */ IF j > 1 THEN dbms_output.put_line('- ['||lv_verse(j)||']'); /* The last verse. */ ELSIF i = j THEN dbms_output.put_line('- A ['||lv_verse(j)||']'||CHR(10)); /* Last verse. */ ELSE dbms_output.put_line('and a ['||lv_verse(j)||']'||CHR(10)); END IF; END IF; END LOOP; ELSE CONTINUE; END IF; END LOOP; END; / |
As always, I hope it helps you solve problems in the real world.
SQL Developer JDK
In my classes, we use a VMware Linux install with SQL Developer. One of my students called me in a panic after an upgrade of packages when SQL Developer failed to launch. The student was astute enough to try running it from the command line where it generates an error like:
Oracle SQL Developer Copyright (c) 2005, 2018, Oracle and/or its affiliates. All rights reserved. /opt/sqldeveloper/sqldeveloper/bin/../../ide/bin/launcher.sh: line 954: [: : integer expression expected The JDK (/usr/lib/jvm/java-1.8.0-openjdk-1.8.0.222.b10-0.fc30.x86_64/) is not a valid JDK. The JDK was specified by a SetJavaHome directive in a .conf file or by a --setjavahome option. Type the full pathname of a JDK installation (or Ctrl-C to quit), the path will be stored in /home/student/.sqldeveloper/19.2.0/product.conf Error: Unable to get APP_JAVA_HOME input from stdin after 10 tries |
The error is simple, the SQL Developer package update wipe clean the configuration of the SetJavaHome variable in the user’s ~/.sqldeveloper/19.2.0/product.conf file. The fix is three steps because its very likely that the Java packages were also updated. Here’s how to fix it:
- Navigate to the directory where you’ve installed the Java Virtual Machine (JVM) and find the current version of the JVM installed:
cd /usr/lib/jvm
ls java*
It will return a set of files, like:
java
java-1.8.0
java-1.8.0-openjdk
java-1.8.0-openjdk-1.8.0.252.b09-0.fc30.x86_64
java-openjdk
jre
jre-1.8.0
jre-1.8.0-openjdk
jre-1.8.0-openjdk-1.8.0.252.b09-0.fc30.x86_64
jre-openjdk
- Navigate to your user’s product configuration file with this command:
cd ~/.sqldeveloper/19.2.0
- Add the following line to the
product.conffile:# SetJavaHome /path/jdk SetJavaHome /usr/lib/jvm/java-1.8.0-openjdk-1.8.0.252.b09-0.fc30.x86_64/
Now, you should be able to run it from the command line. The shortcut icon should also work if one was installed. Also, don’t forget to update your $JAVA_HOME variable in the master Bash resource file, or your local user’s .bashrc files.
As always, I hope this helps those looking for a quick solution.
Oracle Docker Container
Install, configure, and use an Oracle Docker Container
Installing a Docker instance isn’t quite straightforward nor is it terribly difficult. It can be quite overwhelming if you’re unfamiliar with the technology of virtualization and containerization. This essay shows you how to create, configure, and manage an Oracle Database 18c XE Docker instance on the macOS. There are some slight differences when you install it on Windows OS.
Installation
You need to download the Oracle Database 18c XE file for Linux. You will find it on Oracle’s OTN website at https://www.oracle.com/downloads/. Click the Database link under the Developer Downloads banner. You want to download the Oracle Database Express Edition (XE), Release 18.4.0.0.0 (18c) file.
The file is a Linux Red Hat Package Manager (rpm) file. The file is approximately 2.5 GB in size, which means you may want to take a break while downloading it. Whether you take a break or not, this step may take more time than you like.
While downloading the Oracle database, you want to work on the two other tasks concurrently. You need to download and install Docker and Homebrew software, which aren’t installed from Apple’s Application Store. Many macOS systems disallow by default software from outside the comfy boundaries and inspections of the Apps Store. You may need to change your system preferences to install Docker and Homebrew.
You can download Docker for the macOS from the following website:
https://docs.docker.com/docker-for-mac/install/
The Homebrew (the missing package manager for macOS) website will tell you to install it from the macOS Command Line Interface (CLI). Please note that you must already have the Xcode Command Line Tools installed before you install Homebrew. The following Homebrew installation will update your Command Line Tools to macOS Mojave Version 10.14.
Open a Terminal session from your finder and run this command:
bash -c "$(curl -fsSL https://raw.githubusercontent.com/Homebrew/install/master/install.sh)" |
After you install Homebrew in the Terminal, type the following to go to your user’s home folder (or directory):
cd |
In your home directory (/Users/username [~]), create the docker-images directory from the available GitHub docker containers with these two commands (separated by the semicolon):
cd ~/; git clone https://github.com/oracle/docker-images.git |
Move the Oracle Database XE 18c rpm file from your Downloads folder to the target docker-images subfolder with the following command:
mv ~/Downloads/oracle-database-xe-18c-1.0-1.x86_64-2.rpm \ ~/docker-images/OracleDatabase/SingleInstance/dockerfiles/18.4.0/. |
Change your present working directory with the following cd command:
cd docker-images/OracleDatabase/SingleInstance/dockerfiles |
Build the Docker image with the following command (from the directory where the buildDockerImage.sh shell script is found):
./buildDockerImage.sh -v 18.4.0 -x |
The Docker image build takes quite some time. It may take more than 10 minutes on some macOS computers. After it completes, you should see that it was successfully built and tagged in the Terminal. You can confirm the image build with this command:
docker images |
It should return something like this:
REPOSITORY TAG IMAGE ID CREATED SIZE oracle/database 18.4.0-xe 926f4349b277 12 minutes ago 5.89GB oraclelinux 7-slim 153f8d73287e 8 weeks ago 131MB |
Before you start your Docker container, you need to open a Terminal session. You will be in your home directory, which should give you a prompt like:
machine_name:~ username$ |
If you issue a pwd command, you should see the following:
/Users/username |
Create an oracle directory as subdirectory:
mkdir oracle |
While you might wonder about the oracle directory at this point, it’s to help keep straight Docker containers on the macOS file system. For example, when you install Docker instances for MySQL and PostgreSQL, you can see the Docker file systems as:
/Users/username/mysql /Users/username/oracle /Users/username/postgres |
Now, you start the Docker container with the following command:
sudo \ docker run --name videodb -d -p 51521:1521 -p 55500:5500 -e ORACLE_PWD=cangetin \ -e ORACLE_CHARACTERSET=AL32UTF8 -v ~/oracle:/home oracle/database:18.4.0-xe |
After starting the Docker container, you check the container’s status the following command:
docker ps |
Congratulations, you have successfully installed the Docker container.
Configure
The standard docker container prepares a base platform for you. It doesn’t create a schema or containerized user. It simply installs the Oracle Database Management System (DBMS) and Oracle Listener. You need to configure your Linux environment and your database.
You connect to the container as the root user, like:
docker exec -it videodb bash |
You should update any of the older packages with the following command:
yum update |
Next, you should install the openssh-server and vim packages. They’re not installed as part of the docker container’s default configuration. You’ll need them when you create non-root users and edit configuration files. This command installs them both:
yum openssh-server vim |
There are a number of things for you to do at this point. They don’t all have to be done in the order that this essay takes. Like any other installation of Oracle on Linux, there is an oracle user who owns the installation. The oracle user is a non-login user. A non-login user doesn’t have a password and disallows a ssh connection. You need to first become the root user before you can use the su (substitute user) command to become the oracle user. Only superuser accounts hold the privileges to su without credentials because they’re trusted users.
The easiest thing to do while you’re the root user is test your ability to connect to the Oracle database’s system schema. You set the system schema’s password to cangetin when you ran the docker run command. At the command prompt, type the following to connect to the database:
sqlplus system/cangetin@xe |
You should see the following when you connect as the system user:
SQL*Plus: Release 18.0.0.0.0 - Production on Sun Sep 13 02:48:44 2020 Version 18.4.0.0.0 Copyright (c) 1982, 2018, Oracle. All rights reserved. Last Successful login time: Sat Sep 12 2020 21:13:33 +00:00 Connected to: Oracle Database 18c Express Edition Release 18.0.0.0.0 - Production Version 18.4.0.0.0 SQL> |
Please note that only the oracle user can connect without referencing the @xe service identifier, which is defined in the $ORACLE_HOME/network/admin/tnsnames.ora file. You can read more about the SQL*Net configuration in the documentation. The quit command exits the SQL*Plus Command Line Interface. At this point, as root, lets you create a missing vi symbolic link to the vim utility you installed earlier.
ln -s /usr/bin/vim /usr/bin/vi |
With vi configured, let’s su to the oracle user and create an .bashrc file for it. You should note that a non-login user doesn’t have a .bashrc file by default. You become the oracle user with the following command:
su oracle |
You may notice that you’re not in the oracle user’s home directory. Let’s change that by moving to the correct home directory.
The home directory for any user is configured in the /etc/passwd file and available by using the echo command to see the $HOME environment variable’s value. This is true for Red Hat, Oracle Unbreakable Linux, CentOS, and Fedora distributions. They create users’ home directories as subdirectories in the /home directory.
The .bashrc file is a hidden file. Hidden files have no file name before the period and are not visible with an ls (list) command. You can find them by using a -al flag value with the ls command
ls -al |
You can use the vi editor to create a .bashrc file like this:
vi .bashrc |
A minimal oracle .bashrc (bash resource) file should look like this:
# Source global definitions if [ -f /etc/bashrc ]; then . /etc/bashrc fi # User specific environment if ! [[ "$PATH" =~ "$HOME/.local/bin:$HOME/bin:" ]] then PATH="$HOME/.local/bin:$HOME/bin:$PATH" fi export PATH # Set Prompt export PS1="[\u@localhost \W]\$ " # Change to home directory. cd $HOME # Uncomment the following line if you don't like systemctl's auto-paging feature: # export SYSTEMD_PAGER= # User specific aliases and functions |
If you know about the Linux CLI prompt, the localhost string may seem odd. It’s there to suppress the random string otherwise provided by the docker container.
A number of other Oracle environment parameters have already been set. You can see them with this command:
env | grep -i oracle |
You can connect as the privileged sysdba role, once known as the internal user, to start and stop the database instance without stopping the docker container. That command syntax is:
sqlplus / as sysdba |
Only the oracle user has privileges to connect with the sysdba role by default. That’s because the oracle user is the owner of the Oracle database installation.
While connected as the oracle user, you should make three changes. One change to oracle executable file permissions and two changes to the glogin.sql default configuration file.
The initial permissions on the $ORACLE_HOME/bin/oracle executable file in the docker container are shown below.
-rwxr-x--x 1 oracle oinstall 437755981 Oct 18 2018 oracle |
The setuid bit is disabled when the user’s permissions are rwx. The oracle executable should always run with the permissions and ownership of the oracle user. That only happens when the setuid bit is enabled. You set the setuid. bit with the following syntax as the oracle user or privileged root superuser (from the $ORACLE_HOME/bin directory):
chmod u+s oracle |
Relisting the file in a long list view (ls -al) after the change, you should see the following:
-rwsr-x--x 1 oracle oinstall 437755981 Oct 18 2018 oracle |
The setuid bit is enabled when the user permissions are rws. Connections to the database by non-privileged Oracle users may raise ORA-01017 and ORA-12547 errors when the setuid bit is unset.
The glogin.sql file is read and processed with every connection to the database. Therefore, you should put little in there, and some would argue nothing in there. You’re going to enter the command that lets you interactively launch vi from a SQL> command prompt and set a SQL*Plus environment variable. The SQL*Plus environment variable lets you see debug messages raised by your PL/SQL programs.
To edit the glogin.sql file, change your terminal directory as follows:
cd $ORACLE_HOME/sqlplus/admin |
Add the following two lines at the bottom of the glogin.sql file:
define _editor=vi SET SERVEROUTPUT ON SIZE UNLIMITED |
That’s it for configuring the oracle user’s account. Type exit to return to the root user shell. Type exit again, this time to leave the root user’s account and return to your hosting macOS.
The next configuration step sets up a non-privileged student account in Linux. You setup the student user with the following Docker command (for reference, it can’t be done from within the docker container):
sudo \ docker exec -it videodb bash -c "useradd -u 501 -g dba -G users \ -d /home/student -s /bin/bash -c "Student" -n student" |
You will be prompted for a password when this command runs. Try to keep the password simple. Using a password like cangetin is recommended when it’s a development instance. You can connect with the following docker command:
docker exec -it --user student videodb bash |
After logging in to the docker container as the student user, you need to configure the .bashrc file. You should use the following minimal .bashrc file in the /home/student directory, which you can create with the vi editor.
# Source global definitions if [ -f /etc/bashrc ]; then . /etc/bashrc fi # User specific environment if ! [[ "$PATH" =~ "$HOME/.local/bin:$HOME/bin:" ]] then PATH="$HOME/.local/bin:$HOME/bin:$PATH" fi export PATH # Set Prompt export PS1="[\u@localhost \W]\$ " # Change to home directory. cd $HOME # Uncomment the following line if you don't like systemctl's auto-paging feature: # export SYSTEMD_PAGER= # User specific aliases and functions # Set Oracle environment variables. export ORACLE_SID=XE export ORACLE_BASE=/opt/oracle export ORACLE_HOME=/opt/oracle/product/18c/dbhomeXE |
As the c##student user, you need to connect to the system schema and provision a c##student container database. You can connect to the system schema with the following syntax:
sqlplus system/cangetin@xe |
There are four steps required to provision a container database. These steps are different than the steps for previous non-container databases. In non-container databases, you could grant privileges directly to database users. Oracle now requires that you create database roles, which bundle privileges together. Then, you grant roles to users. The four provisioning steps are:
- Create a user, which must adhere to the following naming convention from Oracle Database 12c forward. The database user’s name must start with the letter
cand two#(pound) symbols followed by a character and then a string of letters and numbers. - Create a role, which must use the same naming convention as containerized users. Failure to use the correct naming convention raises an
ORA-65096error. - Grant database privileges to a role.
- Grant a database role to a user.
You create a c##student container database user with the following syntax:
CREATE USER c##student IDENTIFIED BY student DEFAULT TABLESPACE users QUOTA 100M ON users TEMPORARY TABLESPACE temp; |
Next, you create a c##studentrole container role with the following syntax:
CREATE ROLE c##studentrole CONTAINER = ALL; |
Then, you grant the following privileges to your newly created c##studentrole role:
GRANT CREATE CLUSTER, CREATE INDEXTYPE, CREATE PROCEDURE, CREATE SEQUENCE, CREATE SESSION, CREATE TABLE, CREATE TRIGGER, CREATE TYPE, CREATE VIEW TO c##studentrole; |
Finally, you grant a c##studentrole role (bundle of privileges) to a c##videodb user:
GRANT c##studentrole TO c##student; |
After completing these tasks, you should use the quit command to exit the SQL*Plus CLI. Please note that unlike some database CLIs, you do not need to add a semicolon to quit the connection. Oracle divides its CLI commands into SQL*Plus and SQL commands; and the quit command is a SQL*Plus command. SQL*Plus commands do not require the terminating semicolon. SQL commands do require the semicolon or a line return and forward slash, which dispatches the SQL command to the SQL engine.
You should confirm that the provisioning worked by reconnecting to the Oracle database as the c##student user with this syntax:
sqlplus c##student/student@xe |
You have now provisioned and verified the connection to a database container user. Use the quit command to disconnect from the Oracle database, and the exit command to return to your host operating system.
At this point you have a couple options for using the docker container. You can install a proprietary Integrated Development Environment (IDE), like Oracle’s free SQL Developer. There are several others and some support more than one database engine. Unfortunately, all the others have annual licensing costs.
Post Install: Access Tools
Oracle’s SQL Developer is a Java-based solution that runs on numerous platforms. You can download SQL Developer from Oracle’s OTN web site:
https://www.oracle.com/downloads/
Click on the Developer Tools link to find the current version of the SQL Developer. Before you install SQL Developer on your macOS, you will need to download and install the Java 8 Software Development Kit (SDK) from this web site:
http://www.oracle.com/technetwork/java/javase/downloads/
You configure a SQL Developer connection with the following values: use localhost as the host, c##student as the user, xe as the network service identifier, and 51521 as the port address. Click the plus button to add a connection where you enter these values, like shown below:
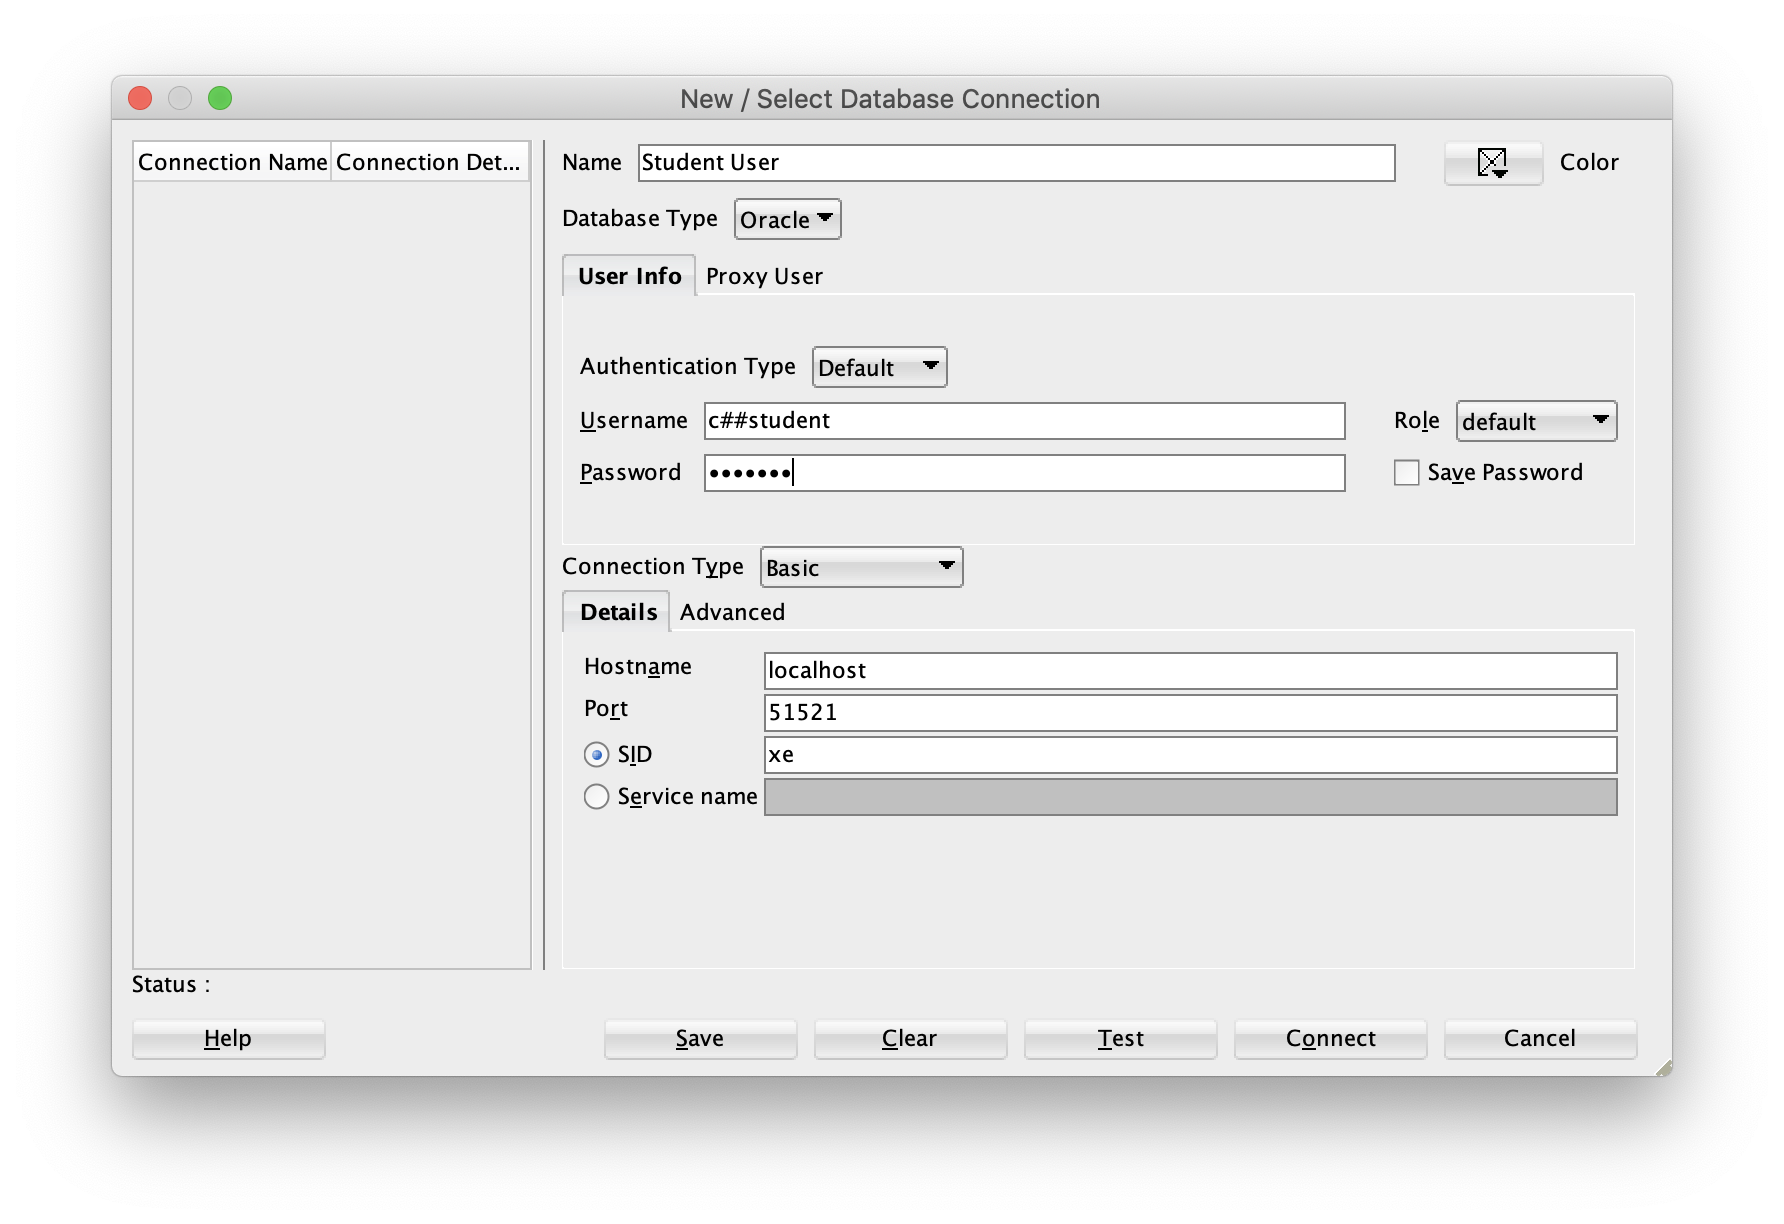
While the Java code in SQL Developer supports a port connection, Docker maps the port to the Oracle docker container. You don’t need to resolve the connection between SQL Developer and the Oracle Database listener through the network layer because this solution uses an Internal Process Control (IPC) model, based on socket to socket communication.
With virtualization you would need to install the Oracle Instant Client software on the hosting operating system. Then, you would configure your /etc/hosts file on both the hosting (macOS) and hosted (Oracle Linux) operating systems. Alternatively, you could add both IP addresses to a DNS server. The IP addresses let you map the connection between your physical macOS system and the Docker container running Oracle Linux. You can find further qualification of the connection mechanisms and repackaging in the Oracle Docker User Guide.
Containers map a local directory to operating system inside the container. Based on the earlier instructions the ~/oracle directory maps to the /home directory in the docker container. You have the ability to edit and move files within this portion of the file system’s hierarchy, which means you have complete control of the portion of the file system owned by the student user.
The next few steps help you verify the dual access to this portion of the docker container. Open a Terminal session and check your present working directory (with the pwd utility).
macName:~ username$ pwd |
It should return:
/Users/username |
During the installation, you created two subdirectories in the /Users/username directory. They were the oracle and docker-images subdirectories. In your host macOS, you should list (with the ls utility) the contents of your oracle subdirectory:
ls ~/oracle |
It should return the following:
oracle student |
As mentioned, your macOS /Users/username/oracle directory holds the contents of your docker container’s /home directory. That means that your /Users/username/oracle/student directory mirrors the /home/student directory in your docker container.
Assume your GitHub code repository for Oracle development is in a directory on your macOS side. The local mapping to the ~/oracle/student directly lets you put symbolic links in the hosted student user’s subdirectories. These symbolic links would point to the editable code on the macOS file system, which can be concurrently linked to your GitHub code repository.
Wrap Oracle SQL*Plus
One of the key problems with Oracle’s deployment is that you can not use the up-arrow key to navigate the sqlplus command-line history. Here’s little Bash shell function that you can put in your .bashrc file. It requires you to have your system administrator install the rlwrap package, which wraps the sqlplus command-line history.
You should also set the $ORACLE_HOME environment variable before you put this function in your .bashrc file.
sqlplus () { # Discover the fully qualified program name. path=`which rlwrap 2>/dev/null` file='' # Parse the program name from the path. if [ -n ${path} ]; then file=${path##/*/} fi; # Wrap when there is a file and it is rewrap. if [ -n ${file} ] && [[ ${file} = "rlwrap" ]]; then rlwrap sqlplus "${@}" else echo "Command-line history unavailable: Install the rlwrap package." $ORACLE_HOME/bin/sqlplus "${@}" fi } |
If you port this shell script to an environment where rlwrap is not installed, it simply prints the error message and advises you to install the rlwrap package.
As always, I hope this helps those looking for a solution.
Create Student User
It’s amazing how old some of my students’ computers are. The oldest with least memory are the foreign students. Fortunately, I kept copies of the old Oracle Database 10g XE. I give it to some students who need to run the smallest possible option. Then, again I have students who get emotional about having to use Unix or Linux as an operating system, which means I now also support Oracle Database 18c.
Anyway, I had to write a script that would support building a small 200 MB student schema in any of the Express Edition databases from 10g to 18c. Here’s the script for those who would like to use it. It sets up a student schema for Oracle Database 10g and 11g databases and a c##student schema for Oracle’s Containized Database 12c and 18c.
1 2 3 4 5 6 7 8 9 10 11 12 13 14 15 16 17 18 19 20 21 22 23 24 25 26 27 28 29 30 31 32 33 34 35 36 37 38 39 40 41 42 43 44 45 46 47 48 49 50 51 52 53 54 55 56 57 58 59 60 61 62 63 64 65 66 67 68 69 70 71 72 73 74 75 76 77 78 79 80 81 82 83 84 85 86 87 88 89 90 91 92 93 94 95 96 | DECLARE /* Control variable. */ container BOOLEAN := FALSE; /* Weakly structured system reference cursor. */ container_sql SYS_REFCURSOR; /* Constant required for pre-container databases to avoid a a compile time error. */ sql_statement CONSTANT VARCHAR2(50) := 'SELECT cdb FROM v$database WHERE cdb = ''YES'''; BEGIN /* Check if the current user is the superuser. */ FOR i IN (SELECT USER FROM dual) LOOP /* Perform tasks as superuser. */ IF i.USER = 'SYSTEM' THEN /* Check for a container-enabled column, which enables this to work in both pre-container Oracle databases, like 10g and 11g. */ FOR j IN (SELECT DISTINCT column_name FROM dba_tab_columns WHERE column_name = 'CDB') LOOP /* Check for a container database, set control variable and exit when found. */ OPEN container_sql FOR sql_statement; LOOP container := TRUE; EXIT WHEN container_sql%FOUND; END LOOP; END LOOP; /* Conditionally drop existing user and role. */ IF container THEN /* Conditionally drop a container user. */ FOR j IN (SELECT username FROM dba_users WHERE username = 'C##STUDENT') LOOP EXECUTE IMMEDIATE 'DROP USER c##student CASCADE'; END LOOP; /* Conditionally rop the container c##studentrole role. */ FOR j IN (SELECT ROLE FROM dba_roles WHERE ROLE = 'C##STUDENTROLE') LOOP EXECUTE IMMEDIATE 'DROP ROLE c##studentrole'; END LOOP; /* Create a container user with 200 MB of space. */ EXECUTE IMMEDIATE 'CREATE USER c##student'||CHR(10) || 'IDENTIFIED BY student'||CHR(10) || 'DEFAULT TABLESPACE users'||CHR(10) || 'QUOTA 200M ON users'||CHR(10) || 'TEMPORARY TABLESPACE temp'; /* Create a container role. */ EXECUTE IMMEDIATE 'CREATE ROLE c##studentrole CONTAINER = ALL'; /* Grant privileges to a container user. */ EXECUTE IMMEDIATE 'GRANT CREATE CLUSTER, CREATE INDEXTYPE,'||CHR(10) || 'CREATE PROCEDURE, CREATE SEQUENCE,'||CHR(10) || 'CREATE SESSION, CREATE TABLE,'||CHR(10) || 'CREATE TRIGGER, CREATE TYPE,'||CHR(10) || 'CREATE VIEW TO c##studentrole'; /* Grant role to user. */ EXECUTE IMMEDIATE 'GRANT c##studentrole TO c##student'; ELSE /* Conditonally drop the non-container database user. */ FOR j IN (SELECT username FROM dba_users WHERE username = 'STUDENT') LOOP EXECUTE IMMEDIATE 'DROP USER student CASCADE'; END LOOP; /* Create the student database. */ EXECUTE IMMEDIATE 'CREATE USER student'||CHR(10) || 'IDENTIFIED BY student'||CHR(10) || 'DEFAULT TABLESPACE users'||CHR(10) || 'QUOTA 200M ON users'||CHR(10) || 'TEMPORARY TABLESPACE temp'; /* Grant necessary privileges to the student database. */ EXECUTE IMMEDIATE 'GRANT CREATE CLUSTER, CREATE INDEXTYPE,'||CHR(10) || 'CREATE PROCEDURE, CREATE SEQUENCE,'||CHR(10) || 'CREATE SESSION, CREATE TABLE,'||CHR(10) || 'CREATE TRIGGER, CREATE TYPE,'||CHR(10) || 'CREATE VIEW TO student'; END IF; ELSE /* Print an message that the user lacks privilegs. */ dbms_output.put_line('You must be the SYSTEM user to drop and create a user.'); END IF; END LOOP; END; / |
As always, I hope this helps those looking for a solution beyond Quest’s Toad for Oracle, APEX, or SQL Developer. Let me know if you like it.
