Archive for the ‘Linux Administration’ tag
AlmaLinxu + javac
I neglected to show how to install and configure the Java SDK on my earlier post without relying on including the $JAVA_HOME in the $PATH. This post shows how to install the Java and Java SDK on Alma Linux without layering it with the $JAVA_HOME environment variable.
You install the Java runtime and development kit with the following command:
sudo dnf install -y java-17-openjdk java-17-openjdk-devel |
Then, you need to add it to the $PATH environment variable with the following syntax in your .bashrc file or environment file of your choice.
export set PATH=$PATH:/usr/lib/jvm/java-17-openjdk-17.0.8.0.7-2.el9.x86_64/bin/ |
After you source the new $PATH environment value, you can then write a file like this Hello.java file to test it.
// Define the Java program. public class HelloWorld { public static void main(String[] args) { System.out.println("Hello World!"); } } |
You compile the Hello.java file with this syntax:
javac Hello.java |
Then, you run the compiled program with the following syntax:
java Hello |
It’ll print:
Hello World! |
AlmaLinux Installation
These are the instructions for installing AlmaLinux 9 on MacOS Intel with VMware. It’s broken into three parts: Configuration, Installation, and Setup.
You should download the current or desired older version of AlmaLinux from the website. It’s a good idea to install it in a source directory or folder.
You need to launch VMware, click the File menu option and then the New menu option before you can configure, install, and setup AlmaLinux. It will show you the following dialog.

Use the Finder to drag the AlmaLinux-9-latest-x86_64-dvd.iso file on to the Install from disc or image to begin the configuration process.
Configuration

- The first thing you need to do is configure the VMware container. You click on the wrench icon in the menu bar that lets you edit the hardware settings for this virtual machine. This opens the general settings dialog.
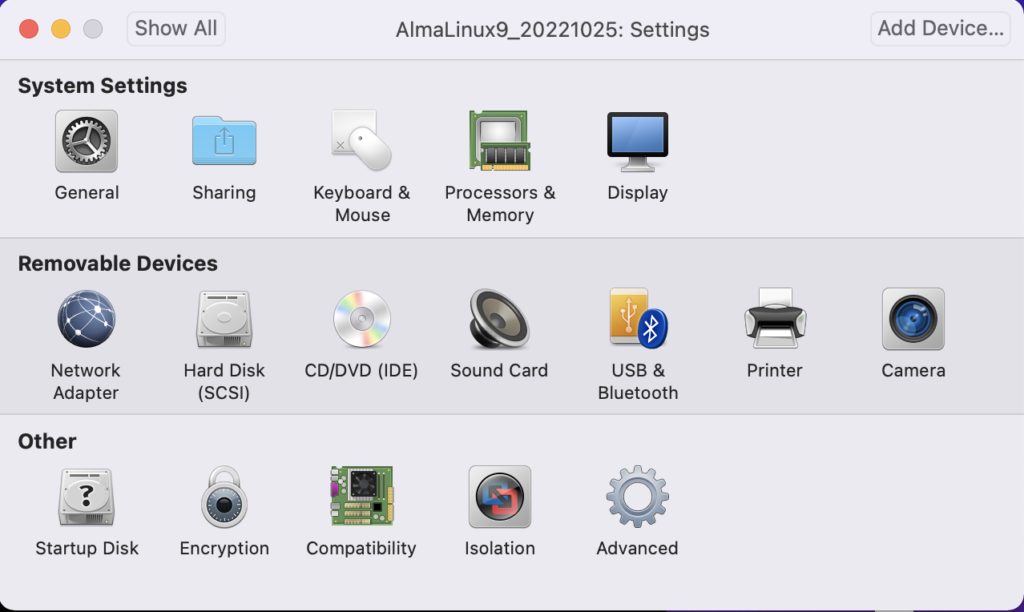
- The General System Settings dialog lets you will configure the isolation properties for “drag and drop” and “copy and paste”, and define the network adapter.
![]()
- Click on the Isolation menu option from the General System Settings dialog, and enable “Drag adn Drop” and “Copy and Paste” checkboxes. Then, return to the General System Settings dialog/li>
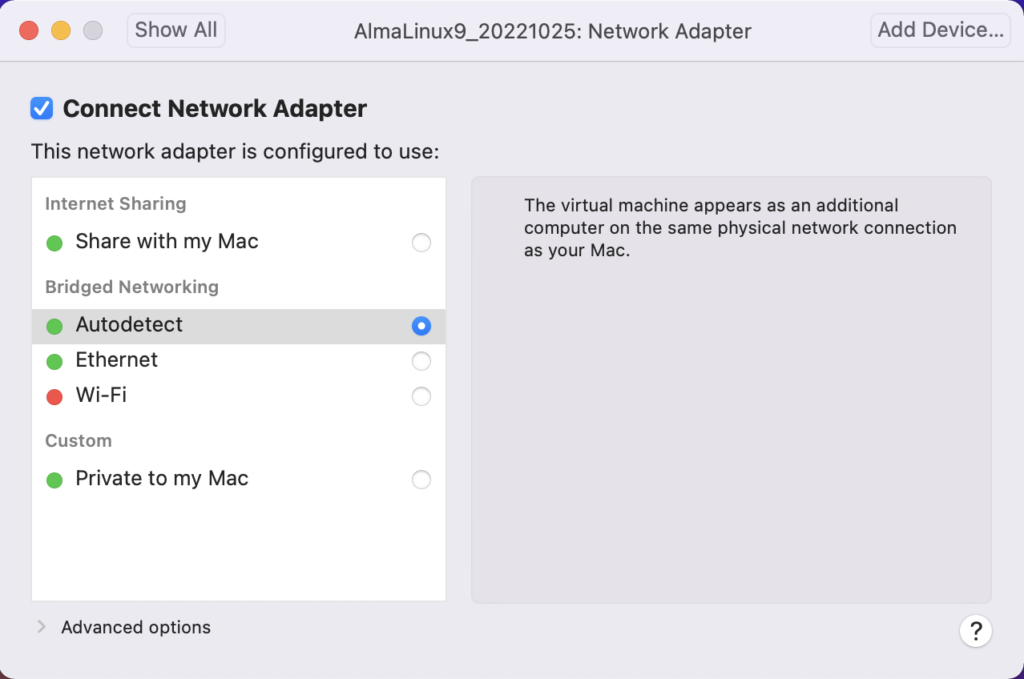
- Click on the Network Adapter menu option from the General System Settings dialog, and click the “Autodetect” checkbox. Then, return to the General System Settings dialog.
Installation
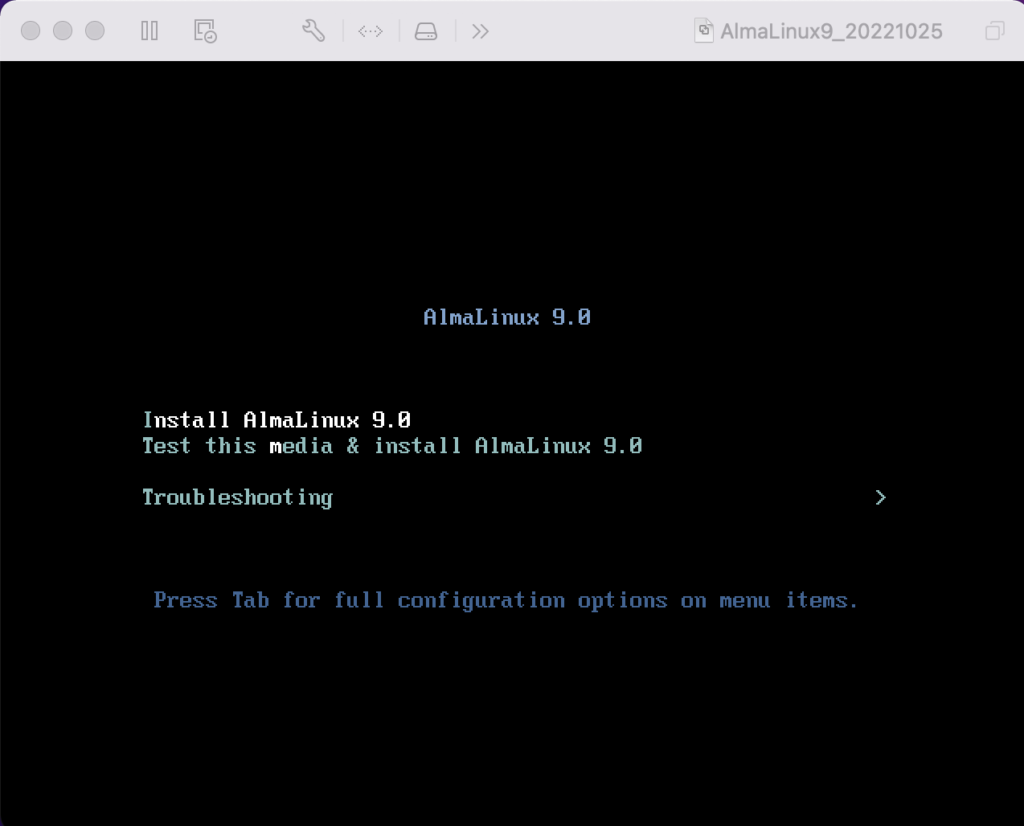
- The first the install asks you to do is type an I for install or T for test. Generally, you can skip the test if this is a copied file rather than DVD.
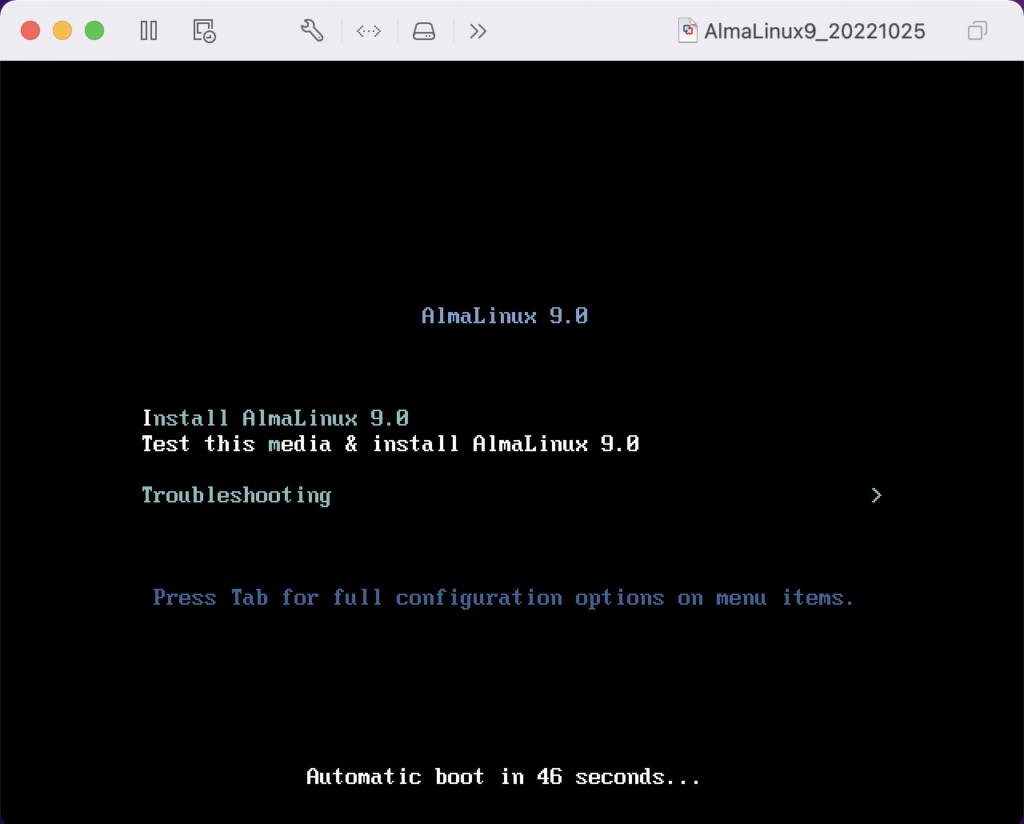
- Click the Tab key to configure the target installation or Enter key to skip the automatic boot delay.

- Choose the installation language and click the Continue button.
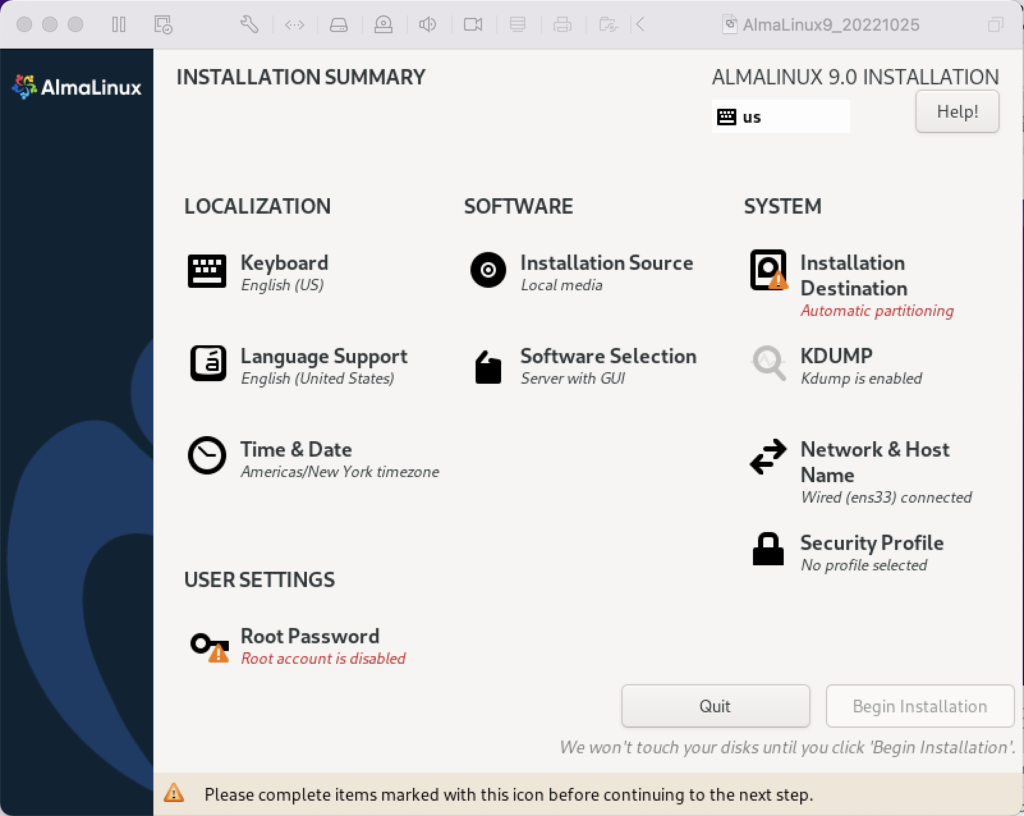
- The Installation Summary dialog lets you fix anything with a warning message orange triangle. Fix the Root Password first by clicking on the text.
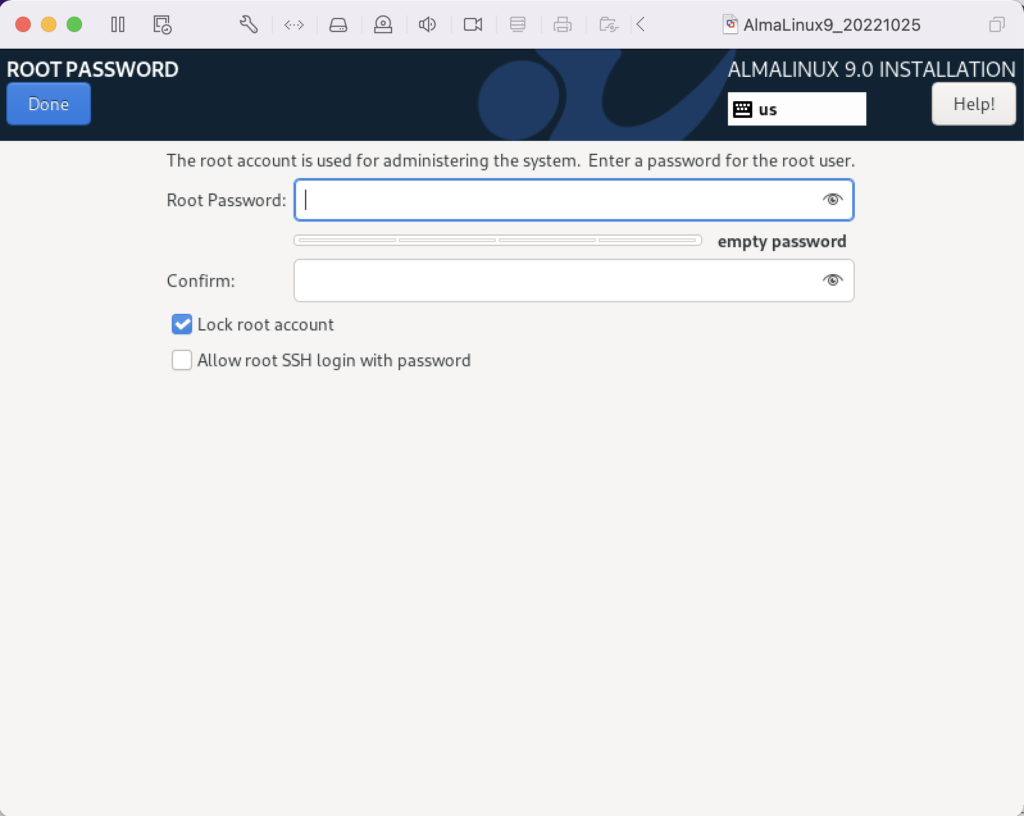
- Enter the Root Password twice, click the Lock root account checkbox to unselect it, and click the Allow root SSH login with password checkbox to enable it.

- Click the Done button to complete setting the root password.

- After fixing the root password, click on the Installation Destination item to change the default partition.
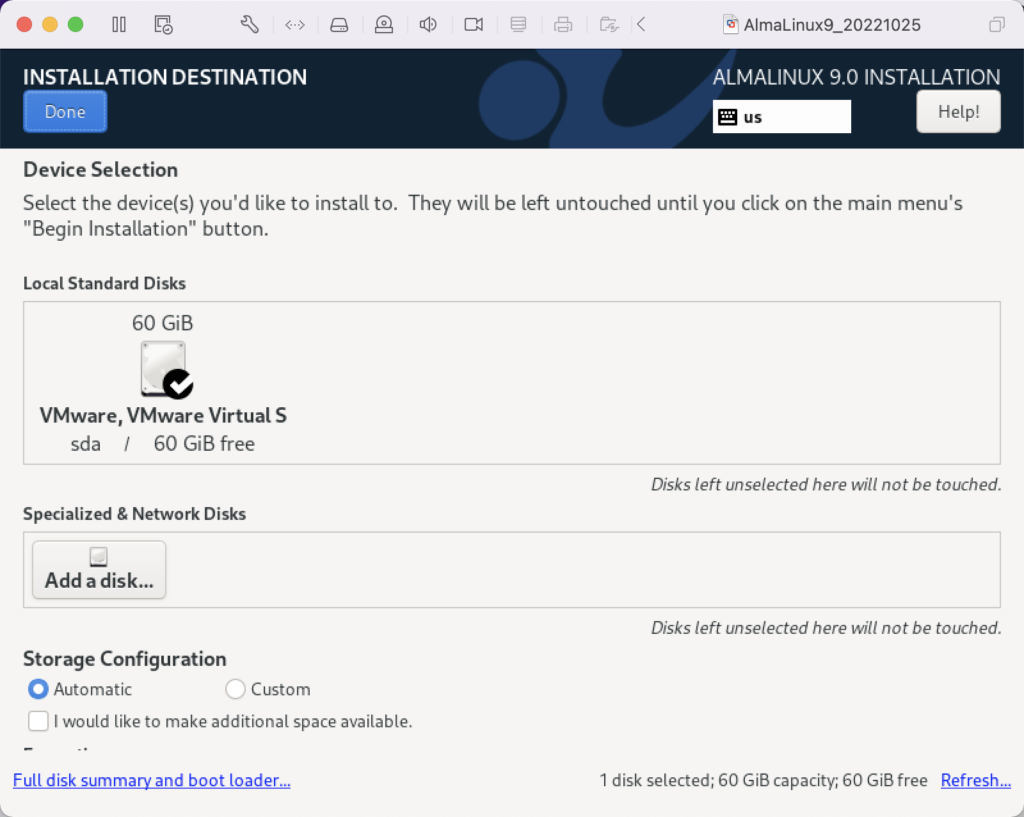
- Click the Done button to accept the initial size of the VM partition.
- Click the Software Selection element to add software components to the default installation.
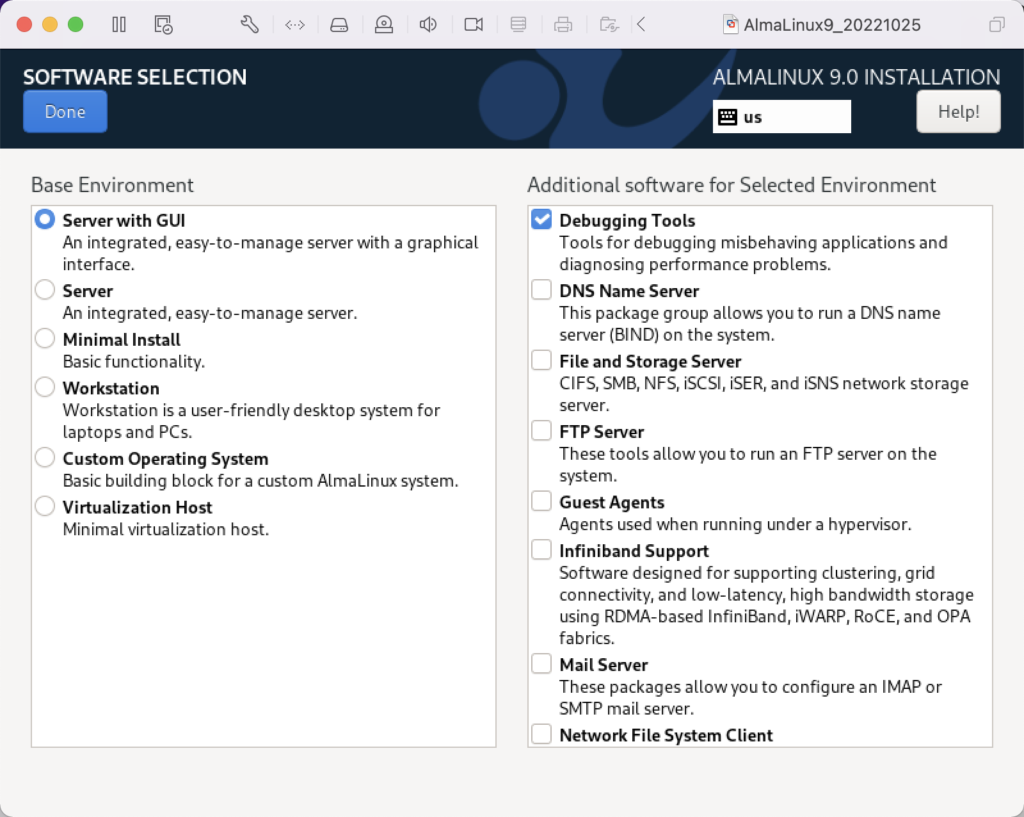
- Click the checkboxes for the following additional software:
- Debugging Tools
- Performance Tools
- Remote Desktop Clients
- Remote Management for Linux
- Legacy UNIX Compatibility
- Console Internet Tools
- Development Tools
- .NET Development
- Graphical Administration Tools
- System Tools
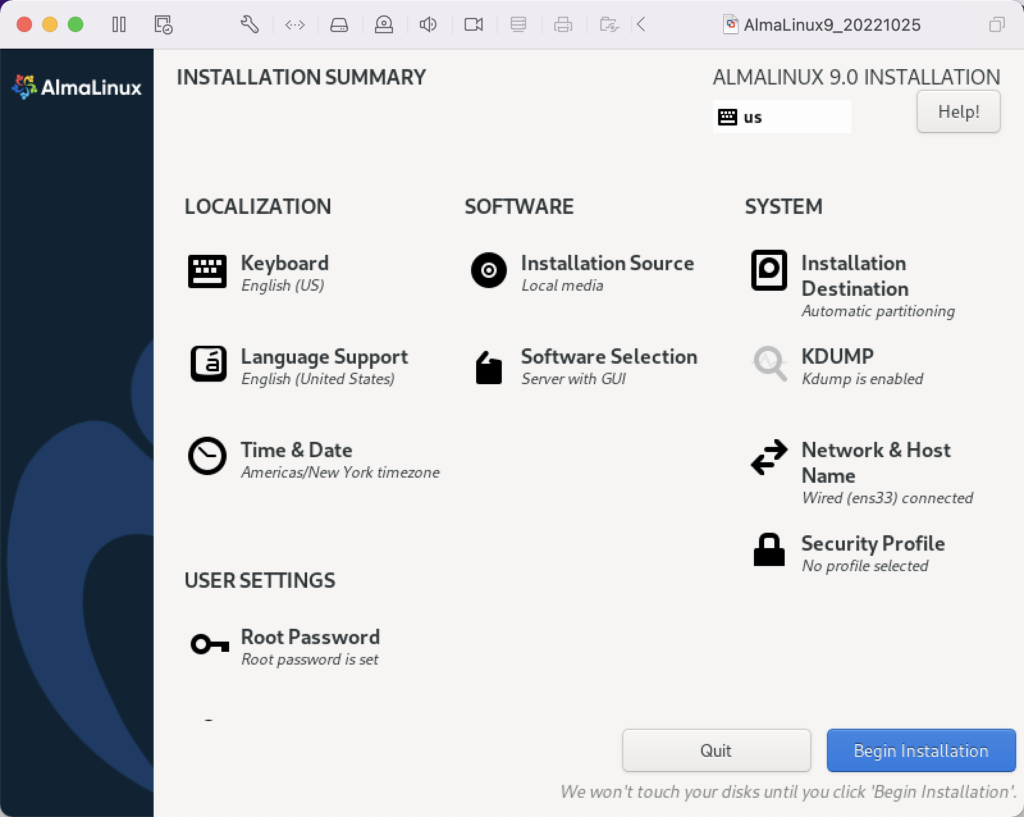
Click the Done button to accept the added software elements.
- Click the Begin Installation button to begin the installation of AlmaLinux.
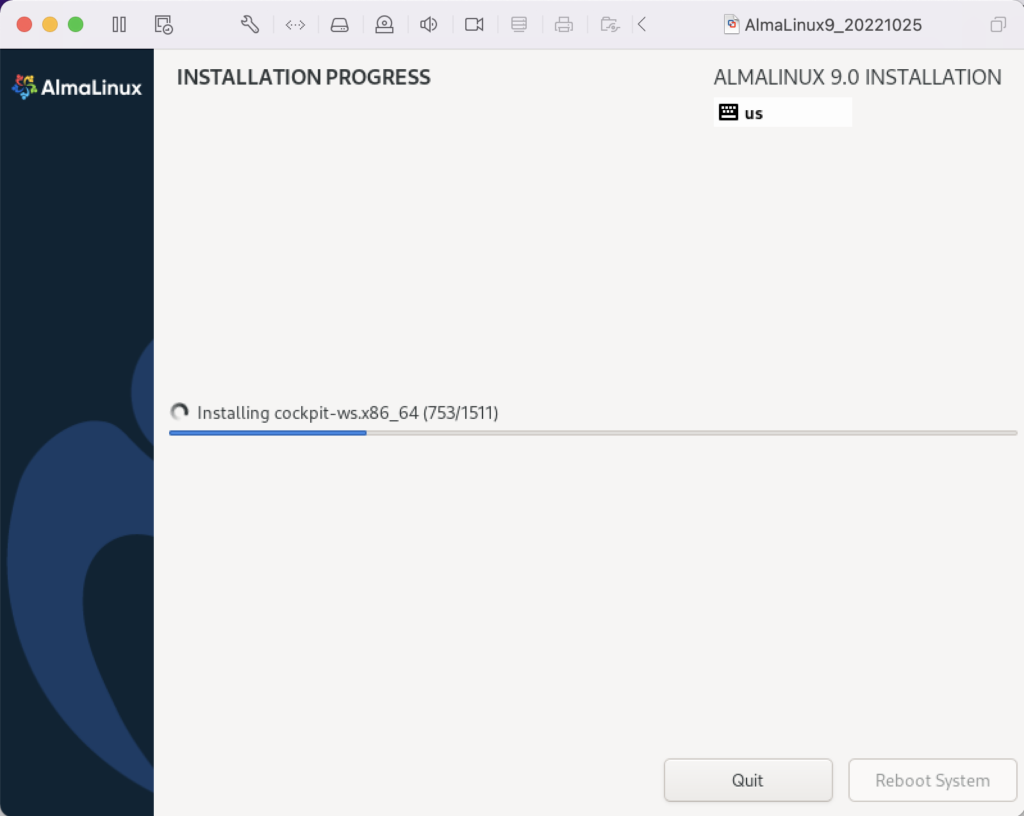
- The Installing Progress dialog will show a progress bar for several minutes.
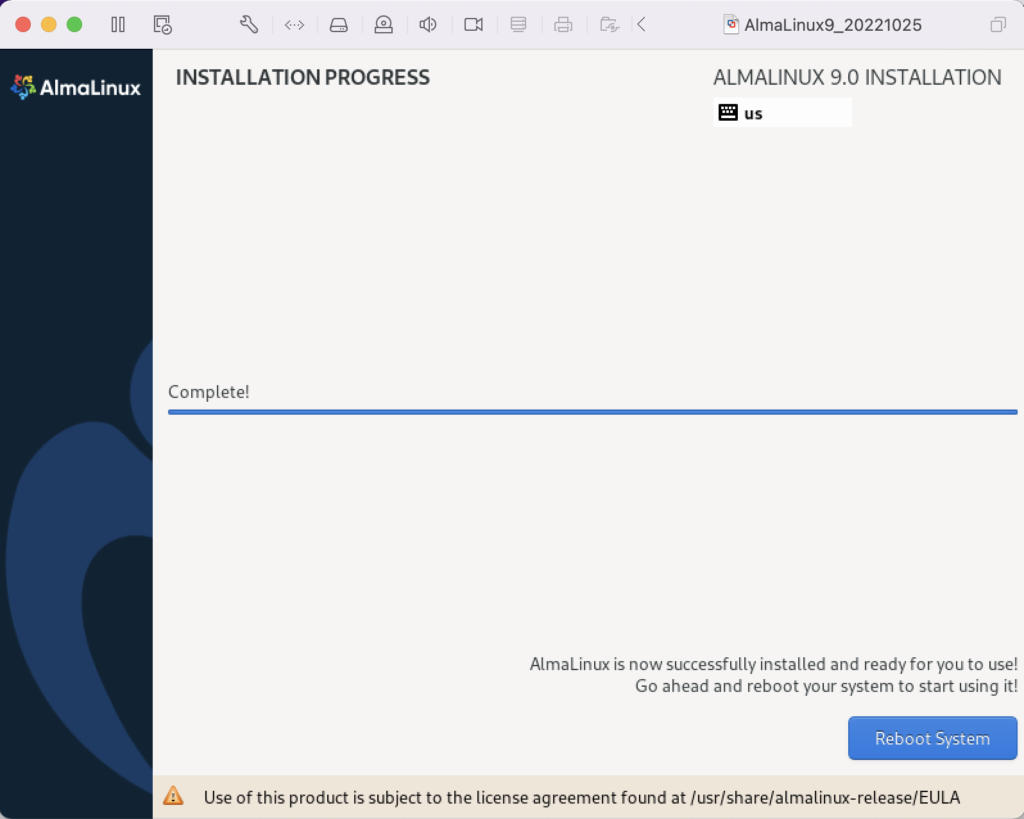
- The Installing Progress dialog eventually completes, and you click the Reboot System button to complete the installation.
Setup
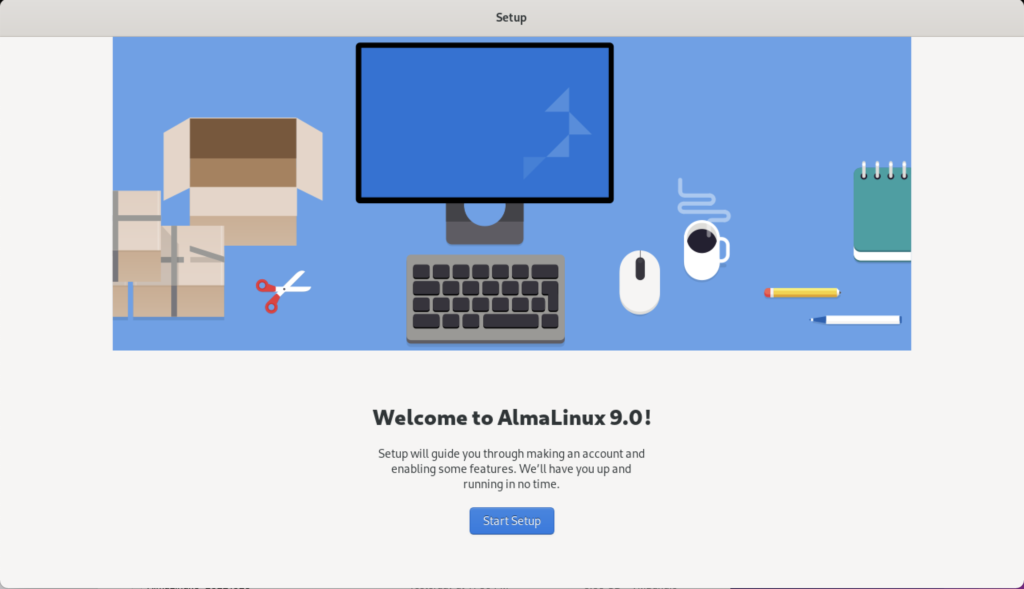
- The Welcome to AlmaLinux page begins the set up of the operating systems.
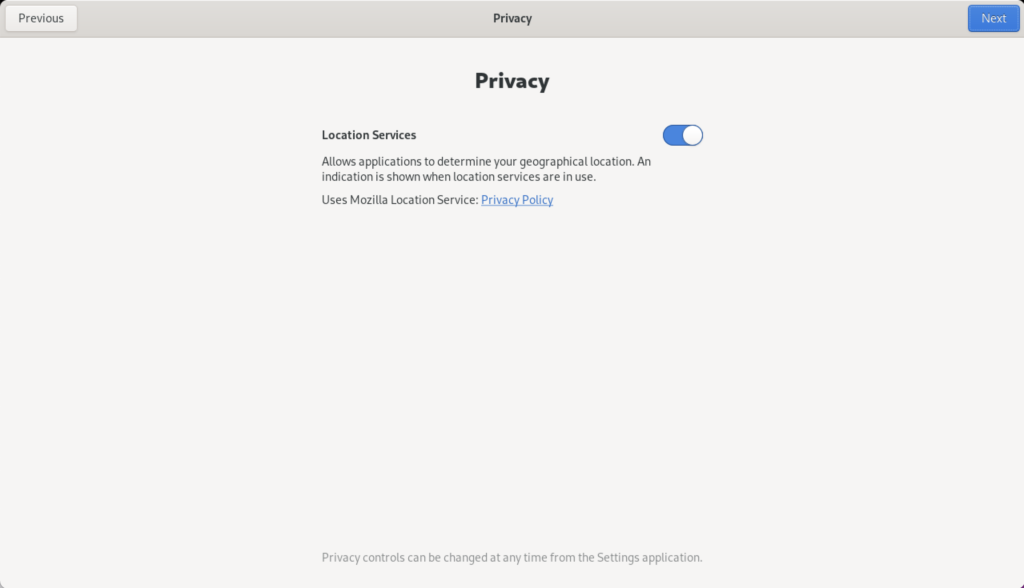
- Click the Slide to disable location services.
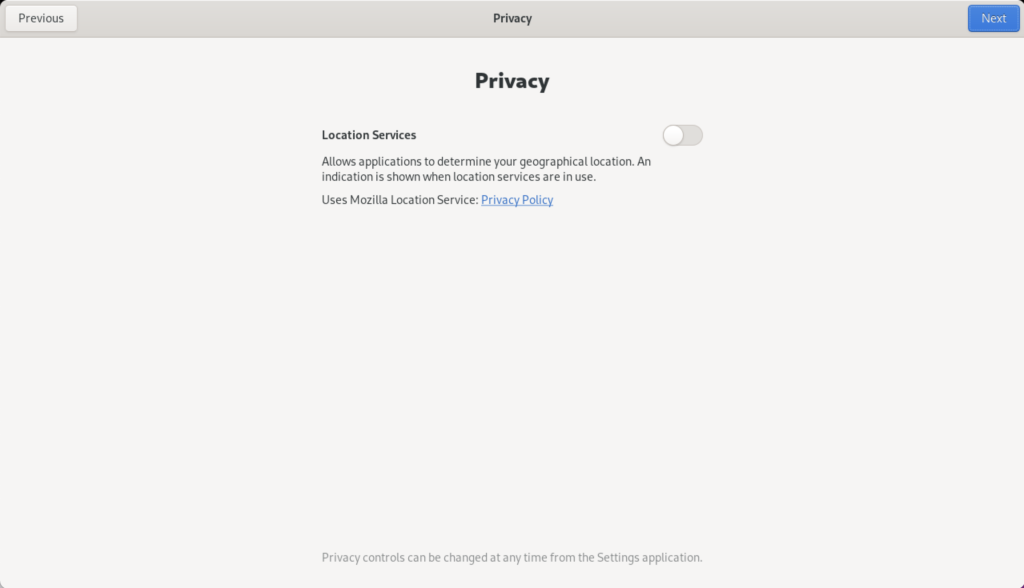
- After clicking the Slide location services are disabled.

- The Online Account dialog lets you connect your email, online calendar, contacts, documents, and photos. You click the Skip button to avoid setting up any of the online accounts.

- The About You dialog lets you enter user account with sudoer privileges.
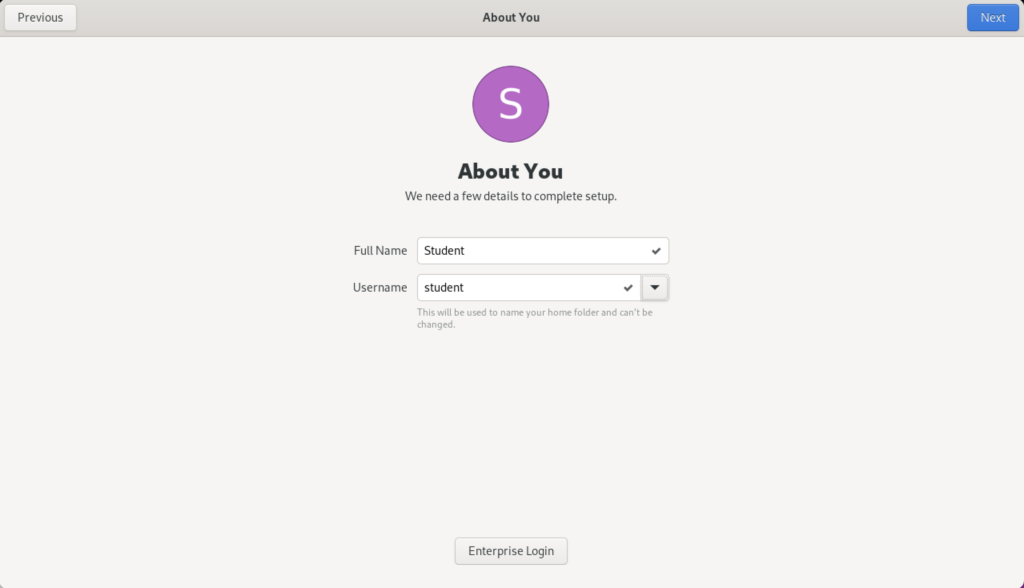
- The About You dialog enters a title case user’s name and a lowercase user’s name.
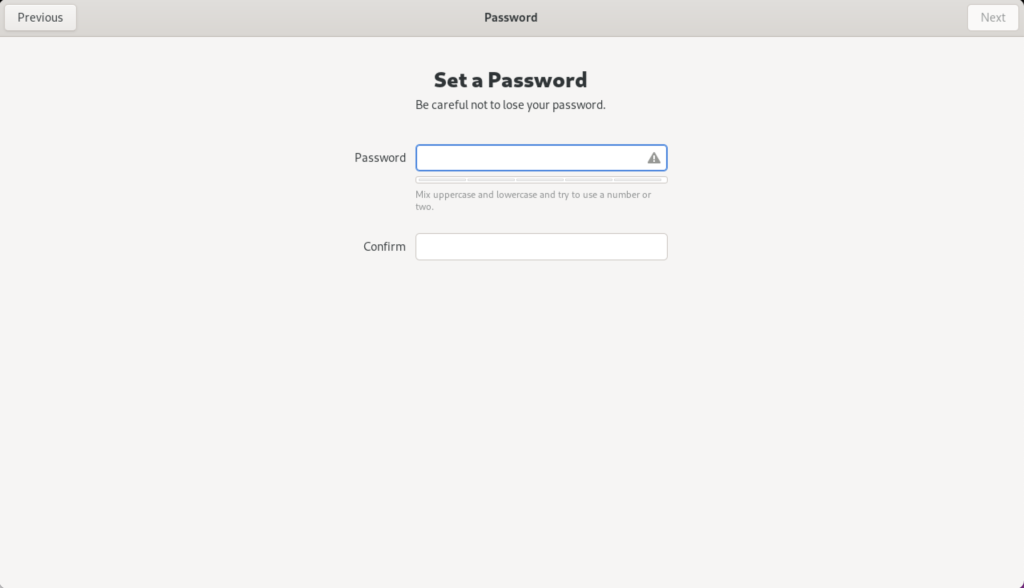
- The Password dialog lets you enter a case sensitive password.
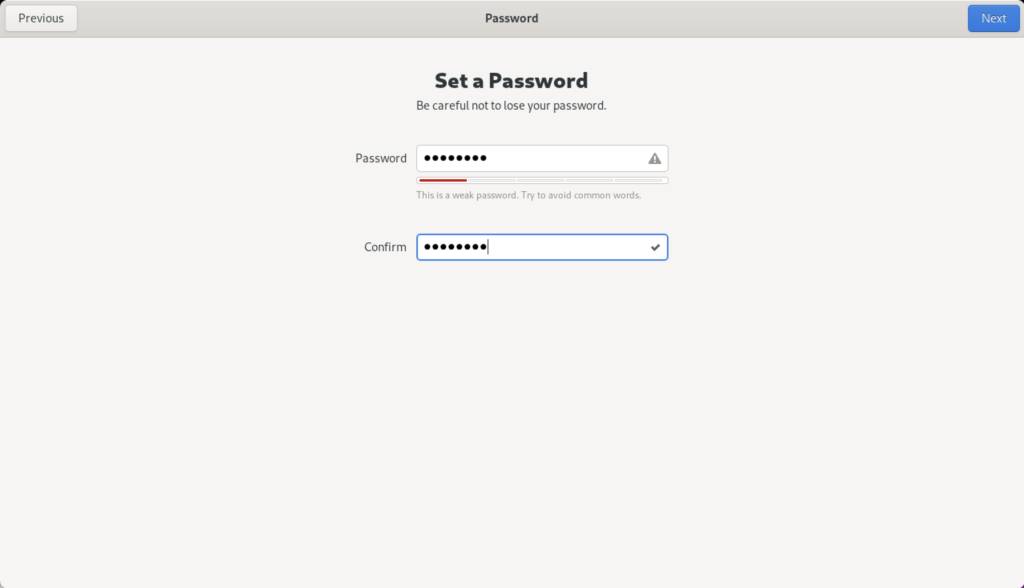
- The Password dialog displays the entry of the passwords as dots.
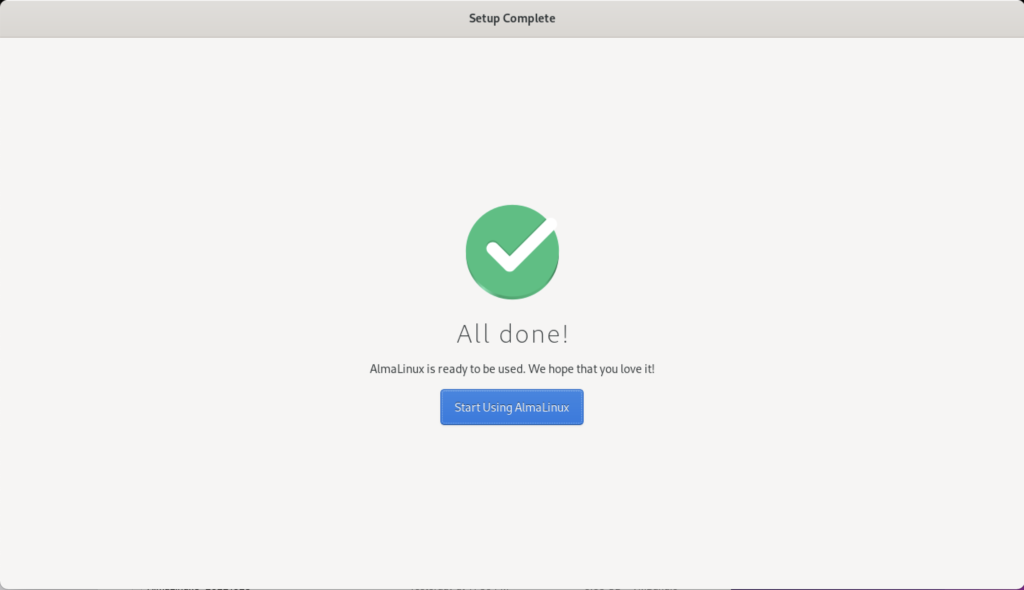
- The Setup Complete dialog leaves you to click the Start Using AlmaLinux button to complete the setup.

- The blank image page displays until you click on it.
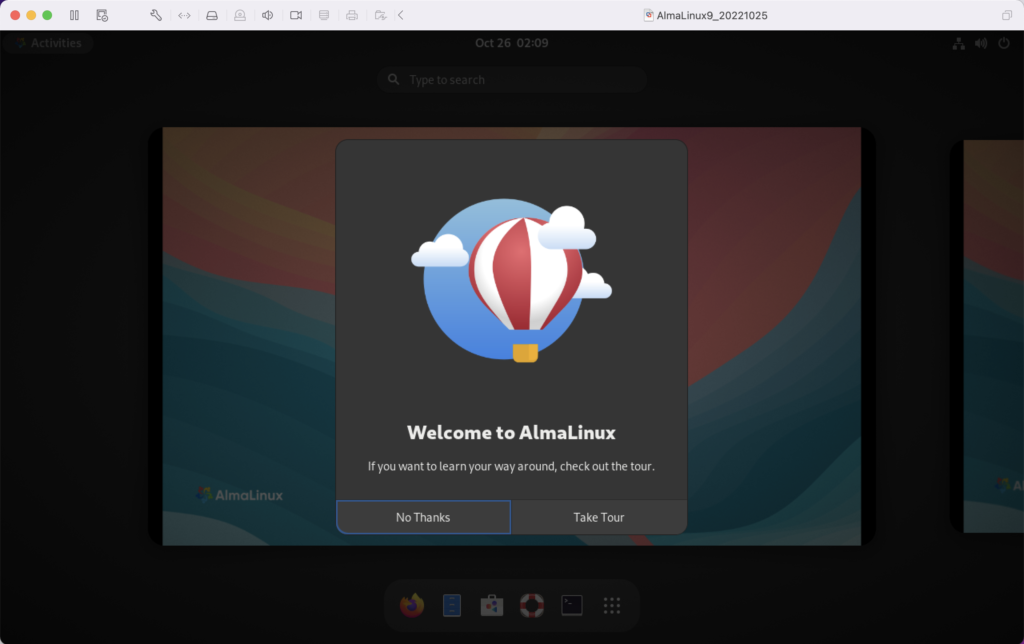
- The Welcome to AlmaLinux dialog invites you to take a tour or decline it. Click the No Thanks button to decline the tour.

- After declining the tour, it displays the core AlmaLinux screen.

- Rebooting the system is necessary to complete the installation. Click on the circle icon on the right to begin the process to restart or shutdown the operating system. Click on the Power Off / Log Out dropdown to continue.

- Click the Restart… menu option to restart the operating system.

- Click the Restart… menu option to confirm the restart of the operating system.
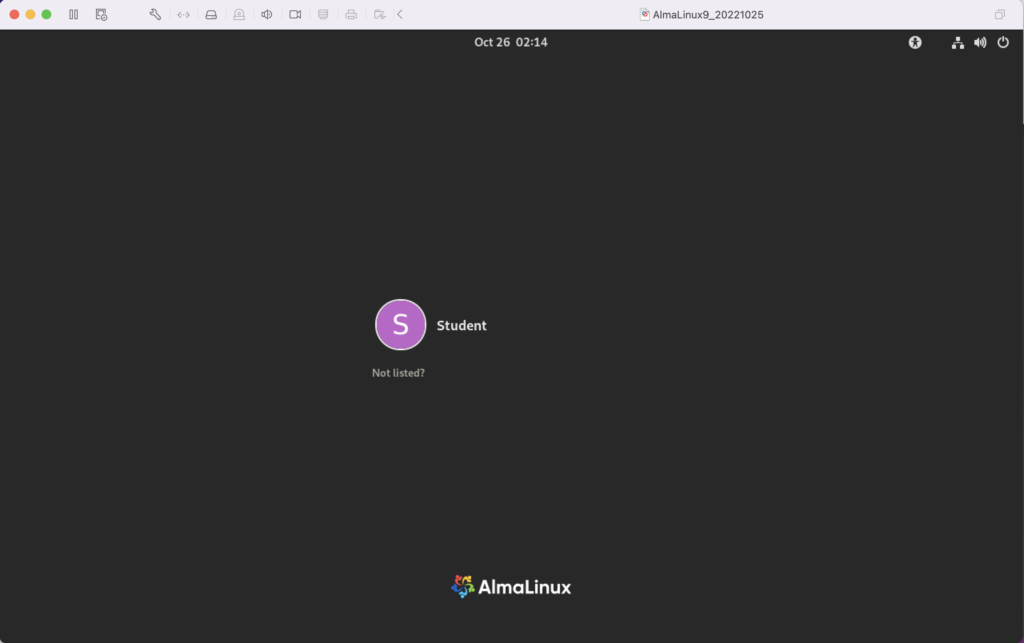
- Click the Student icon to get prompted for a password.
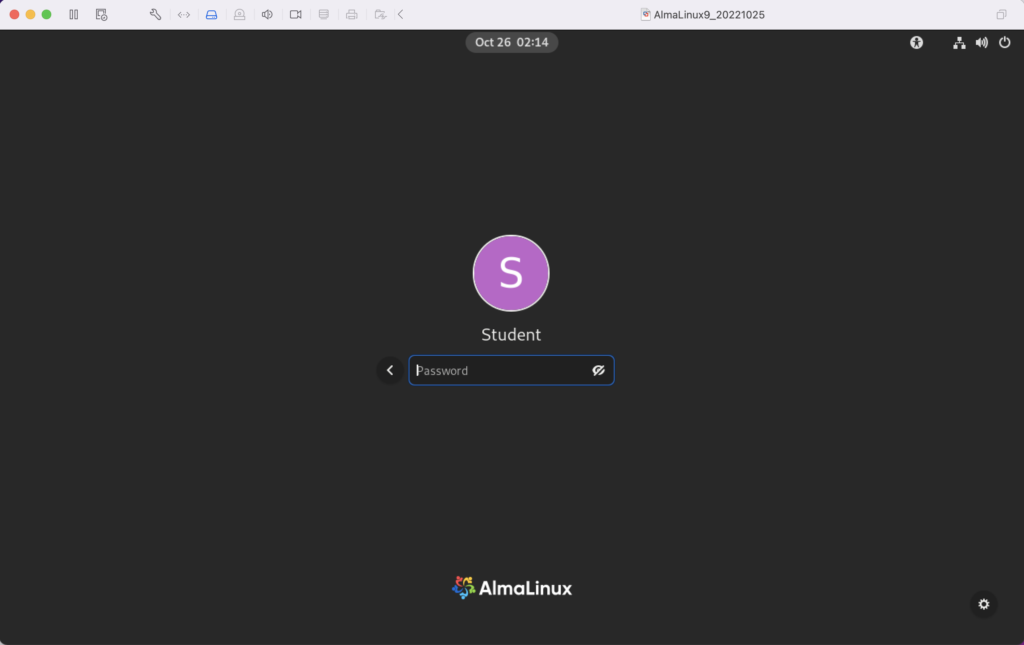
- Enter the Student password to connect to the AlmaLinux operating system.

- This displays the standard working interface for the AlmaLinux operating system.
Fedora for macOS ARM64
I’m always updating VMs, and I was gratified to notice that there’s a Fedora arm64 ISO. If you’re interested in it, you can download the Live Workstation from here or the Fedora Server from here.
Unfortunately, I only have macOS running on i7 and i9 Intel Processors. It would be great to hear back how it goes for somebody one of the new Apple M1 chip.
I typically install the workstation version because it meets my needs to run MySQL and other native Linux development tools. However, the server version is also available. Fedora is a wonderful option, as a small footprint for testing things on my MacBookPro.
Bash Debug Function
My students working in Linux would have a series of labs to negotiate and I’d have them log the activities of their Oracle SQL scripts. Many of them would suffer quite a bit because they didn’t know how to find the errors in the log files.
I wrote this SQL function for them to put in their .bashrc files. It searches all the .txt files for errors and organizes them by log file, line number, and descriptive error message.
errors () { label="File Name:Line Number:Error Code"; list=`ls ./*.$1 | wc -l`; if [[ ${list} -eq 1 ]]; then echo ${label}; echo "----------------------------------------"; filename=`ls *.txt`; echo ${filename}:`find . -type f | grep -in *.txt -e ora\- -e pls\- -e sp2\-`; else if [[ ${list} -gt 1 ]]; then echo ${label}; echo "----------------------------------------"; find . -type f | grep --color=auto -in *.txt -e ora\- -e pls\- -e sp2\-; fi; fi } |
I hope it helps others now too.
Waking up the Network
Interesting problems seem to plague me from time to time. The current problem isn’t yet solved but I’m working on it. After a sleep cycle, IPV6 networking isn’t starting.
Try:
- Checking the network cables, modem, and router
- Reconnecting to Wi-Fi
ERR_INTERNET_DISCONNECTED |
In the broken Fedora 30 VM, I checked the status with the nmcli tool:
sudo nmcli general status |
It returned:
STATE CONNECTIVITY WIFI-HW WIFI WWAN-HW WWAN asleep none enabled enabled enabled enabled |
The STATE should return connected and connectivity return full. Unfortunately, that’s not the case.
There was little surprise that the next check:
sudo nmcli device |
Returned the following:
DEVICE TYPE STATE CONNECTION virbr0 bridge unmanaged -- ens33 ethernet unmanaged -- lo loopback unmanaged -- virbr0-nic tun unmanaged -- |
In a working instance, it should return:
DEVICE TYPE STATE CONNECTION ens33 ethernet connected ens33 virbr0 bridge connected virbr0 lo loopback unmanaged -- virbr0-nic tun unmanaged -- |
I’m currently troubleshooting what failed by leveraging an article on How to Configure Network Connection Using ‘nmcli’ Tool and the Gnome nmcli documentation. Naturally, when I get it fixed, I’ll finish this article.
Wrap Oracle’s tnsping
If you’ve worked with the Oracle database a while, you probably noticed that some utilities write to stdout for both standard output and what should be standard error (stderr). One of those commands is the tnsping utility.
You can wrap the tnsping command to send the TNS-03505 error to stdout with the following code. I put Bash functions like these in a library.sh script, which I can source when automating tasks.
1 2 3 4 5 6 7 8 9 10 11 12 13 14 15 16 | #!/usr/bin/bash tnsping() { if [ ! -z ${1} ]; then # Set default return value. stdout=`$ORACLE_HOME/bin/tnsping ${1} | tail -1` # Check stdout to return 0 for success and 1 for failure. if [[ `echo ${stdout} | cut -c1-9` = 'TNS-03505' ]]; then python -c 'import os, sys; arg = sys.argv[1]; os.write(2,arg + "\n")' "${stdout}" else echo "${1}" fi fi } |
You should notice that the script uses a Python call to redirect the error message to standard out (stdout), which highlights some of the tricks and techniques available when you combine single-line Python routines with Bash shell. However, let’s get real. You can redirect in Bash shell with the following:
1 2 3 4 5 6 7 8 9 10 11 12 13 14 15 16 | #!/usr/bin/bash tnsping() { if [ ! -z ${1} ]; then # Set default return value. stdout=`$ORACLE_HOME/bin/tnsping ${1} | tail -1` # Check stdout to return 0 for success and 1 for failure. if [[ `echo ${stdout} | cut -c1-9` = 'TNS-03505' ]]; then echo ${stdout} 1>&2 else echo "${1}" fi fi } |
Interactively, we can now test a non-existent service name like wrong with this syntax:
tnsping wrong |
It’ll print the standard error to console, like:
TNS-03505: Failed to resolve name |
or, you can suppress standard error (stderr) by redirecting it to the traditional black hole, like:
tnsping wrong 2>/dev/null |
After redirecting standard error (stderr), you simply receive nothing back. That lets you evaluate in another script whether or not the utility raises an error.
In an automating Bash shell script, you use the source command to put the Bash function in scope, like this:
source library.sh |
As always, I hope this helps those looking for a solution.
Node.js Fedora Install
I want to add the MEAN (MongoDB, Express.js, Angular.js, and Node.js) stack to my backend server development course. This post documents the installation and configuration of components on Fedora 30.
The first step requires installing the Node package. The Node package also contains the Node package manager (npm). You install the Node packages as the root user or as a sudoer user with the following command.
yum install -y npm |
It should produce the following installation log:
Last metadata expiration check: 1:10:42 ago on Wed 08 Jul 2020 06:57:52 PM MDT. Dependencies resolved. ================================================================================================================================ Package Architecture Version Repository Size ================================================================================================================================ Installing: npm x86_64 1:6.13.4-1.10.19.0.1.fc30 updates 3.8 M Installing dependencies: nodejs x86_64 1:10.19.0-1.fc30 updates 88 k nodejs-libs x86_64 1:10.19.0-1.fc30 updates 9.1 M Installing weak dependencies: nodejs-full-i18n x86_64 1:10.19.0-1.fc30 updates 7.3 M Transaction Summary ================================================================================================================================ Install 4 Packages Total download size: 20 M Installed size: 91 M Downloading Packages: (1/4): nodejs-10.19.0-1.fc30.x86_64.rpm 173 kB/s | 88 kB 00:00 (2/4): nodejs-full-i18n-10.19.0-1.fc30.x86_64.rpm 2.8 MB/s | 7.3 MB 00:02 (3/4): nodejs-libs-10.19.0-1.fc30.x86_64.rpm 2.7 MB/s | 9.1 MB 00:03 (4/4): npm-6.13.4-1.10.19.0.1.fc30.x86_64.rpm 1.3 MB/s | 3.8 MB 00:02 -------------------------------------------------------------------------------------------------------------------------------- Total 4.9 MB/s | 20 MB 00:04 Running transaction check Transaction check succeeded. Running transaction test Transaction test succeeded. Running transaction Running scriptlet: npm-1:6.13.4-1.10.19.0.1.fc30.x86_64 1/1 Preparing : 1/1 Installing : nodejs-libs-1:10.19.0-1.fc30.x86_64 1/4 Installing : nodejs-full-i18n-1:10.19.0-1.fc30.x86_64 2/4 Installing : npm-1:6.13.4-1.10.19.0.1.fc30.x86_64 3/4 Installing : nodejs-1:10.19.0-1.fc30.x86_64 4/4 Running scriptlet: nodejs-1:10.19.0-1.fc30.x86_64 4/4 Verifying : nodejs-1:10.19.0-1.fc30.x86_64 1/4 Verifying : nodejs-full-i18n-1:10.19.0-1.fc30.x86_64 2/4 Verifying : nodejs-libs-1:10.19.0-1.fc30.x86_64 3/4 Verifying : npm-1:6.13.4-1.10.19.0.1.fc30.x86_64 4/4 Installed: nodejs-1:10.19.0-1.fc30.x86_64 nodejs-full-i18n-1:10.19.0-1.fc30.x86_64 nodejs-libs-1:10.19.0-1.fc30.x86_64 npm-1:6.13.4-1.10.19.0.1.fc30.x86_64 Complete! |
After installing the Node package, you should use the Node package manager (npm) to install the Node Monitor nodemon. nodemon is a popular utility that automatically lets you restart Node programs when you make changes to the source code.
While npm is installed as part of the Node package, you must use npm to install the Node Monitor. The following command installs the nodemon globally on your Fedora system. The -g flag lets you install it globally, which is important when you manage package.json files.
npm install -g nodemon |
You install nodemon globally but most of your web app or project files will be installed locally. Node is a different paradigm than building an Apache or IIS web application because Node provides a framework for you to build a web server.
Here’s a quick Hello World! example that I borrowed a JavaScript helloworld.js file from an excellent Web Development with Node & Express: Leveraging the JavaScript Stack by Ethan Brown. For those who haven’t worked with JavaScript in years, semicolons are optional now.
/* Construct a web server. */ const http = require('http') const port = process.env.PORT || 3000 const server = http.createServer((req, res) => { res.writeHead(200, { 'Content-Type': 'text/plain' }) res.end('Hello world!') }) server.listen(port, () => console.log(`server started on port ${port}); ` + 'press Ctrl-C to terminate...')) |
I put this in /var/www/html/node directory, which is owned by the superuser, root. You need to start the server before accessing it from a browser. You can start the program with the following syntax as a privileged user:
node /var/www/html/node/helloworld.js |
Then, you can use the localhost to access it with the following URL:
http://localhost:3000 |
It will display the following:

Next, you need to use the Node Package Manager (npm) to install the Express.js packages. You do that with the following syntax:
npm install -g express express-generator |
It should produce a console out put like the following:
npm WARN deprecated mkdirp@0.5.1: Legacy versions of mkdirp are no longer supported. Please update to mkdirp 1.x. (Note that the API surface has changed to use Promises in 1.x.) /usr/local/bin/express -> /usr/local/lib/node_modules/express-generator/bin/express-cli.js + express@4.17.1 + express-generator@4.16.1 added 60 packages from 42 contributors in 4.798s |
After you install all the packages, you can inspect them with the following command. The packages are found in the /usr/local/lib/node_modules/express directory. The listing is generated from the package.json file on Fedora and Ubuntu Linux.
npm list -g |
It should display something like this:
/usr/local/lib ├─┬ express@4.17.1 │ ├─┬ accepts@1.3.7 │ │ ├─┬ mime-types@2.1.27 │ │ │ └── mime-db@1.44.0 │ │ └── negotiator@0.6.2 │ ├── array-flatten@1.1.1 │ ├─┬ body-parser@1.19.0 │ │ ├── bytes@3.1.0 │ │ ├── content-type@1.0.4 deduped │ │ ├── debug@2.6.9 deduped │ │ ├── depd@1.1.2 deduped │ │ ├─┬ http-errors@1.7.2 │ │ │ ├── depd@1.1.2 deduped │ │ │ ├── inherits@2.0.3 │ │ │ ├── setprototypeof@1.1.1 deduped │ │ │ ├── statuses@1.5.0 deduped │ │ │ └── toidentifier@1.0.0 │ │ ├─┬ iconv-lite@0.4.24 │ │ │ └── safer-buffer@2.1.2 │ │ ├── on-finished@2.3.0 deduped │ │ ├── qs@6.7.0 deduped │ │ ├─┬ raw-body@2.4.0 │ │ │ ├── bytes@3.1.0 deduped │ │ │ ├── http-errors@1.7.2 deduped │ │ │ ├── iconv-lite@0.4.24 deduped │ │ │ └── unpipe@1.0.0 deduped │ │ └── type-is@1.6.18 deduped │ ├─┬ content-disposition@0.5.3 │ │ └── safe-buffer@5.1.2 deduped │ ├── content-type@1.0.4 │ ├── cookie@0.4.0 │ ├── cookie-signature@1.0.6 │ ├─┬ debug@2.6.9 │ │ └── ms@2.0.0 │ ├── depd@1.1.2 │ ├── encodeurl@1.0.2 │ ├── escape-html@1.0.3 │ ├── etag@1.8.1 │ ├─┬ finalhandler@1.1.2 │ │ ├── debug@2.6.9 deduped │ │ ├── encodeurl@1.0.2 deduped │ │ ├── escape-html@1.0.3 deduped │ │ ├── on-finished@2.3.0 deduped │ │ ├── parseurl@1.3.3 deduped │ │ ├── statuses@1.5.0 deduped │ │ └── unpipe@1.0.0 │ ├── fresh@0.5.2 │ ├── merge-descriptors@1.0.1 │ ├── methods@1.1.2 │ ├─┬ on-finished@2.3.0 │ │ └── ee-first@1.1.1 │ ├── parseurl@1.3.3 │ ├── path-to-regexp@0.1.7 │ ├─┬ proxy-addr@2.0.6 │ │ ├── forwarded@0.1.2 │ │ └── ipaddr.js@1.9.1 │ ├── qs@6.7.0 │ ├── range-parser@1.2.1 │ ├── safe-buffer@5.1.2 │ ├─┬ send@0.17.1 │ │ ├── debug@2.6.9 deduped │ │ ├── depd@1.1.2 deduped │ │ ├── destroy@1.0.4 │ │ ├── encodeurl@1.0.2 deduped │ │ ├── escape-html@1.0.3 deduped │ │ ├── etag@1.8.1 deduped │ │ ├── fresh@0.5.2 deduped │ │ ├── http-errors@1.7.2 deduped │ │ ├── mime@1.6.0 │ │ ├── ms@2.1.1 │ │ ├── on-finished@2.3.0 deduped │ │ ├── range-parser@1.2.1 deduped │ │ └── statuses@1.5.0 deduped │ ├─┬ serve-static@1.14.1 │ │ ├── encodeurl@1.0.2 deduped │ │ ├── escape-html@1.0.3 deduped │ │ ├── parseurl@1.3.3 deduped │ │ └── send@0.17.1 deduped │ ├── setprototypeof@1.1.1 │ ├── statuses@1.5.0 │ ├─┬ type-is@1.6.18 │ │ ├── media-typer@0.3.0 │ │ └── mime-types@2.1.27 deduped │ ├── utils-merge@1.0.1 │ └── vary@1.1.2 └─┬ express-generator@4.16.1 ├── commander@2.15.1 ├── ejs@2.6.1 ├─┬ minimatch@3.0.4 │ └─┬ brace-expansion@1.1.11 │ ├── balanced-match@1.0.0 │ └── concat-map@0.0.1 ├─┬ mkdirp@0.5.1 │ └── minimist@0.0.8 └── sorted-object@2.0.1 |
You can also create a secure node site (HTTPS) with the following additional steps. They include creating a self-signed secure public and private key. This creates the public key:
openssl genrsa -out key.pem |
The openssl command will generate a private key key.pem file. It generates something like the following text message to console:
Generating RSA private key, 2048 bit long modulus (2 primes) ...........+++++ .............................................+++++ e is 65537 (0x010001) |
Next, you need to generate a self-signed certificate. You do this in two steps.
- Create a Distinguished Name (
DN) file. Thecsr.pemfile is theDNfile. You need it to create a self-signed certificate:openssl req -new -key key.pem -out csr.pem
It will prompt you for values, like the following:
You are about to be asked to enter information that will be incorporated
into your certificate request.
What you are about to enter is what is called a Distinguished Name or a DN.
There are quite a few fields but you can leave some blank
For some fields there will be a default value,
If you enter '.', the field will be left blank.
-----
Country Name (2 letter code) [XX]:
State or Province Name (full name) []:MiddleEarth
Locality Name (eg, city) [Default City]:Rivendell
Organization Name (eg, company) [Default Company Ltd]:Fellowship
Organizational Unit Name (eg, section) []:Self
Common Name (eg, your name or your server's hostname) []:Localhost
Email Address []:bilbo@loth.org

Please enter the following 'extra' attributes
to be sent with your certificate request
A challenge password []:friend
An optional company name []:Bilbo
- Use the DN file to create your secure certificate. The following
opensslcommand creates the certificate file by using your private keykey.pemandDNcsr.pemfiles.openssl x509 -req -days 9999 -in csr.pem -signkey key.pem -out cert.pem
It should generate a Secure certificate cert.pem file and return something like the following to the console.
Signature ok
subject=C = XX, ST = MiddleEarth, L = Rivendell, O = Fellowship, OU = Self, CN = Localhost, emailAddress = bilbo@loth.org
Getting Private key
You can put these private key (key.pem) and certificate (cert.pem) files in an ssl subdirectory of the directory where you put the JavaScript program. The following creates a secure server page with the following code.
/* Construct a secure web server. */ const https = require('https') const fs = require('fs') const port = process.env.PORT || 3000 const options = { key: fs.readFileSync('ssl/key.pem'), cert: fs.readFileSync('ssl/cert.pem') } const server = https.createServer((options, res) => { res.writeHead(200, { 'Content-Type': 'text/plain' }) res.end('Hello world!') }) server.listen(port, () => console.log(`server started on port ${port}); ` + 'press Ctrl-C to terminate...')) |
If you try launch your browser using the localhost instead of a DNS or file resolved network name on the designated port, it will raise the following security error:
This site can't be reached https's server IP address could not be found. DNS_PROBE_FINISHED_NXDOMAIN |
An alternate approach to writing a secure server includes using Express.js library. The syntax changes somewhat and you include two new libraries, as shown below:
/* Construct a secure web server. */ const https = require('https') const express = require('express') const fs = require('fs') const app = express() const port = process.env.PORT || 3001 const options = { key: fs.readFileSync('ssl/key.pem'), cert: fs.readFileSync('ssl/cert.pem') } https.createServer(options, app).listen(port, () => { console.log(`Express started in ${app.get('env')} mode ` + `on port + ${port}.`) }) |
This will fail with the following error message if you’re running it with a global installation unless you set the $NODE_PATH environment variable correctly. Without setting the variable you may get the following error message:
internal/modules/cjs/loader.js:638 throw err; ^ Error: Cannot find module 'express' at Function.Module._resolveFilename (internal/modules/cjs/loader.js:636:15) at Function.Module._load (internal/modules/cjs/loader.js:562:25) at Module.require (internal/modules/cjs/loader.js:692:17) at require (internal/modules/cjs/helpers.js:25:18) at Object.<anonymous> (/var/www/html/node/helloworldsecure.js:3:17) at Module._compile (internal/modules/cjs/loader.js:778:30) at Object.Module._extensions..js (internal/modules/cjs/loader.js:789:10) at Module.load (internal/modules/cjs/loader.js:653:32) at tryModuleLoad (internal/modules/cjs/loader.js:593:12) at Function.Module._load (internal/modules/cjs/loader.js:585:3) |
Sometimes they’ll advise you to do an individual user installation of Express.js to get past this error but that’s not necessary. You just need to set the $NODE_PATH environment variable as follows:
export NODE_PATH=/usr/local/lib/node_modules |
This will enable the JavaScript to work without error and without a specific user installation. Assuming you name either of these programs as helloworldsecure.js, you run them with the following command:
node helloworldsecure.js |
You can terminate the program with a Ctrl+c or if use the kill -15 pid command if you started it as a background process. You can find the process ID (pid) with the jobs command.
As always, I hope this is helpful to those starting out with this cool technology stack.
Recursive bash function
While teaching a class on the Linux Command-Line (CLI), the book gave an example of generating a list of random US telephone numbers into a file. The book uses the RANDOM function to generate segments of the telephone number, and then the grep command to identify malformed telephone numbers.
My students wanted me to explain why the numbers were malformed. I had to explain that the RANDOM function returns a random number between 1 and 99,999. The RANDOM function may return a 1 to 5 digit random number, which means you may get a 1-digit or 2-digit number when you request a 3-digit random number or a 1- to 3-digit number when you request a 4-digit random number.
The author’s example is:
for i in {1..10}; do echo "(${RANDOM:0:3}) ${RANDOM:0:3}-${RANDOM:0:4}" >> list.txt done |
They asked if there was a way to write a shell script that guaranteed random but well-formed US telephone numbers. I said yes, however, you need to write a recursive bash shell function and assign the result to a global variable set in the shell script.
They seemed doubtful, so I wrote it for them. Here’s the script if you’re interested in learning more about bash shell scripting. While I implemented it with an bash array, that’s optional.
#!/usr/bin/bash # ============================================================ # Name: telephone.sh # Author: Michael McLaughlin # Date: 05-May-2020 # ------------------------------------------------------------ # Purpose: Demonstrate how to generate random telehpone # numbers. The RANDOM function returns a random # number between 1 and 99999; and while you can # easily shave off a extra digit guarnteeing a # value above 100 is impossible without logic. # ============================================================ targetLength() { # Declare variable in function-level scope. randomString='' # Check the number of parameters to process. if [[ ${#} = 2 ]]; then # Assign value to function-level and local variables. randomString=${1} formatLength=${2} # Get the length of the telephone number as integer. length=`echo -n ${randomString} | wc -c` # Calculate any shortfall. short=$((${formatLength}-${length})) # Check if the telephone number is too short. if [[ ${short} > 0 ]]; then randomString=`echo "${randomString}${RANDOM:0:${short}}"` fi fi # Check if the combination of random numbers equals the target length # and assign the value to the global variable, or repeat processing # by making a recursive function call. if [[ `echo -n ${randomString} | wc -c` = ${formatLength} ]]; then result=${randomString} else targetLength ${randomString} ${formatLength} fi } # Declare global variable to support targetLength(). result='' # Declare an array of strings. declare -A telephone_parts # Generate one hundred random telephone numbers. for i in {1..100}; do # Create random three digit area code. targetLength ${RANDOM:0:3} 3 telephone_parts[1]=${result} # Create random three digit prefix code. targetLength ${RANDOM:0:3} 3 telephone_parts[2]=${result} # Create random four digit number code. targetLength ${RANDOM:0:4} 4 telephone_parts[3]=${result} # Print the telephone numbers. echo "[${i}] (${telephone_parts[1]}) ${telephone_parts[2]}-${telephone_parts[3]}" done |
For reference, a recursive function call isn’t required here. It could be done more effectively with the following while loop:
targetLength() { # Declare variable in function-level scope. randomString='' short=1 # Check the number of parameters to process. if [[ ${#} = 2 ]]; then # Assign value to function-level and local variables. randomString=${1} formatLength=${2} # Check if the telephone number is too short. while [[ ${short} > 0 ]]; do # Get the length of the telephone number as integer. length=`echo -n ${randomString} | wc -c` # Calculate any shortfall. short=$((${formatLength}-${length})) # Assign new value to randomString. randomString=`echo "${randomString}${RANDOM:0:${short}}"` done # Assign randomString to global result variable. result=${randomString} fi } |
As always, I hope this helps those you want to learn or solve a problem.
Linux mongod Service
The installation of MongoDB doesn’t do everything for you. In fact, the first time you start the mongod service, like this as the root user or sudoer user with the command:
service mongod start |
A sudoer user will be prompted for their password, like

A typical MongoDB instance raises the following errors:
Redirecting to /bin/systemctl start mongod.service [student@localhost cit425]$ mongo MongoDB shell version v3.4.11 connecting to: mongodb://127.0.0.1:27017 MongoDB server version: 3.4.11 Server has startup warnings: 2018-10-29T10:51:57.515-0600 I STORAGE [initandlisten] 2018-10-29T10:51:57.515-0600 I STORAGE [initandlisten] ** WARNING: Using the XFS filesystem is strongly recommended with the WiredTiger storage engine 2018-10-29T10:51:57.515-0600 I STORAGE [initandlisten] ** See http://dochub.mongodb.org/core/prodnotes-filesystem 2018-10-29T10:51:58.264-0600 I CONTROL [initandlisten] 2018-10-29T10:51:58.264-0600 I CONTROL [initandlisten] ** WARNING: Access control is not enabled for the database. 2018-10-29T10:51:58.264-0600 I CONTROL [initandlisten] ** Read and write access to data and configuration is unrestricted. 2018-10-29T10:51:58.264-0600 I CONTROL [initandlisten] 2018-10-29T10:51:58.265-0600 I CONTROL [initandlisten] 2018-10-29T10:51:58.265-0600 I CONTROL [initandlisten] ** WARNING: soft rlimits too low. rlimits set to 15580 processes, 64000 files. Number of processes should be at least 32000 : 0.5 times number of files. |
You can fix this by following the MongoDB instructions for the Unix ulimit Settings, which will tell you to create a mongod file in the /etc/systemd/system directory. You should create this file as the root superuser. This is what you should put in the file:
[Unit] Description=MongoDB Documentation=man:mongo [Service] # Other directives omitted # (file size) LimitFSIZE=infinity # (cpu time) LimitCPU=infinity # (virtual memory size) LimitAS=infinity # (locked-in-memory size) LimitMEMLOCK=infinity # (open files) LimitNOFILE=64000 # (processes/threads) LimitNPROC=64000 |
Then, you should be able to restart the mongod service without any warnings with this command:
service mongod restart |
As always, I hope this helps somebody.
Fedora 27 Screen Saver
Just back from Oracle OpenWorld and somebody desperately wants to know how to disable the 5 minute default screen saver setting in the KDE environment. OK, you navigate to the Fedora “f” in the lower left hand corner and choose System Settings, like:

In the System Setting menu page, select Desktop Behavior:

In the Desktop Behavior dialog, select Screen Locking. Change the default to something large like 90 for 1 and half hours.

As always, I hope that solves your problem.
