Archive for the ‘Linux’ Category
AlmaLinux MySQL Workbench
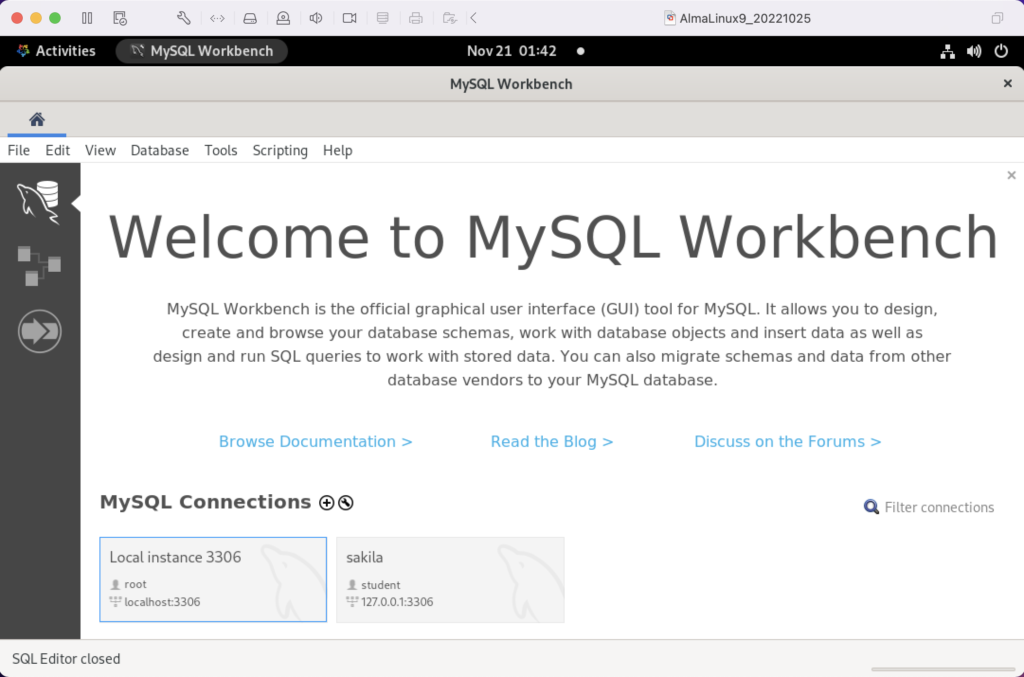
AlmaLinux doesn’t natively support MySQL Workbench but these notes will help you install it. The great news is that MySQL Workbench works perfectly once you’ve installed all the dependent libraries. It’ll look like the following:
Disclaimer of sorts:
AlmaLinux is an open-source, community-driven project that intends to fill the gap left by the demise of the CentOS stable release. AlmaLinux is a 1:1 binary compatible fork of RHEL® 9 and it is built by the AlmaLinux OS Foundation as a standalone, completely free OS. The AlmaLinux OS Foundation will support future RHEL® releases by updating AlmaLinux. Ongoing development efforts are governed by the members of the community.
You can download MySQL Workbench from the following website:
https://dev.mysql.com/downloads/workbench |
When you open this page, select the Red Hat Enterprise Linux 9 / Oracle Linux 9 (x86, 64-bit), RPM Package from the dropdown menu. Then, click the Download button. You may be prompted for your credentials or to create new credentials, but you can skip that by clicking on the No thanks, just start my download link.
When the download completes, open a terminal session as the student user. Navigate to the Downloads directory with the following command:
cd $HOME/Downloads |
List the files in the $HOME/Downloads directory and you should see:
mysql-workbench-community-8.0.31-1.el9.x86_64.rpm |
As the sudoer user or root, run the following command (naturally, exclude sudo if you’re the root user):
sudo dnf install -y mysql-workbench-community-8.0.31-1.el9.x86_64.rpm |
It will most likely fail with an error message like this:
Last metadata expiration check: 2:50:04 ago on Thu 17 Nov 2022 09:33:15 AM EST. Error: Problem: conflicting requests - nothing provides gtkmm30-devel needed by mysql-workbench-community-8.0.31-1.el9.src - nothing provides libzip-devel needed by mysql-workbench-community-8.0.31-1.el9.src - nothing provides proj-devel needed by mysql-workbench-community-8.0.31-1.el9.src - nothing provides swig >= 3.0 needed by mysql-workbench-community-8.0.31-1.el9.src (try to add '--skip-broken' to skip uninstallable packages or '--nobest' to use not only best candidate packages) |
AlmaLinux doesn’t install these prerequisite packages. You’ll need to resolve these dependencies by installing them in the right order and groups before you can run the MySQL Workbench packages.
You can discover missing packages at the pkgs.org website. You need to resolve all four prerequisites before installing MySQL Workbench.
- Let’s start with the gtkmm30-devel package, which has eight separate dependencies. Assuming you’re still in your $HOME/Downloads directory, you can run the following command to get the gtkmm30-devel for AlmaLinux 9:
wget https://repo.almalinux.org/almalinux/9/CRB/x86_64/os/Packages/gtkmm30-devel-3.24.5-1.el9.x86_64.rpm
It downloads the following package:
gtkmm30-devel-3.24.5-1.el9.x86_64.rpm
If you attempt to run it, the gtkmm30-devel package raises the following errors:
sudo dnf install -y gtkmm30-devel-3.24.5-1.el9.x86_64.rpm
Last metadata expiration check: 0:41:13 ago on Thu 17 Nov 2022 02:39:59 PM EST.
Error:
 Problem: conflicting requests
  - nothing provides pkgconfig(atkmm-1.6) >= 2.24.2 needed by gtkmm30-devel-3.24.5-1.el9.x86_64
  - nothing provides pkgconfig(cairomm-1.0) >= 1.12.0 needed by gtkmm30-devel-3.24.5-1.el9.x86_64
  - nothing provides pkgconfig(giomm-2.4) >= 2.54.0 needed by gtkmm30-devel-3.24.5-1.el9.x86_64
  - nothing provides pkgconfig(pangomm-1.4) >= 1.12.0 needed by gtkmm30-devel-3.24.5-1.el9.x86_64
(try to add '--skip-broken' to skip uninstallable packages or '--nobest' to use not only best candidate packages)
While you only get four errors, there are more packages required. You need to use the wget utility to download these packages. I would recommend you create a temporary gtkmm30 subdirectory inside your $HOME/Downloads directory and change to that directory before downloading these files.
wget https://repo.almalinux.org/almalinux/9/CRB/x86_64/os/Packages/atkmm-devel-2.28.2-2.el9.x86_64.rpm
wget https://repo.almalinux.org/almalinux/9/CRB/x86_64/os/Packages/cairomm-devel-1.14.2-10.el9.x86_64.rpm
wget https://repo.almalinux.org/almalinux/9/AppStream/x86_64/os/Packages/gdk-pixbuf2-devel-2.42.6-2.el9.x86_64.rpm
wget https://repo.almalinux.org/almalinux/9/CRB/x86_64/os/Packages/glibmm24-devel-2.66.1-1.el9.x86_64.rpm
wget https://repo.almalinux.org/almalinux/9/AppStream/x86_64/os/Packages/gtk3-devel-3.24.31-2.el9.x86_64.rpm
wget https://repo.almalinux.org/almalinux/9/CRB/x86_64/os/Packages/pangomm-devel-2.46.1-1.el9.x86_64.rpm
wget https://repo.almalinux.org/almalinux/9/CRB/x86_64/os/Packages/libsigc++20-devel-2.10.7-2.el9.x86_64.rpm
You need to run these as a set of prerequisites, so from your gtkmm30 subdirectory use the following dnf command as the sudoer user:
sudo dnf install -y *.rpm
The log file for this is:
Display detailed console log →
Last metadata expiration check: 0:09:20 ago on Sun 20 Nov 2022 12:52:28 AM EST. Dependencies resolved. ================================================================================ Package Arch Version Repository Size ================================================================================ Installing: atkmm-devel x86_64 2.28.2-2.el9 @commandline 45 k cairomm-devel x86_64 1.14.2-10.el9 @commandline 62 k gdk-pixbuf2-devel x86_64 2.42.6-2.el9 @commandline 64 k glibmm24-devel x86_64 2.66.1-1.el9 @commandline 497 k gtk3-devel x86_64 3.24.31-2.el9 @commandline 4.1 M libsigc++20-devel x86_64 2.10.7-2.el9 @commandline 67 k pangomm-devel x86_64 2.46.1-1.el9 @commandline 65 k Upgrading: dbus-common noarch 1:1.12.20-6.el9 baseos 14 k dbus-daemon x86_64 1:1.12.20-6.el9 appstream 196 k dbus-libs x86_64 1:1.12.20-6.el9 baseos 151 k dbus-tools x86_64 1:1.12.20-6.el9 baseos 50 k fontconfig x86_64 2.14.0-1.el9 appstream 274 k freetype x86_64 2.10.4-9.el9 baseos 387 k fribidi x86_64 1.0.10-6.el9.2 appstream 84 k harfbuzz x86_64 2.7.4-8.el9 baseos 624 k harfbuzz-icu x86_64 2.7.4-8.el9 appstream 14 k libblkid x86_64 2.37.4-9.el9 baseos 107 k libfdisk x86_64 2.37.4-9.el9 baseos 154 k libmount x86_64 2.37.4-9.el9 baseos 133 k libselinux x86_64 3.4-3.el9 baseos 85 k libselinux-utils x86_64 3.4-3.el9 baseos 158 k libsepol x86_64 3.4-1.1.el9 baseos 315 k libsmartcols x86_64 2.37.4-9.el9 baseos 63 k libtiff x86_64 4.4.0-2.el9 appstream 195 k libuuid x86_64 2.37.4-9.el9 baseos 27 k libxml2 x86_64 2.9.13-2.el9 baseos 746 k pcre2 x86_64 10.40-2.el9 baseos 236 k pcre2-syntax noarch 10.40-2.el9 baseos 143 k pcre2-utf16 x86_64 10.40-2.el9 appstream 216 k pcre2-utf32 x86_64 10.40-2.el9 appstream 205 k python3-libselinux x86_64 3.4-3.el9 appstream 185 k python3-libxml2 x86_64 2.9.13-2.el9 baseos 226 k util-linux x86_64 2.37.4-9.el9 baseos 2.2 M util-linux-core x86_64 2.37.4-9.el9 baseos 434 k util-linux-user x86_64 2.37.4-9.el9 baseos 30 k Installing dependencies: at-spi2-atk-devel x86_64 2.38.0-4.el9 appstream 9.5 k at-spi2-core-devel x86_64 2.40.3-1.el9 appstream 134 k atk-devel x86_64 2.36.0-5.el9 appstream 172 k brotli x86_64 1.0.9-6.el9 appstream 313 k brotli-devel x86_64 1.0.9-6.el9 appstream 31 k bzip2-devel x86_64 1.0.8-8.el9 appstream 213 k cairo-devel x86_64 1.17.4-7.el9 appstream 190 k cairo-gobject-devel x86_64 1.17.4-7.el9 appstream 10 k dbus-devel x86_64 1:1.12.20-6.el9 appstream 33 k fontconfig-devel x86_64 2.14.0-1.el9 appstream 128 k freetype-devel x86_64 2.10.4-9.el9 appstream 1.1 M fribidi-devel x86_64 1.0.10-6.el9.2 appstream 25 k glib2-devel x86_64 2.68.4-5.el9 appstream 475 k graphite2-devel x86_64 1.3.14-9.el9 appstream 21 k harfbuzz-devel x86_64 2.7.4-8.el9 appstream 305 k libX11-devel x86_64 1.7.0-7.el9 appstream 940 k libXau-devel x86_64 1.0.9-8.el9 appstream 13 k libXcomposite-devel x86_64 0.4.5-7.el9 appstream 15 k libXcursor-devel x86_64 1.2.0-7.el9 appstream 21 k libXdamage-devel x86_64 1.1.5-7.el9 appstream 9.3 k libXext-devel x86_64 1.3.4-8.el9 appstream 72 k libXfixes-devel x86_64 5.0.3-16.el9 appstream 12 k libXft-devel x86_64 2.3.3-8.el9 appstream 18 k libXi-devel x86_64 1.7.10-8.el9 appstream 99 k libXinerama-devel x86_64 1.1.4-10.el9 appstream 13 k libXrandr-devel x86_64 1.5.2-8.el9 appstream 19 k libXrender-devel x86_64 0.9.10-16.el9 appstream 16 k libXtst-devel x86_64 1.2.3-16.el9 appstream 15 k libblkid-devel x86_64 2.37.4-9.el9 appstream 17 k libdatrie-devel x86_64 0.2.13-4.el9 appstream 132 k libepoxy-devel x86_64 1.5.5-4.el9 appstream 133 k libffi-devel x86_64 3.4.2-7.el9 appstream 29 k libglvnd-core-devel x86_64 1:1.3.4-1.el9 appstream 17 k libglvnd-devel x86_64 1:1.3.4-1.el9 appstream 155 k libicu-devel x86_64 67.1-9.el9 appstream 830 k libmount-devel x86_64 2.37.4-9.el9 appstream 18 k libpng-devel x86_64 2:1.6.37-12.el9 appstream 290 k libselinux-devel x86_64 3.4-3.el9 appstream 113 k libsepol-devel x86_64 3.4-1.1.el9 appstream 40 k libthai-devel x86_64 0.1.28-8.el9 appstream 117 k libtiff-devel x86_64 4.4.0-2.el9 appstream 513 k libxcb-devel x86_64 1.13.1-9.el9 appstream 1.0 M libxkbcommon-devel x86_64 1.0.3-4.el9 appstream 61 k libxml2-devel x86_64 2.9.13-2.el9 appstream 828 k pango-devel x86_64 1.48.7-2.el9 appstream 141 k pcre-cpp x86_64 8.44-3.el9.3 appstream 26 k pcre-devel x86_64 8.44-3.el9.3 appstream 470 k pcre-utf16 x86_64 8.44-3.el9.3 appstream 184 k pcre-utf32 x86_64 8.44-3.el9.3 appstream 174 k pcre2-devel x86_64 10.40-2.el9 appstream 474 k perl-Filter x86_64 2:1.60-4.el9 appstream 81 k perl-encoding x86_64 4:3.00-462.el9 appstream 62 k perl-open noarch 1.12-479.el9 appstream 25 k pixman-devel x86_64 0.40.0-5.el9 appstream 17 k sysprof-capture-devel x86_64 3.40.1-3.el9 appstream 59 k wayland-devel x86_64 1.19.0-4.el9 appstream 132 k xorg-x11-proto-devel noarch 2021.4-2.el9 appstream 262 k Transaction Summary ================================================================================ Install 64 Packages Upgrade 28 Packages Total size: 23 M Total download size: 18 M Downloading Packages: (1/85): at-spi2-atk-devel-2.38.0-4.el9.x86_64.r 38 kB/s | 9.5 kB 00:00 (2/85): atk-devel-2.36.0-5.el9.x86_64.rpm 334 kB/s | 172 kB 00:00 (3/85): brotli-devel-1.0.9-6.el9.x86_64.rpm 354 kB/s | 31 kB 00:00 (4/85): at-spi2-core-devel-2.40.3-1.el9.x86_64. 167 kB/s | 134 kB 00:00 (5/85): cairo-devel-1.17.4-7.el9.x86_64.rpm 1.9 MB/s | 190 kB 00:00 (6/85): cairo-gobject-devel-1.17.4-7.el9.x86_64 179 kB/s | 10 kB 00:00 (7/85): brotli-1.0.9-6.el9.x86_64.rpm 413 kB/s | 313 kB 00:00 (8/85): dbus-devel-1.12.20-6.el9.x86_64.rpm 549 kB/s | 33 kB 00:00 (9/85): bzip2-devel-1.0.8-8.el9.x86_64.rpm 505 kB/s | 213 kB 00:00 (10/85): fribidi-devel-1.0.10-6.el9.2.x86_64.rp 492 kB/s | 25 kB 00:00 (11/85): fontconfig-devel-2.14.0-1.el9.x86_64.r 891 kB/s | 128 kB 00:00 (12/85): graphite2-devel-1.3.14-9.el9.x86_64.rp 316 kB/s | 21 kB 00:00 (13/85): glib2-devel-2.68.4-5.el9.x86_64.rpm 1.1 MB/s | 475 kB 00:00 (14/85): harfbuzz-devel-2.7.4-8.el9.x86_64.rpm 850 kB/s | 305 kB 00:00 (15/85): freetype-devel-2.10.4-9.el9.x86_64.rpm 1.7 MB/s | 1.1 MB 00:00 (16/85): libXau-devel-1.0.9-8.el9.x86_64.rpm 170 kB/s | 13 kB 00:00 (17/85): libXcomposite-devel-0.4.5-7.el9.x86_64 273 kB/s | 15 kB 00:00 (18/85): libXcursor-devel-1.2.0-7.el9.x86_64.rp 344 kB/s | 21 kB 00:00 (19/85): libXdamage-devel-1.1.5-7.el9.x86_64.rp 133 kB/s | 9.3 kB 00:00 (20/85): libXfixes-devel-5.0.3-16.el9.x86_64.rp 256 kB/s | 12 kB 00:00 (21/85): libXext-devel-1.3.4-8.el9.x86_64.rpm 768 kB/s | 72 kB 00:00 (22/85): libXft-devel-2.3.3-8.el9.x86_64.rpm 324 kB/s | 18 kB 00:00 (23/85): libXinerama-devel-1.1.4-10.el9.x86_64. 205 kB/s | 13 kB 00:00 (24/85): libXi-devel-1.7.10-8.el9.x86_64.rpm 913 kB/s | 99 kB 00:00 (25/85): libXrender-devel-0.9.10-16.el9.x86_64. 295 kB/s | 16 kB 00:00 (26/85): libXrandr-devel-1.5.2-8.el9.x86_64.rpm 289 kB/s | 19 kB 00:00 (27/85): libXtst-devel-1.2.3-16.el9.x86_64.rpm 261 kB/s | 15 kB 00:00 (28/85): libblkid-devel-2.37.4-9.el9.x86_64.rpm 284 kB/s | 17 kB 00:00 (29/85): libX11-devel-1.7.0-7.el9.x86_64.rpm 1.4 MB/s | 940 kB 00:00 (30/85): libepoxy-devel-1.5.5-4.el9.x86_64.rpm 1.2 MB/s | 133 kB 00:00 (31/85): libdatrie-devel-0.2.13-4.el9.x86_64.rp 876 kB/s | 132 kB 00:00 (32/85): libffi-devel-3.4.2-7.el9.x86_64.rpm 426 kB/s | 29 kB 00:00 (33/85): libglvnd-core-devel-1.3.4-1.el9.x86_64 233 kB/s | 17 kB 00:00 (34/85): libmount-devel-2.37.4-9.el9.x86_64.rpm 280 kB/s | 18 kB 00:00 (35/85): libglvnd-devel-1.3.4-1.el9.x86_64.rpm 976 kB/s | 155 kB 00:00 (36/85): libpng-devel-1.6.37-12.el9.x86_64.rpm 1.9 MB/s | 290 kB 00:00 (37/85): libselinux-devel-3.4-3.el9.x86_64.rpm 801 kB/s | 113 kB 00:00 (38/85): libsepol-devel-3.4-1.1.el9.x86_64.rpm 636 kB/s | 40 kB 00:00 (39/85): libthai-devel-0.1.28-8.el9.x86_64.rpm 630 kB/s | 117 kB 00:00 (40/85): libicu-devel-67.1-9.el9.x86_64.rpm 1.3 MB/s | 830 kB 00:00 (41/85): libtiff-devel-4.4.0-2.el9.x86_64.rpm 1.6 MB/s | 513 kB 00:00 (42/85): libxkbcommon-devel-1.0.3-4.el9.x86_64. 710 kB/s | 61 kB 00:00 (43/85): pango-devel-1.48.7-2.el9.x86_64.rpm 914 kB/s | 141 kB 00:00 (44/85): pcre-cpp-8.44-3.el9.3.x86_64.rpm 425 kB/s | 26 kB 00:00 (45/85): pcre-devel-8.44-3.el9.3.x86_64.rpm 1.8 MB/s | 470 kB 00:00 (46/85): pcre-utf16-8.44-3.el9.3.x86_64.rpm 1.5 MB/s | 184 kB 00:00 (47/85): libxml2-devel-2.9.13-2.el9.x86_64.rpm 1.2 MB/s | 828 kB 00:00 (48/85): libxcb-devel-1.13.1-9.el9.x86_64.rpm 1.2 MB/s | 1.0 MB 00:00 (49/85): pcre-utf32-8.44-3.el9.3.x86_64.rpm 1.4 MB/s | 174 kB 00:00 (50/85): perl-Filter-1.60-4.el9.x86_64.rpm 704 kB/s | 81 kB 00:00 (51/85): perl-encoding-3.00-462.el9.x86_64.rpm 916 kB/s | 62 kB 00:00 (52/85): perl-open-1.12-479.el9.noarch.rpm 476 kB/s | 25 kB 00:00 (53/85): pixman-devel-0.40.0-5.el9.x86_64.rpm 272 kB/s | 17 kB 00:00 (54/85): sysprof-capture-devel-3.40.1-3.el9.x86 797 kB/s | 59 kB 00:00 (55/85): pcre2-devel-10.40-2.el9.x86_64.rpm 1.3 MB/s | 474 kB 00:00 (56/85): wayland-devel-1.19.0-4.el9.x86_64.rpm 1.0 MB/s | 132 kB 00:00 (57/85): xorg-x11-proto-devel-2021.4-2.el9.noar 1.3 MB/s | 262 kB 00:00 (58/85): dbus-daemon-1.12.20-6.el9.x86_64.rpm 1.3 MB/s | 196 kB 00:00 (59/85): fontconfig-2.14.0-1.el9.x86_64.rpm 1.7 MB/s | 274 kB 00:00 (60/85): harfbuzz-icu-2.7.4-8.el9.x86_64.rpm 217 kB/s | 14 kB 00:00 (61/85): fribidi-1.0.10-6.el9.2.x86_64.rpm 700 kB/s | 84 kB 00:00 (62/85): libtiff-4.4.0-2.el9.x86_64.rpm 1.5 MB/s | 195 kB 00:00 (63/85): pcre2-utf32-10.40-2.el9.x86_64.rpm 1.2 MB/s | 205 kB 00:00 (64/85): python3-libselinux-3.4-3.el9.x86_64.rp 1.5 MB/s | 185 kB 00:00 (65/85): pcre2-utf16-10.40-2.el9.x86_64.rpm 995 kB/s | 216 kB 00:00 (66/85): dbus-common-1.12.20-6.el9.noarch.rpm 203 kB/s | 14 kB 00:00 (67/85): dbus-tools-1.12.20-6.el9.x86_64.rpm 856 kB/s | 50 kB 00:00 (68/85): dbus-libs-1.12.20-6.el9.x86_64.rpm 1.3 MB/s | 151 kB 00:00 (69/85): libblkid-2.37.4-9.el9.x86_64.rpm 1.6 MB/s | 107 kB 00:00 (70/85): libfdisk-2.37.4-9.el9.x86_64.rpm 1.6 MB/s | 154 kB 00:00 (71/85): freetype-2.10.4-9.el9.x86_64.rpm 1.5 MB/s | 387 kB 00:00 (72/85): libmount-2.37.4-9.el9.x86_64.rpm 1.3 MB/s | 133 kB 00:00 (73/85): libselinux-3.4-3.el9.x86_64.rpm 820 kB/s | 85 kB 00:00 (74/85): harfbuzz-2.7.4-8.el9.x86_64.rpm 1.4 MB/s | 624 kB 00:00 (75/85): libselinux-utils-3.4-3.el9.x86_64.rpm 1.4 MB/s | 158 kB 00:00 (76/85): libuuid-2.37.4-9.el9.x86_64.rpm 448 kB/s | 27 kB 00:00 (77/85): libsmartcols-2.37.4-9.el9.x86_64.rpm 793 kB/s | 63 kB 00:00 (78/85): libsepol-3.4-1.1.el9.x86_64.rpm 1.6 MB/s | 315 kB 00:00 (79/85): pcre2-syntax-10.40-2.el9.noarch.rpm 1.2 MB/s | 143 kB 00:00 (80/85): pcre2-10.40-2.el9.x86_64.rpm 1.6 MB/s | 236 kB 00:00 (81/85): python3-libxml2-2.9.13-2.el9.x86_64.rp 1.4 MB/s | 226 kB 00:00 (82/85): libxml2-2.9.13-2.el9.x86_64.rpm 1.5 MB/s | 746 kB 00:00 (83/85): util-linux-user-2.37.4-9.el9.x86_64.rp 618 kB/s | 30 kB 00:00 (84/85): util-linux-core-2.37.4-9.el9.x86_64.rp 1.1 MB/s | 434 kB 00:00 (85/85): util-linux-2.37.4-9.el9.x86_64.rpm 1.9 MB/s | 2.2 MB 00:01 -------------------------------------------------------------------------------- Total 2.4 MB/s | 18 MB 00:07 Running transaction check Transaction check succeeded. Running transaction test Transaction test succeeded. Running transaction Preparing : 1/1 Installing : xorg-x11-proto-devel-2021.4-2.el9.noarch 1/120 Upgrading : libuuid-2.37.4-9.el9.x86_64 2/120 Upgrading : libblkid-2.37.4-9.el9.x86_64 3/120 Running scriptlet: libblkid-2.37.4-9.el9.x86_64 3/120 Upgrading : harfbuzz-2.7.4-8.el9.x86_64 4/120 Upgrading : freetype-2.10.4-9.el9.x86_64 5/120 Upgrading : libxml2-2.9.13-2.el9.x86_64 6/120 Upgrading : pcre2-syntax-10.40-2.el9.noarch 7/120 Upgrading : pcre2-10.40-2.el9.x86_64 8/120 Upgrading : libsepol-3.4-1.1.el9.x86_64 9/120 Upgrading : libselinux-3.4-3.el9.x86_64 10/120 Running scriptlet: libselinux-3.4-3.el9.x86_64 10/120 Upgrading : libmount-2.37.4-9.el9.x86_64 11/120 Upgrading : dbus-libs-1:1.12.20-6.el9.x86_64 12/120 Installing : libpng-devel-2:1.6.37-12.el9.x86_64 13/120 Installing : dbus-devel-1:1.12.20-6.el9.x86_64 14/120 Installing : libxml2-devel-2.9.13-2.el9.x86_64 15/120 Upgrading : libsmartcols-2.37.4-9.el9.x86_64 16/120 Installing : libsigc++20-devel-2.10.7-2.el9.x86_64 17/120 Installing : libffi-devel-3.4.2-7.el9.x86_64 18/120 Installing : wayland-devel-1.19.0-4.el9.x86_64 19/120 Upgrading : util-linux-core-2.37.4-9.el9.x86_64 20/120 Running scriptlet: util-linux-core-2.37.4-9.el9.x86_64 20/120 Installing : libxkbcommon-devel-1.0.3-4.el9.x86_64 21/120 Upgrading : dbus-tools-1:1.12.20-6.el9.x86_64 22/120 Installing : libsepol-devel-3.4-1.1.el9.x86_64 23/120 Upgrading : pcre2-utf16-10.40-2.el9.x86_64 24/120 Upgrading : pcre2-utf32-10.40-2.el9.x86_64 25/120 Installing : pcre2-devel-10.40-2.el9.x86_64 26/120 Installing : libselinux-devel-3.4-3.el9.x86_64 27/120 Upgrading : fontconfig-2.14.0-1.el9.x86_64 28/120 Running scriptlet: fontconfig-2.14.0-1.el9.x86_64 28/120 Upgrading : harfbuzz-icu-2.7.4-8.el9.x86_64 29/120 Installing : libblkid-devel-2.37.4-9.el9.x86_64 30/120 Installing : libmount-devel-2.37.4-9.el9.x86_64 31/120 Upgrading : libfdisk-2.37.4-9.el9.x86_64 32/120 Upgrading : util-linux-2.37.4-9.el9.x86_64 33/120 Installing : libXau-devel-1.0.9-8.el9.x86_64 34/120 Installing : libxcb-devel-1.13.1-9.el9.x86_64 35/120 Installing : libX11-devel-1.7.0-7.el9.x86_64 36/120 Installing : libXext-devel-1.3.4-8.el9.x86_64 37/120 Installing : libXfixes-devel-5.0.3-16.el9.x86_64 38/120 Installing : libXrender-devel-0.9.10-16.el9.x86_64 39/120 Installing : libXi-devel-1.7.10-8.el9.x86_64 40/120 Installing : libXtst-devel-1.2.3-16.el9.x86_64 41/120 Installing : libXcursor-devel-1.2.0-7.el9.x86_64 42/120 Installing : libXrandr-devel-1.5.2-8.el9.x86_64 43/120 Installing : libXcomposite-devel-0.4.5-7.el9.x86_64 44/120 Installing : libXdamage-devel-1.1.5-7.el9.x86_64 45/120 Installing : libXinerama-devel-1.1.4-10.el9.x86_64 46/120 Upgrading : dbus-common-1:1.12.20-6.el9.noarch 47/120 Running scriptlet: dbus-common-1:1.12.20-6.el9.noarch 47/120 Upgrading : libtiff-4.4.0-2.el9.x86_64 48/120 Installing : libtiff-devel-4.4.0-2.el9.x86_64 49/120 Upgrading : fribidi-1.0.10-6.el9.2.x86_64 50/120 Installing : fribidi-devel-1.0.10-6.el9.2.x86_64 51/120 Installing : sysprof-capture-devel-3.40.1-3.el9.x86_64 52/120 Installing : pixman-devel-0.40.0-5.el9.x86_64 53/120 Installing : perl-Filter-2:1.60-4.el9.x86_64 54/120 Installing : perl-encoding-4:3.00-462.el9.x86_64 55/120 Installing : perl-open-1.12-479.el9.noarch 56/120 Installing : pcre-utf32-8.44-3.el9.3.x86_64 57/120 Installing : pcre-utf16-8.44-3.el9.3.x86_64 58/120 Installing : pcre-cpp-8.44-3.el9.3.x86_64 59/120 Installing : pcre-devel-8.44-3.el9.3.x86_64 60/120 Installing : glib2-devel-2.68.4-5.el9.x86_64 61/120 Installing : atk-devel-2.36.0-5.el9.x86_64 62/120 Installing : glibmm24-devel-2.66.1-1.el9.x86_64 63/120 Installing : at-spi2-core-devel-2.40.3-1.el9.x86_64 64/120 Installing : at-spi2-atk-devel-2.38.0-4.el9.x86_64 65/120 Installing : gdk-pixbuf2-devel-2.42.6-2.el9.x86_64 66/120 Installing : libicu-devel-67.1-9.el9.x86_64 67/120 Installing : libglvnd-core-devel-1:1.3.4-1.el9.x86_64 68/120 Installing : libglvnd-devel-1:1.3.4-1.el9.x86_64 69/120 Installing : libepoxy-devel-1.5.5-4.el9.x86_64 70/120 Installing : libdatrie-devel-0.2.13-4.el9.x86_64 71/120 Installing : libthai-devel-0.1.28-8.el9.x86_64 72/120 Installing : graphite2-devel-1.3.14-9.el9.x86_64 73/120 Installing : bzip2-devel-1.0.8-8.el9.x86_64 74/120 Installing : brotli-1.0.9-6.el9.x86_64 75/120 Installing : brotli-devel-1.0.9-6.el9.x86_64 76/120 Installing : harfbuzz-devel-2.7.4-8.el9.x86_64 77/120 Installing : freetype-devel-2.10.4-9.el9.x86_64 78/120 Installing : fontconfig-devel-2.14.0-1.el9.x86_64 79/120 Installing : cairo-devel-1.17.4-7.el9.x86_64 80/120 Installing : cairo-gobject-devel-1.17.4-7.el9.x86_64 81/120 Installing : cairomm-devel-1.14.2-10.el9.x86_64 82/120 Installing : libXft-devel-2.3.3-8.el9.x86_64 83/120 Installing : pango-devel-1.48.7-2.el9.x86_64 84/120 Installing : gtk3-devel-3.24.31-2.el9.x86_64 85/120 Installing : pangomm-devel-2.46.1-1.el9.x86_64 86/120 Installing : atkmm-devel-2.28.2-2.el9.x86_64 87/120 Running scriptlet: dbus-daemon-1:1.12.20-6.el9.x86_64 88/120 Upgrading : dbus-daemon-1:1.12.20-6.el9.x86_64 88/120 Running scriptlet: dbus-daemon-1:1.12.20-6.el9.x86_64 88/120 Upgrading : util-linux-user-2.37.4-9.el9.x86_64 89/120 Upgrading : python3-libselinux-3.4-3.el9.x86_64 90/120 Upgrading : libselinux-utils-3.4-3.el9.x86_64 91/120 Upgrading : python3-libxml2-2.9.13-2.el9.x86_64 92/120 Cleanup : python3-libxml2-2.9.13-1.el9_0.1.x86_64 93/120 Running scriptlet: dbus-daemon-1:1.12.20-5.el9.x86_64 94/120 Cleanup : dbus-daemon-1:1.12.20-5.el9.x86_64 94/120 Running scriptlet: dbus-daemon-1:1.12.20-5.el9.x86_64 94/120 Cleanup : libselinux-utils-3.3-2.el9.x86_64 95/120 Cleanup : fontconfig-2.13.94-2.el9.x86_64 96/120 Running scriptlet: fontconfig-2.13.94-2.el9.x86_64 96/120 Cleanup : dbus-tools-1:1.12.20-5.el9.x86_64 97/120 Cleanup : python3-libselinux-3.3-2.el9.x86_64 98/120 Cleanup : util-linux-user-2.37.4-3.el9.x86_64 99/120 Cleanup : util-linux-2.37.4-3.el9.x86_64 100/120 Cleanup : util-linux-core-2.37.4-3.el9.x86_64 101/120 Cleanup : libmount-2.37.4-3.el9.x86_64 102/120 Cleanup : libfdisk-2.37.4-3.el9.x86_64 103/120 Cleanup : libselinux-3.3-2.el9.x86_64 104/120 Cleanup : harfbuzz-icu-2.7.4-5.el9.x86_64 105/120 Cleanup : pcre2-10.37-5.el9_0.x86_64 106/120 Cleanup : libblkid-2.37.4-3.el9.x86_64 107/120 Cleanup : freetype-2.10.4-6.el9.x86_64 108/120 Cleanup : pcre2-utf32-10.37-5.el9_0.x86_64 109/120 Cleanup : pcre2-utf16-10.37-5.el9_0.x86_64 110/120 Cleanup : pcre2-syntax-10.37-5.el9_0.noarch 111/120 Running scriptlet: dbus-common-1:1.12.20-5.el9.noarch 112/120 Cleanup : dbus-common-1:1.12.20-5.el9.noarch 112/120 Running scriptlet: dbus-common-1:1.12.20-5.el9.noarch 112/120 Cleanup : harfbuzz-2.7.4-5.el9.x86_64 113/120 Cleanup : libuuid-2.37.4-3.el9.x86_64 114/120 Cleanup : libsepol-3.3-2.el9.x86_64 115/120 Cleanup : libsmartcols-2.37.4-3.el9.x86_64 116/120 Cleanup : dbus-libs-1:1.12.20-5.el9.x86_64 117/120 Cleanup : libxml2-2.9.13-1.el9_0.1.x86_64 118/120 Cleanup : libtiff-4.2.0-3.el9.x86_64 119/120 Cleanup : fribidi-1.0.10-6.el9.x86_64 120/120 Running scriptlet: fontconfig-2.14.0-1.el9.x86_64 120/120 Running scriptlet: fribidi-1.0.10-6.el9.x86_64 120/120 Regex version mismatch, expected: 10.40 2022-04-14 actual: 10.37 2021-05-26 Regex version mismatch, expected: 10.40 2022-04-14 actual: 10.37 2021-05-26 Regex version mismatch, expected: 10.40 2022-04-14 actual: 10.37 2021-05-26 Regex version mismatch, expected: 10.40 2022-04-14 actual: 10.37 2021-05-26 Verifying : at-spi2-atk-devel-2.38.0-4.el9.x86_64 1/120 Verifying : at-spi2-core-devel-2.40.3-1.el9.x86_64 2/120 Verifying : atk-devel-2.36.0-5.el9.x86_64 3/120 Verifying : brotli-1.0.9-6.el9.x86_64 4/120 Verifying : brotli-devel-1.0.9-6.el9.x86_64 5/120 Verifying : bzip2-devel-1.0.8-8.el9.x86_64 6/120 Verifying : cairo-devel-1.17.4-7.el9.x86_64 7/120 Verifying : cairo-gobject-devel-1.17.4-7.el9.x86_64 8/120 Verifying : dbus-devel-1:1.12.20-6.el9.x86_64 9/120 Verifying : fontconfig-devel-2.14.0-1.el9.x86_64 10/120 Verifying : freetype-devel-2.10.4-9.el9.x86_64 11/120 Verifying : fribidi-devel-1.0.10-6.el9.2.x86_64 12/120 Verifying : glib2-devel-2.68.4-5.el9.x86_64 13/120 Verifying : graphite2-devel-1.3.14-9.el9.x86_64 14/120 Verifying : harfbuzz-devel-2.7.4-8.el9.x86_64 15/120 Verifying : libX11-devel-1.7.0-7.el9.x86_64 16/120 Verifying : libXau-devel-1.0.9-8.el9.x86_64 17/120 Verifying : libXcomposite-devel-0.4.5-7.el9.x86_64 18/120 Verifying : libXcursor-devel-1.2.0-7.el9.x86_64 19/120 Verifying : libXdamage-devel-1.1.5-7.el9.x86_64 20/120 Verifying : libXext-devel-1.3.4-8.el9.x86_64 21/120 Verifying : libXfixes-devel-5.0.3-16.el9.x86_64 22/120 Verifying : libXft-devel-2.3.3-8.el9.x86_64 23/120 Verifying : libXi-devel-1.7.10-8.el9.x86_64 24/120 Verifying : libXinerama-devel-1.1.4-10.el9.x86_64 25/120 Verifying : libXrandr-devel-1.5.2-8.el9.x86_64 26/120 Verifying : libXrender-devel-0.9.10-16.el9.x86_64 27/120 Verifying : libXtst-devel-1.2.3-16.el9.x86_64 28/120 Verifying : libblkid-devel-2.37.4-9.el9.x86_64 29/120 Verifying : libdatrie-devel-0.2.13-4.el9.x86_64 30/120 Verifying : libepoxy-devel-1.5.5-4.el9.x86_64 31/120 Verifying : libffi-devel-3.4.2-7.el9.x86_64 32/120 Verifying : libglvnd-core-devel-1:1.3.4-1.el9.x86_64 33/120 Verifying : libglvnd-devel-1:1.3.4-1.el9.x86_64 34/120 Verifying : libicu-devel-67.1-9.el9.x86_64 35/120 Verifying : libmount-devel-2.37.4-9.el9.x86_64 36/120 Verifying : libpng-devel-2:1.6.37-12.el9.x86_64 37/120 Verifying : libselinux-devel-3.4-3.el9.x86_64 38/120 Verifying : libsepol-devel-3.4-1.1.el9.x86_64 39/120 Verifying : libthai-devel-0.1.28-8.el9.x86_64 40/120 Verifying : libtiff-devel-4.4.0-2.el9.x86_64 41/120 Verifying : libxcb-devel-1.13.1-9.el9.x86_64 42/120 Verifying : libxkbcommon-devel-1.0.3-4.el9.x86_64 43/120 Verifying : libxml2-devel-2.9.13-2.el9.x86_64 44/120 Verifying : pango-devel-1.48.7-2.el9.x86_64 45/120 Verifying : pcre-cpp-8.44-3.el9.3.x86_64 46/120 Verifying : pcre-devel-8.44-3.el9.3.x86_64 47/120 Verifying : pcre-utf16-8.44-3.el9.3.x86_64 48/120 Verifying : pcre-utf32-8.44-3.el9.3.x86_64 49/120 Verifying : pcre2-devel-10.40-2.el9.x86_64 50/120 Verifying : perl-Filter-2:1.60-4.el9.x86_64 51/120 Verifying : perl-encoding-4:3.00-462.el9.x86_64 52/120 Verifying : perl-open-1.12-479.el9.noarch 53/120 Verifying : pixman-devel-0.40.0-5.el9.x86_64 54/120 Verifying : sysprof-capture-devel-3.40.1-3.el9.x86_64 55/120 Verifying : wayland-devel-1.19.0-4.el9.x86_64 56/120 Verifying : xorg-x11-proto-devel-2021.4-2.el9.noarch 57/120 Verifying : atkmm-devel-2.28.2-2.el9.x86_64 58/120 Verifying : cairomm-devel-1.14.2-10.el9.x86_64 59/120 Verifying : gdk-pixbuf2-devel-2.42.6-2.el9.x86_64 60/120 Verifying : glibmm24-devel-2.66.1-1.el9.x86_64 61/120 Verifying : gtk3-devel-3.24.31-2.el9.x86_64 62/120 Verifying : libsigc++20-devel-2.10.7-2.el9.x86_64 63/120 Verifying : pangomm-devel-2.46.1-1.el9.x86_64 64/120 Verifying : dbus-daemon-1:1.12.20-6.el9.x86_64 65/120 Verifying : dbus-daemon-1:1.12.20-5.el9.x86_64 66/120 Verifying : fontconfig-2.14.0-1.el9.x86_64 67/120 Verifying : fontconfig-2.13.94-2.el9.x86_64 68/120 Verifying : fribidi-1.0.10-6.el9.2.x86_64 69/120 Verifying : fribidi-1.0.10-6.el9.x86_64 70/120 Verifying : harfbuzz-icu-2.7.4-8.el9.x86_64 71/120 Verifying : harfbuzz-icu-2.7.4-5.el9.x86_64 72/120 Verifying : libtiff-4.4.0-2.el9.x86_64 73/120 Verifying : libtiff-4.2.0-3.el9.x86_64 74/120 Verifying : pcre2-utf16-10.40-2.el9.x86_64 75/120 Verifying : pcre2-utf16-10.37-5.el9_0.x86_64 76/120 Verifying : pcre2-utf32-10.40-2.el9.x86_64 77/120 Verifying : pcre2-utf32-10.37-5.el9_0.x86_64 78/120 Verifying : python3-libselinux-3.4-3.el9.x86_64 79/120 Verifying : python3-libselinux-3.3-2.el9.x86_64 80/120 Verifying : dbus-common-1:1.12.20-6.el9.noarch 81/120 Verifying : dbus-common-1:1.12.20-5.el9.noarch 82/120 Verifying : dbus-libs-1:1.12.20-6.el9.x86_64 83/120 Verifying : dbus-libs-1:1.12.20-5.el9.x86_64 84/120 Verifying : dbus-tools-1:1.12.20-6.el9.x86_64 85/120 Verifying : dbus-tools-1:1.12.20-5.el9.x86_64 86/120 Verifying : freetype-2.10.4-9.el9.x86_64 87/120 Verifying : freetype-2.10.4-6.el9.x86_64 88/120 Verifying : harfbuzz-2.7.4-8.el9.x86_64 89/120 Verifying : harfbuzz-2.7.4-5.el9.x86_64 90/120 Verifying : libblkid-2.37.4-9.el9.x86_64 91/120 Verifying : libblkid-2.37.4-3.el9.x86_64 92/120 Verifying : libfdisk-2.37.4-9.el9.x86_64 93/120 Verifying : libfdisk-2.37.4-3.el9.x86_64 94/120 Verifying : libmount-2.37.4-9.el9.x86_64 95/120 Verifying : libmount-2.37.4-3.el9.x86_64 96/120 Verifying : libselinux-3.4-3.el9.x86_64 97/120 Verifying : libselinux-3.3-2.el9.x86_64 98/120 Verifying : libselinux-utils-3.4-3.el9.x86_64 99/120 Verifying : libselinux-utils-3.3-2.el9.x86_64 100/120 Verifying : libsepol-3.4-1.1.el9.x86_64 101/120 Verifying : libsepol-3.3-2.el9.x86_64 102/120 Verifying : libsmartcols-2.37.4-9.el9.x86_64 103/120 Verifying : libsmartcols-2.37.4-3.el9.x86_64 104/120 Verifying : libuuid-2.37.4-9.el9.x86_64 105/120 Verifying : libuuid-2.37.4-3.el9.x86_64 106/120 Verifying : libxml2-2.9.13-2.el9.x86_64 107/120 Verifying : libxml2-2.9.13-1.el9_0.1.x86_64 108/120 Verifying : pcre2-10.40-2.el9.x86_64 109/120 Verifying : pcre2-10.37-5.el9_0.x86_64 110/120 Verifying : pcre2-syntax-10.40-2.el9.noarch 111/120 Verifying : pcre2-syntax-10.37-5.el9_0.noarch 112/120 Verifying : python3-libxml2-2.9.13-2.el9.x86_64 113/120 Verifying : python3-libxml2-2.9.13-1.el9_0.1.x86_64 114/120 Verifying : util-linux-2.37.4-9.el9.x86_64 115/120 Verifying : util-linux-2.37.4-3.el9.x86_64 116/120 Verifying : util-linux-core-2.37.4-9.el9.x86_64 117/120 Verifying : util-linux-core-2.37.4-3.el9.x86_64 118/120 Verifying : util-linux-user-2.37.4-9.el9.x86_64 119/120 Verifying : util-linux-user-2.37.4-3.el9.x86_64 120/120 Upgraded: dbus-common-1:1.12.20-6.el9.noarch dbus-daemon-1:1.12.20-6.el9.x86_64 dbus-libs-1:1.12.20-6.el9.x86_64 dbus-tools-1:1.12.20-6.el9.x86_64 fontconfig-2.14.0-1.el9.x86_64 freetype-2.10.4-9.el9.x86_64 fribidi-1.0.10-6.el9.2.x86_64 harfbuzz-2.7.4-8.el9.x86_64 harfbuzz-icu-2.7.4-8.el9.x86_64 libblkid-2.37.4-9.el9.x86_64 libfdisk-2.37.4-9.el9.x86_64 libmount-2.37.4-9.el9.x86_64 libselinux-3.4-3.el9.x86_64 libselinux-utils-3.4-3.el9.x86_64 libsepol-3.4-1.1.el9.x86_64 libsmartcols-2.37.4-9.el9.x86_64 libtiff-4.4.0-2.el9.x86_64 libuuid-2.37.4-9.el9.x86_64 libxml2-2.9.13-2.el9.x86_64 pcre2-10.40-2.el9.x86_64 pcre2-syntax-10.40-2.el9.noarch pcre2-utf16-10.40-2.el9.x86_64 pcre2-utf32-10.40-2.el9.x86_64 python3-libselinux-3.4-3.el9.x86_64 python3-libxml2-2.9.13-2.el9.x86_64 util-linux-2.37.4-9.el9.x86_64 util-linux-core-2.37.4-9.el9.x86_64 util-linux-user-2.37.4-9.el9.x86_64 Installed: at-spi2-atk-devel-2.38.0-4.el9.x86_64 at-spi2-core-devel-2.40.3-1.el9.x86_64 atk-devel-2.36.0-5.el9.x86_64 atkmm-devel-2.28.2-2.el9.x86_64 brotli-1.0.9-6.el9.x86_64 brotli-devel-1.0.9-6.el9.x86_64 bzip2-devel-1.0.8-8.el9.x86_64 cairo-devel-1.17.4-7.el9.x86_64 cairo-gobject-devel-1.17.4-7.el9.x86_64 cairomm-devel-1.14.2-10.el9.x86_64 dbus-devel-1:1.12.20-6.el9.x86_64 fontconfig-devel-2.14.0-1.el9.x86_64 freetype-devel-2.10.4-9.el9.x86_64 fribidi-devel-1.0.10-6.el9.2.x86_64 gdk-pixbuf2-devel-2.42.6-2.el9.x86_64 glib2-devel-2.68.4-5.el9.x86_64 glibmm24-devel-2.66.1-1.el9.x86_64 graphite2-devel-1.3.14-9.el9.x86_64 gtk3-devel-3.24.31-2.el9.x86_64 harfbuzz-devel-2.7.4-8.el9.x86_64 libX11-devel-1.7.0-7.el9.x86_64 libXau-devel-1.0.9-8.el9.x86_64 libXcomposite-devel-0.4.5-7.el9.x86_64 libXcursor-devel-1.2.0-7.el9.x86_64 libXdamage-devel-1.1.5-7.el9.x86_64 libXext-devel-1.3.4-8.el9.x86_64 libXfixes-devel-5.0.3-16.el9.x86_64 libXft-devel-2.3.3-8.el9.x86_64 libXi-devel-1.7.10-8.el9.x86_64 libXinerama-devel-1.1.4-10.el9.x86_64 libXrandr-devel-1.5.2-8.el9.x86_64 libXrender-devel-0.9.10-16.el9.x86_64 libXtst-devel-1.2.3-16.el9.x86_64 libblkid-devel-2.37.4-9.el9.x86_64 libdatrie-devel-0.2.13-4.el9.x86_64 libepoxy-devel-1.5.5-4.el9.x86_64 libffi-devel-3.4.2-7.el9.x86_64 libglvnd-core-devel-1:1.3.4-1.el9.x86_64 libglvnd-devel-1:1.3.4-1.el9.x86_64 libicu-devel-67.1-9.el9.x86_64 libmount-devel-2.37.4-9.el9.x86_64 libpng-devel-2:1.6.37-12.el9.x86_64 libselinux-devel-3.4-3.el9.x86_64 libsepol-devel-3.4-1.1.el9.x86_64 libsigc++20-devel-2.10.7-2.el9.x86_64 libthai-devel-0.1.28-8.el9.x86_64 libtiff-devel-4.4.0-2.el9.x86_64 libxcb-devel-1.13.1-9.el9.x86_64 libxkbcommon-devel-1.0.3-4.el9.x86_64 libxml2-devel-2.9.13-2.el9.x86_64 pango-devel-1.48.7-2.el9.x86_64 pangomm-devel-2.46.1-1.el9.x86_64 pcre-cpp-8.44-3.el9.3.x86_64 pcre-devel-8.44-3.el9.3.x86_64 pcre-utf16-8.44-3.el9.3.x86_64 pcre-utf32-8.44-3.el9.3.x86_64 pcre2-devel-10.40-2.el9.x86_64 perl-Filter-2:1.60-4.el9.x86_64 perl-encoding-4:3.00-462.el9.x86_64 perl-open-1.12-479.el9.noarch pixman-devel-0.40.0-5.el9.x86_64 sysprof-capture-devel-3.40.1-3.el9.x86_64 wayland-devel-1.19.0-4.el9.x86_64 xorg-x11-proto-devel-2021.4-2.el9.noarch Complete!
Now return to your $HOME/Downloads directory and run the following command. You’ll notice that it installs and upgrades many more packages than you might expect.
sudo dnf install -y gtkmm30-devel-3.24.5-1.el9.x86_64.rpm
The log file for this is:
Display detailed console log →
Last metadata expiration check: 1:22:32 ago on Sun 20 Nov 2022 12:52:28 AM EST.
Dependencies resolved.
================================================================================
 Package             Architecture Version              Repository          Size
================================================================================
Installing:
 gtkmm30-devel       x86_64       3.24.5-1.el9         @commandline       605 k

Transaction Summary
================================================================================
Install  1 Package

Total size: 605 k
Installed size: 4.7 M
Downloading Packages:
Running transaction check
Transaction check succeeded.
Running transaction test
Transaction test succeeded.
Running transaction
Regex version mismatch, expected: 10.40 2022-04-14 actual: 10.37 2021-05-26
Regex version mismatch, expected: 10.40 2022-04-14 actual: 10.37 2021-05-26
  Preparing        :                                                        1/1
  Installing       : gtkmm30-devel-3.24.5-1.el9.x86_64                      1/1
  Running scriptlet: gtkmm30-devel-3.24.5-1.el9.x86_64                      1/1
  Verifying        : gtkmm30-devel-3.24.5-1.el9.x86_64                      1/1

Installed:
  gtkmm30-devel-3.24.5-1.el9.x86_64

Complete!
All that done and you’ve only got the first of four dependencies resovled.
- Next, start with the libzip-devel package, which has a couple dependencies. Assuming you’re still in your $HOME/Downloads directory, you can run the following command to get the libzip-devel and its prerequisite packages for AlmaLinux 9:
wget https://repo.almalinux.org/almalinux/9/CRB/x86_64/os/Packages/libzip-devel-1.7.3-7.el9.x86_64.rpm
wget https://repo.almalinux.org/almalinux/9/AppStream/x86_64/os/Packages/cmake-filesystem-3.20.2-7.el9.x86_64.rpm
wget https://repo.almalinux.org/almalinux/9/AppStream/x86_64/os/Packages/libzip-1.7.3-7.el9.x86_64.rpm
You can run the prerequisites with the following command:
sudo dnf install -y cmake*.rpm libzip-1.7.3*.rpm
Now, you can run the libzip-devel package with this syntax:
sudo dnf install -y libzip-devel*.rpm
Having resolved the two dependencies, you can install the compression development kit. This completes the second step.
-
Next, you need to apply the proj_devel package for AlmaLinux 9:
wget https://download-ib01.fedoraproject.org/pub/epel/9/Everything/x86_64/Packages/p/proj-devel-8.2.0-1.el9.x86_64.rpm
Now, you can run the proj-devel package with this syntax:
sudo dnf install -y proj-devel-8.2.0-1.el9.x86_64.rpm
-
Next, you need to apply the swig packages for AlmaLinux 9:
wget https://repo.almalinux.org/almalinux/9/CRB/x86_64/os/Packages/swig-4.0.2-8.el9.x86_64.rpm
wget https://repo.almalinux.org/almalinux/9/CRB/x86_64/os/Packages/swig-doc-4.0.2-8.el9.noarch.rpm
wget https://repo.almalinux.org/almalinux/9/CRB/x86_64/os/Packages/swig-gdb-4.0.2-8.el9.x86_64.rpm
sudo dnf install -y swig*.rpm
-
Next, you need to apply the mysql-community-workbench packages for AlmaLinux 9. The download instructions where provided above. You apply the packages with the following command.
sudo dnf install -y mysql-workbench-community-8.0.31-1.el9.x86_64.rpm
Display detailed console log →
Last metadata expiration check: 1:06:04 ago on Sun 20 Nov 2022 03:28:30 PM EST.
Dependencies resolved.
================================================================================
 Package                      Arch      Version           Repository       Size
================================================================================
Installing:
 mysql-workbench-community    x86_64    8.0.31-1.el9      @commandline     39 M
Upgrading:
 proj                         x86_64    8.2.0-1.el9       epel            2.5 M

Transaction Summary
================================================================================
Install  1 Package
Upgrade  1 Package

Total size: 41 M
Total download size: 2.5 M
Downloading Packages:
proj-8.2.0-1.el9.x86_64.rpm                     388 kB/s | 2.5 MB     00:06
--------------------------------------------------------------------------------
Total                                           354 kB/s | 2.5 MB     00:07
Extra Packages for Enterprise Linux 9 - x86_64  1.6 MB/s | 1.6 kB     00:00
Importing GPG key 0x3228467C:
 Userid     : "Fedora (epel9) <epel@fedoraproject.org>"
 Fingerprint: FF8A D134 4597 106E CE81 3B91 8A38 72BF 3228 467C
 From       : /etc/pki/rpm-gpg/RPM-GPG-KEY-EPEL-9
Key imported successfully
Running transaction check
Transaction check succeeded.
Running transaction test
Transaction test succeeded.
Running transaction
Regex version mismatch, expected: 10.40 2022-04-14 actual: 10.37 2021-05-26
Regex version mismatch, expected: 10.40 2022-04-14 actual: 10.37 2021-05-26
  Preparing        :                                                        1/1
  Upgrading        : proj-8.2.0-1.el9.x86_64                                1/3
  Installing       : mysql-workbench-community-8.0.31-1.el9.x86_64          2/3
  Running scriptlet: mysql-workbench-community-8.0.31-1.el9.x86_64          2/3
  Cleanup          : proj-4.8.0-4.el7.x86_64                                3/3
  Running scriptlet: proj-4.8.0-4.el7.x86_64                                3/3
  Verifying        : mysql-workbench-community-8.0.31-1.el9.x86_64          1/3
  Verifying        : proj-8.2.0-1.el9.x86_64                                2/3
  Verifying        : proj-4.8.0-4.el7.x86_64                                3/3

Upgraded:
  proj-8.2.0-1.el9.x86_64
Installed:
  mysql-workbench-community-8.0.31-1.el9.x86_64

Complete!
After applying the dependent and mysql-community-workbench packages, you can launch MySQL Workbench by clicking the Activities symbol in the upper left hand corner. That displays the nine-dots for Show Applications icon. Click the Show Applications icon and choose the MySQL Workbench icon to launch MySQL Workbench.
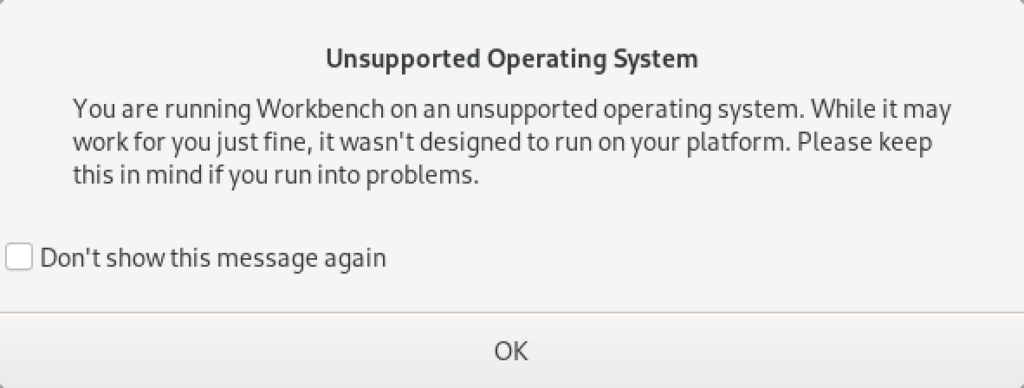
You’ll be prompted with the following dialog. Just click Don’t show this message again checkbox and the OK button to launch MySQL Workbench.
As always, I hope this helps those looking to solve a real problem.
AlmaLinux LAMP

After installing and configuring MySQL 8.0.30, I installed the Apache Web Server, PHP and the MySQLi packages. Here are the step-by-step instructions after installing and configuring the MySQL Server and provisioning a student user and the sakila and studentdb databases (blog for those steps). After installing the major components, I completed the HTTPS configuration steps for Apache 2.
The installation steps are:
- Install the Apache packages as the sudoer user with this command:
sudo dnf install -y httpd
- Enable Apache as the sudoer user with this command:
chkconfig httpd on
This returns the following completion message:
Note: Forwarding request to 'systemctl enable httpd.service'.
Created symlink /etc/systemd/system/multi-user.target.wants/httpd.service → /usr/lib/systemd/system/httpd.service.
A quick Linux syntax note in the event you want to confirm the link or link target later. You can use the following syntax as a sudoer user to find the link:
ls `find /etc -type l | grep httpd.service 2>/dev/null`
and the following syntax as a sudoer user to find the link’s target:
readlink `find /etc -type l | grep httpd.service 2>/dev/null`
- You still need to start the Apache service unless you reboot the operating system as the sudoer user with this command:
apachectl start - At this point, you need to check the firewall settings because Apache can’t even read localhost at this point. If you’re new to these firewall commands, you should consider reviewing Korbin Brown’s tutorial. As the sudoer user check the Apache available services with this command:
firewall-cmd --zone=public --list-services
It should return:
cockpit dhcpv6-client sshAdd the following services and ports with these commands:
firewall-cmd --zone=public --add-port 80/tcp --permanent
firewall-cmd --zone=public --add-port 443/tcp --permanent
firewall-cmd --zone=public --add-port 8080/tcp --permanent
firewall-cmd --zone=public --add-service=http --permanent
firewall-cmd --zone=public --add-service=https --permanent
Check the open ports with the following command:
firewall-cmd --zone=public --list-ports
It should return:
80/tcp 443/tcp 8080/tcp
Check the open services with the following command:
firewall-cmd --zone=public --list-services
It should return:
cockpit dhcpv6-client http https ssh - Create the hello.htm file in the /var/www/html directory as the root user:
Restart the Apache service as the sudoer user:
apache restart
<html>
<body>
Hello World!
</body>
</html>
Then, you can launch the Firefox browser and type the following:
localhost/hello.htmIt should print “Hello World!” in the browser.
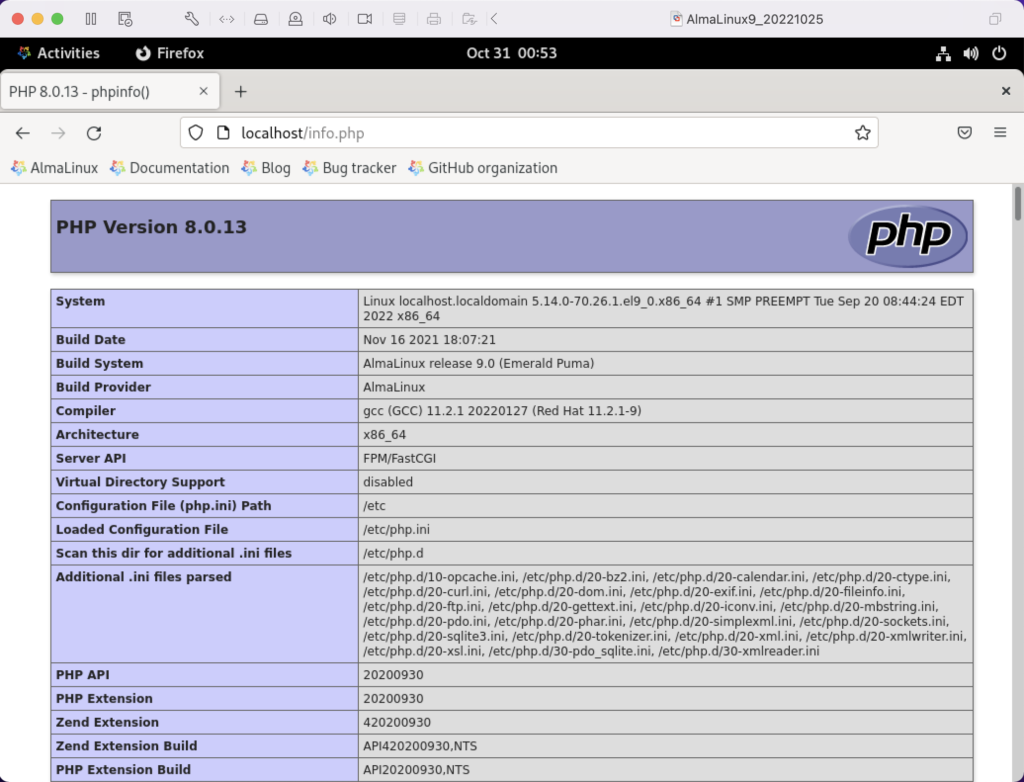
- Install the php package as the sudoer user with the following command:
sudo dnf install -y php
Create the info.php file in the /var/www/html directory as the root user:
<?php
  phpinfo();
?>
apache restart
Then, you can launch the Firefox browser and type the following:
localhost/info.php
It should return the following in the browser.
- Install the php_mysqli package as the sudoer user with the following command:
dnf install -y php-mysqli
Create the mysqli_check.php file in the /var/www/html directory as the root user:
<html>
<header>
<title>Static Query Object Sample</title>
</header>
<body>
<?php
  if (!function_exists('mysqli_init') && !extension_loaded('mysqli')) {
    print 'mysqli not installed.'; }
  else {
    print 'mysqli installed.'; }
  if (!function_exists('pdo_init') && !extension_loaded('pdo')) {
    print '<p>pdo not installed.</p>'; }
  else {
    print '<p>pdo installed.</p>'; }
?>
</script>
</body>
</html>
apache restart
Then, you can launch the Firefox browser and type the following:
localhost/mysqli_check.php
It should print the following in the browser.
mysqli installed.

pdo installed.
- Check if the mod_ssl module is installed. You can use the following command::
rpm -qa | grep mod_ssl
Assuming it’s not installed, you install it like this:
dnf install -y mod_ssl
Recheck after installing mod_ssl with the following command::
rpm -qa | grep mod_ssl
It should print:
mod_ssl-2.4.51-7.el9_0.x86_64
- AlmaLinux and Apache require you to resolve the ServerName values and the public and private keys. Run this command on AlmaLinux to begin verifying and configuring the ServerName values and the public and private keys:
httpd -M | grep ssl
Assuming a new installation consistent with were MySQL and Apache were just configured, you should get the following message:
AH00558: httpd: Could not reliably determine the server's fully qualified domain name, using localhost.localdomain. Set the 'ServerName' directive globally to suppress this message
 ssl_module (shared)
Recheck the failure for more detail with this command:
sudo systemctl status httpd.service -l --no-pager
It should print:
● httpd.service - The Apache HTTP Server Loaded: loaded (/usr/lib/systemd/system/httpd.service; enabled; vendor preset: disabled) Drop-In: /usr/lib/systemd/system/httpd.service.d └─php-fpm.conf Active: active (running) since Sun 2022-11-13 22:39:07 EST; 1h 37min ago Docs: man:httpd.service(8) Main PID: 1351 (httpd) Status: "Total requests: 0; Idle/Busy workers 100/0;Requests/sec: 0; Bytes served/sec: 0 B/sec" Tasks: 213 (limit: 23280) Memory: 43.1M CPU: 2.733s CGroup: /system.slice/httpd.service ├─1351 /usr/sbin/httpd -DFOREGROUND ├─1443 /usr/sbin/httpd -DFOREGROUND ├─1452 /usr/sbin/httpd -DFOREGROUND ├─1456 /usr/sbin/httpd -DFOREGROUND └─1459 /usr/sbin/httpd -DFOREGROUND Nov 13 22:39:06 localhost.localdomain systemd[1]: Starting The Apache HTTP Server... Nov 13 22:39:07 localhost.localdomain httpd[1351]: AH00558: httpd: Could not reliably determine the server's fully qualified domain name, using localhost.localdomain. Set the 'ServerName' directive globally to suppress this message Nov 13 22:39:07 localhost.localdomain systemd[1]: Started The Apache HTTP Server. Nov 13 22:39:07 localhost.localdomain httpd[1351]: Server configured, listening on: port 80It takes the next set of steps to fix the ServerName values.
- Generically, on Linux you need to find the files to modify. You can use the following command from within the /etc directory to find the configuration files in the /etc directory that include ServerName in them. Their values will be proceeded by a # symbol because they’re comments by default.
find /etc -type f | xargs grep -i ServerName
It should return the following:
./httpd/conf.d/ssl.conf:#ServerName www.example.com:443
./httpd/conf/httpd.conf:# ServerName gives the name and port that the server uses to identify itself.
./httpd/conf/httpd.conf:#ServerName www.example.com:80
./dnsmasq.conf:# tftp_servername (the third option to dhcp-boot) and in that
- Add the following line to the ssl.conf file as the root user:
ServerName localhost:443 - Add the following line to the httpd.conf file as the root user:
ServerName localhost:443 - After adding the two values, restart Apache with the following command:
sudo apachectl restart
- Rerun the systemctl command to get the status of the httpd service with this command:
sudo systemctl status httpd.service -l --no-pager
It should print:
● httpd.service - The Apache HTTP Server
     Loaded: loaded (/usr/lib/systemd/system/httpd.service; enabled; vendor preset: disabled)
    Drop-In: /usr/lib/systemd/system/httpd.service.d
             └─php-fpm.conf
     Active: active (running) since Mon 2022-11-14 00:37:03 EST; 3min 23s ago
       Docs: man:httpd.service(8)
   Main PID: 53596 (httpd)
     Status: "Total requests: 0; Idle/Busy workers 100/0;Requests/sec: 0; Bytes served/sec:   0 B/sec"
      Tasks: 213 (limit: 23280)
     Memory: 34.0M
        CPU: 183ms
     CGroup: /system.slice/httpd.service
             ├─53596 /usr/sbin/httpd -DFOREGROUND
             ├─53597 /usr/sbin/httpd -DFOREGROUND
             ├─53598 /usr/sbin/httpd -DFOREGROUND
             ├─53599 /usr/sbin/httpd -DFOREGROUND
             └─53600 /usr/sbin/httpd -DFOREGROUND

Nov 14 00:37:03 localhost.localdomain systemd[1]: Starting The Apache HTTP Server...
Nov 14 00:37:03 localhost.localdomain systemd[1]: Started The Apache HTTP Server.
Nov 14 00:37:03 localhost.localdomain httpd[53596]: Server configured, listening on: port 443, port 80
- Generically, on Linux you need to find the files to modify. You can use the following command from within the /etc directory to find the configuration files in the /etc directory that include ServerName in them. Their values will be proceeded by a # symbol because they’re comments by default.
- Your next step requires setting up an SSL Certificate. Consistent with the design to build a standalone test system that uses a DHCP assigned IP address to resolve a localhost server name, you require the following two tasks to create an openssl self-signed certificate.
- On the new instance, you create a private subdirectory with this command:
sudo mkdir /etc/ssl/private
- Then, you can build a self-signed certificate with this command:
sudo openssl req -x509 -nodes -days 365 -newkey rsa:2048 -keyout /etc/ssl/private/apache-selfsigned.key -out /etc/ssl/certs/apache-selfsigned.crt
The openssl command will prompt you for these values to create a private key:
You are about to be asked to enter information that will be incorporated
into your certificate request.
What you are about to enter is what is called a Distinguished Name or a DN.
There are quite a few fields but you can leave some blank
For some fields there will be a default value,
If you enter '.', the field will be left blank.
-----
Country Name (2 letter code) [XX]:
State or Province Name (full name) []:
Locality Name (eg, city) [Default City]:
Organization Name (eg, company) [Default Company Ltd]:
Organizational Unit Name (eg, section) []:
Common Name (eg, your name or your server's hostname) []:
Email Address []:
- On the new instance, you create a private subdirectory with this command:
- Your last step requires three tasks to configure Apache to use SSL.
- You need to create the following sites-available directory with the following command as the root user:
mkdir /etc/httpd/sites-available
- Add the following localhost.conf/etc/httpd/sites-available directory:
<VirtualHost *:443>
   ServerName localhost
   DocumentRoot /var/www/html

   SSLEngine on
   SSLCertificateFile /etc/ssl/certs/localhost.crt
   SSLCertificateKeyFile /etc/ssl/private/apache-selfsigned.key
</VirtualHost>
- Restart Apache with the following command:
sudo apachectl restart
- You need to create the following sites-available directory with the following command as the root user:
- After configuring everything, let’s test our self-signed HTTPS skunkworks. Launch the default Firefox browser and enter the following URL, which uses the mysql_check.php file from step #7:
https://localhost/mysqli_check.php
It will raise a warning message about a potential security risk, which is caused by our self-signed certificate. Click the Advanced… button and will see the option to Accept the Risk and Continue. If you want to use the self-signed and contained AlmaLinux LAMP stack for developer testing, accept the risk.

Having assumed the risk, the confirmation of the configuration will be displayed as follows:

As always, I hope this helps those looking to install MySQL, PHP, on AlmaLinux.
AlmaLinux MySQL+Python
After installing and configuring MySQL 8.0.30, I installed the Python connector. During that process on AlmaLinux, there were several changes since I last installed the Python’s mysql module. Here are the step-by-step instructions after installing and configuring MySQL Server (blog for those steps).
Using the MySQL Connector/Python X DevAPI Reference, you must install the pip utility before you install the library. You install the pip library as a sudoer user with the following command:
sudo yum install -y pip |
Then, using the pip utility as a sudoer user install the mysql-connector-python module with the following command:
sudo pip install mysql-connector-python |
Please note that this type of library installation can cause problems when you maintain multiple testing environments. If you plan to maintain multiple testing environments, please install this library in a virtual environment.
You create a bare-bones Python connection test program, like connect.py below:
# Import the library. import mysql.connector from mysql.connector import errorcode try: # Open connection. cnx = mysql.connector.connect(user='student', password='student', host='127.0.0.1', database='studentdb') # Print the value. print("Database connection resolved.") # Handle exception and close connection. except mysql.connector.Error as e: if e.errno == errorcode.ER_ACCESS_DENIED_ERROR: print("Something is wrong with your user name or password") elif e.errno == errorcode.ER_BAD_DB_ERROR: print("Database does not exist") else: print(e) # Close the connection when the try block completes. else: cnx.close() |
You test the connect.py program with this command:
python connect.py |
It’ll return the following provided you provisioned the student user and studentdb database:
Database connection resolved. |
If you’d like to run it without calling the python executable, you can add the following as the first line:
#/usr/bin/python |
and, change the default file permissions from
-rw-rw-r--. 1 student student 717 Oct 30 13:57 connect.py |
with the chmod command to
-rwxr-xr-x. 1 student student 717 Oct 30 13:57 connect.py |
These instructions should set you up to develop Python code against your AlmaLinux MySQL studentdb database. You use this syntax, assuming a default $PATH environment variable that excludes the present working directory.
./connect.py |
As always, I hope this helps those trying to get a complete solution.
AlmaLinux Installation
These are the instructions for installing AlmaLinux 9 on MacOS Intel with VMware. It’s broken into three parts: Configuration, Installation, and Setup.
You should download the current or desired older version of AlmaLinux from the website. It’s a good idea to install it in a source directory or folder.
You need to launch VMware, click the File menu option and then the New menu option before you can configure, install, and setup AlmaLinux. It will show you the following dialog.
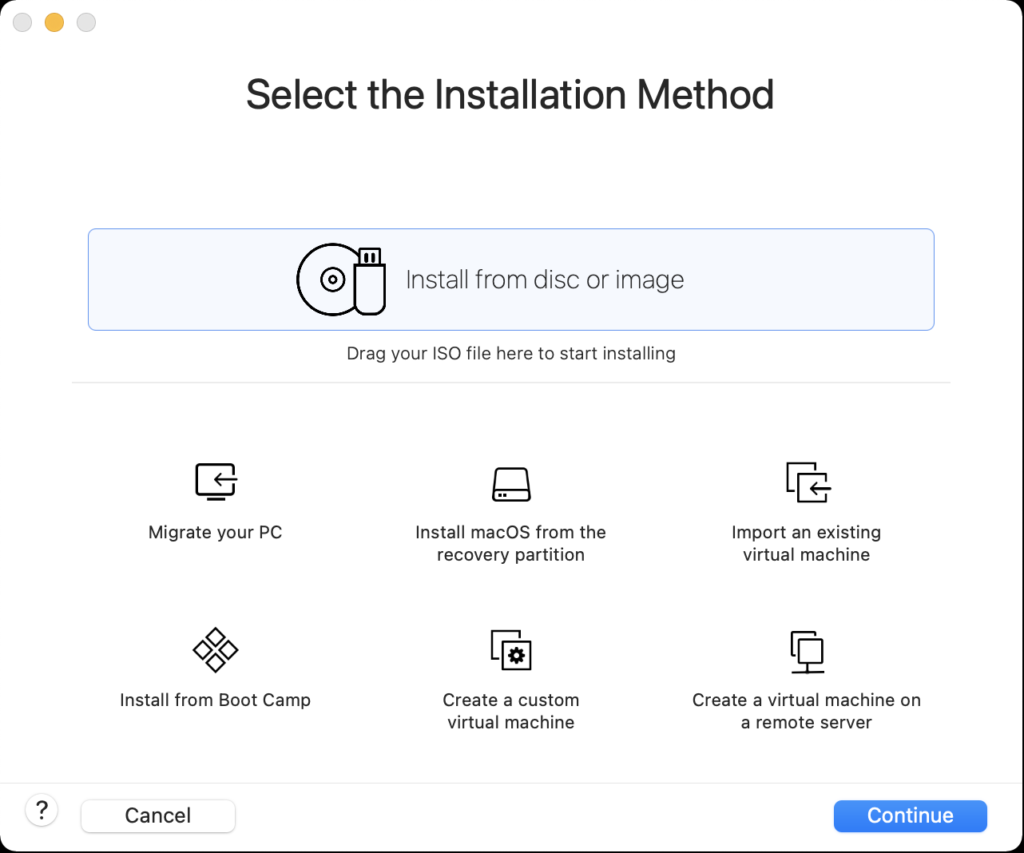
Use the Finder to drag the AlmaLinux-9-latest-x86_64-dvd.iso file on to the Install from disc or image to begin the configuration process.
Configuration

- The first thing you need to do is configure the VMware container. You click on the wrench icon in the menu bar that lets you edit the hardware settings for this virtual machine. This opens the general settings dialog.
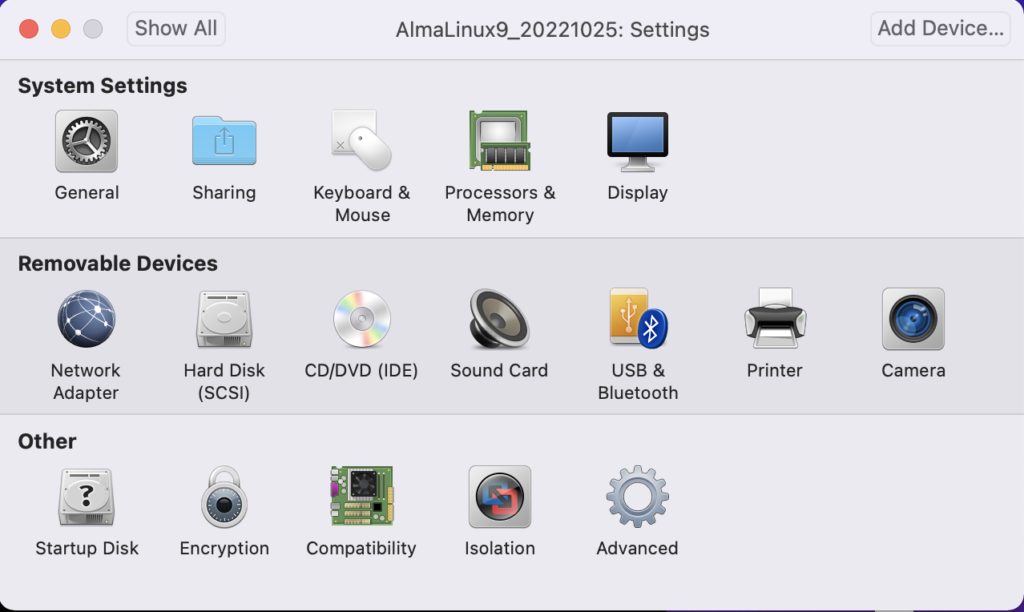
- The General System Settings dialog lets you will configure the isolation properties for “drag and drop” and “copy and paste”, and define the network adapter.
![]()
- Click on the Isolation menu option from the General System Settings dialog, and enable “Drag adn Drop” and “Copy and Paste” checkboxes. Then, return to the General System Settings dialog/li>
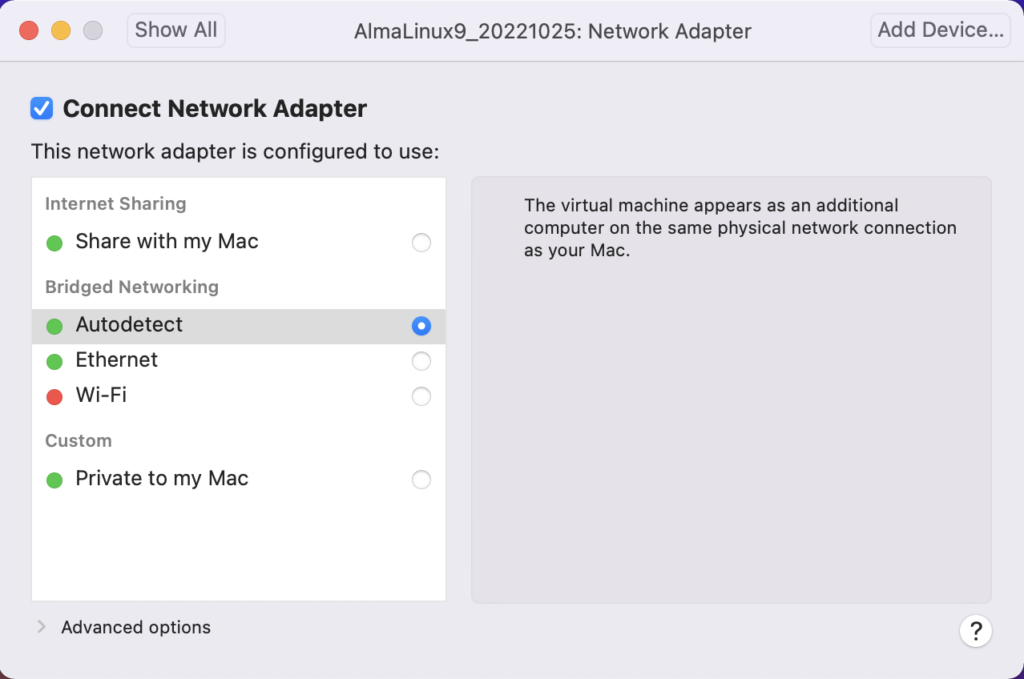
- Click on the Network Adapter menu option from the General System Settings dialog, and click the “Autodetect” checkbox. Then, return to the General System Settings dialog.
Installation
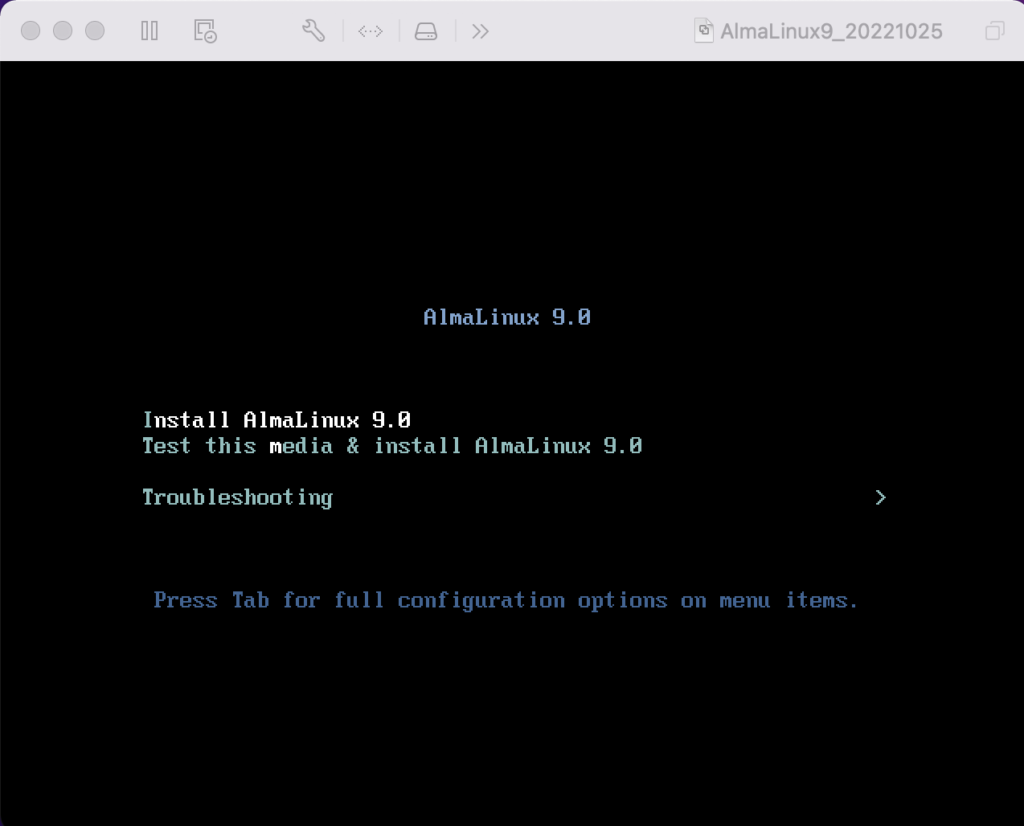
- The first the install asks you to do is type an I for install or T for test. Generally, you can skip the test if this is a copied file rather than DVD.
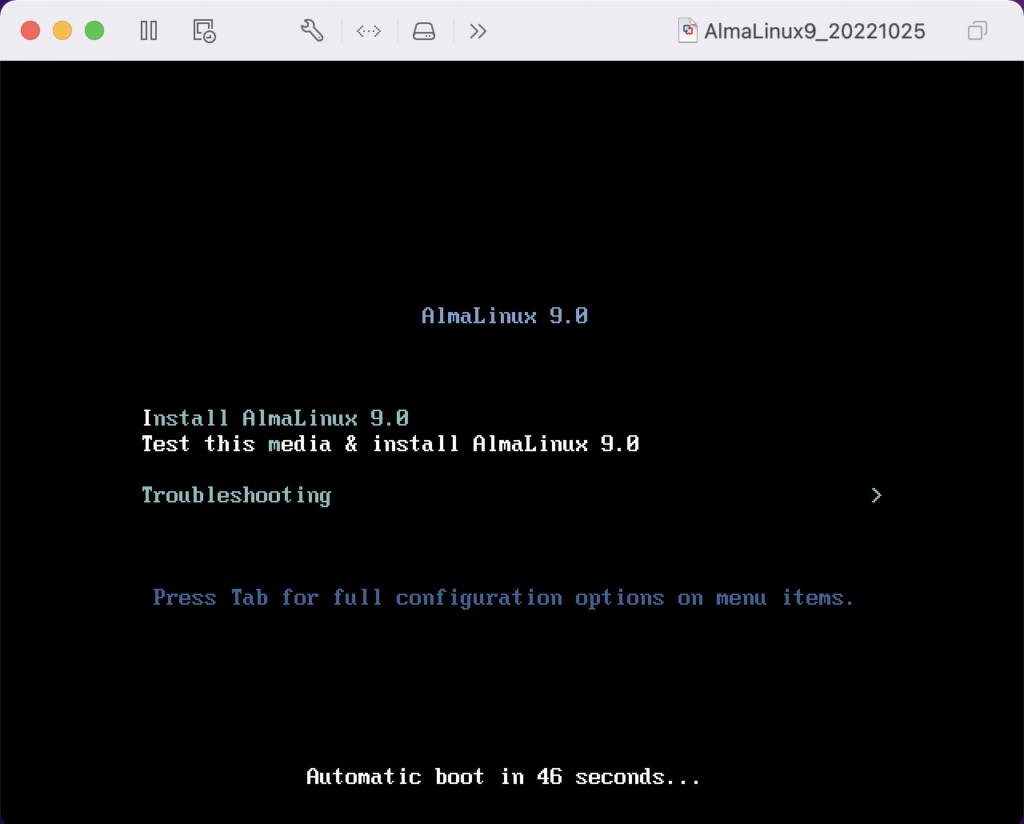
- Click the Tab key to configure the target installation or Enter key to skip the automatic boot delay.

- Choose the installation language and click the Continue button.
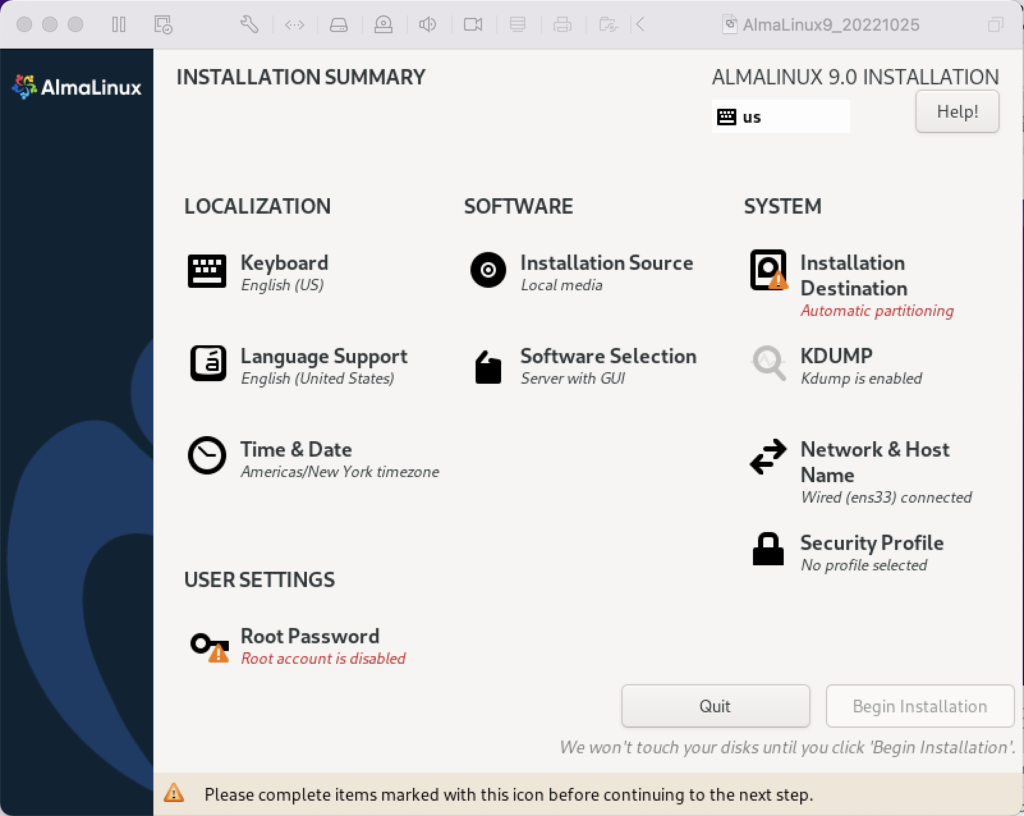
- The Installation Summary dialog lets you fix anything with a warning message orange triangle. Fix the Root Password first by clicking on the text.
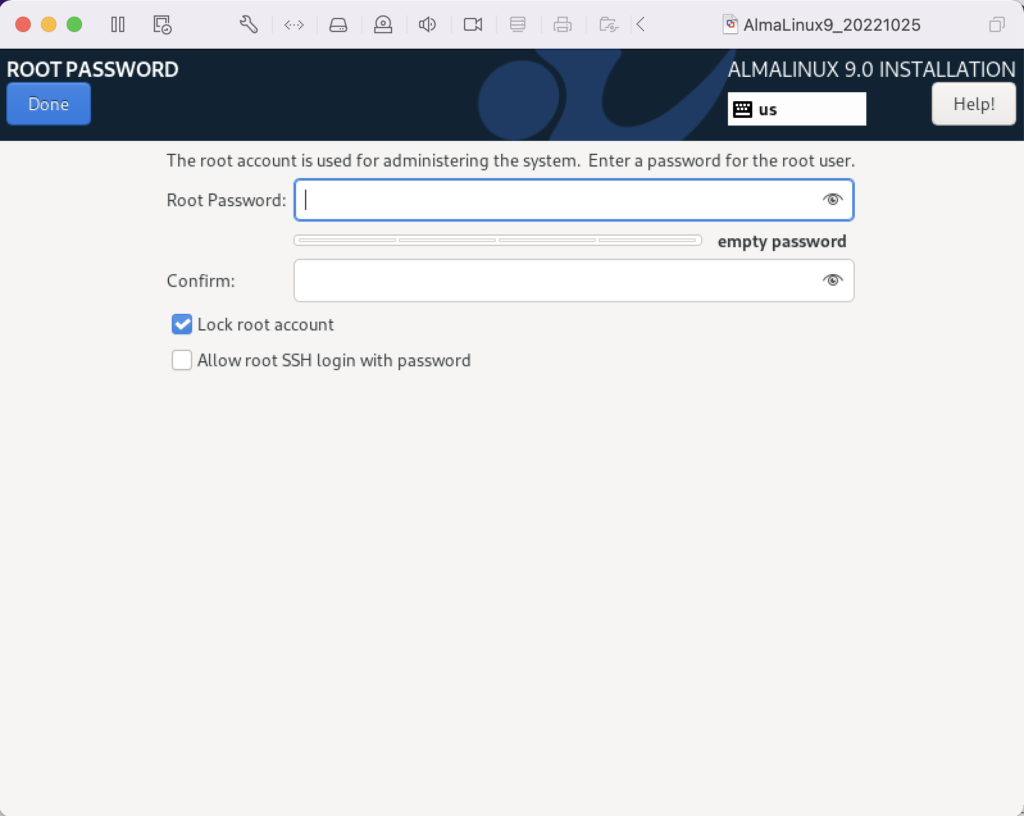
- Enter the Root Password twice, click the Lock root account checkbox to unselect it, and click the Allow root SSH login with password checkbox to enable it.

- Click the Done button to complete setting the root password.

- After fixing the root password, click on the Installation Destination item to change the default partition.
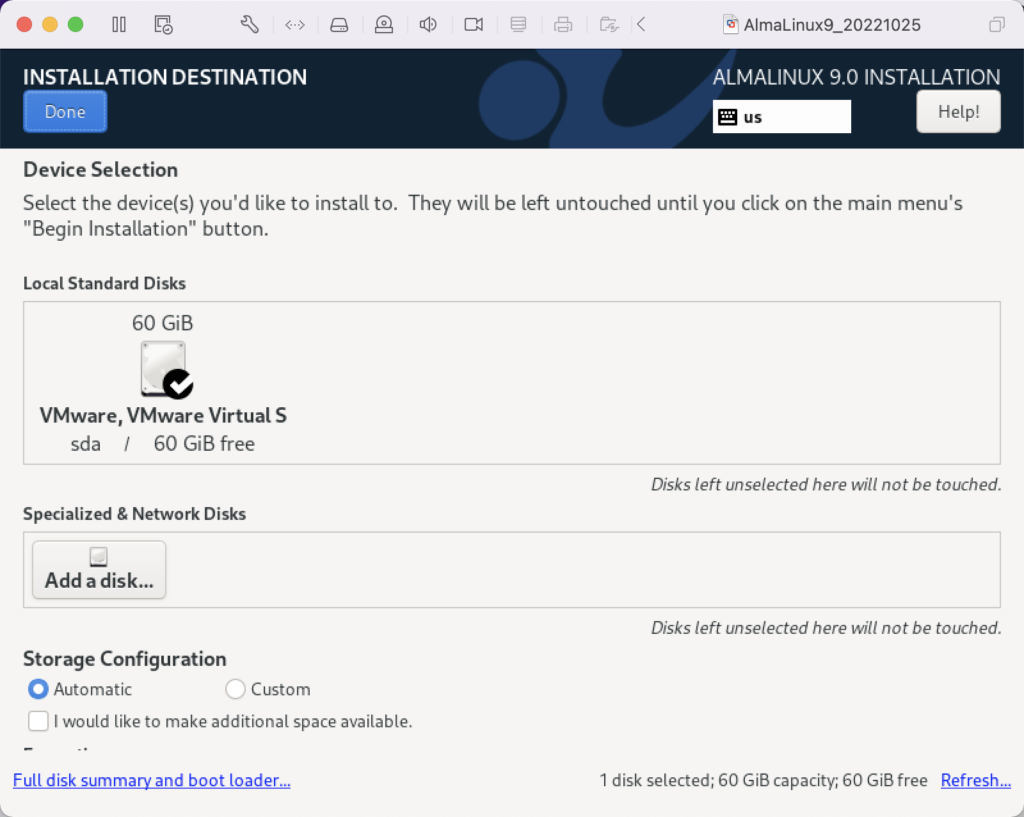
- Click the Done button to accept the initial size of the VM partition.
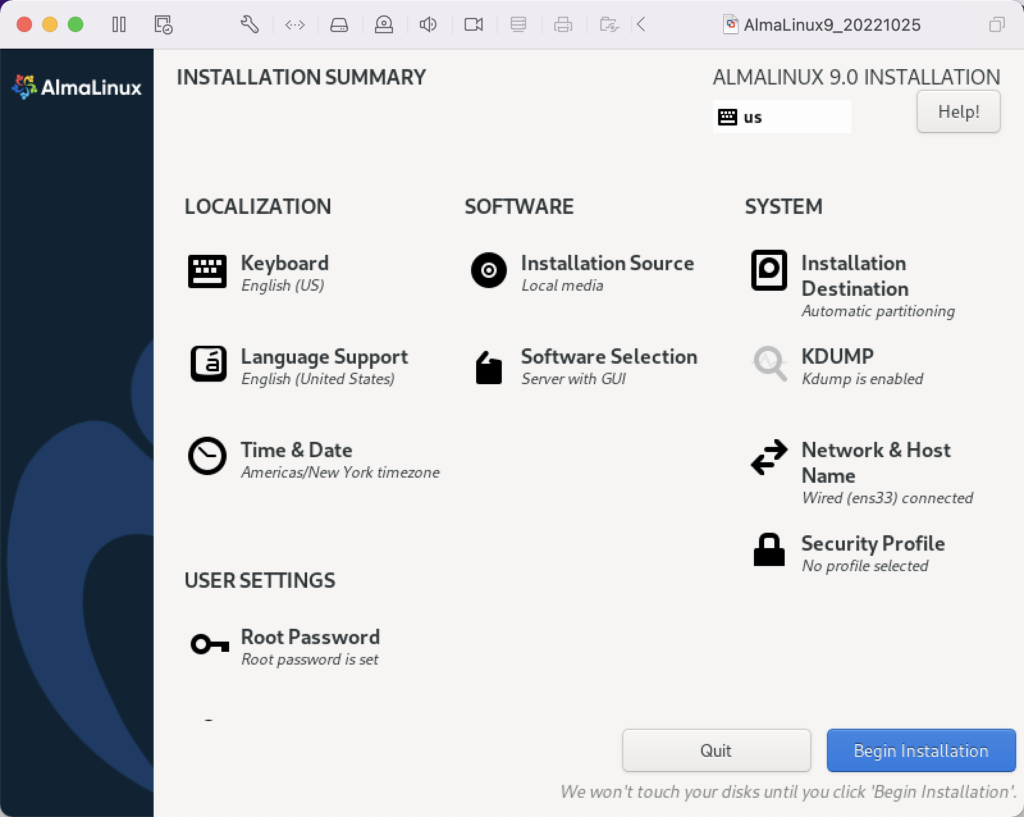
- Click the Software Selection element to add software components to the default installation.
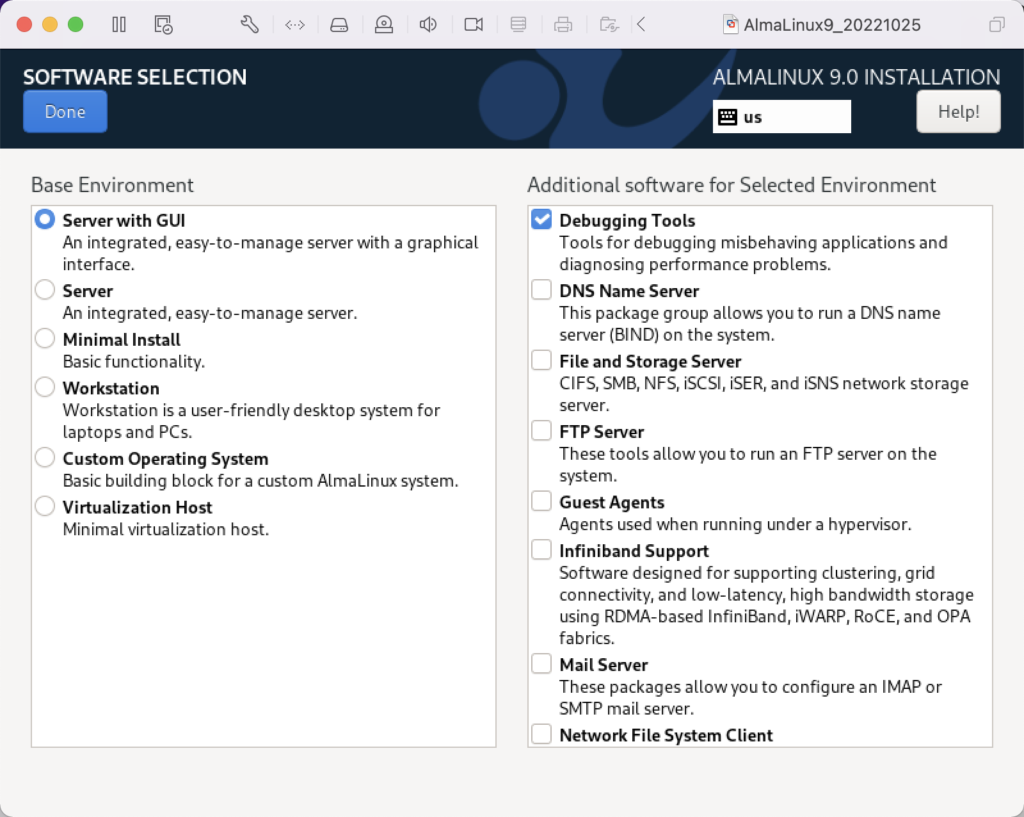
- Click the checkboxes for the following additional software:
- Debugging Tools
- Performance Tools
- Remote Desktop Clients
- Remote Management for Linux
- Legacy UNIX Compatibility
- Console Internet Tools
- Development Tools
- .NET Development
- Graphical Administration Tools
- System Tools
Click the Done button to accept the added software elements.
- Click the Begin Installation button to begin the installation of AlmaLinux.
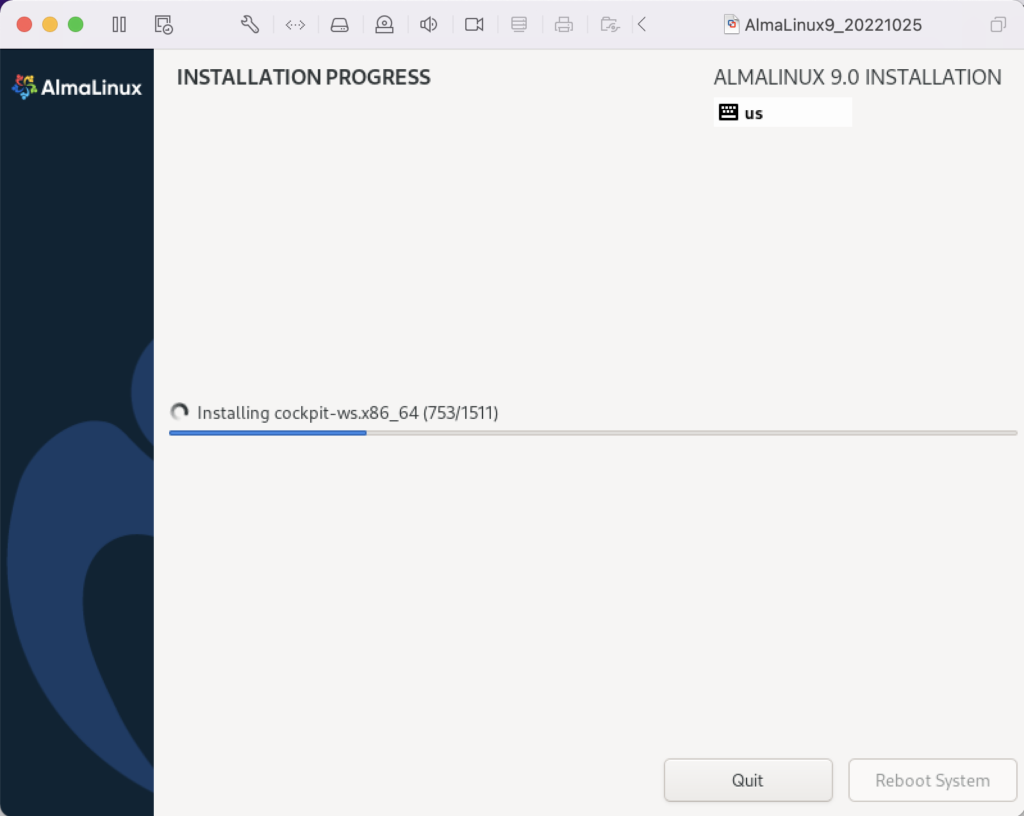
- The Installing Progress dialog will show a progress bar for several minutes.
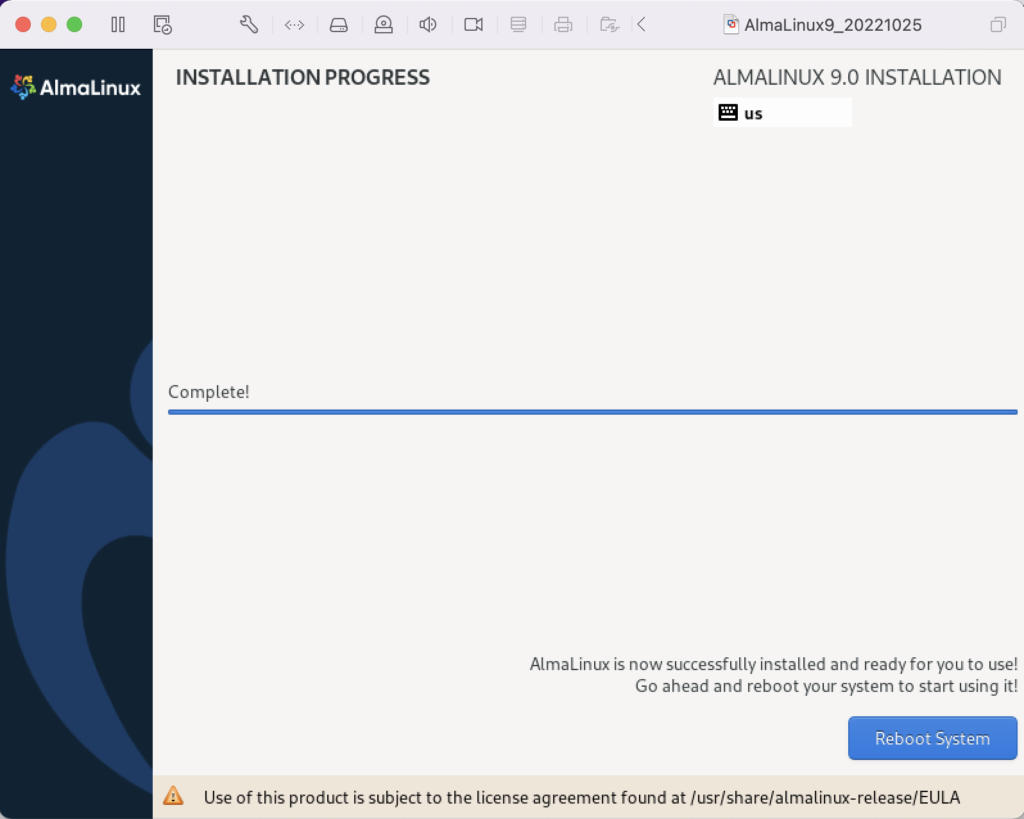
- The Installing Progress dialog eventually completes, and you click the Reboot System button to complete the installation.
Setup
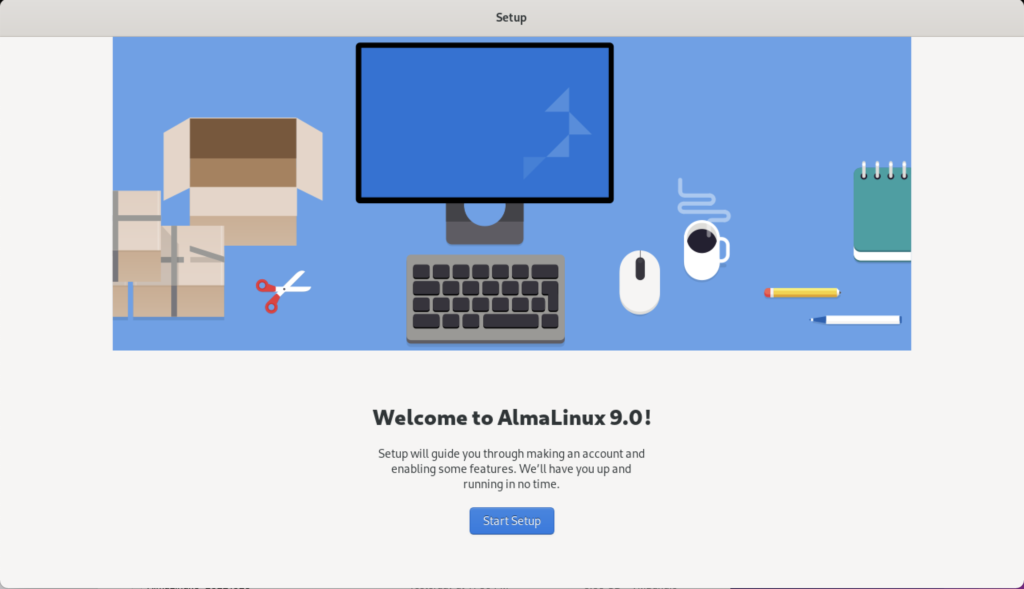
- The Welcome to AlmaLinux page begins the set up of the operating systems.
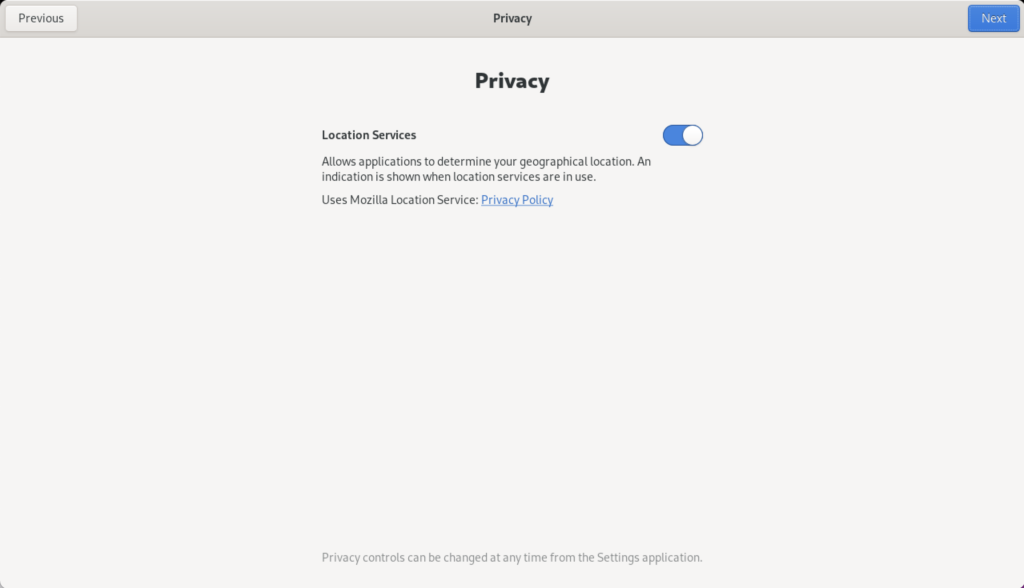
- Click the Slide to disable location services.
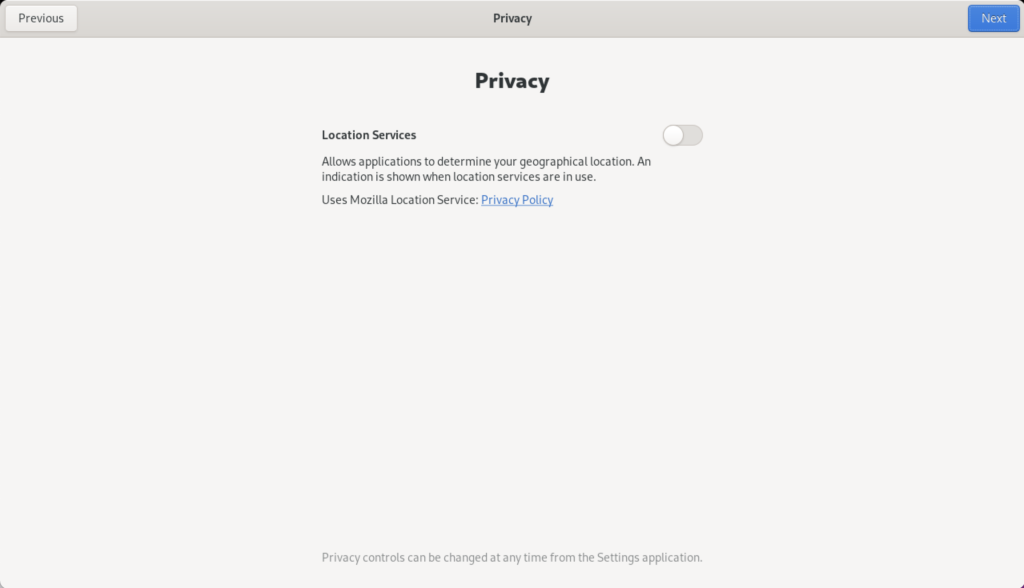
- After clicking the Slide location services are disabled.

- The Online Account dialog lets you connect your email, online calendar, contacts, documents, and photos. You click the Skip button to avoid setting up any of the online accounts.

- The About You dialog lets you enter user account with sudoer privileges.
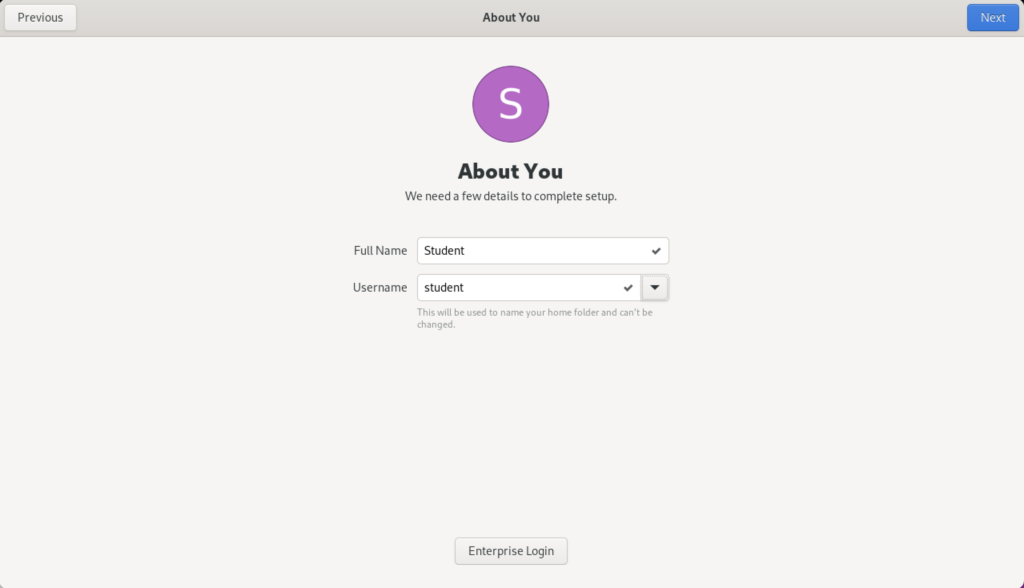
- The About You dialog enters a title case user’s name and a lowercase user’s name.
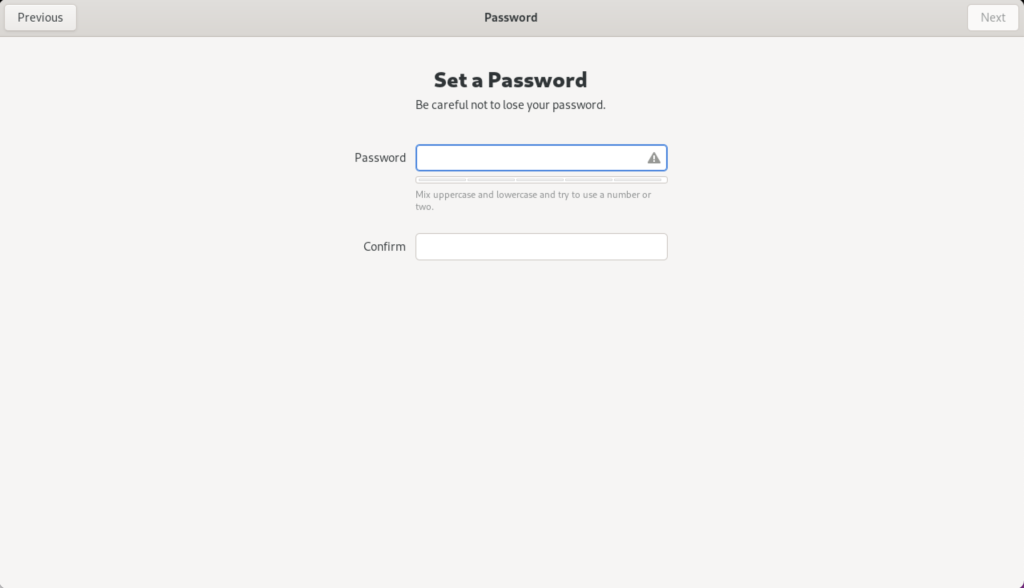
- The Password dialog lets you enter a case sensitive password.
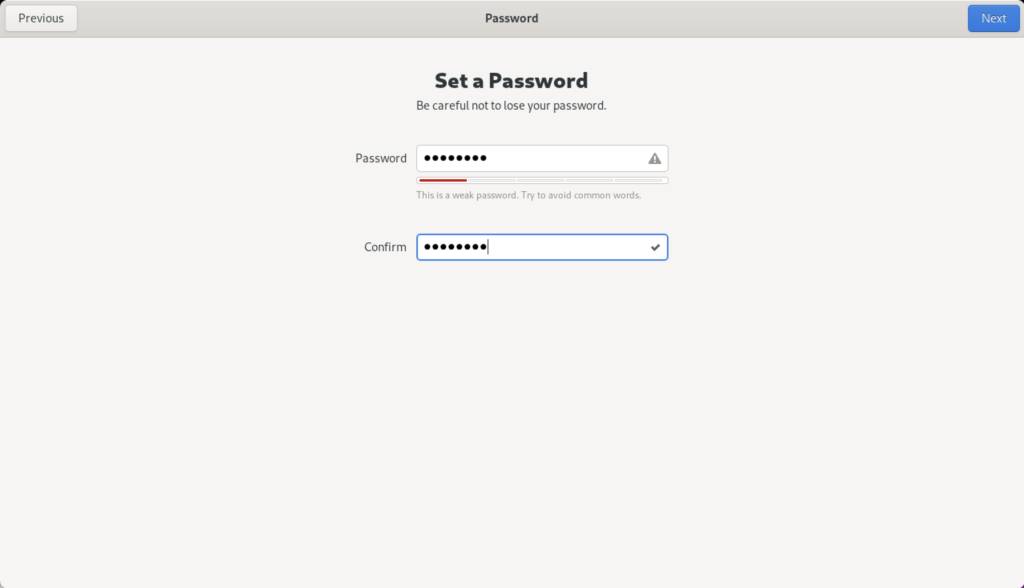
- The Password dialog displays the entry of the passwords as dots.
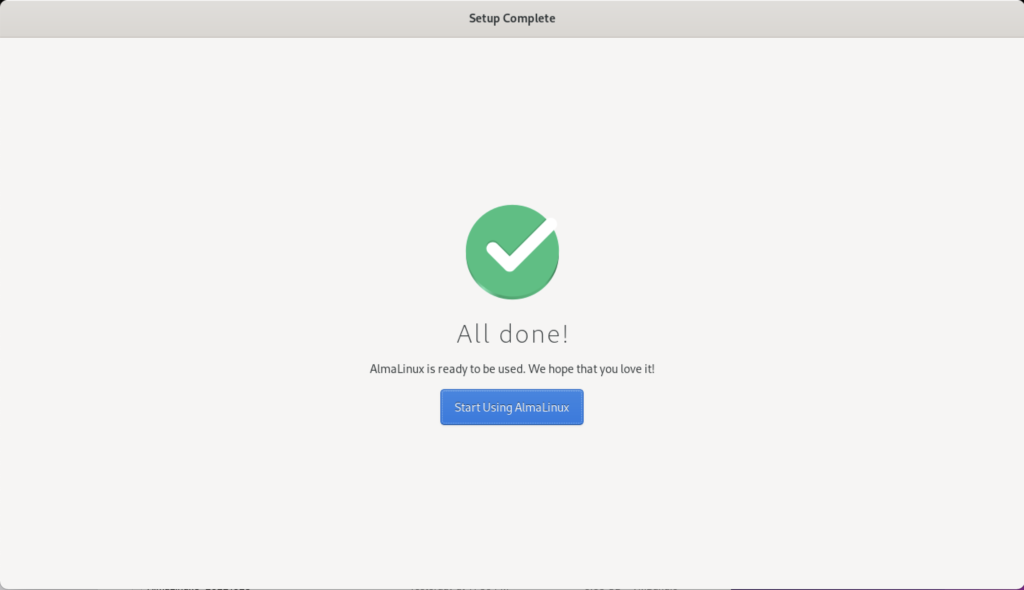
- The Setup Complete dialog leaves you to click the Start Using AlmaLinux button to complete the setup.

- The blank image page displays until you click on it.
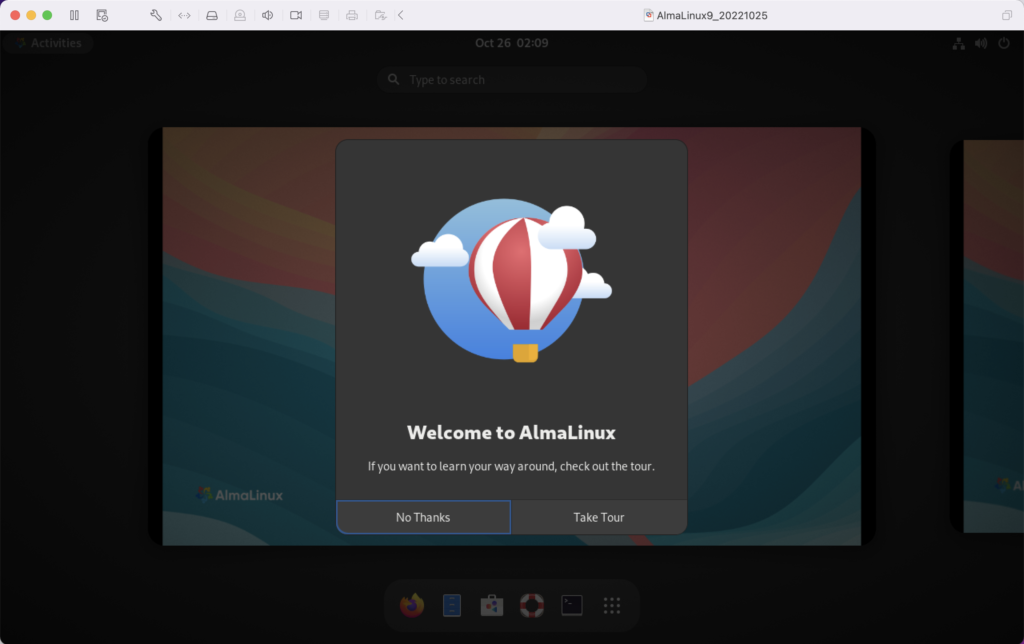
- The Welcome to AlmaLinux dialog invites you to take a tour or decline it. Click the No Thanks button to decline the tour.

- After declining the tour, it displays the core AlmaLinux screen.

- Rebooting the system is necessary to complete the installation. Click on the circle icon on the right to begin the process to restart or shutdown the operating system. Click on the Power Off / Log Out dropdown to continue.

- Click the Restart… menu option to restart the operating system.

- Click the Restart… menu option to confirm the restart of the operating system.
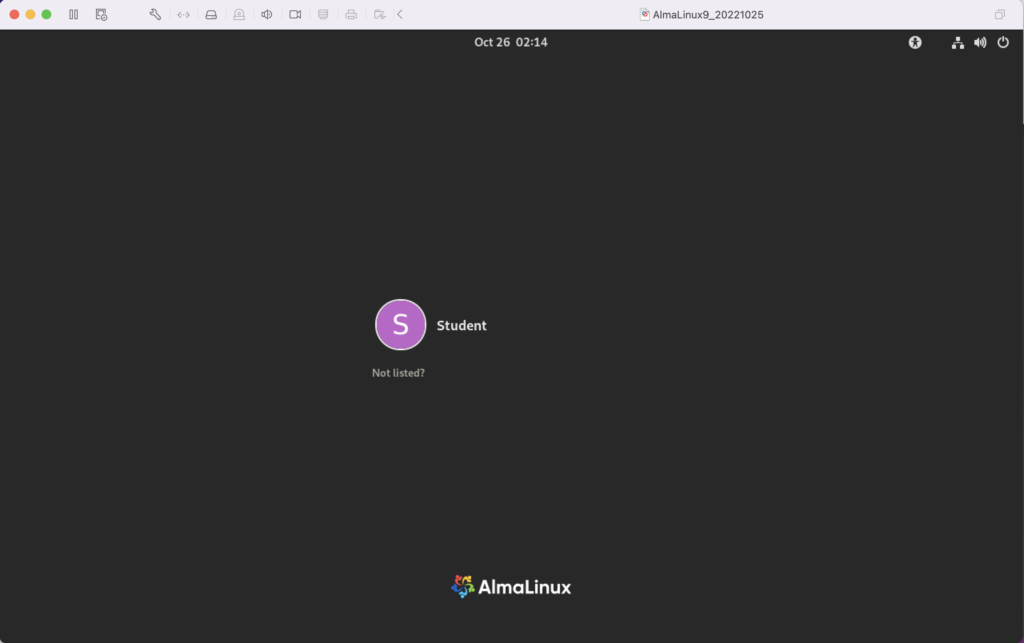
- Click the Student icon to get prompted for a password.
- Enter the Student password to connect to the AlmaLinux operating system.

- This displays the standard working interface for the AlmaLinux operating system.
MySQL on AlmaLinux
After installing AlmaLinux in a VMware VM on my MacBook Pro (Intel Chip), and updating the packages with the following command:
sudo dnf upgrade --refresh -y |
MySQL was first on my installation and configuration list. Here are the commands to install and configure it on AlmaLinux.
Install the MySQL Server packages and dependents:
sudo dnf install mysql mysql-server -y |
Install the MySQL service utilities with the initscripts package, using the following command:
sudo yum install -y initscripts |
Start the MySQL daemon with the following command:
sudo service mysqld start |
Connect and verify the root user can connect to the database. At this point, you’ve not set the root user’s password and should use the following syntax:
mysql -uroot |
It should connect and display:
Welcome to the MySQL monitor. Commands end with ; or \g. Your MySQL connection id is 10 Server version: 8.0.30 Source distribution Copyright (c) 2000, 2022, Oracle and/or its affiliates. Oracle is a registered trademark of Oracle Corporation and/or its affiliates. Other names may be trademarks of their respective owners. Type 'help;' or '\h' for help. Type '\c' to clear the current input statement. mysql> |
Exit MySQL and run the following command:
mysql_secure_installation |
It’ll run you through the following prompts, which you may change to suit your installation. My choices are a trivial student database isolated inside a VM.
Securing the MySQL server deployment. Connecting to MySQL using a blank password. VALIDATE PASSWORD COMPONENT can be used to test passwords and improve security. It checks the strength of password and allows the users to set only those passwords which are secure enough. Would you like to setup VALIDATE PASSWORD component? Press y|Y for Yes, any other key for No: n Please set the password for root here. New password: Re-enter new password: By default, a MySQL installation has an anonymous user, allowing anyone to log into MySQL without having to have a user account created for them. This is intended only for testing, and to make the installation go a bit smoother. You should remove them before moving into a production environment. Remove anonymous users? (Press y|Y for Yes, any other key for No) : y Success. Normally, root should only be allowed to connect from 'localhost'. This ensures that someone cannot guess at the root password from the network. Disallow root login remotely? (Press y|Y for Yes, any other key for No) : y Success. By default, MySQL comes with a database named 'test' that anyone can access. This is also intended only for testing, and should be removed before moving into a production environment. Remove test database and access to it? (Press y|Y for Yes, any other key for No) : y - Dropping test database... Success. - Removing privileges on test database... Success. Reloading the privilege tables will ensure that all changes made so far will take effect immediately. Reload privilege tables now? (Press y|Y for Yes, any other key for No) : y Success. All done! |
The next step requires setting up the sample sakila and studentdb database. The syntax has changed from prior releases. Here are the new three steps:
- Grant the root user the privilege to grant to others, which root does not have by default. You use the following syntax as the MySQL root user:
mysql> GRANT ALL ON *.* TO 'root'@'localhost';
- Download the sakila database, which you can download from this site. Click on the sakila database’s TGZ download.

When you download the sakila zip file it creates a sakila-db folder in the /home/student/Downloads directory. Copy the sakila-db folder into the /home/student/Data/sakila directory. Then, change to the /home/student/Data/sakila/sakila-db directory, connect to mysql as the root user, and run the following command:
mysql> SOURCE /home/student/Data/sakila/sakila-db/sakila-schema.sql
mysql> SOURCE /home/student/Data/sakila/sakila-db/sakila-data.sql
- Create the studentdb database with the following command as the MySQL root user:
mysql> CREATE DATABASE studentdb; - Create the user with a clear English password and grant the user student full privileges on the sakila and studentdb databases:
mysql> CREATE USER 'student'@'localhost' IDENTIFIED WITH mysql_native_password BY 'student';
mysql> GRANT ALL ON studentdb.* TO 'student'@'localhost';
mysql> GRANT ALL ON sakila.* TO 'student'@'localhost';
You can now connect to a sandboxed sakila database with the student user’s credentials, like:
mysql -ustudent -p -Dsakila |
or, you can now connect to a sandboxed studentdb database with the student user’s credentials, like:
mysql -ustudent -p -Dstudentdb |
As always, I hope code and step complete instructions help others get things done more quickly.
PL/SQL Overloading
So, I wrote an updated example of my grandma and tweetie_bird for my students. It demonstrates overloading with the smallest parameter lists possible across a transaction of two tables. It also shows how one version of the procedure can call another version of the procedure.
The tables are created with the following:
/* Conditionally drop grandma table and grandma_s sequence. */ BEGIN FOR i IN (SELECT object_name , object_type FROM user_objects WHERE object_name IN ('GRANDMA','GRANDMA_SEQ')) LOOP IF i.object_type = 'TABLE' THEN /* Use the cascade constraints to drop the dependent constraint. */ EXECUTE IMMEDIATE 'DROP TABLE '||i.object_name||' CASCADE CONSTRAINTS'; ELSE EXECUTE IMMEDIATE 'DROP SEQUENCE '||i.object_name; END IF; END LOOP; END; / /* Create the table. */ CREATE TABLE GRANDMA ( grandma_id NUMBER CONSTRAINT grandma_nn1 NOT NULL , grandma_house VARCHAR2(30) CONSTRAINT grandma_nn2 NOT NULL , created_by NUMBER CONSTRAINT grandma_nn3 NOT NULL , CONSTRAINT grandma_pk PRIMARY KEY (grandma_id) ); /* Create the sequence. */ CREATE SEQUENCE grandma_seq; /* Conditionally drop a table and sequence. */ BEGIN FOR i IN (SELECT object_name , object_type FROM user_objects WHERE object_name IN ('TWEETIE_BIRD','TWEETIE_BIRD_SEQ')) LOOP IF i.object_type = 'TABLE' THEN EXECUTE IMMEDIATE 'DROP TABLE '||i.object_name||' CASCADE CONSTRAINTS'; ELSE EXECUTE IMMEDIATE 'DROP SEQUENCE '||i.object_name; END IF; END LOOP; END; / /* Create the table with primary and foreign key out-of-line constraints. */ CREATE TABLE TWEETIE_BIRD ( tweetie_bird_id NUMBER CONSTRAINT tweetie_bird_nn1 NOT NULL , tweetie_bird_house VARCHAR2(30) CONSTRAINT tweetie_bird_nn2 NOT NULL , grandma_id NUMBER CONSTRAINT tweetie_bird_nn3 NOT NULL , created_by NUMBER CONSTRAINT tweetie_bird_nn4 NOT NULL , CONSTRAINT tweetie_bird_pk PRIMARY KEY (tweetie_bird_id) , CONSTRAINT tweetie_bird_fk FOREIGN KEY (grandma_id) REFERENCES GRANDMA (GRANDMA_ID) ); /* Create sequence. */ CREATE SEQUENCE tweetie_bird_seq; |
The sylvester package specification holds the two overloaded procedures, like:
CREATE OR REPLACE PACKAGE sylvester IS /* Three variable length strings. */ PROCEDURE warner_brother ( pv_grandma_house VARCHAR2 , pv_tweetie_bird_house VARCHAR2 , pv_system_user_name VARCHAR2 ); /* Two variable length strings and a number. */ PROCEDURE warner_brother ( pv_grandma_house VARCHAR2 , pv_tweetie_bird_house VARCHAR2 , pv_system_user_id NUMBER ); END sylvester; / |
The sylvester package implements two warner_brother procedures. One takes the system user’s ID and the other takes the system user’s name. The procedure that accepts the system user name queries the system_user table with the system_user_name to get the system_user_id column and then calls the other version of itself. This demonstrates how you only write logic once when overloading and let one version call the other with the added information.
Here’s the sylvester package body code:
CREATE OR REPLACE PACKAGE BODY sylvester IS /* Procedure warner_brother with user name. */ PROCEDURE warner_brother ( pv_grandma_house VARCHAR2 , pv_tweetie_bird_house VARCHAR2 , pv_system_user_id NUMBER ) IS /* Declare a local variable for an existing grandma_id. */ lv_grandma_id NUMBER; FUNCTION get_grandma_id ( pv_grandma_house VARCHAR2 ) RETURN NUMBER IS /* Initialized local return variable. */ lv_retval NUMBER := 0; -- Default value is 0. /* A cursor that lookups up a grandma's ID by their name. */ CURSOR find_grandma_id ( cv_grandma_house VARCHAR2 ) IS SELECT grandma_id FROM grandma WHERE grandma_house = cv_grandma_house; BEGIN /* Assign a grandma_id as the return value when a row exists. */ FOR i IN find_grandma_id(pv_grandma_house) LOOP lv_retval := i.grandma_id; END LOOP; /* Return 0 when no row found and the grandma_id when a row is found. */ RETURN lv_retval; END get_grandma_id; BEGIN /* Set the savepoint. */ SAVEPOINT starting; /* * Identify whether a member account exists and assign it's value * to a local variable. */ lv_grandma_id := get_grandma_id(pv_grandma_house); /* * Conditionally insert a new member account into the member table * only when a member account does not exist. */ IF lv_grandma_id = 0 THEN /* Insert grandma. */ INSERT INTO grandma ( grandma_id , grandma_house , created_by ) VALUES ( grandma_seq.NEXTVAL , pv_grandma_house , pv_system_user_id ); /* Assign grandma_seq.currval to local variable. */ lv_grandma_id := grandma_seq.CURRVAL; END IF; /* Insert tweetie bird. */ INSERT INTO tweetie_bird ( tweetie_bird_id , tweetie_bird_house , grandma_id , created_by ) VALUES ( tweetie_bird_seq.NEXTVAL , pv_tweetie_bird_house , lv_grandma_id , pv_system_user_id ); /* If the program gets here, both insert statements work. Commit it. */ COMMIT; EXCEPTION /* When anything is broken do this. */ WHEN OTHERS THEN /* Until any partial results. */ ROLLBACK TO starting; END; PROCEDURE warner_brother ( pv_grandma_house VARCHAR2 , pv_tweetie_bird_house VARCHAR2 , pv_system_user_name VARCHAR2 ) IS /* Define a local variable. */ lv_system_user_id NUMBER := 0; FUNCTION get_system_user_id ( pv_system_user_name VARCHAR2 ) RETURN NUMBER IS /* Initialized local return variable. */ lv_retval NUMBER := 0; -- Default value is 0. /* A cursor that lookups up a grandma's ID by their name. */ CURSOR find_system_user_id ( cv_system_user_id VARCHAR2 ) IS SELECT system_user_id FROM system_user WHERE system_user_name = pv_system_user_name; BEGIN /* Assign a grandma_id as the return value when a row exists. */ FOR i IN find_system_user_id(pv_system_user_name) LOOP lv_retval := i.system_user_id; END LOOP; /* Return 0 when no row found and the grandma_id when a row is found. */ RETURN lv_retval; END get_system_user_id; BEGIN /* Convert a system_user_name to system_user_id. */ lv_system_user_id := get_system_user_id(pv_system_user_name); /* Call the warner_brother procedure. */ warner_brother ( pv_grandma_house => pv_grandma_house , pv_tweetie_bird_house => pv_tweetie_bird_house , pv_system_user_id => lv_system_user_id ); EXCEPTION /* When anything is broken do this. */ WHEN OTHERS THEN /* Until any partial results. */ ROLLBACK TO starting; END; END sylvester; / |
The following anonymous block test case works with the code:
BEGIN sylvester.warner_brother( pv_grandma_house => 'Blue House' , pv_tweetie_bird_house => 'Cage' , pv_system_user_name => 'DBA 3' ); sylvester.warner_brother( pv_grandma_house => 'Blue House' , pv_tweetie_bird_house => 'Tree House' , pv_system_user_id => 4 ); END; / |
You can now query the results with this SQL*PLus formatting and query:
/* Query results from warner_brother procedure. */ COL grandma_id FORMAT 9999999 HEADING "Grandma|ID #" COL grandma_house FORMAT A14 HEADING "Grandma House" COL created_by FORMAT 9999999 HEADING "Created|By" COL tweetie_bird_id FORMAT 9999999 HEADING "Tweetie|Bird ID" COL tweetie_bird_house FORMAT A18 HEADING "Tweetie Bird House" SELECT * FROM grandma g INNER JOIN tweetie_bird tb ON g.grandma_id = tb.grandma_id; |
You should see the following data:
 Grandma                 Created  Tweetie                     Grandma  Created
    ID # Grandma House        By  Bird ID Tweetie Bird House     ID #       By
-------- -------------- -------- -------- ------------------ -------- --------
       1 Blue House            3        1 Cage                      1        3
       1 Blue House            3        2 Tree House                1        4
As always, I hope complete code samples help solve real problems.
Node.js MySQL Error
While I blogged about how to setup Node.js and MySQL almost two years ago, it was interesting when a student ran into a problem. The student said they’d configured the environment but were unable to use Node.js to access MySQL.
The error is caused by this import statement:
const mysql = require('mysql') |
The student got the following error, which simply says that they hadn’t installed the Node.js package for MySQL driver.
internal/modules/cjs/loader.js:638 throw err; ^ Error: Cannot find module 'mysql' at Function.Module._resolveFilename (internal/modules/cjs/loader.js:636:15) at Function.Module._load (internal/modules/cjs/loader.js:562:25) at Module.require (internal/modules/cjs/loader.js:692:17) at require (internal/modules/cjs/helpers.js:25:18) at Object.<anonymous> (/home/student/Data/cit325/oracle-s/lib/Oracle12cPLSQLCode/Introduction/query.js:4:15) at Module._compile (internal/modules/cjs/loader.js:778:30) at Object.Module._extensions..js (internal/modules/cjs/loader.js:789:10) at Module.load (internal/modules/cjs/loader.js:653:32) at tryModuleLoad (internal/modules/cjs/loader.js:593:12) at Function.Module._load (internal/modules/cjs/loader.js:585:3) |
I explained they could fix the problem with the following two Node.js Package Manager (NPM) commands:
npm init --y npm install --save mysql |
The student was able to retest the code with success. The issue was simply that the Node.js couldn’t find the NPM MySQL module.
MySQL Partitioned Tables
MySQL Partitioned Tables
Learning Outcomes
- Learn about List Partitioning.
- Learn about Range Partitioning.
- Learn about Columns Partitioning.
- Learn about Hash Partitioning.
- Learn about Key Partitioning.
- Learn about Subpartitioning.
Lesson Material
MySQL supports partitioning of tables. It supports range, list, hash, and key partitioning. Range partitioning lets you partition based on column values that fall within given ranges. List partitioning lets you partition based on columns matching one of a set of discrete values. Hash partitioning lets you partition based on the return value from a user-defined expression (the result from a stored SQL/PSM function). Key partitioning performs like hash partitioning, but it lets a user select one or more columns from the set of columns in a table; a hash manages the selection process for you. A hash is a method of organizing keys to types of data, and hashes speed access to read and change data in tables.
Each of the following subsections discusses one of the supported forms of partitioning in MySQL. Naturally, there are differences between other databases and MySQL’s implementation.
List Partitioning
A MySQL list partition works by identifying a column that contains an integer value, the franchise_number in the following example. Partitioning clauses follow the list of columns and constraints and require a partitioning key to be in the primary key or indexed.
The following list partition works with literal numeric values. MySQL uses the IN keyword for list partitions. Note that there’s no primary key designated and an index is on the auto-incrementing surrogate key column. A complete example is provided to avoid confusion on how to index the partitioning key:
CREATE TABLE franchise ( franchise_id INT UNSIGNED AUTO_INCREMENT , franchise_number INT UNSIGNED , franchise_name VARCHAR(20) , city VARCHAR(20) , state VARCHAR(20) , index idx (franchise_id)) PARTITION BY LIST(franchise_number) ( PARTITION offshore VALUES IN (49,50) , PARTITION west VALUES IN (34,45,48) , PARTITION desert VALUES IN (46,47) , PARTITION rockies VALUES IN (38,41,42,44)); |
The inclusion of a PRIMARY KEY constraint on the franchise_id column would trigger an ERROR 1503 when the partitioning key isn’t the primary key. The reason for the error message is that a primary key implicitly creates a unique index, and that index would conflict with the partitioning by list instruction. The use of a non-unique idx index on the franchise_id column is required when you want to partition on a non-primary key column.
Range Partitioning
Range partitioning works only with an integer value or an expression that resolves to an integer against the primary key column. The limitation of the integer drives the necessity of choosing an integer column for range partitioning. You can’t define a range-partitioned table with a PRIMARY KEY constraint unless the primary key becomes your partitioning key, like
the one below.
CREATE TABLE ordering ( ordering_id INT UNSIGNED AUTO_INCREMENT , item_id INT UNSIGNED , rental_amount DECIMAL(15,2) , rental_date DATE , index idx (ordering_id)) PARTITION BY RANGE(item_id) ( PARTITION jan2011 VALUES LESS THAN (10000) , PARTITION feb2011 VALUES LESS THAN (20000) , PARTITION mar2011 VALUES LESS THAN (30000)); |
Range partitioning is best suited to large tables that you want to break into smaller pieces based on the integer column. You can also use stored functions that return integers as the partitioning key instead of the numeric literals shown. Few other options are available in MySQL.
Columns Partitioning
Columns partitioning is a new variant of range and list partitioning. It is included in MySQL 5.5 and forward. Both range and list partitioning work on an integer-based column (using TINYINT, SMALLINT, MEDIUMINT, INT [alias INTEGER], and BIGINT). Columns partitioning extends those models by expanding the possible data types for the partitioning column to include CHAR, VARCHAR, BINARY, and VARBINARY string data types, and DATE, DATETIME, or TIMESTAMP data types. You still can’t use other number data types such as DECIMAL and FLOAT. The TIMESTAMP data type is also available only in range partitions with the caveat that you use a UNIX_TIMESTAMP function, according to MySQL Bug 42849.
Hash Partitioning
Hash partitions ensure an even distribution of rows across a predetermined number of partitions. It is probably the easiest way to partition a table quickly to test the result of partitioning on a large table. You should base hash partitions on a surrogate or natural primary key.
The following provides a modified example of the ordering table:
CREATE TABLE ordering ( ordering_id INT UNSIGNED PRIMARY KEY AUTO_INCREMENT , item_id INT UNSIGNED , rental_amount DECIMAL(15,2) , rental_date DATE) PARTITION BY HASH(ordering_id) PARTITIONS 8; |
This is the partitioning type that benefits from a PRIMARY KEY constraint because it automatically creates a unique index that can be used by the hash. A non-unique index such as the list partitioning example doesn’t work for a hash partition.
Key Partitioning
Key partitioning is valuable because you can partition on columns that aren’t integers. It performs along the line of hash partitioning, except the MySQL Server uses its own hashing expression.
CREATE TABLE orders_list ( order_list_id INT UNSIGNED AUTO_INCREMENT , customer_surname VARCHAR(30) , store_id INT UNSIGNED , salesperson_id INT UNSIGNED , order_date DATE , index idx (order_list_id)) PARTITION BY KEY (order_date) PARTITIONS 8; |
This is the only alternative when you want to partition by date ranges. Like the hash partition, it’s easy to deploy. The only consideration is the number of slices that you want to make of the data in the table.
Subpartitioning
The concept of subpartitioning is also known as composite partitioning. You can subpartition range or list partitions with a hash, linear hash, or linear key.
A slight change to the previously created ordering table is required to demonstrate composite partitioning: we’ll add a store_id column to the table definition. The following is an example of a range partition subpartitioned by a hash:
CREATE TABLE ordering INT UNSIGNED INT UNSIGNED DATE ( ordering_id INT UNSIGNED AUTO_INCREMENT , item_id INT UNSIGNED , store_id INT UNSIGNED , rental_amount DECIMAL(15,2) , rental_date DATE , index idx (ordering_id)) PARTITION BY RANGE(item_id) SUBPARTITION BY HASH(store_id) SUBPARTITIONS 4 ( PARTITION jan2011 VALUES LESS THAN (10000) , PARTITION feb2011 VALUES LESS THAN (20000) , PARTITION mar2011 VALUES LESS THAN (30000)); |
Composite partitioning is non-trivial and might require some experimentation to achieve optimal results. Plan on making a few tests of different scenarios before you deploy a solution.
Oracle Partitioned Tables
Oracle Partitioned Tables
Learning Outcomes
- Learn about List Partitioning.
- Learn about Range Partitioning.
- Learn about Hash Partitioning.
- Learn about Composite Partitioning.
Lesson Material
Partitioning is the process of breaking up a data source into a series of data sources. Partitioned tables are faster to access and transact against. Partitioning data becomes necessary as the amount of data grows in any table. It speeds the search to find rows and insert, update, or delete rows.
Oracle Database 21c supports four types of table partitioning: list, range, hash, and composite partitioning.
List Partitioning
A list partition works by identifying a column that contains a value, such as a STATE column in an ADDRESS table. Partitioning clauses follow the list of columns and constraints.
A list partition could use a STATE column, like the following (the complete example is avoided to conserve space, and the three dots represent the balance of partitions not shown):
CREATE TABLE franchise ( franchise_id NUMBER CONSTRAINT pk_franchise PRIMARY KEY , franchise_name VARCHAR(20) , city VARCHAR(20) , state VARCHAR(20)) PARTITION BY LIST(state) ( PARTITION offshore VALUES('Alaska', 'Hawaii') , PARTITION west VALUES('California', 'Oregon', 'Washington') , PARTITION desert VALUES ('Arizona','New Mexico') , PARTITION rockies VALUES ('Colorado', 'Idaho', 'Montana', 'Wyoming') , ... ); |
This can be used with other values such as ZIP codes with great effect, but the maintenance of list partitioning can be considered costly. Cost occurs when the list of values changes over time. Infrequent change means low cost, while frequent change means high costs. In the latter case, you should consider other partitioning strategies. Although an Oracle database supports partitioning on a variable-length string, MySQL performs list partitioning only on integer columns.
Range Partitioning
Range partitioning is very helpful on any column that contains a continuous metric, such as dates or time. It works by stating a minimum set that is less than a certain value, and then a group of sets of higher values until you reach the top most set of values. This type of partition helps you improve performance by letting you search ranges rather than complete data sets. Range partitioning is also available in MySQL.
A range example based on dates could look like this:
PARTITION BY RANGE(rental_date) ( PARTITION rental_jan2011 VALUES LESS THAN TO_DATE('31-JAN-11','DD-MON-YY') , PARTITION rental_feb2011 VALUES LESS THAN TO_DATE('28-FEB-11','DD-MON-YY') , PARTITION rental_mar2011 VALUES LESS THAN TO_DATE('31-MAR-11','DD-MON-YY') , ... ); |
The problem with this type of partitioning, however, is that the new months require constant management. Many North American businesses simply add partitions for all months in the year as an annual maintenance task during the holidays in November or December. Companies that opt for bigger range increments reap search and access benefits from range partitioning, while minimizing ongoing maintenance expenses.
Hash Partitioning
Hash partitioning is much easier to implement than list or range partitioning. Many DBAs favor it because it avoids the manual maintenance of list and range partitioning. Oracle Database 21c documentation recommends that you implement a hash for the following reasons:
- There is no concrete knowledge about how much data maps to a partitioning range.
- The sizes of partitions are unknown at the outset and difficult to balance as data is added to the database.
- A range partition might cluster data in an ineffective way.
This next statement creates eight partitions and stores them respectively in one of the eight tablespaces. The hash partition manages nodes and attempts to balance the distribution of rows across the nodes.
PARTITION BY HASH(store) PARTITIONS 8 STORE IN (tablespace1, tablespace2, tablespace3, tablespace4 ,tablespace5, tablespace6, tablespace7, tablespace8); |
As you can imagine the maintenance for this type of partitioning is low. Some DBAs choose this method to get an initial sizing before adopting a list or range partitioning plan. Maximizing the physical resources of the machine ultimately rests with the DBAs who manage the system. Developers need to stand ready to assist DBAs with analysis and syntax support.
Composite Partitioning
Composite partitioning requires a partition and subpartition. The composites are combinations of two types of partitioning—typically, list and range partitioning, or range and hash composite partitioning. Which of these you should choose depends on a few considerations. List and range composite partitioning is done for historical information and is well suited for data warehouses. This method lets you partition on unordered or unrelated column values.
A composite partition like this uses the range as the partition and the list as the subpartition, like the following:
PARTITION BY RANGE (rental_date) SUBPARTITION BY LIST (state) (PARTITION FQ1_1999 VALUES LESS THAN (TO_DATE('1-APR-2011','DD-MON-YYYY')) (SUBPARTITION offshore VALUES('Alaska', 'Hawaii') , SUBPARTITION west VALUES('California', 'Oregon', 'Washington') , SUBPARTITION desert VALUES ('Arizona','New Mexico') , SUBPARTITION rockies VALUES ('Colorado', 'Idaho', 'Montana', 'Wyoming') , ... ) ,(PARTITION FQ2_1999 VALUES LESS THAN (TO_DATE('1-APR-2011','DD-MON-YYYY')) (SUBPARTITION offshore VALUES('Alaska', 'Hawaii') , SUBPARTITION west VALUES('California', 'Oregon', 'Washington') , SUBPARTITION desert VALUES ('Arizona','New Mexico') , SUBPARTITION rockies VALUES ('Colorado', 'Idaho', 'Montana', 'Wyoming') , ... ) , ... ) |
Range and hash composite partitioning is done for historical information when you also need to stripe data. Striping is the process of creating an attribute in a table that acts as a natural subtype or separator of data. Users typically view data sets of one subtype, which means organizing the data by stripes (subtypes) can speed access based on user access patterns.
Range is typically the partition and the hash is the subpartition in this composite partitioning schema. The syntax for this type of partition is shown next:
PARTITION BY RANGE (rental_date) SUBPARTITION BY HASH(store) SUBPARTITIONS 8 STORE IN (tablespace1, tablespace2, tablespace3 ,tablespace4, tablespace5, tablespace6 ,tablespace7, tablespace8) ( PARTITION rental_jan2011 VALUES LESS THAN TO_DATE('31-JAN-11','DD-MON-YY') , PARTITION rental_feb2011 VALUES LESS THAN TO_DATE('28-FEB-11','DD-MON-YY') , PARTITION rental_mar2011 VALUES LESS THAN TO_DATE('31-MAR-11','DD-MON-YY') , ... ) |
Logging Table Function
It is interesting when somebody remembers a presentation from 10 years ago. They asked if it was possible in PL/pgSQL to write an autonomous procedure to log data when calling a table view function. The answer is two fold. PL/pgSQL doesn’t support autonomous functions or procedures like the Oracle database but it doesn’t need to because unless you invoke a transaction it auto commits writes.
Logging table functions are important for security auditing and compliance management against laws, like SOX, HIPAA, and FERPA. All too many systems lack the basic ability to audit who queries records without raising an error and blocking the access. That means the bad actor or actress gains the ability to probe the system for weaknesses before determining an attack vector. It’s often better to capture the unauthorized access and take direct action to protect both the the data and systems.
While the example lets an unauthorized person access the information in the first version of the student_query, it blocks access by reporting no rows returned in the latter. Both versions of the query log the data and thereby collect the evidence necessary to act against the hack.
This blog post shows you how to write it and test it. Follow the following steps:
- Create the necessary tables and data to work with a logging PL/pgSQL table view function:
/* Conditionally drop and create table. */
DROP TABLE IF EXISTS student;
CREATE TABLE student
( student_id      SERIAL
, first_name      VARCHAR(20)
, last_name       VARCHAR(20)
, hogwarts_house  VARCHAR(10));

/* Conditionally drop and create table. */
DROP TABLE IF EXISTS logger;
CREATE TABLE logger
( logger_id        SERIAL
, app_user         VARCHAR(30)
, queried_student  VARCHAR(30)
, query_time       TIMESTAMP );

/* Insert one record into table. */
INSERT INTO student
( first_name, last_name, hogwarts_house )
VALUES
 ( 'Harry', 'Potter', 'Gryffindor' )
,( 'Hermione', 'Granger', 'Gryffindor' )
,( 'Ronald', 'Weasily', 'Gryffindor' )
,( 'Draco', 'Malfoy', 'Slytherin' )
,( 'Vincent', 'Crabbe', 'Slytherin' )
,( 'Susan', 'Bones', 'Hufflepuff' )
,( 'Hannah', 'Abbott', 'Hufflepuff' )
,( 'Luna', 'Lovegood', 'Ravenclaw' )
,( 'Cho', 'Chang', 'Ravenclaw' )
,( 'Gilderoy', 'Lockhart', 'Ravenclaw' );
- While not necessary if you’re very familiar with PL/pgSQL, it may be helpful to review:
- The SET command that lets you assign a value to a session-level variable, which you can later use in a PL/pgSQL block.
- The SELECT-INTO statement in a DO-block.
Here’s a test script that demonstrates both:
1
2
3
4
5
6
7
8
9
10
11
12
13
14
15
16
17
18
19
20
21
22
23
/* Set a session-level variable. */
SET credential.app_user = 'Draco Malfoy';

/* Secure the value from a session-level variable. */
SELECT current_setting('credential.app_user');

/*
DO
$$
DECLARE
  input   VARCHAR(30) := 'Hermione';
  output  VARCHAR(30);
BEGIN
  /* Sample for partial name construction of full name. */
  SELECT CONCAT(s.first_name, ' ', s.last_name) AS student_name
  INTO   output
  FROM   student s
  WHERE  CONCAT(s.first_name, ' ', s.last_name) LIKE '%'||input||'%';

  /* Show result of local assignment via a query. */
  RAISE NOTICE '[%][%]', current_setting('credential.app_user'), output;
END;
$$;
There’s an important parsing trick to this sample program. It uses the LIKE operator rather than the SIMILAR TO operator because the parser fails to recognize the SIMILAR TO operator.
The DO-block returns the following output:
NOTICE: [Draco Malfoy][Hermione Granger]
- This creates the student_query logging table function, which takes a partial portion of a students first and last name to return the student information. While the example only returns the name and the Hogwarts House it lays a foundation for a more complete solution.
1
2
3
4
5
6
7
8
9
10
11
12
13
14
15
16
17
18
19
20
21
22
23
24
25
26
27
28
29
30
31
32
33
34
CREATE OR REPLACE
  FUNCTION student_query (partial_name  VARCHAR)
  RETURNS TABLE ( first_naem      VARCHAR(20)
                , last_name       VARCHAR(20)
                , hogwarts_house  VARCHAR(10) ) AS
$$
DECLARE
  queried   VARCHAR;
  by_whome  VARCHAR;
BEGIN
  /* Query separately because embedding in insert statement fails. */
  SELECT CONCAT(s.first_name, ' ', s.last_name) AS student_name
  FROM   student s INTO queried
  WHERE  CONCAT(s.first_name, ' ', s.last_name) LIKE '%'||partial_name||'%';

  /* Log the query with the credentials of the user. */
  INSERT INTO logger
  ( app_user
  , queried_student
  , query_time )
  VALUES
  ( current_setting('credential.app_user')
  , queried
  , NOW());

  /* Return the result set without disclosing the query was recorded. */
  RETURN QUERY
  SELECT s.first_name
  ,      s.last_name
  ,      s.hogwarts_house
  FROM   student s
  WHERE  CONCAT(s.first_name, ' ', s.last_name) LIKE '%'||partial_name||'%';
END;
$$ LANGUAGE plpgsql;
- You can test the function by calling it, like this:
SELECT * FROM student_query('Hermione');
It displays:
 first_naem | last_name | hogwarts_house
------------+-----------+----------------
 Hermione   | Granger   | Gryffindor
(1 row)
You can check the logging table and discover who looked up another student’s records.
SELECT * FROM logger;
It displays:
logger_id | app_user | queried_student | query_time -----------+--------------+------------------+---------------------------- 1 | Draco Malfoy | Hermione Granger | 2022-05-29 22:51:50.398987 (1 row) - Assuming you’ve built an authorized_user function that returns a Boolean, you can add a call to it in the WHERE clause. For simplicity, let’s implement the function to deny all users, like:
1
2
3
4
5
6
7
8
9
10
CREATE OR REPLACE
  FUNCTION authorized_user
  (user_name  VARCHAR) RETURNS BOOLEAN AS
$$
DECLARE
  lv_retval  BOOLEAN := FALSE;
BEGIN
  RETURN lv_retval;
END;
$$  LANGUAGE plpgsql;
You can now replace the query on lines 28 through 32 with the new one below. The added clause on line 33 denies access to unauthorized users because there aren’t any.
28
29
30
31
32
33
  SELECT s.first_name
  ,      s.last_name
  ,      s.hogwarts_house
  FROM   student s
  WHERE  CONCAT(s.first_name, ' ', s.last_name) LIKE '%'||partial_name||'%'
  AND    authorized_user(current_setting('credential.app_user'));
While it returns:
 first_naem | last_name | hogwarts_house
------------+-----------+----------------
(0 rows)
The logger table shows two entries. One for the query that returned a value and one for the version that didn’t.
logger_id | app_user | queried_student | query_time -----------+--------------+------------------+---------------------------- 1 | Draco Malfoy | Hermione Granger | 2022-05-29 23:23:39.82063 2 | Draco Malfoy | Hermione Granger | 2022-05-29 23:23:40.736945 (2 rows)In both cases the bad actor Draco Malfoy’s unauthorized access is captured and he was denied any information without alerting him to the security precaution in a logging table function.
As always, I hope this helps those looking for this type of solution.
