OracleDB Python Tutorial 1
This shows you how to get Python working with the Oracle Database 23c in Docker or Podman on Ubuntu. You can find useful connection strings for this in Oracle Database Free Get Started.
- First step requires you to install the pip3/span> utility on Ubuntu.
sudo apt install -y python3-pip
Display detailed console log →
Reading package lists... Done
Building dependency tree... Done
Reading state information... Done
The following additional packages will be installed:
 binutils binutils-common binutils-x86-64-linux-gnu build-essential dpkg-dev
 fakeroot g++ g++-11 gcc gcc-11 javascript-common libalgorithm-diff-perl
 libalgorithm-diff-xs-perl libalgorithm-merge-perl libasan6 libbinutils
 libc-dev-bin libc-devtools libc6-dev libcc1-0 libcrypt-dev libctf-nobfd0
 libctf0 libdpkg-perl libexpat1-dev libfakeroot libfile-fcntllock-perl
 libgcc-11-dev libitm1 libjs-jquery libjs-sphinxdoc libjs-underscore liblsan0
 libnsl-dev libpython3-dev libpython3.10-dev libquadmath0 libstdc++-11-dev
 libtirpc-dev libtsan0 libubsan1 linux-libc-dev lto-disabled-list make
 manpages-dev python3-dev python3-distutils python3-setuptools python3-wheel
 python3.10-dev rpcsvc-proto zlib1g-dev
Suggested packages:
 binutils-doc debian-keyring g++-multilib g++-11-multilib gcc-11-doc
 gcc-multilib autoconf automake libtool flex bison gcc-doc gcc-11-multilib
 gcc-11-locales apache2 | lighttpd | httpd glibc-doc bzr libstdc++-11-doc
 make-doc python-setuptools-doc
The following NEW packages will be installed:
 binutils binutils-common binutils-x86-64-linux-gnu build-essential dpkg-dev
 fakeroot g++ g++-11 gcc gcc-11 javascript-common libalgorithm-diff-perl
 libalgorithm-diff-xs-perl libalgorithm-merge-perl libasan6 libbinutils
 libc-dev-bin libc-devtools libc6-dev libcc1-0 libcrypt-dev libctf-nobfd0
 libctf0 libdpkg-perl libexpat1-dev libfakeroot libfile-fcntllock-perl
 libgcc-11-dev libitm1 libjs-jquery libjs-sphinxdoc libjs-underscore liblsan0
 libnsl-dev libpython3-dev libpython3.10-dev libquadmath0 libstdc++-11-dev
 libtirpc-dev libtsan0 libubsan1 linux-libc-dev lto-disabled-list make
 manpages-dev python3-dev python3-distutils python3-pip python3-setuptools
 python3-wheel python3.10-dev rpcsvc-proto zlib1g-dev
0 upgraded, 53 newly installed, 0 to remove and 9 not upgraded.
Need to get 62.2 MB of archives.
After this operation, 220 MB of additional disk space will be used.
Get:1 http://us.archive.ubuntu.com/ubuntu jammy-updates/main amd64 binutils-common amd64 2.38-4ubuntu2.3 [222 kB]
Get:2 http://us.archive.ubuntu.com/ubuntu jammy-updates/main amd64 libbinutils amd64 2.38-4ubuntu2.3 [662 kB]
Get:3 http://us.archive.ubuntu.com/ubuntu jammy-updates/main amd64 libctf-nobfd0 amd64 2.38-4ubuntu2.3 [107 kB]
Get:4 http://us.archive.ubuntu.com/ubuntu jammy-updates/main amd64 libctf0 amd64 2.38-4ubuntu2.3 [103 kB]
Get:5 http://us.archive.ubuntu.com/ubuntu jammy-updates/main amd64 binutils-x86-64-linux-gnu amd64 2.38-4ubuntu2.3 [2,327 kB]
Get:6 http://us.archive.ubuntu.com/ubuntu jammy-updates/main amd64 binutils amd64 2.38-4ubuntu2.3 [3,190 B]
Get:7 http://us.archive.ubuntu.com/ubuntu jammy-updates/main amd64 libc-dev-bin amd64 2.35-0ubuntu3.5 [20.3 kB]
Get:8 http://us.archive.ubuntu.com/ubuntu jammy-updates/main amd64 linux-libc-dev amd64 5.15.0-91.101 [1,332 kB]
Get:9 http://us.archive.ubuntu.com/ubuntu jammy/main amd64 libcrypt-dev amd64 1:4.4.27-1 [112 kB]
Get:10 http://us.archive.ubuntu.com/ubuntu jammy/main amd64 rpcsvc-proto amd64 1.4.2-0ubuntu6 [68.5 kB]
Get:11 http://us.archive.ubuntu.com/ubuntu jammy-updates/main amd64 libtirpc-dev amd64 1.3.2-2ubuntu0.1 [192 kB]
Get:12 http://us.archive.ubuntu.com/ubuntu jammy/main amd64 libnsl-dev amd64 1.3.0-2build2 [71.3 kB]
Get:13 http://us.archive.ubuntu.com/ubuntu jammy-updates/main amd64 libc6-dev amd64 2.35-0ubuntu3.5 [2,098 kB]
Get:14 http://us.archive.ubuntu.com/ubuntu jammy-updates/main amd64 libcc1-0 amd64 12.3.0-1ubuntu1~22.04 [48.3 kB]
Get:15 http://us.archive.ubuntu.com/ubuntu jammy-updates/main amd64 libitm1 amd64 12.3.0-1ubuntu1~22.04 [30.2 kB]
Get:16 http://us.archive.ubuntu.com/ubuntu jammy-updates/main amd64 libasan6 amd64 11.4.0-1ubuntu1~22.04 [2,282 kB]
Get:17 http://us.archive.ubuntu.com/ubuntu jammy-updates/main amd64 liblsan0 amd64 12.3.0-1ubuntu1~22.04 [1,069 kB]
Get:18 http://us.archive.ubuntu.com/ubuntu jammy-updates/main amd64 libtsan0 amd64 11.4.0-1ubuntu1~22.04 [2,260 kB]
Get:19 http://us.archive.ubuntu.com/ubuntu jammy-updates/main amd64 libubsan1 amd64 12.3.0-1ubuntu1~22.04 [976 kB]
Get:20 http://us.archive.ubuntu.com/ubuntu jammy-updates/main amd64 libquadmath0 amd64 12.3.0-1ubuntu1~22.04 [154 kB]
Get:21 http://us.archive.ubuntu.com/ubuntu jammy-updates/main amd64 libgcc-11-dev amd64 11.4.0-1ubuntu1~22.04 [2,517 kB]
Get:22 http://us.archive.ubuntu.com/ubuntu jammy-updates/main amd64 gcc-11 amd64 11.4.0-1ubuntu1~22.04 [20.1 MB]
Get:23 http://us.archive.ubuntu.com/ubuntu jammy/main amd64 gcc amd64 4:11.2.0-1ubuntu1 [5,112 B]
Get:24 http://us.archive.ubuntu.com/ubuntu jammy-updates/main amd64 libstdc++-11-dev amd64 11.4.0-1ubuntu1~22.04 [2,101 kB]
Get:25 http://us.archive.ubuntu.com/ubuntu jammy-updates/main amd64 g++-11 amd64 11.4.0-1ubuntu1~22.04 [11.4 MB]
Get:26 http://us.archive.ubuntu.com/ubuntu jammy/main amd64 g++ amd64 4:11.2.0-1ubuntu1 [1,412 B]
Get:27 http://us.archive.ubuntu.com/ubuntu jammy/main amd64 make amd64 4.3-4.1build1 [180 kB]
Get:28 http://us.archive.ubuntu.com/ubuntu jammy-updates/main amd64 libdpkg-perl all 1.21.1ubuntu2.2 [237 kB]
Get:29 http://us.archive.ubuntu.com/ubuntu jammy/main amd64 lto-disabled-list all 24 [12.5 kB]
Get:30 http://us.archive.ubuntu.com/ubuntu jammy-updates/main amd64 dpkg-dev all 1.21.1ubuntu2.2 [922 kB]
Get:31 http://us.archive.ubuntu.com/ubuntu jammy/main amd64 build-essential amd64 12.9ubuntu3 [4,744 B]
Get:32 http://us.archive.ubuntu.com/ubuntu jammy/main amd64 libfakeroot amd64 1.28-1ubuntu1 [31.5 kB]
Get:33 http://us.archive.ubuntu.com/ubuntu jammy/main amd64 fakeroot amd64 1.28-1ubuntu1 [60.4 kB]
Get:34 http://us.archive.ubuntu.com/ubuntu jammy/main amd64 javascript-common all 11+nmu1 [5,936 B]
Get:35 http://us.archive.ubuntu.com/ubuntu jammy/main amd64 libalgorithm-diff-perl all 1.201-1 [41.8 kB]
Get:36 http://us.archive.ubuntu.com/ubuntu jammy/main amd64 libalgorithm-diff-xs-perl amd64 0.04-6build3 [11.9 kB]
Get:37 http://us.archive.ubuntu.com/ubuntu jammy/main amd64 libalgorithm-merge-perl all 0.08-3 [12.0 kB]
Get:38 http://us.archive.ubuntu.com/ubuntu jammy-updates/main amd64 libc-devtools amd64 2.35-0ubuntu3.5 [28.9 kB]
Get:39 http://us.archive.ubuntu.com/ubuntu jammy-updates/main amd64 libexpat1-dev amd64 2.4.7-1ubuntu0.2 [147 kB]
Get:40 http://us.archive.ubuntu.com/ubuntu jammy/main amd64 libfile-fcntllock-perl amd64 0.22-3build7 [33.9 kB]
Get:41 http://us.archive.ubuntu.com/ubuntu jammy/main amd64 libjs-jquery all 3.6.0+dfsg+~3.5.13-1 [321 kB]
Get:42 http://us.archive.ubuntu.com/ubuntu jammy/main amd64 libjs-underscore all 1.13.2~dfsg-2 [118 kB]
Get:43 http://us.archive.ubuntu.com/ubuntu jammy/main amd64 libjs-sphinxdoc all 4.3.2-1 [139 kB]
Get:44 http://us.archive.ubuntu.com/ubuntu jammy-updates/main amd64 zlib1g-dev amd64 1:1.2.11.dfsg-2ubuntu9.2 [164 kB]
Get:45 http://us.archive.ubuntu.com/ubuntu jammy-updates/main amd64 libpython3.10-dev amd64 3.10.12-1~22.04.3 [4,762 kB]
Get:46 http://us.archive.ubuntu.com/ubuntu jammy-updates/main amd64 libpython3-dev amd64 3.10.6-1~22.04 [7,166 B]
Get:47 http://us.archive.ubuntu.com/ubuntu jammy/main amd64 manpages-dev all 5.10-1ubuntu1 [2,309 kB]
Get:48 http://us.archive.ubuntu.com/ubuntu jammy-updates/main amd64 python3.10-dev amd64 3.10.12-1~22.04.3 [507 kB]
Get:49 http://us.archive.ubuntu.com/ubuntu jammy-updates/main amd64 python3-distutils all 3.10.8-1~22.04 [139 kB]
Get:50 http://us.archive.ubuntu.com/ubuntu jammy-updates/main amd64 python3-dev amd64 3.10.6-1~22.04 [26.0 kB]
Get:51 http://us.archive.ubuntu.com/ubuntu jammy-updates/main amd64 python3-setuptools all 59.6.0-1.2ubuntu0.22.04.1 [339 kB]
Get:52 http://us.archive.ubuntu.com/ubuntu jammy-updates/universe amd64 python3-wheel all 0.37.1-2ubuntu0.22.04.1 [32.0 kB]
Get:53 http://us.archive.ubuntu.com/ubuntu jammy-updates/universe amd64 python3-pip all 22.0.2+dfsg-1ubuntu0.4 [1,305 kB]
Fetched 62.2 MB in 35s (1,781 kB/s)
Extracting templates from packages: 100%
Selecting previously unselected package binutils-common:amd64.
(Reading database ... 221117 files and directories currently installed.)
Preparing to unpack .../00-binutils-common_2.38-4ubuntu2.3_amd64.deb ...
Unpacking binutils-common:amd64 (2.38-4ubuntu2.3) ...
Selecting previously unselected package libbinutils:amd64.
Preparing to unpack .../01-libbinutils_2.38-4ubuntu2.3_amd64.deb ...
Unpacking libbinutils:amd64 (2.38-4ubuntu2.3) ...
Selecting previously unselected package libctf-nobfd0:amd64.
Preparing to unpack .../02-libctf-nobfd0_2.38-4ubuntu2.3_amd64.deb ...
Unpacking libctf-nobfd0:amd64 (2.38-4ubuntu2.3) ...
Selecting previously unselected package libctf0:amd64.
Preparing to unpack .../03-libctf0_2.38-4ubuntu2.3_amd64.deb ...
Unpacking libctf0:amd64 (2.38-4ubuntu2.3) ...
Selecting previously unselected package binutils-x86-64-linux-gnu.
Preparing to unpack .../04-binutils-x86-64-linux-gnu_2.38-4ubuntu2.3_amd64.deb ...
Unpacking binutils-x86-64-linux-gnu (2.38-4ubuntu2.3) ...
Selecting previously unselected package binutils.
Preparing to unpack .../05-binutils_2.38-4ubuntu2.3_amd64.deb ...
Unpacking binutils (2.38-4ubuntu2.3) ...
Selecting previously unselected package libc-dev-bin.
Preparing to unpack .../06-libc-dev-bin_2.35-0ubuntu3.5_amd64.deb ...
Unpacking libc-dev-bin (2.35-0ubuntu3.5) ...
Selecting previously unselected package linux-libc-dev:amd64.
Preparing to unpack .../07-linux-libc-dev_5.15.0-91.101_amd64.deb ...
Unpacking linux-libc-dev:amd64 (5.15.0-91.101) ...
Selecting previously unselected package libcrypt-dev:amd64.
Preparing to unpack .../08-libcrypt-dev_1%3a4.4.27-1_amd64.deb ...
Unpacking libcrypt-dev:amd64 (1:4.4.27-1) ...
Selecting previously unselected package rpcsvc-proto.
Preparing to unpack .../09-rpcsvc-proto_1.4.2-0ubuntu6_amd64.deb ...
Unpacking rpcsvc-proto (1.4.2-0ubuntu6) ...
Selecting previously unselected package libtirpc-dev:amd64.
Preparing to unpack .../10-libtirpc-dev_1.3.2-2ubuntu0.1_amd64.deb ...
Unpacking libtirpc-dev:amd64 (1.3.2-2ubuntu0.1) ...
Selecting previously unselected package libnsl-dev:amd64.
Preparing to unpack .../11-libnsl-dev_1.3.0-2build2_amd64.deb ...
Unpacking libnsl-dev:amd64 (1.3.0-2build2) ...
Selecting previously unselected package libc6-dev:amd64.
Preparing to unpack .../12-libc6-dev_2.35-0ubuntu3.5_amd64.deb ...
Unpacking libc6-dev:amd64 (2.35-0ubuntu3.5) ...
Selecting previously unselected package libcc1-0:amd64.
Preparing to unpack .../13-libcc1-0_12.3.0-1ubuntu1~22.04_amd64.deb ...
Unpacking libcc1-0:amd64 (12.3.0-1ubuntu1~22.04) ...
Selecting previously unselected package libitm1:amd64.
Preparing to unpack .../14-libitm1_12.3.0-1ubuntu1~22.04_amd64.deb ...
Unpacking libitm1:amd64 (12.3.0-1ubuntu1~22.04) ...
Selecting previously unselected package libasan6:amd64.
Preparing to unpack .../15-libasan6_11.4.0-1ubuntu1~22.04_amd64.deb ...
Unpacking libasan6:amd64 (11.4.0-1ubuntu1~22.04) ...
Selecting previously unselected package liblsan0:amd64.
Preparing to unpack .../16-liblsan0_12.3.0-1ubuntu1~22.04_amd64.deb ...
Unpacking liblsan0:amd64 (12.3.0-1ubuntu1~22.04) ...
Selecting previously unselected package libtsan0:amd64.
Preparing to unpack .../17-libtsan0_11.4.0-1ubuntu1~22.04_amd64.deb ...
Unpacking libtsan0:amd64 (11.4.0-1ubuntu1~22.04) ...
Selecting previously unselected package libubsan1:amd64.
Preparing to unpack .../18-libubsan1_12.3.0-1ubuntu1~22.04_amd64.deb ...
Unpacking libubsan1:amd64 (12.3.0-1ubuntu1~22.04) ...
Selecting previously unselected package libquadmath0:amd64.
Preparing to unpack .../19-libquadmath0_12.3.0-1ubuntu1~22.04_amd64.deb ...
Unpacking libquadmath0:amd64 (12.3.0-1ubuntu1~22.04) ...
Selecting previously unselected package libgcc-11-dev:amd64.
Preparing to unpack .../20-libgcc-11-dev_11.4.0-1ubuntu1~22.04_amd64.deb ...
Unpacking libgcc-11-dev:amd64 (11.4.0-1ubuntu1~22.04) ...
Selecting previously unselected package gcc-11.
Preparing to unpack .../21-gcc-11_11.4.0-1ubuntu1~22.04_amd64.deb ...
Unpacking gcc-11 (11.4.0-1ubuntu1~22.04) ...
Selecting previously unselected package gcc.
Preparing to unpack .../22-gcc_4%3a11.2.0-1ubuntu1_amd64.deb ...
Unpacking gcc (4:11.2.0-1ubuntu1) ...
Selecting previously unselected package libstdc++-11-dev:amd64.
Preparing to unpack .../23-libstdc++-11-dev_11.4.0-1ubuntu1~22.04_amd64.deb ...
Unpacking libstdc++-11-dev:amd64 (11.4.0-1ubuntu1~22.04) ...
Selecting previously unselected package g++-11.
Preparing to unpack .../24-g++-11_11.4.0-1ubuntu1~22.04_amd64.deb ...
Unpacking g++-11 (11.4.0-1ubuntu1~22.04) ...
Selecting previously unselected package g++.
Preparing to unpack .../25-g++_4%3a11.2.0-1ubuntu1_amd64.deb ...
Unpacking g++ (4:11.2.0-1ubuntu1) ...
Selecting previously unselected package make.
Preparing to unpack .../26-make_4.3-4.1build1_amd64.deb ...
Unpacking make (4.3-4.1build1) ...
Selecting previously unselected package libdpkg-perl.
Preparing to unpack .../27-libdpkg-perl_1.21.1ubuntu2.2_all.deb ...
Unpacking libdpkg-perl (1.21.1ubuntu2.2) ...
Selecting previously unselected package lto-disabled-list.
Preparing to unpack .../28-lto-disabled-list_24_all.deb ...
Unpacking lto-disabled-list (24) ...
Selecting previously unselected package dpkg-dev.
Preparing to unpack .../29-dpkg-dev_1.21.1ubuntu2.2_all.deb ...
Unpacking dpkg-dev (1.21.1ubuntu2.2) ...
Selecting previously unselected package build-essential.
Preparing to unpack .../30-build-essential_12.9ubuntu3_amd64.deb ...
Unpacking build-essential (12.9ubuntu3) ...
Selecting previously unselected package libfakeroot:amd64.
Preparing to unpack .../31-libfakeroot_1.28-1ubuntu1_amd64.deb ...
Unpacking libfakeroot:amd64 (1.28-1ubuntu1) ...
Selecting previously unselected package fakeroot.
Preparing to unpack .../32-fakeroot_1.28-1ubuntu1_amd64.deb ...
Unpacking fakeroot (1.28-1ubuntu1) ...
Selecting previously unselected package javascript-common.
Preparing to unpack .../33-javascript-common_11+nmu1_all.deb ...
Unpacking javascript-common (11+nmu1) ...
Selecting previously unselected package libalgorithm-diff-perl.
Preparing to unpack .../34-libalgorithm-diff-perl_1.201-1_all.deb ...
Unpacking libalgorithm-diff-perl (1.201-1) ...
Selecting previously unselected package libalgorithm-diff-xs-perl.
Preparing to unpack .../35-libalgorithm-diff-xs-perl_0.04-6build3_amd64.deb ...
Unpacking libalgorithm-diff-xs-perl (0.04-6build3) ...
Selecting previously unselected package libalgorithm-merge-perl.
Preparing to unpack .../36-libalgorithm-merge-perl_0.08-3_all.deb ...
Unpacking libalgorithm-merge-perl (0.08-3) ...
Selecting previously unselected package libc-devtools.
Preparing to unpack .../37-libc-devtools_2.35-0ubuntu3.5_amd64.deb ...
Unpacking libc-devtools (2.35-0ubuntu3.5) ...
Selecting previously unselected package libexpat1-dev:amd64.
Preparing to unpack .../38-libexpat1-dev_2.4.7-1ubuntu0.2_amd64.deb ...
Unpacking libexpat1-dev:amd64 (2.4.7-1ubuntu0.2) ...
Selecting previously unselected package libfile-fcntllock-perl.
Preparing to unpack .../39-libfile-fcntllock-perl_0.22-3build7_amd64.deb ...
Unpacking libfile-fcntllock-perl (0.22-3build7) ...
Selecting previously unselected package libjs-jquery.
Preparing to unpack .../40-libjs-jquery_3.6.0+dfsg+~3.5.13-1_all.deb ...
Unpacking libjs-jquery (3.6.0+dfsg+~3.5.13-1) ...
Selecting previously unselected package libjs-underscore.
Preparing to unpack .../41-libjs-underscore_1.13.2~dfsg-2_all.deb ...
Unpacking libjs-underscore (1.13.2~dfsg-2) ...
Selecting previously unselected package libjs-sphinxdoc.
Preparing to unpack .../42-libjs-sphinxdoc_4.3.2-1_all.deb ...
Unpacking libjs-sphinxdoc (4.3.2-1) ...
Selecting previously unselected package zlib1g-dev:amd64.
Preparing to unpack .../43-zlib1g-dev_1%3a1.2.11.dfsg-2ubuntu9.2_amd64.deb ...
Unpacking zlib1g-dev:amd64 (1:1.2.11.dfsg-2ubuntu9.2) ...
Selecting previously unselected package libpython3.10-dev:amd64.
Preparing to unpack .../44-libpython3.10-dev_3.10.12-1~22.04.3_amd64.deb ...
Unpacking libpython3.10-dev:amd64 (3.10.12-1~22.04.3) ...
Selecting previously unselected package libpython3-dev:amd64.
Preparing to unpack .../45-libpython3-dev_3.10.6-1~22.04_amd64.deb ...
Unpacking libpython3-dev:amd64 (3.10.6-1~22.04) ...
Selecting previously unselected package manpages-dev.
Preparing to unpack .../46-manpages-dev_5.10-1ubuntu1_all.deb ...
Unpacking manpages-dev (5.10-1ubuntu1) ...
Selecting previously unselected package python3.10-dev.
Preparing to unpack .../47-python3.10-dev_3.10.12-1~22.04.3_amd64.deb ...
Unpacking python3.10-dev (3.10.12-1~22.04.3) ...
Selecting previously unselected package python3-distutils.
Preparing to unpack .../48-python3-distutils_3.10.8-1~22.04_all.deb ...
Unpacking python3-distutils (3.10.8-1~22.04) ...
Selecting previously unselected package python3-dev.
Preparing to unpack .../49-python3-dev_3.10.6-1~22.04_amd64.deb ...
Unpacking python3-dev (3.10.6-1~22.04) ...
Selecting previously unselected package python3-setuptools.
Preparing to unpack .../50-python3-setuptools_59.6.0-1.2ubuntu0.22.04.1_all.deb ...
Unpacking python3-setuptools (59.6.0-1.2ubuntu0.22.04.1) ...
Selecting previously unselected package python3-wheel.
Preparing to unpack .../51-python3-wheel_0.37.1-2ubuntu0.22.04.1_all.deb ...
Unpacking python3-wheel (0.37.1-2ubuntu0.22.04.1) ...
Selecting previously unselected package python3-pip.
Preparing to unpack .../52-python3-pip_22.0.2+dfsg-1ubuntu0.4_all.deb ...
Unpacking python3-pip (22.0.2+dfsg-1ubuntu0.4) ...
Setting up python3-distutils (3.10.8-1~22.04) ...
Setting up javascript-common (11+nmu1) ...
Setting up manpages-dev (5.10-1ubuntu1) ...
Setting up lto-disabled-list (24) ...
Setting up python3-setuptools (59.6.0-1.2ubuntu0.22.04.1) ...
Setting up libfile-fcntllock-perl (0.22-3build7) ...
Setting up libalgorithm-diff-perl (1.201-1) ...
Setting up binutils-common:amd64 (2.38-4ubuntu2.3) ...
Setting up linux-libc-dev:amd64 (5.15.0-91.101) ...
Setting up libctf-nobfd0:amd64 (2.38-4ubuntu2.3) ...
Setting up python3-wheel (0.37.1-2ubuntu0.22.04.1) ...
Setting up libfakeroot:amd64 (1.28-1ubuntu1) ...
Setting up libasan6:amd64 (11.4.0-1ubuntu1~22.04) ...
Setting up fakeroot (1.28-1ubuntu1) ...
update-alternatives: using /usr/bin/fakeroot-sysv to provide /usr/bin/fakeroot (fakeroot) in auto mode
Setting up libtirpc-dev:amd64 (1.3.2-2ubuntu0.1) ...
Setting up rpcsvc-proto (1.4.2-0ubuntu6) ...
Setting up make (4.3-4.1build1) ...
Setting up libquadmath0:amd64 (12.3.0-1ubuntu1~22.04) ...
Setting up python3-pip (22.0.2+dfsg-1ubuntu0.4) ...
Setting up libdpkg-perl (1.21.1ubuntu2.2) ...
Setting up libubsan1:amd64 (12.3.0-1ubuntu1~22.04) ...
Setting up libnsl-dev:amd64 (1.3.0-2build2) ...
Setting up libcrypt-dev:amd64 (1:4.4.27-1) ...
Setting up libjs-jquery (3.6.0+dfsg+~3.5.13-1) ...
Setting up libbinutils:amd64 (2.38-4ubuntu2.3) ...
Setting up libc-dev-bin (2.35-0ubuntu3.5) ...
Setting up libalgorithm-diff-xs-perl (0.04-6build3) ...
Setting up libcc1-0:amd64 (12.3.0-1ubuntu1~22.04) ...
Setting up liblsan0:amd64 (12.3.0-1ubuntu1~22.04) ...
Setting up libitm1:amd64 (12.3.0-1ubuntu1~22.04) ...
Setting up libc-devtools (2.35-0ubuntu3.5) ...
Setting up libjs-underscore (1.13.2~dfsg-2) ...
Setting up libalgorithm-merge-perl (0.08-3) ...
Setting up libtsan0:amd64 (11.4.0-1ubuntu1~22.04) ...
Setting up libctf0:amd64 (2.38-4ubuntu2.3) ...
Setting up libjs-sphinxdoc (4.3.2-1) ...
Setting up libgcc-11-dev:amd64 (11.4.0-1ubuntu1~22.04) ...
Setting up libc6-dev:amd64 (2.35-0ubuntu3.5) ...
Setting up binutils-x86-64-linux-gnu (2.38-4ubuntu2.3) ...
Setting up binutils (2.38-4ubuntu2.3) ...
Setting up dpkg-dev (1.21.1ubuntu2.2) ...
Setting up libexpat1-dev:amd64 (2.4.7-1ubuntu0.2) ...
Setting up libstdc++-11-dev:amd64 (11.4.0-1ubuntu1~22.04) ...
Setting up zlib1g-dev:amd64 (1:1.2.11.dfsg-2ubuntu9.2) ...
Setting up gcc-11 (11.4.0-1ubuntu1~22.04) ...
Setting up g++-11 (11.4.0-1ubuntu1~22.04) ...
Setting up gcc (4:11.2.0-1ubuntu1) ...
Setting up libpython3.10-dev:amd64 (3.10.12-1~22.04.3) ...
Setting up python3.10-dev (3.10.12-1~22.04.3) ...
Setting up g++ (4:11.2.0-1ubuntu1) ...
update-alternatives: using /usr/bin/g++ to provide /usr/bin/c++ (c++) in auto mode
Setting up build-essential (12.9ubuntu3) ...
Setting up libpython3-dev:amd64 (3.10.6-1~22.04) ...
Setting up python3-dev (3.10.6-1~22.04) ...
Processing triggers for man-db (2.10.2-1) ...
Processing triggers for libc-bin (2.35-0ubuntu3.5) ...
- Second step requires that you pip3 install the oracledb library:
sudo pip3 install oracledb --upgrade
Display detailed console log →
Defaulting to user installation because normal site-packages is not writeable Collecting oracledb Downloading oracledb-1.4.2-cp310-cp310-manylinux_2_17_x86_64.manylinux2014_x86_64.whl (8.6 MB) ━━━━━━━━━━━━━━━━━━━━━━━━━━━━━━━━━━━━━━━━ 8.6/8.6 MB 2.7 MB/s eta 0:00:00 Requirement already satisfied: cryptography>=3.2.1 in /usr/lib/python3/dist-packages (from oracledb) (3.4.8) Installing collected packages: oracledb Successfully installed oracledb-1.4.2 - Third step requires you write a Python program to test your connection to Oracle Database 23c Free, like:
1
2
3
4
5
6
7
8
9
10
11
12
13
14
15
16
17
18
19
20
#!/usr/bin/python

# Import the Oracle library.
import oracledb

try:
  # Create a connection to local Docker or Podman installation.
  db = oracledb.connect(user='c##student', password='student', dsn='localhost:51521/FREE')

  # Print a connection message.
  print("Connected to the Oracle", db.version, "database.")

except oracledb.DatabaseError as e:
  error, = e.args
  print(sys.stderr, "Oracle-Error-Code:", error.code)
  print(sys.stderr, "Oracle-Error-Message:", error.message)

finally:
  # Close connection.
  db.close()
The 51521 port is the recommended port when setting up Docker or Podman services, however, it can be set to any port above 1024.
It should print:
Connected to the Oracle 23.3.0.23.9 database.
- Fourth step requires you write a Python program to test querying data from an Oracle Database 23c Free instance. I created the following avenger table and seeded it with six Avengers.
1
2
3
4
5
6
7
8
9
10
11
12
13
14
15
16
17
/* Conditionally drop the table. */
DROP TABLE IF EXISTS avenger;

/* Create the table. */
CREATE TABLE avenger
( avenger_id      NUMBER
, first_name      VARCHAR2(20)
, last_name       VARCHAR2(20)
, character_name  VARCHAR2(20));

/* Seed the table with data. */
INSERT INTO avenger VALUES (1,'Anthony','Stark','Iron Man');
INSERT INTO avenger VALUES (2,'Thor','Odinson','God of Thunder');
INSERT INTO avenger VALUES (3,'Steven','Rogers','Captain America');
INSERT INTO avenger VALUES (4,'Bruce','Banner','Hulk');
INSERT INTO avenger VALUES (5,'Clinton','Barton','Hawkeye');
INSERT INTO avenger VALUES (6,'Natasha','Romanoff','Black Widow');
Then, I extended the program logic to include a cursor and for loop to read the values from the avenger table:
1
2
3
4
5
6
7
8
9
10
11
12
13
14
15
16
17
18
19
20
21
22
23
24
25
26
27
28
29
30
31
32
#!/usr/bin/python

# Import the Oracle library.
import oracledb

try:
  # Create a connection to local Docker or Podman installation.
  db = oracledb.connect(user='c##student', password='student', dsn='localhost:51521/FREE')

  # Create a cursor.
  cursor = db.cursor()

  # Execute a query.
  cursor.execute("SELECT   character_name " +
                 ",        first_name " +
                 ",        last_name " +
                 "FROM     avenger " +
                 "ORDER BY character_name")

  # Read the contents of the cursor.
  for row in cursor:
    print(row[0] + ':',row[2] + ',',row[1])

except oracledb.DatabaseError as e:
  error, = e.args
  print(sys.stderr, "Oracle-Error-Code:", error.code)
  print(sys.stderr, "Oracle-Error-Message:", error.message)

finally:
  # Close cursor and connection.
  cursor.close()
  db.close()
The 51521 port is the recommended port when setting up Docker or Podman services, however, it can be set to any port above 1024.
It should print:
Black Widow: Romanoff, Natasha
Captain America: Rogers, Steven
God of Thunder: Odinson, Thor
Hawkeye: Barton, Clinton
Hulk: Banner, Bruce
Iron Man: Stark, Anthony
- Fifth step requires you write a Python program to test querying data filtered by a local variable from an Oracle Database 23c Free instance. This example looks only for the Hulk among the six Avengers.
1
2
3
4
5
6
7
8
9
10
11
12
13
14
15
16
17
18
19
20
21
22
23
24
25
26
27
28
29
30
31
32
33
34
35
36
#!/usr/bin/python

# Import the Oracle library.
import oracledb

try:
  # Create a connection to local Docker or Podman installation.
  db = oracledb.connect(user='c##student', password='student', dsn='localhost:51521/FREE')

  # Create a cursor.
  cursor = db.cursor()

  # Execute a query.
  stmt = "SELECT   character_name "            \
         ",        first_name "                \
         ",        last_name "                 \
         "FROM     avenger "                   \
         "WHERE    character_name = :avenger " \
         "ORDER BY character_name"

  # Execute with bind variable.
  cursor.execute(stmt, avenger = "Hulk")

  # Read the contents of the cursor.
  for row in cursor:
    print(row[0] + ':',row[2] + ',',row[1])

except oracledb.DatabaseError as e:
  error, = e.args
  print(sys.stderr, "Oracle-Error-Code:", error.code)
  print(sys.stderr, "Oracle-Error-Message:", error.message)

finally:
  # Close cursor and connection.
  cursor.close()
  db.close()
It should print:
Hulk: Banner, Bruce
As always, I hope this puts everything together for setting up Python with Oracle Database 23c Free.
pgAdmin4 on Ubuntu
Installing pgAdmin4 is qualified by the pgAdmin4 (APT) web page, which relies on the curl utility. Ubuntu doesn’t install curl by default, so you need to install it before you can download and install pgAdmin4:
- Download and install curl utility
sudo apt-get install -y curl
Display detailed console log →
Reading package lists... Done
Building dependency tree... Done
Reading state information... Done
The following NEW packages will be installed:
  curl
0 upgraded, 1 newly installed, 0 to remove and 5 not upgraded.
Need to get 194 kB of archives.
After this operation, 454 kB of additional disk space will be used.
Ign:1 http://us.archive.ubuntu.com/ubuntu jammy-updates/main amd64 curl amd64 7.81.0-1ubuntu1.14
Err:1 http://security.ubuntu.com/ubuntu jammy-updates/main amd64 curl amd64 7.81.0-1ubuntu1.14
  404  Not Found [IP: 91.189.91.38 80]
E: Failed to fetch http://security.ubuntu.com/ubuntu/pool/main/c/curl/curl_7.81.0-1ubuntu1.14_amd64.deb  404  Not Found [IP: 91.189.91.38 80]
E: Unable to fetch some archives, maybe run apt-get update or try with --fix-missing?
student@student-virtual-machine:~$ sudo apt-get update
Hit:1 http://us.archive.ubuntu.com/ubuntu jammy InRelease
Get:2 http://us.archive.ubuntu.com/ubuntu jammy-updates InRelease [119 kB]
Get:3 http://security.ubuntu.com/ubuntu jammy-security InRelease [110 kB]
Get:4 https://dl.google.com/linux/chrome/deb stable InRelease [1,825 B]
Get:5 http://us.archive.ubuntu.com/ubuntu jammy-backports InRelease [109 kB]
Get:6 http://security.ubuntu.com/ubuntu jammy-security/main i386 Packages [376 kB]
Get:7 https://dl.google.com/linux/chrome/deb stable/main amd64 Packages [1,081 B]
Get:8 http://us.archive.ubuntu.com/ubuntu jammy-updates/main amd64 Packages [1,244 kB]
Get:9 http://security.ubuntu.com/ubuntu jammy-security/main amd64 Packages [1,016 kB]
Get:10 http://security.ubuntu.com/ubuntu jammy-security/main Translation-en [195 kB]
Get:11 http://security.ubuntu.com/ubuntu jammy-security/restricted amd64 Packages [1,179 kB]
Get:12 http://security.ubuntu.com/ubuntu jammy-security/universe i386 Packages [577 kB]
Get:13 http://security.ubuntu.com/ubuntu jammy-security/universe amd64 Packages [815 kB]
Get:14 http://security.ubuntu.com/ubuntu jammy-security/universe Translation-en [152 kB]
Get:15 http://us.archive.ubuntu.com/ubuntu jammy-updates/main i386 Packages [543 kB]
Get:16 http://us.archive.ubuntu.com/ubuntu jammy-updates/main Translation-en [257 kB]
Get:17 http://us.archive.ubuntu.com/ubuntu jammy-updates/restricted amd64 Packages [1,226 kB]
Get:18 http://us.archive.ubuntu.com/ubuntu jammy-updates/restricted Translation-en [199 kB]
Get:19 http://us.archive.ubuntu.com/ubuntu jammy-updates/universe i386 Packages [675 kB]
Get:20 http://us.archive.ubuntu.com/ubuntu jammy-updates/universe amd64 Packages [1,018 kB]
Get:21 http://us.archive.ubuntu.com/ubuntu jammy-updates/universe Translation-en [226 kB]
Get:22 http://us.archive.ubuntu.com/ubuntu jammy-backports/universe amd64 Packages [27.8 kB]
Get:23 http://us.archive.ubuntu.com/ubuntu jammy-backports/universe i386 Packages [16.8 kB]
Fetched 10.1 MB in 26s (386 kB/s)
Reading package lists... Done
- Download and install the public key for the repository (if not done previously):
sudo curl -fsS https://www.pgadmin.org/static/packages_pgadmin_org.pub | sudo gpg --dearmor -o /usr/share/keyrings/packages-pgadmin-org.gpg
It may find an existing key and require you to confirm its replacement:
File '/usr/share/keyrings/packages-pgadmin-org.gpg' exists. Overwrite? (y/N) y
- Create the repository configuration file:
sudo sh -c 'echo "deb [signed-by=/usr/share/keyrings/packages-pgadmin-org.gpg] https://ftp.postgresql.org/pub/pgadmin/pgadmin4/apt/$(lsb_release -cs) pgadmin4 main" > /etc/apt/sources.list.d/pgadmin4.list && apt update'
Display detailed console log →
Hit:1 http://us.archive.ubuntu.com/ubuntu jammy InRelease
Hit:2 http://us.archive.ubuntu.com/ubuntu jammy-updates InRelease
Hit:3 http://security.ubuntu.com/ubuntu jammy-security InRelease
Hit:4 http://us.archive.ubuntu.com/ubuntu jammy-backports InRelease
Hit:5 https://dl.google.com/linux/chrome/deb stable InRelease
Get:6 https://ftp.postgresql.org/pub/pgadmin/pgadmin4/apt/jammy pgadmin4 InRelease [4,217 B]
Get:7 https://ftp.postgresql.org/pub/pgadmin/pgadmin4/apt/jammy pgadmin4/main all Packages [4,637 B]
Get:8 https://ftp.postgresql.org/pub/pgadmin/pgadmin4/apt/jammy pgadmin4/main amd64 Packages [7,693 B]
Fetched 16.5 kB in 2s (7,404 B/s)
Reading package lists... Done
Building dependency tree... Done
Reading state information... Done
21 packages can be upgraded. Run 'apt list --upgradable' to see them.
student@student-virtual-machine:~$ sudo apt-get update
Hit:1 http://security.ubuntu.com/ubuntu jammy-security InRelease
Hit:2 http://us.archive.ubuntu.com/ubuntu jammy InRelease
Hit:3 http://us.archive.ubuntu.com/ubuntu jammy-updates InRelease
Hit:4 https://dl.google.com/linux/chrome/deb stable InRelease
Hit:5 http://us.archive.ubuntu.com/ubuntu jammy-backports InRelease
Hit:6 https://ftp.postgresql.org/pub/pgadmin/pgadmin4/apt/jammy pgadmin4 InRelease
Reading package lists... Done
- Install the pgadmin4 Desktop:
sudo apt install pgadmin4-desktop
Display detailed console log →
Reading package lists... Done
Building dependency tree... Done
Reading state information... Done
The following additional packages will be installed:
 pgadmin4-server
The following NEW packages will be installed:
 pgadmin4-desktop pgadmin4-server
0 upgraded, 2 newly installed, 0 to remove and 21 not upgraded.
Need to get 203 MB of archives.
After this operation, 0 B of additional disk space will be used.
Do you want to continue? [Y/n] Y
Get:1 https://ftp.postgresql.org/pub/pgadmin/pgadmin4/apt/jammy pgadmin4/main amd64 pgadmin4-server amd64 8.0 [93.5 MB]
Get:2 https://ftp.postgresql.org/pub/pgadmin/pgadmin4/apt/jammy pgadmin4/main amd64 pgadmin4-desktop amd64 8.0 [110 MB]
Fetched 203 MB in 49s (4,163 kB/s)
Selecting previously unselected package pgadmin4-server.
(Reading database ... 204519 files and directories currently installed.)
Preparing to unpack .../pgadmin4-server_8.0_amd64.deb ...
Unpacking pgadmin4-server (8.0) ...
Selecting previously unselected package pgadmin4-desktop.
Preparing to unpack .../pgadmin4-desktop_8.0_amd64.deb ...
Unpacking pgadmin4-desktop (8.0) ...
Setting up pgadmin4-server (8.0) ...
Setting up pgadmin4-desktop (8.0) ...
Processing triggers for desktop-file-utils (0.26-1ubuntu3) ...
Processing triggers for hicolor-icon-theme (0.17-2) ...
Processing triggers for gnome-menus (3.36.0-1ubuntu3) ...
Processing triggers for mailcap (3.70+nmu1ubuntu1) ...
- You can launch your pgadmin4 program file or by clicking the pgAdmin4 icon in the other applications menu:

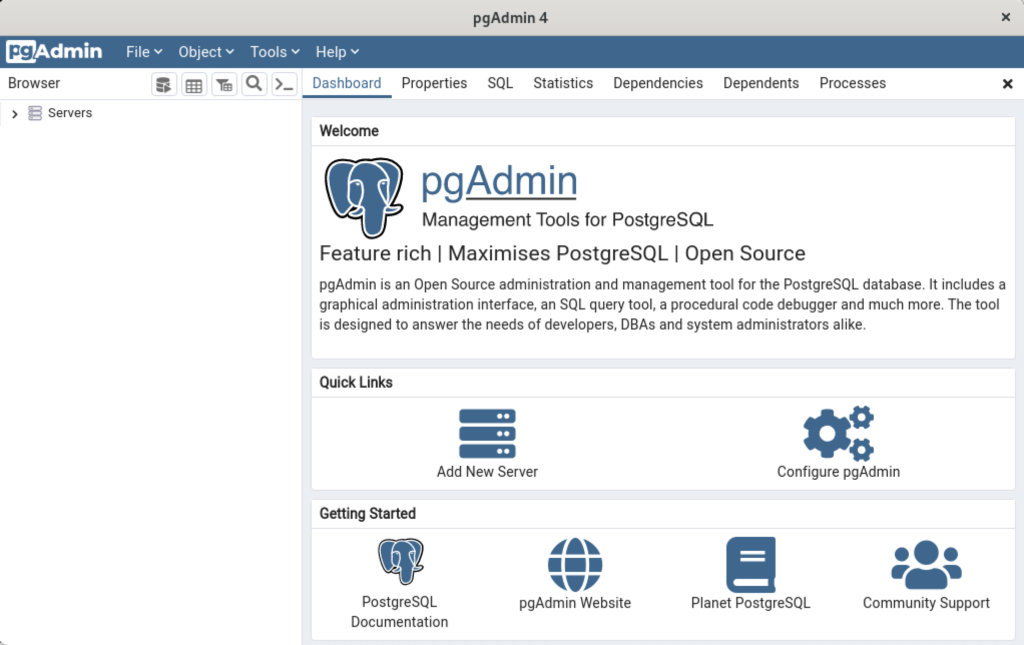
- It takes a couple moments to launch the pgadmin4 desktop. The initial screen will look like:

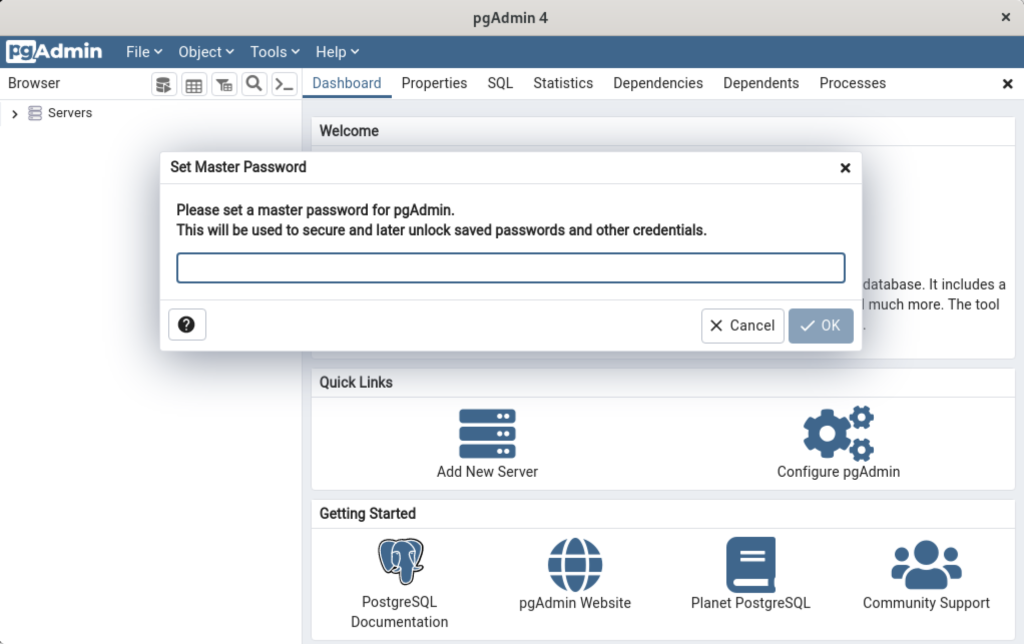
- After pgadmin4 launches, you’re prompted for a master password. Enter the password and click the OK button to proceed or simply let it sit for a couple minutes to avoid entering a password.
- After entering the password or skipping its entry you arrive at the base dialog, as shown.
- Click the Add New Server link, which prompts you to register your database. Enter videodb in the Name field and click the Connection tab to the right of the General tab.
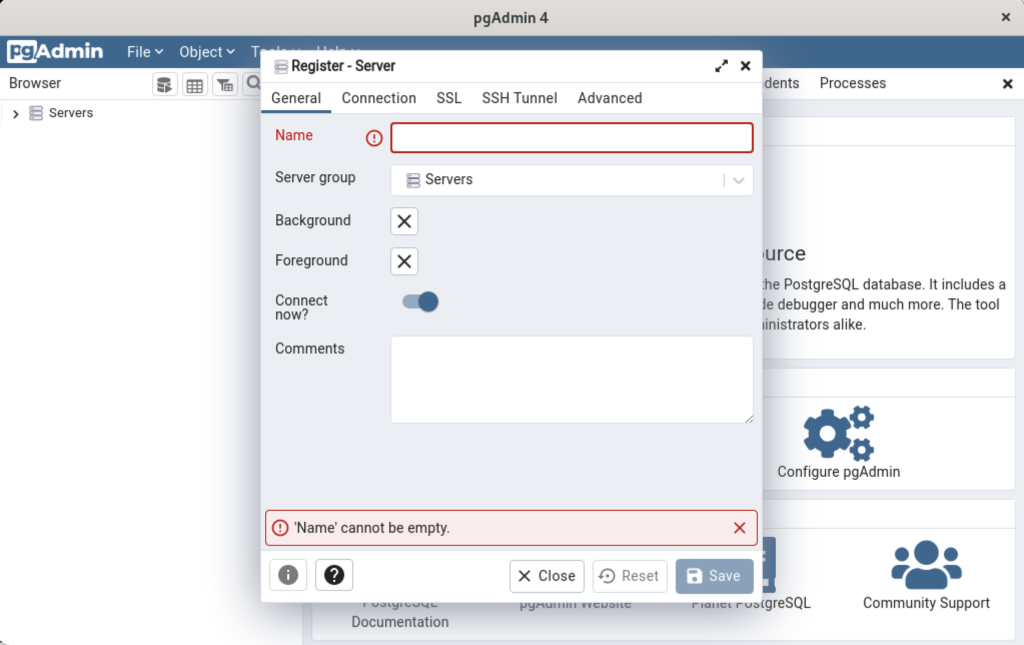
- In the Connection dialog, enter the following values:
- Host name/address: localhost
- Port: 5432
- Maintenance database: postgres
- Username: student
- Password: student

Enter a name for your database. In this example, videodb is the Server Name. Click the Save button to proceed.
- Having completed the configuration, you now see the home page.

This completes the instructions for installing, configuring, and using PostgreSQL on AlmaLinux. As always, I hope it helps those looking for instructions.
Oracle 23c MLE JavaScript
Oracle Database 23c has some really great features. One of those features is the ability to write JavaScript functions inside the database. Unfortunately, I noticed a couple omissions in Oracle’s JavaScript Developer’s Guide. Specifically, I encountered a privilege error while testing the example in the 5.1 Call Specifications for Functions example.
After having typed it all in to a simple script file, I encountered the following error message when trying to create an MLE MODULE:
CREATE OR REPLACE MLE MODULE jsmodule * ERROR AT line 1: ORA-01031: insufficient PRIVILEGES Help: https://docs.oracle.com/error-help/db/ora-06575 |
That was easy enough to fix. As the system user you need to grant the following two additional privileges to the user (based on my earlier sandbox pluggable user configuration user setup), which in my case is the c##student pluggable user:
GRANT CREATE MLE TO c##student; GRANT EXECUTE ON JAVASCRIPT TO c##student; |
You need to enable the SQL*PLus SERVEROUTPUT environment parameter for Oracle’s code example to work when you run the greet procedure from SQL*Plus command-line interface (CLI).
Below is the modified example file (unfortunately, the GeSHi formatting promotes log and return in the JavaScript functions to uppercase because they’re assumed as keywords in Oracle SQL):
- Conditionally drop the MLE MODULE.
DROP MLE MODULE IF EXISTS jsmodule;
- Create a MLE Call Specification.
1
2
3
4
5
6
7
8
9
10
11
12
CREATE OR REPLACE
  MLE MODULE jsmodule
  LANGUAGE JAVASCRIPT AS

  export function greet(str) {
    console.log(`Hello ${str}!`)
  }

  export function concat(str1, str2) {
    return str1 + " " + str2 + "!";
  }
/
- The greet function doesn’t return a value and uses the Nodejs console.log() function to write a string, which means you must wrap the JavaScript function as a procedure because it returns a void type.
1
2
3
4
5
CREATE OR REPLACE
  PROCEDURE greet(str in VARCHAR2)
  AS MLE MODULE jsmodule
  SIGNATURE 'greet(string)';
/
- Wrap the concatenate function as a function because it returns a value inside the JavaScript.
1
2
3
4
5
6
7
CREATE OR REPLACE
  FUNCTION concatenate
  ( str1  VARCHAR2
  , str2  VARCHAR2 ) RETURN VARCHAR2 AS
  MLE MODULE jsmodule
  SIGNATURE 'concat(string, string)';
/
- Enable to the SERVEROUTPUT environment variable to display messages printed from inside stored procedures or other PL/SQL blocks.
SET SERVEROUTPUT ON SIZE UNLIMITED
- Call the greet(literal|variable) function’s procedure wrapper.
CALL greet('Peter');
It returns
Hello Peter!
- Query the result from the concatenate() function’s function wrapper. */
SELECT concatenate('Hello','World');
It returns
Hello World!
As always, I hope this helps somebody working through the same issue.
Python3 on PostgreSQL
The necessary Python 3 driver for connections to the PostgreSQL database is python3-psycopg2, as qualified by this earlier post with full test examples for Red Hat distributions. You can install it on Ubuntu with the following command:
sudo apt-get install -y python3-psycopg2 |
Display detailed console log →
python3-psycopg2 Reading package lists... Done Building dependency tree... Done Reading state information... Done Suggested packages: python-psycopg2-doc The following NEW packages will be installed: python3-psycopg2 0 upgraded, 1 newly installed, 0 to remove and 4 not upgraded. Need to get 136 kB of archives. After this operation, 483 kB of additional disk space will be used. Get:1 http://us.archive.ubuntu.com/ubuntu jammy/main amd64 python3-psycopg2 amd64 2.9.2-1build2 [136 kB] Fetched 136 kB in 1s (146 kB/s) Selecting previously unselected package python3-psycopg2. (Reading database ... 204321 files and directories currently installed.) Preparing to unpack .../python3-psycopg2_2.9.2-1build2_amd64.deb ... Unpacking python3-psycopg2 (2.9.2-1build2) ... Setting up python3-psycopg2 (2.9.2-1build2) ... |
As always, I hope this helps those looking for a solution. Also, remember the referenced post above provides Linux distribution neutral full solutions.
SQL Developer on Ubuntu
The following steps show how to install and configure SQL Developer on Ubuntu 22.0.4 to work with Oracle Database 23c Free in a Docker container. The first steps are installing the Java Runtime Environment and Java Development Kit, and then downloading, installing and configuring SQL Developer. These are the required steps:
- Install the Java Runtime Environment:
sudo apt install default-jre
The log file for this is:
Display detailed console log →
Reading package lists... Done
Building dependency tree... Done
Reading state information... Done
The following additional packages will be installed:
 ca-certificates-java default-jre-headless fonts-dejavu-extra java-common
 libatk-wrapper-java libatk-wrapper-java-jni openjdk-11-jre
 openjdk-11-jre-headless
Suggested packages:
 fonts-ipafont-gothic fonts-ipafont-mincho fonts-wqy-microhei
 | fonts-wqy-zenhei
The following NEW packages will be installed:
 ca-certificates-java default-jre default-jre-headless fonts-dejavu-extra
 java-common libatk-wrapper-java libatk-wrapper-java-jni openjdk-11-jre
 openjdk-11-jre-headless
0 upgraded, 9 newly installed, 0 to remove and 4 not upgraded.
Need to get 44.9 MB of archives.
After this operation, 185 MB of additional disk space will be used.
Do you want to continue? [Y/n] Y
Get:1 http://us.archive.ubuntu.com/ubuntu jammy/main amd64 java-common all 0.72build2 [6,782 B]
Get:2 http://us.archive.ubuntu.com/ubuntu jammy-updates/main amd64 openjdk-11-jre-headless amd64 11.0.21+9-0ubuntu1~22.04 [42.5 MB]
Get:3 http://us.archive.ubuntu.com/ubuntu jammy/main amd64 default-jre-headless amd64 2:1.11-72build2 [3,042 B]
Get:4 http://us.archive.ubuntu.com/ubuntu jammy-updates/main amd64 ca-certificates-java all 20190909ubuntu1.2 [12.1 kB]
Get:5 http://us.archive.ubuntu.com/ubuntu jammy-updates/main amd64 openjdk-11-jre amd64 11.0.21+9-0ubuntu1~22.04 [214 kB]
Get:6 http://us.archive.ubuntu.com/ubuntu jammy/main amd64 default-jre amd64 2:1.11-72build2 [896 B]
Get:7 http://us.archive.ubuntu.com/ubuntu jammy/main amd64 fonts-dejavu-extra all 2.37-2build1 [2,041 kB]
Get:8 http://us.archive.ubuntu.com/ubuntu jammy/main amd64 libatk-wrapper-java all 0.38.0-5build1 [53.1 kB]
Get:9 http://us.archive.ubuntu.com/ubuntu jammy/main amd64 libatk-wrapper-java-jni amd64 0.38.0-5build1 [49.0 kB]
Fetched 44.9 MB in 14s (3,270 kB/s)
Selecting previously unselected package java-common.
(Reading database ... 203118 files and directories currently installed.)
Preparing to unpack .../0-java-common_0.72build2_all.deb ...
Unpacking java-common (0.72build2) ...
Selecting previously unselected package openjdk-11-jre-headless:amd64.
Preparing to unpack .../1-openjdk-11-jre-headless_11.0.21+9-0ubuntu1~22.04_amd64
.deb ...
Unpacking openjdk-11-jre-headless:amd64 (11.0.21+9-0ubuntu1~22.04) ...
Selecting previously unselected package default-jre-headless.
Preparing to unpack .../2-default-jre-headless_2%3a1.11-72build2_amd64.deb ...
Unpacking default-jre-headless (2:1.11-72build2) ...
Selecting previously unselected package ca-certificates-java.
Preparing to unpack .../3-ca-certificates-java_20190909ubuntu1.2_all.deb ...
Unpacking ca-certificates-java (20190909ubuntu1.2) ...
Selecting previously unselected package openjdk-11-jre:amd64.
Preparing to unpack .../4-openjdk-11-jre_11.0.21+9-0ubuntu1~22.04_amd64.deb ...
Unpacking openjdk-11-jre:amd64 (11.0.21+9-0ubuntu1~22.04) ...
Selecting previously unselected package default-jre.
Preparing to unpack .../5-default-jre_2%3a1.11-72build2_amd64.deb ...
Unpacking default-jre (2:1.11-72build2) ...
Selecting previously unselected package fonts-dejavu-extra.
Preparing to unpack .../6-fonts-dejavu-extra_2.37-2build1_all.deb ...
Unpacking fonts-dejavu-extra (2.37-2build1) ...
Selecting previously unselected package libatk-wrapper-java.
Preparing to unpack .../7-libatk-wrapper-java_0.38.0-5build1_all.deb ...
Unpacking libatk-wrapper-java (0.38.0-5build1) ...
Selecting previously unselected package libatk-wrapper-java-jni:amd64.
Preparing to unpack .../8-libatk-wrapper-java-jni_0.38.0-5build1_amd64.deb ...
Unpacking libatk-wrapper-java-jni:amd64 (0.38.0-5build1) ...
Setting up java-common (0.72build2) ...
Setting up fonts-dejavu-extra (2.37-2build1) ...
Setting up libatk-wrapper-java (0.38.0-5build1) ...
Setting up libatk-wrapper-java-jni:amd64 (0.38.0-5build1) ...
Setting up default-jre-headless (2:1.11-72build2) ...
Setting up openjdk-11-jre-headless:amd64 (11.0.21+9-0ubuntu1~22.04) ...
update-alternatives: using /usr/lib/jvm/java-11-openjdk-amd64/bin/java to provid
e /usr/bin/java (java) in auto mode
update-alternatives: using /usr/lib/jvm/java-11-openjdk-amd64/bin/jjs to provide
/usr/bin/jjs (jjs) in auto mode
update-alternatives: using /usr/lib/jvm/java-11-openjdk-amd64/bin/keytool to pro
vide /usr/bin/keytool (keytool) in auto mode
update-alternatives: using /usr/lib/jvm/java-11-openjdk-amd64/bin/rmid to provid
e /usr/bin/rmid (rmid) in auto mode
update-alternatives: using /usr/lib/jvm/java-11-openjdk-amd64/bin/rmiregistry to
provide /usr/bin/rmiregistry (rmiregistry) in auto mode
update-alternatives: using /usr/lib/jvm/java-11-openjdk-amd64/bin/pack200 to pro
vide /usr/bin/pack200 (pack200) in auto mode
update-alternatives: using /usr/lib/jvm/java-11-openjdk-amd64/bin/unpack200 to p
rovide /usr/bin/unpack200 (unpack200) in auto mode
update-alternatives: using /usr/lib/jvm/java-11-openjdk-amd64/lib/jexec to provi
de /usr/bin/jexec (jexec) in auto mode
Setting up openjdk-11-jre:amd64 (11.0.21+9-0ubuntu1~22.04) ...
Setting up default-jre (2:1.11-72build2) ...
Setting up ca-certificates-java (20190909ubuntu1.2) ...
head: cannot open '/etc/ssl/certs/java/cacerts' for reading: No such file or dir
ectory
Adding debian:QuoVadis_Root_CA_1_G3.pem
Adding debian:GlobalSign_Root_E46.pem
Adding debian:T-TeleSec_GlobalRoot_Class_3.pem
Adding debian:Certum_Trusted_Network_CA.pem
Adding debian:Buypass_Class_2_Root_CA.pem
Adding debian:NetLock_Arany_=Class_Gold=_Főtanúsítvány.pem
Adding debian:e-Szigno_Root_CA_2017.pem
Adding debian:emSign_Root_CA_-_G1.pem
Adding debian:D-TRUST_BR_Root_CA_1_2020.pem
Adding debian:Hongkong_Post_Root_CA_3.pem
Adding debian:GlobalSign_ECC_Root_CA_-_R4.pem
Adding debian:NAVER_Global_Root_Certification_Authority.pem
Adding debian:UCA_Extended_Validation_Root.pem
Adding debian:AffirmTrust_Premium.pem
Adding debian:Entrust_Root_Certification_Authority.pem
Adding debian:DigiCert_Trusted_Root_G4.pem
Adding debian:CFCA_EV_ROOT.pem
Adding debian:ePKI_Root_Certification_Authority.pem
Adding debian:Hellenic_Academic_and_Research_Institutions_ECC_RootCA_2015.pem
Adding debian:HARICA_TLS_RSA_Root_CA_2021.pem
Adding debian:GlobalSign_Root_CA_-_R6.pem
Adding debian:TWCA_Global_Root_CA.pem
Adding debian:Trustwave_Global_ECC_P384_Certification_Authority.pem
Adding debian:ISRG_Root_X1.pem
Adding debian:Starfield_Services_Root_Certificate_Authority_-_G2.pem
Adding debian:QuoVadis_Root_CA_3.pem
Adding debian:Security_Communication_Root_CA.pem
Adding debian:DigiCert_TLS_RSA4096_Root_G5.pem
Adding debian:Entrust_Root_Certification_Authority_-_EC1.pem
Adding debian:Security_Communication_RootCA3.pem
Adding debian:TeliaSonera_Root_CA_v1.pem
Adding debian:vTrus_ECC_Root_CA.pem
Adding debian:AC_RAIZ_FNMT-RCM_SERVIDORES_SEGUROS.pem
Adding debian:Certum_EC-384_CA.pem
Adding debian:Microsec_e-Szigno_Root_CA_2009.pem
Adding debian:ssl-cert-snakeoil.pem
Adding debian:USERTrust_ECC_Certification_Authority.pem
Adding debian:CA_Disig_Root_R2.pem
Adding debian:Certum_Trusted_Network_CA_2.pem
Adding debian:ACCVRAIZ1.pem
Adding debian:TunTrust_Root_CA.pem
Adding debian:Buypass_Class_3_Root_CA.pem
Adding debian:D-TRUST_Root_Class_3_CA_2_2009.pem
Adding debian:Security_Communication_ECC_RootCA1.pem
Adding debian:GTS_Root_R2.pem
Adding debian:Certigna.pem
Adding debian:SSL.com_EV_Root_Certification_Authority_RSA_R2.pem
Adding debian:Entrust.net_Premium_2048_Secure_Server_CA.pem
Adding debian:E-Tugra_Global_Root_CA_ECC_v3.pem
Adding debian:Hongkong_Post_Root_CA_1.pem
Adding debian:SZAFIR_ROOT_CA2.pem
Adding debian:TUBITAK_Kamu_SM_SSL_Kok_Sertifikasi_-_Surum_1.pem
Adding debian:Atos_TrustedRoot_2011.pem
Adding debian:DigiCert_High_Assurance_EV_Root_CA.pem
Adding debian:emSign_Root_CA_-_C1.pem
Adding debian:Go_Daddy_Root_Certificate_Authority_-_G2.pem
Adding debian:GDCA_TrustAUTH_R5_ROOT.pem
Adding debian:GlobalSign_Root_CA_-_R3.pem
Adding debian:DigiCert_Assured_ID_Root_G3.pem
Adding debian:Autoridad_de_Certificacion_Firmaprofesional_CIF_A62634068_2.pem
Adding debian:Certainly_Root_R1.pem
Adding debian:vTrus_Root_CA.pem
Adding debian:Certainly_Root_E1.pem
Adding debian:Autoridad_de_Certificacion_Firmaprofesional_CIF_A62634068.pem
Adding debian:TWCA_Root_Certification_Authority.pem
Adding debian:Starfield_Root_Certificate_Authority_-_G2.pem
Adding debian:Amazon_Root_CA_3.pem
Adding debian:GTS_Root_R1.pem
Adding debian:SwissSign_Gold_CA_-_G2.pem
Adding debian:Certum_Trusted_Root_CA.pem
Adding debian:Hellenic_Academic_and_Research_Institutions_RootCA_2015.pem
Adding debian:AffirmTrust_Networking.pem
Adding debian:emSign_ECC_Root_CA_-_G3.pem
Adding debian:HARICA_TLS_ECC_Root_CA_2021.pem
Adding debian:certSIGN_ROOT_CA.pem
Adding debian:Actalis_Authentication_Root_CA.pem
Adding debian:SSL.com_Root_Certification_Authority_RSA.pem
Adding debian:Certigna_Root_CA.pem
Adding debian:XRamp_Global_CA_Root.pem
Adding debian:Baltimore_CyberTrust_Root.pem
Adding debian:Trustwave_Global_ECC_P256_Certification_Authority.pem
Adding debian:QuoVadis_Root_CA_2_G3.pem
Adding debian:GTS_Root_R3.pem
Adding debian:COMODO_RSA_Certification_Authority.pem
Adding debian:ISRG_Root_X2.pem
Adding debian:SwissSign_Silver_CA_-_G2.pem
Adding debian:IdenTrust_Public_Sector_Root_CA_1.pem
Adding debian:Microsoft_ECC_Root_Certificate_Authority_2017.pem
Adding debian:UCA_Global_G2_Root.pem
Adding debian:DigiCert_Assured_ID_Root_CA.pem
Adding debian:Entrust_Root_Certification_Authority_-_G2.pem
Adding debian:QuoVadis_Root_CA_2.pem
Adding debian:Trustwave_Global_Certification_Authority.pem
Adding debian:OISTE_WISeKey_Global_Root_GB_CA.pem
Adding debian:HiPKI_Root_CA_-_G1.pem
Adding debian:E-Tugra_Certification_Authority.pem
Adding debian:GTS_Root_R4.pem
Adding debian:Amazon_Root_CA_2.pem
Adding debian:Amazon_Root_CA_1.pem
Adding debian:SecureTrust_CA.pem
Adding debian:GlobalSign_Root_R46.pem
Adding debian:IdenTrust_Commercial_Root_CA_1.pem
Adding debian:DigiCert_Global_Root_G2.pem
Adding debian:Comodo_AAA_Services_root.pem
Adding debian:SSL.com_Root_Certification_Authority_ECC.pem
Adding debian:T-TeleSec_GlobalRoot_Class_2.pem
Adding debian:Starfield_Class_2_CA.pem
Adding debian:DigiCert_Global_Root_CA.pem
Adding debian:SecureSign_RootCA11.pem
Adding debian:certSIGN_Root_CA_G2.pem
Adding debian:DigiCert_TLS_ECC_P384_Root_G5.pem
Adding debian:Entrust_Root_Certification_Authority_-_G4.pem
Adding debian:OISTE_WISeKey_Global_Root_GC_CA.pem
Adding debian:DigiCert_Global_Root_G3.pem
Adding debian:Secure_Global_CA.pem
Adding debian:Microsoft_RSA_Root_Certificate_Authority_2017.pem
Adding debian:DigiCert_Assured_ID_Root_G2.pem
Adding debian:Telia_Root_CA_v2.pem
Adding debian:emSign_ECC_Root_CA_-_C3.pem
Adding debian:COMODO_Certification_Authority.pem
Adding debian:AffirmTrust_Premium_ECC.pem
Adding debian:GLOBALTRUST_2020.pem
Adding debian:E-Tugra_Global_Root_CA_RSA_v3.pem
Adding debian:Amazon_Root_CA_4.pem
Adding debian:COMODO_ECC_Certification_Authority.pem
Adding debian:AffirmTrust_Commercial.pem
Adding debian:SSL.com_EV_Root_Certification_Authority_ECC.pem
Adding debian:AC_RAIZ_FNMT-RCM.pem
Adding debian:Go_Daddy_Class_2_CA.pem
Adding debian:QuoVadis_Root_CA_3_G3.pem
Adding debian:D-TRUST_EV_Root_CA_1_2020.pem
Adding debian:GlobalSign_Root_CA.pem
Adding debian:GlobalSign_ECC_Root_CA_-_R5.pem
Adding debian:USERTrust_RSA_Certification_Authority.pem
Adding debian:D-TRUST_Root_Class_3_CA_2_EV_2009.pem
Adding debian:Izenpe.com.pem
Adding debian:ANF_Secure_Server_Root_CA.pem
Adding debian:Security_Communication_RootCA2.pem
done.
Processing triggers for mailcap (3.70+nmu1ubuntu1) ...
Processing triggers for fontconfig (2.13.1-4.2ubuntu5) ...
Processing triggers for desktop-file-utils (0.26-1ubuntu3) ...
Processing triggers for hicolor-icon-theme (0.17-2) ...
Processing triggers for gnome-menus (3.36.0-1ubuntu3) ...
Processing triggers for man-db (2.10.2-1) ...
Processing triggers for ca-certificates (20230311ubuntu0.22.04.1) ...
Updating certificates in /etc/ssl/certs...
0 added, 0 removed; done.
Running hooks in /etc/ca-certificates/update.d...

done.
done.
- Install the Java Runtime Environment:
sudo apt install -y default-idk
The log file for this is:
Display detailed console log →
Reading package lists... Done
Building dependency tree... Done
Reading state information... Done
The following additional packages will be installed:
 default-jdk-headless libice-dev libpthread-stubs0-dev libsm-dev libx11-dev
 libxau-dev libxcb1-dev libxdmcp-dev libxt-dev openjdk-11-jdk
 openjdk-11-jdk-headless x11proto-dev xorg-sgml-doctools xtrans-dev
Suggested packages:
 libice-doc libsm-doc libx11-doc libxcb-doc libxt-doc openjdk-11-demo
 openjdk-11-source visualvm
The following NEW packages will be installed:
 default-jdk default-jdk-headless libice-dev libpthread-stubs0-dev libsm-dev
 libx11-dev libxau-dev libxcb1-dev libxdmcp-dev libxt-dev openjdk-11-jdk
 openjdk-11-jdk-headless x11proto-dev xorg-sgml-doctools xtrans-dev
0 upgraded, 15 newly installed, 0 to remove and 4 not upgraded.
Need to get 76.9 MB of archives.
After this operation, 90.6 MB of additional disk space will be used.
Get:1 http://us.archive.ubuntu.com/ubuntu jammy-updates/main amd64 openjdk-11-jdk-headless amd64 11.0.21+9-0ubuntu1~22.04 [73.5 MB]
Get:2 http://us.archive.ubuntu.com/ubuntu jammy/main amd64 default-jdk-headless amd64 2:1.11-72build2 [942 B]
Get:3 http://us.archive.ubuntu.com/ubuntu jammy-updates/main amd64 openjdk-11-jdk amd64 11.0.21+9-0ubuntu1~22.04 [1,327 kB]
Get:4 http://us.archive.ubuntu.com/ubuntu jammy/main amd64 default-jdk amd64 2:1.11-72build2 [908 B]
Get:5 http://us.archive.ubuntu.com/ubuntu jammy/main amd64 xorg-sgml-doctools all 1:1.11-1.1 [10.9 kB]
Get:6 http://us.archive.ubuntu.com/ubuntu jammy/main amd64 x11proto-dev all 2021.5-1 [604 kB]
Get:7 http://us.archive.ubuntu.com/ubuntu jammy/main amd64 libice-dev amd64 2:1.0.10-1build2 [51.4 kB]
Get:8 http://us.archive.ubuntu.com/ubuntu jammy/main amd64 libpthread-stubs0-dev amd64 0.4-1build2 [5,516 B]
Get:9 http://us.archive.ubuntu.com/ubuntu jammy/main amd64 libsm-dev amd64 2:1.2.3-1build2 [18.1 kB]
Get:10 http://us.archive.ubuntu.com/ubuntu jammy/main amd64 libxau-dev amd64 1:1.0.9-1build5 [9,724 B]
Get:11 http://us.archive.ubuntu.com/ubuntu jammy/main amd64 libxdmcp-dev amd64 1:1.1.3-0ubuntu5 [26.5 kB]
Get:12 http://us.archive.ubuntu.com/ubuntu jammy/main amd64 xtrans-dev all 1.4.0-1 [68.9 kB]
Get:13 http://us.archive.ubuntu.com/ubuntu jammy/main amd64 libxcb1-dev amd64 1.14-3ubuntu3 [86.5 kB]
Get:14 http://us.archive.ubuntu.com/ubuntu jammy-updates/main amd64 libx11-dev amd64 2:1.7.5-1ubuntu0.3 [744 kB]
Get:15 http://us.archive.ubuntu.com/ubuntu jammy/main amd64 libxt-dev amd64 1:1.2.1-1 [396 kB]
Fetched 76.9 MB in 6s (12.7 MB/s)
Selecting previously unselected package openjdk-11-jdk-headless:amd64.
(Reading database ... 203527 files and directories currently installed.)
Preparing to unpack .../00-openjdk-11-jdk-headless_11.0.21+9-0ubuntu1~22.04_amd6
4.deb ...
Unpacking openjdk-11-jdk-headless:amd64 (11.0.21+9-0ubuntu1~22.04) ...
Selecting previously unselected package default-jdk-headless.
Preparing to unpack .../01-default-jdk-headless_2%3a1.11-72build2_amd64.deb ...
Unpacking default-jdk-headless (2:1.11-72build2) ...
Selecting previously unselected package openjdk-11-jdk:amd64.
Preparing to unpack .../02-openjdk-11-jdk_11.0.21+9-0ubuntu1~22.04_amd64.deb ...
Unpacking openjdk-11-jdk:amd64 (11.0.21+9-0ubuntu1~22.04) ...
Selecting previously unselected package default-jdk.
Preparing to unpack .../03-default-jdk_2%3a1.11-72build2_amd64.deb ...
Unpacking default-jdk (2:1.11-72build2) ...
Selecting previously unselected package xorg-sgml-doctools.
Preparing to unpack .../04-xorg-sgml-doctools_1%3a1.11-1.1_all.deb ...
Unpacking xorg-sgml-doctools (1:1.11-1.1) ...
Selecting previously unselected package x11proto-dev.
Preparing to unpack .../05-x11proto-dev_2021.5-1_all.deb ...
Unpacking x11proto-dev (2021.5-1) ...
Selecting previously unselected package libice-dev:amd64.
Preparing to unpack .../06-libice-dev_2%3a1.0.10-1build2_amd64.deb ...
Unpacking libice-dev:amd64 (2:1.0.10-1build2) ...
Selecting previously unselected package libpthread-stubs0-dev:amd64.
Preparing to unpack .../07-libpthread-stubs0-dev_0.4-1build2_amd64.deb ...
Unpacking libpthread-stubs0-dev:amd64 (0.4-1build2) ...
Selecting previously unselected package libsm-dev:amd64.
Preparing to unpack .../08-libsm-dev_2%3a1.2.3-1build2_amd64.deb ...
Unpacking libsm-dev:amd64 (2:1.2.3-1build2) ...
Selecting previously unselected package libxau-dev:amd64.
Preparing to unpack .../09-libxau-dev_1%3a1.0.9-1build5_amd64.deb ...
Unpacking libxau-dev:amd64 (1:1.0.9-1build5) ...
Selecting previously unselected package libxdmcp-dev:amd64.
Preparing to unpack .../10-libxdmcp-dev_1%3a1.1.3-0ubuntu5_amd64.deb ...
Unpacking libxdmcp-dev:amd64 (1:1.1.3-0ubuntu5) ...
Selecting previously unselected package xtrans-dev.
Preparing to unpack .../11-xtrans-dev_1.4.0-1_all.deb ...
Unpacking xtrans-dev (1.4.0-1) ...
Selecting previously unselected package libxcb1-dev:amd64.
Preparing to unpack .../12-libxcb1-dev_1.14-3ubuntu3_amd64.deb ...
Unpacking libxcb1-dev:amd64 (1.14-3ubuntu3) ...
Selecting previously unselected package libx11-dev:amd64.
Preparing to unpack .../13-libx11-dev_2%3a1.7.5-1ubuntu0.3_amd64.deb ...
Unpacking libx11-dev:amd64 (2:1.7.5-1ubuntu0.3) ...
Selecting previously unselected package libxt-dev:amd64.
Preparing to unpack .../14-libxt-dev_1%3a1.2.1-1_amd64.deb ...
Unpacking libxt-dev:amd64 (1:1.2.1-1) ...
Setting up openjdk-11-jdk-headless:amd64 (11.0.21+9-0ubuntu1~22.04) ...
update-alternatives: using /usr/lib/jvm/java-11-openjdk-amd64/bin/jar to provide
/usr/bin/jar (jar) in auto mode
update-alternatives: using /usr/lib/jvm/java-11-openjdk-amd64/bin/jarsigner to p
rovide /usr/bin/jarsigner (jarsigner) in auto mode
update-alternatives: using /usr/lib/jvm/java-11-openjdk-amd64/bin/javac to provi
de /usr/bin/javac (javac) in auto mode
update-alternatives: using /usr/lib/jvm/java-11-openjdk-amd64/bin/javadoc to pro
vide /usr/bin/javadoc (javadoc) in auto mode
update-alternatives: using /usr/lib/jvm/java-11-openjdk-amd64/bin/javap to provi
de /usr/bin/javap (javap) in auto mode
update-alternatives: using /usr/lib/jvm/java-11-openjdk-amd64/bin/jcmd to provid
e /usr/bin/jcmd (jcmd) in auto mode
update-alternatives: using /usr/lib/jvm/java-11-openjdk-amd64/bin/jdb to provide
/usr/bin/jdb (jdb) in auto mode
update-alternatives: using /usr/lib/jvm/java-11-openjdk-amd64/bin/jdeprscan to p
rovide /usr/bin/jdeprscan (jdeprscan) in auto mode
update-alternatives: using /usr/lib/jvm/java-11-openjdk-amd64/bin/jdeps to provi
de /usr/bin/jdeps (jdeps) in auto mode
update-alternatives: using /usr/lib/jvm/java-11-openjdk-amd64/bin/jfr to provide
/usr/bin/jfr (jfr) in auto mode
update-alternatives: using /usr/lib/jvm/java-11-openjdk-amd64/bin/jimage to prov
ide /usr/bin/jimage (jimage) in auto mode
update-alternatives: using /usr/lib/jvm/java-11-openjdk-amd64/bin/jinfo to provi
de /usr/bin/jinfo (jinfo) in auto mode
update-alternatives: using /usr/lib/jvm/java-11-openjdk-amd64/bin/jlink to provi
de /usr/bin/jlink (jlink) in auto mode
update-alternatives: using /usr/lib/jvm/java-11-openjdk-amd64/bin/jmap to provid
e /usr/bin/jmap (jmap) in auto mode
update-alternatives: using /usr/lib/jvm/java-11-openjdk-amd64/bin/jmod to provid
e /usr/bin/jmod (jmod) in auto mode
update-alternatives: using /usr/lib/jvm/java-11-openjdk-amd64/bin/jps to provide
/usr/bin/jps (jps) in auto mode
update-alternatives: using /usr/lib/jvm/java-11-openjdk-amd64/bin/jrunscript to
provide /usr/bin/jrunscript (jrunscript) in auto mode
update-alternatives: using /usr/lib/jvm/java-11-openjdk-amd64/bin/jshell to prov
ide /usr/bin/jshell (jshell) in auto mode
update-alternatives: using /usr/lib/jvm/java-11-openjdk-amd64/bin/jstack to prov
ide /usr/bin/jstack (jstack) in auto mode
update-alternatives: using /usr/lib/jvm/java-11-openjdk-amd64/bin/jstat to provi
de /usr/bin/jstat (jstat) in auto mode
update-alternatives: using /usr/lib/jvm/java-11-openjdk-amd64/bin/jstatd to prov
ide /usr/bin/jstatd (jstatd) in auto mode
update-alternatives: using /usr/lib/jvm/java-11-openjdk-amd64/bin/rmic to provid
e /usr/bin/rmic (rmic) in auto mode
update-alternatives: using /usr/lib/jvm/java-11-openjdk-amd64/bin/serialver to p
rovide /usr/bin/serialver (serialver) in auto mode
update-alternatives: using /usr/lib/jvm/java-11-openjdk-amd64/bin/jaotc to provi
de /usr/bin/jaotc (jaotc) in auto mode
update-alternatives: using /usr/lib/jvm/java-11-openjdk-amd64/bin/jhsdb to provi
de /usr/bin/jhsdb (jhsdb) in auto mode
Setting up libpthread-stubs0-dev:amd64 (0.4-1build2) ...
Setting up xtrans-dev (1.4.0-1) ...
Setting up default-jdk-headless (2:1.11-72build2) ...
Setting up openjdk-11-jdk:amd64 (11.0.21+9-0ubuntu1~22.04) ...
update-alternatives: using /usr/lib/jvm/java-11-openjdk-amd64/bin/jconsole to pr
ovide /usr/bin/jconsole (jconsole) in auto mode
Setting up xorg-sgml-doctools (1:1.11-1.1) ...
Setting up default-jdk (2:1.11-72build2) ...
Processing triggers for sgml-base (1.30) ...
Setting up x11proto-dev (2021.5-1) ...
Setting up libxau-dev:amd64 (1:1.0.9-1build5) ...
Setting up libice-dev:amd64 (2:1.0.10-1build2) ...
Setting up libsm-dev:amd64 (2:1.2.3-1build2) ...
Processing triggers for man-db (2.10.2-1) ...
Setting up libxdmcp-dev:amd64 (1:1.1.3-0ubuntu5) ...
Setting up libxcb1-dev:amd64 (1.14-3ubuntu3) ...
Setting up libx11-dev:amd64 (2:1.7.5-1ubuntu0.3) ...
Setting up libxt-dev:amd64 (1:1.2.1-1) ...
- Download SQL Developer from here; and then install SQL Developer to the /opt directory on your Ubuntu local instance:
Use the following command to unzip the SQL Developer files to the /opt directory:
sudo unzip ~/Downloads/sqldeveloper-23.1.0.097.1607-no-jre.zip
- Create the following /usr/local/bin/sqldeveloper symbolic link:
sudo ln -s /opt/sqldeveloper/sqldeveloper.sh /usr/local/bin/sqldeveloper
- Edit the /opt/sqldeveloper/sqldeveloper.sh file by replacing the following line:
cd "`dirname $0`"/sqldeveloper/bin && bash sqldeveloper $*
with this version:
/opt/sqldeveloper/sqldeveloper/bin/sqldeveloper $*
- Now, you can launch SQL Developer from any location on your local Ubuntu operating system, like:
sqldeveloper
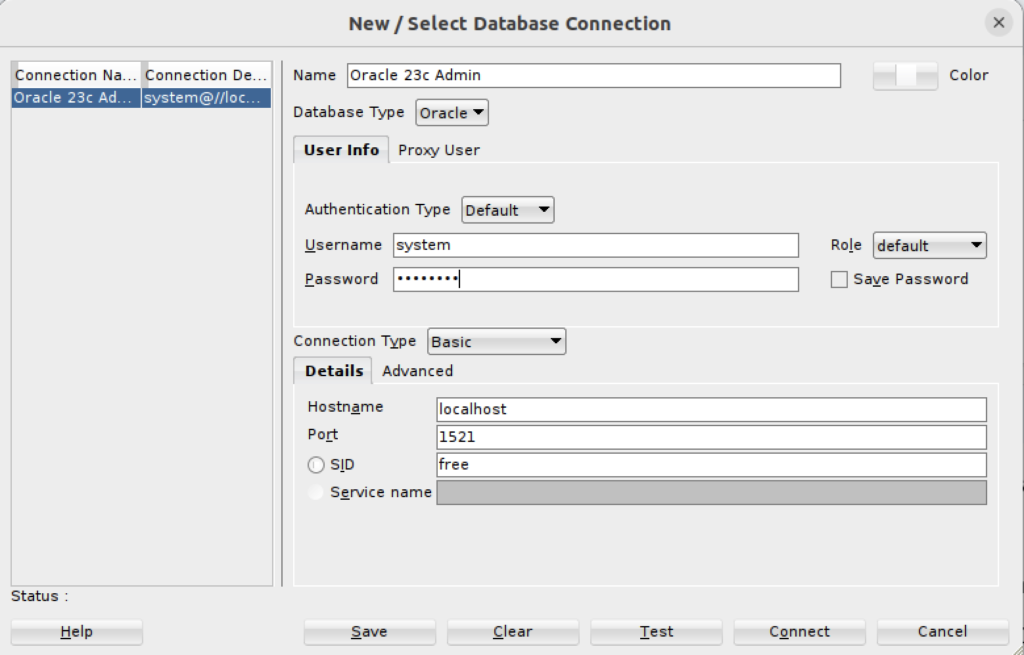
- You can now connect as the system user through SQL Developer to the Oracle Database 23c Free Docker instance with the following connection information:
- You can also create a Desktop shortcut by creating the sqldeveloper.desktop file in the /usr/share/applications directory. The SQL Developer icon is provided in the sqldeveloper base directory.
You should create the following sqldeveloper.desktop file to use a Desktop shortcut:
[Desktop Entry]
Name=Oracle SQL Developer
Comment=SQL Developer from Oracle
GenericName=SQL Tool
Exec=/usr/local/bin/sqldeveloper
Icon=/opt/sqldeveloper/icon.png
Type=Application
StartupNotify=true
Categories=Utility;Oracle;Development;SQL;
You can create a sandboxed container c##student user with the instructions from this earlier post on Oracle Database 18c, which remains the correct syntax.
As always, I hope this helps those trying to accomplish this task.
Disk Space Allocation
It’s necessary to check for adequate disk space on your Virtual Machine (VM) before installing Oracle 23c Free in a Docker container or as a podman service. Either way, it requires about 13 GB of disk space. On Ubuntu, the typical install of a VM allocates 20 GB and a 500 MB swap. You need to create a 2 GB swap when you install Ubuntu or plan to change the swap, as qualified in this excellent DigitalOcean article. Assuming you installed it with the correct swap or extended your swap area, you can confirm it with the following command:
sudo swapon --show |
It should return something like this:
NAME TYPE SIZE USED PRIO /swapfile file 2.1G 1.2G -2 |
Next, check your disk space allocation and availability with this command:
df -h |
This is what was in my instance with MySQL and PostgreSQL databases already installed and configured with sandboxed schemas:
Filesystem Size Used Avail Use% Mounted on tmpfs 388M 2.1M 386M 1% /run /dev/sda3 20G 14G 4.6G 75% / tmpfs 1.9G 28K 1.9G 1% /dev/shm tmpfs 5.0M 4.0K 5.0M 1% /run/lock /dev/sda2 512M 6.1M 506M 2% /boot/efi tmpfs 388M 108K 388M 1% /run/user/1000 |
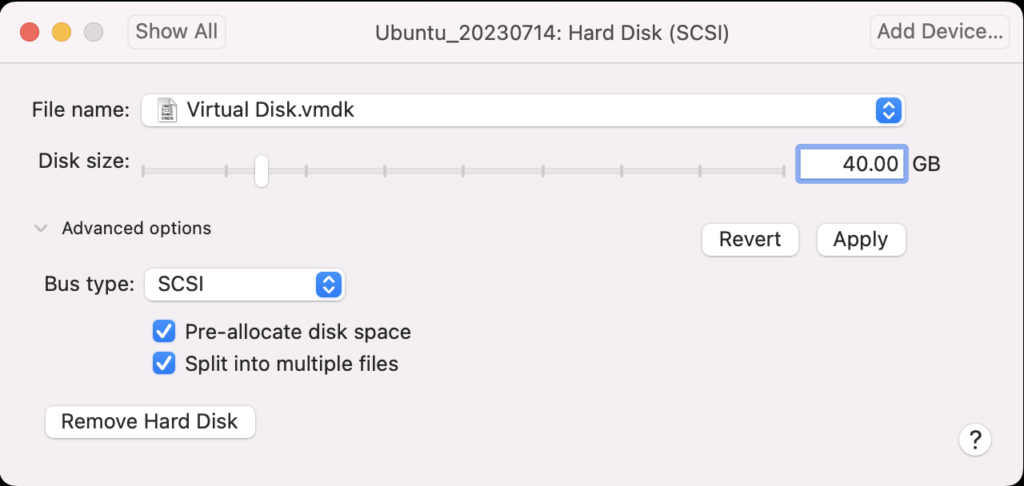
Using VMware Fusion on my Mac (Intel-based i9), I changed the allocated space from 20 GB to 40 GB by navigating to Virtual Machine, Settings…, Hard Disk. I entered 40.00 as the disk size and clicked the Pre-allocate disk space checkbox before clicking the Apply button, as shown in below. This added space is necessary because Oracle Database 23c Free as a Docker instance requires almost 10 GB of local space.
After clicking the Apply button, I checked Ubuntu with the “df -h” command and found there was no change. That’s unlike doing the same thing on AlmaLinux or a RedHat distribution, which was surprising.
The next set of steps required that I manually add the space to the Ubuntu instance:
- Start the Ubuntu VM and check the instance’s disk information with fdisk:
sudo fdisk -l
The log file for this is:
Display detailed console log →
Disk /dev/loop0: 238.77 MiB, 250372096 bytes, 489008 sectors
Units: sectors of 1 * 512 = 512 bytes
Sector size (logical/physical): 512 bytes / 512 bytes
I/O size (minimum/optimal): 512 bytes / 512 bytes


Disk /dev/loop1: 73.86 MiB, 77443072 bytes, 151256 sectors
Units: sectors of 1 * 512 = 512 bytes
Sector size (logical/physical): 512 bytes / 512 bytes
I/O size (minimum/optimal): 512 bytes / 512 bytes


Disk /dev/loop2: 349.7 MiB, 366682112 bytes, 716176 sectors
Units: sectors of 1 * 512 = 512 bytes
Sector size (logical/physical): 512 bytes / 512 bytes
I/O size (minimum/optimal): 512 bytes / 512 bytes


Disk /dev/loop3: 91.69 MiB, 96141312 bytes, 187776 sectors
Units: sectors of 1 * 512 = 512 bytes
Sector size (logical/physical): 512 bytes / 512 bytes
I/O size (minimum/optimal): 512 bytes / 512 bytes


Disk /dev/loop4: 496.98 MiB, 521121792 bytes, 1017816 sectors
Units: sectors of 1 * 512 = 512 bytes
Sector size (logical/physical): 512 bytes / 512 bytes
I/O size (minimum/optimal): 512 bytes / 512 bytes


Disk /dev/loop5: 45.93 MiB, 48160768 bytes, 94064 sectors
Units: sectors of 1 * 512 = 512 bytes
Sector size (logical/physical): 512 bytes / 512 bytes
I/O size (minimum/optimal): 512 bytes / 512 bytes


Disk /dev/loop6: 128.92 MiB, 135184384 bytes, 264032 sectors
Units: sectors of 1 * 512 = 512 bytes
Sector size (logical/physical): 512 bytes / 512 bytes
I/O size (minimum/optimal): 512 bytes / 512 bytes


Disk /dev/loop7: 63.45 MiB, 66531328 bytes, 129944 sectors
Units: sectors of 1 * 512 = 512 bytes
Sector size (logical/physical): 512 bytes / 512 bytes
I/O size (minimum/optimal): 512 bytes / 512 bytes


Disk /dev/fd0: 1.41 MiB, 1474560 bytes, 2880 sectors
Units: sectors of 1 * 512 = 512 bytes
Sector size (logical/physical): 512 bytes / 512 bytes
I/O size (minimum/optimal): 512 bytes / 512 bytes
Disklabel type: dos
Disk identifier: 0x90909090

Device     Boot      Start        End    Sectors  Size Id Type
/dev/fd0p1      2425393296 4850786591 2425393296  1.1T 90 unknown
/dev/fd0p2      2425393296 4850786591 2425393296  1.1T 90 unknown
/dev/fd0p3      2425393296 4850786591 2425393296  1.1T 90 unknown
/dev/fd0p4      2425393296 4850786591 2425393296  1.1T 90 unknown
GPT PMBR size mismatch (41943039 != 83886079) will be corrected by write.


Disk /dev/sda: 40 GiB, 42949672960 bytes, 83886080 sectors
Disk model: VMware Virtual S
Units: sectors of 1 * 512 = 512 bytes
Sector size (logical/physical): 512 bytes / 512 bytes
I/O size (minimum/optimal): 512 bytes / 512 bytes
Disklabel type: gpt
Disk identifier: 7906AE0B-498C-4FE4-8B45-9CD1B2265197

Device       Start      End  Sectors  Size Type
/dev/sda1     2048     4095     2048    1M BIOS boot
/dev/sda2     4096  1054719  1050624  513M EFI System
/dev/sda3  1054720 41940991 40886272 19.5G Linux filesystem


Disk /dev/loop8: 40.84 MiB, 42827776 bytes, 83648 sectors
Units: sectors of 1 * 512 = 512 bytes
Sector size (logical/physical): 512 bytes / 512 bytes
I/O size (minimum/optimal): 512 bytes / 512 bytes


Disk /dev/loop9: 304 KiB, 311296 bytes, 608 sectors
Units: sectors of 1 * 512 = 512 bytes
Sector size (logical/physical): 512 bytes / 512 bytes
I/O size (minimum/optimal): 512 bytes / 512 bytes


Disk /dev/loop10: 452 KiB, 462848 bytes, 904 sectors
Units: sectors of 1 * 512 = 512 bytes
Sector size (logical/physical): 512 bytes / 512 bytes
I/O size (minimum/optimal): 512 bytes / 512 bytes


Disk /dev/loop13: 496.88 MiB, 521015296 bytes, 1017608 sectors
Units: sectors of 1 * 512 = 512 bytes
Sector size (logical/physical): 512 bytes / 512 bytes
I/O size (minimum/optimal): 512 bytes / 512 bytes


Disk /dev/loop12: 240.05 MiB, 251707392 bytes, 491616 sectors
Units: sectors of 1 * 512 = 512 bytes
Sector size (logical/physical): 512 bytes / 512 bytes
I/O size (minimum/optimal): 512 bytes / 512 bytes


Disk /dev/loop11: 4 KiB, 4096 bytes, 8 sectors
Units: sectors of 1 * 512 = 512 bytes
Sector size (logical/physical): 512 bytes / 512 bytes
I/O size (minimum/optimal): 512 bytes / 512 bytes


Disk /dev/loop14: 346.33 MiB, 363151360 bytes, 709280 sectors
Units: sectors of 1 * 512 = 512 bytes
Sector size (logical/physical): 512 bytes / 512 bytes
I/O size (minimum/optimal): 512 bytes / 512 bytes


Disk /dev/loop16: 12.32 MiB, 12922880 bytes, 25240 sectors
Units: sectors of 1 * 512 = 512 bytes
Sector size (logical/physical): 512 bytes / 512 bytes
I/O size (minimum/optimal): 512 bytes / 512 bytes


Disk /dev/loop17: 73.9 MiB, 77492224 bytes, 151352 sectors
Units: sectors of 1 * 512 = 512 bytes
Sector size (logical/physical): 512 bytes / 512 bytes
I/O size (minimum/optimal): 512 bytes / 512 bytes


Disk /dev/loop15: 175.83 MiB, 184373248 bytes, 360104 sectors
Units: sectors of 1 * 512 = 512 bytes
Sector size (logical/physical): 512 bytes / 512 bytes
I/O size (minimum/optimal): 512 bytes / 512 bytes


Disk /dev/loop18: 63.46 MiB, 66547712 bytes, 129976 sectors
Units: sectors of 1 * 512 = 512 bytes
Sector size (logical/physical): 512 bytes / 512 bytes
I/O size (minimum/optimal): 512 bytes / 512 bytes


Disk /dev/loop19: 40.86 MiB, 42840064 bytes, 83672 sectors
Units: sectors of 1 * 512 = 512 bytes
Sector size (logical/physical): 512 bytes / 512 bytes
I/O size (minimum/optimal): 512 bytes / 512 bytes
After running fdisk, I rechecked disk allocation with df -h and saw no change:
Filesystem      Size  Used Avail Use% Mounted on
tmpfs           388M  2.1M  386M   1% /run
/dev/sda3        20G   14G  4.6G  75% /
tmpfs           1.9G   28K  1.9G   1% /dev/shm
tmpfs           5.0M  4.0K  5.0M   1% /run/lock
/dev/sda2       512M  6.1M  506M   2% /boot/efi
tmpfs           388M  108K  388M   1% /run/user/1000
- So, I installed Ubuntu’s user space utility gparted:
sudo apt install gparted
The log file for this is:
Display detailed console log →
Reading package lists... Done
Building dependency tree... Done
Reading state information... Done
The following additional packages will be installed:
  gparted-common
Suggested packages:
  dmraid gpart jfsutils kpartx mtools reiser4progs reiserfsprogs udftools
  xfsprogs exfatprogs
The following NEW packages will be installed:
  gparted gparted-common
0 upgraded, 2 newly installed, 0 to remove and 4 not upgraded.
Need to get 490 kB of archives.
After this operation, 2,128 kB of additional disk space will be used.
Do you want to continue? [Y/n] Y
Get:1 http://us.archive.ubuntu.com/ubuntu jammy/main amd64 gparted-common all 1.3.1-1ubuntu1 [71.9 kB]
Get:2 http://us.archive.ubuntu.com/ubuntu jammy/main amd64 gparted amd64 1.3.1-1ubuntu1 [418 kB]
Fetched 490 kB in 2s (211 kB/s)
Selecting previously unselected package gparted-common.
(Reading database ... 203026 files and directories currently installed.)
Preparing to unpack .../gparted-common_1.3.1-1ubuntu1_all.deb ...
Unpacking gparted-common (1.3.1-1ubuntu1) ...
Selecting previously unselected package gparted.
Preparing to unpack .../gparted_1.3.1-1ubuntu1_amd64.deb ...
Unpacking gparted (1.3.1-1ubuntu1) ...
Setting up gparted-common (1.3.1-1ubuntu1) ...
Setting up gparted (1.3.1-1ubuntu1) ...
Processing triggers for mailcap (3.70+nmu1ubuntu1) ...
Processing triggers for desktop-file-utils (0.26-1ubuntu3) ...
Processing triggers for hicolor-icon-theme (0.17-2) ...
Processing triggers for gnome-menus (3.36.0-1ubuntu3) ...
Processing triggers for man-db (2.10.2-1) ...
- After installing the gparted utility (manual can be found here), you can launch it with the following syntax:
sudo gpartedYou’ll see the following in the console, which you can ignore.
GParted 1.3.1
configuration --enable-libparted-dmraid --enable-online-resize
libparted 3.4
It launches a GUI interface that should look something like the following:
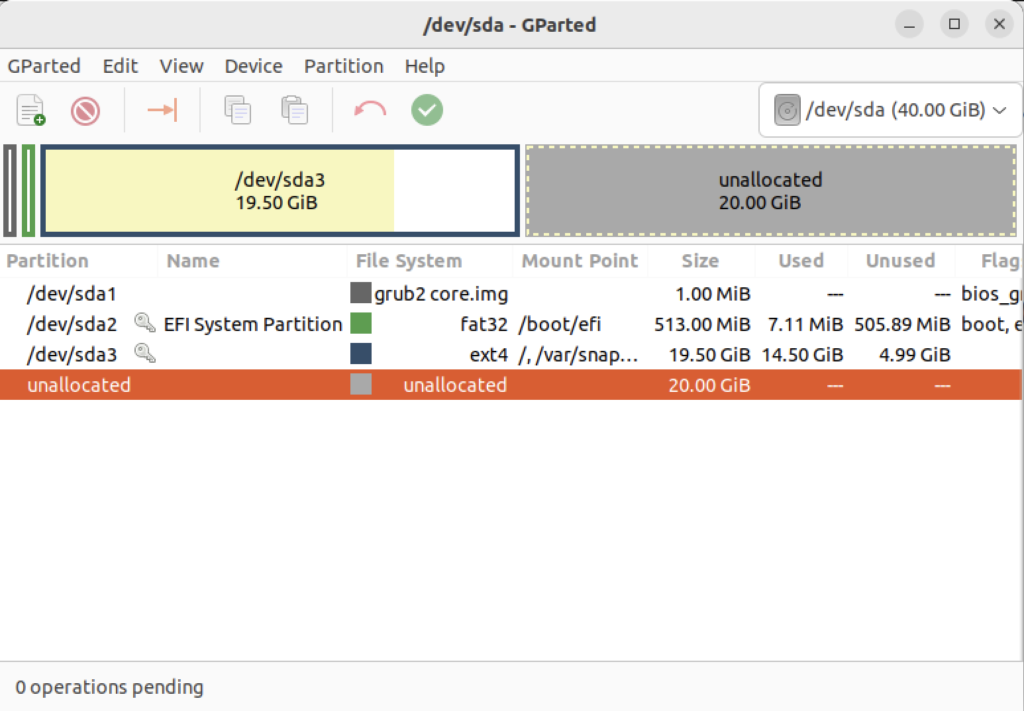
Right-click on the /dev/sda3 Partition and the GParted application will present the following context popup menu. Click the Resize/Move menu option.

The attempt to resize the disk at this point GParted will raise a read-only exception like the following:
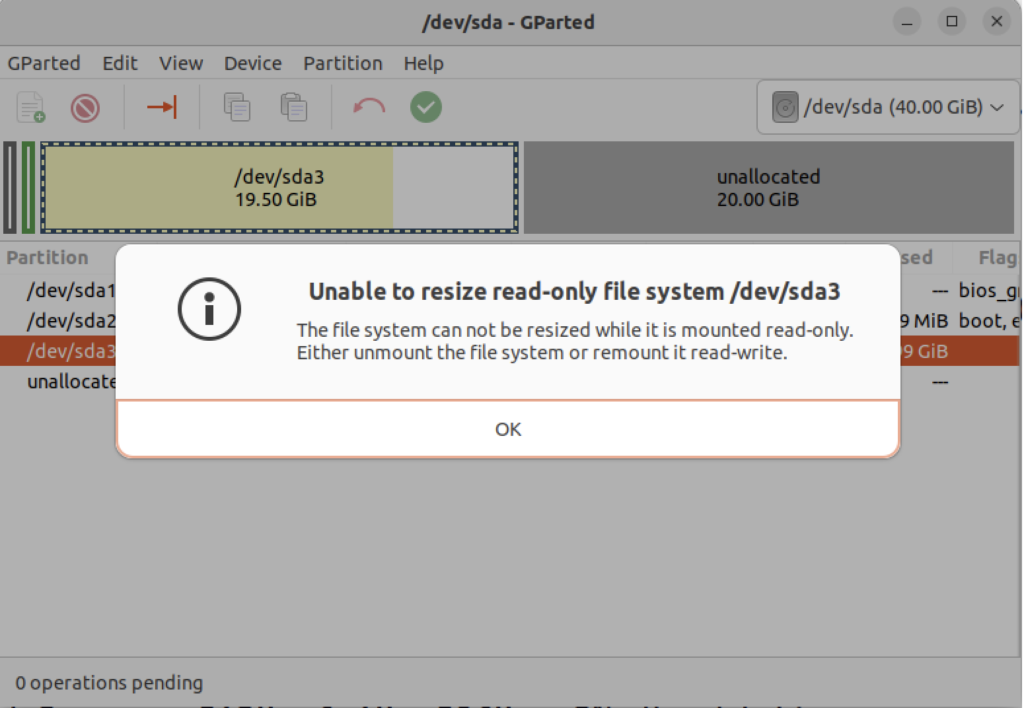
You might open a new shell and fix the disk at the command-line but you’ll need to relaunch gparted regardless. So, you should close gparted and run the following commands:
sudo mount -o remount -rw /
sudo mount -o remount -rw /var/snap/firefox/common/host-hunspell
When you relaunch GParted, you see that the graphic depiction has changed when you right-click on the /dev/sda3 Partition as follows:
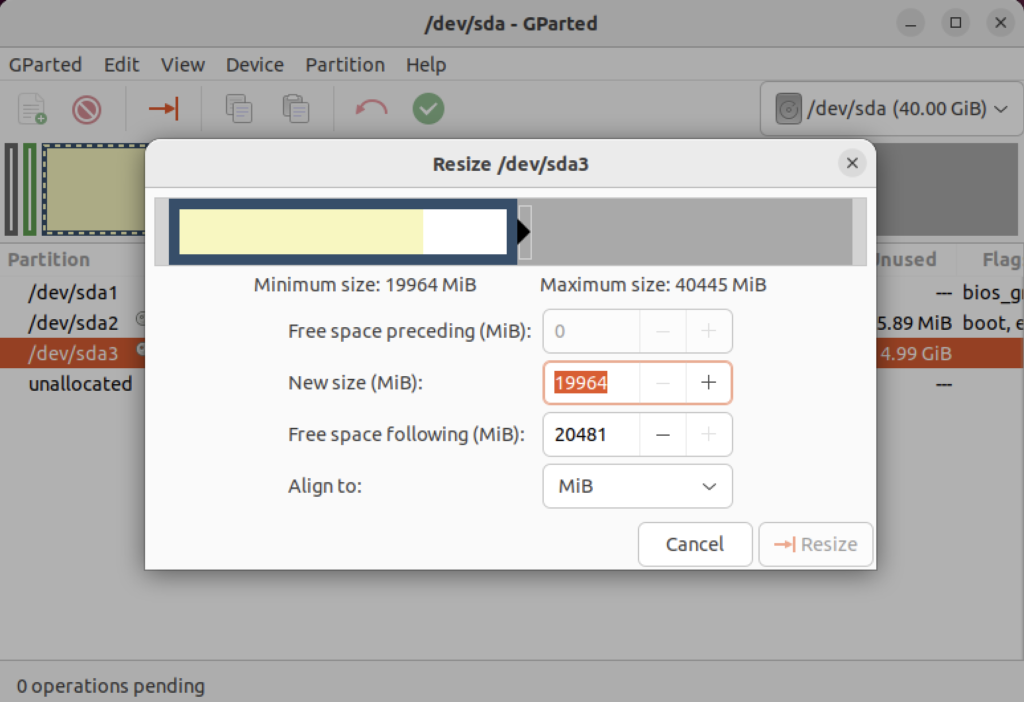
Click on the highlighted box with the arrow and drag it all the way to the right. It will then show you something like the following.

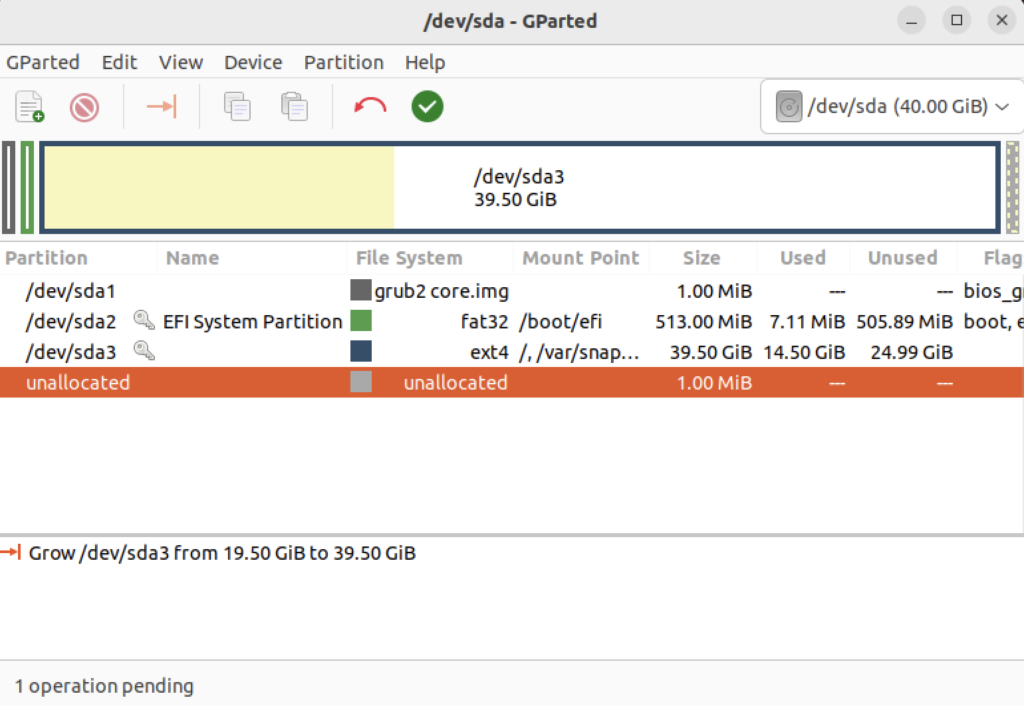
Click the Resize button to make the change and add the space to the Ubuntu file system and see something like the following in Gparted:
Choose Edit in the menu bar and then Apply All Operations to effect the change in the disk allocation. The last dialog will require you to verify you want to make the changes. Click the Apply button to make the changes.
Click the close for the GParted application and then you can rerun the following command:
df -h
You will see that you now have 19.5 GB of additional space:
Filesystem      Size  Used Avail Use% Mounted on
tmpfs           388M  2.2M  386M   1% /run
/dev/sda3        39G 19.5G   23G  39% /
tmpfs           1.9G   28K  1.9G   1% /dev/shm
tmpfs           5.0M  4.0K  5.0M   1% /run/lock
/dev/sda2       512M  6.1M  506M   2% /boot/efi
tmpfs           388M  116K  388M   1% /run/user/1000
- Finally, you can now successfully download the latest Docker version of Oracle Database 23c Free with the following command:
docker run --name oracle23c -p 1521:1521 -p 5500:5500 -e ORACLE_PWD=cangetin container-registry.oracle.com/database/free:latest
Since you haven’t downloaded the container, you’ll get a warning that it is unable to find the image before it discovers it and downloads it. This will take several minutes. At the conclusion, it will start the Oracle Database Net Listener and begin updating files. the updates may take quite a while to complete.
The basic download console output looks like the following and if you check your disk space you’ve downloaded about 14 GB in the completed container.
Unable to find image 'container-registry.oracle.com/database/free:latest' locally
latest: Pulling from database/free
089fdfcd47b7: Pull complete
43c899d88edc: Pull complete
47aa6f1886a1: Pull complete
f8d07bb55995: Pull complete
c31c8c658c1e: Pull complete
b7d28faa08b4: Pull complete
1d0d5c628f6f: Pull complete
db82a695dad3: Pull complete
25a185515793: Pull complete
Digest: sha256:5ac0efa9896962f6e0e91c54e23c03ae8f140cf6ed43ca09ef4354268a942882
Status: Downloaded newer image for container-registry.oracle.com/database/free:latest
My detailed log file for the complete recovery operation is:
Display detailed console log →
Starting Oracle Net Listener.
Oracle Net Listener started.
Starting Oracle Database instance FREE.
Oracle Database instance FREE started.

The Oracle base remains unchanged with value /opt/oracle

SQL*Plus: Release 23.0.0.0.0 - Production on Thu Nov 30 22:40:55 2023
Version 23.3.0.23.09

Copyright (c) 1982, 2023, Oracle.  All rights reserved.


Connected to:
Oracle Database 23c Free Release 23.0.0.0.0 - Develop, Learn, and Run for Free
Version 23.3.0.23.09

SQL>
User altered.

SQL>
User altered.

SQL>
Session altered.

SQL>
User altered.

SQL> Disconnected from Oracle Database 23c Free Release 23.0.0.0.0 - Develop, Learn, and Run for Free
Version 23.3.0.23.09
The Oracle base remains unchanged with value /opt/oracle
#########################
DATABASE IS READY TO USE!
#########################
The following output is now a tail of the alert.log:
Completed: Pluggable database FREEPDB1 opened read write
Completed: ALTER DATABASE OPEN
2023-11-30T22:40:55.538359+00:00
===========================================================
Dumping current patch information
===========================================================
No patches have been applied
===========================================================
2023-11-30T22:40:57.521629+00:00
FREEPDB1(3):TABLE AUDSYS.AUD$UNIFIED: ADDED INTERVAL PARTITION SYS_P342 (3440) VALUES LESS THAN (TIMESTAMP' 2023-12-01 00:00:00')
2023-11-30T22:41:00.565540+00:00
TABLE SYS.WRP$_REPORTS: ADDED AUTOLIST FRAGMENT SYS_P413 (3) VALUES (( 1418518649, TO_DATE(' 2023-11-27 00:00:00', 'syyyy-mm-dd hh24:mi:ss', 'nls_calendar=gregorian') ))
TABLE SYS.WRP$_REPORTS_DETAILS: ADDED AUTOLIST FRAGMENT SYS_P414 (3) VALUES (( 1418518649, TO_DATE(' 2023-11-27 00:00:00', 'syyyy-mm-dd hh24:mi:ss', 'nls_calendar=gregorian') ))
TABLE SYS.WRP$_REPORTS_TIME_BANDS: ADDED AUTOLIST FRAGMENT SYS_P417 (3) VALUES (( 1418518649, TO_DATE(' 2023-11-27 00:00:00', 'syyyy-mm-dd hh24:mi:ss', 'nls_calendar=gregorian') ))
2023-11-30T22:41:45.639208+00:00
FREEPDB1(3):Resize operation completed for file# 13, fname /opt/oracle/oradata/FREE/FREEPDB1/sysaux01.dbf, old size 317440K, new size 327680K
2023-11-30T22:41:45.663044+00:00
FREEPDB1(3):Resize operation completed for file# 13, fname /opt/oracle/oradata/FREE/FREEPDB1/sysaux01.dbf, old size 327680K, new size 337920K
2023-11-30T22:46:51.616417+00:00
Resize operation completed for file# 201, fname /opt/oracle/oradata/FREE/temp01.dbf, old size 20480K, new size 86016K
Resize operation completed for file# 201, fname /opt/oracle/oradata/FREE/temp01.dbf, old size 86016K, new size 151552K
Resize operation completed for file# 201, fname /opt/oracle/oradata/FREE/temp01.dbf, old size 151552K, new size 217088K
2023-11-30T22:46:53.024736+00:00
Resize operation completed for file# 201, fname /opt/oracle/oradata/FREE/temp01.dbf, old size 217088K, new size 282624K
Resize operation completed for file# 201, fname /opt/oracle/oradata/FREE/temp01.dbf, old size 282624K, new size 348160K
2023-11-30T22:50:45.816010+00:00
Resize operation completed for file# 3, fname /opt/oracle/oradata/FREE/sysaux01.dbf, old size 573440K, new size 593920K
2023-11-30T23:00:46.159283+00:00
Resize operation completed for file# 3, fname /opt/oracle/oradata/FREE/sysaux01.dbf, old size 593920K, new size 604160K
2023-11-30T23:00:46.228087+00:00
FREEPDB1(3):Resize operation completed for file# 13, fname /opt/oracle/oradata/FREE/FREEPDB1/sysaux01.dbf, old size 337920K, new size 358400K
2023-12-01T00:30:43.494249+00:00
--ATTENTION--
Heavy swapping observed on system
WARNING: Heavy swapping observed on system in last 5 mins.
Heavy swapping can lead to timeouts, poor performance, and instance eviction.
2023-12-01T12:40:07.820678+00:00
Warning: VKTM detected a forward time drift.
Please see the VKTM trace file for more details:
/opt/oracle/diag/rdbms/free/FREE/trace/FREE_vktm_46.trc
2023-12-01T16:09:32.702179+00:00
Warning: VKTM detected a forward time drift.
Time drifts can result in unexpected behavior such as time-outs.
Please see the VKTM trace file for more details:
/opt/oracle/diag/rdbms/free/FREE/trace/FREE_vktm_46.trc
2023-12-01T18:02:02.658867+00:00
FREEPDB1(3):Resize operation completed for file# 13, fname /opt/oracle/oradata/FREE/FREEPDB1/sysaux01.dbf, old size 358400K, new size 368640K
2023-12-01T18:22:03.858970+00:00
Resize operation completed for file# 3, fname /opt/oracle/oradata/FREE/sysaux01.dbf, old size 604160K, new size 624640K
2023-12-01T20:31:39.671144+00:00
Warning: VKTM detected a forward time drift.
Time drifts can result in unexpected behavior such as time-outs.
Please see the VKTM trace file for more details:
/opt/oracle/diag/rdbms/free/FREE/trace/FREE_vktm_46.trc
2023-12-01T22:16:50.007797+00:00
Warning: VKTM detected a forward time drift.
Time drifts can result in unexpected behavior such as time-outs.
Please see the VKTM trace file for more details:
/opt/oracle/diag/rdbms/free/FREE/trace/FREE_vktm_46.trc
2023-12-01T23:11:39.776733+00:00
Resize operation completed for file# 3, fname /opt/oracle/oradata/FREE/sysaux01.dbf, old size 624640K, new size 634880K
2023-12-01T23:11:39.920882+00:00
FREEPDB1(3):Resize operation completed for file# 13, fname /opt/oracle/oradata/FREE/FREEPDB1/sysaux01.dbf, old size 368640K, new size 378880K
2023-12-01T23:11:45.530407+00:00
Begin automatic SQL Tuning Advisor run for special tuning task "SYS_AUTO_SQL_TUNING_TASK".
2023-12-01T23:11:46.626668+00:00
End automatic SQL Tuning Advisor run for special tuning task "SYS_AUTO_SQL_TUNING_TASK".
2023-12-01T23:11:56.518724+00:00
TABLE SYS.WRI$_OPTSTAT_HISTHEAD_HISTORY: ADDED INTERVAL PARTITION SYS_P473 (45260) VALUES LESS THAN (TO_DATE(' 2023-12-02 00:00:00', 'SYYYY-MM-DD HH24:MI:SS', 'NLS_CALENDAR=GREGORIAN'))
TABLE SYS.WRI$_OPTSTAT_HISTGRM_HISTORY: ADDED INTERVAL PARTITION SYS_P476 (45260) VALUES LESS THAN (TO_DATE(' 2023-12-02 00:00:00', 'SYYYY-MM-DD HH24:MI:SS', 'NLS_CALENDAR=GREGORIAN'))
2023-12-01T23:13:58.659641+00:00
Resize operation completed for file# 1, fname /opt/oracle/oradata/FREE/system01.dbf, old size 1085440K, new size 1095680K
2023-12-01T23:14:27.016016+00:00
Thread 1 advanced to log sequence 3 (LGWR switch),  current SCN: 3248652
  Current log# 3 seq# 3 mem# 0: /opt/oracle/oradata/FREE/redo03.log
2023-12-01T23:14:47.256059+00:00
cellip.ora not found.
2023-12-01T23:14:54.365395+00:00
Resize operation completed for file# 11, fname /opt/oracle/oradata/FREE/undotbs01.dbf, old size 40960K, new size 46080K
Resize operation completed for file# 11, fname /opt/oracle/oradata/FREE/undotbs01.dbf, old size 46080K, new size 51200K
2023-12-01T23:16:40.460917+00:00
--ATTENTION--
Heavy swapping observed on system
WARNING: Heavy swapping observed on system in last 5 mins.
Heavy swapping can lead to timeouts, poor performance, and instance eviction.
2023-12-02T11:40:23.802013+00:00
Warning: VKTM detected a forward time drift.
Please see the VKTM trace file for more details:
/opt/oracle/diag/rdbms/free/FREE/trace/FREE_vktm_46.trc
2023-12-02T11:40:24.917287+00:00
Warning: VKTM detected a forward time drift.
Time drifts can result in unexpected behavior such as time-outs.
Please see the VKTM trace file for more details:
/opt/oracle/diag/rdbms/free/FREE/trace/FREE_vktm_46.trc
2023-12-02T11:40:34.601396+00:00
TABLE SYS.ACTIVITY_TABLE$: ADDED INTERVAL PARTITION SYS_P493 (2) VALUES LESS THAN (202)
2023-12-02T19:35:06.380899+00:00
Warning: VKTM detected a forward time drift.
Time drifts can result in unexpected behavior such as time-outs.
Please see the VKTM trace file for more details:
/opt/oracle/diag/rdbms/free/FREE/trace/FREE_vktm_46.trc
2023-12-02T19:35:11.094760+00:00
Begin automatic SQL Tuning Advisor run for special tuning task "SYS_AUTO_SQL_TUNING_TASK".
2023-12-02T19:35:11.913190+00:00
FREEPDB1(3):TABLE SYS.WRI$_OPTSTAT_HISTHEAD_HISTORY: ADDED INTERVAL PARTITION SYS_P442 (45261) VALUES LESS THAN (TO_DATE(' 2023-12-03 00:00:00', 'SYYYY-MM-DD HH24:MI:SS', 'NLS_CALENDAR=GREGORIAN'))
FREEPDB1(3):TABLE SYS.WRI$_OPTSTAT_HISTGRM_HISTORY: ADDED INTERVAL PARTITION SYS_P445 (45261) VALUES LESS THAN (TO_DATE(' 2023-12-03 00:00:00', 'SYYYY-MM-DD HH24:MI:SS', 'NLS_CALENDAR=GREGORIAN'))
2023-12-02T19:35:12.623823+00:00
FREEPDB1(3):TABLE SYS.ACTIVITY_TABLE$: ADDED INTERVAL PARTITION SYS_P446 (2) VALUES LESS THAN (202)
2023-12-02T19:35:15.630900+00:00
End automatic SQL Tuning Advisor run for special tuning task "SYS_AUTO_SQL_TUNING_TASK".
2023-12-02T19:35:26.656198+00:00
TABLE SYS.WRI$_OPTSTAT_HISTHEAD_HISTORY: ADDED INTERVAL PARTITION SYS_P513 (45261) VALUES LESS THAN (TO_DATE(' 2023-12-03 00:00:00', 'SYYYY-MM-DD HH24:MI:SS', 'NLS_CALENDAR=GREGORIAN'))
TABLE SYS.WRI$_OPTSTAT_HISTGRM_HISTORY: ADDED INTERVAL PARTITION SYS_P516 (45261) VALUES LESS THAN (TO_DATE(' 2023-12-03 00:00:00', 'SYYYY-MM-DD HH24:MI:SS', 'NLS_CALENDAR=GREGORIAN'))
2023-12-02T19:36:00.842540+00:00
FREEPDB1(3):TABLE SYS.WRP$_REPORTS: ADDED AUTOLIST FRAGMENT SYS_P482 (2) VALUES (( 2054829351, TO_DATE(' 2023-11-27 00:00:00', 'syyyy-mm-dd hh24:mi:ss', 'nls_calendar=gregorian') ))
FREEPDB1(3):TABLE SYS.WRP$_REPORTS_DETAILS: ADDED AUTOLIST FRAGMENT SYS_P483 (2) VALUES (( 2054829351, TO_DATE(' 2023-11-27 00:00:00', 'syyyy-mm-dd hh24:mi:ss', 'nls_calendar=gregorian') ))
FREEPDB1(3):TABLE SYS.WRP$_REPORTS_TIME_BANDS: ADDED AUTOLIST FRAGMENT SYS_P486 (2) VALUES (( 2054829351, TO_DATE(' 2023-11-27 00:00:00', 'syyyy-mm-dd hh24:mi:ss', 'nls_calendar=gregorian') ))
2023-12-02T19:36:49.488283+00:00
cellip.ora not found.
2023-12-02T19:36:59.941785+00:00
FREEPDB1(3):Resize operation completed for file# 12, fname /opt/oracle/oradata/FREE/FREEPDB1/system01.dbf, old size 286720K, new size 296960K
2023-12-02T19:38:11.214065+00:00
FREEPDB1(3):cellip.ora not found.
2023-12-02T19:39:38.144241+00:00
Resize operation completed for file# 3, fname /opt/oracle/oradata/FREE/sysaux01.dbf, old size 634880K, new size 645120K
2023-12-02T19:39:38.254317+00:00
FREEPDB1(3):Resize operation completed for file# 13, fname /opt/oracle/oradata/FREE/FREEPDB1/sysaux01.dbf, old size 378880K, new size 389120K
2023-12-02T19:39:45.971914+00:00
--ATTENTION--
Heavy swapping observed on system
WARNING: Heavy swapping observed on system in last 5 mins.
Heavy swapping can lead to timeouts, poor performance, and instance eviction.
2023-12-02T19:49:39.226372+00:00
Resize operation completed for file# 3, fname /opt/oracle/oradata/FREE/sysaux01.dbf, old size 645120K, new size 655360K
2023-12-02T19:49:55.006771+00:00
Thread 1 cannot allocate new log, sequence 4
Private strand flush not complete
  Current log# 3 seq# 3 mem# 0: /opt/oracle/oradata/FREE/redo03.log
2023-12-02T19:49:58.006305+00:00
Thread 1 advanced to log sequence 4 (LGWR switch),  current SCN: 3327607
  Current log# 1 seq# 4 mem# 0: /opt/oracle/oradata/FREE/redo01.log
2023-12-02T19:51:10.096706+00:00
cellip.ora not found.
2023-12-02T19:59:39.923548+00:00
Resize operation completed for file# 3, fname /opt/oracle/oradata/FREE/sysaux01.dbf, old size 655360K, new size 665600K
2023-12-02T23:44:23.322751+00:00
Warning: VKTM detected a forward time drift.
Time drifts can result in unexpected behavior such as time-outs.
Please see the VKTM trace file for more details:
/opt/oracle/diag/rdbms/free/FREE/trace/FREE_vktm_46.trc
2023-12-03T01:20:19.592589+00:00
Warning: VKTM detected a forward time drift.
Time drifts can result in unexpected behavior such as time-outs.
Please see the VKTM trace file for more details:
/opt/oracle/diag/rdbms/free/FREE/trace/FREE_vktm_46.trc
2023-12-03T01:25:01.817094+00:00
FREEPDB1(3):Resize operation completed for file# 13, fname /opt/oracle/oradata/FREE/FREEPDB1/sysaux01.dbf, old size 389120K, new size 399360K
2023-12-03T01:25:11.199280+00:00
TABLE SYS.WRI$_OPTSTAT_HISTHEAD_HISTORY: ADDED INTERVAL PARTITION SYS_P553 (45262) VALUES LESS THAN (TO_DATE(' 2023-12-04 00:00:00', 'SYYYY-MM-DD HH24:MI:SS', 'NLS_CALENDAR=GREGORIAN'))
TABLE SYS.WRI$_OPTSTAT_HISTGRM_HISTORY: ADDED INTERVAL PARTITION SYS_P556 (45262) VALUES LESS THAN (TO_DATE(' 2023-12-04 00:00:00', 'SYYYY-MM-DD HH24:MI:SS', 'NLS_CALENDAR=GREGORIAN'))
2023-12-03T01:25:13.434023+00:00
FREEPDB1(3):TABLE SYS.WRI$_OPTSTAT_HISTHEAD_HISTORY: ADDED INTERVAL PARTITION SYS_P502 (45262) VALUES LESS THAN (TO_DATE(' 2023-12-04 00:00:00', 'SYYYY-MM-DD HH24:MI:SS', 'NLS_CALENDAR=GREGORIAN'))
FREEPDB1(3):TABLE SYS.WRI$_OPTSTAT_HISTGRM_HISTORY: ADDED INTERVAL PARTITION SYS_P505 (45262) VALUES LESS THAN (TO_DATE(' 2023-12-04 00:00:00', 'SYYYY-MM-DD HH24:MI:SS', 'NLS_CALENDAR=GREGORIAN'))
2023-12-03T01:26:29.620704+00:00
FREEPDB1(3):cellip.ora not found.
2023-12-03T01:26:36.758289+00:00
cellip.ora not found.
2023-12-03T02:25:52.946809+00:00
Warning: VKTM detected a forward time drift.
Time drifts can result in unexpected behavior such as time-outs.
Please see the VKTM trace file for more details:
/opt/oracle/diag/rdbms/free/FREE/trace/FREE_vktm_46.trc
2023-12-03T02:27:56.055089+00:00
--ATTENTION--
Heavy swapping observed on system
WARNING: Heavy swapping observed on system in last 5 mins.
Heavy swapping can lead to timeouts, poor performance, and instance eviction.
2023-12-03T02:32:47.996105+00:00
Resize operation completed for file# 3, fname /opt/oracle/oradata/FREE/sysaux01.dbf, old size 665600K, new size 675840K
You can connect to the Oracle Database 23c Free container with the following syntax:
docker exec -it -u root oracle23c bash |
At the command-line, you connect to the Oracle Database 23c Free container with the following syntax:
sqlplus system/cangetin@free |
You have arrived at the Oracle SQL prompt:
SQL*Plus: Release 23.0.0.0.0 - Production on Fri Dec 1 00:13:55 2023 Version 23.3.0.23.09 Copyright (c) 1982, 2023, Oracle. All rights reserved. Last Successful login time: Thu Nov 30 2023 23:27:54 +00:00 Connected to: Oracle Database 23c Free Release 23.0.0.0.0 - Develop, Learn, and Run for Free Version 23.3.0.23.09 SQL> |
As always, I hope this helps those trying to work with the newest Oracle stack.
SQL 1 v.s. SQL 3
In Alan Beaulieu’s wonderful book Learning SQL: Generate, Manipulate, and Retrieve Data, he uses a SQL 1 to demonstrates a CROSS JOIN in MySQL counting from 1 to 100. My students always find it difficult to read because the subqueries take so much space it makes it difficult to see the process, for example he gives this SQL 1 solution:
SELECT ones.x + tens.x + 1 AS counter FROM (SELECT 0 AS x UNION ALL SELECT 1 AS x UNION ALL SELECT 2 AS x UNION ALL SELECT 3 AS x UNION ALL SELECT 4 AS x UNION ALL SELECT 5 AS x UNION ALL SELECT 6 AS x UNION ALL SELECT 7 AS x UNION ALL SELECT 8 AS x UNION ALL SELECT 9 AS x ) ones CROSS JOIN (SELECT 0 AS x UNION ALL SELECT 10 AS x UNION ALL SELECT 20 AS x UNION ALL SELECT 30 AS x UNION ALL SELECT 40 AS x UNION ALL SELECT 50 AS x UNION ALL SELECT 60 AS x UNION ALL SELECT 70 AS x UNION ALL SELECT 80 AS x UNION ALL SELECT 90 AS x ) tens ORDER BY counter; |
While anybody with a command of SQL should be able to see how it works, for those new to SQL it’s difficult. It’s more effective to use a Common Table Expression with the WITH clause because the derived tables become variables in the scope of the WITH clause and the final query works more like a CROSS JOIN between two tables:
WITH ones AS (SELECT 0 AS x UNION ALL SELECT 1 AS x UNION ALL SELECT 2 AS x UNION ALL SELECT 3 AS x UNION ALL SELECT 4 AS x UNION ALL SELECT 5 AS x UNION ALL SELECT 6 AS x UNION ALL SELECT 7 AS x UNION ALL SELECT 8 AS x UNION ALL SELECT 9 AS x ) , tens AS (SELECT 0 AS x UNION ALL SELECT 10 AS x UNION ALL SELECT 20 AS x UNION ALL SELECT 30 AS x UNION ALL SELECT 40 AS x UNION ALL SELECT 50 AS x UNION ALL SELECT 60 AS x UNION ALL SELECT 70 AS x UNION ALL SELECT 80 AS x UNION ALL SELECT 90 AS x ) SELECT ones.x + tens.x + 1 AS counter FROM ones CROSS JOIN tens ORDER BY counter; |
As always, I hope this helps somebody trying to sort out the syntax and workflow.
PostgreSQL User Password
Miraculous events happen on my students’ computers almost weekly. For example, one couldn’t remember their student user’s password, which I set by default. How did they change it? They don’t recall.
Assuming you have sudoer authority on a Linux operating system, you can change a PostgreSQL user’s password as follows:
- Assume the root user’s role with the following command:
sudo sh
- As the root user, assume the postgres user’s role with the following command:
su - postgres - As the postgres user, connect to the PostgreSQL database with the following command:
psql -U postgres - Assuming the user’s name is student and you want to set the password to a trivial value like student, use the following command:
ALTER USER student WITH ENCRYPTED PASSWORD 'student';
As always, I hope this helps somebody trying to sort out the syntax and workflow.
PL/pgSQL Test Q?
Intriguing little PostgreSQL PL/pgSQL test question posed by an interviewer of one of my students. Basically, how many times will this loop and what will it return or will it generate an error. (BTW, they wrapped it into a named function.)
DO $$ BEGIN FOR i IN 0.2..1.5 LOOP RAISE NOTICE '%', i; END LOOP; END; $$; |
It’ll loop three times and return 0, 1, and 2 because the double numbers entered as boundaries to the for-loop are implicitly case as integers.
Parallels + Ubuntu
Installing Parallels on my iStudio (M2) was straightforward because I let it install Windows 11. Then, when I wanted to install Ubuntu it wasn’t quite that easy. You just need to understand that you click the Parallels’ Window menu option and Control Center option.
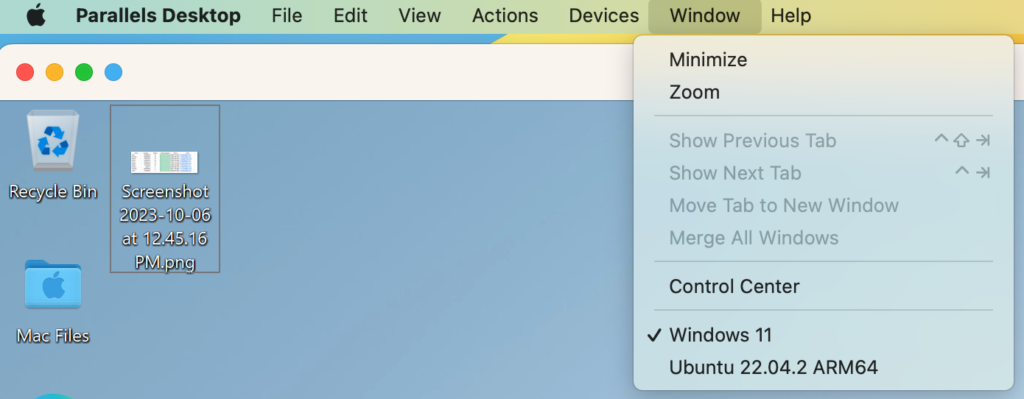
The Control Center option provides the following dialog.

Click the + symbol to create a new virtualization and you get the following dialog; and choose the Download Ubuntu with x86_64 emulation if you want to install a Docker image that’s not ported to ARM, like the Oracle Database 19c.
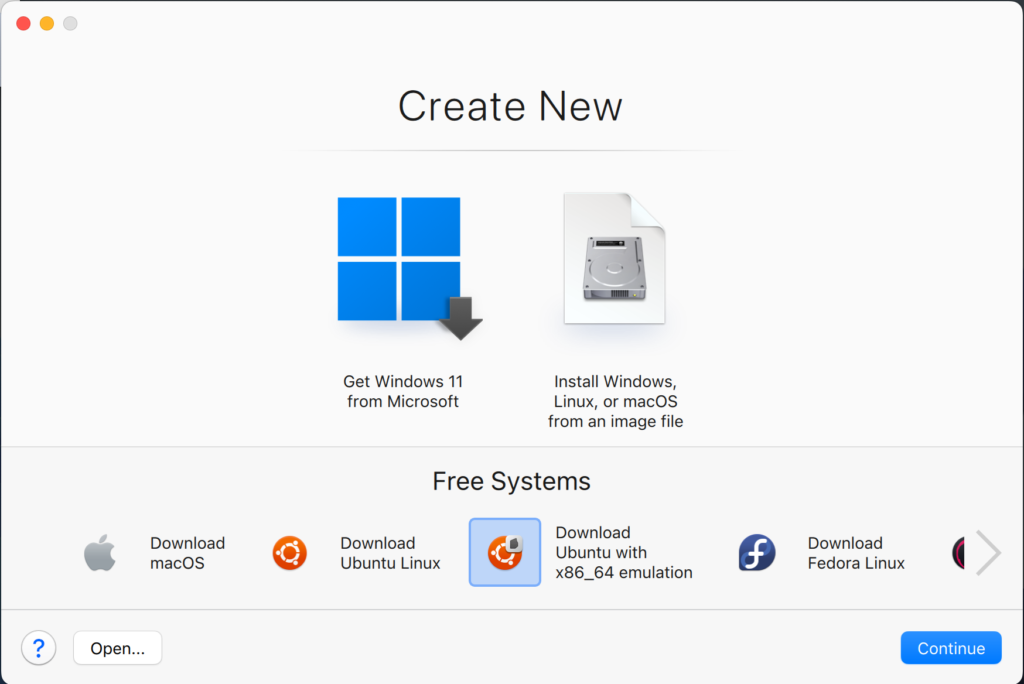
It’ll then explain in this dialog that is uses Apple’s Rosetta 2 technology, which means you should be able to install an Intel architecture Docker image with Oracle Database 23c.
As always, I hope this helps those trying to sort out how to leverage a new stack.
