Install Docker Ubuntu
Contrary to the instructions, you should do the following as a sudoer user:
sudo apt install -y docker.io |
Install all dependency packages using the following command:
sudo snap install docker |
You should see the following:
docker 20.10.24 from Canonical✓ installed |
You can verify the Docker install with the following command:
sudo docker --version |
It should show something like this:
Docker version 24.0.5, build 24.0.5-0ubuntu1~22.04.1 |
You can check the pulled containers with the following command but at this point there should be no pulled containers.
sudo docker images |
At this point, a docker group already exists but you need to add your user to the docker group with the following command:
sudo usermod -aG docker $USER |
Using the Docker Commands:
- To activate the logging, utilize the -f parameter.
- To divide JSON, use Docker by default; to extract individual keys, use JQ.
- In your Container file, there are quite a few areas where commands may be specified.
- Posting to the volumes could be more effective while the picture is being built.
- Docker offers a highly efficient way to create an alias for its own built-in commands. This makes it easier to set up and handle lengthy and enormous orders. These alias values are stored in the directories /.bashrc or and /.bash_aliases.
- Docker offers further assistance to remove unused code fragments from the installation of the container.
- Docker always favors reading statements from the container file that have not changed. Therefore, time savings may be realized by arranging what is shown in the container file in a way that ensures the elements that are susceptible to change are shown towards the end of the document and those that are most likely to undergo change are shown at the top.
As always, I hope this helps.
SQL Developer & PostgreSQL
I had a request from one of the adjunct professors to connect SQL Developer to the PostgreSQL database. This is in support of our database programming class that teaches students how to write PL/SQL against the Oracle database and pgPL/SQL against the PostgreSQL database. We also demonstrate transactional management through Node.js, Python and Java.
Naturally, this is also a frequent step taken by those required to migrate PostgreSQL data models to an Oracle database. While my final solution requires mimicking Oracle’s database user to schema, it does work for migration purposes. I’ll update this post when I determine how to populate the database drop-down list.
The first step was figuring out where to put the PostgreSQL JDBC Java ARchive (.jar) file on a Linux distribution. You navigate to the end-user student account in a Terminal and change to the .sqldeveloper directory. Then, create a jdbc subdirectory as the student user with the following command:
mkdir /home/student/.sqldeveloper/jdbc |
Then, download the most current PostgreSQL JDBC Java ARchive (.jar) file and copy it into the /home/student/.sqldeveloper/jdbc, which you can see afterward with the following command:
ll /home/student/.sqldeveloper/jdbc |
It should display:
-rw-r--r--. 1 student student 1041081 Aug 9 13:46 postgresql-42.3.7.jar |
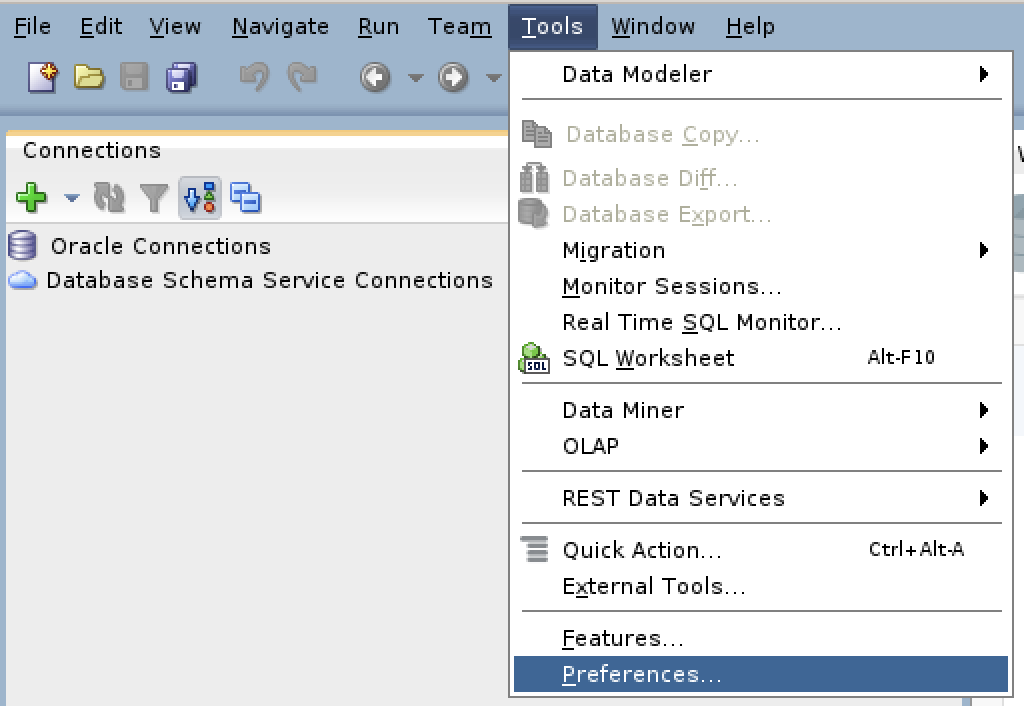
The next series of steps are done within SQL Developer. Launch SQL Developer and navigate to Tools and Preferences, like this:
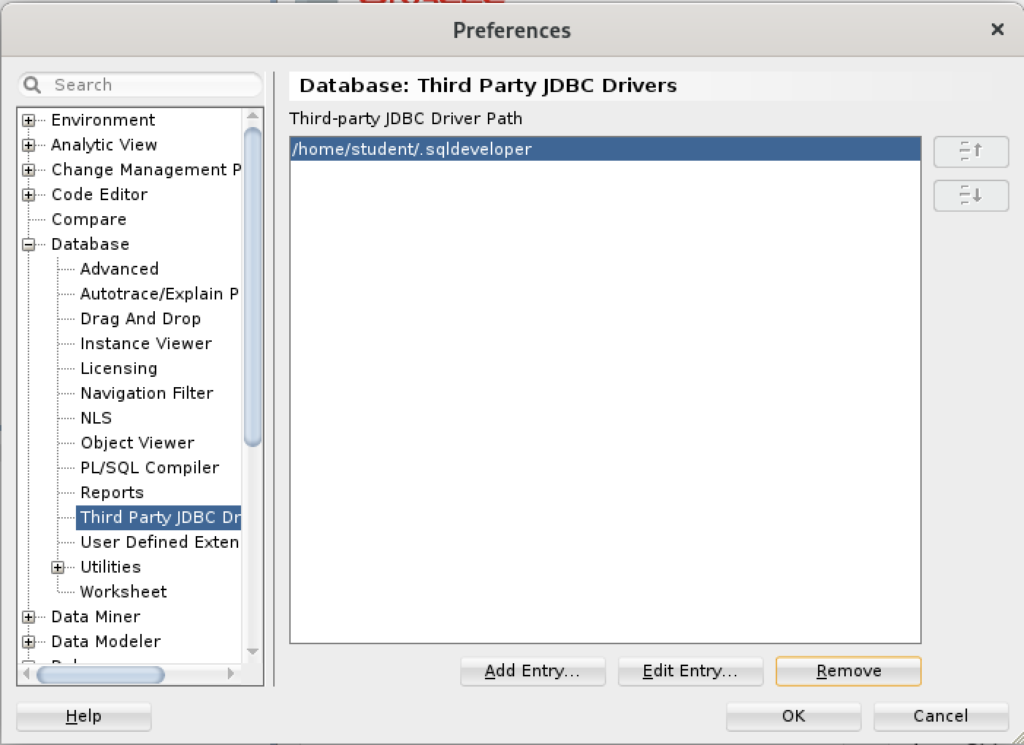
Inside the Preferences dialog, navigate to Database and Third Party JDBC Drivers like shown and click the Add Entry button to proceed:
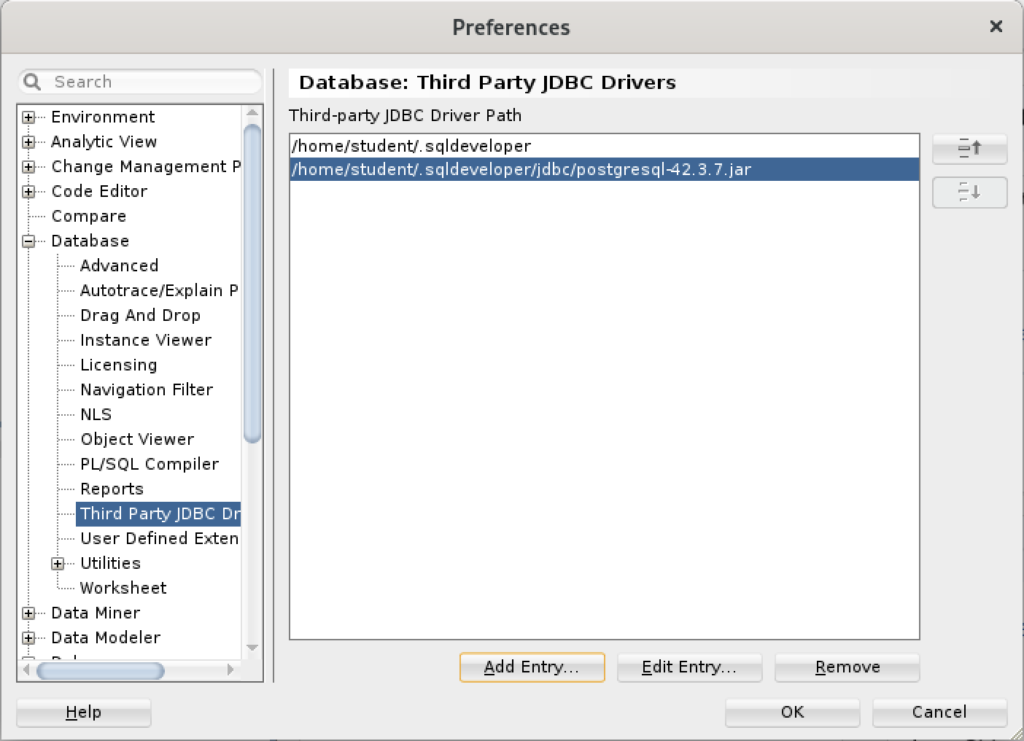
Inside the Select Path Entry dialog, select the current PostgreSQL JDBC Java ARchive (.jar) file, which is postgresql-42-3.7.jar in this example. Then, click the Select button.

You are returned to the Preferences dialog as shown below. Click the OK button to continue.
After completing the 3rd Party Java Driver setup, you attempt to create a new connection to the PostgreSQL database. You should see that you now have two available Database Type values: Oracle and PostgreSQL, as shown below:
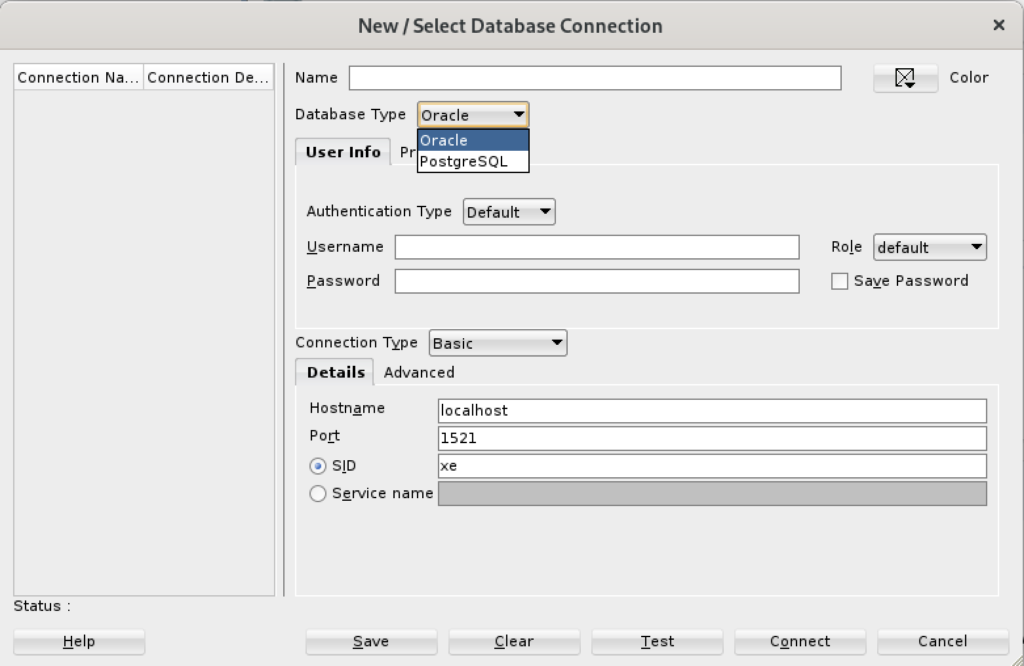
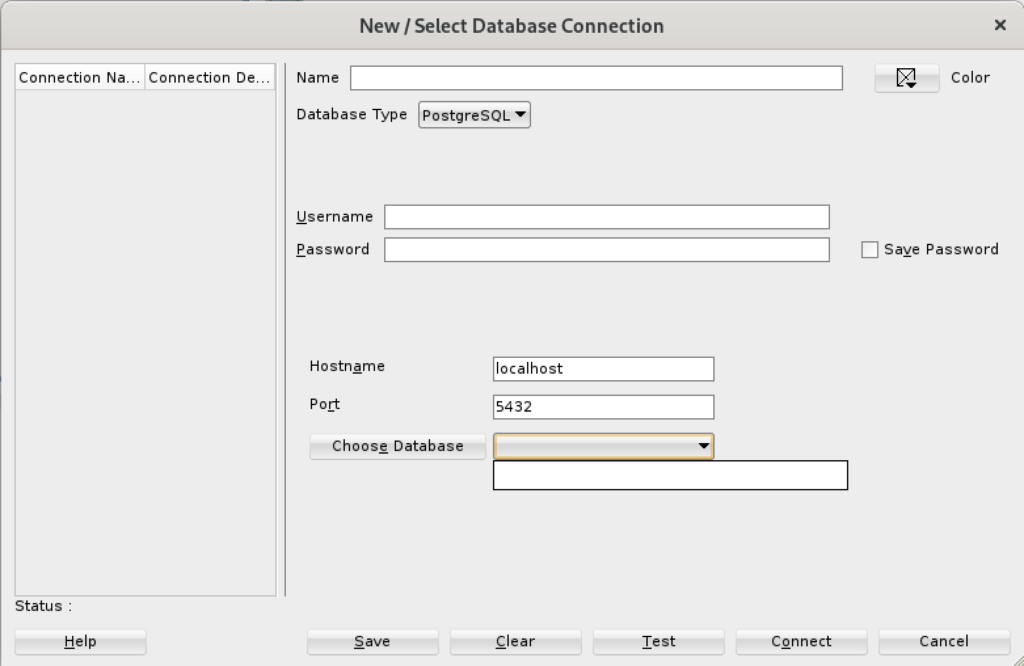
When you click on the PostgreSQL Database Type, the dialog updates to the following view. Unfortunately, I couldn’t discover how to set the values in the list for the Choose Database drop down. Naturally, a sandboxed user can’t connect to the PostgreSQL database without qualifying the database name.
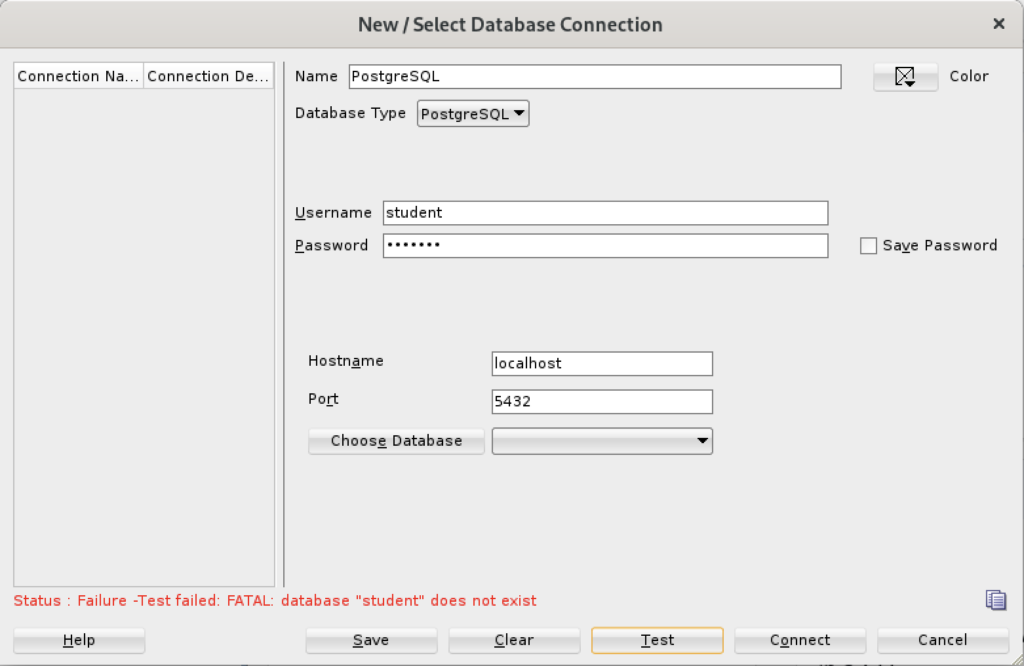
Unless you qualify the PostgreSQL database or connect as the postgres user with a privileged password, SQL Developer translates the absence of a database selection to a database name equivalent to the user’s name. That’s the default behavior for the Oracle database but differs from the behavior for MySQL, PostgreSQL, and Microsoft SQL Server. It returns the following
Status: Failure - Test failed: FATAL: database "student" does not exist |
As seen in the diaglog’s result when testing the connection:
Based on my hunch and not knowing how to populate the database field for the connection, I did the following:
- Created a Linux OS videodb user.
- Copied the .bashrc file with all the standard Oracle environment variables.
- Created the /home/videodb/.sqldeveloper/jdbc directory.
- Copied the postgresql-42.3.7.jar into the new jdbc directory.
- Connected as the postgres super user and created the PostgreSQL videodb user with this syntax:
CREATE USER videodb
  WITH ROLE dba
       ENCRYPTED PASSWORD 'cangetin';
- As the postgres super user, granted the following privileges:
-- Grant privileges on videodb database videodb user.
GRANT ALL ON DATABASE "videodb" TO "videodb";

-- Connect to the videodb database.
\c

-- Grant privileges.
GRANT ALL PRIVILEGES ON ALL TABLES IN SCHEMA public TO videodb;
GRANT ALL PRIVILEGES ON ALL SEQUENCES IN SCHEMA public TO videodb;
- Added the following line to the pg_hba.conf file in the /var/lib/pgsql/15/data directory as the postgres user:
local all videodb peer - Connected as the switched from the student to videodb Linux user, and launched SQL Developer. Then, I used the Tools menu to create the 3rd party PostgreSQL JDBC Java ARchive (.jar) file in context of the SQL Developer program. Everything completed correctly.
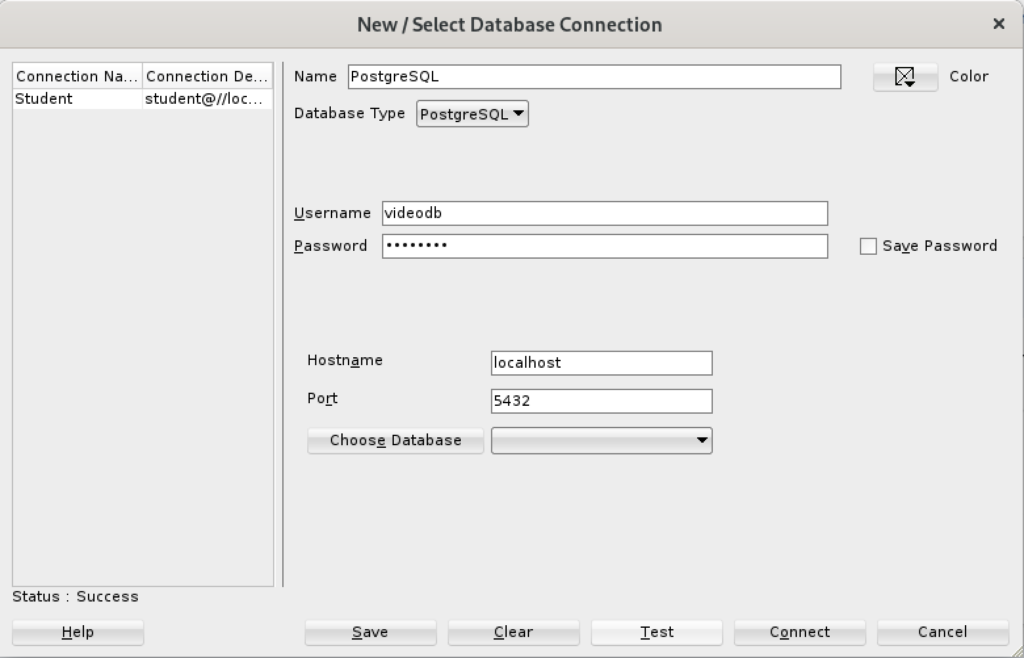
- Created a new PostgreSQL connection in SQL Developer and tested it with success as shown:
- Saving the new PostgreSQL connection, I opened the connection and could run SQL statements and display the catalog information, as shown:
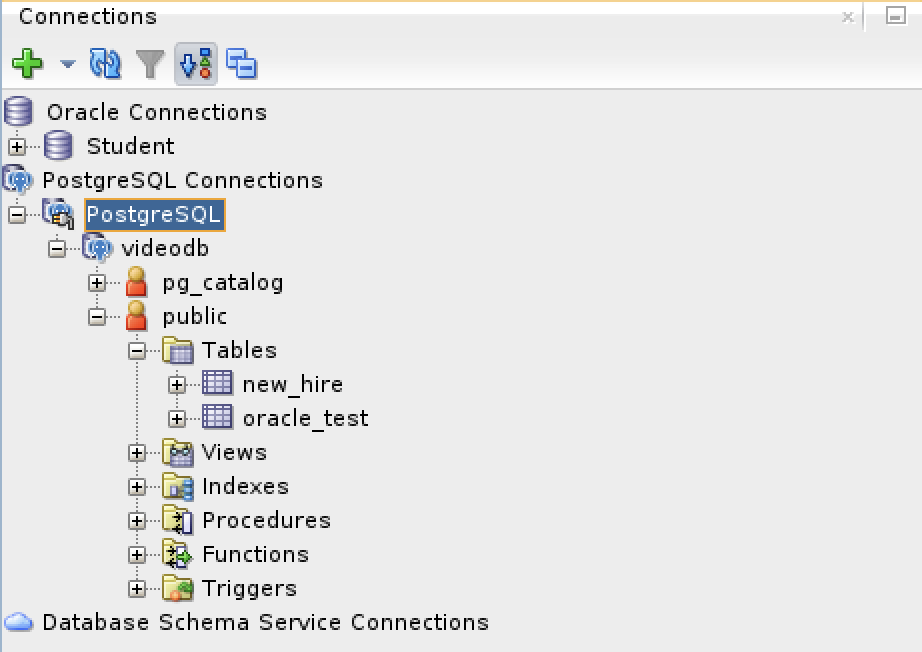
Connected as the videodb user to the videodb database I can display tables owned by student and videodb users:
-- List tables.
\d

                   List of relations
 Schema |           Name           |   Type   |  Owner
--------+--------------------------+----------+---------
 public | new_hire                 | table    | student
 public | new_hire_new_hire_id_seq | sequence | student
 public | oracle_test              | table    | videodb
(3 rows)
In SQL Developer, you can also inspect the tables, as shown:

At this point, I’m working on trying to figure out how to populate the database drop-down table. However, I’ve either missed a key document or it’s unfortunate that SQL Developer isn’t as friendly as MySQL Workbench in working with 3rd Party drivers.
PostgreSQL Java
The majority of information to write this post comes form knowing how Java works and where to find the PostgreSQL JDBC Java archive (.jar) file and the standard documentation. Here are the URLs:
The rest of the example is simply demonstrating how to create a fully working program to return one or more rows from a static query. After you download the latest PostgreSQL JDBC archive, with a command like:
wget https://jdbc.postgresql.org/download/postgresql-42.3.7.jar |
Assuming you put it in test directory, like /home/student/java, you would add it to your Java $CLASSPATH environment variable, like this:
export set CLASSPATH="/home/student/Code/java/postgresql-42.3.7.jar:." |
If you’re new to Java and Linux, the . (dot) represents the present working directory and is required in the Java $CLASSPATH to avoid raising a java.lang.ClassNotFoundException when you test your code. For example, the sample program name is PostgreSQLDriver.java and if you failed to include the present working directory in the $CLASSPATH it would raise the following error message when you try to run the compiled class file:
Error: Could not find or load main class PSQL Caused by: java.lang.ClassNotFoundException: PSQL |
Now that you’ve set your Java $CLASSPATH correctly, you can copy or type this PostgreSQLDriver.java Java program into a file.
1 2 3 4 5 6 7 8 9 10 11 12 13 14 15 16 17 18 19 20 21 22 23 24 25 26 27 28 29 30 31 32 33 34 35 36 37 38 39 40 41 42 43 44 45 46 47 48 49 50 51 52 53 54 55 56 57 58 59 60 61 62 63 64 65 66 67 68 69 | // Import classes. import java.sql.Connection; import java.sql.DriverManager; import java.sql.ResultSet; import java.sql.SQLException; import java.sql.Statement; import java.util.Properties; /* You can't include the following on Linux without raising an exception. */ // import com.mysql.jdbc.Driver; public class PostgreSQLDriver { public PostgreSQLDriver() { /* Declare variables that require explicit assignments because they're addressed in the finally block. */ Connection conn = null; Statement stmt = null; ResultSet rset = null; /* Declare other variables. */ String url; String username = "student"; String password = "student"; String database = "videodb"; String hostname = "[::1]"; String port = "5432"; String sql; /* Attempt a connection. */ try { // Set URL. url = "jdbc:postgresql://" + hostname + ":" + port + "/" + database; // Create instance of MySQLDriver. conn = DriverManager.getConnection (url, username, password); // Query the version of the database. sql = "SELECT version()"; stmt = conn.createStatement(); rset = stmt.executeQuery(sql); System.out.println ("Database connection established"); // Read row returns for one column. while (rset.next()) { System.out.println("PostgreSQL Connected to the [" + rset.getString(1) + "] database."); } } catch (SQLException e) { System.err.println ("Cannot connect to database server:"); System.out.println(e.getMessage()); } finally { if (conn != null) { try { rset.close(); stmt.close(); conn.close(); System.out.println ("Database connection terminated"); } catch (Exception e) { /* ignore close errors */ } } } } /* Unit test. */ public static void main(String args[]) { new PostgreSQLDriver(); } } |
Now, you compile the program from the present working directory with this syntax:
javac PostgreSQLDriver.java |
It creates a PostgreSQLDriver.class file, which you can run with this syntax:
java PostgreSQLDriver |
It will return the following, which verifies you’ve connected to a valid database in the PostgreSQL instance. You should note that the IPV6 syntax is used in the example on line #25 but you could substitute localhost, an assigned host name, or an IP address.
AlmaLinxu + javac
I neglected to show how to install and configure the Java SDK on my earlier post without relying on including the $JAVA_HOME in the $PATH. This post shows how to install the Java and Java SDK on Alma Linux without layering it with the $JAVA_HOME environment variable.
You install the Java runtime and development kit with the following command:
sudo dnf install -y java-17-openjdk java-17-openjdk-devel |
Then, you need to add it to the $PATH environment variable with the following syntax in your .bashrc file or environment file of your choice.
export set PATH=$PATH:/usr/lib/jvm/java-17-openjdk-17.0.8.0.7-2.el9.x86_64/bin/ |
After you source the new $PATH environment value, you can then write a file like this Hello.java file to test it.
// Define the Java program. public class HelloWorld { public static void main(String[] args) { System.out.println("Hello World!"); } } |
You compile the Hello.java file with this syntax:
javac Hello.java |
Then, you run the compiled program with the following syntax:
java Hello |
It’ll print:
Hello World! |
MySQL on Ubuntu
Working with my students to create an Ubuntu virtual environment for Python development with the MySQL database. After completing the general provisioning covered in this older post, I’d recommend you create a python symbolic link before installing the MySQL-Python driver.
sudo ln -s /usr/bin/python3 /usr/bin/python |
You install the Python development driver with the following:
sudo apt-get -y install python3-mysql.connector |
Create a python_connect.py file to test your Python deployment’s ability to connect to the MySQL database:
#!/usr/bin/python # Import the library. import mysql.connector from mysql.connector import errorcode try: # Open connection. cnx = mysql.connector.connect(user='student', password='student', host='localhost', database='sakila') # Print the value. print("Database connection resolved.") # Handle exception and close connection. except mysql.connector.Error as e: if e.errno == errorcode.ER_ACCESS_DENIED_ERROR: print("Something is wrong with your user name or password") elif e.errno == errorcode.ER_BAD_DB_ERROR: print("Database does not exist") else: print(e) # Close the connection when the try block completes. else: cnx.close() |
You should change the file permissions of the python_connect.py to read-write-execute as owner, and read-execute as group and other with the following command:
chmod 755 python_connect.py |
Then, you can test your python_connect.py program from the local directory with the following command:
./python_connect.py |
You see the following output if it works:
Database connection resolved. |
As alway, I hope those looking for a code complete solutionk
Python Objects
![]()
I promised to give my students a full example of how to write and execute a Python object. There were two motivations for this post. The first was driven by my students trying to understand the basics and the second my somebody else saying Python couldn’t deliver objects. Hopefully, this code is simple enough for both audiences. I gave them this other tutorial on writing and mimicking overloaded Python functions earlier.
This defines a Ball object type and a FilledBall object subtype of Ball. It incorporates the following elements:
- A special __init__ function, which is a C/C++ equivalent to a constructor.
- A special __str__ function represents a class object instance as a string. It is like the getString() equivalent in the Java programming language.
- A bounce instance function, which means it acts on any instance of the Ball object type or FilledBall object subtype.
- A get_direction instance function and it calls the __format local object function, which is intended to mimic a private function call, like other object-oriented programming languages.
- A private name __format function (Private name mangling: When an identifier that textually occurs in a class definition begins with two or more underscore characters and does not end in two or more underscores, it is considered a private name of that class.)
You can test this code by creating the $PYTHONPATH (Unix or Linux) or %PYTHONPATH% (Windows) as follows with all the code inside the present working directory, like this in Unix or Linux:
export set $PYTHONPATH=. |
Then, you create the Ball.py file with this syntax:
1 2 3 4 5 6 7 8 9 10 11 12 13 14 15 16 17 18 19 20 21 22 23 24 25 26 27 28 29 30 31 32 33 34 35 36 37 38 39 40 41 42 43 44 45 46 47 48 49 50 51 52 53 54 55 56 57 58 59 60 61 62 63 64 65 66 67 68 69 70 71 72 73 74 75 76 77 | # Creates a Ball object type and FilledBall object subtype. class Ball: # User-defined constructor with required parameters. def __init__(self, color = None, radius = None, direction = None): # Assign a default color value when the parameter is null. if color is None: self.color = "Blue" else: self.color = color.lower() # Assign a default radius value when the parameter is null. if radius is None: self.radius = 1 else: self.radius = radius # Assign a default direction value when the parameter is null. if direction is None: self.direction = "down" else: self.direction = direction.lower() # Set direction switch values. self.directions = ("down","up") # User-defined standard function when printing an object type. def __str__(self): # Build a default descriptive message of the object. msg = "It's a " + self.color + " " + str(self.radius) + '"' + " ball" # Return the message variable. return msg # Define a bounce function. def bounce(self, direction = None): # Set direction on bounce. if not direction is None: self.direction = direction else: # Switch directions. if self.directions[0] == self.direction: self.direction = self.directions[1] elif self.directions[1] == self.direction: self.direction = self.directions[0] # Define a bounce function. def getDirection(self): # Return current direction of ball. return self.__format(self.direction) # User-defined pseudo-private function, which is available # to instances of the Ball object and any of its subtypes. def __format(self, msg): return "[" + msg + "]" # This is the object subtype, which takes the parent class as an # argument. class FilledBall(Ball): def __init__(self, filler = None): # Instantiate the parent class and then any incremental # parameter values. Ball.__init__(self,"Red",2) # Add a default value or the constructor filler value. if filler is None: self.filler = "Air".lower() else: self.filler = filler # User-defined standard function when printing an object type, which # uses generalized invocation. def __str__(self): # Build a default descriptive message of the object. msg = Ball.__str__(self) + str(" filled with " + self.filler) # Return the message variable. return msg |
Next, let’s test instantiating the Ball object type with the following code:
1 2 3 4 5 6 7 8 9 10 11 12 13 14 15 16 17 18 19 20 21 | #!/usr/bin/python # Import the Ball class into its own namespace. import Ball # Assign an instantiated class to a local variable. myBall = Ball.Ball() # Check whether the local variable holds a valid Ball instance. if not myBall is None: print(myBall, "instance.") else: print("No Ball instance.") # Loop through 10 times changing bounce direction. for i in range(1,10): # Find dirction of ball. print(myBall.getDirection()) # Bounce the ball. myBall.bounce() |
Next, let’s test instantiating the FilledBall object subtype with the following code:
1 2 3 4 5 6 7 8 9 10 11 12 13 14 15 16 17 18 19 20 21 | #!/usr/bin/python # Import the Ball class into its own namespace. import Ball # Assign an instantiated class to a local variable. myBall = Ball.FilledBall() # Check whether the local variable holds a valid FilledBall instance. if not myBall is None: print(myBall, "instance.") else: print("No Ball instance.") # Loop through 10 times changing bounce direction. for i in range(1,10): # Find dirction of ball. print(myBall.getDirection()) # Bounce the ball. myBall.bounce() |
As always, I hope this helps those looking to learn and extend their knowledge.
User/Group Setups
The following are samples of creating, changing, and removing users and groups in Linux. These are the command-line options in the event you don’t have access to the GUI tools.
Managing Users:
Adding a user:
The prototype is:
# useradd [-u uid] [-g initial_group] [-G group[,...]] \ > [-d home_directory] [-s shell] [-c comment] \ > [-m [-k skeleton_directory]] [-f inactive_time] \ > [-e expire_date] -n username |
A sample implementation of the prototype is:
# useradd -u 502 -g dba -G users,root \ > -d /u02/oracle -s /bin/tcsh -c "Oracle Account" \ > -f 7 -e 12/31/03 -n jdoe |
Modifying a user:
The prototype is:
# usermod [-u uid] [-g initial_group] [-G group[,...]] \ > [-d home_directory] [-s shell] [-c comment] \ > [-l new_username ] [-f inactive_time] [-e expire_date] > username |
A sample implementation of the prototype is:
# usermod -u 502 -g dba -G users,root > -d /u02/oracle -s /bin/bash -c "Senior DBA" > -l sdba -f 7 -e 12/31/03 jdoe |
Removing a user:
The prototype is:
# userdel [-r] username |
A sample implementation of the prototype is:
# userdel -r jdoe |
Managing Groups:
Adding a group:
The prototype is:
# groupadd [-g gid] [-rf] groupname |
A sample implementation of the prototype is:
# groupadd -g 500 dba |
Modifying a group:
The prototype is:
# groupmod [-g gid] [-n new_group_name] groupname |
A sample implementation of the prototype is:
# groupmod -g 500 -n dba oinstall |
Deleting a group:
The prototype is:
# groupdel groupname |
A sample implementation of the prototype is:
# groupdel dba |
Installing a GUI Manager for Users and Groups:
If you’re the root user or enjoy sudoer privileges, you can install the following GUI package for these tasks:
yum install -y system-config-users |
You can verify the GUI user management tool is present with the following command:
which system-config-users |
It should return this:
/bin/system-config-users |
You can run the GUI user management tool from the root user account or any sudoer account. The following shows how to launch the GUI User Manager from a sudoer account:
sudo system-config-users |
As always, I hope this helps those trying to figure out the proper syntax.
MySQL Workbench Fits
My students wanted an illustration of where MySQL Workbench fits within the MySQL database. So, I overlaid it in this drawing from my old book on comparative SQL syntax for Oracle and MySQL. Anybody else have a cool alternative illustration?
The idea is the lightening bolt transmits an interactive call and reading a script file submits a call paradigm.

More or less MySQL processes a static query in the panel, like the following Python program process the dynamic query (on lines 71-78) with parameters sent when calling the Python script.
1 2 3 4 5 6 7 8 9 10 11 12 13 14 15 16 17 18 19 20 21 22 23 24 25 26 27 28 29 30 31 32 33 34 35 36 37 38 39 40 41 42 43 44 45 46 47 48 49 50 51 52 53 54 55 56 57 58 59 60 61 62 63 64 65 66 67 68 69 70 71 72 73 74 75 76 77 78 79 80 81 82 83 84 85 86 87 88 89 90 91 92 93 94 95 96 97 98 99 100 101 102 103 104 | #!/usr/bin/python # ------------------------------------------------------------ # Name: mysql-query2.py # Date: 20 Aug 2019 # ------------------------------------------------------------ # Purpose: # ------- # The program shows you how to provide agruments, convert # from a list to individual variables of the date type. # # You can call the program: # # ./mysql-query3.py 2001-01-01 2003-12-31 # # ------------------------------------------------------------ # Import the library. import sys import mysql.connector from datetime import datetime from datetime import date from mysql.connector import errorcode # Capture argument list. fullCmdArguments = sys.argv # Assignable variables. start_date = "" end_date = "" # Assign argument list to variable. argumentList = fullCmdArguments[1:] # Check and process argument list. # ============================================================ # If there are less than two arguments provide default values. # Else enumerate and convert strings to dates. # ============================================================ if (len(argumentList) < 2): # Set a default start date. if (isinstance(start_date,str)): start_date = date(1980, 1, 1) # Set the default end date. if (isinstance(end_date,str)): end_date = datetime.date(datetime.today()) else: # Enumerate through the argument list where beginDate precedes endDate as strings. try: for i, s in enumerate(argumentList): if (i == 0): start_date = datetime.date(datetime.fromisoformat(s)) elif (i == 1): end_date = datetime.date(datetime.fromisoformat(s)) except ValueError: print("One of the first two arguments is not a valid date (YYYY-MM-DD).") # Attempt the query. # ============================================================ # Use a try-catch block to manage the connection. # ============================================================ try: # Open connection. cnx = mysql.connector.connect(user='student', password='student', host='127.0.0.1', database='studentdb') # Create cursor. cursor = cnx.cursor() # Set the query statement. query = ("SELECT CASE " " WHEN item_subtitle IS NULL THEN CONCAT('''',item_title,'''') " " ELSE CONCAT('''',item_title,': ',item_subtitle,'''') " " END AS title, " "release_date " "FROM item " "WHERE release_date BETWEEN %s AND %s " "ORDER BY item_title") # Execute cursor. cursor.execute(query, (start_date, end_date)) # Display the rows returned by the query. for (title, release_date) in cursor: print("{}, {:%d-%b-%Y}".format(title, release_date)) # Close cursor. cursor.close() # ------------------------------------------------------------ # Handle exception and close connection. except mysql.connector.Error as e: if e.errno == errorcode.ER_ACCESS_DENIED_ERROR: print("Something is wrong with your user name or password") elif e.errno == errorcode.ER_BAD_DB_ERROR: print("Database does not exist") else: print("Error code:", e.errno) # error number print("SQLSTATE value:", e.sqlstate) # SQLSTATE value print("Error message:", e.msg) # error message # Close the connection when the try block completes. else: cnx.close() |
You could call this type of script from the Linux CLI (Command-Line Interface), like this:
./mysql-query3.py '2003-01-01' '2003-12-31' 2>/dev/null |
As always, I hope this helps those looking to understand things.
MySQL Posts Summary
Here’s a quick catalog for my students of PowerShell, JavaScript, and Python examples connecting to MySQL:
- MySQL Powershell Connection with .Net Library Example
- MySQL Powershell Connection with ODBC DSN Example
- MySQL Powershell with CSV File Write Example
- MySQL Powershell with Dialog for Dynamic Connection Inputs
- MySQL Node.js Introduction without Bind Variables
- MySQL Express.js Introcution with Bind Variables – Inclusive of Alternate Syntax
- MySQL Node.js Server-side Scripting Example – Inclusive of Regular Expressions and Parameter Validation
- MySQL Node.js Server-side Clarification of JavaScript Streams
- MySQL Python Connector – Working Example with Python 2 & 3
- MySQL Python with CTE Examples
- MySQL How to use Python to Read a CSV and Write it to a Table
- MySQL How to use Python to cleanup JSON Presentation
As always, I hope this helps those looking for a code sample.
Python Functions
It seems a number of my students had some confusion over how to write overloaded Python functions. So, I prepared this little tutorial using Python 3.
The first basic1.py example file is a standalone Python file that:
- Defines a hello() world function.
- Calls the local hello() world function.
#!/usr/bin/python # Define a hello() function. def hello(): print("Hello World!") # Call the hello() function. hello() |
You can test the basic1.py script as follows:
./basic1.py |
It prints:
Hello World! |
The second basic2.py example file is also a standalone Python file that:
- Attempts to define overloaded hello() world functions. One version takes no arguments and the other takes one argument.
- Attempts to call the overloaded local hello() world function without any arguments and with one argument.
#!/usr/bin/python # Call the hello() function without any arguments. def hello(): print("Hello World!") # Call the hello() function with one argument. def hello(whom): print("Hello", whom) # Call the overloaded hello() functions. hello() hello("Henry") |
You can test the basic2.py script as follows:
./basic2.py |
It successfully defines the hello() function and then it replaces it with the hello(whom) function. So, it raises the following runtime error because the call to the hello() world function finds the hello(whom) function and the call lacks a call parameter.
Traceback (most recent call last):
  File "/home/student/Code/python/funct/./basic2.py", line 12, in <module>
    hello()
TypeError: hello() missing 1 required positional argument: 'whom' |
The third basic3.py example file is also a standalone Python file that:
- Defines a function that acts like an overloaded hello(whom=None) world function.
- Call the local hello(whom=None) world function without any arguments and with one argument. It works because you do two things:
- You assign a default null value to the whom parameter, which makes the parameter optional in the function’s signature.
- You use an if-statement to manage the behavior of a null parameter. The None keyword defines a null value. Please note that the is reference comparison operator is necessary to evaluate whether a variable contains a null value.
#!/usr/bin/python # Call the hello() function with an optional parameter; and # manage the inner workings with and without a parameter. def hello(whom = None): if whom is None: print("Hello World!") else: print("Hello", whom + "!") # Call the overloaded hello() functions. hello() hello("Henry") |
You can test the basic3.py script as follows:
./basic3.py |
It prints:
Hello World! Hello Henry! |
At this point, we need to qualify how you can position a Python library file in a development directory. Development directories aren’t typically in the standard library locations, which means you need to define the directories in the $PYTHONPATH environment variable.
There’s a convenient trick that lets you set the $PYTHONPATH value so that you can use it across multiple test environments. It requires you to create an src directory for your library source code inside the directory where you develop code that will use library functions.
After creating the src directory, you can set the $PYTHONPATH environment variable with a relative src directory in the following syntax:
export set PYTHONPATH=$PYTHONPATH:./src:. |
It will now let Python look for libraries in the src subdirectory or the present working directory.
Next, you deploy the following hello(whom=None) function in a lib.py file inside the src subdirectory.
# Call the hello() function with an optional parameter; and # manage the inner workings with and without a parameter. def hello(whom = None): if whom is None: print("Hello World!") else: print("Hello", whom + "!") |
In the parent directory of the src subdirectory create the basic4.py file, like:
#!/usr/bin/python # Import the lib.py file as a lib package. import lib # Call the hello() function without arguments and # with one argument within the namespace of the lib # library. lib.hello() lib.hello("Henry") |
An alternate way to write the basic4.py program imports a single namespace element (like a variable, function, or object) and places it in the local namespace of the program. You can redefine hello() function
#!/usr/bin/python # Define the hello namespace element from the lib # library in the current program. from lib import hello # Call the hello() function without arguments and # with one argument within the namespace of the lib # library. hello() hello("Henry") |
The hello() function only prints messages. You can add a return statement to return a value from the hello() function. The modified library returns a string rather than printing a string, as follows:
# Call the hello() function with an optional parameter; and # manage the inner workings with and without a parameter. def hello(whom = None): if whom is None: return "Hello World!" else: return "Hello " + whom + "!" # Call the goodbye() function with an optional parameter; and # manage the inner workings with and without a parameter. def goodbye(whom = None): if whom is None: return "Goodbye World!" else: return "Goodbye " + whom + "!" |
You would then make the following changes to the basic5.py program that calls the lib.py library file. You could also call the goodbye() function inside the imported lib scope. However, you wouldn’t be able to call the goodbye() function if you had imported only the hello() function from the lib package into the local namespace.
#!/usr/bin/python # Import the lib.py file as a lib package. import lib # Call the hello() function without arguments and # with one argument within the namespace of the lib # library. print(lib.hello()) print(lib.hello("Henry")) |
As always, I hope this helps those looking to understand and use functions in Python.
