Selective Aggregation
Selective Aggregation
Learning Outcomes
- Learn how to combine CASE operators and aggregation functions.
- Learn how to selective aggregate values.
- Learn how to use SQL to format report output.
Selective aggregation is the combination of the CASE operator and aggregation functions. Any aggregation function adds, sums, or averages the numbers that it finds; and when you embed the results of a CASE operator inside an aggregation function you get a selective result. The selectivity is determined by the WHEN clause of a CASE operator, which is more or less like an IF statement in an imperative programming language.
The prototype for selective aggregation is illustrated with a SUM function below:
SELECT SUM(CASE WHEN left_operand = right_operand THEN result WHEN left_operand > right_operand THEN result WHEN left_operand IN (SET OF comma-delimited VALUES) THEN result WHEN left_operand IN (query OF results) THEN result ELSE alt_result END) AS selective_aggregate FROM some_table; |
A small example let’s you see how selective aggregation works. You create a PAYMENT table and PAYMENT_S sequence for this example, as follows:
-- Create a PAYMENT table. CREATE TABLE payment ( payment_id NUMBER , payment_date DATE CONSTRAINT nn_payment_1 NOT NULL , payment_amount NUMBER(20,2) CONSTRAINT nn_payment_2 NOT NULL , CONSTRAINT pk_payment PRIMARY KEY (payment_id)); -- Create a PAYMENT_S sequence. CREATE SEQUENCE payment_s; |
After you create the table and sequence, you should insert some data. You can match the values below or choose your own values. You should just insert values for a bunch of rows.
View Anonymous PL/SQL Block →
You can populate data with the anonymous PL/SQL block, which creates 10,000 random rows in the payment table. Please note thatyou will get different payment dates and amounts each time you run the script.
1 2 3 4 5 6 7 8 9 10 11 12 13 14 15 16 17 18 19 20 21 22 23 24 25 26 27 28 29 30 31 32 33 34 35 36 37 38 39 40 41 42 43 44 45 46 47 48 49 50 51 52 53 54 55 56 | DECLARE -- Create local collection data types. TYPE pmtval IS TABLE OF NUMBER(20,2); TYPE smonth IS TABLE OF VARCHAR2(3); -- Create variable to hold the list of payments. payments PMTVAL := pmtval(); -- Declare month arrays. short_month SMONTH := smonth('JAN','FEB','MAR','APR','MAY','JUN' ,'JUL','AUG','SEP','OCT','NOV','DEC'); -- Declare variable values. month VARCHAR2(3); year NUMBER := '2019'; pmt_date DATE; tpmt_date VARCHAR2(11); -- Declare default number of random payments. payment_number NUMBER := 10000; BEGIN -- Populate payment list. FOR i IN 1..payment_number LOOP payments.EXTEND; SELECT ROUND(dbms_random.value() * 1000,0) || '.' || ROUND(dbms_random.value() * 100,0) INTO payments(payments.COUNT) FROM dual; END LOOP; -- Create and populate payment date and amount. FOR i IN 1..payment_number LOOP -- Assign random month value. month := short_month(dbms_random.value(1,short_month.COUNT)); -- Assign random day of the month value and assemble random date. IF month IN ('JAN','MAR','MAY','JUL','AUG','OCT','DEC') THEN pmt_date := ROUND(dbms_random.value(1,31),0) || '-' || month || '-' || year; ELSIF month IN ('APR','JUN','SEP','NOV') THEN pmt_date := ROUND(dbms_random.value(1,30),0) || '-' || month || '-' || year; ELSE pmt_date := ROUND(dbms_random.value(1,28),0) || '-' || month || '-' || year; END IF; -- Insert values into the PAYMENT table. INSERT INTO payment ( payment_id, payment_date, payment_amount ) VALUES ( payment_s.NEXTVAL, pmt_date, payments(i)); END LOOP; -- Commit the writes. COMMIT; END; / |
After inserting 10,000 rows, you can get an unformatted total with the following query:
-- Query total amount. SELECT SUM(payment_amount) AS payment_total FROM payment; |
It outputs the following:
PAYMENT_TOTAL ------------- 5011091.75 |
You can nest the result inside the TO_CHAR function to format the output, like
-- Query total formatted amount. SELECT TO_CHAR(SUM(payment_amount),'999,999,999.00') AS payment_total FROM payment; |
It outputs the following:
PAYMENT_TOTAL --------------- 5,011,091.75 |
Somebody may suggest that you use a PIVOT function to rotate the data into a summary by month but the PIVOT function has limits. The pivoting key must be numeric and the column values will use only those numeric values.
-- Pivoted summaries by numeric monthly value. SELECT * FROM (SELECT EXTRACT(MONTH FROM payment_date) payment_month , payment_amount FROM payment) PIVOT (SUM(payment_amount) FOR payment_month IN (1,2,3,4,5,6,7,8,9,10,11,12)); |
It outputs the following:
1 2 3 4 5 6 7 8 9 10 11 12 ---------- ---------- ---------- ---------- ---------- ---------- ---------- ---------- ---------- ---------- ---------- ---------- 245896.55 430552.36 443742.63 457860.27 470467.18 466370.71 415158.28 439898.72 458998.09 461378.56 474499.22 246269.18 |
You can use selective aggregation to get the results by a character label, like
SELECT SUM( CASE WHEN EXTRACT(MONTH FROM payment_date) = 1 AND EXTRACT(YEAR FROM payment_date) = 2019 THEN payment_amount END) AS "JAN" , SUM( CASE WHEN EXTRACT(MONTH FROM payment_date) = 2 AND EXTRACT(YEAR FROM payment_date) = 2019 THEN payment_amount END) AS "FEB" , SUM( CASE WHEN EXTRACT(MONTH FROM payment_date) = 3 AND EXTRACT(YEAR FROM payment_date) = 2019 THEN payment_amount END) AS "MAR" , SUM( CASE WHEN EXTRACT(MONTH FROM payment_date) IN (1,2,3) AND EXTRACT(YEAR FROM payment_date) = 2019 THEN payment_amount END) AS "1FQ" , SUM( CASE WHEN EXTRACT(MONTH FROM payment_date) = 4 AND EXTRACT(YEAR FROM payment_date) = 2019 THEN payment_amount END) AS "APR" FROM payment; |
It outputs the following:
JAN FEB MAR 1FQ APR ---------- ---------- ---------- ---------- ---------- 245896.55 430552.36 443742.63 1120191.54 457860.27 |
You can format the output with a combination of the TO_CHAR and LPAD functions. The TO_CHAR allows you to add a formatting mask, complete with commas and two mandatory digits to the right of the decimal point. The reformatted query looks like
COL JAN FORMAT A13 HEADING "Jan" COL FEB FORMAT A13 HEADING "Feb" COL MAR FORMAT A13 HEADING "Mar" COL 1FQ FORMAT A13 HEADING "1FQ" COL APR FORMAT A13 HEADING "Apr" SELECT LPAD(TO_CHAR(SUM( CASE WHEN EXTRACT(MONTH FROM payment_date) = 1 AND EXTRACT(YEAR FROM payment_date) = 2019 THEN payment_amount END),'9,999,999.00'),13,' ') AS "JAN" , LPAD(TO_CHAR(SUM( CASE WHEN EXTRACT(MONTH FROM payment_date) = 2 AND EXTRACT(YEAR FROM payment_date) = 2019 THEN payment_amount END),'9,999,999.00'),13,' ') AS "FEB" , LPAD(TO_CHAR(SUM( CASE WHEN EXTRACT(MONTH FROM payment_date) = 3 AND EXTRACT(YEAR FROM payment_date) = 2019 THEN payment_amount END),'9,999,999.00'),13,' ') AS "MAR" , LPAD(TO_CHAR(SUM( CASE WHEN EXTRACT(MONTH FROM payment_date) IN (1,2,3) AND EXTRACT(YEAR FROM payment_date) = 2019 THEN payment_amount END),'9,999,999.00'),13,' ') AS "1FQ" , LPAD(TO_CHAR(SUM( CASE WHEN EXTRACT(MONTH FROM payment_date) = 4 AND EXTRACT(YEAR FROM payment_date) = 2019 THEN payment_amount END),'9,999,999.00'),13,' ') AS "APR" FROM payment; |
It displays the formatted output:
Jan Feb Mar 1FQ Apr ------------- ------------- ------------- ------------- ------------- 245,896.55 430,552.36 443,742.63 1,120,191.54 457,860.27 |
INSERT Statement
INSERT Statement
Learning Outcomes
- Learn how to use positional- and named-notation in INSERT statements.
- Learn how to use the VALUES clause in INSERT statements.
- Learn how to use subqueries in INSERT statements.
The INSERT statement lets you enter data into tables and views in two ways: via an INSERT statement with a VALUES clause and via an INSERT statement with a query. The VALUES clause takes a list of literal values (strings, numbers, and dates represented as strings), expression values (return values from functions), or variable values.
Query values are results from SELECT statements that are subqueries (covered earlier in this appendix). INSERT statements work with scalar, single-row, and multiple-row subqueries. The list of columns in the VALUES clause or SELECT clause of a query (a SELECT list) must map to the positional list of columns that defines the table. That list is found in the data dictionary or catalog. Alternatively to the list of columns from the data catalog, you can provide a named list of those columns. The named list overrides the positional (or default) order from the data catalog and must provide at least all mandatory columns in the table definition. Mandatory columns are those that are not null constrained.
Oracle databases differ from other databases in how they implement the INSERT statement. Oracle doesn’t support multiple-row inserts with a VALUES clause. Oracle does support default and override signatures as qualified in the ANSI SQL standards. Oracle also provides a multiple- table INSERT statement. This section covers how you enter data with an INSERT statement that is based on a VALUES clause or a subquery result statement. It also covers multiple-table INSERT statements.
The INSERT statement has one significant limitation: its default signature. The default signature is the list of columns that defines the table in the data catalog. The list is defined by the position and data type of columns. The CREATE statement defines the initial default signature, and the ALTER statement can change the number, data types, or ordering of columns in the default signature.
The default prototype for an INSERT statement allows for an optional column list that overrides the default list of columns. When you provide the column list you choose to implement named-notation, which is the right way to do it. Relying on the insertion order of the columns is a bad idea. An INSERT statement without a list of column names is a position-notation statement. Position-notation is bad because somebody can alter that order and previously written INSERT statements will break or put data in the wrong columns.
Like methods in OOPLs, an INSERT statement without the optional column list constructs an instance (or row) of the table using the default constructor. The override constructor for a row is defined by any INSERT statement when you provide an optional column list. That’s because it overrides the default constructor.
The generic prototype for an INSERT statement is confusing when it tries to capture both the VALUES clause and the result set from a query. Therefore, I’ve opted to provide two generic prototypes.
Insert by value
The first uses the VALUES clause:
INSERT INTO table_name [( column1, column2, column3, ...)] VALUES ( value1, value2, value3, ...); |
Notice that the prototype for an INSERT statement with the result set from a query doesn’t use the VALUES clause at all. A parsing error occurs when the VALUES clause and query both occur in an INSERT statement.
The second prototype uses a query and excludes the VALUES clause. The subquery may return one to many rows of data. The operative rule is that all columns in the query return the same number of rows of data, because query results should be rectangles—rectangles made up of one to many rows of columns.
Insert by subquery
Here’s the prototype for an INSERT statement that uses a subquery:
INSERT INTO table_name [( column1, column2, column3, ...)] ( SELECT value1, value2, value3, ... FROM table_name WHERE ...); |
A query, or SELECT statement, returns a SELECT list. The SELECT list is the list of columns, and it’s evaluated by position and data type. The SELECT list must match the definition of the table or the override signature provided.
Default signatures present a risk of data corruption through insertion anomalies, which occur when you enter bad data in tables. Mistakes transposing or misplacing values can occur more frequently with a default signature, because the underlying table structure can change. As a best practice, always use named notation by providing the optional list of values; this should help you avoid putting the right data in the wrong place.
The following subsections provide examples that use the default and override syntax for INSERT statements in Oracle databases. The subsections also cover multiple-table INSERT statements and a RETURNING INTO clause, which is an extension of the ANSI SQL standard. Oracle uses the RETURNING INTO clause to manage large objects, to return autogenerated identity column values, and to support some of the features of Oracle’s dynamic SQL. Note that Oracle also supports a bulk INSERT statement, which requires knowledge of PL/SQL.
Insert by Values →
An INSERT statement with a VALUES clause can only insert one row at a time in and Oracle database. Other databases, like Microsoft SQL Server and MySQL allow you to insert a comma delimited set of values inside the VALUES clause. Oracle adheres to the ANSI standard that support single row inserts with a VALUES clause and multiple row inserts with a subquery.
Inserting by the VALUES clause is the most common type of INSERT statement. It’s most useful when interacting with single-row inserts.
You typically use this type of INSERT statement when working with data entered through end-user web forms. In some cases, users can enter more than one row of data using a form, which occurs, for example, when a user places a meal order in a restaurant and the meal and drink are treated as order items. The restaurant order entry system would enter a single-row in the order table and two rows in the order_item table (one for the meal and the other for the drink). PL/SQL programmers usually handle the insertion of related rows typically inside a loop structure when they use dynamic INSERT statements. Dynamic inserts are typically performed using NDS (Native Dynamic SQL) statements.
Oracle supports only a single-row insert through the VALUES clause. Multiple-row inserts require an INSERT statement from a query.
The VALUES clause of an INSERT statement accepts scalar values, such as strings, numbers, and dates. It also accepts calls to arrays, lists, or user-defined object types, which are called flattened objects. Oracle supports VARRAY as arrays and nested tables as lists. They can both contain elements of a scalar data type or user-defined object type.
The following sections discuss how you use the VALUES clause with scalar data types, how you convert various data types, and how you use the VALUES clause with nested tables and user-defined object data types.
Inserting Scalar Data Types
Instruction Details →
This section shows you how to INSERT scalar values into tables.
The basic syntax for an INSERT statement with a VALUES clause can include an optional override signature between the table name and VALUES keyword. With an override signature, you designate the column names and the order of entry for the VALUES clause elements. Without an override signature, the INSERT signature checks the definition of the table in the database catalog. The positional order of the column in the data catalog defines the positional, or default, signature for the INSERT statement. As shown previously, you can discover the structure of a table in Oracle with the DESCRIBE command issued at the SQL*Plus command line:
DESCRIBE table_name |
You’ll see the following after describing the rental table in SQL*Plus:
Name Null? Type ------------------------------------ -------- -------- RENTAL_ID NOT NULL NUMBER CUSTOMER_ID NOT NULL NUMBER CHECK_OUT_DATE NOT NULL DATE RETURN_DATE DATE CREATED_BY NOT NULL NUMBER CREATION_DATE NOT NULL DATE LAST_UPDATED_BY NOT NULL NUMBER LAST_UPDATE_DATE NOT NULL DATE |
The rental_id column is a surrogate key, or an artificial numbering sequence. The combination of the customer_id and check_out_date columns serves as a natural key because a DATE data type is a date-time value. If it were only a date, the customer would be limited to a single entry for each day, and limiting customer rentals to one per day isn’t a good business model.
The basic INSERT statement would require that you look up the next sequence value before using it. You should also look up the surrogate key column value that maps to the row where your unique customer is stored in the contact table. For this example, assume the following facts:
- Next sequence value is 1086
- Customer’s surrogate key value is 1009
- Current date-time is represented by the value from the SYSDATE function
- Return date is the fifth date from today
- User adding and updating the row has a primary (surrogate) key value of 1
- Creation and last update date are the value returned from the SYSDATE function.
An INSERT statement must include a list of values that match the positional data types of the database catalog, or it must use an override signature for all mandatory columns.
You can now write the following INSERT statement, which relies on the default signature:
SQL> INSERT INTO rental 2 VALUES 3 ( 1086 4 , 1009 5 , SYSDATE 6 , TRUNC(SYSDATE + 5) 7 ,1 8 , SYSDATE 9 , 1 10 , SYSDATE); |
If you weren’t using SYSDATE for the date-time value on line 5, you could manually enter a date-time with the following Oracle proprietary syntax:
5 , TO_DATE('15-APR-2011 12:53:01','DD-MON-YYYY HH24:MI:SS') |
The TO_DATE function is an Oracle-specific function. The generic conversion function would be the CAST function. The problem with a CAST function by itself is that it can’t handle a format mask other than the database defaults (‘DD-MON-RR‘ or ‘DD-MON-YYYY‘). For example, consider this syntax:
5 , CAST('15-APR-2011 12:53:02' AS DATE) |
It raises the following error:
5 , CAST('15-APR-2011 12:53:02' AS DATE) FROM dual * ERROR AT line 1: ORA-01830: DATE format picture ends before converting entire input string |
You actually need to double cast this type of format mask when you want to store it as a DATE data type. The working syntax casts the date-time string as a TIMESTAMP data type before recasting the TIMESTAMP to a DATE, like
5 , CAST(CAST('15-APR-2011 12:53:02' AS TIMESTAMP) AS DATE) |
Before you could write the preceding INSERT statement, you would need to run some queries to find the values. You would secure the next value from a rental_s1 sequence in an Oracle database with the following command:
SQL> SELECT rental_s1.NEXTVAL FROM dual; |
This assumes two things, because sequences are separate objects from tables. First, code from which the values in a table’s surrogate key column come must appear in the correct sequence. Second, a sequence value is inserted only once into a table as a primary key value.
In place of a query that finds the next sequence value, you would simply use a call against the .nextval pseudocolumn in the VALUES clause. You would replace line 3 with this:
3 ( rental_s1.NEXTVAL |
The .nextval is a pseudocolumn, and it instantiates an instance of a sequence in the current session. After a call to a sequence with the .nextval pseudocolumn, you can also call back the prior sequence value with the .currval pseudocolumn.
Assuming the following query would return a single-row, you can use the contact_id value as the customer_id value in the rental table:
SQL> SELECT contact_id 2 FROM contact 3 WHERE last_name = 'Potter' 4 AND first_name = 'Harry'; |
Taking three steps like this is unnecessary, however, because you can call the next sequence value and find the valid customer_id value inside the VALUES clause of the INSERT statement. The following INSERT statement uses an override signature and calls for the next sequence value on line 11. It also uses a scalar subquery to look up the correct customer_id value with a scalar subquery on lines 12 through 15.
SQL> INSERT INTO rental 2 ( rental_id 3 , customer_id 4 , check_out_date 5 , return_date 6 , created_by 7 , creation_date 8 , last_updated_by 9 , last_update_date ) 10 VALUES 11 ( rental_s1.NEXTVAL 12 ,(SELECT contact_id 13 FROM contact 14 WHERE last_name = 'Potter' 15 AND first_name = 'Harry') 16 , SYSDATE 17 , TRUNC(SYSDATE + 5) 18 , 1 19 , SYSDATE 20 , 3 21 , SYSDATE); |
When a subquery returns two or more rows because the conditions in the WHERE clause failed to find and return a unique row, the INSERT statement would fail with the following message:
,(SELECT contact_id * ERROR AT line 3: ORA-01427: single-ROW subquery returns more than one ROW |
In fact, the statement could fail when there are two or more “Harry Potter” names in the data set because three columns make up the natural key of the contact table. The third column is the member_id, and all three should be qualified inside a scalar subquery to guarantee that it returns only one row of data.
Handling Oracle’s Large Objects
Instruction Details →
This section shows you how to INSERT large object values into tables.
Oracle’s large objects present a small problem when they’re not null constrained in the table definition. You must insert empty object containers or references when you perform an INSERT statement.
Assume, for example, that you have the following three large object columns in a table:
Name Null? Type ------------------------------- -------- ----------------------- ITEM_DESC NOT NULL CLOB ITEM_ICON NOT NULL BLOB ITEM_PHOTO BINARY FILE LOB |
The item_desc column uses a CLOB (Character Large Object) data type, and it is a required column; it could hold a lengthy description of a movie, for example. The item_icon column uses a BLOB (Binary Large Object) data type, and it is also a required column. It could hold a graphic image. The item_photo column uses a binary file (an externally managed file) but is fortunately null allowed or an optional column in any INSERT statement. It can hold a null or a reference to an external graphic image.
Oracle provides two functions that let you enter an empty large object, and they are:
EMPTY_BLOB() EMPTY_CLOB() |
Although you could insert a null value in the item_photo column, you can also enter a reference to an Oracle database virtual directory file. Here’s the syntax to enter a valid BFILE name with the BFILENAME function call:
10 , BFILENAME('VIRTUAL_DIRECTORY_NAME', 'file_name.png') |
You can insert a large character or binary stream into BLOB and CLOB data types by using the stored procedures and functions available in the dbms_lob package. Chapter 13 covers the dbms_lob package.
You can use an empty_clob function or a string literal up to 32,767 bytes long in a VALUES clause. You must use the dbms_lob package when you insert a string that is longer than 32,767 bytes. That also changes the nature of the INSERT statement and requires that you append the RETURNING INTO clause. Here’s the prototype for this Oracle proprietary syntax:
INSERT INTO some_table [( column1, column2, column3, ...)] VALUES ( value1, value2, value3, ...) RETURNING column1 INTO local_variable; |
The local_variable is a reference to a procedural programming language. It lets you insert a character stream into a target CLOB column or insert a binary stream into a BLOB column.
Capturing the Last Sequence Value
Instruction Details →
This section shows you how to INSERT a new sequence in a parent table and a copy of that new sequence as a foreign key value in a child table.
Sometimes you insert into a series of tables in the scope of a transaction. In this scenario, one table gets the new sequence value (with a call to sequence_name.nextval) and enters it as the surrogate primary key, and another table needs a copy of that primary key to enter into a foreign key column. While scalar subqueries can solve this problem, Oracle provides the .currval pseudocolumn for this purpose.
The steps to demonstrate this behavior require a parent table and a child table. The parent table is defined as follows:
Name Null? Type ------------------------------------ -------- -------------- PARENT_ID NOT NULL NUMBER PARENT_NAME VARCHAR2(10) |
The parent_id column is the primary key for the parent table. You include the parent_id column in the child table. In the child table, the parent_id column holds a copy of a valid primary key column value as a foreign key to the parent table.
Name Null? Type ------------------------------------ -------- -------------- CHILD_ID NOT NULL NUMBER PARENT_ID NUMBER PARENT_NAME VARCHAR2(10) |
After creating the two tables, you can manage inserts into them with the .nextval and .currval pseudocolumns. The sequence calls with the .nextval pseudocolumn insert primary key values, and the sequence calls with the .currval pseudocolumn insert foreign key values.
You would perform these two INSERT statements as a group:
SQL> INSERT INTO parent 2 VALUES 3 ( parent_s1.NEXTVAL 4 ,'One Parent'); SQL> INSERT INTO child 2 VALUES 3 ( child_s1.NEXTVAL 4 , parent_s1.CURRVAL 5 ,'One Child'); |
The .currval pseudocolumn for any sequence fetches the value placed in memory by call to the .nextval pseudocolumn. Any attempt to call the .currval pseudocolumn before the .nextval pseudocolumn raises an ORA-02289 exception. The text message for that error says the sequence doesn’t exist, which actually means that it doesn’t exist in the scope of the current session. Line 4 in the insert into the child table depends on line 3 in the insert into the parent table.
You can use comments in INSERT statements to map to columns in the table. For example, the following shows the technique for the child table from the preceding example:
SQL> INSERT INTO child 2 VALUES 3 ( child_s1.NEXTVAL -- CHILD_ID 4 , parent_s1.CURRVAL -- PARENT_ID 5 ,'One Child') -- CHILD_NAME 6 / |
Comments on the lines of the VALUES clause identify the columns where the values are inserted. A semicolon doesn’t execute this statement, because a trailing comment would trigger a runtime exception. You must use the semicolon or forward slash on the line below the last VALUES element to include the last comment.
Insert by Subquery Results →
An INSERT statement with a subquery can insert one to many rows of data into any table provided the SELECT-list of the subquery matches the data dictionary definition of the table or the named-notation list provided by the INSERT statement. An INSERT statement with a subquery cannot have a VALUES keyword in it, or it raises an error.
The generic prototype for an INSERT statement follows the pattern of an INSERT statement by value prototype with one exception, it excludes the VALUES keyword and replaces the common delimited list of values with a SELECT-list from a subquery. If you want to rely on the positional definition of the table, exclude the list of comma delimited column values. The optional comma-delimited list of column values is necessary when you want to insert columns in a different order or exclude optional columns.
The generic prototype is:
INSERT INTO table_name [( column1, column2, column3, ...)] ( SELECT value1, value2, value3, ... FROM table_name WHERE ...); |
The subquery, or SELECT statement, must return a SELECT-list that maps to the column definition in the data dictionary or the optional comma-delimited column list.
MySQL CSV Output
Saturday, I posted how to use Microsoft ODBC DSN to connect to MySQL. Somebody didn’t like the fact that the PowerShell program failed to write a *.csv file to disk because the program used the Write-Host command to write to the content of the query to the console.
I thought that approach was a better as an example. However, it appears that it wasn’t because not everybody knows simple redirection. The original program can transfer the console output to a file, like:
powershell .\MySQLODBC.ps1 > output.csv |
So, the first thing you need to do is add a parameter list, like:
2 3 4 | param ( [Parameter(Mandatory)][string]$fileName ) |
Anyway, it’s trivial to demonstrate how to modify the PowerShell program to write to a disk. You should also create a virtual PowerShell drive before writing the file. That’s because you can change the physical directory anytime you want with minimal changes to rest of your code’s file references.
You can create a PowerShell virtual drive with the following command:
7 8 | New-PSDrive -Name test -PSProvider FileSystem -Description 'Test area' ` -Root C:\Data\cit225\mysql\test |
but, it will write the following to console:
Name Used (GB) Free (GB) Provider Root CurrentLocation ---- --------- --------- -------- ---- --------------- test 0.00 28.74 FileSystem C:\Data\cit225\mysql\test |
You can suppress the console output with Microsoft’s version of redirection to the void (> /dev/null), which pipes (|) the standard out (stdout) to Out-Null, like:
7 8 | New-PSDrive -Name test -PSProvider FileSystem -Description 'Test area' ` -Root C:\Data\cit225\mysql\test | Out-Null |
Since the program may run before an output file has been created, or after its been created and removed, you need to check whether the file exists before attempting to remove it. PowerShell provides the Test-Path command to check for the existence of a file and the Remove-Item command to remove a file, like:
11 12 | if (Test-Path test:$fileName) { Remove-Item -Path test:$fileName } |
Then, you simply replace the Write-Host call in the other program with the Add-Content command:
Add-Content -Value $output -Path test:$fileName |
Now, the PowerShell script file writes the MySQL query’s output to an output.csv file. You can call the MySQLContact.ps1 script file with the following syntax:
powershell MySQLContact.ps1 output.csv |
In case these changes don’t make sense outside the scope of the full script, here is the rewritten script:
1 2 3 4 5 6 7 8 9 10 11 12 13 14 15 16 17 18 19 20 21 22 23 24 25 26 27 28 29 30 31 32 33 34 35 36 37 38 39 40 41 42 43 44 45 46 47 48 49 50 51 52 53 54 55 56 57 58 59 60 61 62 63 64 65 66 | # Define parameter list for mandatory file name. param ( [Parameter(Mandatory)][string]$fileName ) # Define a PowerShell Virtual Drive. New-PSDrive -Name test -PSProvider FileSystem -Description 'Test area' ` -Root C:\Data\cit225\mysql\test | Out-Null # Remove the file only when it exists. if (Test-Path test:$fileName) { Remove-Item -Path test:$fileName } # Define a ODBC DSN connection string. $ConnectionString = 'DSN=MySQLODBC2' # Define a MySQL Command Object for a non-query. $Connection = New-Object System.Data.Odbc.OdbcConnection; $Connection.ConnectionString = $ConnectionString # Attempt connection. try { $Connection.Open() # Create a SQL command. $Command = $Connection.CreateCommand(); $Command.CommandText = "SELECT last_name " + ", first_name " + "FROM contact " + "ORDER BY 1, 2"; # Attempt to read SQL command. try { $row = $Command.ExecuteReader(); # Read while records are found. while ($row.Read()) { # Initialize output for each row. $output = "" # Navigate across all columns (only two in this example). for ($column = 0; $column -lt $row.FieldCount; $column += 1) { # Mechanic for comma-delimit between last and first name. if ($output.length -eq 0) { $output += $row[$column] } else { $output += ", " + $row[$column] } } # Write the output from the database to a file. Add-Content -Value $output -Path test:$fileName } } catch { Write-Error "Message: $($_.Exception.Message)" Write-Error "StackTrace: $($_.Exception.StackTrace)" Write-Error "LoaderExceptions: $($_.Exception.LoaderExceptions)" } finally { # Close the reader. $row.Close() } } catch { Write-Error "Message: $($_.Exception.Message)" Write-Error "StackTrace: $($_.Exception.StackTrace)" Write-Error "LoaderExceptions: $($_.Exception.LoaderExceptions)" } finally { $Connection.Close() } |
While I understand you might want to go to this level of effort if you where building a formal cmdlet, I’m not convinced its worth the effort in an ordinary PowerShell script. However, I don’t like to leave a question unanswered.
MySQL ODBC DSN
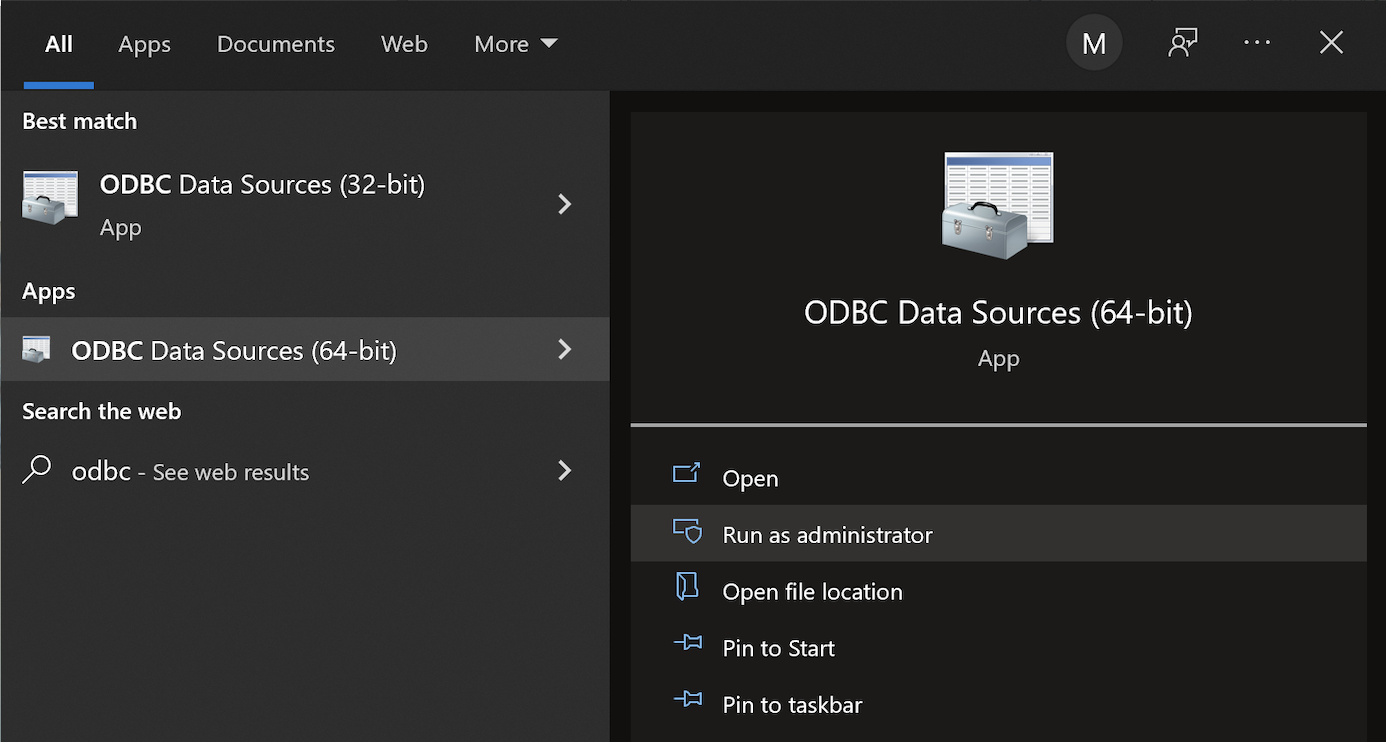
This post explains and demonstrates how to install, configure, and use the MySQL’s ODBC libraries and a DSN (Data Source Name) to connect your Microsoft PowerShell programs to a locally or remotely installed MySQL database. After you’ve installed the MySQL ODBC library, use Windows search field to find the ODBC Data Sources dialog and run it as administrator.
There are four steps to setup, test, and save your ODBC Data Source Name (DSN) for MySQL. You can click on the images on the right to launch them in a more readable format or simply read the instructions.
MySQL ODBC Setup Steps
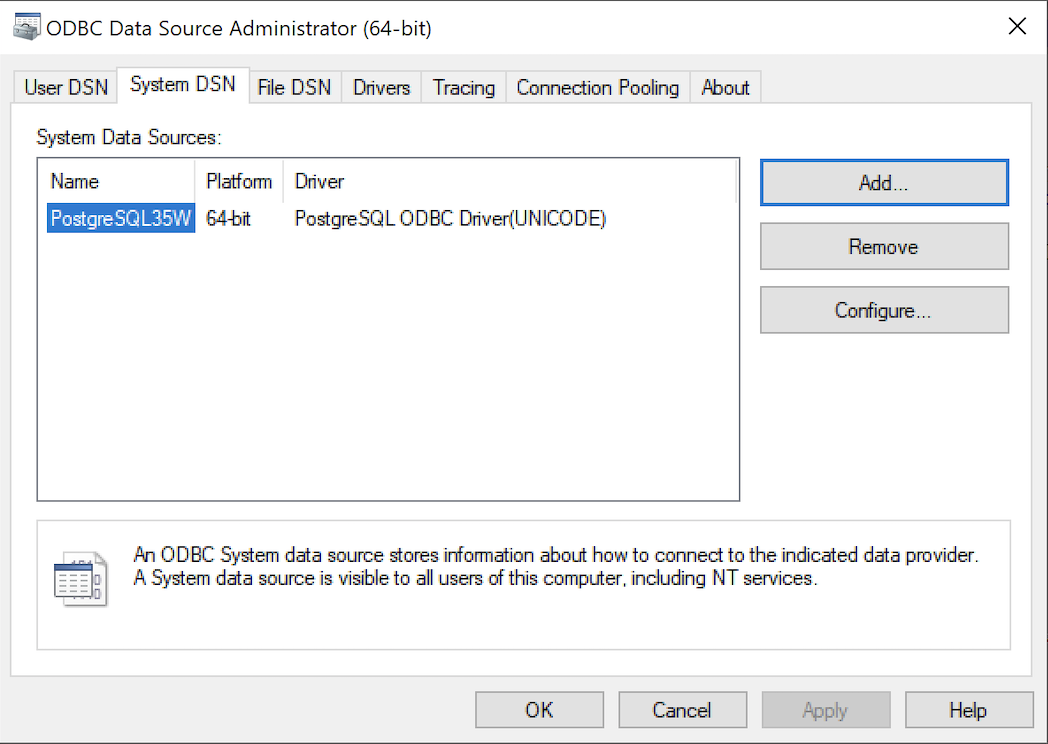
- Click the SystemDSN tab to see he view which is exactly like the User DSN tab. Click the Add button to start the workflow.
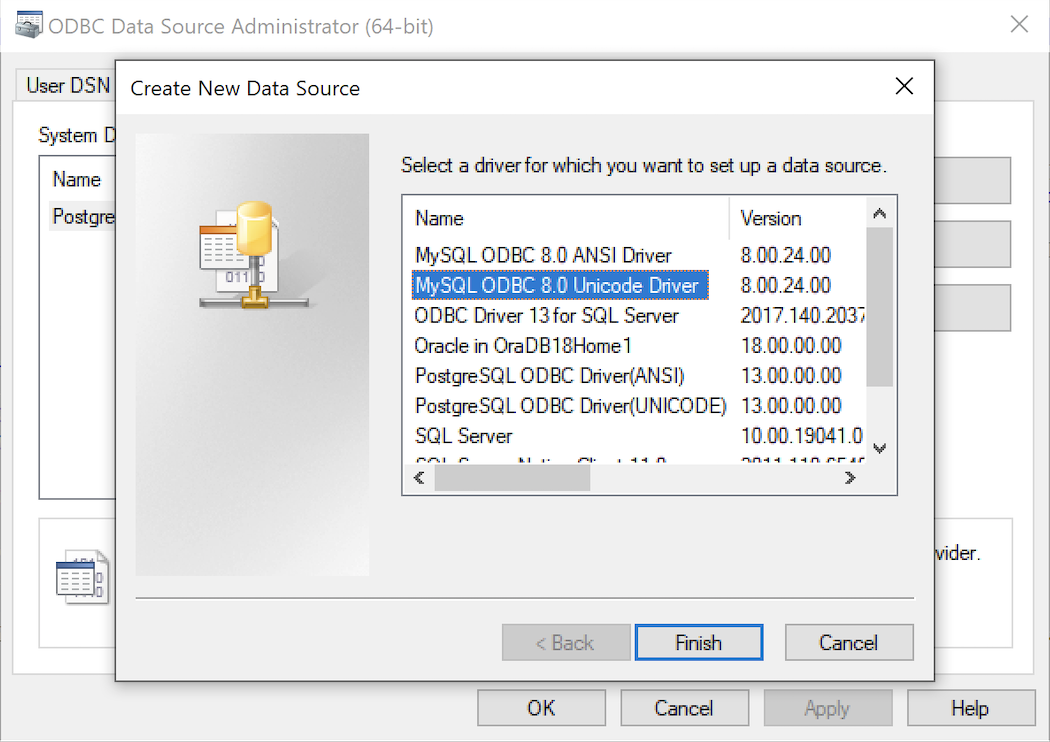
- The Create New Data Source dialog requires you select the MySQL ODBC Driver(UNICODE) option from the list and click the Finish button to proceed.
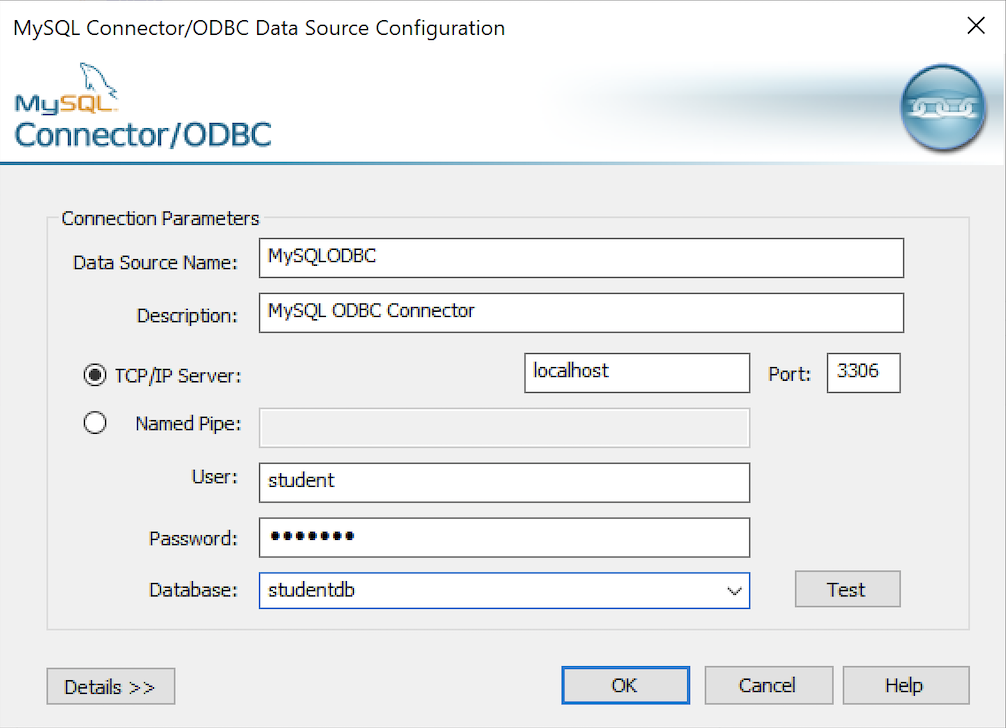
- The MySQL Unicode ODBC Driver Setup dialog should complete the prompts as follows below. If you opt for localhost as the server value and you have a DCHP IP address, make sure you’ve configured your hosts file in the C:\Windows\System32\drivers\etc directory. You should enter the following two lines in the hosts file:
127.0.0.1  localhost
::1        localhost
These are the string values you should enter in the MySQL Unicode ODBC Driver Setup dialog:
Data Source: MySQLODBC
Database:    studentdb
Server:      localhost
User Name:   student
Description: MySQL ODBC Connector
Port:        3306
Password:    student
After you complete the entry, click the Test button.
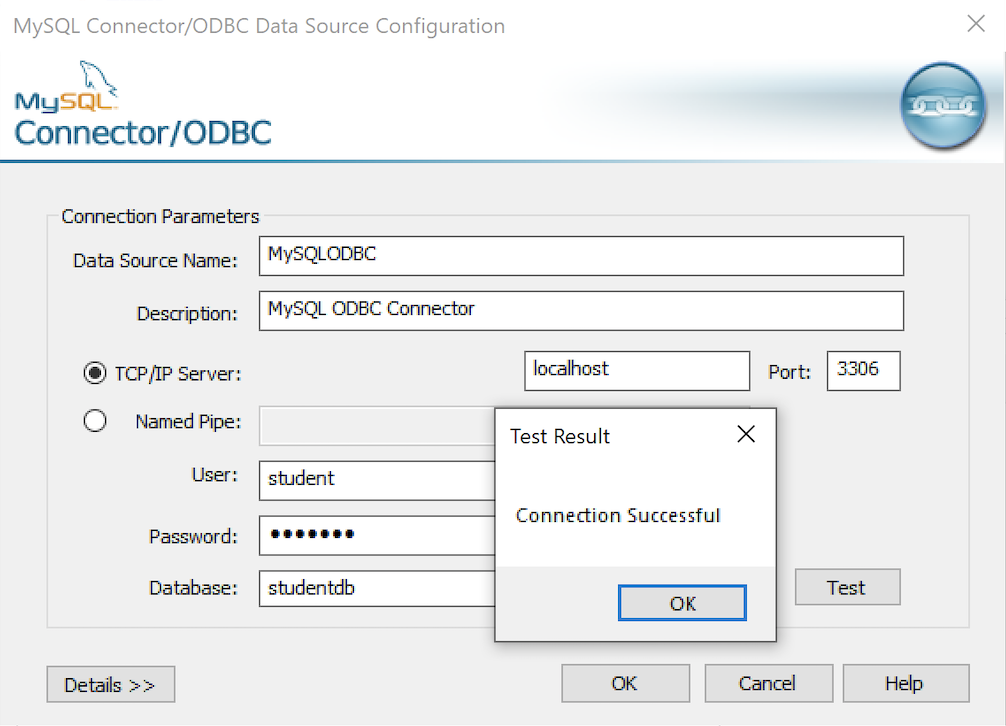
- The Connection Test dialog should return a “Connection successful” message. Click the OK button to continue, and then click the OK button in the next two screens.
After you have created the System MySQL ODBC Setup, it’s time to build a PowerShell Cmdlet (or, Commandlet). Some documentation and blog notes incorrectly suggest you need to write a connection string with a UID and password, like:
$ConnectionString = 'DSN=MySQLODBC;Uid=student;Pwd=student' |
You can do that if you leave the UID and password fields empty in the MySQL ODBC Setup but it’s recommended to enter them there to avoid putting them in your PowerShell script file.
The UID and password are unnecessary in the connection string when they’re in MySQL ODBC DSN. You can use a connection string like the following when the UID and password are in the DSN:
$ConnectionString = 'DSN=MySQLODBC' |
You can create a MySQLCursor.ps1 Cmdlet like the following:
1 2 3 4 5 6 7 8 9 10 11 12 13 14 15 16 17 18 19 20 21 22 23 24 25 26 27 28 29 30 31 32 33 34 35 36 37 | # Define a ODBC DSN connection string. $ConnectionString = 'DSN=MySQLODBC' # Define a MySQL Command Object for a non-query. $Connection = New-Object System.Data.Odbc.OdbcConnection; $Connection.ConnectionString = $ConnectionString # Attempt connection. try { $Connection.Open() # Create a SQL command. $Command = $Connection.CreateCommand(); $Command.CommandText = "SELECT database();"; # Attempt to read SQL command. try { $Reader = $Command.ExecuteReader(); # Read while records are found. while ($Reader.Read()) { Write-Host "Current Database [" $Reader[0] "]"} } catch { Write-Host "Message: $($_.Exception.Message)" Write-Host "StackTrace: $($_.Exception.StackTrace)" Write-Host "LoaderExceptions: $($_.Exception.LoaderExceptions)" } finally { # Close the reader. $Reader.Close() } } catch { Write-Host "Message: $($_.Exception.Message)" Write-Host "StackTrace: $($_.Exception.StackTrace)" Write-Host "LoaderExceptions: $($_.Exception.LoaderExceptions)" } finally { $Connection.Close() } |
Line 14 assigns a SQL query that returns a single row with one column as the CommandText of a Command object. Line 22 reads the zero position of a row or record set with only one column.
You call the MySQLCursor.ps1 Cmdlet with the following syntax:
powershell .\MySQLCursor.ps1 |
It returns:
Current Database [ studentdb ] |
A more realistic way to write a query would return multiple rows with a set of two or more columns. The following program queries a table with multiple rows of two columns, but the program logic can manage any number of columns.
# Define a ODBC DSN connection string. $ConnectionString = 'DSN=MySQLODBC' # Define a MySQL Command Object for a non-query. $Connection = New-Object System.Data.Odbc.OdbcConnection; $Connection.ConnectionString = $ConnectionString # Attempt connection. try { $Connection.Open() # Create a SQL command. $Command = $Connection.CreateCommand(); $Command.CommandText = "SELECT last_name, first_name FROM contact ORDER BY 1, 2"; # Attempt to read SQL command. try { $row = $Command.ExecuteReader(); # Read while records are found. while ($row.Read()) { # Initialize output for each row. $output = "" # Navigate across all columns (only two in this example). for ($column = 0; $column -lt $row.FieldCount; $column += 1) { # Mechanic for comma-delimit between last and first name. if ($output.length -eq 0) { $output += $row[$column] } else { $output += ", " + $row[$column] } } # Write the output from the database. Write-Host $output } } catch { Write-Host "Message: $($_.Exception.Message)" Write-Host "StackTrace: $($_.Exception.StackTrace)" Write-Host "LoaderExceptions: $($_.Exception.LoaderExceptions)" } finally { # Close the reader. $row.Close() } } catch { Write-Host "Message: $($_.Exception.Message)" Write-Host "StackTrace: $($_.Exception.StackTrace)" Write-Host "LoaderExceptions: $($_.Exception.LoaderExceptions)" } finally { $Connection.Close() } |
You call the MySQLContact.ps1 Cmdlet with the following syntax:
powershell .\MySQLContact.ps1 |
It returns an ordered set of comma-separated values, like
Clinton, Goeffrey Gretelz, Simon Moss, Wendy Potter, Ginny Potter, Harry Potter, Lily Royal, Elizabeth Smith, Brian Sweeney, Ian Sweeney, Matthew Sweeney, Meaghan Vizquel, Doreen Vizquel, Oscar Winn, Brian Winn, Randi |
As always, I hope this helps those looking for a complete concrete example of how to make Microsoft Powershell connect and query results from a MySQL database.
MySQL 5-Table Procedure
A student wanted a better example of writing a MySQL Persistent Stored Module (PSM) that maintains transactional scope across a couple tables. Here’s the one I wrote about ten years ago to build the MySQL Video Store model. It looks I neglected to put it out there before, so here it is for reference.
-- Conditionally drop procedure if it exists. DROP PROCEDURE IF EXISTS contact_insert; -- Reset the delimiter so that a semicolon can be used as a statement and block terminator. DELIMITER $$ SELECT 'CREATE PROCEDURE contact_insert' AS "Statement"; CREATE PROCEDURE contact_insert ( pv_member_type CHAR(12) , pv_account_number CHAR(19) , pv_credit_card_number CHAR(19) , pv_credit_card_type CHAR(12) , pv_first_name CHAR(20) , pv_middle_name CHAR(20) , pv_last_name CHAR(20) , pv_contact_type CHAR(12) , pv_address_type CHAR(12) , pv_city CHAR(30) , pv_state_province CHAR(30) , pv_postal_code CHAR(20) , pv_street_address CHAR(30) , pv_telephone_type CHAR(12) , pv_country_code CHAR(3) , pv_area_code CHAR(6) , pv_telephone_number CHAR(10)) MODIFIES SQL DATA BEGIN /* Declare variables to manipulate auto generated sequence values. */ DECLARE member_id int unsigned; DECLARE contact_id int unsigned; DECLARE address_id int unsigned; DECLARE street_address_id int unsigned; DECLARE telephone_id int unsigned; /* Declare local constants for who-audit columns. */ DECLARE lv_created_by int unsigned DEFAULT 1001; DECLARE lv_creation_date DATE DEFAULT UTC_DATE(); DECLARE lv_last_updated_by int unsigned DEFAULT 1001; DECLARE lv_last_update_date DATE DEFAULT UTC_DATE(); /* Declare a locally scoped variable. */ DECLARE duplicate_key INT DEFAULT 0; /* Declare a duplicate key handler */ DECLARE CONTINUE HANDLER FOR 1062 SET duplicate_key = 1; /* Start the transaction context. */ START TRANSACTION; /* Create a SAVEPOINT as a recovery point. */ SAVEPOINT all_or_none; /* Insert into the first table in sequence based on inheritance of primary keys by foreign keys. */ INSERT INTO member ( member_type , account_number , credit_card_number , credit_card_type , created_by , creation_date , last_updated_by , last_update_date ) VALUES ((SELECT common_lookup_id FROM common_lookup WHERE common_lookup_context = 'MEMBER' AND common_lookup_type = pv_member_type) , pv_account_number , pv_credit_card_number ,(SELECT common_lookup_id FROM common_lookup WHERE common_lookup_context = 'MEMBER' AND common_lookup_type = pv_credit_card_type) , lv_created_by , lv_creation_date , lv_last_updated_by , lv_last_update_date ); /* Preserve the sequence by a table related variable name. */ SET member_id = last_insert_id(); /* Insert into the first table in sequence based on inheritance of primary keys by foreign keys. */ INSERT INTO contact VALUES ( null , member_id ,(SELECT common_lookup_id FROM common_lookup WHERE common_lookup_context = 'CONTACT' AND common_lookup_type = pv_contact_type) , pv_first_name , pv_middle_name , pv_last_name , lv_created_by , lv_creation_date , lv_last_updated_by , lv_last_update_date ); /* Preserve the sequence by a table related variable name. */ SET contact_id = last_insert_id(); /* Insert into the first table in sequence based on inheritance of primary keys by foreign keys. */ INSERT INTO address VALUES ( null , last_insert_id() ,(SELECT common_lookup_id FROM common_lookup WHERE common_lookup_context = 'MULTIPLE' AND common_lookup_type = pv_address_type) , pv_city , pv_state_province , pv_postal_code , lv_created_by , lv_creation_date , lv_last_updated_by , lv_last_update_date ); /* Preserve the sequence by a table related variable name. */ SET address_id = last_insert_id(); /* Insert into the first table in sequence based on inheritance of primary keys by foreign keys. */ INSERT INTO street_address VALUES ( null , last_insert_id() , pv_street_address , lv_created_by , lv_creation_date , lv_last_updated_by , lv_last_update_date ); /* Insert into the first table in sequence based on inheritance of primary keys by foreign keys. */ INSERT INTO telephone VALUES ( null , contact_id , address_id ,(SELECT common_lookup_id FROM common_lookup WHERE common_lookup_context = 'MULTIPLE' AND common_lookup_type = pv_telephone_type) , pv_country_code , pv_area_code , pv_telephone_number , lv_created_by , lv_creation_date , lv_last_updated_by , lv_last_update_date); /* This acts as an exception handling block. */ IF duplicate_key = 1 THEN /* This undoes all DML statements to this point in the procedure. */ ROLLBACK TO SAVEPOINT all_or_none; END IF; /* This commits the write when successful and is harmless otherwise. */ COMMIT; END; $$ -- Reset the standard delimiter to let the semicolon work as an execution command. DELIMITER ; |
You can then call the procedure, like:
SELECT 'CALL contact_insert() PROCEDURE 5 times' AS "Statement"; CALL contact_insert('INDIVIDUAL','R11-514-34','1111-1111-1111-1111','VISA_CARD','Goeffrey','Ward','Clinton','CUSTOMER','HOME','Provo','Utah','84606','118 South 9th East','HOME','011','801','423\-1234'); CALL contact_insert('INDIVIDUAL','R11-514-35','1111-2222-1111-1111','VISA_CARD','Wendy',null,'Moss','CUSTOMER','HOME','Provo','Utah','84606','1218 South 10th East','HOME','011','801','423-1234'); CALL contact_insert('INDIVIDUAL','R11-514-36','1111-1111-2222-1111','VISA_CARD','Simon','Jonah','Gretelz','CUSTOMER','HOME','Provo','Utah','84606','2118 South 7th East','HOME','011','801','423-1234'); CALL contact_insert('INDIVIDUAL','R11-514-37','1111-1111-1111-2222','MASTER_CARD','Elizabeth','Jane','Royal','CUSTOMER','HOME','Provo','Utah','84606','2228 South 14th East','HOME','011','801','423-1234'); CALL contact_insert('INDIVIDUAL','R11-514-38','1111-1111-3333-1111','VISA_CARD','Brian','Nathan','Smith','CUSTOMER','HOME','Spanish Fork','Utah','84606','333 North 2nd East','HOME','011','801','423-1234'); |
I hope this code complete approach helps those looking to learn how to write MySQL PSMs.
PostgreSQL+PowerShell
This post explains and demonstrates how to install, configure, and use the psqlODBC (32-bit) and psqlODBC (64-bit) libraries to connect your Microsoft PowerShell programs to a locally installed PostgreSQL 14 database. It relies on you previously installing and configuring a PostgreSQL 14 database. This post is a step-by-step guide to installing PostgreSQL 14 on Windows 10, and this post shows you how to configure the PostgreSQL 14 database.
If you didn’t follow the instructions to get the psqlODBC libraries in the installation blog post, you will need to get those libraries, as qualified by Microsoft with the PostgreSQL Stack Builder.
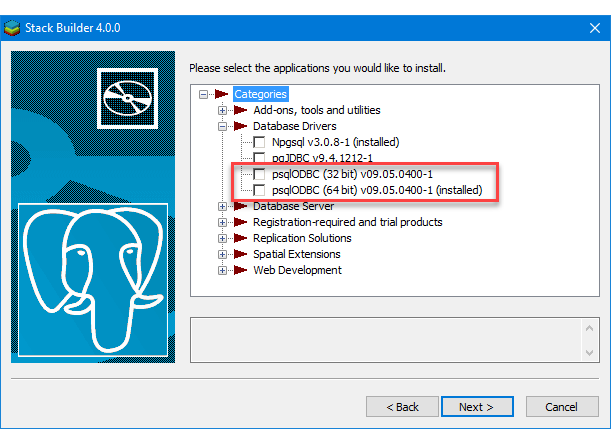
You can launch PostgreSQL Stack Builder after the install by clicking on Start -> PostgreSQL -> Stack Builder. Choose to enable Stack Builder to change your system and install the psqlODBC libraries. After you’ve installed the psqlODBC library, use Windows search field to find the ODBC Data Sources dialog and run it as administrator.
There are six steps to setup, test, and save your ODBC Data Source Name (DSN). You can click on the images on the right to launch them in a more readable format or simply read the instructions.
PostgreSQL ODBC Setup Steps

- The Microsoft DSN (Data Source Name) dialog automatically elects the User DSN tab. Click on the System DSN tab.
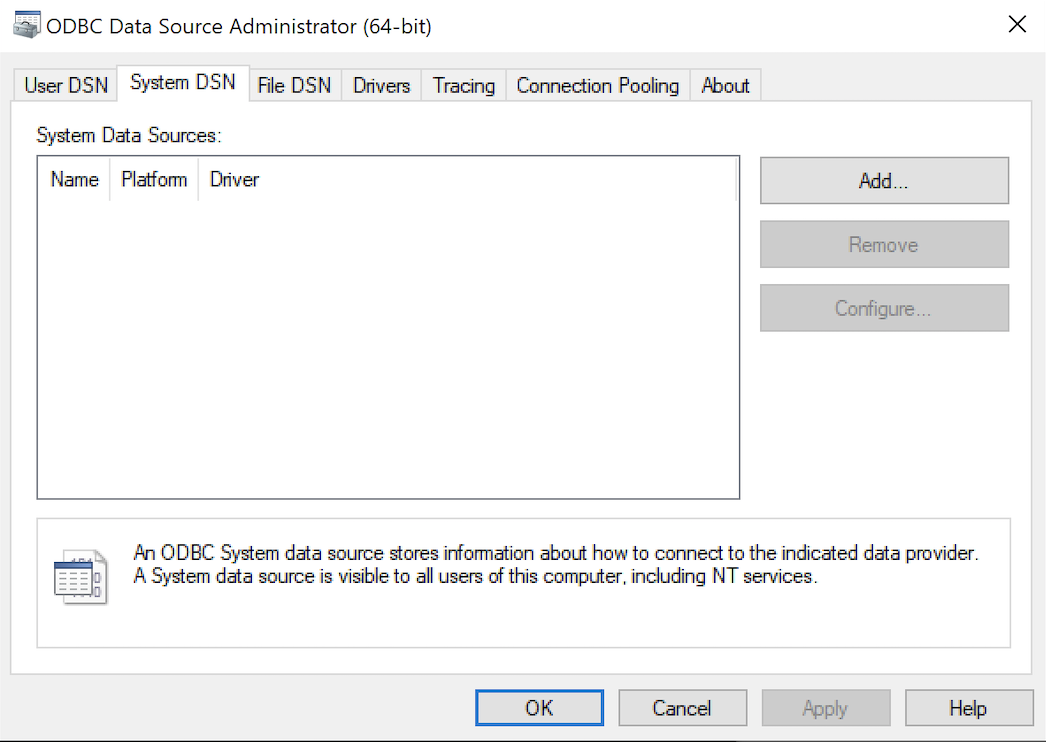
- The view under the System DSN is exactly like the User DSN tab. Click the Add button to start the workflow.

- The Create New Data Source dialog requires you select the PostgreSQL ODBC Driver(UNICODE) option from the list and click the Finish button to proceed.
- The PostgreSQL Unicode ODBC Driver Setup dialog should complete the prompts as follows below and consistent with the PostgreSQL 14 Configuration blog. If you opt for localhost as the server value because you have a DCHP IP address, make sure you’ve configured your hosts file in the C:\Windows\System32\drivers\etc directory. You should enter the following two lines in the hosts file:
127.0.0.1  localhost
::1        localhost
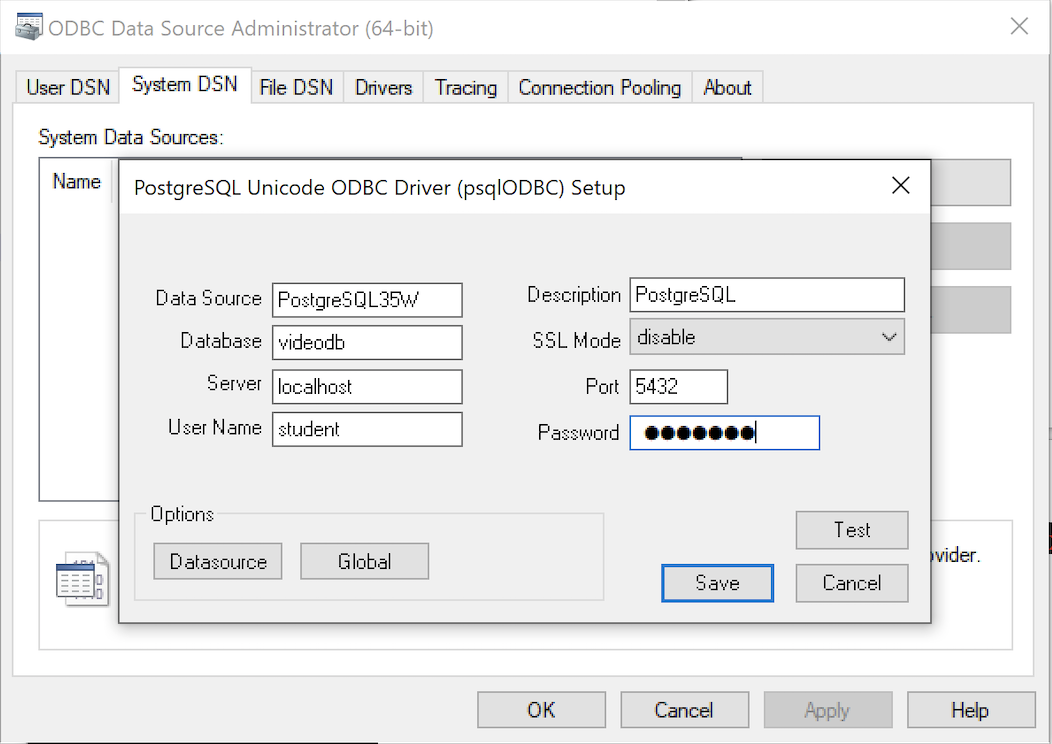
These are the string values you should enter in the PostgreSQL Unicode ODBC Driver Setup dialog:
Data Source: PostgreSQL35W
Database:    videodb
Server:      localhost
User Name:   student
Description: PostgreSQL
SSL Mode:    disable
Port:        5432
Password:    student
After you complete the entry, click the Test button.
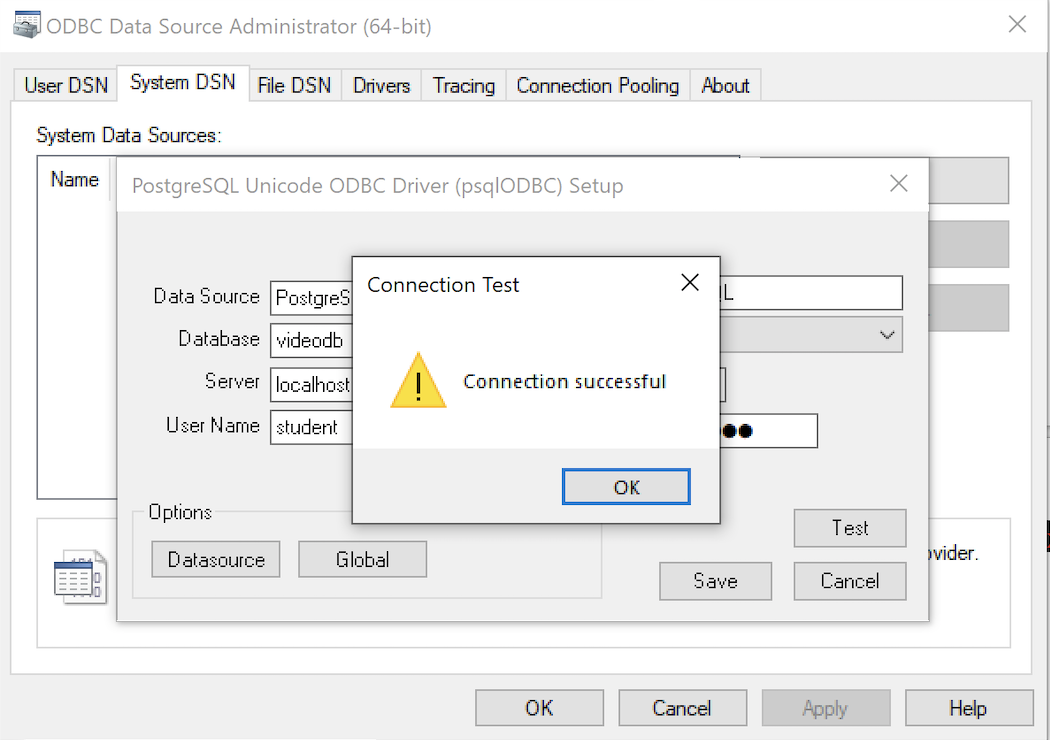
- The Connection Test dialog should return a “Connection successful” message. Click the OK button to continue.
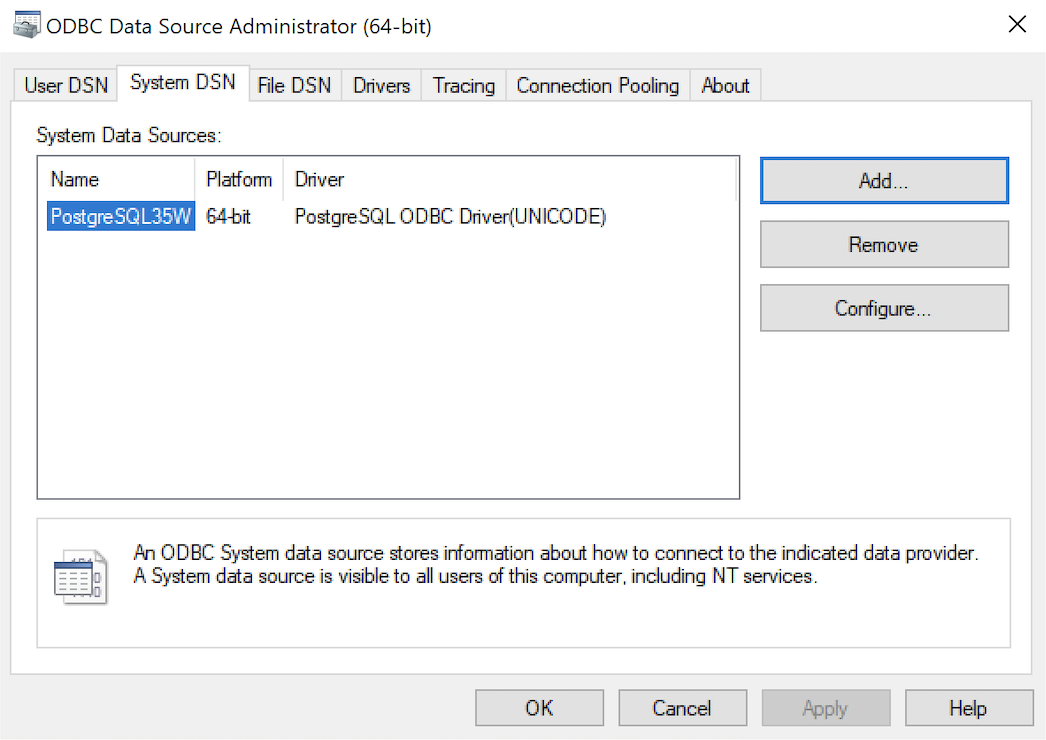
- The ODBC Data Source Administrator dialog should show the PostgreSQL35W System Data Source. Click the OK button to continue.
After you have created the System PostgreSQL ODBC Setup, it’s time to build a PowerShell Cmdlet (or, Commandlet). Some documentation and blog notes incorrectly suggest you need to write a connection string with a UID and password, like:
$ConnectionString = 'DSN=PostgreSQL35W;Uid=student;Pwd=student' |
The UID and password is unnecessary in the connection string. As a rule, the UID and password are only necessary in the ODBC DSN, like:
$ConnectionString = 'DSN=PostgreSQL35W' |
You can create a readcursor.ps1 Cmdlet like the following:
1 2 3 4 5 6 7 8 9 10 11 12 13 14 15 16 17 18 19 20 21 22 23 24 25 26 27 28 29 30 31 32 33 34 35 36 37 | # Define a ODBC DSN connection string. $ConnectionString = 'DSN=PostgreSQL35W' # Define a MySQL Command Object for a non-query. $Connection = New-Object System.Data.Odbc.OdbcConnection; $Connection.ConnectionString = $ConnectionString # Attempt connection. try { $Connection.Open() # Create a SQL command. $Command = $Connection.CreateCommand(); $Command.CommandText = "SELECT current_database();"; # Attempt to read SQL command. try { $Reader = $Command.ExecuteReader(); # Read while records are found. while ($Reader.Read()) { Write-Host "Current Database [" $Reader[0] "]"} } catch { Write-Error "Message: $($_.Exception.Message)" Write-Error "StackTrace: $($_.Exception.StackTrace)" Write-Error "LoaderExceptions: $($_.Exception.LoaderExceptions)" } finally { # Close the reader. $Reader.Close() } } catch { Write-Error "Message: $($_.Exception.Message)" Write-Error "StackTrace: $($_.Exception.StackTrace)" Write-Error "LoaderExceptions: $($_.Exception.LoaderExceptions)" } finally { $Connection.Close() } |
Line 14 assigns a SQL query that returns a single row with one column as the CommandText of a Command object. Line 22 reads the zero position of a row or record set with only one column.
You call the readcursor.ps1 Cmdlet with the following syntax:
powershell .\readcursor.ps1 |
It returns:
Current Database [ videodb ] |
A more realistic way to write a query would return multiple rows with a set of two or more columns. The following program queries a table with multiple rows of two columns, but the program logic can manage any number of columns.
# Define a ODBC DSN connection string. $ConnectionString = 'DSN=PostgreSQL35W' # Define a MySQL Command Object for a non-query. $Connection = New-Object System.Data.Odbc.OdbcConnection; $Connection.ConnectionString = $ConnectionString # Attempt connection. try { $Connection.Open() # Create a SQL command. $Command = $Connection.CreateCommand(); $Command.CommandText = "SELECT last_name, first_name FROM contact ORDER BY 1, 2"; # Attempt to read SQL command. try { $row = $Command.ExecuteReader(); # Read while records are found. while ($row.Read()) { # Initialize output for each row. $output = "" # Navigate across all columns (only two in this example). for ($column = 0; $column -lt $row.FieldCount; $column += 1) { # Mechanic for comma-delimit between last and first name. if ($output.length -eq 0) { $output += $row[$column] } else { $output += ", " + $row[$column] } } # Write the output from the database. Write-Host $output } } catch { Write-Error "Message: $($_.Exception.Message)" Write-Error "StackTrace: $($_.Exception.StackTrace)" Write-Error "LoaderExceptions: $($_.Exception.LoaderExceptions)" } finally { # Close the reader. $row.Close() } } catch { Write-Error "Message: $($_.Exception.Message)" Write-Error "StackTrace: $($_.Exception.StackTrace)" Write-Error "LoaderExceptions: $($_.Exception.LoaderExceptions)" } finally { $Connection.Close() } |
You call the readcontact.ps1 Cmdlet with the following syntax:
powershell .\readcontact.ps1 |
It returns an ordered set of comma-separated values, like
Clinton, Goeffrey Gretelz, Simon Moss, Wendy Royal, Elizabeth Smith, Brian Sweeney, Ian Sweeney, Matthew Sweeney, Meaghan Vizquel, Doreen Vizquel, Oscar Winn, Brian Winn, Randi |
As always, I hope this helps those looking for a complete concrete example of how to make Microsoft Powershell connect and query results from a PostgreSQL database.
PostgreSQL Arrays
If you’re wondering about this post, it shows the basic array of a set of integers and strings before showing you how to create nested tables of data in PostgreSQL. By the way, they’re not called nested tables in PostgreSQL, like they are in Oracle but perform like their Oracle cousins.
Let’s create a table with an auto-incrementing column and two arrays, one array of integers and another of strings:
-- Conditionally drop the demo table. DROP TABLE IF EXISTS demo; -- Create the test table. CREATE TABLE demo ( demo_id serial , demo_number integer[5] , demo_string varchar(5)[7]); |
You can insert test values like this:
INSERT INTO demo (demo_number, demo_string) VALUES ( array[1,2,3,4,5] , array['One','Two','Three','Four','Five','Six','Seven']); |
Then, you can query them with this unnest function, like:
SELECT unnest(demo_number) AS numbers , unnest(demo_string) AS strings FROM demo; |
It returns:
 numbers | strings
---------+---------
 1       | One
 2       | Two
 3       | Three
 4       | Four
 5       | Five
         | Six
         | Seven
(7 rows) |
You may note that the two arrays are asymmetrical. It only becomes an issue when you navigate the result in a PL/pgSQL cursor or imperative programming language, like Python.
Now, let’s do something more interesting like work with a composite user-defined type, like the player structure. You would create the composite user-defined type with this syntax:
-- Conditionally drop the player type. DROP TYPE IF EXISTS player; -- Create the player type. CREATE TYPE player AS ( player_no integer , player_name varchar(24) , player_position varchar(14) , ab integer , r integer , h integer , bb integer , rbi integer ); |
You can create a world_series table that include a players column that uses an array of player type, like
-- Conditionally drop the world_series table. DROP TABLE IF EXISTS world_series; -- Create the player type. CREATE TABLE world_series ( world_series_id serial , team varchar(24) , players player[30] , game_no integer , year integer ); |
If you’re familiar with the Oracle Database, you’d have to specify a tested table in the syntax. Fortunately, PostgreSQL doesn’t require that.
Insert two rows with the following statement:
INSERT INTO world_series ( team , players , game_no , year ) VALUES ('San Francisco Giants' , array[(24,'Willie Mayes','Center Fielder',5,0,1,0,0)::player ,(5,'Tom Haller','Catcher',4,1,2,0,2)::player] , 4 , 1962 ); |
You can append to the array with the following syntax. A former student and I have a disagreement on whether this is shown in the PostgreSQL 8.15.4 Modifying Array documentation. I believe it can be inferred from the document and he doesn’t believe so. Anyway, here’s how you add an element to an existing array in a table with the UPDATE statement:
UPDATE world_series SET players = (SELECT array_append(players,(7,'Henry Kuenn','Right Fielder',3,0,0,1,0)::player) FROM world_series) WHERE team = 'San Francisco Giants' AND year = 1962 AND game_no = 4; |
Like Oracle’s nested tables, PostgreSQL’s arrays of composite user-defined types requires writing a PL/pgSQL function. I’ll try to add one of those shortly in another blog entry to show you how to edit and replace entries in stored arrays of composite user-defined types.
You can query the unnested rows and get a return set like a Python tuple with the following query:
SELECT unnest(players) AS player_list FROM world_series WHERE team = 'San Francisco Giants' AND year = 1962 AND game_no = 4; |
It returns the three rows from the players array:
player_list ---------------------------------------------- (24,"Willie Mayes","Center Field",5,0,1,0,0) (5,"Tom Haller",Catcher,4,1,2,0,2) (7,"Henry Kuenn","Right Fielde",3,0,0,1,0) (3 rows) |
It returns the data set in entry-order. If we step outside of the standard 8.15 Arrays PostgreSQL Documentation, you can do much more with arrays (or nested tables). The balance of this example demonstrates some new syntax that helps you achieve constructive outcomes in PostgreSQL.
You can use a Common Table Expression (CTE) to get the columnar display of the player composite user-defined type. This type of solution is beyond the standard , like:
WITH list AS (SELECT unnest(players) AS row_result FROM world_series WHERE team = 'San Francisco Giants' AND year = 1962 AND game_no = 4) SELECT (row_result).player_name , (row_result).player_no , (row_result).player_position FROM list; |
If you’re unfamiliar with accessing composite user-defined types, I wrote a post on that 7 years ago. You can find the older blog entry PostgreSQL Composites on my blog.
It returns only the three requested columns of the player composite user-defined type:
player_name | player_no | player_position --------------+-----------+----------------- Willie Mayes | 24 | Center Fielder Tom Haller | 5 | Catcher Henry Kuenn | 7 | Right Fielder (3 rows) |
You should note that the data is presented in an entry-ordered manner when unnested alone in the SELECT-list. That behavior changes when the SELECT-list includes non-array data.
The easiest way to display data from the non-array and array columns is to list them inside the SELECT-list of the CTE, like:
WITH list AS (SELECT game_no AS game , year , unnest(players) AS row_result FROM world_series WHERE team = 'San Francisco Giants' AND year = 1962 AND game_no = 4) SELECT game , year , (row_result).player_name , (row_result).player_no , (row_result).player_position FROM list; |
It returns an ordered set of unnested rows when you include non-array columns, like:
 game | year | player_name  | player_no | player_position
------+------+--------------+-----------+-----------------
    4 | 1962 | Henry Kuenn  |         7 | Right Fielder
    4 | 1962 | Tom Haller   |         5 | Catcher
    4 | 1962 | Willie Mayes |        24 | Center Fielder
(3 rows) |
While you can join the world_series table to the unnested array rows (returned as a derived table, its a bad idea. The mechanics to do it require you to return the primary key column in the same SELECT-list of the CTE. Then, you join the CTE list to the world_series table by using the world_series_id primary key.
However, there is no advantage to an inner join approach and it imposes unnecessary processing on the database server. The odd rationale that I heard when I noticed somebody was using a CTE to base-table join was: “That’s necessary so they could use column aliases for the non-array columns.” That’s not true because you can use the aliases inside the CTE, as shown above when game is an alias to the game_no column.
As always, I hope this helps those looking to solve a problem in PostgreSQL.
Setting SQL_MODE
In MySQL, the @@sql_mode parameter should generally use ONLY_FULL_GROUP_BY. If it doesn’t include it and you don’t have the ability to change the database parameters, you can use a MySQL PSM (Persistent Stored Module), like:
Create the set_full_group_by procedure:
1 2 3 4 5 6 7 8 9 10 11 12 13 14 15 16 17 18 19 20 21 22 23 24 25 26 27 | -- Drop procedure conditionally on whether it exists already. DROP PROCEDURE IF EXISTS set_full_group_by; -- Reset delimter to allow semicolons to terminate statements. DELIMITER $$ -- Create a procedure to verify and set connection parameter. CREATE PROCEDURE set_full_group_by() LANGUAGE SQL NOT DETERMINISTIC SQL SECURITY DEFINER COMMENT 'Set connection parameter when not set.' BEGIN /* Check whether full group by is set in the connection and if unset, set it in the scope of the connection. */ IF NOT EXISTS (SELECT NULL WHERE REGEXP_LIKE(@@SQL_MODE,'ONLY_FULL_GROUP_BY')) THEN SET SQL_MODE=(SELECT CONCAT(@@sql_mode,',ONLY_FULL_GROUP_BY')); END IF; END; $$ -- Reset the default delimiter. DELIMITER ; |
Run the following SQL command before you attempt the exercises in the same session scope:
CALL set_full_group_by(); |
As always, I hope this helps those looking for a solution. Naturally, you can simply use the SET command on line #21 above.
Drop Overloaded Routine
In October 2019, I wrote a post with anonymous block programs to drop tables, sequences, routines, and triggers. Two weeks later, I wrote another post to drop all overloaded routines. However, I recognized the other day that I should have written a function that let you target which function or procedure you want to drop.
The older code only let you drop all of your functions or procedures. That was overkill when you’re working on new functions or procedures.
This post provides a utility for those writing functions and procedures in a public schema of any database in a PostgreSQL installation. It is designed to drop functions or procedures from the public schema.
The code follows below:
1 2 3 4 5 6 7 8 9 10 11 12 13 14 15 16 17 18 19 20 21 22 23 24 25 26 27 28 29 30 31 32 33 34 35 36 37 38 39 40 41 42 43 44 45 46 47 48 49 50 51 52 53 54 55 56 57 58 59 60 61 62 63 64 65 66 67 68 69 70 71 72 73 74 75 76 77 78 79 80 81 82 83 84 85 86 87 88 89 90 91 92 93 94 95 96 97 98 99 100 101 102 103 104 | CREATE OR REPLACE FUNCTION drop_routine( IN pv_routine_name VARCHAR(64) , IN pv_routine_type VARCHAR(64)) RETURNS INTEGER AS $$ DECLARE /* Declare the current catalog. */ lv_local_catalog VARCHAR(64) := current_database(); /* Declare return type variable. */ lv_retval INTEGER := 1; /* Manage data dictionary case mechanics: ====================================== routine_name is always in lowercase. routine_type is always in uppercase. */ lv_routine_name VARCHAR(64) := LOWER(pv_routine_name); lv_routine_type VARCHAR(64) := UPPER(pv_routine_type); /* Declare an indefinite length string for SQL statement. */ sql VARCHAR; /* Declare variables to manage cursor return values. */ row RECORD; arg VARCHAR; /* Declare parameter list. */ list VARCHAR; /* Declare a routine cursor. */ routine_cursor CURSOR( cv_routine_name VARCHAR , cv_routine_type VARCHAR ) FOR SELECT r.routine_name , r.specific_name , r.routine_type FROM information_schema.routines r WHERE r.specific_catalog = current_database() AND r.routine_schema = 'public' AND r.routine_type = cv_routine_type AND r.routine_name = cv_routine_name; /* Declare a parameter cursor. */ parameter_cursor CURSOR( cv_specific_name VARCHAR ) FOR SELECT args.data_type FROM information_schema.parameters args WHERE args.specific_catalog = current_database() AND args.specific_schema = 'public' AND args.specific_name = cv_specific_name; BEGIN /* Open the cursor. */ OPEN routine_cursor(lv_routine_name, lv_routine_type); <<row_loop>> LOOP /* Fetch table names. */ FETCH routine_cursor INTO row; /* Exit when no more records are found. */ EXIT row_loop WHEN NOT FOUND; /* Initialize parameter list. */ list := '('; /* Open the parameter cursor. */ OPEN parameter_cursor(row.specific_name::varchar); <<parameter_loop>> LOOP FETCH parameter_cursor INTO arg; /* Exit the parameter loop. */ EXIT parameter_loop WHEN NOT FOUND; /* Add parameter and delimit more than one parameter with a comma. */ IF LENGTH(list) > 1 THEN list := CONCAT(list,',',arg); ELSE list := CONCAT(list,arg); END IF; END LOOP; /* Close the parameter list. */ list := CONCAT(list,')'); /* Close the parameter cursor. */ CLOSE parameter_cursor; /* Concatenate together a DDL to drop the table with prejudice. */ sql := 'DROP '||row.routine_type||' IF EXISTS '||row.routine_name||list; /* Execute the DDL statement. */ EXECUTE sql; /* Assign success flag of 0. */ lv_retval := 0; END LOOP; /* Close the routine_cursor. */ CLOSE routine_cursor; /* Return the output text variable. */ RETURN lv_retval; END $$ LANGUAGE plpgsql; |
If you now create a series of hello overloaded functions, like:
CREATE OR REPLACE FUNCTION hello() RETURNS text AS $$ DECLARE output VARCHAR; BEGIN SELECT 'Hello World!' INTO output; RETURN output; END $$ LANGUAGE plpgsql; CREATE OR REPLACE FUNCTION hello(whom text) RETURNS text AS $$ DECLARE output VARCHAR; BEGIN SELECT CONCAT('Hello ',whom,'!') INTO output; RETURN output; END $$ LANGUAGE plpgsql; CREATE OR REPLACE FUNCTION hello(id int, whom text) RETURNS text AS $$ DECLARE output VARCHAR; BEGIN SELECT CONCAT('[',id,'] Hello ',whom,'!') INTO output; RETURN output; END $$ LANGUAGE plpgsql; |
After you create the overloaded functions, you can query their status from the information_schema.routines table in the data dictionary:
SELECT routine_name , specific_name , routine_type FROM information_schema.routines WHERE specific_catalog = current_setting('videodb.catalog_name') AND routine_schema = 'public' AND routine_name = 'hello'; |
Which shows you the three versions of the hello function:
routine_name | specific_name | routine_type --------------+---------------+-------------- hello | hello_18100 | FUNCTION hello | hello_18101 | FUNCTION hello | hello_18102 | FUNCTION (3 rows) |
You can drop all versions of the hello functions by calling the drop_routine function:
SELECT CASE WHEN drop_routine('hello','function') = 0 THEN 'Success' ELSE 'Failure' END AS drop_routine; |
It returns the following:
drop_routine -------------- Success (1 row) |
As always, I hope this helps those looking for how to routinely test new functions and procedures.
Install Python on Windows
A number of my students want to run the databases and development environments on Windows rather than Linux. Some of the students have various problems configuring a virtual machine or Docker environment on their laptops.
Installing Python on Windows is quite straightforward. You simply open a Windows Command Line Interface (CLI) with Administrator privileges and type python at the command line. It will launch a dialog that lets you download and install Python.
After the installation, you are returned to the Windows CLI where you can type python to launch the Python IDE. You’ll learn that it’s an older version when it opens.
Python 3.10.2 (tags/v3.10.2:a58ebcc, Jan 17 2022, 14:12:15) [MSC v.1929 64 bit (AMD64)] on win32 Type "help", "copyright", "credits" or "license" for more information. >>> |
After installing Python, I started to install drivers with the Python package-management utility – PIP. I loaded the psycopg2 driver first and discovered that Windows installed an older version of PIP, as qualified when I installed the Python library:
pip install psycopg2 Collecting psycopg2 Downloading psycopg2-2.9.3-cp310-cp310-win_amd64.whl (1.2 MB) |████████████████████████████████| 1.2 MB 1.6 MB/s Installing collected packages: psycopg2 Successfully installed psycopg2-2.9.3 WARNING: You are using pip version 21.2.4; however, version 22.0.3 is available. You should consider upgrading via the 'C:\Users\mclaughlinm\AppData\Local\Microsoft\WindowsApps\PythonSoftwareFoundation.Python.3.10_qbz5n2kfra8p0\python.exe -m pip install --upgrade pip' command. |
So, I immediately installed the new version of PIP and discovered that I have to manually reset the %PATH% environment variable.
python -m pip install --upgrade pip Requirement already satisfied: pip in c:\program files\windowsapps\pythonsoftwarefoundation.python.3.10_3.10.752.0_x64__qbz5n2kfra8p0\lib\site-packages (21.2.4) Collecting pip Downloading pip-22.0.3-py3-none-any.whl (2.1 MB) |████████████████████████████████| 2.1 MB 656 kB/s Installing collected packages: pip WARNING: The scripts pip.exe, pip3.10.exe and pip3.exe are installed in 'C:\Users\mclaughlinm\AppData\Local\Packages\PythonSoftwareFoundation.Python.3.10_qbz5n2kfra8p0\LocalCache\local-packages\Python310\Scripts' which is not on PATH. Consider adding this directory to PATH or, if you prefer to suppress this warning, use --no-warn-script-location. Successfully installed pip-22.0.3 |
The default location for the PIP.exe and PIP3.exe are found in the:
C:\Users\mclaughlinm\AppData\Local\Microsoft\WindowsApps |
Rather than put the newer directory in the System Environment %PATH% variable, I created a batch file that lets me set it only when I need it.
SET PATH=C:\Users\mclaughlinm\AppData\Local\Packages\PythonSoftwareFoundation.Python.3.10_qbz5n2kfra8p0\LocalCache\local-packages\Python310\Scripts;%PATH% |
After installing the psycopg2 driver, I tested the new_hire.sql and new_hire.py files from this earlier Linux post successfully. I hope this helps those looking to work with Python on Windows.
