Archive for the ‘PostgreSQL DBA’ tag
Add PostGIS to PostgreSQL
The following blog post shows you how to add PostGIS and PgRouting to your existing install of PostgeSQL 14 on the Ubuntu Desktop, Version 22.0.4. This blog post relies on information in this earlier Install and Configure PostgreSQL on Ubuntu post. Generalized documentation on PostGIS exists at this URL.
You install the postgis libraries:
sudo apt install -y postgis |
Display detailed console log →
Reading package lists... Done Building dependency tree... Done Reading state information... Done The following additional packages will be installed: gdal-data libaec0 libaom3 libarmadillo10 libarpack2 libblosc1 libboost-serialization1.74.0 libcfitsio9 libcharls2 libdav1d5 libde265-0 libfreexl1 libfyba0 libgdal30 libgeos-c1v5 libgeos3.10.2 libgeotiff5 libgmpxx4ldbl libhdf4-0-alt libhdf5-103-1 libhdf5-hl-100 libheif1 libkmlbase1 libkmldom1 libkmlengine1 libminizip1 libnetcdf19 libodbc2 libodbcinst2 libogdi4.1 libproj22 libprotobuf-c1 libqhull-r8.0 librttopo1 libsfcgal1 libsnappy1v5 libspatialite7 libsuperlu5 libsz2 liburiparser1 libx265-199 libxerces-c3.2 postgis-doc postgresql-14-postgis-3 postgresql-14-postgis-3-scripts proj-bin proj-data unixodbc-common Suggested packages: geotiff-bin gdal-bin libgeotiff-epsg libhdf4-doc libhdf4-alt-dev hdf4-tools odbc-postgresql tdsodbc ogdi-bin The following NEW packages will be installed: gdal-data libaec0 libaom3 libarmadillo10 libarpack2 libblosc1 libboost-serialization1.74.0 libcfitsio9 libcharls2 libdav1d5 libde265-0 libfreexl1 libfyba0 libgdal30 libgeos-c1v5 libgeos3.10.2 libgeotiff5 libgmpxx4ldbl libhdf4-0-alt libhdf5-103-1 libhdf5-hl-100 libheif1 libkmlbase1 libkmldom1 libkmlengine1 libminizip1 libnetcdf19 libodbc2 libodbcinst2 libogdi4.1 libproj22 libprotobuf-c1 libqhull-r8.0 librttopo1 libsfcgal1 libsnappy1v5 libspatialite7 libsuperlu5 libsz2 liburiparser1 libx265-199 libxerces-c3.2 postgis postgis-doc postgresql-14-postgis-3 postgresql-14-postgis-3-scripts proj-bin proj-data unixodbc-common 0 upgraded, 49 newly installed, 0 to remove and 6 not upgraded. Need to get 42.0 MB of archives. After this operation, 173 MB of additional disk space will be used. Get:1 http://us.archive.ubuntu.com/ubuntu jammy/universe amd64 gdal-data all 3.4.1+dfsg-1build4 [216 kB] Get:2 http://us.archive.ubuntu.com/ubuntu jammy/universe amd64 libaec0 amd64 1.0.6-1 [20.1 kB] Get:3 http://us.archive.ubuntu.com/ubuntu jammy/universe amd64 libaom3 amd64 3.3.0-1 [1,748 kB] Get:4 http://us.archive.ubuntu.com/ubuntu jammy/universe amd64 libarpack2 amd64 3.8.0-1 [92.4 kB] Get:5 http://us.archive.ubuntu.com/ubuntu jammy/universe amd64 libsuperlu5 amd64 5.3.0+dfsg1-2 [183 kB] Get:6 http://us.archive.ubuntu.com/ubuntu jammy/universe amd64 libarmadillo10 amd64 1:10.8.2+dfsg-1 [105 kB] Get:7 http://us.archive.ubuntu.com/ubuntu jammy/main amd64 libsnappy1v5 amd64 1.1.8-1build3 [17.5 kB] Get:8 http://us.archive.ubuntu.com/ubuntu jammy/universe amd64 libblosc1 amd64 1.21.1+ds2-2 [35.8 kB] Get:9 http://us.archive.ubuntu.com/ubuntu jammy/main amd64 libboost-serialization1.74.0 amd64 1.74.0-14ubuntu3 [327 kB] Get:10 http://us.archive.ubuntu.com/ubuntu jammy/universe amd64 libcfitsio9 amd64 4.0.0-1 [519 kB] Get:11 http://us.archive.ubuntu.com/ubuntu jammy/universe amd64 libcharls2 amd64 2.3.4-1 [87.0 kB] Get:12 http://us.archive.ubuntu.com/ubuntu jammy/universe amd64 libdav1d5 amd64 0.9.2-1 [463 kB] Get:13 http://us.archive.ubuntu.com/ubuntu jammy-updates/universe amd64 libde265-0 amd64 1.0.8-1ubuntu0.1 [289 kB] Get:14 http://us.archive.ubuntu.com/ubuntu jammy/universe amd64 libfyba0 amd64 4.1.1-7 [113 kB] Get:15 http://us.archive.ubuntu.com/ubuntu jammy/universe amd64 libfreexl1 amd64 1.0.6-1 [33.5 kB] Get:16 http://us.archive.ubuntu.com/ubuntu jammy/universe amd64 libgeos3.10.2 amd64 3.10.2-1 [713 kB] Get:17 http://us.archive.ubuntu.com/ubuntu jammy/universe amd64 libgeos-c1v5 amd64 3.10.2-1 [82.5 kB] Get:18 http://us.archive.ubuntu.com/ubuntu jammy/universe amd64 proj-data all 8.2.1-1 [10.0 MB] Get:19 http://us.archive.ubuntu.com/ubuntu jammy/universe amd64 libproj22 amd64 8.2.1-1 [1,257 kB] Get:20 http://us.archive.ubuntu.com/ubuntu jammy/universe amd64 libgeotiff5 amd64 1.7.0-2build1 [67.1 kB] Get:21 http://us.archive.ubuntu.com/ubuntu jammy/universe amd64 libhdf4-0-alt amd64 4.2.15-4 [290 kB] Get:22 http://us.archive.ubuntu.com/ubuntu jammy/universe amd64 libsz2 amd64 1.0.6-1 [5,354 B] Get:23 http://us.archive.ubuntu.com/ubuntu jammy/universe amd64 libhdf5-103-1 amd64 1.10.7+repack-4ubuntu2 [1,295 kB] Get:24 http://us.archive.ubuntu.com/ubuntu jammy/universe amd64 libx265-199 amd64 3.5-2 [1,170 kB] Get:25 http://us.archive.ubuntu.com/ubuntu jammy/universe amd64 libheif1 amd64 1.12.0-2build1 [196 kB] Get:26 http://us.archive.ubuntu.com/ubuntu jammy/universe amd64 libminizip1 amd64 1.1-8build1 [20.2 kB] Get:27 http://us.archive.ubuntu.com/ubuntu jammy/universe amd64 liburiparser1 amd64 0.9.6+dfsg-1 [36.4 kB] Get:28 http://us.archive.ubuntu.com/ubuntu jammy/universe amd64 libkmlbase1 amd64 1.3.0-9 [45.0 kB] Get:29 http://us.archive.ubuntu.com/ubuntu jammy/universe amd64 libkmldom1 amd64 1.3.0-9 [150 kB] Get:30 http://us.archive.ubuntu.com/ubuntu jammy/universe amd64 libkmlengine1 amd64 1.3.0-9 [71.7 kB] Get:31 http://us.archive.ubuntu.com/ubuntu jammy/universe amd64 libhdf5-hl-100 amd64 1.10.7+repack-4ubuntu2 [59.1 kB] Get:32 http://us.archive.ubuntu.com/ubuntu jammy/universe amd64 libnetcdf19 amd64 1:4.8.1-1 [456 kB] Get:33 http://us.archive.ubuntu.com/ubuntu jammy/main amd64 libodbc2 amd64 2.3.9-5 [159 kB] Get:34 http://us.archive.ubuntu.com/ubuntu jammy/main amd64 unixodbc-common all 2.3.9-5 [9,228 B] Get:35 http://us.archive.ubuntu.com/ubuntu jammy/main amd64 libodbcinst2 amd64 2.3.9-5 [31.9 kB] Get:36 http://us.archive.ubuntu.com/ubuntu jammy/universe amd64 libogdi4.1 amd64 4.1.0+ds-5 [197 kB] Get:37 http://us.archive.ubuntu.com/ubuntu jammy/universe amd64 libqhull-r8.0 amd64 2020.2-4 [196 kB] Get:38 http://us.archive.ubuntu.com/ubuntu jammy/universe amd64 librttopo1 amd64 1.1.0-2 [178 kB] Get:39 http://us.archive.ubuntu.com/ubuntu jammy/universe amd64 libspatialite7 amd64 5.0.1-2build2 [2,092 kB] Get:40 http://us.archive.ubuntu.com/ubuntu jammy-updates/universe amd64 libxerces-c3.2 amd64 3.2.3+debian-3ubuntu0.1 [929 kB] Get:41 http://us.archive.ubuntu.com/ubuntu jammy/universe amd64 libgdal30 amd64 3.4.1+dfsg-1build4 [7,642 kB] Get:42 http://us.archive.ubuntu.com/ubuntu jammy/main amd64 libgmpxx4ldbl amd64 2:6.2.1+dfsg-3ubuntu1 [9,580 B] Get:43 http://us.archive.ubuntu.com/ubuntu jammy-updates/main amd64 libprotobuf-c1 amd64 1.3.3-1ubuntu2.1 [20.3 kB] Get:44 http://us.archive.ubuntu.com/ubuntu jammy/universe amd64 libsfcgal1 amd64 1.4.1-1 [2,179 kB] Get:45 http://us.archive.ubuntu.com/ubuntu jammy/universe amd64 postgis amd64 3.2.0+dfsg-1ubuntu1 [350 kB] Get:46 http://us.archive.ubuntu.com/ubuntu jammy/universe amd64 postgis-doc all 3.2.0+dfsg-1ubuntu1 [2,922 kB] Get:47 http://us.archive.ubuntu.com/ubuntu jammy/universe amd64 postgresql-14-postgis-3-scripts all 3.2.0+dfsg-1ubuntu1 [1,018 kB] Get:48 http://us.archive.ubuntu.com/ubuntu jammy/universe amd64 postgresql-14-postgis-3 amd64 3.2.0+dfsg-1ubuntu1 [3,696 kB] Get:49 http://us.archive.ubuntu.com/ubuntu jammy/universe amd64 proj-bin amd64 8.2.1-1 [154 kB] Fetched 42.0 MB in 7s (5,994 kB/s) Extracting templates from packages: 100% Selecting previously unselected package gdal-data. (Reading database ... 249055 files and directories currently installed.) Preparing to unpack .../00-gdal-data_3.4.1+dfsg-1build4_all.deb ... Unpacking gdal-data (3.4.1+dfsg-1build4) ... Selecting previously unselected package libaec0:amd64. Preparing to unpack .../01-libaec0_1.0.6-1_amd64.deb ... Unpacking libaec0:amd64 (1.0.6-1) ... Selecting previously unselected package libaom3:amd64. Preparing to unpack .../02-libaom3_3.3.0-1_amd64.deb ... Unpacking libaom3:amd64 (3.3.0-1) ... Selecting previously unselected package libarpack2:amd64. Preparing to unpack .../03-libarpack2_3.8.0-1_amd64.deb ... Unpacking libarpack2:amd64 (3.8.0-1) ... Selecting previously unselected package libsuperlu5:amd64. Preparing to unpack .../04-libsuperlu5_5.3.0+dfsg1-2_amd64.deb ... Unpacking libsuperlu5:amd64 (5.3.0+dfsg1-2) ... Selecting previously unselected package libarmadillo10. Preparing to unpack .../05-libarmadillo10_1%3a10.8.2+dfsg-1_amd64.deb ... Unpacking libarmadillo10 (1:10.8.2+dfsg-1) ... Selecting previously unselected package libsnappy1v5:amd64. Preparing to unpack .../06-libsnappy1v5_1.1.8-1build3_amd64.deb ... Unpacking libsnappy1v5:amd64 (1.1.8-1build3) ... Selecting previously unselected package libblosc1:amd64. Preparing to unpack .../07-libblosc1_1.21.1+ds2-2_amd64.deb ... Unpacking libblosc1:amd64 (1.21.1+ds2-2) ... Selecting previously unselected package libboost-serialization1.74.0:amd64. Preparing to unpack .../08-libboost-serialization1.74.0_1.74.0-14ubuntu3_amd64.deb ... Unpacking libboost-serialization1.74.0:amd64 (1.74.0-14ubuntu3) ... Selecting previously unselected package libcfitsio9:amd64. Preparing to unpack .../09-libcfitsio9_4.0.0-1_amd64.deb ... Unpacking libcfitsio9:amd64 (4.0.0-1) ... Selecting previously unselected package libcharls2:amd64. Preparing to unpack .../10-libcharls2_2.3.4-1_amd64.deb ... Unpacking libcharls2:amd64 (2.3.4-1) ... Selecting previously unselected package libdav1d5:amd64. Preparing to unpack .../11-libdav1d5_0.9.2-1_amd64.deb ... Unpacking libdav1d5:amd64 (0.9.2-1) ... Selecting previously unselected package libde265-0:amd64. Preparing to unpack .../12-libde265-0_1.0.8-1ubuntu0.1_amd64.deb ... Unpacking libde265-0:amd64 (1.0.8-1ubuntu0.1) ... Selecting previously unselected package libfyba0:amd64. Preparing to unpack .../13-libfyba0_4.1.1-7_amd64.deb ... Unpacking libfyba0:amd64 (4.1.1-7) ... Selecting previously unselected package libfreexl1:amd64. Preparing to unpack .../14-libfreexl1_1.0.6-1_amd64.deb ... Unpacking libfreexl1:amd64 (1.0.6-1) ... Selecting previously unselected package libgeos3.10.2:amd64. Preparing to unpack .../15-libgeos3.10.2_3.10.2-1_amd64.deb ... Unpacking libgeos3.10.2:amd64 (3.10.2-1) ... Selecting previously unselected package libgeos-c1v5:amd64. Preparing to unpack .../16-libgeos-c1v5_3.10.2-1_amd64.deb ... Unpacking libgeos-c1v5:amd64 (3.10.2-1) ... Selecting previously unselected package proj-data. Preparing to unpack .../17-proj-data_8.2.1-1_all.deb ... Unpacking proj-data (8.2.1-1) ... Selecting previously unselected package libproj22:amd64. Preparing to unpack .../18-libproj22_8.2.1-1_amd64.deb ... Unpacking libproj22:amd64 (8.2.1-1) ... Selecting previously unselected package libgeotiff5:amd64. Preparing to unpack .../19-libgeotiff5_1.7.0-2build1_amd64.deb ... Unpacking libgeotiff5:amd64 (1.7.0-2build1) ... Selecting previously unselected package libhdf4-0-alt. Preparing to unpack .../20-libhdf4-0-alt_4.2.15-4_amd64.deb ... Unpacking libhdf4-0-alt (4.2.15-4) ... Selecting previously unselected package libsz2:amd64. Preparing to unpack .../21-libsz2_1.0.6-1_amd64.deb ... Unpacking libsz2:amd64 (1.0.6-1) ... Selecting previously unselected package libhdf5-103-1:amd64. Preparing to unpack .../22-libhdf5-103-1_1.10.7+repack-4ubuntu2_amd64.deb ... Unpacking libhdf5-103-1:amd64 (1.10.7+repack-4ubuntu2) ... Selecting previously unselected package libx265-199:amd64. Preparing to unpack .../23-libx265-199_3.5-2_amd64.deb ... Unpacking libx265-199:amd64 (3.5-2) ... Selecting previously unselected package libheif1:amd64. Preparing to unpack .../24-libheif1_1.12.0-2build1_amd64.deb ... Unpacking libheif1:amd64 (1.12.0-2build1) ... Selecting previously unselected package libminizip1:amd64. Preparing to unpack .../25-libminizip1_1.1-8build1_amd64.deb ... Unpacking libminizip1:amd64 (1.1-8build1) ... Selecting previously unselected package liburiparser1:amd64. Preparing to unpack .../26-liburiparser1_0.9.6+dfsg-1_amd64.deb ... Unpacking liburiparser1:amd64 (0.9.6+dfsg-1) ... Selecting previously unselected package libkmlbase1:amd64. Preparing to unpack .../27-libkmlbase1_1.3.0-9_amd64.deb ... Unpacking libkmlbase1:amd64 (1.3.0-9) ... Selecting previously unselected package libkmldom1:amd64. Preparing to unpack .../28-libkmldom1_1.3.0-9_amd64.deb ... Unpacking libkmldom1:amd64 (1.3.0-9) ... Selecting previously unselected package libkmlengine1:amd64. Preparing to unpack .../29-libkmlengine1_1.3.0-9_amd64.deb ... Unpacking libkmlengine1:amd64 (1.3.0-9) ... Selecting previously unselected package libhdf5-hl-100:amd64. Preparing to unpack .../30-libhdf5-hl-100_1.10.7+repack-4ubuntu2_amd64.deb ... Unpacking libhdf5-hl-100:amd64 (1.10.7+repack-4ubuntu2) ... Selecting previously unselected package libnetcdf19:amd64. Preparing to unpack .../31-libnetcdf19_1%3a4.8.1-1_amd64.deb ... Unpacking libnetcdf19:amd64 (1:4.8.1-1) ... Selecting previously unselected package libodbc2:amd64. Preparing to unpack .../32-libodbc2_2.3.9-5_amd64.deb ... Unpacking libodbc2:amd64 (2.3.9-5) ... Selecting previously unselected package unixodbc-common. Preparing to unpack .../33-unixodbc-common_2.3.9-5_all.deb ... Unpacking unixodbc-common (2.3.9-5) ... Selecting previously unselected package libodbcinst2:amd64. Preparing to unpack .../34-libodbcinst2_2.3.9-5_amd64.deb ... Unpacking libodbcinst2:amd64 (2.3.9-5) ... Selecting previously unselected package libogdi4.1. Preparing to unpack .../35-libogdi4.1_4.1.0+ds-5_amd64.deb ... Unpacking libogdi4.1 (4.1.0+ds-5) ... Selecting previously unselected package libqhull-r8.0:amd64. Preparing to unpack .../36-libqhull-r8.0_2020.2-4_amd64.deb ... Unpacking libqhull-r8.0:amd64 (2020.2-4) ... Selecting previously unselected package librttopo1:amd64. Preparing to unpack .../37-librttopo1_1.1.0-2_amd64.deb ... Unpacking librttopo1:amd64 (1.1.0-2) ... Selecting previously unselected package libspatialite7:amd64. Preparing to unpack .../38-libspatialite7_5.0.1-2build2_amd64.deb ... Unpacking libspatialite7:amd64 (5.0.1-2build2) ... Selecting previously unselected package libxerces-c3.2:amd64. Preparing to unpack .../39-libxerces-c3.2_3.2.3+debian-3ubuntu0.1_amd64.deb ... Unpacking libxerces-c3.2:amd64 (3.2.3+debian-3ubuntu0.1) ... Selecting previously unselected package libgdal30. Preparing to unpack .../40-libgdal30_3.4.1+dfsg-1build4_amd64.deb ... Unpacking libgdal30 (3.4.1+dfsg-1build4) ... Selecting previously unselected package libgmpxx4ldbl:amd64. Preparing to unpack .../41-libgmpxx4ldbl_2%3a6.2.1+dfsg-3ubuntu1_amd64.deb ... Unpacking libgmpxx4ldbl:amd64 (2:6.2.1+dfsg-3ubuntu1) ... Selecting previously unselected package libprotobuf-c1:amd64. Preparing to unpack .../42-libprotobuf-c1_1.3.3-1ubuntu2.1_amd64.deb ... Unpacking libprotobuf-c1:amd64 (1.3.3-1ubuntu2.1) ... Selecting previously unselected package libsfcgal1. Preparing to unpack .../43-libsfcgal1_1.4.1-1_amd64.deb ... Unpacking libsfcgal1 (1.4.1-1) ... Selecting previously unselected package postgis. Preparing to unpack .../44-postgis_3.2.0+dfsg-1ubuntu1_amd64.deb ... Unpacking postgis (3.2.0+dfsg-1ubuntu1) ... Selecting previously unselected package postgis-doc. Preparing to unpack .../45-postgis-doc_3.2.0+dfsg-1ubuntu1_all.deb ... Unpacking postgis-doc (3.2.0+dfsg-1ubuntu1) ... Selecting previously unselected package postgresql-14-postgis-3-scripts. Preparing to unpack .../46-postgresql-14-postgis-3-scripts_3.2.0+dfsg-1ubuntu1_all.deb ... Unpacking postgresql-14-postgis-3-scripts (3.2.0+dfsg-1ubuntu1) ... Selecting previously unselected package postgresql-14-postgis-3. Preparing to unpack .../47-postgresql-14-postgis-3_3.2.0+dfsg-1ubuntu1_amd64.deb ... Unpacking postgresql-14-postgis-3 (3.2.0+dfsg-1ubuntu1) ... Selecting previously unselected package proj-bin. Preparing to unpack .../48-proj-bin_8.2.1-1_amd64.deb ... Unpacking proj-bin (8.2.1-1) ... Setting up libgeos3.10.2:amd64 (3.10.2-1) ... Setting up libaom3:amd64 (3.3.0-1) ... Setting up libxerces-c3.2:amd64 (3.2.3+debian-3ubuntu0.1) ... Setting up proj-data (8.2.1-1) ... Setting up libogdi4.1 (4.1.0+ds-5) ... Setting up libcharls2:amd64 (2.3.4-1) ... Setting up libminizip1:amd64 (1.1-8build1) ... Setting up libarpack2:amd64 (3.8.0-1) ... Setting up libsuperlu5:amd64 (5.3.0+dfsg1-2) ... Setting up libqhull-r8.0:amd64 (2020.2-4) ... Setting up libproj22:amd64 (8.2.1-1) ... Setting up postgresql-14-postgis-3-scripts (3.2.0+dfsg-1ubuntu1) ... update-alternatives: using /usr/share/postgresql/14/extension/postgis-3.control to provide /usr/share/postg resql/14/extension/postgis.control (postgresql-14-postgis.control) in auto mode Setting up libprotobuf-c1:amd64 (1.3.3-1ubuntu2.1) ... Setting up libaec0:amd64 (1.0.6-1) ... Setting up gdal-data (3.4.1+dfsg-1build4) ... Setting up libgeotiff5:amd64 (1.7.0-2build1) ... Setting up libsnappy1v5:amd64 (1.1.8-1build3) ... Setting up libcfitsio9:amd64 (4.0.0-1) ... Setting up postgis-doc (3.2.0+dfsg-1ubuntu1) ... Setting up libgmpxx4ldbl:amd64 (2:6.2.1+dfsg-3ubuntu1) ... Setting up libgeos-c1v5:amd64 (3.10.2-1) ... Setting up unixodbc-common (2.3.9-5) ... Setting up libhdf4-0-alt (4.2.15-4) ... Setting up libx265-199:amd64 (3.5-2) ... Setting up libboost-serialization1.74.0:amd64 (1.74.0-14ubuntu3) ... Setting up libodbc2:amd64 (2.3.9-5) ... Setting up liburiparser1:amd64 (0.9.6+dfsg-1) ... Setting up librttopo1:amd64 (1.1.0-2) ... Setting up libfreexl1:amd64 (1.0.6-1) ... Setting up libfyba0:amd64 (4.1.1-7) ... Setting up libkmlbase1:amd64 (1.3.0-9) ... Setting up libblosc1:amd64 (1.21.1+ds2-2) ... Setting up libsfcgal1 (1.4.1-1) ... Setting up libdav1d5:amd64 (0.9.2-1) ... Setting up libde265-0:amd64 (1.0.8-1ubuntu0.1) ... Setting up libsz2:amd64 (1.0.6-1) ... Setting up libkmldom1:amd64 (1.3.0-9) ... Setting up libspatialite7:amd64 (5.0.1-2build2) ... Setting up libodbcinst2:amd64 (2.3.9-5) ... Setting up libarmadillo10 (1:10.8.2+dfsg-1) ... Setting up libkmlengine1:amd64 (1.3.0-9) ... Setting up libheif1:amd64 (1.12.0-2build1) ... Setting up proj-bin (8.2.1-1) ... Setting up libhdf5-103-1:amd64 (1.10.7+repack-4ubuntu2) ... Setting up libhdf5-hl-100:amd64 (1.10.7+repack-4ubuntu2) ... Setting up libnetcdf19:amd64 (1:4.8.1-1) ... Setting up libgdal30 (3.4.1+dfsg-1build4) ... Setting up postgresql-14-postgis-3 (3.2.0+dfsg-1ubuntu1) ... Setting up postgis (3.2.0+dfsg-1ubuntu1) ... Processing triggers for postgresql-common (238) ... Building PostgreSQL dictionaries from installed myspell/hunspell packages... en_us Removing obsolete dictionary files: Processing triggers for libc-bin (2.35-0ubuntu3.6) ... Processing triggers for man-db (2.10.2-1) ... |
You install the postgresql-14-pgrouting libraries:
sudo apt install -y postgresql-14-pgrouting |
Display detailed console log →
Reading package lists... Done Building dependency tree... Done Reading state information... Done The following additional packages will be installed: postgresql-14-pgrouting-scripts Suggested packages: postgresql-14-pgrouting-doc The following NEW packages will be installed: postgresql-14-pgrouting postgresql-14-pgrouting-scripts 0 upgraded, 2 newly installed, 0 to remove and 6 not upgraded. Need to get 705 kB of archives. After this operation, 4,314 kB of additional disk space will be used. Get:1 http://us.archive.ubuntu.com/ubuntu jammy/universe amd64 postgresql-14-pgrouting-scripts all 3.3.0-2 [46.3 kB] Get:2 http://us.archive.ubuntu.com/ubuntu jammy/universe amd64 postgresql-14-pgrouting amd64 3.3.0-2 [659 kB] Fetched 705 kB in 1s (721 kB/s) Selecting previously unselected package postgresql-14-pgrouting-scripts. (Reading database ... 250431 files and directories currently installed.) Preparing to unpack .../postgresql-14-pgrouting-scripts_3.3.0-2_all.deb ... Unpacking postgresql-14-pgrouting-scripts (3.3.0-2) ... Selecting previously unselected package postgresql-14-pgrouting. Preparing to unpack .../postgresql-14-pgrouting_3.3.0-2_amd64.deb ... Unpacking postgresql-14-pgrouting (3.3.0-2) ... Setting up postgresql-14-pgrouting-scripts (3.3.0-2) ... Setting up postgresql-14-pgrouting (3.3.0-2) ... Processing triggers for postgresql-common (238) ... Building PostgreSQL dictionaries from installed myspell/hunspell packages... en_us Removing obsolete dictionary files: |
You should also install ogr2ogr program, which is a command-line utility for converting data between GIS data formats, including common file formats and common spatial databases. You install the ogr2ogr libraries:
sudo apt install -y gdal-bin |
Display detailed console log →
Reading package lists... Done Building dependency tree... Done Reading state information... Done The following additional packages will be installed: python3-gdal python3-numpy Suggested packages: libgdal-grass python-numpy-doc python3-pytest The following NEW packages will be installed: gdal-bin python3-gdal python3-numpy 0 upgraded, 3 newly installed, 0 to remove and 11 not upgraded. Need to get 4,381 kB of archives. After this operation, 24.9 MB of additional disk space will be used. Get:1 http://us.archive.ubuntu.com/ubuntu jammy-updates/main amd64 python3-numpy amd64 1:1.21.5-1ubuntu22.04.1 [3,467 kB] Get:2 http://us.archive.ubuntu.com/ubuntu jammy/universe amd64 python3-gdal amd64 3.4.1+dfsg-1build4 [673 kB] Get:3 http://us.archive.ubuntu.com/ubuntu jammy/universe amd64 gdal-bin amd64 3.4.1+dfsg-1build4 [241 kB] Fetched 4,381 kB in 1s (2,965 kB/s) Selecting previously unselected package python3-numpy. (Reading database ... 249006 files and directories currently installed.) Preparing to unpack .../python3-numpy_1%3a1.21.5-1ubuntu22.04.1_amd64.deb ... Unpacking python3-numpy (1:1.21.5-1ubuntu22.04.1) ... Selecting previously unselected package python3-gdal. Preparing to unpack .../python3-gdal_3.4.1+dfsg-1build4_amd64.deb ... Unpacking python3-gdal (3.4.1+dfsg-1build4) ... Selecting previously unselected package gdal-bin. Preparing to unpack .../gdal-bin_3.4.1+dfsg-1build4_amd64.deb ... Unpacking gdal-bin (3.4.1+dfsg-1build4) ... Setting up python3-numpy (1:1.21.5-1ubuntu22.04.1) ... Setting up python3-gdal (3.4.1+dfsg-1build4) ... Setting up gdal-bin (3.4.1+dfsg-1build4) ... Processing triggers for man-db (2.10.2-1) ... |
Verify the installation by using the which utility, like
which -a ogr2ogr |
It should return:
/usr/bin/ogr2ogr |
You can qualify the installed PostGIS packages with the following command:
dpkg -l | grep -i postgis |
It should display:
ii postgis 3.2.0+dfsg-1ubuntu1 amd64 Geographic objects support for PostgreSQL ii postgis-doc 3.2.0+dfsg-1ubuntu1 all Geographic objects support for PostgreSQL -- documentation ii postgresql-14-pgrouting 3.3.0-2 amd64 Routing functionality support for PostgreSQL/PostGIS ii postgresql-14-pgrouting-scripts 3.3.0-2 all Routing functionality support for PostgreSQL/PostGIS - SQL scripts ii postgresql-14-postgis-3 3.2.0+dfsg-1ubuntu1 amd64 Geographic objects support for PostgreSQL 14 ii postgresql-14-postgis-3-scripts 3.2.0+dfsg-1ubuntu1 all Geographic objects support for PostgreSQL 14 -- SQL scripts |
Connect as the postgres user by becoming the root user with this command:
sudo sh |
Then, assume the role of the postgres user with this command:
su - postgres |
Connect to the PostgreSQL database as the privileged postgres owner/user:
psql postgres |
You will see the following prompt after connecting to the PostgreSQL database:
postgres@student-virtual-machine:~$ psql psql (14.10 (Ubuntu 14.10-0ubuntu0.22.04.1)) Type "help" for help. postgres=# |
As the the privileged postgres owner/user issue the following commands to create the gisdb database and set a new search path for it:
CREATE DATABASE gisdb; ALTER DATABASE gisdb SET search_path=public,postgis,contrib,tiger; |
Connect to the gisdb database:
\connect gisdb |
You are now connected to database gisdb as the postgres user. You change to the postgis schema, and create the following extensions in this schema.
CREATE SCHEMA postgis; CREATE EXTENSION postgis SCHEMA postgis; CREATE EXTENSION postgis_raster SCHEMA postgis; CREATE EXTENSION fuzzystrmatch SCHEMA postgis; CREATE EXTENSION address_standardizer_data_us SCHEMA postgis; |
You query the modified catalog with this query:
SELECT n.nspname AS "Name" , pg_catalog.pg_get_userbyid(n.nspowner) AS "Owner" FROM pg_catalog.pg_namespace n WHERE n.nspname !~ '^pg_' AND n.nspname <> 'information_schema' ORDER BY 1; |
It should return:
Name | Owner ---------+---------- postgis | postgres public | postgres (2 rows) |
You must assign the postgis_tiger_geocoder and postgis_topology without a schema assignment. The
postgis_tiger_eeocoder must be assigned by default to the tiger schema, and the postgis_topology schema.
CREATE EXTENSION postgis_tiger_geocoder; CREATE EXTENSION postgis_topology; |
You reuse the same above referenced query to see the modified catalog with this query:
It should return:
Name | Owner ------------+---------- postgis | postgres public | postgres tiger | postgres tiger_data | postgres topology | postgres (5 rows) |
Connect as the gisdb database with this command:
\connect gisdb |
You can see the active PostGIS extension with this command:
\dx postgis |
It shows:
List of installed extensions Name | Version | Schema | Description ---------+---------+---------+------------------------------------------------------------ postgis | 3.2.0 | postgis | PostGIS geometry and geography spatial types and functions (1 row) |
Now, you can use this query:
SELECT postgis_full_version(); |
to discover what PostGIS version is installed:
postgis_full_version -------------------------------------------------------------------------------------------------------------------------------------------------------------------- POSTGIS="3.2.0 c3e3cc0" [EXTENSION] PGSQL="140" GEOS="3.10.2-CAPI-1.16.0" PROJ="8.2.1" LIBXML="2.9.12" LIBJSON="0.15" LIBPROTOBUF="1.3.3" WAGYU="0.5.0 (Internal)" (1 row) |
Connect back to as the privileged postgres owner/user with this command:
\connect postgres |
Next, check the available databases with this command:
\l |
It should display the following:
                                  List of databases
   Name    |  Owner   | Encoding |   Collate   |    Ctype    |   Access privileges
-----------+----------+----------+-------------+-------------+-----------------------
 gisdb     | postgres | UTF8     | en_US.UTF-8 | en_US.UTF-8 |
 postgres  | postgres | UTF8     | en_US.UTF-8 | en_US.UTF-8 |
 template0 | postgres | UTF8     | en_US.UTF-8 | en_US.UTF-8 | =c/postgres          +
           |          |          |             |             | postgres=CTc/postgres
 template1 | postgres | UTF8     | en_US.UTF-8 | en_US.UTF-8 | =c/postgres          +
           |          |          |             |             | postgres=CTc/postgres
 videodb   | student  | UTF8     | en_US.UTF-8 | en_US.UTF-8 | =Tc/student          +
           |          |          |             |             | student=CTc/student  +
           |          |          |             |             | dba=CTc/student
(5 rows) |
As the privileged postgres owner/user make the following grants with these commands:
GRANT TEMPORARY, CONNECT ON DATABASE gisdb TO PUBLIC; GRANT ALL PRIVILEGES ON DATABASE gisdb TO postgres; GRANT ALL PRIVILEGES ON DATABASE gisdb TO dba; |
After making the grants, check the available databases access with this \l command:
\l |
It should display the following:
                                  List of databases
   Name    |  Owner   | Encoding |   Collate   |    Ctype    |   Access privileges
-----------+----------+----------+-------------+-------------+-----------------------
 gisdb     | postgres | UTF8     | en_US.UTF-8 | en_US.UTF-8 | =Tc/postgres         +
           |          |          |             |             | postgres=CTc/postgres+
           |          |          |             |             | dba=CTc/postgres
 postgres  | postgres | UTF8     | en_US.UTF-8 | en_US.UTF-8 |
 template0 | postgres | UTF8     | en_US.UTF-8 | en_US.UTF-8 | =c/postgres          +
           |          |          |             |             | postgres=CTc/postgres
 template1 | postgres | UTF8     | en_US.UTF-8 | en_US.UTF-8 | =c/postgres          +
           |          |          |             |             | postgres=CTc/postgres
 videodb   | student  | UTF8     | en_US.UTF-8 | en_US.UTF-8 | =Tc/student          +
           |          |          |             |             | student=CTc/student  +
           |          |          |             |             | dba=CTc/student
(5 rows) |
At this point, you can exit psql, the postgres user’s account, and the root user’s account. This should return you to your sudoer account, which in my case is the student user.
Connect to the gisdb with the following command-line interface command:
psql -U student -W -d gisdb |
You can create the following, as per instructions in PostGIS Chapter 9 instructions:
-- Conditionally drop table. DROP TABLE IF EXISTS geometries; -- Create table with geometry column in table. CREATE TABLE geometries ( geometries_id INT , name VARCHAR , geometry_obj GEOMETRY); INSERT INTO geometries ( name , geometry_obj ) VALUES ('Point', 'POINT(0 0)') ,('Linestring', 'LINESTRING(0 0, 1 1, 2 1, 2 2)') ,('Polygon', 'POLYGON((0 0, 1 0, 1 1, 0 1, 0 0))') ,('PolygonWithHole', 'POLYGON((0 0, 10 0, 10 10, 0 10, 0 0),(1 1, 1 2, 2 2, 2 1, 1 1))') ,('Collection', 'GEOMETRYCOLLECTION(POINT(2 0),POLYGON((0 0, 1 0, 1 1, 0 1, 0 0)))'); SELECT name , ST_AsText(geometry_obj) FROM geometries; |
Unfortunately, it raises the following error when attempting to create the geometries table:
psql:/home/student/Code/postgis/geometry.sql:7: ERROR: type "geometry" does not exist LINE 4: , geometry_obj GEOMETRY); |
As always, I hope the solutions presented helps move forward implementations of the technology. You can also find an excellent tutorial to learning PostGIS in the Introduction to PostGIS tutorial.
Python3 on PostgreSQL
The necessary Python 3 driver for connections to the PostgreSQL database is python3-psycopg2, as qualified by this earlier post with full test examples for Red Hat distributions. You can install it on Ubuntu with the following command:
sudo apt-get install -y python3-psycopg2 |
Display detailed console log →
python3-psycopg2 Reading package lists... Done Building dependency tree... Done Reading state information... Done Suggested packages: python-psycopg2-doc The following NEW packages will be installed: python3-psycopg2 0 upgraded, 1 newly installed, 0 to remove and 4 not upgraded. Need to get 136 kB of archives. After this operation, 483 kB of additional disk space will be used. Get:1 http://us.archive.ubuntu.com/ubuntu jammy/main amd64 python3-psycopg2 amd64 2.9.2-1build2 [136 kB] Fetched 136 kB in 1s (146 kB/s) Selecting previously unselected package python3-psycopg2. (Reading database ... 204321 files and directories currently installed.) Preparing to unpack .../python3-psycopg2_2.9.2-1build2_amd64.deb ... Unpacking python3-psycopg2 (2.9.2-1build2) ... Setting up python3-psycopg2 (2.9.2-1build2) ... |
As always, I hope this helps those looking for a solution. Also, remember the referenced post above provides Linux distribution neutral full solutions.
PostgreSQL User Password
Miraculous events happen on my students’ computers almost weekly. For example, one couldn’t remember their student user’s password, which I set by default. How did they change it? They don’t recall.
Assuming you have sudoer authority on a Linux operating system, you can change a PostgreSQL user’s password as follows:
- Assume the root user’s role with the following command:
sudo sh
- As the root user, assume the postgres user’s role with the following command:
su - postgres - As the postgres user, connect to the PostgreSQL database with the following command:
psql -U postgres - Assuming the user’s name is student and you want to set the password to a trivial value like student, use the following command:
ALTER USER student WITH ENCRYPTED PASSWORD 'student';
As always, I hope this helps somebody trying to sort out the syntax and workflow.
PL/pgSQL Test Q?
Intriguing little PostgreSQL PL/pgSQL test question posed by an interviewer of one of my students. Basically, how many times will this loop and what will it return or will it generate an error. (BTW, they wrapped it into a named function.)
DO $$ BEGIN FOR i IN 0.2..1.5 LOOP RAISE NOTICE '%', i; END LOOP; END; $$; |
It’ll loop three times and return 0, 1, and 2 because the double numbers entered as boundaries to the for-loop are implicitly case as integers.
SQL Developer & PostgreSQL
I had a request from one of the adjunct professors to connect SQL Developer to the PostgreSQL database. This is in support of our database programming class that teaches students how to write PL/SQL against the Oracle database and pgPL/SQL against the PostgreSQL database. We also demonstrate transactional management through Node.js, Python and Java.
Naturally, this is also a frequent step taken by those required to migrate PostgreSQL data models to an Oracle database. While my final solution requires mimicking Oracle’s database user to schema, it does work for migration purposes. I’ll update this post when I determine how to populate the database drop-down list.
The first step was figuring out where to put the PostgreSQL JDBC Java ARchive (.jar) file on a Linux distribution. You navigate to the end-user student account in a Terminal and change to the .sqldeveloper directory. Then, create a jdbc subdirectory as the student user with the following command:
mkdir /home/student/.sqldeveloper/jdbc |
Then, download the most current PostgreSQL JDBC Java ARchive (.jar) file and copy it into the /home/student/.sqldeveloper/jdbc, which you can see afterward with the following command:
ll /home/student/.sqldeveloper/jdbc |
It should display:
-rw-r--r--. 1 student student 1041081 Aug 9 13:46 postgresql-42.3.7.jar |
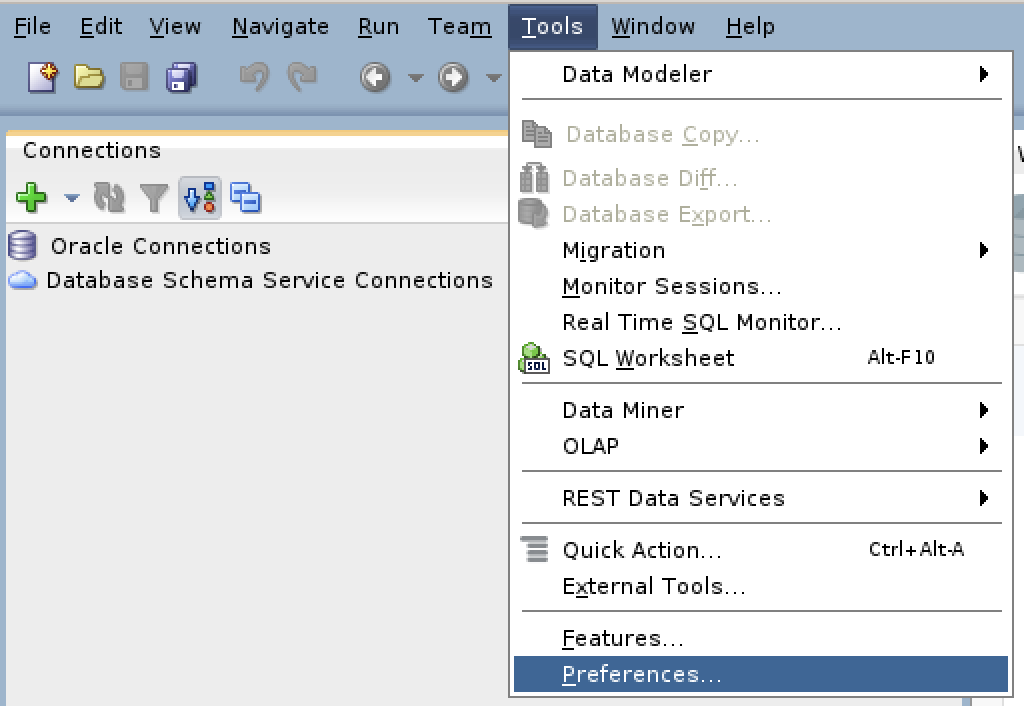
The next series of steps are done within SQL Developer. Launch SQL Developer and navigate to Tools and Preferences, like this:
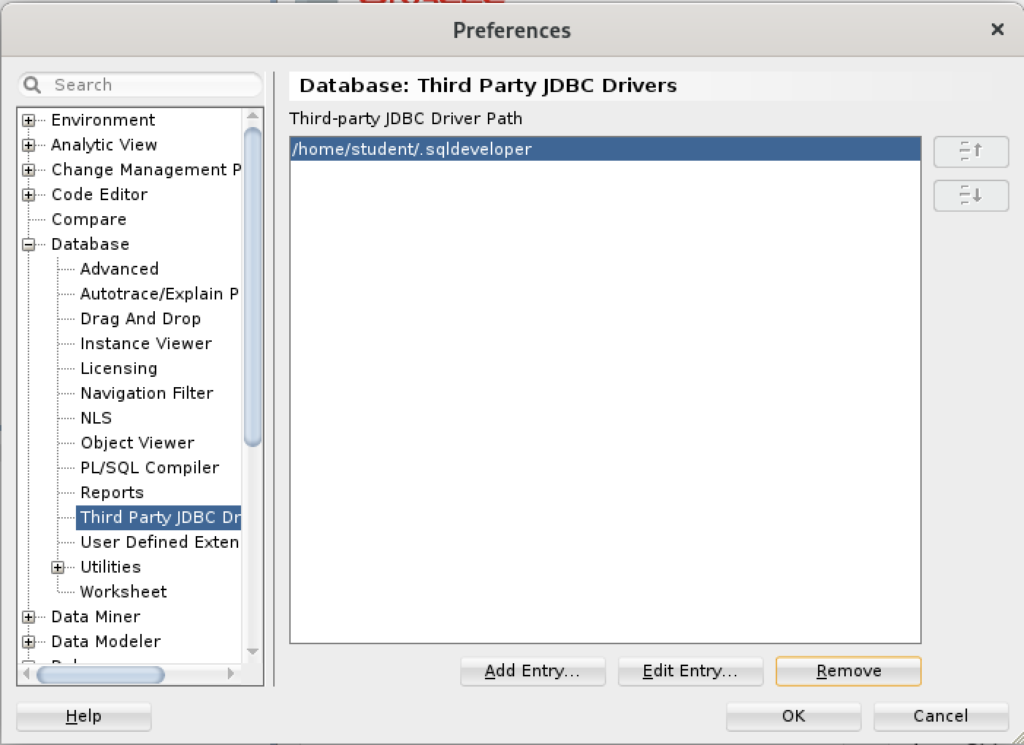
Inside the Preferences dialog, navigate to Database and Third Party JDBC Drivers like shown and click the Add Entry button to proceed:
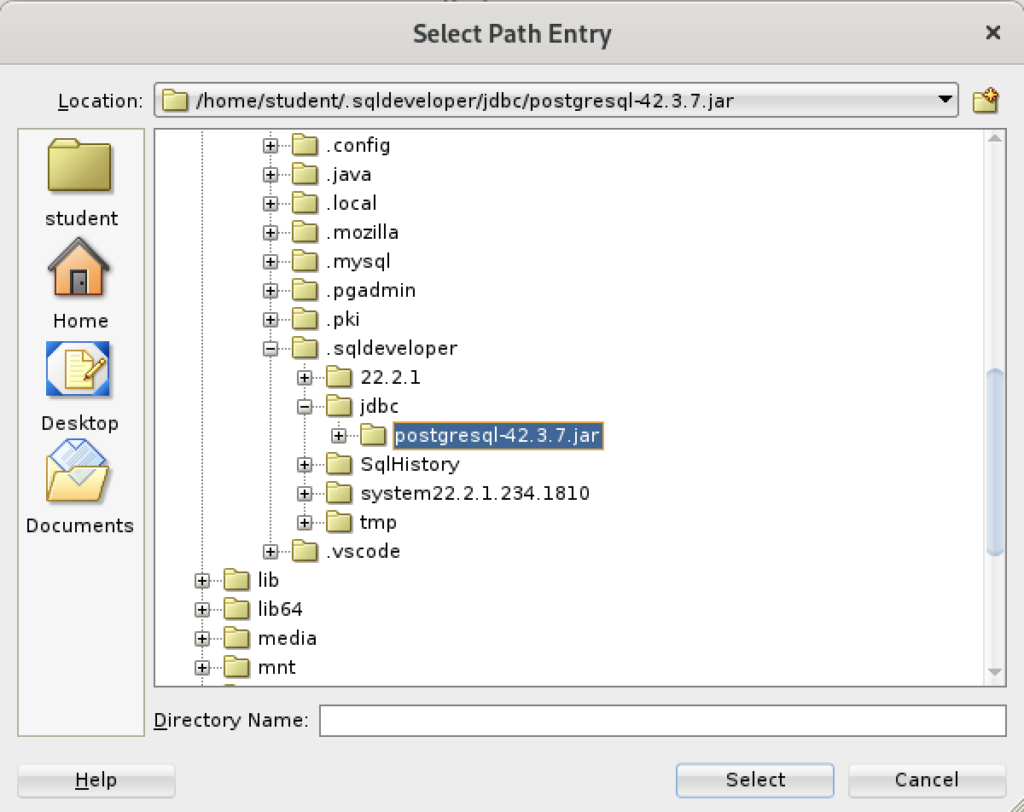
Inside the Select Path Entry dialog, select the current PostgreSQL JDBC Java ARchive (.jar) file, which is postgresql-42-3.7.jar in this example. Then, click the Select button.
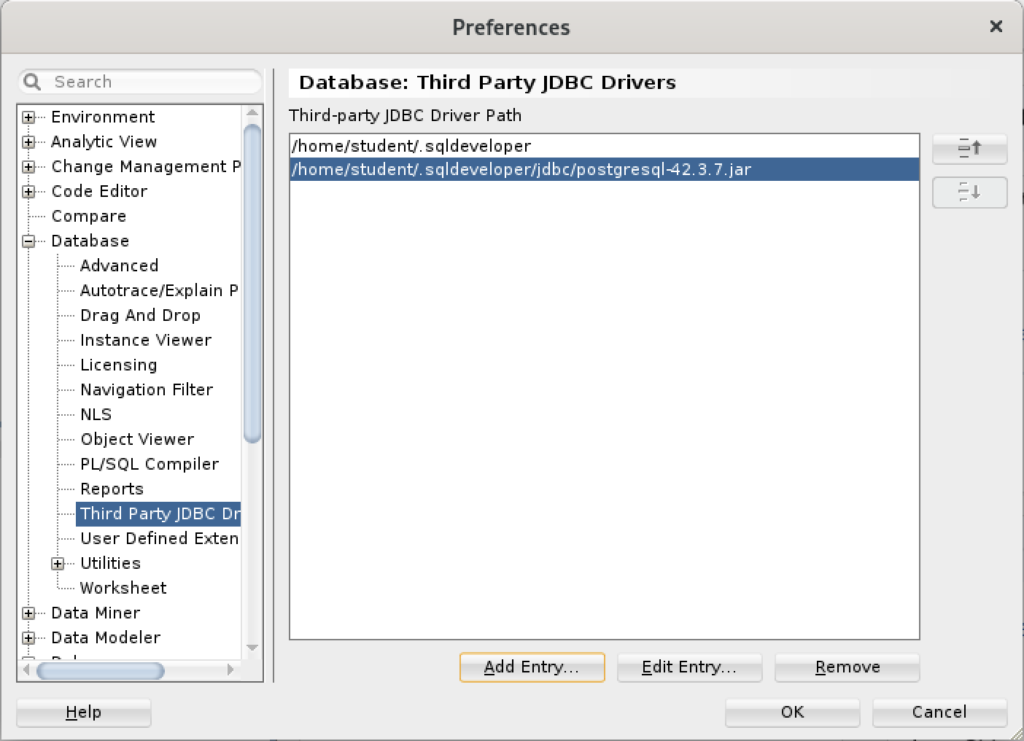
You are returned to the Preferences dialog as shown below. Click the OK button to continue.
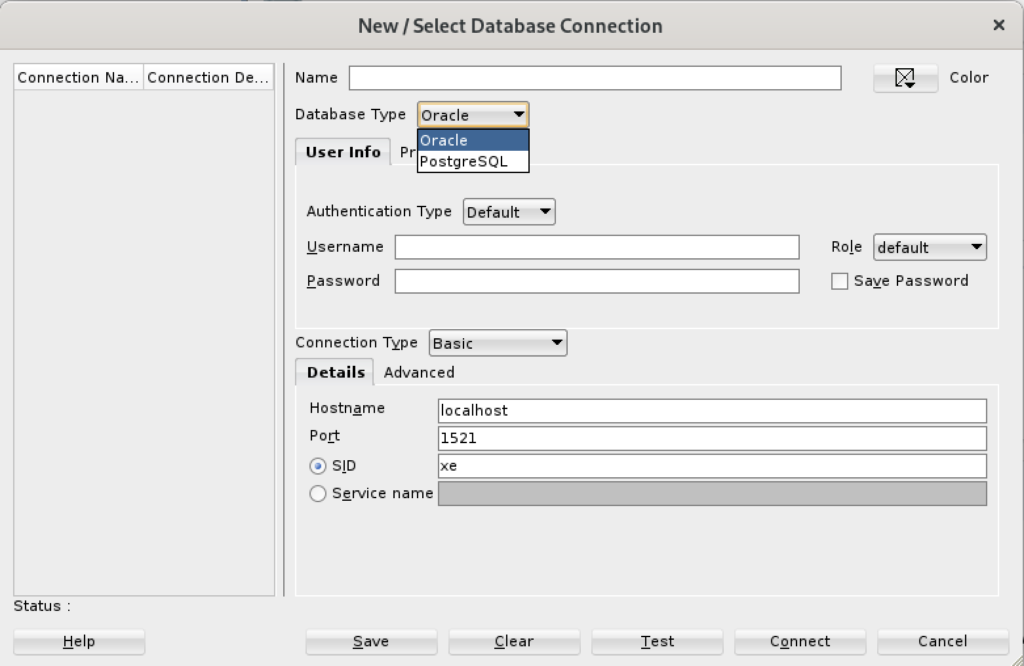
After completing the 3rd Party Java Driver setup, you attempt to create a new connection to the PostgreSQL database. You should see that you now have two available Database Type values: Oracle and PostgreSQL, as shown below:
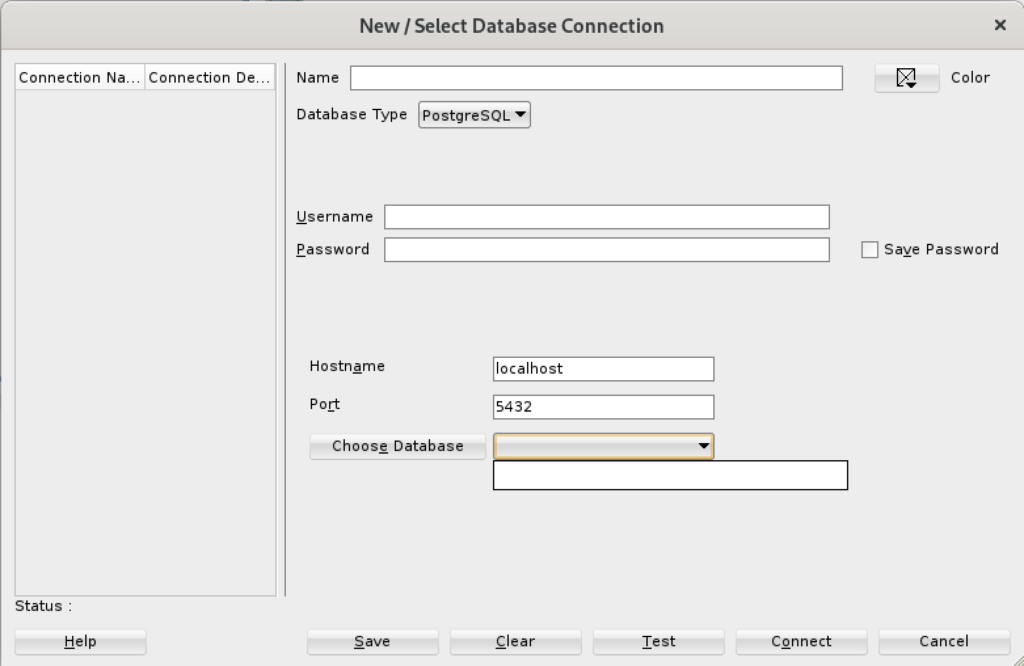
When you click on the PostgreSQL Database Type, the dialog updates to the following view. Unfortunately, I couldn’t discover how to set the values in the list for the Choose Database drop down. Naturally, a sandboxed user can’t connect to the PostgreSQL database without qualifying the database name.
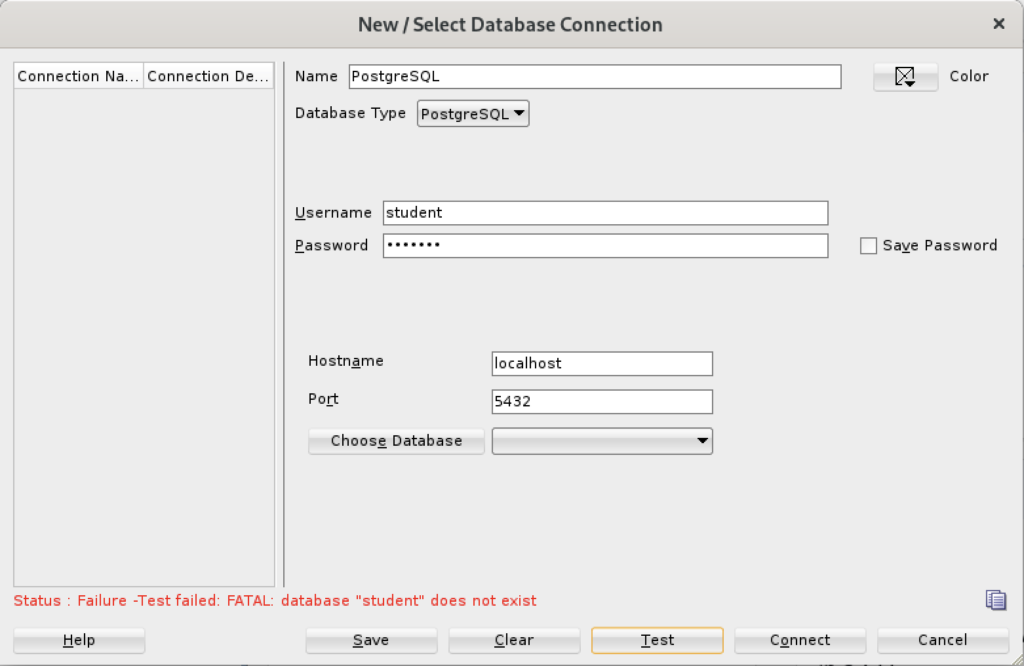
Unless you qualify the PostgreSQL database or connect as the postgres user with a privileged password, SQL Developer translates the absence of a database selection to a database name equivalent to the user’s name. That’s the default behavior for the Oracle database but differs from the behavior for MySQL, PostgreSQL, and Microsoft SQL Server. It returns the following
Status: Failure - Test failed: FATAL: database "student" does not exist |
As seen in the diaglog’s result when testing the connection:
Based on my hunch and not knowing how to populate the database field for the connection, I did the following:
- Created a Linux OS videodb user.
- Copied the .bashrc file with all the standard Oracle environment variables.
- Created the /home/videodb/.sqldeveloper/jdbc directory.
- Copied the postgresql-42.3.7.jar into the new jdbc directory.
- Connected as the postgres super user and created the PostgreSQL videodb user with this syntax:
CREATE USER videodb
  WITH ROLE dba
       ENCRYPTED PASSWORD 'cangetin';
- As the postgres super user, granted the following privileges:
-- Grant privileges on videodb database videodb user.
GRANT ALL ON DATABASE "videodb" TO "videodb";

-- Connect to the videodb database.
\c

-- Grant privileges.
GRANT ALL PRIVILEGES ON ALL TABLES IN SCHEMA public TO videodb;
GRANT ALL PRIVILEGES ON ALL SEQUENCES IN SCHEMA public TO videodb;
- Added the following line to the pg_hba.conf file in the /var/lib/pgsql/15/data directory as the postgres user:
local all videodb peer - Connected as the switched from the student to videodb Linux user, and launched SQL Developer. Then, I used the Tools menu to create the 3rd party PostgreSQL JDBC Java ARchive (.jar) file in context of the SQL Developer program. Everything completed correctly.
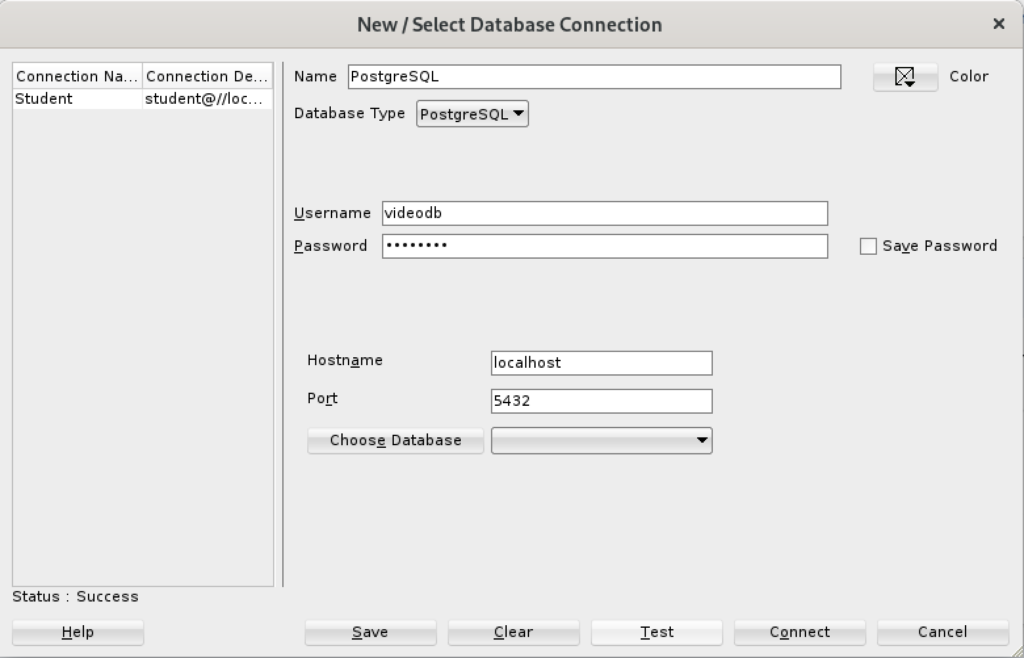
- Created a new PostgreSQL connection in SQL Developer and tested it with success as shown:
- Saving the new PostgreSQL connection, I opened the connection and could run SQL statements and display the catalog information, as shown:
Connected as the videodb user to the videodb database I can display tables owned by student and videodb users:
-- List tables.
\d

                   List of relations
 Schema |           Name           |   Type   |  Owner
--------+--------------------------+----------+---------
 public | new_hire                 | table    | student
 public | new_hire_new_hire_id_seq | sequence | student
 public | oracle_test              | table    | videodb
(3 rows)
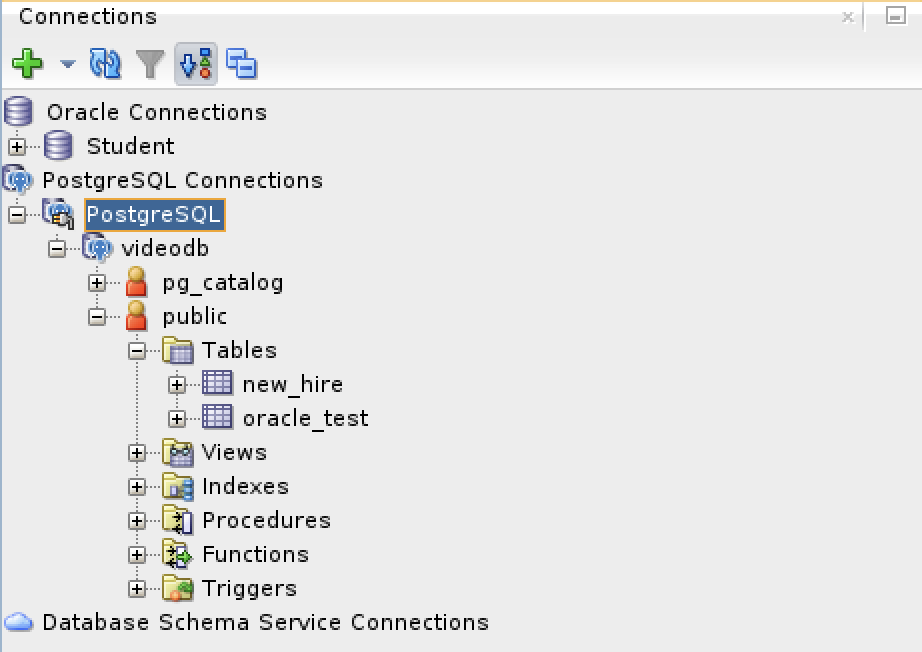
In SQL Developer, you can also inspect the tables, as shown:
At this point, I’m working on trying to figure out how to populate the database drop-down table. However, I’ve either missed a key document or it’s unfortunate that SQL Developer isn’t as friendly as MySQL Workbench in working with 3rd Party drivers.
TDE on PostgreSQL

The scope of Transparent Data Encryption (TDE) in PostgreSQL only applies to columns. It does not encrypt other aspects of the database, like table-level and database-level encryption; and those who deploy PostgreSQL may need to implement additional security measures to protect these database components.
You need to know two key elements before exploring TDE in PostgreSQL: Scheme inside a database and extensions. Unlike many databases, PostgreSQL schemas are not synonymous with a database. You may have multiple scheme (or, alternatively schemas) inside any PostgreSQL database.
Creating an extension is a one time event. Therefore, it’s easier to show you that first. You create a pgcrypto extension with the following command:
CREATE EXTENSION pgcrypto; |
The public schema is the one most users deploy but for the purpose of hiding our AES encryption key this example creates a hidden schema. Unless you change the default find setting the hidden schema is not visible when connecting to the database.
You create the hidden schema with the following idimpotent (re-runnable) set of commands:
/* Drop dependent objects before dropping the schema. */ DROP TABLE IF EXISTS hidden.aes_key; DROP FUNCTION IF EXISTS hidden.get_aes_key; /* * Drop function with cascade to remove the * film_character_t trigger at same time. */ DROP FUNCTION IF EXISTS hidden.film_character_dml_f CASCADE; /* Drop the schema conditionally. */ DROP SCHEMA IF EXISTS hidden; /* Create the schema. */ CREATE SCHEMA hidden; |
Next, we need to create a aes_key table and get_aes_key function in the hidden schema. The table will store the AES encryption key and the function lets us create an AES encryption key.
/* Create an aes encryption key table. */ CREATE TABLE hidden.aes_key ( aes_key text ); /* Create a hidden function to build an AES encryption key. */ CREATE OR REPLACE FUNCTION hidden.get_aes_key() RETURNS text AS $$ BEGIN RETURN gen_random_bytes(16)::text; END; $$ LANGUAGE plpgsql; |
After creating the public get_key() function, you insert a single row to the aes_key table by prefacing it with the hidden schema name, like this:
/* Insert the AES encryption key into a table. */ INSERT INTO hidden.aes_key ( aes_key ) VALUES ( hidden.get_aes_key()); |
Having built the plumbing for our AES encryption key, let’s show you how to encrypt and decrypt string values. This example lets you create an idimpotent film_character table in the public schema, like:
/* Drop the table conditionally. */ DROP TABLE IF EXISTS film_character; /* Create the demonstration table for encrypting and decrypting strings. */ CREATE TABLE film_character ( character_id serial PRIMARY KEY , plain_text text , encrypted_text bytea ); |
After creating the AES encryption key table, function, and inserting a row of data, you need to create a public get_key() function, like:
/* Create a public function to retrieve the AES encryption key. */ CREATE OR REPLACE FUNCTION get_key() RETURNS text AS $$ DECLARE retval text; BEGIN SELECT aes_key INTO retval FROM hidden.aes_key; RETURN retval; END; $$ LANGUAGE plpgsql; |
The following INSERT statement write a plain text column and encrypted text column into the film_character table. The get_key() function hides how the pgp_sym_encrypt function encrypts the string.
/* Insert plain and encrypted text into a table. */ INSERT INTO film_character ( plain_text , encrypted_text ) VALUES ('Severus Snape' , pgp_sym_encrypt('Slytherin',get_key())); |
The following query displays the plain and encrypted text stored in a row of the film_character table.
/* Query plain and encrypted text from a table. */ SELECT character_id , plain_text , encrypted_text FROM film_character; |
It displays:
 character_id |  plain_text   | encrypted_text
--------------+---------------+--------------------------------------------------------------------------------------------------------------------------------------------------------
            1 | Severus Snape | \xc30d04070302fa1c4eebd90204cc7bd23901f1d4fa91b2455c3ef2987a305aebe01a4d94f9ebb467d6cb7a3846342ccd09cb55ac5e82a71cbaef93728fbeb4aaa9bf71b6fb93457758d1
(1 row) |
Last, the following query displays the plain and decrypted text with the pgp_sym_decrypt function in a query:
/* Query the plain and decrypted text from a table. */ SELECT character_id , plain_text , pgp_sym_decrypt(encrypted_text,get_key()) AS encrypted_text FROM film_character; |
The query returns the plain and decrypted values:
 character_id |  plain_text   | encrypted_text
--------------+---------------+-----------------
            1 | Severus Snape | Slytherin
(1 row) |
However, this approach exposes the method for encrypting the encrypted_text column’s string value. You can hide this by creating a film_character_dml_f function in the hidden schema and a film_character_t trigger in the public schema, like:
/* Create trigger function for insert or update. */ CREATE FUNCTION hidden.film_character_dml_f() RETURNS trigger AS $$ DECLARE /* Declare local variable. */ unencrypted_input VARCHAR(30); BEGIN unencrypted_input := new.encrypted_text::text; /* Encrypt the column. */ new.encrypted_text := pgp_sym_encrypt(unencrypted_input,get_key()); /* Return new record type. */ RETURN NEW; END; $$ LANGUAGE plpgsql; CREATE TRIGGER film_character_t BEFORE INSERT OR UPDATE ON film_character FOR EACH ROW EXECUTE FUNCTION hidden.film_character_dml_f(); |
Now, you can insert the plain text data in an INSERT statement and the encryption occurs without disclosing how it happens. Here’s a sample statement:
INSERT INTO film_character ( plain_text , encrypted_text ) VALUES ('Harry Potter' ,'Gryffindor'); |
A query of the table shows you that both rows have an encrypted value in the encrypted_text column.
/* Query plain and encrypted text from a table. */ SELECT character_id , plain_text , encrypted_text FROM film_character; |
Displayed like:
 character_id |  plain_text   |                                                                                   encrypted_text
--------------+---------------+------------------------------------------------------------------------------------------------------------------------------------------------------------------------------------
            1 | Severus Snape | \xc30d040703026716034f140d83e76cd23a01f99168afebe50d760b85c69373e3947c74473115a939843887db8e102cd0b2524378f4d684e0ba91c20afc436a056cd983fc47794eef7d4904
            2 | Harry Potter  | \xc30d040703020d8cc71d1f84e1ef6fd24701fd308f669e28a6135beac130fc51a6ccb5cef3c5005f4f557207fe5c84c4aedbb5b098dc9a882a9b7d801c61e34cd90517b4628b5a18b96b3fc61663b48391146b8c0fa2a858
(2 rows) |
As always, I hope this code complete solution helps those trying to work with this technical stack.
AlmaLinux Install & Configuration

This is a collection of blog posts for installing and configuring AlmaLinux with the Oracle, PostgreSQL, MySQL databases and several programming languages. Sample programs show how to connect PHP and Python to the MySQL database.
- Installing AlmaLinux operating system
- Installing and configuring MySQL
- Installing Python-MySQL connector and provide sample programs
- Configuring Flask for Python on AlmaLinux with a complete software router instruction set.
- Installing Rust programming language and writing a sample program
- Installing and configuring LAMP stack with PHP and MySQL and a self-signed security key
- MySQL PNG Images in LAMP with PHP Programming
- Demonstration of how to write Perl that connects to MySQL
- Installing and configuring MySQL Workbench
- Installing and configuring PostgreSQL and pgAdmin4
- Identifying the required libnsl2-devel packages for SQL*Plus
- Writing and deploying a sqlplus function to use a read line wrapper
- Installing and configuring Visual Studio Code Editor
- Installing and configuring Java with connectivity to MySQL
- Installing and configuring Oracle SQL Developer
I used Oracle Database 11g XE in this instance to keep the footprint as small as possible. It required a few tricks and discovering the missing library that caused folks grief eleven years ago. I build another with a current Oracle Database XE after the new year.
If you see something that I missed or you’d like me to add, let me know. As time allows, I’ll try to do that. Naturally, the post will get updates as things are added later.
AlmaLinux+PostgreSQL
This installs PostgreSQL 15 on AlmaLinux 9 (don’t forget the PostgreSQL 15 Documentation site). The executable is available in the script that the postgresql.org provides; however, it seems appropriate to show how to find that script for any platform.
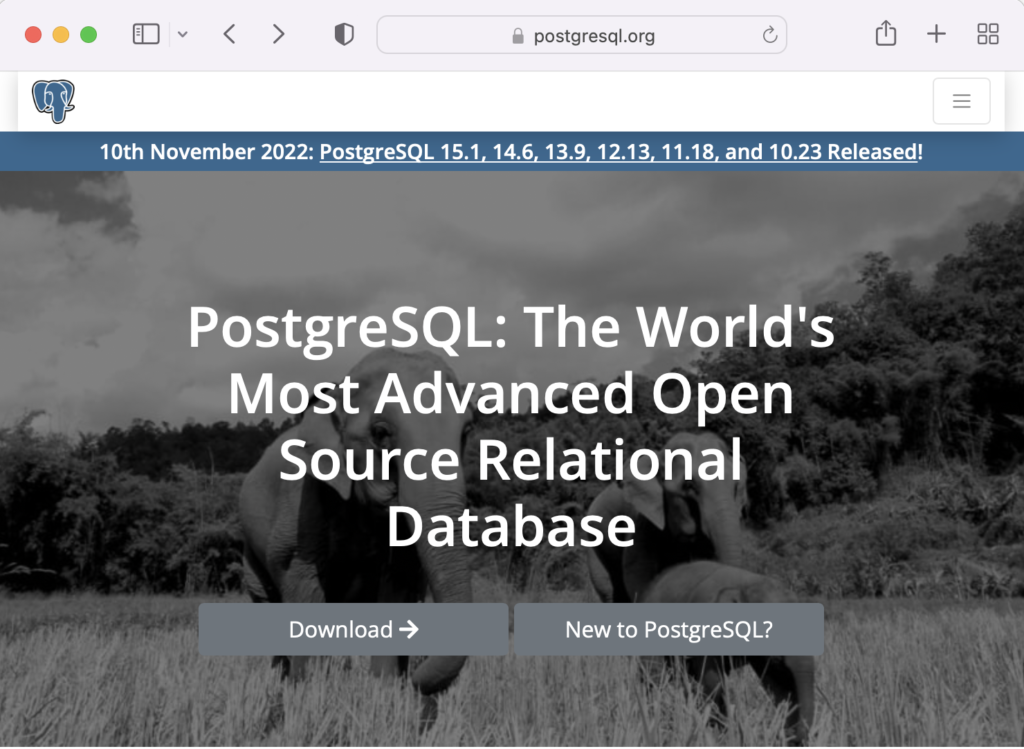
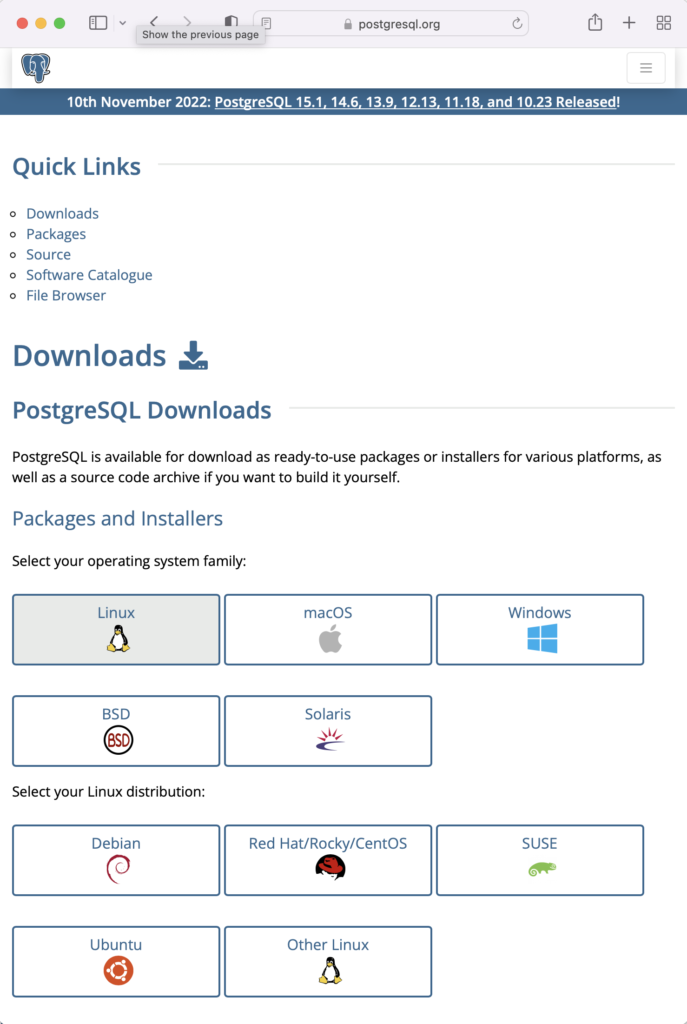
When you launch the postgres.org web site, you will see the following dialog. Click the Download-> button to choose an operating system.
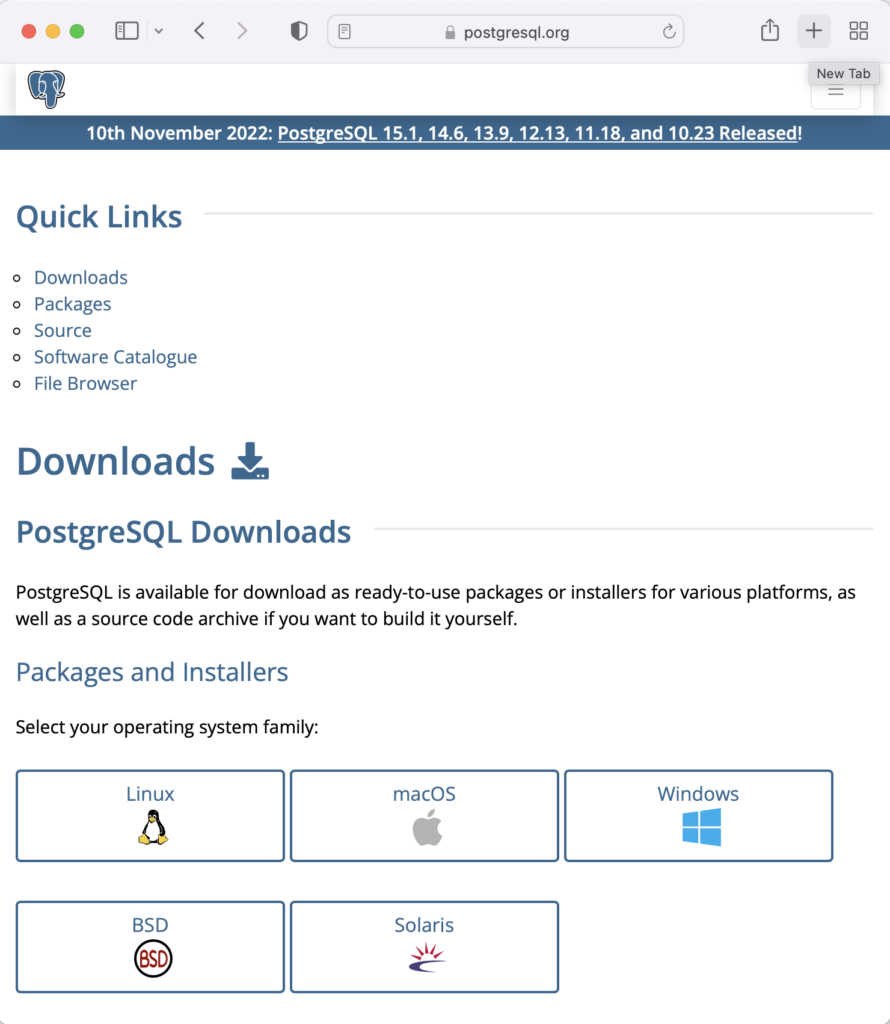
On the next webpage, click on the Linux icon button to proceed.
This page expands for you to choose a Linux distribution. Click on the Red Hat/Rocky/CentOS button to proceed.
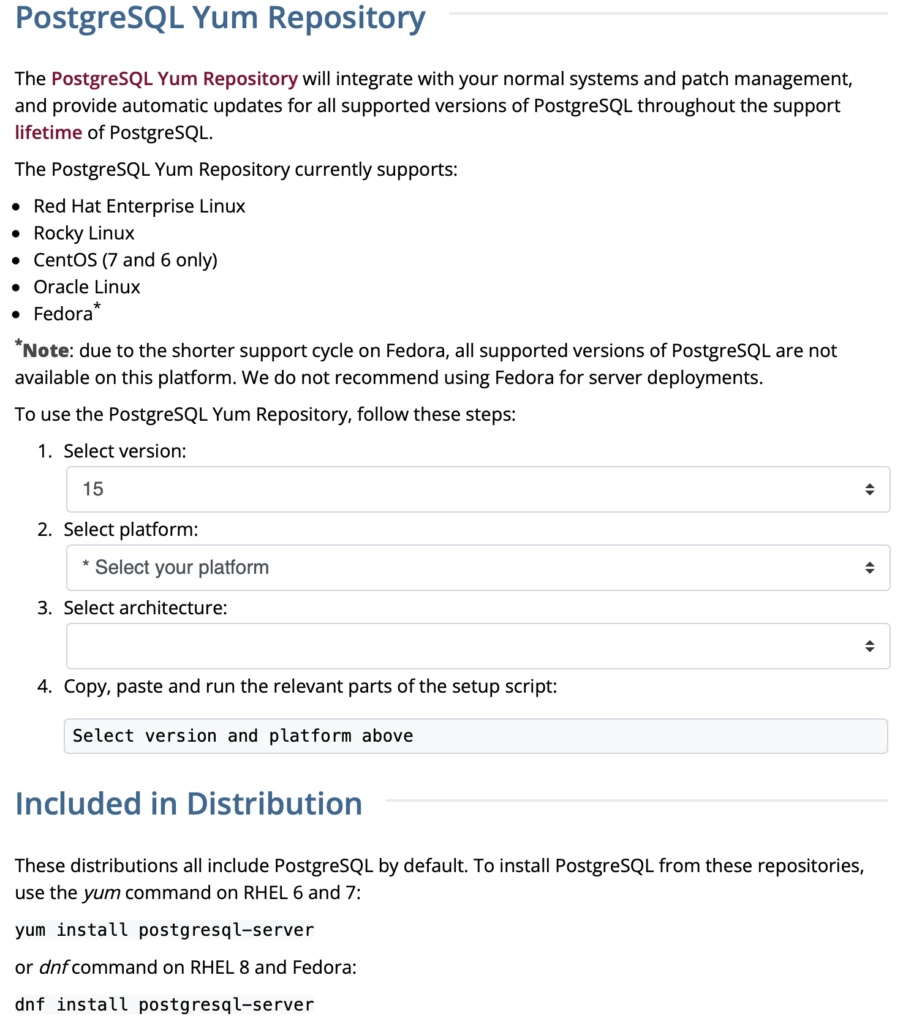
This web page lets you choose a platform, which should be Red Hat Enterprise, Rocky, or Oracle version 9.
The selection fills out the web page and provides a setup script. The script installs the PostgreSQL packages, disables the built-in PostgreSQL module, installs PostgreSQL 15 Server, initialize, enable, and start PostgreSQL Server.
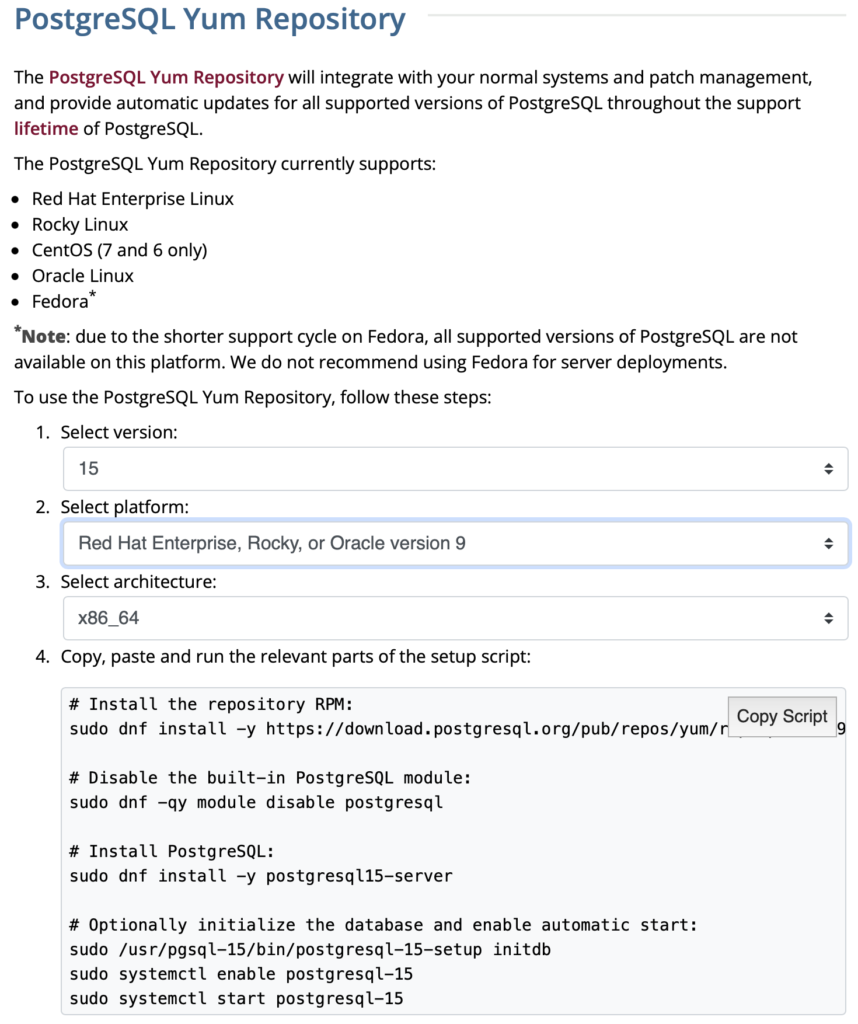
Here are the detailed steps:
- Install the PostgreSQL by updating dependent packages before installing it with the script provided by the PostgreSQL download web site:
# Install the repository RPM:
sudo dnf install -y https://download.postgresql.org/pub/repos/yum/reporpms/EL-9-x86_64/pgdg-redhat-repo-latest.noarch.rpm

# Disable the built-in PostgreSQL module:
sudo dnf -qy module disable postgresql

# Install PostgreSQL:
sudo dnf install -y postgresql15-server

# Optionally initialize the database and enable automatic start:
sudo /usr/pgsql-15/bin/postgresql-15-setup initdb
sudo systemctl enable postgresql-15
sudo systemctl start postgresql-15
Display detailed console log →
Last metadata expiration check: 20:38:10 ago on Mon 21 Nov 2022 02:07:25 AM EST.
pgdg-redhat-repo-latest.noarch.rpm              3.6 kB/s |  12 kB     00:03
Dependencies resolved.
================================================================================
 Package                 Architecture  Version        Repository           Size
================================================================================
Installing:
 pgdg-redhat-repo        noarch        42.0-28        @commandline         12 k

Transaction Summary
================================================================================
Install  1 Package

Total size: 12 k
Installed size: 14 k
Downloading Packages:
Running transaction check
Transaction check succeeded.
Running transaction test
Transaction test succeeded.
Running transaction
Regex version mismatch, expected: 10.40 2022-04-14 actual: 10.37 2021-05-26
Regex version mismatch, expected: 10.40 2022-04-14 actual: 10.37 2021-05-26
  Preparing        :                                                        1/1
  Installing       : pgdg-redhat-repo-42.0-28.noarch                        1/1
  Verifying        : pgdg-redhat-repo-42.0-28.noarch                        1/1

Installed:
  pgdg-redhat-repo-42.0-28.noarch

Complete!

Last metadata expiration check: 20:38:10 ago on Mon 21 Nov 2022 02:07:25 AM EST.
pgdg-redhat-repo-latest.noarch.rpm              3.6 kB/s |  12 kB     00:03
Dependencies resolved.
================================================================================
 Package                 Architecture  Version        Repository           Size
================================================================================
Installing:
 pgdg-redhat-repo        noarch        42.0-28        @commandline         12 k

Transaction Summary
================================================================================
Install  1 Package

Total size: 12 k
Installed size: 14 k
Downloading Packages:
Running transaction check
Transaction check succeeded.
Running transaction test
Transaction test succeeded.
Running transaction
Regex version mismatch, expected: 10.40 2022-04-14 actual: 10.37 2021-05-26
Regex version mismatch, expected: 10.40 2022-04-14 actual: 10.37 2021-05-26
  Preparing        :                                                        1/1
  Installing       : pgdg-redhat-repo-42.0-28.noarch                        1/1
  Verifying        : pgdg-redhat-repo-42.0-28.noarch                        1/1

Installed:
  pgdg-redhat-repo-42.0-28.noarch

Complete!
Importing GPG key 0x442DF0F8:
 Userid     : "PostgreSQL RPM Building Project <pgsql-pkg-yum@postgresql.org>"
 Fingerprint: 68C9 E2B9 1A37 D136 FE74 D176 1F16 D2E1 442D F0F8
 From       : /etc/pki/rpm-gpg/RPM-GPG-KEY-PGDG
Importing GPG key 0x442DF0F8:
 Userid     : "PostgreSQL RPM Building Project <pgsql-pkg-yum@postgresql.org>"
 Fingerprint: 68C9 E2B9 1A37 D136 FE74 D176 1F16 D2E1 442D F0F8
 From       : /etc/pki/rpm-gpg/RPM-GPG-KEY-PGDG
Importing GPG key 0x442DF0F8:
 Userid     : "PostgreSQL RPM Building Project <pgsql-pkg-yum@postgresql.org>"
 Fingerprint: 68C9 E2B9 1A37 D136 FE74 D176 1F16 D2E1 442D F0F8
 From       : /etc/pki/rpm-gpg/RPM-GPG-KEY-PGDG
Importing GPG key 0x442DF0F8:
 Userid     : "PostgreSQL RPM Building Project <pgsql-pkg-yum@postgresql.org>"
 Fingerprint: 68C9 E2B9 1A37 D136 FE74 D176 1F16 D2E1 442D F0F8
 From       : /etc/pki/rpm-gpg/RPM-GPG-KEY-PGDG
Importing GPG key 0x442DF0F8:
 Userid     : "PostgreSQL RPM Building Project <pgsql-pkg-yum@postgresql.org>"
 Fingerprint: 68C9 E2B9 1A37 D136 FE74 D176 1F16 D2E1 442D F0F8
 From       : /etc/pki/rpm-gpg/RPM-GPG-KEY-PGDG
Importing GPG key 0x442DF0F8:
 Userid     : "PostgreSQL RPM Building Project <pgsql-pkg-yum@postgresql.org>"
 Fingerprint: 68C9 E2B9 1A37 D136 FE74 D176 1F16 D2E1 442D F0F8
 From       : /etc/pki/rpm-gpg/RPM-GPG-KEY-PGDG
Importing GPG key 0x442DF0F8:
 Userid     : "PostgreSQL RPM Building Project <pgsql-pkg-yum@postgresql.org>"
 Fingerprint: 68C9 E2B9 1A37 D136 FE74 D176 1F16 D2E1 442D F0F8
 From       : /etc/pki/rpm-gpg/RPM-GPG-KEY-PGDG
Unable to resolve argument postgresql
Error: Problems in request:
missing groups or modules: postgresql
Last metadata expiration check: 0:00:02 ago on Mon 21 Nov 2022 10:46:16 PM EST.
Dependencies resolved.
================================================================================
 Package                  Arch        Version                 Repository   Size
================================================================================
Installing:
 postgresql15-server      x86_64      15.1-1PGDG.rhel9        pgdg15      6.0 M
Installing dependencies:
 lz4                      x86_64      1.9.3-5.el9             baseos       58 k
 postgresql15             x86_64      15.1-1PGDG.rhel9        pgdg15      1.5 M
 postgresql15-libs        x86_64      15.1-1PGDG.rhel9        pgdg15      296 k

Transaction Summary
================================================================================
Install  4 Packages

Total download size: 7.8 M
Installed size: 33 M
Downloading Packages:
(1/4): lz4-1.9.3-5.el9.x86_64.rpm                91 kB/s |  58 kB     00:00
(2/4): postgresql15-libs-15.1-1PGDG.rhel9.x86_6  97 kB/s | 296 kB     00:03
(3/4): postgresql15-15.1-1PGDG.rhel9.x86_64.rpm 214 kB/s | 1.5 MB     00:07
(4/4): postgresql15-server-15.1-1PGDG.rhel9.x86 371 kB/s | 6.0 MB     00:16
--------------------------------------------------------------------------------
Total                                           446 kB/s | 7.8 MB     00:17
PostgreSQL 15 for RHEL / Rocky 9 - x86_64       1.4 MB/s | 1.7 kB     00:00
Importing GPG key 0x442DF0F8:
 Userid     : "PostgreSQL RPM Building Project <pgsql-pkg-yum@postgresql.org>"
 Fingerprint: 68C9 E2B9 1A37 D136 FE74 D176 1F16 D2E1 442D F0F8
 From       : /etc/pki/rpm-gpg/RPM-GPG-KEY-PGDG
Key imported successfully
Running transaction check
Transaction check succeeded.
Running transaction test
Transaction test succeeded.
Running transaction
Regex version mismatch, expected: 10.40 2022-04-14 actual: 10.37 2021-05-26
Regex version mismatch, expected: 10.40 2022-04-14 actual: 10.37 2021-05-26
  Preparing        :                                                        1/1
  Installing       : postgresql15-libs-15.1-1PGDG.rhel9.x86_64              1/4
  Running scriptlet: postgresql15-libs-15.1-1PGDG.rhel9.x86_64              1/4
  Installing       : lz4-1.9.3-5.el9.x86_64                                 2/4
  Installing       : postgresql15-15.1-1PGDG.rhel9.x86_64                   3/4
  Running scriptlet: postgresql15-15.1-1PGDG.rhel9.x86_64                   3/4
  Running scriptlet: postgresql15-server-15.1-1PGDG.rhel9.x86_64            4/4
  Installing       : postgresql15-server-15.1-1PGDG.rhel9.x86_64            4/4
  Running scriptlet: postgresql15-server-15.1-1PGDG.rhel9.x86_64            4/4
Regex version mismatch, expected: 10.40 2022-04-14 actual: 10.37 2021-05-26
Regex version mismatch, expected: 10.40 2022-04-14 actual: 10.37 2021-05-26

  Verifying        : lz4-1.9.3-5.el9.x86_64                                 1/4
  Verifying        : postgresql15-15.1-1PGDG.rhel9.x86_64                   2/4
  Verifying        : postgresql15-libs-15.1-1PGDG.rhel9.x86_64              3/4
  Verifying        : postgresql15-server-15.1-1PGDG.rhel9.x86_64            4/4

Installed:
  lz4-1.9.3-5.el9.x86_64
  postgresql15-15.1-1PGDG.rhel9.x86_64
  postgresql15-libs-15.1-1PGDG.rhel9.x86_64
  postgresql15-server-15.1-1PGDG.rhel9.x86_64

Complete!
Initializing database ... /sbin/restorecon: Regex version mismatch, expected: 10.40 2022-04-14 actual: 10.37 2021-05-26
/sbin/restorecon: Regex version mismatch, expected: 10.40 2022-04-14 actual: 10.37 2021-05-26
/sbin/restorecon: Regex version mismatch, expected: 10.40 2022-04-14 actual: 10.37 2021-05-26
/sbin/restorecon: Regex version mismatch, expected: 10.40 2022-04-14 actual: 10.37 2021-05-26
/sbin/restorecon: Regex version mismatch, expected: 10.40 2022-04-14 actual: 10.37 2021-05-26
/sbin/restorecon: Regex version mismatch, expected: 10.40 2022-04-14 actual: 10.37 2021-05-26
OK

Created symlink /etc/systemd/system/multi-user.target.wants/postgresql-15.service → /usr/lib/systemd/system/postgresql-15.service.
- The simpmlest way to verify the installation is to check for the psql executable. You can do that with this command:
which psqlIt should return:
/usr/bin/psql
- Attempt to login with the following command-line interface (CLI) syntax:
psql -U postgres -W
It should fail and return the following:
psql: error: connection to server on socket "/var/run/postgresql/.s.PGSQL.5432" failed: FATAL: Peer authentication failed for user "postgres"
This error occurs because you’re not the postgres user, and all other users must designate that they’re connecting to an account with a password. The following steps let you configure the Operating System (OS).
-
You must shell out to the root superuser’s account, and then shell out to the postgres user’s account to test your connection because postgres user’s account disallows direct connection.
su - root
su - postgres
You can verify the current postgres user with this command:
whoamiIt should return the following:
postgres
As the postgres user, you connect to the database without a password. You use the following syntax:
psql -U postgresIt should display the following:
psql (15.1)
Type "help" for help.
-
At this point, you have some operating system (OS) stuff to setup before configuring a PostgreSQL sandboxed videodb database and student user. Exit psql with the following command:
postgres=# \q
Navigate to the PostgreSQL home database directory as the postgres user with this command:
cd /var/lib/pgsql/15/data
Edit the pg_hba.conf file to add lines for the postgres and student users:
# TYPE  DATABASE        USER            ADDRESS                 METHOD

# "local" is for Unix domain socket connections only
local   all             all                                     peer
local   all             postgres                                peer
local   all             student                                 peer

# IPv4 local connections:
host    all             all             127.0.0.1/32            scram-sha-256
# IPv6 local connections:
host    all             all             ::1/128                 scram-sha-256
# Allow replication connections from localhost, by a user with the
# replication privilege.
local   replication     all                                     scram-sha-256
host    replication     all             127.0.0.1/32            scram-sha-256
host    replication     all             ::1/128                 scram-sha-256
Navigate up the directory tree from the /var/lib/pgsql/15/data directory, which is also the data dictionary, to the following /var/lib/pgsql/15 base directory:
cd /var/lib/pgsql/15
Create a new video_db directory. This is where you will deploy the video_db tablespace. You create this directory with the following command:
mkdir video_dbChange the video_db permissions to read, write, and execute for only the owner with this syntax as the postgres user:
chmod 700 video_db
-
Exit the postgres user with the exit command and open PostgreSQL’s 5432 listener port as the root user. You can use the following command, as the root user:
firewall-cmd --zone=public --add-port 5432/tcp --permanent
-
You must shell out from the root user to the postgres user with the following command:
su - postgres
-
You must shell out to the root superuser’s account, and then shell out to the postgres user’s account to test your connection because postgres user’s account disallows direct connection.
- Connect to the postgres account and perform the following commands:
- After connecting as the postgres superuser, you can create a video_db tablespace with the following syntax:
CREATE TABLESPACE video_db
  OWNER postgres
  LOCATION 'C:\Users\username\video_db';
This will return the following:
CREATE TABLESPACE
You can query whether you successfully create the video_db tablespace with the following:
SELECT * FROM pg_tablespace;
It should return the following:
  oid  |  spcname   | spcowner | spcacl | spcoptions
-------+------------+----------+--------+------------
  1663 | pg_default |       10 |        |
  1664 | pg_global  |       10 |        |
 16389 | video_db   |       10 |        |
(3 rows)
-
You need to know the PostgreSQL default collation before you create a new database. You can write the following query to determine the default correlation:
postgres=# SELECT datname, datcollate FROM pg_database WHERE datname = 'postgres';
It should return something like this:
 datname  | datcollate
----------+-------------
 postgres | en_US.UTF-8
(1 row)
The datcollate value of the postgres database needs to the same value for the LC_COLLATE and LC_CTYPE parameters when you create a database. You can create a videodb database with the following syntax provided you’ve made appropriate substitutions for the LC_COLLATE and LC_CTYPE values below:
CREATE DATABASE videodb
  WITH OWNER = postgres
  ENCODING = 'UTF8'
  TABLESPACE = video_db
  LC_COLLATE = 'en_US.UTF-8'
  LC_CTYPE = 'en_US.UTF-8'
  CONNECTION LIMIT = -1;
You can verify the creation of the videodb with the following command:
postgres# \l
It should show you a display like the following:
List of databases Name | Owner | Encoding | Collate | Ctype | ICU Locale | Locale Provider | Access privileges -----------+----------+----------+-------------+-------------+------------+-----------------+----------------------- postgres | postgres | UTF8 | en_US.UTF-8 | en_US.UTF-8 | | libc | template0 | postgres | UTF8 | en_US.UTF-8 | en_US.UTF-8 | | libc | =c/postgres + | | | | | | | postgres=CTc/postgres template1 | postgres | UTF8 | en_US.UTF-8 | en_US.UTF-8 | | libc | =c/postgres + | | | | | | | postgres=CTc/postgres videodb | postgres | UTF8 | en_US.UTF-8 | en_US.UTF-8 | | libc | (4 rows)Then, you can assign comment to the database with the following syntax:
COMMENT ON DATABASE videodb IS 'Video Store Database';
- After connecting as the postgres superuser, you can create a video_db tablespace with the following syntax:
- Create a Role, Grant, and User:
In this section you create a dba role, grant privileges on a videodb database to a role, and create a user with the role that you created previously with the following three statements. There are three steps in this sections.
- The first step creates a dba role:
CREATE ROLE dba WITH SUPERUSER;
- The second step grants all privileges on the videodb database to both the postgres superuser and the dba role:
GRANT TEMPORARY, CONNECT ON DATABASE videodb TO PUBLIC;
GRANT ALL PRIVILEGES ON DATABASE videodb TO postgres;
GRANT ALL PRIVILEGES ON DATABASE videodb TO dba;
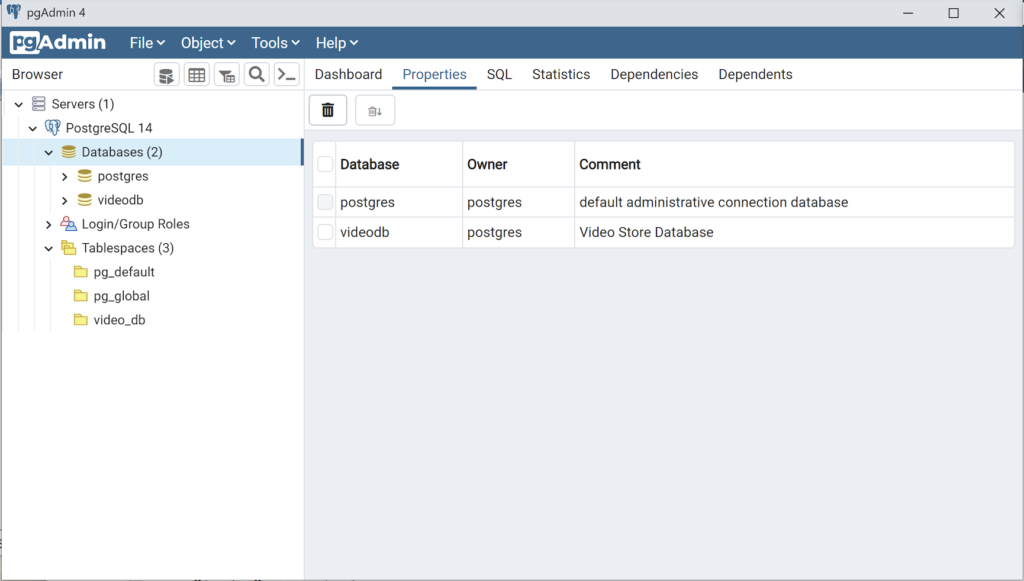
Any work in pgAdmin4 requires a grant on the videodb database to the postgres superuser. The grant enables visibility of the videodb database in the pgAdmin4 console as shown in the following image.
- The third step changes the ownership of the videodb database to the student user:
ALTER DATABASE videodb OWNER TO student;
You can verify the change of ownership for the videodb from the postgres user to student user with the following command:
postgres# \l
It should show you a display like the following:
List of databases Name | Owner | Encoding | Collate | Ctype | ICU Locale | Locale Provider | Access privileges -----------+----------+----------+-------------+-------------+------------+-----------------+----------------------- postgres | postgres | UTF8 | en_US.UTF-8 | en_US.UTF-8 | | libc | template0 | postgres | UTF8 | en_US.UTF-8 | en_US.UTF-8 | | libc | =c/postgres + | | | | | | | postgres=CTc/postgres template1 | postgres | UTF8 | en_US.UTF-8 | en_US.UTF-8 | | libc | =c/postgres + | | | | | | | postgres=CTc/postgres videodb | student | UTF8 | en_US.UTF-8 | en_US.UTF-8 | | libc | =Tc/student + | | | | | | | student=CTc/student + | | | | | | | dba=CTc/student (4 rows) - The fourth step creates a student user with the dba role:
CREATE USER student
  WITH ROLE dba
       ENCRYPTED PASSWORD 'student';
After this step, you need to disconnect as the postgres superuser with the following command:
\q
- The first step creates a dba role:
- Connect to the videodb database as the student user with the PostgreSQL CLI, create a new_hire table and quit the database.
The following syntax lets you connect to a videodb database as the student user. You should note that the Linux OS student user name should match the database user name.
psql -Ustudent -W -dvideodb
You create the new_hire table in the public schema of the videodb database with the following syntax:
CREATE TABLE new_hire
( new_hire_id  SERIAL        CONSTRAINT new_hire_pk PRIMARY KEY
, first_name   VARCHAR(20)   NOT NULL
, middle_name  VARCHAR(20)
, last_name    VARCHAR(20)   NOT NULL
, hire_date    DATE          NOT NULL
, UNIQUE(first_name, middle_name, hire_date));
You can describe the new_hire table with the following command:
\d new_hire
You quit the psql connection with a quit; or \q, like so
quit;
- Installing, configuring, and launching pgadmin4 (don’t forget the pgAdmin 4 Documentation site):
- You need to install three sets of packages. They’re the pgadmin-server, policycoreutils-python-utils, and pgadmin4-desktop.
- Apply the pgadmin-server package:
sudo yum install https://ftp.postgresql.org/pub/pgadmin/pgadmin4/yum/redhat/rhel-9Server-x86_64/pgadmin4-server-6.16-1.el9.x86_64.rpm
Display detailed console log →
Last metadata expiration check: 0:36:13 ago on Mon 28 Nov 2022 12:59:07 AM EST.
pgadmin4-server-6.16-1.el9.x86_64.rpm                                                           1.9 MB/s |  73 MB     00:38
Dependencies resolved.
================================================================================================================================
 Package                           Architecture             Version                        Repository                      Size
================================================================================================================================
Installing:
 pgadmin4-server                   x86_64                   6.16-1.el9                     @commandline                    73 M

Transaction Summary
================================================================================================================================
Install  1 Package

Total size: 73 M
Installed size: 265 M
Is this ok [y/N]: y
Downloading Packages:
Running transaction check
Transaction check succeeded.
Running transaction test
Transaction test succeeded.
Running transaction
Regex version mismatch, expected: 10.40 2022-04-14 actual: 10.37 2021-05-26
Regex version mismatch, expected: 10.40 2022-04-14 actual: 10.37 2021-05-26
  Preparing        :                                                                                                        1/1
  Installing       : pgadmin4-server-6.16-1.el9.x86_64                                                                      1/1
  Verifying        : pgadmin4-server-6.16-1.el9.x86_64                                                                      1/1

Installed:
  pgadmin4-server-6.16-1.el9.x86_64

Complete!
- Apply or upgrade (which is the default at this point) the policycoreutils-python-utils package:
sudo dnf install policycoreutils-python-utils
Display detailed console log →
Last metadata expiration check: 0:50:44 ago on Mon 28 Nov 2022 12:59:07 AM EST.
Package policycoreutils-python-utils-3.3-6.el9_0.noarch is already installed.
Dependencies resolved.
================================================================================================================================
 Package                                      Architecture           Version                    Repository                 Size
================================================================================================================================
Upgrading:
 libsemanage                                  x86_64                 3.4-2.el9                  baseos                    118 k
 policycoreutils                              x86_64                 3.4-4.el9                  baseos                    202 k
 policycoreutils-devel                        x86_64                 3.4-4.el9                  appstream                 139 k
 policycoreutils-python-utils                 noarch                 3.4-4.el9                  appstream                  69 k
 python3-libsemanage                          x86_64                 3.4-2.el9                  appstream                  80 k
 python3-policycoreutils                      noarch                 3.4-4.el9                  appstream                 2.0 M

Transaction Summary
================================================================================================================================
Upgrade  6 Packages

Total download size: 2.6 M
Is this ok [y/N]: y
Downloading Packages:
(1/6): policycoreutils-python-utils-3.4-4.el9.noarch.rpm                                         28 kB/s |  69 kB     00:02
(2/6): python3-libsemanage-3.4-2.el9.x86_64.rpm                                                  32 kB/s |  80 kB     00:02
(3/6): policycoreutils-devel-3.4-4.el9.x86_64.rpm                                                55 kB/s | 139 kB     00:02
(4/6): libsemanage-3.4-2.el9.x86_64.rpm                                                         189 kB/s | 118 kB     00:00
(5/6): python3-policycoreutils-3.4-4.el9.noarch.rpm                                             2.8 MB/s | 2.0 MB     00:00
(6/6): policycoreutils-3.4-4.el9.x86_64.rpm                                                     302 kB/s | 202 kB     00:00
--------------------------------------------------------------------------------------------------------------------------------
Total                                                                                           521 kB/s | 2.6 MB     00:05
Running transaction check
Transaction check succeeded.
Running transaction test
Transaction test succeeded.
Running transaction
Regex version mismatch, expected: 10.40 2022-04-14 actual: 10.37 2021-05-26
Regex version mismatch, expected: 10.40 2022-04-14 actual: 10.37 2021-05-26
  Preparing        :                                                                                                        1/1
  Upgrading        : libsemanage-3.4-2.el9.x86_64                                                                          1/12
  Upgrading        : python3-libsemanage-3.4-2.el9.x86_64                                                                  2/12
  Upgrading        : policycoreutils-3.4-4.el9.x86_64                                                                      3/12
  Running scriptlet: policycoreutils-3.4-4.el9.x86_64                                                                      3/12
  Upgrading        : python3-policycoreutils-3.4-4.el9.noarch                                                              4/12
  Upgrading        : policycoreutils-python-utils-3.4-4.el9.noarch                                                         5/12
  Upgrading        : policycoreutils-devel-3.4-4.el9.x86_64                                                                6/12
  Cleanup          : policycoreutils-devel-3.3-6.el9_0.x86_64                                                              7/12
  Cleanup          : policycoreutils-python-utils-3.3-6.el9_0.noarch                                                       8/12
  Cleanup          : python3-policycoreutils-3.3-6.el9_0.noarch                                                            9/12
  Cleanup          : python3-libsemanage-3.3-2.el9.x86_64                                                                 10/12
  Running scriptlet: policycoreutils-3.3-6.el9_0.x86_64                                                                   11/12
  Cleanup          : policycoreutils-3.3-6.el9_0.x86_64                                                                   11/12
  Cleanup          : libsemanage-3.3-2.el9.x86_64                                                                         12/12
  Running scriptlet: libsemanage-3.3-2.el9.x86_64                                                                         12/12
  Verifying        : policycoreutils-devel-3.4-4.el9.x86_64                                                                1/12
  Verifying        : policycoreutils-devel-3.3-6.el9_0.x86_64                                                              2/12
  Verifying        : policycoreutils-python-utils-3.4-4.el9.noarch                                                         3/12
  Verifying        : policycoreutils-python-utils-3.3-6.el9_0.noarch                                                       4/12
  Verifying        : python3-libsemanage-3.4-2.el9.x86_64                                                                  5/12
  Verifying        : python3-libsemanage-3.3-2.el9.x86_64                                                                  6/12
  Verifying        : python3-policycoreutils-3.4-4.el9.noarch                                                              7/12
  Verifying        : python3-policycoreutils-3.3-6.el9_0.noarch                                                            8/12
  Verifying        : libsemanage-3.4-2.el9.x86_64                                                                          9/12
  Verifying        : libsemanage-3.3-2.el9.x86_64                                                                         10/12
  Verifying        : policycoreutils-3.4-4.el9.x86_64                                                                     11/12
  Verifying        : policycoreutils-3.3-6.el9_0.x86_64                                                                   12/12

Upgraded:
  libsemanage-3.4-2.el9.x86_64                   policycoreutils-3.4-4.el9.x86_64      policycoreutils-devel-3.4-4.el9.x86_64
  policycoreutils-python-utils-3.4-4.el9.noarch  python3-libsemanage-3.4-2.el9.x86_64  python3-policycoreutils-3.4-4.el9.noarch

Complete!
- Apply the pgadmin4-desktop package:
sudo dnf install -y https://ftp.postgresql.org/pub/pgadmin/pgadmin4/yum/redhat/rhel-9Server-x86_64/pgadmin4-desktop-6.16-1.el9.x86_64.rpm
Display detailed console log →
Last metadata expiration check: 1:14:02 ago on Mon 28 Nov 2022 12:59:07 AM EST.
pgadmin4-desktop-6.16-1.el9.x86_64.rpm                                                          3.1 MB/s |  88 MB     00:28
Dependencies resolved.
================================================================================================================================
 Package                          Architecture           Version                             Repository                    Size
================================================================================================================================
Installing:
 pgadmin4-desktop                 x86_64                 6.16-1.el9                          @commandline                  88 M
Installing dependencies:
 libatomic                        x86_64                 11.3.1-2.1.el9.alma                 baseos                        56 k

Transaction Summary
================================================================================================================================
Install  2 Packages

Total size: 88 M
Total download size: 56 k
Installed size: 341 M
Downloading Packages:
libatomic-11.3.1-2.1.el9.alma.x86_64.rpm                                                         83 kB/s |  56 kB     00:00
--------------------------------------------------------------------------------------------------------------------------------
Total                                                                                            39 kB/s |  56 kB     00:01
Running transaction check
Transaction check succeeded.
Running transaction test
Transaction test succeeded.
Running transaction
Regex version mismatch, expected: 10.40 2022-04-14 actual: 10.37 2021-05-26
Regex version mismatch, expected: 10.40 2022-04-14 actual: 10.37 2021-05-26
  Preparing        :                                                                                                        1/1
  Installing       : libatomic-11.3.1-2.1.el9.alma.x86_64                                                                   1/2
  Installing       : pgadmin4-desktop-6.16-1.el9.x86_64                                                                     2/2
  Running scriptlet: pgadmin4-desktop-6.16-1.el9.x86_64                                                                     2/2
  Verifying        : libatomic-11.3.1-2.1.el9.alma.x86_64                                                                   1/2
  Verifying        : pgadmin4-desktop-6.16-1.el9.x86_64                                                                     2/2

Installed:
  libatomic-11.3.1-2.1.el9.alma.x86_64                            pgadmin4-desktop-6.16-1.el9.x86_64

Complete!
- Apply the pgadmin-server package:
- You configure your .bashrc file to add the pgadmin4 directory to your $PATH environment variable.
# Add the pgadmin4 executable to the $PATH.
export set PATH=$PATH:/usr/pgadmin4/bin
You also configure your .bashrc file to add a pgadmin4 function, which simplifies how you call the pgadmin4 executable.
# Function to ensure pgadmin4 call is simplified and without warnings.
pgadmin4 ()
{
  # Call the pgadmin4 executable.
  if [[ `type -t pgadmin4` = 'function' ]]; then
    if [ -f "/usr/pgadmin4/bin/pgadmin4" ]; then
      /usr/pgadmin4/bin/pgadmin4 2>/dev/null &
    else
      echo "[/usr/pgadmin4/bin/pgadmin4] is not found."
    fi
  else
    echo "[pgadmin4] is not a function"
  fi
}
You can launch your pgadmin4 program file now with the following syntax as the student user:
pgadmin4
It takes a couple moments to launch the pgadmin4 desktop. The initial screen will look like:

After pgadmin4 launches, you’re prompted for a master password. Enter the password and click the OK button to proceed.
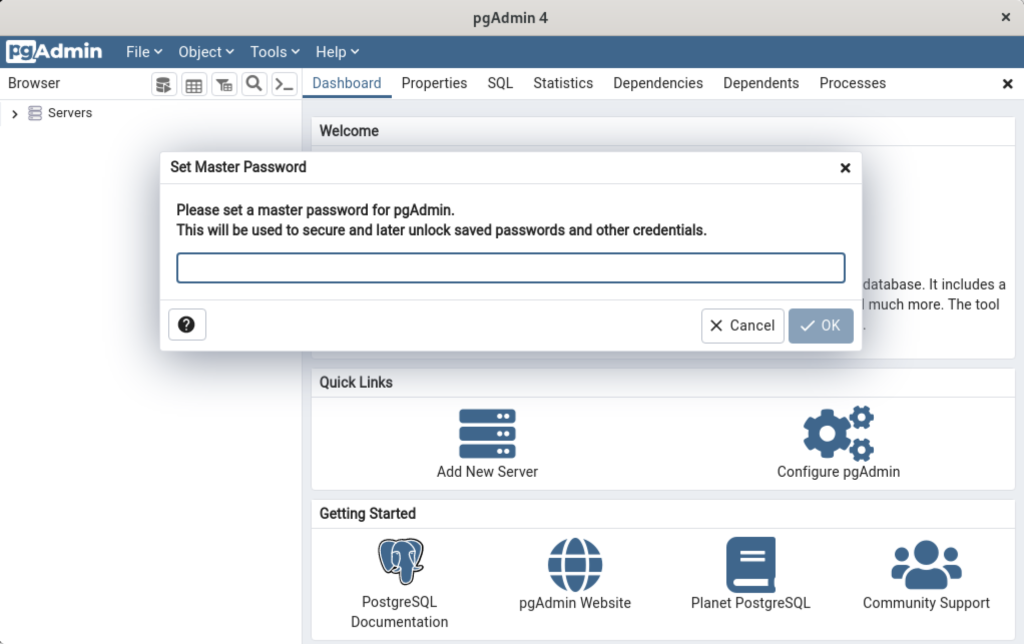
After entering the password, you arrive at the base dialog, as shown.
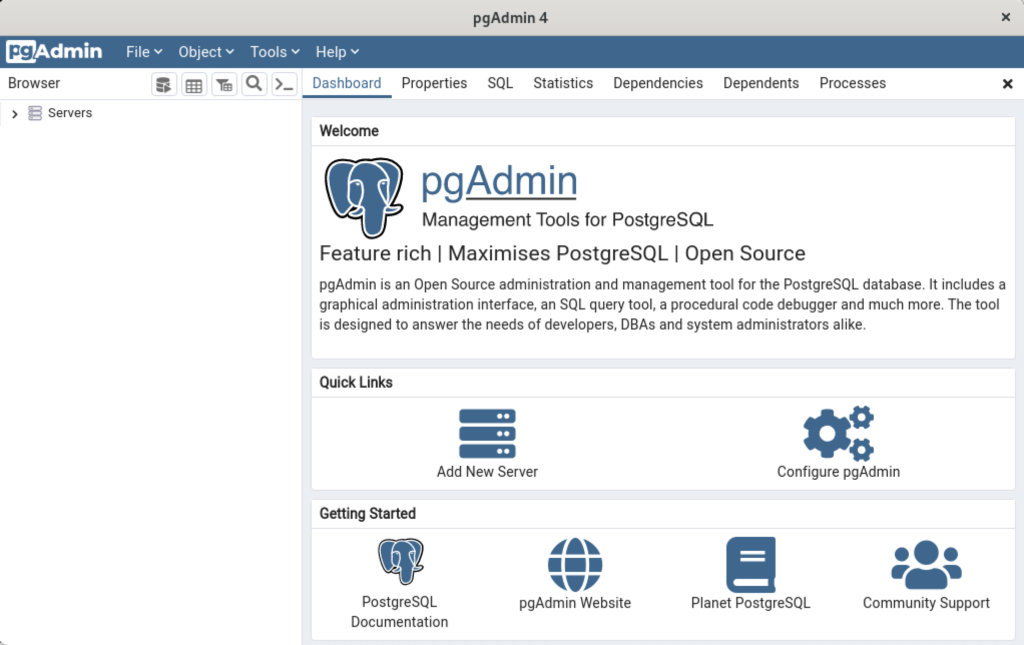
Click the Add New Server link, which prompts you to register your database. Enter videodb in the Name field and click the Connection tab to the right of the General tab.
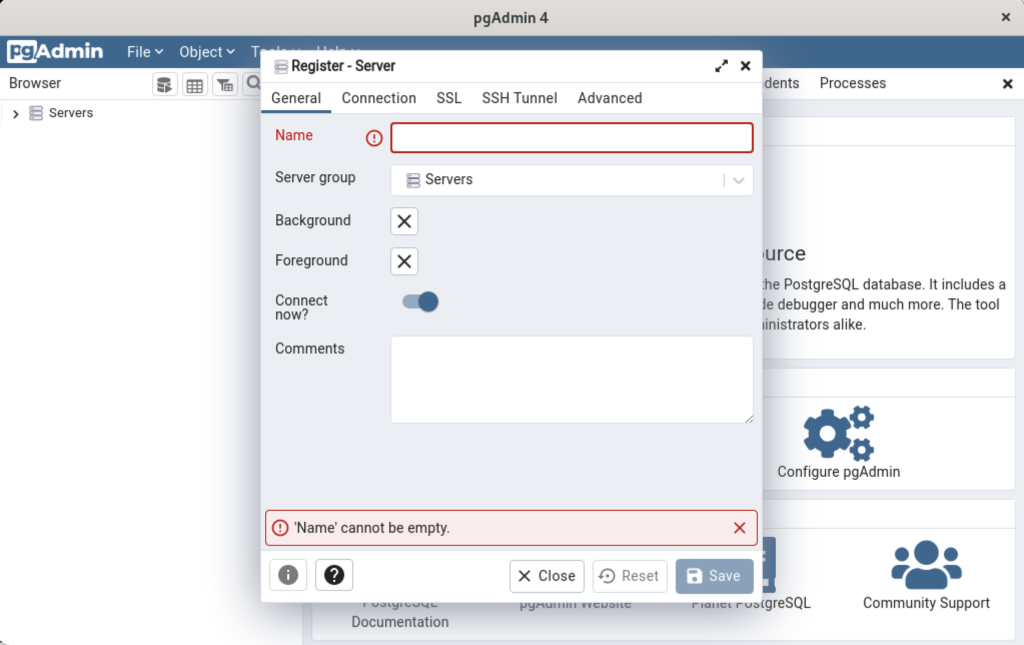
In the Connection dialog, enter the following values:
- Host name/address: localhost
- Port: 5432
- Maintenance database: postgres
- Username: student
- Password: student

Enter a name for your database. In this example, videodb is the Server Name. Click the Save button to proceed.

- You need to install three sets of packages. They’re the pgadmin-server, policycoreutils-python-utils, and pgadmin4-desktop.
This completes the instructions for installing, configuring, and using PostgreSQL on AlmaLinux. As always, I hope it helps those looking for instructions.
PL/pgSQL Transactions
There are many nuances that I show students about PL/pgSQL because first I teach them how to use PL/SQL. These are some of the differences:
- PL/SQL declares the function or procedure and then uses the IS keyword; whereas, PL/pgSQL uses the AS keyword.
- PL/SQL uses the RETURN keyword for functions declarations, like:
RETURN [data_type} IS
Whereas, PL/pgSQL uses the plural RETURNS keyword in the function declaration, like:
RETURNS [data_type] AS
- PL/SQL considers everything after the function or procedure header as the implicit declaration section; whereas, PL/pgSQL requires you block the code with something like $$ (double dollar symbols) and explicitly use the DECLARE keyword.
- PL/SQL supports local functions (inside the DECLARE block of a function or procedure); whereas, PL/pgSQL doesn’t.
- PL/SQL puts the variable modes (IN, INOUT, OUT) between the parameter name and type; whereas, PL/pgSQL puts them before the variable name.
- PL/SQL declares cursors like:
CURSOR cursor_name (parameter_list) IS
Whereas, PL/pgSQL declares them like
cursor_name CURSOR (parameter_list) FOR
- PL/SQL terminates and runs the block by using an END keyword, an optional module name, a semicolon to terminate the END; statement, and a forward slash to dispatch the program to PL/SQL statement engine:
END [module_name];
/
Whereas, PL/pgSQL terminates and runs the block by using an END keyword, a semicolon to terminate the END; statement, two dollar signs to end the PL/pgSQL block, and a semicolon to dispatch the program.
END LANGUAGE plpgsql;
$$;
After all that basic syntax discussion, we try to create a sample set of tables, a function, a procedure, and a test case in PL/pgSQL. They’ve already done a virtually equivalent set of tasks in PL/SQL.
Here are the steps:
- Create the grandma and tweetie_bird tables:
/* Conditionally drop grandma table and grandma_s sequence. */
DROP TABLE IF EXISTS grandma CASCADE;

/* Create the table. */
CREATE TABLE GRANDMA
( grandma_id     SERIAL
, grandma_house  VARCHAR(30)  NOT NULL
, PRIMARY KEY (grandma_id)
);

/* Conditionally drop a table and sequence. */
DROP TABLE IF EXISTS tweetie_bird CASCADE;

/* Create the table with primary and foreign key out-of-line constraints. */
SELECT 'CREATE TABLE tweetie_bird' AS command;
CREATE TABLE TWEETIE_BIRD
( tweetie_bird_id     SERIAL
, tweetie_bird_house  VARCHAR(30)   NOT NULL
, grandma_id          INTEGER       NOT NULL
, PRIMARY KEY (tweetie_bird_id)
, CONSTRAINT tweetie_bird_fk        FOREIGN KEY (grandma_id)
  REFERENCES grandma (grandma_id)
);
- Create a get_grandma_id function that returns a number, which should be a valid primary key value from the grandma_id column of the grandma table.
1
2
3
4
5
6
7
8
9
10
11
12
13
14
15
16
17
18
19
20
21
22
23
24
25
26
27
28
CREATE OR REPLACE
  FUNCTION get_grandma_id
  ( IN pv_grandma_house  VARCHAR ) RETURNS INTEGER AS
$$
  /* Required for PL/pgSQL programs. */
  DECLARE

    /* Local return variable. */
    lv_retval  INTEGER := 0;  -- Default value is 0.

    /* Use a cursor, which will not raise an exception at runtime. */
    find_grandma_id CURSOR
    ( cv_grandma_house  VARCHAR ) FOR
      SELECT grandma_id
      FROM   grandma
      WHERE  grandma_house = cv_grandma_house;

  BEGIN

    /* Assign a value when a row exists. */
    FOR i IN find_grandma_id(pv_grandma_house) LOOP
      lv_retval := i.grandma_id;
    END LOOP;

    /* Return 0 when no row found and the ID # when row found. */
    RETURN lv_retval;
  END;
$$ LANGUAGE plpgsql;
- Create a Warner_brother procedure that writes data across two tables as a transaction. You con’t include any of the following in your functions or procedures because all PostgreSQL PL/pgSQL functions and procedures are transaction by default:
- SET TRANSACTION
- START TRANSACTION
- SAVEPOINT
- COMMIT
A ROLLBACK should be placed in your exception handler as qualified on lines #33 thru #36. The warner_brother procedure inserts rows into the grandma and tweetie_bird tables.
1
2
3
4
5
6
7
8
9
10
11
12
13
14
15
16
17
18
19
20
21
22
23
24
25
26
27
28
29
30
31
32
33
34
35
36
37
38
/* Create or replace procedure warner_brother. */
CREATE OR REPLACE
  PROCEDURE warner_brother
  ( pv_grandma_house       VARCHAR
  , pv_tweetie_bird_house  VARCHAR ) AS
$$
  /* Required for PL/pgSQL programs. */
  DECLARE

  /* Declare a local variable for an existing grandma_id. */
  lv_grandma_id   INTEGER;

BEGIN
  /* Check for existing grandma row. */
  lv_grandma_id := get_grandma_id(pv_grandma_house);
  IF lv_grandma_id = 0 THEN
    /* Insert grandma. */
    INSERT INTO grandma
    ( grandma_house )
    VALUES
    ( pv_grandma_house )
    RETURNING grandma_id INTO lv_grandma_id;
  END IF;

  /* Insert tweetie bird. */
  INSERT INTO tweetie_bird
  ( tweetie_bird_house
  , grandma_id )
  VALUES
  ( pv_tweetie_bird_house
  , lv_grandma_id );

EXCEPTION
  WHEN OTHERS THEN
    ROLLBACK;
    RAISE NOTICE '[%] [%]', SQLERRM, SQLSTATE;
END;
$$ LANGUAGE plpgsql;
You should take note of the RETURNING-INTO statement on line #22. The alternative to this clause isn’t pretty if you know that PostgreSQL uses a table name, column name, and the literal seq value separated by underscores (that is, snake case), like:
    /* Assign current value to local variable. */
    lv_grandma_id := CURRVAL('grandma_grandma_id_seq');
It would be even uglier if you had to look up the sequence name, like:
    /* Assign current value to local variable. */
    lv_grandma_id := CURRVAL(pg_get_serial_sequence('grandma','grandma_id'));
- You can test the combination of these two stored procedures with the following DO-block:
/* Test the warner_brother procedure. */
DO
$$
BEGIN
  /* Insert the yellow house. */
  CALL warner_brother( 'Yellow House', 'Cage');
  CALL warner_brother( 'Yellow House', 'Tree House');

  /* Insert the red house. */
  CALL warner_brother( 'Red House', 'Cage');
  CALL warner_brother( 'Red House', 'Tree House');
END;
$$ LANGUAGE plpgsql;
Then, query the results:
SELECT *
FROM   grandma g INNER JOIN tweetie_bird tb
ON.    g.grandma_id = tb.grandma_id;
It should return:
 grandma_id | grandma_house | tweetie_bird_id | tweetie_bird_house | grandma_id
------------+---------------+-----------------+--------------------+------------
          1 | Red House     |               1 | Cage               |          1
          1 | Red House     |               2 | Tree House         |          1
          2 | Yellow House  |               3 | Cage               |          2
          2 | Yellow House  |               4 | Tree House         |          2
(4 rows)
As always, I hope writing a clear and simple examples helps those looking for sample code.
PostgreSQL Table Function
A quick tutorial on how to write a PL/pgSQL Table function. The functions is simple. It returns the list of conquistadors that were originally German. It does that by filtering on the lang column in the table. For example, you use ‘de‘ for German.
I’ll stage this with the same conquistador table used in the last post. Don’t forget to use the chcp command to the Active Console Code Page to 4-byte Unicode before you run the script file, like:
chcp 65001 |
Then, connect to the psql shell and run the following script file:
/* Conditionally drop the conquistador table. */ DROP TABLE IF EXISTS conquistador; /* Create the conquistador table. */ CREATE TABLE conquistador ( conquistador_id SERIAL , conquistador VARCHAR(30) , actual_name VARCHAR(30) , nationality VARCHAR(30) , lang VARCHAR(2)); /* Insert some conquistadors into the table. */ INSERT INTO conquistador ( conquistador , actual_name , nationality , lang ) VALUES ('Juan de Fuca','Ioánnis Fokás','Greek','el') ,('Nicolás de Federmán','Nikolaus Federmann','German','de') ,('Sebastián Caboto','Sebastiano Caboto','Venetian','it') ,('Jorge de la Espira','Georg von Speyer','German','de') ,('Eusebio Francisco Kino','Eusebius Franz Kühn','Italian','it') ,('Wenceslao Linck','Wenceslaus Linck','Bohemian','cs') ,('Fernando Consag','Ferdinand Konšcak','Croatian','sr') ,('Américo Vespucio','Amerigo Vespucci','Italian','it') ,('Alejo García','Aleixo Garcia','Portuguese','pt'); |
Now, you can build another script file to create the getConquistador function, like:
/* Drop the funciton conditionally. */ DROP FUNCTION IF EXISTS getConquistador; |
Create the getConquistador function:
1 2 3 4 5 6 7 8 9 10 11 12 13 14 15 | CREATE FUNCTION getConquistador (IN lang_in VARCHAR(2)) RETURNS TABLE ( conquistador VARCHAR(30) , actual_name VARCHAR(30) , nationality VARCHAR(30)) AS $$ BEGIN RETURN QUERY SELECT c.conquistador , c.actual_name , c.nationality FROM conquistador c WHERE c.lang = lang_in; END; $$ LANGUAGE plpgsql; |
Then, you can test it like:
SELECT * FROM getConquistador('de'); |
It will return the following:
conquistador | actual_name | nationality -----------------------+--------------------+------------- Nicolás de Federmán | Nikolaus Federmann | German Jorge de la Espira | Georg von Speyer | German (2 rows) |
As always, I hope this helps with a technique that’s useful.
